
bolin
-
Posts
482 -
Joined
-
Last visited
Content Type
Profiles
Forums
Gallery
Events
Everything posted by bolin
-

Die Kogge Von Bremen by kentyler
bolin replied to kentyler's topic in - Subjects built Up to and including 1500 AD
This will be interesting. I will grab a chair and follow along. -
Quality building jig
bolin replied to PAnderson's topic in Building, Framing, Planking and plating a ships hull and deck
I have seen that Billing Boats sells a building jig similar to Hobby Zones smaller one. I don’t know anything about it’s quality, but It seems to be more expensive than the HZ one. Have you considered building your own jig? -
I actually had to scrap the first keel as it got misaligned. I did not use any mor fancy method than Eyeball 1.0 for checking the alignment, you just need to pay attention to what you are doing. I did consider using a couple of tree nails to reinforce the joint of the halves. However, it felt unnecessary when the glue had set so I skipped that. I’m using aliphatic resin as glue. It may not be water resistant, but it will not dissolve immediately in water either. There are other PVC glues for outdoor use that might be better, but if you really are going to sail I guess that epoxy is a better option. However if you are going to sail you would need to coat the hull to make it water proof, and then the keel joint should no longer be exposed.
-
Sloop from Roslagen by bolin - FINISHED - 1:50
bolin replied to bolin's topic in - Build logs for subjects built 1851 - 1900
Working carefully it was not to hard to get the bulwark stanchions in angles that allows a fair curve for the planks. Now I have started with bending and fitting the planks. Here the first one is bent to shape and let dry after a dip in hot water. Two of the stanchions on each side of the bow and in the mid/aft section are closer together and taller and sturdier as they will form bollards. Before I will glue the plank I will install the chain plates. As there will be very little room behind the bulwark for attaching the dead eyes I will do that now.

-
Actually the keel of my longship is ever so slightly bent upwards towards the ends. I selected the method of making the T keel from two pieces to be able to accommodate this. I steamed the pieces before I bent them to shape over the build mold. After that they where glued. Beveling the keel so that the garboard plank would lay flat was done using chisels. The keel also narrows towards the end so that the shape goes fro T midships, through “Y” to “I” towards the stem and stern. In my other current build of a Sloop from Roslagen I worked from a solid straight piece of Lime wood. But that keel is straight.
-
I have used it on both brass and copper, but not bronze. The effect is about the same on either. The metal will turn black within a minute or so.
-
Sloop from Roslagen by bolin - FINISHED - 1:50
bolin replied to bolin's topic in - Build logs for subjects built 1851 - 1900
I have access to a report from Sjöhitsoriska museet (Maritime history museum) in Stockholm documenting the build of the last ship of this type. The sequence I'm following is thus far the one that was actually used. -
Sloop from Roslagen by bolin - FINISHED - 1:50
bolin replied to bolin's topic in - Build logs for subjects built 1851 - 1900
I have continued with the bulwark supports. After looking at several pictures, in particular the ones from the renovation of Helmi (some of which I have shown earlier), I have decided to put a support for every other frame. This is slightly more than what the plans indicate. But it seems more authentic (and will also make it easier to plank). Getting the correct angle for the supports is tricky. I have tried to make them so that they are flat with the upper plank. However when I raise them all, and wedge them in place, they point ever which way and do not form a nice curve. I will need a better method of checking the angles. My current idea is to ensure that the hull is level and then use movable jig to check that the angles are symmetrical on either side. I will work from midship and glue the supports pair by pair and check that each new pair still forms a nice curve for the bulwark. It might have been easier to plank the bulwark while the hull was on the mold. That is before the frames where installed. However, since the bulwark is carvel planked it would only have been edge glued while the frames where installed. That would have required a building slip with more supports and would also have made the installation of the frames slightly harder.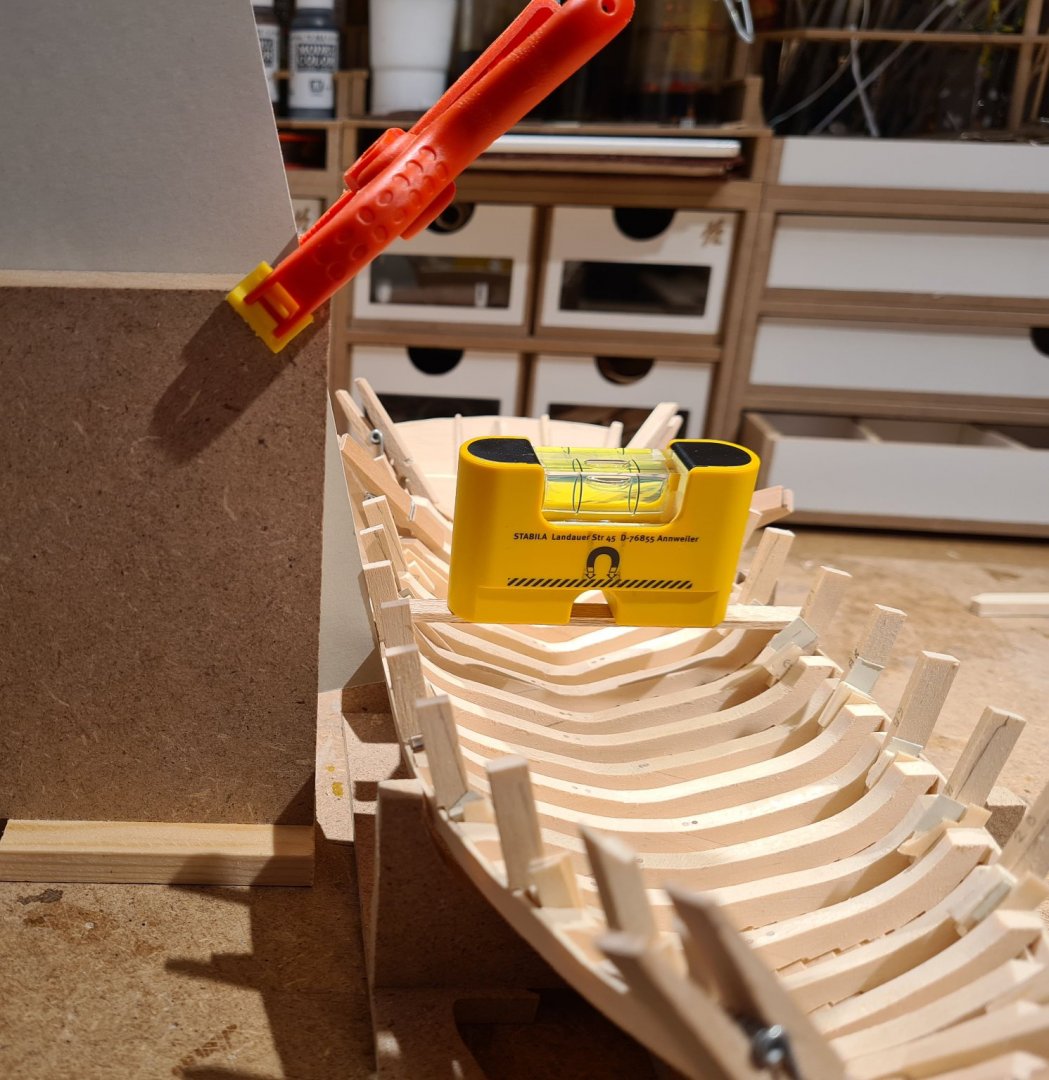
-
Sloop from Roslagen by bolin - FINISHED - 1:50
bolin replied to bolin's topic in - Build logs for subjects built 1851 - 1900
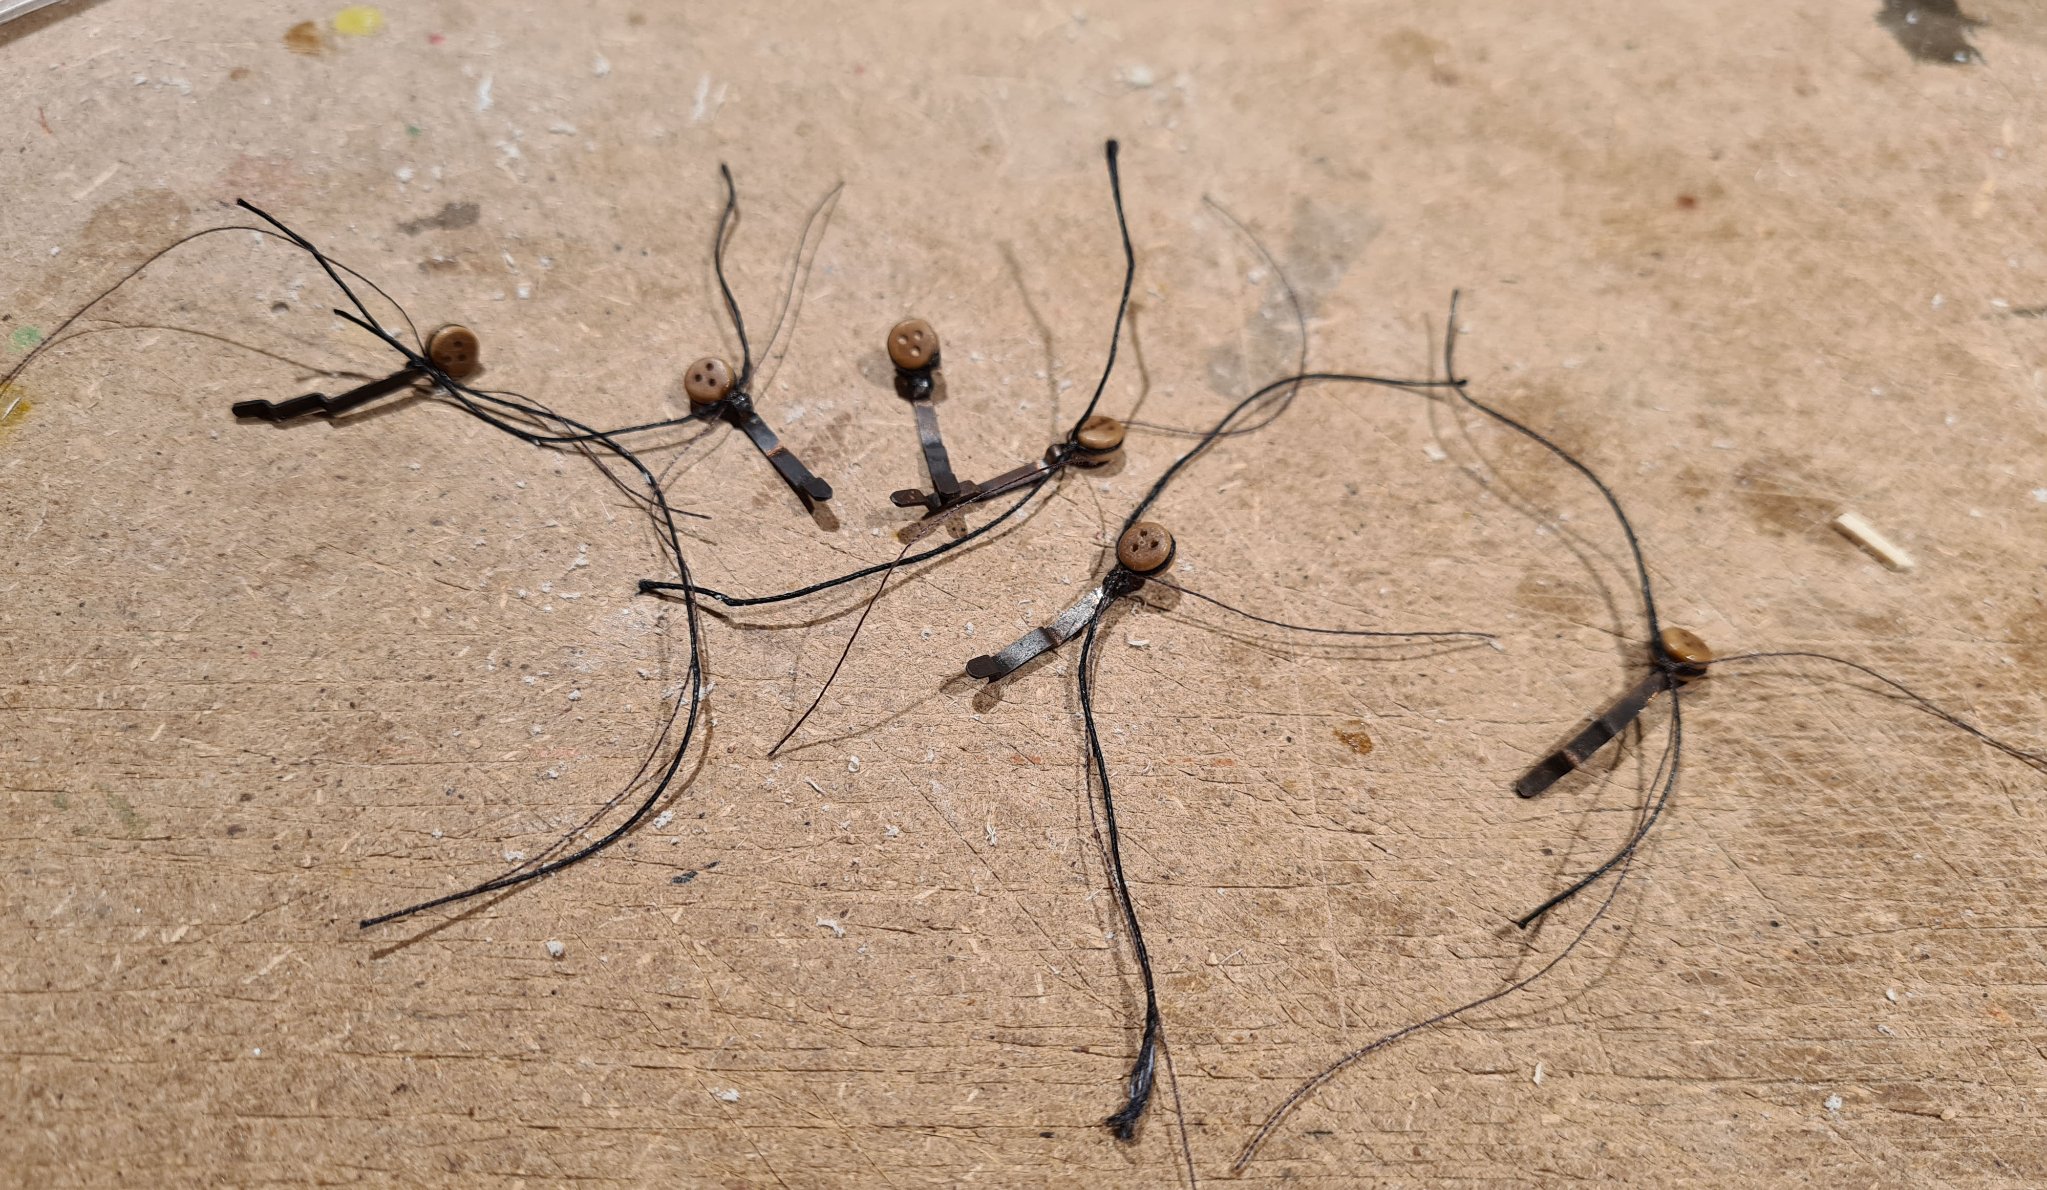
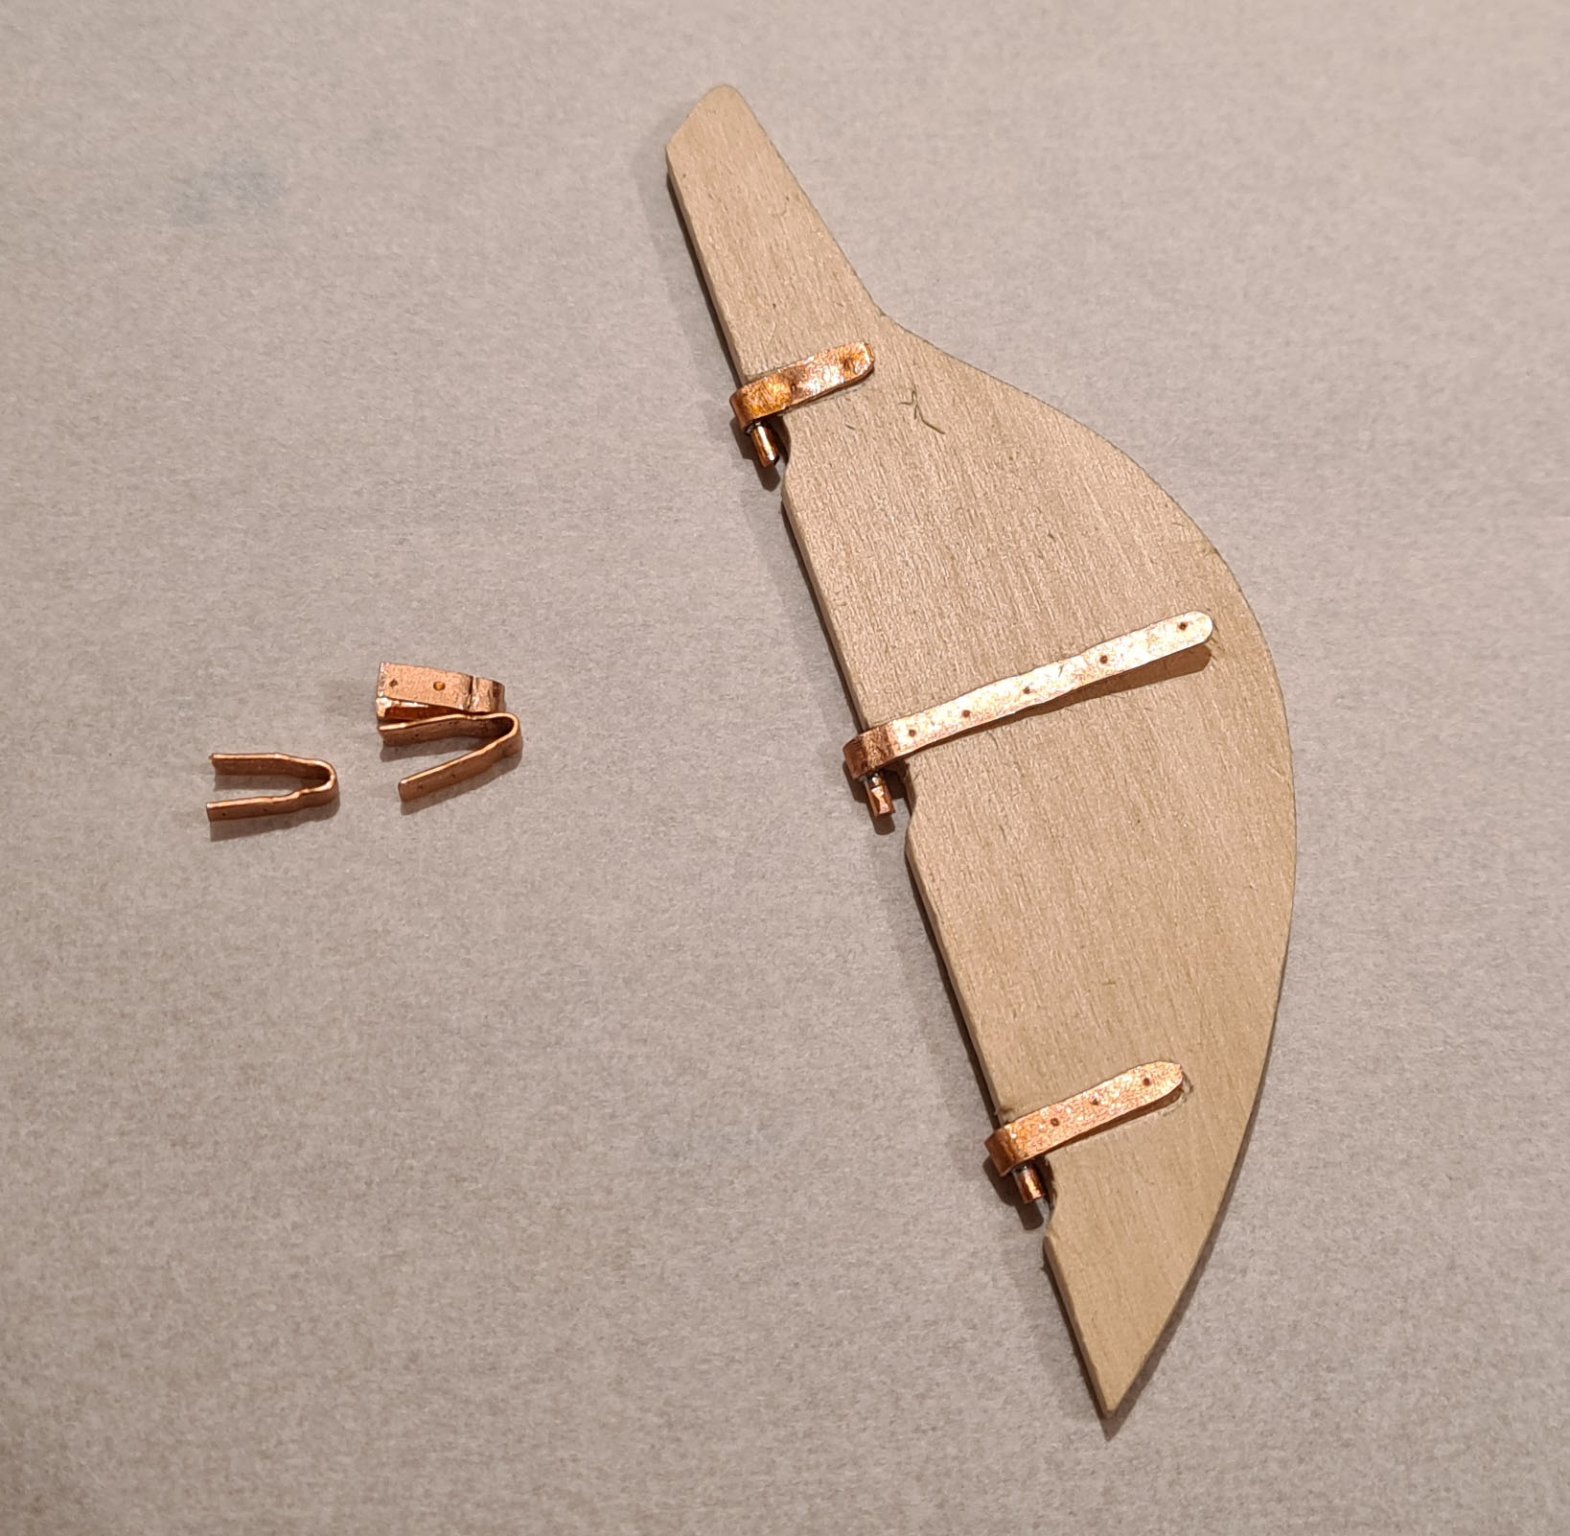
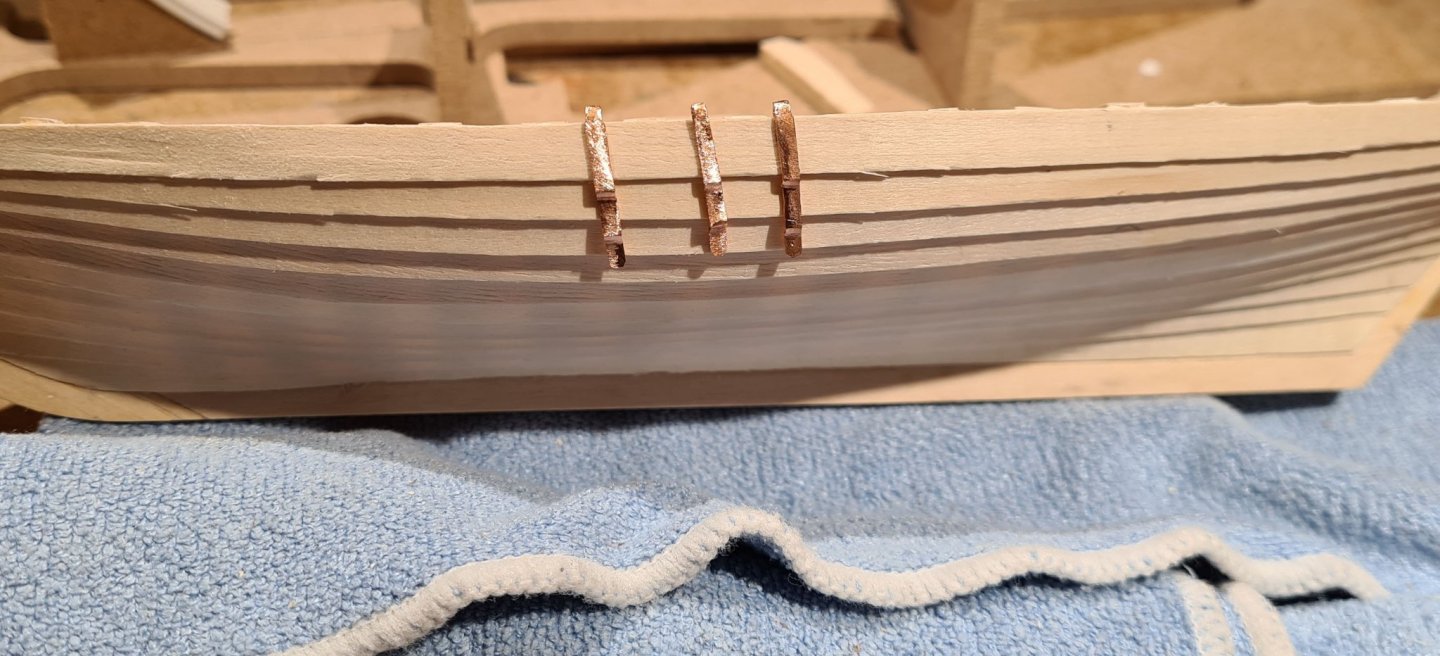
I decided to follow the plans and put the chain plates so that the shrouds end on the inside of the bulwark. So I have switch to some metal working. I thought I had some left over brass strips, but discovered that it was not enough. So instead of ordering some more and wait for it to arrive, I took the copper wire from a piece of electric cable. I worked it flat with a hammer and filed it to shape. While I was at it I also made the metal pieces for the rudder. The pins are soldered to the bands.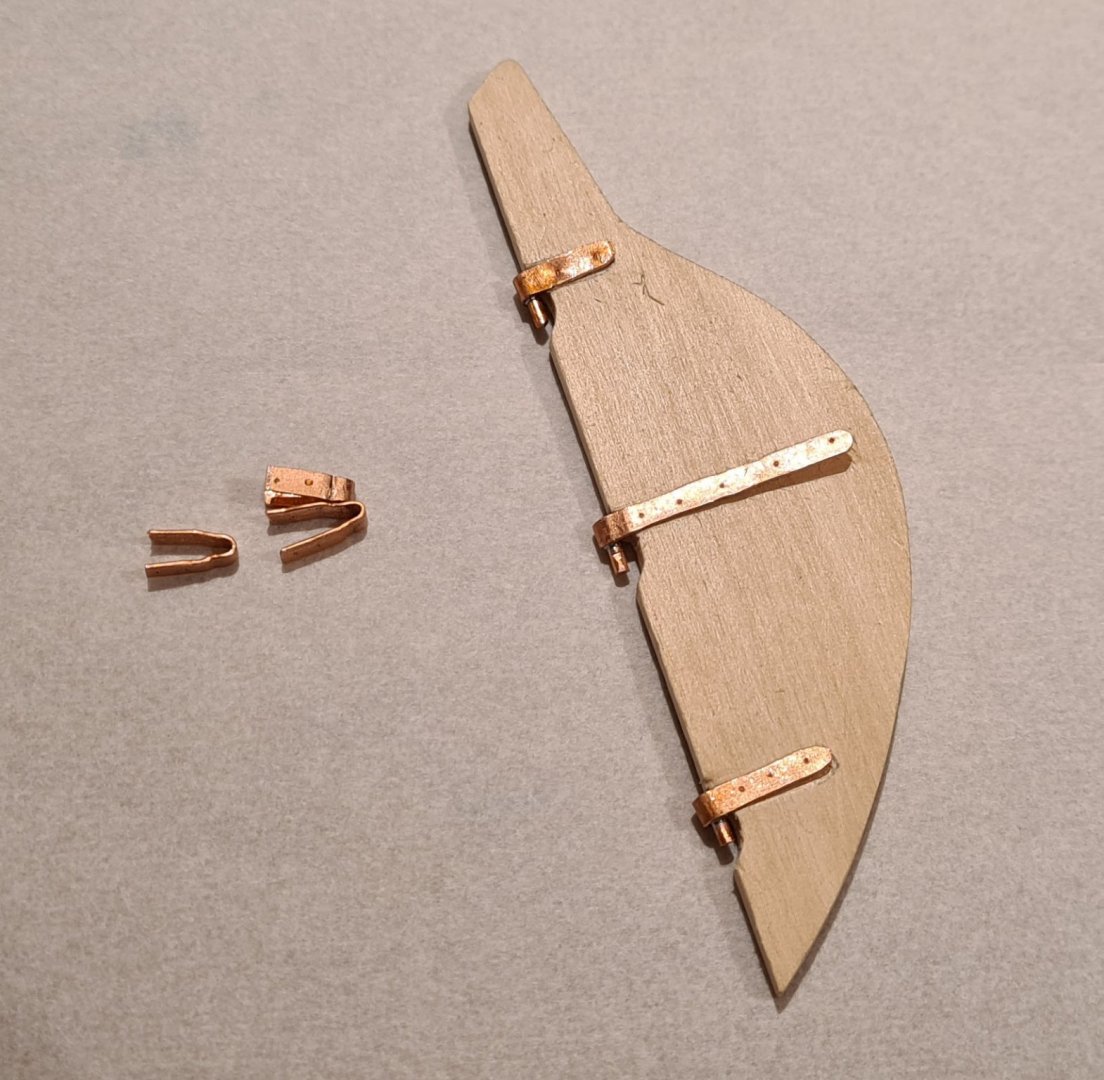
-
Welcome to MSW! I started ship modelling a little more than a year ago. The first kit I ordered was Billing Boats Will Everard, by the look of it about the same level of complexity as the one you have found. Due to some mix up at the place where I ordered it from it was delayed, but I was eager to get started so I went to a local hobby shop and bought Bluejackets Swampscott Dory. This is a much simpler kit, and in hindsight I'm happy that I started with that. The Billings was sold as a "beginners kit", but in reality it requires some experience. However, that is mostly due to the very brief instructions in Billings kits. The kit you have found looks very different in that regard, which should help a beginner tremendously. There are other suppliers that also offers starter packs, for example OcCre, but the subjects are not always historically accurate. The one you have found seem to be, which is good. I too wanted to find books to read when I started building. I bought several, but in the end it was here at MSW that I found what I needed. At lest for my first builds. Now I have progressed to scratch builds, and the need for reference literature is greater. Regarding tools, glues and accessories you will find several threads here at MSW going deep into all these topics. Personally I quickly got several types of glues, as they are good for different materials and assemblies. For wood I use aliphatic resin (yellow carpenters glue) and ordinary white PVA glue. For metal and metal to wood I use super glue (CA) or epoxy, depending on how strong the bond needs to be. As for tools, the general advice is to start simple, and add when you know what you need. There are several threads on the topic, and articles in the article section of this site.
-
Sloop from Roslagen by bolin - FINISHED - 1:50
bolin replied to bolin's topic in - Build logs for subjects built 1851 - 1900
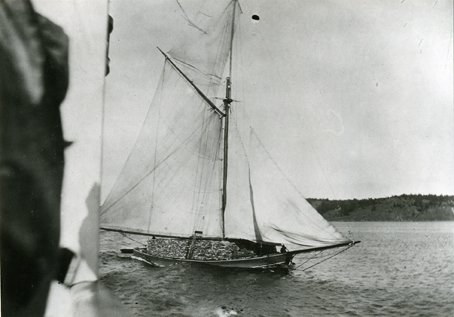
Yes, that is my best guess now. On pictures where the shrouds end on top of the bulwarks there seem to be extra bulwark supports in that area. The plan above shows rather few supports compared to real photos. Maybe the practice of overloading the ship only came later or for the slightly larger ones that usually carried firewood. When overloading the shrouds would get in the way if they where on the inside. -
Sloop from Roslagen by bolin - FINISHED - 1:50
bolin replied to bolin's topic in - Build logs for subjects built 1851 - 1900
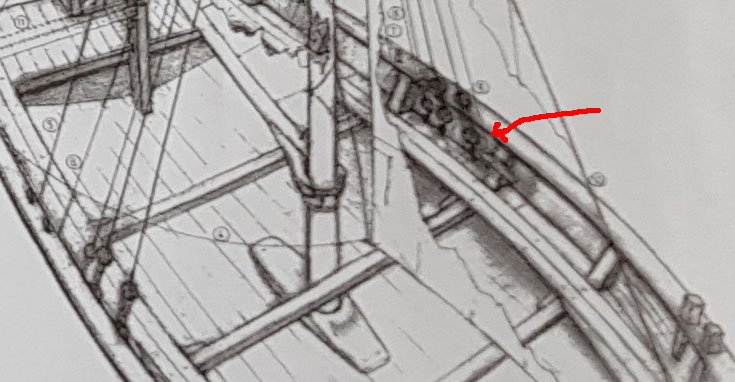
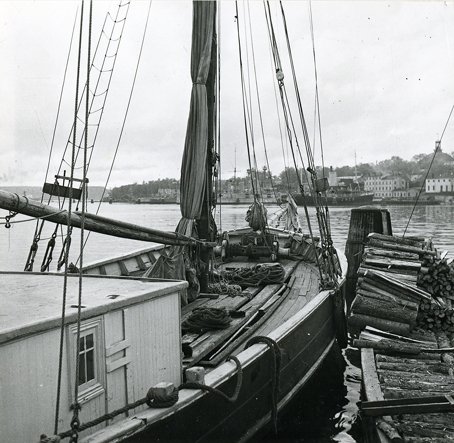
And so all the frames are installed! The next step will be the bulwark supports. I have thought through the plan for the rest of the build and made a list of some 30 steps, from bulwark supports to rigging. However there is one detail in the plans that I'm (kind of) following that I need to think about. According to the plan, the chain plates should go in between the hull planking and the bulwark so that the dead eyes are sitting on the inside of the bulwark. On almost every photo I can find the chain plates sits on the outside of the bulwark and the dead eyes are sitting on top of the hand rails, for example this one: However, I have found one photo from digitalt museum that seem to show shrouds ending on the inside of the bulwarks. In response to @Wintergreen, the bulwark are cravel planked: The bulwarks also need to be completely water tight. These vessels where regularly overloaded in a way that by today's standard is not advisable. The cargo in the picture below is firewood, one of the most common ones.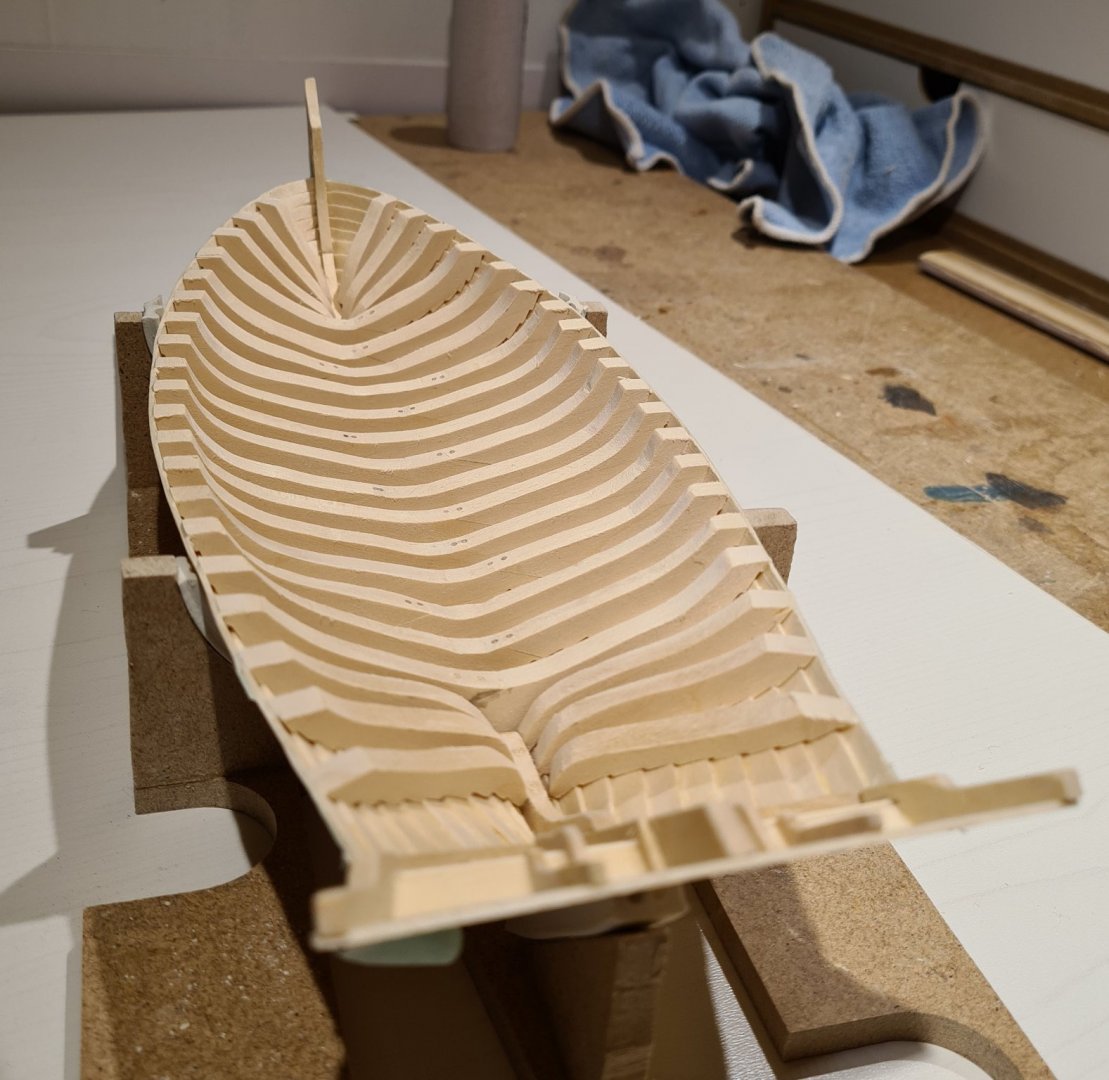

-
Sloop from Roslagen by bolin - FINISHED - 1:50
bolin replied to bolin's topic in - Build logs for subjects built 1851 - 1900
Yes, the bulwarks will be the next step, I think. I need to make a plan for the following steps. Until now it has been rather straight forward, but from now I risk put things in that will be in the way for other steps. -
Nice work. I know exactly what you mean by moving the frames in and out of the hull for test fitting! I've done it all weekend myself 🙂
-
Sloop from Roslagen by bolin - FINISHED - 1:50
bolin replied to bolin's topic in - Build logs for subjects built 1851 - 1900
Practice makes perfect... or at least improvements. I have now finished fitting all the full frames and glued them in place. Maybe I could have made them fit even better, but my patience ran out... I have continued with the cant frames in the fore and aft. These are easier to make, as one can work on one side at a time. I have also become better at seeing how much I need to file to get the desired angle after all the practice with the other frames.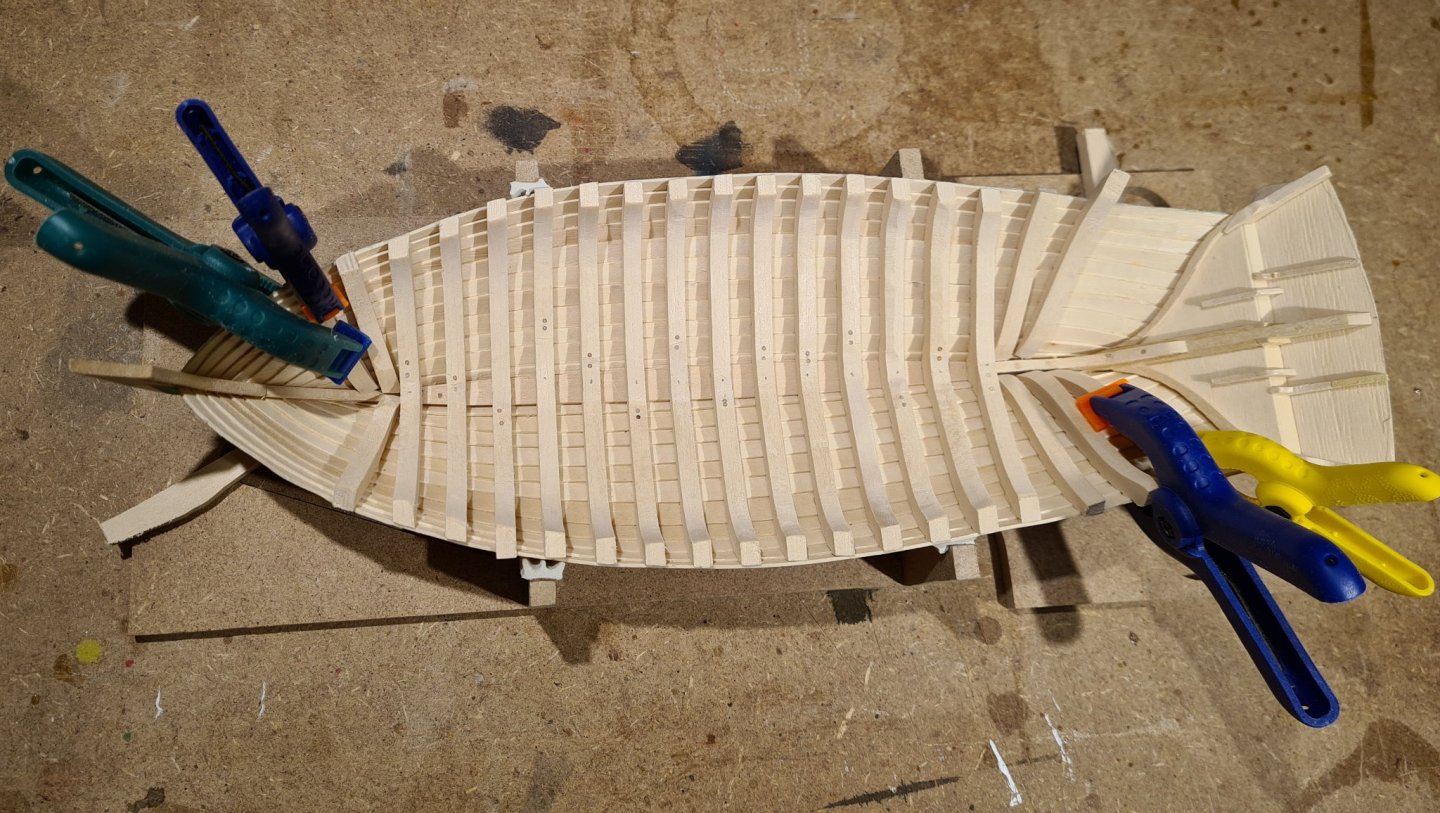
-
The garboard plank looks good. The next plank looks a bit to high on the transom though, but its hard do see in picture.
-
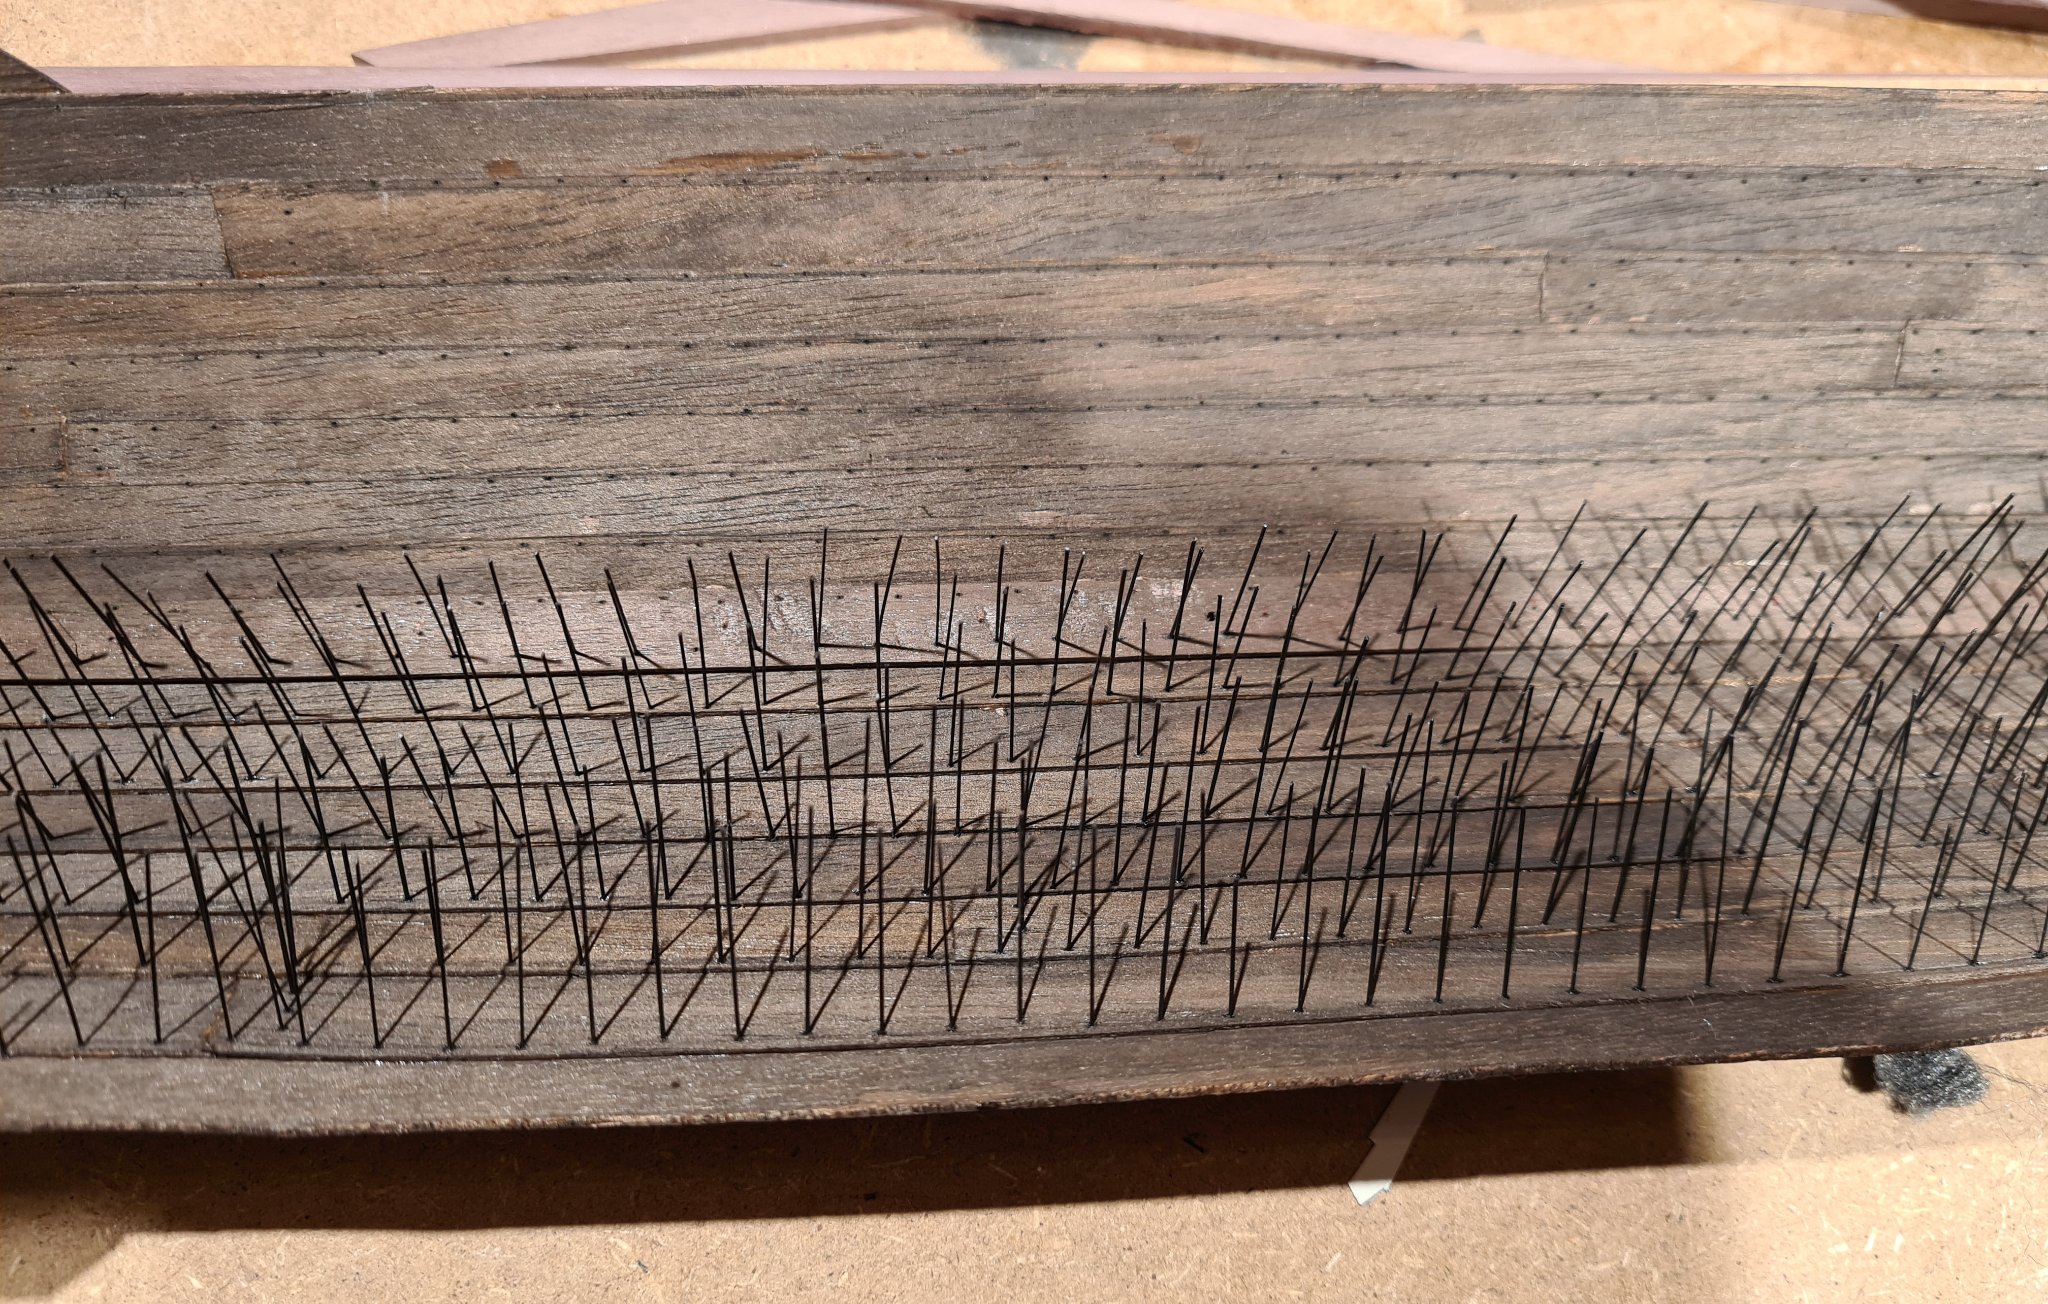
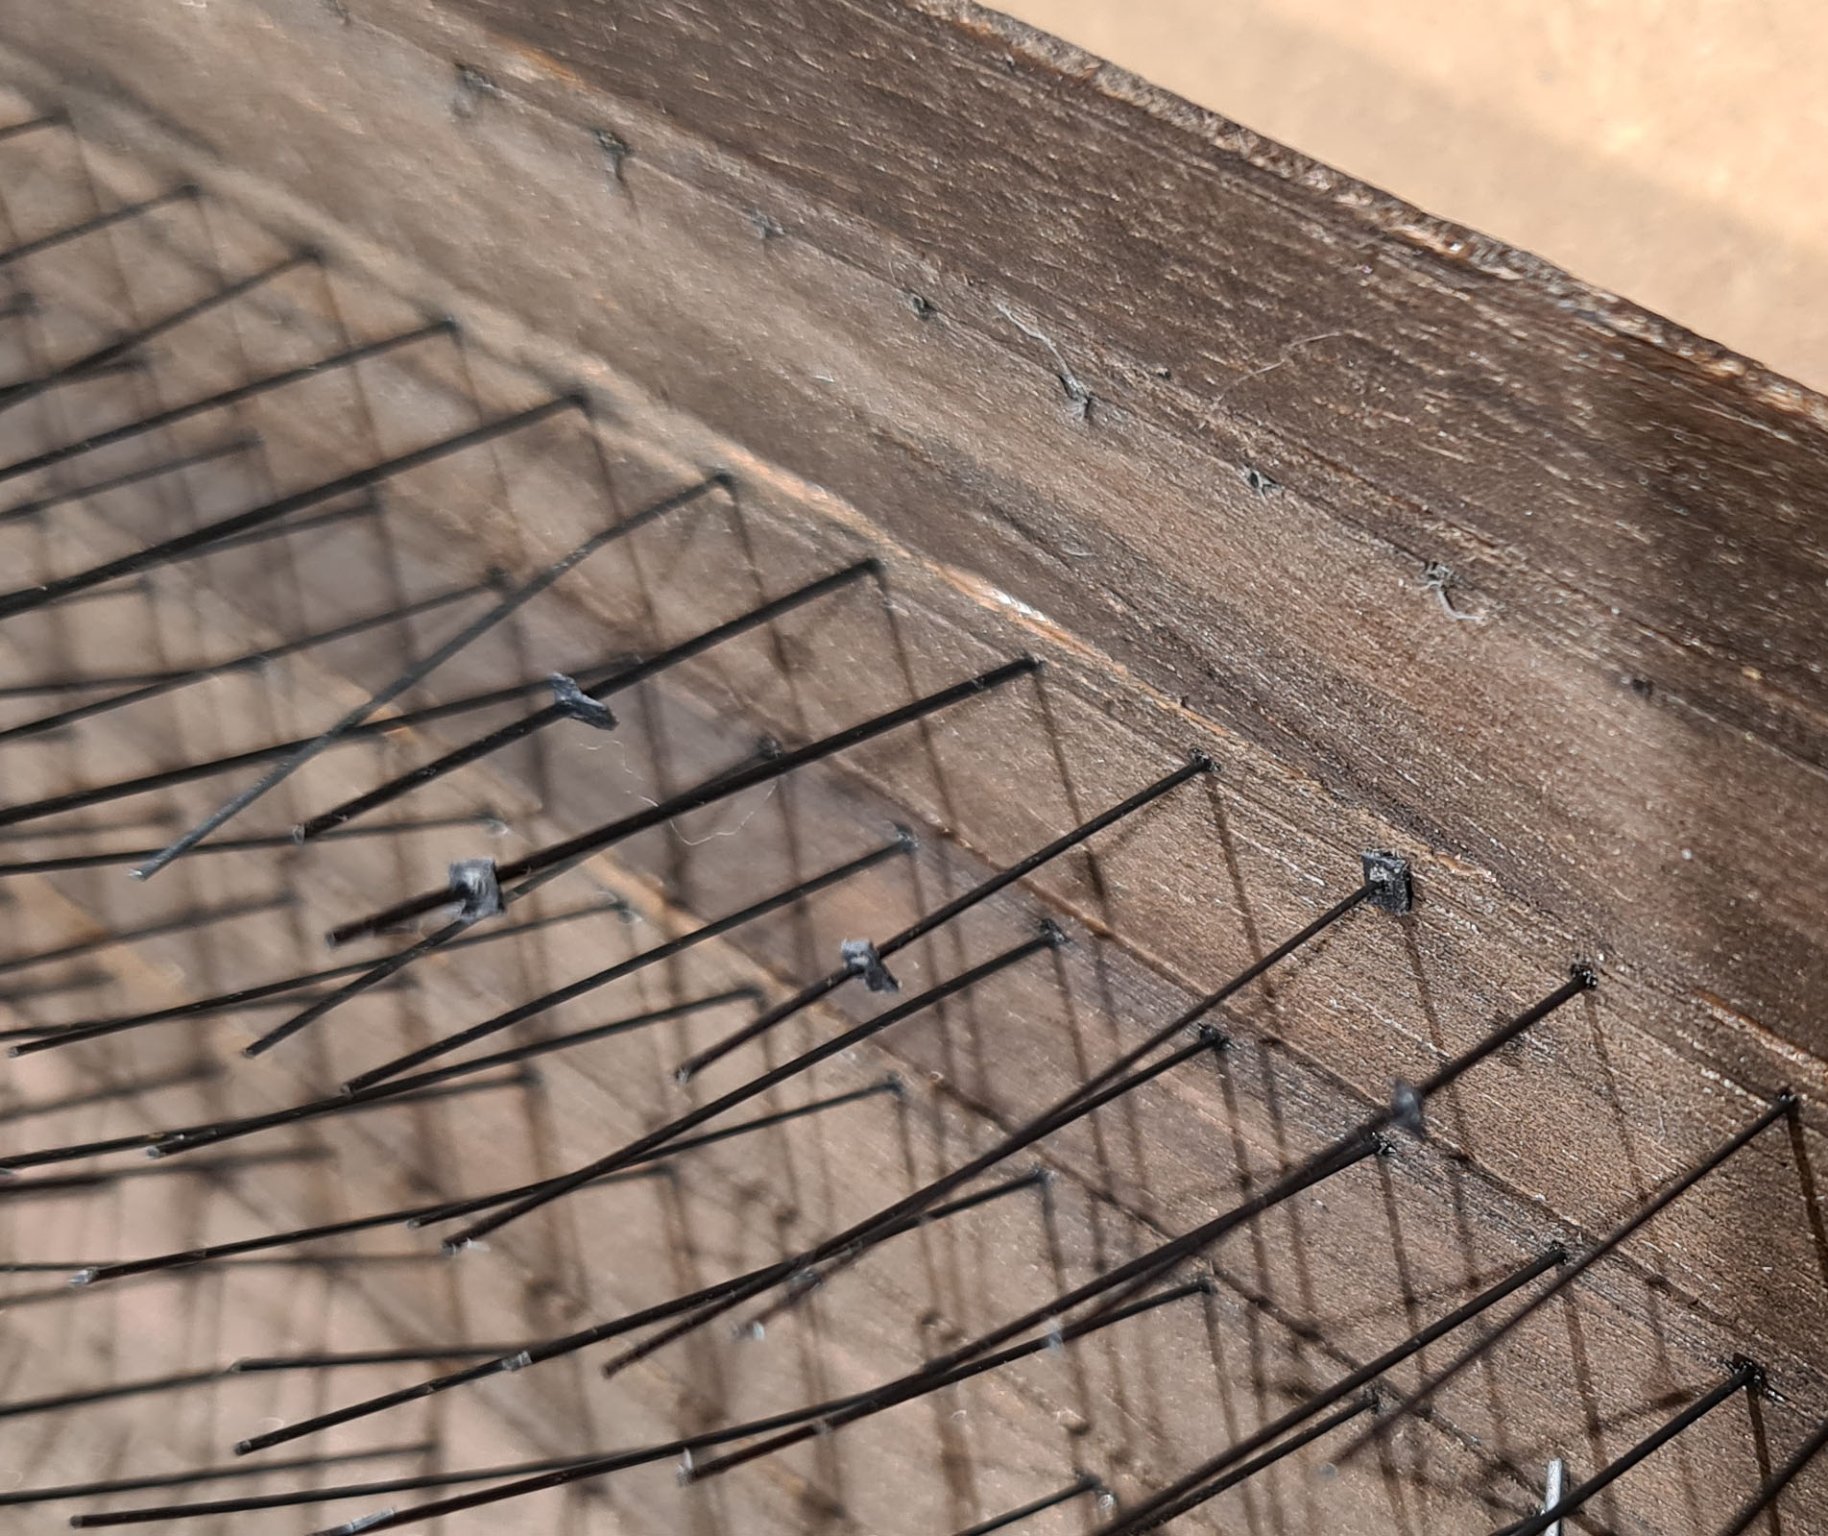
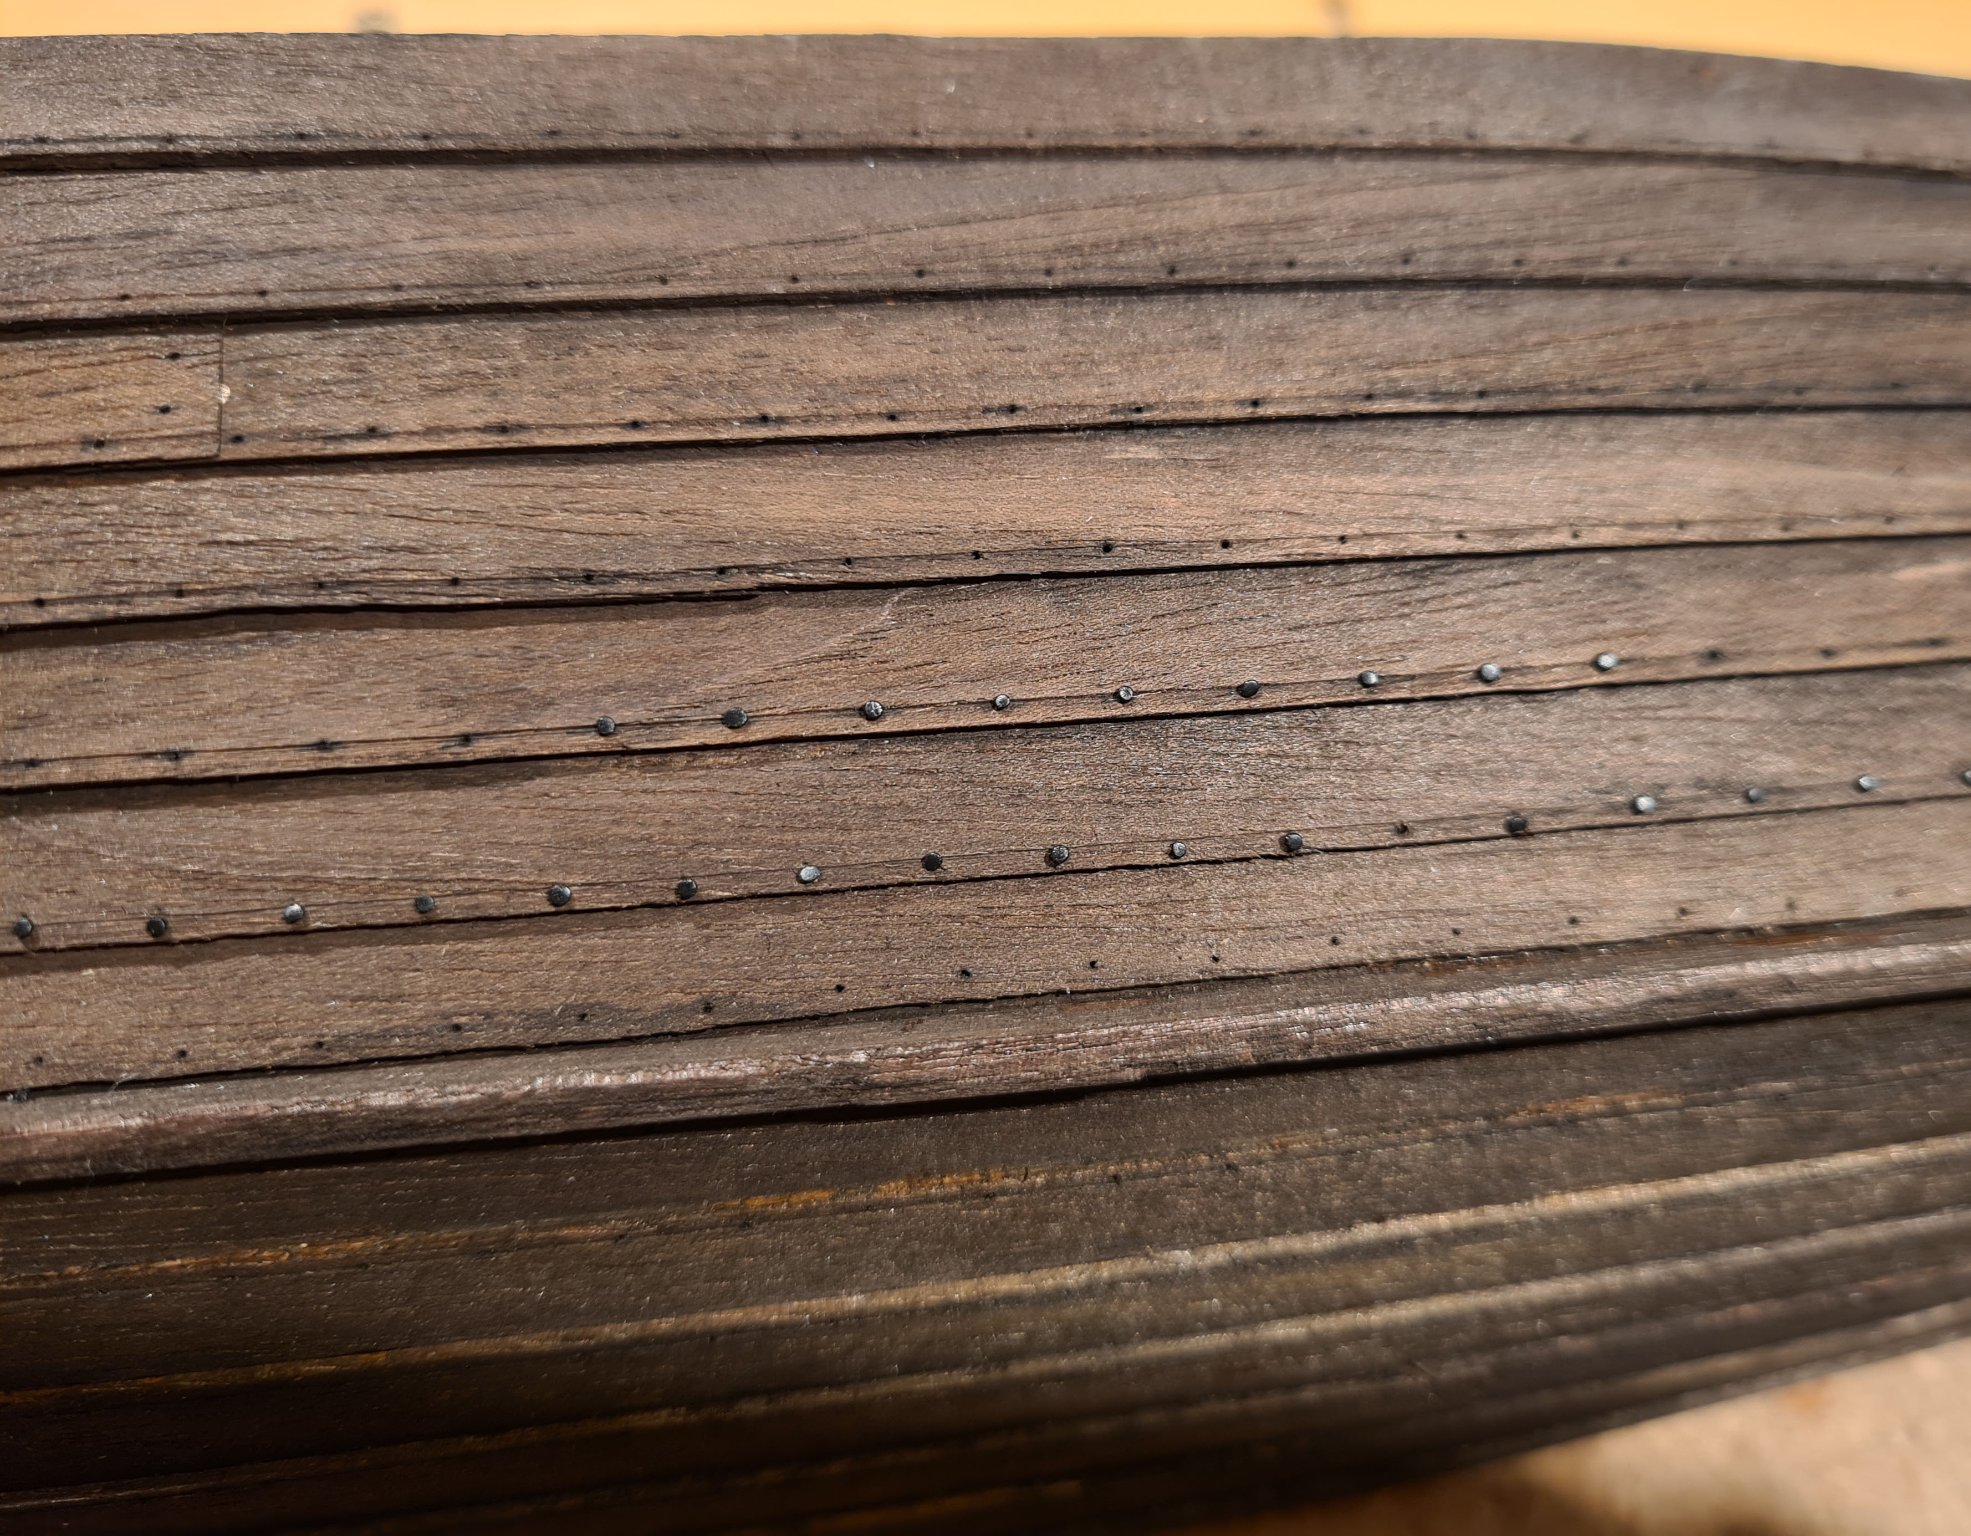
The riveting is now mostly complete on one side. I have built an inverted hedgehog 😀 Now I will continue with adding the washers. I ended with selecting black card stock (120g/m2) for these. They are cut as 1x1 mm squares and I use a metal pin to push a 0.5 mm hole. The rivets are about 0.3 mm so its not to hard to get the washers in place. I will put a drop of dilute glue under to fix them and then cut away the pin.


- 179 replies
-
- 12
-

-
- longship
- Helga Holm
- (and 1 more)
-
Sloop from Roslagen by bolin - FINISHED - 1:50
bolin replied to bolin's topic in - Build logs for subjects built 1851 - 1900
Thanks Keith! Per, maybe I should put that at the top of the mast? I have continued with the frames. It's getting closer now. I'm still not totally satisfied, there are still to much gap between the hull and some of the frames.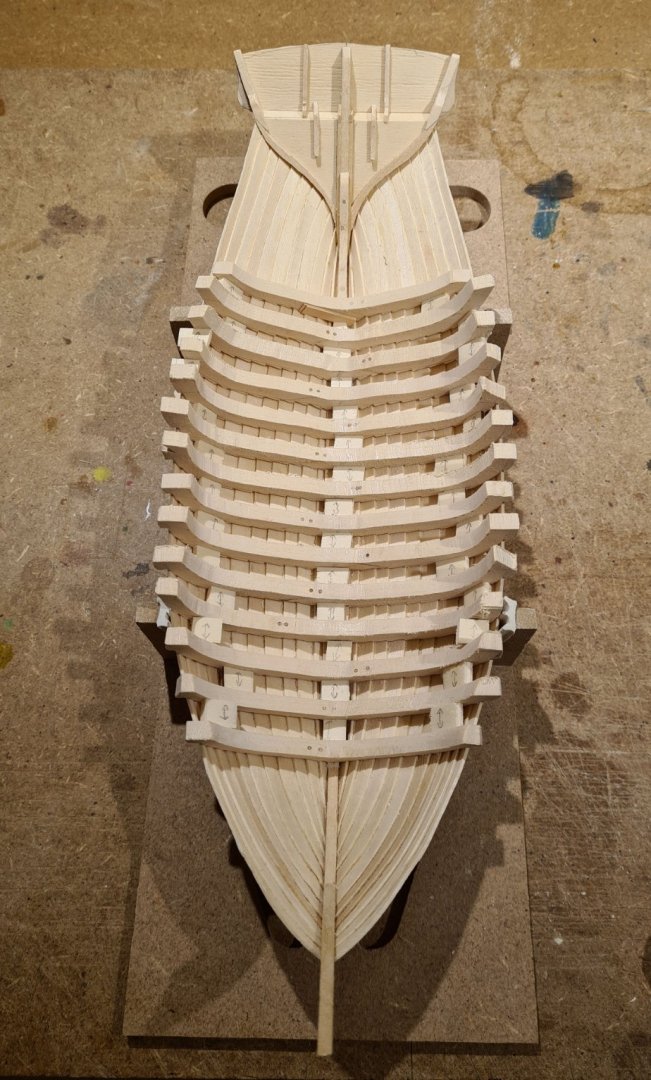
-
Unfortunately the smell is hard to get right. But on the other hand the rivets are plastic, so I think I shouldn’t be so picky. I will probably scrub certain parts where the tar has been worn off, such as the oarlocks and thwarts.
- 179 replies
-
- 3
-
-
- longship
- Helga Holm
- (and 1 more)
-
Thank you @Gaffrig, @Kingfisher317 and @Dr PR. Your input is very helpful when trying to understand what I see when studying various pictures and plans that can be found in books and on the Net. I will check out the references mentioned, some of them I already have, but some are new to me. I have one point I’m still wondering about. If you have a brail to lift up the tack of the topsail, would there be two tack lines going down? One on port and one or starboard so that the tack can be pulled down on the other side when the sheet has been pulled over.
-
I think that I have found most of my answers in COMMODORE S. B. LUCEs Text-Book of Seamanship with the relevant section here. The most relevant part says: If I understand the nautical terms it means that seamen must go aloft and shift the sail there.
-
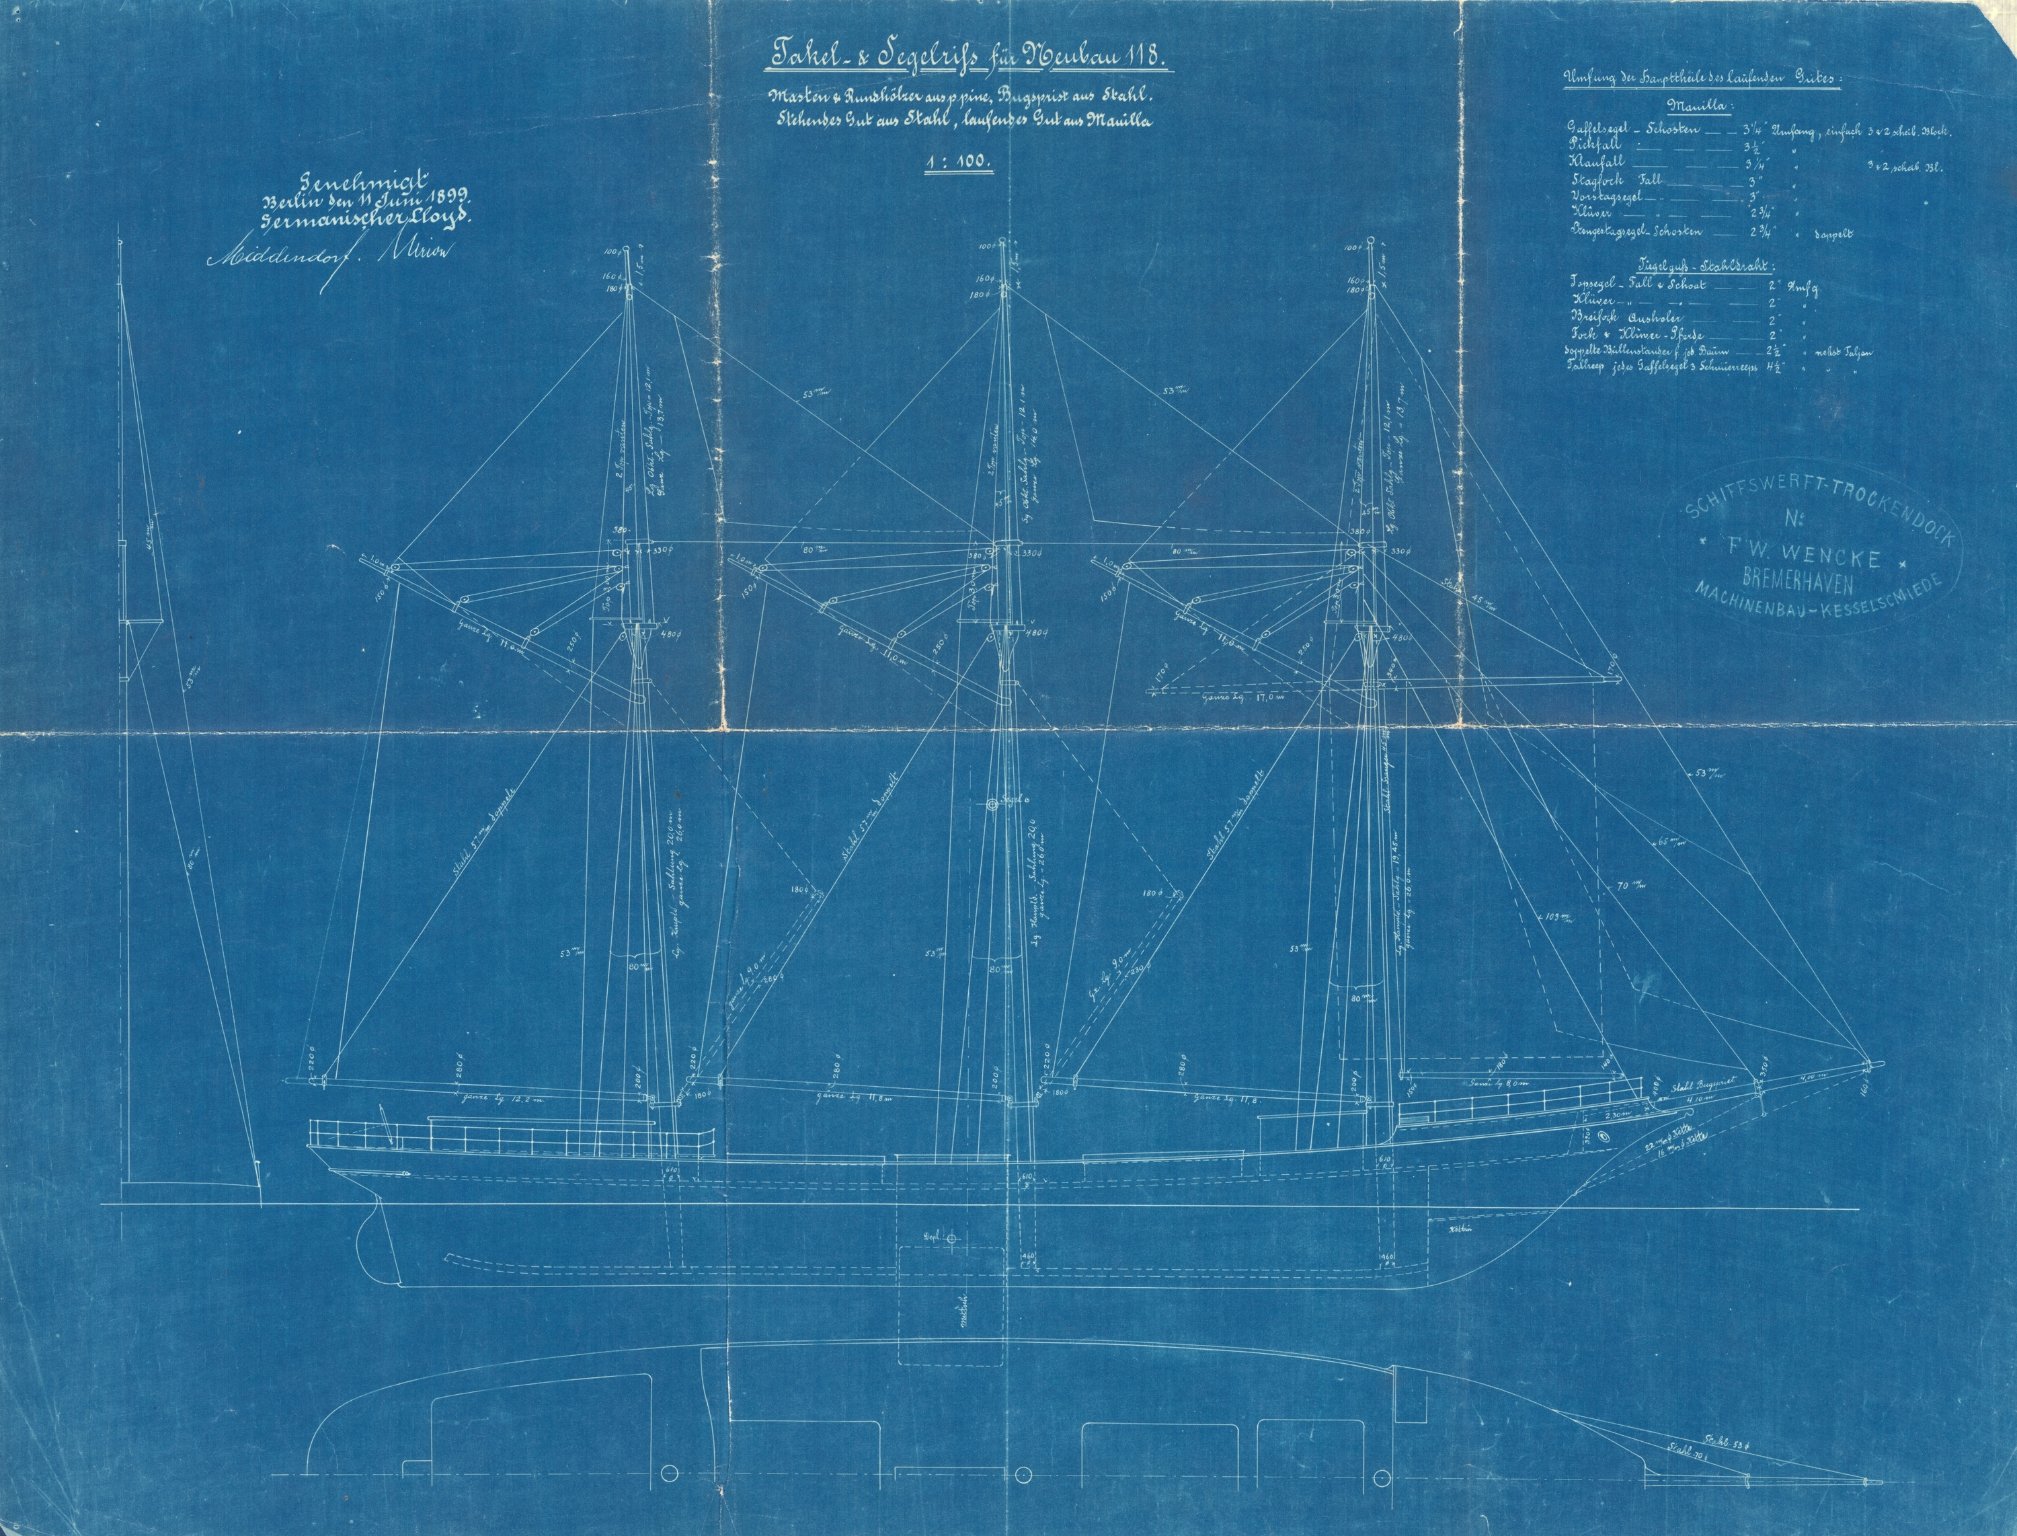
I have started some research for a future project, and have come across a question that I hope someone could help me shed light on. I have taken over a started build of Billing Boats Meta, which in the kit is presented as a three masted jackass barque. However I plan to modify it to be the original configuration, a thee masted fore-and-aft rigged schooner. What running lines are needed to control both the stay sails and the topsails on the main and fore masts in the following sail plan? How are the sails handled when tacking? Is the topsails lifted over the stays? How? I recently got my hands on Masting & Rigging the Clipper Ship & Ocean Carrier by Harold Underhill. I have not read all of it yet, so I might have missed something. Does anyone know of another source? Maybe a build log of a similar ship?
-
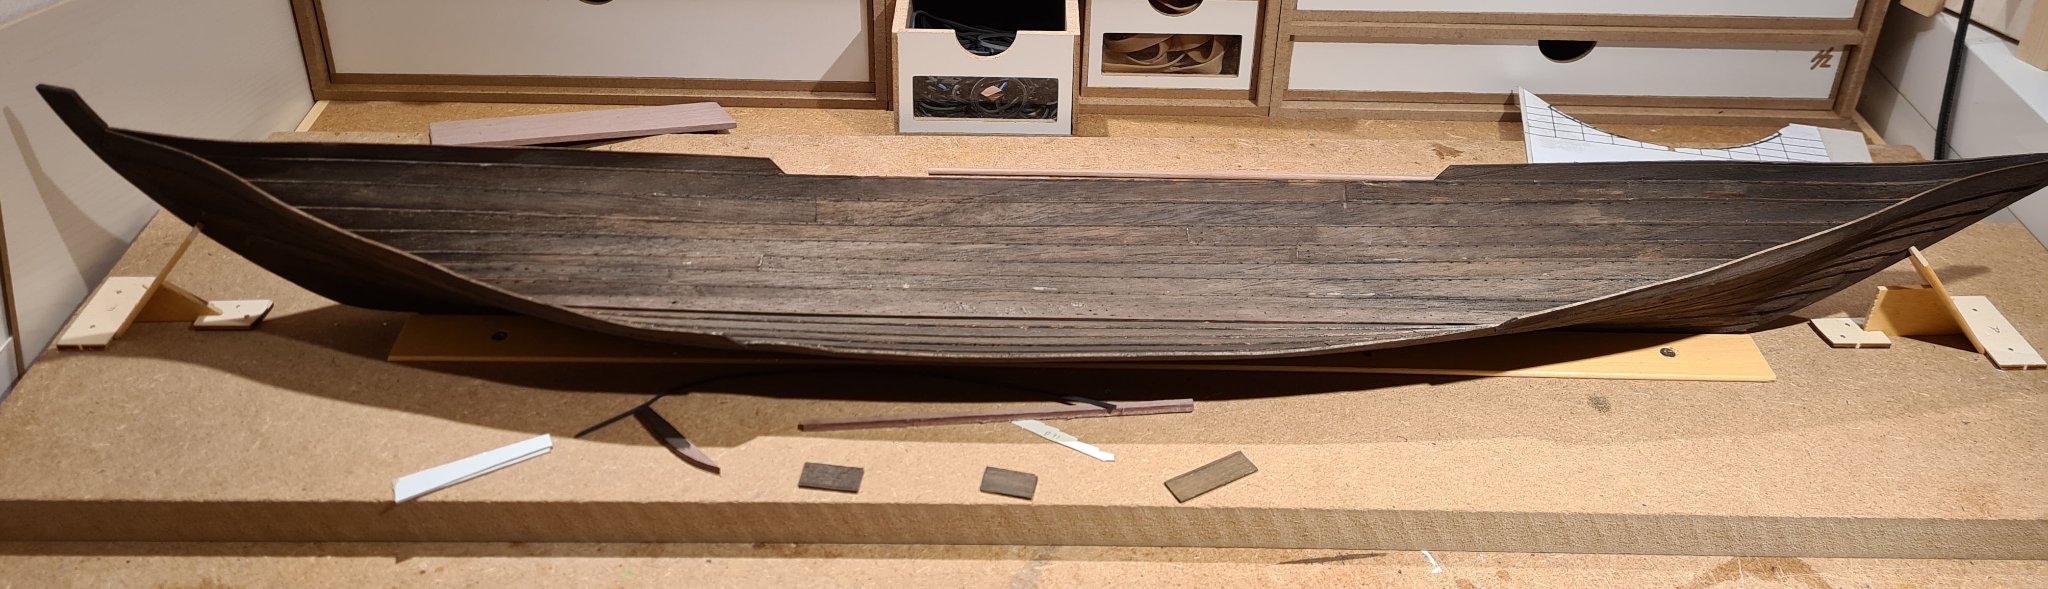
And now the hull has been "tarred". I think the stain turned out OK Compare for example with the pictures that @Mike Y shared earlier in this thread. The slightly uneven coloration looks quite realistic. I do plan to put a coat of dark shellac on top, so it will be become even darker. In the end my mix was 3 parts light oak, 1 part mahogany, 1 part ebony stains and 5 parts water. The riveting has also started.


- 179 replies
-
- 19
-
-
- longship
- Helga Holm
- (and 1 more)
-
Sloop from Roslagen by bolin - FINISHED - 1:50
bolin replied to bolin's topic in - Build logs for subjects built 1851 - 1900
Yes, there will be 14 full frames, and 3 cant frames in the fore and aft. These where working crafts built for transporting heavy loads, so they needed to be sturdy.