
bolin
-
Posts
482 -
Joined
-
Last visited
Content Type
Profiles
Forums
Gallery
Events
Everything posted by bolin
-

Le Coureur by PC52 - Mamoli - 1:54
bolin replied to PC52's topic in - Kit build logs for subjects built from 1751 - 1800
Nice trick. Good luck with your build. I like the lugger riggings, they are different. -
Thank you for having shared your work. It has been very enjoyable, and encouraging for me that is just starting with scratch building.
-
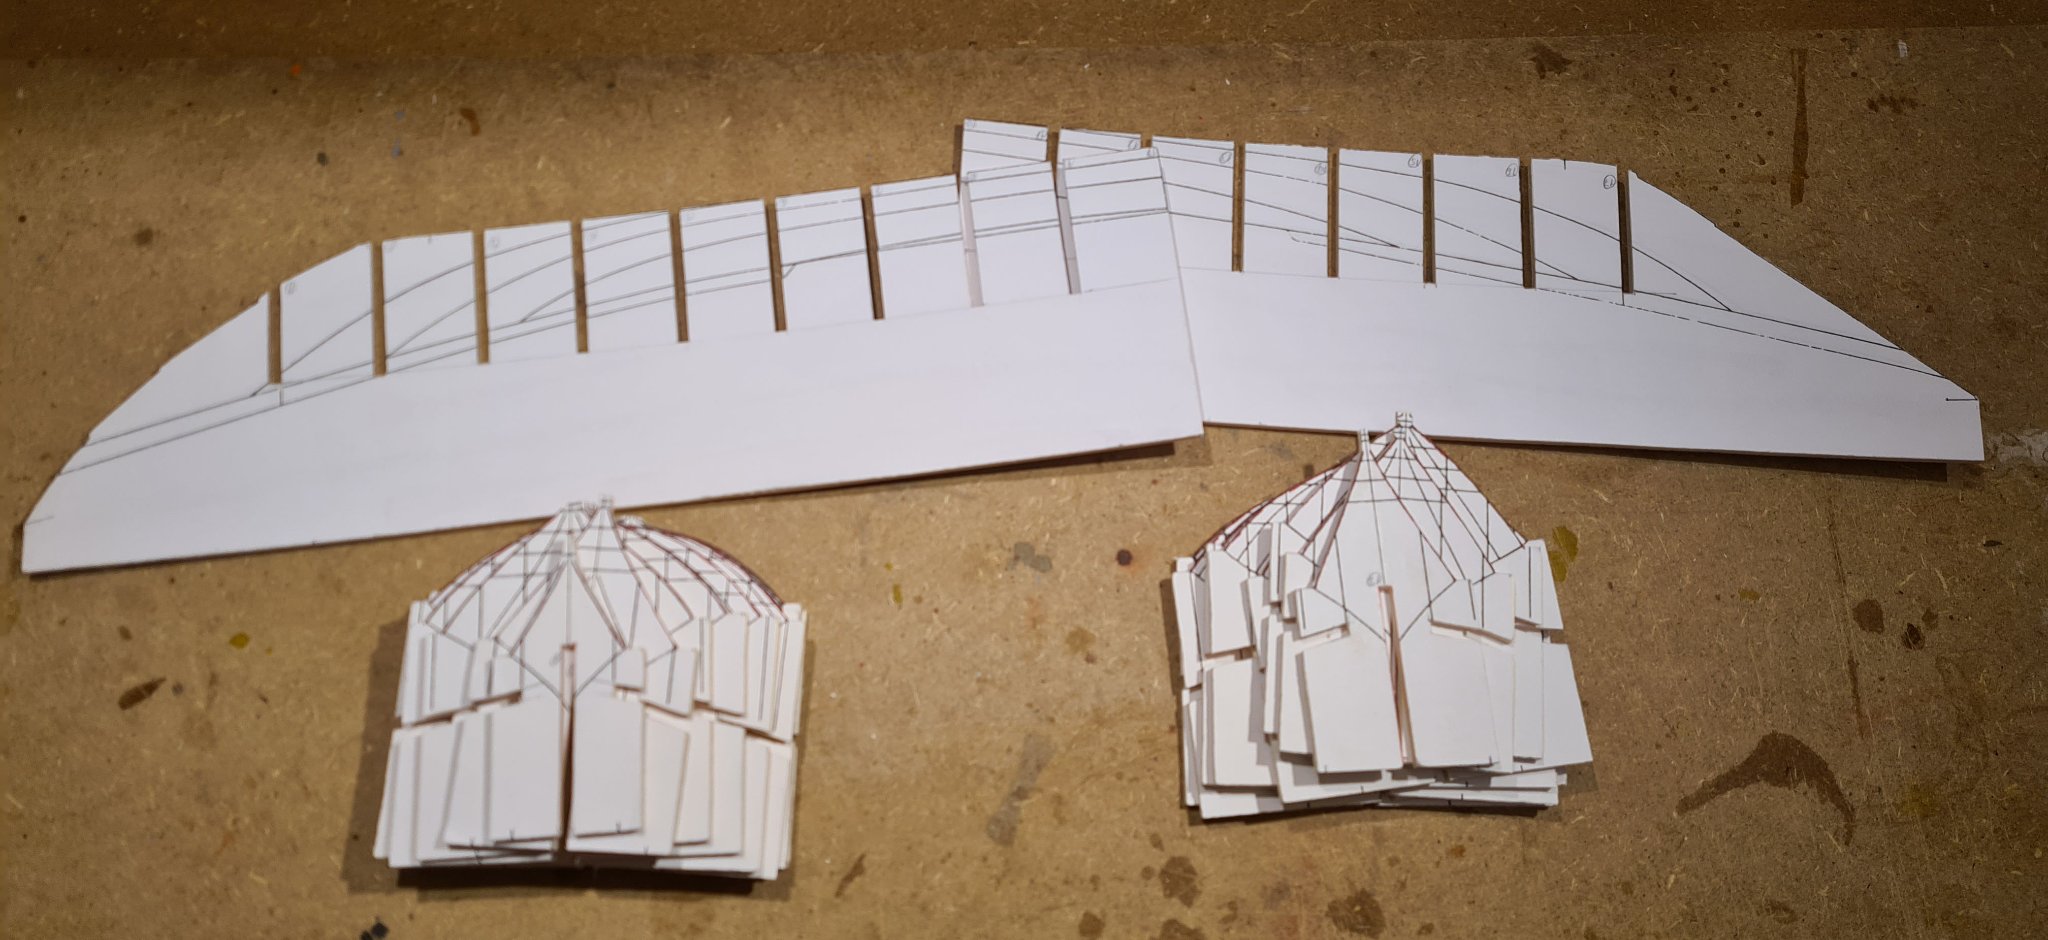
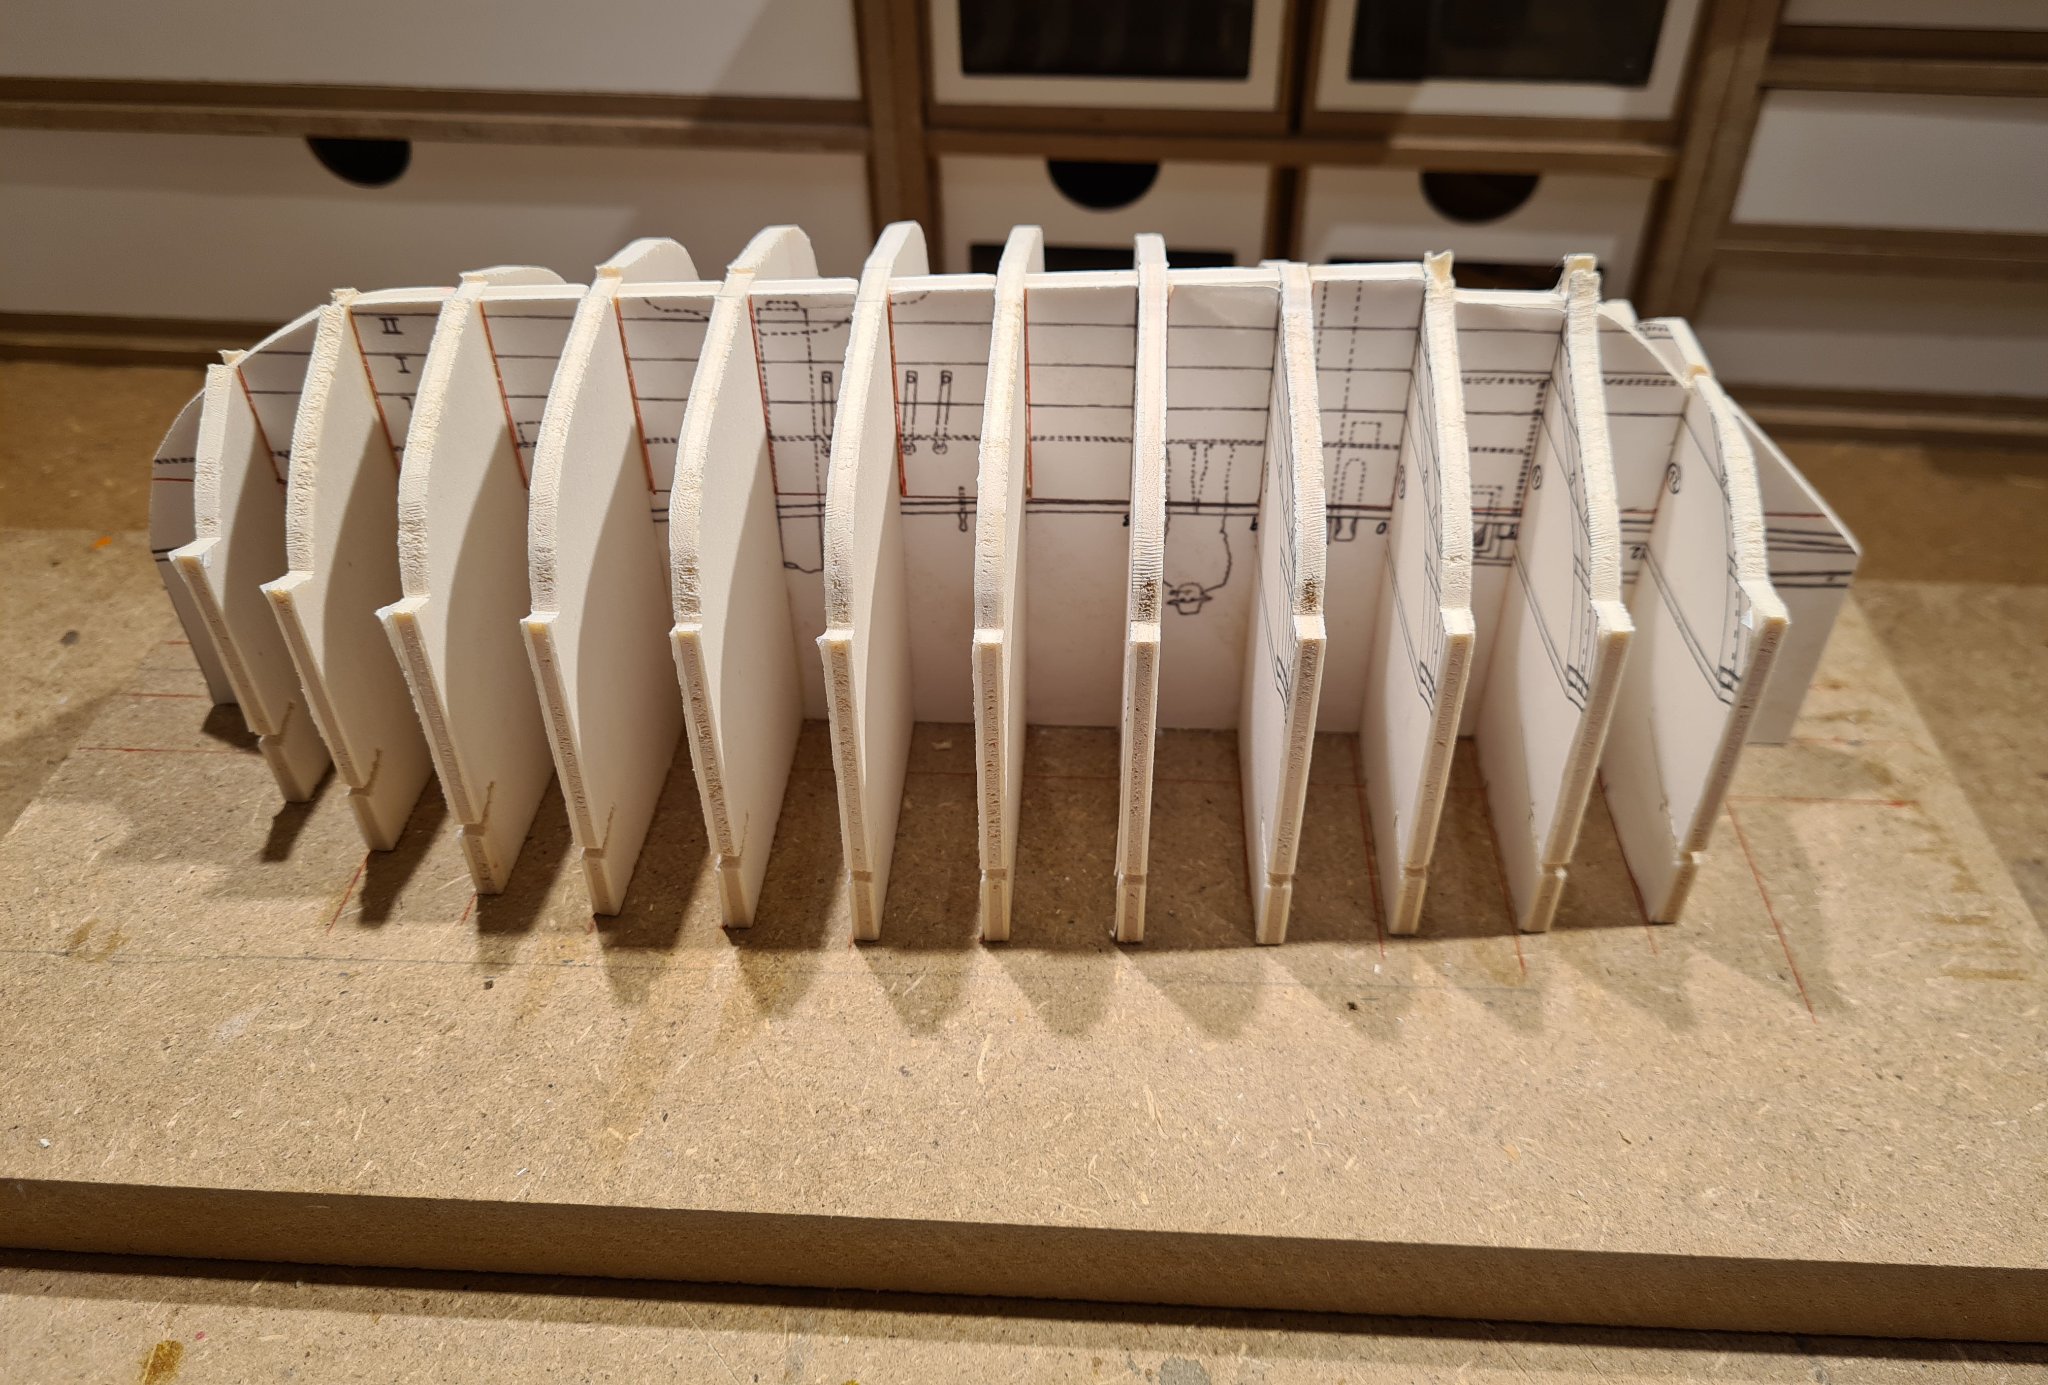
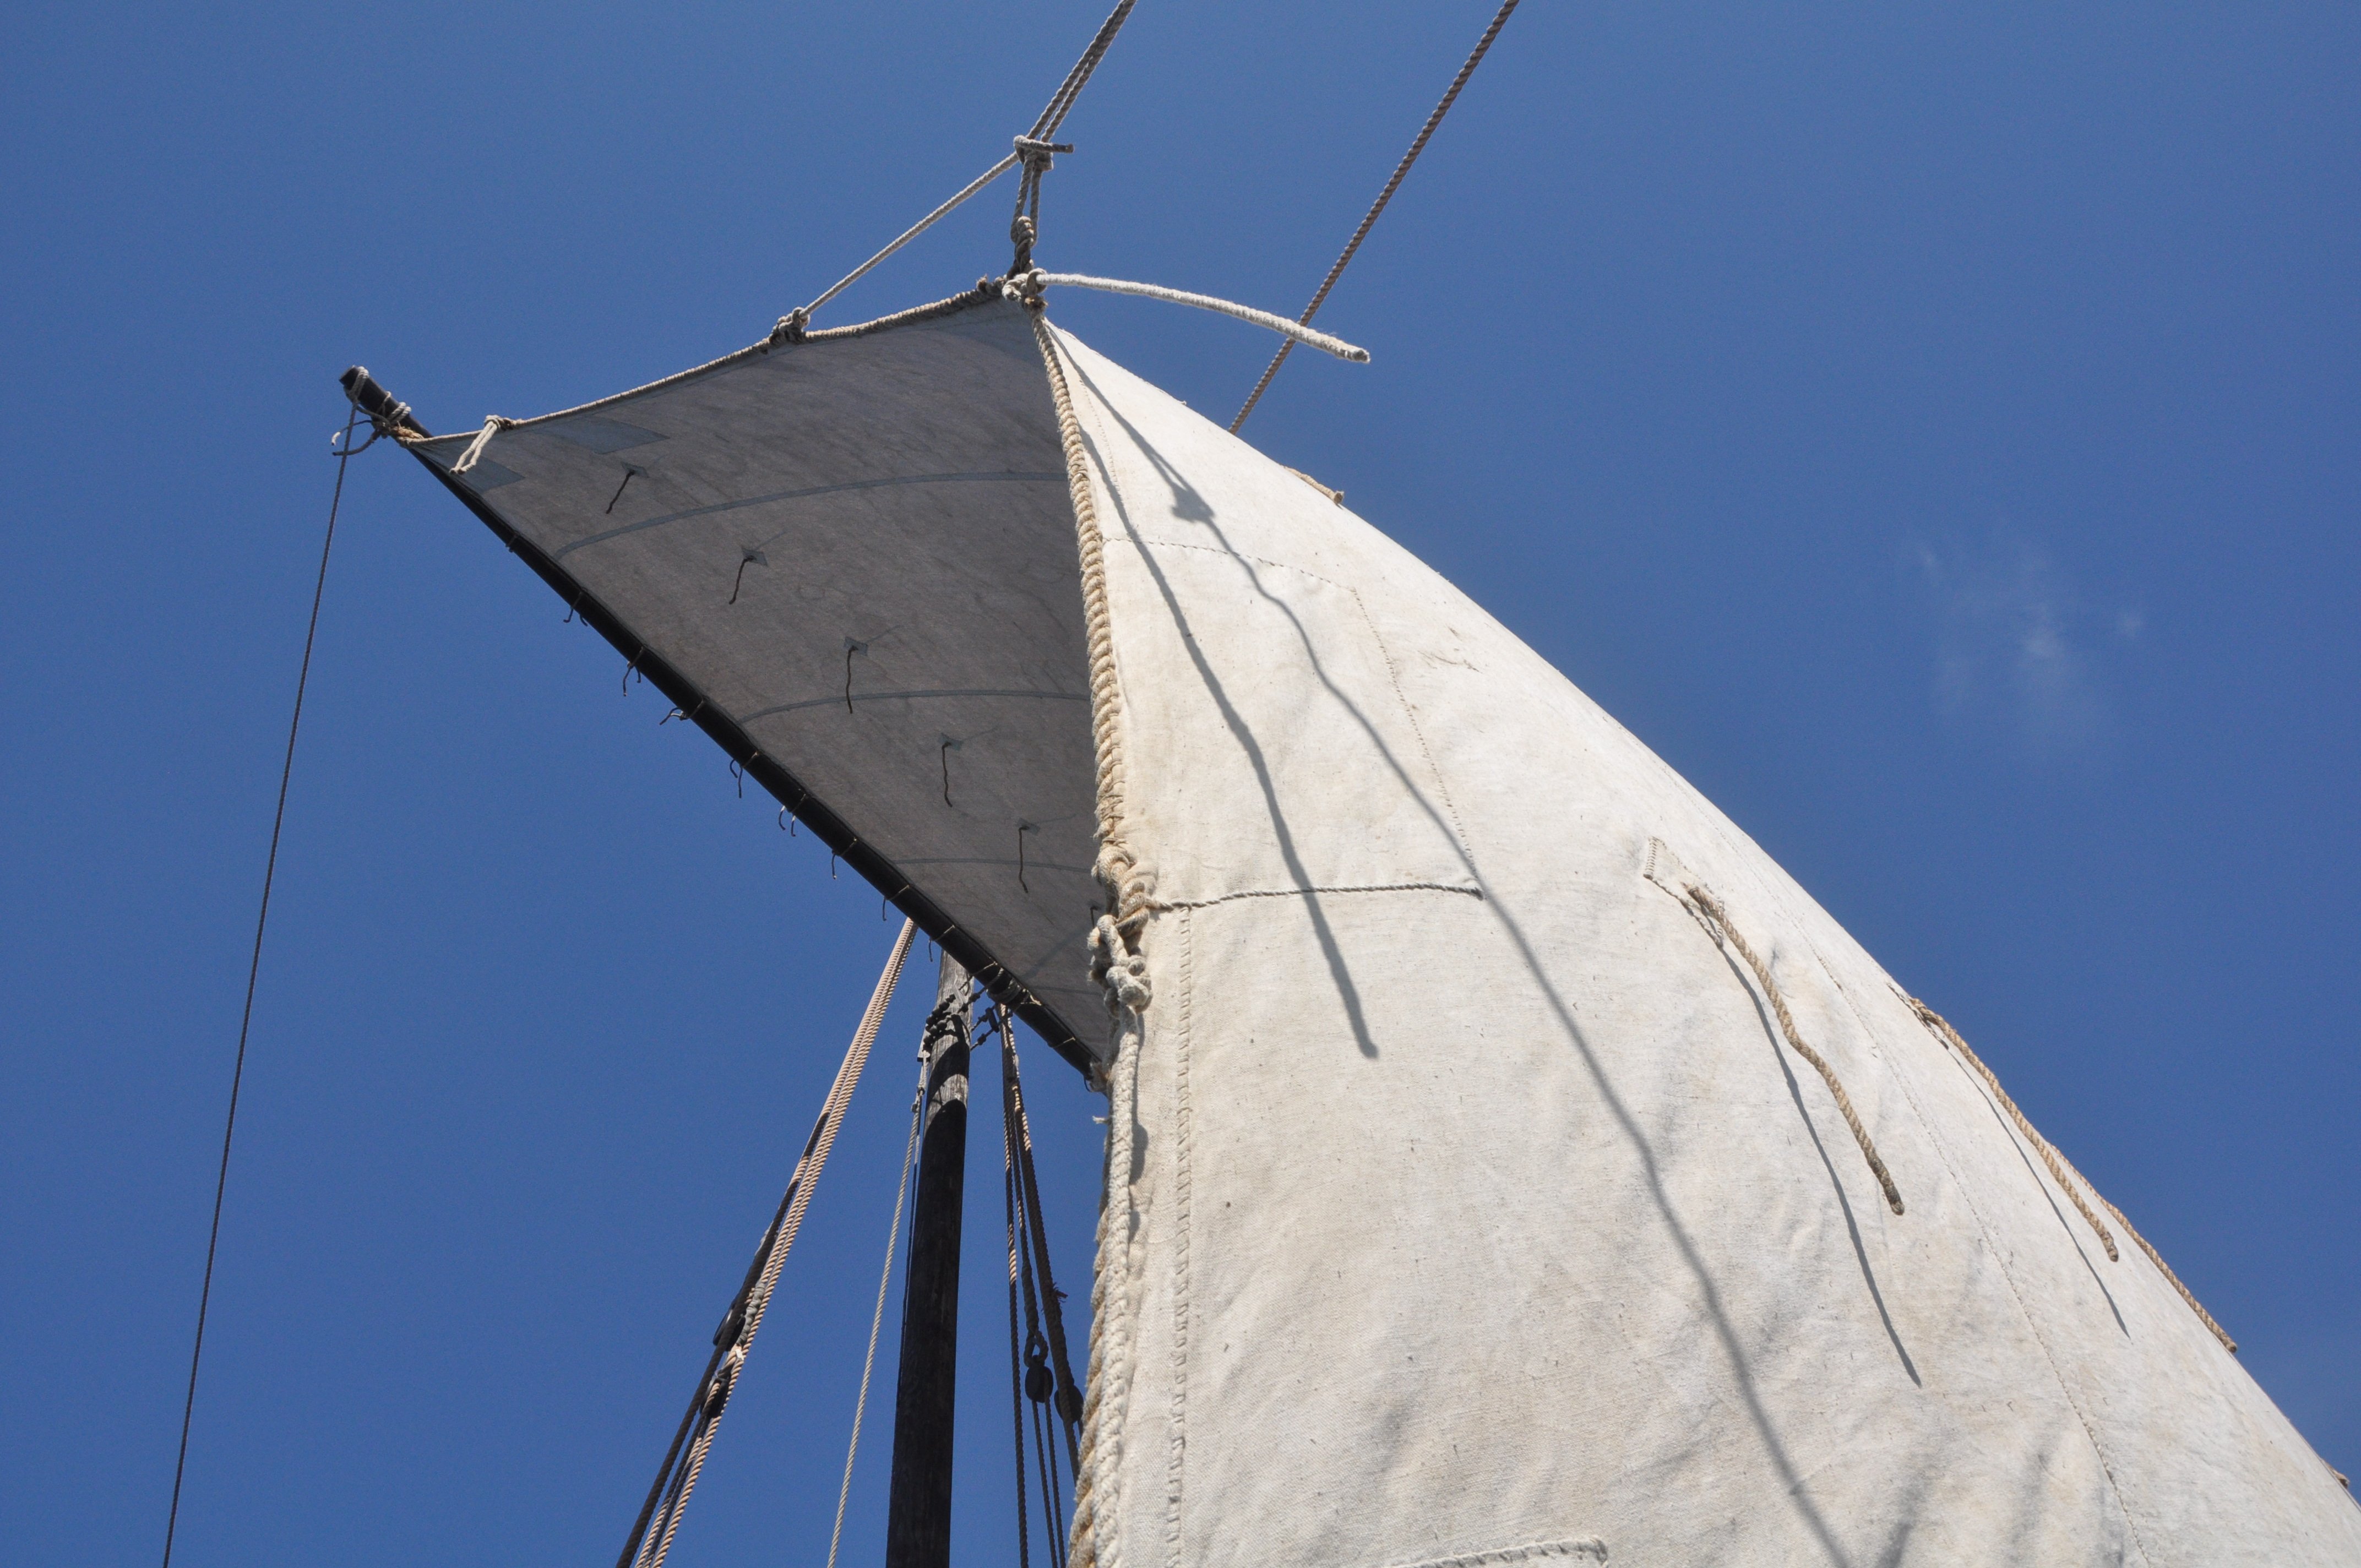
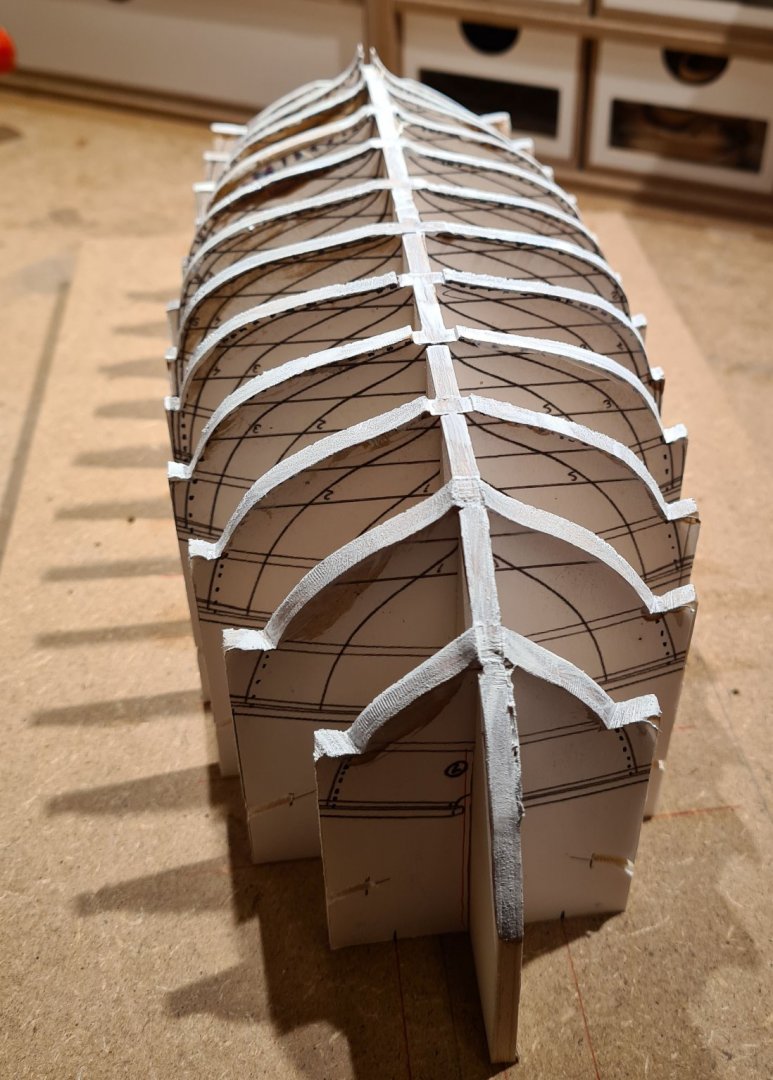
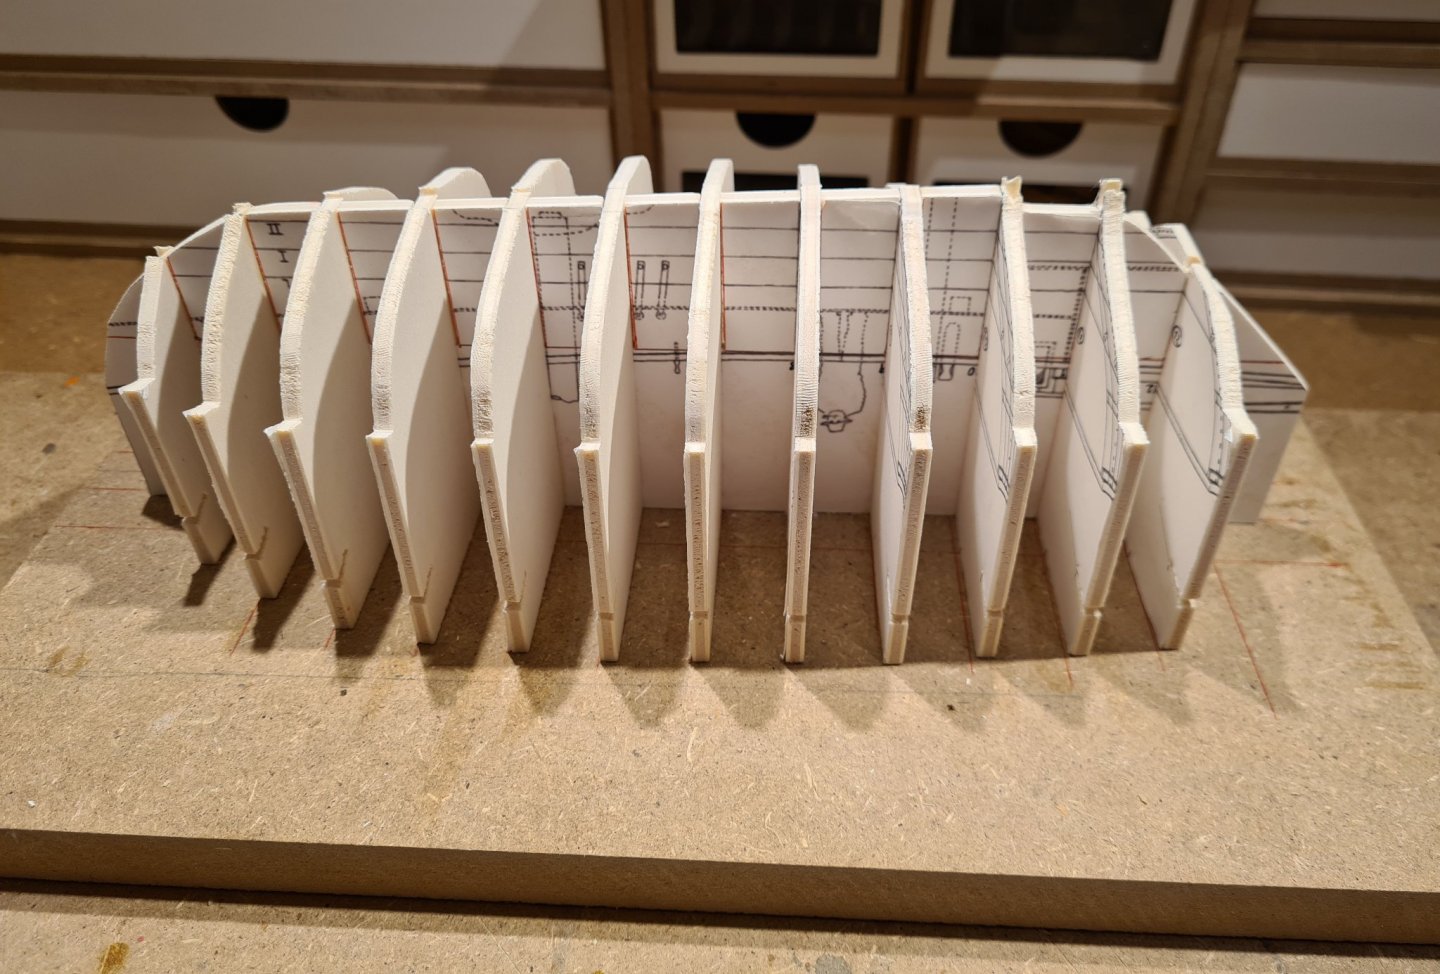
I would think that reef points are more or less necessary to sail such a boat safely. You need a way to adjust the area of the sail if you have only one. You need a large sail in light winds to get the speed you need so that you don't drift sideways instead. In stronger winds you need a reduced sail to be able to sail safely at all, otherwise you would tip over. I have been working on the build form. Seventeen "bulkheads" sawed out by hand with a coping saw. Slots cut for assembly, and some small slits on each side for holding rubber bands.

- 179 replies
-
- 6
-

-
- longship
- Helga Holm
- (and 1 more)
-
Sloop from Roslagen by bolin - FINISHED - 1:50
bolin replied to bolin's topic in - Build logs for subjects built 1851 - 1900
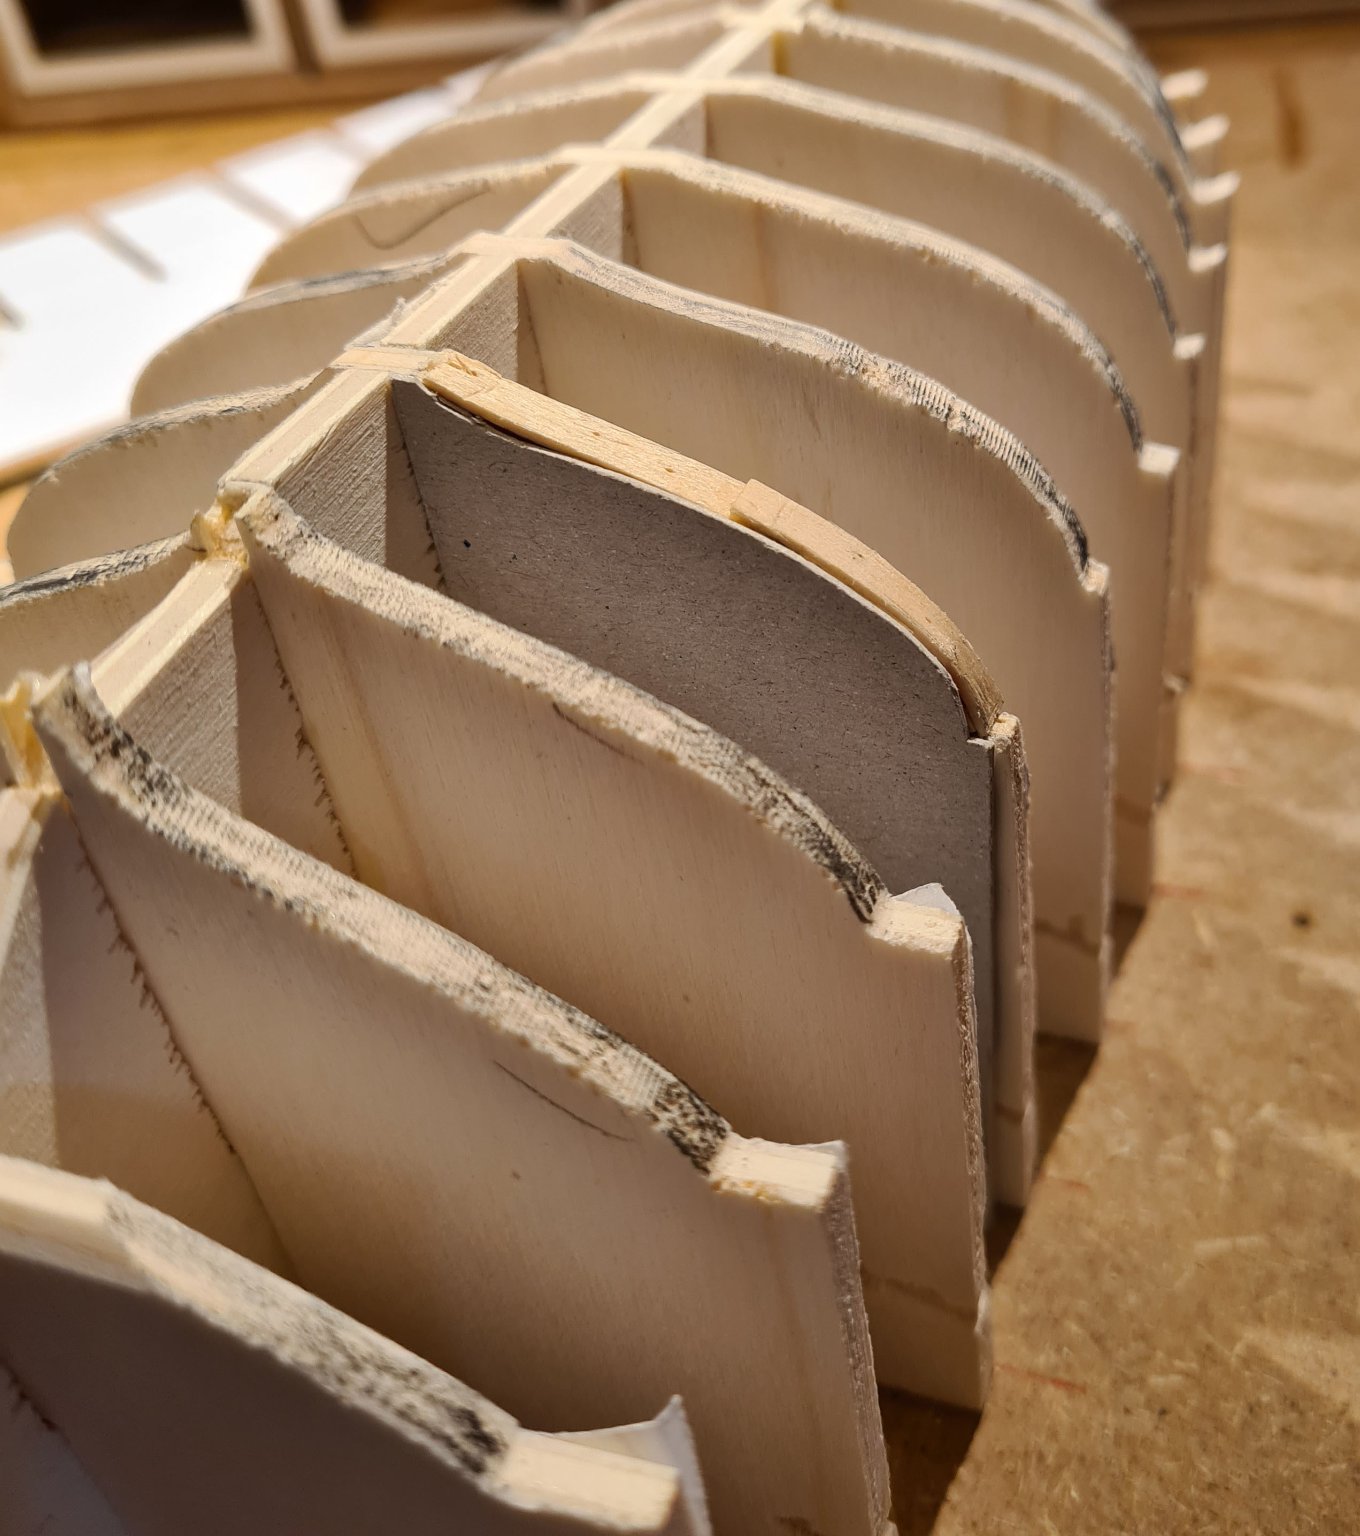
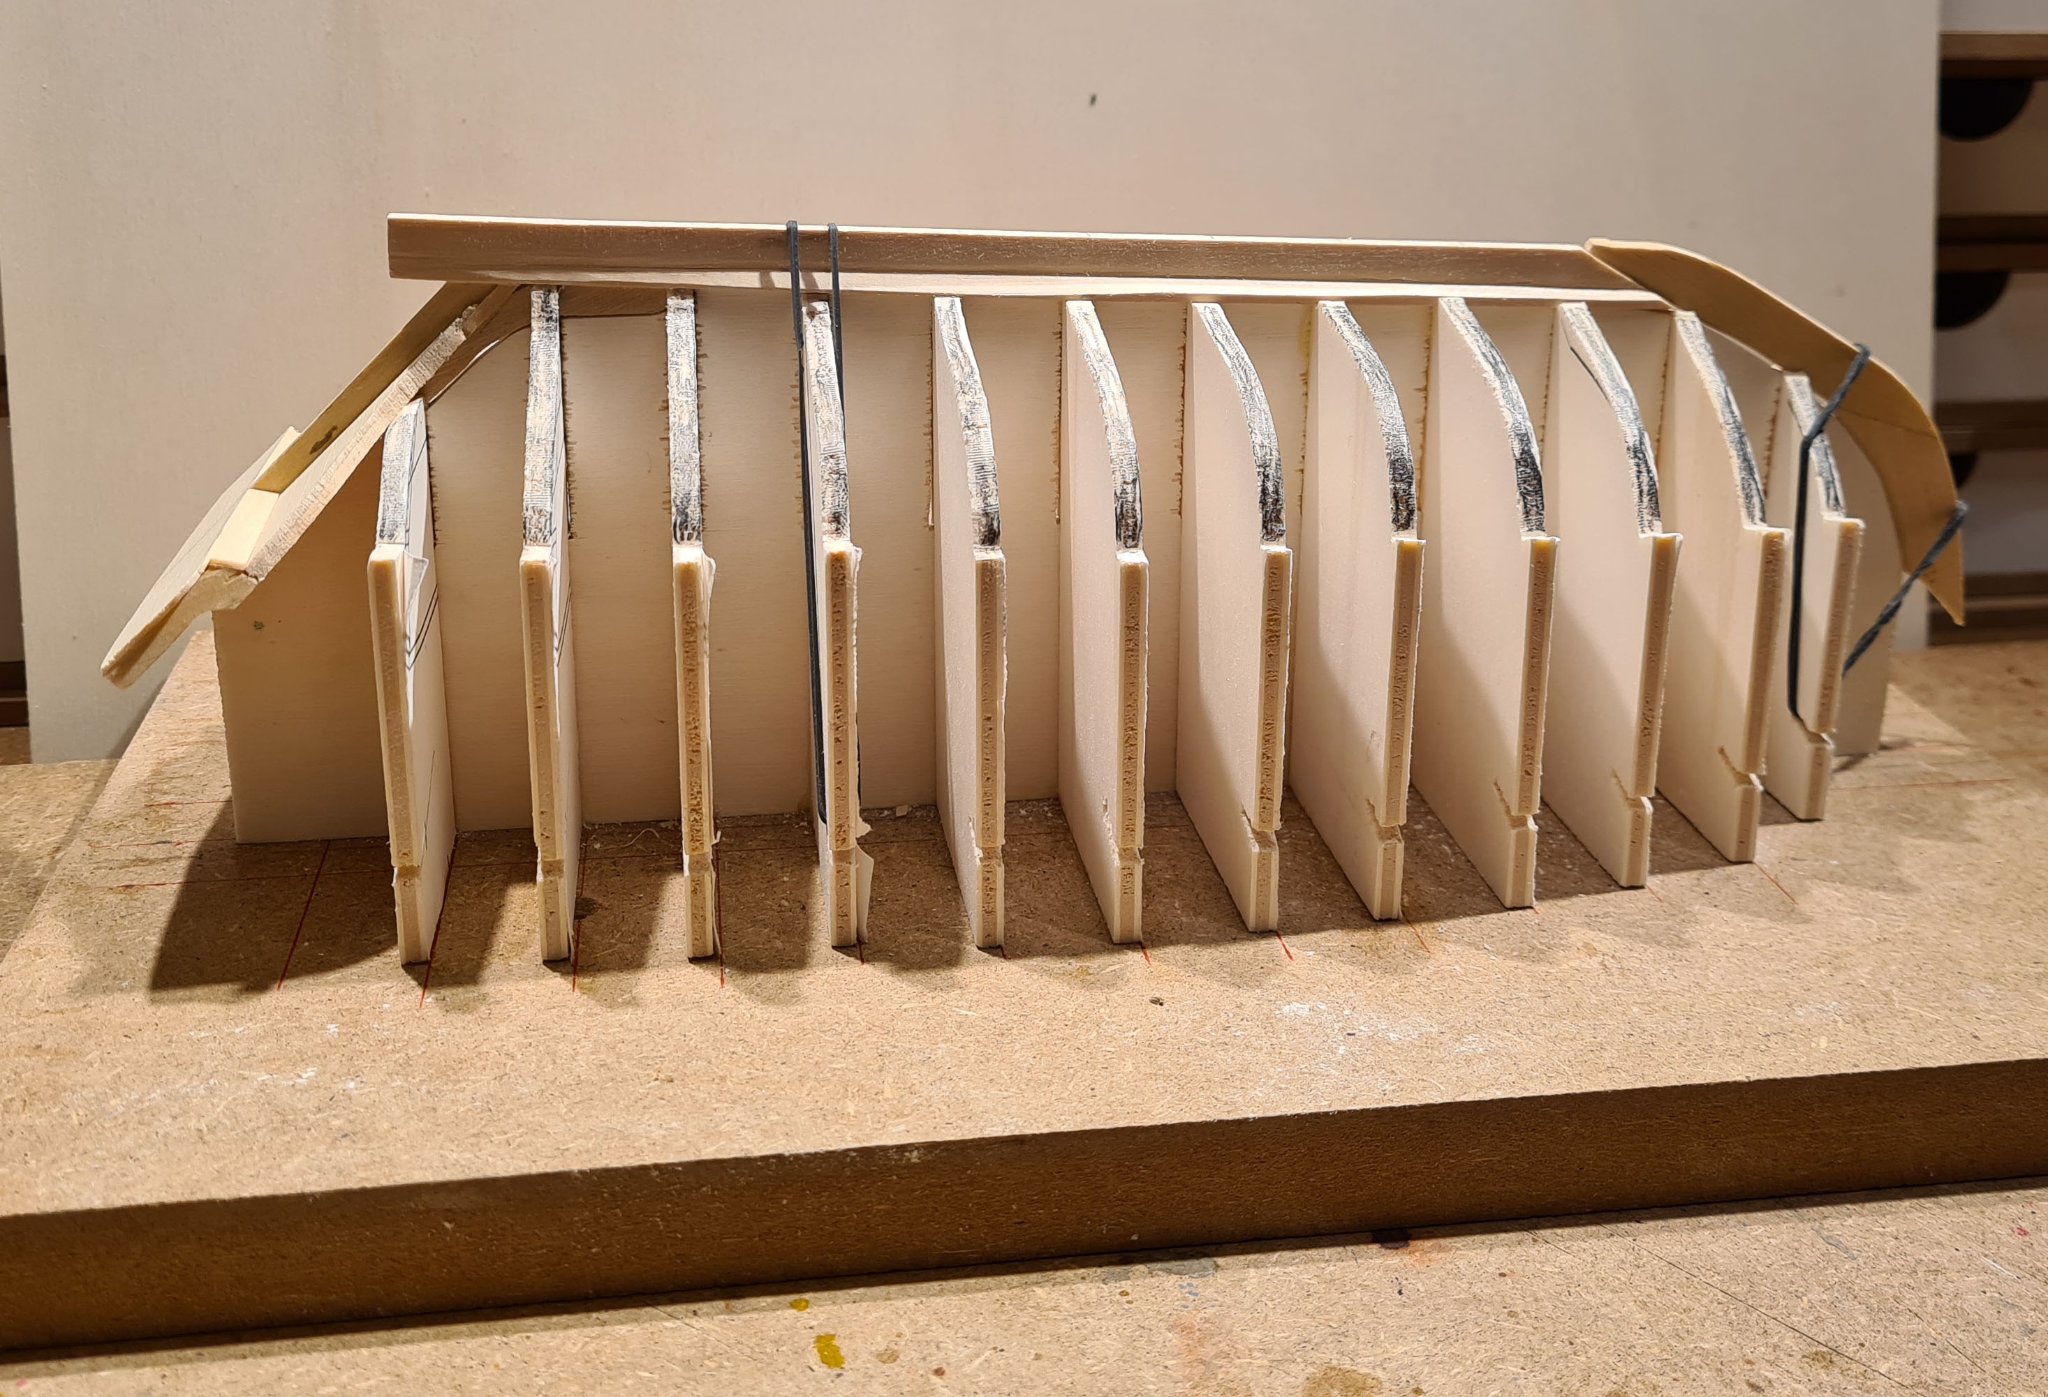
I have fixed the faulty frame 9 by bending and gluing a number of strips of wood to it. I cut a template from the starboard side to get the correct shape. After this I have faired the build form and then treated the frame ends with shellac. The plywood I use in the form is very soft and I thought it a good idea to harden it a bit. Then I painted the frame ends with white paint. I need to mark of the position of the strakes on the form and needed a better contrast. I also hope that the acrylic paint will make it easier to loosen the hull if some glue would spill to the wrong spot.
-
I realized that I need to print a few more copies of the plans to use as templates when cutting wood for the stem, stern and keel. In the meantime I can treat you with a short film made this summer from sailing the reconstruction. Cheers
- 179 replies
-
- 6
-
-
- longship
- Helga Holm
- (and 1 more)
-
Sloop from Roslagen by bolin - FINISHED - 1:50
bolin replied to bolin's topic in - Build logs for subjects built 1851 - 1900
Today I thought that I was closing in on a milestone; gluing the keel pieces together. I had worked on the landing for the garboard plank on the keel and was becoming satisfied. But before I do that I thought that I should fair the form. When I started that I discovered a mistake; frame 9 on port side is to narrow. I had cut that side along the same line as frame 10. Now I need to figure out a way to fill out the frame and then cut it to the correct shape.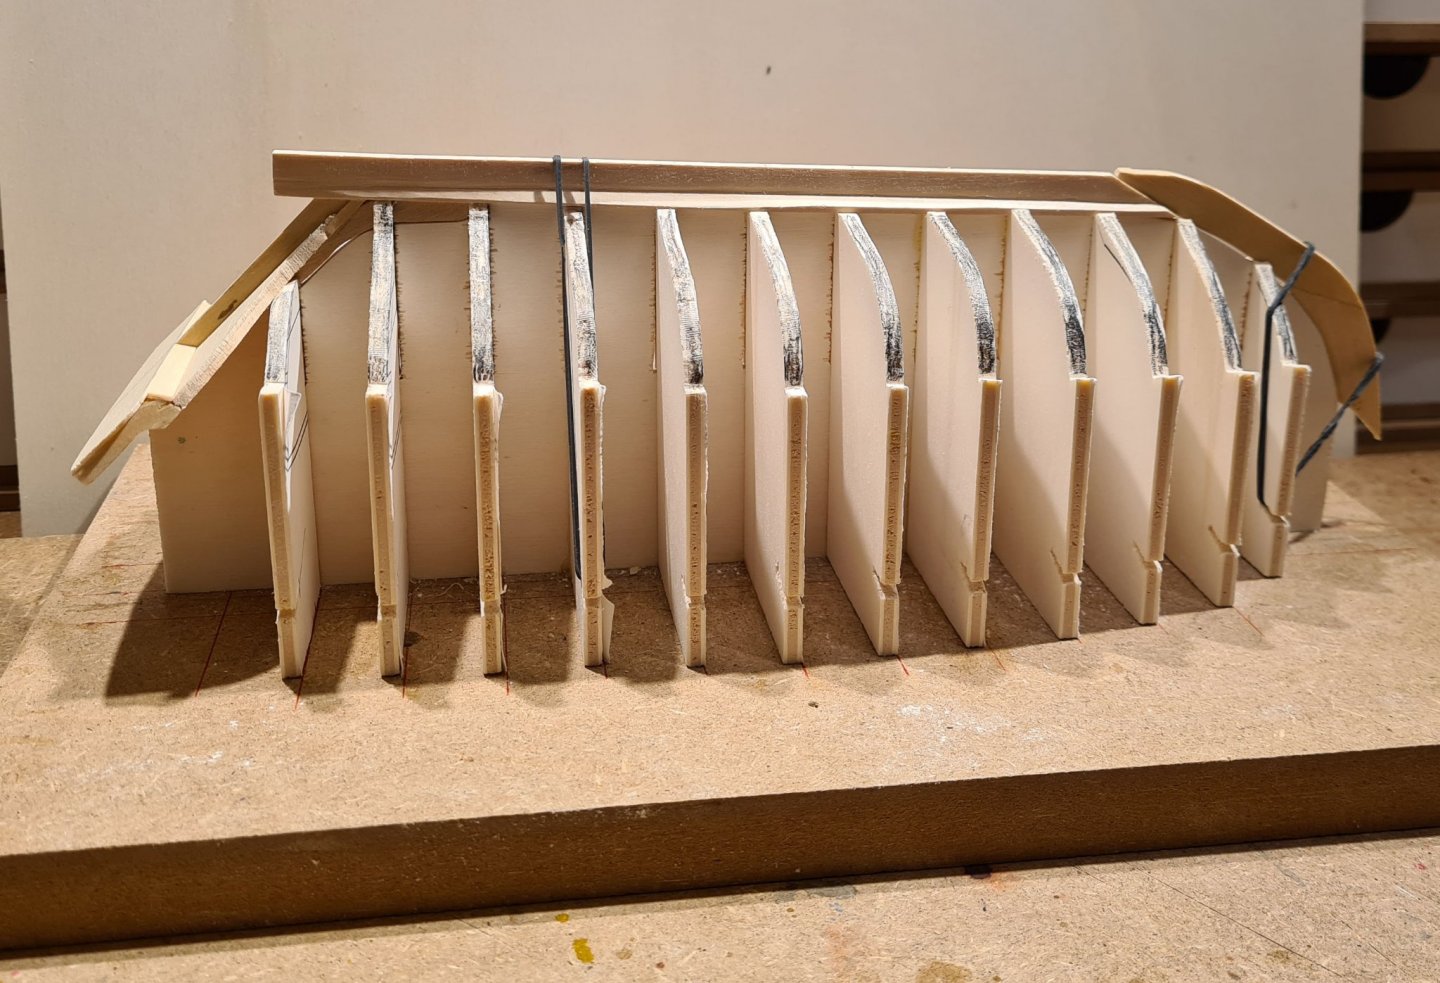

-
Sloop from Roslagen by bolin - FINISHED - 1:50
bolin replied to bolin's topic in - Build logs for subjects built 1851 - 1900
I have followed up the work on the transom, and it is now more or less completed (some cleanup is still needed). As I have mentioned before the plans does not include any details for the inside of the hull. The supporting knees and frames are conjectures from me based on the little material I have found elsewhere (mostly the renovation of the similar ship Helmi that I have mentioned before.)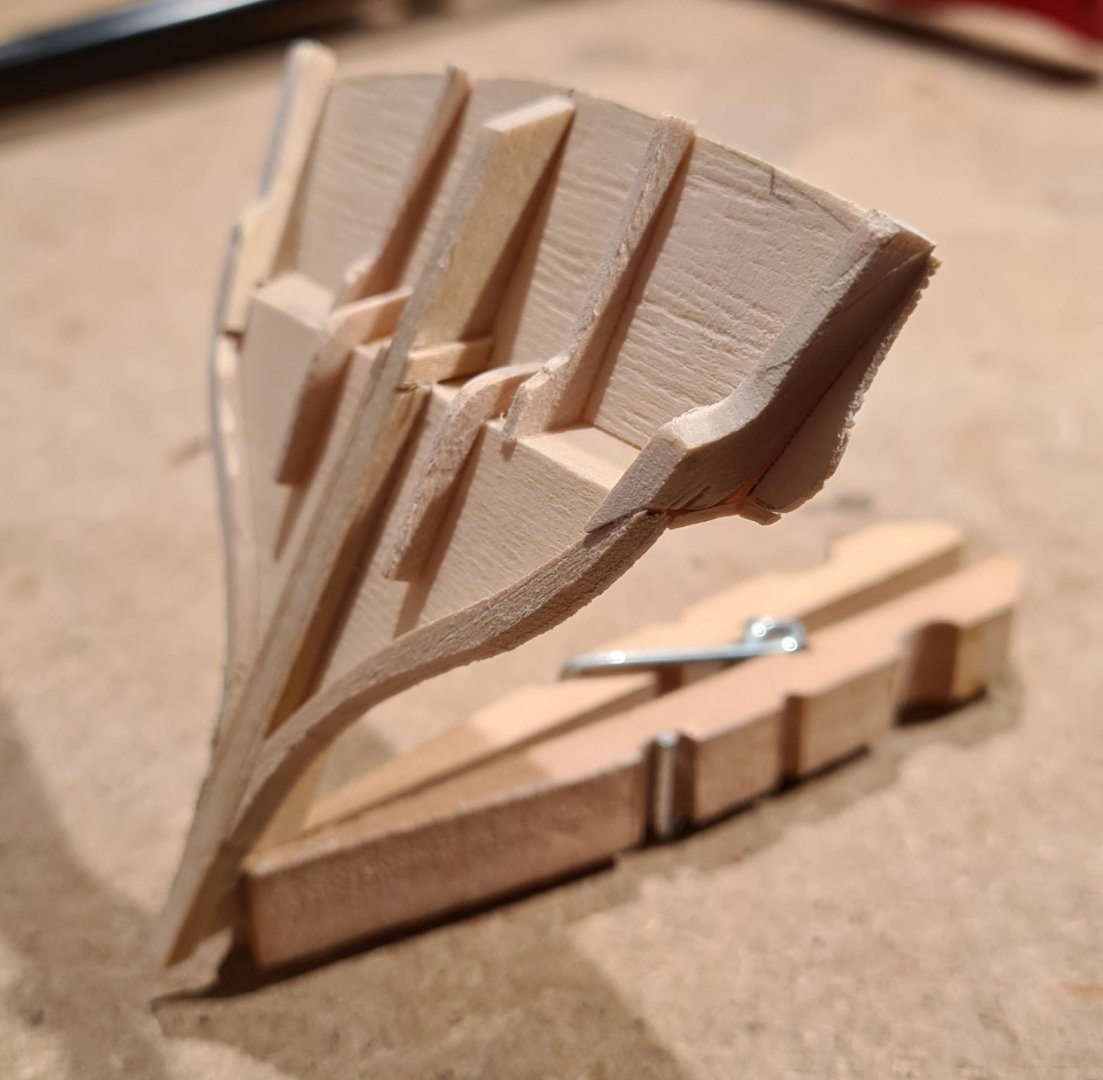
-
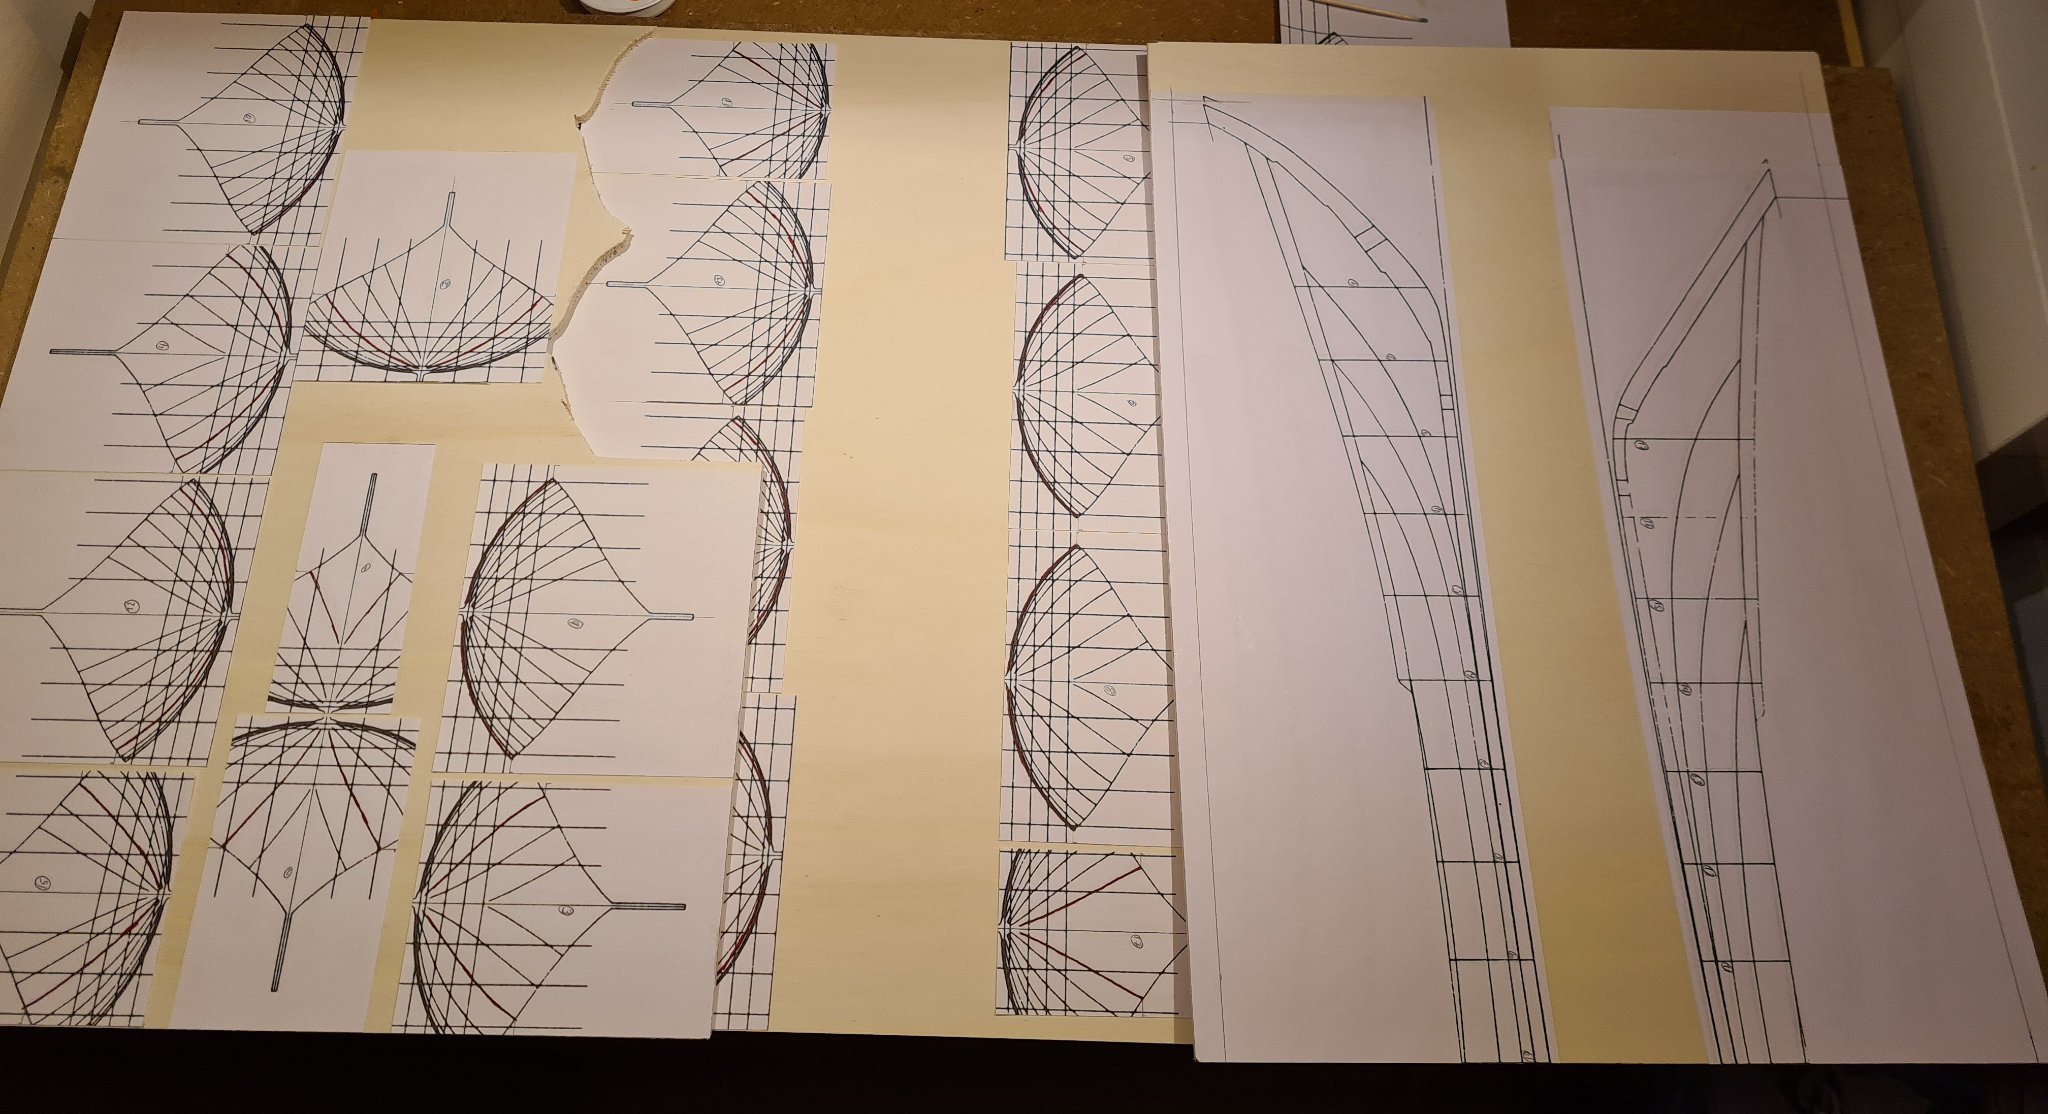
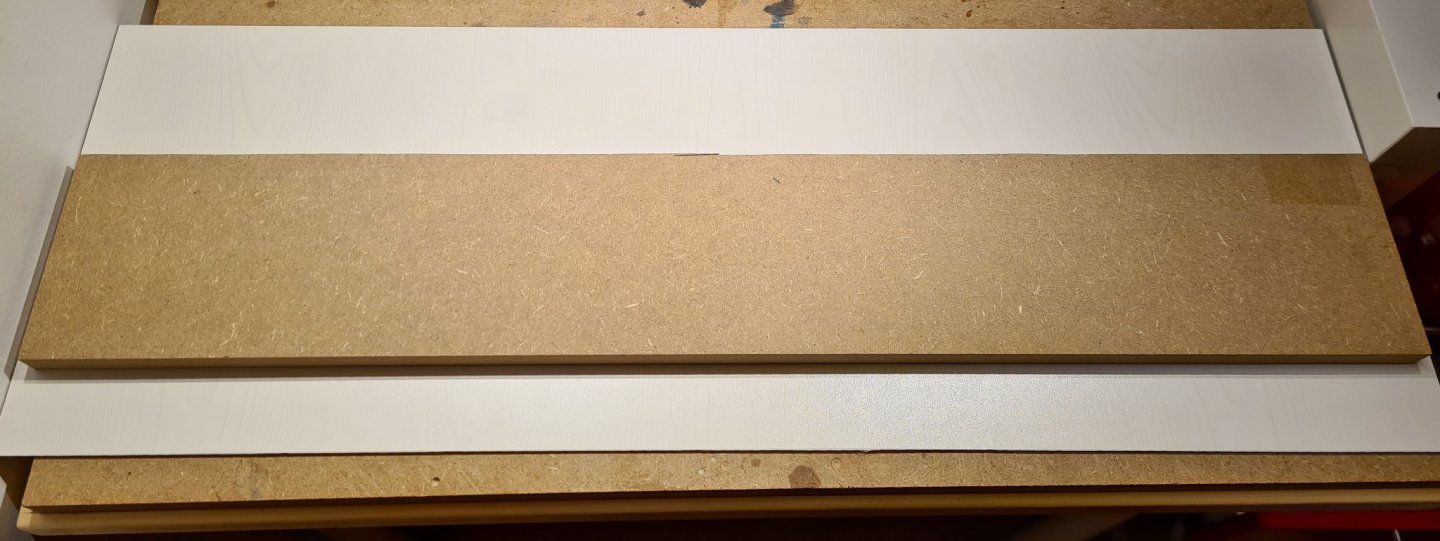
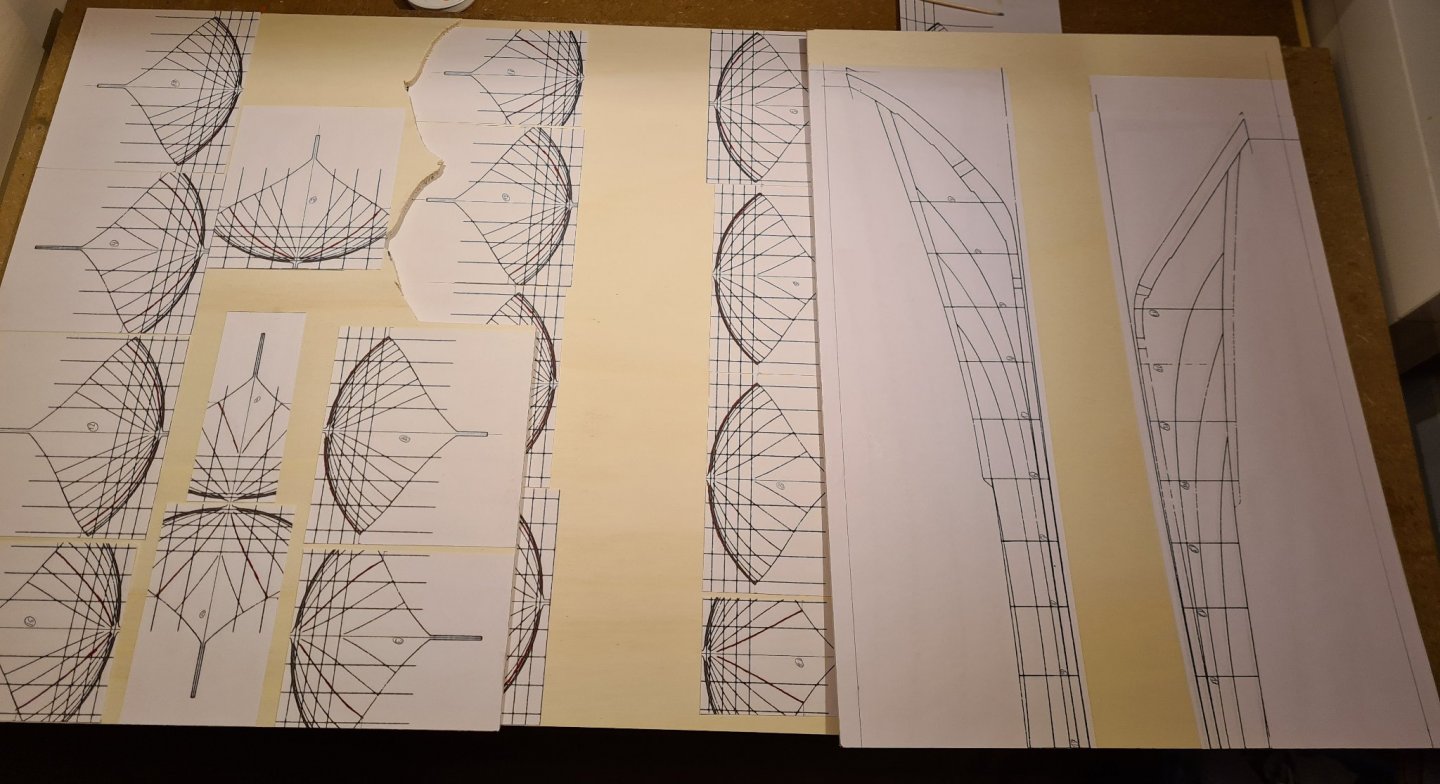
Interesting discussion on stern rudder. The conclusions in the reconstruction seem to me to be quite well founded. The markings left on the stern pieces, the lack of indications of a side rudder and existence of stern rudders on longships from the period. The report, among other sources, references the same picture from Skamstrup church that Louie includes. That picture seem to be less open for interpretation when seen up close. But as Chuck mentions, the angle of the rudder gives quite an arch to the tiller. Another interesting observation in the picture that Louie showed is that it shows a parrel with beads. For the actual building of my model I have started to prepare a building frame. I will build the hull up-side down and shell first. The method will be more or less the same as in my Sloop from Roslagen build. First a sturdy build board (19 mm MDF). Then I have printed the frames and side view in my chosen scale 1:30, and glued them to plywood. In this scale the hull will be 75 cm long. Which is about as long as I can build in my ship yard. The table is only 80 cm wide.
- 179 replies
-
- 8
-
-
- longship
- Helga Holm
- (and 1 more)
-
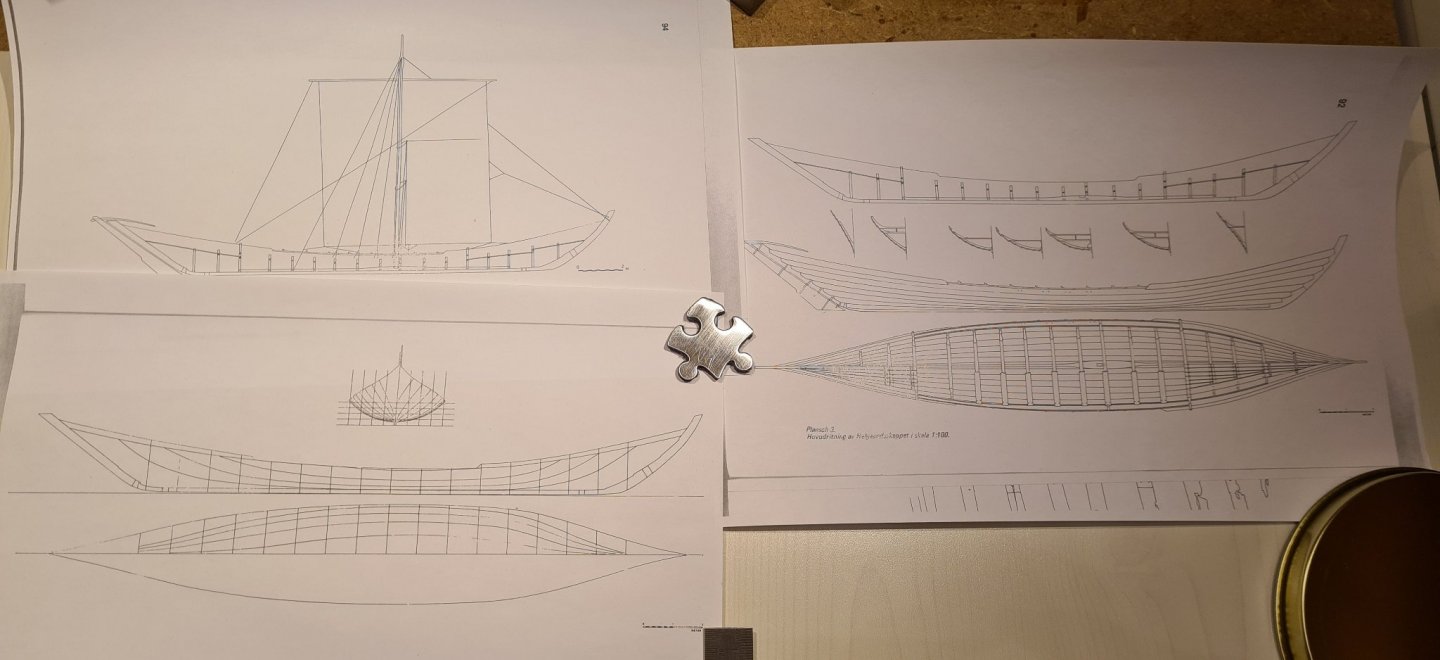
It's encouraging to see so many of you knowledgeable people joining to see my project. You are very welcome! Yes this ship is rather odd in many aspects. There are not many longships found from this period, and that was one of the reasons that a reconstruction was made. The archeological find consisted of a large part of the starboard side, from the keel to the railing. From the port side very little is preserved. Only pieces of the stem and stern where found, which makes the reconstruction of these parts more uncertain. In particular it has been discussed if the stem was straight och bent. From marks in the stern it could be concluded that there had been a stern rudder, but no pieces of it was found. The reconstruction has used other sources to construct one. From the find it was concluded that there where 8 pairs of oars, and that the ship was rigged. The dimensions of the reconstruction is length 22.5 m, beam 3.4 m and draft about 0.5 m depending on load. Regarding the original use of the ship, no clear answer has been found. She is clearly no cargo ship, there is not enough room for any relevant amount of cargo. She is not a dedicated rowing ship, the number of oarsmen are relatively few compared to the overall length of the ship. There is a rather big decked area in the fore and aft where no rowers sit. Many years of practical use of the reconstruction has shown that the ship is not particularly good in hard weather, so it is unlikely that it would be used outside the Stockholm archipelago and the Mälaren lake. The most likely guess seem to be that the ship was built and used as transport ship for some important person, or on some official capacity such as watch ship.
- 179 replies
-
- 6
-
-
- longship
- Helga Holm
- (and 1 more)
-
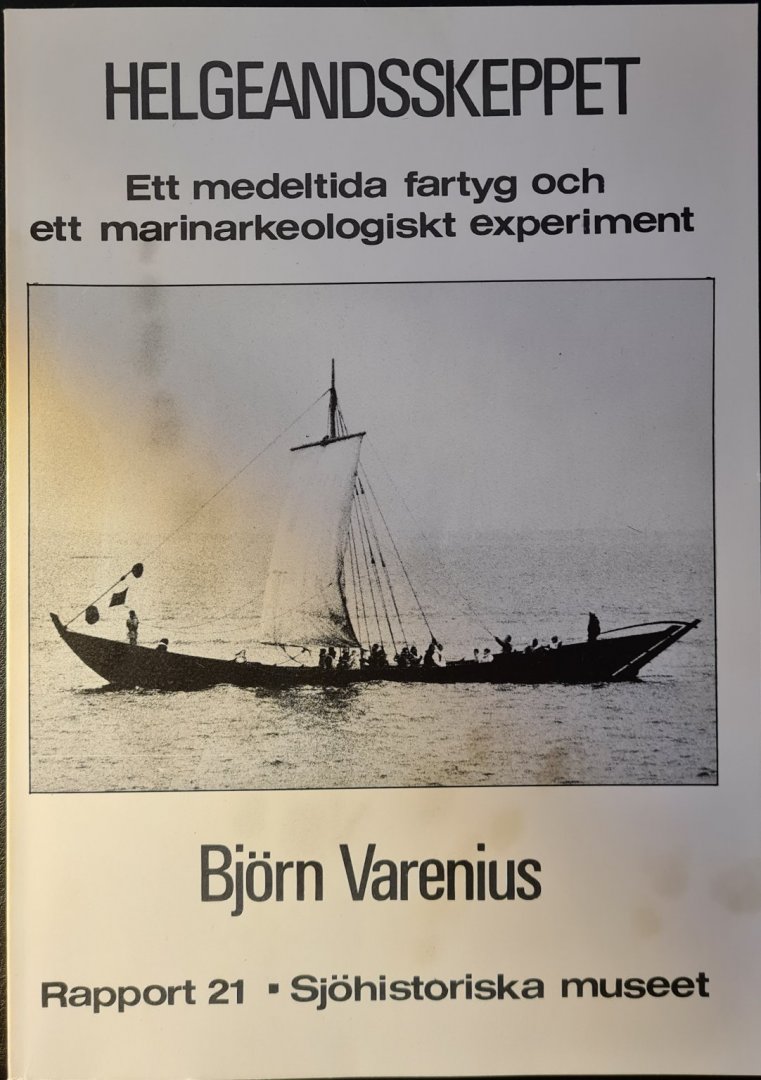
This will start the build log for the model I have been planning to build since I decided to start model ship building. However, I realized that I needed to acquire some skill and get experience before I could attempt it. With some models under my west I now feel ready to start. The subject is medieval long-ship from around 1325 that was found in Stockholm in 1979. The ships size and unusual form caught the attention by marine archeologists and the public, so a reconstruction was built. The reconstruction was launched in 1983, and was named Helga Holm (literally "holy islet" which is a word play of the island where the wreck was found "helgeandsholmen" = "the islet of the Holy spirit") . The first years it was the Maritime History Museum (Sjöhistoriska museet) in Stockholm that owned and sailed the ship in order to perform "experimental archeology". Later on the ownership was transferred to an association that has sailed and maintained the ship since then, mostly for recreation. I have been participating and sailing the reconstruction for about 18 years. Unfortunately the ship is now becoming so old, and requiring so large and costly renovations, that we can no longer maintain here as a sailing ship. The plan is to place her on land in the city of Sigtuna north of Stockholm. The original reconstruction was documented in one archeological report and a more popularly written book. The report includes the reconstruction plans that I will use as the basis for my model. Both the report and the book documents the building of the reconstruction and will help with different detailed aspects. I will also (at least for a while longer) have access to the reconstruction for any specific measurements. One question I have been asking myself, will I be building a model of the original ship based on the information gained by the reconstruction, or will I build model of the reconstruction? I have concluded that it will be the former. For the hull shape I will not be able to improve on the reconstructions results, but for the rig and some other details I plan to do a bit of my own research and might come up with other conclusions. I plan to go slow on this build, and I will use my build of a Sloop from Roslagen as practice for certain aspects. In particular regarding building the clinker hull. On the other hand I would like to start the build while I still have access to the reconstruction for additional measurements etc. Cheers
- 179 replies
-
- 12
-
-
- longship
- Helga Holm
- (and 1 more)
-
Sloop from Roslagen by bolin - FINISHED - 1:50
bolin replied to bolin's topic in - Build logs for subjects built 1851 - 1900
This build got interrupted for some weeks while I finished my Bohuseka. I have done some few things in the meantime. First the building frame was completed (but still no fairing). Then when I checked some of the pieces I had started to build I realized that the transom was to wide. I measured it again from the plan and found out that I only had to adjust it, not start over. Today I glued the upper part of the transom. The gap will be filled with a diagonal plank.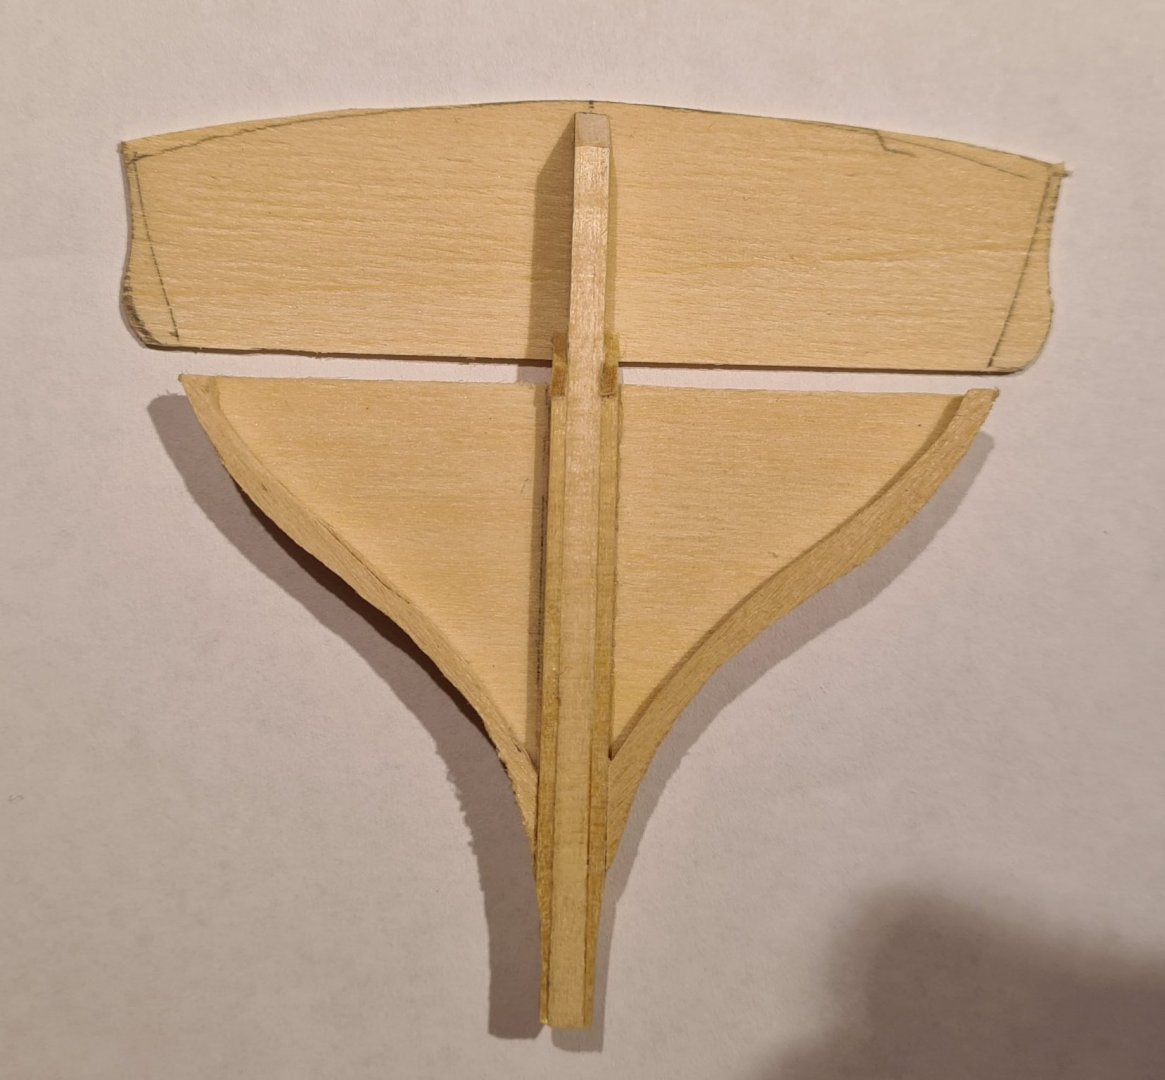
-
Thanks for all the nice comments! wefalck, I did entertain the idea of giving it a tarred look. But in a sense I chickened out. I intend the model as a gift, and I felt that the recipient would appreciate it more in a clean wooden finish. I was afraid that the tarred look would look "dirty" and less attractive to the untrained eye.
-
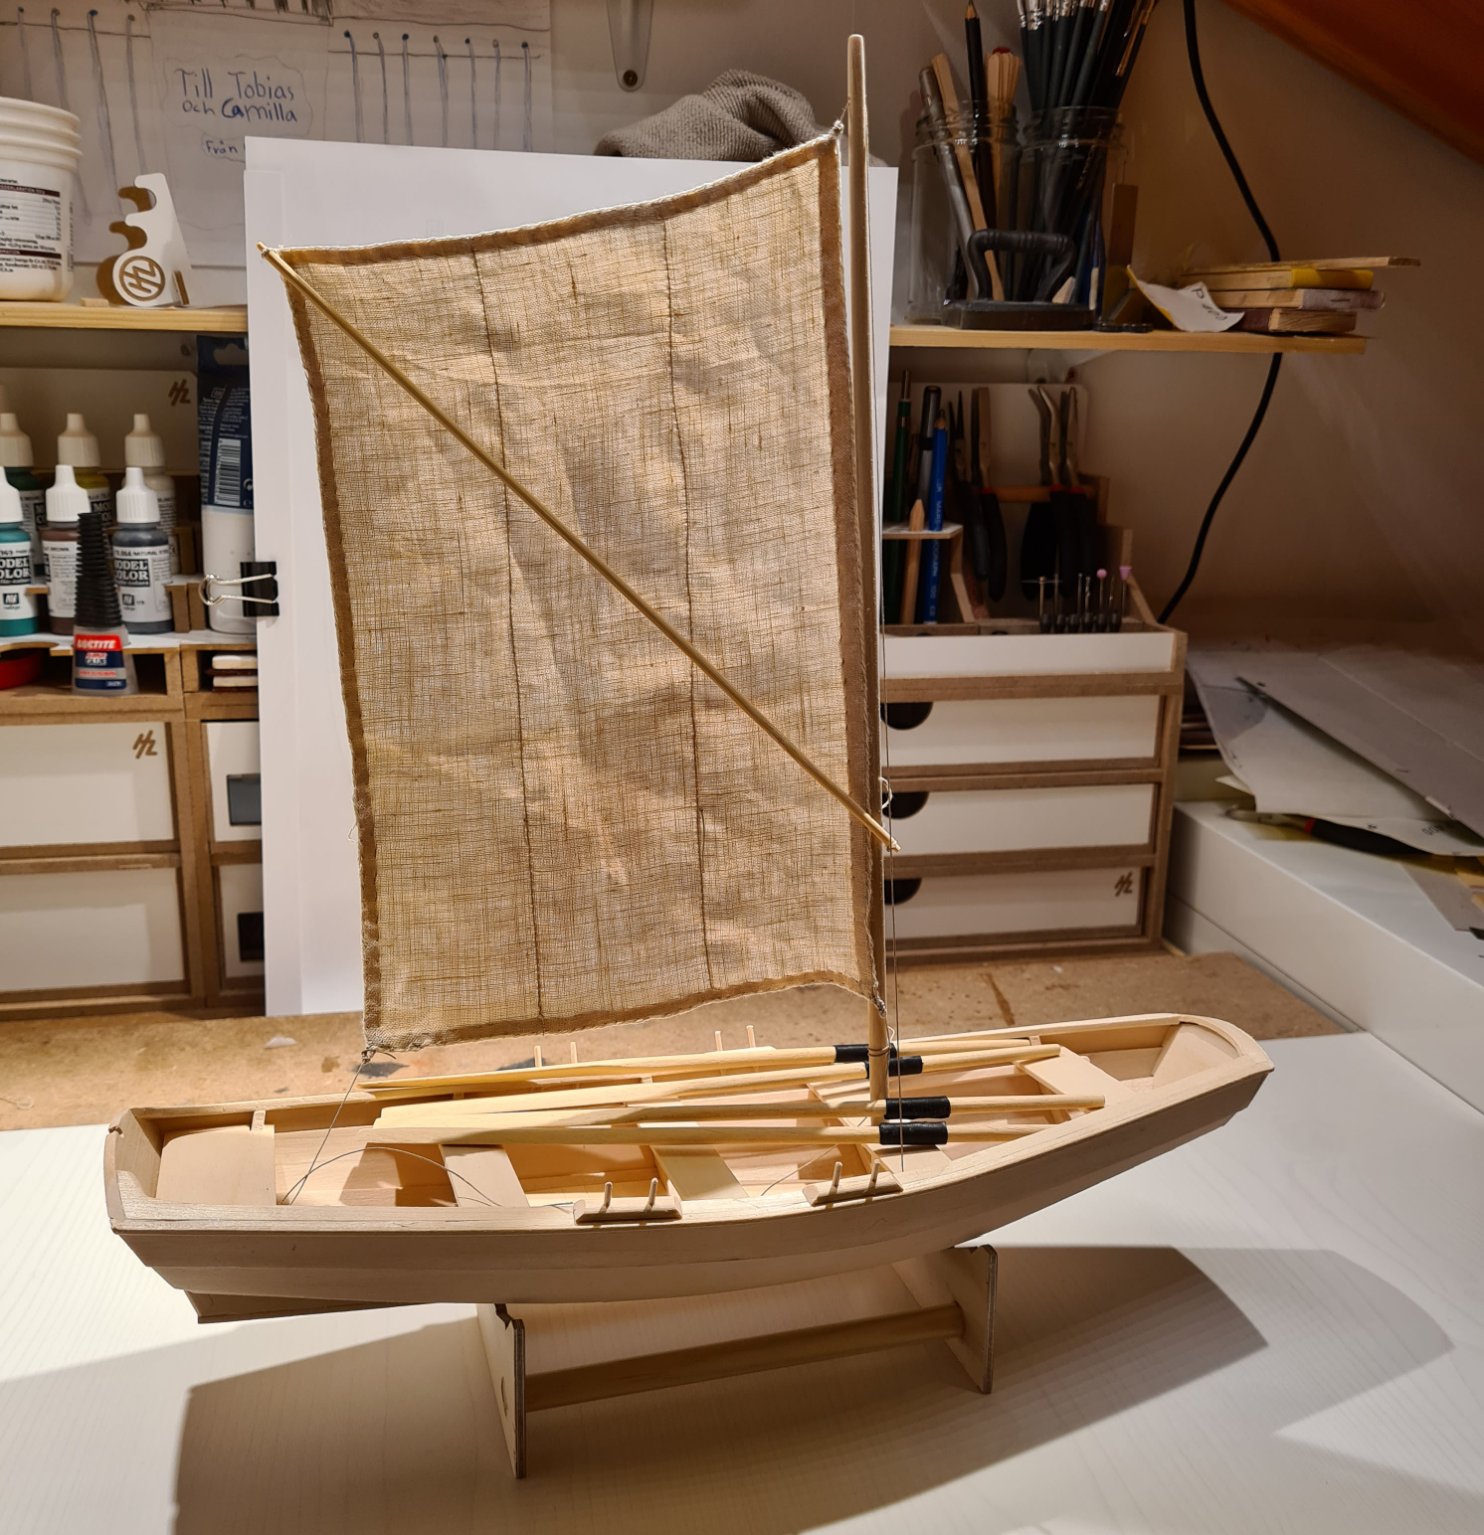
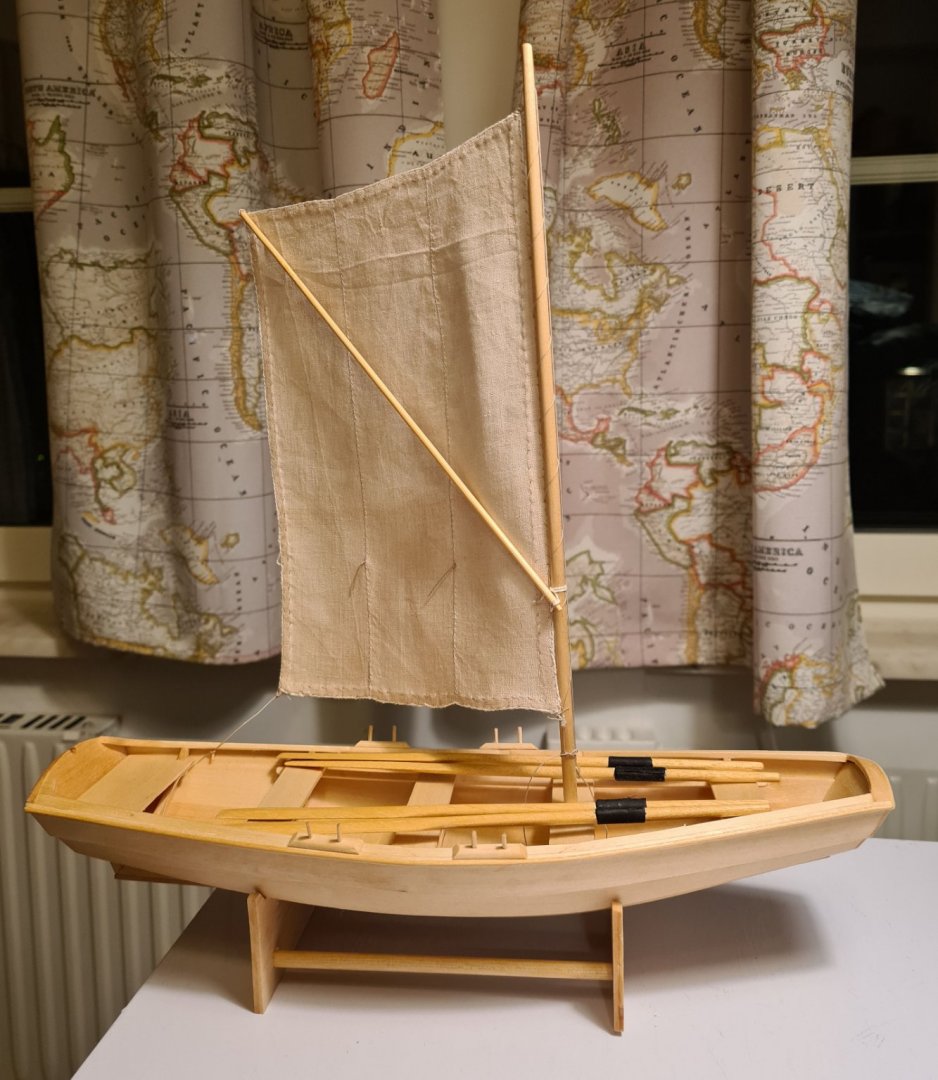
Today I put the boat on a new stand, tied the last knots and declare the Bohuseka complete! This has turned out to be a very satisfying build. It started out a bit shakily, as the hull shape did not become as narrow in the fore as it should have been, but in the end I like the result. Scratch building is much more satisfying, challenging and ultimatly more satisfying for me than kit building. There will be more.

- 31 replies
-
- 12
-
-
I agree that braces are likely for the rig. Maneuvering the sail only through the sheets would definitely make it hard to go higher against the wind.
-
Hobby Zone Organizers and Ship Building Slip
bolin replied to Osmosis's topic in Modeling tools and Workshop Equipment
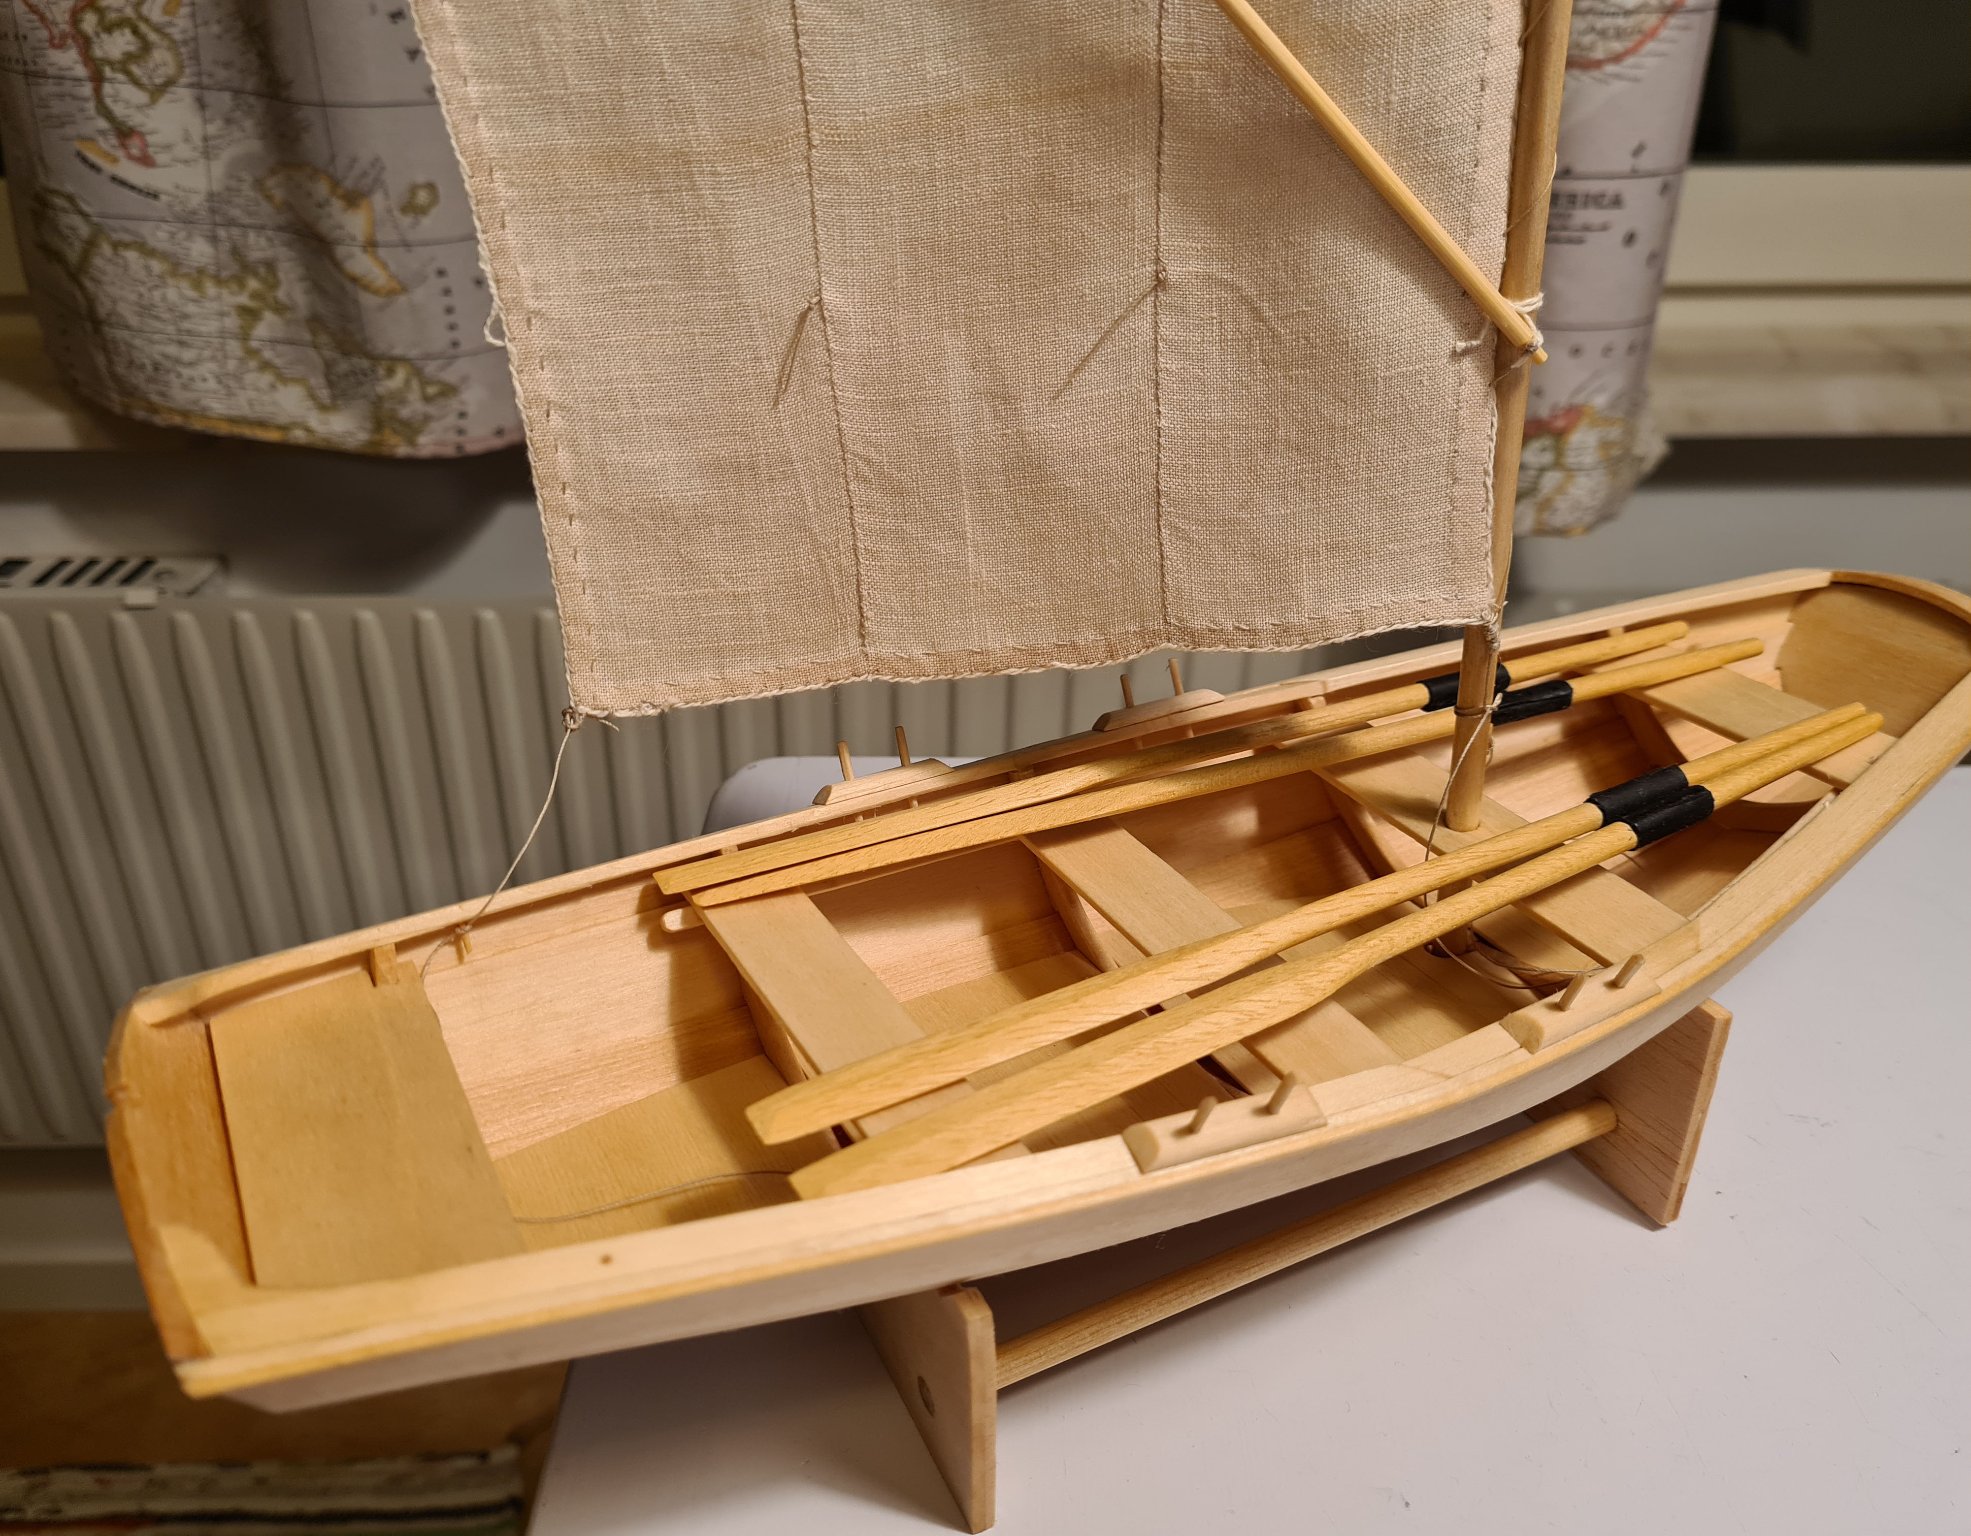
I recently bought HobbyZones smaller building slip. My work space is only 80 cm wide, so their big one would not fit. The small building slip is also simpler in its design, and quite easy to build. I have not started using it yet, but my feeling is that it gives good value for money. -
Thanks wefalck for the input on the need for (or rather lack thereof) belaying points. With your input I know what to look for. There is a half cleat in the plan on the under side of the railing by the aft seat. I had missed that. I don’t have any photo of the original mast, and the plans does not include them. However, I have seen other boats from the same area with a cleat for the halliard on the mast. I will probably add one. Thanks Chris for reminding me of the name for the rig type. In Swedish it’s called sprisegel (segel = sail), basically the same word. As always the information is always a search away, but I was a bit lazy...
-
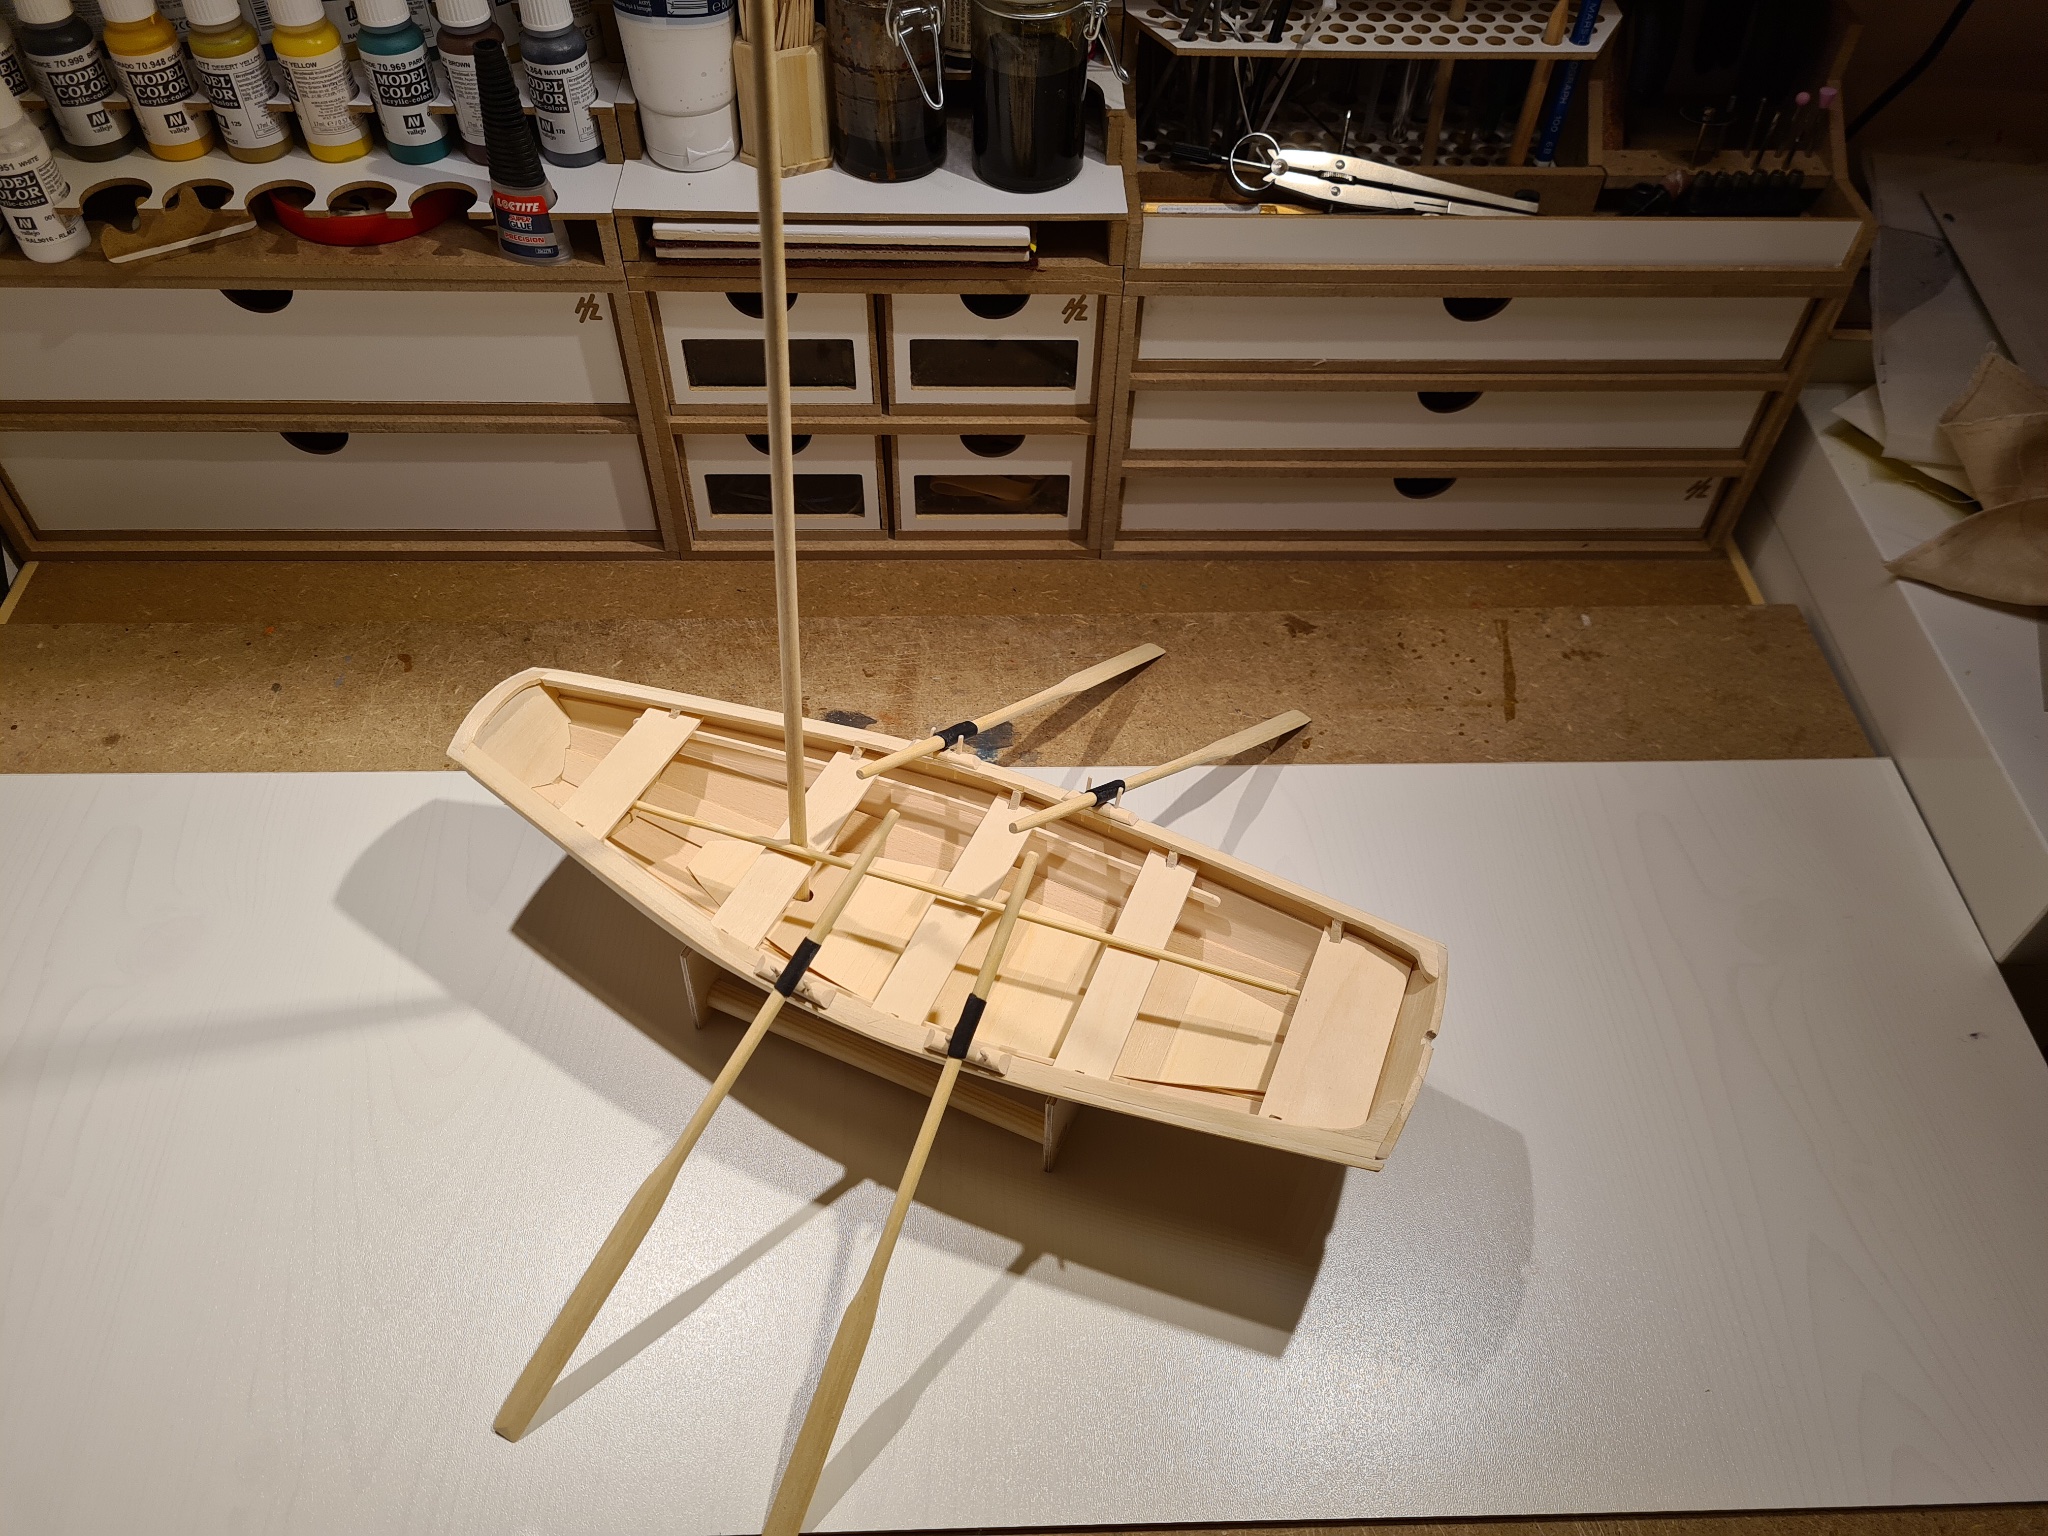
And we are almost done! Now when I have the rigging temporarily in place I need to add cleats or similar for the lines to attach to. The sail also needs to be lashed to the mast.
- 31 replies
-
- 10
-
-
You would swivel the yard quite a lot even if you sail in favorable winds to get the most out of it. The more I think of it I don't think that a parrel would be a practical solution on a bi pod mast. Regarding the ability of this hull and rig to sail against the wind I think its hard to judge unless you try it. What I know from similar ships, they can handle rather well (but may not be fast) when sailing against the wind. The option to row against the wind would only be an option for a ship with a lot of rowers and a long and sleek hull. For this type of shorter and broader hulls with only a few rowers, rowing is only an option of there is now wind at all, or for maneuvering in harbor.
-
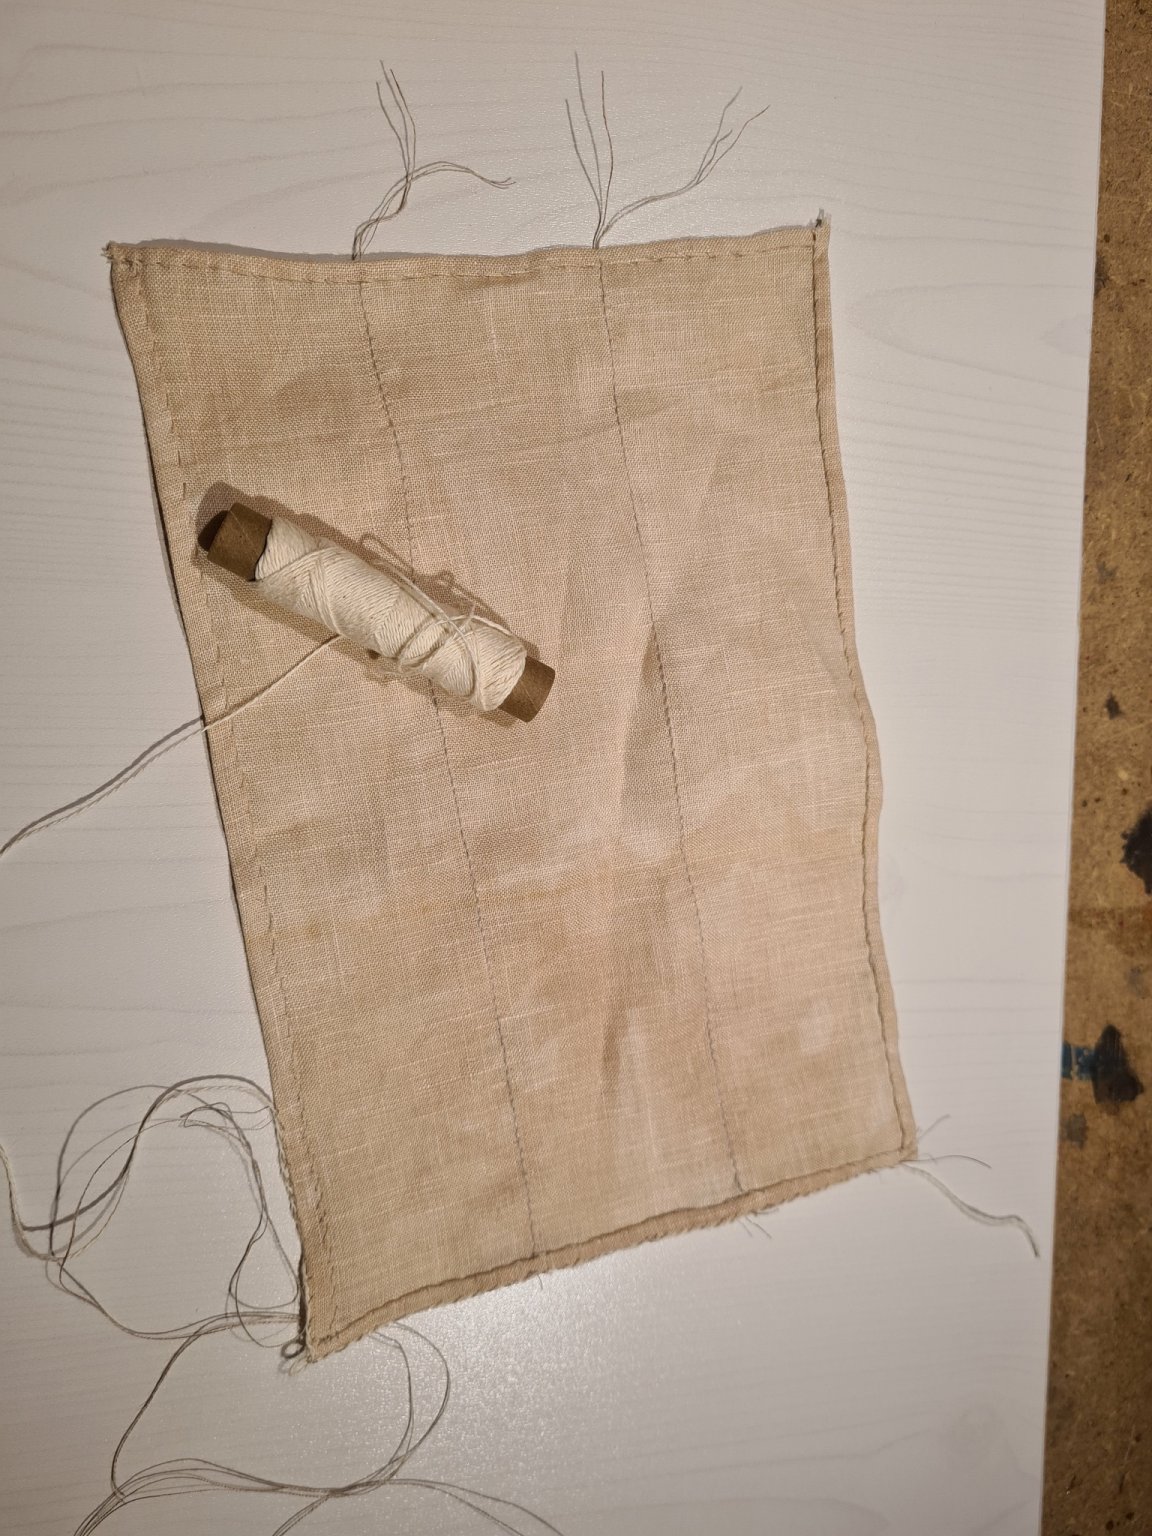
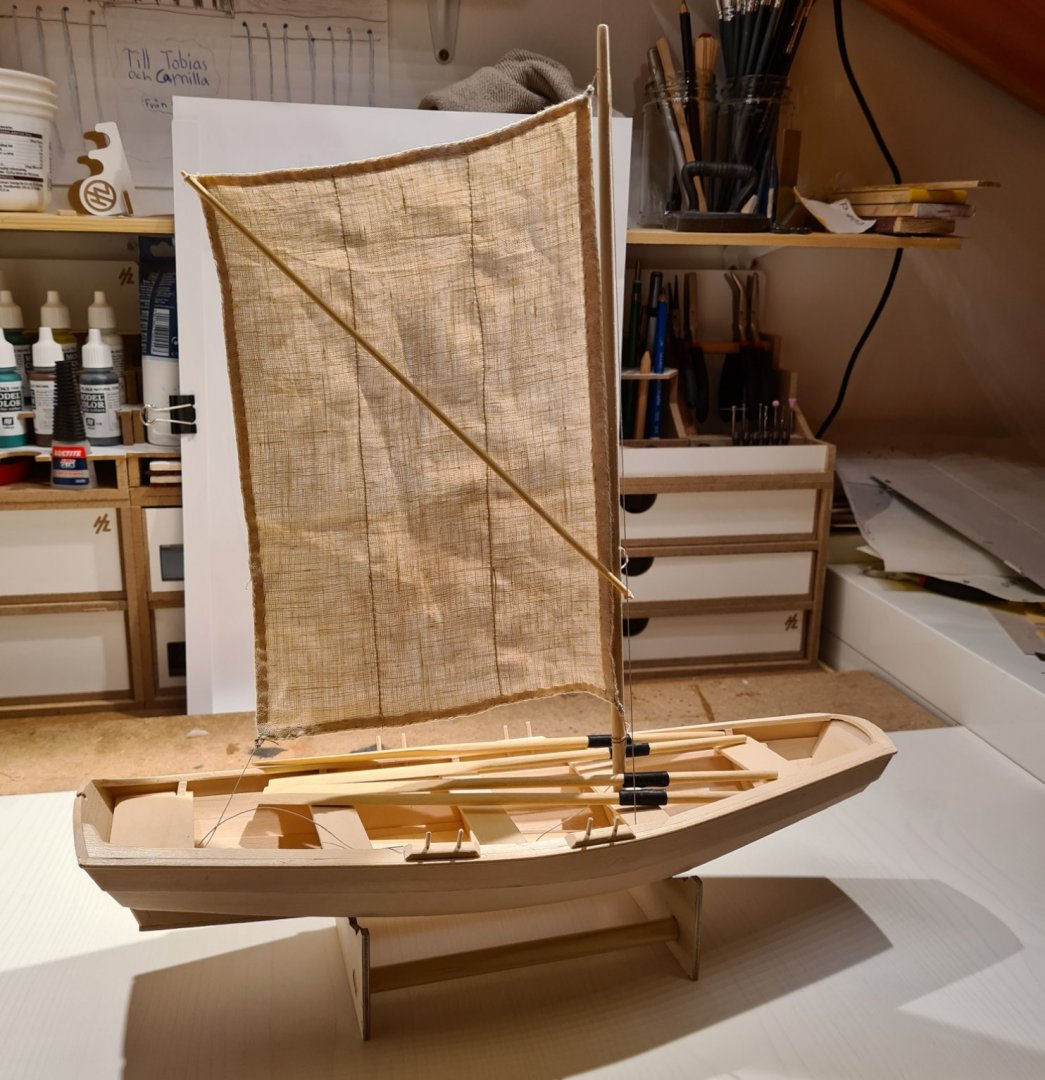
Based on the information I found in the Digital Museum I have made oars, mast and pole for the sail (I’m unsure of the English term). At the moment I’m busy with (hand) sewing the sail. Cheers


-
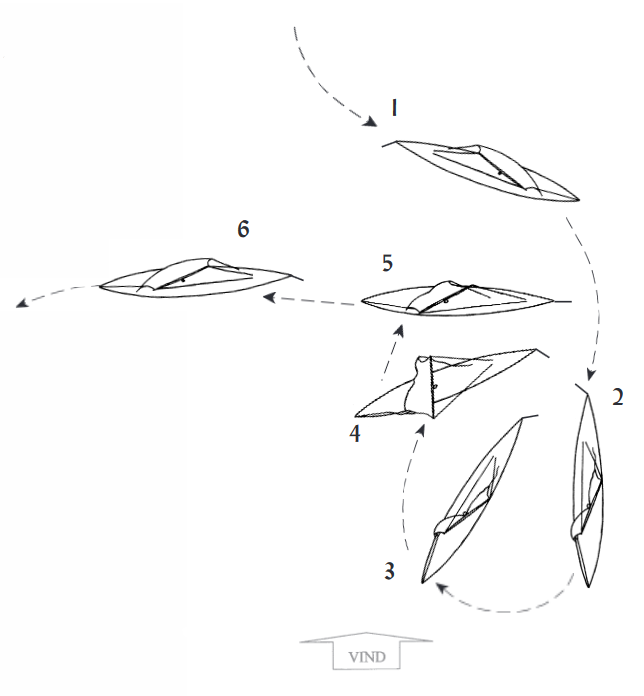
Sorry for being so brief in my comment. What I know of sailing square rigged single masted ships is mostly form a ship called Helga Hom (helgaholm.se). There is an introduction to the principles here https://helgaholm.files.wordpress.com/2020/04/ledsagaren-segling.pdf (in Swedish). For the rest of you I will summarize my thinking. In position 1 the ship is sailing against the wind with the wind from starboard. The ship then turns into the wind until the wind comes into the sail backwards which helps the ship to turn. In position 4 and 5 the yard is turned about to get the wind in from port, and continue sailing in 6. My thinking is that during the steps 2 and 3 the ship does not necessarily need the sail. If the speed (momentum) is high enough and if you put out one or two rowers, you might be able to come through the wind anyway. The sail could at the same time be lowered and raised again only in position 5 with the parrel and maybe some other lines switched. The down haul is the opposite of the halliard, a line attached to the middle of the yard used to pull the sail down when lowering it. For your bi pod mast it could also be used to pull the yard backwards in between the masts. In that case there would be no need for a parrel. By the way, I'm really enjoying your build.
-
On such a small ship, the sail would not be so large. Which means that it would not be totally impractical to raise and lower the sail while tacking. It could probably be done by one or two persons. You may not even need a parrel. A line (the down haul) from the middle of the yard running between the masts and tied to som point in the aft could be enough to keep the sail in place.
-
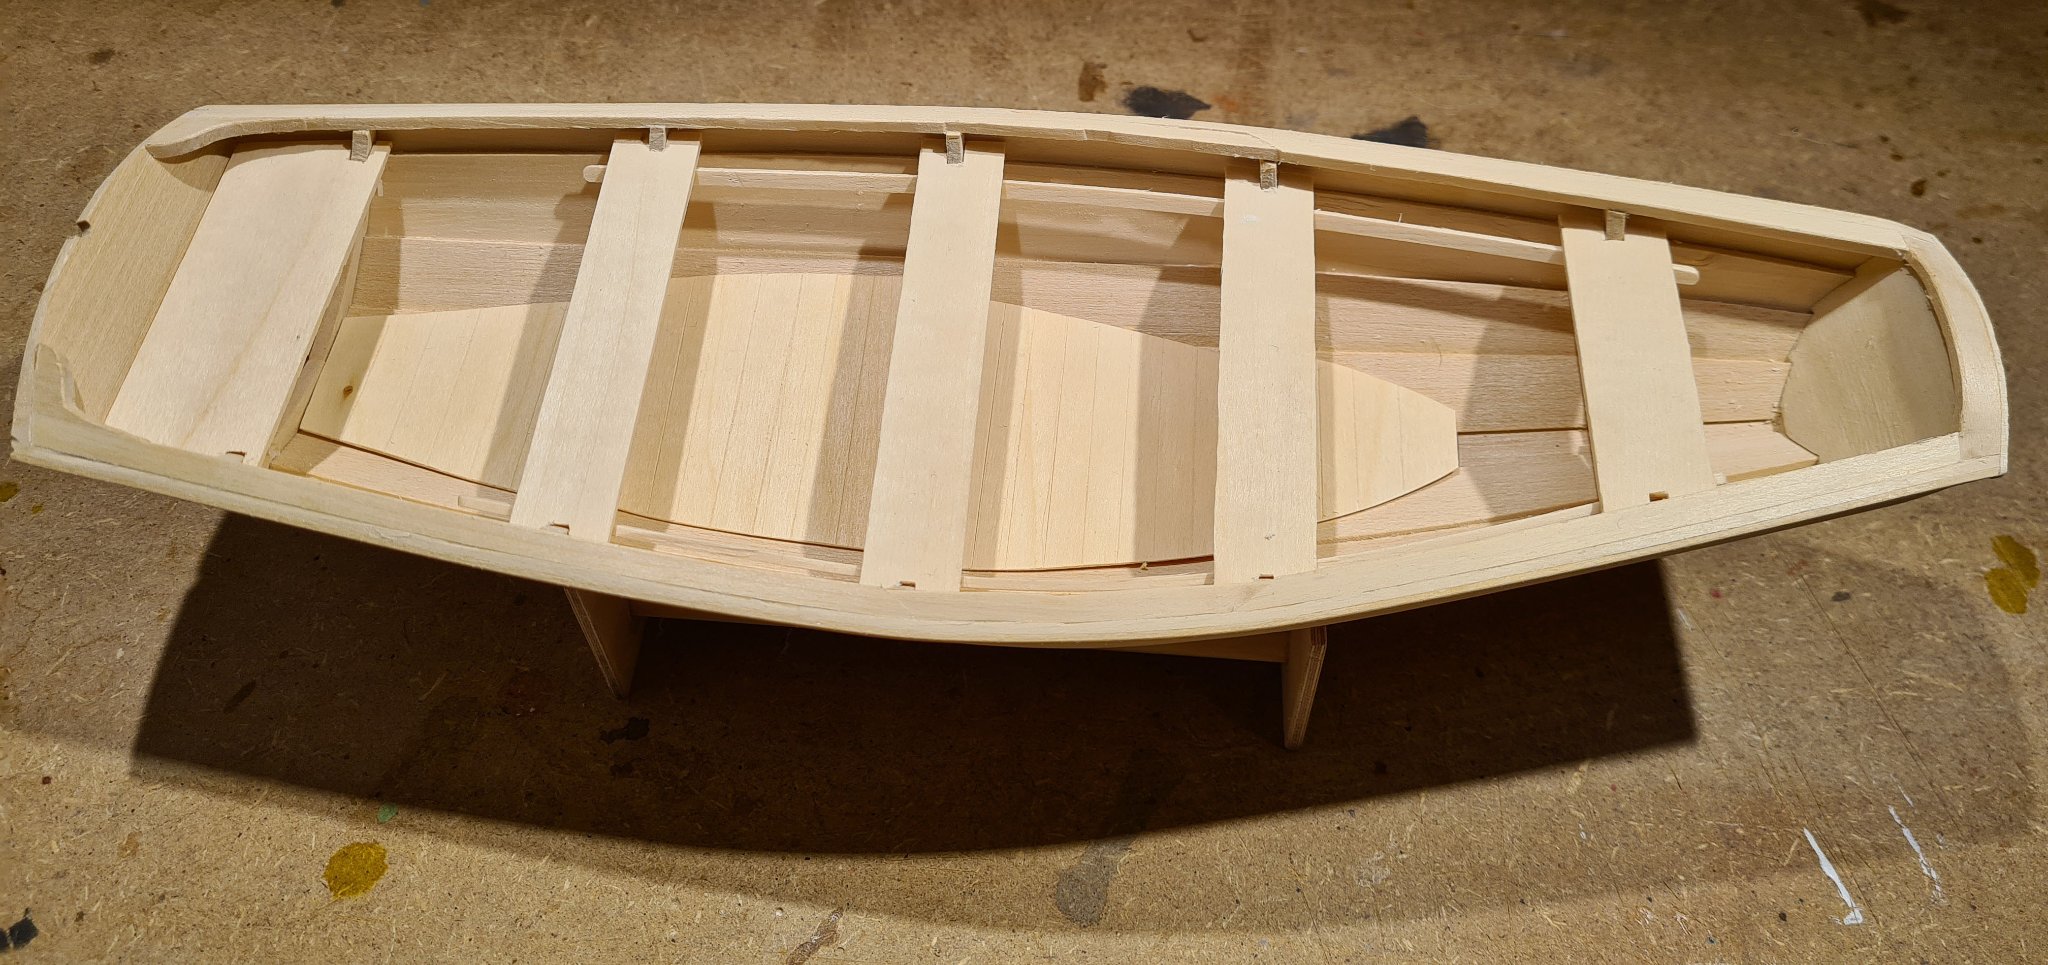
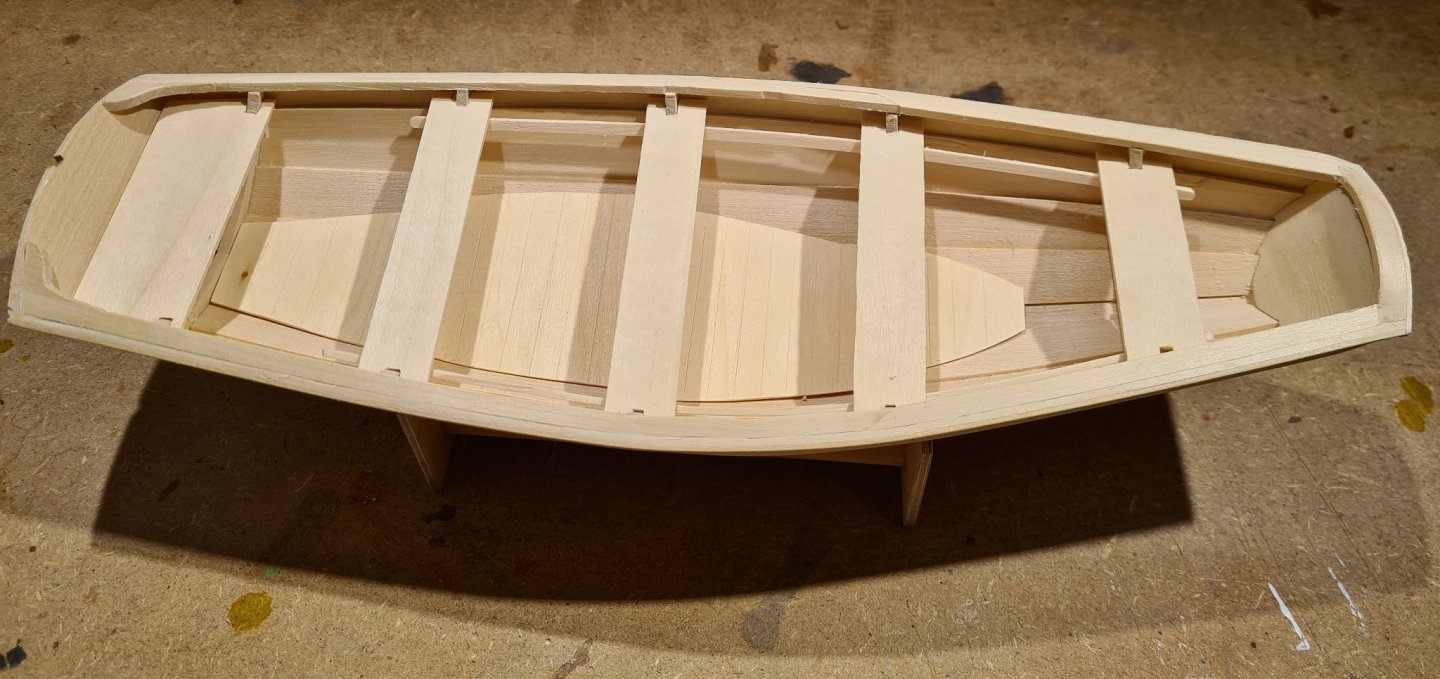
Vain hope or not, I feel like have managed to work a bit better with my upgraded work area 😉 I have finished the railing and installed risers along the sides and thwarts across. The floor boards (I'm not sure of the correct term in English), where made of sheets and the "plank joints" where carved into them. There are still a bit of cleaning up to do before I can do the surface treatment. I have not decided on the method yet. The original boat was tared. Either I try to mimic that, or make it more of a display piece. In the latter case I think I would use raw linseed oil. For a "tared" look I would consider the same oil based varnish that Silverman has used in his cog- build: The original boat was also equipped for sailing (although the mast was probably only raised when needed). The plans I work from does not include any information regarding that. However the link on Digital Museum that wefalck posted above links to information about the length of the mast and some other details. With that, and with this model https://digitaltmuseum.se/021015749836/fo183212dig-5 as reference, I think I will be able to create something plausible. Cheers
-
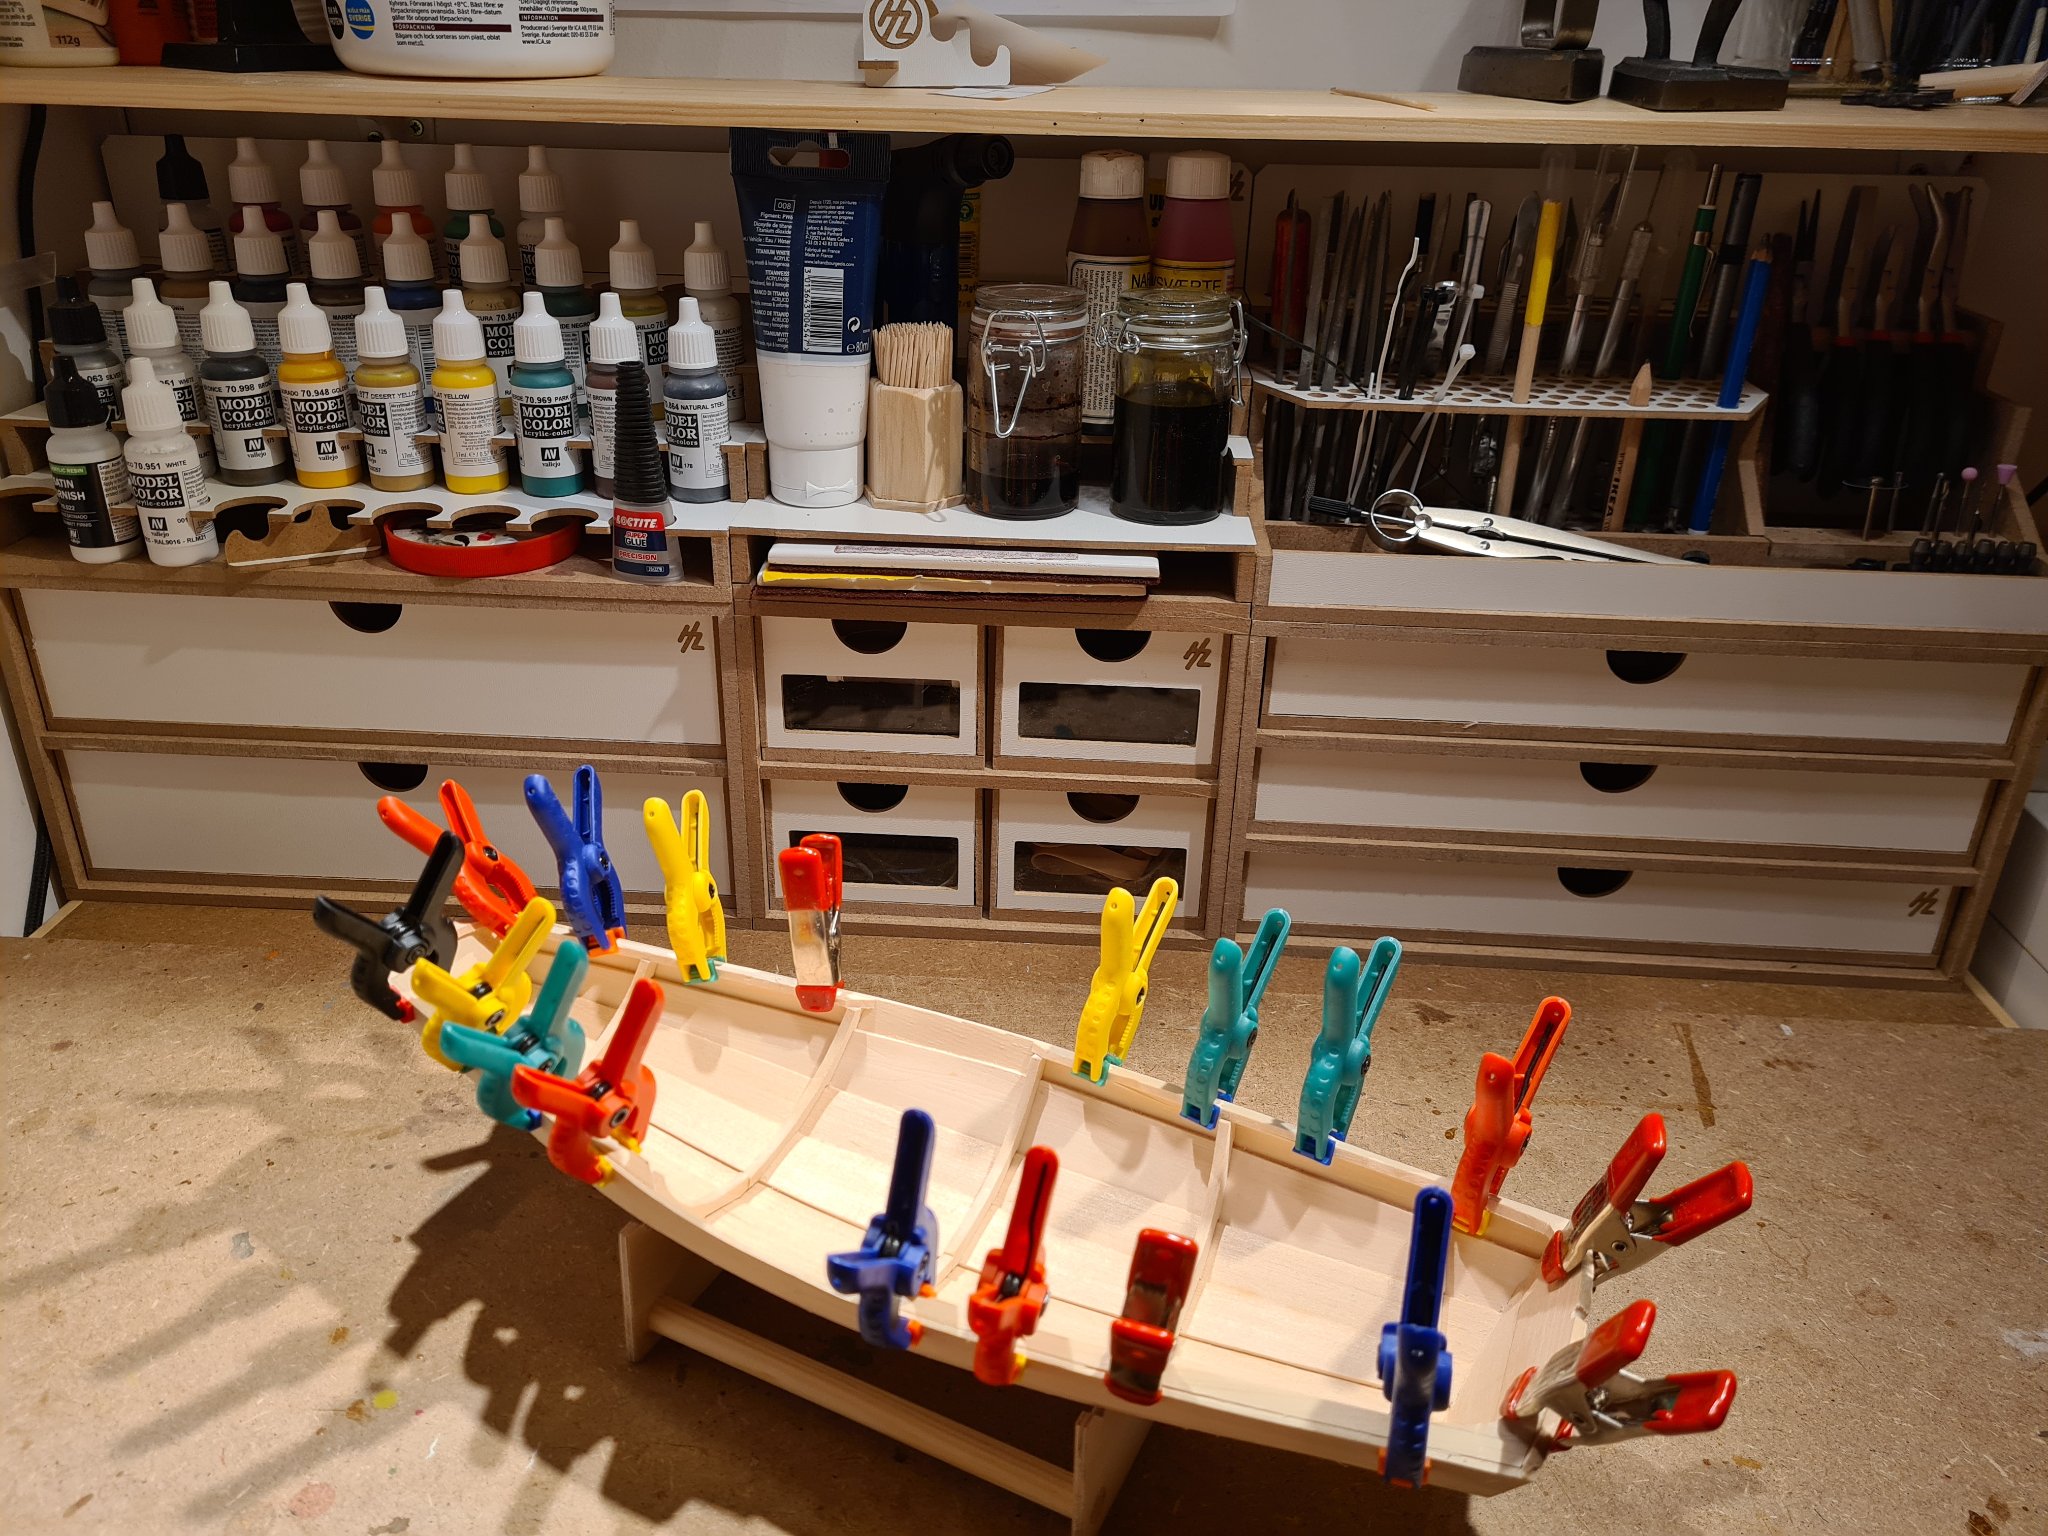
There has been a bit slower progress for a while. The reason can mostly be seen in the background of the picture; improved storage for my workspace. Now I hope that I can keep it tidier, and leave more free space on the work area. On the boat I have worked on the stringer on the inside of the railing. These are med in three pieces with knees extending to the transoms. In the picture the middle pieces are still not fitted.

-
What you are describing sound similar to a detailed build log? Nothing illegal about that, as long as you don’t include the original plans or text verbatim or in large chunks. I think what you propose would be what in US copyright law is called “fair use”. This allows you to comment or critique a copyrighted work for educational and similar reasons.
-
I have recently taken over a half built model from another builder and can inform that the scale is 1:40. Currently my ship yard is full and it sits on a shelf, but I look forward to starting it...