HOLIDAY DONATION DRIVE - SUPPORT MSW - DO YOUR PART TO KEEP THIS GREAT FORUM GOING! (Only 13 donations so far - C'mon guys!)
×


Egilman
-
Posts
4,377 -
Joined
-
Last visited
Content Type
Profiles
Forums
Gallery
Events
Everything posted by Egilman
-
 In my experience reading and talking with some of the builders on some of the european card modeling fora, the general consensus is like we are, build the best model you can, primarily in paper products, but there are those that if the parts are not all paper, or technically, cellulose based, then it isn't truly a card model.... Like all hobbies, they do have their absolutists....
 -
I know this Mark, what I would do is scan the instruction pages into the computer, OCR them, and then translate the whole thing... Was just trying to make a joke... (sorry it didn't come across)
-
And for those of us that don't own a cellphone? {chuckle}
-
In US Navy practice, Flag/Signal Halyards were natural jute or hemp, tan/brownish in color... Guy lines/stays would be steel cable painted dark grey or black.... Radio aerials would be bare metal, either steel (blackish) or aluminum (greyish) wire .... Same as British naval practice, which is where the first major capital ships of the IJN came from.... And which would be copied by them when they started building their own..... Signal halyards were running lines thru a sheave and always paid off taut when not in use, when in use, they had a bit of slack left in them to allow the flag to extend in the breeze and be readable.... Stays are always taut... (as time wore on they would be adjusted with turnbuckles as they slackened with age) Radio Aerials would have some slack to them to allow for expansion/contraction, since they were so thin too taut would cause them to break.... (on a model they would appear taut) But then this was US Navy practice, I find it hard to believe that it would be any different in the other navies using the same/similar equipment and materials...
-
Not going anywhere brother.... And neither are you... Whatever is going on my friend, RL comes first, I will be keeping you in my thoughts in the meantime... And thank you....
-
Yves, I actually have several friends on another fora that use a Cri-Cut to make flat styrene panels like this... Those automatic paper cutters seem to work well with 5, 10 and 15 thousandths sheet.... Was thinking of when I get rich and famous of converting some of my paper model collection to digital files and building them in styrene.... There are many ways to do this work, Michaels way is more efficient and easier than just a straight edge and files, but like everything else technology marches on.... The modeling skills on display here still astound me...
-
I'm down brother, pullin' up the easy chair as we speak...
-
Yeah, they are making it very hard for me to resist as well....
-
Nice pair of planes Craig, I'm still admiring the perfect white paint job.... (which is a lot more difficult than you made it appear) Very nice...
-
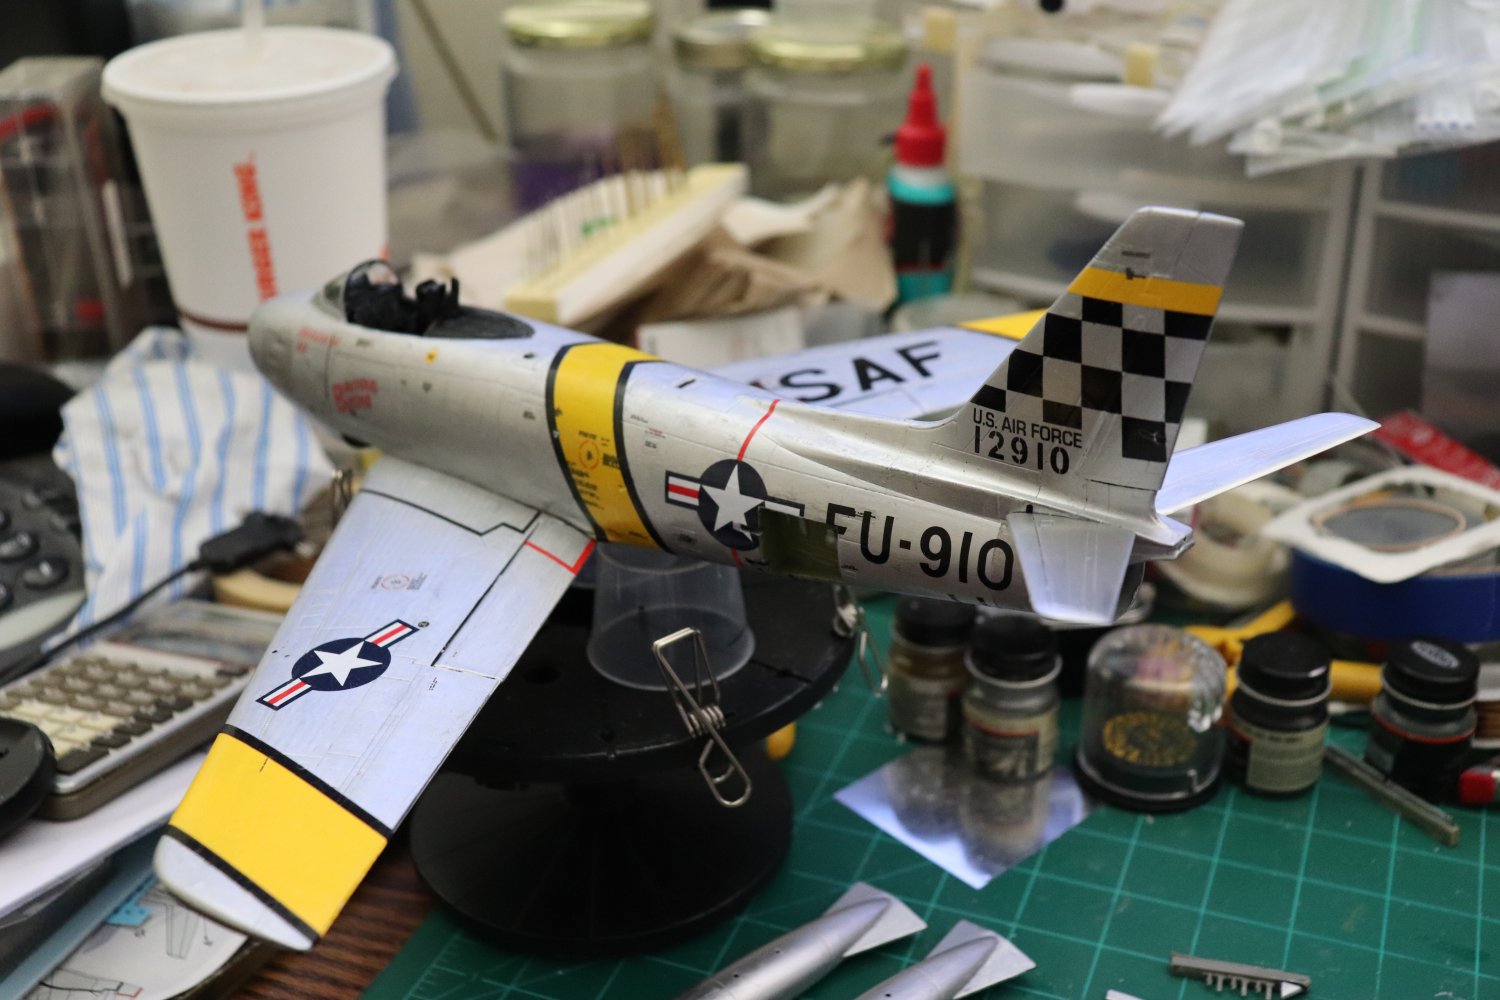
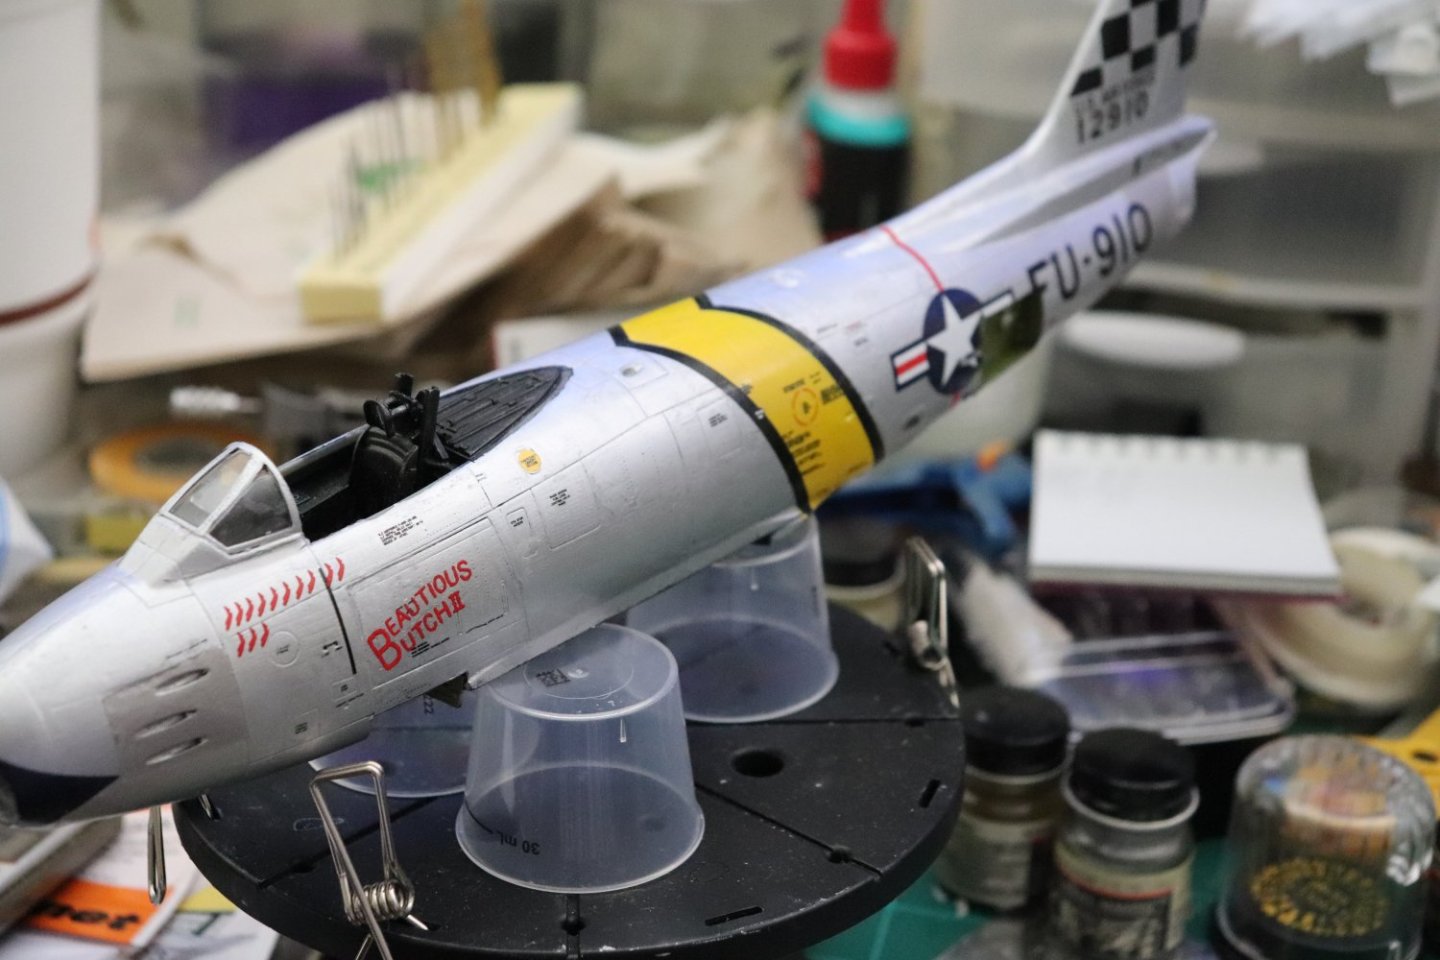
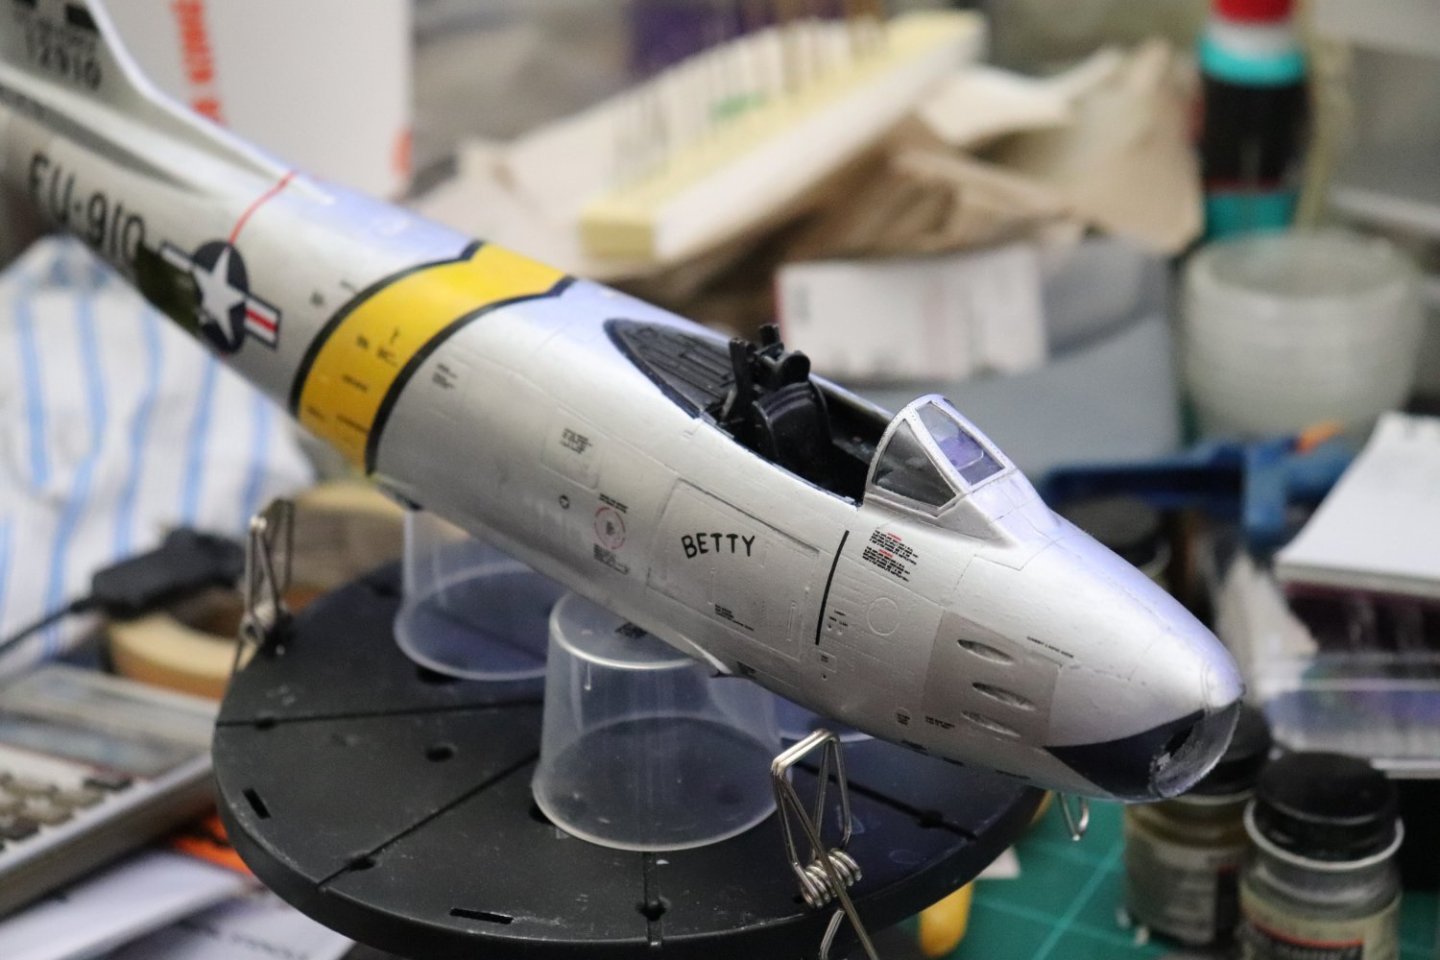
F-86F-30 Sabre by Egilman - Kinetic - 1/32nd scale
Egilman replied to Egilman's topic in Non-ship/categorised builds
Very Short Update: Still working as I can, doesn't seem like I have any stamina at all.... But still making progress of a sorts.... Current state of the build.... Empennages... All silvered up ready for decaling, the speed brakes still need a bit of work shaping them to fit and some PE added to them and the Landing Gear is clear coated ready for staining as well. thinking about cutting the nose gear to show the wheel turned.... Overall status... Tail surfaces are silvered and installed, getting ready for some detail painting if I can get a decent day for steady work.... Onwards not given up yet.. I'm going to finish this bird..... Forever Onwards Brothers....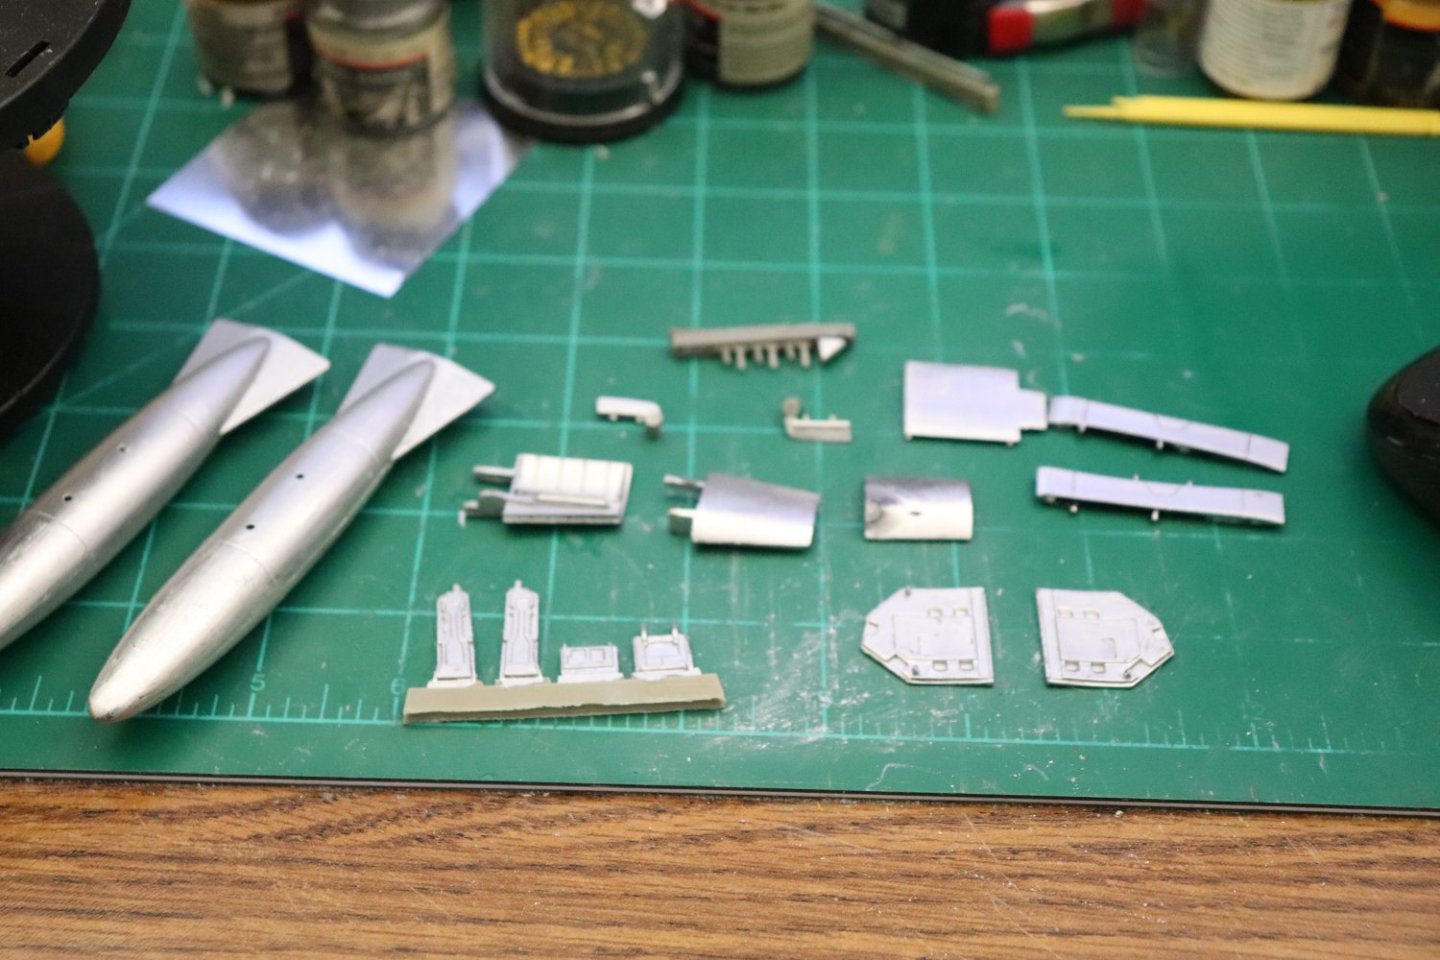

- 585 replies
-
- 10
-

-
F-86F-30 Sabre by Egilman - Kinetic - 1/32nd scale
Egilman replied to Egilman's topic in Non-ship/categorised builds
Thanks Jav, yes they look much better than the kit parts.... -
Yep, I can second this recommendation.... It's also why Microscale manufactures two different decal solutions, Micro Set and Micro Sol, Micro Set being the milder solution to Micro Sol.... I use Microscale's products cause of the issue that Craig points out above with Walther's product.... Solvaset can and has destroyed decals I've used it on before, but there are some decal films where it is the only solution that works... A big part of this hobby is finding out what works and for all those that mention why some work and others don't, this is the reason why... Always test first and failing that, use the mildest solution that will get the job done... Thanks Craig for pointing that out...
-
Nice white paint job, smooth and glossy.... Well done.... And very striking on how they resemble the Sabre in configuration... Even using the same drop tanks.... They are going to be beautiful my friend....
-
Brother, you approach this kind of problem the same way I do, it's what build logs are created for... I'm sure and have full faith that you will find the right way and tell us all how to correct it... It's what great modelers do... Thank you....
-
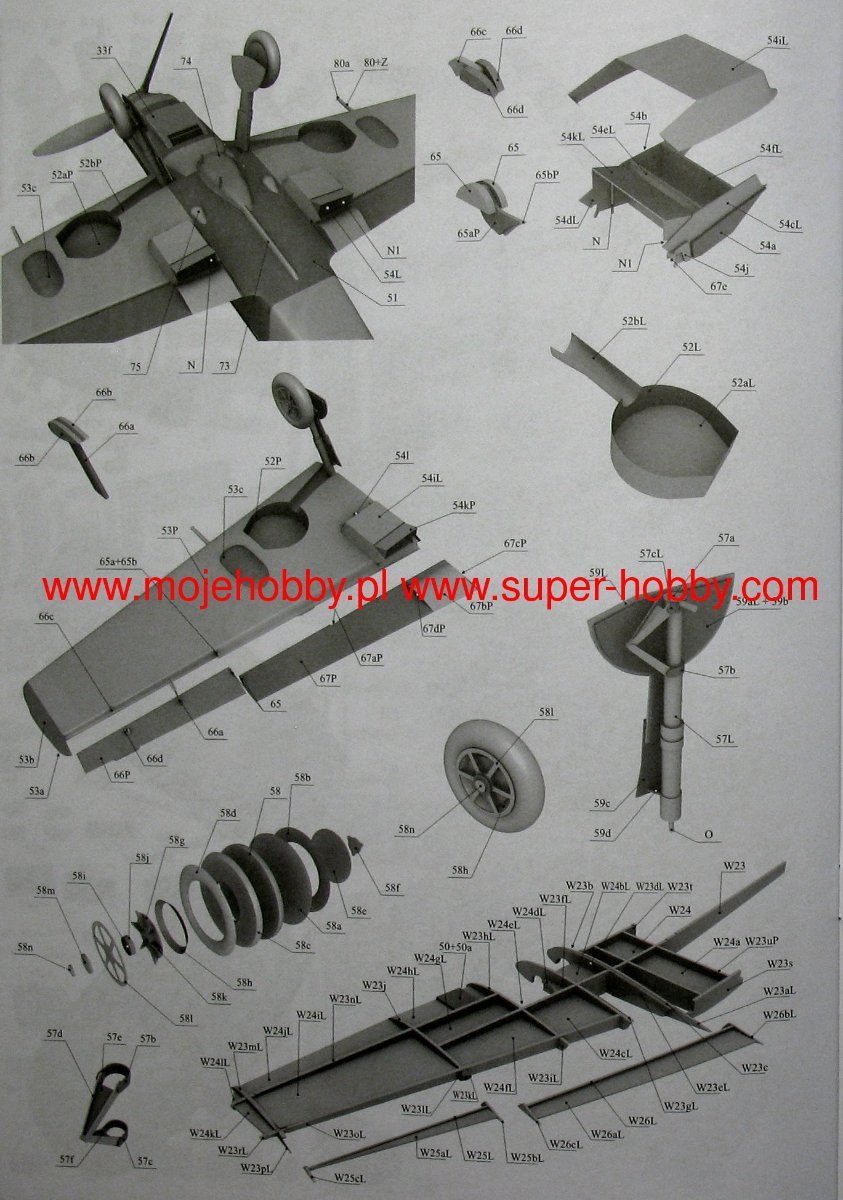
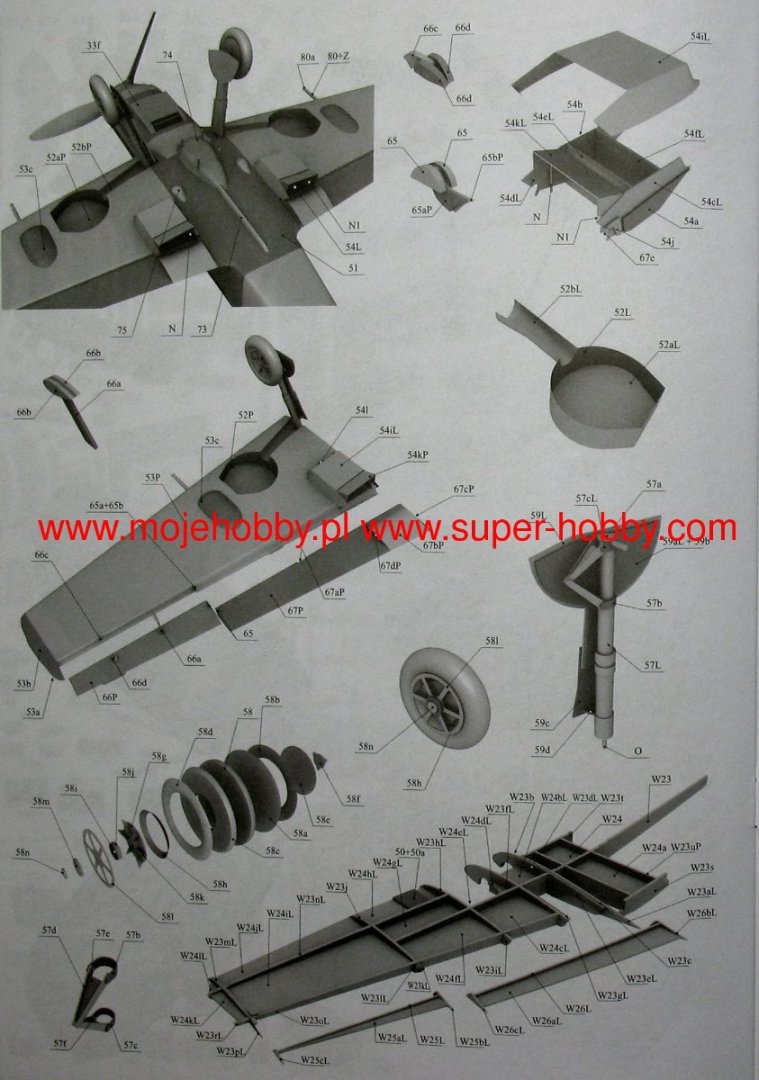
I would say brother the image they provided has them glued as reinforcements or spacers to the outside portion of the radiator bay walls that fits inside the well, of course this isn't going to work... it narrows the space too much... I would submit that the 54A&B glue to the upper half of the of the bay walls on the outside of the wing, reversed from the picture, it gives a gluing edge for 54 H&G which is the vertical airfoil shape of the radiator cover sides... The actuators for the radiator door would then fit inside the well sides and the door fit over that... The radiator cover would then be shaped to the bay sides and 54 H&G... Looks to be the only way the parts will fit together in the space... Note on the image they show no references to 54 H&G... But they have to have a purpose and that is the only way they fit in the construction scheme... They lay along the wing surface to provide a shape for the outer cover.... and the only way they are going to do that is to glue along the radiator well insides... Definitely a mistake on the kit designers part.... I'm sure there is someone out there who has illustrated the issue and shown the correct way to assemble and mount it....
-
Craig, the Navy/Coast Guard have four different colors of red they used on their Training/Rescue craft... when I was doing my research for my Coast Guard Dolphin, I found that there were two that were prevalently used during that period... I found them at True North Paints... Gloss Coast Guard Red #40 and Florescent Red/Orange.. I found the Fluorescent Red/Orange to be too orangy in color but will work well for my Kaman Huskie when I get around to her... It was definitely an orangish red for the navy, much more red than orangish
-
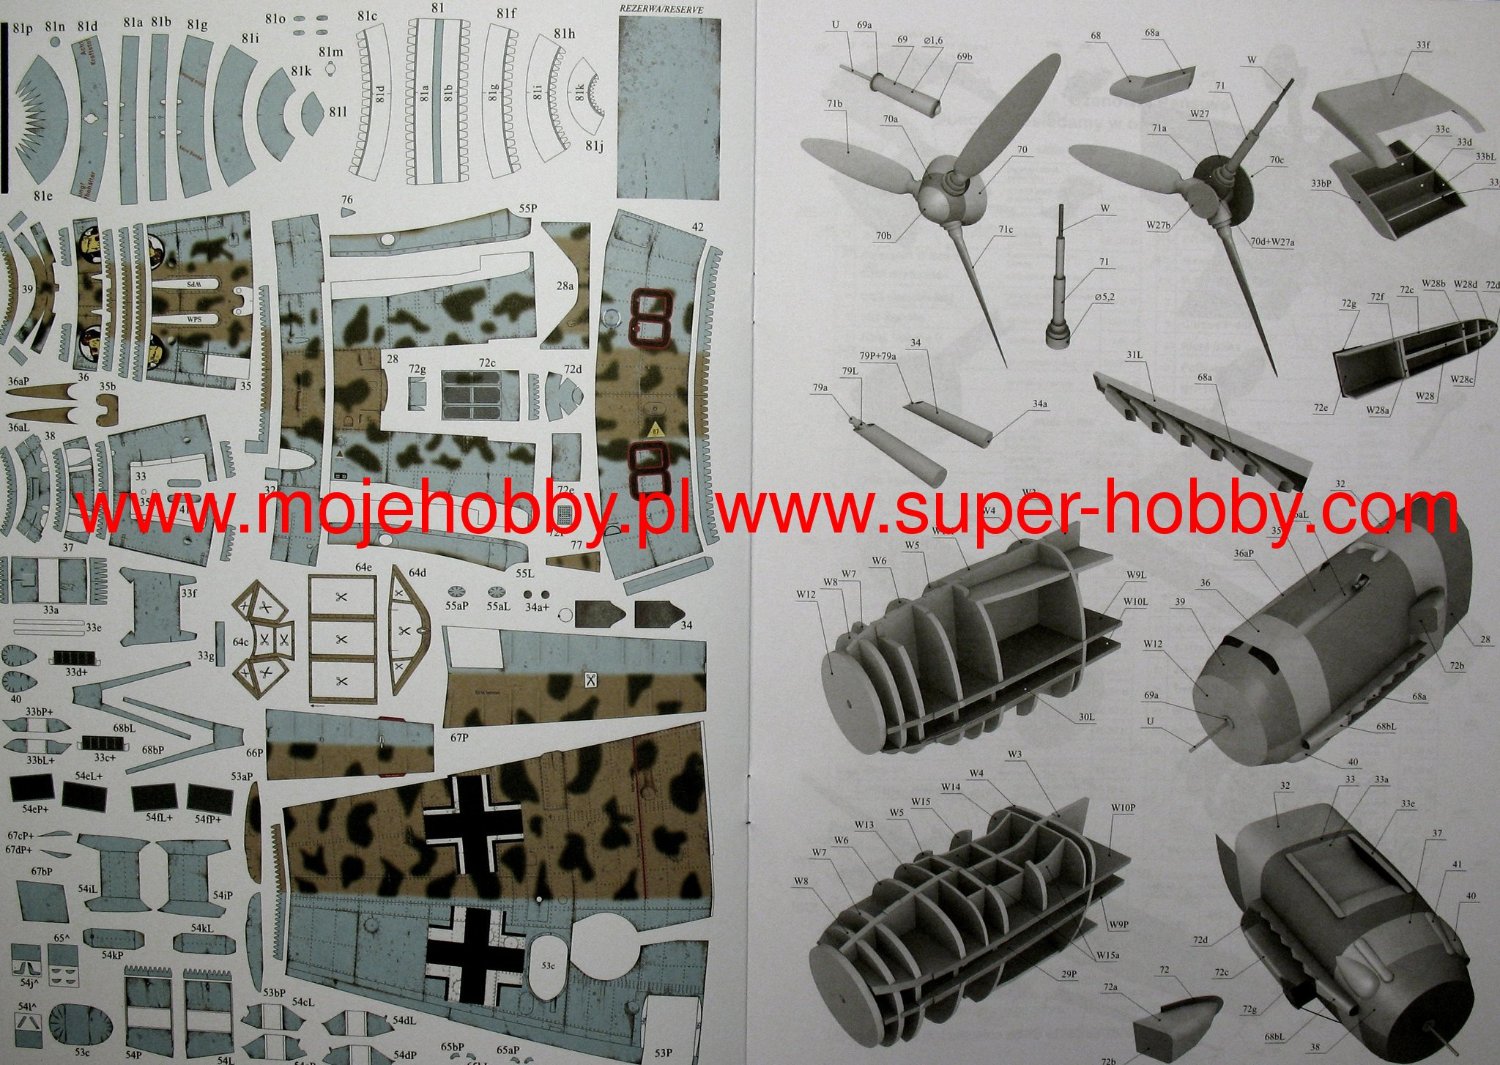
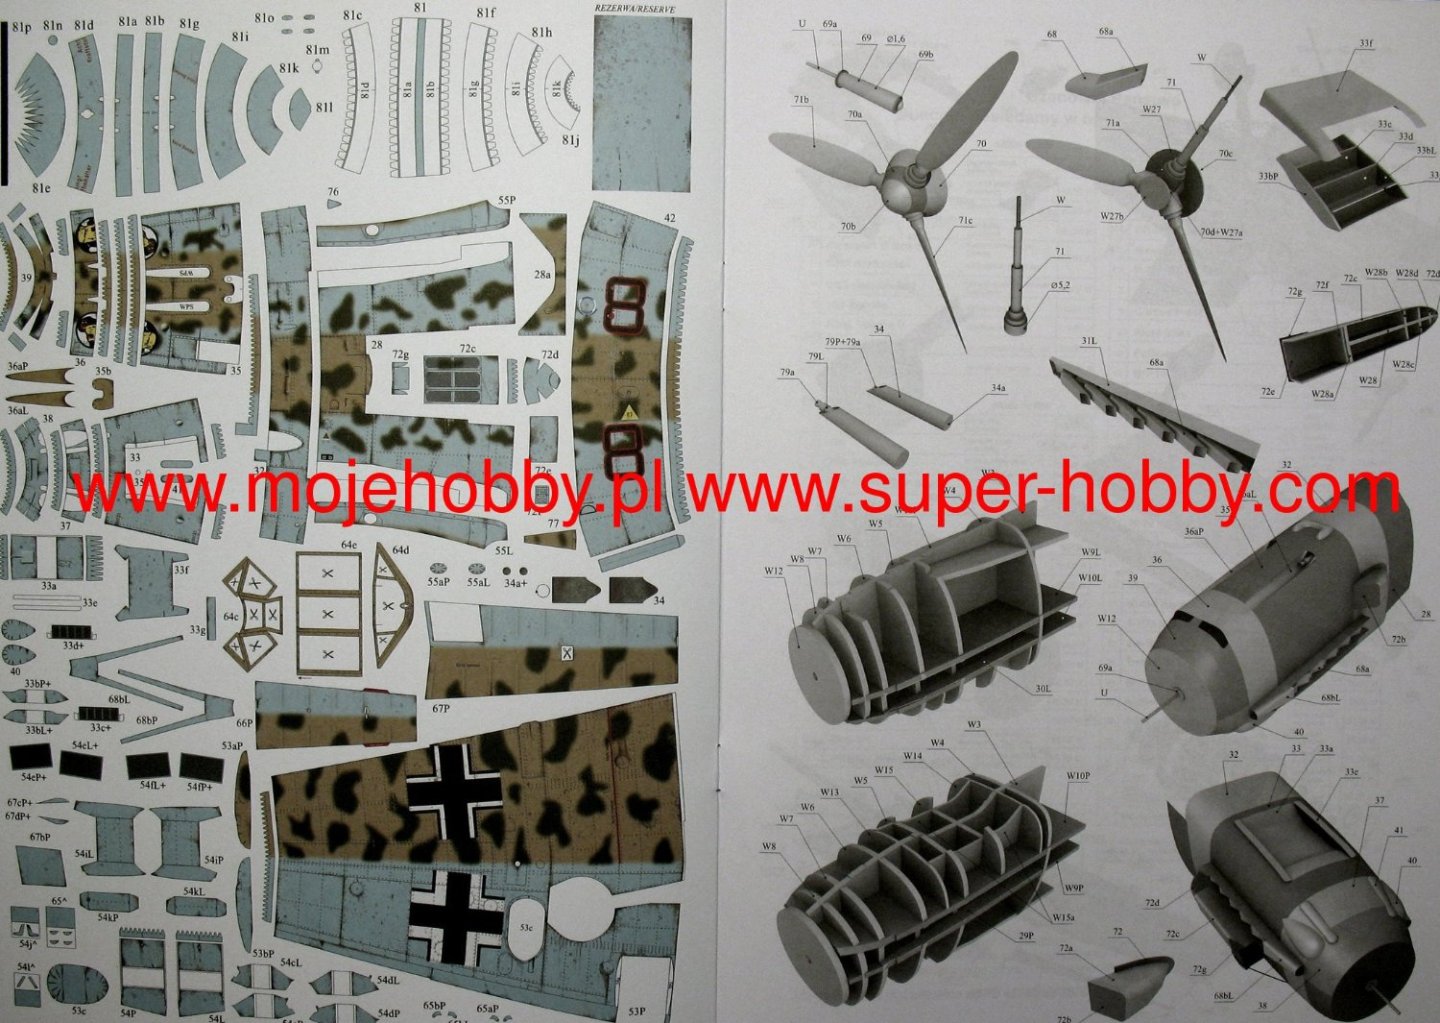
Yeah sometimes the technical drawing side doesn't match up with what they design for parts.... I found this on the net posted to the Superhobby.com website... In the lower left corner the parts are the same... (this is the Haliński KA-2-2009 Bf 109-E7) This image.. (upper right side) shows how they claim it is supposed to go together.... Clearly showing an aft view... I don't know if that helps, but as far as the Wing Radiators they appear to be the same....
-
The leading edges of 54a&b are the edges with the slight curve to them, they match the leading edge curves of the outer radiator covers 54i L&P... The leading edge of the Radiator cover is the end that matches from side to side... The P & L designations on the parts must stand for port and starboard... It's the only way they make sense to me brother...
-
I hope you don't mind me answering this one brother, my technique is simple, Canopy Glue, I use Formula 560 myself, don't know what Dan uses but the process is similar I suspect... Basically you tack glue it on just like you would be installing it closed... Canopy Glue is a flexible PVA glue that dries crystal clear and very thin, it doesn't damage the parts so it is easy to remove afterwards... All it does is peel off leaving the parts in perfect condition.... Afterwards you can position it in any position you like...
- 137 replies
-
- 10
-

-
-
The First Japanese designed aircraft since WWII... It sure shows it's North American Aviation roots doesn't it?
- 45 replies
-
- 11
-
-
Martin B-26B Marauder by CDW - FINISHED - Airfix - 1:72 Scale
Egilman replied to CDW's topic in Non-ship/categorised builds
Beautiful Job My friend.... Excellent rendition of an almost forgotten airplane... -
Hey Brother, I'm in as well, wouldn't miss this for the world... Good Luck! We have a good teacher here...
-
Well, it is a two piece, split bow and stern on the midships mark.... clearly see it in the pic...
-
You really need a Nagato to go along with those two, (or maybe a Yamato for the Okinawa mission) You do beautiful work...