Balclutha75
-
Posts
179 -
Joined
-
Last visited
Content Type
Profiles
Forums
Gallery
Events
Everything posted by Balclutha75
-
Steamboats and other rivercraft - general discussion
Balclutha75 replied to Cathead's topic in Nautical/Naval History
Maybe here? https://www.rivermuseum.com/research-archives the National Mississippi River Museum & Aquarium, has thousands of items available for research. Among them are historic photographs, books, blueprints, original documents, and other reference materials. The collection also includes materials related to National Rivers Hall of Fame inductees and important river people. Not sure how much is online but the have a research request form. I found that yesterday while researching from that passage I posted, Stephen Hanks turned up. https://www.rivermuseum.com/national-rivers-hall-of-fame-inductees/inductees/capt-stephen-beck-hanks- 281 replies
-
- 2
-

-
- Steamboats
- riverboats
- (and 3 more)
-
Steamboats and other rivercraft - general discussion
Balclutha75 replied to Cathead's topic in Nautical/Naval History
This has been an interesting thread. Now I'm interested in river boats. Thanks. Here's another story from that book I'm reading about general Western American History. I hope it's appropriate to post here. There didn't seem to be much online information about this particular event, but I suspect some of you guys know about it. It goes on for three enjoyable pages in the book. This is an abridged version which hopefully captures the spirit. The chapter title is "Fasten Down The Safety Valve". Traveling by river steamboat was relatively comfortable compared to traveling by stagecoach or train. But what the steamboat contributed in comfort it lacked in safety, and steamboat wrecks were a regular occurrence, often costing scores of lives. A good number of these accidents occurred during the course of steamboat races. It was a custom during a close race to burn lard, fat hams, or anything else in the cargo that would make a hot fire; frequently, too, the engineer would tie down the safety valve, which otherwise operated automatically to allow the boiler to blow off steam when the pressure rose to a dangerously high level. Although steamboat racing was widely denounced, the racing instinct was ineradicable in true rivermen. One of the most famous races on the upper Mississippi was that which took place in 1854 between the Dr. Franklin and the Nominee. At the wheel of the Franklin was Stephen Hanks, a cousin of Abraham Lincoln and one of the most skilled and courageous pilots on the river. For mile after mile the boats were almost side by side. The passengers who crowded their decks preferred to miss meals rather than a moment of the contest. The rivals were close enough that the passengers could shout back and forth. At Guttenberg the Franklin had to stop and take on wood. The passengers feared that the enforced halt would allow their rival to pass them, but Captain Smith left them no time to stand around and worry. The wood was on a flatboat, which he hitched alongside, almost without stopping. "Now you fellows come and do a little honest work," the mate yelled to the passengers, and the words were scarcely out of his mouth before the air was full of flying cordwood. The Franklin was carrying a plentiful supply of resin in barrels, and this was now fed into the furnaces with pitch, oil, and anything else that could make a hot fire. By the time the Franklin reached Dubuque the boiler breechings and smokestacks were redhot, and crew members were standing by with a fire hose. At Dubuque the Franklin was ahead. There was a wild scene on the levee while freight was being put ashore and loaded aboard, the mate exhorting the roustabouts with a rigamarole of slashing sarcasm and hide-searing profanity that would have made even a bullwhacker prick up his ears. The Franklin was first away and at half-past three that afternoon she steamed into Galena, having made the run from St. Paul in a bit under twenty-two hours. Except for the stop at Dubuque, never once during this record run did Stephen Hanks take his hands from the wheel. - Tales of the Frontier - From Lewis and Clark to the Last Roundup, selected and retold by Everett Dick, University of Nebraska Press, 1963- 281 replies
-
- 3
-
-
- Steamboats
- riverboats
- (and 3 more)
-
Your ship is really a beauty, cathead - not just"museum quality" like it says on the box of my Amati kit, but actually museum-worthy. Also thanks for the picture of your jig for the oars. I was wondering how I was going to paint mine and that was the answer I didn't know I was looking for.
-
Steamboats and other rivercraft - general discussion
Balclutha75 replied to Cathead's topic in Nautical/Naval History
Apologize if this has been covered upstream, but I’m reading a book on Western Americana history and came upon this passage in a section titled “Traders on the Mississippi”. I thought you guys might be interested. "It was common practice for a merchant who lived in a community on the Mississippi to float his produce downriver in a flatboat to New Orleans, where both the cargo and the boat could be sold for cash. The flatboat, which was usually built on the riverbank, resembled a big box about three times as long as it was wide; its square ends were slanted upward from the bottom to enable it to glide through the water better, and it was steered by an oar at the stern. It had to be constructed upside down so the carpenters could fasten the planks on the bottom. The cracks were then caulked with pitch and flax or hemp to make the hull watertight. Next the boat was eased into the water on rollers made of small logs, and then came the “flatboat turning” - an operation in which the whole community took part. A rope was run to the top of a tree on the riverbank and down to one side of the boat. Rocks and earth were piled on the other side until it sank even with the surface of the water. Then the crowd pulled on the rope and flipped the big box right side up. After a bucket brigade had bailed out the water, the job was completed by nailing planking over the hull to form a deck. As soon as the boat had dried out it was loaded with grain, flour, pork and other articles of trade. If any livestock or poultry were carried, they were placed in pens on the deck. Once the merchant engaged a crew of two or three boatmen and a pilot to do the navigating, he was ready to go to market. On the face of it, floating down the Mississippi in a flatboat sounded like an ideal vacation project for adventurous young men, but the account of a trip made by Daniel M. Brush makes it clear that travel by flatboat was far from being a picnic." - Tales of the Frontier – from Lewis and Clark to the Last Roundup, selected and retold by Everett Dick, University of Nebraska Press, 1963 The date of the trip was December 22, 1834 and the story goes on to recount how the combination of river and weather conditions just about did those boatmen in.- 281 replies
-
- 5
-
-
- Steamboats
- riverboats
- (and 3 more)
-
Thanks cathead, I read it twice to be certain but I get it. You guys are demonstrating that you can teach an old dog new tricks after all. I'm still chipping away at the oars, no pun intended. I was unhappy with a couple of them and thought about ungluing the paddle so I could sand a new shaft. But then I realized I don't have to unglue them, I can simply make new paddles from the scrap sheet. Which I did, and they are indistinguishable from the laser cut pieces. You guys will laugh but to me that was a major revelation, thinking outside of pure kit mentality.
-
End Of The Line, thanks much for that tidbit, makes complete sense. Next time I'll rotate it 90 degrees.
-
And thank you for helping new newbies on this long, complex and fascinating road. Your boat is looking great.
-
Thanks for the encouragement. cathead, I cracked open the blue paint from Tulip and looks beautiful on a practice swatch, so I'm planning to go with it. The colors in my pictures above were lifted from the Tulip website. Steven, I'll try again with the basswood, now that I learned something on the first attempt. Most likely clumsiness on my part is the culprit. I'm thinking I might try to make a kettle on a tripod that you posted somewhere. We'll see how that goes. Thanks again.
-
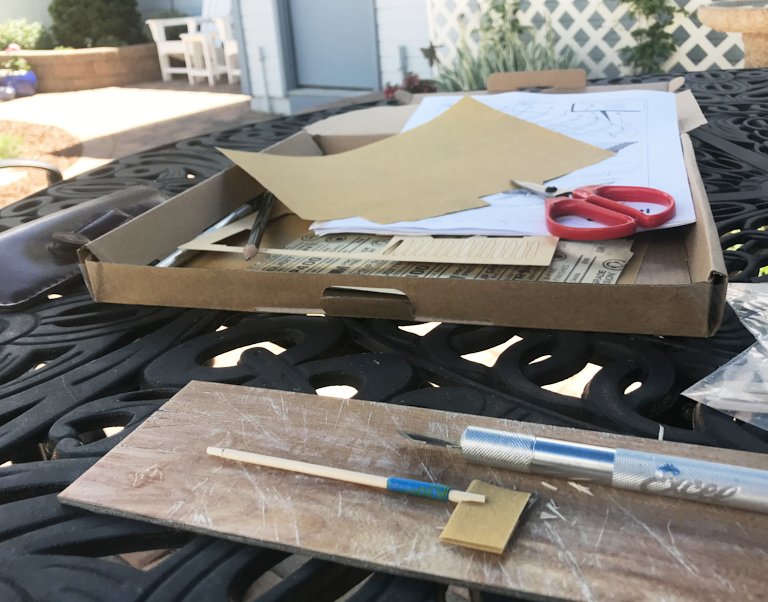
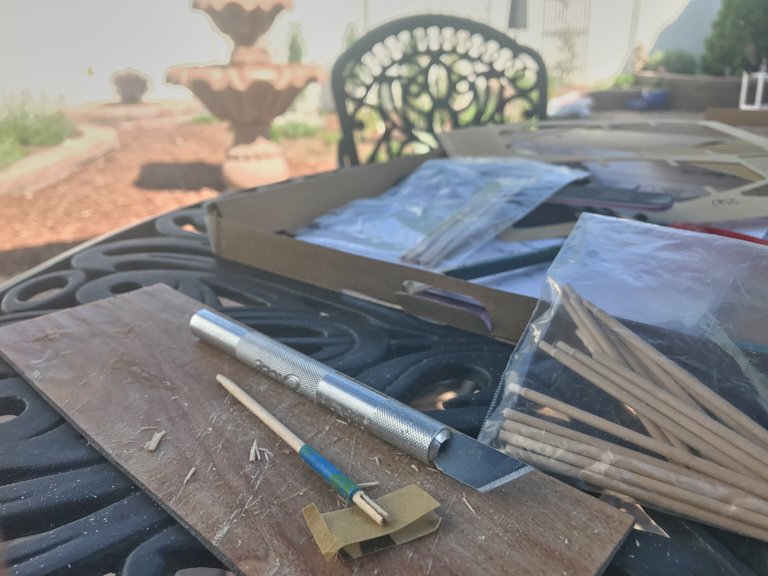
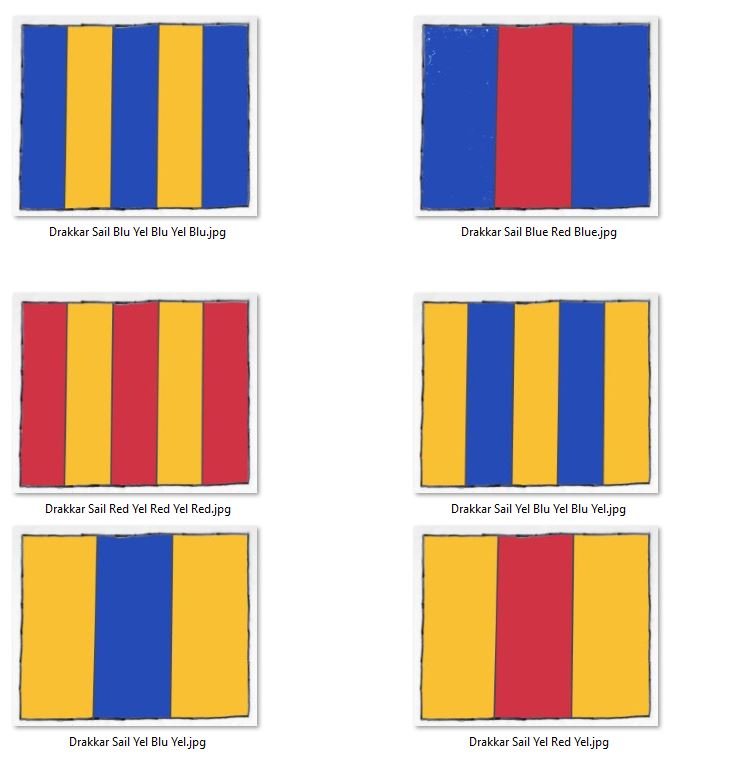
With the arrival of good weather I no longer want to spend much time in my backroom basement workshop. But in order to continue working I put a few items into a cardboard box so I could sit on the patio and make the oars. Nothing much to report here except I learned from another build log to use tape on the dowels to reduce the chances of splitting the wood when cutting the notch. Reduce, not eliminate. I've also been thinking about sail color. I bought a book from the Viking Ship Museum in Roskilde about the Sea Stallion. They say, "In scaldic verses it is sometimes emphasised that the sail is coloured blue - perhaps it was considered to be a particularly prestigious colour", because of its expense. On a rainy afternoon I played around on the computer and came up with this. I kind of like the blue and yellow stripes in the upper left. I've purchased some Tulip fabric paint and will experiment. Finally, I tried making a chest based on a link Steven has posted in other logs. It was looking reasonably OK for a first attempt at something like this, although the dimensions might be off a bit. But then I broke one of the legs off when I was sanding the corners. The wood is basswood, maybe I need something denser (?) or a steadier hand.
-
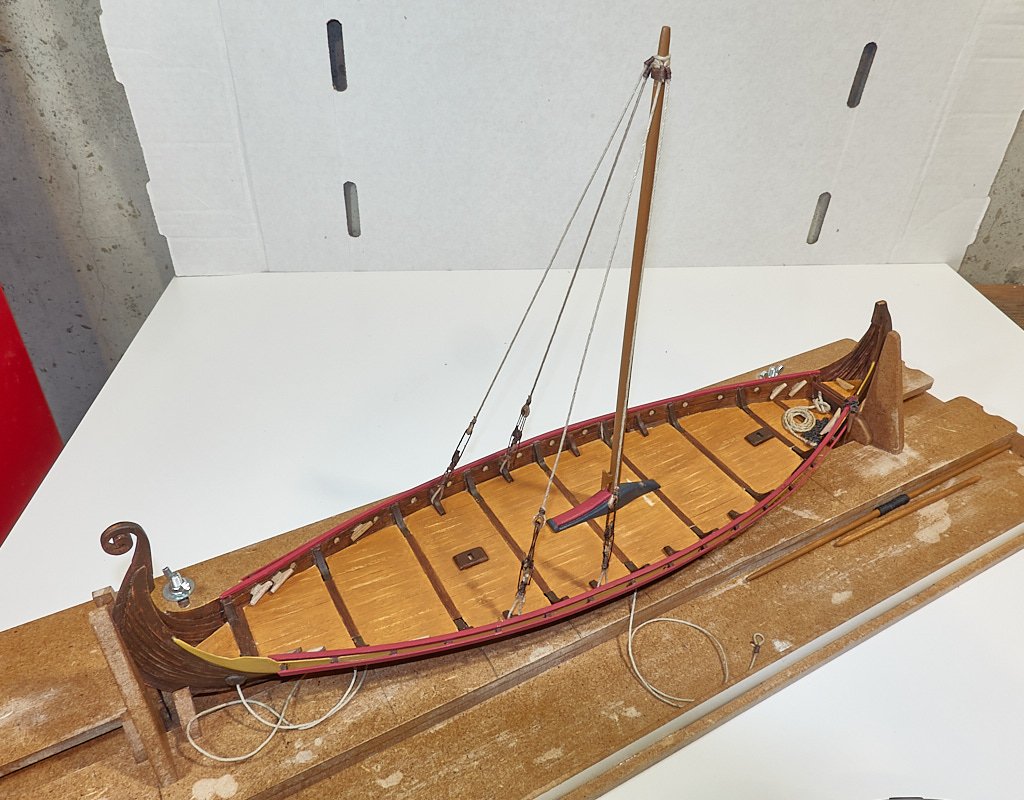
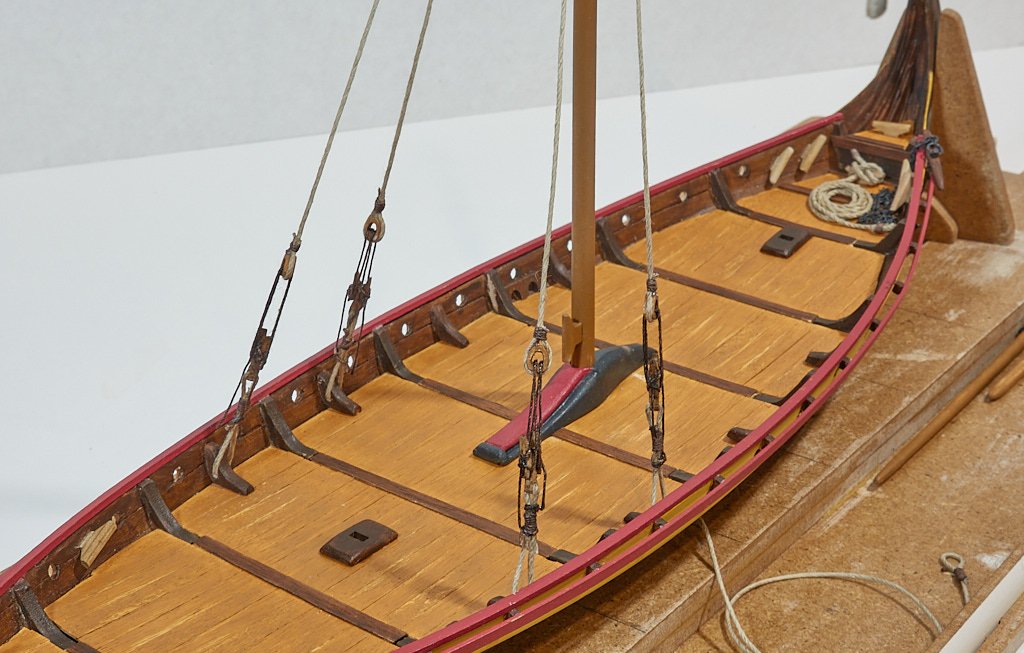
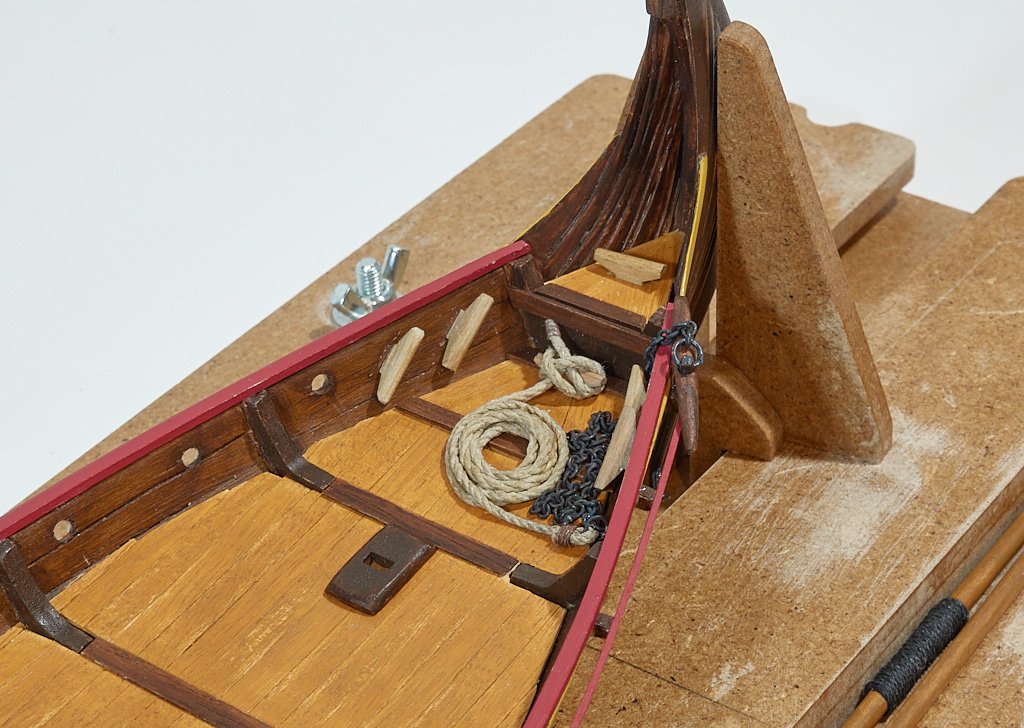
The shrouds are in place. For a while I wasn't sure how to proceed, but finally I just proceeded and am most satisfied with the result. I've seen numerous ways that blocks and lanyards are done on Viking ship models and reconstructions. I settled on using the H-shaped blocks included with the kit, ran lanyards through that, and up to a closed heart in an eye on the shroud. It looks reasonably nautical though to what extent Viking I'm not sure. Debating on whether I should stain the shrouds brown like the lanyards, but at present holding off. They seem pretty even because when I slightly pull on the mast in the direction of the forestay they all snug up at the same time. I now have some understanding of why folks here have high praise from Syren's rope, or go to the extent of making their own with a ropework. In looking at photos I can see the huge difference in how the strands look. For instance check out this in rvchima's build, which looks far nicer than my work. (No doubt the degree of builder skill counts for a great deal.) But I learned a lot and expect there will be more kits in my future. I did purchase some third party rope from Billings and a couple other sources, but settled in the Amati kit rope for the shrouds. However, I did use the Billings for the anchor rope. I blackened the brass chain with Birchwood Casey Brass Black, the first time I've ever used a product like that and once again am basically satisfied with the result. Amati did not show the anchor attached to anything so I added another block to the deck. I guess it's time to start thinking about the sail - how to sew, paint, shape. It's all an adventure!
-
Just started reading this fascinating build. Steven, if you don't mind a newbie question, early on, like posts #13 and #21 for example, what kind of tools are you using to shape these frames. Apologize if this is discussed elsewhere in the log. I'll eventually get there Thanks..
- 740 replies
-
- 2
-
-
- Tudor
- restoration
- (and 4 more)
-
They look OK to me. The dashed lines for the panels, I guess they'd be called, did you just do those with an ink pen? More work to follow? Thanks.
-
Bummer for sure. Good luck with the healing process. Look forward to seeing you back up in the rigging. Take care.
-
In fact barrels was a specific question of mine as well. I hope my above post came across in the lighthearted manner intended, sometimes that gets lost. I'll do some research into this as well, but I look forward to see what you come up with. On Ebay I found a collection of Artitec "old-style ship's cargo" and was wondering if I can use any of it. https://www.artitecshop.com/en/old-style-ships-cargo.html Thanks Steven for your always helpful information.
-
I have no idea, but I've been wondering about this, so thanks for asking. However, historical accuracy is not too important to me at this stage. Let me know if I have to stand in the time out corner for saying that.
-
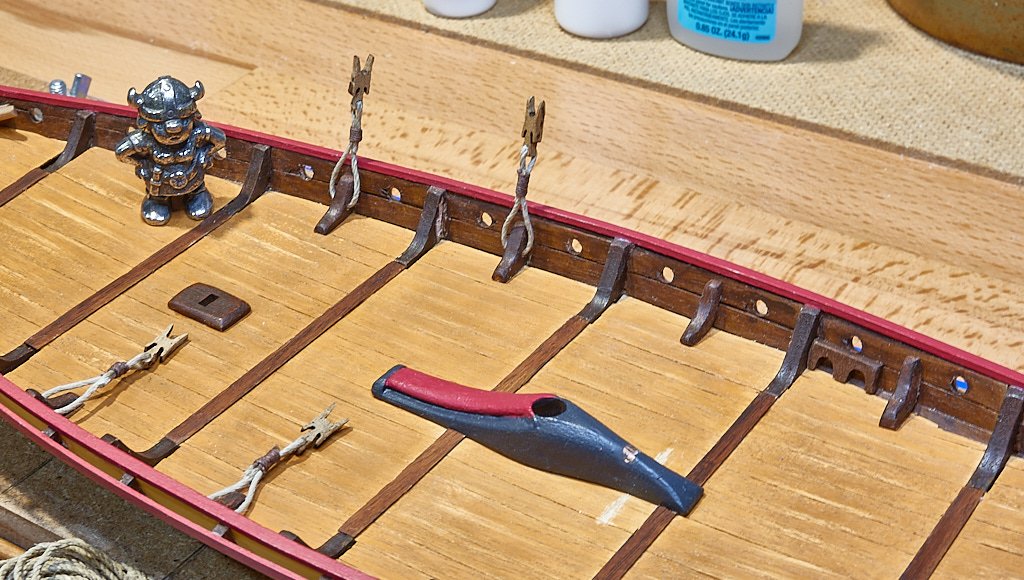
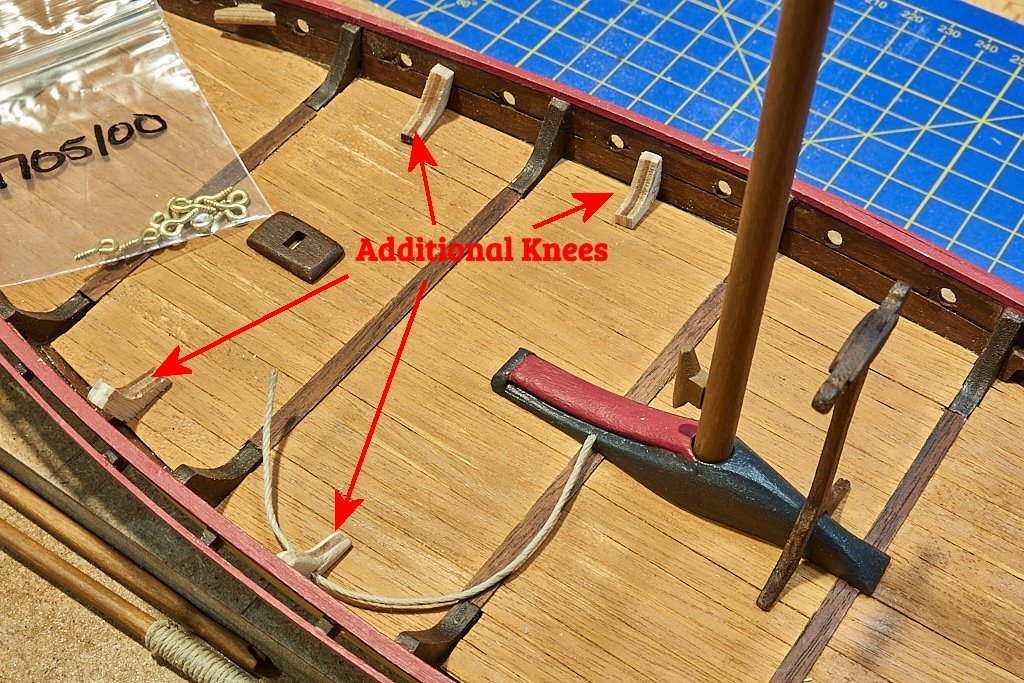
I've sailed into the doldrums a bit with the rigging. Even though I worked for The San Francisco Maritime Museum and had other jobs in my youth where I did big-boy rigging, this small scale stuff is another world, very challenging. But yesterday I did go ahead and add the additional knees I mentioned above. I took Cathead's comment to heart about more frames in that area looking out of place, and decided to add two more knees on each side as a kind of balance. Even if they don't really belong there I think t works OK. It's all crude workmanship, which is my style I guess 🙂, but it's moving forward! I added the flying cleats for the shrouds and next step will be the mast and shrouds.
-
Interesting idea to construct laminated shroud pins like that. They came out quite nice looking, and should look great in the rigging. So far I'm still using the flying cleats that came with the kit.
-
Thanks Eric, I thought of that and decided once the shrouds were attached then it would be obvious why they were there, and perhaps even "make sense". Anyway I'm forging ahead with that plan so far. In drilling the hole I had bits that went from 1 mm to 1.5 mm in one step. Making that big step caused the plywood from the kit to crack, so I've just ordered a bit set from Otto Frei that includes almost each size by 0.1 mm increments from 0.6 to 2.3 mm.
-
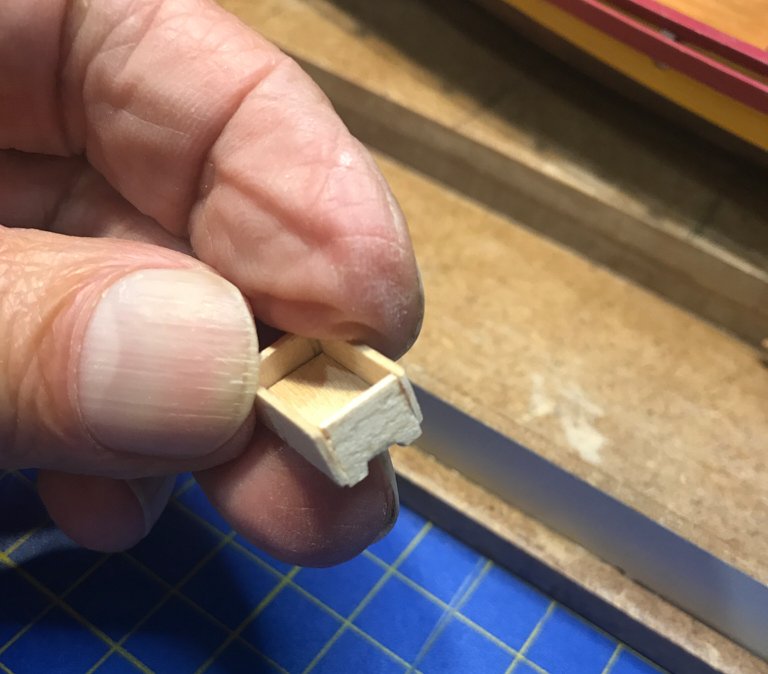
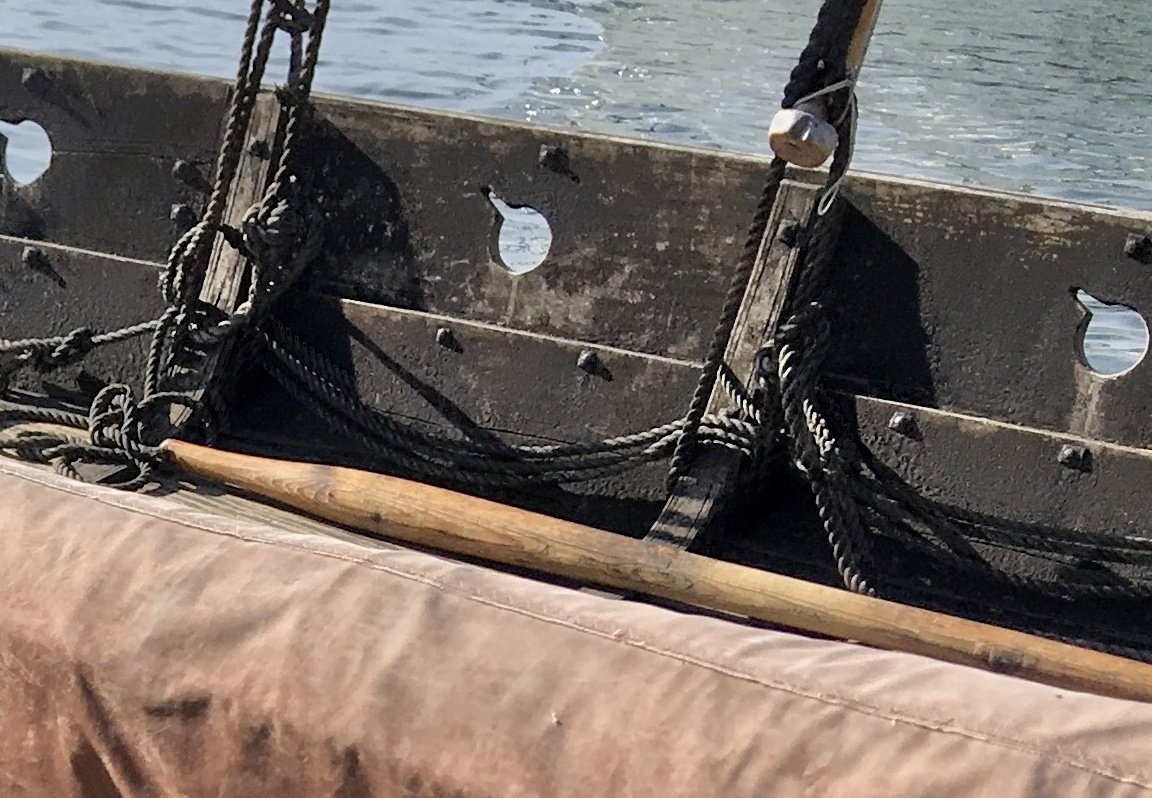
I've got the mast and yard shaped to my satisfaction, and am ready to start on the four shrouds. When gluing the hull the Amati instructions said "Make holes for shrouds, too". These would be in the upper strake located behind the shield rack. I didn't like that at the time and still don't since you'd have a rope tied around the gunwale. In some online searching I found these photos of the Saga Oseberg reproduction. One can see where they used the frames to anchor the shrouds, with what looks like a combination of holes in the frames and perhaps an iron ring (?). So I thought I'd drill holes in my frames and simply do that, but two problems arose: 1) I can't get a drill bit in there at that angle now; 2) it might interfere with placement of the oar racks. So I thought about adding four additional knees to anchor the two shrouds on each side of the mast. See photo below. The knees are just sitting there, only the lower one is somewhat shaped and has the hole drilled. Another option would be to blacken the 3mm brass rings I picked up, and screw those into the knees. Or omit the knees and screw the rings into the edge of the deck. The rings are also in the photo. Thoughts are welcome! Meanwhile, I am forging ahead with holes in the knees.
-
Well,I don't feel qualified to offer feedback, constructive or otherwise, but think this is a fascinating method to make a sail. Probably not something I'll try yet, but it's looking nice!
-
Really nice. So you masked and painted the sail and the paint didn't bleed under the tape? Is there a magic Norse spell required to accomplish that? I'll be crossing this bridge one of these weeks and have been debating on painted stripes, sewn panels of different colors, or simply a solid color. Thanks.
-
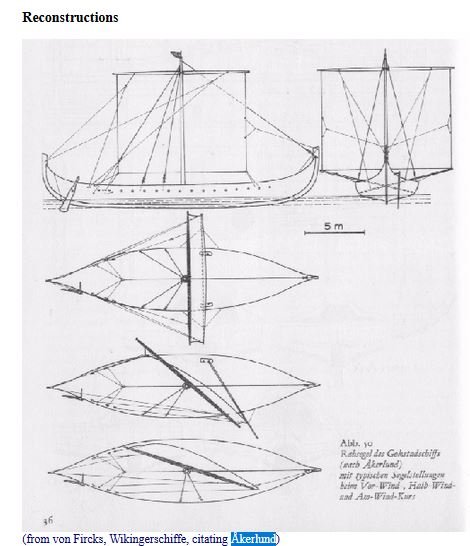
Yesterday my wife and I were was helping a neighbor and she loaned me a 1972 National Geographic book titles "The Vikings". This drawing is on the book's title page. It shows an awkwardly stored shield. This is not so much to give you any ideas, but here's a quote from the books' foreword which might be of interest: The Society’s tradition of telling a story with pictures has resulted in a remarkable set of illustrations for this book, both photographs and paintings. Much labor has gone into the effort to recapture Viking Age scenes. In many cases source material was vague or nonexistent, and sometimes one of several interpretations had to be chosen. I hope and believe that the pictures will convey to readers the splendor and drama of the period, and that departures from any school of opinion will stimulate further research - Arne Emil Christensen, Jr., Curator, University Museum of Antiquities, Oslo Look forward to seeing what you do with the sail. Great link from, Steven. Thanks.

-
Looks superb! As a kid I had a crazy fantasy to go down in Cousteau's saucer. Such a cool looking little craft. Your photo of it on the crane is iconic.
- 70 replies
-
- 1
-
-
- calypso
- billing boats
- (and 1 more)
-
That looks correct End Of The Line, guess I'll keep my rigged block, or maybe an iron ring. If you don't mind I'd like to use your idea for the rudder in this post. I think I can cobble that up and agree looks better than the kit part.
-
Thanks for the comments guys, much appreciated. I thought about that, think I understand what you are saying, and it makes sense. I believe the kit intent is not to have the braces fixed at the sternpost, as Cathead notes based on the Skuldelev 2 reproduction. I just found this which seems (?) to show the hole in the stern, not a fixed brace: http://www.jans-sajt.se/contents/Navigation/Modelling/Patterns_Rigg_Viking.htm In any case, I appreciate the suggestion and may do something like that. At least I feel good not drilling that hole, even though I arrived at this point due to my own error. Moving forward and ready to stain the mast soon. Thanks again for comments and suggestion.