HOLIDAY DONATION DRIVE - SUPPORT MSW - DO YOUR PART TO KEEP THIS GREAT FORUM GOING! (Only 13 donations so far - C'mon guys!)
×


starlight
-
Posts
146 -
Joined
-
Last visited
Content Type
Profiles
Forums
Gallery
Events
Everything posted by starlight
-
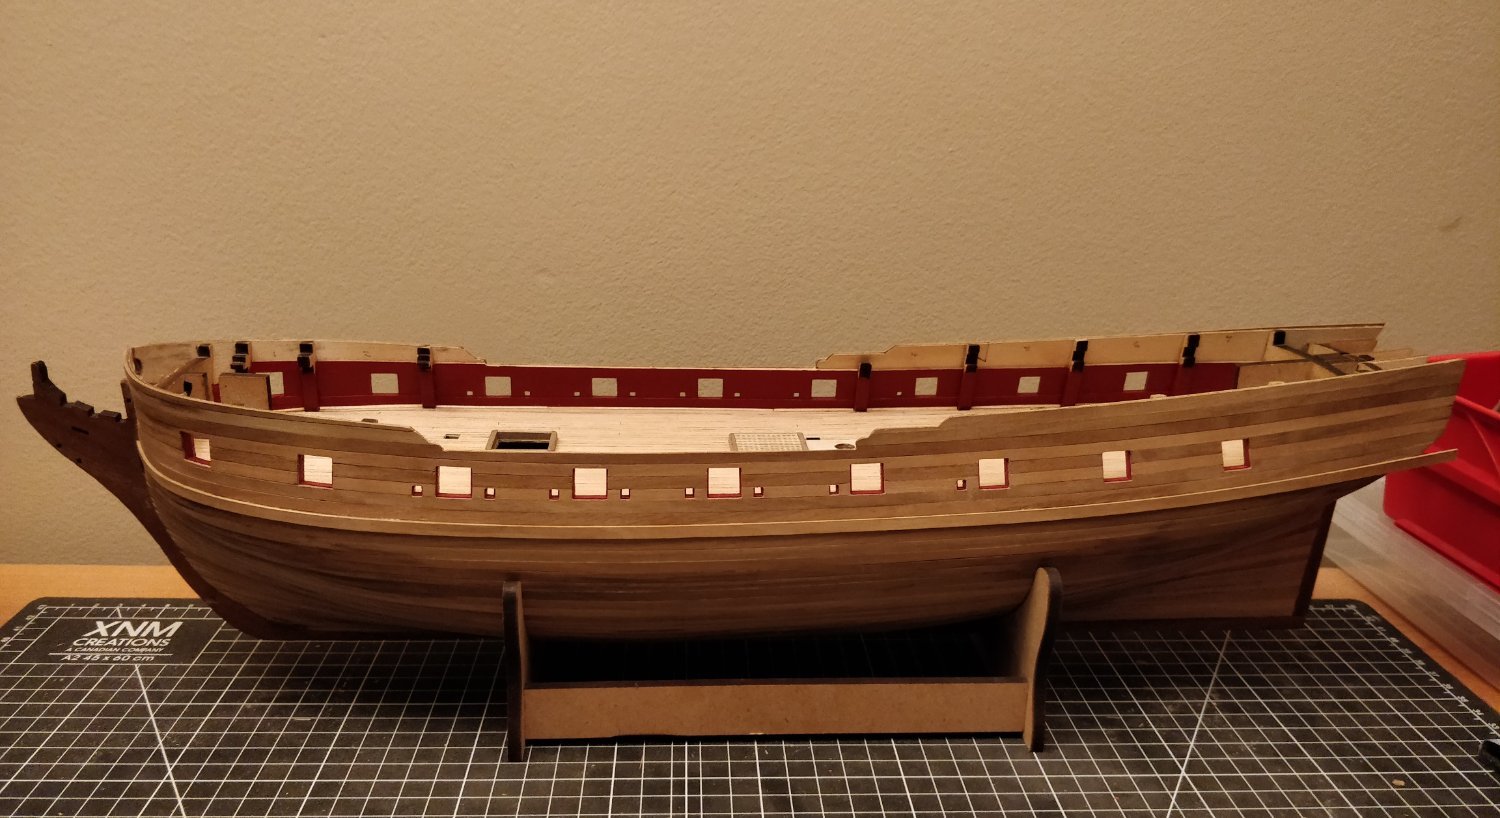
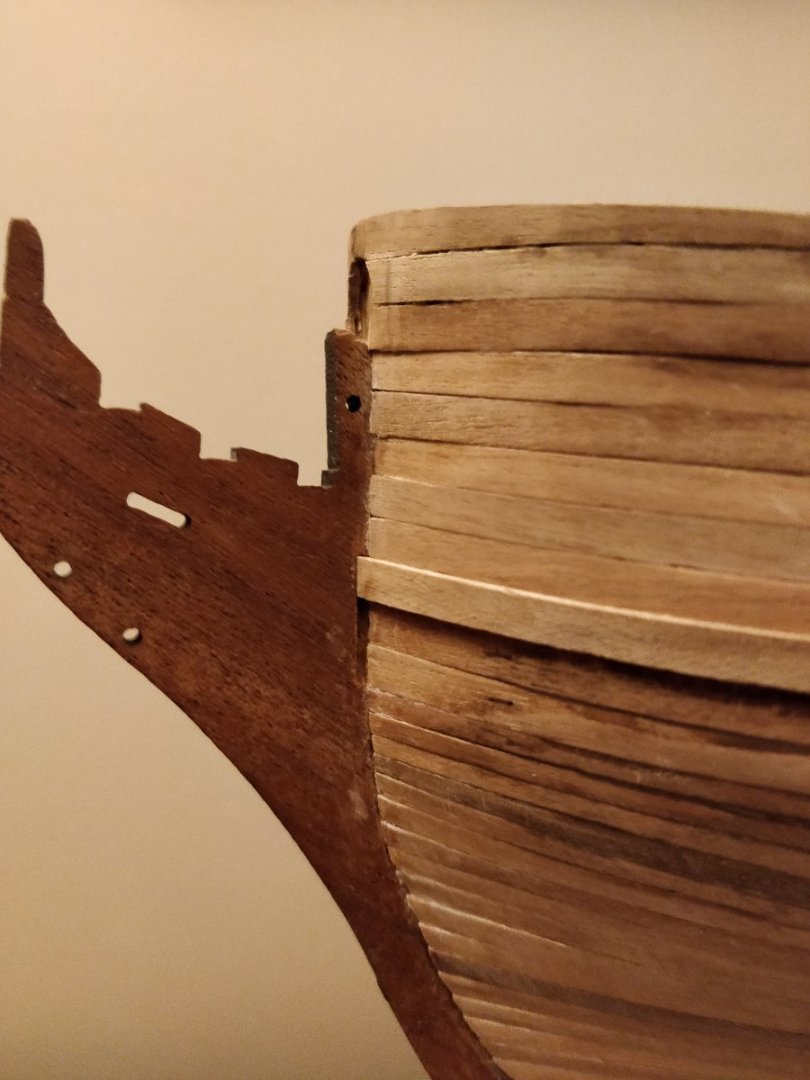
I glued on the top strake of the main wales on both sides. I know that technically the wales are supposed to blend smoothly into the rest of the planking at the stem but I didn't think I could pull that off and have it look nice. There will be no top-and-butt planking either for the same reason. I cut a rabbet into the stem to help hold the planks: One thing I am still confused about is how to properly terminate the wales at the stern. The plans are not much help in this regard, so I would appreciate any comments. -starlight

- 82 replies
-
- 3
-

-
- Fly
- Victory Models
- (and 2 more)
-
Looks good, Dave. Which books on rigging did you buy and which would you recommend? In particular, do you have Lees' book? Looking for advice since I know next to nothing about the subject. -starlight
- 362 replies
-
- 2
-
-
- Amati
- Lady Nelson
- (and 2 more)
-
Hello Clementine, Your build is looking good. I also found your method of doing the first planking to be rather interesting. It seems like you got a nice result though and that's all that matters. Fast progress too! It took me about a year to do two planking layers on my own build... Wishing you continued success with your model, starlight
-
Hi mtaylor, Your build looks phenomenal! Those look like some pretty substantial 9-pdrs. I'm also currently working on the guns for my build and am quite enjoying it. Do you have any tips for rounding off the axles and sanding off the laser char on the wheels? Cheers, starlight
- 505 replies
-
- 5
-
-
- vanguard models
- Sphinx
- (and 1 more)
-
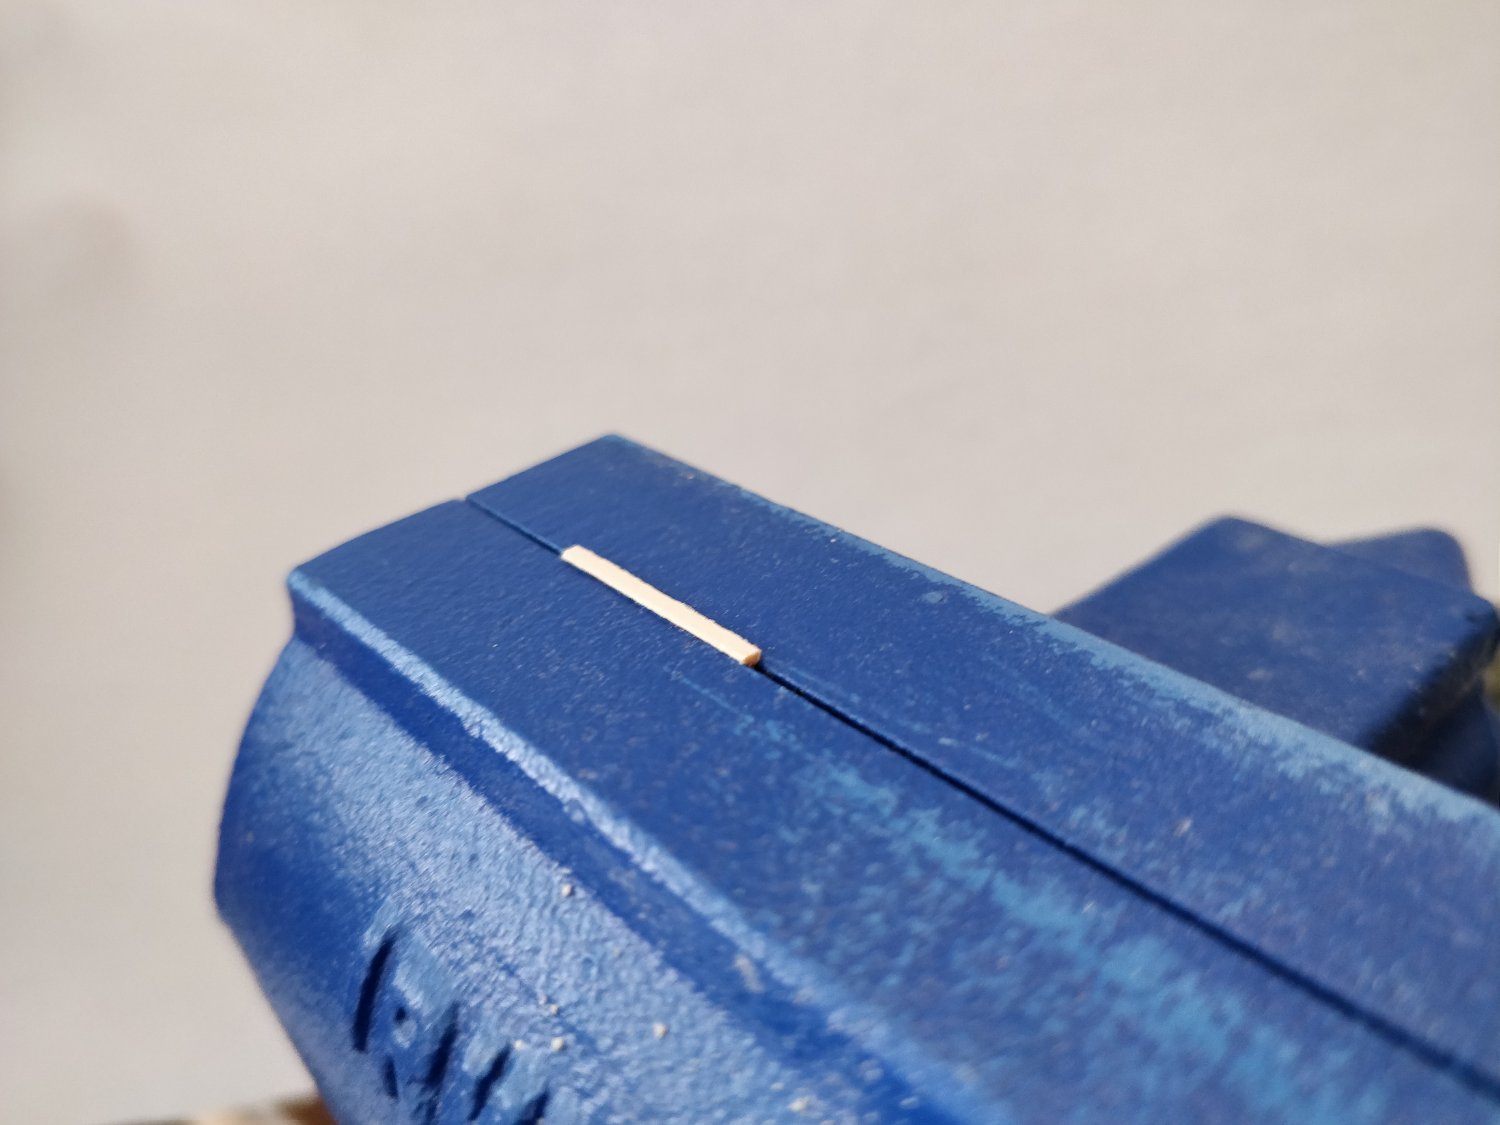
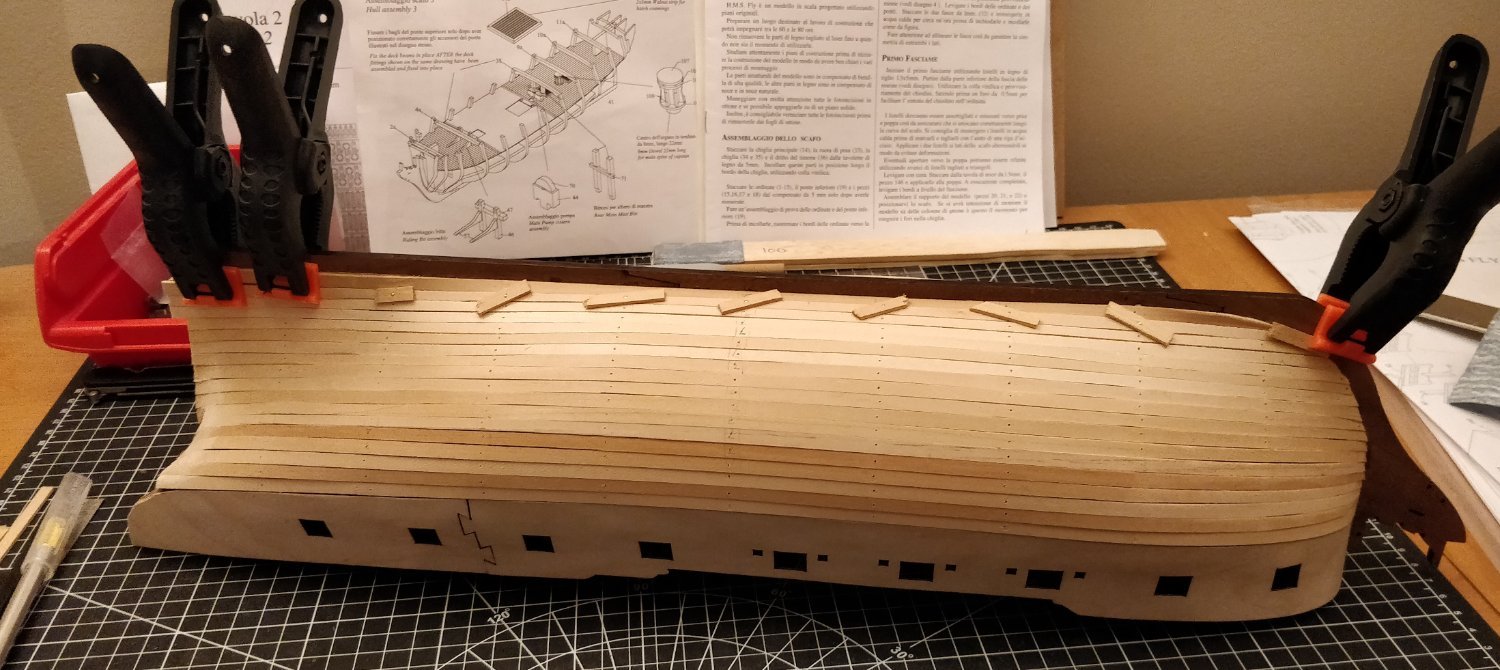
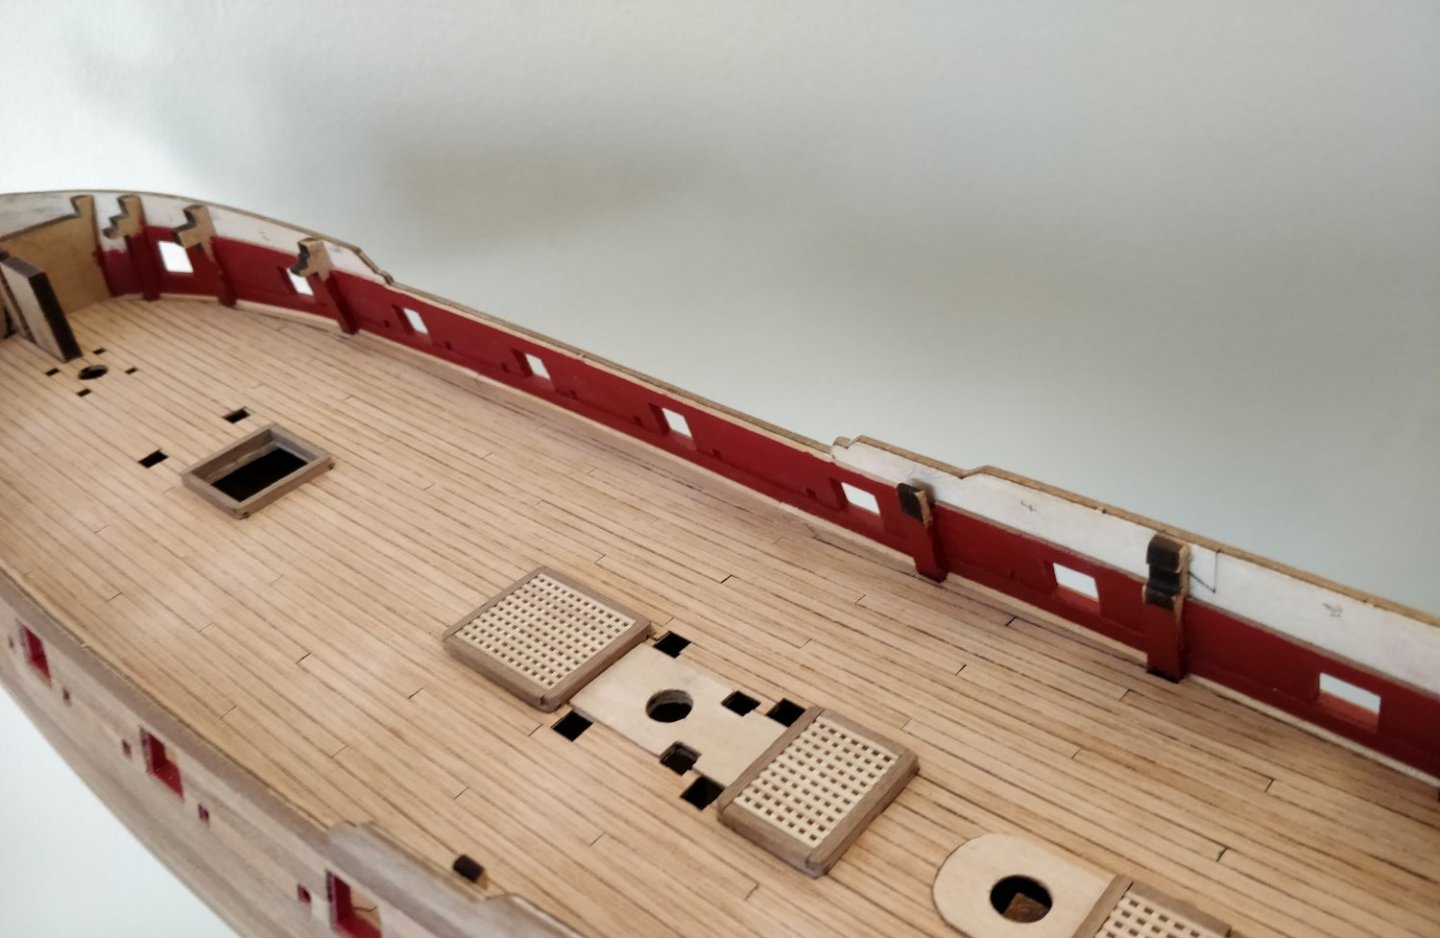
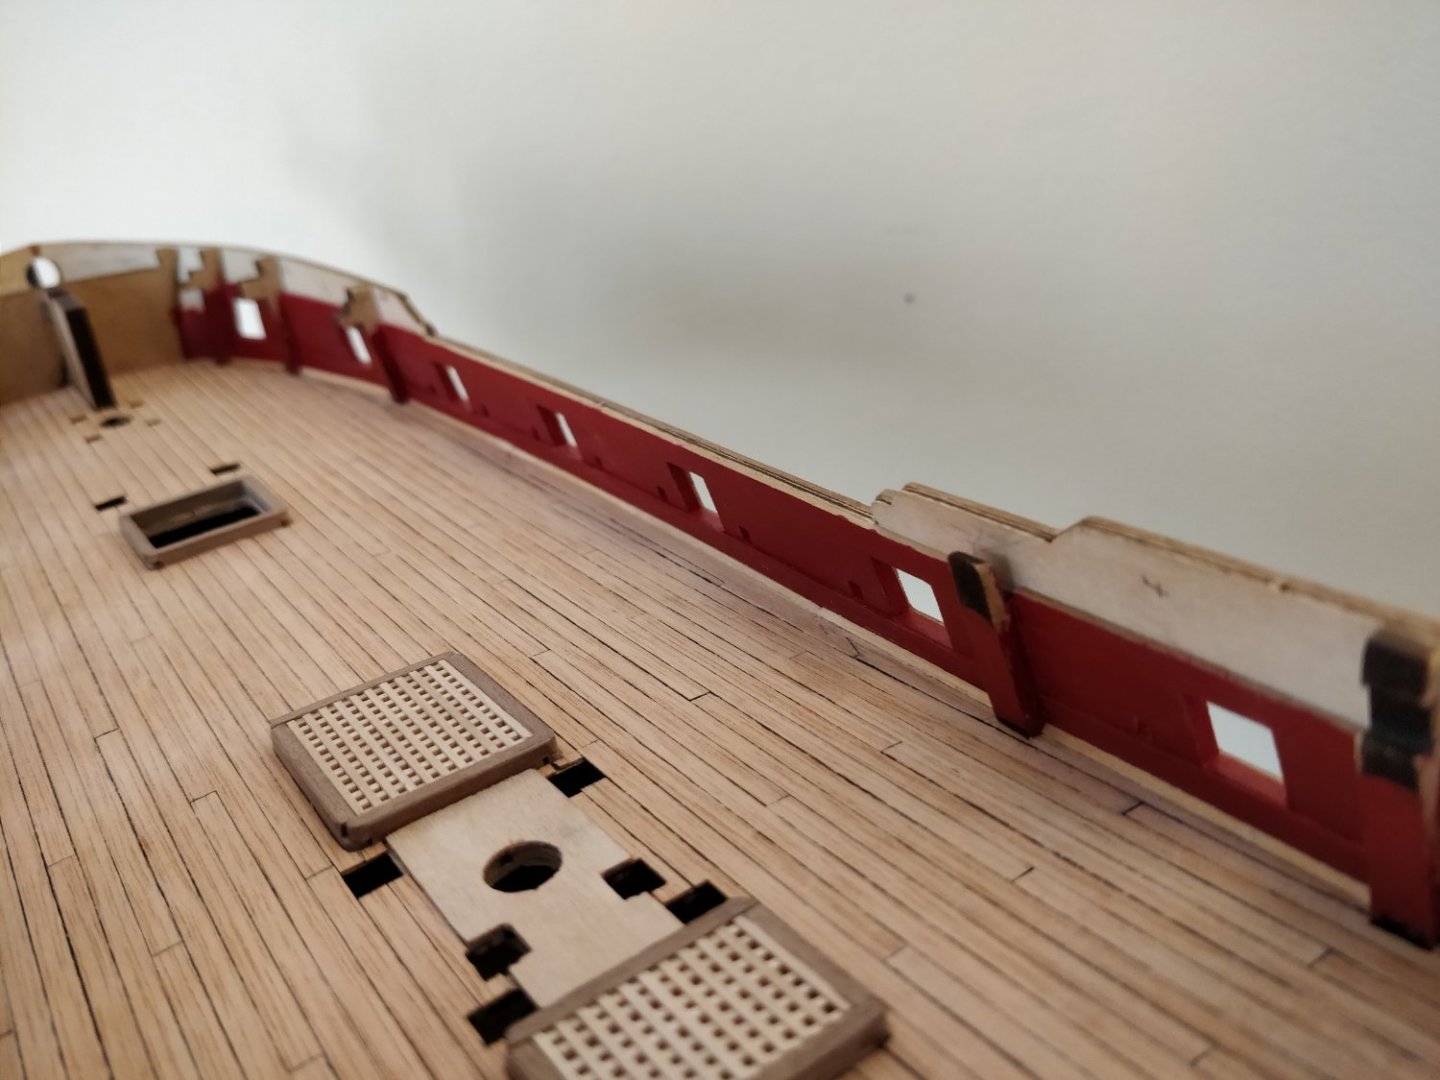
After some on-and-off work over the past month, I finally finished redoing the inner bulwarks. I found this post very helpful in figuring things out: https://modelshipworld.com/topic/25494-edge-of-deck-plank-layout-spirketting-waterway-margin-plank/ I ripped up the scarph joints in the waist and sanded away the paint on the lower area of the inner bulwarks. I then added some strips of the kit Tanganyika (0.5 mm thick) to simulate the spirketting. By my calculations, I should still have enough Tanganyika to do the two upper decks. After repainting the bulwarks, I re-made the margin planks such that they are essentially shifted inboard by about 1.5 mm. Technically this is my third time making these scarph joints... One thing I am not certain about is the height of the spirketting. I know that it should come up to and be flush with the gun/sweep port stops. For me, this meant a fairly straight run of planking. However on other builds I have seen the spirketting laid above this level and then cutouts made to bring it flush at the ports. The other feature I added was a waterway. I made this out of the leftover basswood from the first planking. I first made 1x1 mm strips using the method I outlined in this other post: https://modelshipworld.com/topic/31939-shaping-thin-strip-without-power-tools/ Then, I sanded away half of the strip on the diagonal to obtain a triangular profile. To do this, I opened the jaws of a vise slightly and used it as a crude V-block. I also added some stain to the basswood to try and match it to the Tanganyika, but it still looks too bright. Now, I can at last return to the guns. I also need to muster up the courage to tackle the main wales. As well, I may perhaps look into fitting out the area under the quarterdeck with cabin bulkheads, etc. -starlight

- 82 replies
-
- 3
-
-
- Fly
- Victory Models
- (and 2 more)
-
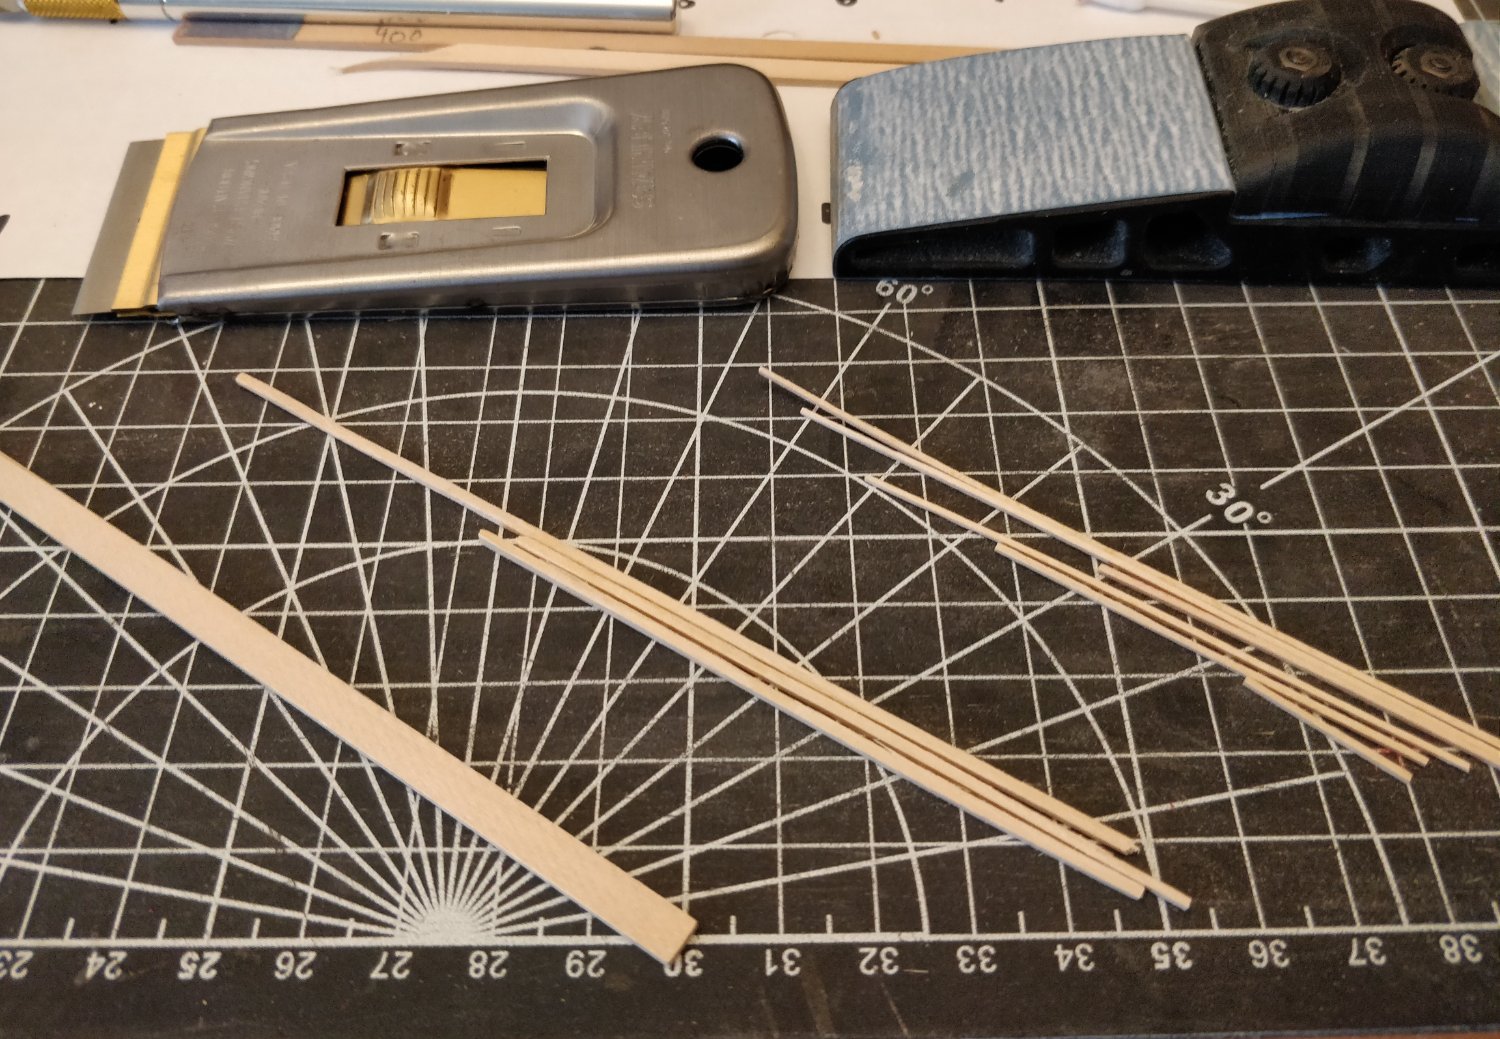
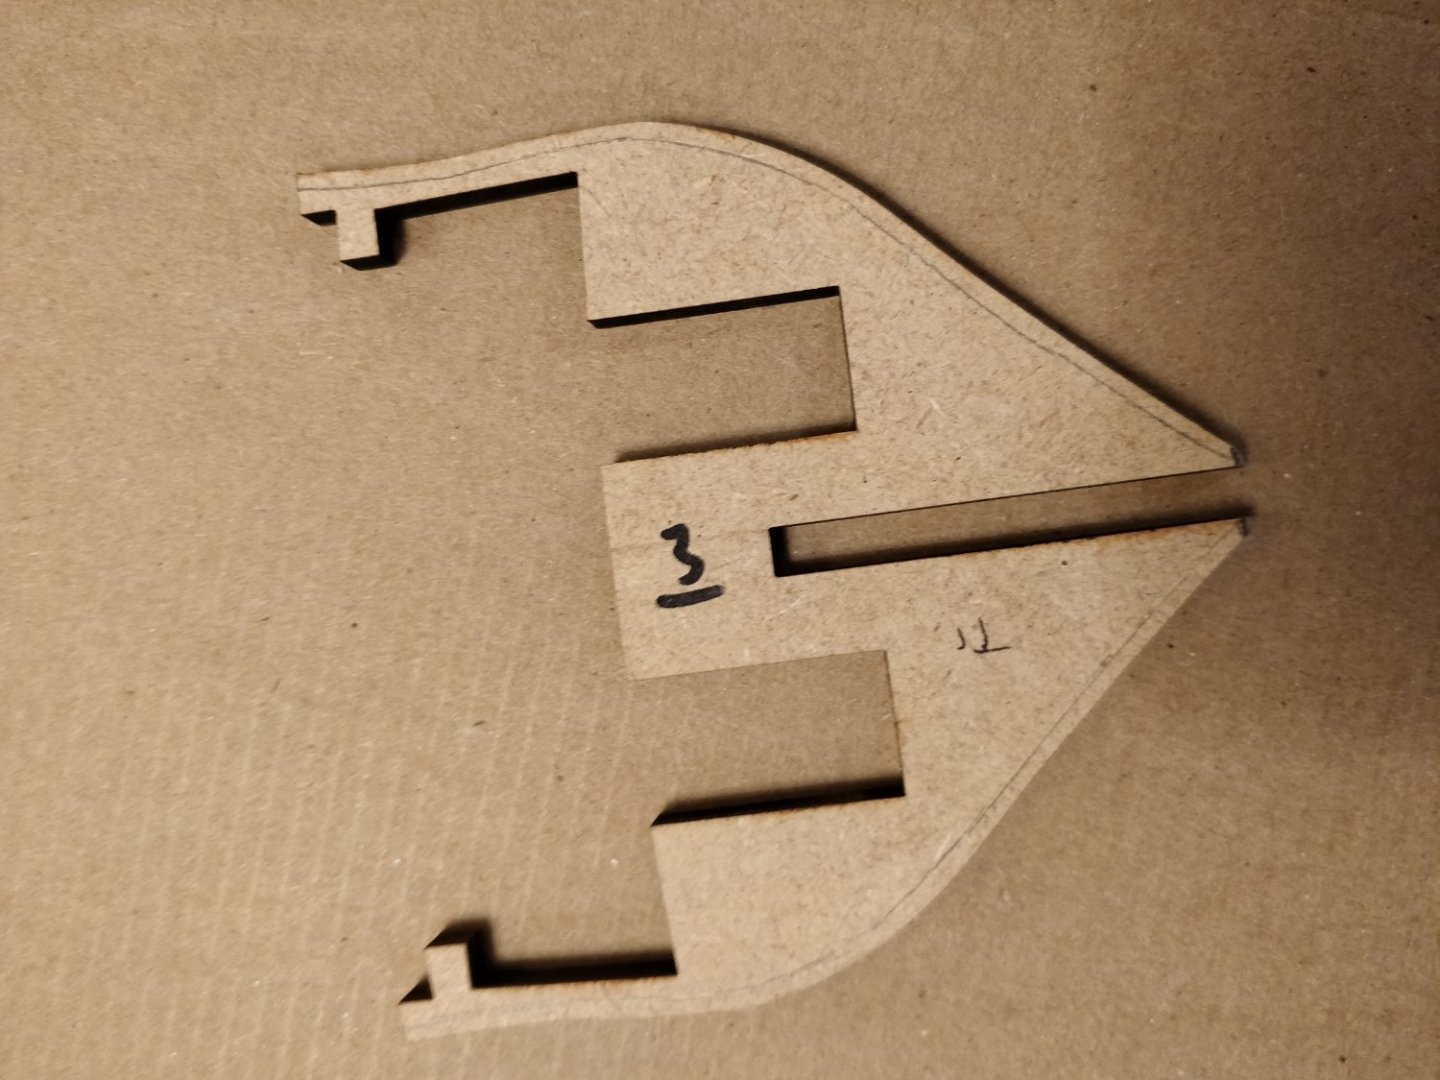
Hi Allan, I recently posted about my own "poor-man's method" of making small square strip: https://modelshipworld.com/topic/31939-shaping-thin-strip-without-power-tools/ Essentially, I use a cheap set of calipers as a drawplate. This has the advantage of being infinitely adjustable to any size you want, and you can gradually step down in size to control the material removal rate. The metal jaws of the calipers do a decent job of shaving away wood if you keep the depth of cut small. I was able to make some 1x1 mm strip for waterways using this method: You probably have access to much better tools than I do, but hopefully you find this interesting nonetheless. -starlight

-
Thank you for this review, James. I hope to buy from Ropes of Scale in the future so this information was very useful. For the benefit of a newbie such as myself, could you or @BenD go over the advantages/disadvantages of synthetic rope over cotton? Much appreciated, starlight
-
Of course, and by no means am I complaining. I have noticed many quality of life improvements that are showing up in more modern kits: laser-etched deck planking, bulkhead bevel guides, resin guns, etc. I am definitely considering buying a Vanguard kit as my next project... but perhaps I am thinking too far ahead
-
I will defer to your knowledge then, since I have not built this kit before! My Fly kit definitely needed a rabbet but there was no mention of such in the instructions. Consequently, I didn't rabbet the keel and ended up with an ugly gap on my garboard strakes. -starlight
-
That's looking much better, Glomar! A few comments: Not to worry about not being flush with the bulwarks. If the error is less than 1 mm it will easily sand out. It looks like you did not cut a rabbet into the stem and keel. I highly recommend doing this, otherwise you will find it hard to get a good plank termination at the bow and for the garboard strake. The area at the stern where the bulkwark strip, stern counter, and first planking strip all meet is very tricky. I think you've done as good of a job as can be expected. Just spend some time with filler + sandpaper there to prepare it for the second planking. I don't mean to harp on this, but will you be removing those brass pins once the glue has dried? They will stand proud of the wood surface and interfere with the second planking if you don't. -starlight
-
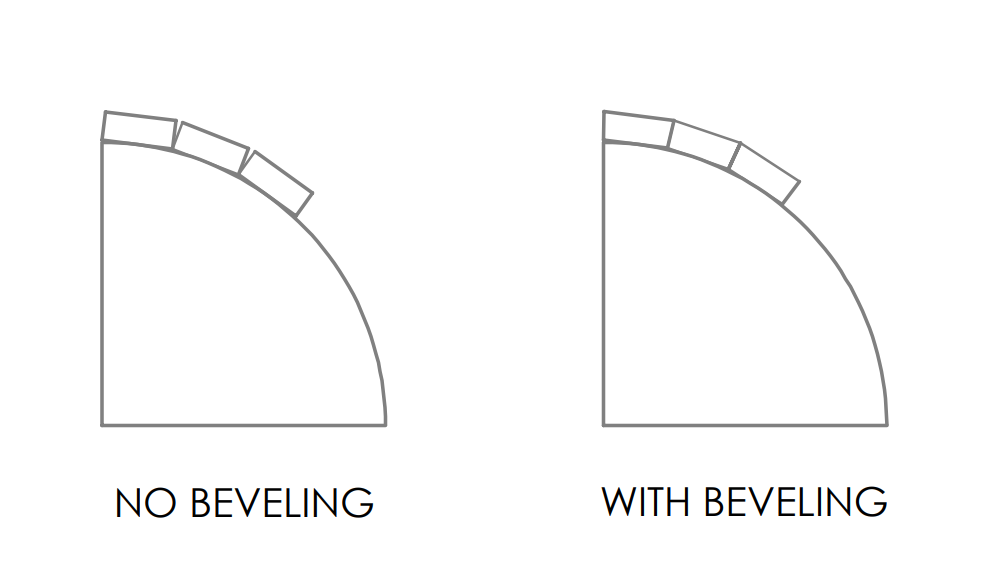
Hi Glomar, You shouldn't need to bevel each plank very much, depending on the bulkhead curvature. If you end up overdoing it, that's also not a big problem as long as you preserve the desired width of each plank, i.e. don't sand away the outside-facing edge. What I did for edge bending was to soak each plank in warm water for about 10 mins, and then clamp it to the edge of a table in the desired curve while it dried (usually 6-8 clamps). Unfortunately I didn't take any pictures of the process. Laying each plank was an iterative process of tapering, edge-bending, and dry-fitting against the bulkheads before finally gluing into position. All I can say is that the more time you spend here will be paid off with less filling/sanding and a better second planking. Hope that helps, starlight
-
Hi Glomar, Looks like you've received some excellent advice on your build log, but I'll try to add on. It seems to me that you have not lined off your hull with tick marks. This will greatly assist with the tapering and edge-bending process. There's a good tutorial by Chuck in the Articles Database: https://thenrg.org/resources/Documents/articles/LiningOffYourHullPlankingTutorialAndFan.pdf I used it as a reference and it was very helpful. Make sure to bevel the long edge of each plank so that they fit tighter. Otherwise you will end up with large gaps and/or a clinker effect on your hull. I made a quick diagram to help illustrate my point: One other thing I would recommend is to remove the brass pins after each plank is laid down. Otherwise they will get in the way of sanding down the first planking. What you can do is to insert some material to stand off the head of the pin so that it can be pulled out with pliers. I just used some broken pieces of planking on my own build. As you can see, my first layer of planking looked a bit rough, but sanding and filler made it turn out all right . Lastly, I know it's easy to feel disheartened. The above picture is my first build (that I'm still working on). I remember getting very frustrated at myself during the planking process, but looking back I'm glad for the challenge and it's just a good memory now. Cheers, starlight
-
Welcome to MSW, Arthur. Good to see more young people on this forum. You're not alone! -starlight
-
Rudy, I'm not exactly sure what you're struggling with. You say that you can get the acute bend, so I assume you understand the whole business about doing the bend in the middle of a plank and then snipping off the excess. Now, if your plank is tapered and edge-bent properly, and you have a good rabbet (which it seems you do), the plank should bite into the rabbet and you can get the twist by simply pressing the plank up to each bulkhead. Or you can do what Chuck does and pre-twist the plank off of the model. Are you finding it difficult to actually twist the plank? -starlight
-
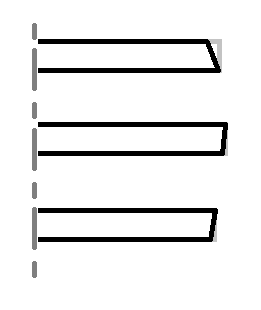
Rudy, Success without challenge is hollow. It's good to tackle projects above your skill level, because that's the only way to learn. I wouldn't worry about how long it takes you to do things. At the end of the day, modelmaking is an intensely personal hobby. Only you can set the schedule and goals for yourself. The best thing to do is to treat each stage of the build as a project in itself. If you can learn to celebrate after each and every plank goes on your model, you will always feel fulfilled. Philosophy aside, let's take a look at the technical problems you're having. Have you lined off your hull with tick strips? Are you comfortable tapering and edge bending the planks? From Blue Ensign's excellent build log, he provides this picture which I think fully illustrates what needs to be done: As you can see, each plank has to vary in width along its length (which you do by lining off the hull and tapering the plank), and also be curved while flat so that it can follow the hull's 3D curvature (which you do by edge bending). Once you have the plank in this state, it should be much easier to curve and twist it against the bulkheads. This is probably the hardest thing to understand in all of model ship building, so it's only natural to struggle here. I know I did. Just remember that there are many people here on MSW that are here to help. -starlight
-
May I be so bold to ask what "good" Tanganyika strip looks like? The Amati Fly kit I am building has given me no end of trouble with this material. It is splintery, open-grained, impossible to get a clean edge with. Probably closer to papier-mâché than wood... Furthermore, I have learned since starting this hobby that many wood species are mislabeled.. e.g. Tanganyika, walnut, ramin. Anyways, I am glad that Mr. Watton runs his own company now and is able to make his own decisions on the actual realization of his excellent designs. -starlight
-
I definitely agree with you about rework being worth it, Moonbug. For me though, I have to worry about not having enough spare timber! Thanks for the instructive posts about the bowsprit. I probably have the same kit parts as you so I'll have to remember this when I get there. -starlight
- 419 replies
-
- 4
-
-
- Victory Models
- Pegasus
- (and 2 more)
-
Tin, can you measure the length of the model? The full-size Victory was 57 meters along the gundeck and 69 meters long overall. You can figure out what scale your model is, which will help narrow down the kit manufacturer. -starlight
-
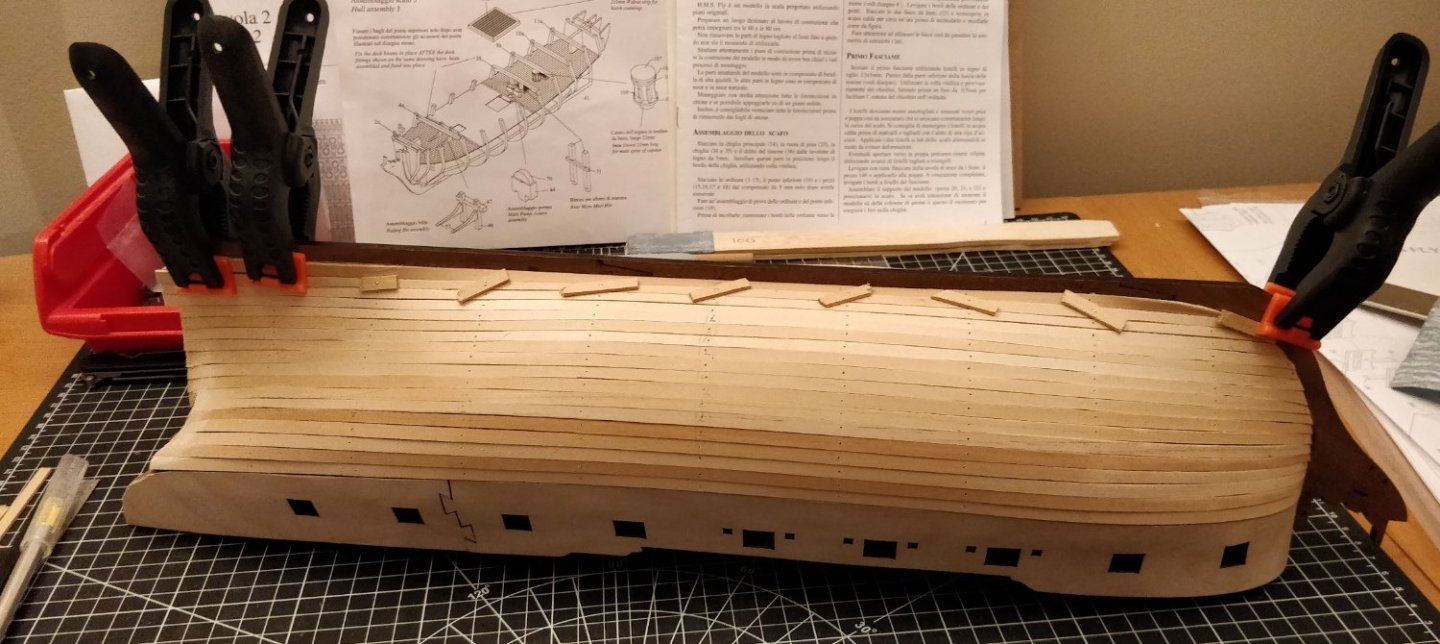
I am currently waiting on some parts to arrive so I can continue with the guns. In the meantime, I decided that I would bite the bullet and rework part of the build: adding spirketting and a waterway to the inner bulwarks. I am now in the process of ripping up all my carefully laid margin planks and sanding away the bulwark paint. If I have forgotten anything else in this area I will be very grateful if someone can point it out. -starlight
- 82 replies
-
- 2
-
-
- Fly
- Victory Models
- (and 2 more)
-
mester03, I believe I was looking at this one: https://modelshipworld.com/topic/7779-palamos-by-frankg-occre-scale-145-first-build/ This modeler also had some trouble with the bulwarks and I think there are some important takeaways. First is the use of a solid shape to clamp the bulwarks to, as I recommended. Without this I suspect you will have difficulty getting the right 3D curvature and symmetry of port and starboard. Secondly, do the instructions really say to plank the bulwarks before bending? I would advise against that, since you will then have double the thickness to bend without snapping wood (which is incidentally what happened in that build log). You will still need multiple iterations of soaking and clamping to achieve the proper shape. -starlight
-
Hello mester03, Looks like an interesting subject and I wish you success with your first build. I took a look at some other build logs of this kit: https://modelshipworld.com/tags/Palamos/. Unfortunately none of them seem to have been completed. The bulwark pieces give me some concerns, since the bulkheads have no extensions above the deck to give you the right shape and a structure to clamp the bulwark strips to. Honestly, I would take the extra pains to carve or 3D print some sort of solid in the correct shape. You can then soak the bulwark strips and clamp to that to form them. For planking the strakes below the deck, there are plenty of tutorials on MSW where you can learn techniques such as spiling, lining off the hull with tick strips, steam bending, etc. Check out this category to start off: https://modelshipworld.com/forum/98-planking-downloads-and-tutorials-and-videos/. Mr. Chuck Passaro's videos in particular are very helpful. There are also some articles on the NRG site (look at the "Articles Database" on the top banner). Cheers, starlight
-
Looks great, Moonbug. Very impressive work with those cleats. -starlight
- 419 replies
-
- 5
-
-
- Victory Models
- Pegasus
- (and 2 more)
-
Hello Glomar, I'm also a newbie but I would like to echo what @glbarlow said about leaving a tiny amount of laser char on one edge of each bulkhead. It should look something like this (before fairing in grey outline, after fairing in black): On your build log I saw that some of the bulkheads had laser-etched bevel marks. Are all the bulkheads etched? If so, your job is made very easy. If not, you can scribe your own with some cheap calipers in order to help keep things symmetric: A small form error amidships will hardly be noticeable. The areas to watch out for are the bow and stern since the curvature is so high. Ultimately you just want to prepare the surfaces so that each plank has maximum contact with the bulkhead and curves naturally. For me, fairing and planking were the most difficult steps so far on my build, and the only way to properly learn them is by doing. A double planked kit, as you have, is the best way to do this. Cheers, starlight
-
Thank you to everyone for your instructive comments. Like many things in this hobby, there are clearly multiple ways to do things. Still, I was worried about making some novice mistake (especially as I have no spares of the gun parts). I am feeling much more reassured now and will be able to progress with my build. -starlight
-
Hello all, I am currently building the guns for my kit-bashed Amati HMS Fly build. I ditched the guns that were provided and purchased turned brass barrels and laser cut carriage parts from Syren. In the process I have come up with a number of small (and probably dumb) questions that I'm hoping people can answer. The resource I am referencing for brass blackening is @dvm27's excellent thread: https://modelshipworld.com/topic/21710-blackening-revisited/. One thing I noticed is that the gun barrels and trunnions are blackened separately before being assembled. Is it better to do it like this? Wouldn't this require the mating surfaces to be stripped back to bare brass before gluing/soldering? Is there a good method for attaching the monogram and touch hole without leaving glue residue? I presume that this needs to be done after the barrels are blackened. Will Wipe-On Poly work as a protective clear-coat for blackened brass? Probably a matter of personal preference, but do you glue the back of the barrel to the quoin? What are everyone's preferred methods of mounting the carriages to the deck? Here's my build log, if anyone is curious: https://modelshipworld.com/topic/25783-hms-fly-by-starlight-victory-models-164/ Any input will be greatly appreciated. -starlight