

Gregory
-
Posts
3,079 -
Joined
-
Last visited
Content Type
Profiles
Forums
Gallery
Events
Everything posted by Gregory
-
 To follow along, I could use some labels. ”steps, brackets”?
 -
cutting, feeding, fixing model ship rope
Gregory replied to palmerit's topic in Masting, rigging and sails
Whipping is just the method of dressing the end of a rope. How to Tie a Common Whipping Knot? Tips, Uses & Video Steps Modeling it may not always be worth the effort depending on the scale you are working and the size of the rope.
-
cutting, feeding, fixing model ship rope
Gregory replied to palmerit's topic in Masting, rigging and sails
I put CA (super glue) on the ends of rope. After it cures, I cut it at an angle with scalpel or clippers to create a point for threading through blocks or other holes. -
Have you considered using drill bits to make uniform eyes and rings? That said your work looks really good so far..
- 714 replies
-
- 1
-

-
- lady nelson
- victory models
- (and 1 more)
-
@vossiewulf I think this recent post by DrPr gives a good idea about how rigging and mast/yard dimensions was established by the riggers. It doesn't help with the configuration of spreaders and other details, but I think following what you see on a contemporary model is a safe bet. If they are different, it doesn't necessarily mean one is wrong.
-
Good catch.. I was thinking the skylight looked different also.
-
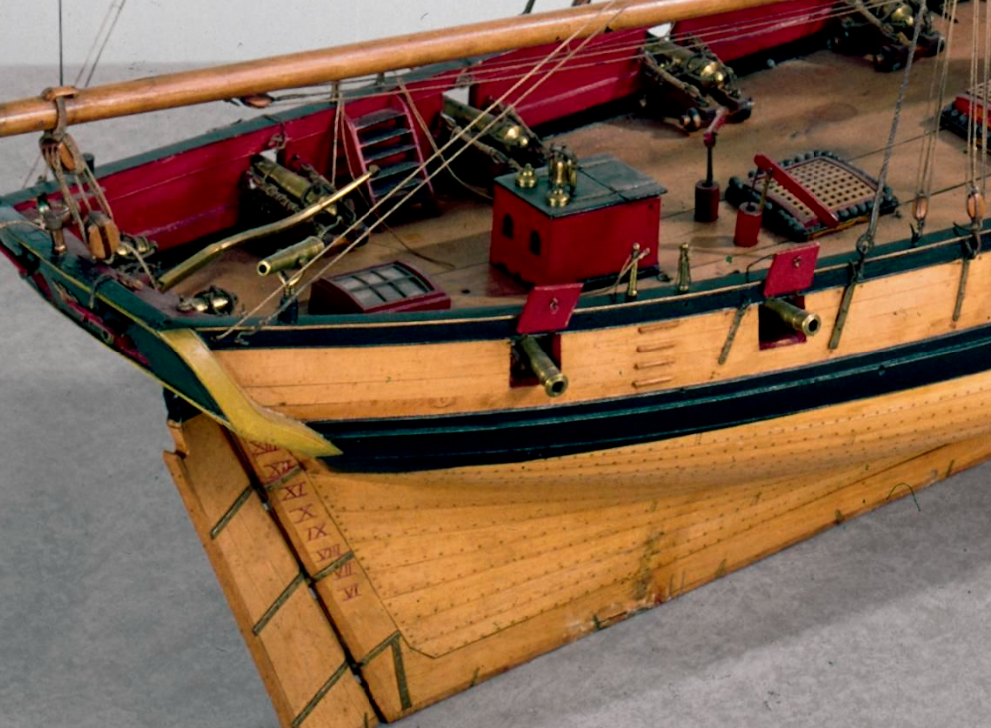
Here is another curious observation about the images in the Science museum. The image on the far left has water line markers and you can see shot in the shot garlands. The other two images show no waterline markers, and instead of shot you see a powdery residue and there is also a chip out of the keel that has been repaired in the first image. FWIW , I suppose we are looking at some restoration work in the first image. I think the first image has an over-all cleaner appearance.
-
I think the inconsistency is a matter of method for the riggers of the time and how a model builder chose to model it. The mechanics of sail handling are well established across the type of sail whether cutter or frigate. It remained the same for a couple hundred years. The details that changed was mostly about where a block was tied off or how long a pendant was, etc.. The rake/height of a mast the length of a yard and the number of yards could be changed by the master of the boat. Paintings are probably a good source for what worked in that regard. There is a lot of variation across the several cutter models in the gallery, but the necessary ropes/lines are all there. I don't think you can go wrong by mixing the features you like. I like the simplicity of four shrouds (Cheerful), but I also like the look of the extra tackle on the backstay. I think the two sheaves in the lower yard add extra work that I can do without, and the instances of one sheave are well documented. My council would be to not get bogged down in minutia that has several different, right ways of doing it, as it can really take the joy out of the journey. The answer to those who say Petersson got it wrong, is that whoever rigged the model got it wrong, if indeed they did.
-
Cutter Trial 1790 The lines don't appear to be leading the same as with the subject model.
-
I managed to find that the model of cutter Trial in the Gallery has the two sheaves in the lower yard. I’ll post a snip later. I wonder if Chris modeled this in his kit?
-
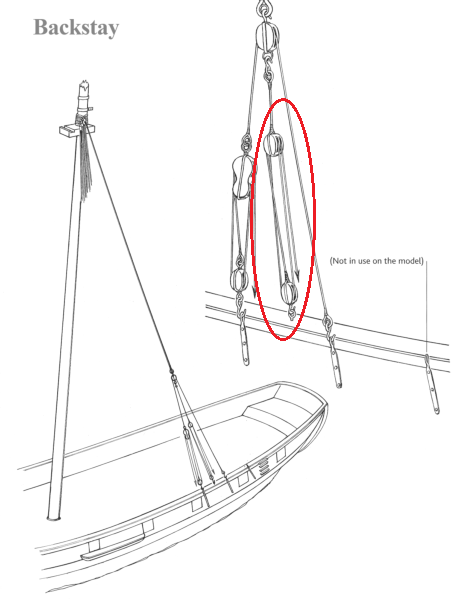
I think the extra tackle on the backstay adds a little bling to a relatively sparse rig. It doesn’t seem illogical that it could provide extra tension when adjusting the stay.
-
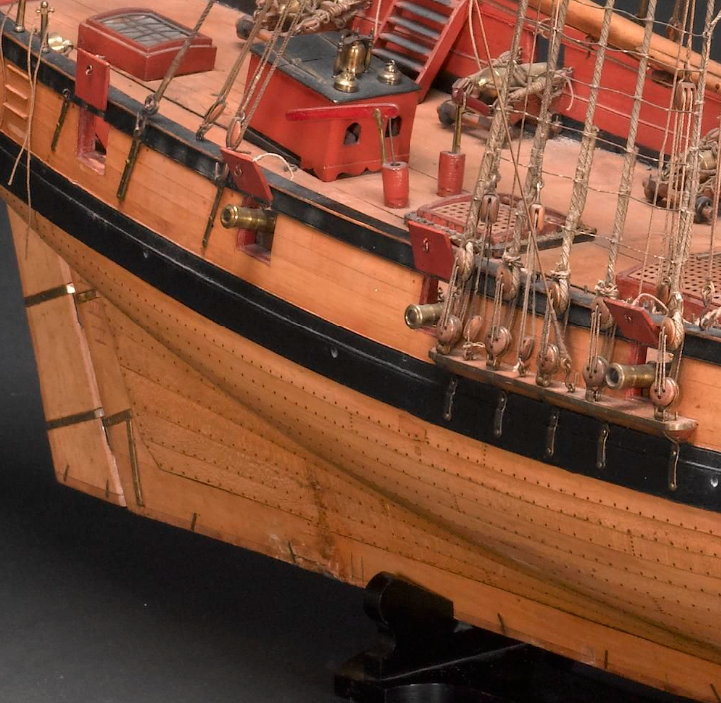
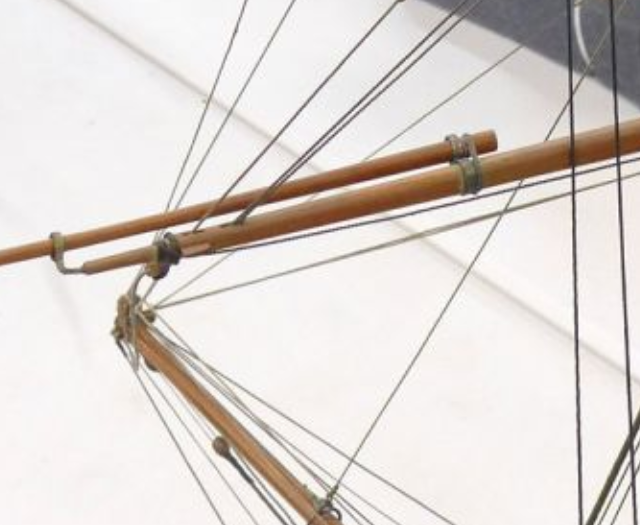
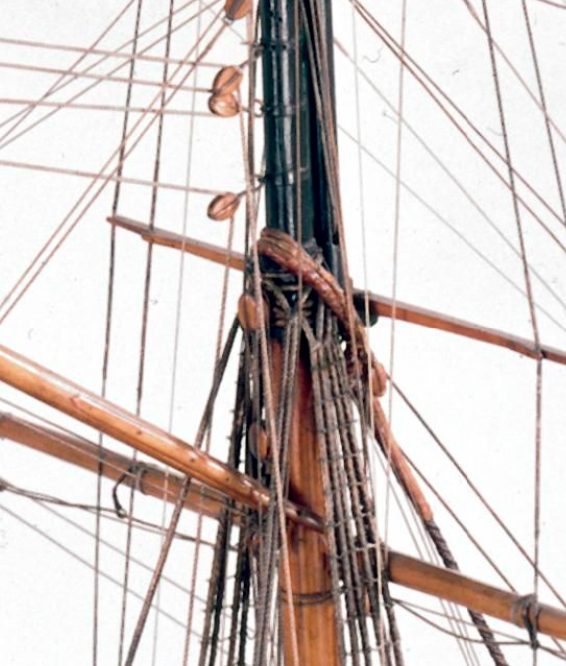
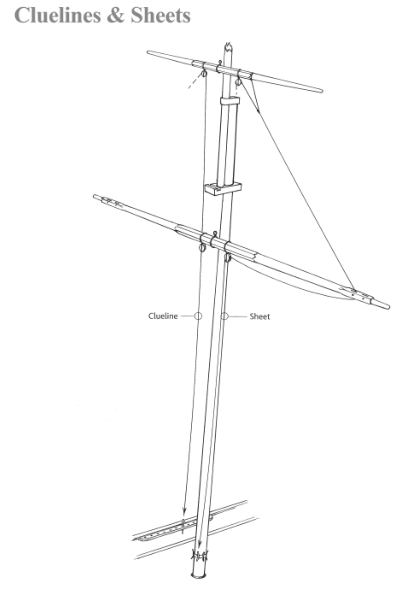
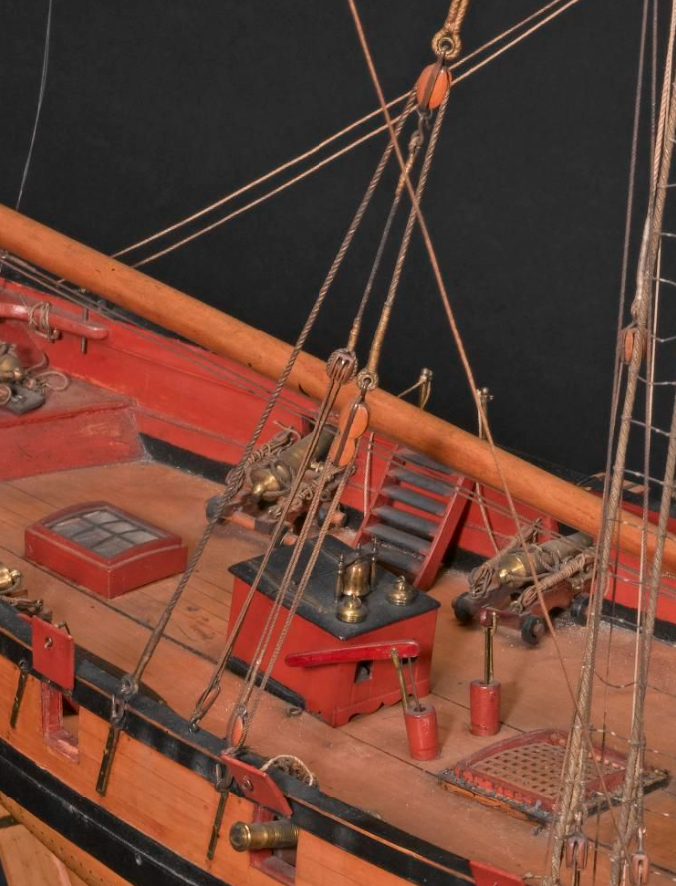
Here is the information I posted in Oakheart's Speedy log. I found the model that Petersson derived his drawings from: Rigged model of a late 18th century naval Revenue Cutter . The pictures are very high resolution and provide some interesting detail. As we discussed above, It looks like the main stay does go over that collar as shown in his drawing but it looks more robust than the apparent band in the drawing with the actual band being below the collar. The stay itself has a lot of parceling and serving, so it looks workable as shown on the model. The double sheave on the lower yard is apparent, but the Petersson drawings doesn't show the purpose of the outboard sheave. I traced the line to a block at the top of the mast, and can't really tell where it leads down at the mast. I can't make out where it goes from there. I will take a closer look. The other end of the line is hooked through an eyebolt at the channel. I'm at a loss as to the function of this line. I questioned Chuck about this tackle shown by Petersson on the backstay when I was using the Cheerful rigging for my Resolution. Chuck said it was just wrong and didn't belong, and indeed it's not present on the Cheerful model. However, it is clearly present on this model, and I'm thinking it may a working/loading tackle. There is a lot of detail to be gleaned from those images at the Science Museum, and gives the opportunity to be a little different from all the other cutter models, while still being accurate as far as the contemporary model builder was accurate.

-
Sounds like a good idea. I have more observations also.
-
I found that Model: Rigged model of a late 18th century naval Revenue Cutter . The pictures are very high resolution and provide some interesting detail. As we discussed in another topic, It looks like the main stay does go over that collar as shown in his drawing but it looks more robust than the apparent band in the drawing with the actual band being below the collar. The stay itself has a lot of parceling and serving, so it looks workable as shown on the model. The double sheave on the lower yard is apparent, but the Petersson drawings doesn't show one of the sheaves being used. I traced the line to a block at the top of the mast, and can't really tell where it leads down to at the mast. The other end of the line is hooked through an eyebolt at the channel. I questioned Chuck about this tackle shown by Petersson on the backstay when I was using the Cheerful rigging for my resolution. Chuck said it was just wrong and didn't belong, and indeed it's not present on the Cheerful model. However, it is clearly present on this model, and I'm thinking it may a working/loading tackle. There is a lot of detail to be gleaned from those images at the Science Museum, and gives the opportunity to be a little different from all the other cutter models, while still being accurate as far as the contemporary model builder was accurate. Tim, if I've cluttered up your log too much, let me know, and I can move this stuff over to the topic where we discussed Petersson's drawings.
-
Ron may chime in later, but his build is a Lumberyard kit based on plans by Harold Hahn. You might check with the Lumberyard to see if they offer the plans separately. I’m not able to post a link right now, but will later .
-
My bad on Halifax. I seemed to have got lost in what seemed to have been the thrust of the original 1st paragraph and the title of the topic. If we go beyond the revolutionary period there are quite a few models available.
-
The Lumberyard has Alfred and Halifax. There is a Mamoli Halifax. Don’t forget Rattlesnake and Confederacy. The other named ships were not contemporary with the revolution. Regarding the OP, I believe there are more kits of Continental ships than British that notably participated in the Revolution, unless some of the Vanguard kits fit that niche. The American Revolution ended in 1783.
-
Have you considered a dowel from a hobby store? Most I have seen have a very subtle grain.
-
I am certainly no rivet counter. I'm more of a " what looks good, is good" modeler. Too many "accurate " details can look cluttered and detract from the fine detail of model like yours. You are the captain of your ship, just make sure the rigging will work.
-
There have been several errors pointed out in this book, and I am in no position to critique it with any expertise, however, as I have pointed out before , Petersson is an artist and not a rigging authority. He drew what he found on a model with no apparent reference checking. I could be wrong but I have to believe what looks like a stay on top of that metal strap has to be wrong compared to actual practice. Who knows why the model builder did it that way.
-
FWIW, I have found that wrapping wire around a drill bit is the best way to get consistent size eyebolts, rings and hooks.
-
I’ve found that it’s easy to snap off the back end of the scalpel blade so it fits the #11 handle.
-
Great to have you back. I like Petersson’s book, but it has it’s critics, keeping in mind he copied what he saw on a model. I don’t think you can go wrong with Chuck’s Cheerful as a guide. You can download the instructions on Chuck’s Syren Ship Model site. Chuck’s and Glenn Barlow’s Cheerful build logs are great “go-to’s”. You could also do well to look at Thukydides Alert.
-
You might also consider Cornwall Model Boats. Their shipping charges to US are surprisingly competitive with US shops, and their pricing on European kits are discounted considerably compared to US prices.
-
Well, they have a presence on the forum.. You could ask them. Artesania Latina - Model Ship World™ OcCre - Model Ship World™