

Gregory
-
Posts
3,170 -
Joined
-
Last visited
Content Type
Profiles
Forums
Gallery
Events
Everything posted by Gregory
-

Unknown Royal Yacht kit.
Gregory replied to Lucius Molchany's topic in - Kit build logs for subjects built from 1751 - 1800
Why is it banned? We don't ban kits just because they are of Chinese origin. Do we know it is a knock off of another kit? I didn't see another match. -
Unknown Royal Yacht kit.
Gregory replied to Lucius Molchany's topic in - Kit build logs for subjects built from 1751 - 1800
On 2nd look, has a lot more bulkheads than the Mamoli kit. Still looks like a similar design. I found this which looks like a good match. Free Shipping Scale 1/80 The Dutch Royal Yacht Wooden Model + Brass Upgrade Parts+ Alloy Anchor - Model Building Kits - AliExpress -
Unknown Royal Yacht kit.
Gregory replied to Lucius Molchany's topic in - Kit build logs for subjects built from 1751 - 1800
Looks like Mamoli kit Mary. Check the link in my signature.. -
Occre VS Artesania dyes
Gregory replied to Johngr's topic in Painting, finishing and weathering products and techniques
I like the Artesania oak. It reminds me of a shade called “golden oak “. I’m not seeing much difference across the sapele’s and walnuts. I think it’s a matter of what you prefer. Because of the differences in display devices, we will all be seeing different shades. You will see as much variation across actual pieces of wood. -
I’m looking forward to your next project, whatever you decide.
- 840 replies
-
- 2
-

-
- winchelsea
- Syren Ship Model Company
- (and 1 more)
-
I've sourced a lot of wood from Ocooch, and was told they would do custom jobs, but they turned me down on a request for some 1/32 sheets. Do you think they would do strips like 1x 6mm?
-
FWIW, just got spammed with an add from Temu with what looks like Innocraftsman's $78 belt sander. Temu's price: $39.68. Their $269 mini lathe is $145 on amazon. Here is the topic where the mini drill press was discussed. It's currently selling for $83 on Amazon. That discussion led me to buy this: Mini Drill press I reviewed it here:
-
Byrnes Alternatives - Saw and Thickness Sander?
Gregory replied to Jcredding's topic in Modeling tools and Workshop Equipment
Love my FET. The Proxxon branded saw blades will bankrupt you though. There are some decent alternatives, so check back if you need some help finding them. -
The drill press looks identical to one brought up in another topic. I don't see anything you can't find on eBay or Amazon...
-
Please note who posted post #9. I guess you are not familiar with how the forum works. Post #9 was made by me, in which I provided a link to another discussion on this Forum that was started by DrPr over 5 years ago. It also contained a lot of other information about gun rigging, recycled as it may be. We share a lot of information by 'recycling' relevant discussions, instead of trying to answer the same questions over again. In addition to Henry's excellent answer, consider how much tension was on that hook when the gun as run out; it couldn't have been unhooked without loosening the tackle, which wouldn't have been a good idea on a rolling sea. That might be a good point to bring up at " the other Forum ".
-
What linked blog are you referring to? Dr PR hasn't posted in this discussion. My links are to discussions in this forum, one of which had 126 replies. Those discussions contain contemporary documents and informed research regarding your question/s. This is not the first time these questions have come up . A search for "gun tackle" returns 439 posts. Showing results for '" gun Tackle"'. - Model Ship World™
-
I don't feel like giving a review of this at this time because it had obvious problems out of the box, and I don't want to take the time to give it a thorough work-out. The variable speed control was loose, and though I was able to tighten it up, the speed control didn't really work. There were dead spots as it was rotated. Overall it seemed well made for the cost, but the quality control was obviously lacking. It was Amazon Prime, so I am going to request a replacement and see what happens.
-
Quite a lengthy discussion here: This is how dafi has rigged his Victory, and I know he has done a lot of research. We have had other discussions about rings which are difficult to find documented explanations, however they appear on many examples. There is speculation that they may be for lifting/moving the gun about. Here is another lengthy discussion.
-
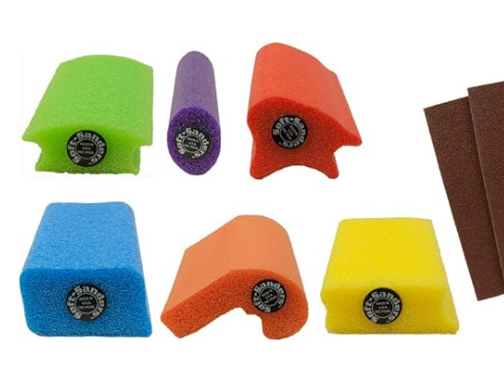
Don't be afraid to use a bit more coarse for fairing. 180 or so. If you think you will be doing more of this going forward , here is a great item to have.: Soft Sanding Blocks. I also really like Dura Gold adhesive backed sand paper. It has virtually no clogging in a wide range of grits.
- 84 replies
-
- 5
-
-
- half hull planking project
- NRG
- (and 2 more)
-
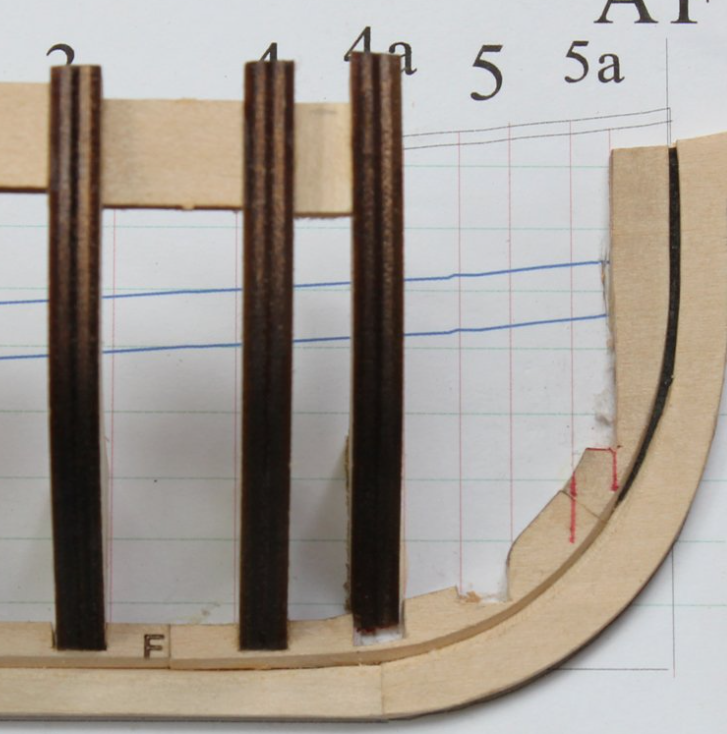
That view really shows off your planking at the stern!
-
I will add that Joe ( Modelers Sawmill ) will do custom jobs. Just send him an email. Determine how many strips you need of your choice of wood, and he will give you a quote.
-
Keep in mind the Confederacy kit is 1:64 while the Winchelsea is 1:48.
-
While I agree with this, I found the Dremel branded one to be very problematic with a lot of play in it that I could never work around. I settled on a small drill press that is working well so far.
-
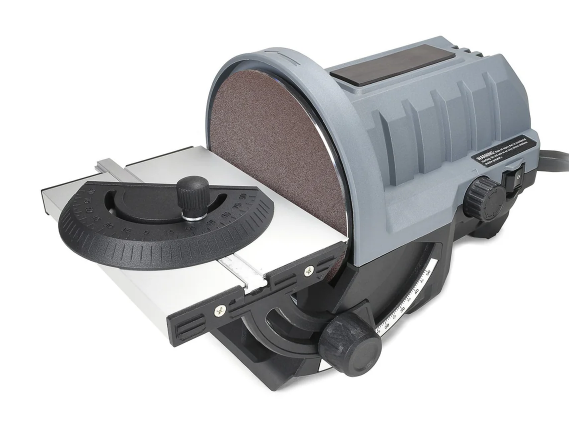
The MicroMark disk sander looks like it should be comparable to the Proxxon for about $100 less. I've been getting by with a bigger benchtop sander, but I'm considering getting this one.
-
It looks more like a mass produced decorator model rather than a kit.
-
Hey everyone, I deleted my “wanna-be” comment. I realize it didn’t convey the message I intended. This kit is certainly more of a challenge than I want to undertake. I hope we get to see a successful build.
-
Posting photos in build log problems
Gregory replied to Desertanimal's topic in Photographing your work. How to do this.
Google for a .HEIC converter. There are free ones out there. Is your PC Windows? You can open in Windows photo viewer and save as .jpg. -
I see the same issue on Toni's log. She doesn't mention it. I think you should be able to just forge ahead without doing any trimming, without affecting the final outcome. But of course that is up to you. Looking ahead in her log, I still see a small deviation there at 4. So I think you will be good.
- 84 replies
-
- 4
-
-
- half hull planking project
- NRG
- (and 2 more)

