

My Fathers Son
-
Posts
193 -
Joined
-
Last visited
Content Type
Profiles
Forums
Gallery
Events
Posts posted by My Fathers Son
-
-
13 hours ago, Keith Black said:
Then I've gotta stop what I'm doing and schedule visits to all the various mental hospitals.
You'll find me in the Royal suite in Caterham-on-the-hill. Pop in for a mince pie for Christmas.
- Keith Black, mtaylor, FriedClams and 1 other
-
 2
2
-
 2
2
-
I have finally got around to ordering some belaying pins. In the mean time I have been taking a good look at my yards. I am happy with how the lower yards are coming along but when I look at Keiths examples, the blocks I have a just too big. So I have ordered a few 2mm and 3mm blocks to see how they will look on the Royals and Top Gallants.
When I set out on this journey, working with such small sizes seemed impossible but not so much any more. The 5mm ones I have on the Mizzen Royal look out of proportion.
These should arrive about Wednesday so I will up date then.
- mtaylor, LeoM and Keith Black
-
3
-
-
NenadM,
Just one small suggestion, you need to make a hole to insert the TopGallant Mast into the top.
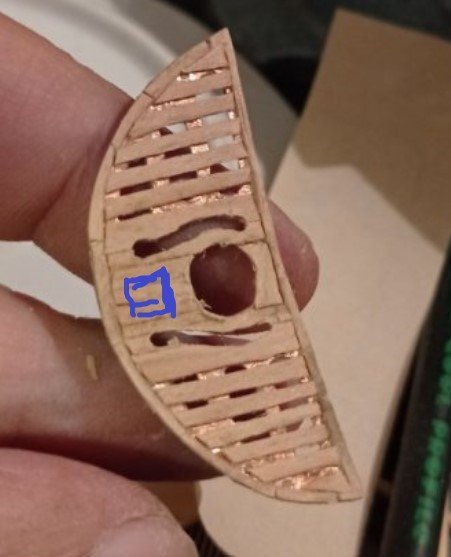
The space between the holes is for the cables for the shrouds to pass between the masts and down through the top in the slots you have cut.
Simon
- GrandpaPhil, NenadM, Jack12477 and 1 other
-
4
-
5 hours ago, NenadM said:
Serbia is continental land without navy tradition, and in our language, there are not terms for all parts of rigging mast and yard details.
Just a quick point on this bit NenadM, dont knock your knowledge on this subject. I come from an Island nation famous for its naval history but there are very few people in this country, including myself, who would not have the faintest idea what a Trestletree or Crosstree is, let alone a bunt line or deadeye without having to research the subject first.
This is a language all of its own that was known to a select few and even that fell out of use over a century ago for the most part, so you are not alone in needing a very specific type of dictionary and thesaurus to get to grips with the task ahead.
Simon
-
I agree exactly about the scale problem, my own Cutty is approx 1:100 and had to surrender to the fact that I wanted to display something that represents what she looks like, but the rigging scale would not be absolutely correct. So my deadeyes are all 5mm. I could have gone for 3mm for the upper shrouds, and in hindsight, probably should have, but it's been a steep learning curve for me also.
I used 1mm thread for cable, 0.7mm for halyards and 0.35mm for ratlines. I will use the same sort of scale to differentiate between the rest of the stays, halyards, and finer ropes like buntlines.
At the end of the day, it's your project and the level of detail you go to is always personal choice, I have had to make plenty of such decisions myself as I wanted to retain as much of dad's original material model as I dared.
Keep up the good work.
-
2 hours ago, NenadM said:
Next step
Micro ironing
And 12 little holes

NenadM
I believe these are known as Crosstrees. They are not a single piece but a construct of a number of pieces. The piece below is normally on the side of the mast and are known as Cheeks, their purpose is to provide a support for the Trestletrees that run fore and aft either side of the mast. Cross trees would be set into these providing a base onto which a platform was built leaving a gap either side of the mast known as a lubbers hole. Bolsters were mounted on top either side to support the shrouds that would pass around the mast and down through the lubbers hole.
The holes you have made are for the upper shrouds either side and the running gear for the bunt lines on the front.
These are typical constructs that can be found described here on Model Ship World.
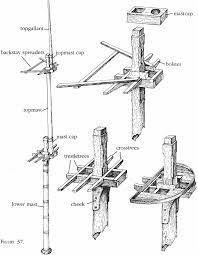
Hope this helps
Simon
-
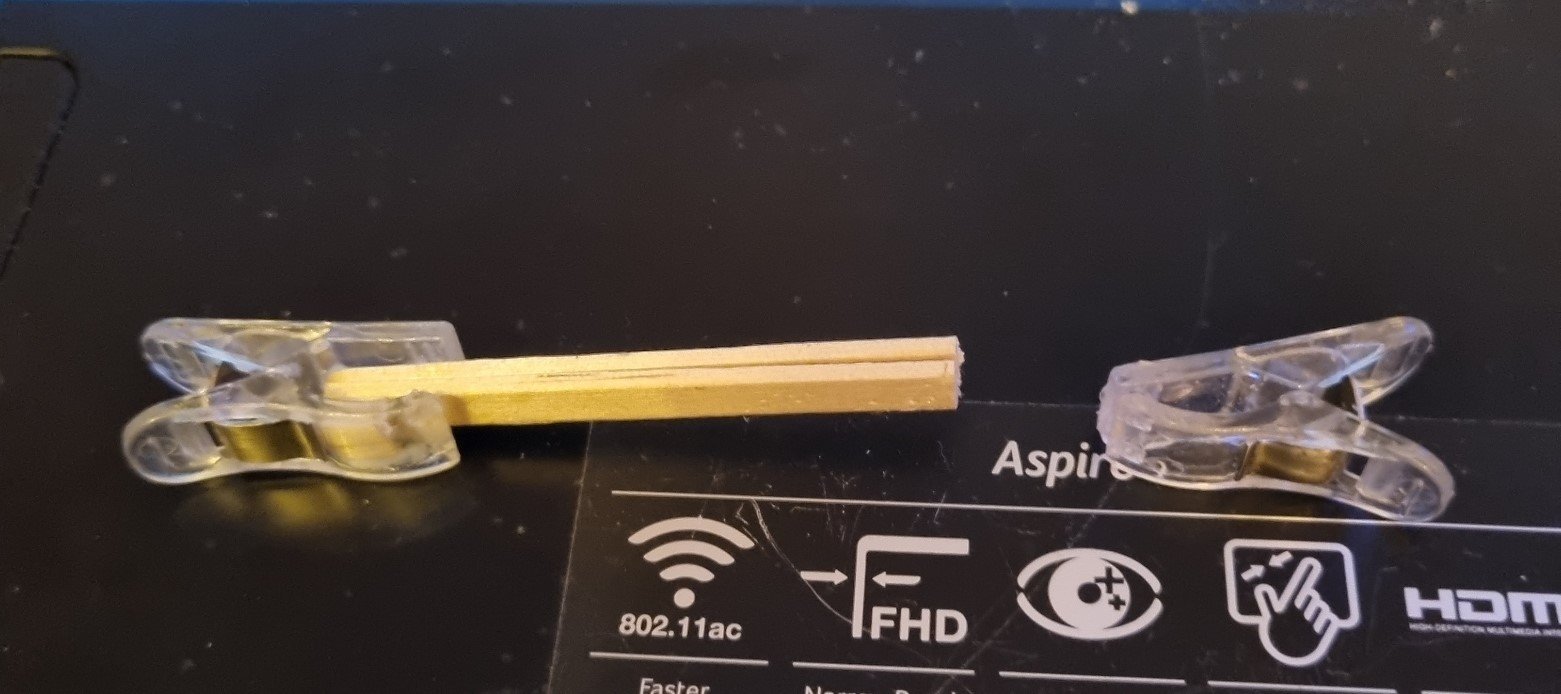
Hi, I used something very similar on my Cutty Shrouds.

The two strips are CA'ed to the jaws of the clamp on the left and then just clamp the other end when its positioned correctly. I found that anything heavier than this dragged on the shrouds and upset the balance and tension of the shroud.
I too would credit the idea to this platform but not to any specific post.
Very nice shrouds, your Cutty is looking very good.
Simon
-
Hi all,
I have been quiet of late as progress has been slow. Basically, I have been trying to make head or tail of the Rigging plan for Cutty and not getting anywhere. I dont want to start on bits and pieces only to realise later on I have made a rod for my own back, so I want to make sure that I am working from the centre line of the boat outward. I have made and installed the Gaff sail, and am now working on fully dressing all the yards for the Mizzen Mast. Just the Royal to finish off. I have given up trying to understand Cambells drawing and have gone to Harold Underhills Plate No 34 - Running Rigging on Square Sails.
I am fairly sure I know where I am going with the Stays and Shrouds. If I am reading this right, Bunt and Leech Lines go in front of the sail and Clew, downhaul and sheet lines behind. This starts out very simple from the Royal and gets more complex as you work your way down to the course and the deck. At that point, I will have to go back to Cambells drawings to get an idea on where to install the belaying points for the lines.
One thing is for sure, I dont have enough Pins. Oh well, after I have completed the Mizzen, at least I will be able to estimate what I will need for the rest of the boat.
Enjoy the rest of the weekend.
-
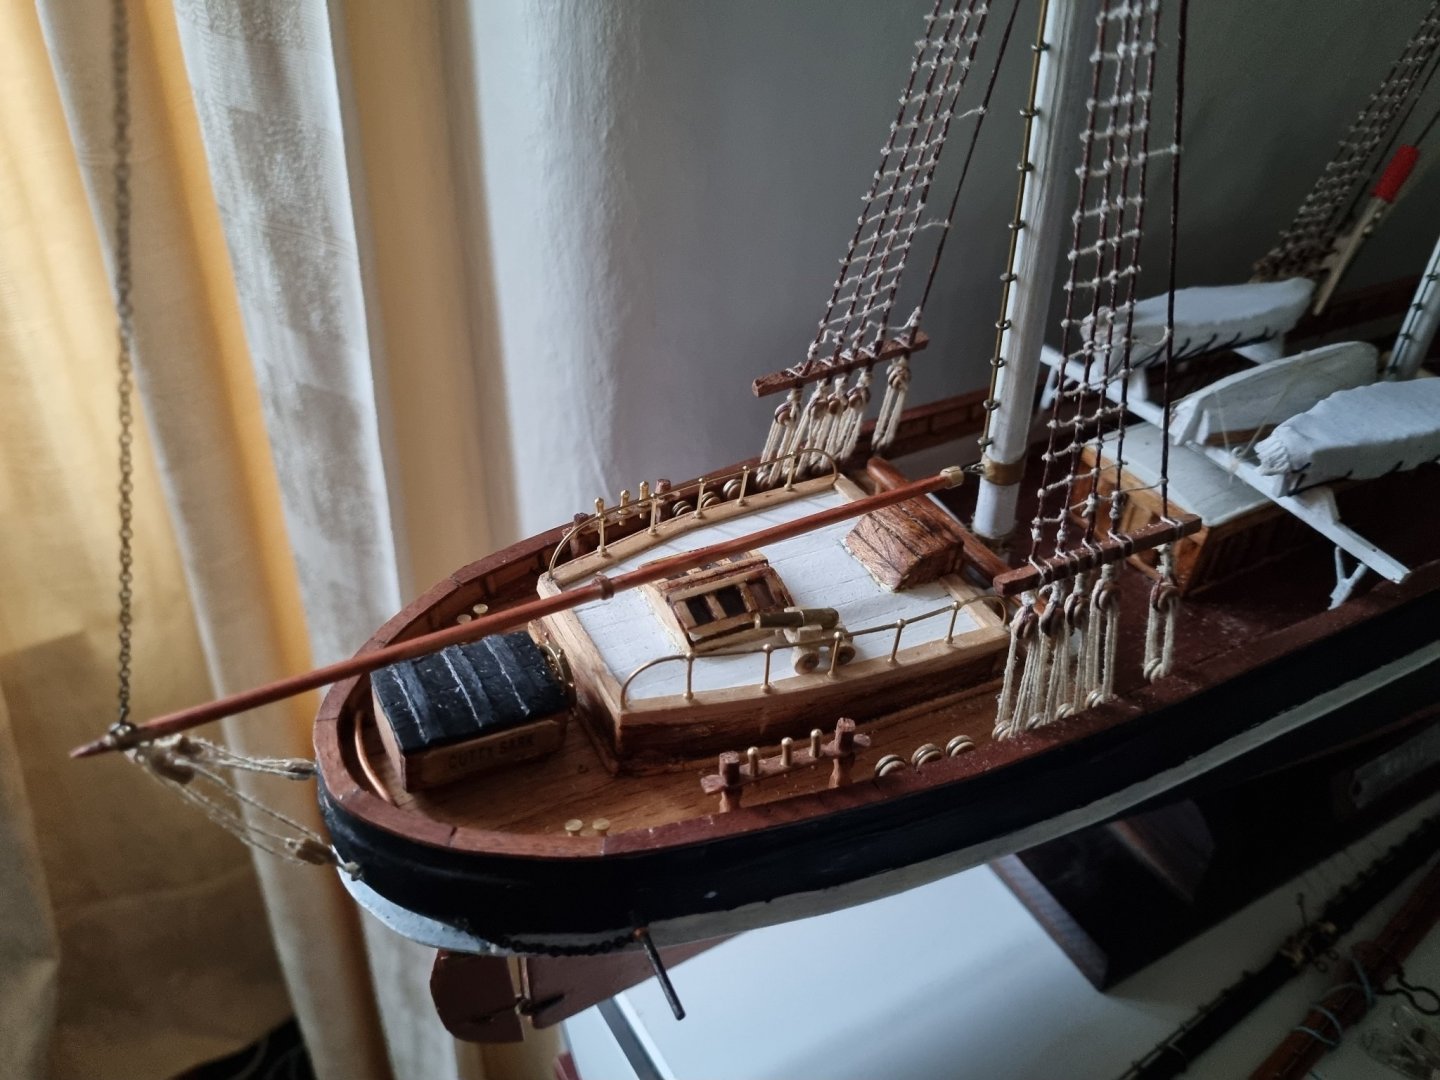
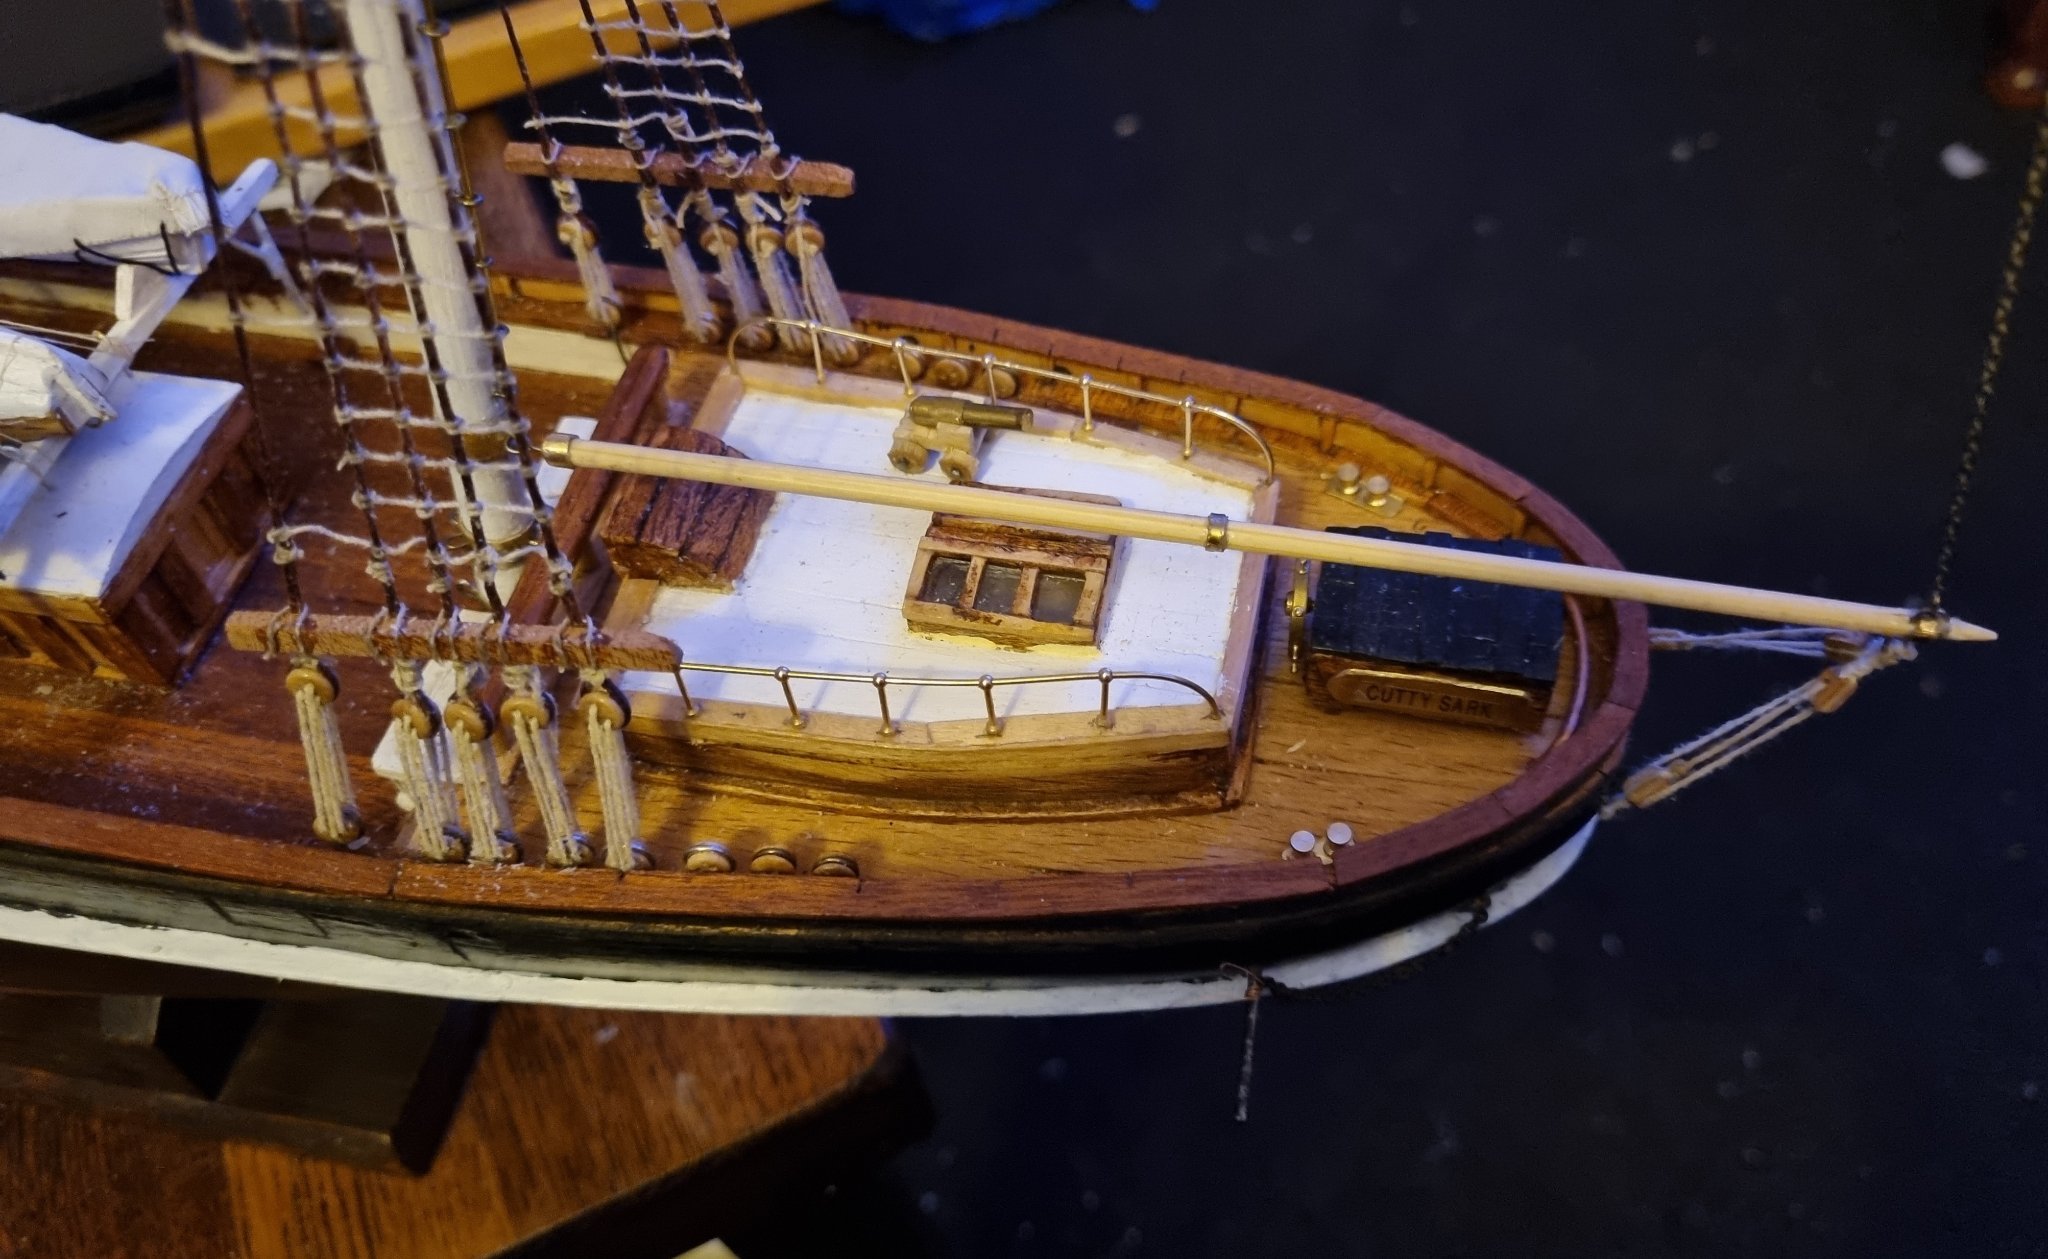
A little progress made.
- mtaylor, ccoyle, Keith Black and 2 others
-
5
-
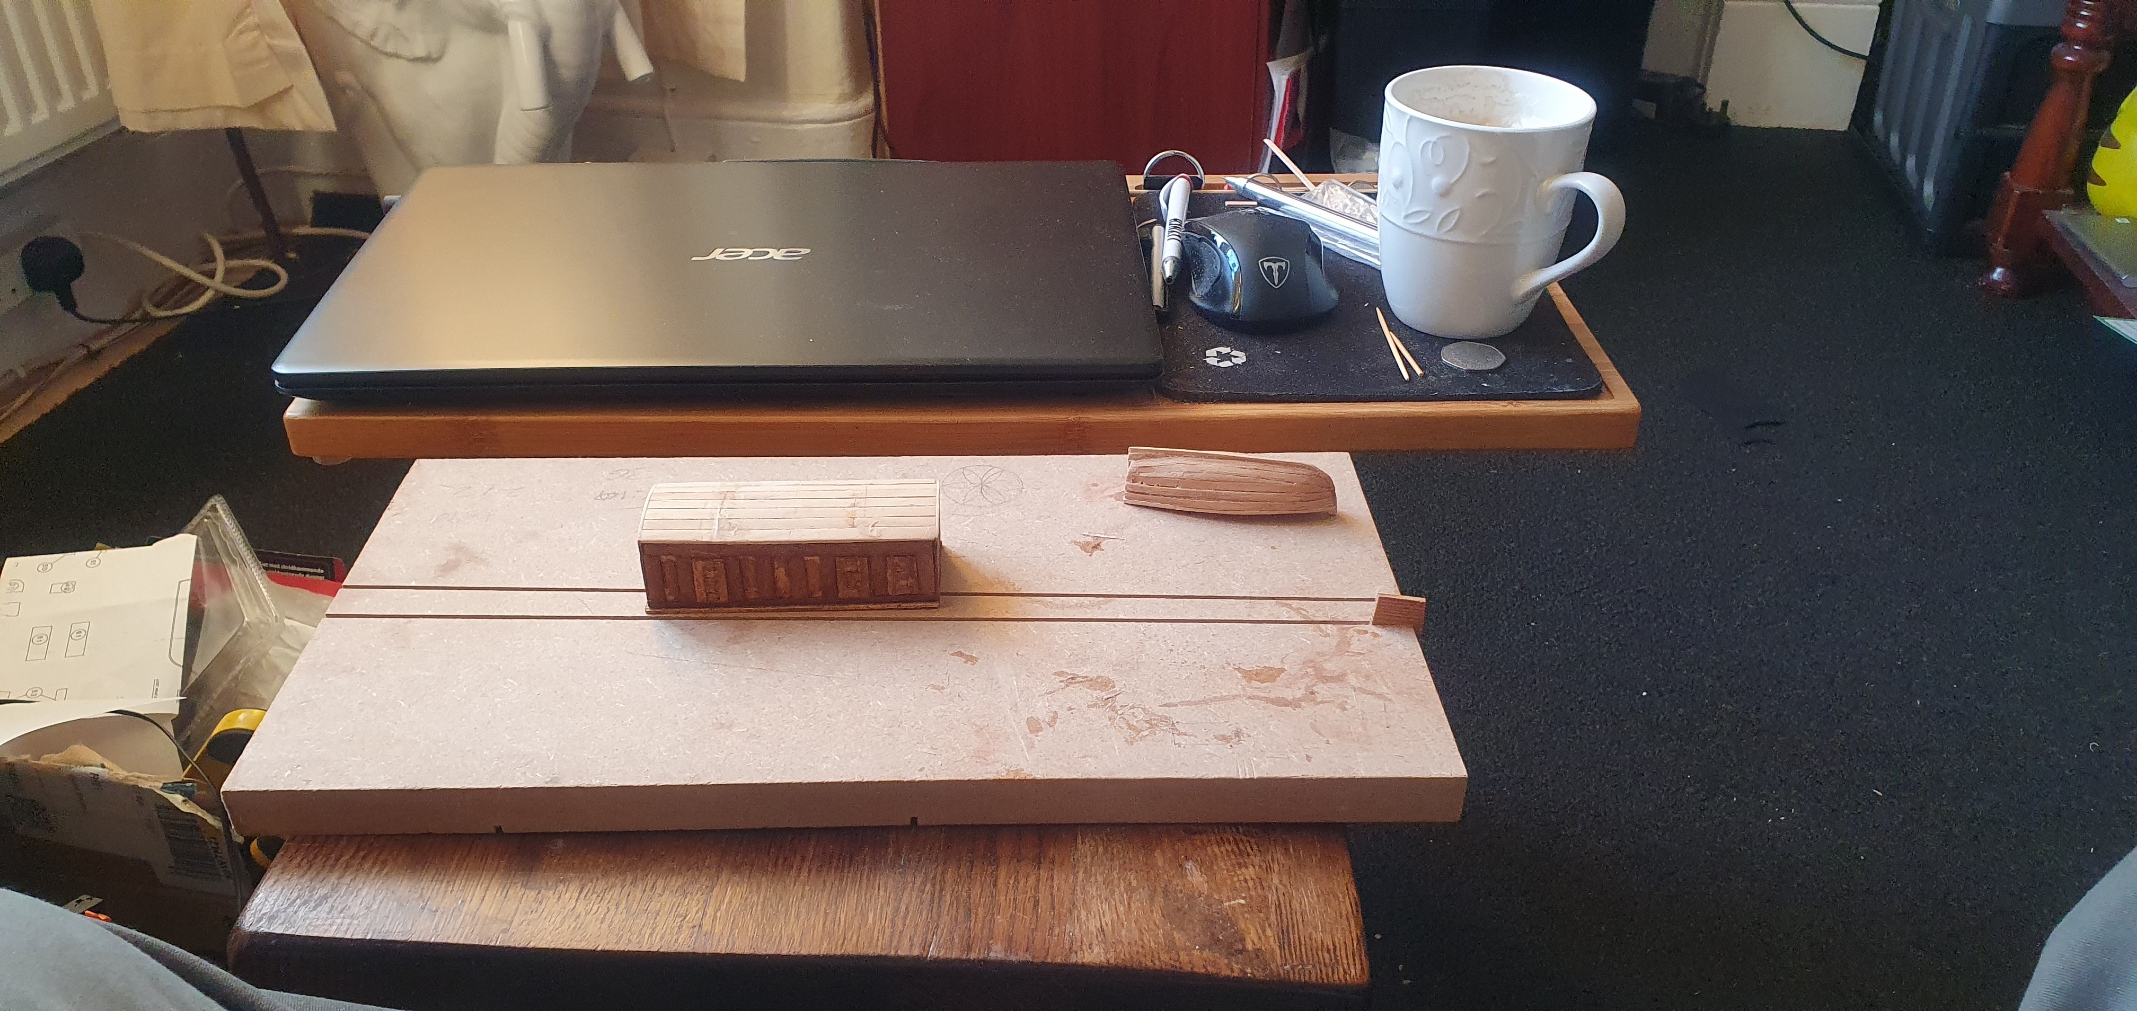
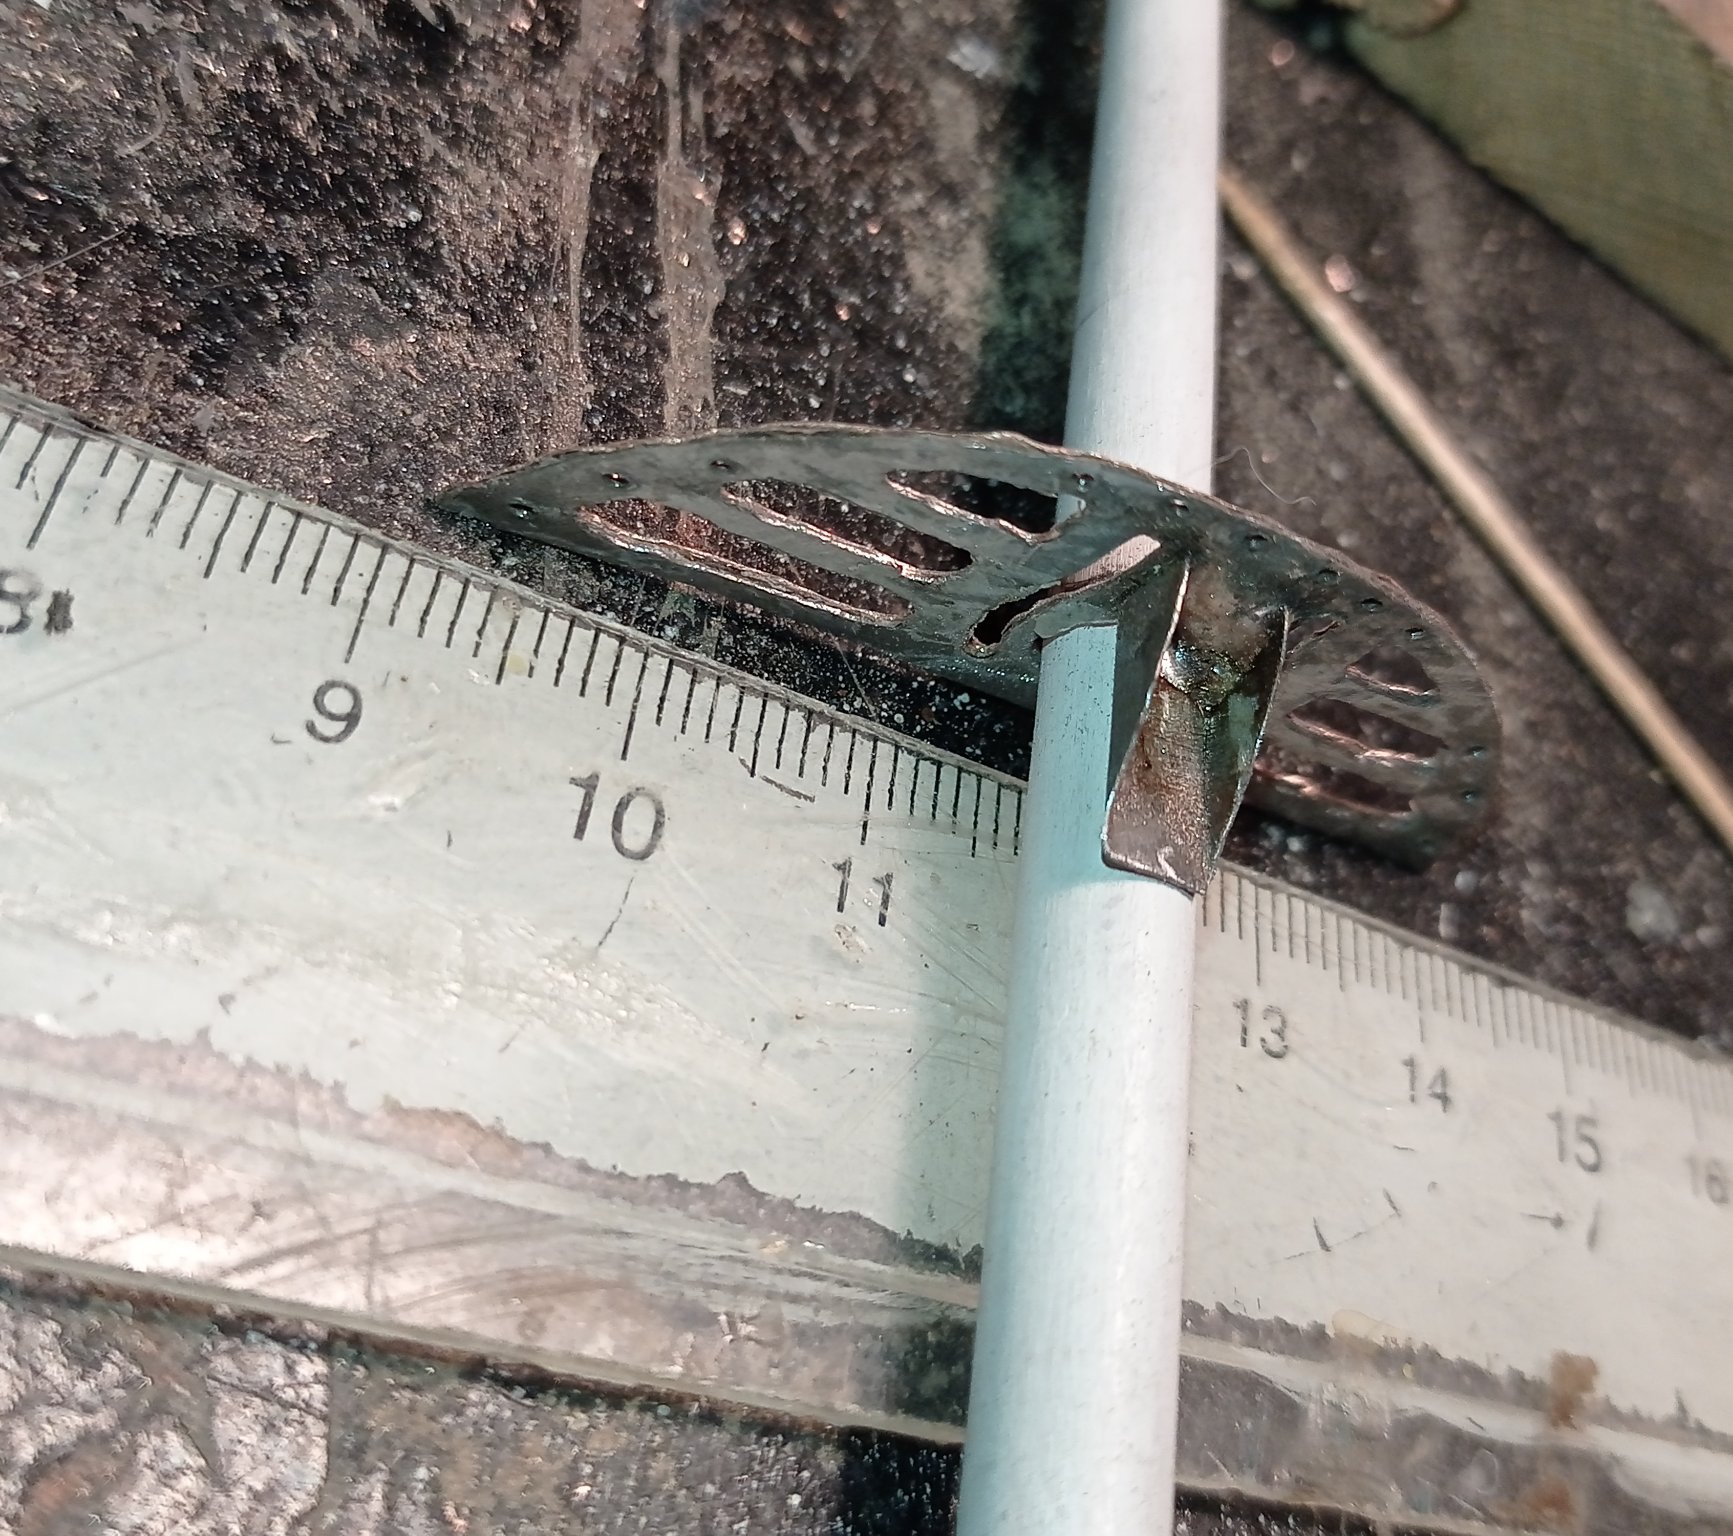
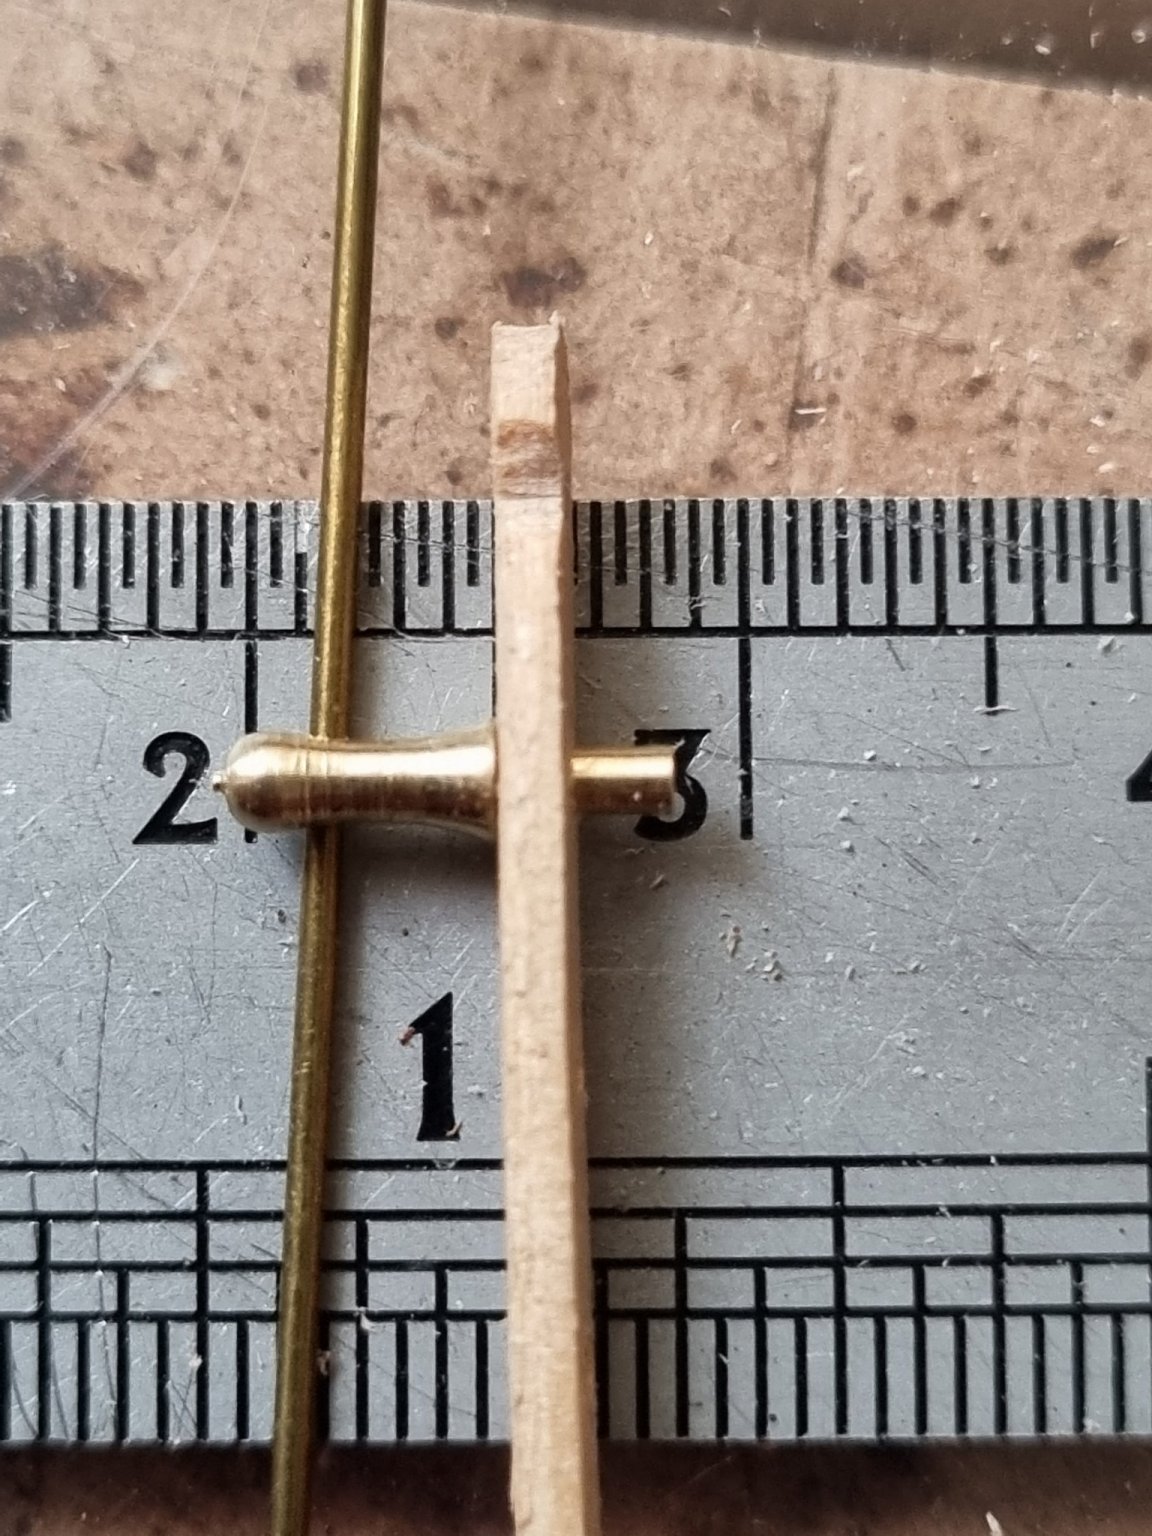
Working on those pin rails I have the aforementioned problem with the proportions of the pins. They are 9mm so already large scale wise, but the pin is disproportionately short compared to the handle. Not a major problem when used on the brass pin holders on the mast but problematic on a pin rail.
I have some mahogany strip that I wanted to use but as you can see, there is not enough pin protruding from the bottom of the rail.
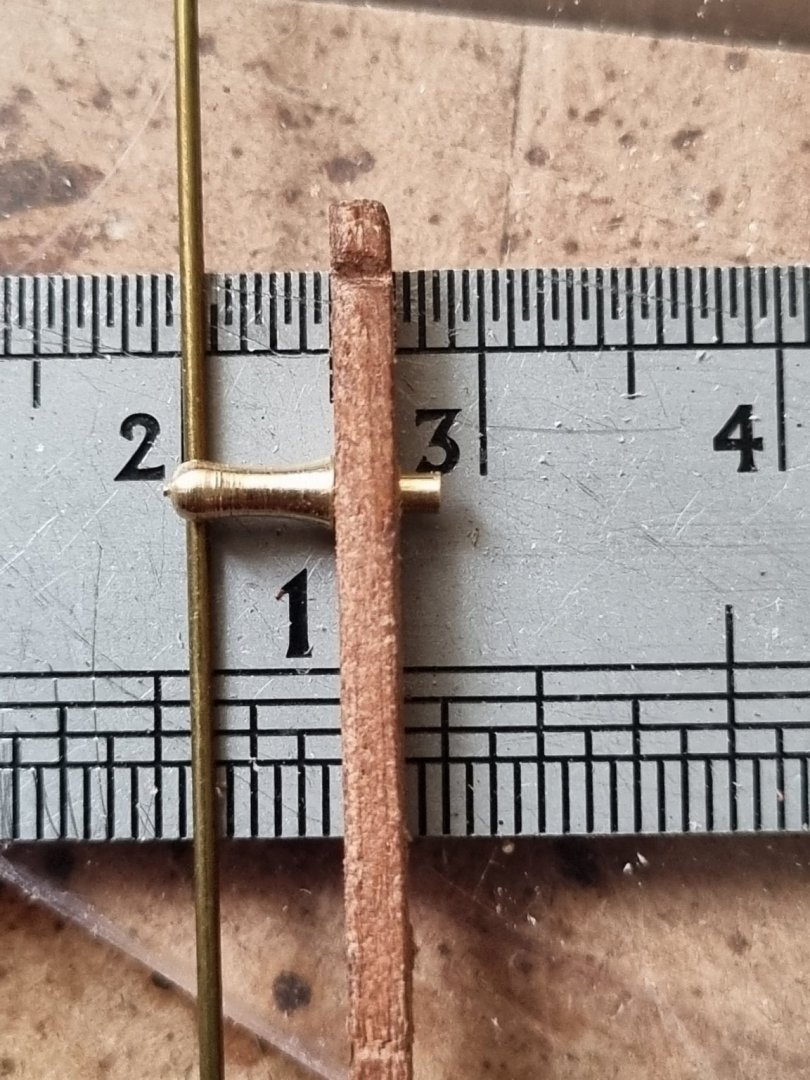
I don't have a micrometer but that looks about 1.5mm thick.
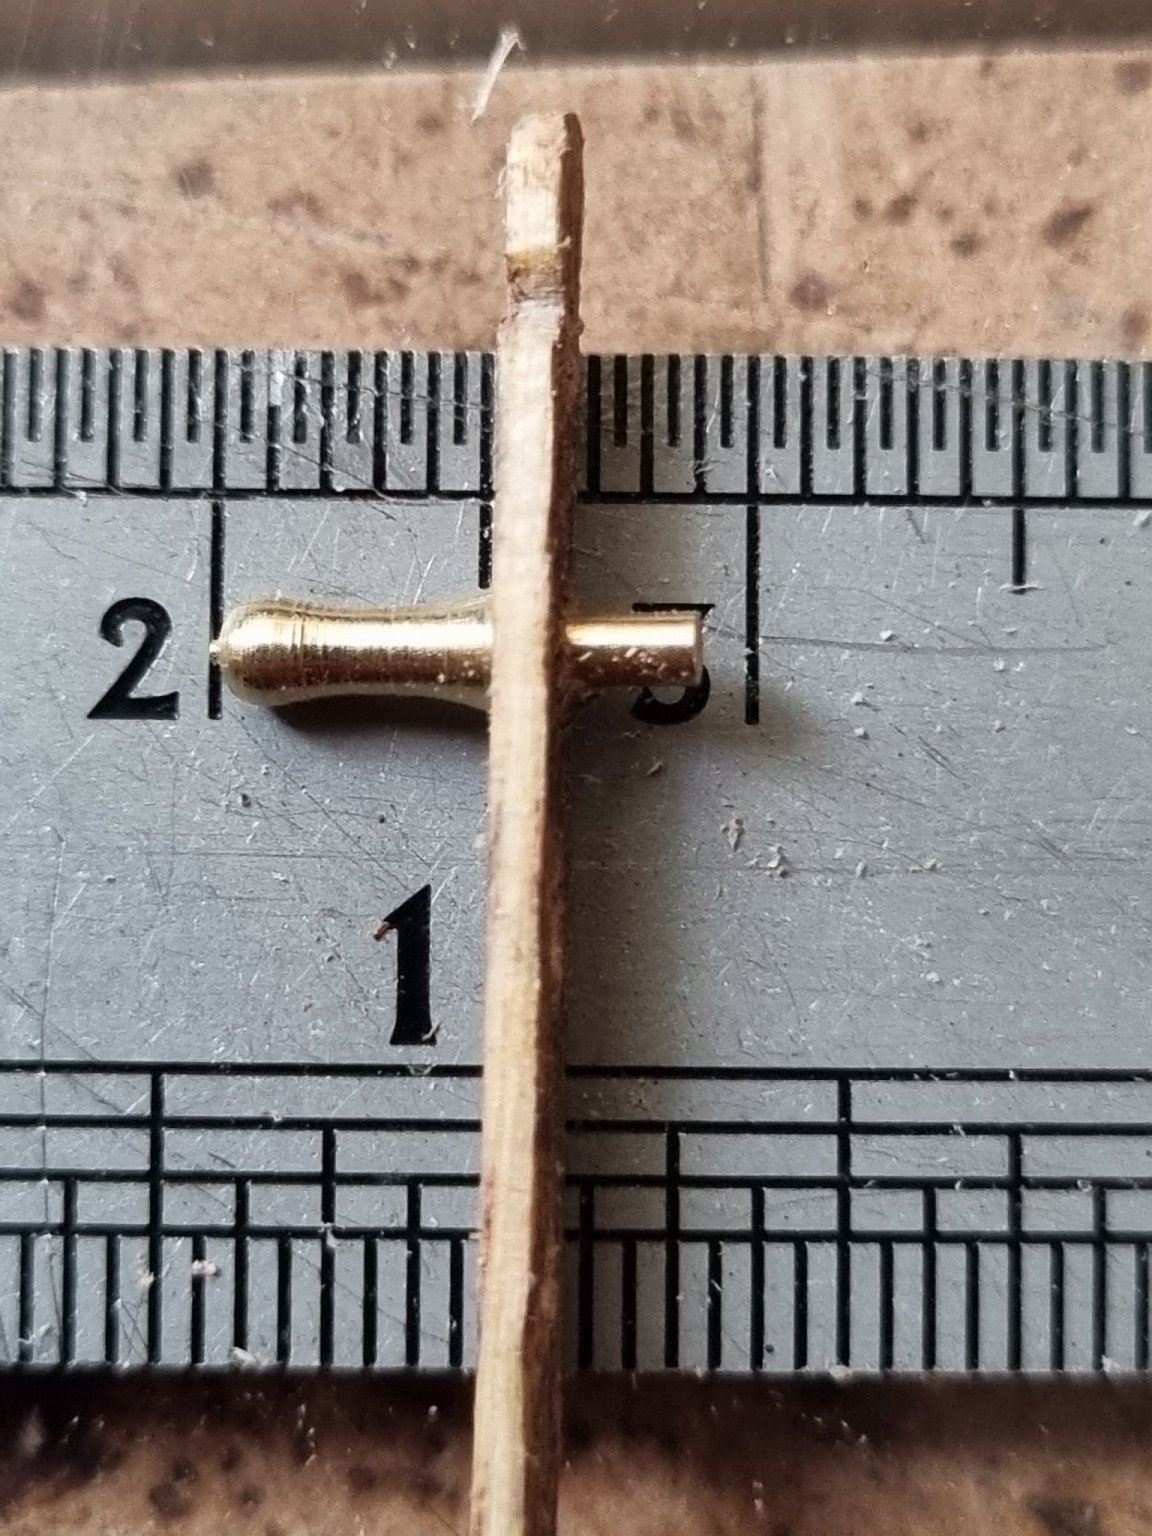
I tried a Starbucks stirrer.
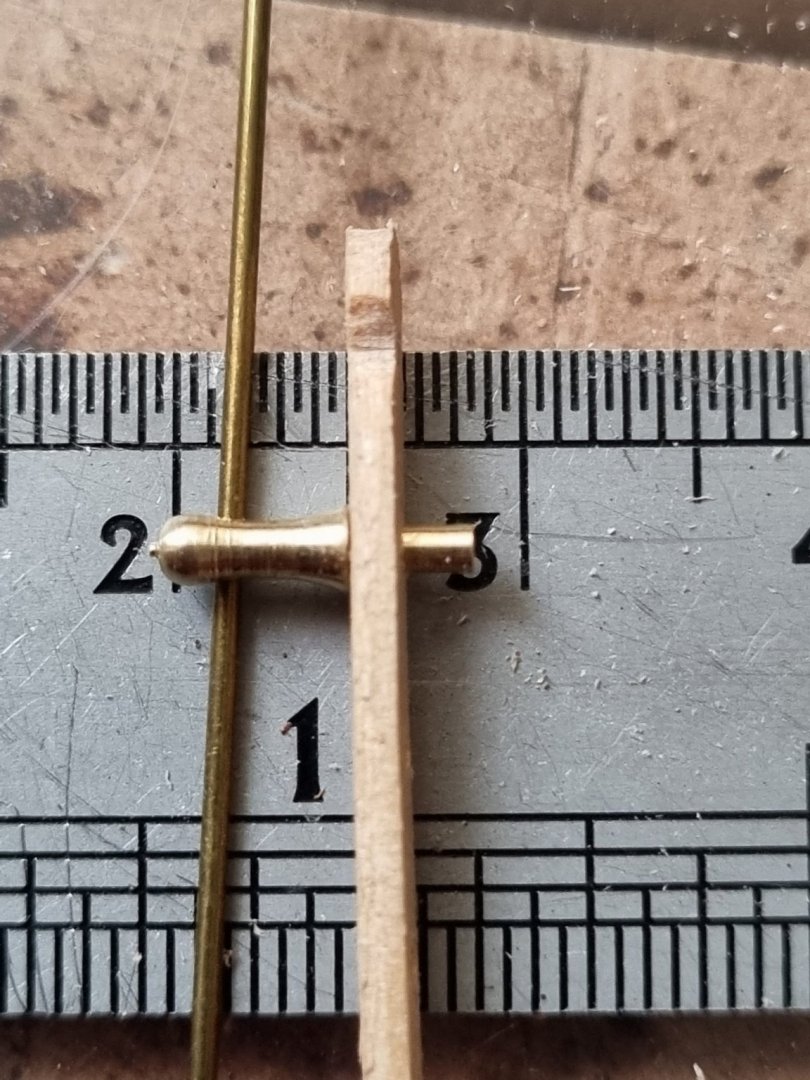
That is better as the stirrer looks about .75mm.
I then tried a Costa stirrer, this looks about .5mm so I suspect I will have to go with that.
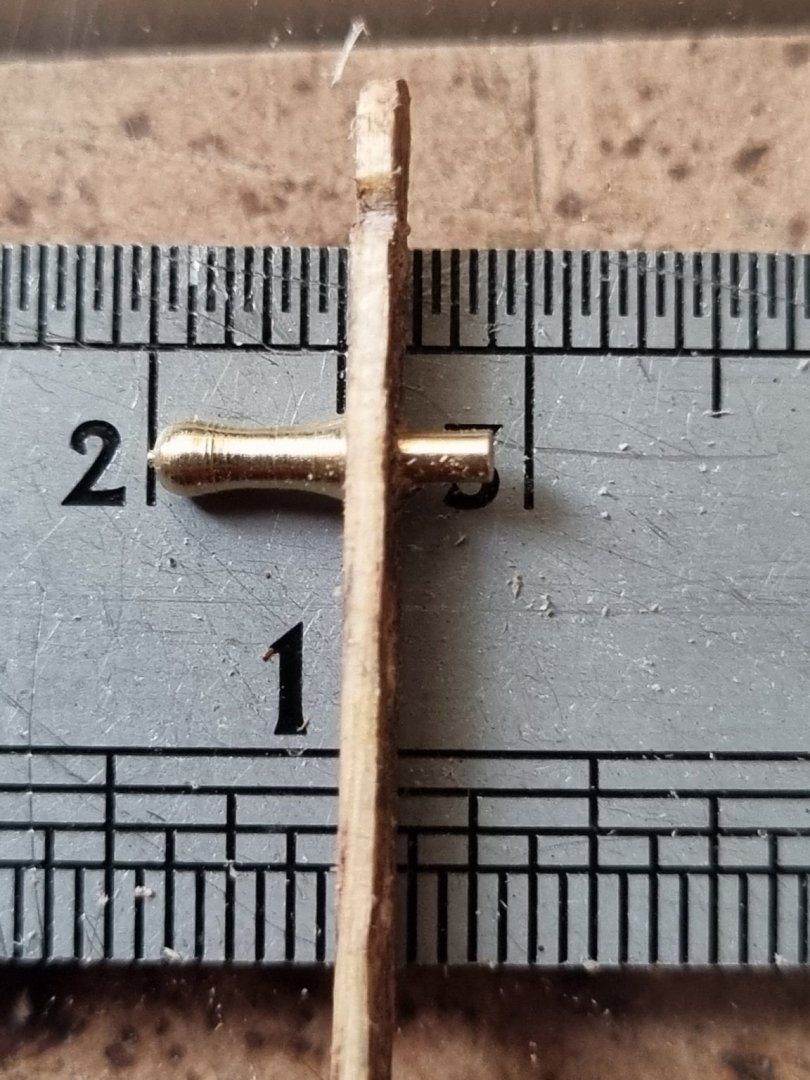
So one more to make, then I can look at the posts, that will be square mahogany stock and I will try to make them a little less blocky.
Simon
- mtaylor, gieb8688, GrandpaPhil and 1 other
-
4
-
Today

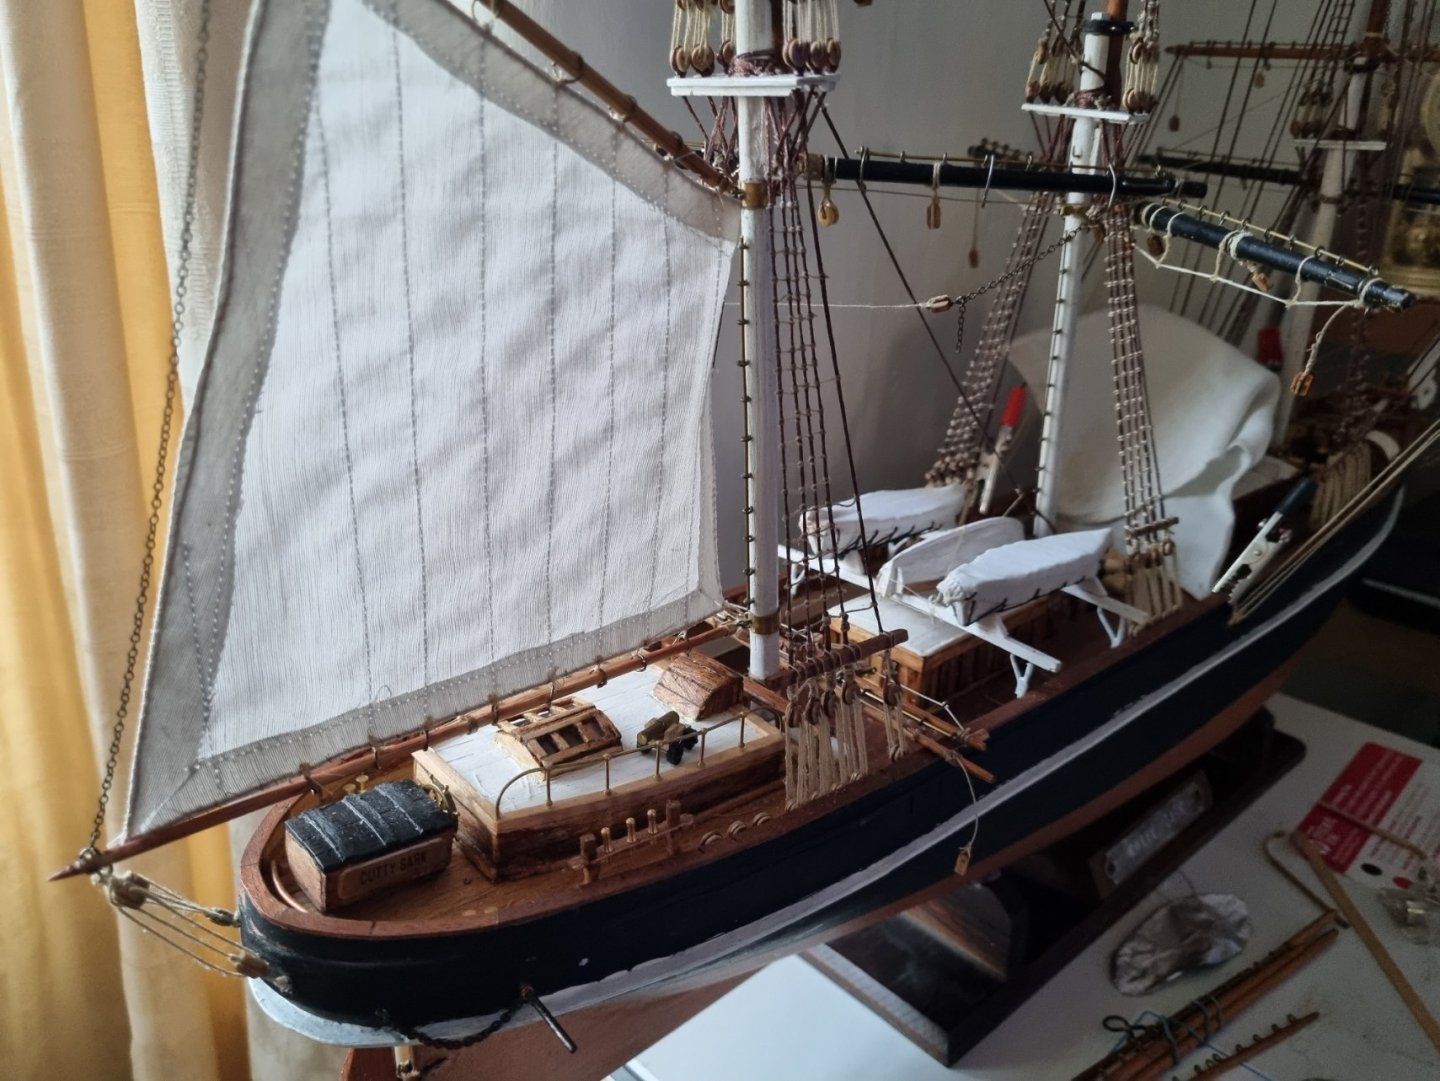
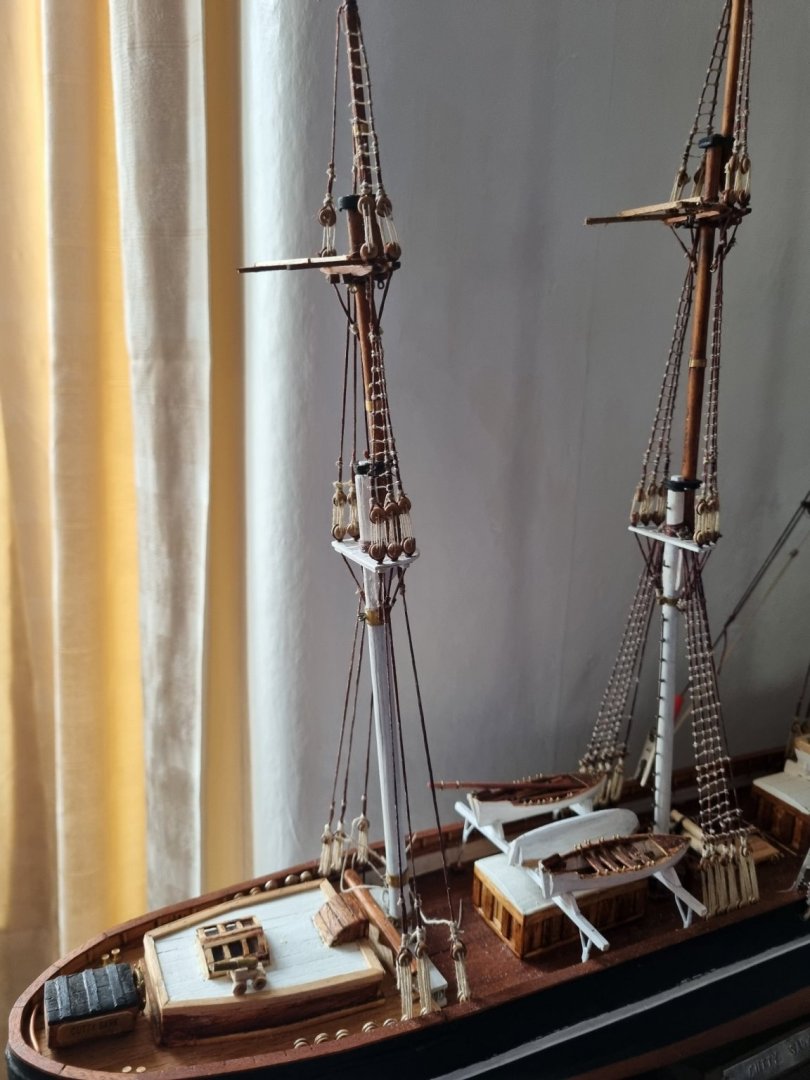
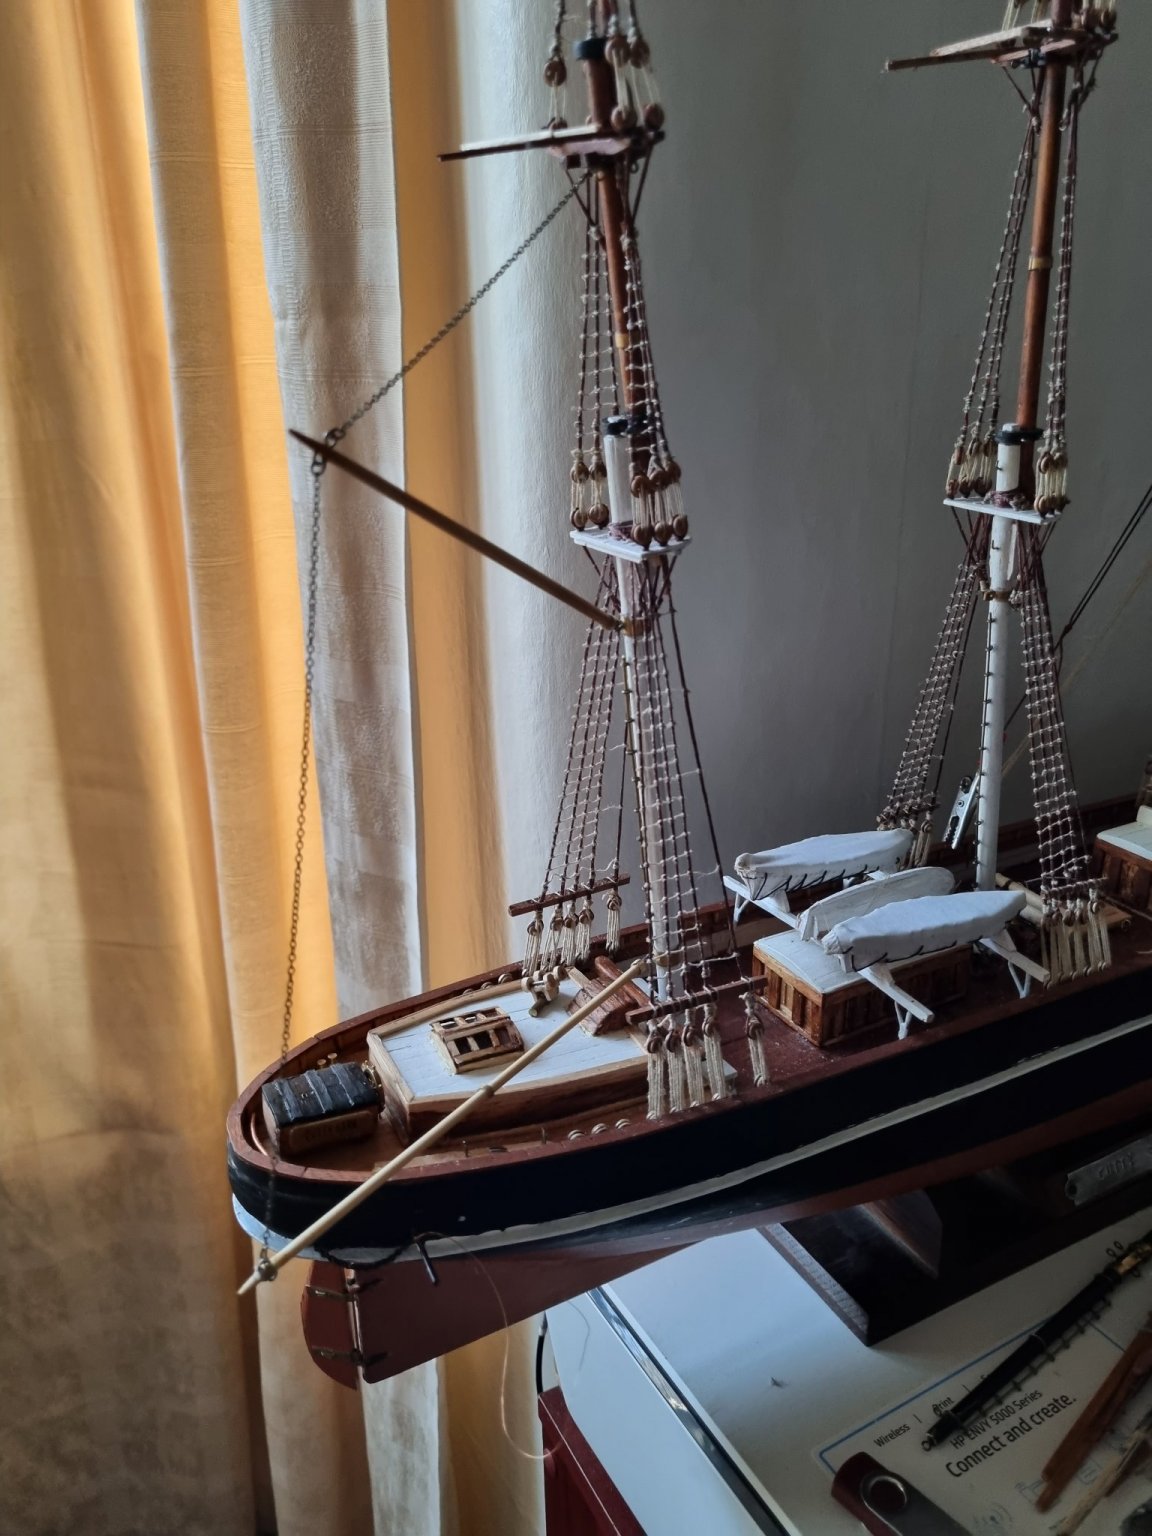
Well, I turned them around and managed to install the chains. I will put the rear stays in place tonight so it is not swinging around. Will have to sort out the stations and rails on the Liverpool House next.
I have made canvas covers for the two life boats. Might be a little oversize but I have not tied them down yet.
I have now installed the rails o the Liverpool house and set up stays for the gaff.

still need to install a pin rail either side before I can go ahead with the Mizzen Backstays.
Simon
- GrandpaPhil, gieb8688, mtaylor and 1 other
-
4
-
Well, I turned them around and managed to install the chains. I will put the rear stays in place tonight so it is not swinging around. Will have to sort out the stations and rails on the Liverpool House next.
I have made canvas covers for the two life boats. Might be a little oversize but I have not tied them down yet.
Simon
- gieb8688, Tigersteve, Keith Black and 2 others
-
5
-
Thanks for the likes guys but has anybody spotted my schoolboy error. The bleeping gaff and spanker are mounted in reverse, do'h.
Oh well, they will have to be removed, revised and re-installed tonight.
Bah humbug.
Simon
- mtaylor and Keith Black
-
 2
2
-
My stepfather was Sicilean, amazing how as kids the first Italian words we learned were cuss words.
Simon
-
Well, I am glad to say that I have finally finished up the ratlines.

I have also reworked the connection for both the gaff and spanker. These need to be stained and varnished and the upper chain installed but I am happy with the metalwork now.
Next biggest job that ends to be broken up is making the sails.
Lots of part started jobs to finish off.
Need to work out where all the deck rings will go to secure rigging.
Need to calculate just how many rigging blocks I am going to need and how many I have. I also need to take stock of what I am doing with belaying pins and whether I can use the ones I just bought.
I would really like to be able finish before the Christmas decorations go up and that's about 2 months (and a bit) so should be doable.
Simon
- GrandpaPhil, gieb8688, Keith Black and 2 others
-
5
-
-
Thanks Mark, but I think the Captain should hold fire before casting of just yet.
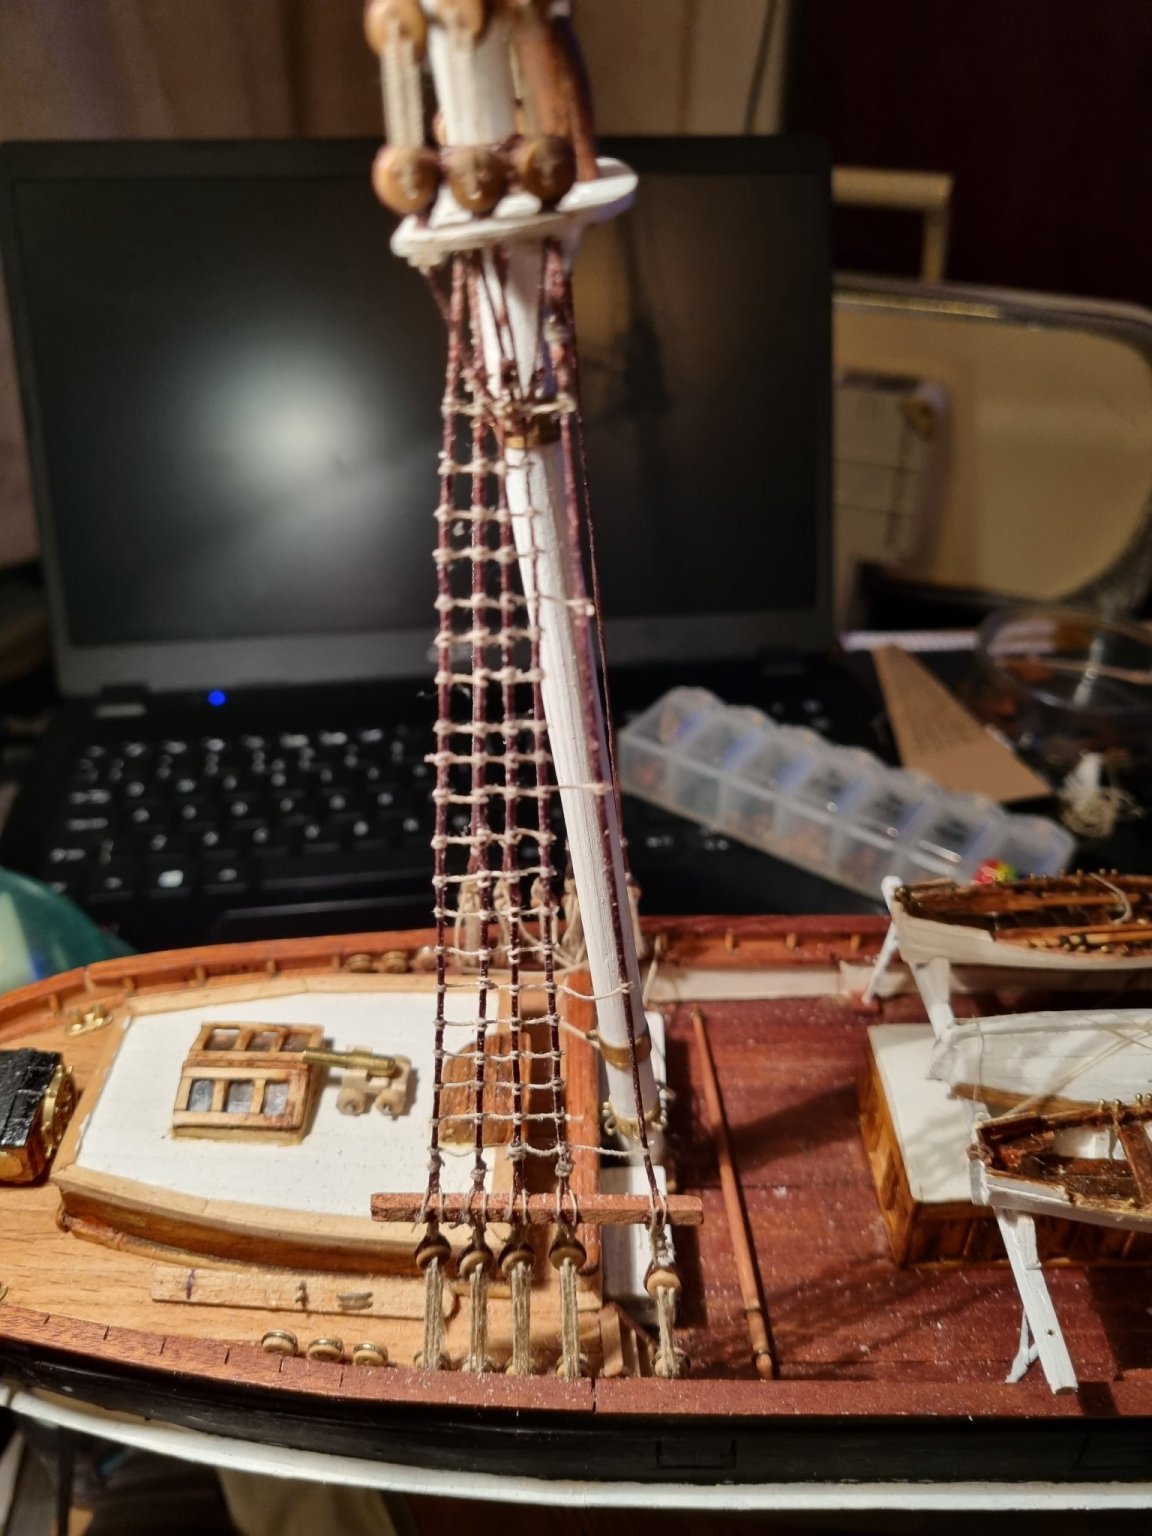
I started on the Fore Mast and worked back and you can see the progress in the standard of the Ratlines, this is definitely a case of Practice makes perfect, not that my latest lines are perfect but they are a huge improvement on my first attempts.
Before I proceed to the Backstays, I have to take stock of the jobs I have left to do that would be easier if the Back and Forestays are absent. For instance, I need to locate all the Belaying Pin locations and Deck eyes. I should now instal the railings on the Liverpool house and certainly do that before installing the Gaff and Spanker.
Rob recently mentioned his method of planning a build, setting out small tasks to complete and completing that target before setting the next task. This is to give a sense of progress and to be able to envisage the end result.
As I have taken on this challenge without plans or instructions, when I read my book, I should have drawn up a task list, I could then have used Robs method and I would be able to see what I had achived, and what is left to do. I can see the light at the end of the tunnel. I started this blogg in January this year, and I aim to finish by Xmas this year, this should be achievable without to much haste.
Simon
- Keith Black and mtaylor
-
2
-
An evenings work.

that completes the ratlines on the starboard side.
-
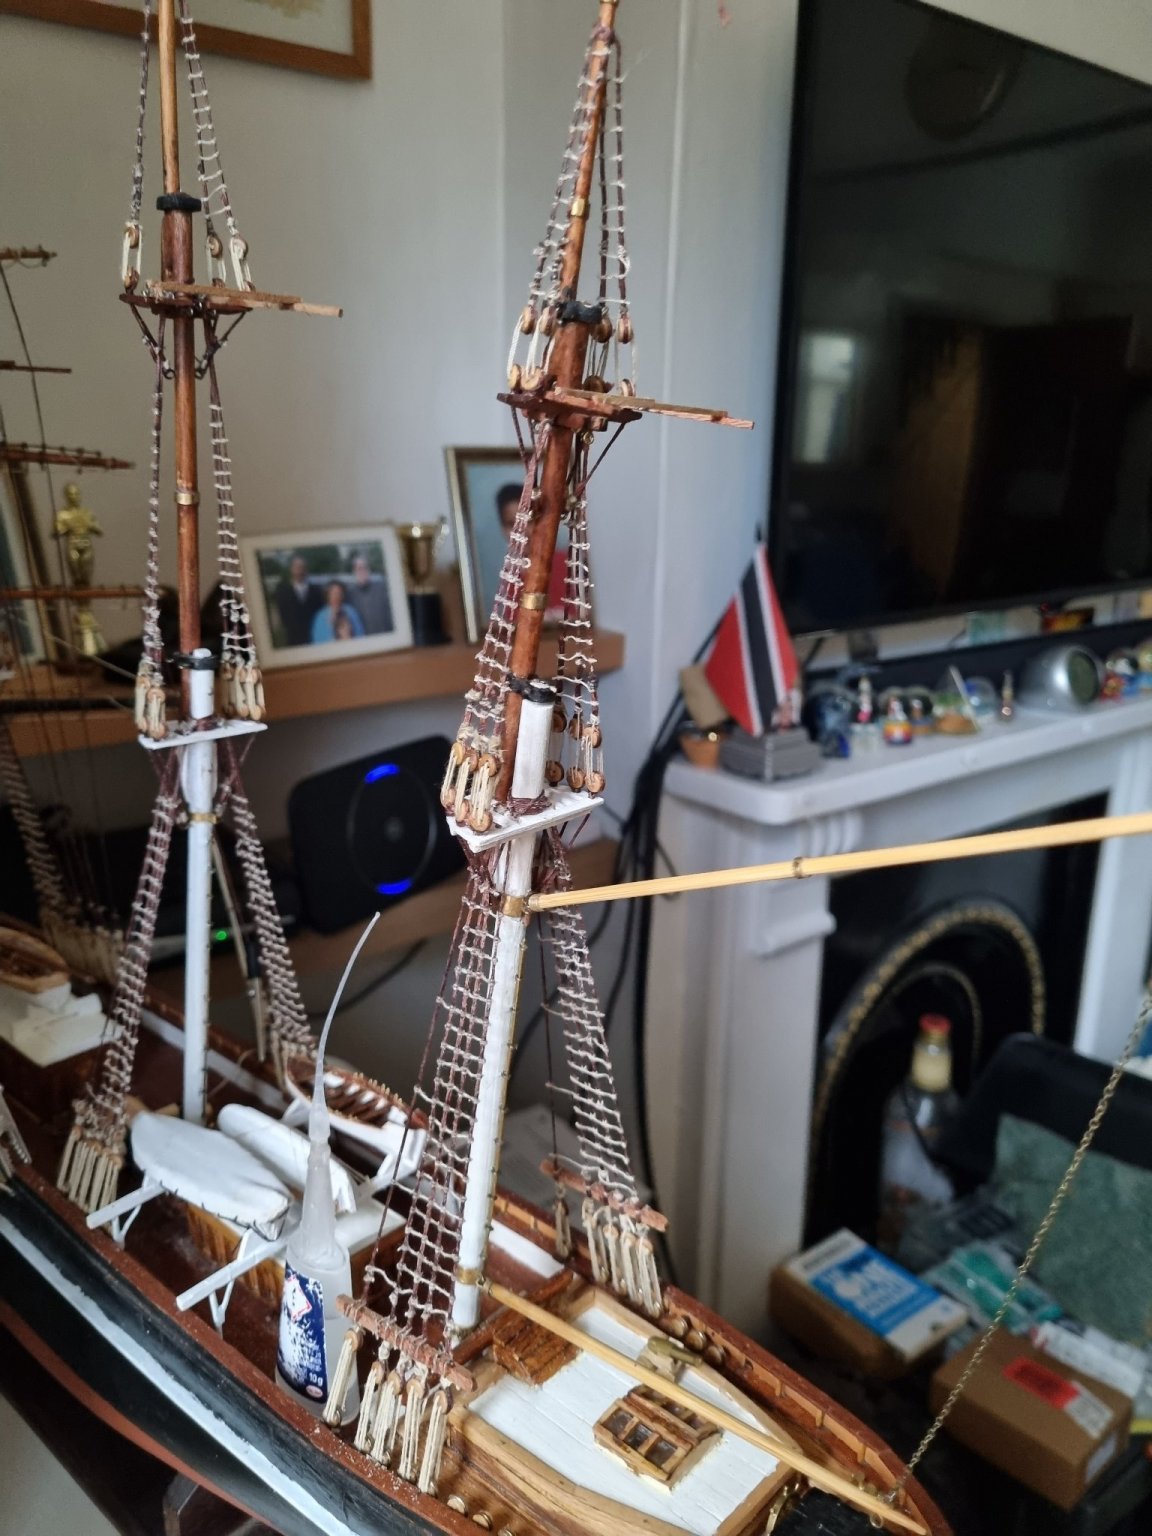
I have been making some progress. All the ratings on the Foremast are finished.

I have installed the shrouds on the main mainmast and the ratings. Backstays are left of for the time being to allow access.
I am now installing the shrouds on the mizzen mast. I won't leave the ratings for later as before, that was far too much to do at once.
Must remember to install the two rails before finishing the backstays.
Ordered and received more brass belaying pins, not really happy with them. I thought the ratio was supposed to be 1/3rd handle and 2/3rds spine but these look closer to 50/50 and there will be very little spine below the rail. Bah humbug, this is why I like to see what I am buying, really wish I could find somewhere closer than Cornwall to get these things.
Simon
- GrandpaPhil, mtaylor, gieb8688 and 1 other
-
4
-
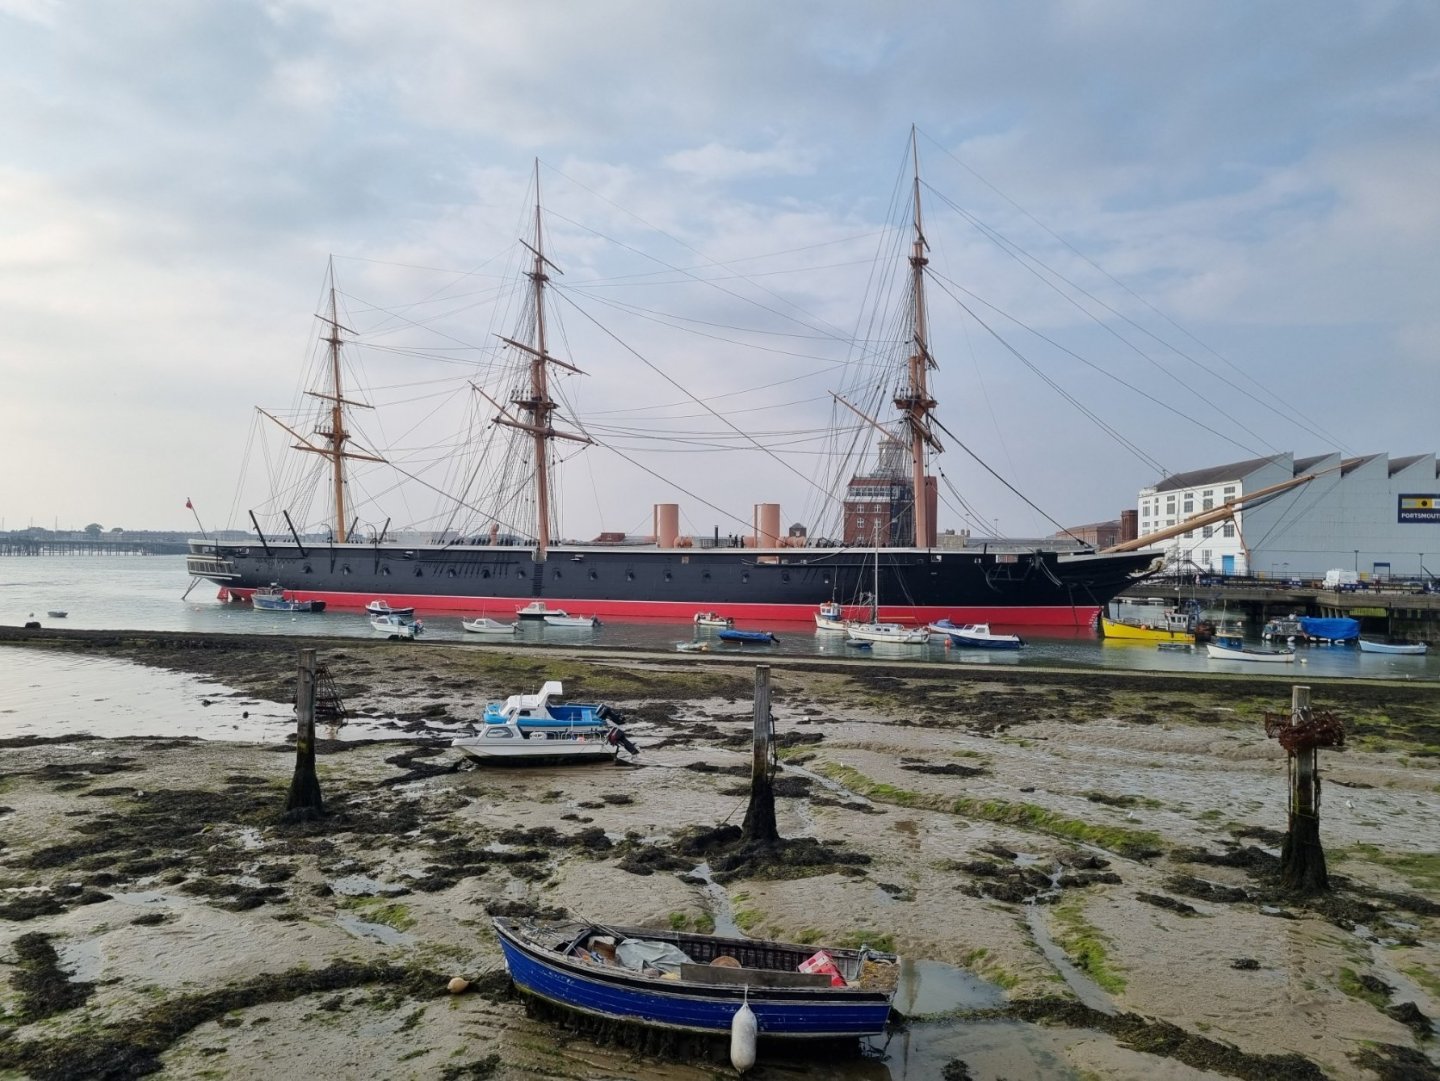
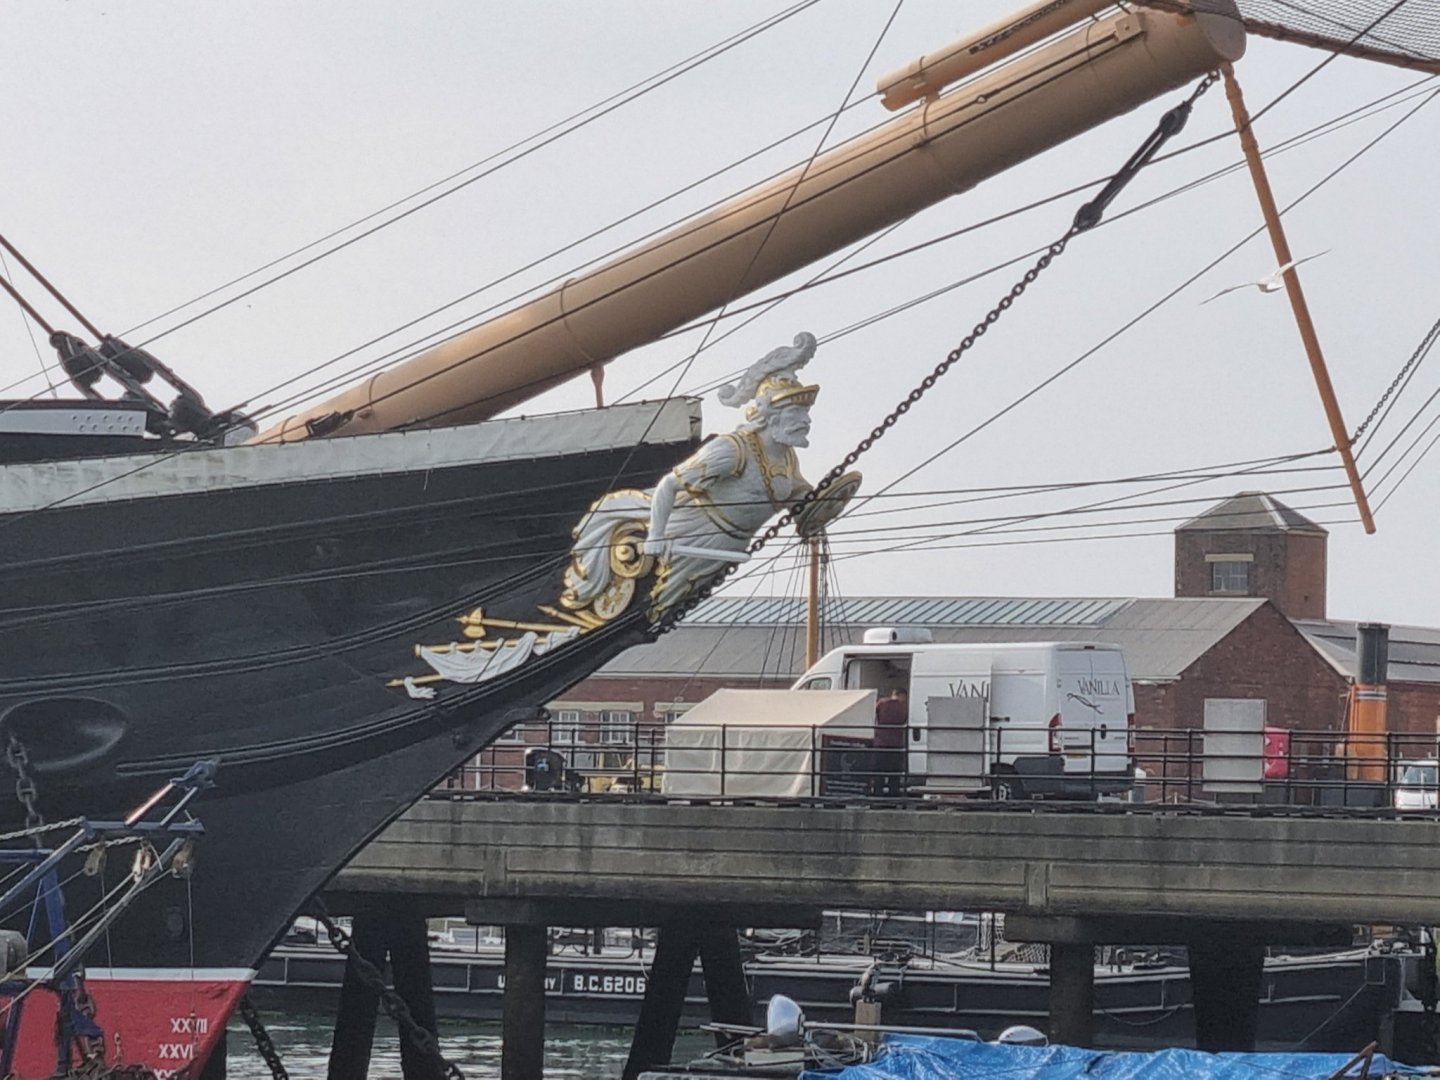
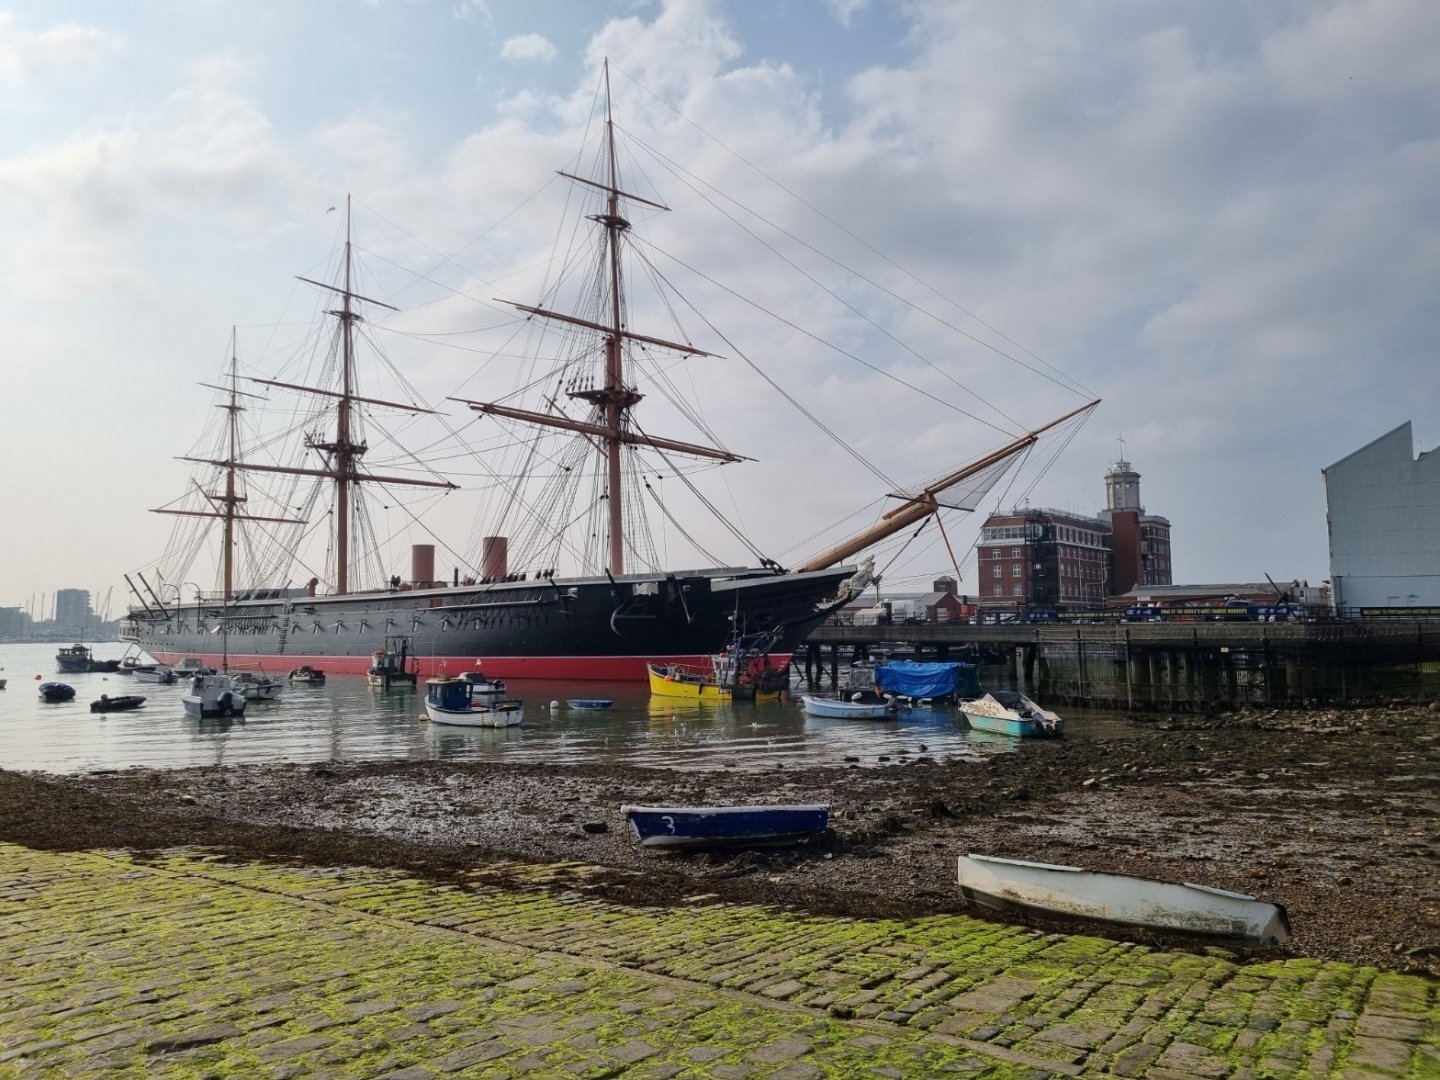
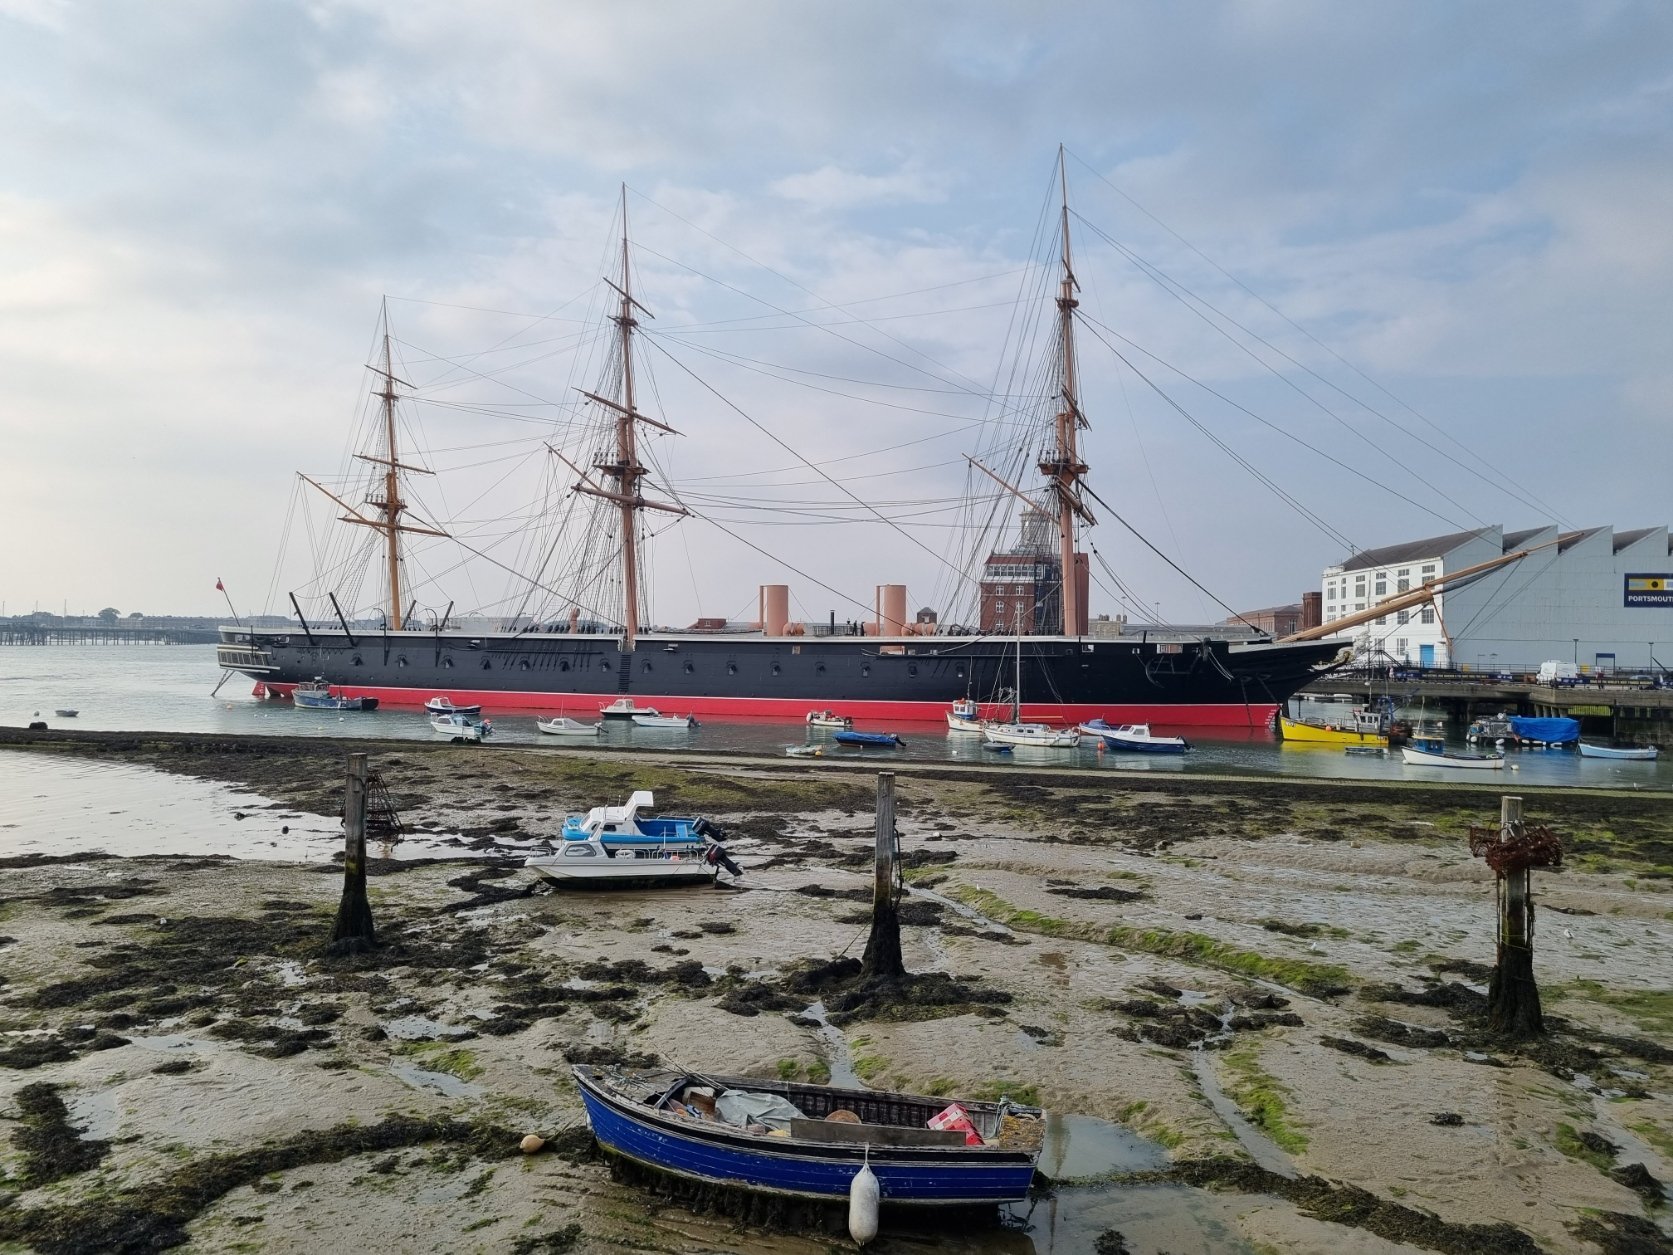
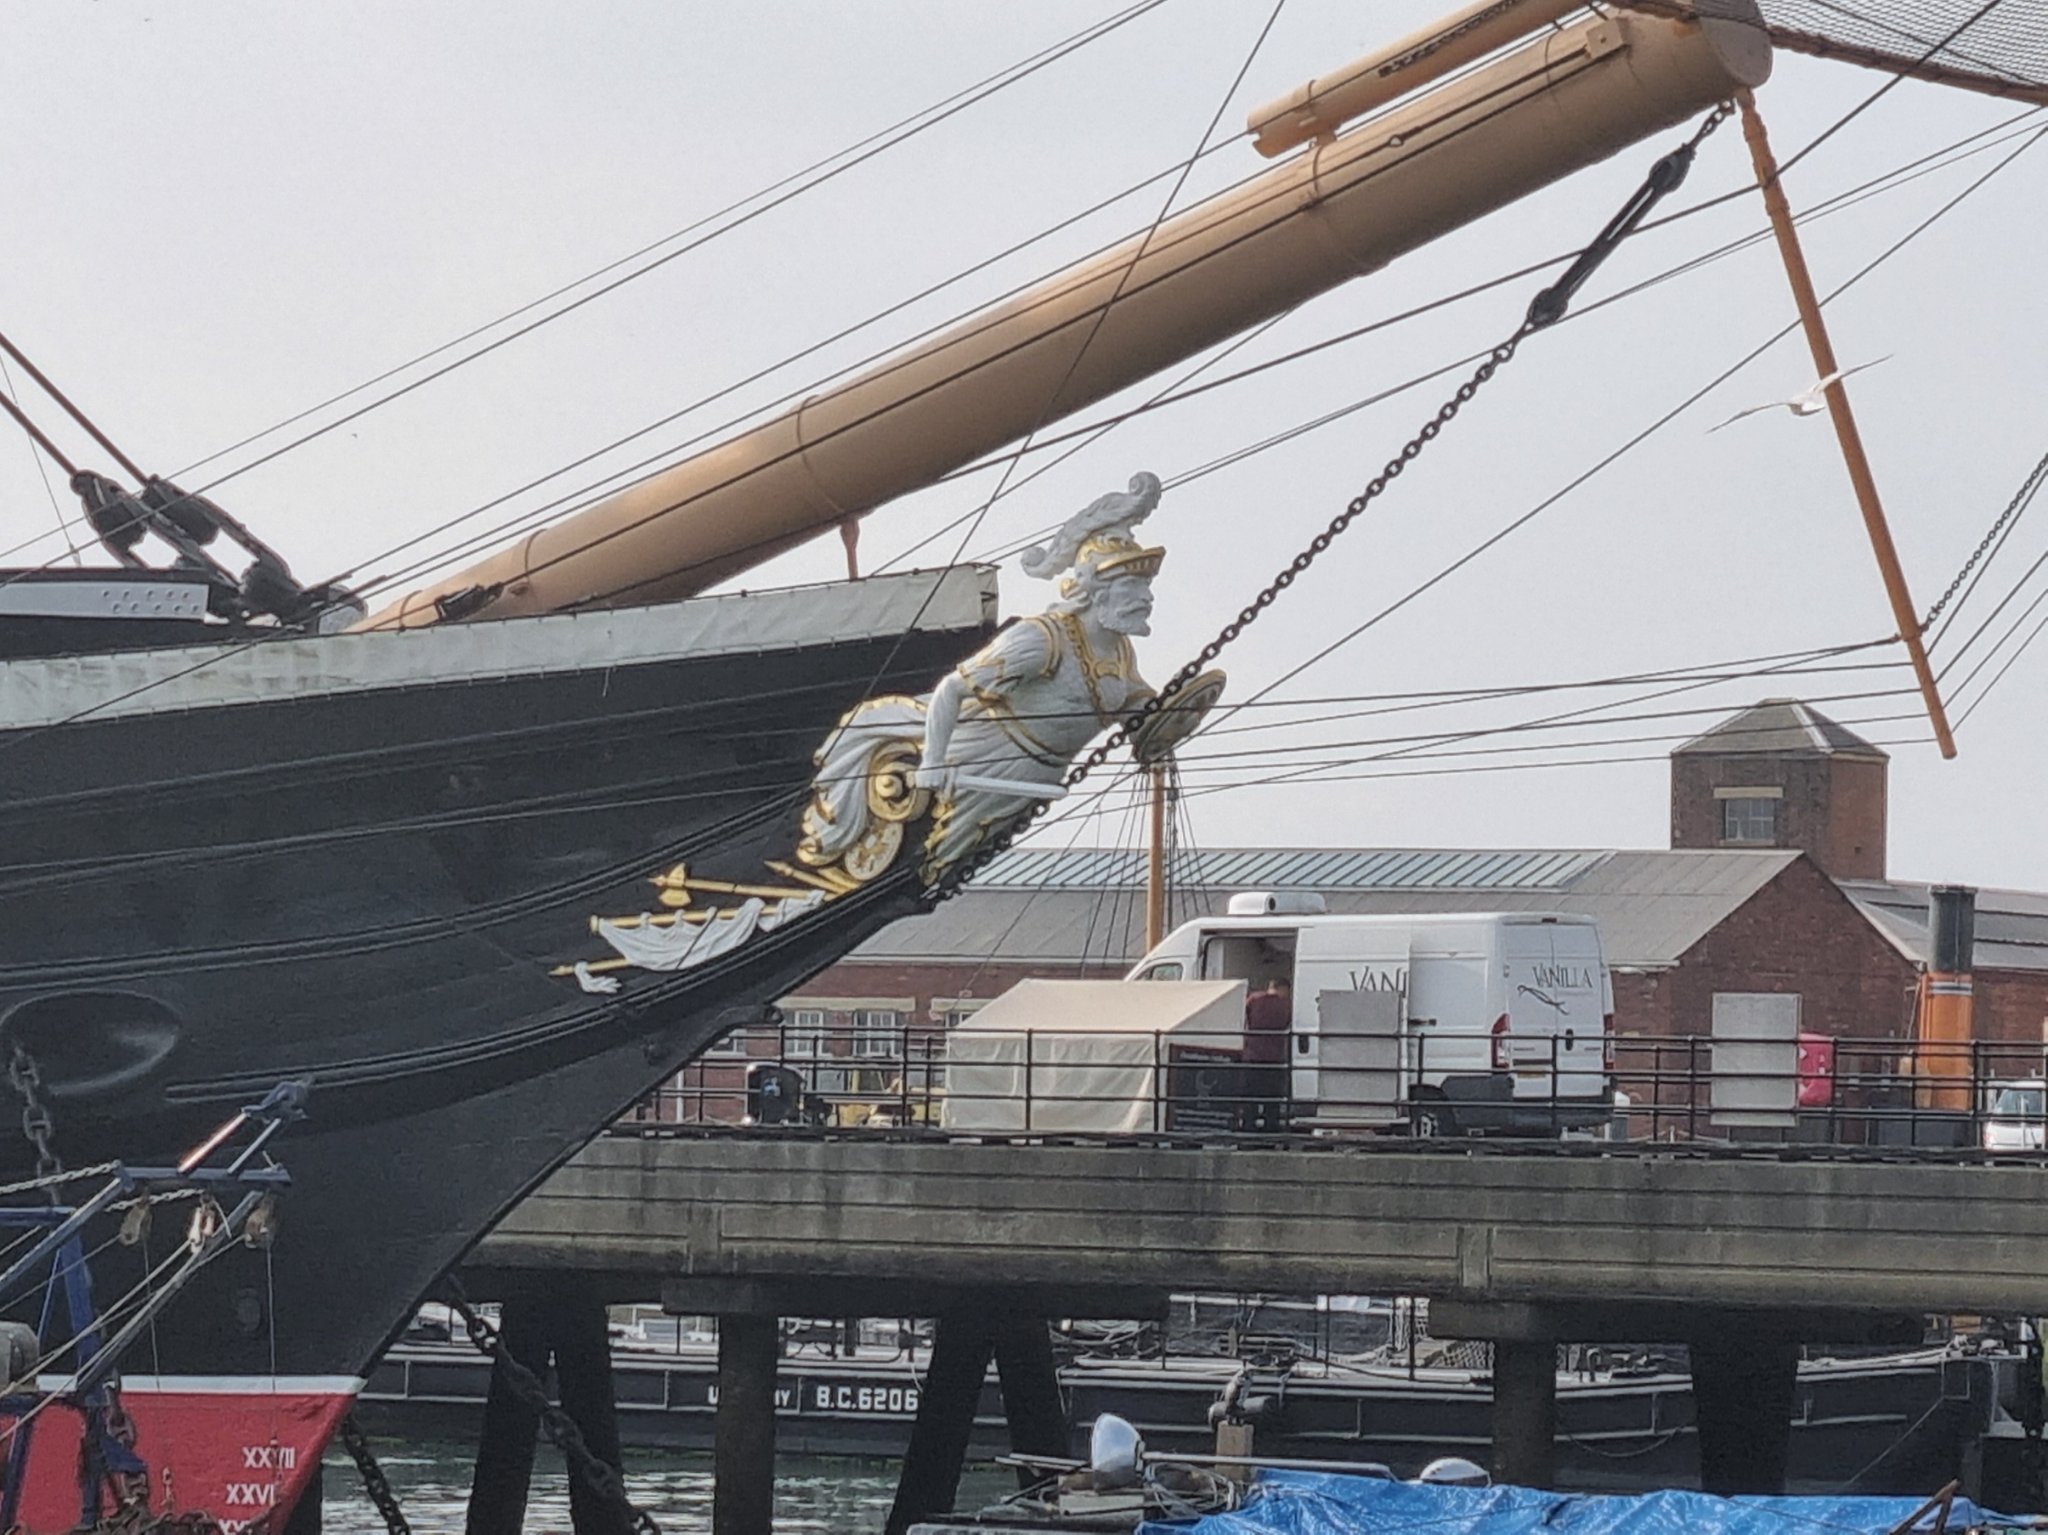
Went for a drive down to Portsmouth today, the Historic Dockyard is open but much of the items are only limited access so going in was not a good idea today. I did however, get to take a few images from the quayside and Portsmouth rail station of HMS Warrior. Not sure if anyone is building or planning to build her, but thought i would share a few of them.
- mtaylor, GrandpaPhil, keelhauled and 3 others
-
6
-
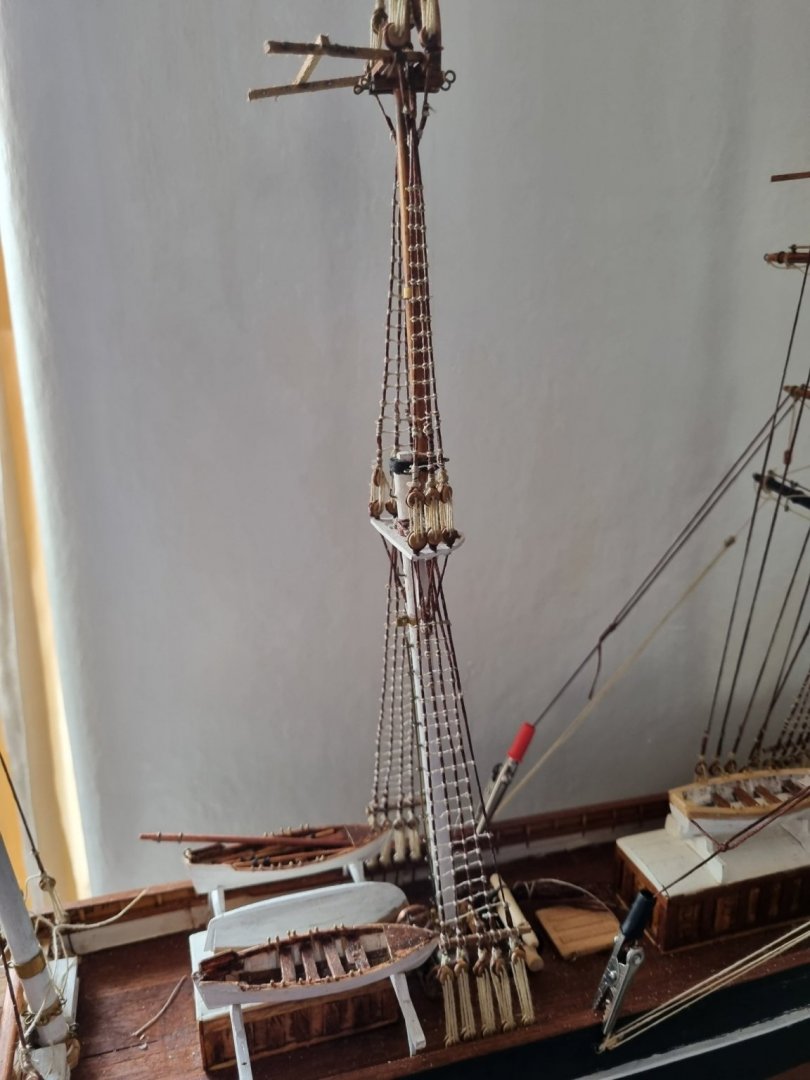
So I have reached the part where I have to convince myself that "Patience is a virtue". Each step you take then impacts on the other areas of the task in hand as fat fingers get in the way. Arthritic fingers take time and effort to respond.
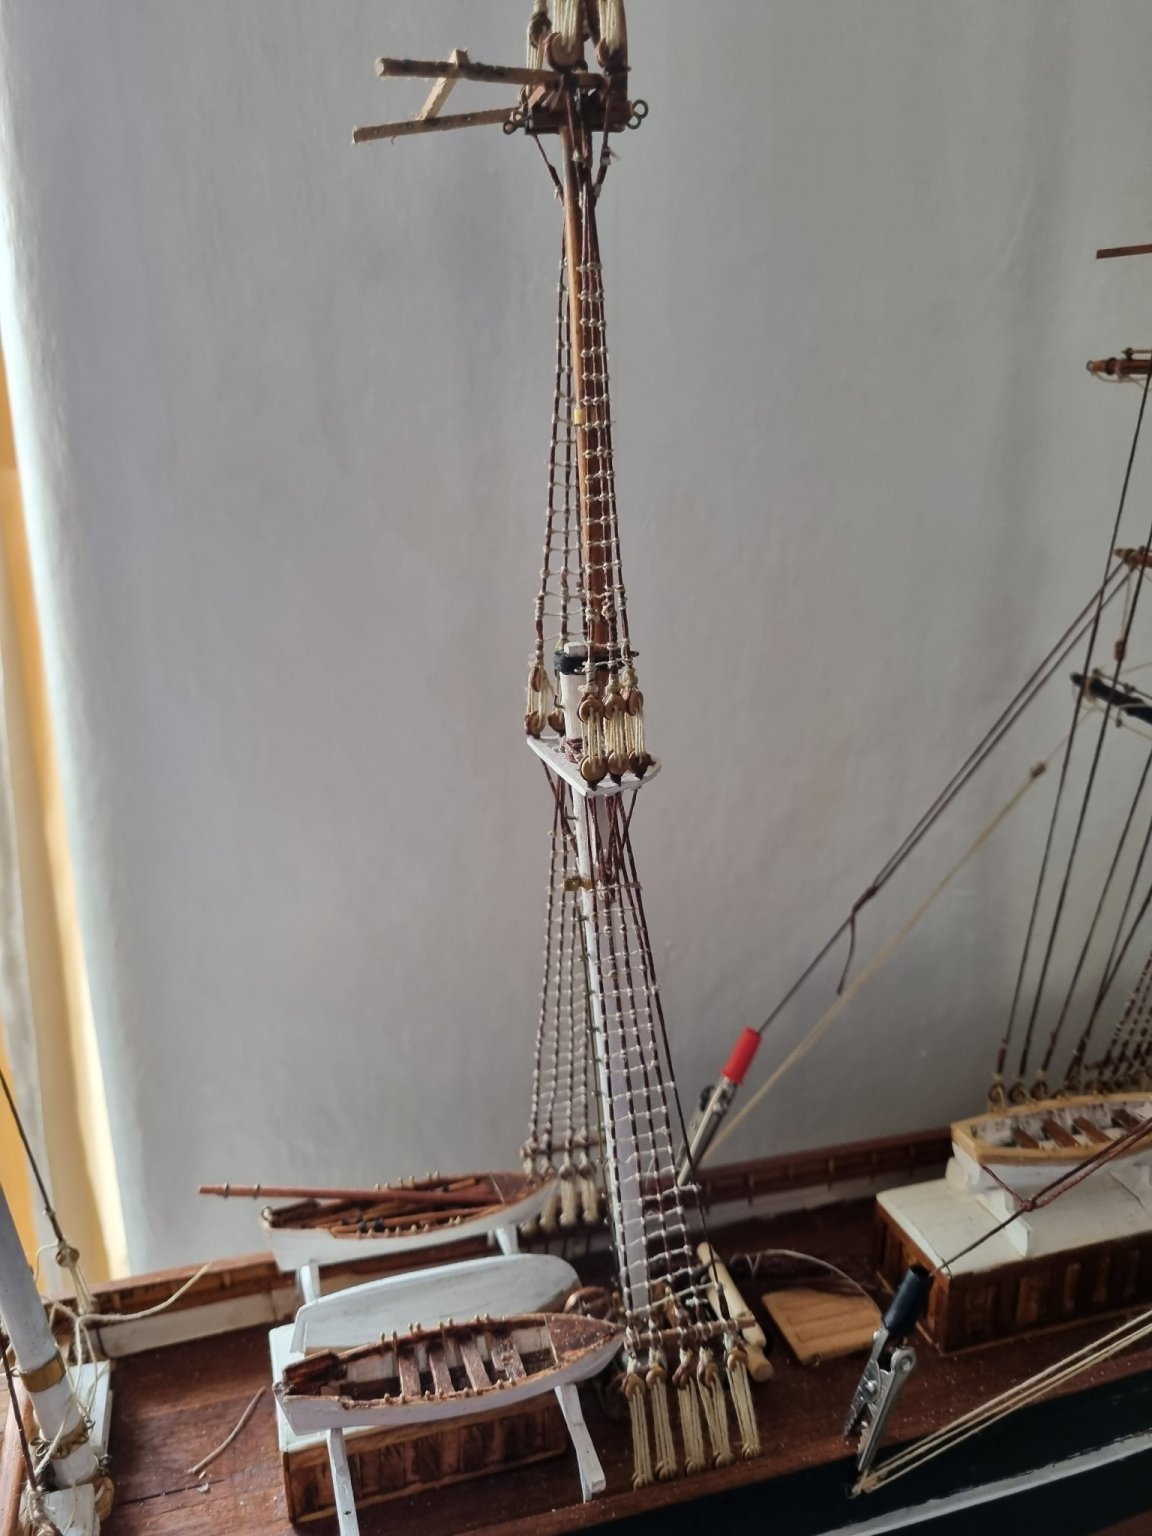
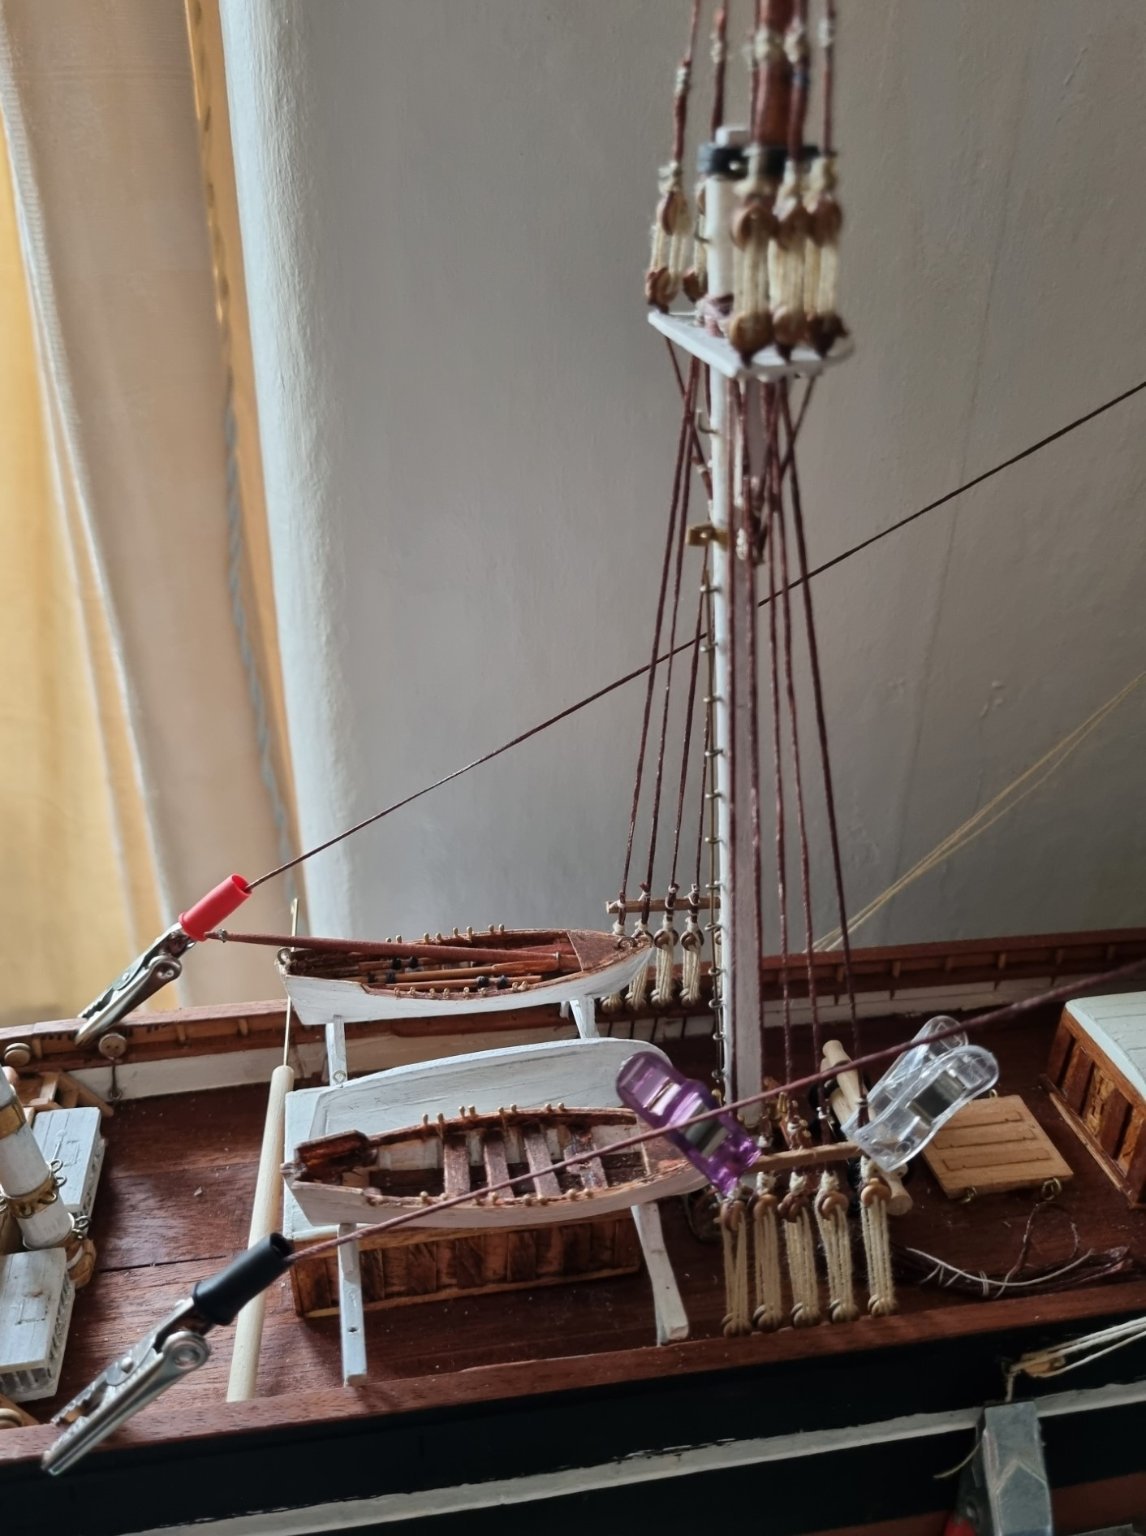
On the Foremast, I have installed the Shrouds and Backstays, but realised that I would struggle to access the mast to install the Yards if I just went ahead and installed the forestays. So I took the time to install the various peices of equioment on the yards and then installed them.
I mislaid my chain supply and this delayed me a bit, but I found it right where it was supposed to be, do'h. They are a bit loose as they swing on their pivots and chains, so started on the outer lines but then realised that I had left the Ratlines of so have had to stop this and go back to getting them finished off. While I was working on them in position, I found it frustrating that they swung around, so I used a few Crocodile clips (I found a box of 80 for £3.99 in Lidl) and attached a length of "Rope" with a loop on one end. You can see that two of these will stabalise a Yard quite easily while you work on the it.
I have started the Ratlines and found it quite difficult to get the lines through and round the Shrouds to tie them in with Tweezers. So I have gone back to needle and thread. These are not sewn through the Shroud, but I find the needle much easier to pass behind the shroud. Also, the pointy end is good for loosening a knot if it is not quite right.
Also, I have shown the rear deck house so you can see my efforts on the boats. I will have to work out whether I am making the rest of the oars, masts and gaffs or whether I am making covers. Might do a mixture of both. I am quite please how they finally came out.

One of the things I love so much about my Admiral, is that she has an opinion, she is not one to sit on the fence. She is generally sat next to me watching telly while I am working on CS and when I show her the pictures of models on the net or from on here, she definitely appreciates the skills, but anything without sails is incomplete, in her view. I have explained the complexity and the difficulty in getting the scale right for sails, but she is adament. However, sails on a ship should look off if they are not full of wind, if you are depicting the vessel at sea, a ship looking like it is is the duldrums is not how such a magnificient speedster should be displayed.
So I am thinking that I should be going for the look of a vessel that is at rest, but not at the dockside. So I will do sails but they will be furled. This will allow me to leave the cover off of a longboat. Also, I am looking to have her look like a working boat, and a model that is 60 years old, not something that is brand new, out of the box. That way, while I will be responsible for much of the look of the boat, I can still say "This is dads creation!".
Simon
- GrandpaPhil, NenadM, gieb8688 and 3 others
-
6
-
I have finished with the boats for the time being as I can now access them and add any finishing touches at the proper time.
I did buy a book Ship Modelling Simplyfied by Frank Mastini but have fallen foul of the Electronic world. Actually have a book, you know, those things that have shhets of paper bound up between hard covers, you would read a section, work on completing the task and then move on to the next section. I think I need to charge up my old Kindle as this is still possible with that, but using the Kindle App on my phone is not. The point of this is getting jobs done in the right order. While Frank has told me to complete the Futtocks and upper shrouds, I have gone ahead and started the main shrouds and that is going to impede my work on other rigging tasks and installing the Yards, so I am putting that on hold for the time being.
The reason I had started this was to add stability to the Masts, I have glued these, but they are stil a little unstable.
I carried out an Audit on what Yards had survived and it appears I was missing 4. Also, they are not necessarily the most accurate in sizes, but I have decided to go with these as they were dads work. A lot of cleaning up was required and one of the larger yards, the Lower Top Sail Main yard was badley warped. 30 minutes in hot water and then clamped overnight to a metal ruler has cured that problem.
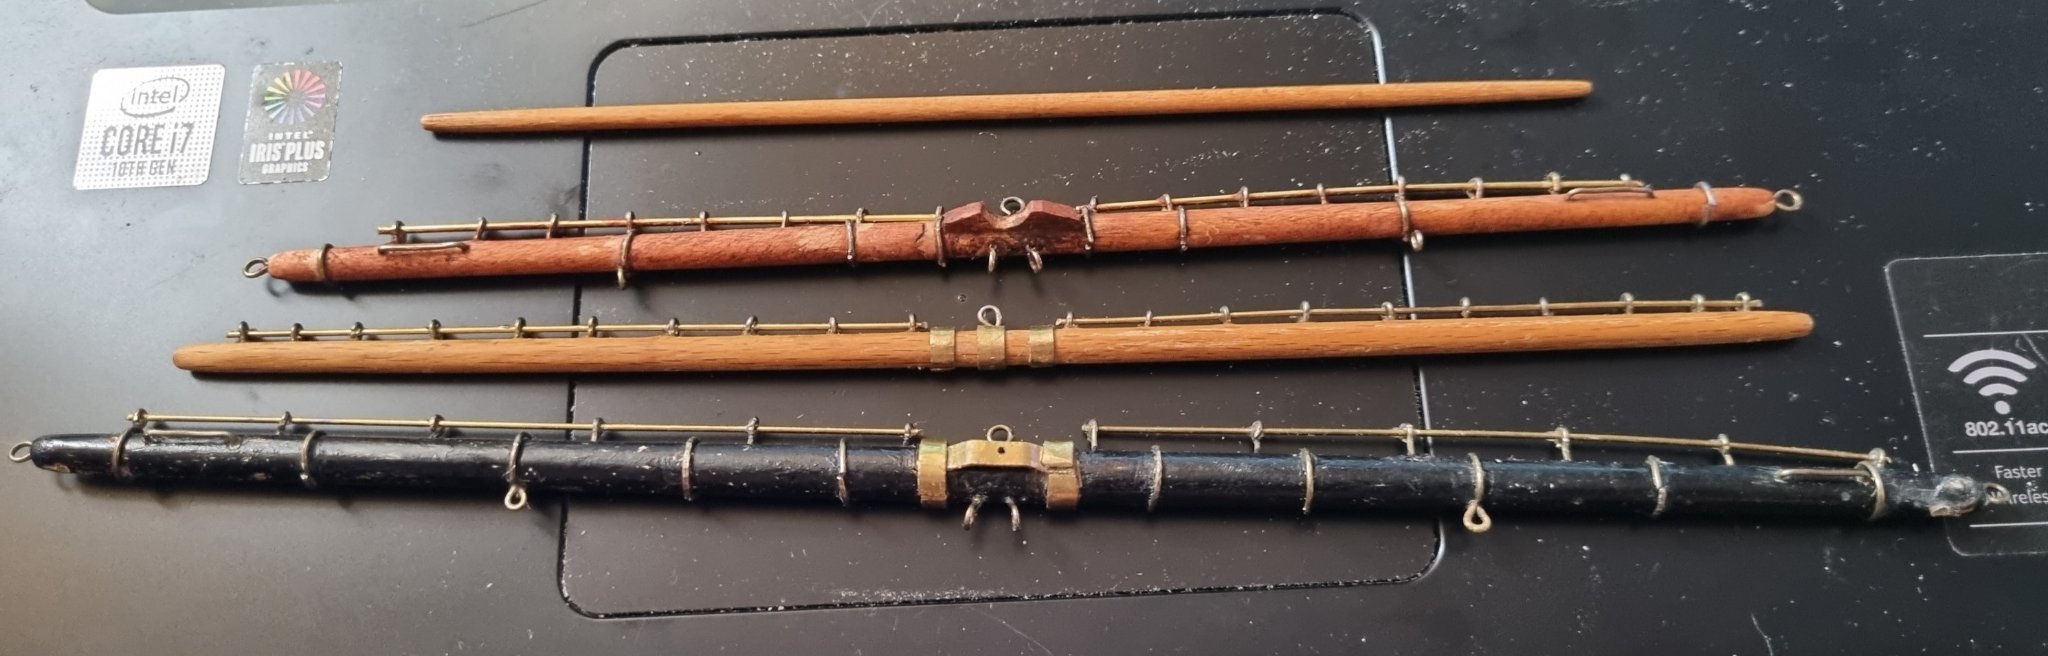
So, I am now making the missing 4 and then converting the fittings on them to match those in Harold Underhills Plate no 18 to get the metal work into some semblance of what should be. I am not going to be able to do Sheaves so I wil have to improvise on this.
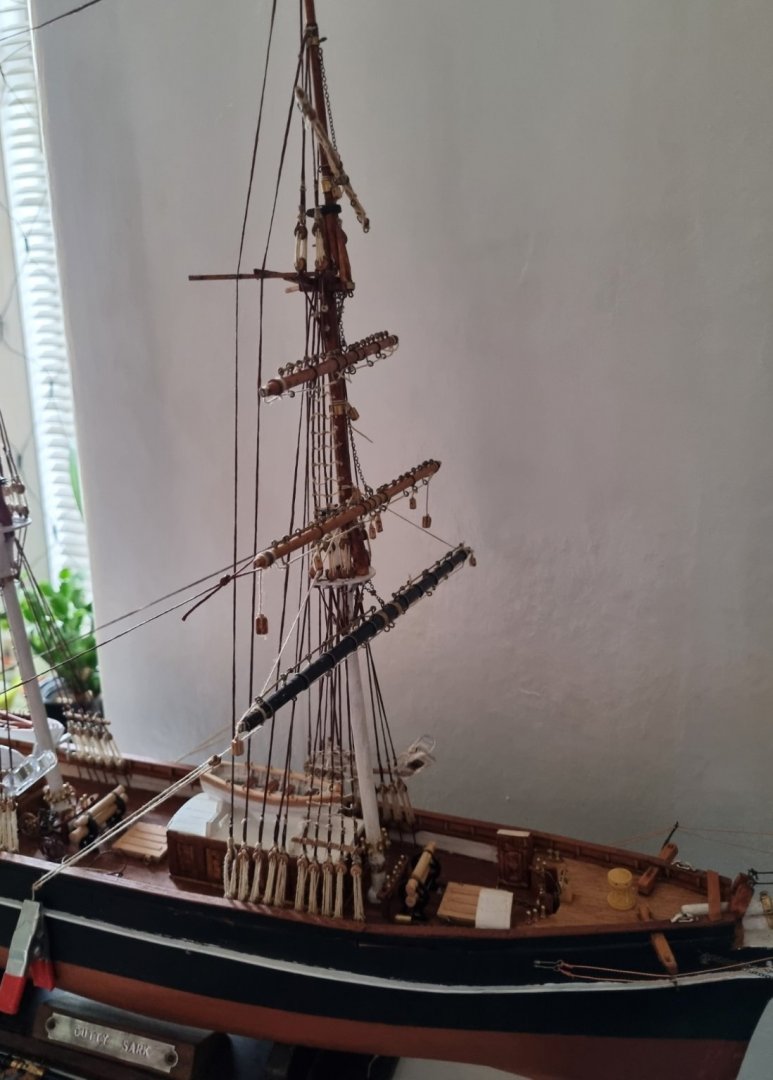
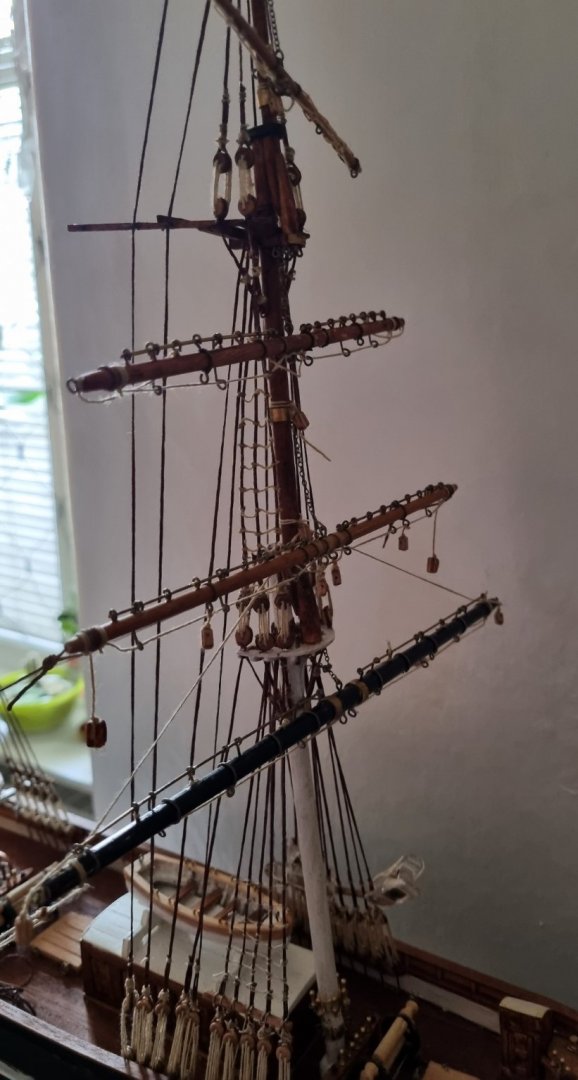
This image is the Yards for the foremast. I still have to recreate the Royal, but the Upper Topsail Yard has been recreated and fitted out. Lessons learned here are Antiqued Brass Wire makes more realistic Bands than sheet Brass and are easier to make, and Pi is an important number to calculate the size of the blank.

I have to admit that this took longer than I envisaged, but the effort will be worth it when they are installed on their Mast.
Simon
-
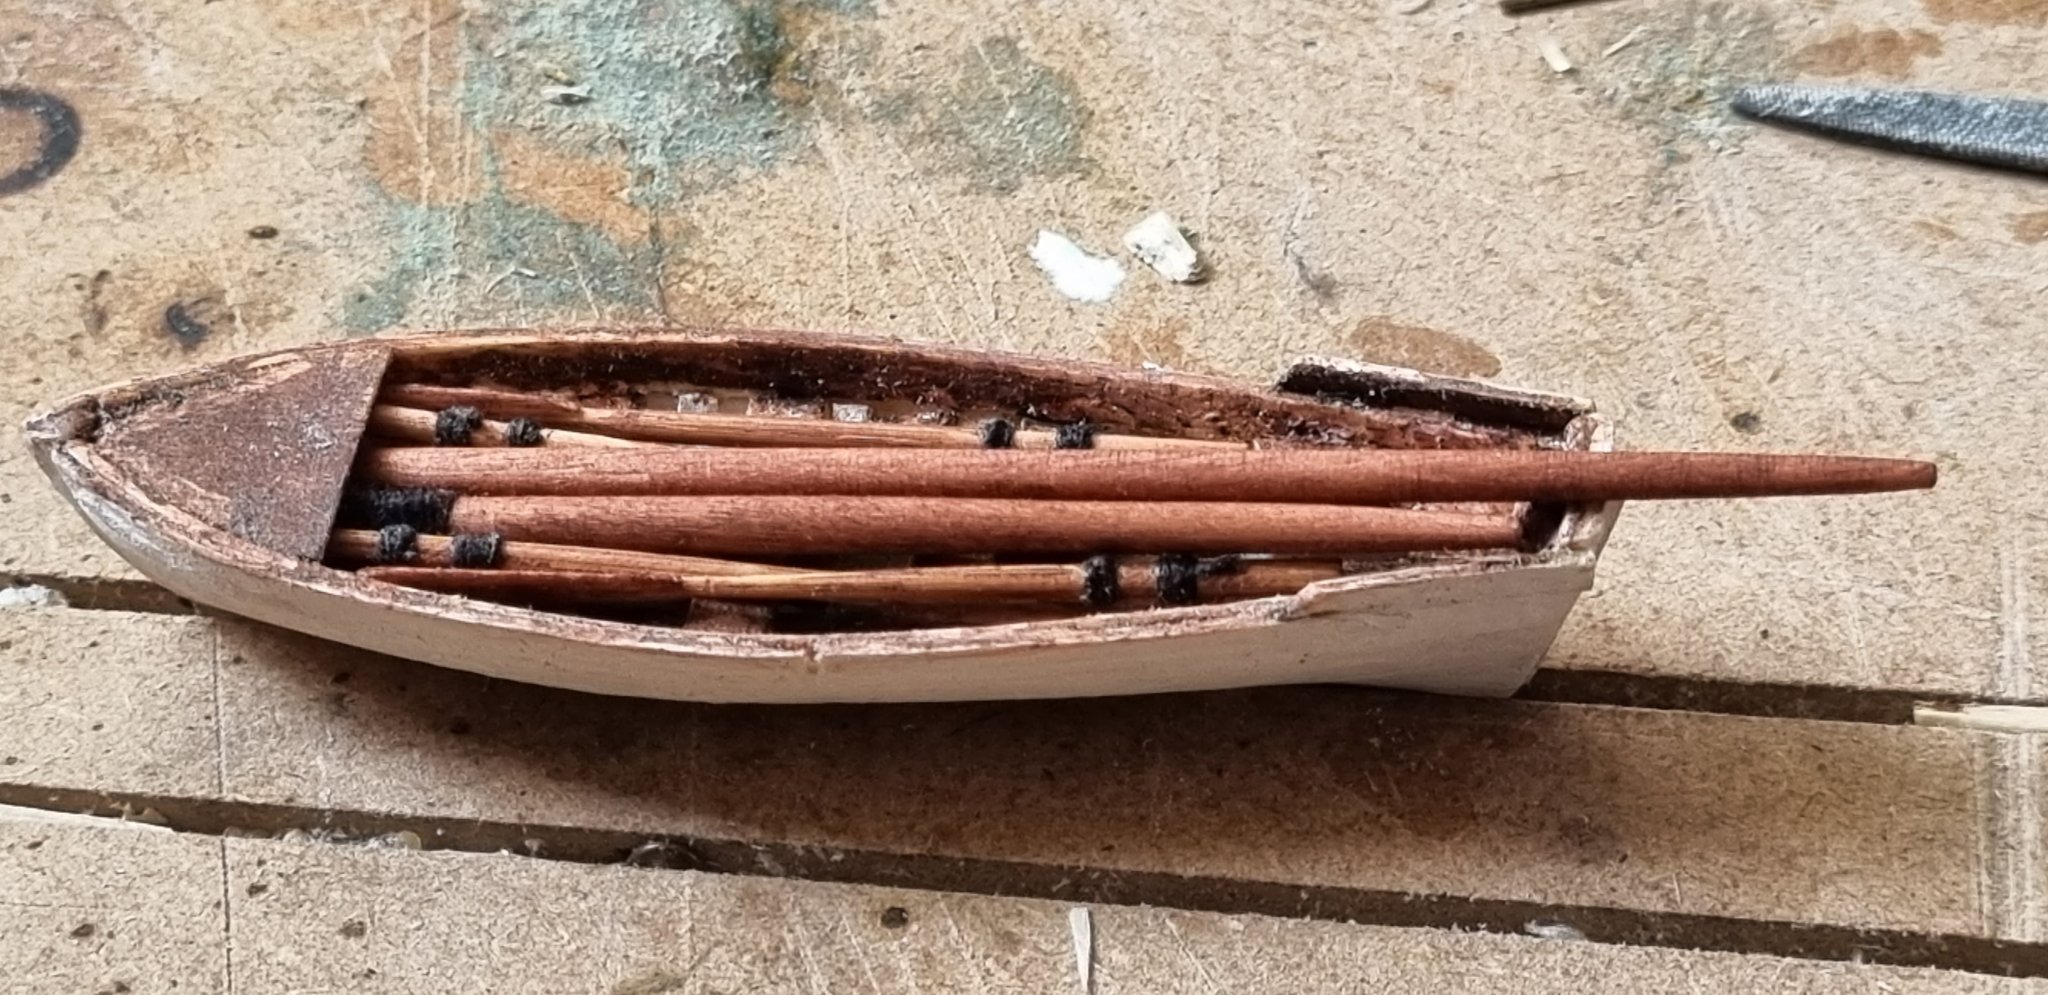
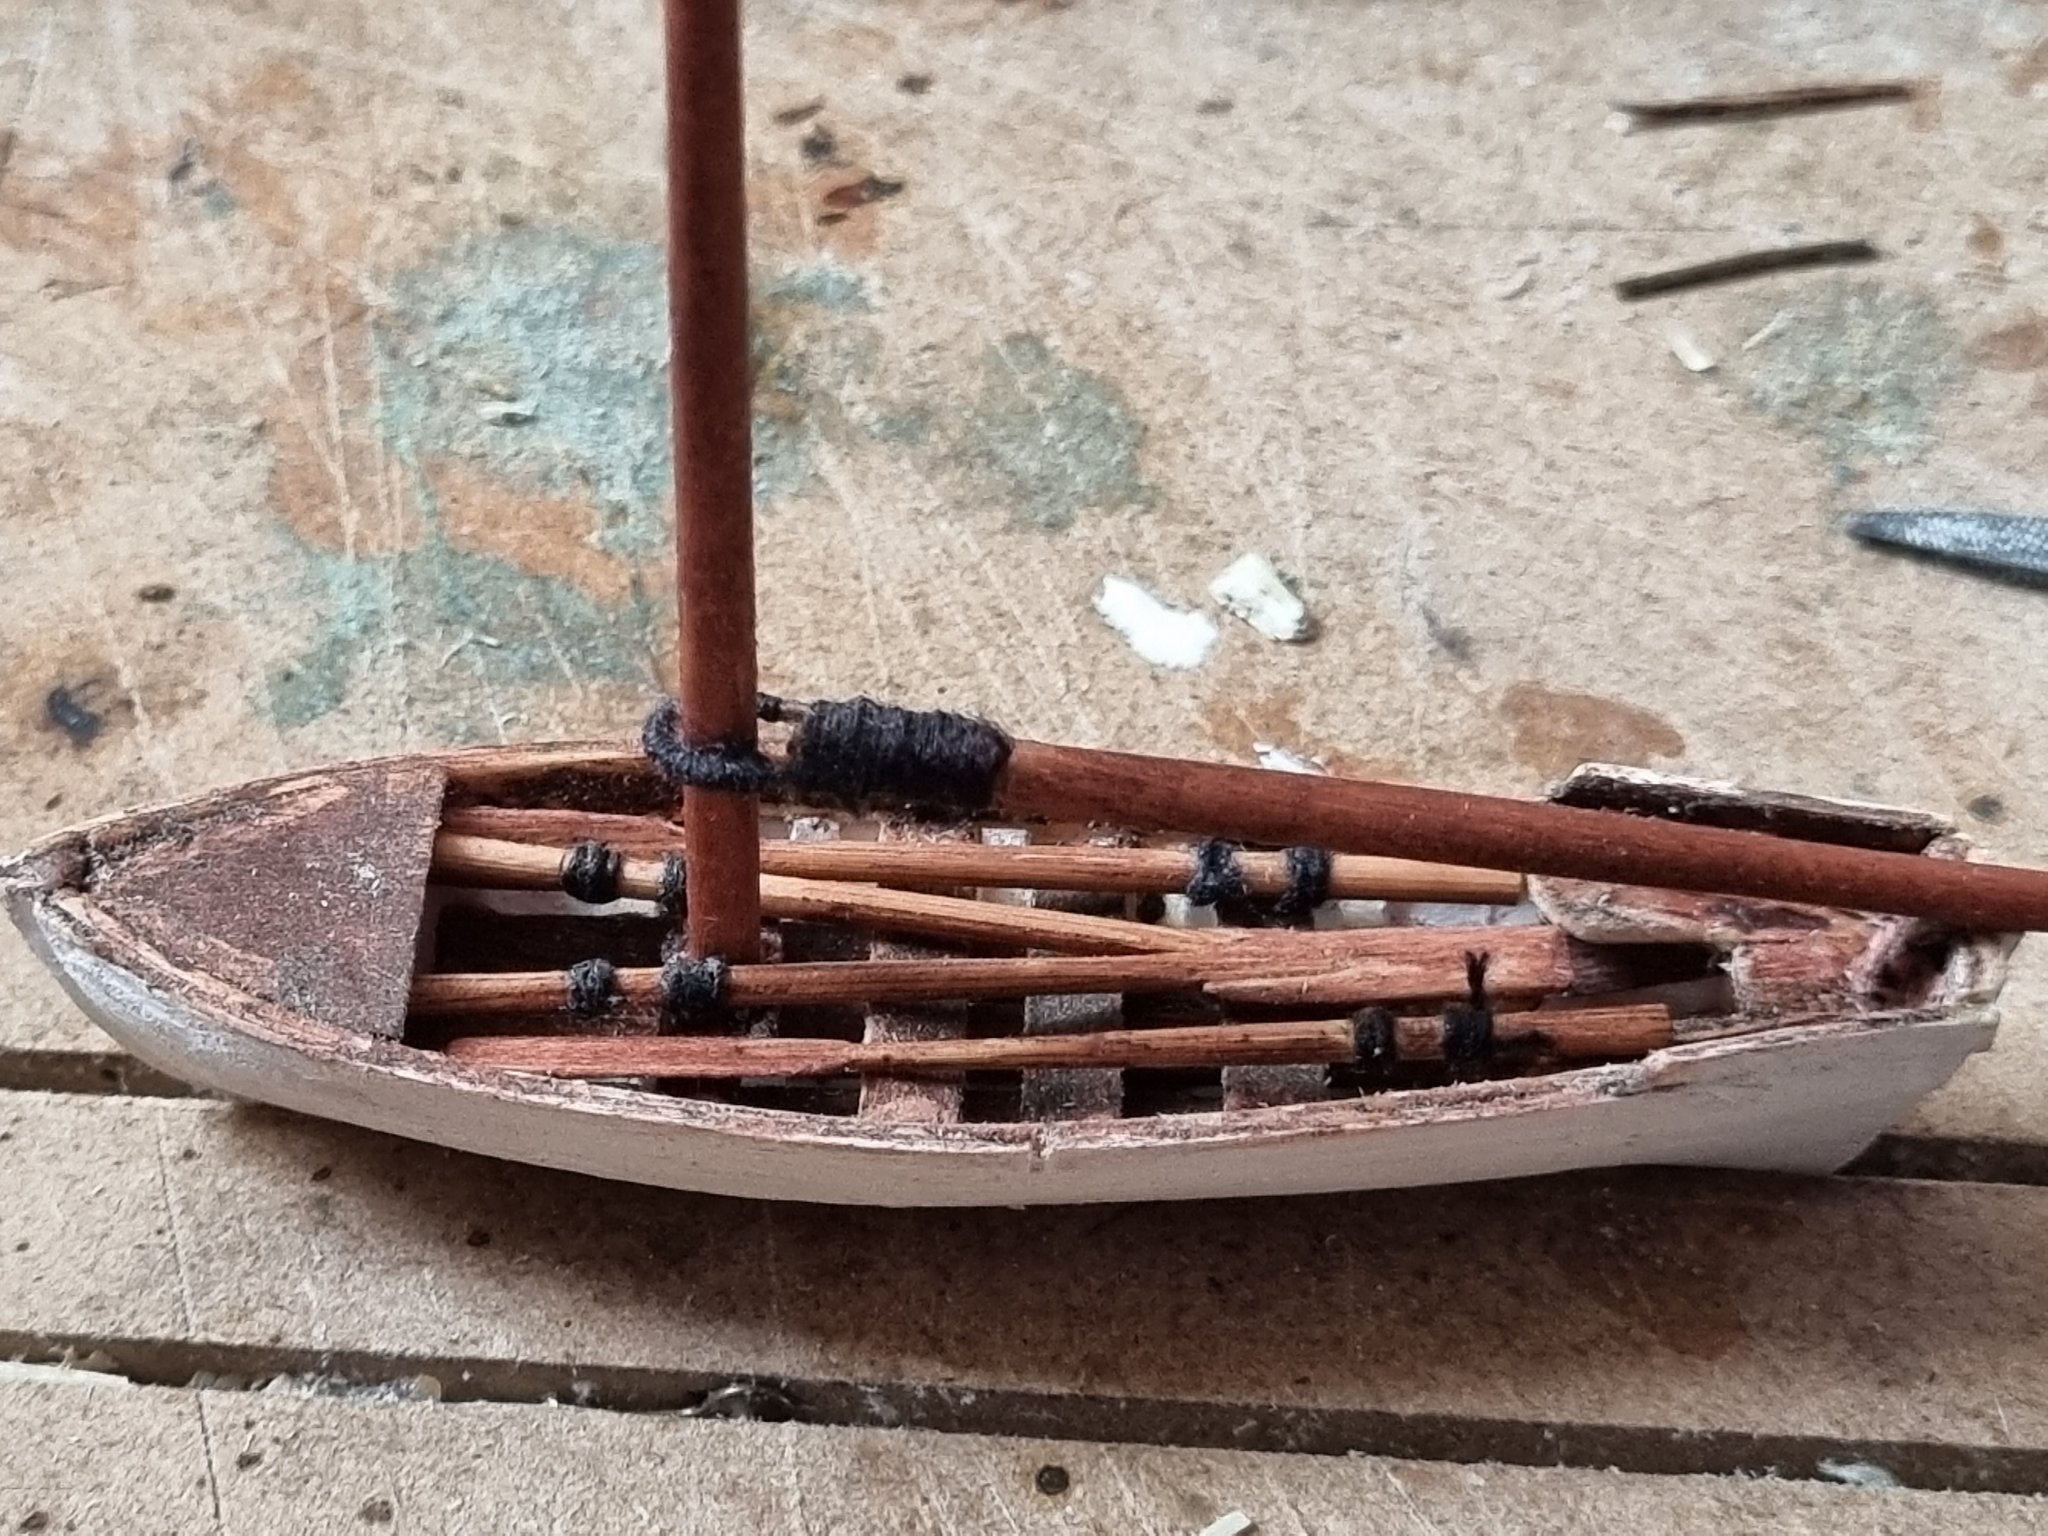
So boat 1 now has 4 oars, mast and gaff. Just needs rowlocks, lifting eyes and fittings for rigging for mast/sail.

 still need s a rudder as well.
- gieb8688, Tigersteve, Keith Black and 2 others
-
5


USS Tennessee 1869 by Keith Black - scale 1:120 - Wood Hull Screw Frigate - ex Madawaska 1865
in - Build logs for subjects built 1851 - 1900
Posted · Edited by My Fathers Son
I agree with @FriedClams , it's not just one thing, it's the whole picture and the attention to detail that is what draws one in. If I can get my yards within a fraction of your detail, I will be happy.
for someone like myself, having your examples, no matter what the photographic skills, gives me something to aspire to and improves the quality of my work. And for that I thank you, as I do to all my mentors in this forum.
Simon