


Dan Vadas
-
Posts
3,261 -
Joined
-
Last visited
Reputation Activity
-

.thumb.jpeg.fc5d633a7b34428fcf19419a73d56d55.jpeg) Dan Vadas got a reaction from EricWilliamMarshall in Shipyard Cardboard kits
Dan Vadas got a reaction from EricWilliamMarshall in Shipyard Cardboard kits
Yep, there are small parts. However, making them from Card is actually easier than from Wood in some cases. I'd have had a bit of trouble making the Anti-Aircraft Guns in the following pics from wood (harder but not impossible ). BTW - they are in 1:200 scale :
Danny
-
 Dan Vadas got a reaction from EricWilliamMarshall in Aurora & Admiral Nakhimov - card model reviews by Captain Slog (publisher - Dom Bumagi, scale 1:200)
G'day Slog. I just re-visited this post and had a thought about the above problem - as the funnels are printed on thin paper, why not re-draw them and change the colour, then print it out. I'm sure you'd get a better result after a couple of tries.
Danny
-
 Dan Vadas got a reaction from shiprookie in HMS Kingfisher 1770 by Remcohe - 1/48 - English 14-Gun Sloop - POF
BE - I agree with that, but the Swans have both open ports and closed ones on the same deck. As there is no way to stow the guns in the "run out" position on the closed ports (it would of course negate the use of port lids) they'd have to be stowed in the "run in" position unless they were stowed in the fore-aft position.
TFFM shows them all as stowed in the "run in" position.
Danny
-
 Dan Vadas got a reaction from FrankWouts in HMS ROYAL KATHERINE 1664 by Doris - 1/55 - CARD
I was going to comment on the exact same thing. It looks like one of them at least is way too high and has no room for elevation, and all of them look like left-overs from some cheap kit .
Danny
-
 Dan Vadas got a reaction from AJClark in Bismarck by Dan Vadas - FINISHED - GPM - 1:200 - CARD and PE
Thanks very much guys .
No, I've had enough of this model .
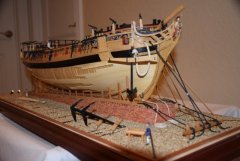
Well, this is it - Bismarck is FINISHED . Here are all the final pics - enjoy :
Thanks to all those who followed this build, and especially those who commented. Now onto HMS Hood .
Danny
-
 Dan Vadas got a reaction from BenD in Shipyard Cardboard kits
Yep, there are small parts. However, making them from Card is actually easier than from Wood in some cases. I'd have had a bit of trouble making the Anti-Aircraft Guns in the following pics from wood (harder but not impossible ). BTW - they are in 1:200 scale :
Danny
-
 Dan Vadas got a reaction from tamer in Bismarck by Dan Vadas - FINISHED - GPM - 1:200 - CARD and PE
Hi all,
I've done some preparations for my latest Card Kit, the famous (infamous? ) German WW2 Battleship "Bismarck". The "Kit" is published by GPM in Poland.
My first impressions are that the printing is not quite up to the standard of my IJN Amatsukaze (Halinski), but still quite good. Halinski's models have a more pronounced "weathering" and texturing, widely regarded as one of the best available. The Instructions are once again in Polish, so Google Translate will be getting another workout .
As with the Halinski kit there is nothing to indicate on which of the 25 Parts Sheets any of the parts are, so again I've spent a full day filling out a Data-sorted Spreadsheet to enable a quick find of them. This idea worked brilliantly on Amatsukaze, and is well worth the effort :
I bought this kit from Pav (maaaslo) - he'd bought it a while ago from GPM but didn't think he'd ever start it. Along with the kit came the Laser Cut frames, a real timesaver . Unfortunately, there was a page missing. No big deal, as one side of the page was merely an Advert for other kits, but all the Instructions were on the reverse side. Luckily, Slog sent me a translation of the missing page, so all's well .
I also have all (or at least most of) the extra Laser Cut Detail sets, a big stack of PE for the other details, and the full compliment of turned Gun Barrels.
Danny
-
 Dan Vadas got a reaction from CiscoH in HMS Vulture 1776 by Dan Vadas - FINISHED - 1:48 scale - 16-gun Swan-class sloop from TFFM plans
Cutting the Bowsprit Seat
The Bowsprit Seat was cut in next, using a straight piece of brass round which was taped to the "convergence point" where the bowsprit would intersect the keel if it continued that far. This point is marked on the Mylar TFFM plan, and coincides with the NMM plan.
120 grit sandpaper was glued to a piece of brass tubing of the correct diameter. This tubing was an easy "slide fit" over the brass round bar. The sandpaper "carriage" was moved back and forth on the upper part of the Stem until the Bowsprit Seat was at the correct depth :
-
 Dan Vadas got a reaction from Rik Thistle in WWII Mk. IX Spitfire - Halinski - 1:33 scale - Card - FINISHED
After fitting the small details the model is FINISHED . It was a very enjoyable kit to build, and I'm going to make the Merlin engine next as a "stand-alone" build to be displayed alongside the plane :
Danny
-
 Dan Vadas got a reaction from Papa in WWII Mk. IX Spitfire - Halinski - 1:33 scale - Card - FINISHED
The wheels are laminated together from various diameters of card. Resin wheels are available for this model, but I didn't find that out until after I'd ordered the kit, so I'm going to have a go at making these ones. No real instructions on how to go about the process were with the kit :
Cutting the outer edge using a scalpel with a chopping motion, one small piece at a time :
The inner edge was cut out using a modified flat blade Xacto chisel. I have 3 of these - 2.0mm, 1.0mm an 0.2mm which are used depending on the radius of the cut. I used the 1.0mm for this part :
The axle cover is 2.0mm in diameter. I could have simply punched it out of the sheet, but instead I decided to show a bit of a trick on how I handle small parts when cutting them. Note the "handle" I've left to make it easier to hold :
The sidewall has a pronounced curve. I shaped it into the printed part using a 8mm washer which has a rounded inner edge and a piece of 2.5mm brass rod :
Rounding off the "tread" area starts by trimming with a scalpel to get most of the waste off. This is followed by sanding using 150 grit paper on a sanding stick, and finishing with 400 grit :
A coat of Sanding Sealer was applied and sanded down again with a 1000-grit flexible pad, then a mix of dark grey acrylic paint finishes the job. This pic was taken just after the paint was applied - the roughness disappeared when the paint dried :
Danny
-

 Dan Vadas got a reaction from Obormotov in How To : Add an Index to your Build Log and Creating Links
Several members have added Indexes to "Points of Interest" to their Build Logs. This helps both themselves and others to quickly find the page or post to certain items during the course of construction - e.g. selecting "Capstan" will take you directly to the first post dealing with it's construction.
Here's how you do it :
The Index is merely a collection of Links. For those of you familiar with the method of creating a Link you can skip this next bit.
How to create a Link :
Find the Post you want to create a Link to, preferably by opening MSW in a separate Window. RIGHT Click on the Post Number :
This will bring up a Menu. Click on "Copy Link Location" :
Click on the "Edit" button in the post you want to create a Link :
Select the word (or words) that you want to turn into a Link by dragging your mouse across it while holding down the left button or using Shift + Arrow on the keyboard :
Click on the "Add Link" Button in the menu bar :
This brings up a small Menu. RIGHT Click in the "URL" bar. Make sure the cursor is inside the bar. Click "Paste" in the menu :
The Link is now attached to your selected word/s.
Example of an Index
It's helpful to place the Index in the first post of your Build Log, but if you can't do that for whatever reason you could create a Link to the Index page in the first post of the Log.
You can Format the text in the usual way (font, size color etc)
-
 Dan Vadas got a reaction from lmagna in Hr.Ms. De Ruyter by amateur - Scaldis/JSC - 1:250 - CARD
The "chain" placed on deck, it looks a bit flat, and not very inspiring. I don't have ideas how to spice this up, so it is left as provided by Scaldis:
Jan, buy some small brass chain of the appropriate size, blacken (or paint) it, and glue it over the printed area :
I suppose it depends on what you want from a model Jan. A Halinski kit would have had about 50 tiny parts for one capstan, all of them fitting perfectly . If you would rather make the simpler version ...... well, that's up to the builder. In my opinion Halinski is well worth the slightly higher price.
Danny
-
 Dan Vadas got a reaction from Blackreed in Tanker Wagon by Dan Vadas - Modelik - 1:25 - CARD - FINISHED
The ends of the tank body are convex, so I made up my usual extra filler pieces. There is also virtually no internal framing, so once again I scratch-built it :
Lots of rivets on this one - over 1,400 of them which took 2 1/2 days to glue on :
The final pics :
Danny
-
 Dan Vadas got a reaction from popeye the sailor in Stage Coach 1848 by Eddie - Artesania Latina - Scale 1:10
Eddie seems to have left us. His last post was the one above last April. I hope it's nothing serious.
Cheers, Danny
-
Dan Vadas got a reaction from popeye the sailor in Stage Coach 1848 by Eddie - Artesania Latina - Scale 1:10
That's quite a feat of scaffolding/engineering happening there Eddie . Should turn out nice and square.
Danny
-
Dan Vadas got a reaction from popeye the sailor in Stage Coach 1848 by Eddie - Artesania Latina - Scale 1:10
Errr, Mike - if you had of clicked on the word "Ebay" in bold blue letters in my previous post, it was a Link that took you directly to a LOT of Hasegawa aeroplane kits .
Danny
-
Dan Vadas got a reaction from popeye the sailor in Stage Coach 1848 by Eddie - Artesania Latina - Scale 1:10
Check out Ebay Mike. I paid about $700 for the 1/8 scale kit 30 years ago . Unfortunately Hasegawa discontinued the model years ago, so Ebay is probably the only place you'll find one.
Danny
-
Dan Vadas got a reaction from popeye the sailor in Stage Coach 1848 by Eddie - Artesania Latina - Scale 1:10
Hi Eddie,
Been there, done that Eddie . Although this Sopwith Camel was brought out by Hasegawa. I made it about 30 years ago, brilliant Kit :
Danny
-
Dan Vadas got a reaction from popeye the sailor in Stage Coach 1848 by Eddie - Artesania Latina - Scale 1:10
Eddie, that would be the Conestoga Wagon from Model Trailways, same manufacturer as my stagecoach. http://www.modelexpo-online.com/page.asp?lp=1005
Danny
-
Dan Vadas got a reaction from popeye the sailor in Stage Coach 1848 by Eddie - Artesania Latina - Scale 1:10
This is the one I use Eddie : https://www.bunnings.com.au/feast-watson-250ml-sanding-sealer_p1564778
-
Dan Vadas got a reaction from popeye the sailor in Stage Coach 1848 by Eddie - Artesania Latina - Scale 1:10
Hi Eddie, good to see the build log up . Off to a flying start.
Yep, gotta agree. I bought a couple of these years ago, they went into the bin not long after .
Are the tips steel or plastic? If they're steel you can unclog them by running them over a gas flame for a couple of seconds .
One point for now - I got the tip when I saw Moonbug's coach - sand smooth and use a clear Sanding Sealer, couple of coats with a sand between, on the outside (and the inside if you feel it necessary) of the cabin sides BEFORE gluing on any Moldings. It's near impossible to get right into the corners later to clean them up properly. Also do the same to the Moldings before gluing them on, same reason. PVA glue will stick to the Sealer. After all is attached you should only have to topcoat it all. Will you be painting or leaving it in natural wood colour?
Danny
-
.thumb.jpeg.d239701c2f7247a100a3f432822c4eda.jpeg) Dan Vadas got a reaction from rkwz in I always end up bending planks latteraly.
Dan Vadas got a reaction from rkwz in I always end up bending planks latteraly.
It could be any number of things.
1. If you're starting at the keel, shaping the Garboard Strake (the first one that butts to the keel) is very important. It's different for every ship, and especially on bluff bowed ones with rounded hulls (18th century for example). The top edge (furthest from the keel) should be straight, shape the edge that butts against the keel. The forward end of this plank will finish with a sharp point - that's OK. All other planks should be no less than half their width at the narrowest point.
2. Bear in mind that there are virtually NO runs of planks that are a single width for most of their length (depending again on the shape of the hull - older ships have more taper than. say, Clippers). They will need tapering for a LOT more distance than you have been doing so far.
3. Don't attempt to lay a single plank the length of the hull. It's much easier to lay them in the correct scale length - between 20 and 30 scale feet. Kit bulkheads are usually too far apart to be too critical with these lengths, just go to the nearest one or add extra bulkheads or filler blocks in the bow and stern.
4. Start in the middle of the ship for each run. The planks usually don't need much of a taper in the middle, if any. Bend the plank over the top of the one already fitted to gauge how much will need to be removed from the BOTTOM edge until it gets to half-width. A Stealer will need to start from that point. Shape your plank and glue it in. Leave the stealer until you have fitted the next plank.
5. A good trick is to temporarily fit a plank about every 5 or 6 planks apart for the full length of the hull,without laterally bending them. Measure the distance between the TOPS of the planks at each bulkhead to see how much they will have to be tapered at that point. Mark the bulkheads, and divide the measurement by the number of planks to get the width of each one. If you hit the marks when you get that far you will know you're on track.
6. Thicker planks (0.6mm or more) will need to be edge-bevelled as they curve vertically to avoid gaps.
7. Always dry-fit each plank and reshape it until you are satisfied with the fit before reaching for the glue. If it's shaped and bent correctly you hardly need to clamp it other than to hold it flush to the bulkheads until the glue sets. It goes without saying that the bulkheads should be properly Faired before starting any planking.
Take a look at how I did the planking on my Norfolk Sloop to get some ideas. I do a "plank by plank" description in that build log, it won't apply to any other ship but the general method is the same.
Danny
-
 Dan Vadas got a reaction from henry x in How To : Add an Index to your Build Log and Creating Links
Several members have added Indexes to "Points of Interest" to their Build Logs. This helps both themselves and others to quickly find the page or post to certain items during the course of construction - e.g. selecting "Capstan" will take you directly to the first post dealing with it's construction.
Here's how you do it :
The Index is merely a collection of Links. For those of you familiar with the method of creating a Link you can skip this next bit.
How to create a Link :
Find the Post you want to create a Link to, preferably by opening MSW in a separate Window. RIGHT Click on the Post Number :
This will bring up a Menu. Click on "Copy Link Location" :
Click on the "Edit" button in the post you want to create a Link :
Select the word (or words) that you want to turn into a Link by dragging your mouse across it while holding down the left button or using Shift + Arrow on the keyboard :
Click on the "Add Link" Button in the menu bar :
This brings up a small Menu. RIGHT Click in the "URL" bar. Make sure the cursor is inside the bar. Click "Paste" in the menu :
The Link is now attached to your selected word/s.
Example of an Index
It's helpful to place the Index in the first post of your Build Log, but if you can't do that for whatever reason you could create a Link to the Index page in the first post of the Log.
You can Format the text in the usual way (font, size color etc)
-
Dan Vadas got a reaction from rkwz in How I make Clue (Clew) Blocks by Dan Vadas
....... continued
Once the glue has dried I trim off the tails of the seizings with sharp sidecutters. The tails of the "splice" in the strop are cut with an Xacto knife :
Danny
-
Dan Vadas got a reaction from rkwz in How I make Clue (Clew) Blocks by Dan Vadas
Hi all,
Here's a small "tutorial" on how I make the rather tricky Clue (aka Clew) Blocks. The ones here are scale 9" blocks and are just 4.5mm long in 1:48 scale. I'm also making 8" and 6" blocks using the same techniques.
I start by cutting the stock for as many as I need from English Box. I find this the best wood to use for these as it has no grain and is very dense, important features on something this small that requires a number of holes.
Next I set the 0.020" kerf blade on the table saw to cut a shallow groove for the sheaves.
Then I drill the sheave holes using my mill - saves a lot of time and ensures accuracy, but it can be done using a Dremel or Pin Vise. Here's a pic up to this stage :
Back to the table saw again, and I cut the various steps required :
Using a very narrow chisel made from an Xacto blade I clean up the holes and round off the shoulders of the "sheaves". This not only improves the look of them but makes the line pass through them more realistically. The two blocks on the right in this pic have been shaped :
Next I drill the two holes for the strop through the head of the block using a Pin Vise :
A sanding stick fitted with 240 grit paper is used to shape the head of the block in both planes, and I cut the **** of the block with a sharp Xacto. The sides of the block are rounded with a small flat needle file :
Once detached from the stock I tidy the rest of the block up with the sanding stick, and also cut a notch for the strop (that stops it from slipping off the block later on). Here's the finished article, the coin measures about 19mm in diameter :
I use most of the above techniques for making all my blocks, the only real variation to these is the shaping of the head of the block and the drilling of the two strop holes. On normal blocks I use the table saw to cut a 2nd shallow groove in the stock for the strop.
Danny