


Thunder
-
Posts
579 -
Joined
-
Last visited
Content Type
Profiles
Forums
Gallery
Events
Posts posted by Thunder
-
-
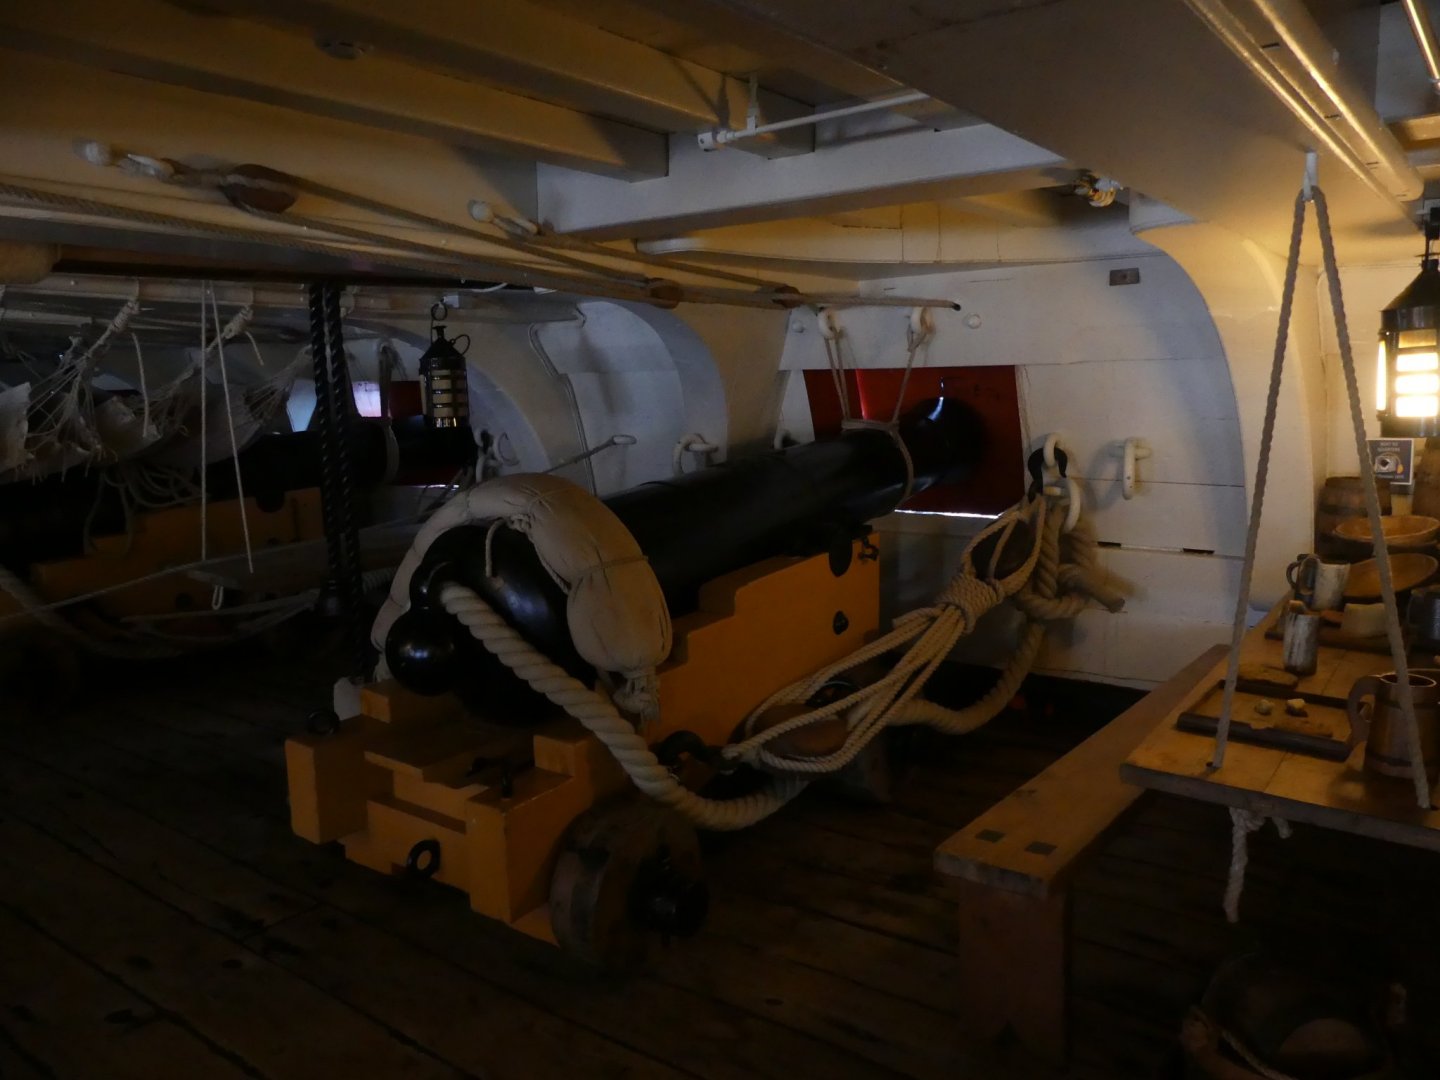
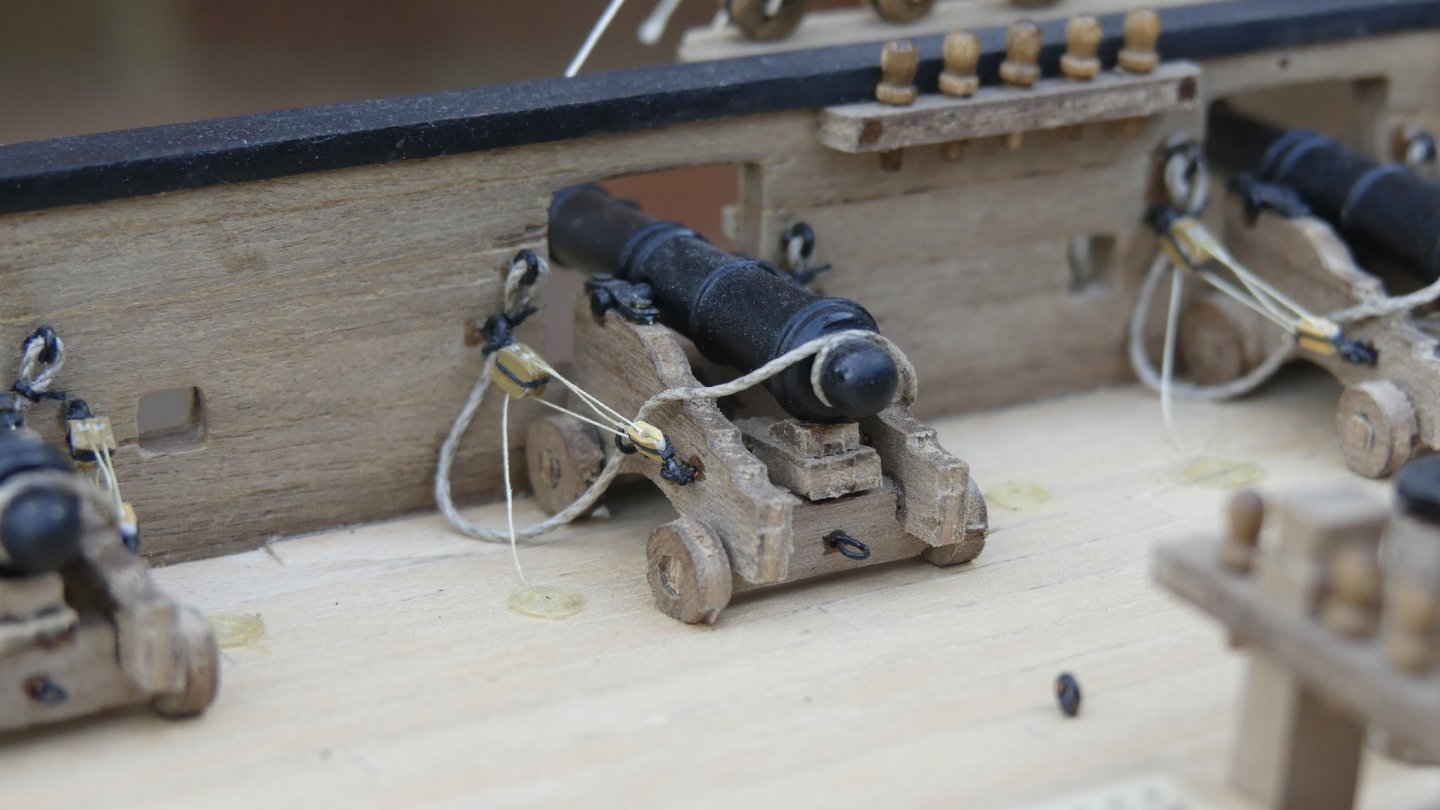
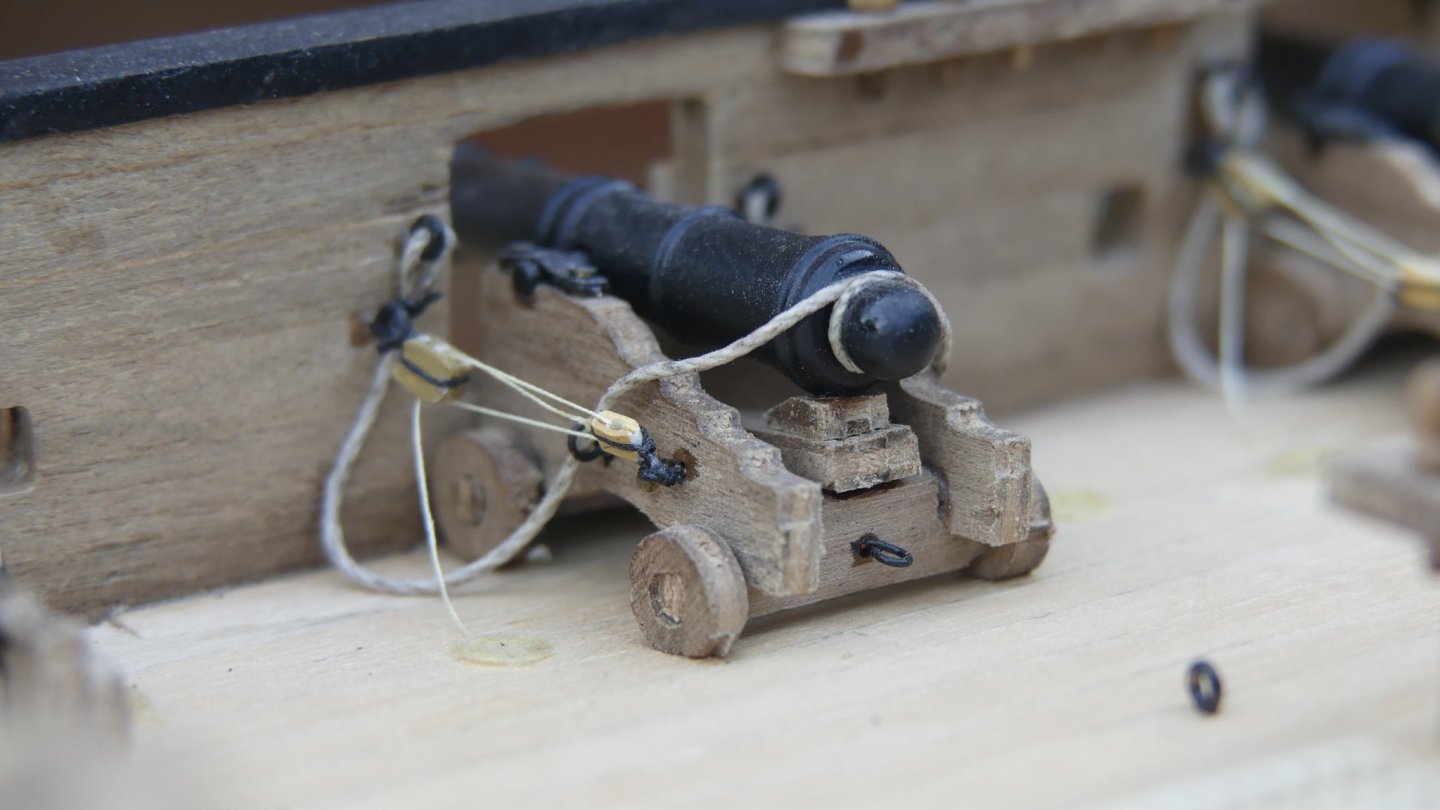
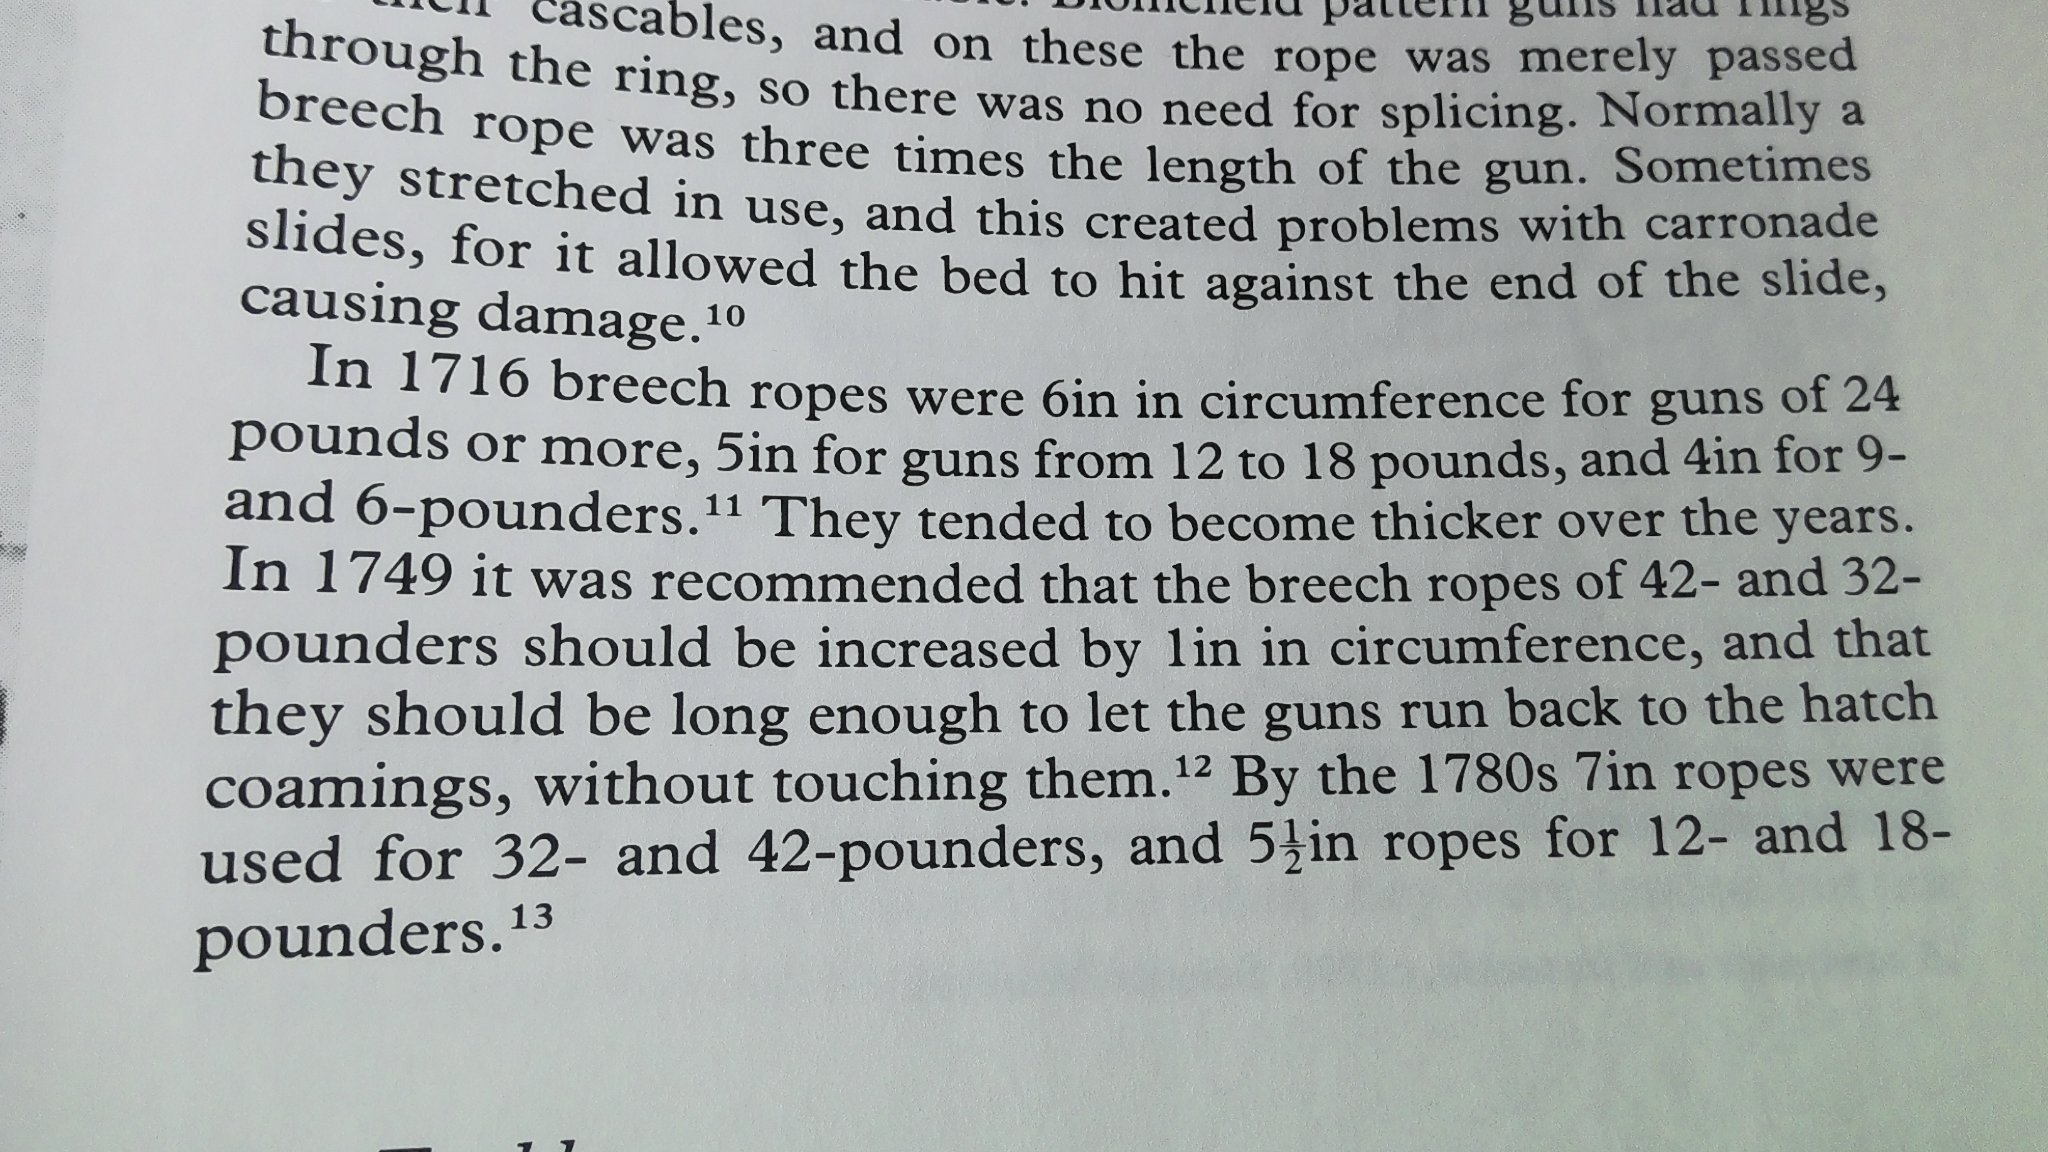
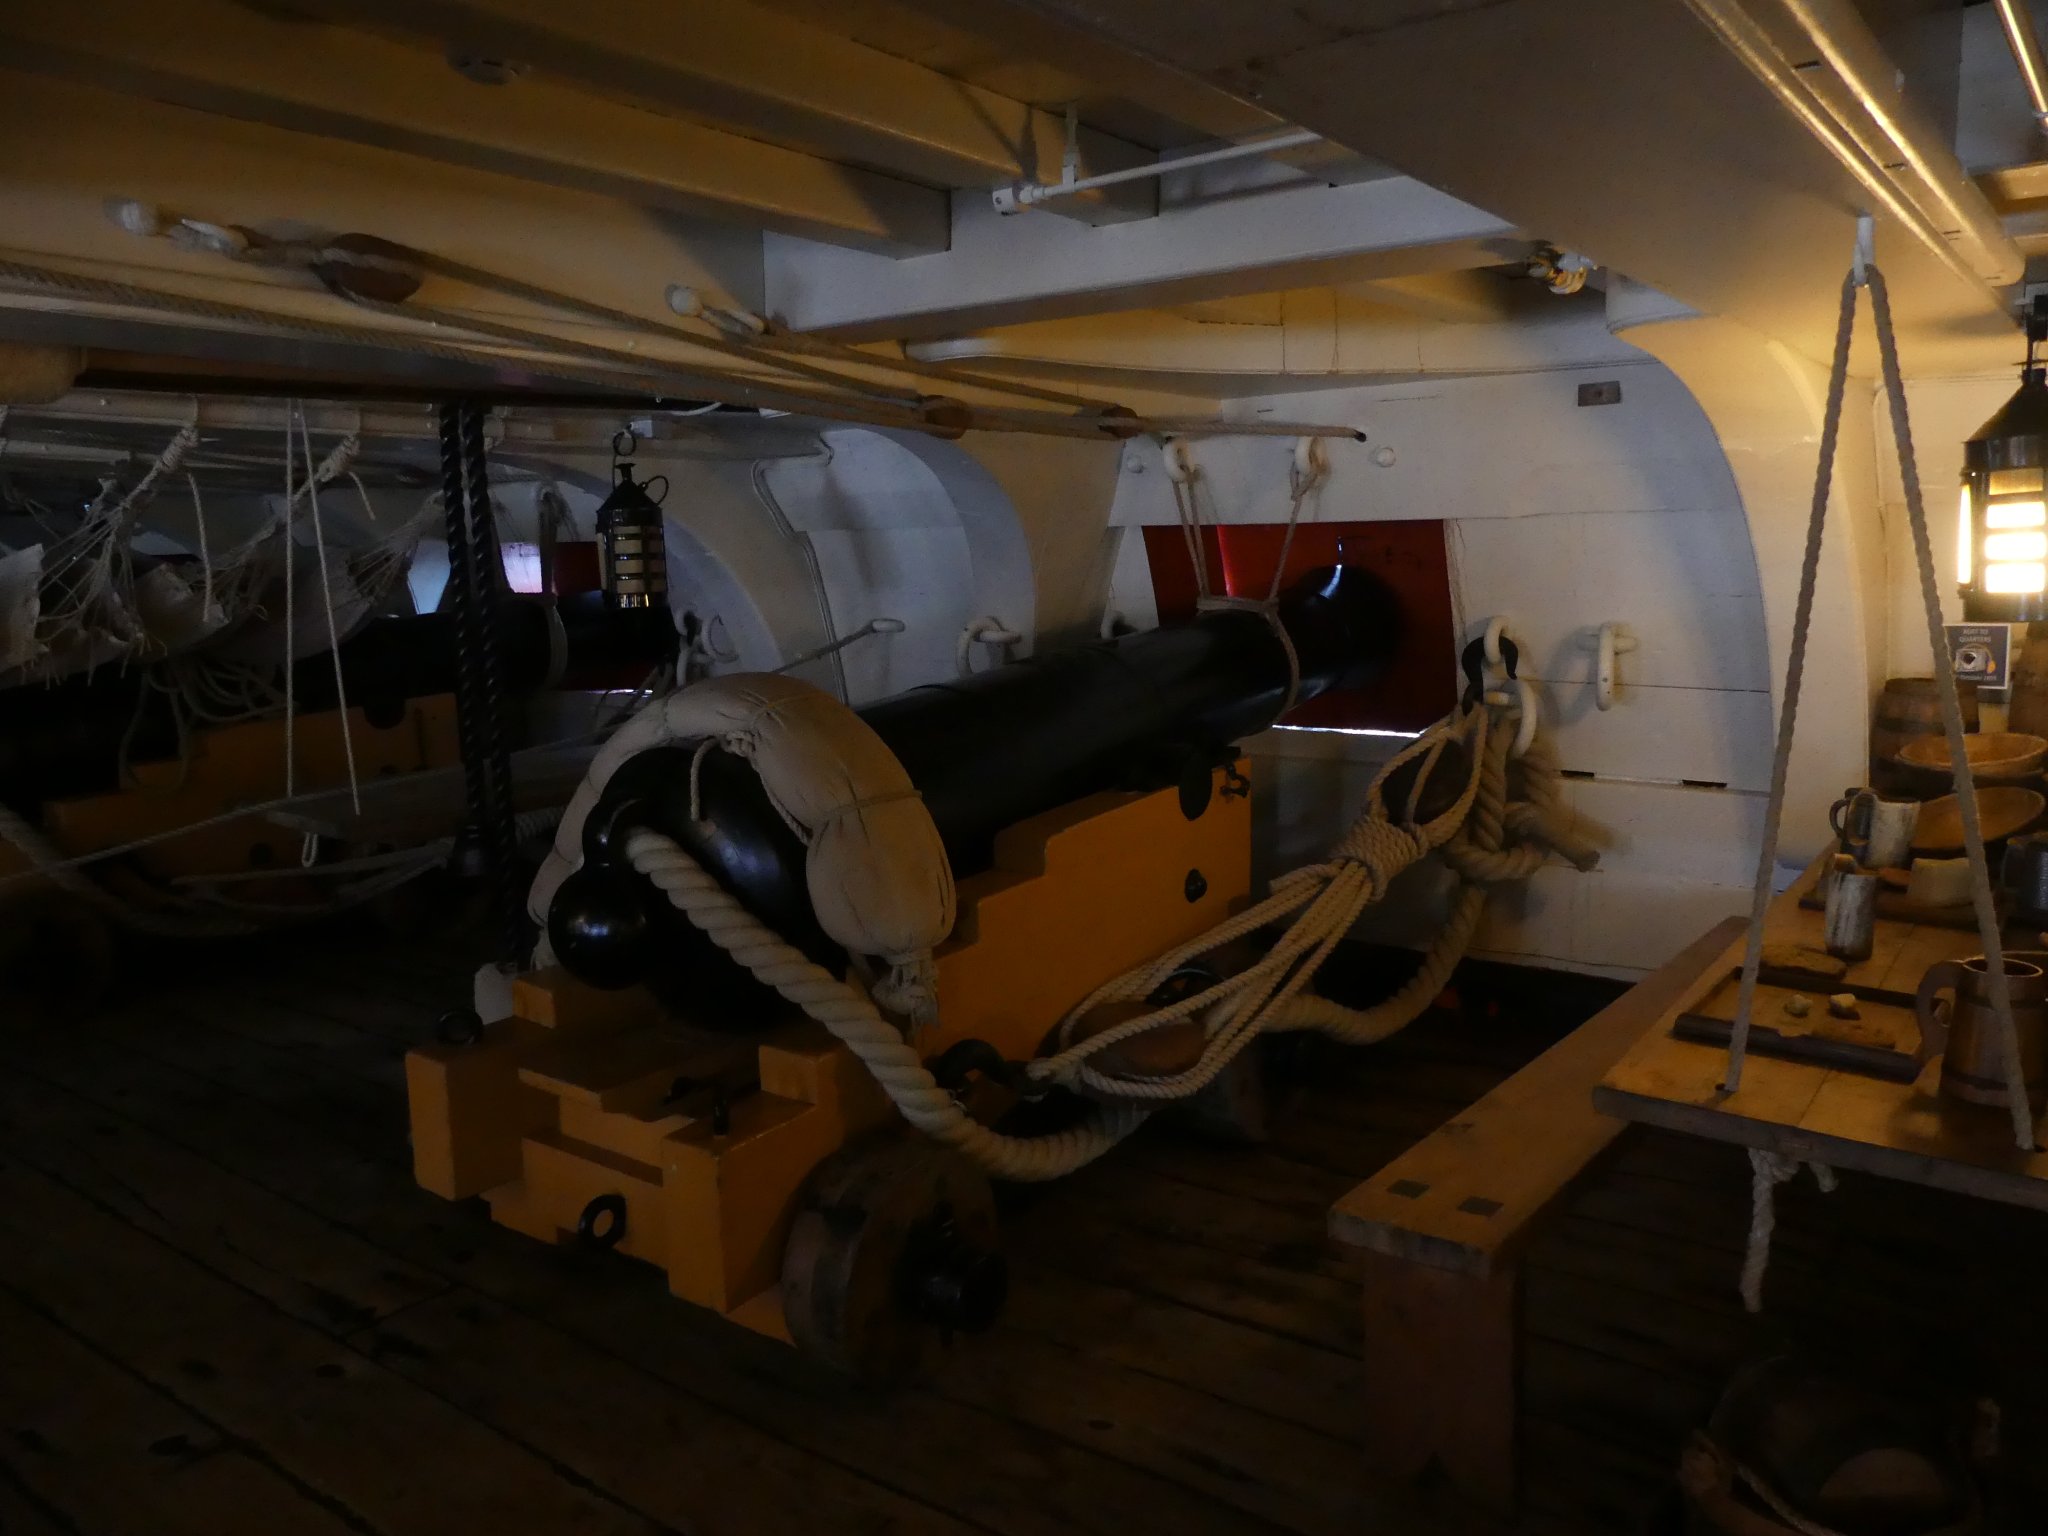
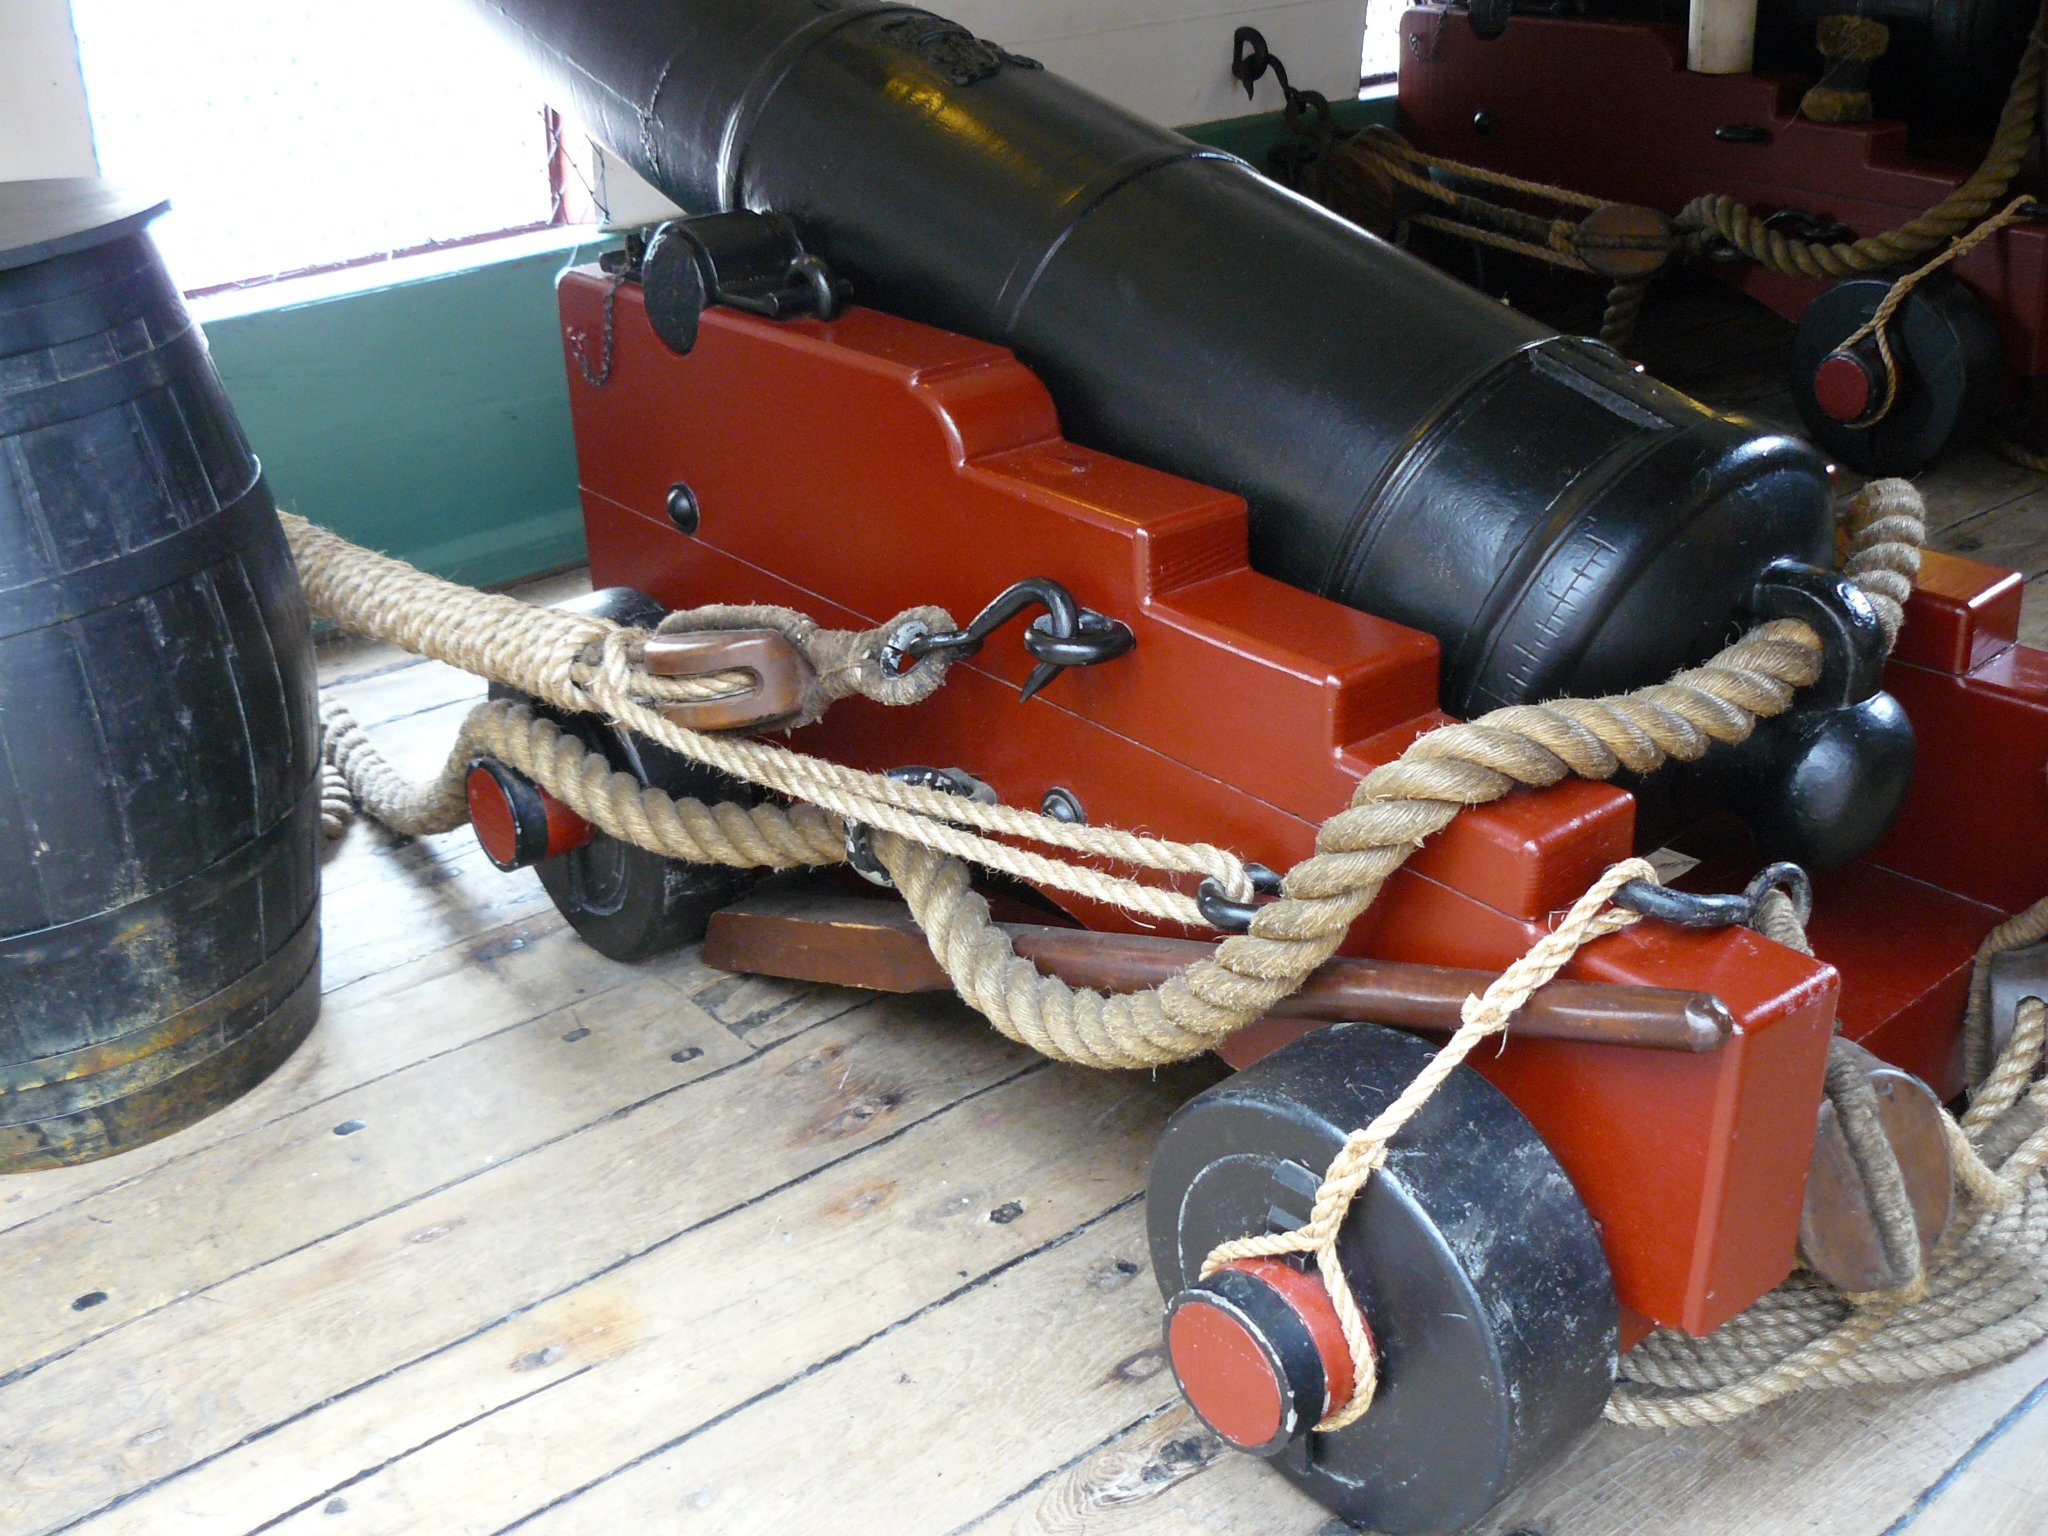
The best way to judge the length of the breech rope is the practical. I.e. they wouldn't want it that long that the gun could recoil down the grating.
-
Looking very good, very professional. Cant wait to see one rigged.
-
Hi,
Had a look in Brian Lavery's 'The Arming and Fitting of English ships of war 1600-1815. He does not include a lot of text other than that below:
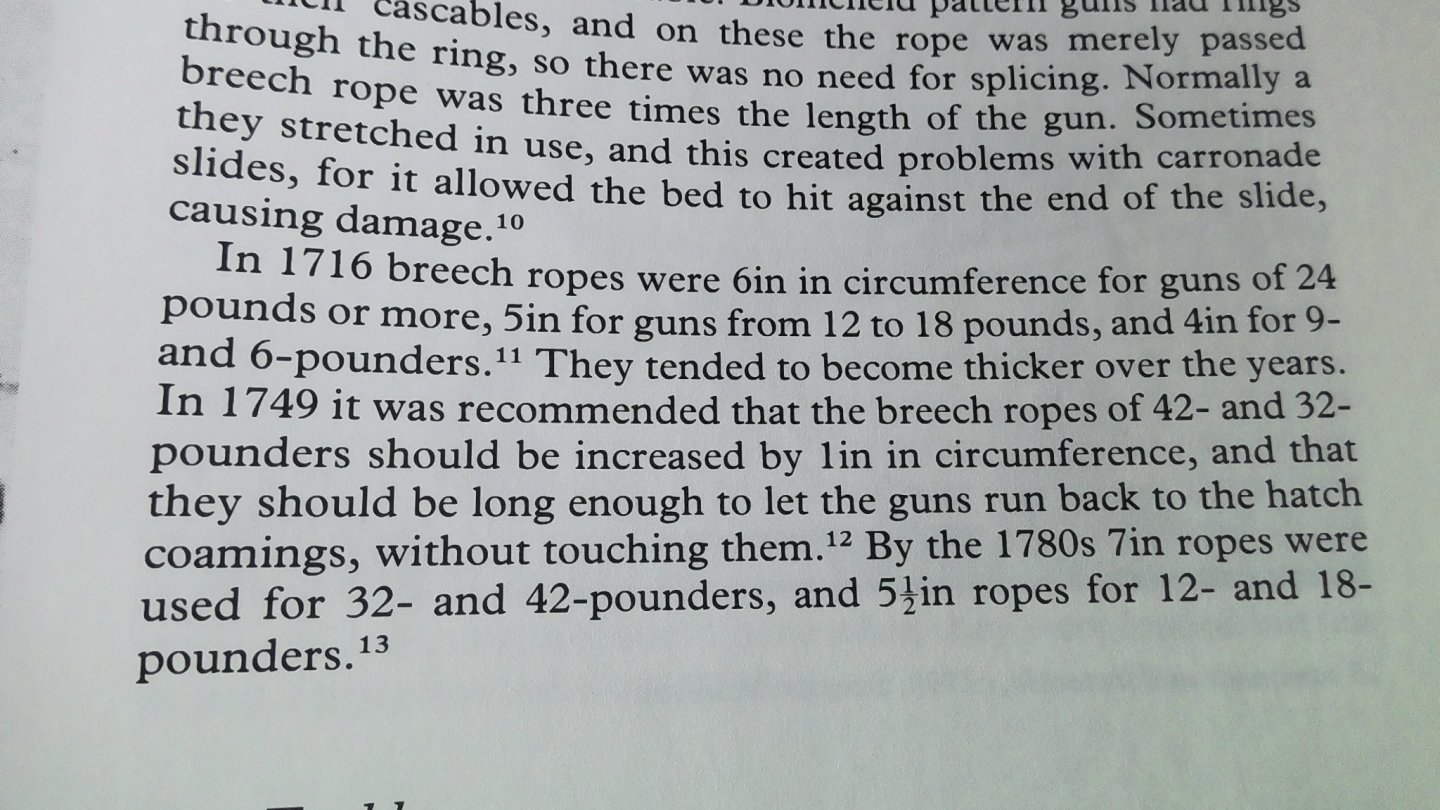
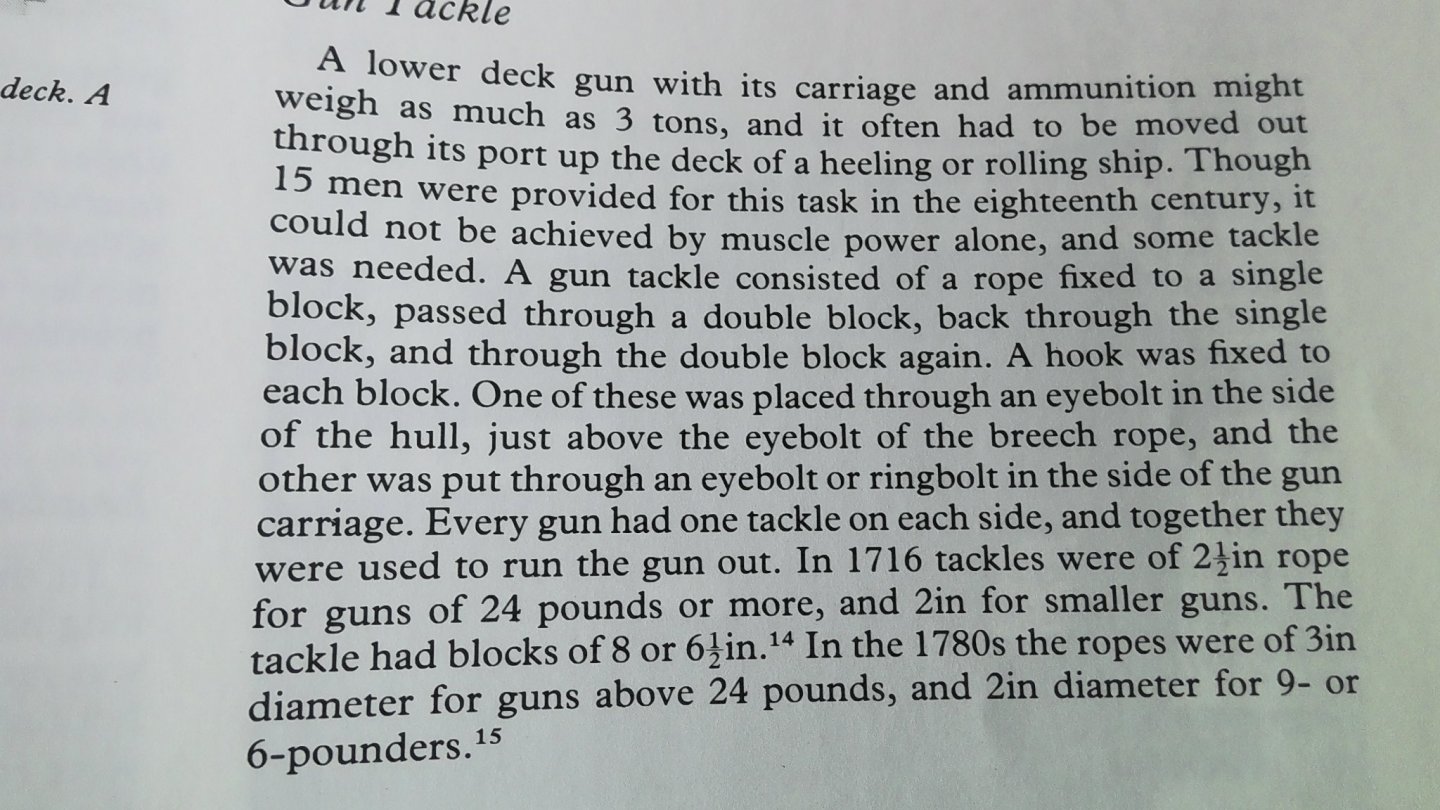
Does not state for our period with 6 pounders for the breechings but does state circumference. If we say 5.5" circumference that gives 0.7mm for our scale.
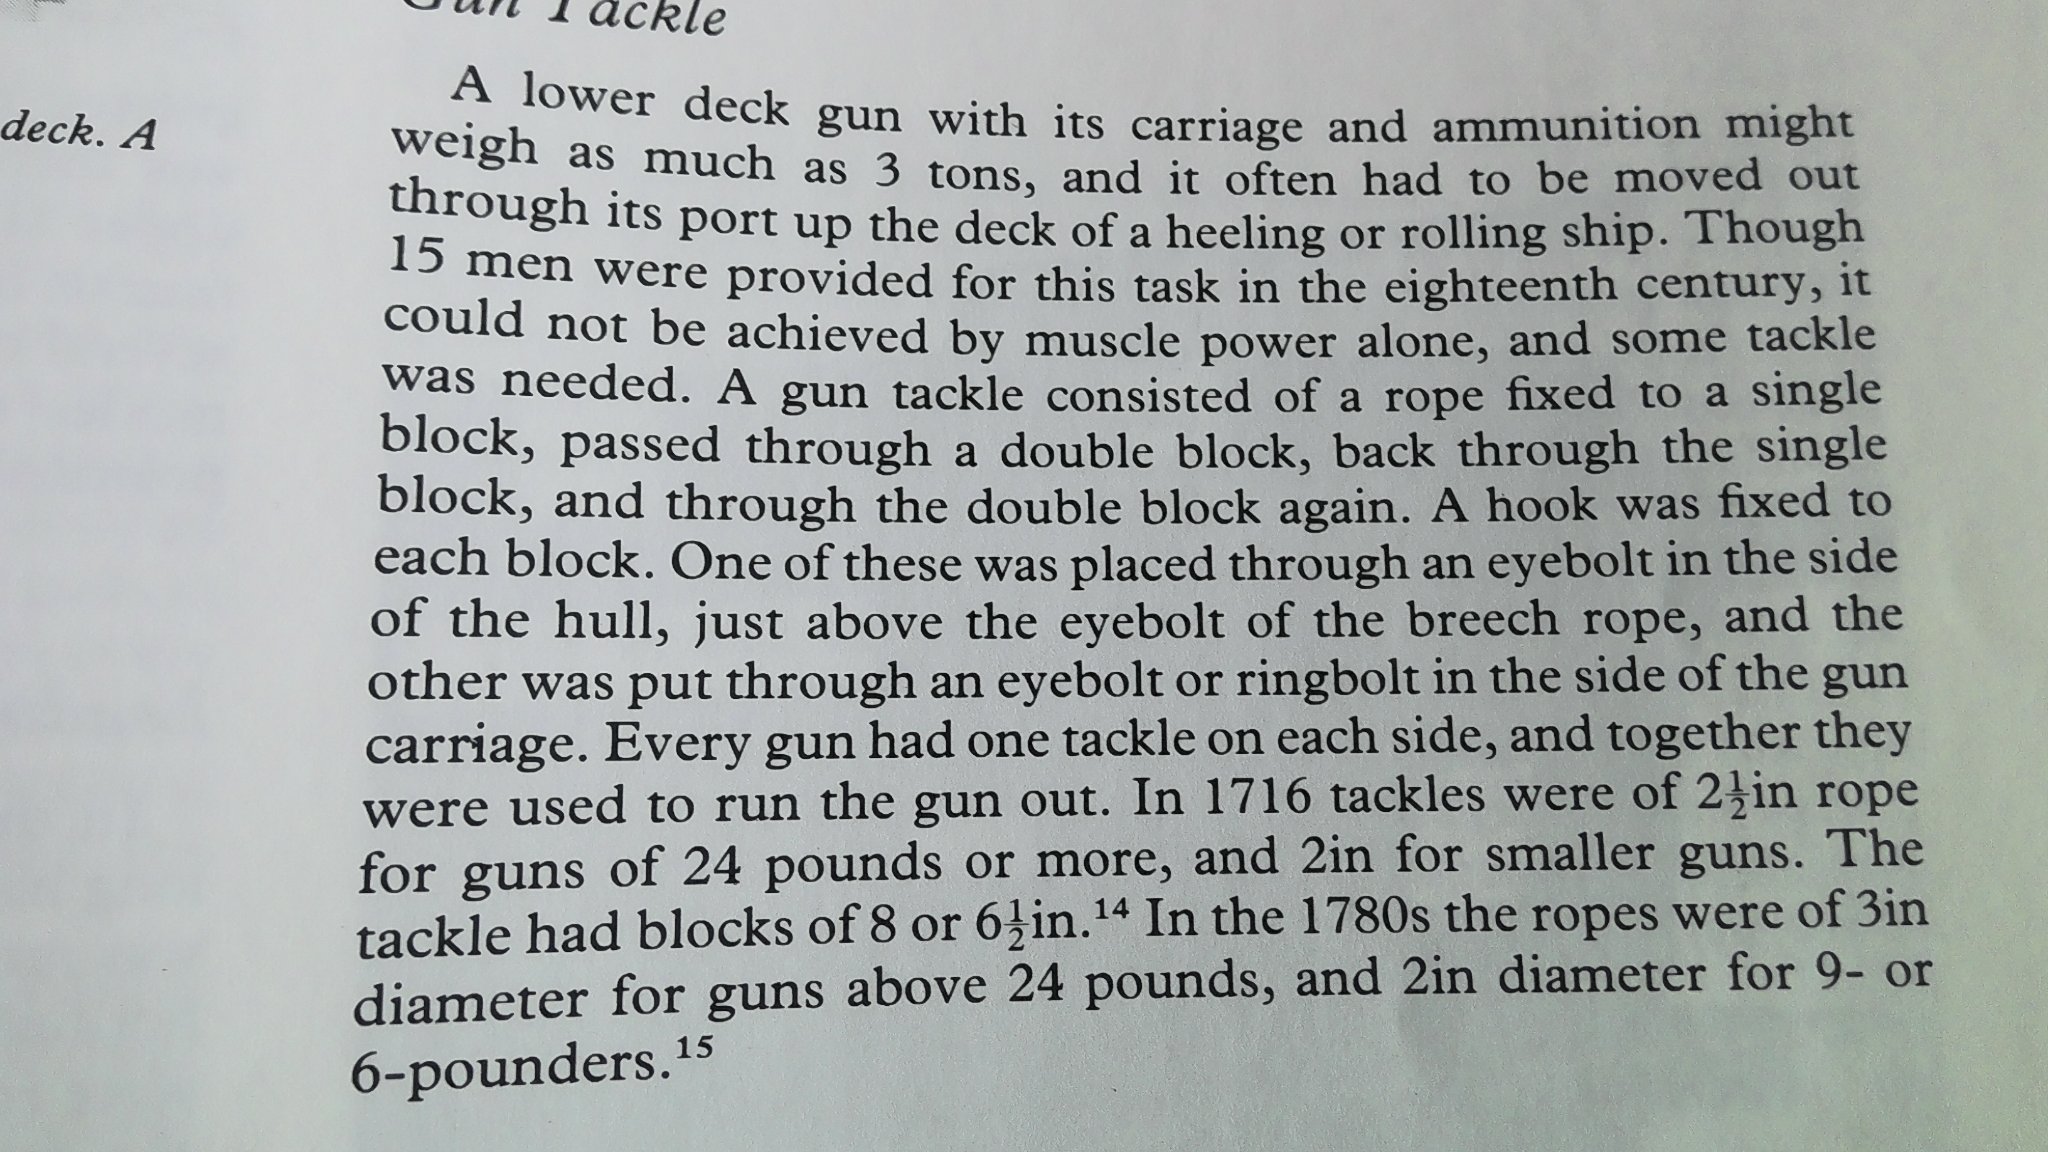
I have added the text for the tackles but this gives more confusion as it seems he has worked on sizes in Diameters for these. This does not make sense as it makes the tackles 0.79mm which is bigger than his breech rope. I would think he meant circumference for this which gives 0.25mm and blocks of 2.5mm.
Unfortunately it is often the case that the more you research the more confused you get. I have an extensive library but often find these great authors contradictory or, in most cases, do not have the information you need. Perhaps they could not find it either.
-
Hi,
Yes very useful chart, even my books on arming and fitting do not give this detail. Works out at 1.59mm.
I have just put some 1.5mm on one of my cannon and compared with photo of victory I posted and think you may be right. You will have to step up the eyebolt sizes as well in order to rig.
At first I thought the chart might be giving circumference instead of diameter but this brings it out at 0.5mm which seems too small.
-
Hi,
1.5mm seems huge to me, have you worked that out from a good source? I used 0.75mm, I would only go as high as 1mm. If unsure i tend to go smaller rather than larger as larger, in my opinion, tends to look clumsy.
However, it will be worth getting a stock of 1mm and 1.5mm as I used these sizes for the standing rigging. 2mm and 2.5mm is also worth having mainly for anchor ropes. The Amati is what I have. I used the natural and dyed black.
I have answered on my log. Sorry for delay, only just got back from holiday and had to look at model to confirm what I used.
-
-
Hi,
I am away so cannot measure what size i used at the moment. I know I probably gauged by eye as finding accurate sizes is near impossible. They are smaller than most people think if taking those on HMS Victory and HMS Trincomalee as a guide.

You can see on the attached that all but the breechings are a single loop so depends what detail you want to go to. Mine are all single loop. The kit sized eyelets on the etched sheet were a good size but think mine made from enamelled wire. If you have a set of miniature drill bits you can use the shaft to twist wire round and make any size you want.
Another source i am just investigating are eyed fishing hooks. You can buy down to size 26 which are tiny. Cut the eyelet off and use or use complete as hooks for rigging. Buy barbless. They come in different shapes of shaft as well as sizes. Cutting the eyes off two and gluing to a third with an eye also makes a nice little grapnel.
- clearway and Edwardkenway
-
 2
2
-
-
It is the gun port distribution that is most concerning, never seen anything like this. Other photos show this shape of port but think the kit company has squeezed in 32 guns as they have their history in error.

- GrandpaPhil and schooner
-
2
-
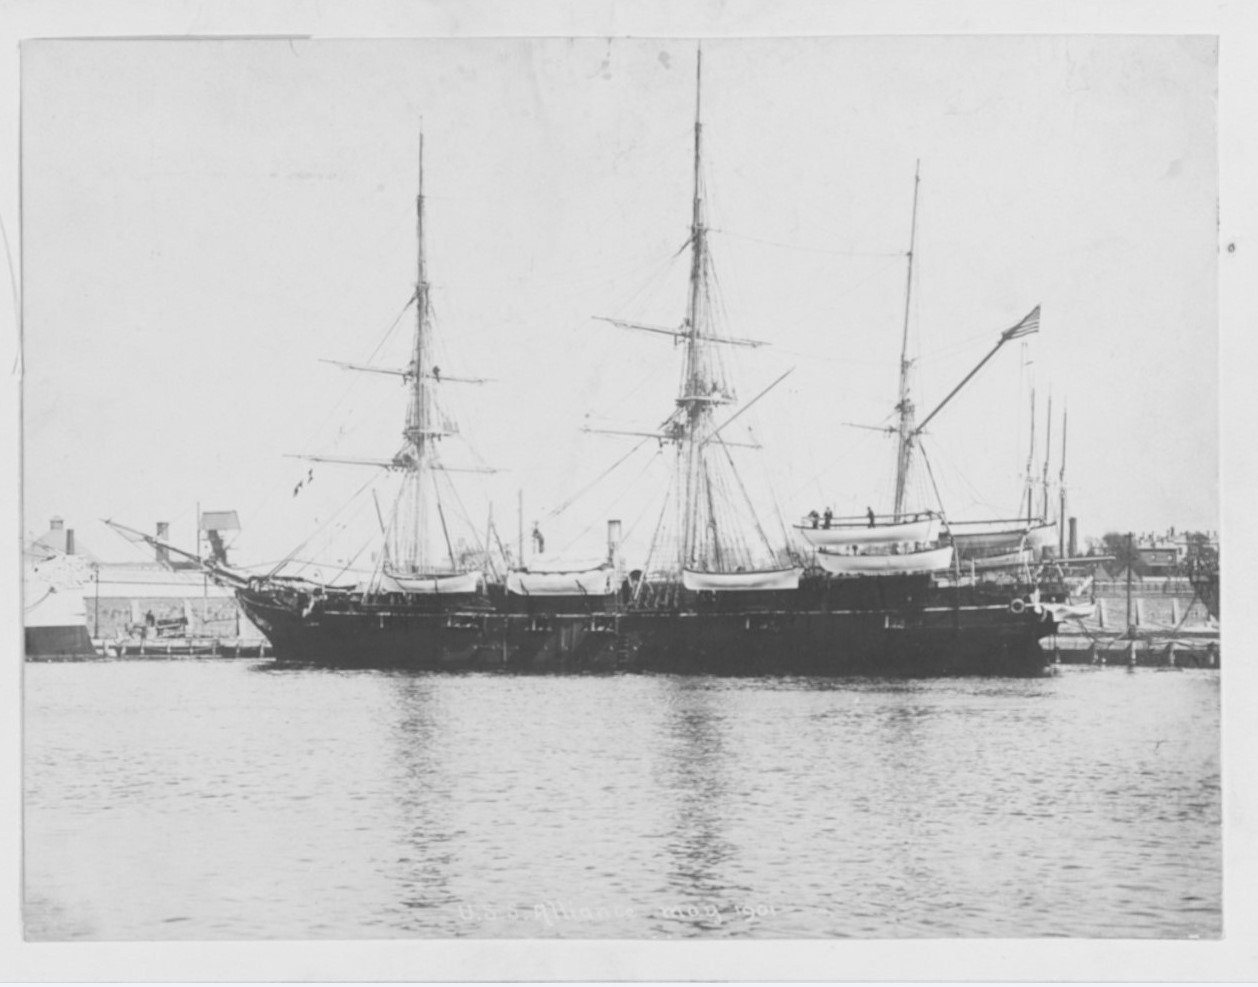
Hi thankyou for the reply and your kind comments about my completed builds.
I did find some interesting photographs of the ship Alliance but did not post due to the lack of interest.
-
Hi,
I used rigging line for the topmast shrouds. Should be steel around deadeyes with metal plates through to just below top and hooks for futtock shrouds.
It is just two cleats to each of fore most shrouds on each mast for the topgallant yard lifts.
-
As my shrouds are rigged was considering replacing one at a time. the other shrouds and ratlines should keep everything in place whilst i do it. Then all should be perfect size. Would be very fiddly though.
-
Hi. yes should be closed. To be honest it has annoyed me that I didn't make new ones ever since I fitted them as should not be hard to do. Also if you solder them there is less chance of them pulling open. If going to solder will be worth doing the bottom of the loop with the deadeye in as these are a bad design and will pull open the split being at the point of most importance.
-
I tend to put the three sections of mast together off the ship, i.e. main mast, topmast and t'gallant. That way they can be glued and dry with a straight line drawn under them so you can see they are all in alignment. I then install on the ship. Make sure the ship is level, fore and aft, to its waterline and from side to side. You can install a plumb line to the rear of the mast (rear so rake of mast makes it swing freely, and as long as this is in alignment with the mast you should have it set accurately.
Of course if you get the rigging incorrect you will pull the mast out of position but gives you a good starting point.
-
THE ORDER OF DRESSING THE MASTS AND YARDS - HMB Cruiser 1796.docx
attached the order I rigged but remember I rigged the lower yard on the main mast as a cross jack, as you are depicting a later date you may want to rig as a sail carrying yard arm. The kit depicts a half way house calling it a cross jack but rigging Jeers.
-
On 9/10/2020 at 7:58 PM, clearway said:
i hear you there, sometimes think it might have been easier to just scratchbuild her, but your cruiser looks good keep up the good work.
Keith
Trouble is, if your in the UK, is getting good quality timber to scratch build. You can buy the same as the kit but it is a costly job. Truith is I don't really even like the kit wood either and do not have room or facilities to mill my own.
This and accuracy is why I will be watching the Vanguard models so closely. For my kits purchased I really hope he starts selling timber or, even better, starts selling replacement timber packs for other manufacturers kits.
-
I would definitely complete the rig of the cannons before starting the rigging to the masts. It would be far to fiddly afterwards.
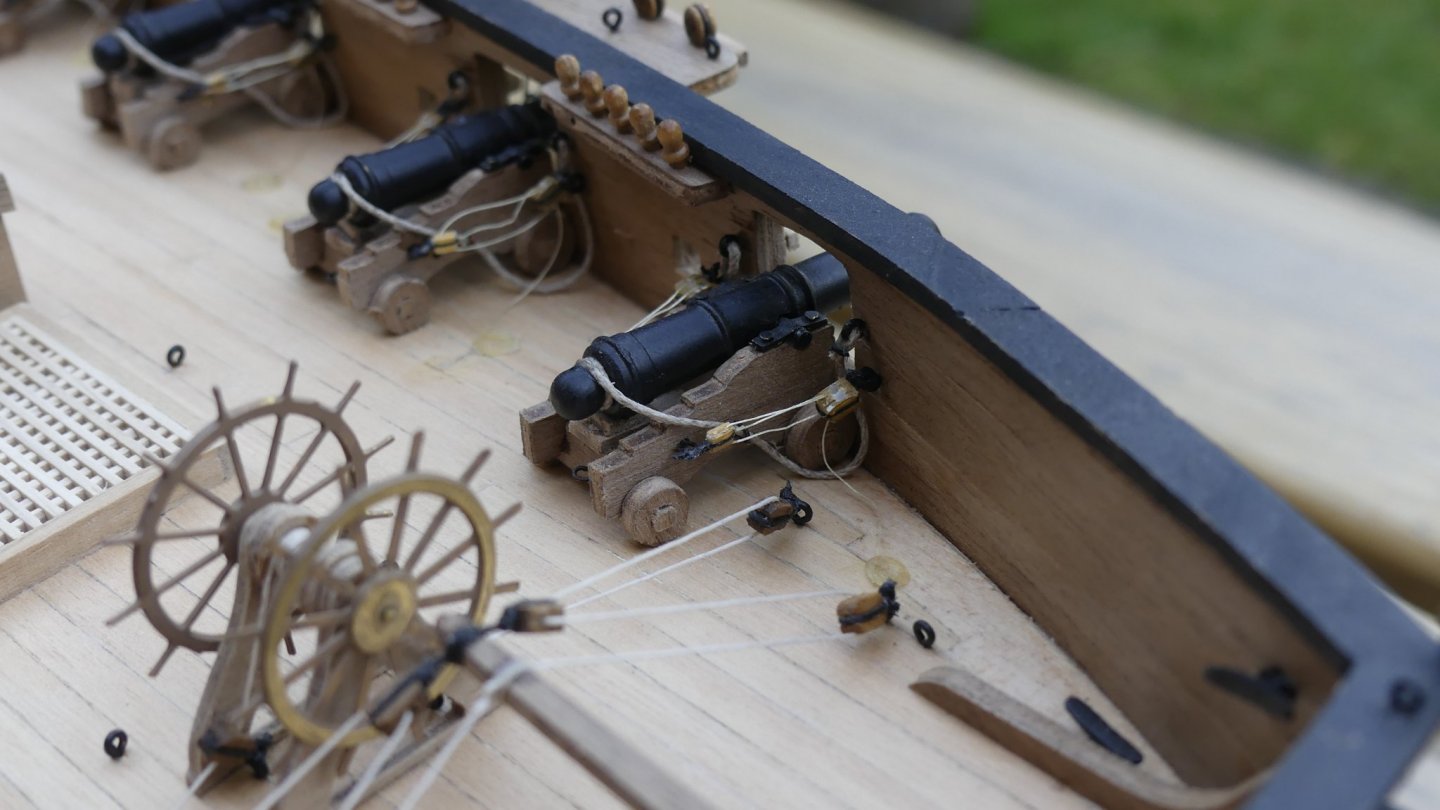
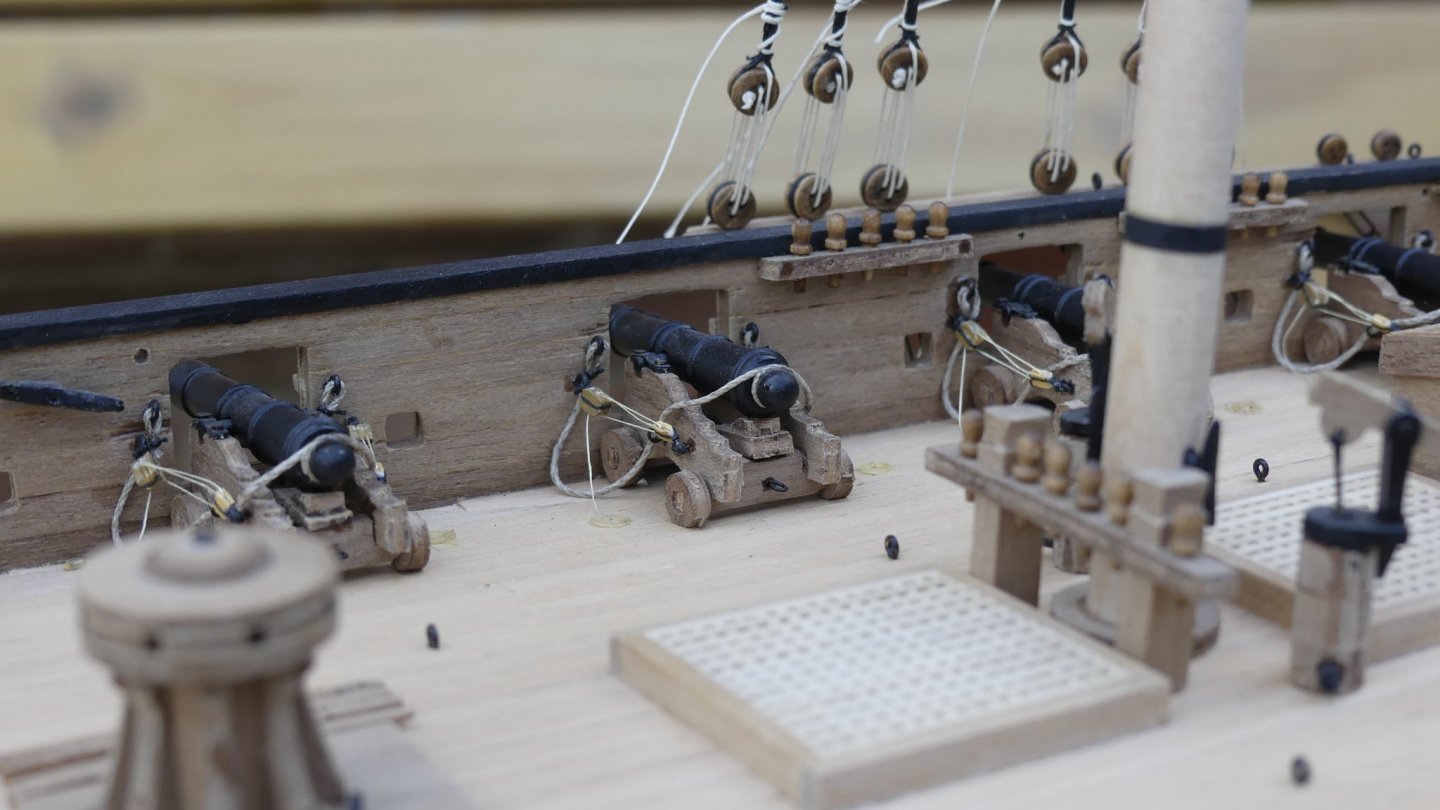
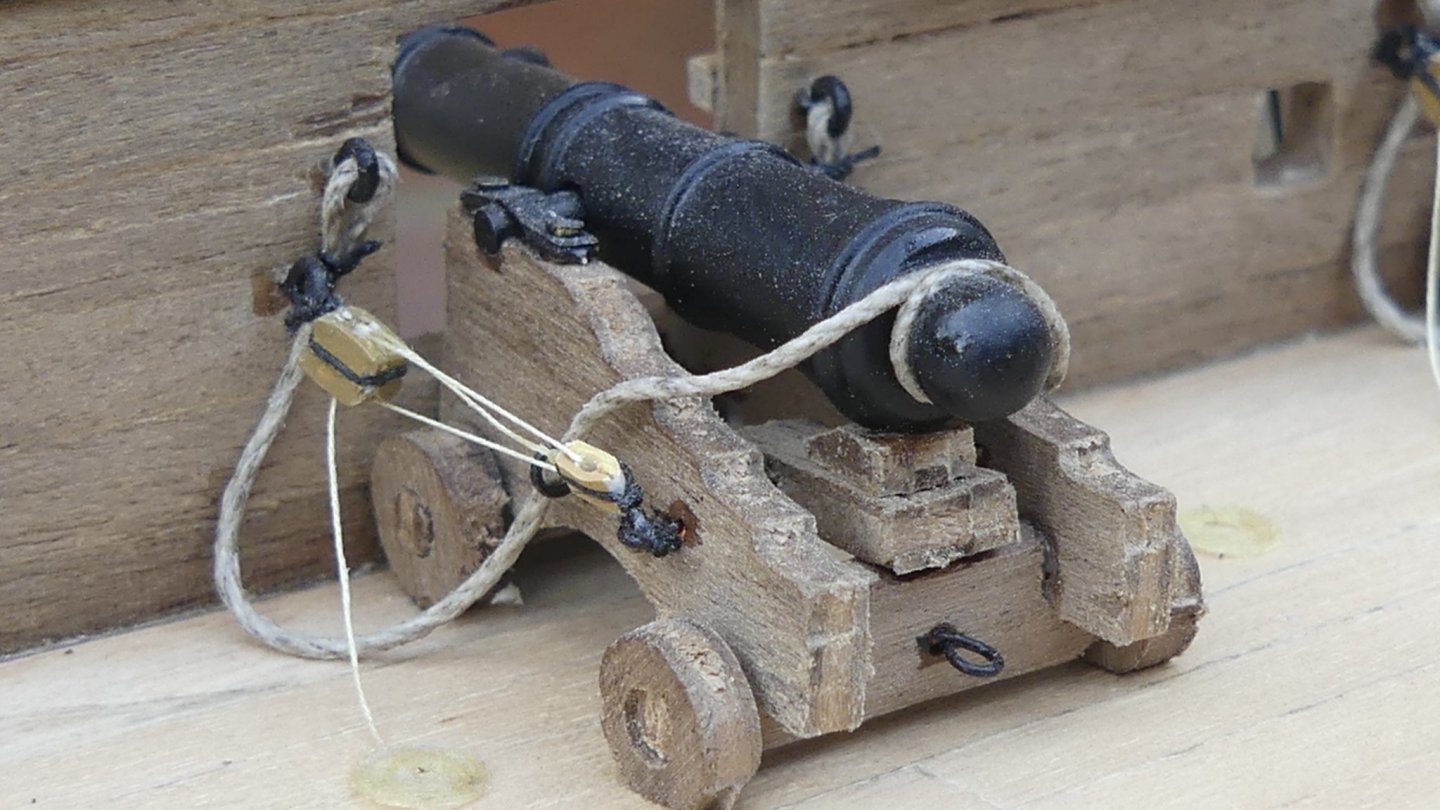
I think the kit only expects you to show the breech rope, which is the thicker rope that goes around the Cascable. There are plenty of eyebolts in the kit to complete correctly, just not enough blocks.
One thing I did end up doing is removing the pumps from the base of the mast, they were in the way for completing the rigging.
I have used different thread sizes to the kit instructions but other than that have not ordered any extra parts. I expect to add rigging blocks as include more rigging than the kit suggests and modify depending on my research. I am away for two weeks now so do not have my sizes i can tell you that the main and fore mast stay sizes were increased, off top of head worked out at 1.27mm 'but don't quote me,' and I ran out of 0.25mm. I seem to have an abundance of other size threads in the kit which has always been the case with their kits in the past.
I would use your time waiting for your order to plan your rigging. I always used to do this in depth and thought I would get away with it this time. Unfortunately I have paid the price.
First thing to do is to check your order of the rigging, I then used to make notes of how to complete each step and do a more accurate belaying diagram. It is worth the effort. The kit drawings do not describe what each item is for so it is worth labelling. By checking James Lees most is correct but i didn't agree with all of it.
-
Sorry missed a comment, I did not use hooks, just rigged direct to eyebolts.
Incidently you can see i used CA here and you can see the discolouration i mentioned and the kinks put into the threads due to them going brittle.
-
Hi Wahka,
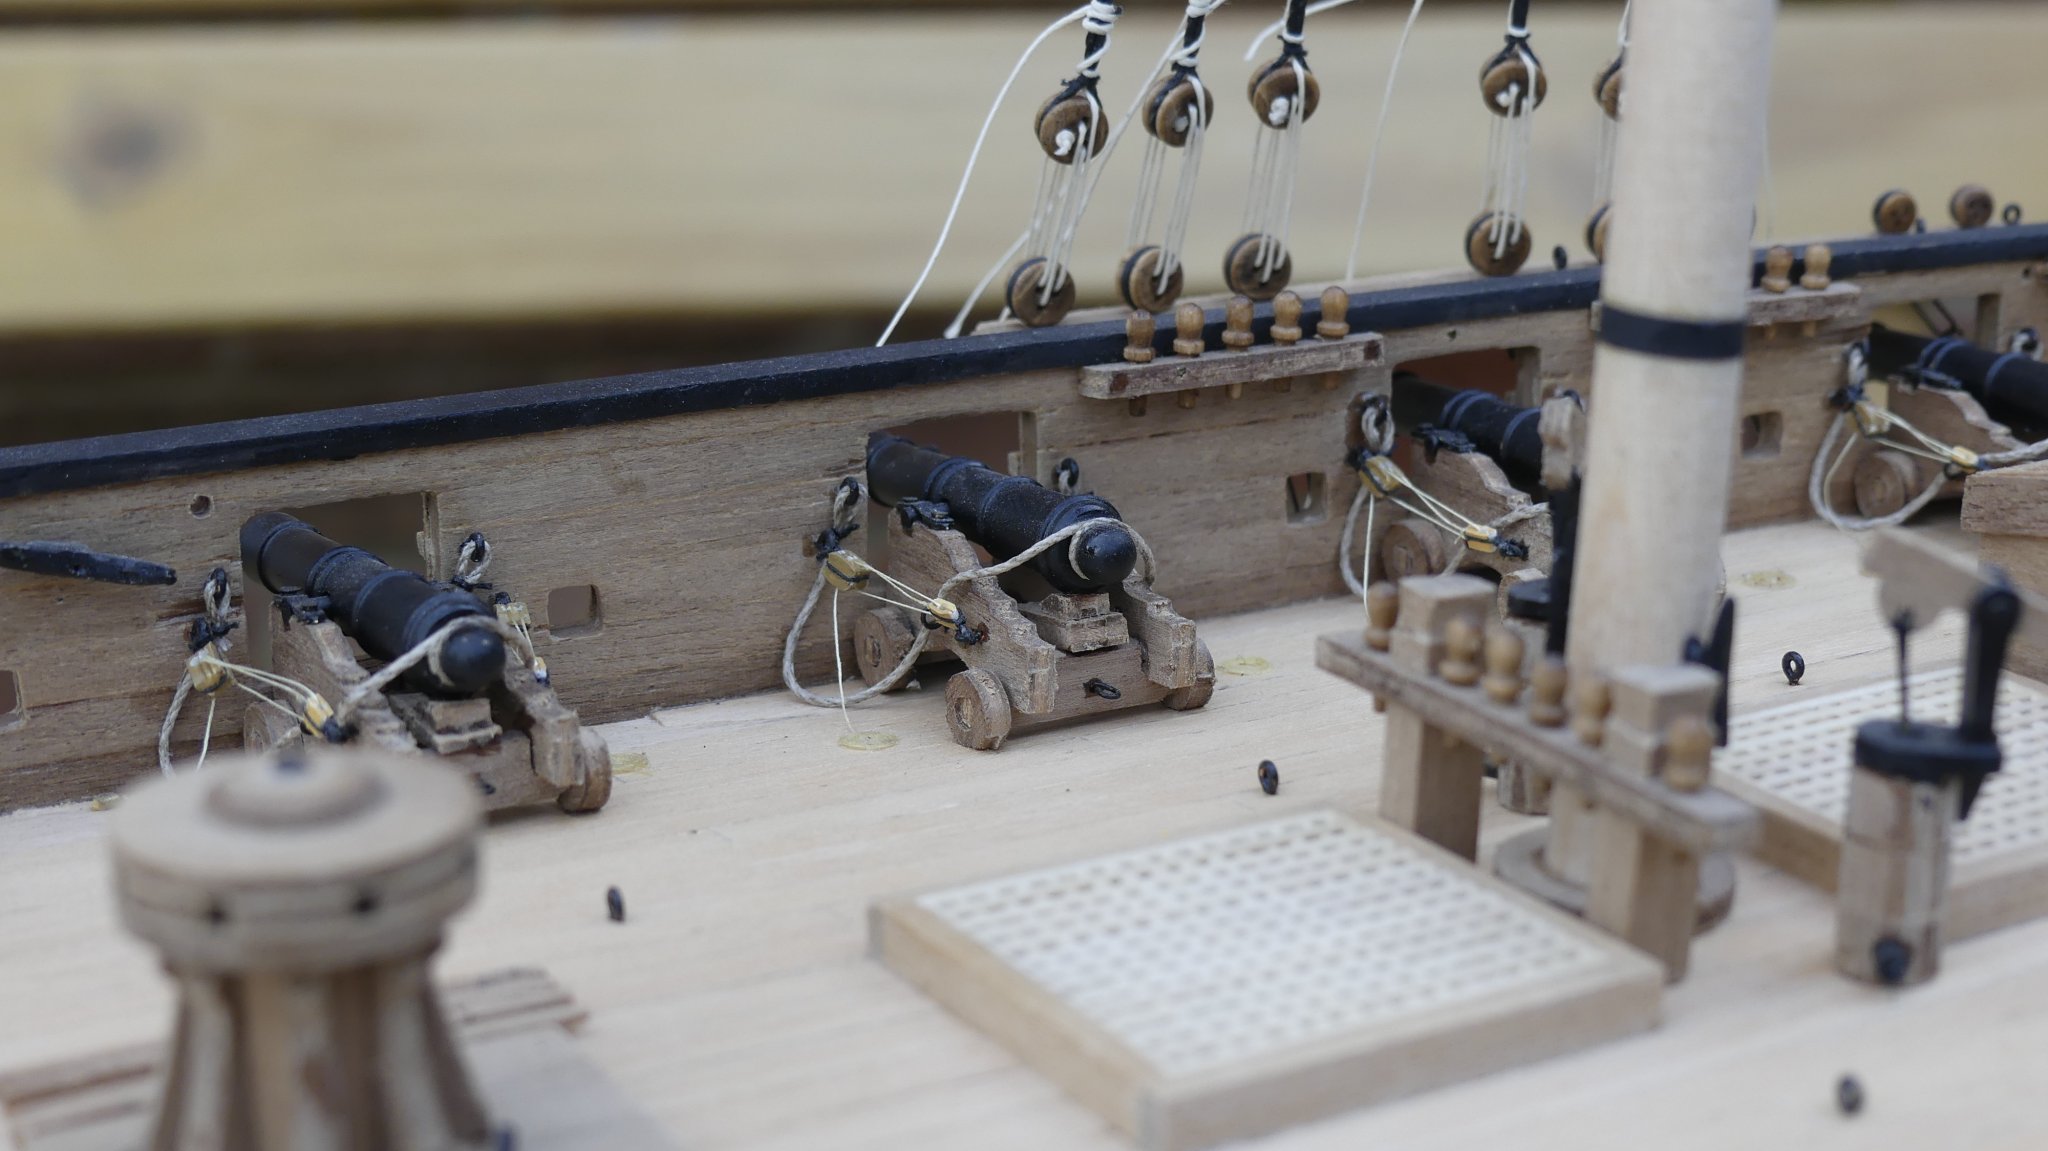
I made additional rigging blocks as the ones in the kit will be too large. If you have the same amount of blocks in the kit as i had then there will not be enough. I am just finishing my rigging and have dipped into my own stock. I have rigged additional items such as reef tackles and bowlines.
The thread is the finest you can get which is used in angling for fly tying.
Blocks that small I have made from white styrene and painted. I think the doubles were 2mm by 2.6mm and the singles 1.5mm by 2mm. Get the length of styrene and cut the grooves along each length, paint brown, drill first block holes and cut from length. Once all cut thread onto some wire to paint the ends. If you experiment with different electrical side cutters the action of cutting produces a curved end to the block. You just have alittle bit of waste cutting the first curve of the second block.
Don't close ups really show off all the faults!
-
I do tend to use CA but it has two disadvantages. Yes it makes the thread and know brittle, You need to make sure the block is angled correctly for its application or you can get a unnatural kink, especially if block is on a pendant. Second is that if it spreads onto the wood of the belaying point or yard arm it will stain it making it look permanently wet.
However, it thread you are using has too much nylon content PVA doesn't work as well.
-
5 hours ago, Bill Brown said:
Thanks Bossman for your kind words. As I stated in the beginning of my log, my postings have been retrospective as I am currently at the point where I have completed all the rigging and just have the anchors and flag to make and she is complete. I will continue to post my progress up to this point trying to highlight some of the things I wished I did differently. I hope this provides some assistance, especially to the novice builder like me, of this beautiful ship.
Bill
'Novice Builder', your kidding aren't you. I had to back track to see if this was a scratch build! Awesome build, I wish i had half this skill.
-
Sorry got to ask this! The eyebolts before applied look flat but when on the gun carriages look just like the correct wrought iron ones in use during this period. Did you have to fettle them to get this look? I like the way they are solid and not obvious wire loops with an open end pushed together.
-
I thought he mentioned something about the Gallows but not certain now.
-
23 hours ago, rkwz said:
Hi Thunder, the blocks came from this site:
From firsthand experience, the blocks are quite well made...edges are sanded nicely, sheaves moulded quite well with very few defective blocks . Much better quality than my local supplier that's for sure!
Thank you, I will defo be taking a look at these.
You can make smaller blocks from white styrene, square section rods. There is many sizes and i have made both singles and doubles with it.
Using a draw knife, you can actually buy one for cutting styrene, score the groves through the whole length on each side. Paint brown, drill first block holes. Cut to length with side cutters, drill next hole and cut again. Thread all onto some wire and paint ends.
What i found that if get the right side cutters, small flush cut for electronics work, as it cuts it makes a nice curved edge to the plastic. Simple turn round for the other end of the block, Turn and cut again to form the next block before drilling the next hole. Gives a little bit of waste but makes nicer shaped blocks. Have managed down to 1mm x 1.5mm.
- rkwz and Edwardkenway
-
2


USF Confederacy by cdrusn89 - FINISHED - Model Shipways - 1/64
in - Kit build logs for subjects built from 1751 - 1800
Posted
If this is the quality of your work then I think I will have a lot to learn by following this build. Inspiring.