


allanyed
-
Posts
8,149 -
Joined
-
Last visited
Content Type
Profiles
Forums
Gallery
Events
Everything posted by allanyed
-

Hello from Seattle - looking to buy a built ship
allanyed replied to wyapa's topic in New member Introductions
Study close ups that show the quality of construction and details of accuracy. For example there are a lot of models of complex ships such as the SoS that show the use of belaying pins which were not used until a hundred years after she was built, incorrect cannon shapes and sizes, out of scale and incorrect number of rudder hinges, incorrect dead eye shapes, and the list goes on. Look at contemporary plans and models of particular ships on the RMG Collections site and other museums. Maybe pick a ship that has not been modeled hundreds of times so you have something a little different. For an accurate model of the SoS go to https://www.rmg.co.uk/collections/objects/rmgc-object-66317 and compare to modern versions. There are also contemporary drawings of her on their site as well. A well done accurate model of SoS is going to be hard to find for less than $10,000 and even some of those in that price range may have things that are not correct. Maybe consider a well made accurately depicted schooner or smaller naval craft if the price is an issue. Allan -
I used to use Xacto exclusively but after more than one episode of it rolling off the bench and onto the floor, or worse, onto a thigh, when it comes to blade holders I went to flat handles. Saws and other attachments are not a problem for me with the Xacto, but definitely not scalpel blades. My go to is Swann Morton handles and blades but there are others that are similar. Allan
-
HMS Euryalus 1803 by rlb - 1:48 scale
allanyed replied to rlb's topic in - Build logs for subjects built 1801 - 1850
WONDERFUL build Ron I really like seeing the great results with the use of hand tools, You are bringing back memories of my adventure in building her. Allan- 122 replies
-
- 5
-

-
- Euryalus
- Plank-on-frame
- (and 4 more)
-
Hello from Seattle - looking to buy a built ship
allanyed replied to wyapa's topic in New member Introductions
While the model is pretty, it does not come close to meeting your requirement of an accurate depiction. But, if you like it and it will bring you pleasure, that is what matters, so go for it. Allan -
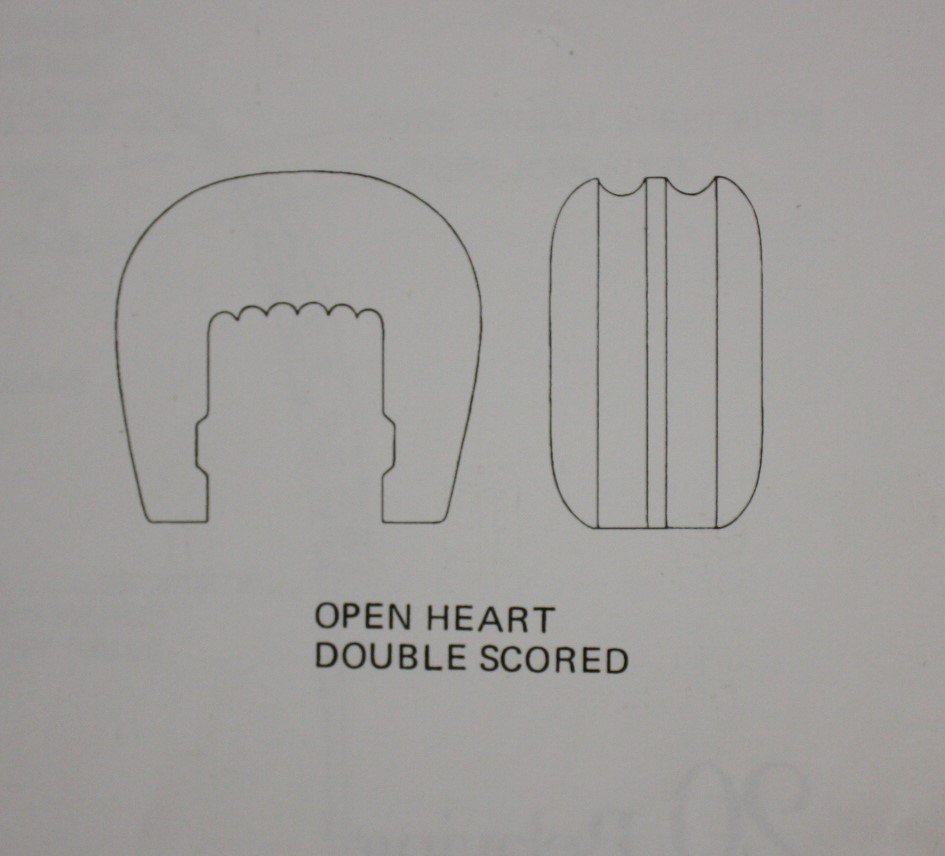
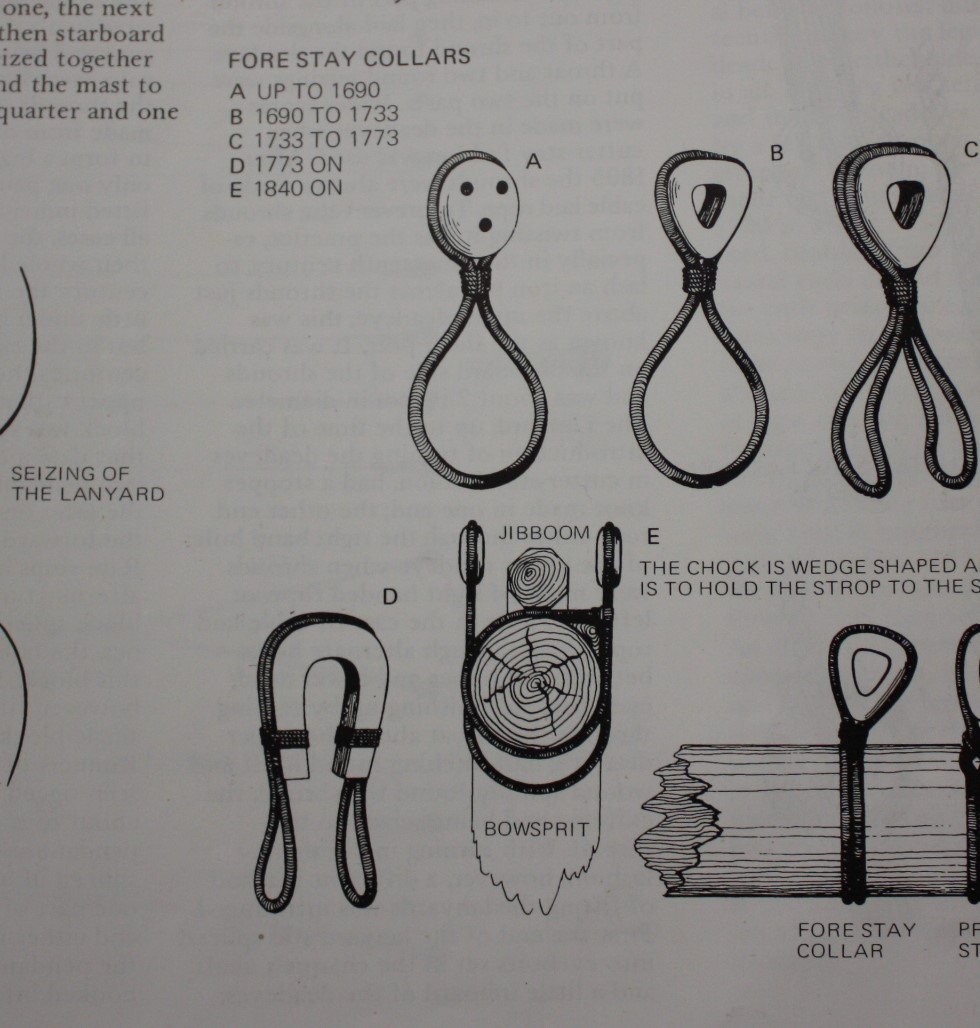
This seems to be the case but this book's drawings are a good guide in many respects as long as further research of contemporary based information is done to confirm or correct any item. Unfortunately it is somewhat limited as it is based solely on the contemporary model Melampus (36) 1785 which as Petersson points out on page 1, has been attended to by restorers over the years. Rigging restoration is not uncommon and based on the single collar, it appears someone may have gotten it wrong. Allan
-
Hello from Seattle - looking to buy a built ship
allanyed replied to wyapa's topic in New member Introductions
For wooden model kits you are correct for the most part as many have a varying degree of quality and accuracy, but there are a couple exceptions to this based on the results seen here at MSW in the member build logs. You mention learning rigging skills which leads me to think you want to build a kit model yourself. If you are indeed in the very beginning stages and want to build your own the best three model kits from which you can learn and present accurate builds are those designed by David Antscherl and available from Model Shipways. If you want to tackle something more complex, the models from Chuck Passaro at Syren Ship Models are top shelf. Allan -
FWIW James Lees gives the following information on page 168 in The Masting and Rigging of English Ships of War: The thickness was slightly more than half their diameter, which was 1 1/2 times the circumference of the shroud or stay. The groove round the deadeyes fitted to the chains was as wide as the link of the chains, those that fitted the shrouds or stays were the diameter of the appropriate shroud or stay. However when shrouds were turned in the cutter-stay fashion, the groove was a little wider to take both parts of the shroud. The depth was half the diameter of the rope or link. The circumference of the lower stays was 1/2 the diameter of the mast and the shroud was 0.6 that of the stay. Allan

- 15 replies
-
- 10
-
-
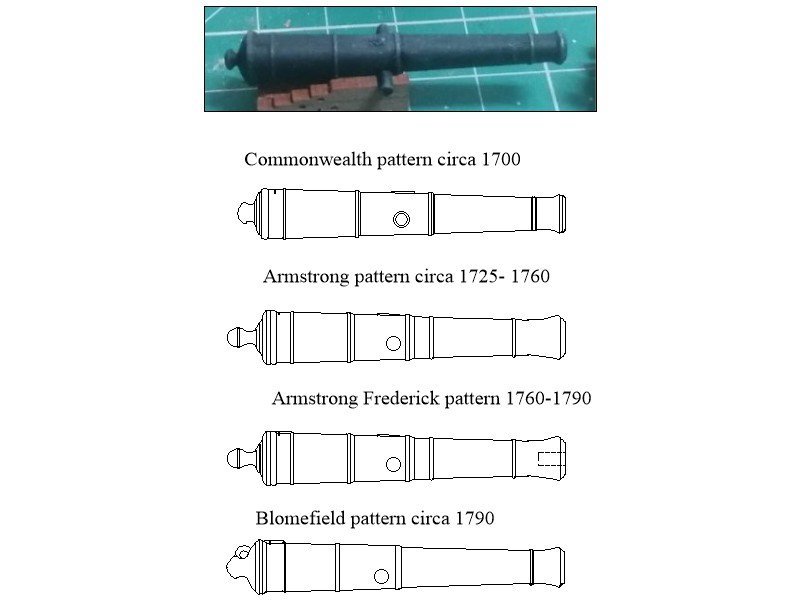
Lieste Thanks for pointing out the missing Borgard. See the revision below including the Pitt and Browne patterns as well. Many of these have been completed in various calibers in 3D by Ron Thibault and posted here at MSW so can be printed in resin. Allan

-
Yes, that is my understanding, but Lees, Longridge, and Petersson all show doubled collars thus my confusion as to why the kit would show a single if the double is what was actually done. No matter, your build and the kit are super!! Allan
- 587 replies
-
- 2
-

-
-
- Indefatigable
- Vanguard Models
- (and 1 more)
-
Hi David Actually they look like Commonwealth pattern guns which were common between 1650-1710. Note the number of reinforce rings, the cascable ring on both the Armstrong and Armstrong Fredericks and the loop at the breech/cascable area on the bottom sketch of the Blomefield. Vanguard offers Blomefield cannon as well and I would guess they are excellent quality. Regardless, what you have look like nice quality barrels. Allan
-
Your build continues to be superb! One question hope you don't mind.. Is there are reason the stay has a single collar with the heart rather than the double collar? Just curious and I realize at 1:64 this is a tough one. From Lees The Masting and Rigging English Ships of War pages 41 and 169 below for a better explanation of what I asking about. I looked to see if both methods were common after 1730 but so far I cannot find any information contemporary to Indefatigable 1794 with a single collar. Thanks Glenn Allan
- 587 replies
-
- 2
-
-
-
- Indefatigable
- Vanguard Models
- (and 1 more)
-
how to secure a rope hank to the sheer poles?
allanyed replied to paul ron's topic in Masting, rigging and sails
Volume III in Ed's books, and in his build log which is, as you know, also a scratch build. His drawings are superior to any kit I have seen to date. I do not recall which pages address the sheer poles in the build log, but I saw them while doing some searching. Allan -
Hi David Those are nice looking barrels. For the future, and I am sure very few folks outside the ship modeling community will notice or care, but I think they look more like a Borgard or some other pattern rather than Blomefields which had 4 rings between the breech and muzzle and the loop on the cascabel for the breech rope. Vanguard offers Blomefields that look great and there are 3D drawings of Blomefields here at MSW that you can take/send to a commercial 3D printer and have them made for very attractive prices. SO FAR I have always paid less than US$1.00 each, including shipping, for 1:64 scale barrels when buying a dozen or more here in the States. Allan
-
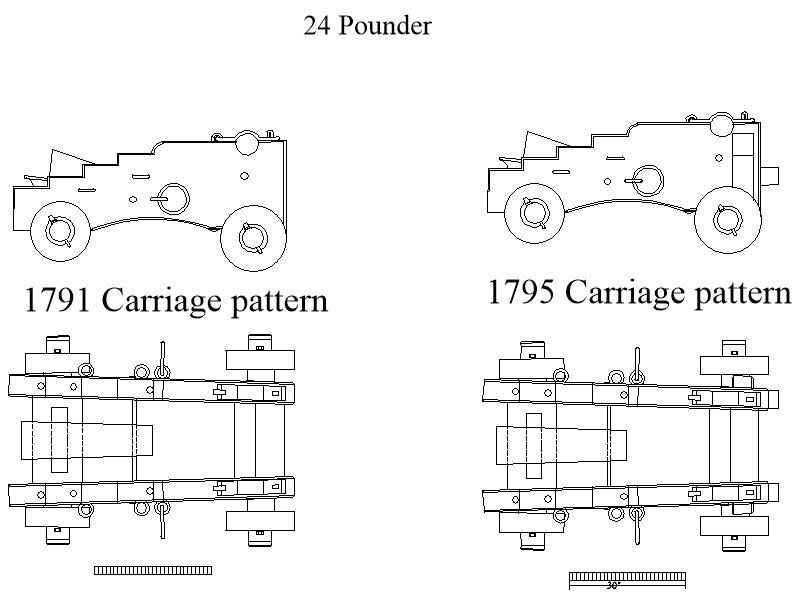
The shape/design of the carriages for the Blomefield pattern above or in Caruana can probably be used as well as those by David White in the AOTS book. The lengths will need some adjustment for each length barrel. In addition Caruana goes into detail that the distance between the brackets should be one inch more than the widths for the diameters at the reinforce rings. Another interesting point is that the carriages were usually painted red due to costs. He goes on to say that not only were they painted, they were on a schedule to be repainted every 9 months. He also mentions that on occasion they were painted white or even gold. Unpainted carriages, to me, look great as the details are more obvious, but if requested I will go with the red in the future. Mark, I agree, the carriage drawings on pages 106 and 107 are well done and look to be 1791 version used with Blomefields. Allan
-
how to secure a rope hank to the sheer poles?
allanyed replied to paul ron's topic in Masting, rigging and sails
Paul I believe there is information on this in Ed Tosti's books and his build log here at MSW on Young America. I just did a little research and there is detailed information on the sheer poles and seems to be good information on lines belayed to the sheer poles. Allan -
Hi David This is a very interesting subject. The carriages varied in length with the barrels at some point. For example, on pages 369 and 370 in Caruana's Volume II of The History of English Sea Ordnance, from drawings in the British Library he shows the 1732 pattern for a 7 foot long 6 pounder was 4' &1/2" long. The carriage for an 8 foot 6 pounder was 5 feet long, thus the added length was about that of the added length of the barrel. By the same token, on page 371 he shows a carriage for a 7 foot long 9 pounder at 4' 8" long. He shows a 24 pounder 9' 6" long having a carriage of 6 feet long. He shows more carriages but does not give the barrel lengths so perhaps the carriages did not vary with barrel length at all times. The following may give you some help. The Robertson Treatise of 1775, https://books.google.ca/books?id=Ww8Fg5rD8hsC&printsec=frontcover&dq=robertson+treatise+of+mathematical+instruments&hl=en&sa=X&ei=_BPoU-DtFYWjyATihoLgDw&ved=0CCoQ6AEwAQ#v=onepage&q&f=false and the treatise of Katrina Bunyard, 2019, https://thescholarship.ecu.edu/bitstream/handle/10342/7250/BUNYARD-MASTERSTHESIS-2019.pdf?sequence=1&isAllowed=y In addition to the dimensional information, assuming Diana was outfitted with Blomefield pattern guns, the carriages may have had cleats which were introduced about the time of Diana. Drawing showing these, based on those in Caruana, is below as jpg and PDF. Allan 1795 pattern carriage 24 pounder.PDF
-
This topic continues to be very interesting. With only four catharpins being appropriate for the time period, I have not been able to find if there was a standard for which shrouds would have had them. Common sense suggests they would not rub against the mast as B.E. has pointed out, but which ones would have been used as the norm? Those in the photo aft of the mast on the Victory seem to make a lot of sense. Allan
- 587 replies
-
- 2
-
-
- Indefatigable
- Vanguard Models
- (and 1 more)
-
BCD What model/kit is your project? Thanks Allan
-
The wood they gave you is not well suited for planking so this may create problems for some folks, not all, from the start. In a nutshell, the advice above is worth following, along with https://www.youtube.com/watch?v=KCWooJ1o3cM This is part 1, study all four parts. https://thenrg.org/resources/Documents/articles/APrimerOnPlanking.pdf here at MSW for a great how-to on spiling planks Your photos show that you seen to be trying to edge bend and that usually is problematic unless following the methods similar to the videos above. Allan
-
Not sure about historical accuracy but the system looks like it would work. Thanks again for sharing. Allan
-
Extremely neat work!!! I realize this was probably supplied with the kit, but how do the oars work on the single tholes rather than between a pair? On the contemporary sources regarding British ship's boats that I have seen, when tholes were shown they have only been as pairs of tholes and all were made of wood. I really am curious how these single pins would be used as they really do look nice. Allan
-
Thanks JJ this a great stuff. I had downloaded all the drawings you mention from the high res group of plans on the Wiki Commons site as well as the many that you were so kind to send me. I love the fifties and Bristol or Salisbury are on my hit list to draw up frames and hopefully build as they both still have a lot of carvings and no copper bottom sheathing when launched as it is my understanding coppering did not really come into common use until the late 1770s. What are you using for scantlings in addition to the plans? The closest I ever found find are those in the 39 page 1745 Establishment and Shipbuilder's Repository 1788. There are likely some differences and the plans are the obvious go to rather than these two sources if there is a controversy. I greatly admire the research you have done! Allan
-
JJ Your work looks VERY good! What contemporary plans did you use for the deck layouts, including gratings, ladder ways, &c? I assume you used the inboard profile as a guide, but curious about this. I could only find one contemporary set of deck plans for a fifty of that era, Salisbury 1770. She is not listed as a Portland class but there are many similarities. Thanks for sharing on your log. Having a high qual kit of a fifty looks to fill a niche in our hobby. Allan
-
I love the silk span sails! It is so nice to see these compared to the burlap material many kits supply and the ensuing out-of-scale sewing that goes with it. Great looking model overall!! Allan
- 31 replies
-
- 3
-
-
- Shamrock V
- Amati
- (and 2 more)
-
Can you post a couple photos? If the planks are spiled or otherwise tapered and pre-curved before attaching to the hull the sanding should be minimal as described by Gregory. If the planks are lifted due to edge bending, it may require additional work if, hopefully, there is still enough wood to scrape or sand. I prefer scraping to sanding in some few cases, depending on the situation, especially deck planking. Allan