-
Posts
8,149 -
Joined
-
Last visited
Content Type
Profiles
Forums
Gallery
Events
Everything posted by allanyed
-
Paul Ron Have you studied Ed Tosti's Young America build log? Not sure, but it may be of some help to you. If not, his Young America 1853 Volume III on rigging probably will give some help to you. Allan
-
Did a little more digging and found the following in contracts for the Echo (1782) , Aurora (1776), and Astrea (1808) which I thought was very interesting. I do not recall ever seeing this on a model where the coppering is done on the keel before the false keel is secured to the bottom of the keel. It makes total sense as the false keel is sacrificial so why protect it as well as prevent it from doing its job. Allan As the Ship is to be partly coppered before the False Keel is put under, Care must be taken that there is Copper, as shall be directed, put all Fore and Aft between the Main and False Keels, properly turned up and fastened.
-
A very warm welcome to you Mark, very nice intro. Allan
-
Dean, NUTS!! Going back a little over 50 years ago, had I known about this being a good wood to harvest I might have had 100 lifetimes supply (and would have happily sent you a few hundred board feet) when I sawed down an acre of the stuff then had the stumps backhoed out. Some went into piles of cordwood and the rest went into a dozen or more wood piles all over the lot and then burned to ash before building our house.. These were Crataegus pennsylvanica, known as the Pennsylvania thorn, which is a species of hawthorn but I have no idea if it has similar properties to the other species of hawthorn. These were all over western PA and most folks hated them because of the thorns and the little apples that dropped all over the yard. Live and learn...... Allan
-
Nice tool that you made! That could work with stiff backed razors. (looks like maybe that is the actual type of blade in the holder) Allan
-
Hi Ron, Your model is really looking good. I really like how all of your gratings correctly have a solid periphery that will lay against the head ledges and coamings. I realize it may be an incorrect kit instruction, but I believe the battens on the gratings always lay fore and aft. Some in the photos are running athwartships. Allan
-
I love the old schooners as well as your build. Lovely work! Allan
- 51 replies
-
- Model Shipways
- Benjamin W Latham
-
(and 1 more)
Tagged with:
-
The cannon drawings look great. Just noticed that you have the George II cypher on the cannon for Endeavour. I may be wrong but as Endeavour was launched in 1764, wouldn't the cypher be for George III? Armstrong Frederick STL drawings may be getting posted in the near future with the George III cypher in the following: https://modelshipworld.com/topic/34442-3d-printing-cannons-in-resin/ There were recent discussions on the trucks having been made of single pieces so there were no bolts in them. There were many exceptions in ships so maybe some carpenter made truck assemblies rather than from single cylinders. https://modelshipworld.com/topic/34538-gun-carriage-questions/page/3/ Posts #66 and after. Allan
- 24 replies
-
- Lady Nelson
- Amati
-
(and 2 more)
Tagged with:
-
Hi David, Your work is truly well done, so this paragraph is meant only as a point of interest. When you have a few minutes, there was a lengthy discussion on trucks on the carriages. The conclusion SEEMS to be, based on contemporary sourced material, that trucks were not made in four pieces with bolts through them. https://modelshipworld.com/topic/34538-gun-carriage-questions/page/3/ It would be really interesting to know where Caldercraft came up with this idea of trucks made in pieces and iron rimmed, especially if they based it on contemporary sources. I never doubt that there were variations in many aspects of these ships of the past but after a lot of searching on this I have yet to find one picture of a relic or contemporary based drawing or written description that describes assembled trucks other than the use of iron bands on the rim on land based carriages. The iron would surely wear the deck planking and it would be far easier to replace a worn truck that had no iron rim than rip out the planking and replace it, Allan
-
Don't forget to study the planking tutorials in the MSW Articles Data Base and Chuck Passaro's four part video on planking which may be more appropriate if your kit provides straight planks instead of spiled planks. It does not look like removing all those nails is going to be fun.😀 Allan
- 90 replies
-
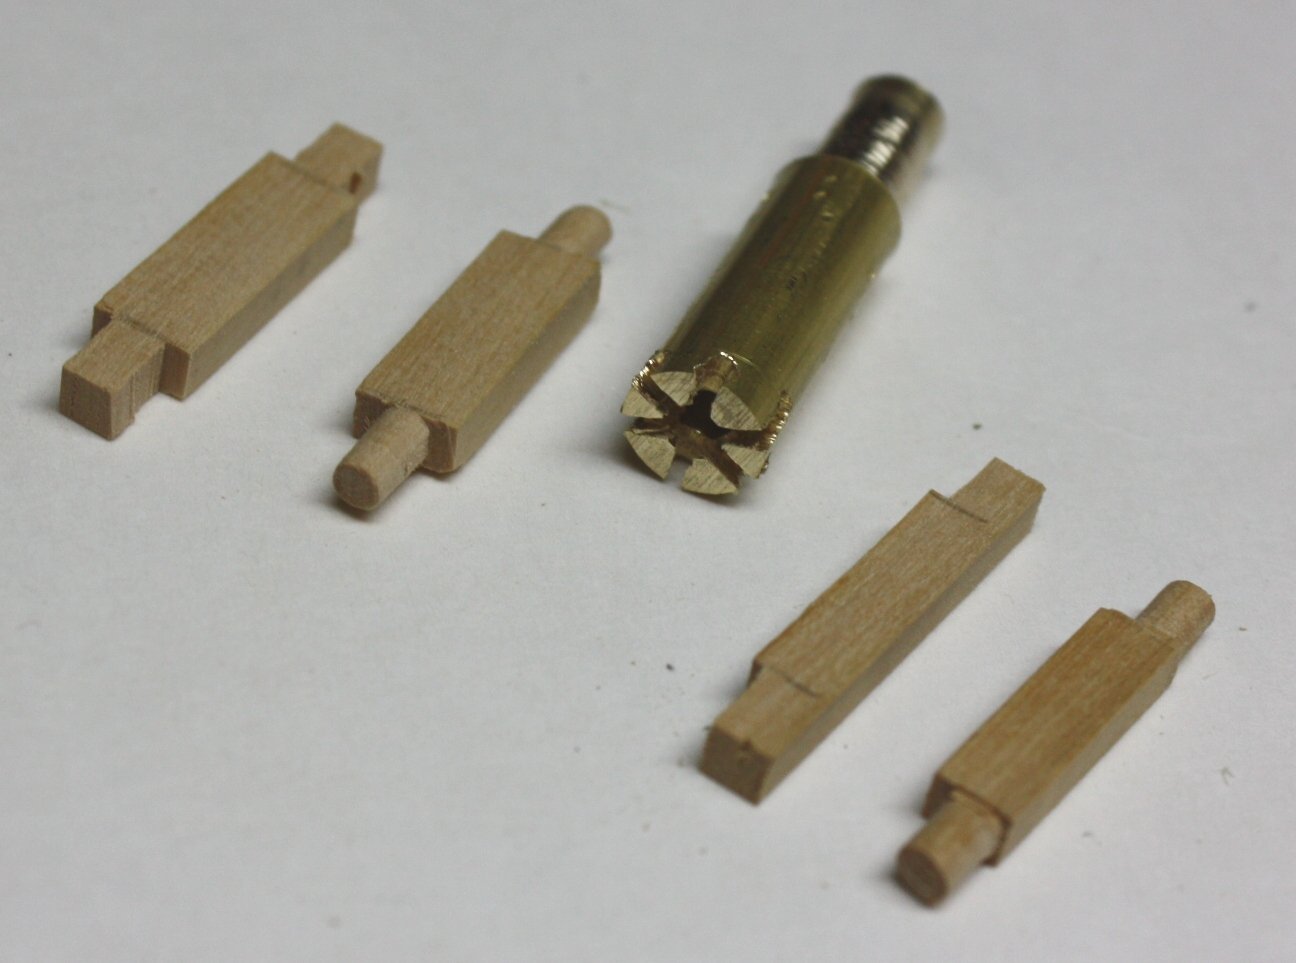
Hi David Not sure if you have seen the below in other posts. It is hard to tell from the photos, but it looks like the axles are square rather than round. Not too late to easily round them with a little home made cutter. Just drill out the cutter stock piece to the diameter you want then cross cut a couple slots to give a cutting edge. Chuck the cutter in a small drill (press or hand drill) and it works easily, quickly and yields a much cleaner rod like protrusion than hand carving to round them. Allan
-
Have you done a thorough search of the posts in the various build logs, including both kit and scratch built logs on how folks do this? Blue Ensign's Sphinx build might be a good example and may be of help to you. Allan
-
BE Your build log and model are top of the line and great advertising for Vanguard kits. Hope you are getting a commission! 😀 Allan
- 648 replies
-
- Indefatigable
- Vanguard Models
-
(and 1 more)
Tagged with:
-
Warm welcome to the motley crew Tim!
-

3D Printing Cannons in Resin
allanyed replied to thibaultron's topic in 3D-Printing and Laser-Cutting.
Drawings please. It is far easier for some of us to understand the designs you are describing with drawings like the fantastic drawings that Ron has posted rather than using words only. Thanks again for your input. 😀 Allan -
Welcome Phez! Moving forward consider one or more of the very high quality starter kits designed by David Antscherl at Model Shipways to learn really good building techniques https://modelexpo-online.com/Model-Shipways-Shipwright-3-Kit-Combo-Series_p_5465.html Allan
-
I agree. My bottle is several years old or more and still good to go but it is sealed tight. But, when pouring a tiny amount into a small working jar and thinned down with water, it works great for a few hours, at most. If the small working jar is sealed tight as well it is good for some days, depending on how much it has be diluted with water. The nice thing is that an artist brush full of the raw LoS and equal amount of water in the small working jar is enough to coat a LOT of pieces. I also find that it is more forgiving on pieces of copper that are not as thoroughly cleaned as I would when using brass and Birchwood Casey and similar blackening agents. Once the pieces are cleaned, finger oils and such have not caused problems for the LoS on copper. Allan
-
Thanks for the history Bob, very very interesting. Never put the pine tar on bats practice together with standing rigging coating practice, before. Allan
-

3D Printing Cannons in Resin
allanyed replied to thibaultron's topic in 3D-Printing and Laser-Cutting.
Hi Lieste Sorry to repeat, but can you share where these instructions can be found and post drawings to help understand. For example, I cannot find what a sond is in relation to a cannon barrel anywhere on the internet, so far, or how Bavarian guns that you mention relate to AFs. Many thanks for your help and input. Allan
About us
Modelshipworld - Advancing Ship Modeling through Research
SSL Secured
Your security is important for us so this Website is SSL-Secured
NRG Mailing Address
Nautical Research Guild
237 South Lincoln Street
Westmont IL, 60559-1917
Model Ship World ® and the MSW logo are Registered Trademarks, and belong to the Nautical Research Guild (United States Patent and Trademark Office: No. 6,929,264 & No. 6,929,274, registered Dec. 20, 2022)
Helpful Links
About the NRG
If you enjoy building ship models that are historically accurate as well as beautiful, then The Nautical Research Guild (NRG) is just right for you.
The Guild is a non-profit educational organization whose mission is to “Advance Ship Modeling Through Research”. We provide support to our members in their efforts to raise the quality of their model ships.
The Nautical Research Guild has published our world-renowned quarterly magazine, The Nautical Research Journal, since 1955. The pages of the Journal are full of articles by accomplished ship modelers who show you how they create those exquisite details on their models, and by maritime historians who show you the correct details to build. The Journal is available in both print and digital editions. Go to the NRG web site (www.thenrg.org) to download a complimentary digital copy of the Journal. The NRG also publishes plan sets, books and compilations of back issues of the Journal and the former Ships in Scale and Model Ship Builder magazines.


