Rokket
-
Posts
20 -
Joined
-
Last visited
Content Type
Profiles
Forums
Gallery
Events
Everything posted by Rokket
-
 I found a free 3D printable STL file. If you know someone with a 3D printer (preferably a resin printer)... I could do it but I'm in Australia. https://www.thingiverse.com/thing:4769472

-
Thanks for the info guys. And the details about the case. Beautiful.
-
The case looks really sharp. I know what you mean about tempered glass and marriage! I was going to (attempt) to build a case but glass is very, very expensive here. Almost as much as a case. So I'm going to save up and just buy a pre-made case. I have about 4-5 years, I imagine.
-
Looking like a ship now. Well done.
-
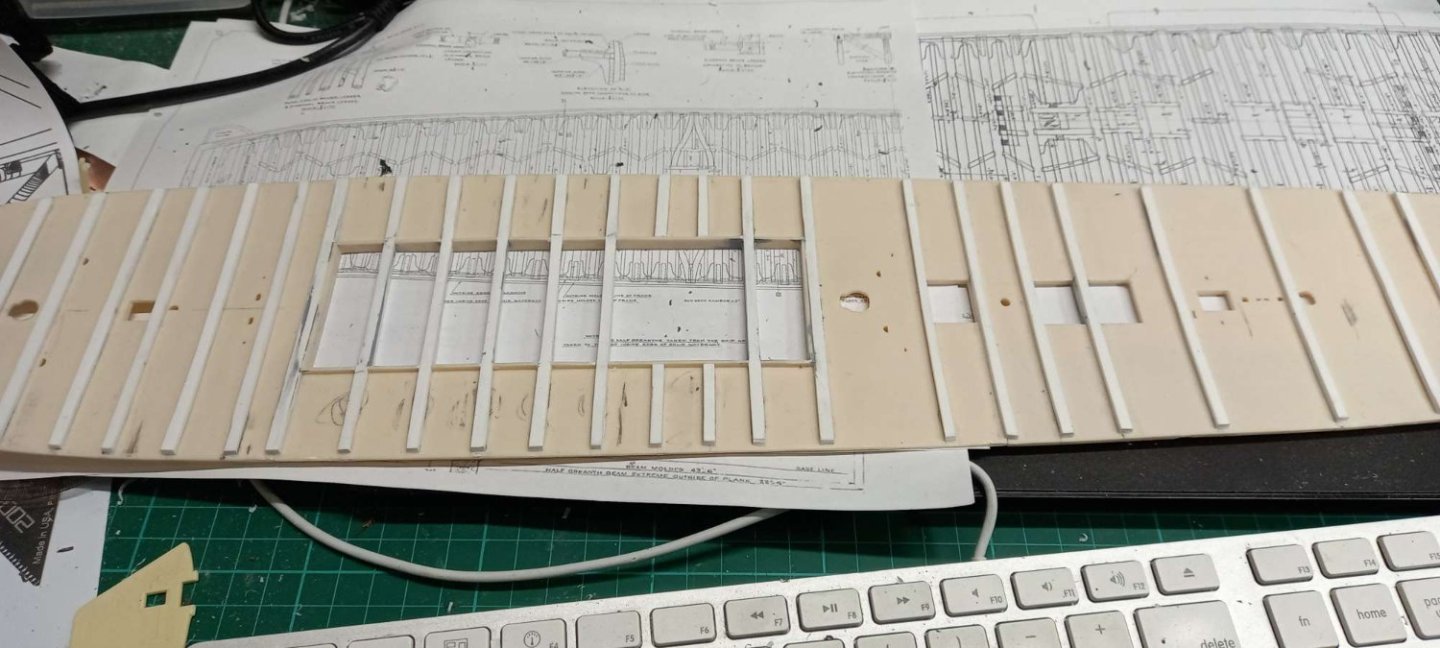
I’ve taken a small detour. A couple actually. I have to finish some models, my 1:72 Gato submarine and Graf Zeppelin airship (1:245 which seems "box scale"), but I’ve started learning 3D CAD. I have a friend with multiple 3D printers. He usually takes my terrible drawings, makes 3D files, and then prints parts for me. But it would be better if I could at least supply the 3D files. I’ve spent six weeks trying various software. I can’t afford $2,000 or $3,000 (especially a year in a subscription). Forums say many people don’t want subscriptions either. I stuck with trying inexpensive or free. Many free programs are online and all documents are public. My stuff isn’t secret, but people don’t need to know everything I do. I have two issues: learning 3D CAD concepts and using specific programs. We all need a hobbyist option. Some of the free are good but clunky. My favorite for power and use was Design Spark Mechanical, but there were weird bits and being free, no support. I ended up with the “lite” version of Alibre, Alibre Atom3D for about US$300.00. While learning, the Secretary of the Treasury/Finance Minister suggested I get a 3D printer. “You would learn and enjoy it and it could be useful.” Dumbfounded blinking. Maybe a little drool as my brain shut down and air escaped my lungs. Obviously my wife was replaced by a Pod Alien who has unfathomable and nefarious purposes in mind. Yes! Yes! YES!!! Wherever this leads, it should be fun getting there. Even if she uses the printer to bludgeon my skull. Though there are easier ways. There must be a cartoon here, of 3D printing a hammer and having it used on me. “Um, yeah, sure, OK…” I now have a resin 3D printer (US$ 179.00!) and am trying to understand how to use it. I’ve already made my first 3D CAD part and printed it (a tiny joke, non-model related). I plan on making guns, cannon balls, barrels, figures and various bits. As mentioned on this site, you can make figures on Hero Forge and download files for US$7.99 each. Scale and print (I'll cast them with different arm and leg poses). When I get back to the ship work, I’m trying to find a way to drop the decks into a finished hull. The gun deck won’t be too bad because the edges aren’t visible, but the spar deck will show. I need a good waterway solution.
- 8 replies
-
- 1
-

-
- Constitution
- Revell
- (and 1 more)
-
Off to a good start, looking good. Both interesting subjects. You'll have to do a "Bligh Jolly boat" to go along with it...
-
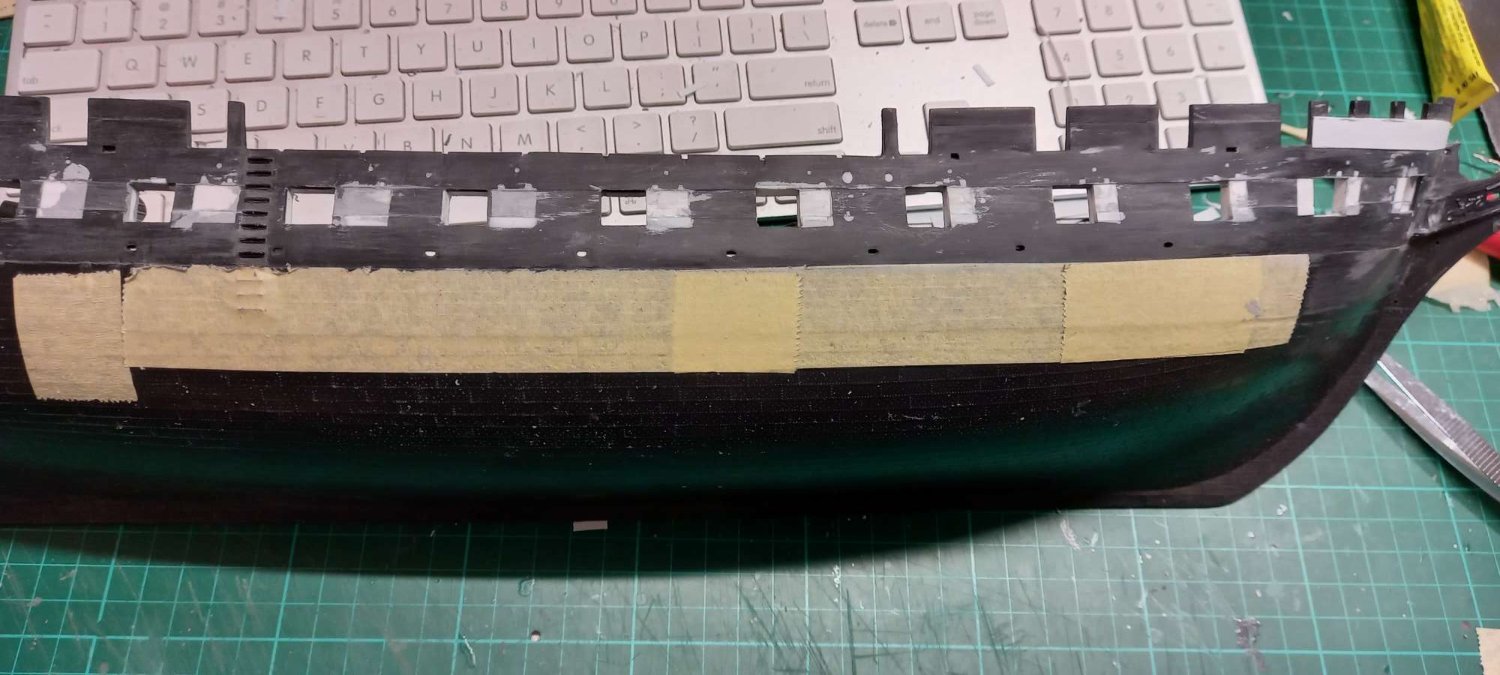
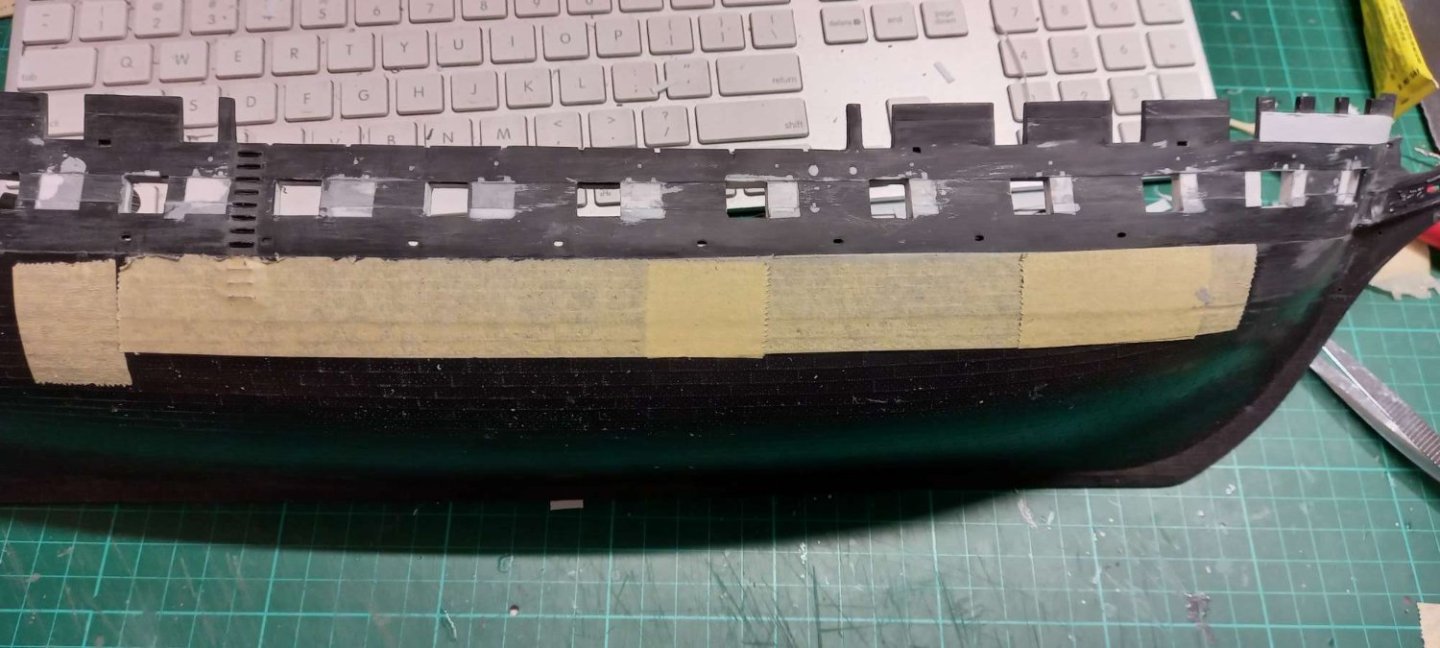
I’ve started with the ship hull. The Hull model has 15 gun ports and the Revell kit 16. Many modelers choose to block out the forward gun port at the bow. Bainbridge cut bridle ports, so blocking takes the ship back to the original configuration. It’s a good idea if you want the 1812 era, like myself. But that makes the new first port pretty far from the stem/beakhead, way past the front of the bow and practically on the straight, flat side of the hull down midships. To use a new unit of measure, GPW (“gun port width”), the new location makes port #2 become #1 with a distance from the stem of 6.3 GPW. The Hull model has the first port at 3.6 GPW. The Revell kit also has the last port very close to the gallery, at 0.48 GPW, the Hull model 1.3 GPW. So I placed the first and last ports according to the Hull model, then through the magic of software, evenly spaced the ports in-between (if I had done it manually I would still be calculating with at least two calculators and a ream of paper.) I overlayed frames from the plans over the Revell models. I figure even with massive overhaul the frames stayed the same, I’d think it would be quite something to change them. The frames mostly match up. All in all, I’m satisfied that the “Hull Port Arrangement” works on the kit. I’ve cut in the new ports and started blocking the old. I also thickened the hull. I have added beams, planks with a cutter and knees and diagonal riders. I've used a too long knee in my test but it may not be noticeable. Many modelers say you can't see this details through gun ports blocked with guns, but I'm hoping the hints will make people think this is shrunk ship. We'll see. Lots of cleanup and the port side to do.
- 8 replies
-
- 4
-
-
- Constitution
- Revell
- (and 1 more)
-
Lovely detail. I really like the knees and the accessories. Beautiful.
-
Very nice. Watching with great interest.
-
Very nice work. She'll be ready to depart in no time.
- 162 replies
-
- 1
-

-
- Model Shipways
- Constitution
- (and 2 more)
-
It's here! To quote Calvin from Calvin and Hobbes: Boy-oh-boy-oh-boy! I've unwrapped my 18+year old kit and had a 'splore. It's exciting! The decks are not warped! But I didn't realize the plank seams were raised. I'd planned to sand off the grain (using the electric toothbrush trick), but was counting on the seams being concave so they'd be visible). I have a new plan that will require testing: Cut planks from 0.010"/0.25mm sheet plastic and paint them. I have three wood colors and can mix them to make more. Then paint the edges black. Then manually plank the spar deck. I think the gun deck won't be noticeable. If necessary only plank the edges near the guns. It's a step I didn't want to take. I hope it works. I'm so impressed by painted plastic really looking like wood. Many fine examples on this site. Plus a wood deck adds $130+ to the cost of construction! Any deck thoughts?
-
Really nice. Great detail and workmanship.
-
Thanks. I'm trying to do a logbook and other books, and sea charts. Maybe a decanter of port. But 1:96 is small! The pirate flag was just for to see who was paying attention, I won't be turning Connie into a pirate ship. (Though she was fast and strong, perfect for a pirate!)
- 8 replies
-
- 1
-
-
- Constitution
- Revell
- (and 1 more)
-
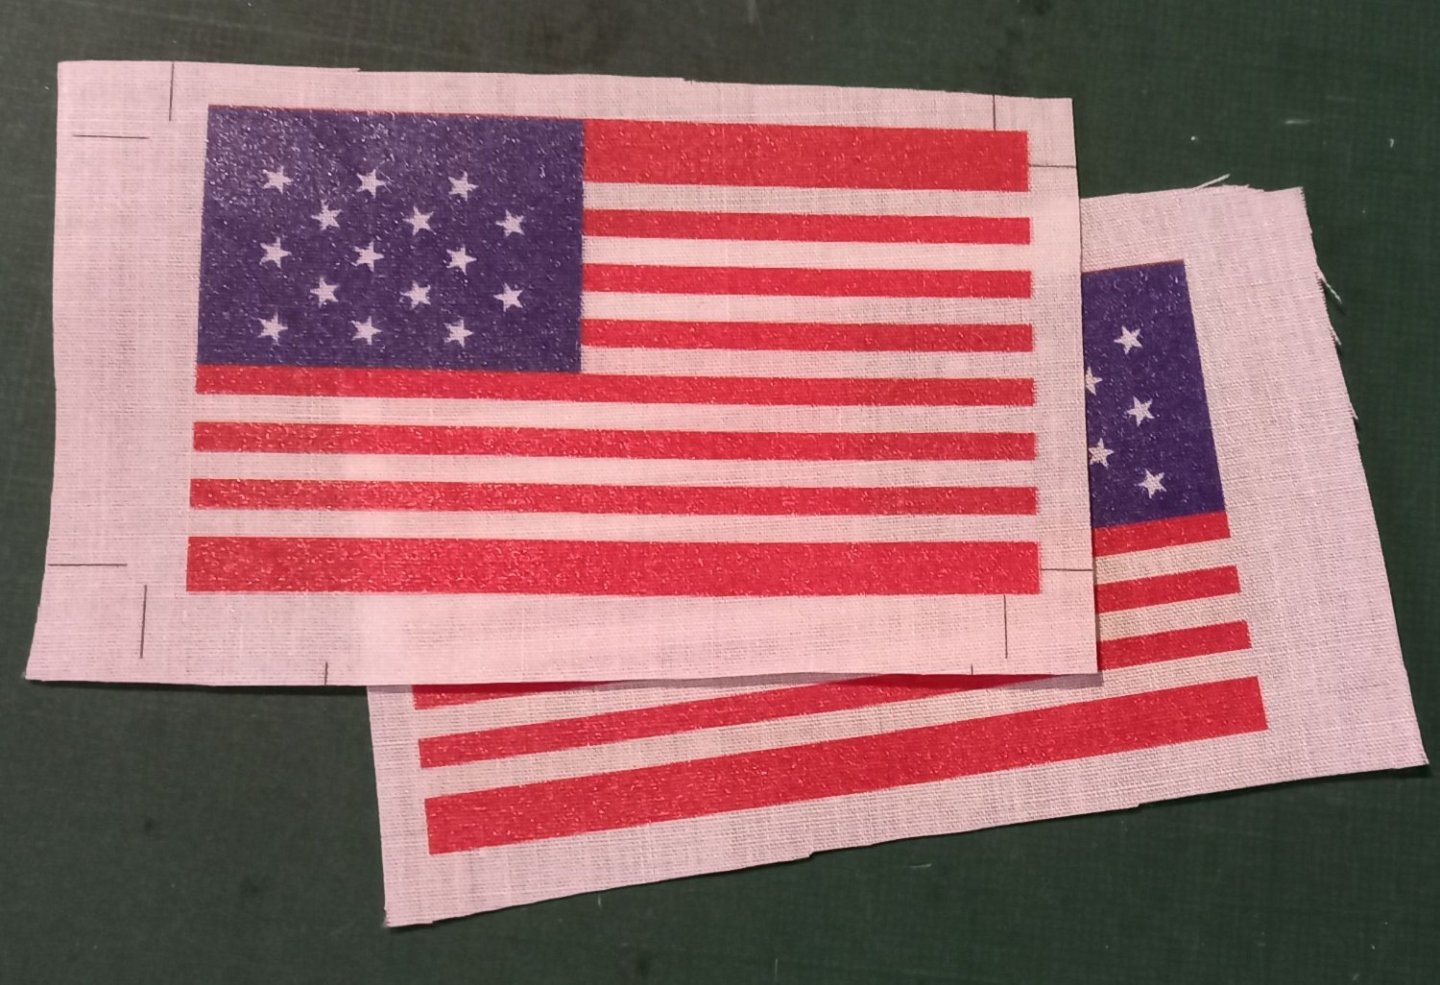
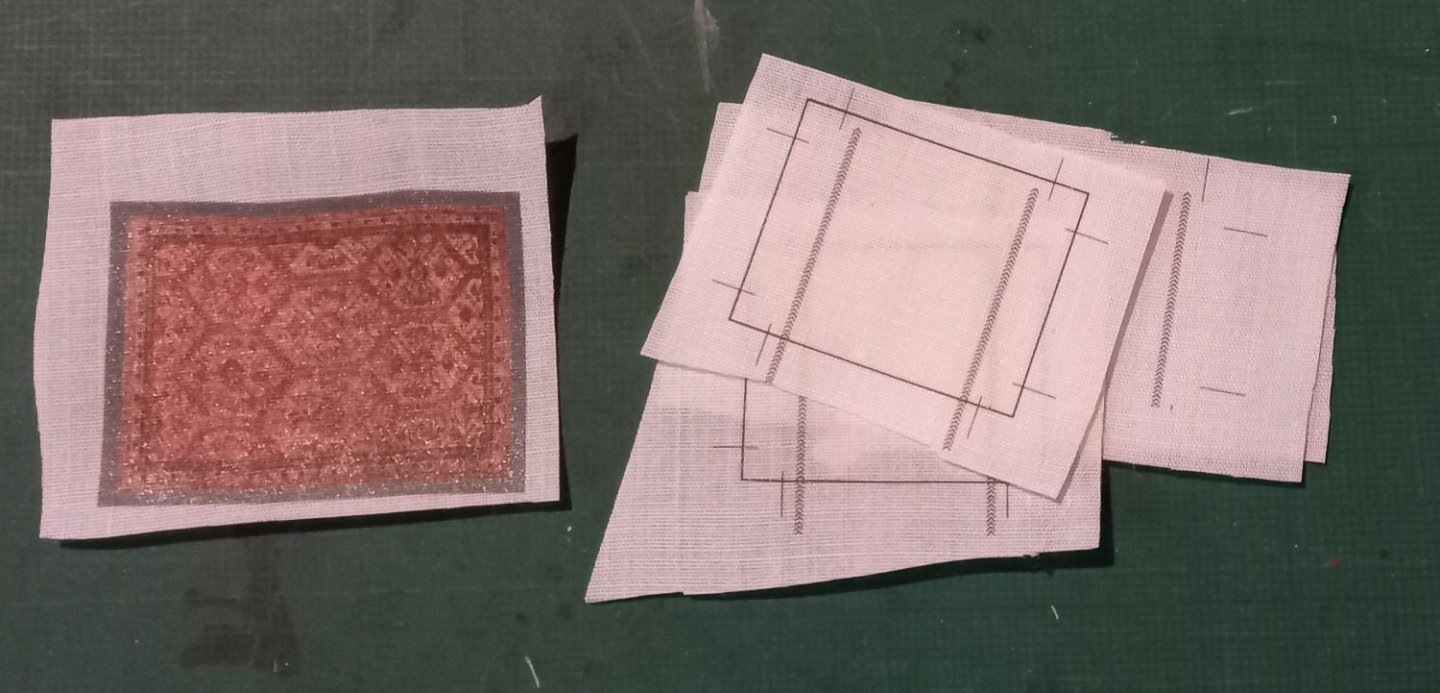
While waiting for the kit to arrive I’ve started planning the Captain’s Cabin. The video tour of the cabin says “Today it looks completely different than it did 200 years ago.” That’s not a lot of help. You could say it’s the opposite of help! I really like what these two modelers did and I’m hoping to be loosely inspired: https://www.modelshipbuilder.com/e107_plugins/forum/forum_viewtopic.php?1405.160 https://cs.finescale.com/fsm/modeling_subjects/f/7/t/178637.aspx?sortorder=desc&page=5 The present cabin is pretty dull compared to many ships. I noticed that a handful of Captain’s Cabins have a Persian rug. HMS Victory, HMS Trincomalee, HMS Unicorn, HMS Warrior, and HMS Endeavour for example. Constitution (the Hull model and the actual ship as presented) doesn’t have stern chasers in the cabin, so a rug wouldn’t necessarily be a huge inconvenience and could possibly sorta/kinda/maybe be plausible. Plus the idea is cool. So I found a rug online from “circa 1820” and printed it on cloth (laser printer transfer and heat press). I’m toying with doing lanterns with LEDs to show the cabin better. Since I was doing the rug I printed flags (double sided, laser printer transfer and heat press). Paintings show different versions of the flag of 1812. The Boston National Historical Park says Constitution flew the 15 star/15 stripe version (same as Fort McHenry, the “Star Spangled Banner”). Apparently a log entry describes the flag size as 14 x 26 feet. In 1818 a navy commissioner spelled out specific dimensions and the star pattern, but for 1812 it seems the “Star Spangled Banner” is the go. There were a lot of variations (canton size/proportions, star field size and pattern, etc.) and no standardization until 1912, so I used the Ft McHenry flag. I’ll have to dig deeper into the other flags, paintings show a US Ensign on the mainmast, or a jack with a future star pattern, and even a commissioning pennant (which apparently can also mean “headed home”). The second cabin modeler above, Luvspinball, has so much detail. He added LEDs to the guns to simulate firing. I’m going to do the same and even add sound. I’ve found small micro SD card/amp combo. I have to explore Arduino boards now. It will be very exciting to “fire as she bears” with chaser lights.

- 8 replies
-
- 3
-
-
- Constitution
- Revell
- (and 1 more)
-
She looks mighty fine. Lovely case, too (despite being narrow). The ratline jig is clever.
-
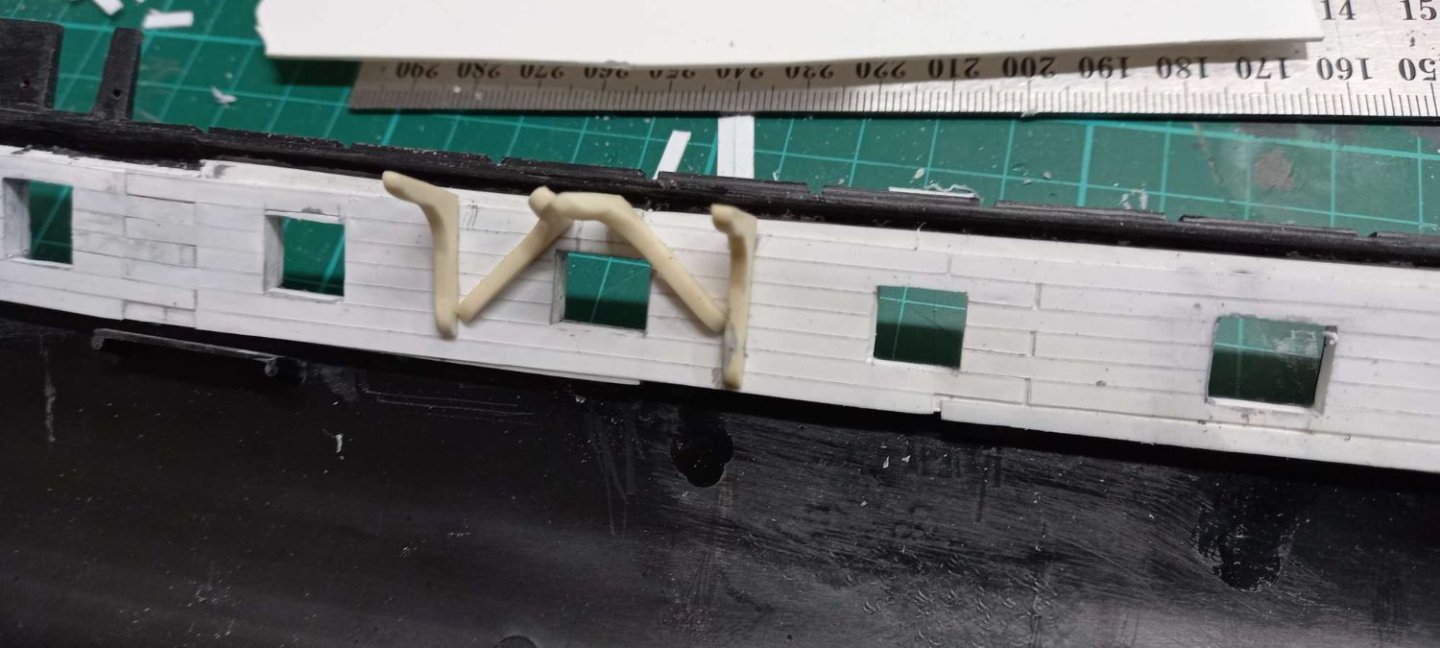
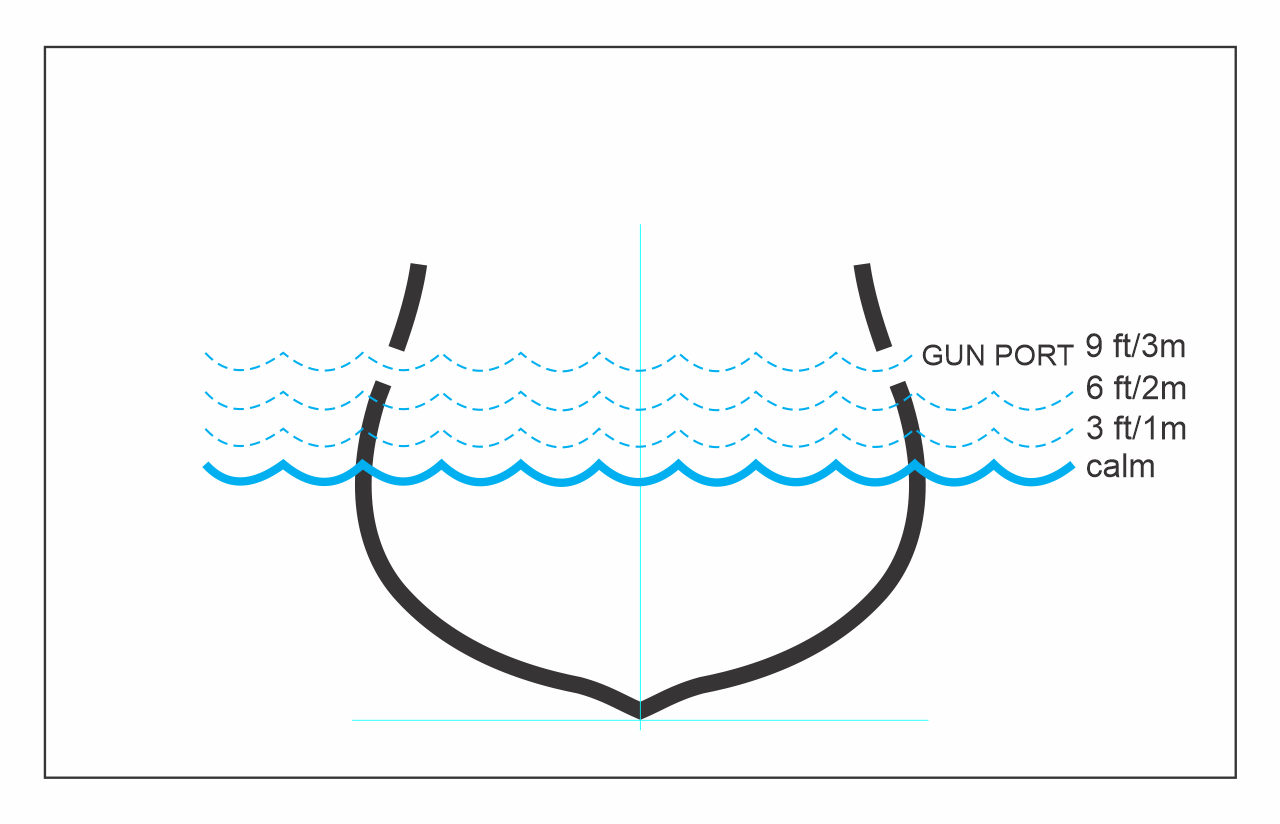
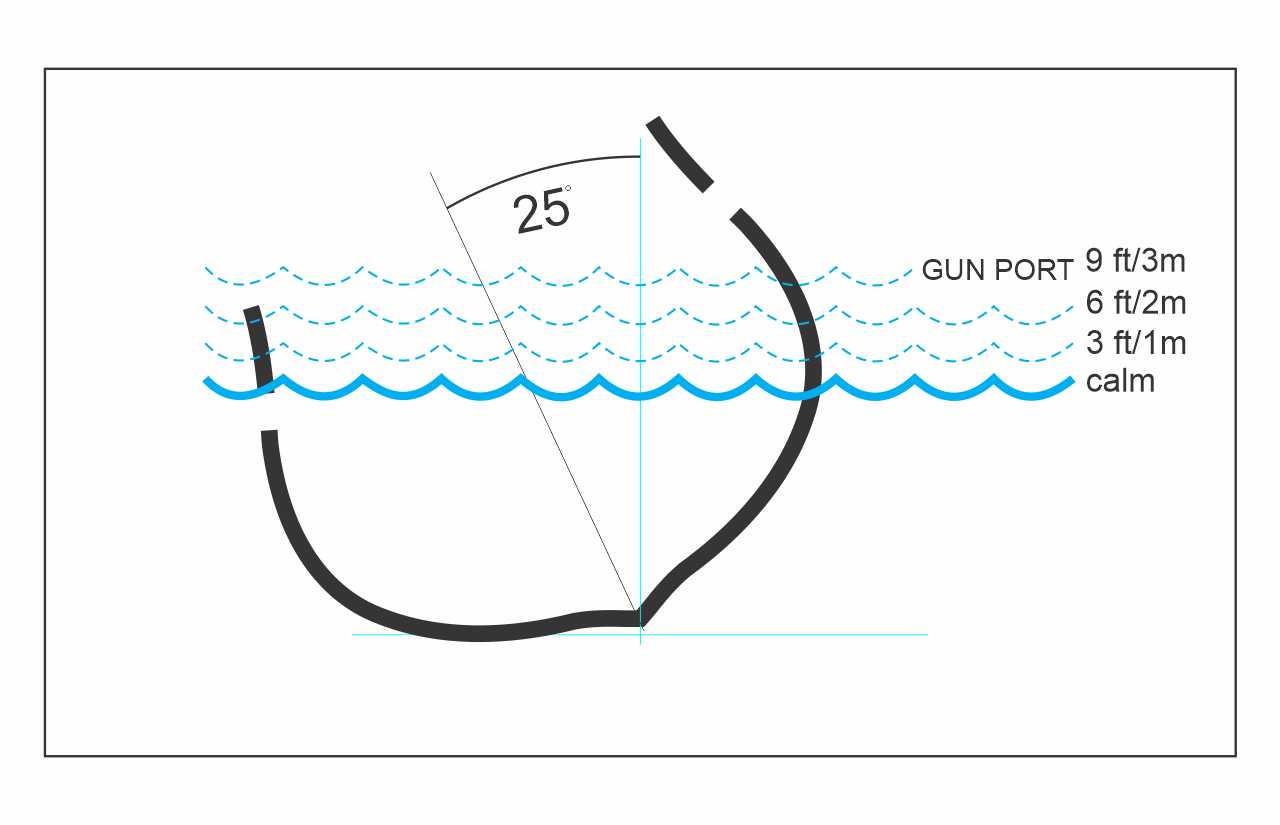
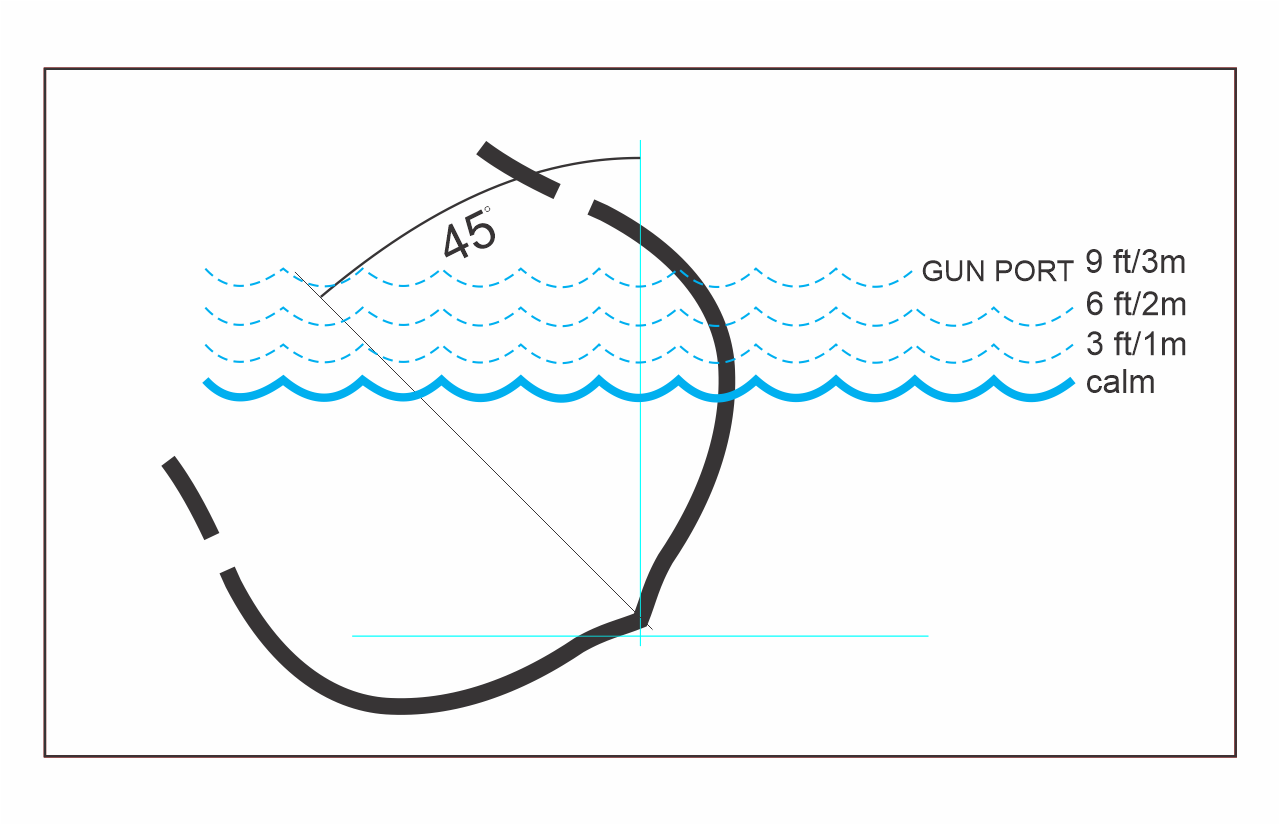
I grew up on Cape Cawd so my first major sailing ship model has to be “Old Ironsides.” Decades ago I worked aboard Mayflower II at Plimoth Plantation and know just enough to be dangerous... I’ll depend on the fine folks here and various books for wisdom. I think I can get a lot of detail from the Revell plastic kit. I’ll use the Hull model as the major info source because, despite problems (questions?), it is a primary source. I do have an “odd area” on the model I don’t trust: gun ports. Gun Ports I traced the plans and did a little heel experimenting (see images below). Quantum Sails website says it’s best to keep the heel to 20-25 degrees. Sailing forums say the sweet spot is 15 degrees. These are not Age of Sail vessels but still offer interesting info. The National Weather Service says Atlantic swells are frequently two and a half meters/yards, often higher in rough weather. “Very rough” is defined as starting at four and a half meters/yards. Looking at the diagram images I conclude that the ports must have been blocked from inside and cleared to run out the guns. With hundreds of crew it wouldn’t be more fiddly than hoisting ports with tackle and making fast. It seems impossible not to somehow close off the ports. I will build with no port lids (except for the bows) and assume manual stowage. The Gun Band The log says the yellow ochre was painted over in white April 7, 1811 (until 1814). I’m not a forensic historian but it doesn’t seem like a mystery. White it is. Inner Bulwarks and Trim Green like Hull, white on the Gun Deck. The Deck I’ve seen some very impressive builds on this site with plastic decks that really look like wood. I’m excited to try the painting method. I also have an idea to tackle the deck seams: “finger combing” or removing the ends of half the planks and adding in new strips. Copper Bottom The Hull model bottom hull is green (with no red waterline). I’m guessing it represents copper plating. Some modelers have said copper only oxidizes in air, but there are photos of Constitution in dry dock with a very green, verdigris patina on the copper all over. And similar photos of other copper bottomed ships - Splotchy green over copper it is. Ships boats (Whaleboats/Cutters/Gigs) I heard one is quite short so will have to lengthen it (more pain than buying a resin one but cheaper!). And a million things I’m forgetting.
- 8 replies
-
- 3
-
-
- Constitution
- Revell
- (and 1 more)
-
Just found this build, coming along very nicely. I really like the thread caulking. Great idea.
- 88 replies
-
- 1
-
-
- Constitution
- billing boats
- (and 1 more)