


Jaager
-
Posts
3,084 -
Joined
-
Last visited
Content Type
Profiles
Forums
Gallery
Events
Everything posted by Jaager
-
 And in the 17th century the length that seems to be in lists of ships and their dimensions is "touch". That is the length of the keel that actually sits on the baseline. The additional length forward involves - for most of the century - the arc of a circle, whose center is on a line perpendicular to the baseline at the fore end of the keel touch. It increased the length on the gundeck ~20%. The sternpost was also at an angle, which also added a few feet at the gundeck level. "Improvements" towards the end of the century changed the forward part from the arc of a circle to a more acute angle that may have been a complex curve. There once was a kit that was designed from plans that used touch from a table of dimensions as the value for LBP. This made things a bit crowded at the waist. I think it was HMS Prince. Look for other discussions here about Sovereign - especially the one about John McKay's book.
 -
A frequent method to build a model open boat is to fit planking over a solid or station mold. The adhesive bond plank to plank holds the shape when it is time to remove the mold. The goal is to keep any adhesive bond between the planking and the mold at zero occurrence. None at all. Grocery stores till sell paraffin wax - candles may be from animal based sources- A cling type sandwich wrap may be a better barrier. I can also imagine a technique where the actual boat frames are mechanically held on the mold ( tricky to do at best ) and the planking bonded to these actual frames while on the mold. But I think for most actual boat frames, their rank in order of attachment was/is last. Often they were bent to fit - saving on time and skilled labor. PVA is the wood to wood adhesive that is most frequently used - both yellow and white have their champions here, although, unless you intend to float the hull, TiteBond III is probably over kill. Hide glue would work, but liquid, such as Franklin or Old Brown may have too high a proportion of water. Glue pot flakes has less water and is really old school, but requires a lot of attention to prepare and maintain. We do not need the reverse gear of a Strad or Chippendale on a ship model but it would work. CA is an eleven footer for a lot of us dinosaurs.
-
Cleaning Brass Casting Residue
Jaager replied to Jonathan_219's topic in Metal Work, Soldering and Metal Fittings
If it is wax, paraffin - petrol based wax, an organic solvent should have an effect on it - e.g. mineral spirits, naphtha, lacquer thinner - or hot white pet (Vaseline) or mineral oil or 3-in-1, Then the detergent and scrub to remove the lower MW liquid material. -
The copper plates were not riveted. The copper nails were hammered near flush. They were all but invisible at a distance corresponding to a model viewing distance. There were way more of them than a ponce wheel produces. Model versions of copper sheathing with a raised or embossed addition mostly tends to give a hull a bad case of small pox. I am still thinking that 100% rag bond paper, paint with real copper, using PVA to attach may be an effective alternative, in which case, a guillotine type paper cutter would be a real help. It may even work to slice individual plates from a strip. The paper could be painted while still at the 8.5 x 11 stage.
-
Capitulation of warship between centuries?
Jaager replied to Baltic_submariner's topic in Nautical/Naval History
The focus with this is limited to a few countries in the 17th, and 18th and early 19th centuries as far as giving up and surrendering as opposed to a fight to the death. I have made no effort to catalog the various wars, but in general the following situation seems to hold: The conflicts were largely economic disagreements, the men in combat were generally from an economic class with no political power and of no actual concern of those in power and generally seen as disposable, the officers were 2nd or 3rd sons who would otherwise be an economic drain on their families, and the countries in conflict were essentially cousins. It was more of a sport than a life or death cultural conflict. These factors were totally different in the 20th century. -
I did my usual process of imagining a theoretical way to approach your problem: bars of polishing compound with a gradation of every finer grit - attaching pieces of leather or shammy leather to a disc - maybe using the DIY hook and loop as a way to attach, go at it with a rotary tool. -AND - I decided that I would probably skip all of that work and go to a glass shop and have them cut me a piece of mirror to the size that I needed. Glass should stand up to time better than SS.
-
Glue for template
Jaager replied to Koopyetz's topic in Building, Framing, Planking and plating a ships hull and deck
I guess I am just unlucky, but my Brother unit requires anything scanned to be scaled up 102.5%. I used a transparent metric ruler as a scan object and print out check. I also had to set a canvas size in Painter that does not give or entice Windows Photo Viewer to "adjust" the size of a document to be printed. Having the border thing checked by default is an extra click that I have to always pay attention to. -
Glue for template
Jaager replied to Koopyetz's topic in Building, Framing, Planking and plating a ships hull and deck
Home scanners have a scale distortion factor - my guess - to make copying paper currency more difficult. ANYWAY, if you wish a scan to print out an exact copy of the original, the scale distortion factor for your specific machine needs to be determined. It is a constant, so determining it once is enough. Just be sure to document it. Guys here write that commercial blueprint operations provide an exact 1:1 copy. I used a company for a NMM print color scan. They do signs and advertising. The color PDF - while good, also needed to be reduced to 70% to match the original. There is also a "maybe" method - it did not work well enough for me - inkjet(?) print on a sheet of paper with wax/plastic coating on one side and iron that directly onto the wood. Probably works better for scroll cutting cartoons - something without a lot of detail. -
Glue for template
Jaager replied to Koopyetz's topic in Building, Framing, Planking and plating a ships hull and deck
I attach a lot of patterns. I need the patterns to stand up to abuse. I use BestTest rubber cement - because I get it in pints or quarts, I also have Bestine (n-heptane) to keep it at brushing consistency. The main trick is to use a liberal coat on both surfaces - let the thinner evaporate - then place the pattern. It is a "get it right the first time" situation. There is no fine tuning of the position. Any brand name rubber cement should serve your need. It is false economy to go generic though. Long ago, before the Internet, before there was help, I used PVA for a model. I did not know about isopropanol being the reverse agent. I used sandpaper to remove the pattern. That was a serious amount of work. But there was no problem with the pattern moving or popping up. -
Is your type of PVA - yellow - which I prefer for wood to wood - or white PVA. The white seems the be water clear when it polymerizes. The yellow is clear amber. If you are using white - the darker color may match the wood when wet - which is the color it will be when a clear coat finish is applied. (shellac for me). If you do a test - same wood - plus a patch with white PVA - and use you final clear coat on it, is the filler still darker than the wood?
-
Symmetry
Jaager replied to Don Case's topic in Building, Framing, Planking and plating a ships hull and deck
I suspect that a private yard would use the stock that was available. If they wasted material, they would not stay in business. In a model - it is ultimately a work of art - even if the goal is the focus on an exact replication of the micro level assembly. I think the eye/mind craves symmetry. An actual ship would probably be too large for a lack of bilateral symmetry to be observed. The size of a model makes a lack of symmetry sort of stand out. Going to school on the actual methods and techniques in extreme detail at the primary learning stage is wise and probably necessary. But ultimately with a model, Art also has its demands. Sturgeon's Law certainly applies to our efforts, but we should try for the ten percent. -
You may find it convenient to get a Rogers drill bit stand to start with. Then restock using bulk single size in 10's of the numbers that are getting use.
-
Neither species is one to use if there are other options. The Ramin may actually be something else since it is on the endangered species list. Basswood is just too soft and prone to splintering and rolling fibers - (friable?). Its much better European brother ( Lime - Linden ) is still not that good a choice for planking. The primary difficulty is that it is becoming increasingly difficult to source wood of suitable species that is in dimensions needed by an end user. You live in a region with ready access to lumber of species that are excellent for our uses: readily available: Hard Maple, Black Cherry, Yellow Poplar hit or miss: Beech, Birch If you can be your own sawyer - most any fruit wood: Apple (the king), Peach, Pear (street planting ornamental too), Crab Apple, Plum. Dogwood, Holly, Hornbeam, Hophornbeam, Hawthorn. Avoid most any nut tree species - open pores and out of scale grain: Walnut, Oak, Ash, Hickory. It is the heat that allows bending. The wood fiber glue (lignin) is not affected by water. The water raises the grain. A bit of water as steam may transfer heat to the interior more quickly, but the time difference is probably of no practical significance. The heat source must not be hot enough to char or even cook the wood. Ships, and even larger boats, required more than one plank per strake, which avoids having a single plank having an opposite twist at each end. Lateral bending ( thru the thick dimension ) is best solved by spilling the plank instead.
-
Bob, Some questions about tube artist's oil paints. Can they be applied straight from the tube? By linseed oil, do you mean the "Boiled linseed oil" - like what I saw at my local hardware store. Can Tung oil (pure) be used like linseed oil? Or the Sutherland-Wells polymerized Tung oil? From where is obtained Japan drier? What about the powdered pigments? Can they be mixed with Tung or linseed oil? What are flattening additives - the names of them? My bias tells me to use the primary color aniline dyes instead of paint and cover with shellac - which can be made egg shell by using 0000 steel wool on the final coat. A dye is not as in your face as paint and with paint, the scale effect runs the danger of it looking like a toy.
-
I found this when exploring an email special at StewMac: It comes in 2" 3/4" and 1/4" rolls I also found this seam separation knife and have it in my "tool looking for a function" category"
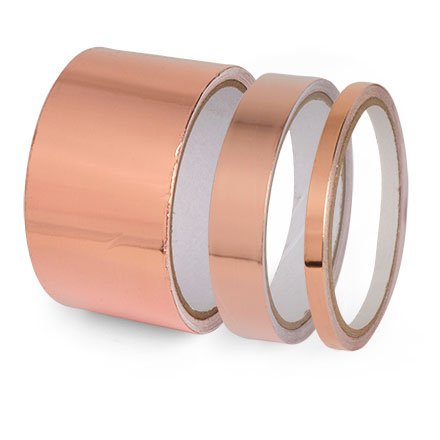
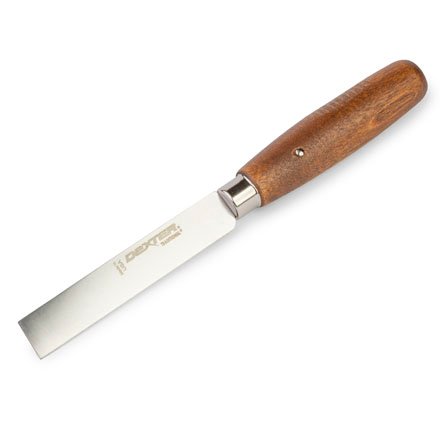
- 1 reply
-
- 4
-

-
Justifying the purchase of a mill
Jaager replied to Captain T's topic in Modeling tools and Workshop Equipment
Tony, If you have the money to burn and any sort of economy in a budget is not a goal, go for a serious precision mill. Understand, that the necessary tooling will probably be be equal to the price of the mill if not more. There will be few jobs for it where something less expensive will not be sufficient and it will mostly be a tool looking for a task. Think of it as primarily a tool for those doing scratch POF with a focus on replicating the usually hidden internal support structure. The real value for a mill as well as for a precision lathe is fabricating your own tools from metal raw material. As for another question it would probably save you some frustration and futility if you forgo any attempt at trying to use the Dremel as anything but a hand held rotary tool. Unless you are doing a lot of trunneling, you are probably seeing it as a paper weight with POB kits. Unless the expenditure is on drill bits or cutting tools, money spent on accessories to turn it into another sort of tool will probably be money that is wasted. To repeat something glib, a serious mill and especially a precision lathe fit well under a version of the Yacht Rule: If you have to ask if you need one, then it is probably something that you do not need - yet. -
If HIC was replicating an existing historical plan, he used the direction on the original plan, I am guessing that when he was starting with a half model or table of offsets he used his own preferred orientation - probably bow at the right side edge.
-
It would serve your purposes to explore the various framing plans on the NMM site. It is my premise that the English were singularly unique in their obsession with having a whole Top timber be the sides that frame the gun ports. There are examples of frames undergoing rather convoluted jogging to determine this result. Below the main wale it is still pretty much regular. But above the waterline, where it does not really matter, some rather curious things were done. In France, North America and the Low Countries it appears that the Tops were made thicker, and or supplemented and notches were cut into the tops as needed.
-
Plans are left for us from the era of wood and sail with the bow on the left and on the right. There is no rule. (It may be something as simple as the dominant hand of the designer.) In museums, a predominance of left side on display or right side on display probably reflects the bias of the curator. If your model is scratch built POF and one side is left frames showing and the other is the completed ship, it would depend on which view you wish to show off at the moment.
-
Salty, You are a bit too salty with your last two sentences. That company is the most forbidden of all of the forbidden pirate kit companies. High quality wood and components can never compensate for blatant theft of original plans and instructions. The site rules are in the bottom forum. Popularity is not a thing here. Scratch building is where real bones are made. Umm... you sold a completed model of a kit that cost ~ $600 for $1000? Working for the new minimum wage, if it took you more than 26 hrs, you lost big time.
-
Home, bench top laser cutters.
Jaager replied to Bill Hudson's topic in Modeling tools and Workshop Equipment
Bill, I really should not be getting involved, because I do not have one. But I will list what I think I know about them. They are not inexpensive. They require ventilation of heat generated gasses when cutting. They are controlled by a vector based drawing program - most of these are a bit costly. The program takes time to master and each job is hands on. There is a thickness of stock limit. On a wooden sailing vessel - almost every part is one off - so there is not much copy/paste involved with the vectors for each part. The computer work and time required does not translate into much if any advantage over scroll cutting a pattern fixed to the wood stock. A laser does allow closer packing and less loss to waste, but the waste is marginal in the over all cost. If multiple copies of a single vessel is the goal - if a home business is the purpose - this machine almost manditory. For a modeler building one copy of a vessel, a laser cutter is almost impossible to justify buying - unless the process involved with the computer instructions and the machine operation is what is the attraction. -
The Last Frame
Jaager replied to Don Case's topic in Building, Framing, Planking and plating a ships hull and deck
I have a similar problem with La Commerce de Marseille. I fill the spaces and use double sided tape to keep the filling wood in place until I am ready to punch them out. Two layers of tape = 0.006". I used a poor method to compensate for the addition of the tape thickness vs the thickness of the glue layer. The ship at 1:60 is a monster - about 3.5 feet between perpendiculars. I estimate that the tape is ~0.5" over the distance. The tape part is below the wale. I made a major error and assembled the hull "0" to FP (Col- whatever that means) and "0" to AP as two units to be joined at "0" as the last step. I do not have the keel mounted - it goes after -just like with a carved hull. But when joined, flat to the keel, the top timbers at "0" are 0.25" apart. not much over 3.5' but a pain to fix. about all of the gap is above the wale, so it will be hidden under planking. The big take home lesson that I learned: work from the deadflat and add to each end until the bow and stern are reached. It is easier to fix the open ends than the middle. In my case, the length of the keel will be whatever is required. If you start from the middle and add frames on either side, if you use a precise space thickness temp wood spacers, dry fit if you are not sure - the temp gap pieces can be made thinner if you overshoot or shim with paper if you undershoot. Glue thickness is not an issue with free standing - frames or bends. It is a factor with Navy Board framing or framing with chocks between the frames (if you use the chocks as you go instead of after) or if you have continuous deadwood and the top timbers are a solid wall. -
The Last Frame
Jaager replied to Don Case's topic in Building, Framing, Planking and plating a ships hull and deck
Quick and dirty = if the keel is made up of scraphed sections, or you wish to make it be that way, take 1/16" out of the keel length in the middle where it does not taper. This makes the hull - what? 3 inches shorter out of 120 feet or more? -
Resistance Soldering Unit
Jaager replied to Roger Pellett's topic in Metal Work, Soldering and Metal Fittings
A place to check for al sorts of electronic parts, wires and connectors: Marlin P. Jones & Assoc. www.mpia.com The selectable output bench supply DC 3-12V 200mA works well with small DC motors used to power small drill bits inside tight spaces -as an example of something with application here. -
Tool holder that makes it easy to see the tool?
Jaager replied to kearnold's topic in Modeling tools and Workshop Equipment
HomeDepot sells craft size sheets of 1" thick Styrofoam. Cut one into brick size rectangles. you define the brick. Glue two layers together using PVA and glue that on to a 1/2" economy quality plywood base. Punch holes in the top layer to hold tools. A 2" thick stack will hold about any model size hand tool in a vertical position. The tools can be as close or far apart as suits. With two or more, tools can be grouped by what is needed for a general task. The foam will not dull a knife blade and blade down saves getting inadvertent holes in your hand. A single smaller block with a white adhesive backed paper layer on top is a way to hold drill bits and the ID can be written on the paper.
