


Jaager
-
Posts
3,084 -
Joined
-
Last visited
Content Type
Profiles
Forums
Gallery
Events
Everything posted by Jaager
-
 Hank, Sort of off the wall, 1) I first thought that by Micro-Make, that MM had a drill press as part of their rebranded line of Kaleas DC tools. The right angle sander I like -a lot. The belt sander does jobs that are difficult otherwise, as long as it is held with a wood spacer to stop it throwing the belt, which takes about a minute otherwise. I am not sure about the other tools. No drill press though. 2) USS Pennsylvania - I first thought of the 1830 120 gun liner- an absolute monster, it has all of the beauty and grace of a Stalin Era high rise apartment building with spars and sails.
 -
Adding Bulkheads
Jaager replied to acaron41120's topic in Building, Framing, Planking and plating a ships hull and deck
Allen, What are the tools that you have access to? Balsa seems to be the default favorite. It is soft and readily available. It is weak, really poor at holding planking pins, dowels, trunnels. It is no joy to work, messy, apparently something that your respiratory tract finds objectionable. Basswood is available in sheets ranging from 1/32" to 1/4". It is strong enough to hold fittings. It carves well and is easy to hand cope. You could also maybe add an addition to your house for what Midwest wants for enough to do the job you want it to do. If you have access to a 10" table saw or a 14" bandsaw - to slice (resaw) pieces that will sum up to fill the gaps: Yellow Poplar if you are determined to use a hardwood. Pine from 2x4 or furring strip bins at your local builders supply. Select, watch for checks, avoid species with sap runs, Fir if you gotta, but Pine is more pleasant to work. My choice would be Pine. Balsa should be an eleven foot situation. I looks like common way to ad the filler is to fit the pieces of filler between the moulds using a horizontal orientation. The end grain against the moulds, cutting to fit is easier. This also places the onus of bulk shaping the filler while it is in place on the hull. Think vertical. Think widths similar to actual frame widths, or 1/4" each at most. Think shaping the rough outside curve on each layer while it is 1/4". The inside can be any shape, just make sure all of the layers between two moulds have some inside overlap. Bamboo skewers can be used to connect the layers and make sure they line up. Use the mould pattern for the larger mould to get the rough outside shape for each layer. Have the position for at least two skewer dowels on each layer. Glue them all together. Dry fit them between their moulds. If there is a gap, poster board and paper can be used to make up a narrow space. Draw the down bevel ( the bow or stern end) and the actual up bevel (the mid ship end). The plan shape will be fat because of the bevel on the mould on the mid ship end, But it has still allowed most of the shaping to be done on thin pieces. Remove the filler and do the beveling on the loose section. Now it can be glued in place between the moulds and only fine shaping is needed. If you have ambition and ability to mill your own stock, now is your opportunity to be a ghoul and see if any neighbors have lost fruit trees or ornamental Pear, Box, Hawthorn, Hornbeam, Honey Locust. Search our Wood forum for what to do with the logs. -
It seems fairly expensive to me. I get acceptable results from a EuroTool DRL 300. I have only used wire gauge bits with it. I added an XY table that cost more than the drill, but now I see that I could have gotten the same thing from Ali Express for ~$40. The price has jumped from $80 to $110. Tariff result is my guess. I would sooner use a $100 machine if I was going to break the rules and use it for lite milling on wood, than a $350 machine. Neither has bearings for lateral force. I also use a momentary foot switch with it. For drilling wood, I do not see the benefit of a bells and whistle level speed control. A sharp cutting edge is more important. Isn't the speed control a metal being worked thing- Al vs Fe vs CU? If you are going to use it to make tools and will be milling metals, a for real milling machine would be reasonable expenditure. For wood, you do not even need accuracy. You do need precision though - i.e. once you determine what and where, that it repeats doing that exactly the same every time. My DRL-300 will do that. My sin is that I use a bit until it bends or breaks. Some burning in a #70 hole does not bother me.
-
I must be seeing this wrong in my mind, because I can imagine a struck harpoon, a whale managing to submerge, and a harpooner dragged overboard and trailing behind under water like a tin can behind a newly weds' car.
-
Rather than bolt tools directly to my bench top, I added a woodworkers vise under the front of the bench - a cheap HF vise that wants to rack when tightened, because the tolerances are from poverty. But I do not do full size wood projects and it is not needed for that. I use a 2x12 to make a tool base. I use lag bolts to secure the tool and to mount a second piece of 2x12 to the front of the base and make it long enough to engage the vise. I can store the tools under the bench and have the whole bench open when I need it. I can interchange a grinder, machinist's vise, 9" band saw. There are open wrenches specific to the saw. I fixed a spring clamp that is for dowels used for clothing hangers to the top of the base. It holds the wrenches, but easily turns them loose. Holes in the top hold tool specific Allen wrenches. It looks like a 2x12 may be difficult to source, but the width is good to have.
-
Epoxy over PVA
Jaager replied to dkuzminov's topic in Building, Framing, Planking and plating a ships hull and deck
You have already planked a POB hull? The moulds are few in number and widely spaced? This is a two layer planked hull and you are shaping the first layer? The planking wood is thin and flexes under force? As Wefalck writes, the usual practice is to use filling material between the moulds, shaped to hull lines before any planking is applied. Done correctly, only one layer of planking is then required. It has been my impression that on a two layer hull, the first layer is relatively stiff and the display layer id often a thin decorative species veneer. (To my eye, often a species with out of scale grain and open pores, but never mind that.) Did you plank the first layer using the veneer? Now, to your present situation: epoxy sounds like a messy and much less than ideal solution. I would obtain a supply of wood veneer that is thin enough to bend inside the 90 degree arc amidship. Use a sharp knife to cut popsicle stick wide or narrower strips and PVA glue a layer or two inside in a vertical orientation. No compatibility problems. -
Home Depot has free sample squares of Vinyl flooring. As an intermediate between a tool base and a bench top, it may absorb some vibration even if it is under heavy clamping pressure. I used this in-line for my Erector Set type mount for my 1/3 hp motor for the drum sander. The cost was right - just a quarter turn on the nut.
-
I use a 9" bench top with the finest available blade (1/8") for scroll cutting. I just need to get sort of close. The blade has teeth with set. There is significant kerf and the face of the cut is rough. As long as the blade is sharp and the blade run is not jammed with scrap, the cut goes quickly. I added a Carter Stabilizer and with it I am not limited in radius. I can turn the work on a lot less than a dime. It about doubles the cost of a low end 9" saw. If you want to bull it out and finish with a disk or drum sander, a bench top band saw does the trick. I would not attempt anything fine or delicate using it. I would not use it for much of anything else though. If you intend to get into the milling from planks or logs, a bench top band saw is a very poor choice. That is a go big (14") or go home situation, unless you enjoy frustration.
-
You might try tissue paper - the stuff used to wrap pretentious gifts - or rag bond paper for thick - to simulate cloth. PVA will bond it and shellac will fill the pores and take any paint.
-
Lin, I have an interest in the Leda class frigates. To be specific, HMS Shannon. I have lofted the timbers. I also lofted USS Chesapeake. I thought that the pair would be interesting together, as singleton stand alone POF. I am not into diorama. Because Leda is a copy of L' Hebe and La Venus is a sister of Hebe, I considered ANCRE Venus and what with the POF supplement I thought that I had my in. But, for my method, they still whiffed on the plans. I used the NMM plans for HMS Leda, as beat up as they are. Which plans did you use to build the hull? Did you build the hull - POF, POB, solid carved?
-
Let me first supply this caveat, I have never built a POB hull. In deed, I went to some effort to demonstrate an alternate method to POB to fabricate a hull that gets you the place where the real planking of the hull can begin. I jumped in because when I looked at C. Poison's pix of POB components and saw no lines to site the moulds properly on the spine, that shocked me. Your model does have them. But I do not believe that the height of the central spine has anything to do with the deck. It would be more or less useless to have one line of pseudo carlings at the center. Indeed, has it exists, it is a problem for hatches and masts. It is neigh on to impossible to have the mast below the main deck be long enough to easily get the correct rake. It just does not extend to a mast step on the keelson. You do want to test that height and camber of the moulds will support a sweet and proper run of deck planking. Use a wooden batten to do this. ( I am guessing that your deck is a sheet of basswood, instead of actual planks. But even this does not like misalignment and dips. )
-
If the line that is on the center spine and on each of the moulds is from the kit mfg, that is the reference/register line to assure that the moulds align properly. Not only is the shape of the hull, and the run of the planking dependent on this being correct but the top is what replaces the deck beams. The moulds look to be sparse enough in number and far enough apart that two layers of planking will be needed. This means that the bottom of the moulds must be well above the rabbet for the actual planks. Some ships had a garboard that was twice the thickness of the bottom planking and the outface was dubbed/adzed smooth and some had a step down. If the outer planking comes in too high, a wedge shaped plank at the spine can fill the gap and allow the outer plank to seat in the rabbet.
-
Do you need the flags to be showing the effects of wind? If it is the rectangular flat version, then the dynamic effects that vector provides are not needed. A raster based graphics program should do. Straight lines will work. I work at 1:48 for plans and the short segments that make a hull cross section be facets instead of a smooth curve, still work for me. GIMP is free, PhotoShop is subscription, PaintShop Pro is low cost, and Painter is too expensive unless you want to use a computer to actually paint a picture.
-
Note that the old guys used circumference, not diameter there is a factor of 3 difference. pre iron and steel - bark brown (Walnut) instead of black is less garish. diameter is easier for us - It is easily measured by counting the number of rotations of the line - tightly packed - in a inch distance along a dowel. the diameter of the dowel does not matter 1/rotations x pi = circumference
-
Yellow PVA (e.g. Titebond II) has gap filling properties. PVA fixed with wood flour from the same wood has even more. With the task of filling the outer perimeter gap between POB moulds - for to give support for planking and allow for needing only one layer: Avoid Balsa at all costs. Basswood comes (or used to come) in packs of sheets 1/32 - 1/4" on line or from mega craft stores. Easy to work but kinda dear on wallet damage. Construction Pine from ~Home Depot or Lowes (Slows as my framing contractor in the Blue Grass called them) 2x4, 1x4, even thinner -easy to cut, soft put sturdy - avoid sap/resin stock. anyway, no one will see it, so as long as it stays bonded in place, close enough is good enough. If you paint, fillers take care of gaps. If it is wood with clear finish, as tight a tolerance as your skill allows. If a piece does not measure up, toss it into a scrap box and start again. You will know and you will always know if you just settle. almost no one else will notice or know that it is less than perfect, but you will. editorial: decks - make the caulking seams under scale and if the vessels is before 1860 - color it Walnut, not black Drake's well was 1859.
-
Newbie planking question
Jaager replied to murphyki's topic in Building, Framing, Planking and plating a ships hull and deck
Edge bending is trying to take wood into a shape that is against its nature. Some species take to this better than others. A lot of the species supplied in kits - look to be brittle - as well as having out of scale pores. One of the better species for serious bending is Holly and stock that has been infected with Blue Mold will work just as well . I suspect that infected Holly is not available commercially. Accepting it makes self harvesting an easier proposition than insisting on snow white stock which requires cold season harvest and immediate placement into a kiln. Commercial white Holly is becoming very expensive and the color matches nothing that was used on an actual ship. I have seen Basswood or Lime taking a serious bend. The grain, color and pore structure are spot on. Those species are too soft, fuzzy, and friable for me, though. Looking at the build in your link, the wale does not seem to edge bend all that much. The run of the planking appears to follow that of the wale, and not the rail. The stern is planked with short runs of planking with little edge bending. A ship that got into wave action requiring serious strength at that upper stern location would be in more trouble than strength there would help. -
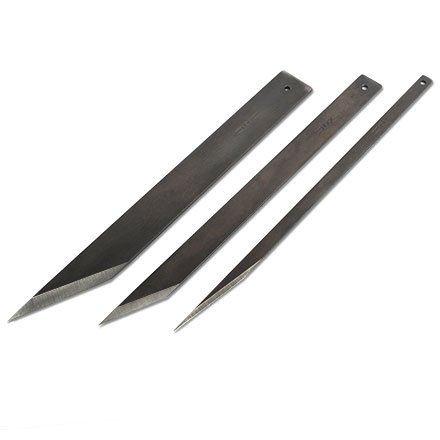
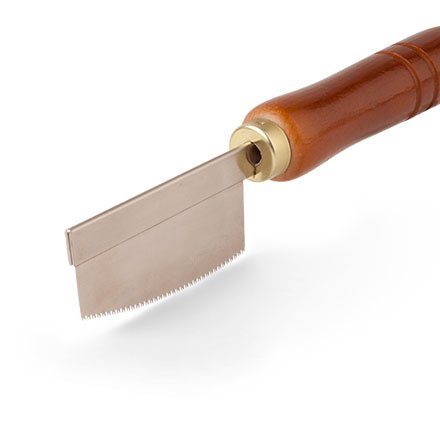
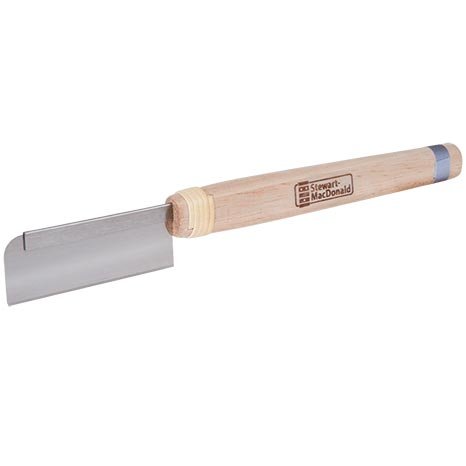
https://www.stewmac.com/Luthier_Tools StewMac is on the high side as far as price, but they have quality tools - if a bit specialized and limited their being focused on luthiers. I have no association other than being a customer. They also use email advertising - a lot.

-
My Rikon 14" uses a 142" circumference blade. The spec literature allows 1/4" to 1" for blade width. I did not look too hard, but I did not find any 1/8" x 142" blades for sale. It is strong enough to tension a 1" blade, but I gave up on expecting a wider blade to improve resaw tracking and use 1/2" blades. I think the frame is steel. It is heavy enough that I hired it assembled, delivered, and adjusted. I never gave much thought to what 9" / 10" / 14" /18" really referred to. The 9"/10" are smaller bench top. The 14" is a large free standing. The 18" is really large free standing. It appears that 9" - 18" is the theoretical maximum height of cut - the upper housing to table distance. I think that the upper blade guide reduces the actual distance possible. I don't think that I would care to try to get 12" diameter log thru - too heavy, too unwieldy, way out of scale. I do not build full size furniture or guitars so wide, thin boards are not something that I need. 2" wide is generally enough and 4" is my upper limit. It is the power and precision in cutting and tracking that requires a 14" saw. If you want frustration, try using a bandsaw that will not track for resawing.
-
I have both a 9" bench top and a 14" bandsaw. The 9" is a model that MM sold for a short period of time. I am not sure if it was manufactured in China or Taiwan. I use it exclusively for scroll cutting. I use 1/8" blades and it is fortuitous that it uses a readily available size blade: 59.5" . It also will mount a Carter Stabilizer, which greatly enhances scroll cutting control. I would choose a more powerful motor, given the option. I only scroll cut sorta, maybe close to the line. I use a drum or disk sander to get to the finished shape. The 14" has more bells and whistles. High quality guides and a lever to release the tension. It also has a 3 hp motor. It is used for resawing, both planks and logs. I would not even attempt to mount a 1/8" blade on it. But that is below what is even listed as a choice and not available anyway. Factors that I consider important decision: the more powerful motor, a blade size that is easy to source, a quality machine if 14" A bandsaw is going to use up steel blades, For resawing dense hardwood steel blades do not last all that long. If you do a lot of cutting, the amount spent on blades will approach what you paid for the machine. I find carbide blades to be more cost effective, but bimetal blades are even more cost effective. Buying an economy machine will probably leave you with a machine that uses up blades more quickly and any supposed savings will be more than reversed in additional outlay on blades. For the 9" only steel is available and cutting frame timbers can use a couple per ship. Bosch makes Vermont American and I ran into a batch that was so dull that I may as well have tried cutting using the back edge. I now only trust Olson, they just cost more. A bandsaw is by far the more efficient and safer way to resaw. I scroll cut 0.15" - 0.25" stock for the most part and a bandsaw with a sharp blade will do the job fairly quickly and the work does not chatter.
-
Wondercutter is the product name. It looks to me as though the target material is too limited in density and thickness for it to provide much use for scratch building.
-
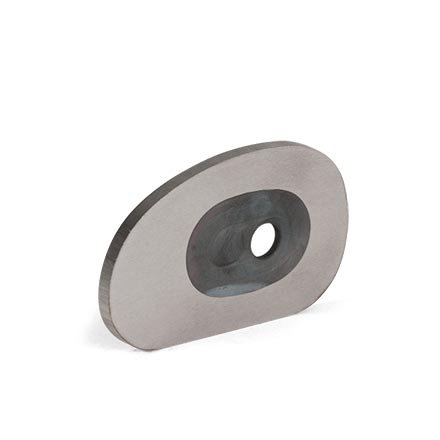
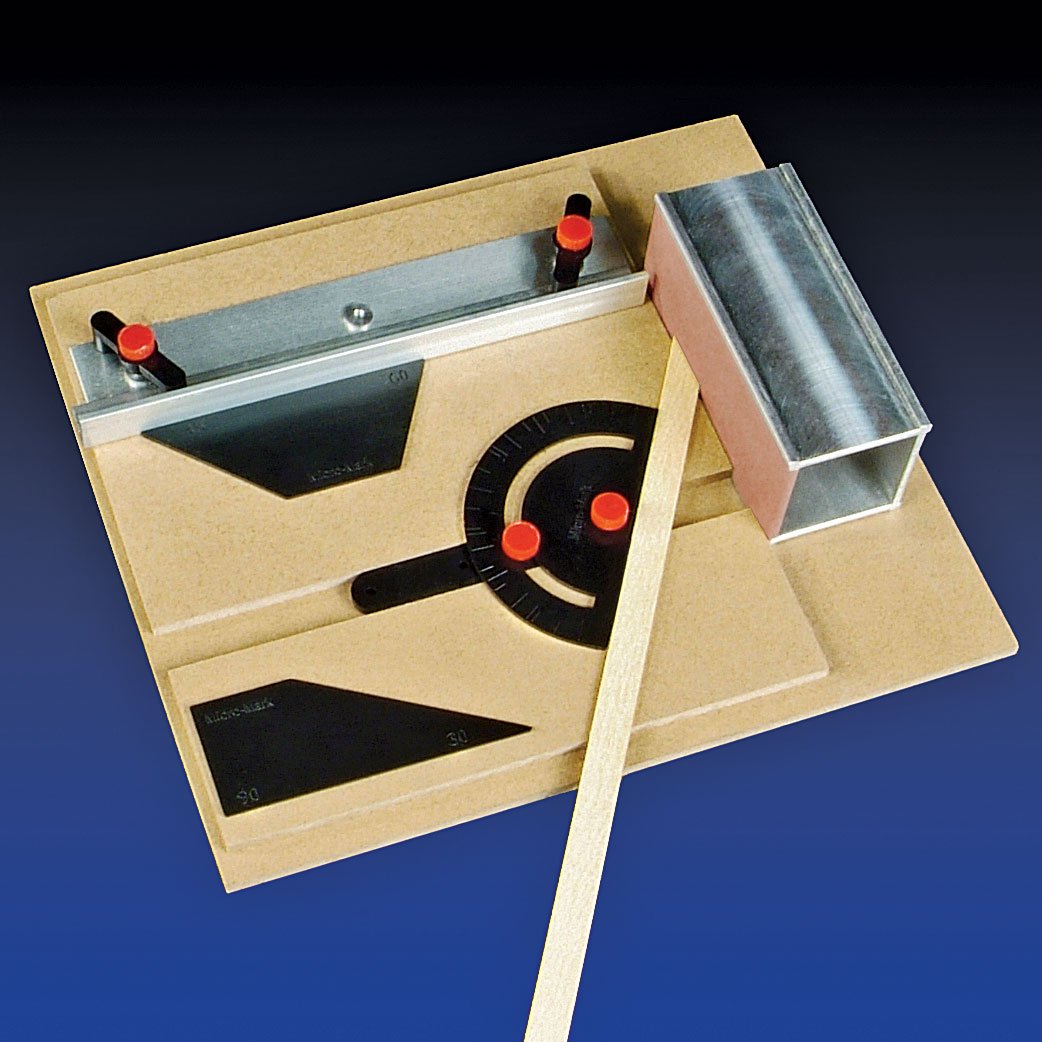
POB filling between moulds? The material will be hidden. It does not need to be pretty. If there is a gap, use paper or cardboard to make up the short fall. Liberal use of PVA will stiffen the paper. A right angle square, a piece of 1/2" plywood, and a sanding block will stand for a poor man's disk sander. This particular tool has been said to be a Chinese copy of a domestic tool, that may have done in the original company. It may look neat'o, cool'o but a home made version will cost less and do what you want. Tooth on the gluing surface is good, so 100/120/150 grit will cut fast and leave a surface for PVA to bond with.
-
Denatured alcohol is ethyl alcohol. The solvent for PVA is isopropyl alcohol, but the properties of short chain alcohols are very similar. So it could be PVA. Hide glue is denatured by ethyl alcohol - especially if it is hot, so it could be a hide glue.
-
Is there a trick to making deadeyes?
Jaager replied to Schooners's topic in Masting, rigging and sails
I see one problem with using a standard dowel as starting stock: the grain. The face of the deadeye will be end grain. The orientation needs to be 90 degrees to that of a dowel. The length of stock to be turned would be 6-12 inches long. It would depend on the width of the starting lumber board. The starting lathe stock would then be square in cross section. I wonder if a tube with an inside diameter that is that of the deadeye could be turned into a hole saw and deadeyes cut from a sheet of wood that is the thickness. The tool used would then be a drill press. A jig could be made to position the 3 holes for the rope and these holes drilled in the sheet along with an orienting site for the hole saw, so that the holes would be already placed before hole saw was used to remove the plug that is the deadeye. Another jig could use the 3 holes to center the deadeye and the lathe used to shape the groove for the shroud. -
Lapwing 1816 Revenue Cutter
Jaager replied to iMustBeCrazy's topic in CAD and 3D Modelling/Drafting Plans with Software
Post #30 - the top graphic - Body plan - aft - the new green station shape. You should maybe recheck the location of the sheer point. I see it as being too close to the preceding station. There will be a bulge. If you do use that shape, you may wish to leave the inside a lot fatter. Otherwise the inside will have to have a scab layer to make it thick enough when you rasp the outer surface to get a smooth run. -
The harpoons needed tending to. Not needing the level and type of work usually done by a blacksmith a smaller anvil would do. The coopering needed to assemble the barrels to hold the oil was also a function.
