

BrochBoating
-
Posts
182 -
Joined
-
Last visited
Content Type
Profiles
Forums
Gallery
Events
Posts posted by BrochBoating
-
-
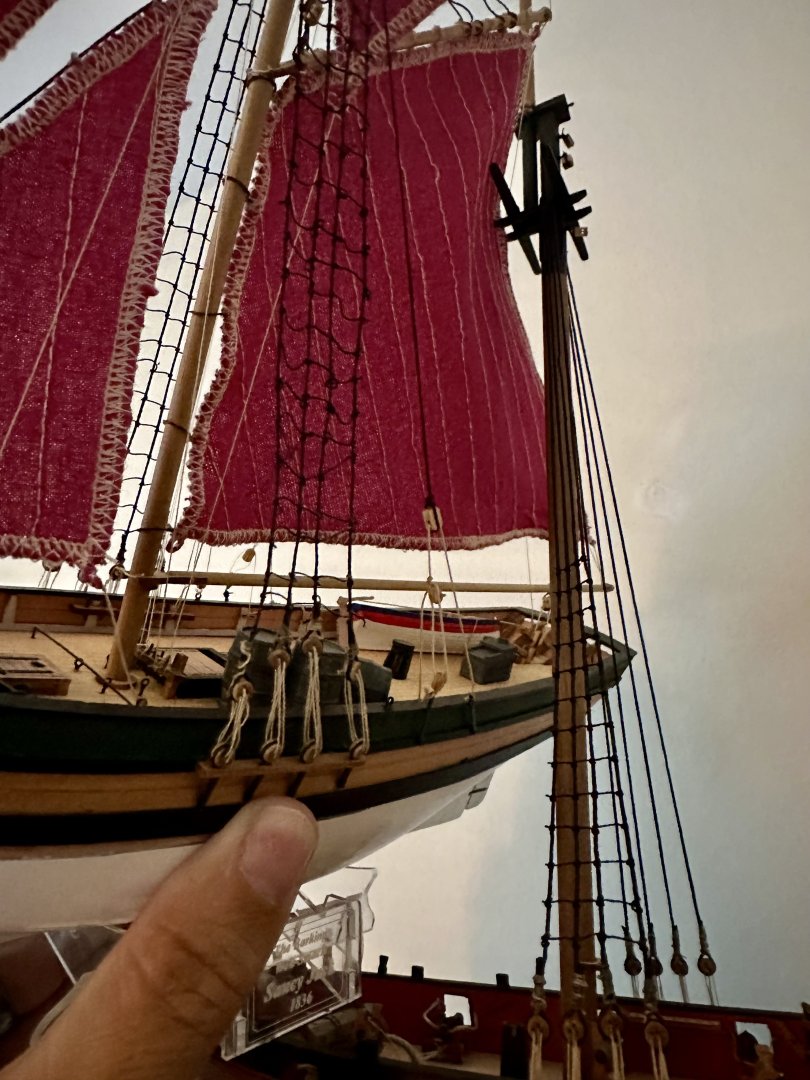
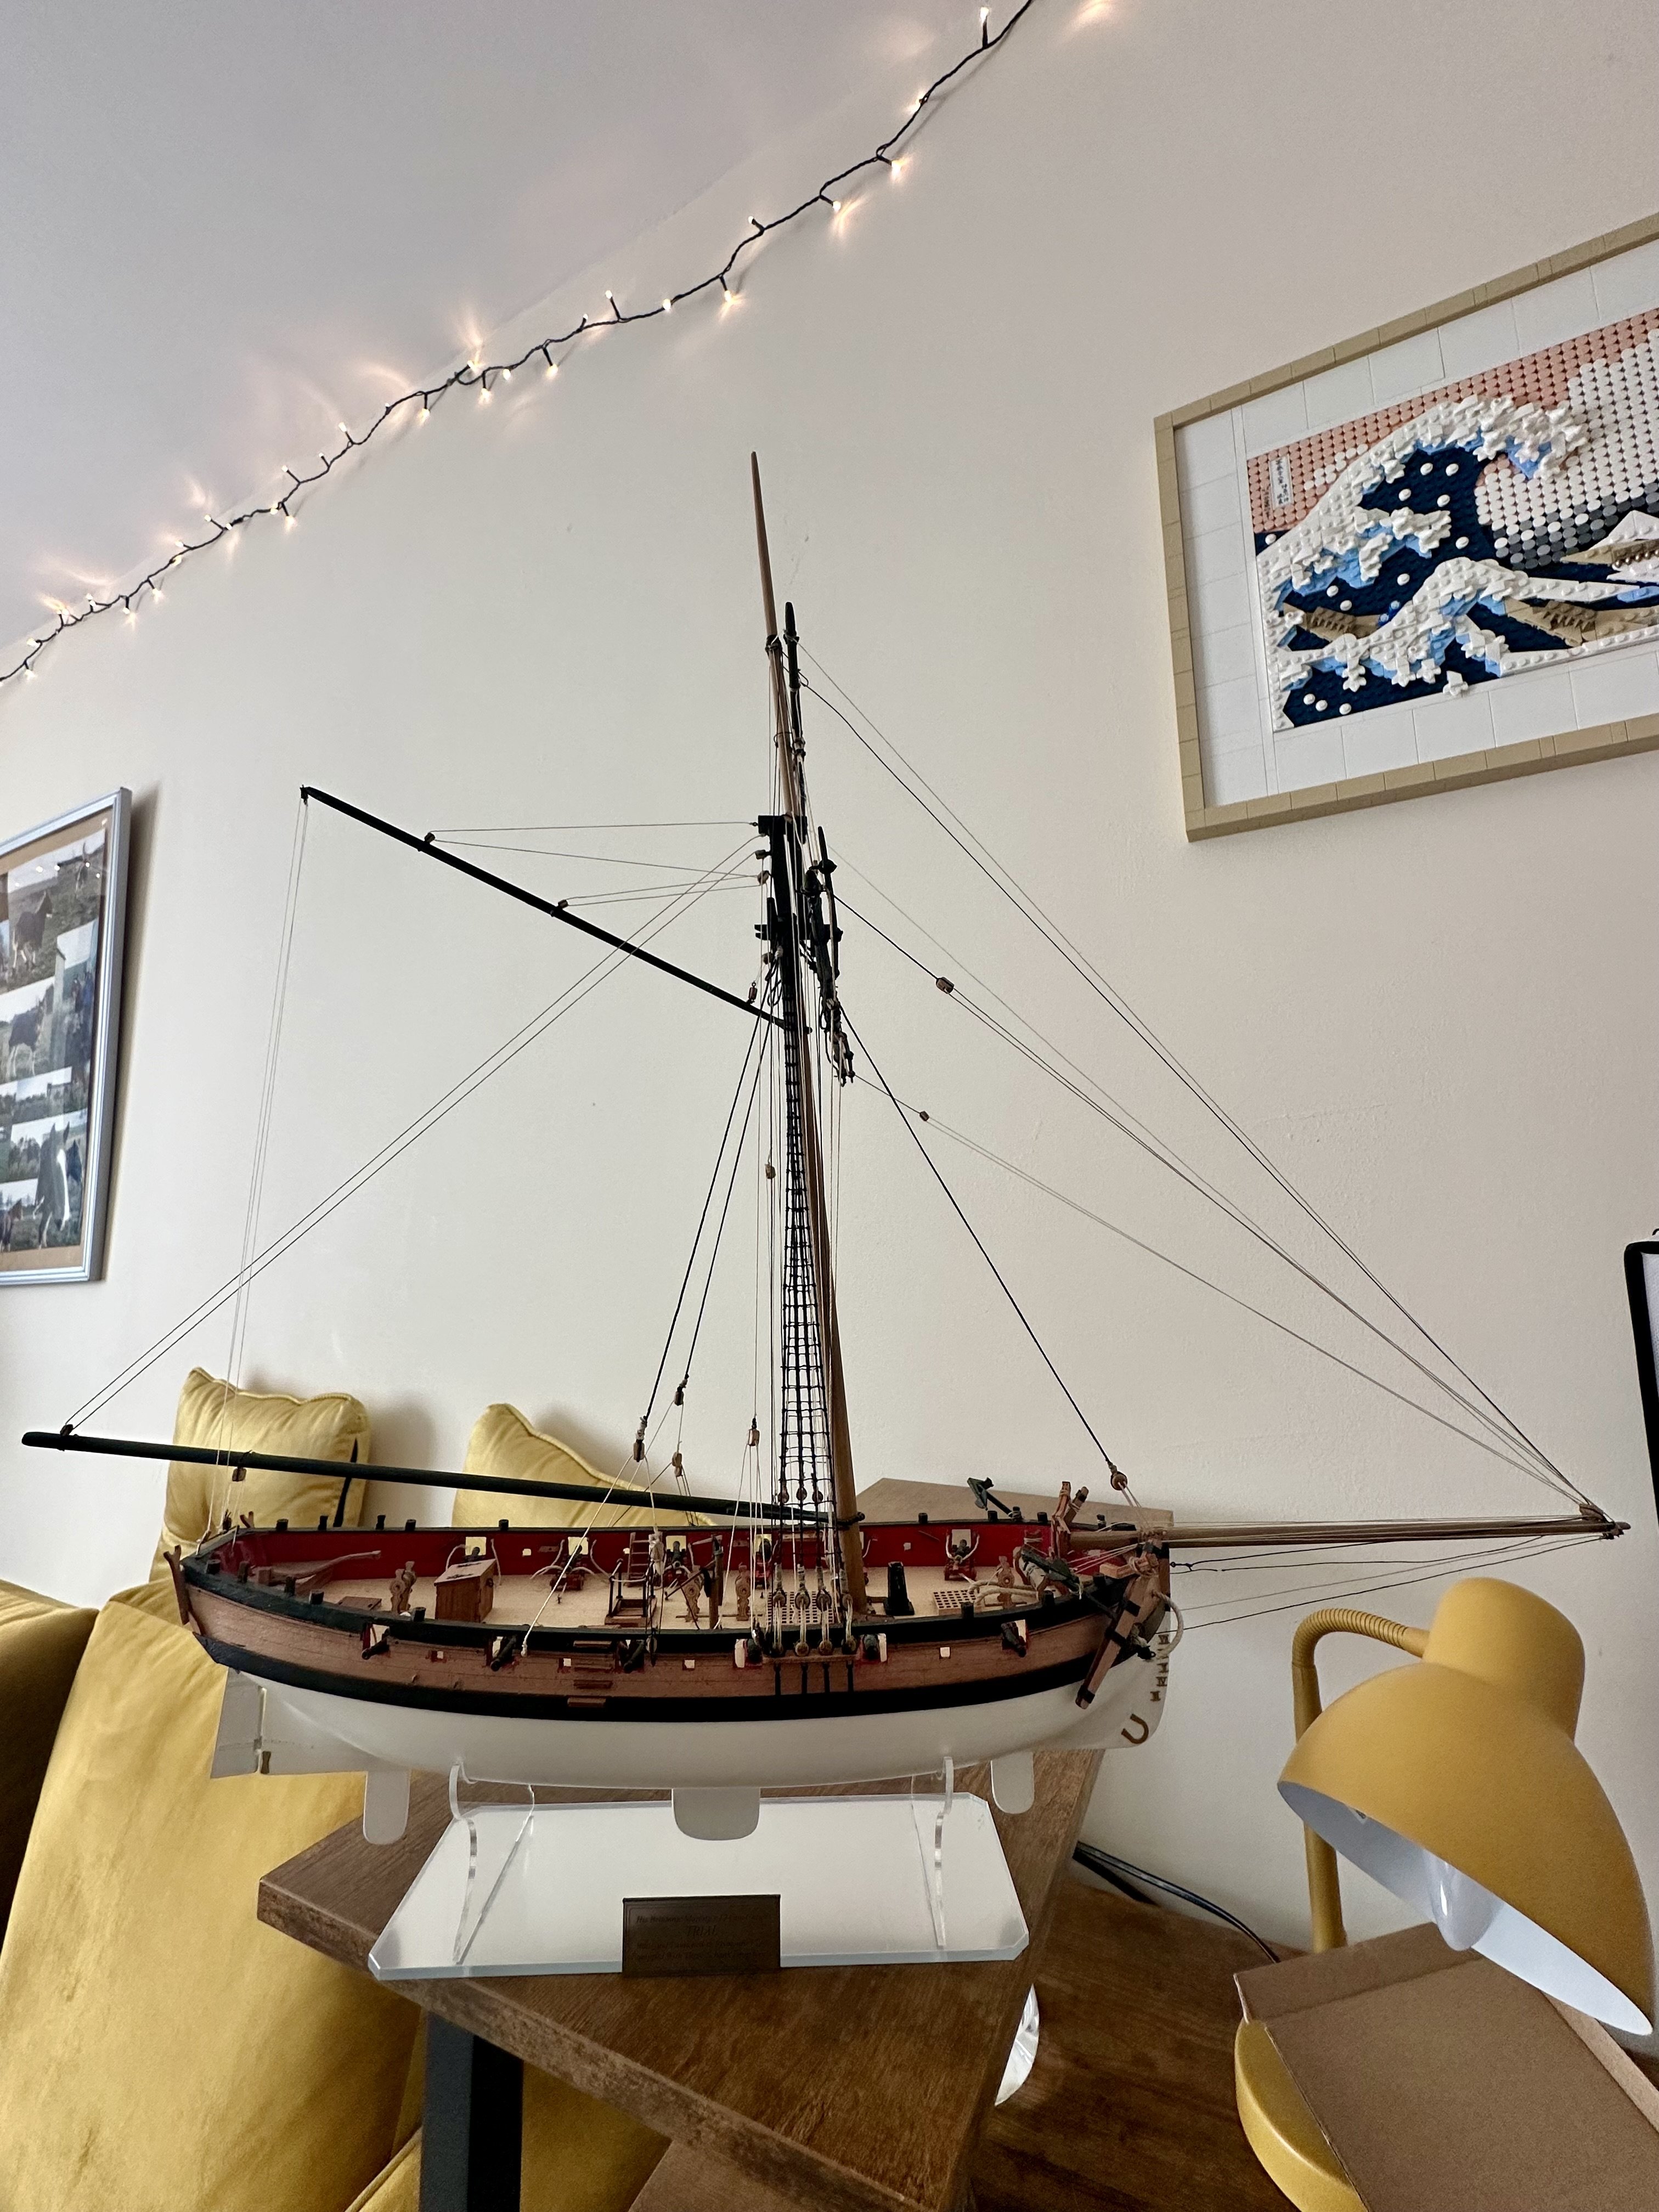
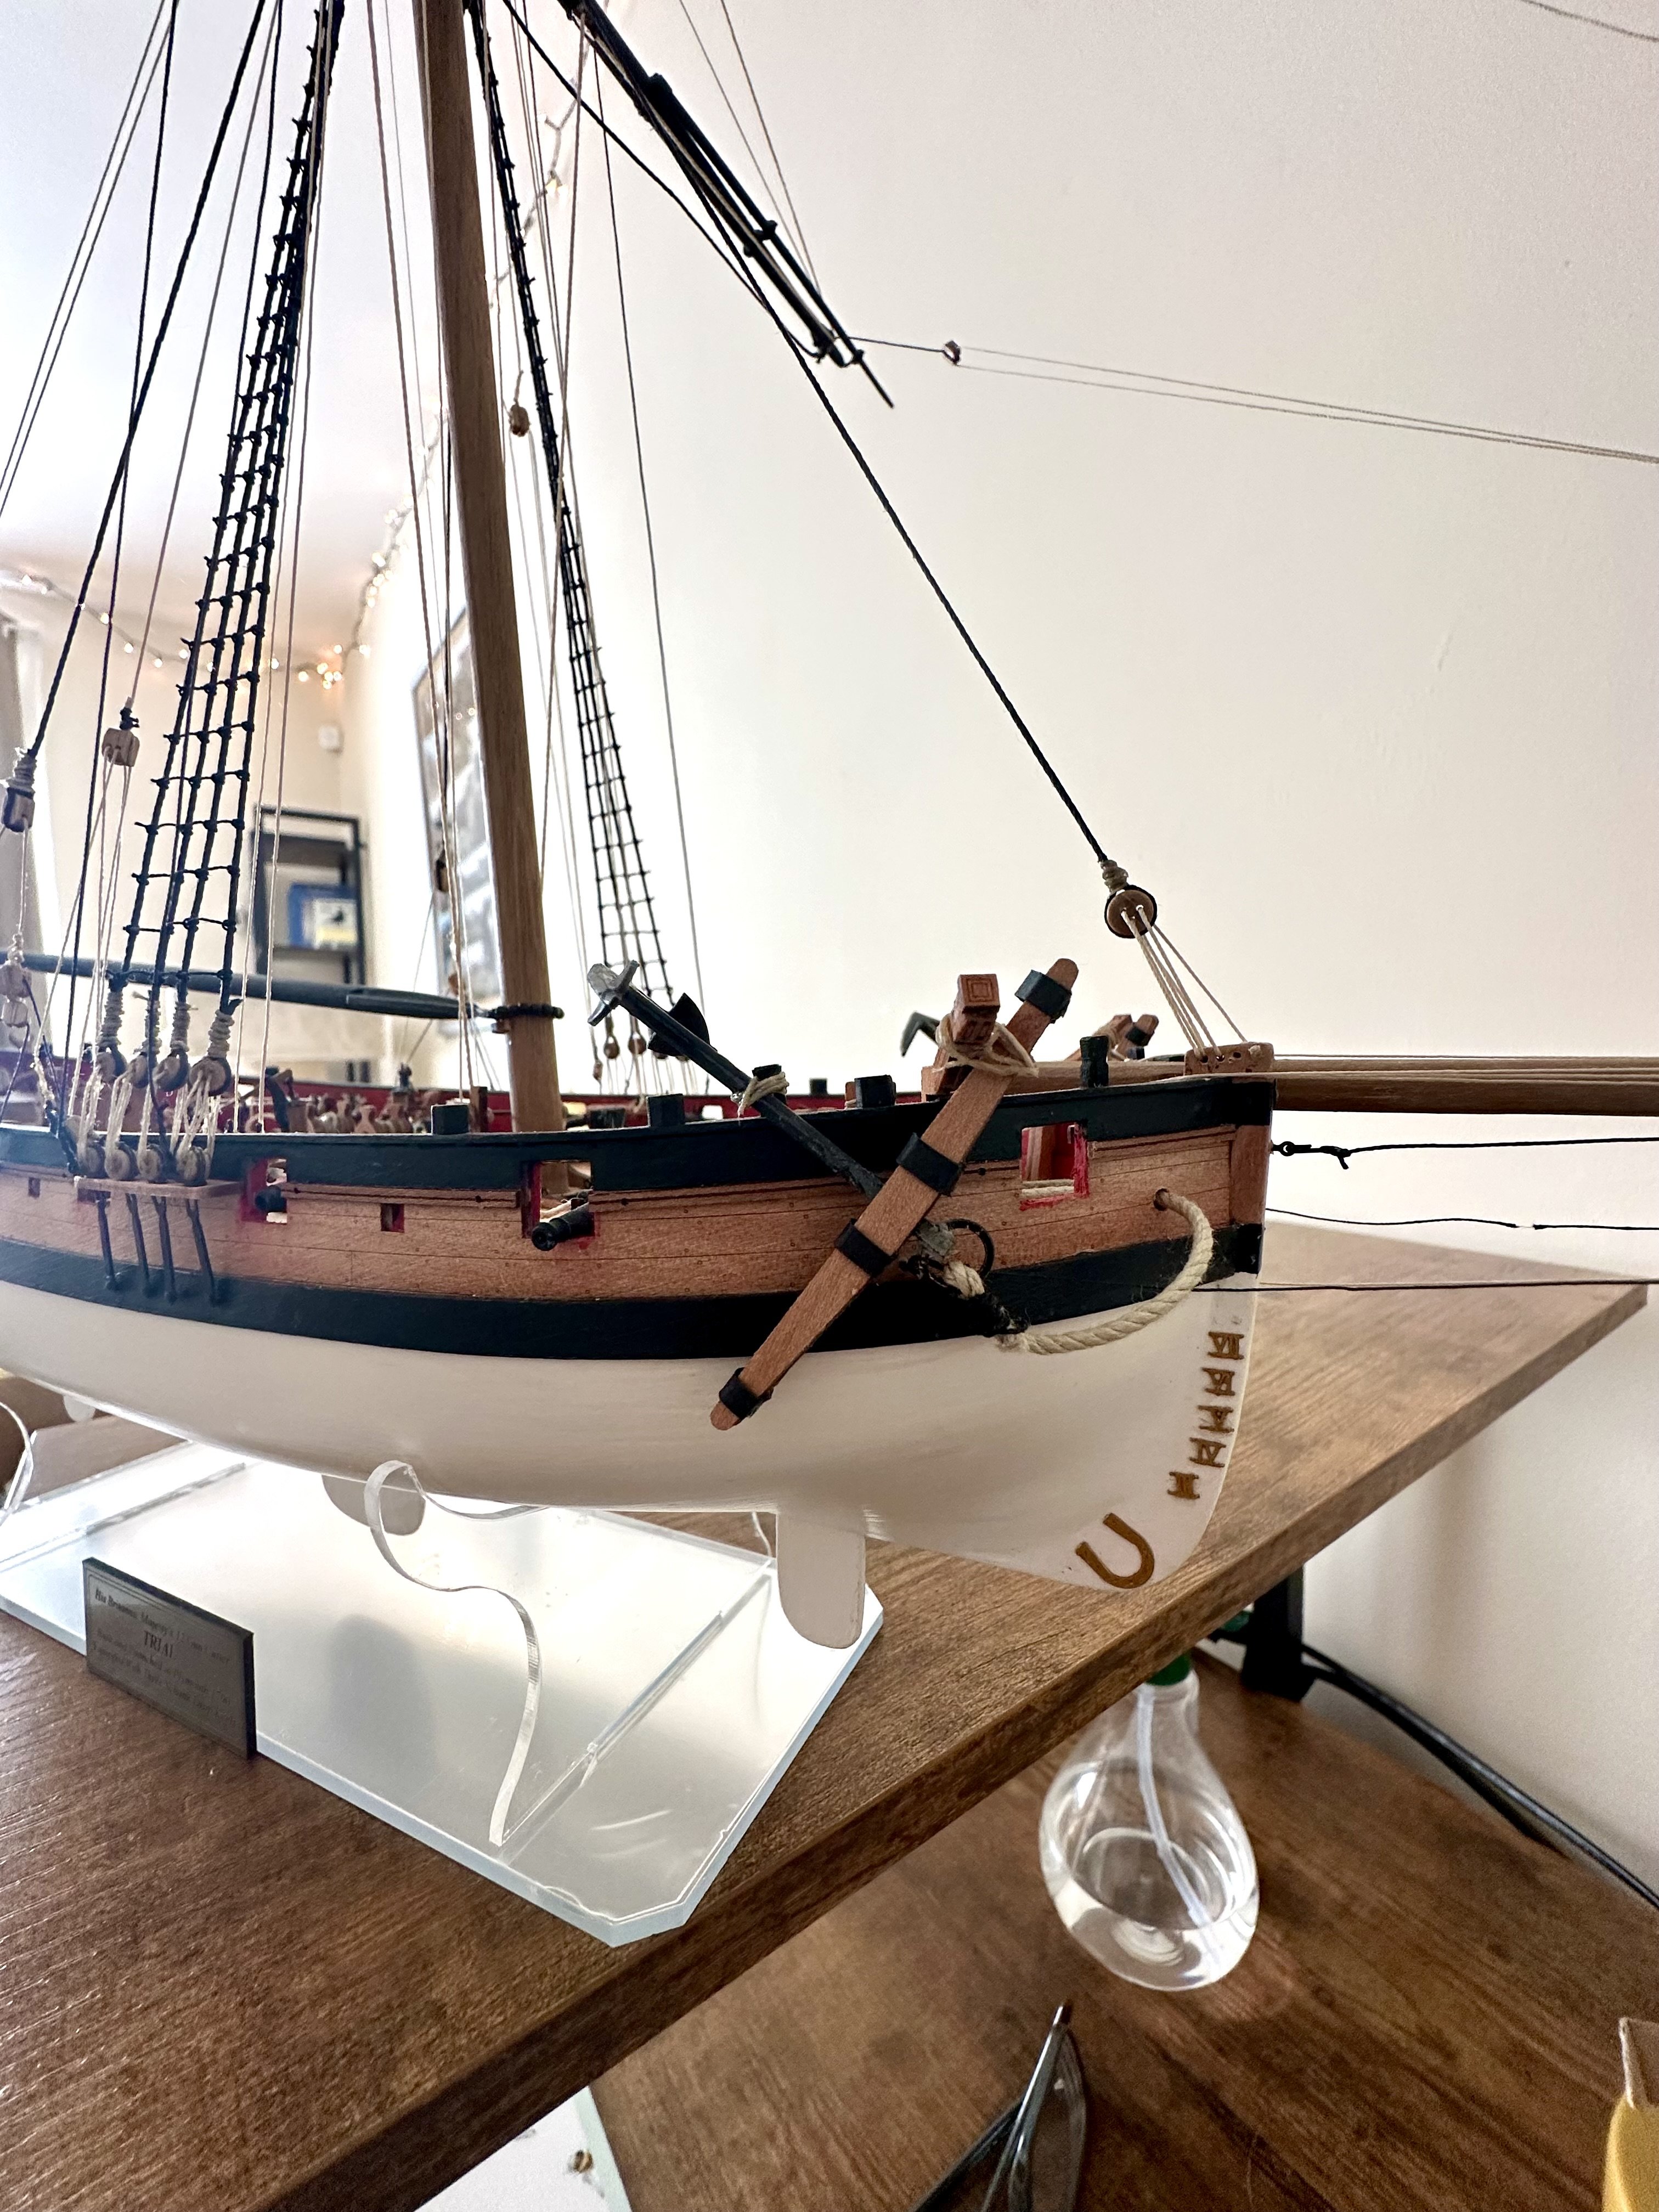
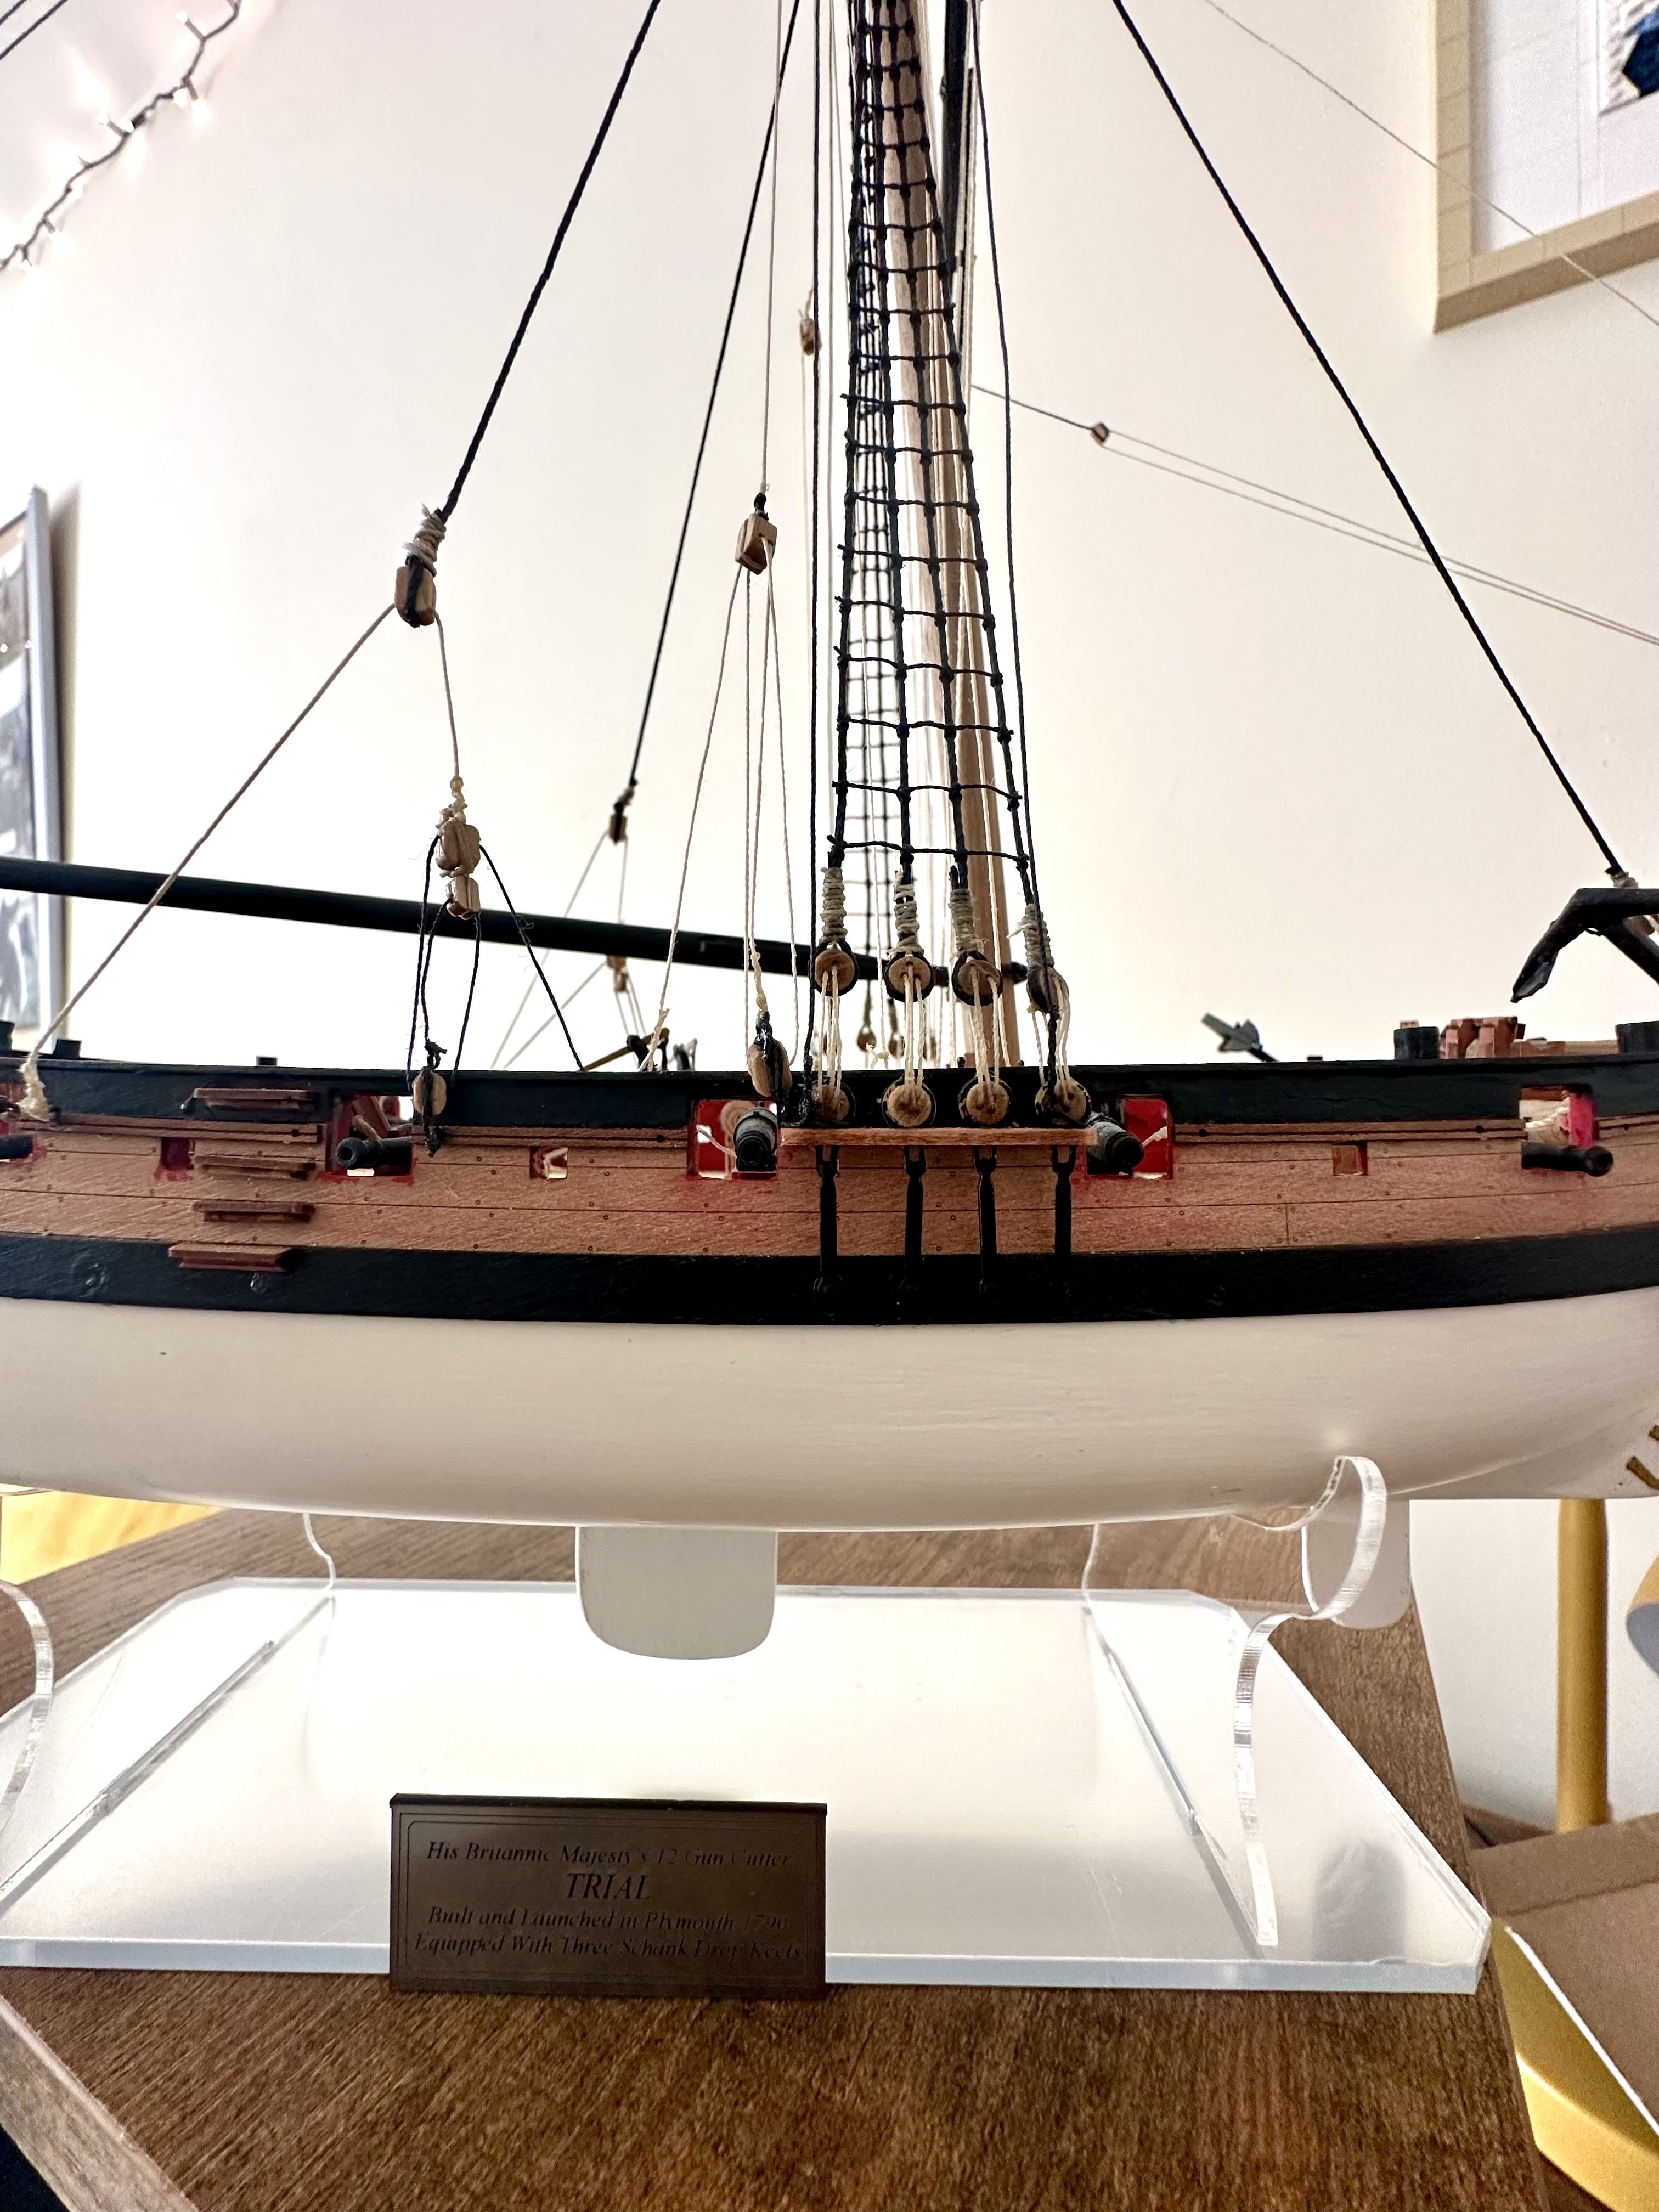
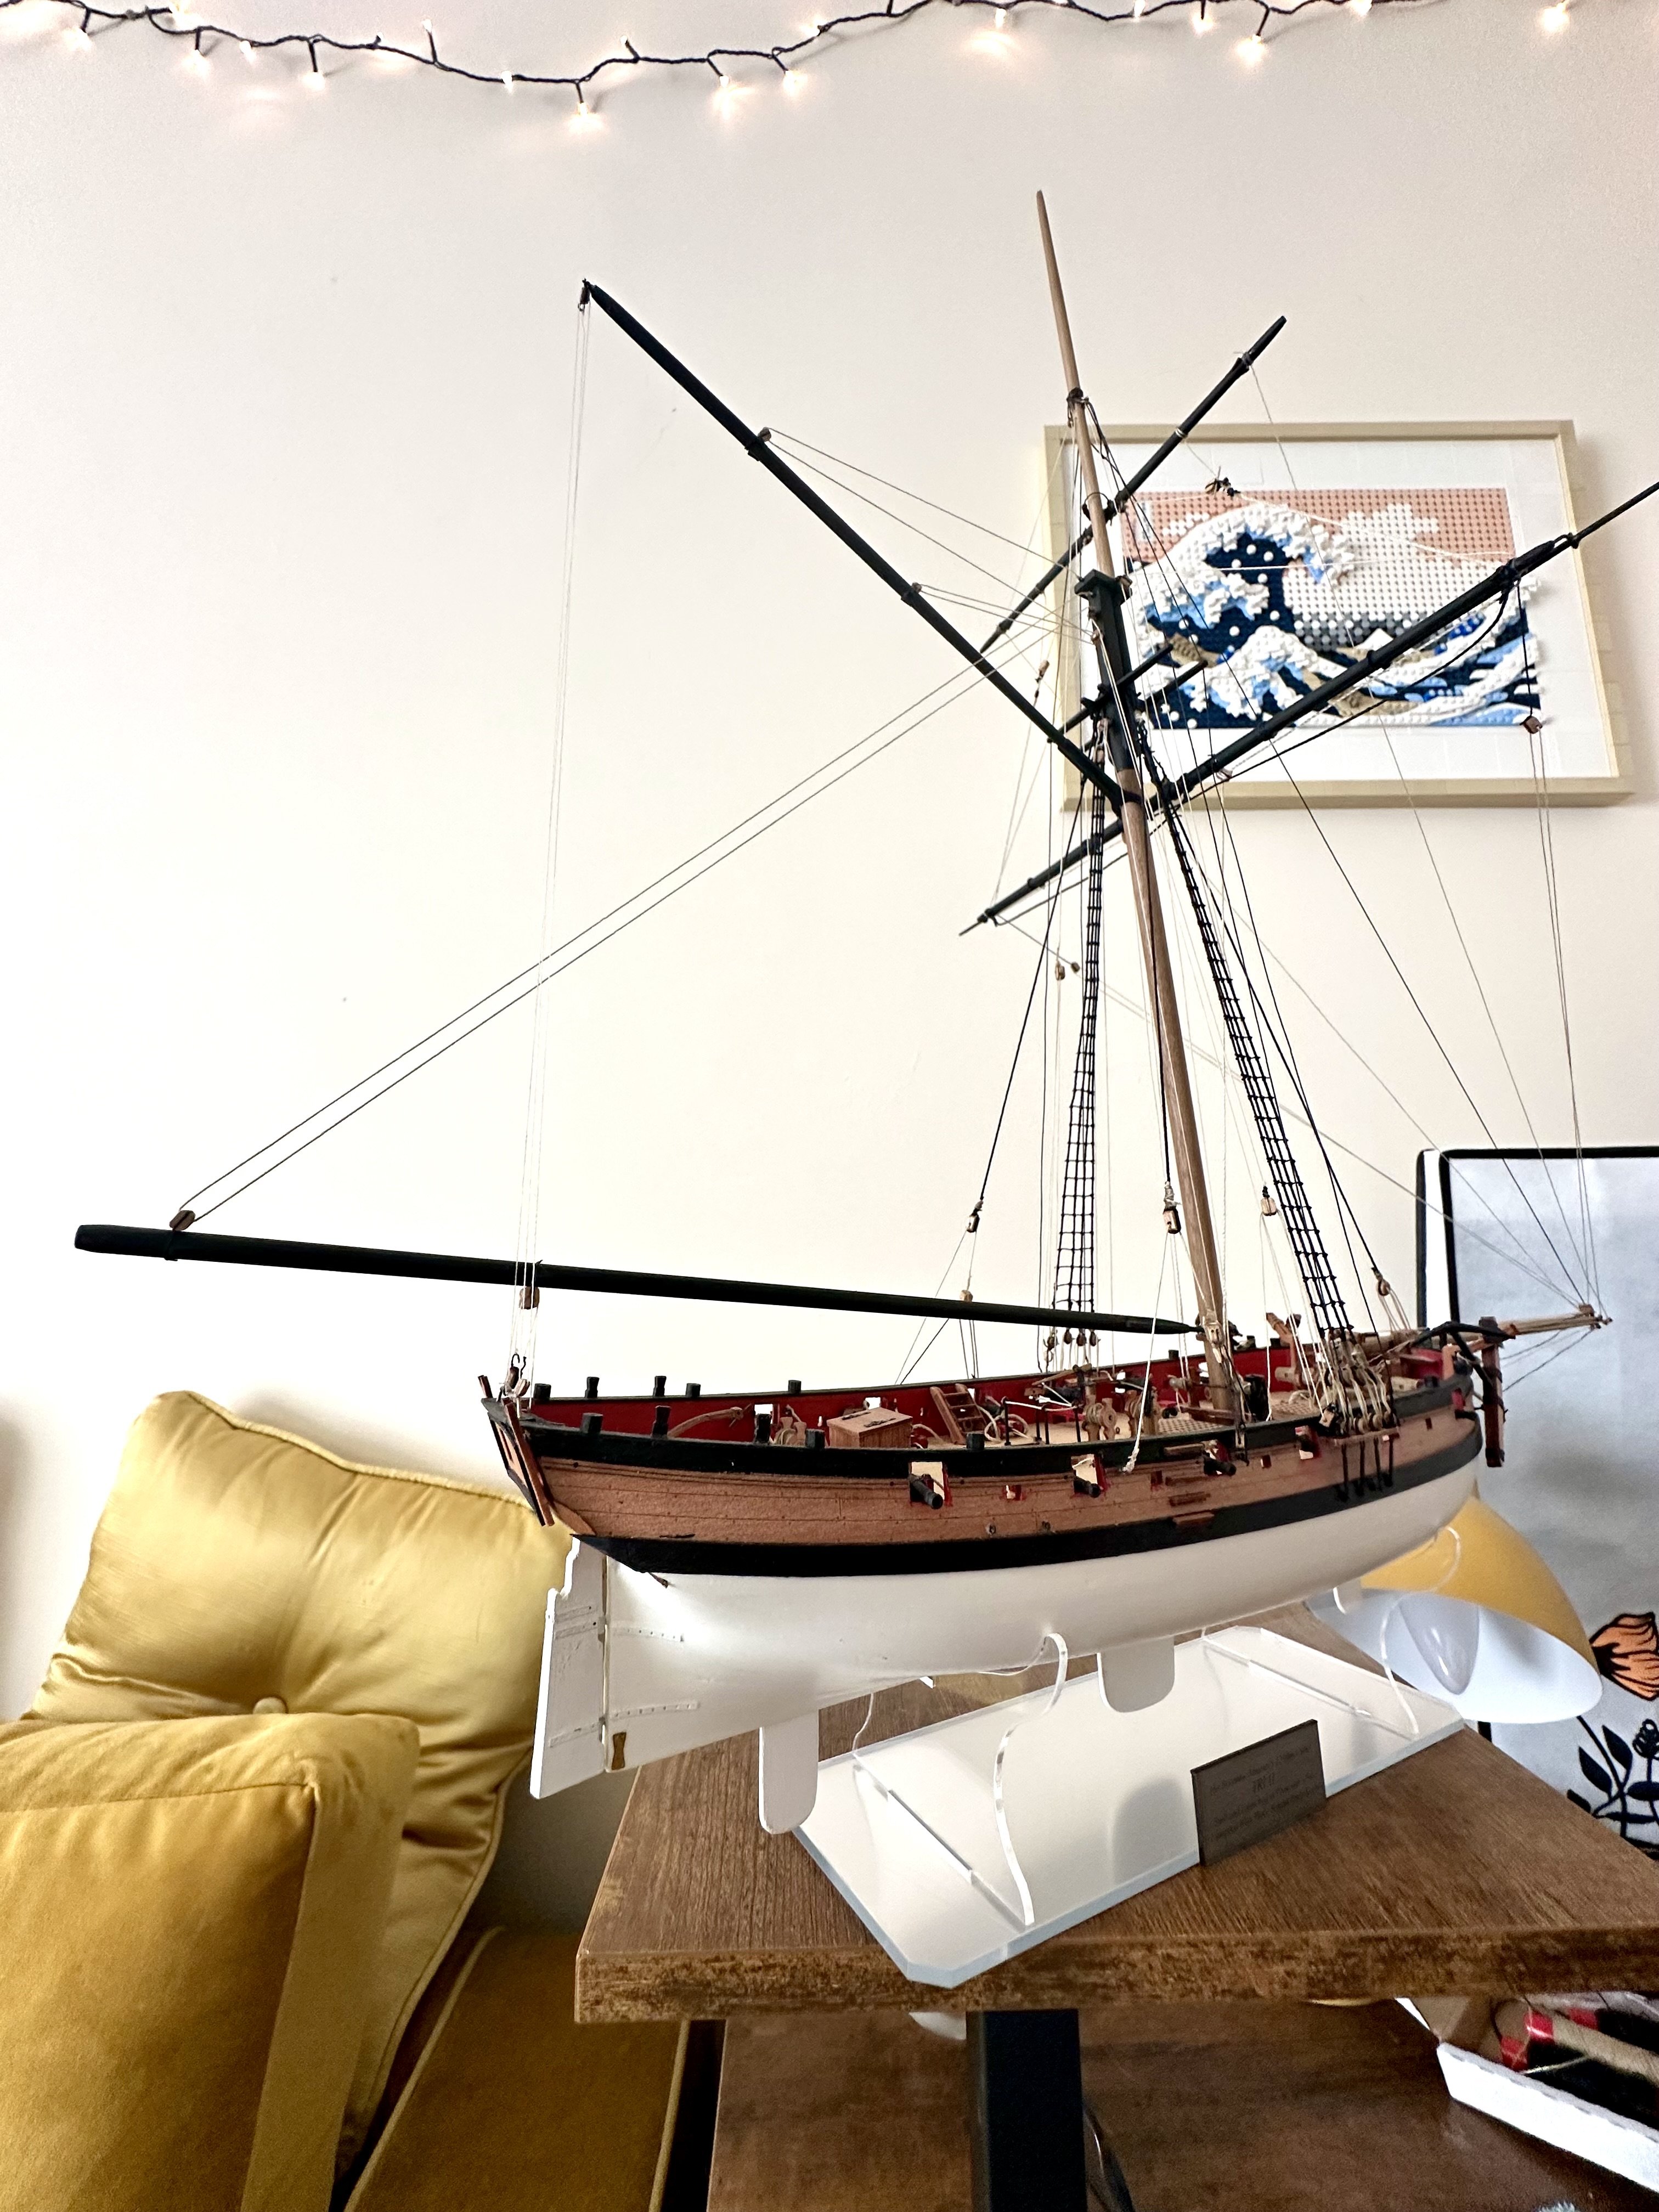
Apologies that this build log didn't get completed properly. However I've completed (for me) Trial today. Compared to many of you it's amateurish but I've enjoyed what I've done and I'm pleased with my improvement over the last kit. Summer brings more swimming, snorkelling and horse riding but Nisha should be along shortly and I'm sure another log of one length or another. Thanks for all your comments along the way, always appreciated.


- Thukydides, Craigie65, AJohnson and 7 others
-
 10
10
-
2 hours ago, AJohnson said:
What fantastic progress you have been making Simon
 , really envious! 😁 For one reason of another I have not been doing much on my Trail for a while. glad to have yours and Dan's Trial logs to check in with!
Thanks Andrew, much appreciated compared to your work. We seem to be suffering a similar pattern of a furry loss and health problems but I'm hoping to be back at the bench shortly too. Good luck
")
-
-
48 minutes ago, Scottish Guy said:
Hi Simon, if asked to be honest I would say, I don´t like the outside of the hull and I don´t like the inside of the hull lol... I don´t like it at all. When I can find a way to take the planks off again I will do so. I got a hint from @Keith Black by using acetone to de-glue the planks. Will try to find a proper way to do so (large basin and loads of acetone) and sink the hull into it.
Not sure if I maybe just should try to fix the ship in the state as it is and finish it by knowing it will never get to a point that I might like it and then start over with the second kit.
Micha
In that case I'd say, if you can, try something else. You will have learnt from this one but it's not worked out and I think that will colour any attempt at salvage. Yes, it can be done, but maybe a bit further down your journey. Personally I think better to chalk it up to experience and try another. Please do though
-
Hi Micha,
How did you get on. I'd echo a comment above and ask if, from the outside of the hull are you happy with the flow and look of the planking? If you are then I'd shape those ribs to fit. If not the taking the planking off may be the way to go if you have enough stock to start from scratch. Depending on how much and which CA you used it may be quit brittle and able to be carefully pulled off from one end. Possibly with the help of a plastic spudger for some leverage?
Good luck,
Simon.
-
It's definitely been a week for being outside up here. Garden work maybe not so much fun!
- Keith Black, Scottish Guy and mtaylor
-
3
-
1 minute ago, Chuck said:
I have been distracted lately with the topic on the SOS where the staff and admin are trashing this project relentlessly....but its a lot fun to watch.
Excuse the newbie ignorance but I assume that is another forum?
Again as a newbie to the hobby I can't imagine (other than insecurity and jealousy( what folk can say negatively about your work. Having looked at a lot of kits before moving on from my first (admittedly online) the only kits I really wanted to try were yours and Vanguards. On all of the build logs here it comes across so strongly how high the quality of both your kits are to give any stage of modeller the very best chance of making something stunning. Yes they are expensive but you get what you pay for in most areas and this is definitely one.
Good luck to you!
-
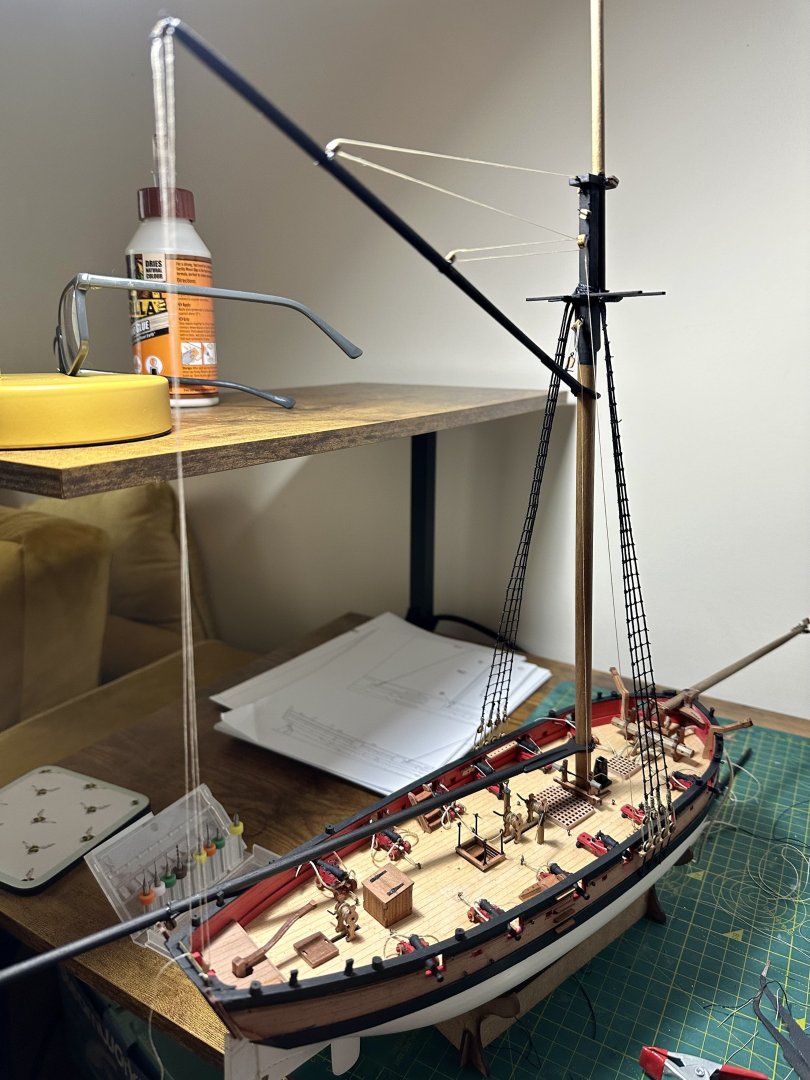
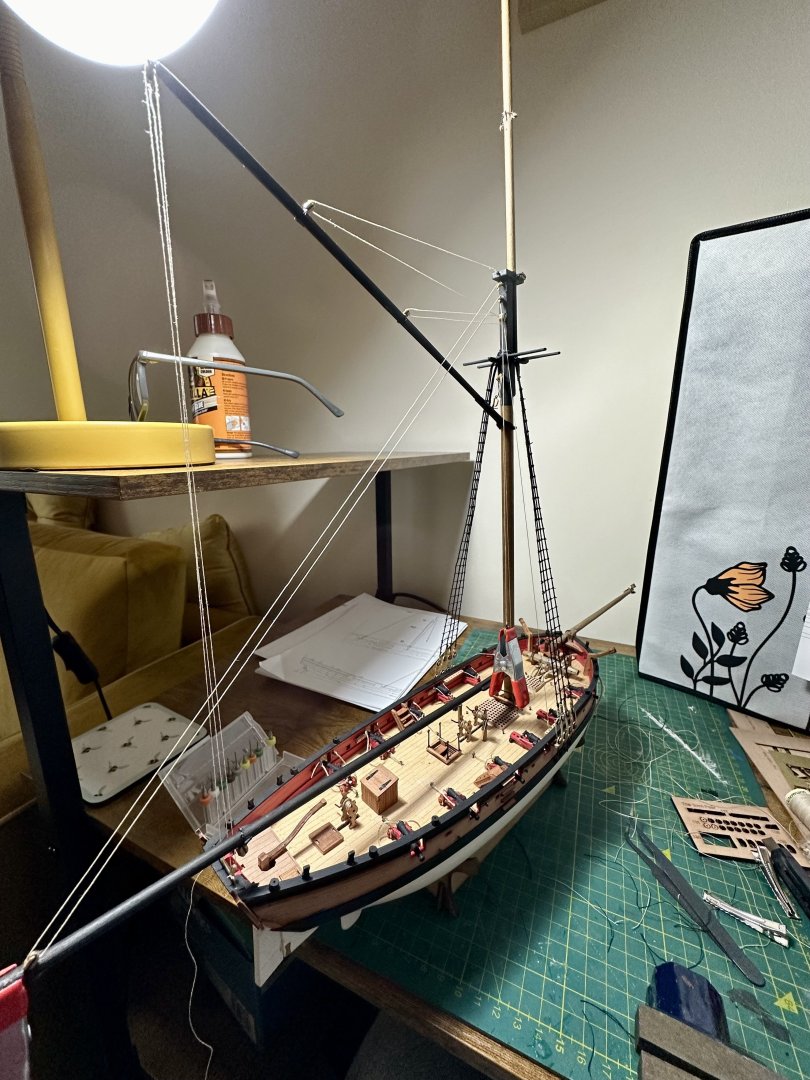
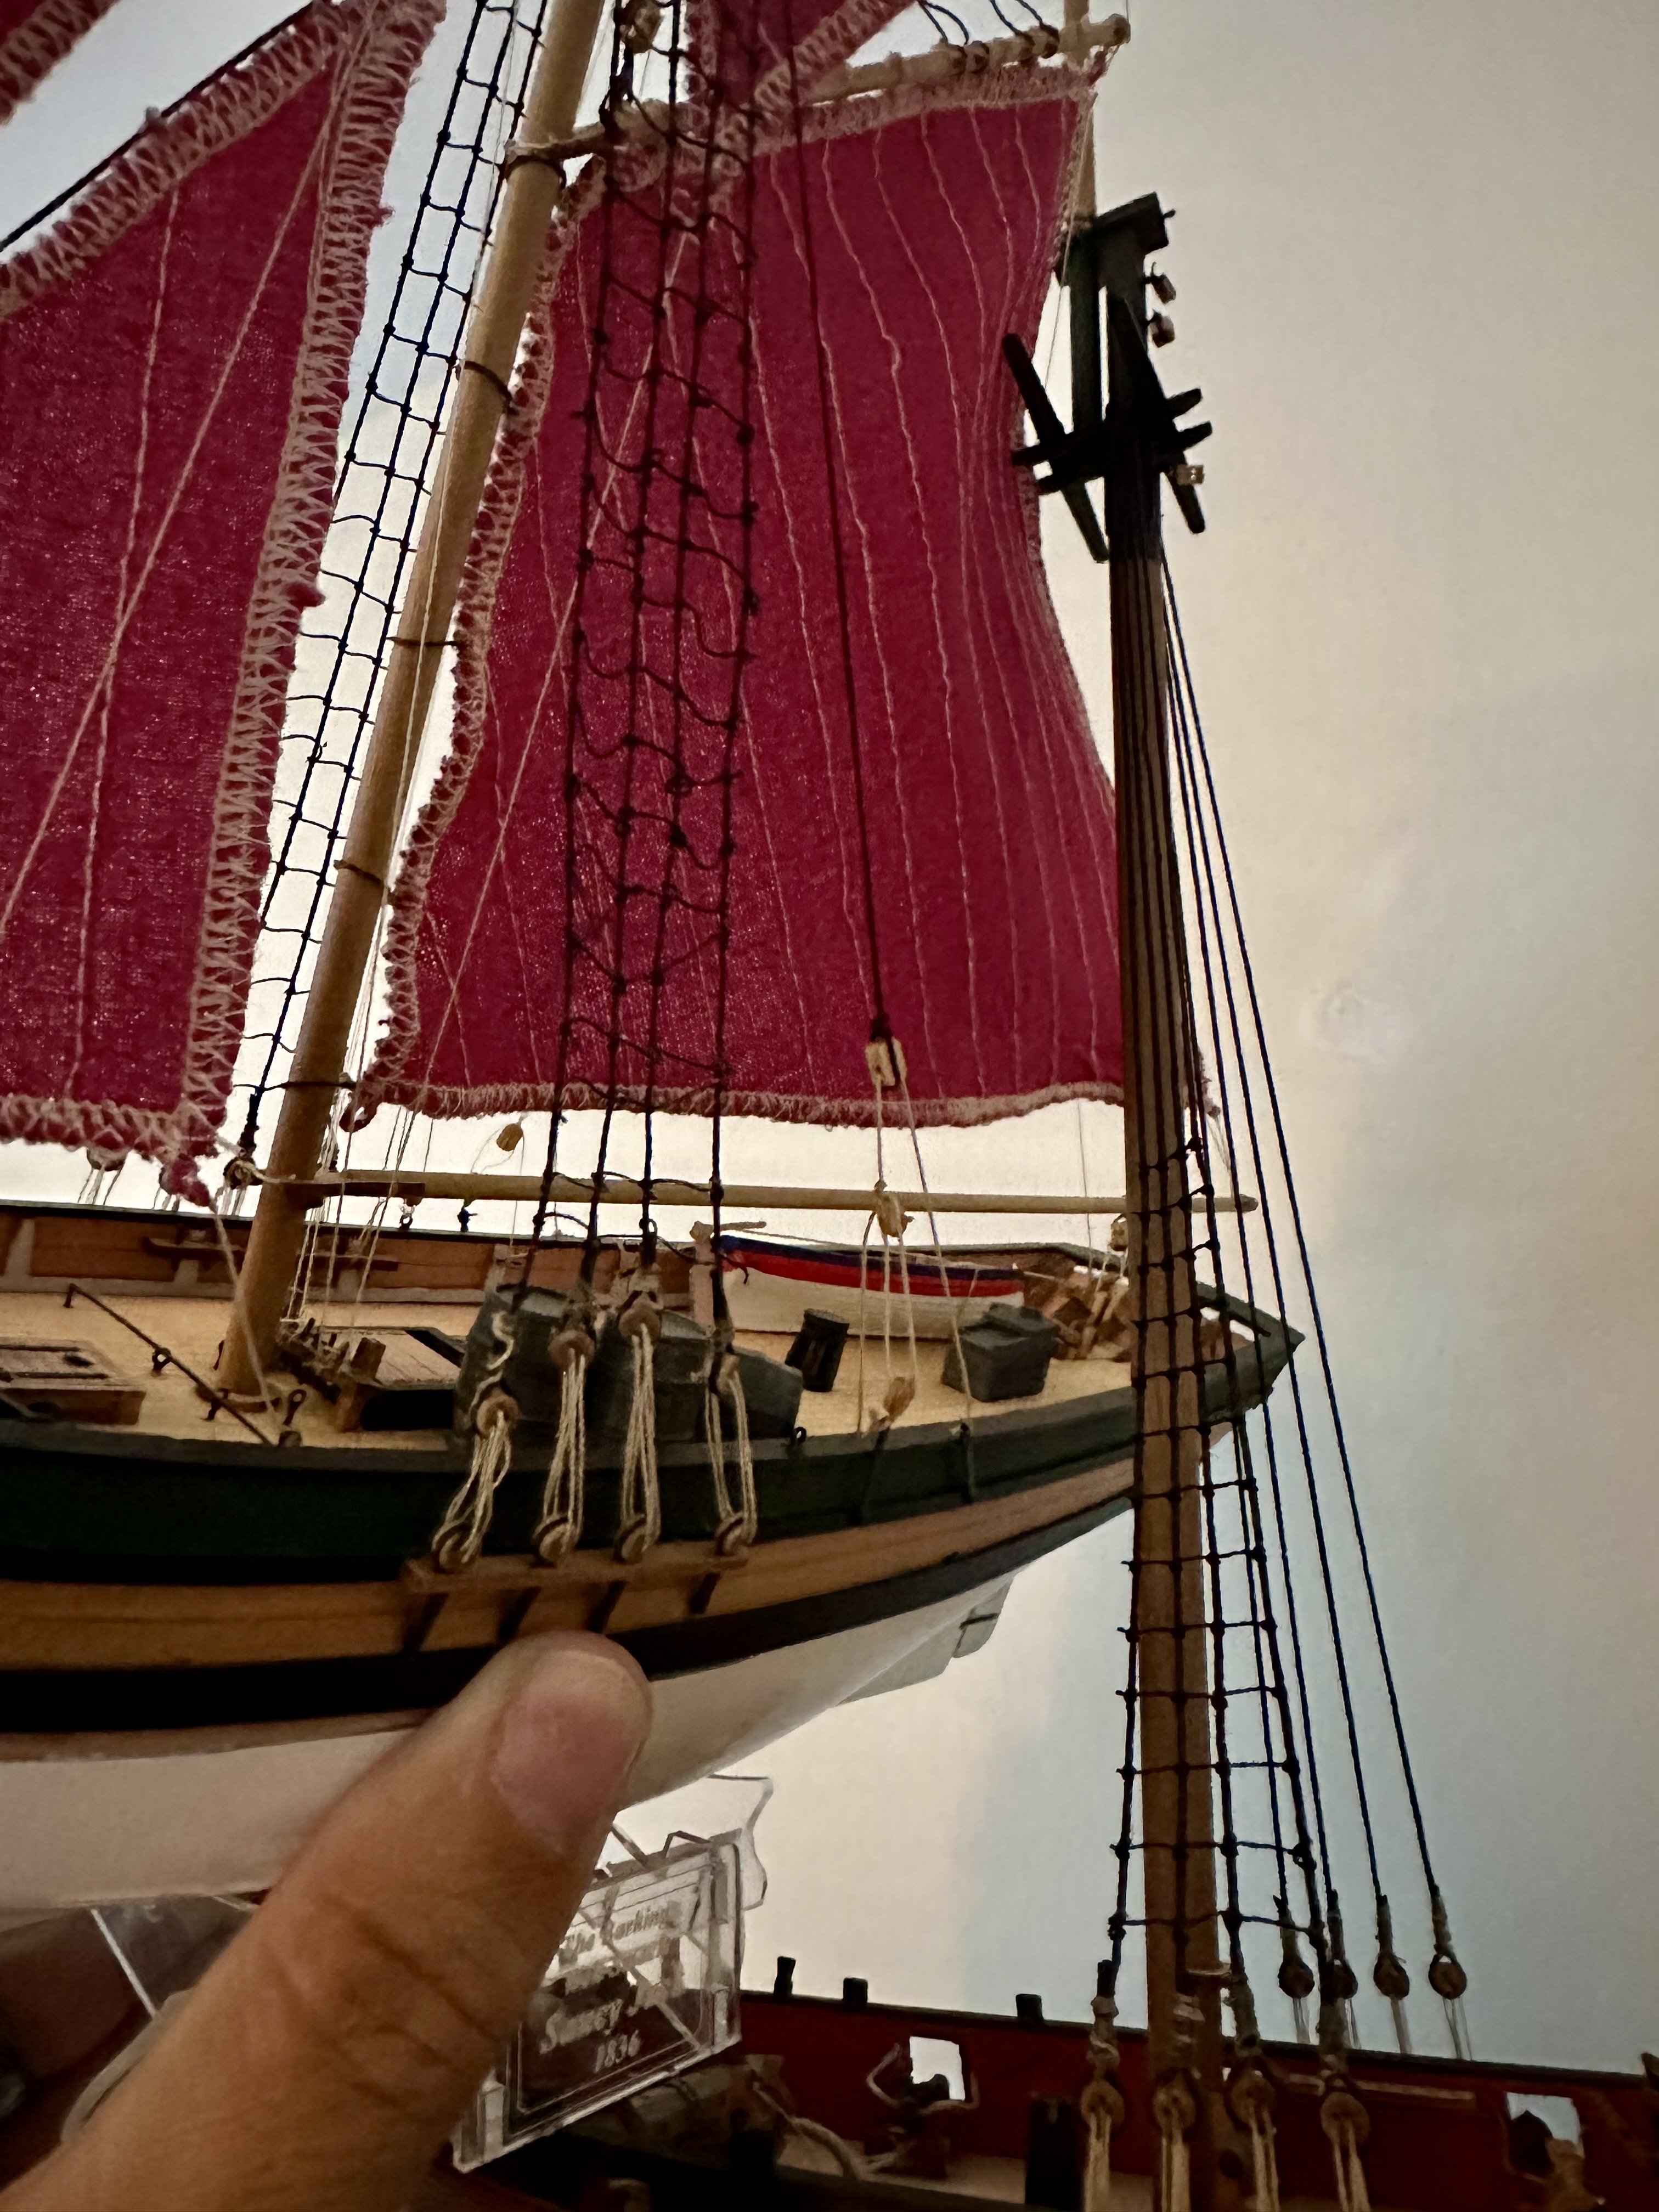
A little more progress with the start of rigging. Slow and steady, trying to keep an eye on where both arms and hands are at all times! The liquid CA on the end of thread trick really comes into its own now. That and using clips to apply just a little weight to try and create the right, minimal, tension when needed.

- Scottish Guy, Isaiah, dunnock and 7 others
-
10
-
2 hours ago, Keith Black said:
Kits are for acquiring the skills necessary to eventually being able to scratch build a model
Not for everyone they're not.
Micha I rapidly came to the conclusion that a great deal of kits are junk which haven't been invested in for years, often decades. Modern kits are entirely different but few and far between.
- Bob Cleek, Scottish Guy, mtaylor and 1 other
-
4
-
So that's the starboard side finished too. No, not perfect but an improvement on the port side and a huge improvement over my last model so I'm happy with that.

-
Excellent review, thanks. Are Mamod really that much now! Awful when they were cheapish!
- Egilman, thibaultron and Canute
-
3
-
-
11 hours ago, Isaiah said:
Hi Simon, great work so far. I hope you don’t mind me giving a little criticism.
I would personally suggest redoing the ratlines. They are currently not a uniform taper from top to bottom. I know it would be very annoying and a big step back, but it would be very worth it in the end.
I hope you don’t take this the wrong way, I just felt I had to tell you this as the rest of your build is really good. It would be a shame for you to build such an amazing model, only to be let down by the ratlines.
Kind regards,
Isaiah
Thanks Isiah. As I said in the text the port side is uneven but a change I made when I did the starboard side improved this greatly. If you look a little further up you'll see the improvement from my last model and I'm very happy with that. I've learnt on this one and I'll learn more next time too.
- Isaiah and Scottish Guy
-
2
-
2 hours ago, Scottish Guy said:
What shall I say Simon, looks amazingly good. I knew you could make it, you just didn´t want to admit your great skills in doing rat lines hehe... but yes, it looks really good. The top bit is a bit narrow though but I don´t know, it just looks a bit narrow, I wouldn´t like to climb up there.
Micha
That side is crewed by very small people
") It is narrow. I'm hoping the other side is better but I suspect the real key was getting the shrouds more spaced at the top to begin with.
It is narrow. I'm hoping the other side is better but I suspect the real key was getting the shrouds more spaced at the top to begin with.
-
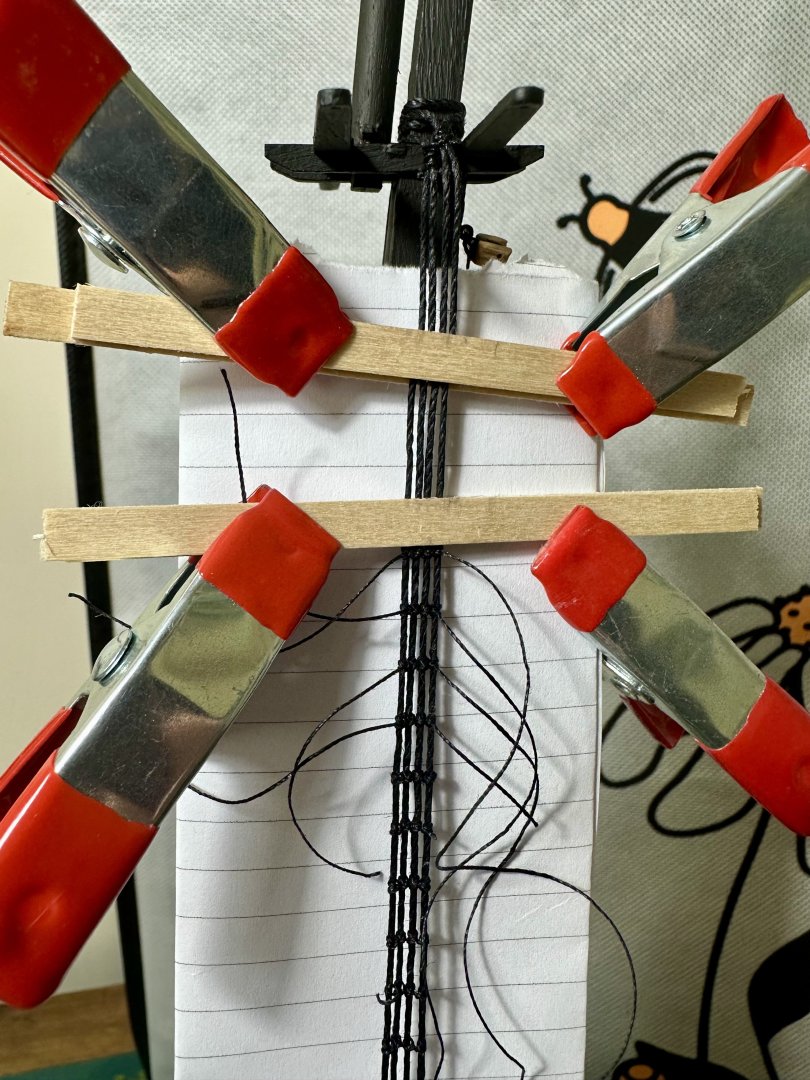
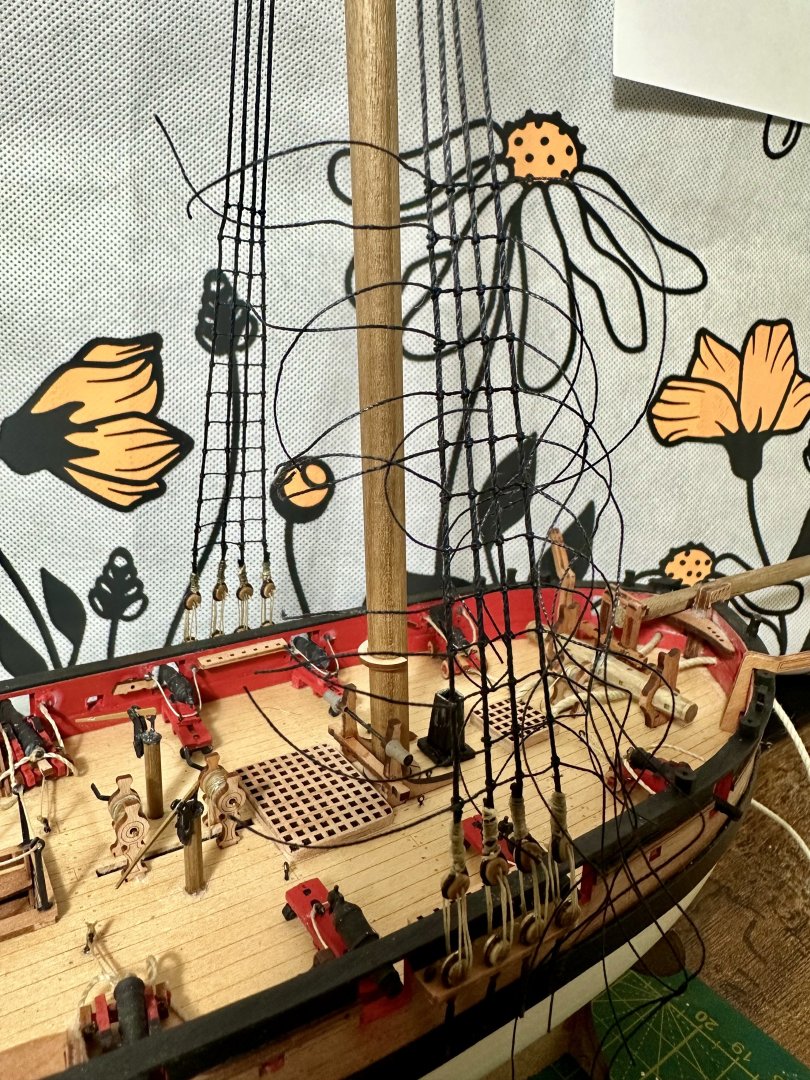
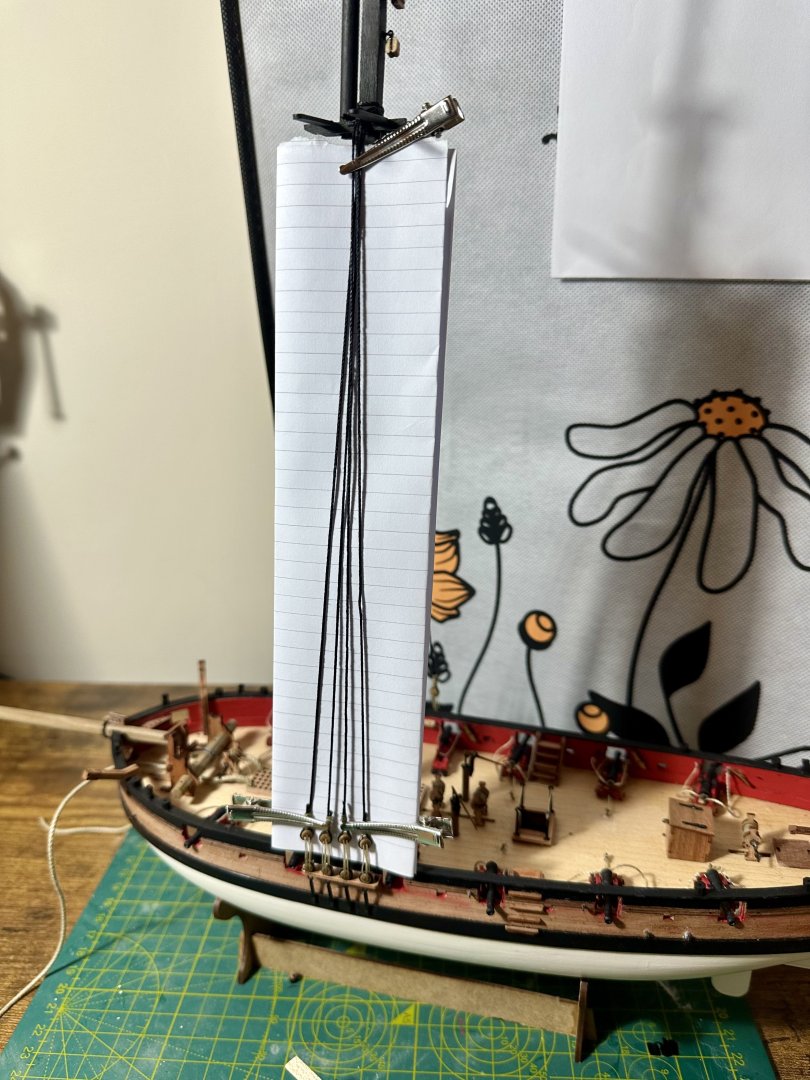
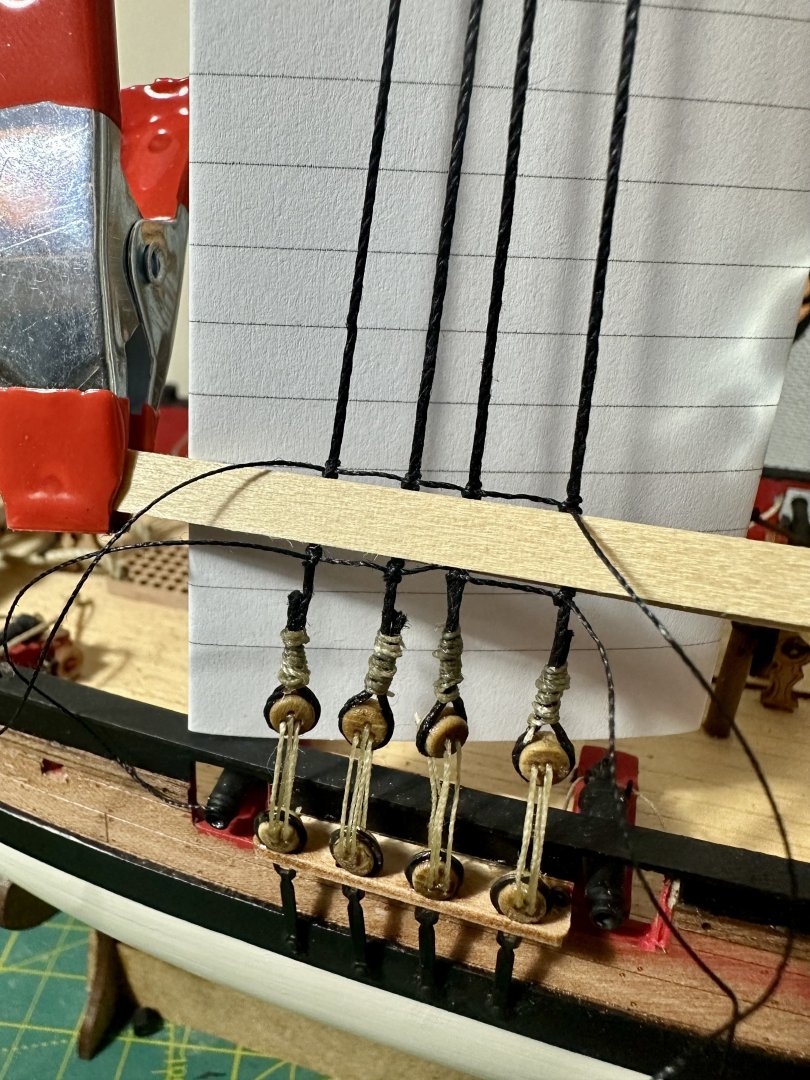
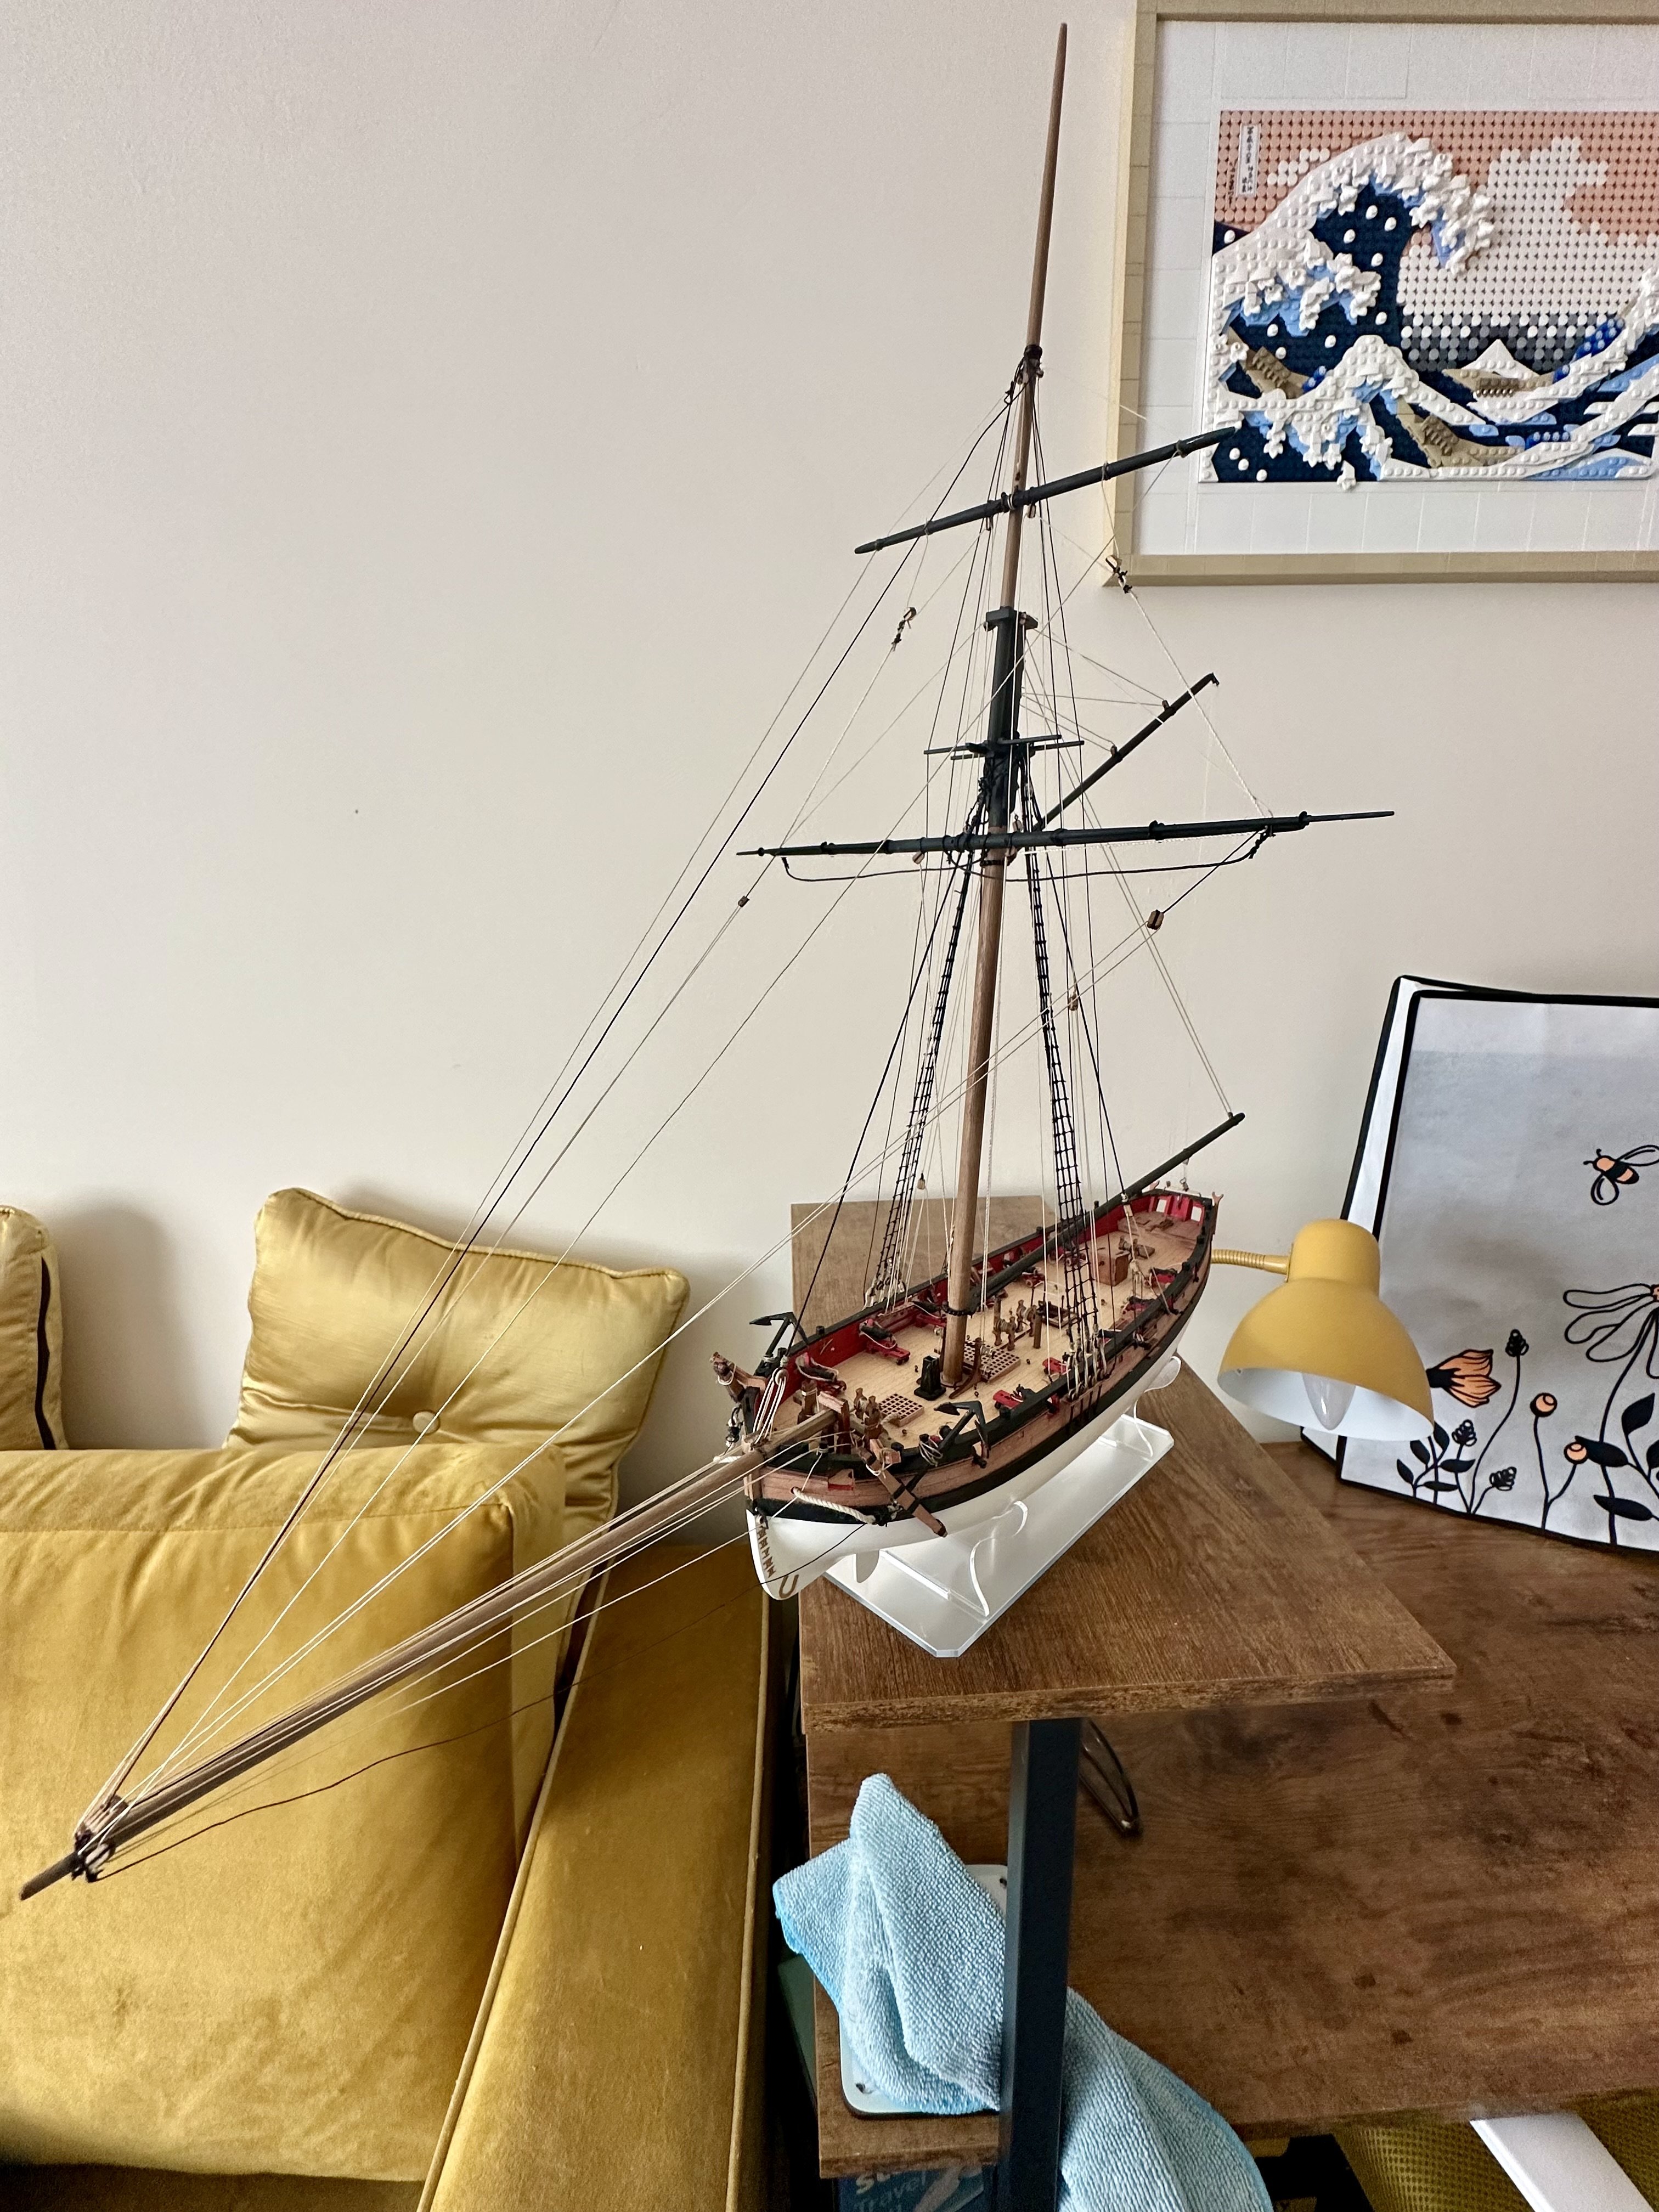
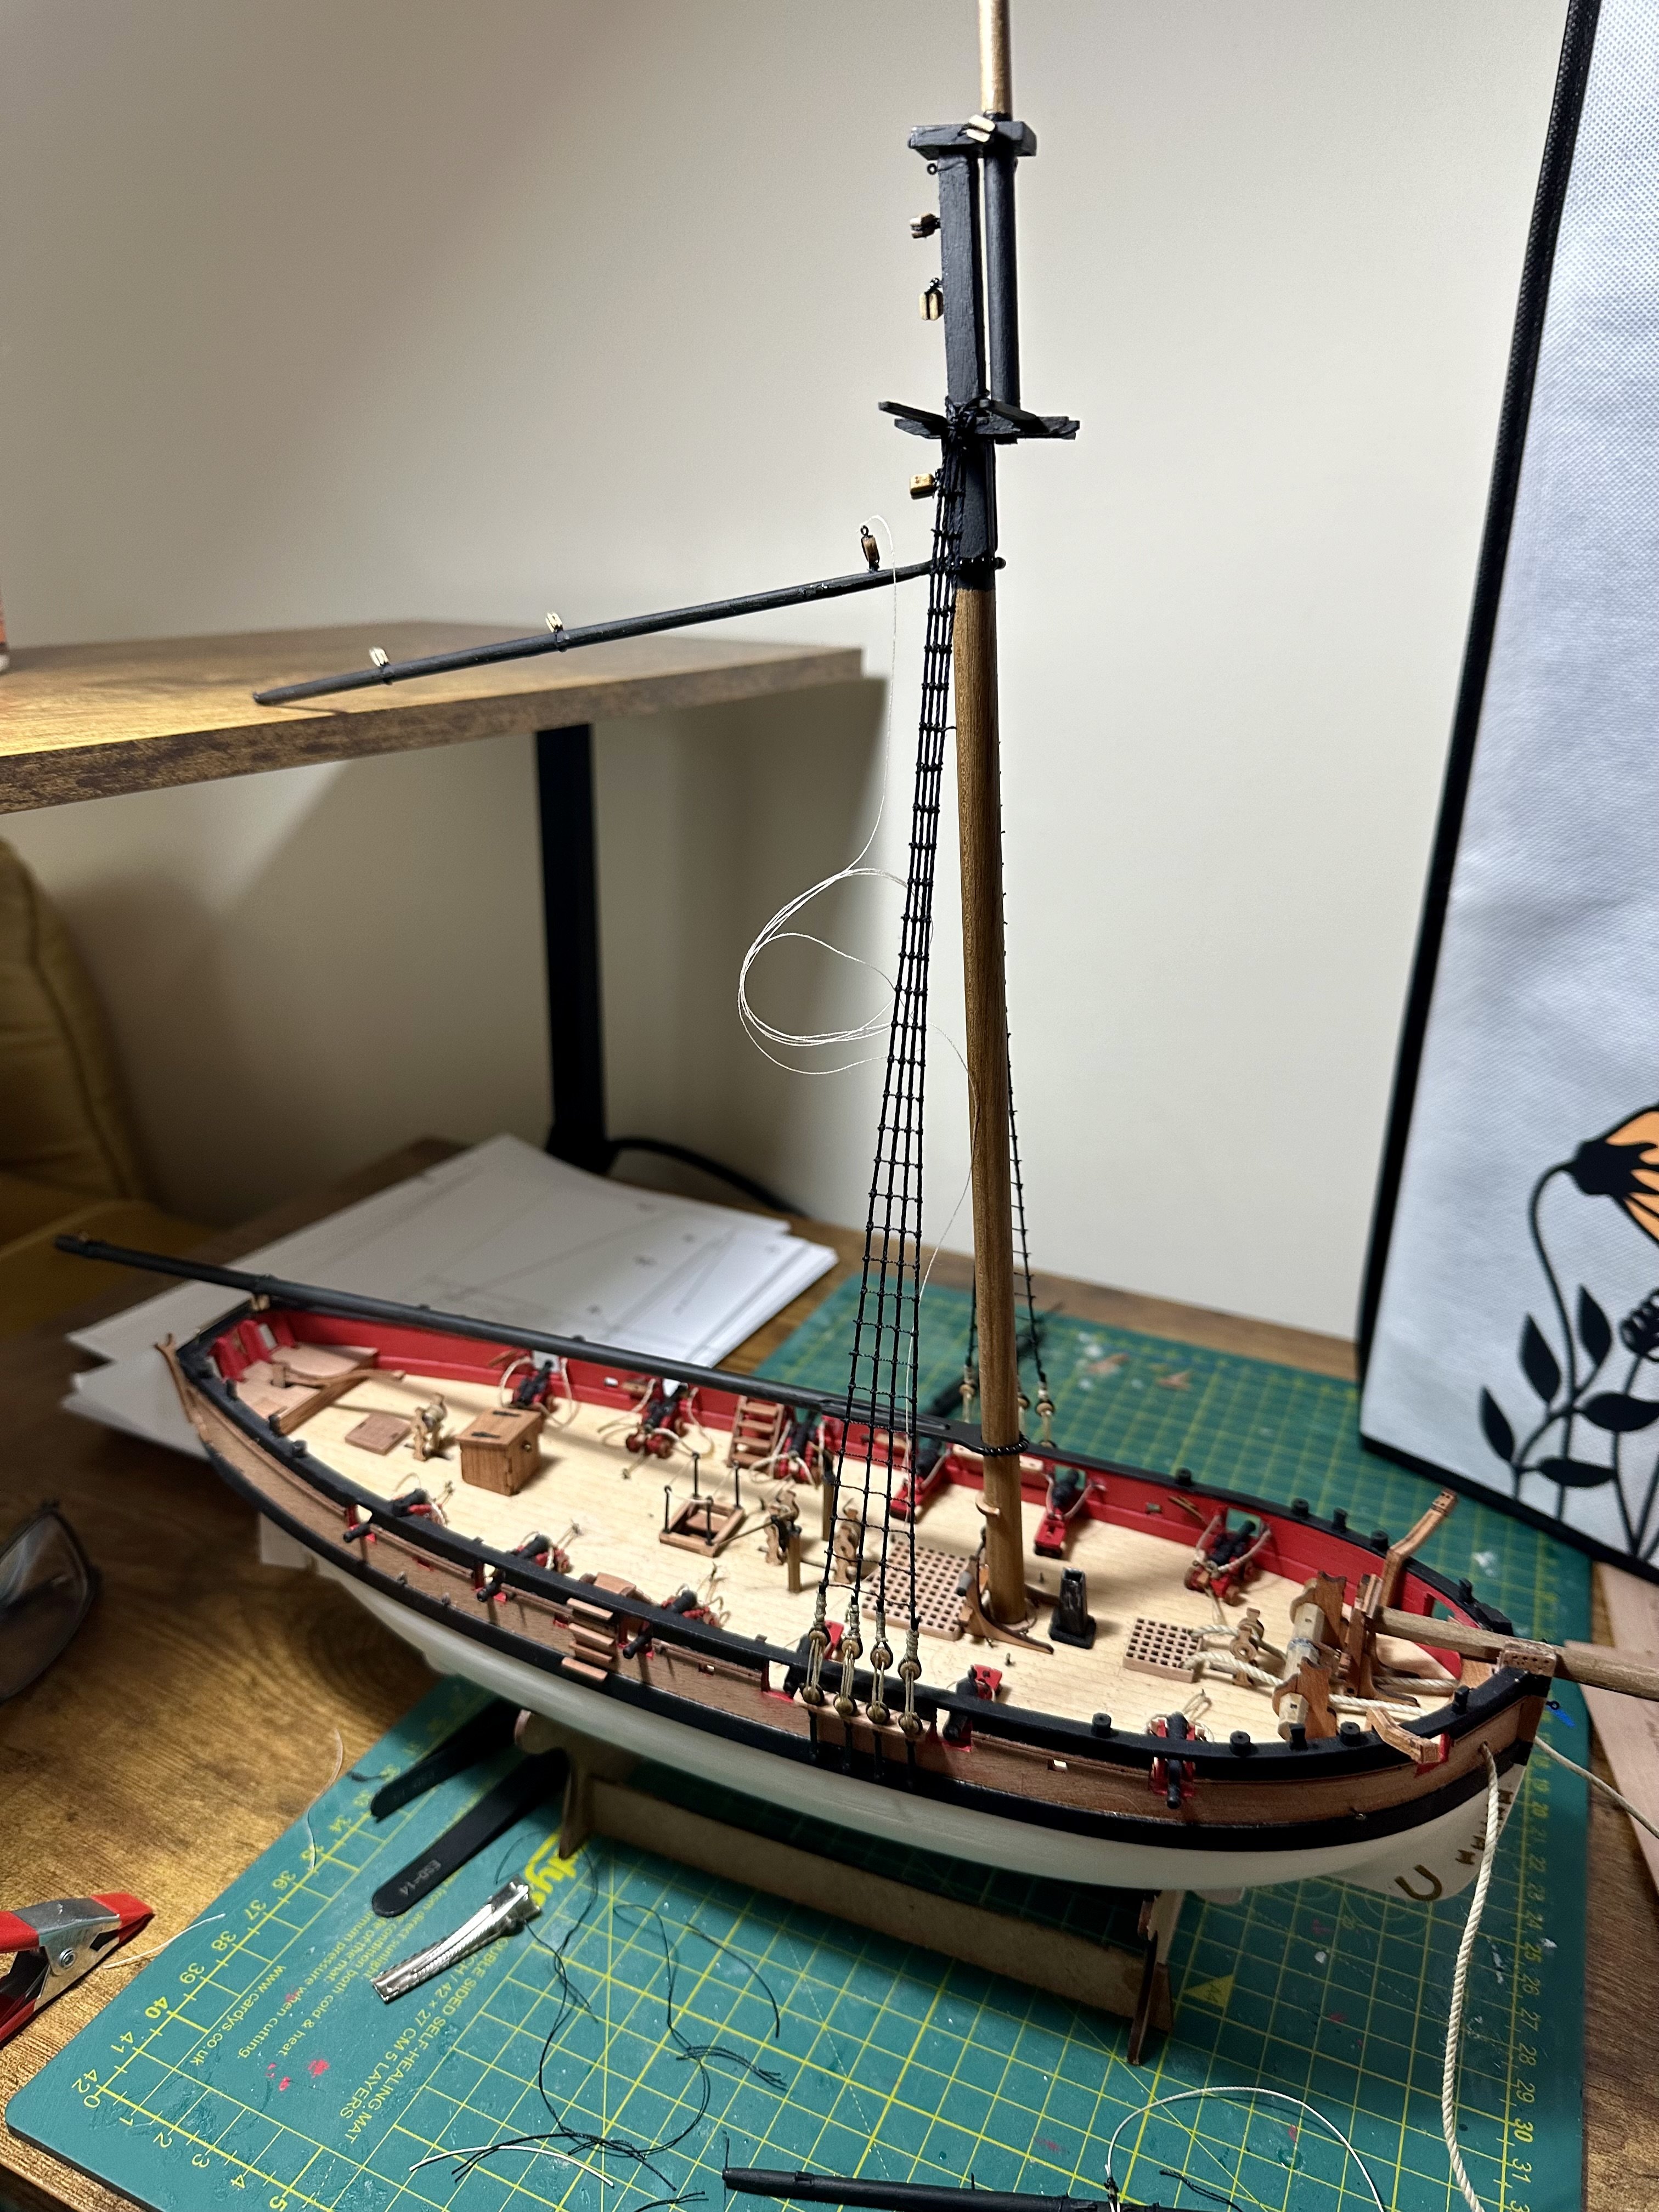
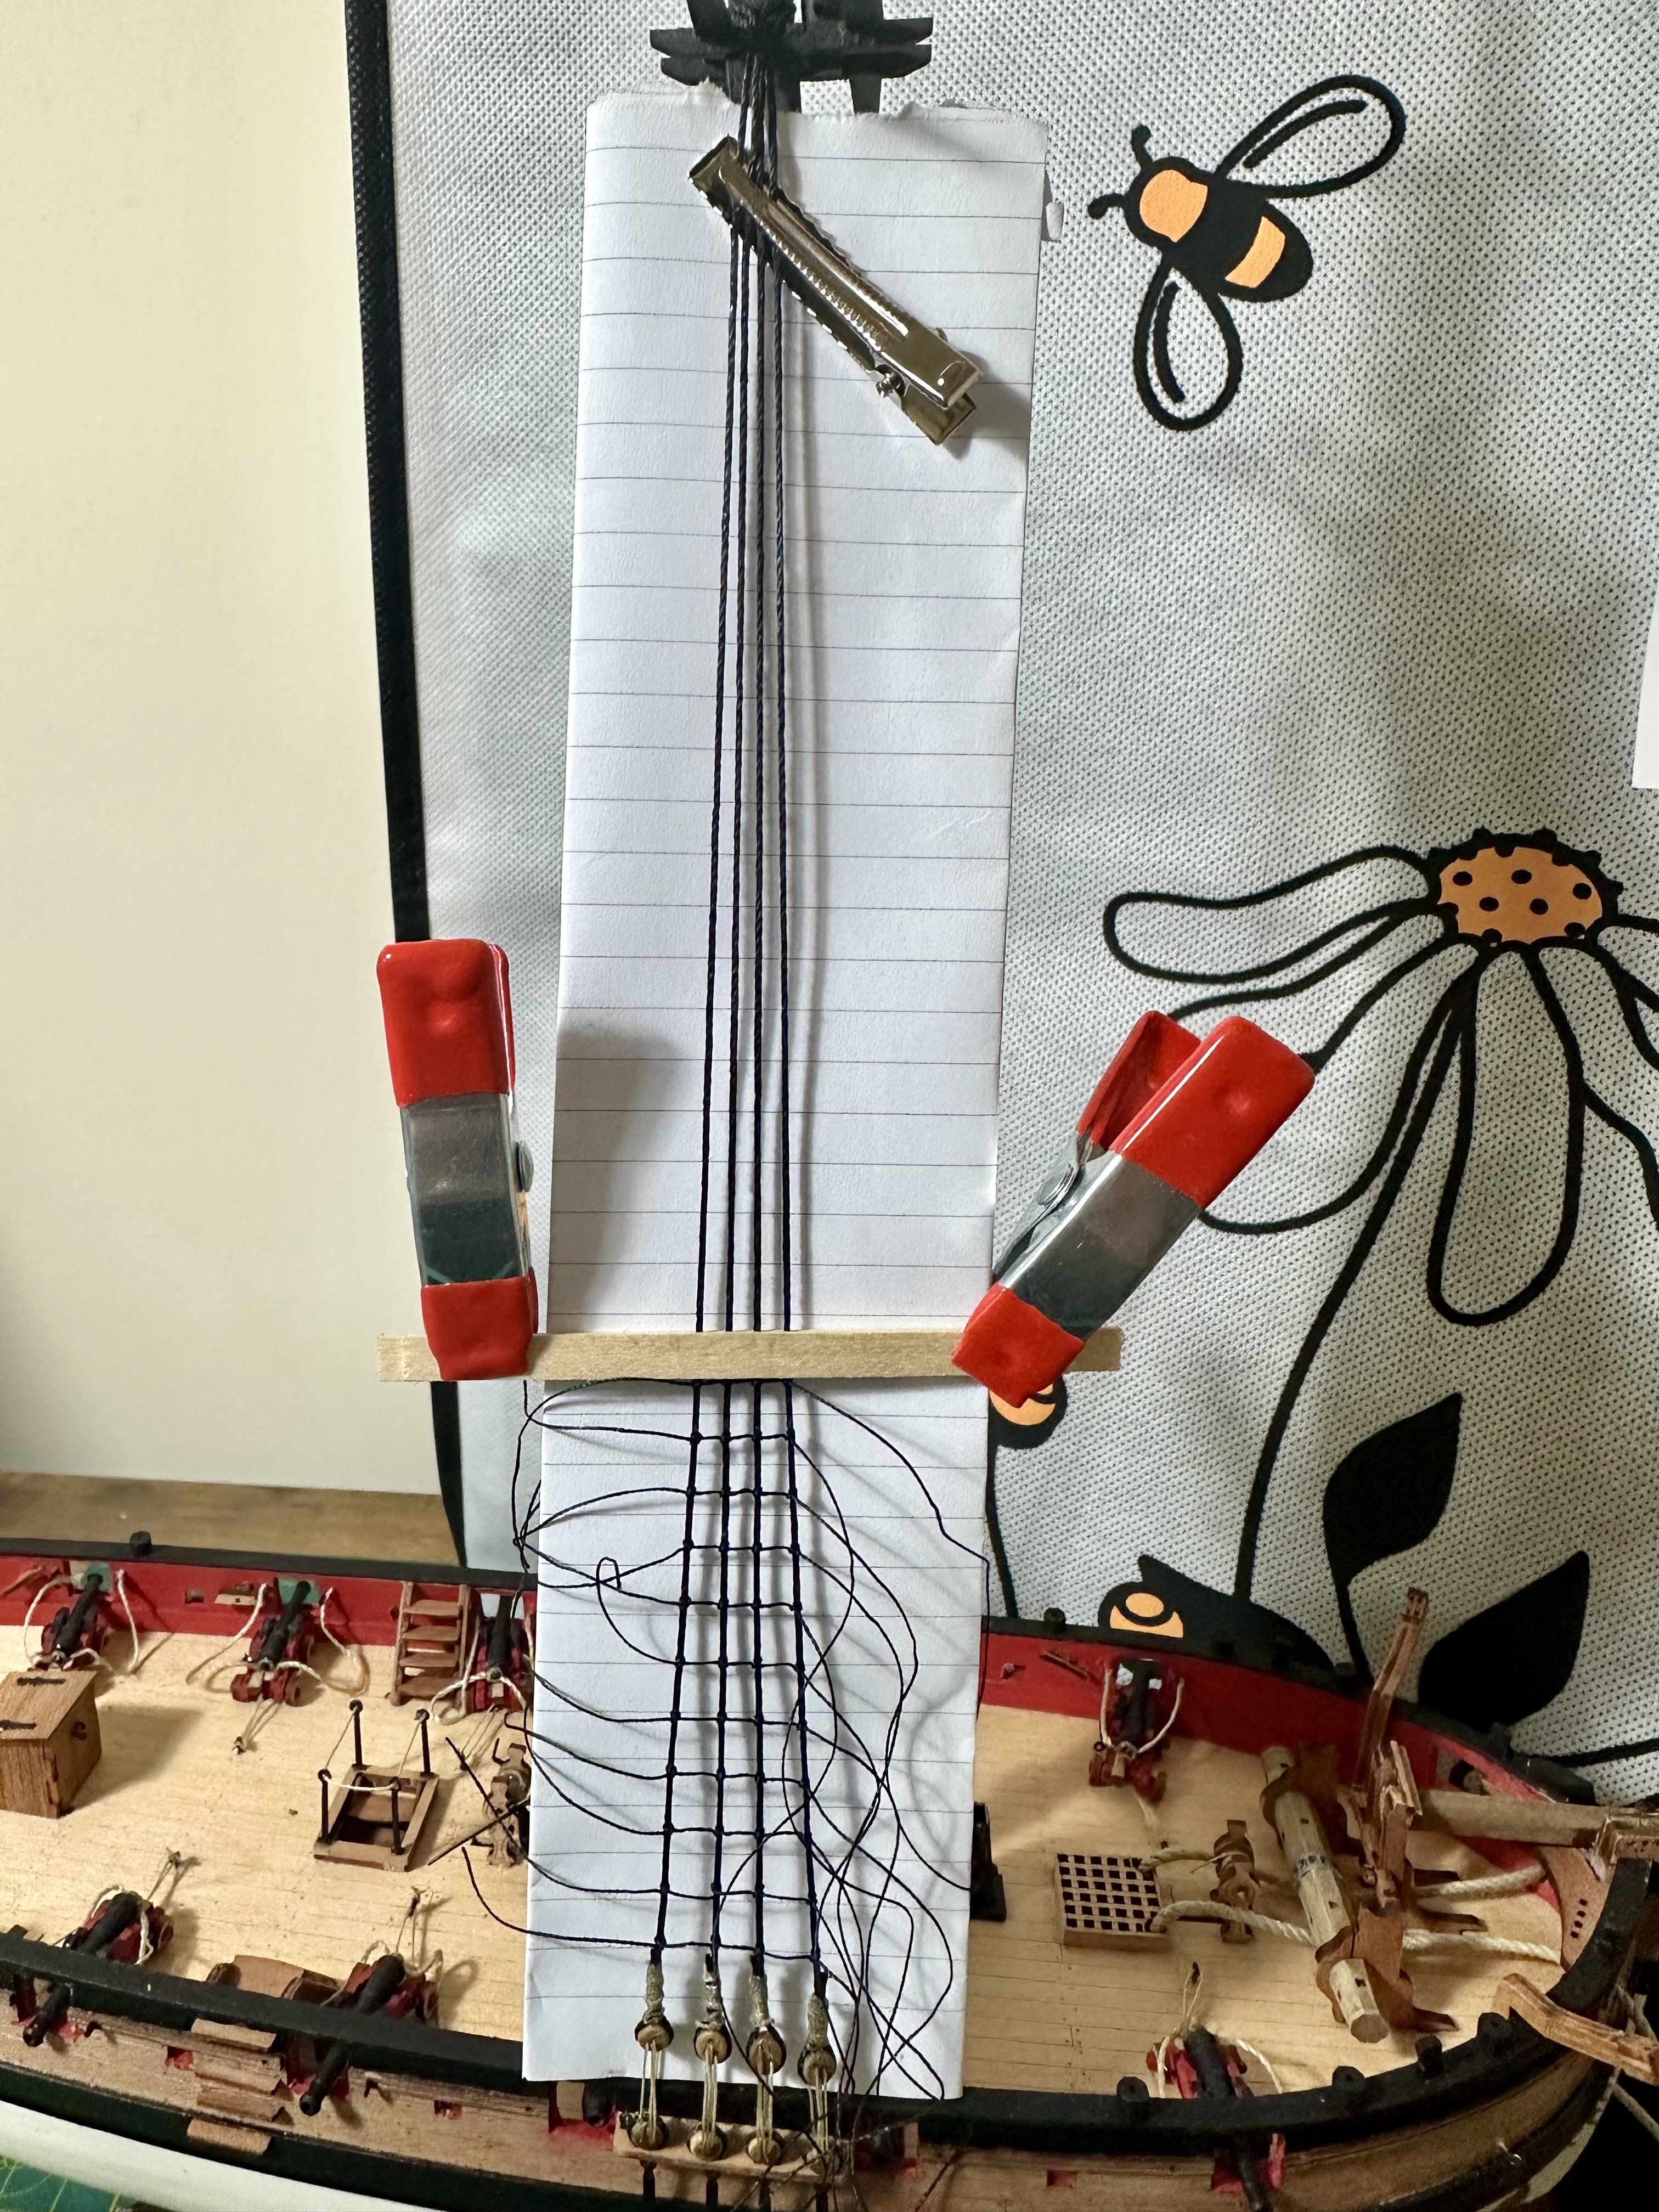
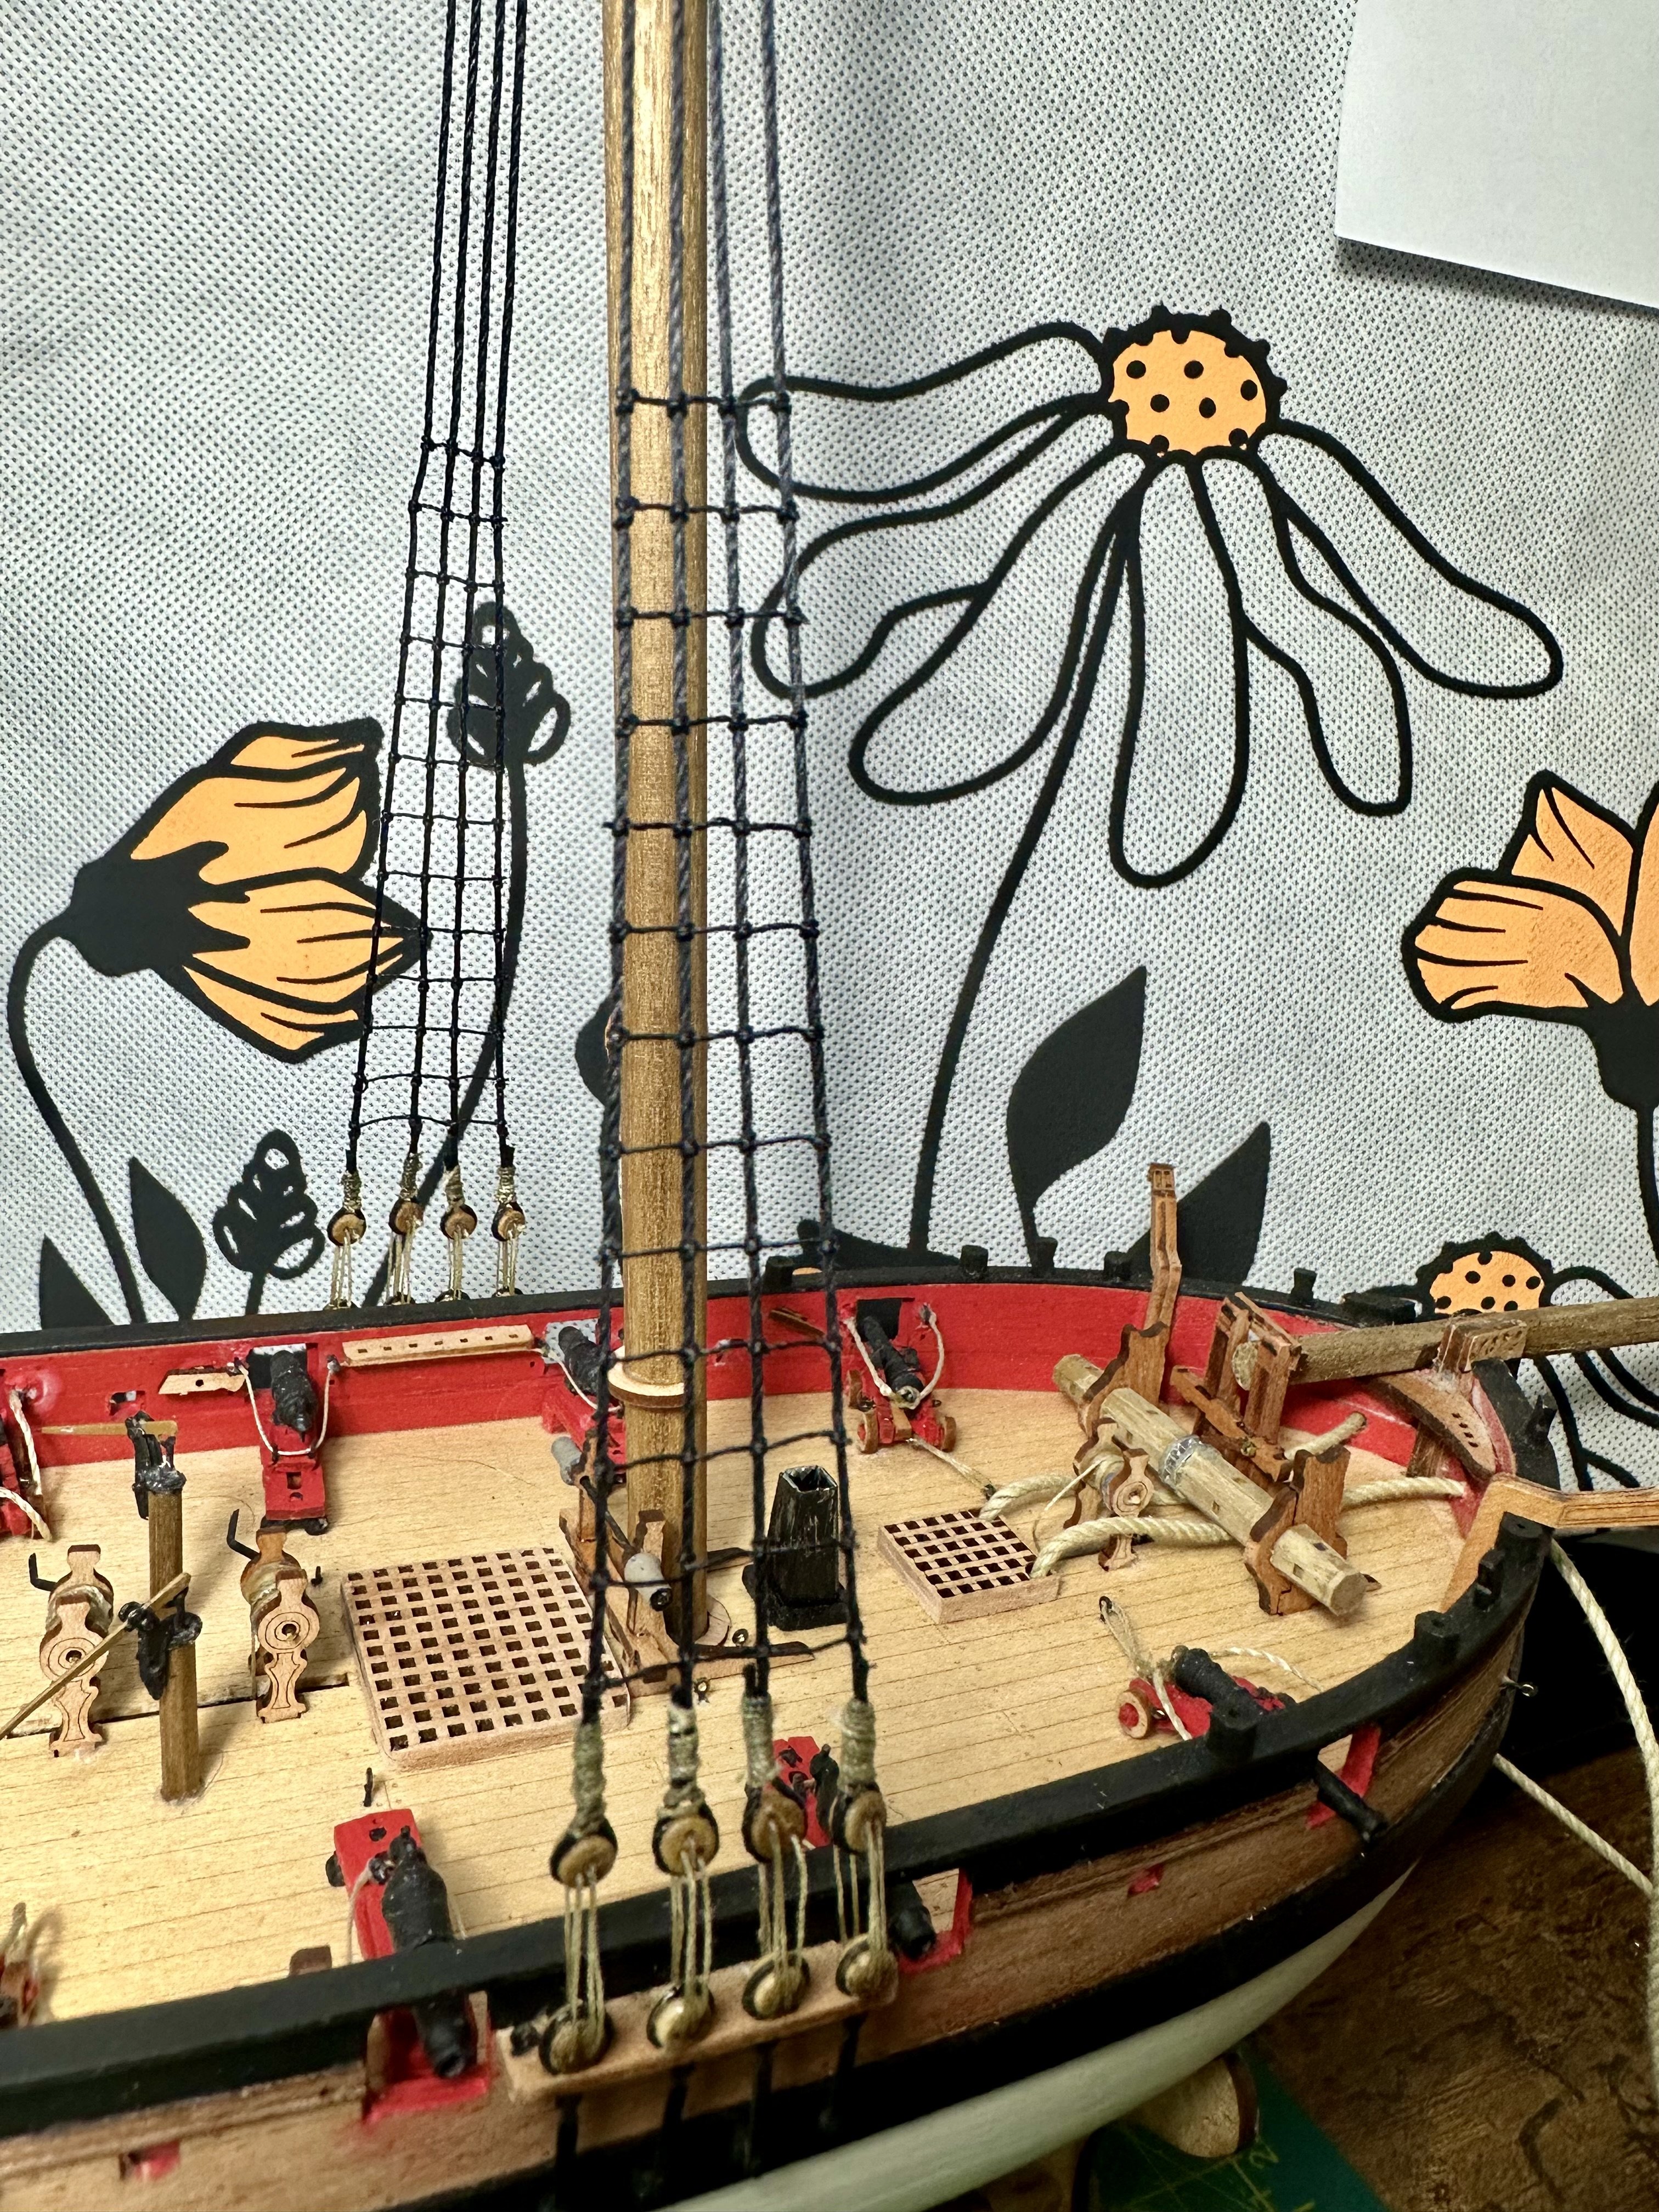
Port side rat lines finished. Somewhat salvaged by using clips at the top as discovered for the starboard side so not as bad as thought might be the case. The lined paper wasn't used for spacing in the end, the scrap plank did that, but I found having it place helped stop the shrouds twisting around. Clipping one side of the two clamped planks to the paper helped this too. Can't clip both ends to the paper or there's not enough movement behind the shrouds to easily get thread through and back with help of tweezers.
The kink towards the stern looks much worse than it actually is.
Next to finish the starboard side.
- Scottish Guy, Ronald-V, Thukydides and 5 others
-
8
-
9 minutes ago, Andre1967 said:
hi jeff yes i have im waiting on a response, its funny in a way that Nairobi or new Guinea is listed but not United Kingdom.
It's a Brexit bonus
Seen a few Spanish modelling companies won't ship direct to UK, I imagine not worth the hassle now. When there's stock Cornwall Model Boats sell them and are good to deal with.
-
45 minutes ago, Scottish Guy said:
When I then try to explain the difference I foten get told off, then I just stop talking and let them believe their false ideas
This is why companies can sell mesh wifi for many times the cost of a wireless router and a few cheap AP'S that do the same thing.
- mtaylor and Scottish Guy
-
2
-
11 hours ago, Scottish Guy said:
That is the only big advantage of full fibre broadband
Unfortunately the build out for this is a long way off a lot people, me included. Maybe next year if Openreach stick to their plan, they've changed whether they will or won't before. Anyhoo I think in many case lack of internet is often a lack of wifi. In a lot of peoples minds internet & wifi are the same thing. Relying on the often woeful router/AP provided by the service provider is usually the problem.
- Scottish Guy and mtaylor
-
2
-
Add the page(s) to your Reading List in Safari then you can set them to save for offline viewing.
- mtaylor and Scottish Guy
-
2
-
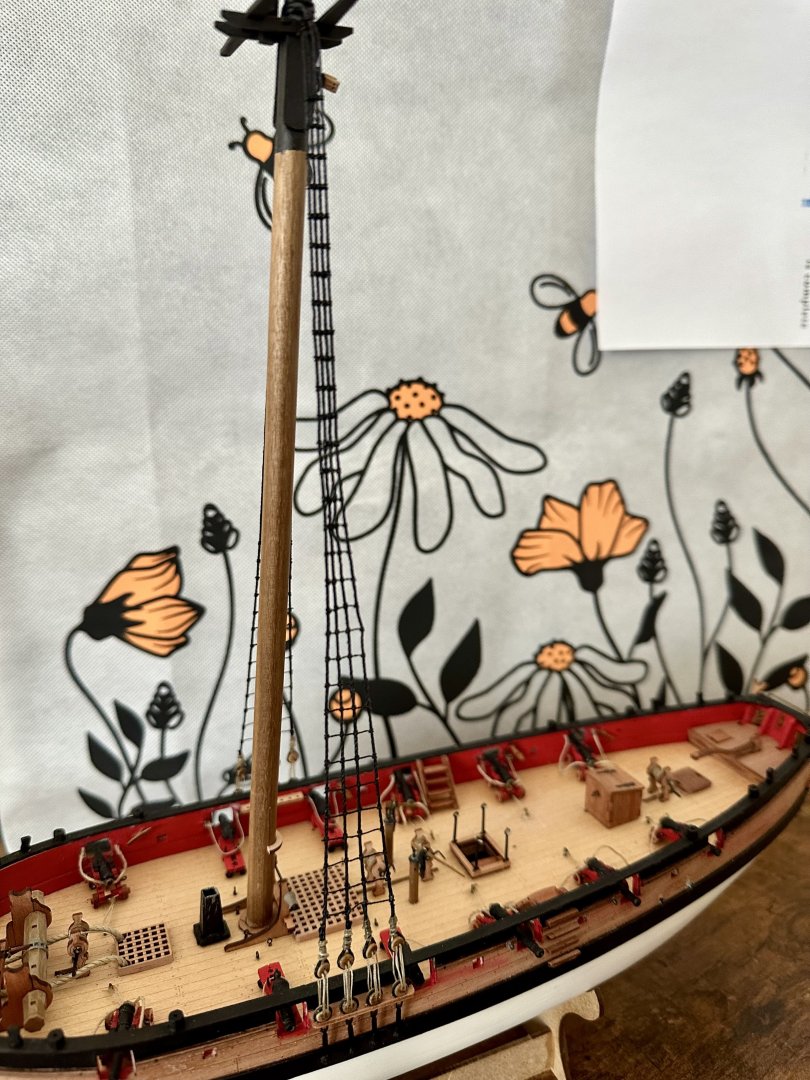
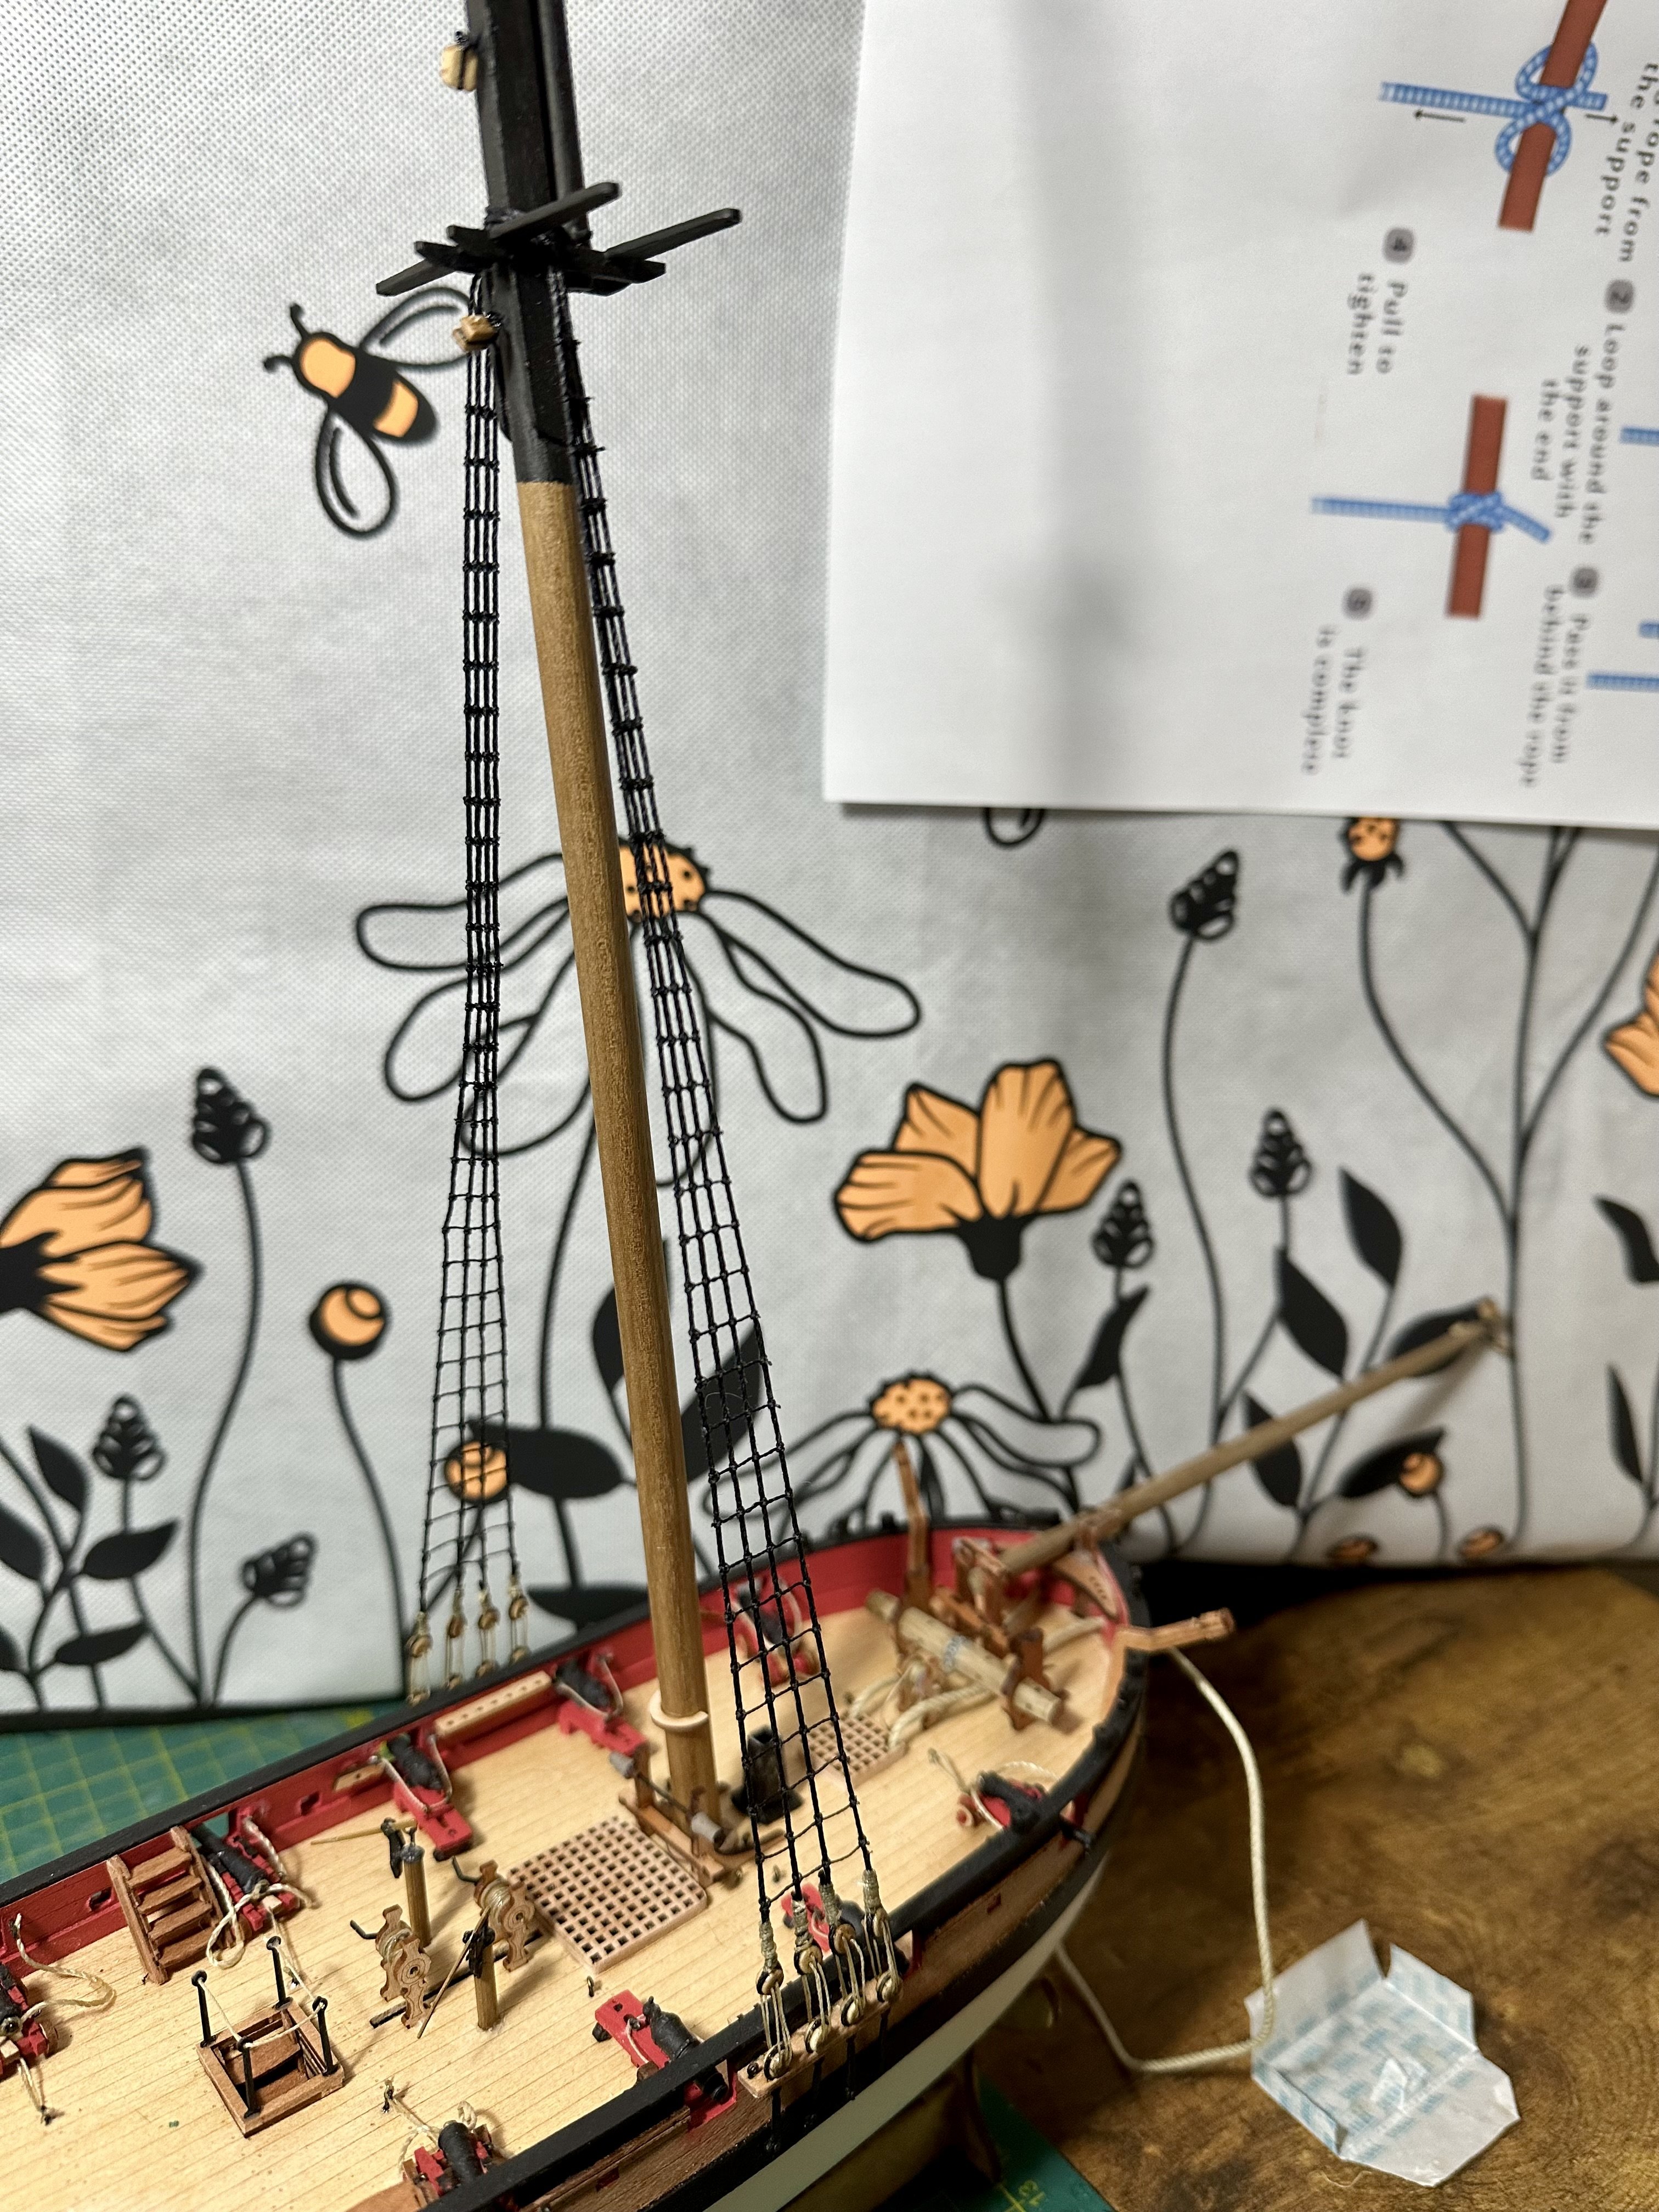
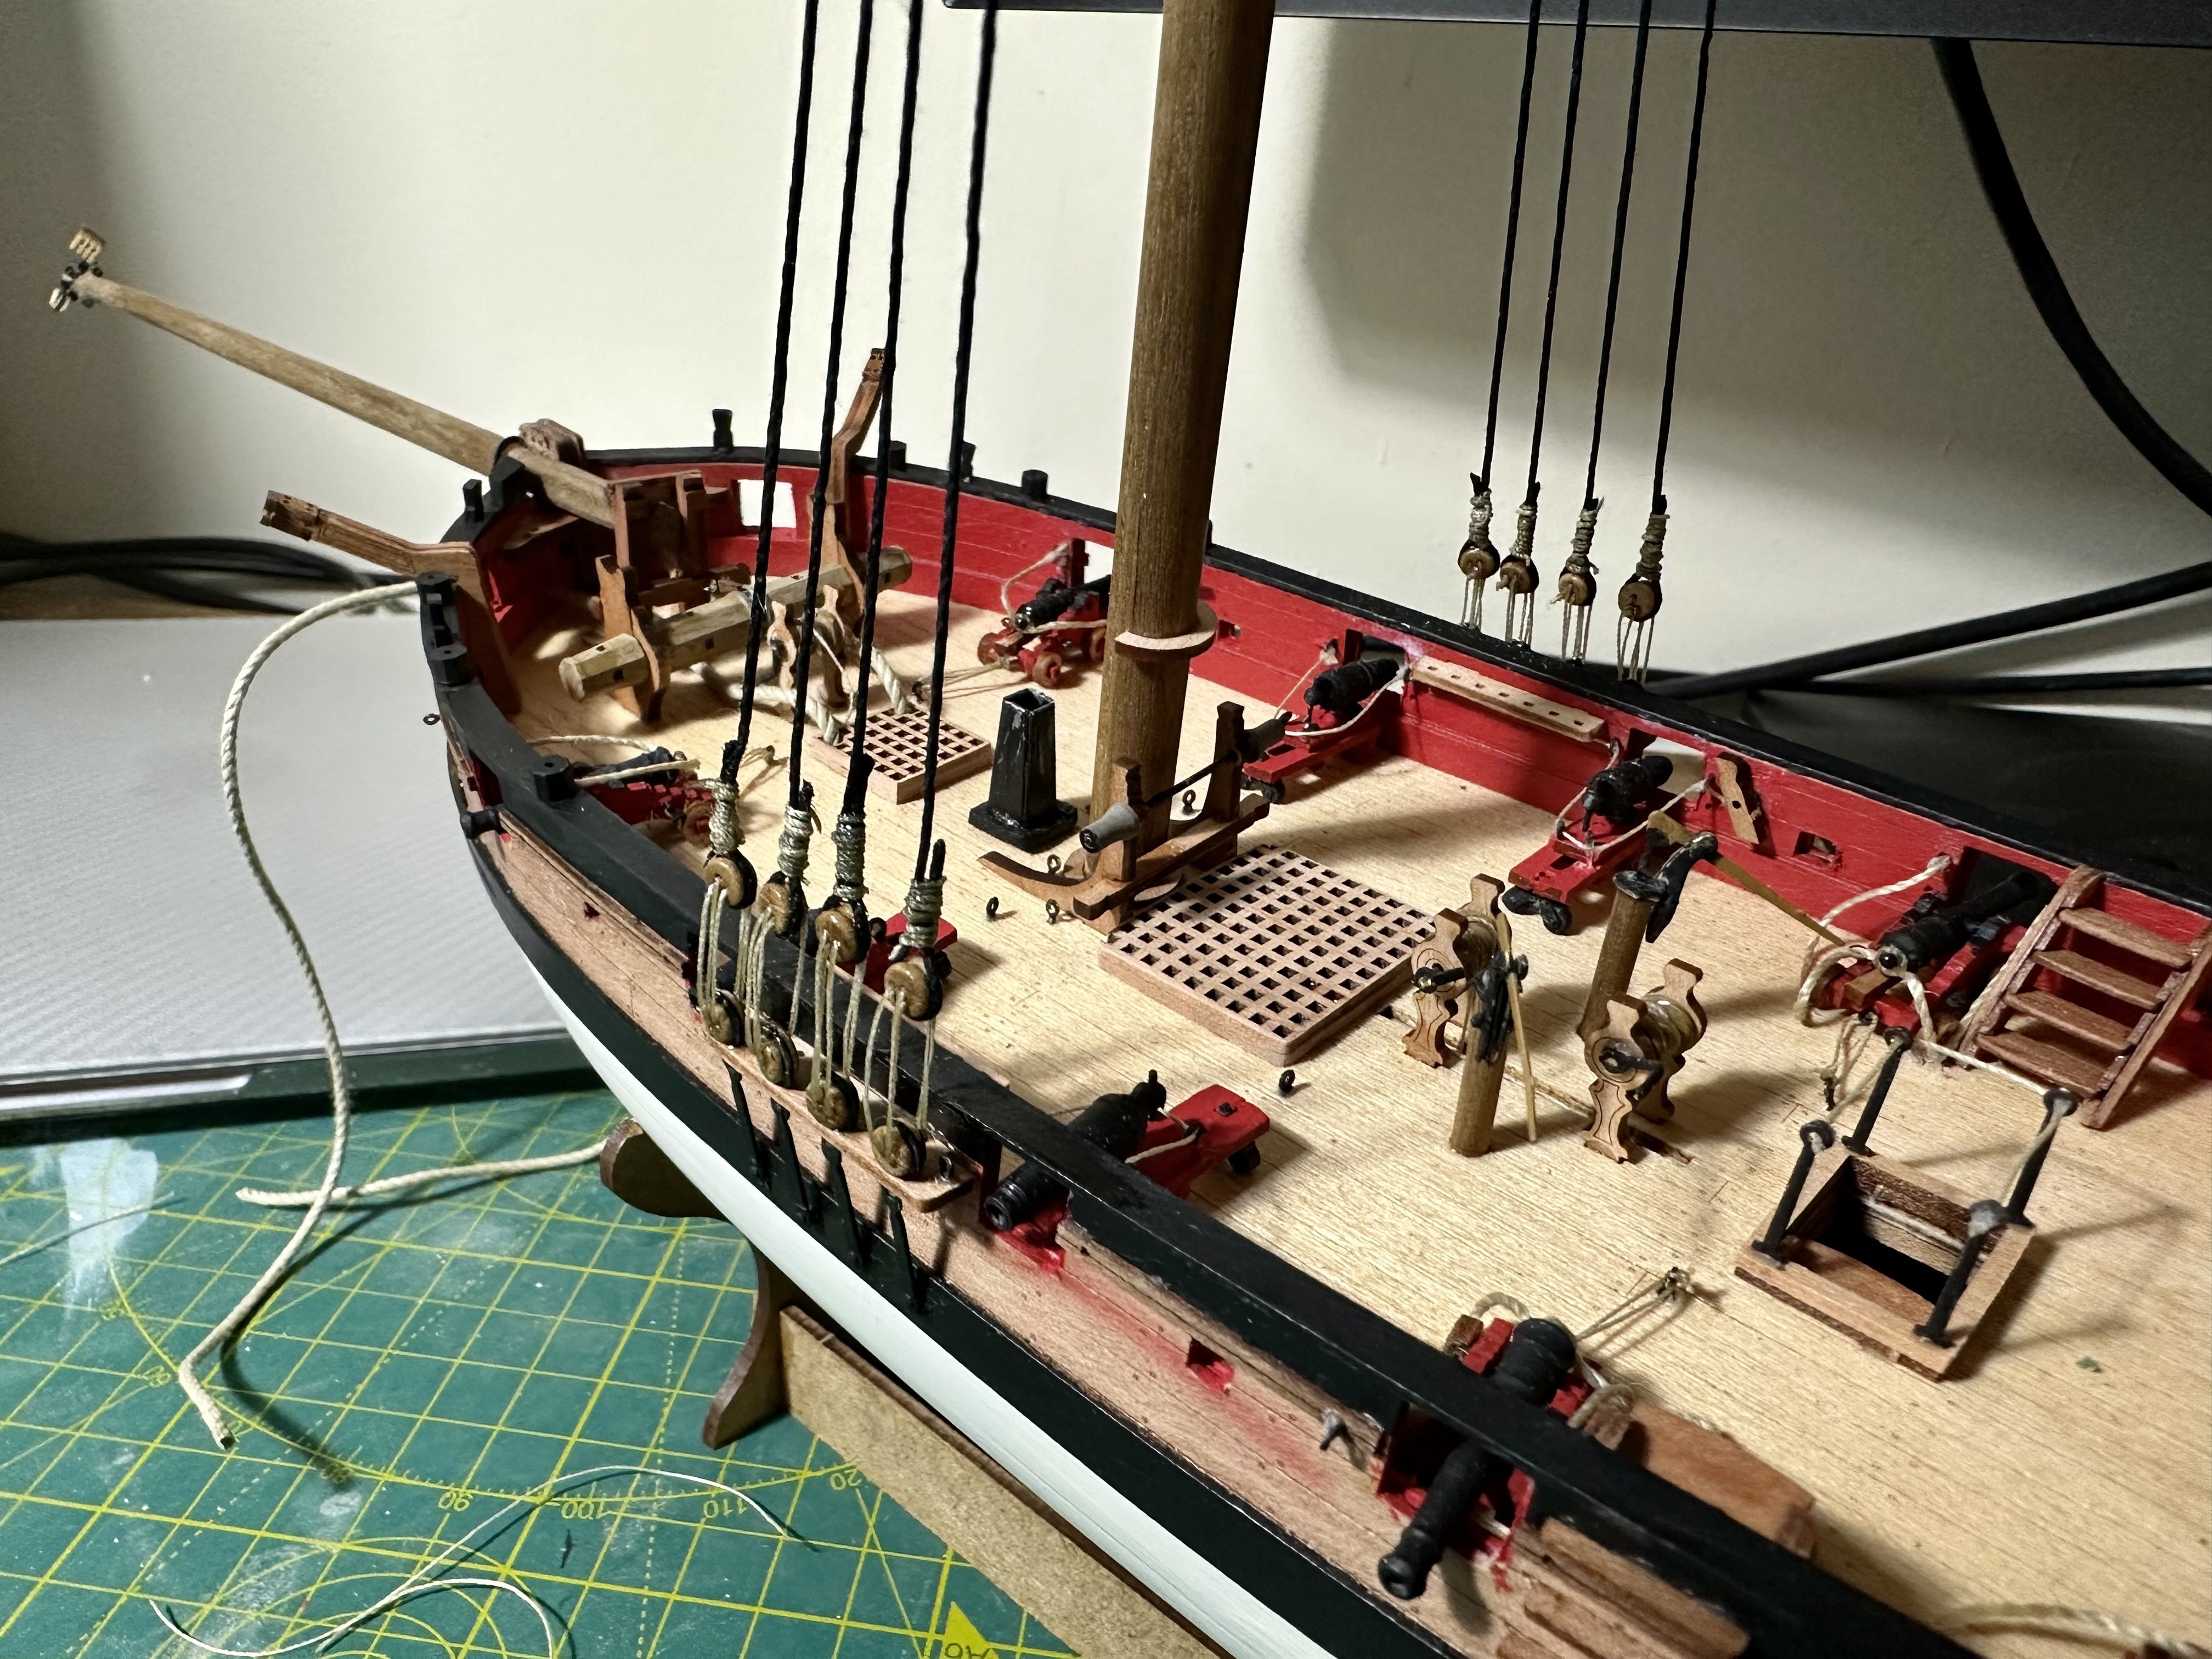
Lower half of starboard side done and much better than port side as used a hairclip to hold shrouds spacing at the top.


- Ronald-V, Craigie65, KARAVOKIRIS and 7 others
-
10
-
6 minutes ago, chris watton said:
For snipping the rigging, especially ratlines, I have always use these Tamiya side cutters:
Tamiya 74035 Model Accessories - Cutting Pliers : Amazon.co.uk: Toys & Games
Thanks Chris I'll add them to the list. Happy to spend for quality tools but knowing what is quality can be hard.
-
56 minutes ago, Scottish Guy said:
smart thought and looks really good to me
 Kudos to you for this (will borrow this thought when I´m in the situation to do rat lines).
Thanks. I can't claim the thought unfortunately it's just a simpler adaptation (and lighter) of this thread. It is working very well though. Here's my first effort on the last boat.
 17 minutes ago, Thukydides said:
Maybe better to hold off on the glue till all of them are tied. That way if you need to go back and fix one it is easier.
I'm stuck on this. On one hand I totally agree. On the other I worry about them coming loose as I go along.
17 minutes ago, Thukydides said:You are making good progress. Ratlines are also not my favourite part of the build.
Thank you. A long way to go but I'm pleased with the improvements on this one so far.
I've got about half of the port side done this morning before my back told me to stop. I use a fresh from the pack safety razor to trim with a very light pressure on the excess and even more gentle wipe of the blade over the joint. I found even a craft knife isn't close to being sharp enough for this.


-
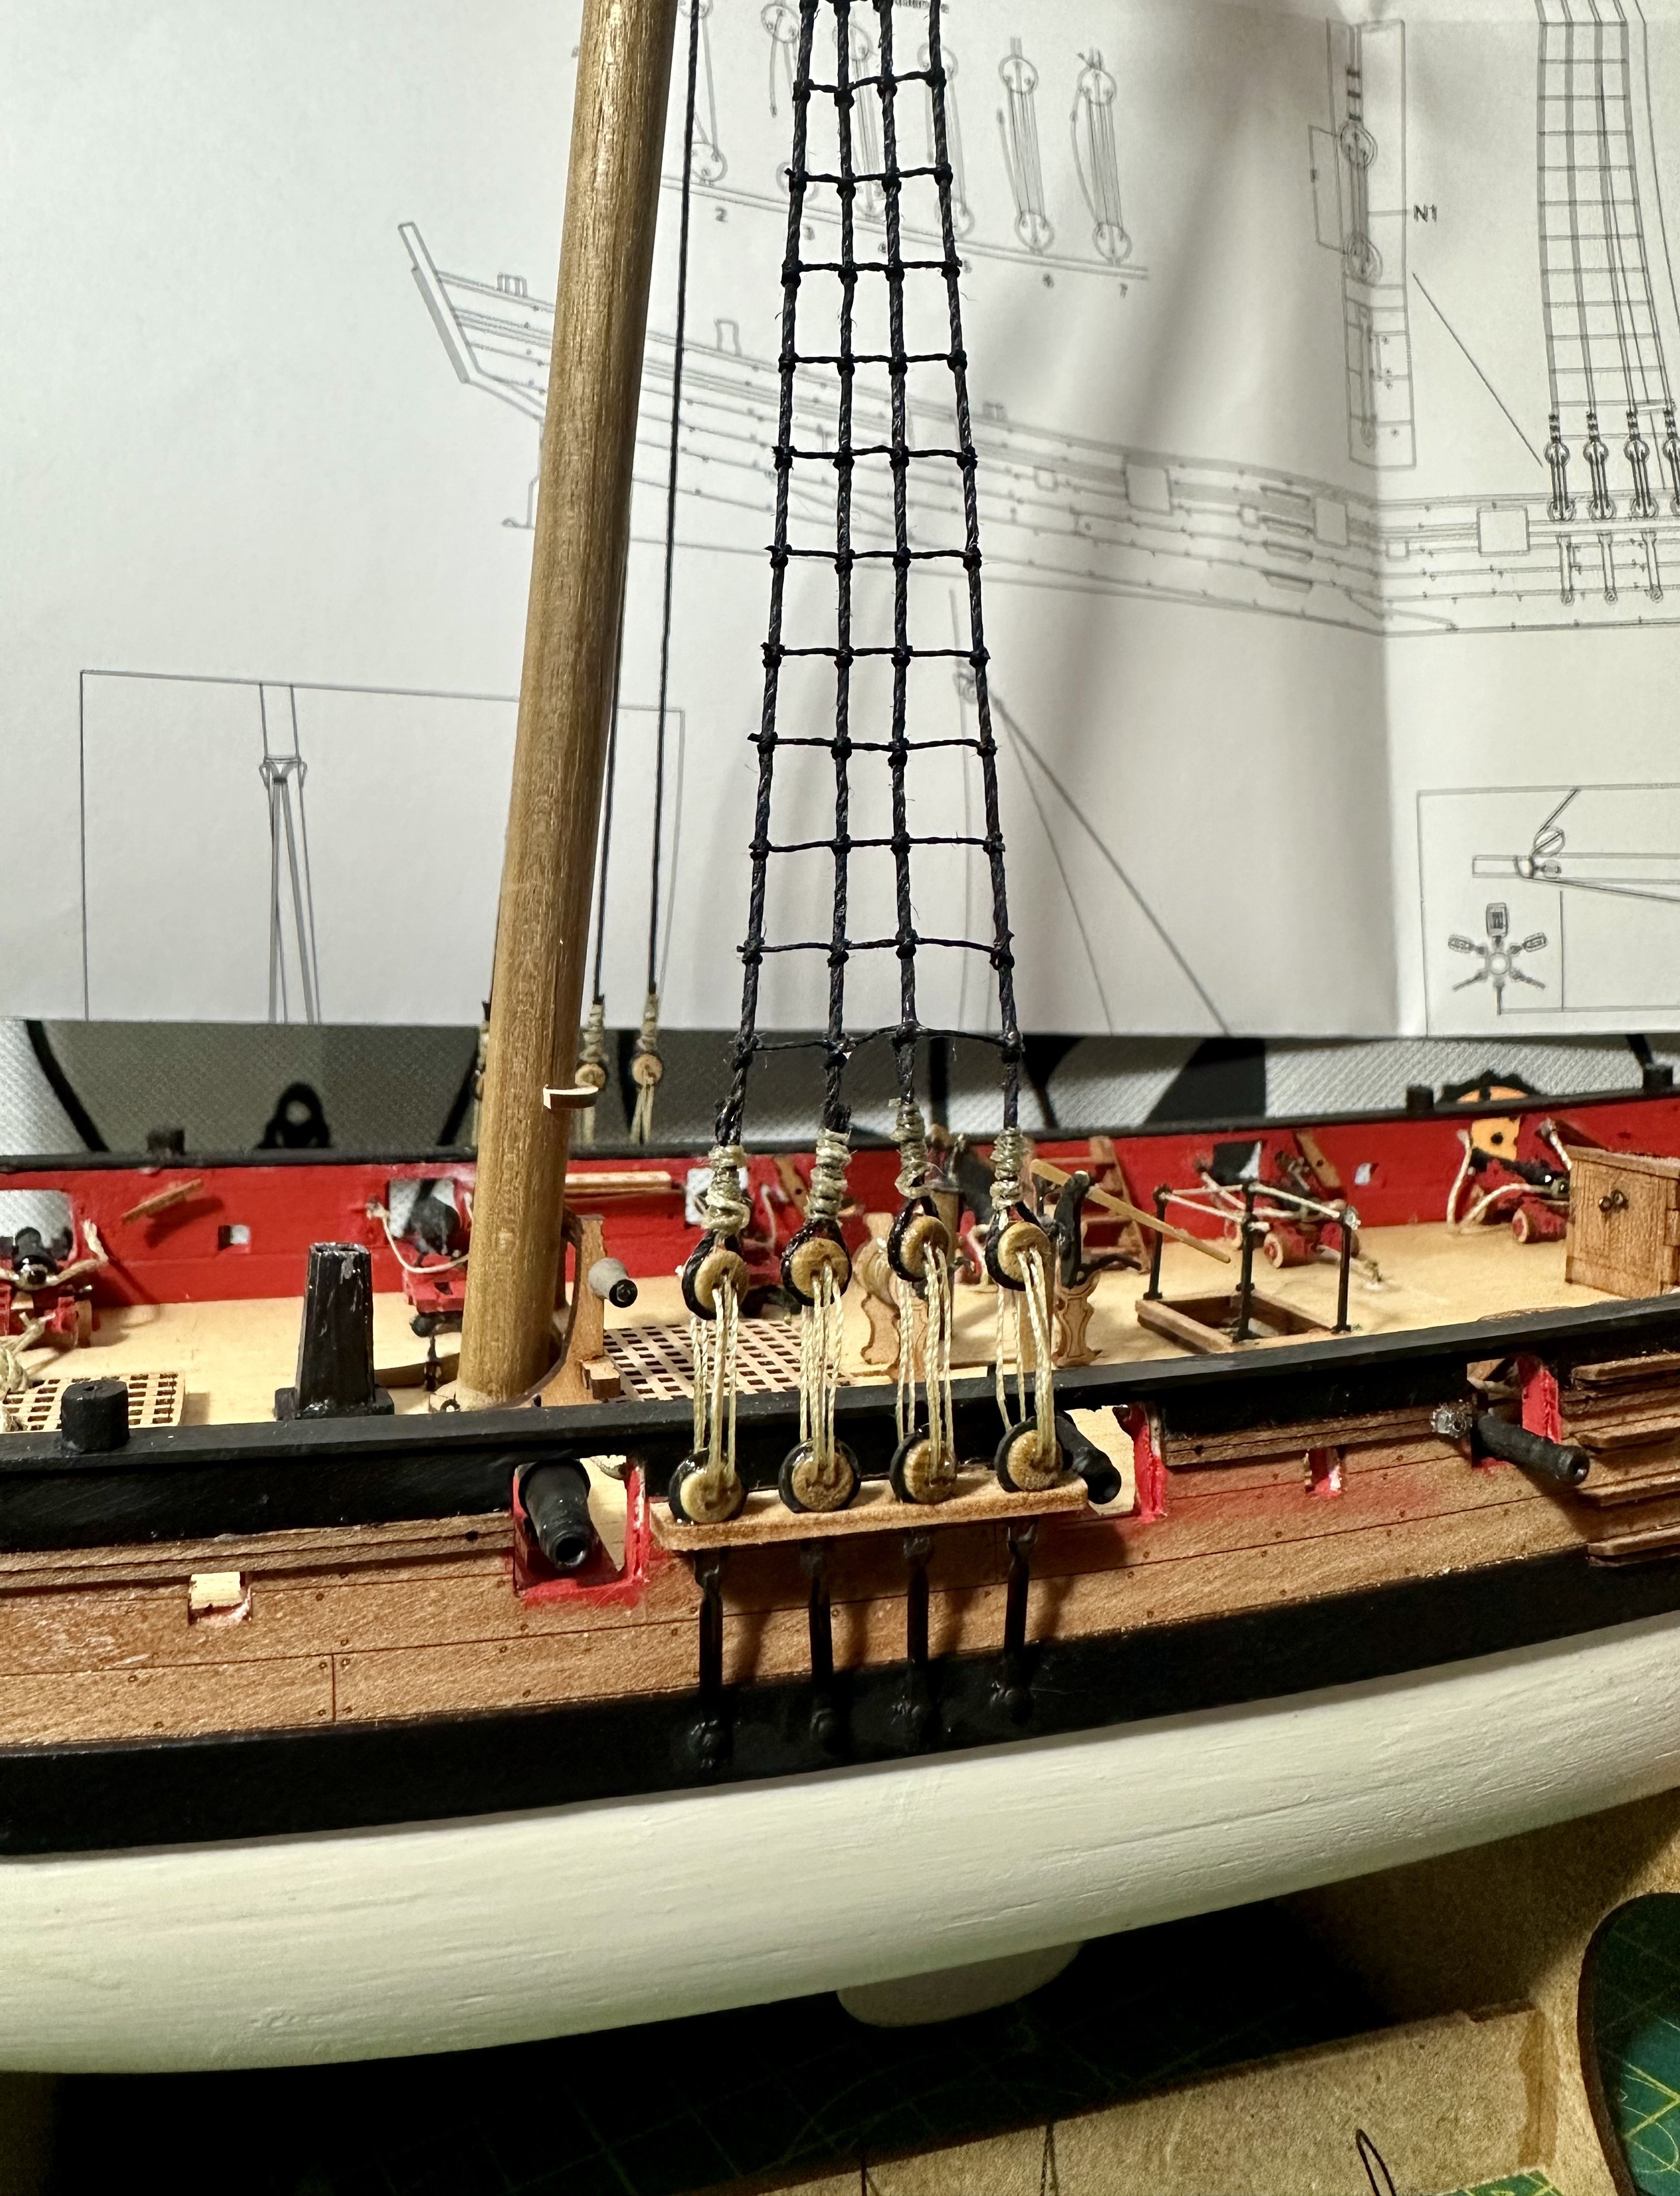
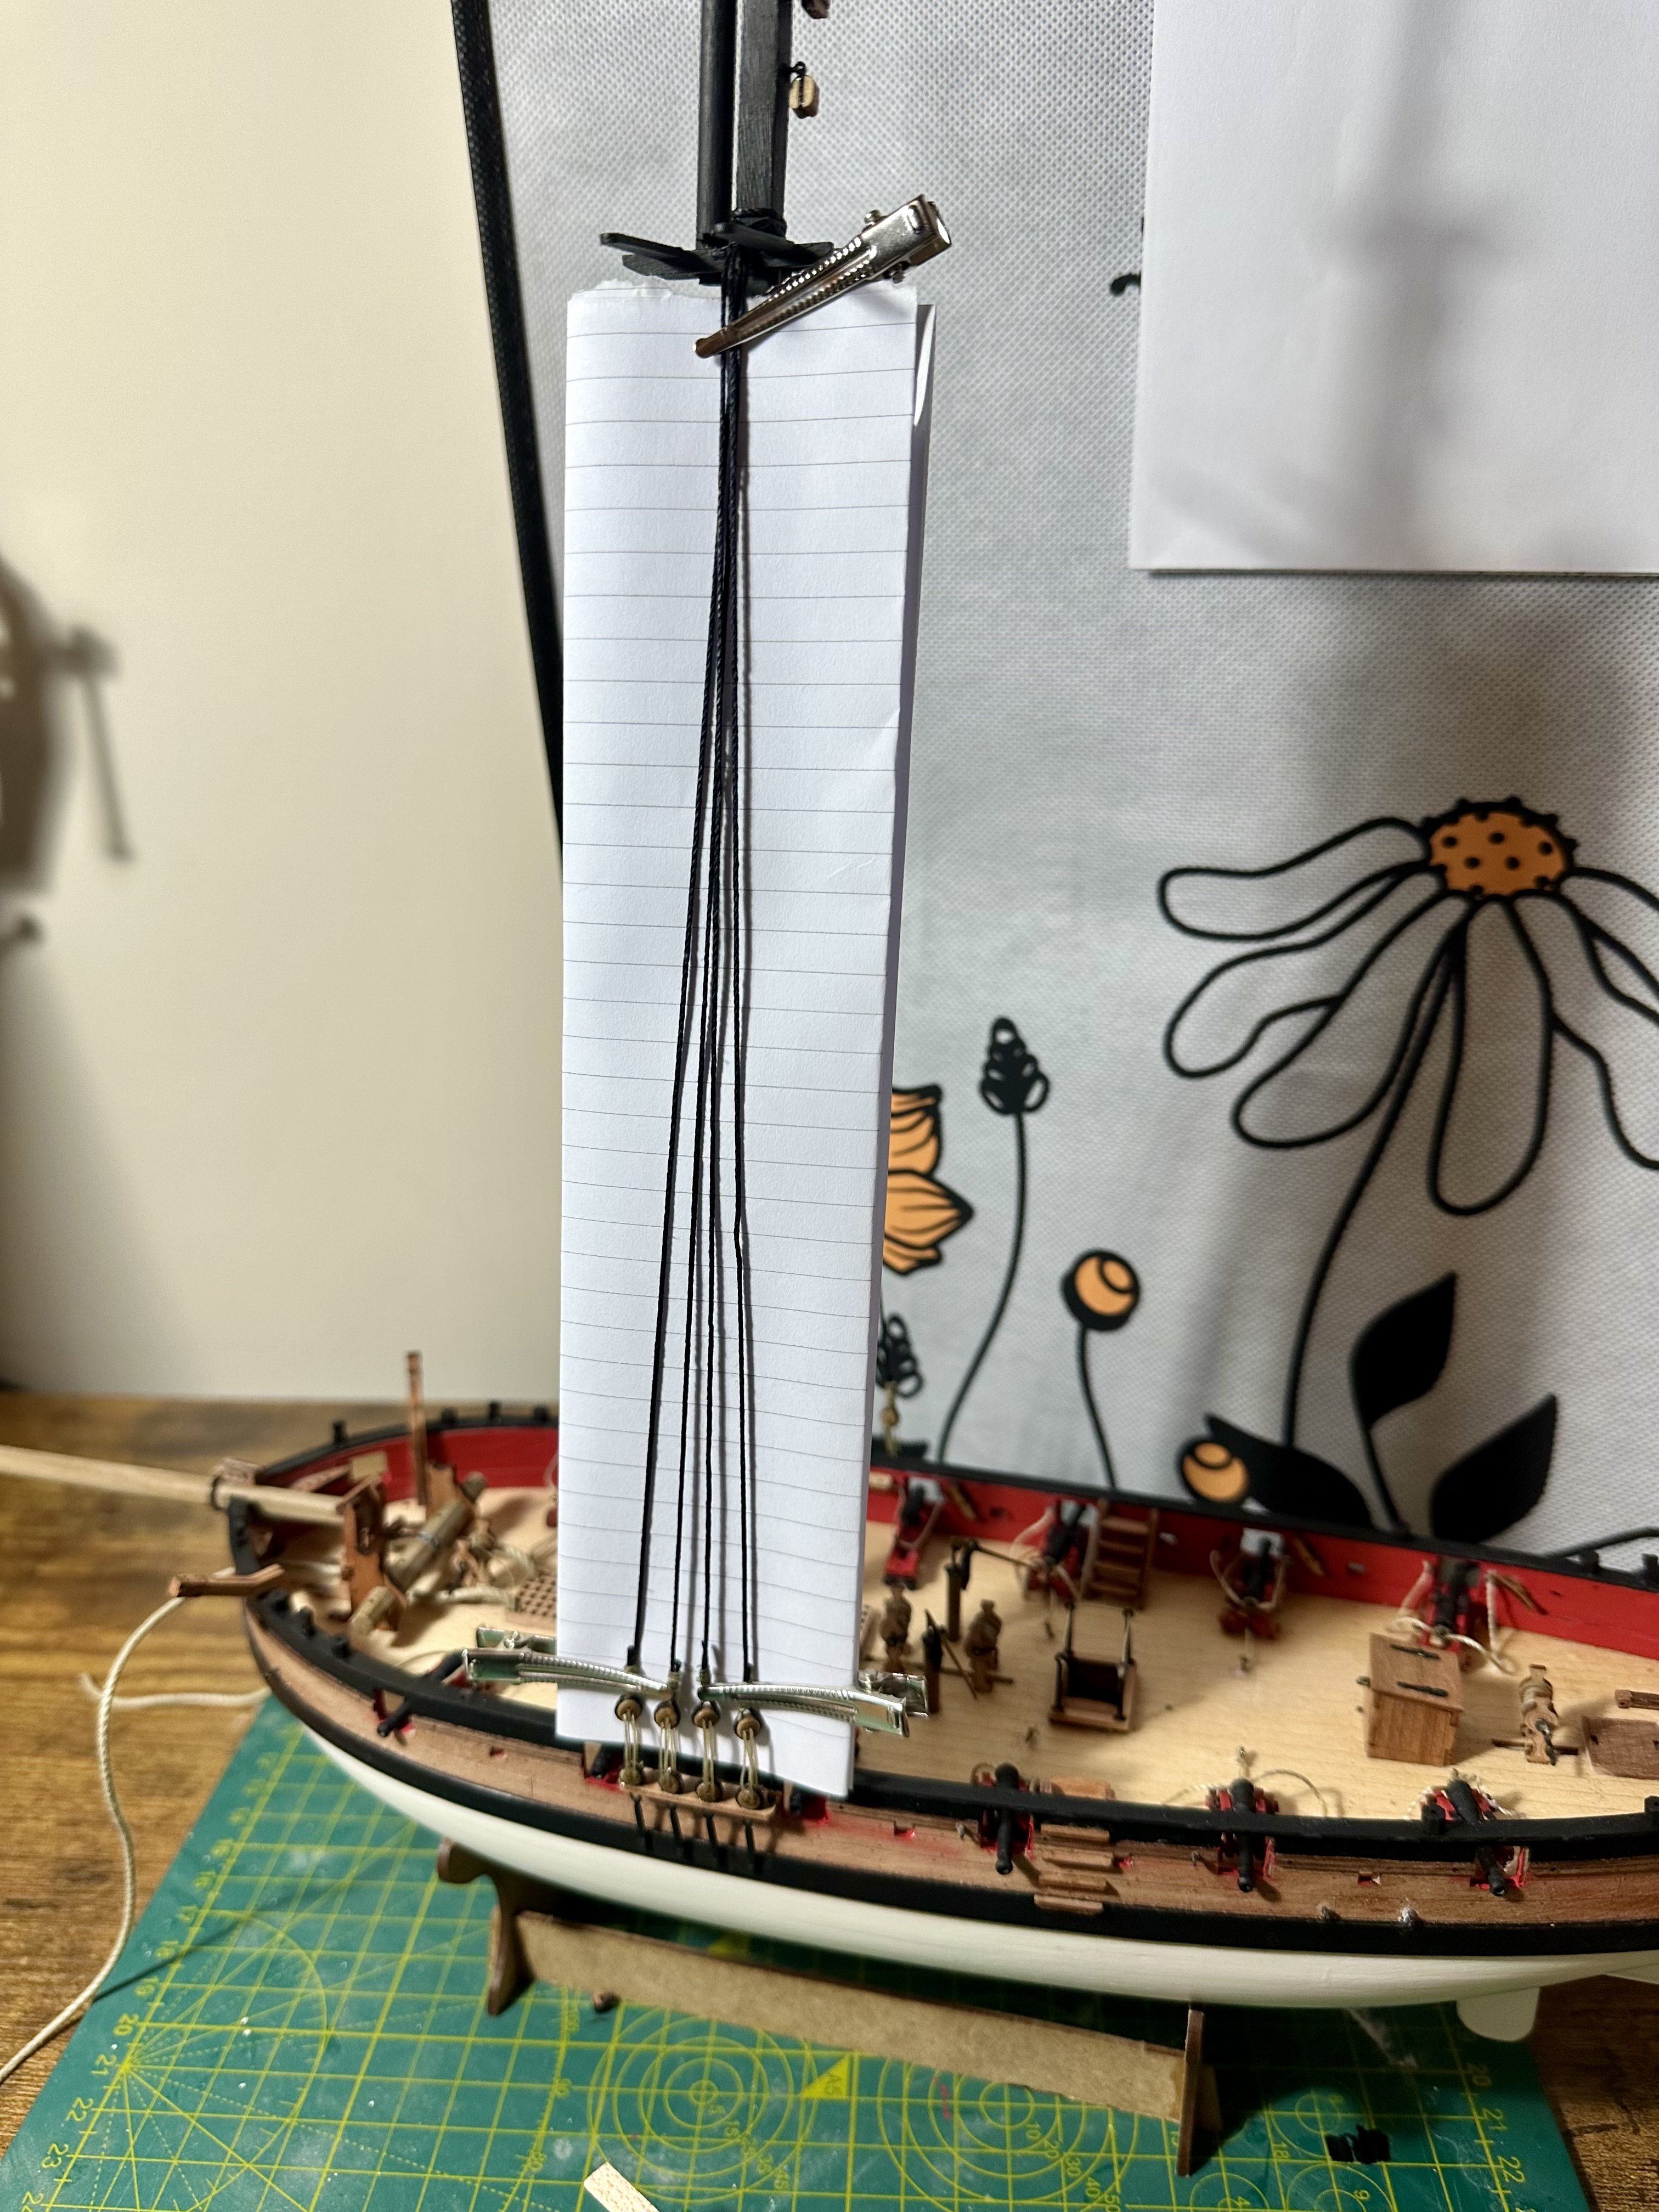
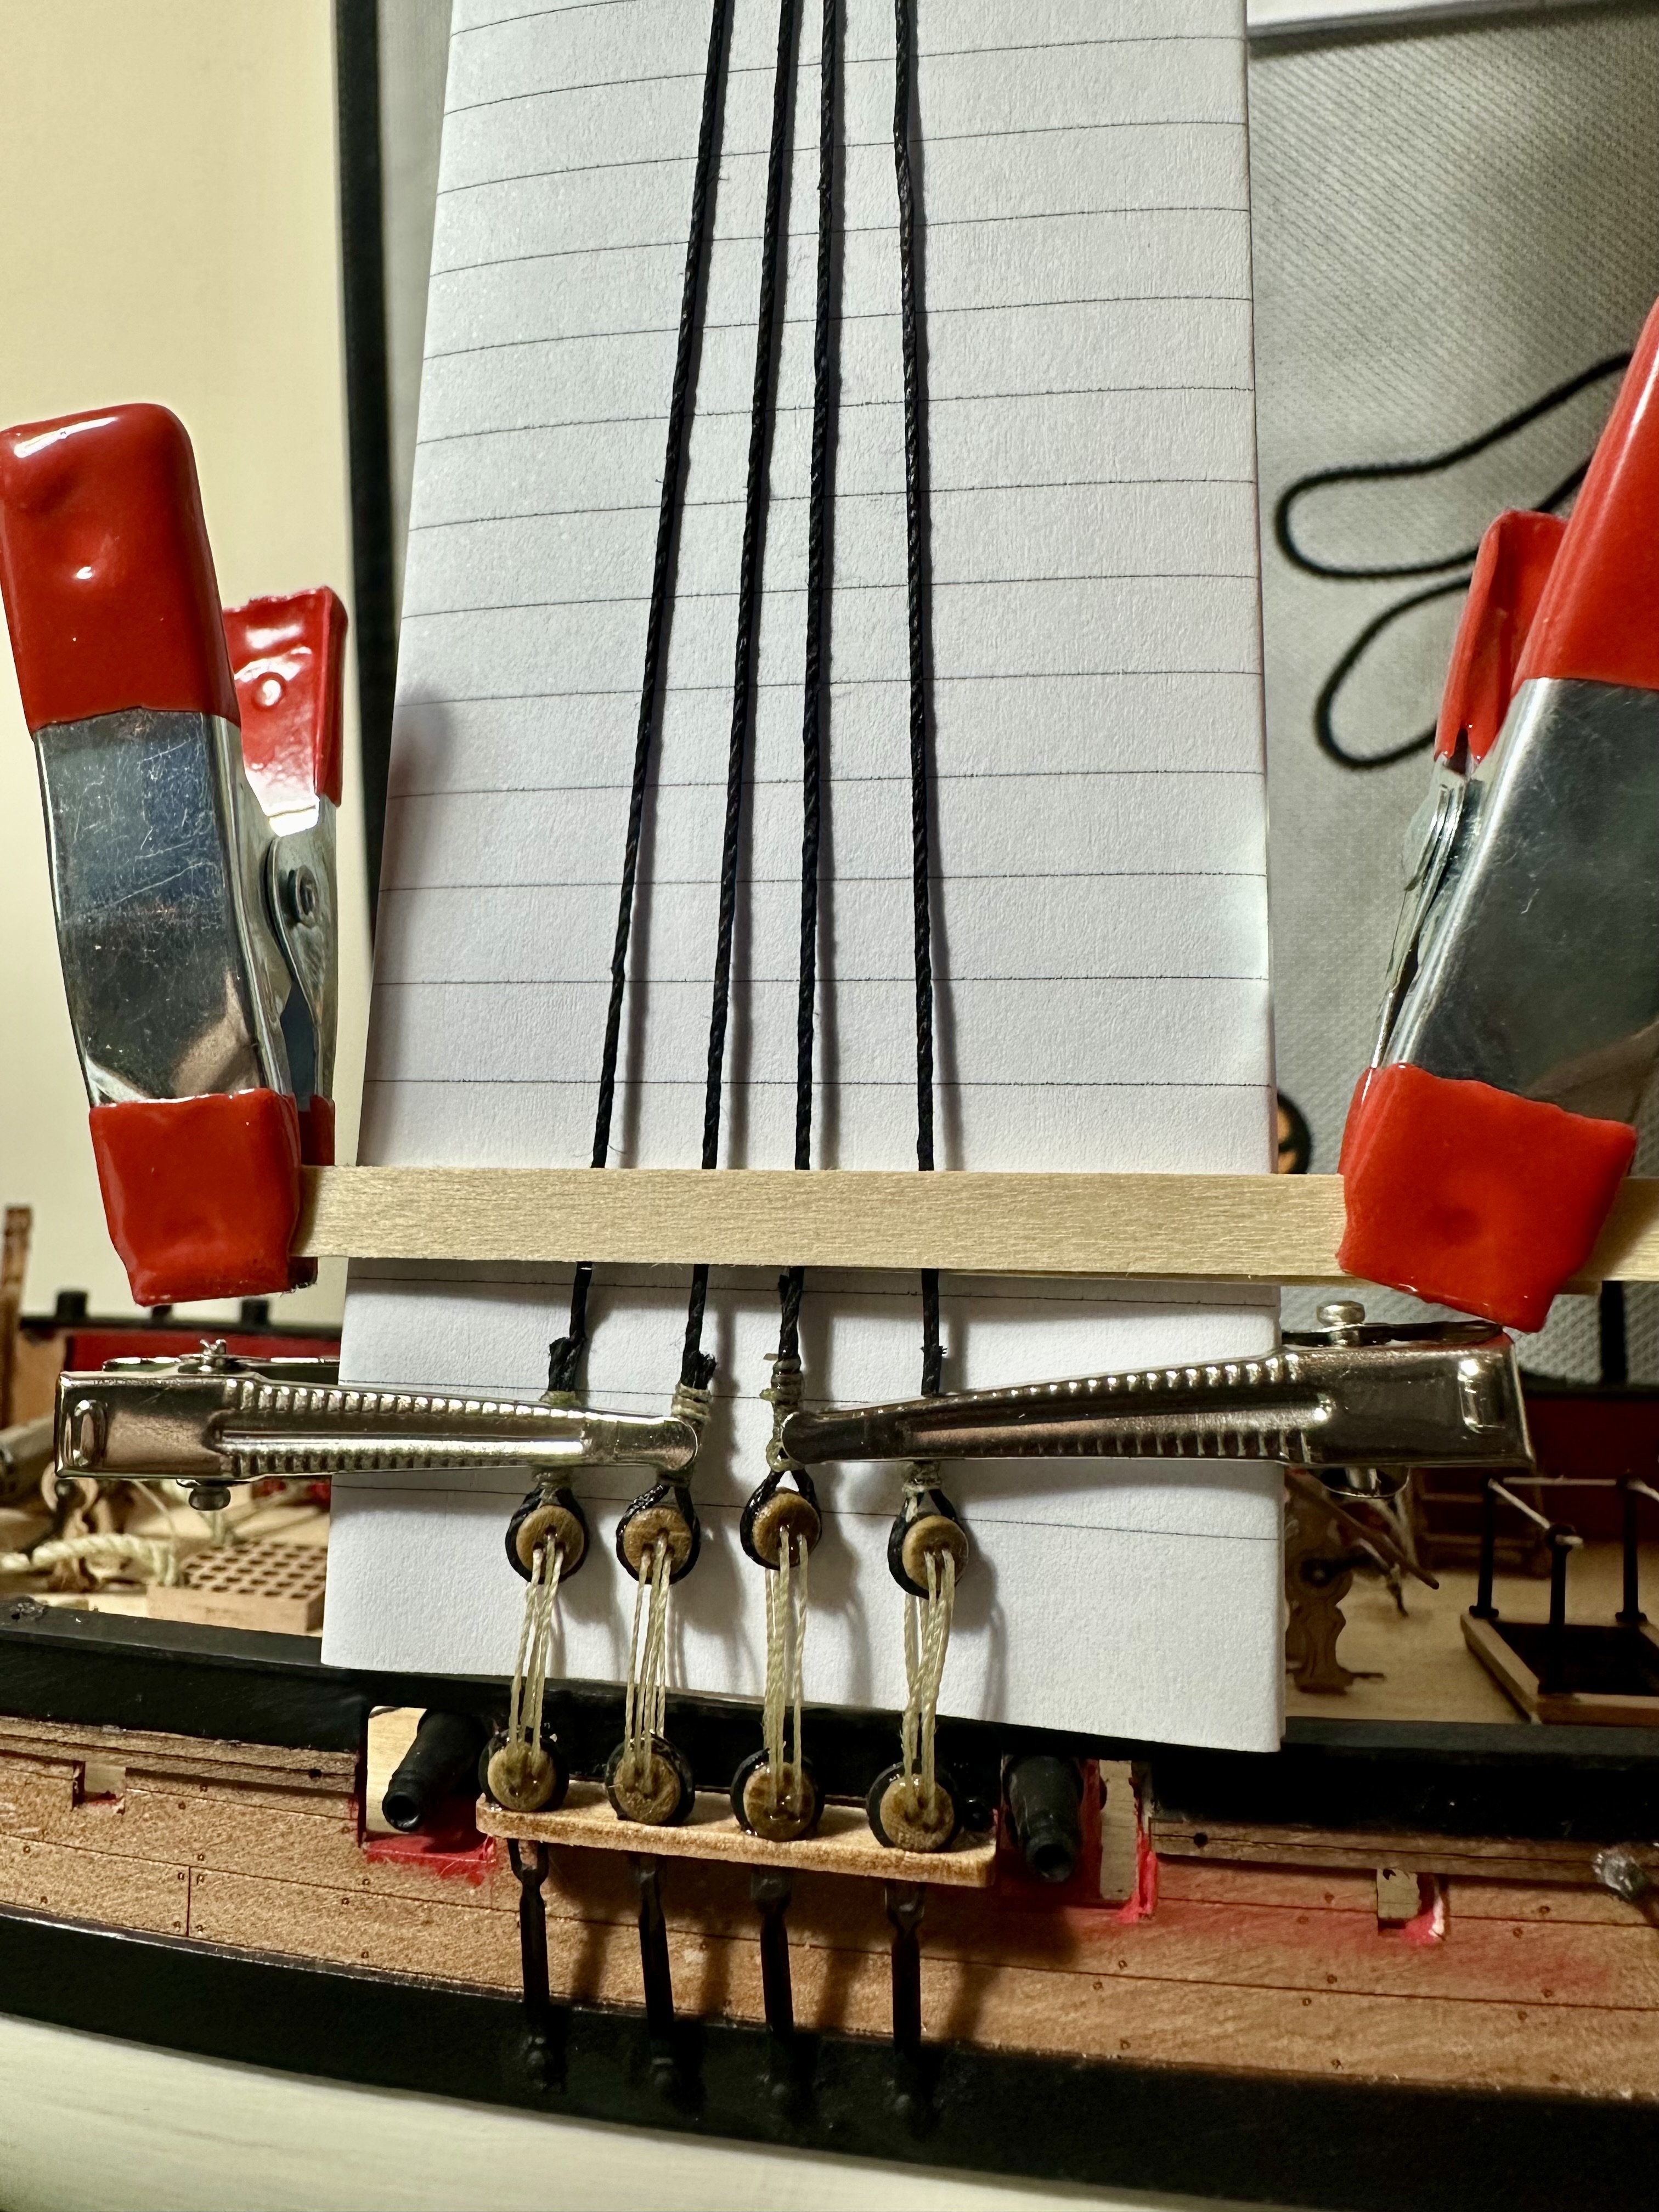
Hurrah it’s Rat Line time. My favourite.
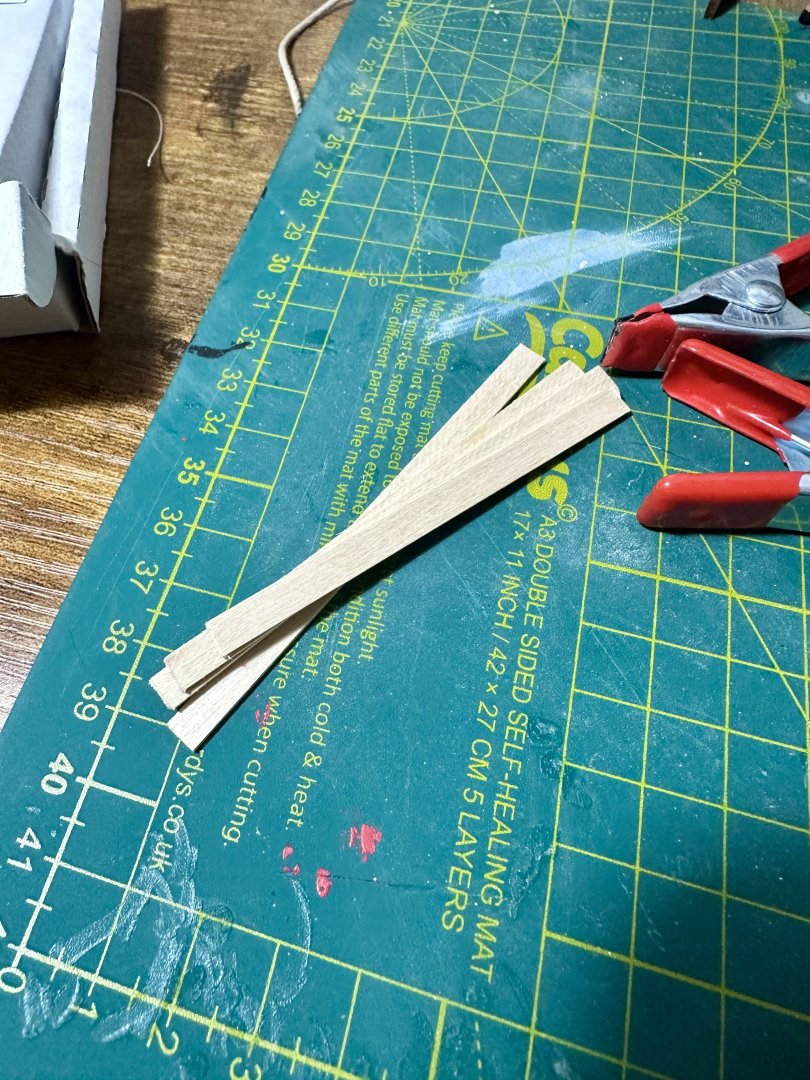
Trying a different route this time. Printed lined paper and suitable scrap plank (6mm). Clamp the planks across the shrouds to keep them properly spaced then tie and brush with dilute PVA.
Much quicker and seems neater so far.

-
Pleased with them

Sure it' a very old tip but one of my favourites. Put a drop of liquid CA on the end of the thread to help make things easier getting through blocks.


HM Cutter Trial 1790 by AJohnson - Vanguard Models - 1:64th
in - Kit build logs for subjects built from 1751 - 1800
Posted
Wow! That's absolutely stunning. Superb job.