


marktiedens
-
Posts
1,737 -
Joined
-
Last visited
Content Type
Profiles
Forums
Gallery
Events
Everything posted by marktiedens
-
Nice to see you back at it - looks interesting. I will follow along if you have enough seats in the room. Did you know Dusek also makes a La Real? It looks very similar,but the scale is a little smaller. Mark
- 510 replies
-
- 1
-

-
- reale de france
- corel
- (and 1 more)
-
Hi Michael - glad to hear you & the Mrs.are doing better. I went through the shoulder repair thing a few years ago,so I kind of know what you are going through. Good as new now. Mark
-
Hi Vince - you`re doing a great job - those sails look perfect!!! Mark
- 593 replies
-
- 1
-
-
- royal william
- euromodels
- (and 1 more)
-
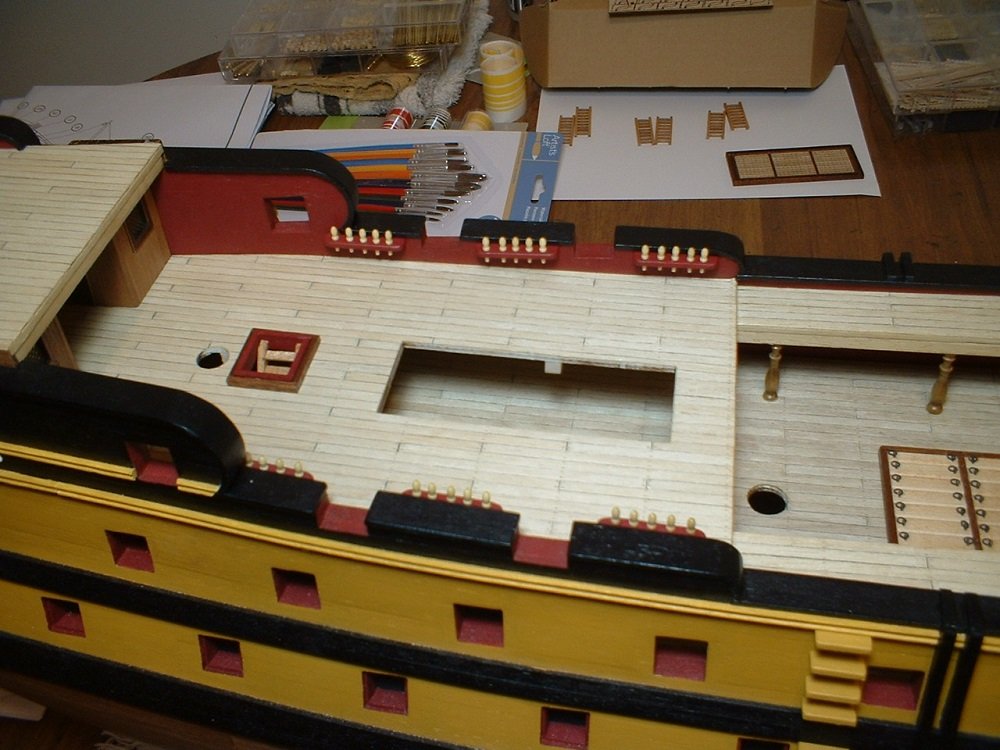
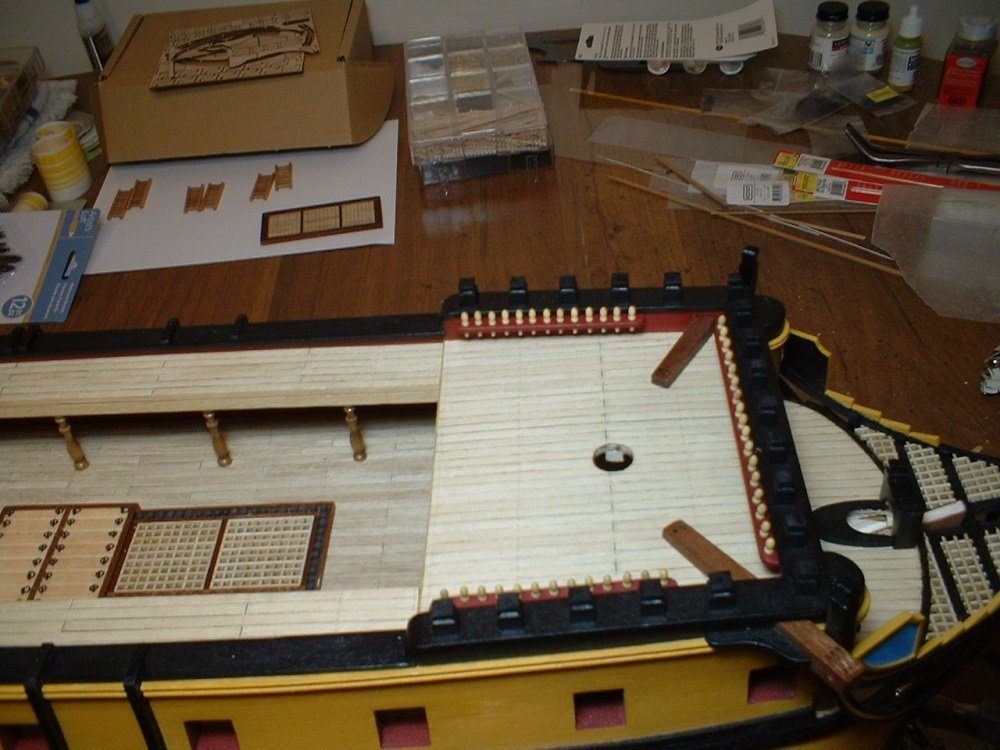
Hi again - one thing I forgot to mention about the pinrails - there are 2 of them that go on each side of the ship`s bell that are not mentioned or shown in the written or pictorial instructions. BUT they are shown on the overhead plan sheet view & the belaying plan,so I added them. All those pinrails are not glued in place yet - I want to get the guns with carriages done on the second gun deck first while I still have access to them(only the breech ropes will be rigged on them). I can see now that I should have left those gangways at the waist off until those guns were in place. Mark
- 331 replies
-
- 2
-
-
- nuestra senora del pilar
- occre
- (and 1 more)
-
Oh - dummy me,I was looking through the wrong box for the timber. There is actually plenty of 5x5 strips. Anyway,the walnut is much stronger than what they supply. After looking further ahead in the instructions,those brass discs do indeed seem to be for the gun carriages - thanks for pointing that out. I will go stand in the corner now............ Mark
- 331 replies
-
- 1
-
-
- nuestra senora del pilar
- occre
- (and 1 more)
-
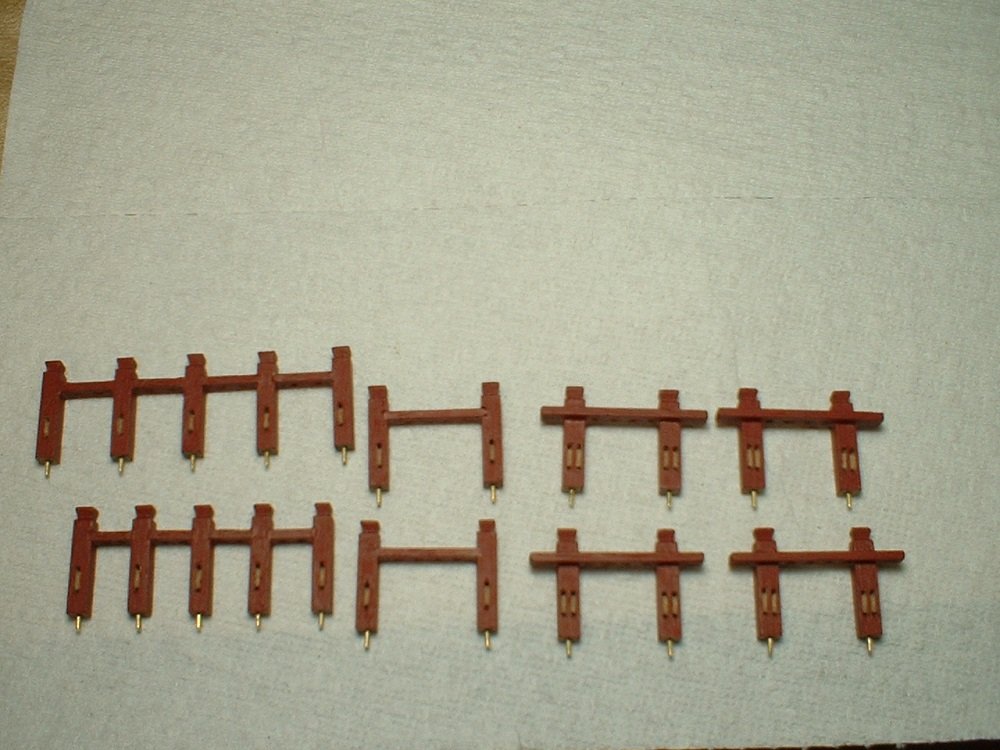
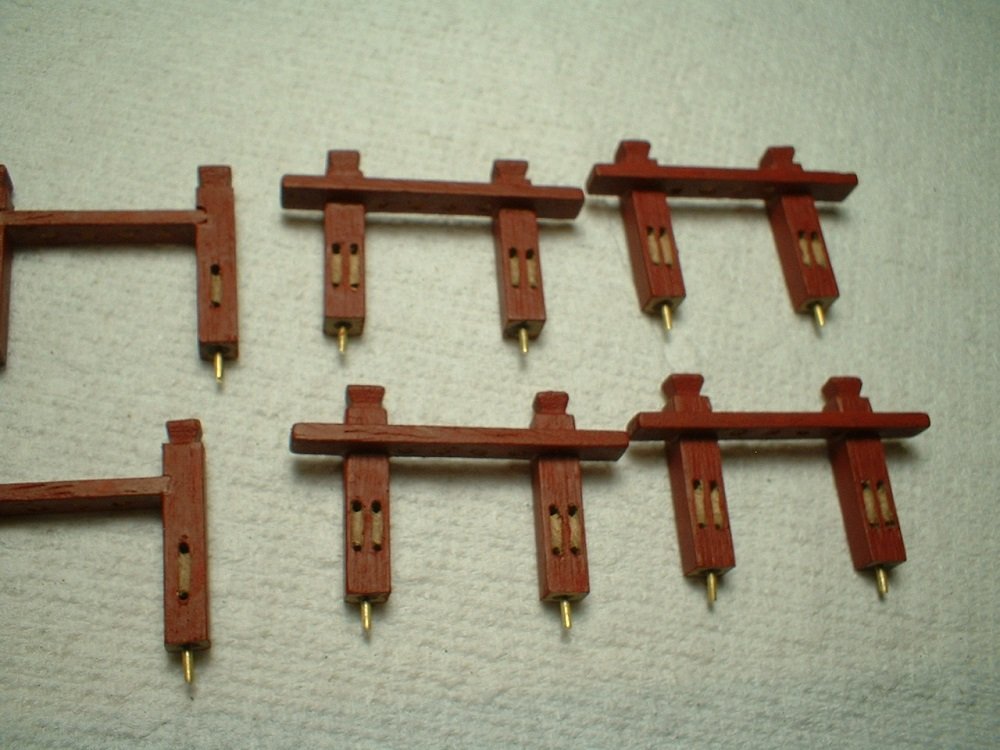
Update - all the rest of the pinrails with their newel posts were made. Issue one - the instructions said to use 5x5mm for the posts. There is no 5x5mm wood in the kit,so I used some 5x5 walnut strips I had for the posts. Issue two - they also said to use 5x5mm wood for the crossbars on the posts next to the masts. Well,the belaying pins are too short to use 5mm thick crossbars,so I used 2x6mm for them,which is what all the other belaying pin racks are. Don`t know why they would want 5mm thick crossbars for those 4 - even at this scale that would be way too thick. The sheaves were made by drilling holes,then filing the area in between with a really small round file. There are some brass discs in the kit which are probably meant to be used for the sheaves,but I decided not to use them since I don`t have a milling machine to make nice,smooth slots - would probably be hard to see them anyway after running ropes through the holes. Finally, they were painted red & brass pins were added to the bottom for added strength. Mark
- 331 replies
-
- 10
-
-
- nuestra senora del pilar
- occre
- (and 1 more)
-
I think it`s another case of the parts not matching the pictures. I think I will probably cut down the lids to match the openings - I have never seen lids that are larger than the openings. They also do not provide hinges,so I will use some leftover hinges that I have. It looks like they have the lids just glued to the hull in a wide open position. By the way,I found those short columns for the small poop deck - they were mixed in with the belaying pins. I am not installing the gunport lids until after the deck work is done. Mark
- 331 replies
-
- 1
-
-
- nuestra senora del pilar
- occre
- (and 1 more)
-
Thanks Nick. Mr.Pucko - yes,there seem to be a number of things in the kit that don`t quite match what`s in the pictured instructions - the stern fascia windows for instance(way too much curve). Looks to me like maybe they made up the instructions from a prototype build & didn`t try to assemble the model with what`s actually in the kit. That sheet of bricks I used does have a few defects in it, but back then I doubt if they were perfect anyway. Mark
-
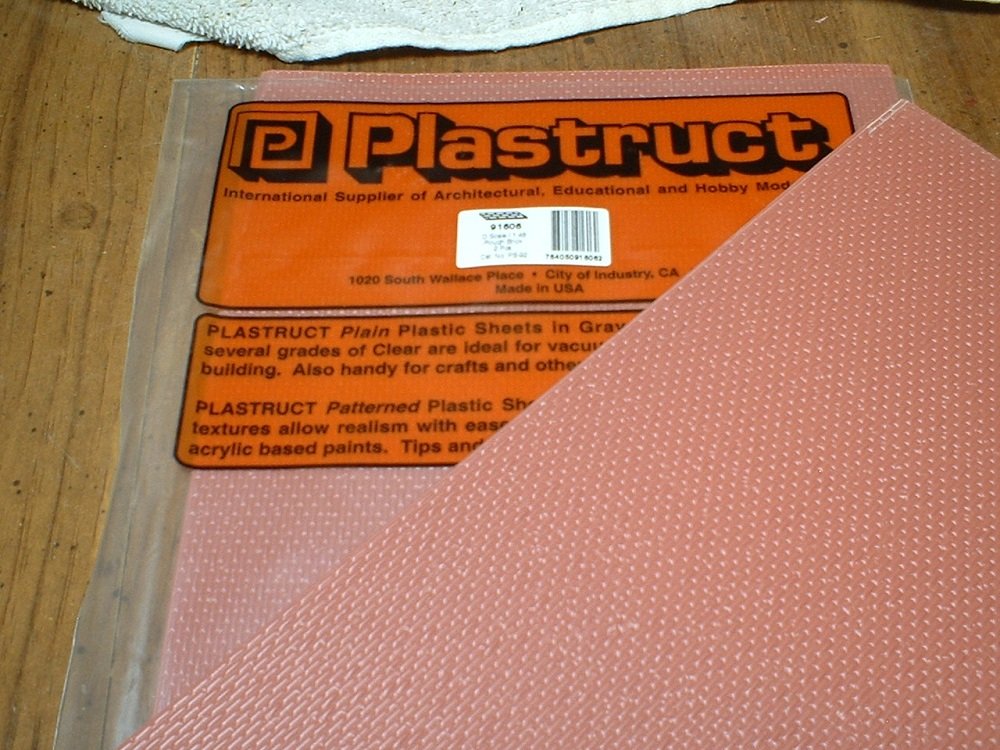
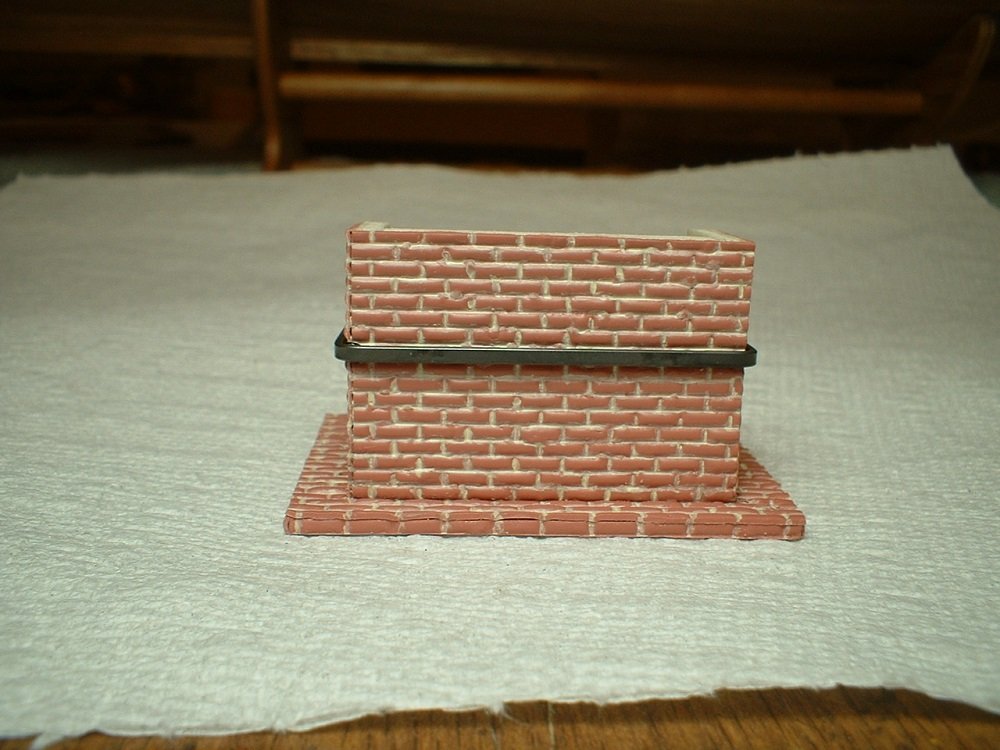
Those bricks are pretty small. Maybe you could use some white wood filler for the mortar - you could glue the bricks on leaving a small gap between them & pack the filler in between the bricks. If using a water based filler you could just smear it in & wipe over the top with a wet rag to remove the filler from the surface of the bricks before it drys. I just didn`t want to fiddle with glueing all those little bricks on when most of the stove can`t even be seen. I am now looking at the ship`s bell tower - the picture in the instructions appear to me to show the columns upside down - what do you think? Here is a pic of the stove in place- Mark
.JPG.ea81596cb3992921765fd6b1e22e50cd.JPG)
- 331 replies
-
- 7
-
-
- nuestra senora del pilar
- occre
- (and 1 more)
-
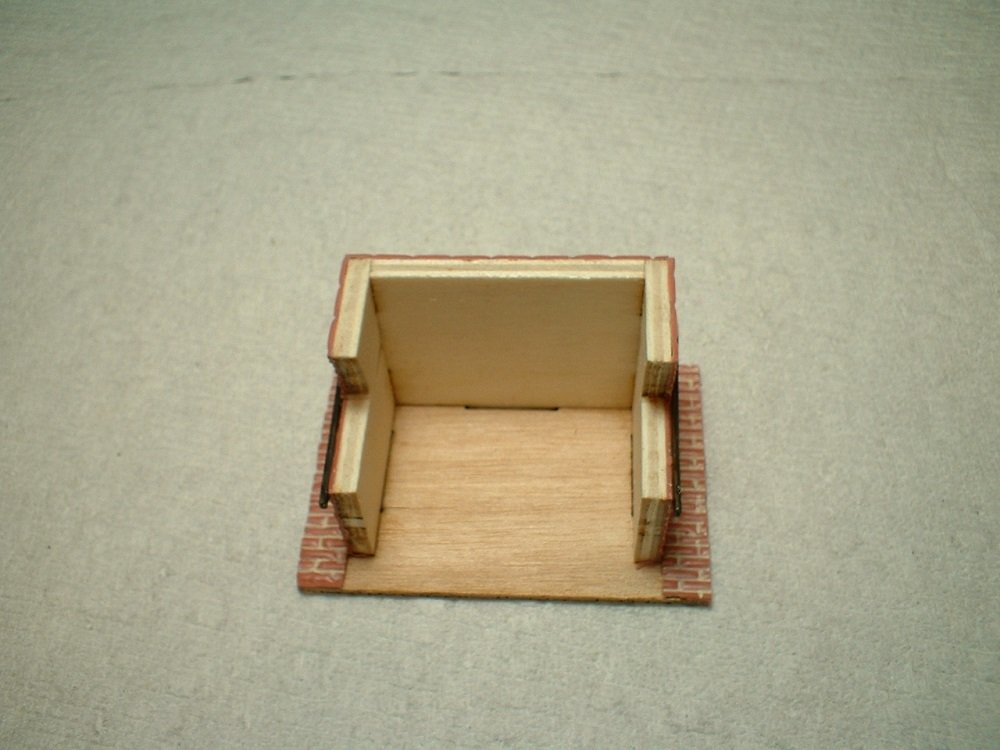
Hi - more progress. The next thing done was the pinrails - simple enough. Then I started on the ship`s stove. It was just 3 sides & a base glued together. The instructions say to file grooves in the surface to simulate the mortar & then paint the "bricks". Well,filing grooves in this plywood is impossible to do without the plywood falling apart,so I went to my local hobby shop & found some plastic sheets made to look like scale bricks. The scale of these is 1/48,which is very close to the scale of the model which is 1/46. After cutting them to fit the stove frame & glueing them on,I used the smallest brush I have to paint the mortar lines off white. Lastly,a brass bar was bent to fit around the stove & blackened & glued in place. The front of the stove will not be finished because where it sits under the forecastle deck only the back side can be seen. Not perfect,but I am satisfied with it. Mark
- 331 replies
-
- 6
-
-
- nuestra senora del pilar
- occre
- (and 1 more)
-
Glad you like the kit. As I stated in an earlier post the wood in my kit is very bad - all the wood in mine is badly warped. It may have just been a bad batch that they had for mine. Also,the parts that are plywood fall apart when sanding the laser char from the edges. Wow - you have a lot going on - I can only manage to build one at a time. cheers,Mark
- 331 replies
-
- 1
-
-
- nuestra senora del pilar
- occre
- (and 1 more)
-
Hi Pucko - thanks! I haven`t got to the stove yet,but it seems ridiculous that they would want you to "paint" the brick pattern. Micro Mark has some textured heavy paper that simulates bricks,but I think I will go to my local hobby shop & see what they have - they have a LOT of train stuff. What do you think of the kit?-I am NOT impressed! Mark edit - after looking at the instructions,I see that they want you to file grooves in the wood panels,then paint the "bricks" - possible,but would take a lot of fiddly work to make it look good.
- 331 replies
-
- 1
-
-
- nuestra senora del pilar
- occre
- (and 1 more)
-
Thanks O.C. Mark
-
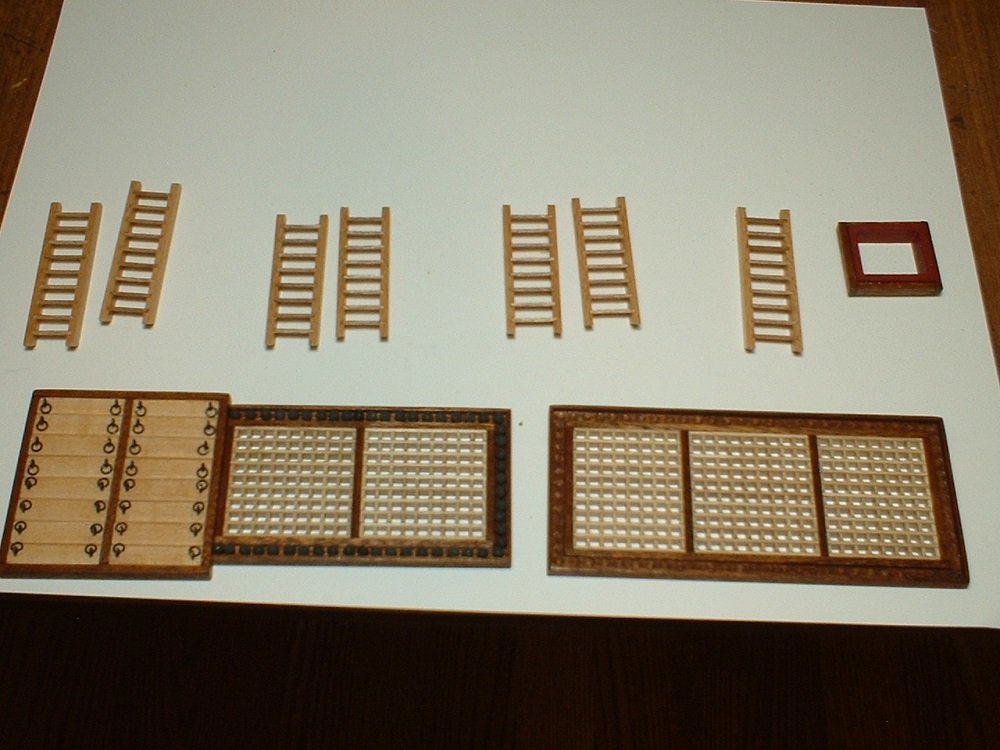
Continuing on........ The gratings & ladders were made up. Small dimples were made in the cannonball racks to keep the cannonballs in place. Back to the bow,the fenders on the upper headrail were installed. They were laser cut items,but the instructions said to cut a line around close to the edge & paint it yellow with blue elsewhere. Well,that wasn`t gonna happen,so I made up some trim pieces from 1/32x1/16 brass bar & glued them around the edge. 4 cleats were also added forward of the fenders on top of the upper headrail. Next,the fenders & ladders at the waist were made up & glued in place. I made the fenders by glueing short sections between the wales,then the long pieces on top of those. The steps were made by glueing 2x2mm strips to 2x6mm strips. After a little shaping,they were painted yellow to match the hull & glued in place. Mark
- 331 replies
-
- 8
-
-
- nuestra senora del pilar
- occre
- (and 1 more)
-
Thanks Frank - good to hear from you. The kit has some issues(like most kits),but I am trying to work around them. Just found out that the positions of the gunports as built according to the instructions don`t match the plan sheets - just one more thing to work around. Mark
- 331 replies
-
- 2
-
-
- nuestra senora del pilar
- occre
- (and 1 more)
-
Update - the bow gratings are now done. quite fiddly working out the curvature along with the framework. The bow knightheads have also been added - the plans show it as 10mm thick,which I thought was a bit excessive,so I thinned it down somewhat. The holes in the gratings seemed a little large,but being at 1/46 scale maybe not too far off. With that out of the way, I will move on to the deck furnishings. Looks like I need to do a good dusting also. Mark
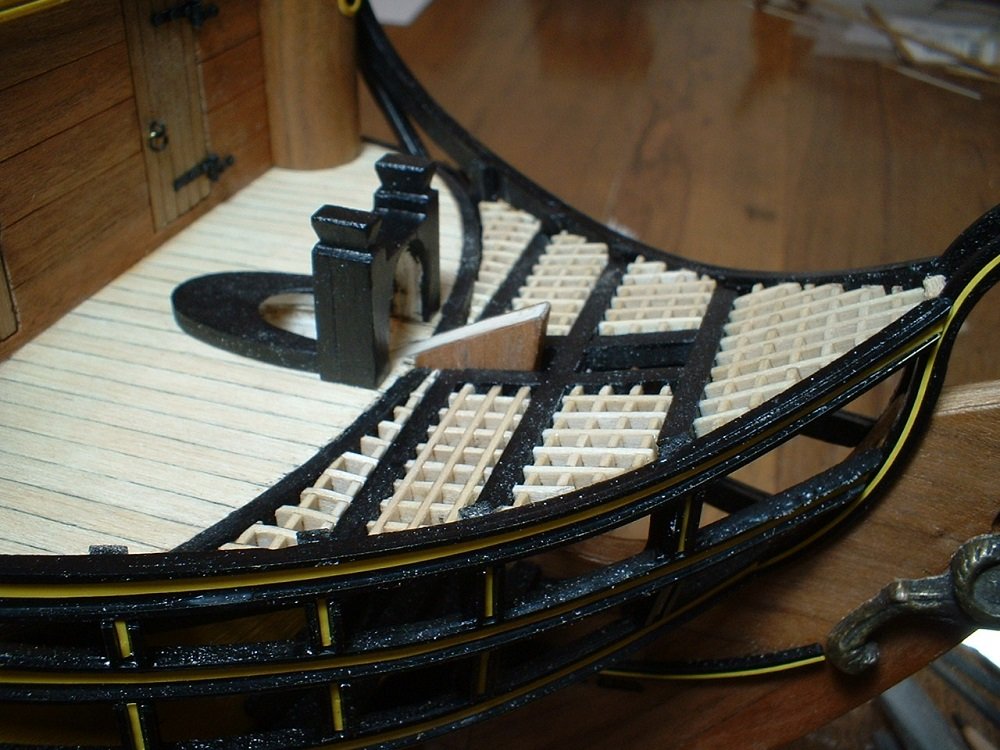
- 331 replies
-
- 11
-
-
- nuestra senora del pilar
- occre
- (and 1 more)
-
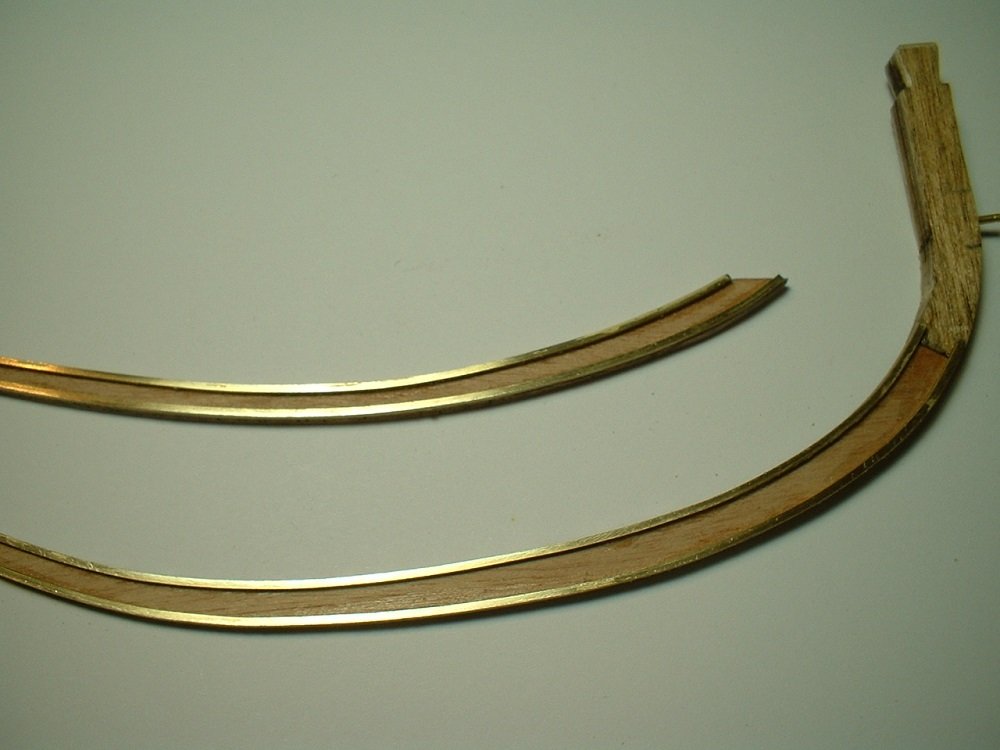
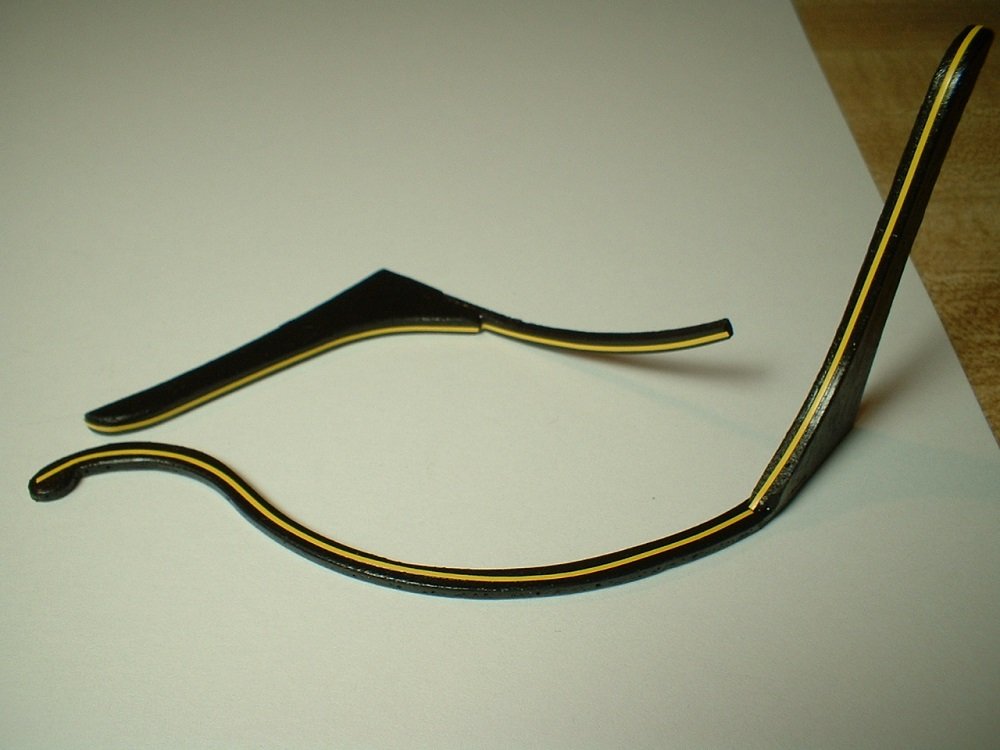
Hi everyone - work on the ship continues(slowly). Working on the head rails,I was hoping they would go a little smoother than the stern work - not so. The upper head rails are pre-cut from 1.5mm plywood & attach to the bottom of the samson posts which are pre-cut from 5mm plywood - glued end to end. So what I did was make the .8mm brass bar for the trim a bit long to overlap the post for strength,plus I tapered the inside part of the post to make a better transition to the much thinner rail. The plans show using some 1mm brass wire for the trim,but I thought that looked a little cheesy,so I used square brass bar instead. The middle head rail was pretty straightforward & fit where it was supposed to. The lower head rail was shown attached to the bottom of the cat davit support knee,but to do so it would fowl the first gunport,plus it would be impossible to bend the 1.5mm plywood to conform to the curve of the hull without breaking it. So instead I fastened it to the rear edge of the samson post/upper head rail assembly. The rails were painted black,with the yellow pinstriping in the center before glueing in place. After the rails were glued in place,the short pieces were added between the rails. Still need to finish the starboard side,then work on the bow gratings. Mark

- 331 replies
-
- 9
-
-
- nuestra senora del pilar
- occre
- (and 1 more)
-
Another fine example of your skill & craftsmanship! Bravo! Mark
- 692 replies
-
- 6
-
-
- eagle of algier
- chebec
- (and 2 more)
-
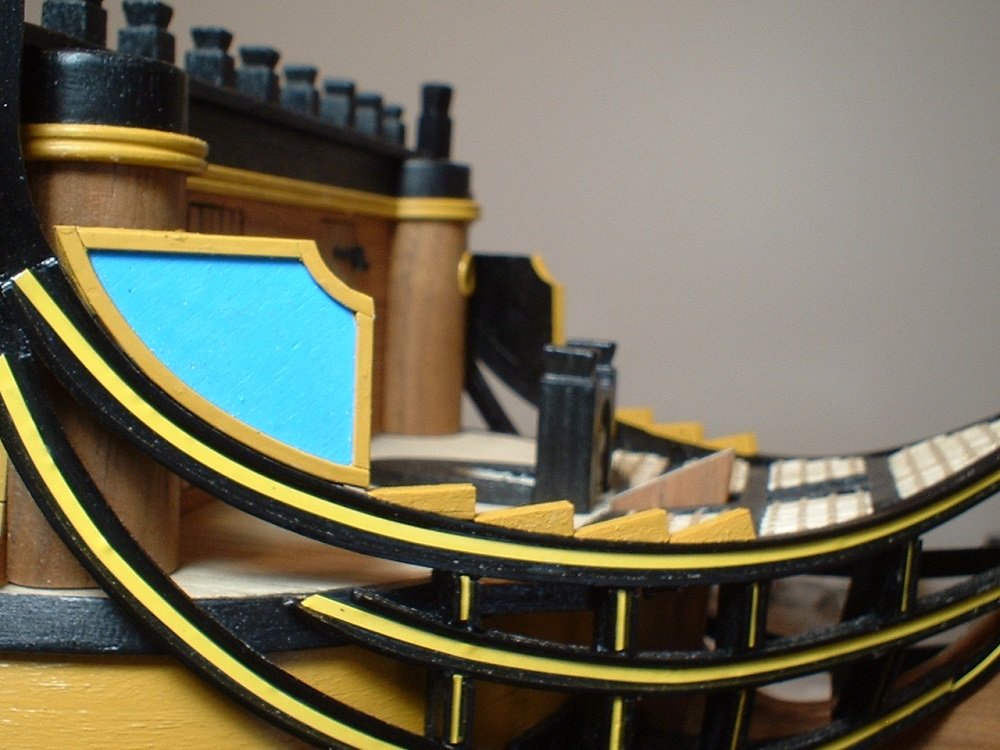
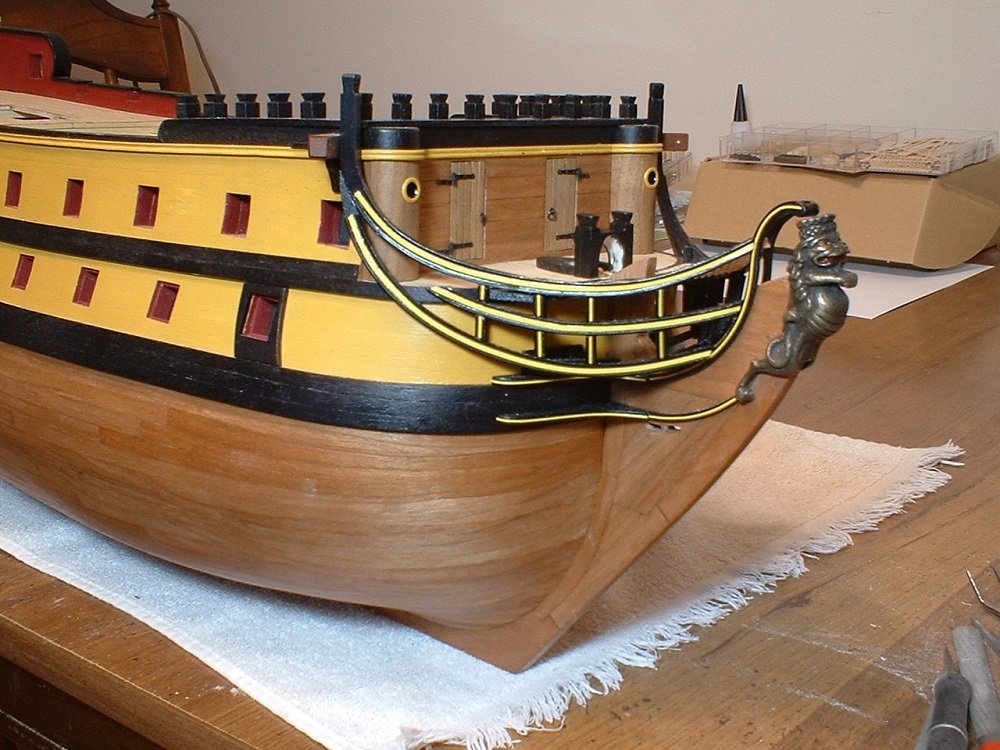
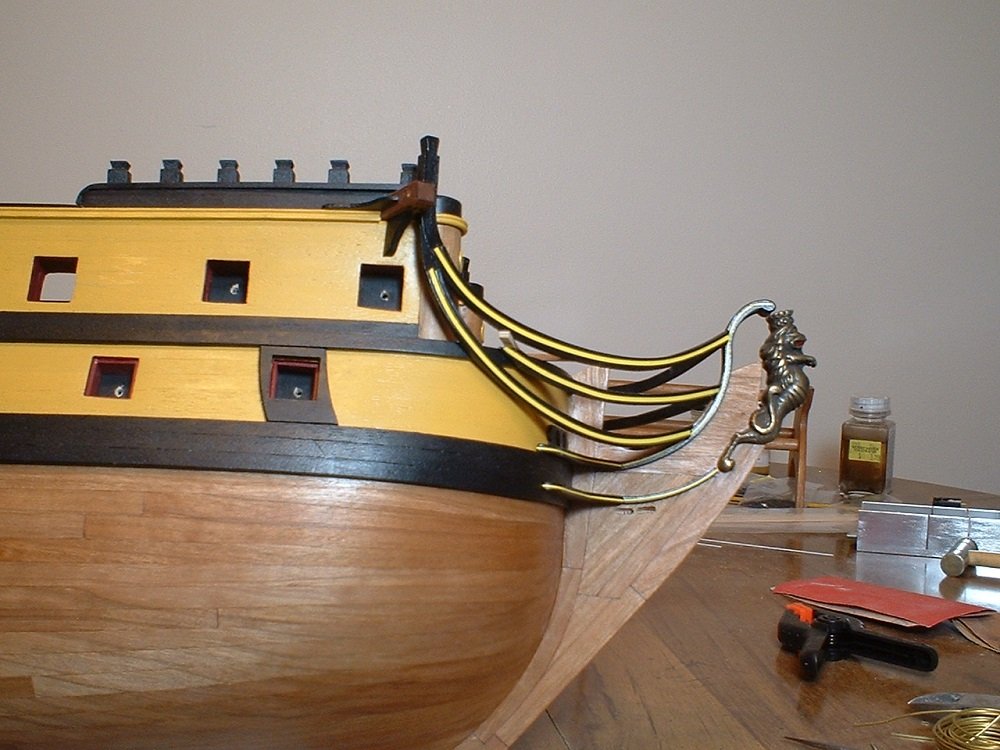
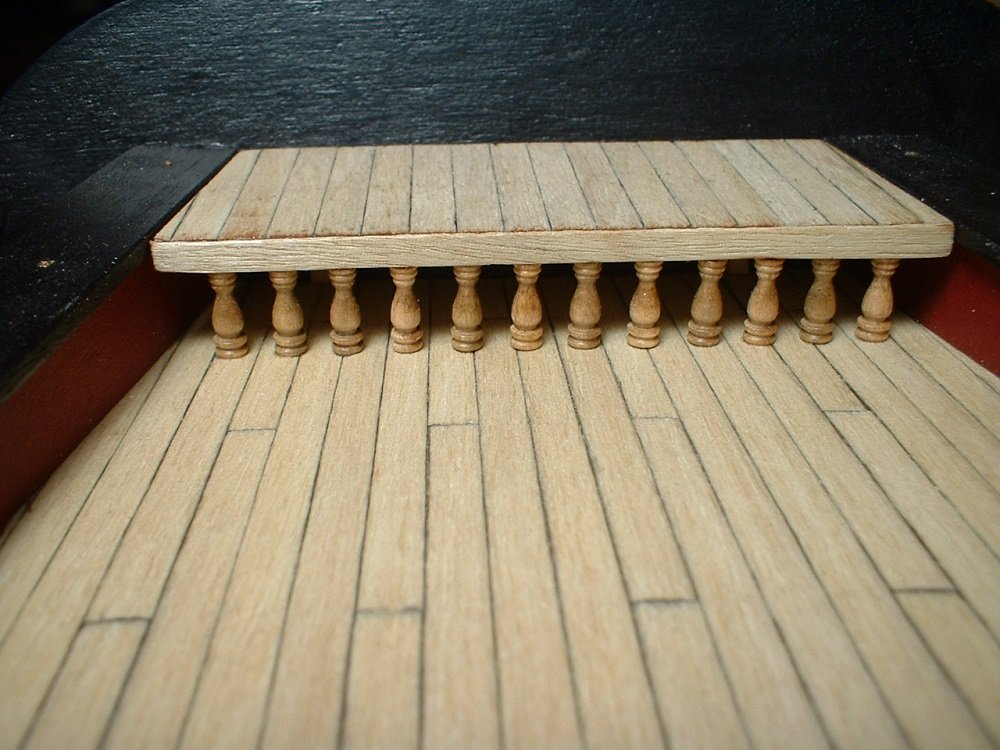
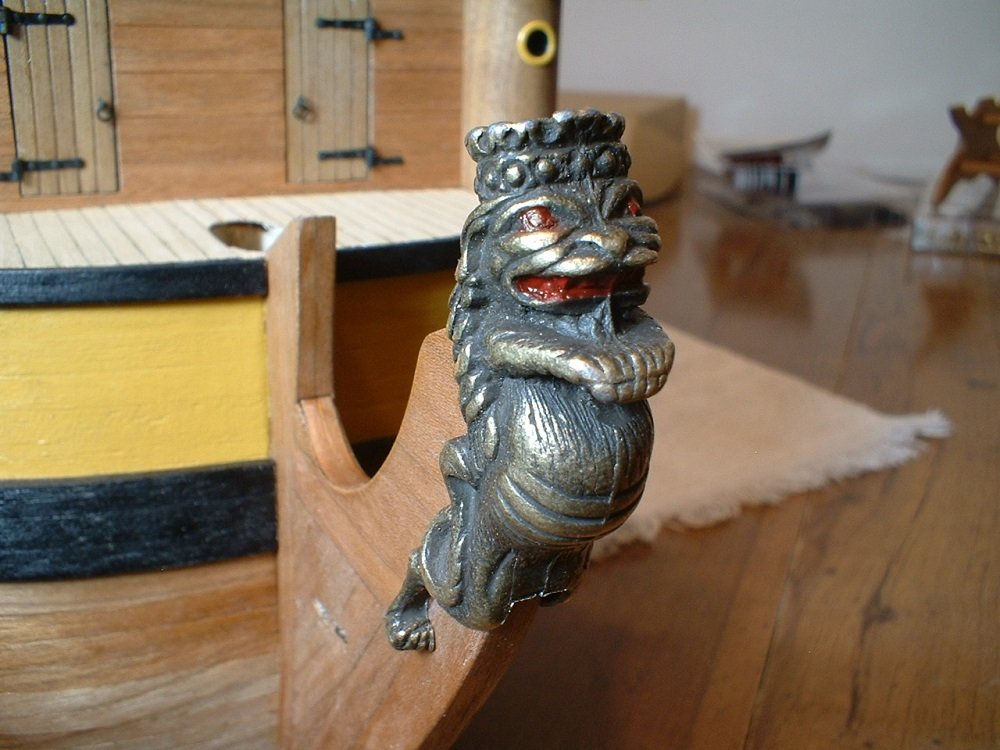
Hi - a little more progress. The next thing I did was installed the small poop deck.The columns across the front were to be made by cutting the large supplied columns in half,which would be a pain to do and get them all even,so, I used some from my stash that were just the right height. There was nothing at the transom to hold up the aft end of the deck,so I just glued a couple of pieces of wood to the transom to support the deck. Next, I started working on the bow. First thing to do was glue the figurehead in place. It was a bit heavy,so I added a pin at the back of the lion`s head to help hold it. Next was the cheeks & their rails. The cheeks & rails consisted of 2 pieces each & when glued together fit pretty good. They are to be painted black with a yellow stripe down the center - no problem painting them black, but much trouble painting the yellow stripes. So,I decided to use some very thin pinstriping tape instead. The tape was sealed down with 2 coats of clear. Then,the fairings for the hawse holes were glued in place & the holes drilled into the hull. Mark
.JPG.22d2d302463f9b5a32d38e1d75544675.JPG)
- 331 replies
-
- 11
-
-
- nuestra senora del pilar
- occre
- (and 1 more)
-
Thank you,zappto Mark
-
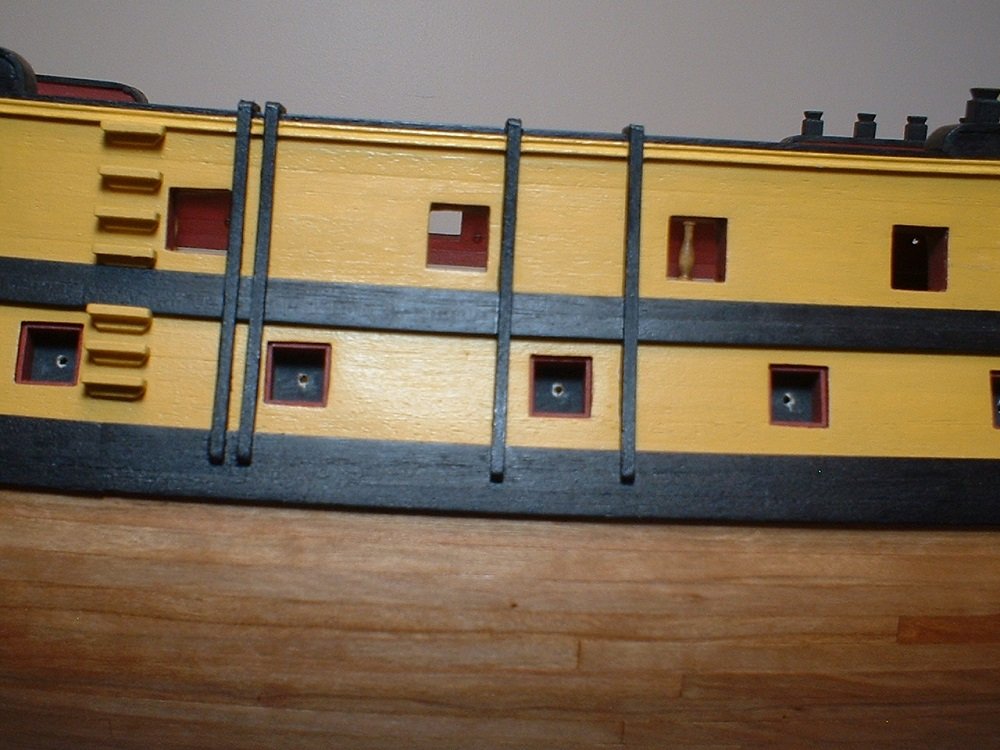
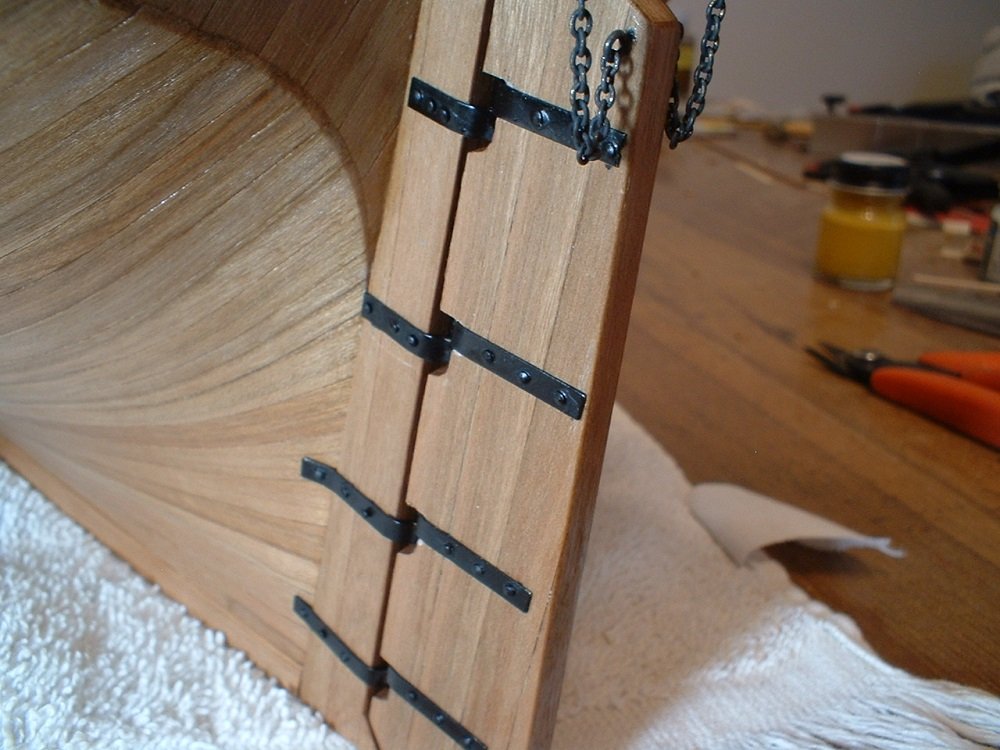
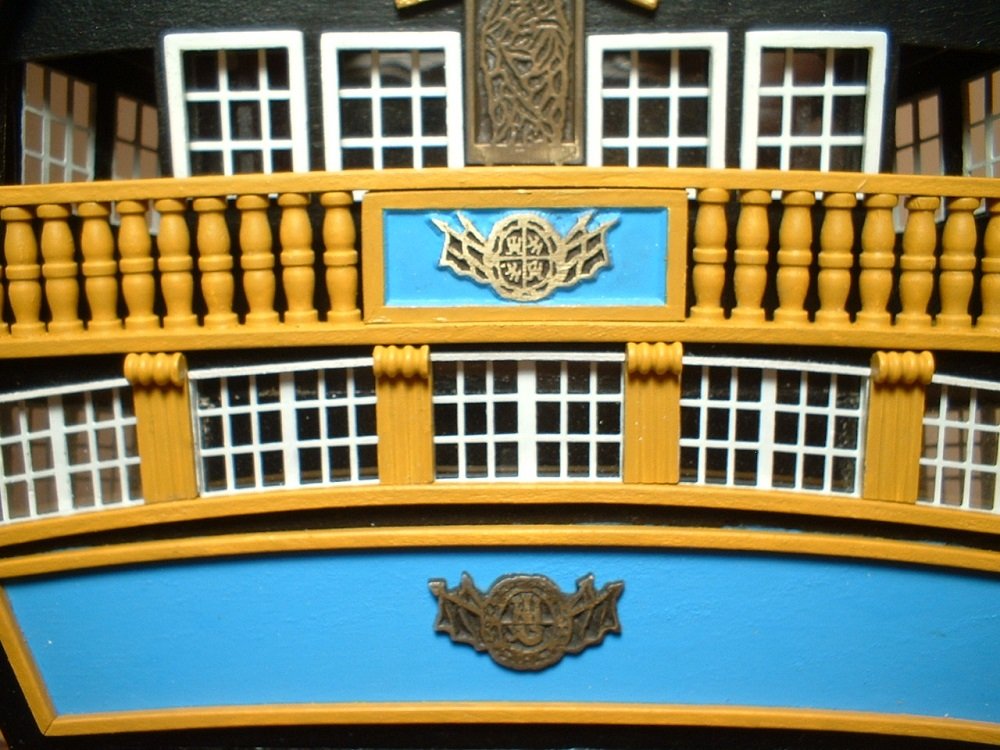
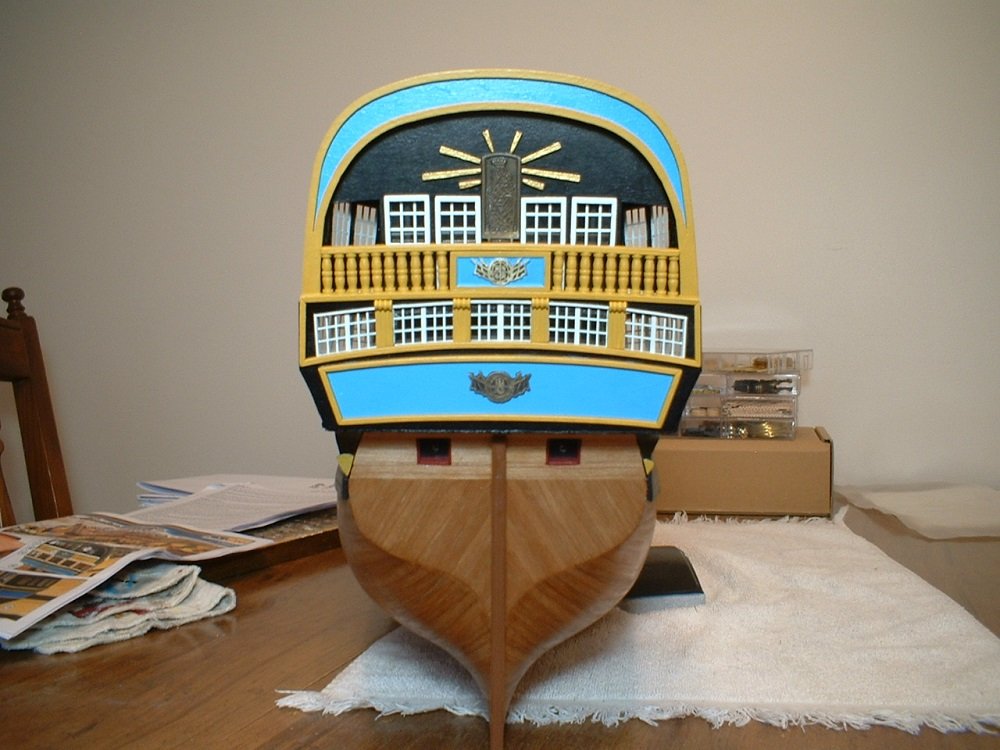
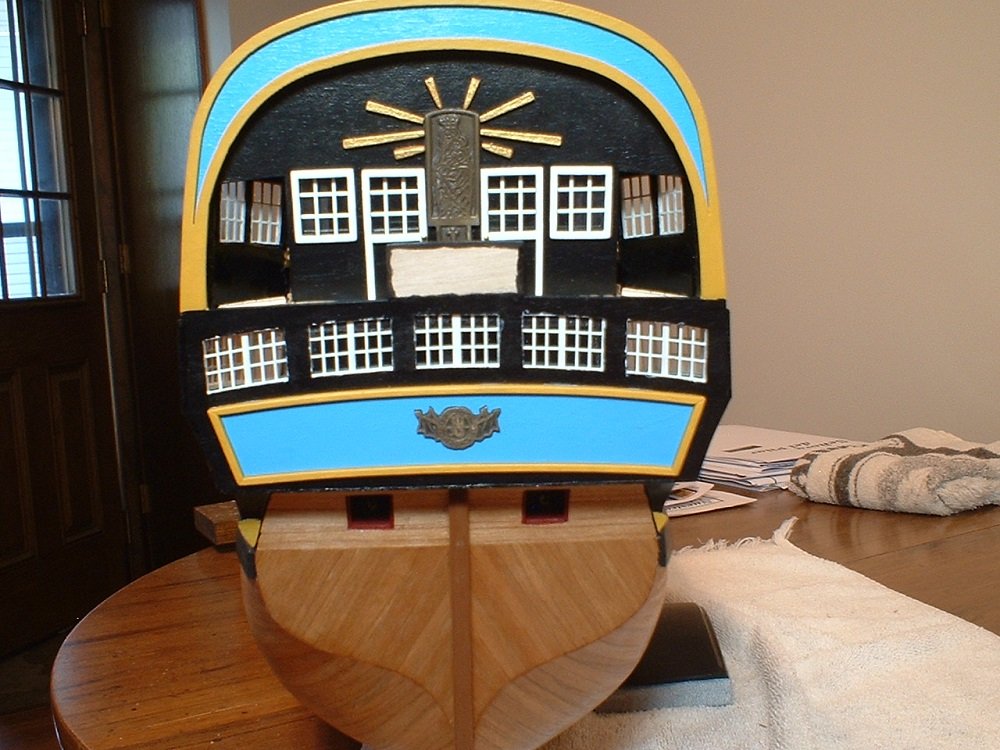
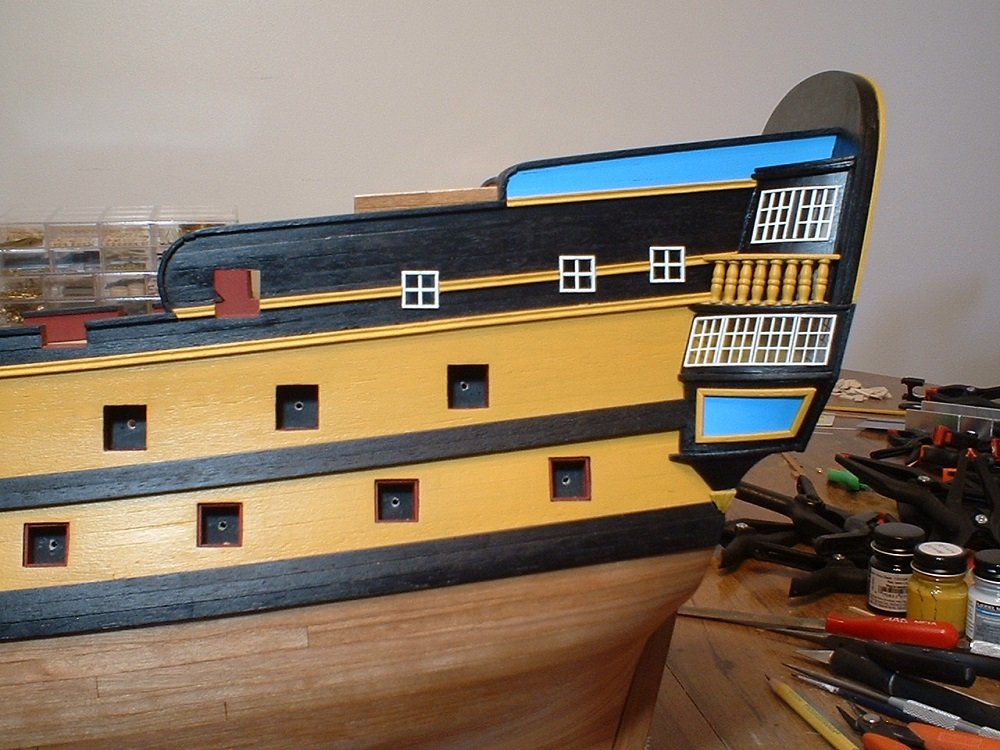
Hi everyone - the stern is now finished. The rudder & chains were installed along with the gunport lids. The instructions showed them 3/4 shut with no cannons,but I decided to show them open & added cannon barrels from my stash. They were made curved to match the curve of the counter. An afterthought of the stern problems - I think it all started with the lower row of windows. They were made with way too much curve in them, resulting in having to build the side sections too low so all the windows would line up. I took a picture of one of the pics in the instructions to show you what I mean. The stern fascia is laser cut & the windows are PE brass,so not a lot I could do with it without scratch building the whole thing(not gonna do that with this kit). Don`t know why they made the actual kit parts so different from what`s shown in the instruction manual. Mark

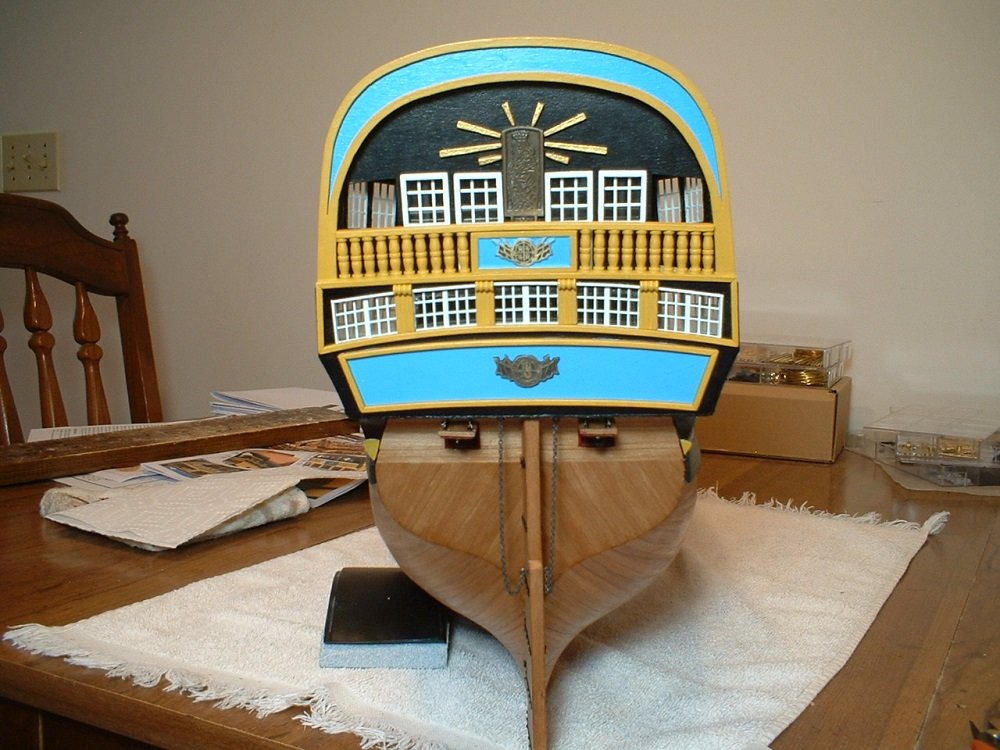
.JPG.3582616bd3943533a45c06ff1b9d41d0.JPG)
- 331 replies
-
- 9
-
-
- nuestra senora del pilar
- occre
- (and 1 more)
-
A little more progress.......The the railing & mouldings are now done,which nearly finishes the stern of the ship - came out better than the semi-disaster of the side galleries. Since I am not following the order of assembly of the instructions,I think I will finish off the stern by installing the rudder & making the 2 gunport lids. Mark
- 331 replies
-
- 7
-
-
- nuestra senora del pilar
- occre
- (and 1 more)
-
Hi everyone - a little more progress. More mouldings & some paint work done. Also,the railings for the galleries are now done - a bit fiddly to line up all the stanchions. More windows have also been added forward of the galleries. Still have another railing to make for the stern fascia,and of course, more mouldings. Thanks for looking in! Mark
- 331 replies
-
- 8
-
-
- nuestra senora del pilar
- occre
- (and 1 more)
-
Thanks Mike. Everything up to now went together really well with very little "adjustments",so it`s kind of a mystery why the stern is so far off.Also,I`m still fighting the plywood which tries to fall apart when I sand or file near the edges. I will soldier on,but no more OcCre kits for me! Mark