HOLIDAY DONATION DRIVE - SUPPORT MSW - DO YOUR PART TO KEEP THIS GREAT FORUM GOING! (Only 20 donations so far - C'mon guys!)
×


Patrick Haw
-
Posts
416 -
Joined
-
Last visited
Content Type
Profiles
Forums
Gallery
Events
Everything posted by Patrick Haw
-
Well done on the repair Grant! Seeing your beautiful work damaged like that almost brought a tear to my eye, but I think we've all been there, done that at some point in our modelling careers, it's just a question of how we respond and it sounds like you've brought her back to ship shape and Bristol fashion very quickly. Great work! Patrick
-
Hi Jerry, Congratulations on completing your hull. Man, you have built this thing so fast! She's looking great and you must be very proud of what you've done in a year. Well done! Patrick
-
Sean, One other thought on this...When you do the hull planking there's going to be a lot of moving the ship around, turning it upside down, etc. Also there's going to be lots and lots and lots of sanding dust flying around, getting into everything. If you've installed and rigged the guns before planking the hull you run a real risk of damaging the guns while planking, and clogging up all your beautiful rigging work with sanding dust. Patrick
-
Sean, I'm not familiar with the Mamoli kit, my Victory is Caldercraft, but I imagine the construction sequence is similar. Before you start installing guns I think you're going to have to plank the hull, first and second planking, then install and plank the inner bulwarks and locate the gunports. Only then can you set the guns in their proper locations and go ahead and rig them. As I said, I'm not a Mamoli expert, but I hope this helps Patrick
-
Beautiful work Mike, seriously good. I can't offer anything on the flags and pennants. Just wanted to admire! Patrick
-
Hi Sean, I made the same mistake on my Victory, but your middle upper gun deck ladder is pointed in the wrong direction. One should descend it looking forward
-
Jud, I agree. But $2,200? There's another site offering the same piece of crap for almost $2,800 Patrick
-
Laughing at the stern. They didn't get the stern even close. Wrong number of Windows and what is up with the stern decorations? And "HMS Victory" on the stern nameplate? Weak!
-
Is this the absolute worst model of the Victory ever? The nerve of these people asking almost $2,200 for this thing. There is so much wrong with this slab of wood that it's almost impossible to begin. I'd give them $2.00 for it for firewood. LINK Patrick
-
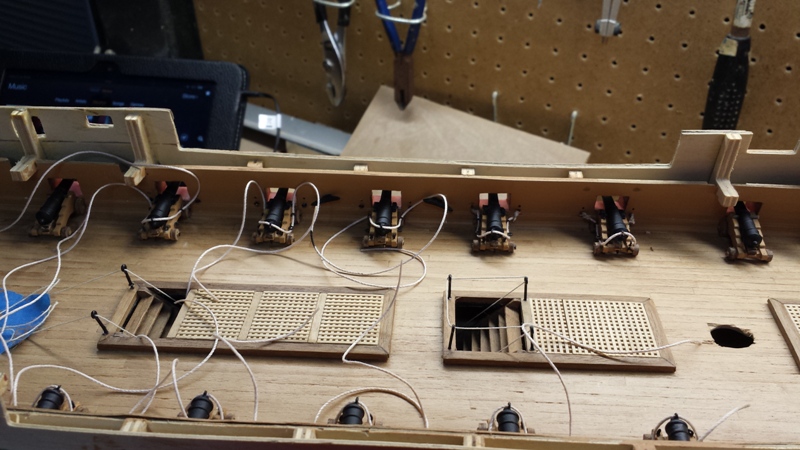
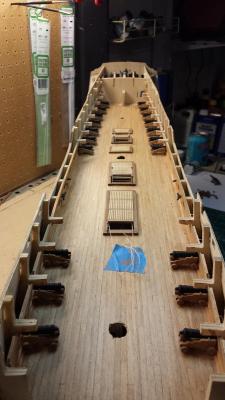
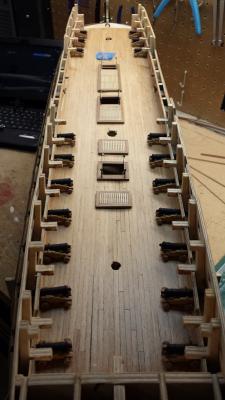
Hi Archicar There are 30 guns on the upper gun deck. When the quarter deck is put on 20 0f those guns will be completely covered up, never to be seen again, so I'm not rigging them at all. Once the quarter deck is in place there are 10 upper gun deck guns that will be visible under the skids that hold the ship's boats. I am going to fully rig these 10 guns with breech ropes, which controlled the gun's recoil, the 2mm blocks and tackles used for hauling the guns out, and the train tackles at the rear of the guns, used for hauling the guns inboard. Best wishes Patrick
-
Hi Glennard, So sorry to read about your major snafu with the bulkheads, but glad you caught it early enough in the build to be able to remedy it. I kind of feel bad that none of us Caldercraft Victory builders caught it while you had the bulkheads dry-fitted...looking back at your earlier photos the misplaced bulkheads do sort of stand out like a sore thumb! Oh well, welcome to the wonderful world of building this model! My own build log is a veritable catalog of mistakes and fixes! Best of luck
-
Thanks Dvaid, Mike, and Sjors, Sjors, I'm going to rig fully rig the 10 guns that showin the ship's waist. Just doing the breech ropes right now, then onto the side and train tackles. Be patient, I'm slow! Patrick
-
Hello David, Catching up on my favorite Victory builds and you're going along like gangbusters! Beautiful work on your rigging and an inspiration to those of us lagging a couple of years behind you! Great job! Patrick
- 439 replies
-
- 1
-

-
- victory
- caldercraft
- (and 1 more)
-
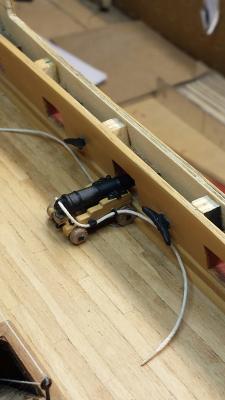
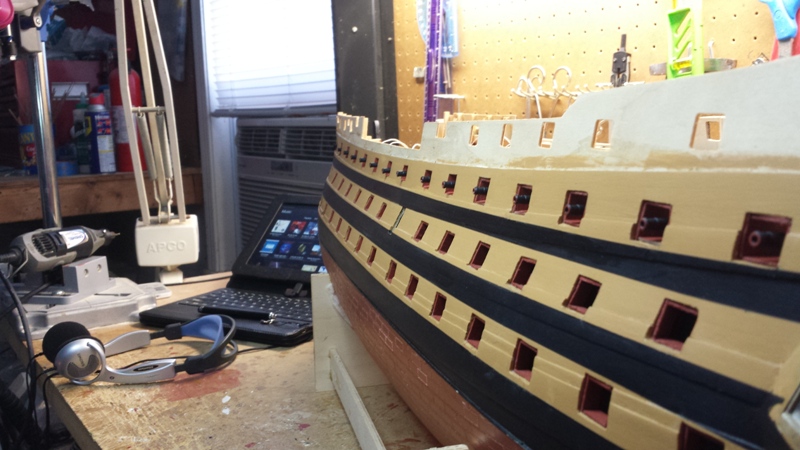
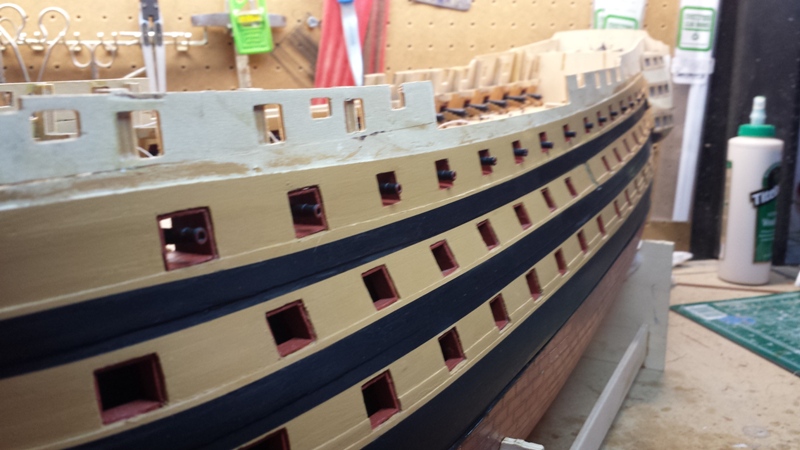
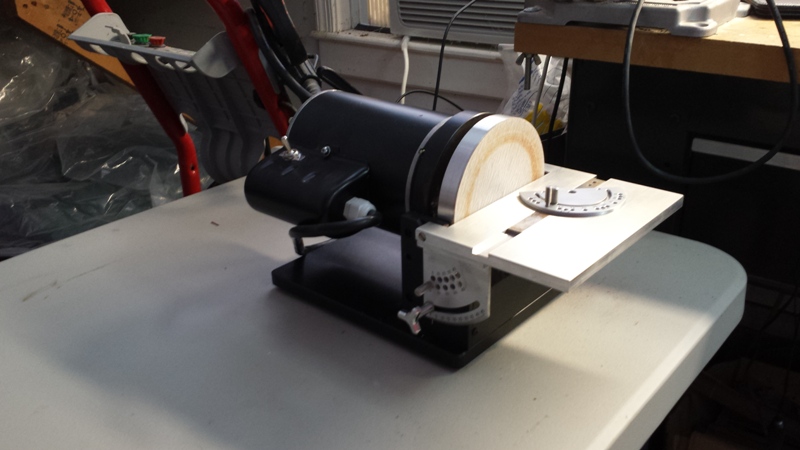
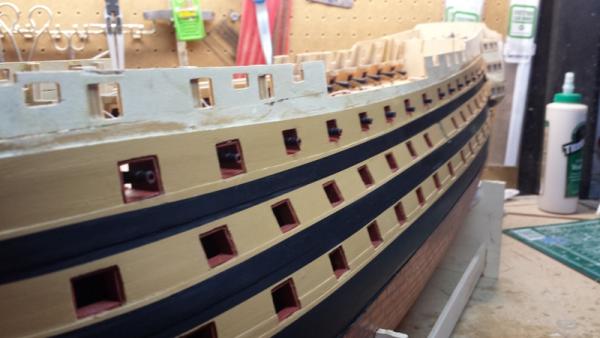
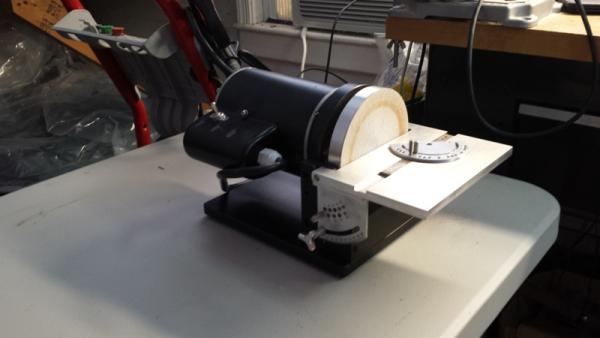
Been away from the shipyard for a few weeks, dealing with the holidays, visiting family, etc., so not a huge amount of progress. I finally finished lining the upper gun deck ports, which was harder than I thought as the inner bulwarks are not necessarily perfectly lined up with the outer gunport holes, which made for some interesting shaping of the gun port lining pieces, but it worked out ok and I don't think you can notice. Got the upper gun deck guns in place and have started rigging the breech ropes, so now she has some "teeth". Life in the shipyard has been made considerably easier by the arrival on Christmas Day of a Byrnes disk sander! Fantastic product and well worth the price, and Ed is a pleasure to deal with. It's going to get a lot of use. Here's a few update pictures. Like I said, not a huge amount of progress, but some! Happy New Year everyone. Patrick


-
Hi Sjors, Really glad to see you've made a start on Agamemnon. She's going to be a great build and I'm looking forward to following along. Good luck and enjoy her! Patrick
- 1,616 replies
-
- 1
-
-
- caldercraft
- agamemnon
- (and 1 more)
-
Welcome to the community of HMS Victory builders here at MSW. And no...there can never be too many Victories on here! Good luck with your build, you're off to a great start. Enjoy! Patrick
-
Hi Glennard, Just found your build log. Welcome to the HMS Victory builders here at MSW. Enjoy your build, you're going to be living with it a long time! As you progress you'll there's quite a lot in the manual that doesn't make sense or is just not there at all. Use all the other Caldercraft Victory build logs here and things get a lot clearer. There are so many excellent Victory builders here who are a wealth of information. Best of luck, and Merry Christmas! Patrick
-
Glad to see you broke off the bottom corners of you stern fascia too. You're in the club now! Patrick
-
Eric, Don't worry too much. You're doing fine. I'd fair and sand those back pieces down a bit so the stern counter sits tighter on them. You'll need a little bit of filler to make it seamless. Look, this kit is pretty good, but it's not perfect. They tell you up front that you need a bit of experience. I'm like you. I don't have much. But it's always been a dream to build this ship. There's a whole bunch of us here trying to figure it out, and a lot who already have. My build is only working because of them. Let's face it, none of our ships is going in a museum, we're building them for ourselves. Just enjoy your build and make it the best you can. I'll be following. Patrick
-
Hi Eric, Just catching up on your build. Well done on getting your first planking down. It looks good. The trick now is wood filler and sanding, sanding, sanding...more wood filler...and more sanding. Try to get the hull as smooth and shaped as you can and your second planking will go on much easier. Keep up the good work! Patrick
-
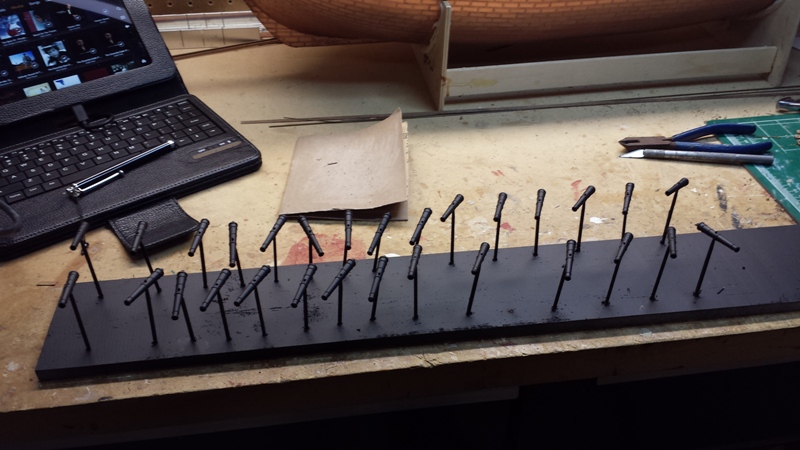
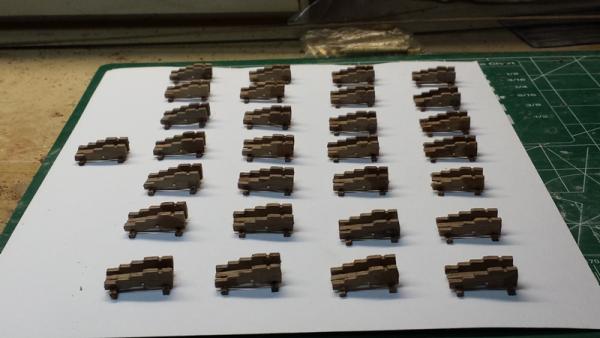
Been gun making this week. The 20 upper gun deck guns which will be invisible once the quarterdeck is in place are "bare bones" - barrel, carriage, quoin and wheels. I have the utmost respect and admiration for those builders who fully rig every one of the upper gun deck guns and then are quite content to cover them up, never to be seen again...I'm just not one of them!! The 10 guns which will be visible at the waist of the ship will be fully rigged with tackles, breech ropes, train tackles, etc. and are in the process of being built right now. I used primer and flat black spray paint on the barrels. The guns shown in the pictures are only temporarily there. I still have the last few gunports to line before gluing the guns in place. Patrick
-
Hello David, Just catching up with your build after beeing away the best part of a week...and wow! Amazing work with all your backstays and now getting on with the bowsprit. She really looks fantastic, well done! I'm moving at the speed of molasses and might be done with mine in time for Nelson's 300th birthday...I'll be 106 by then! Patrick
-
Just catching up with everyone after a few days away and, wow! That yard looks fantastic and all your time and effort in making those blocks is paying off in spades. The blocks look just fantastic and enhance the yard so much. Well done! Patrick
-
Hi Jerry, Been away for a few days and just catching up on your log. Still amazed by the speed you're keeping up with your build and she's looking great! One of the joys of a build like this is coming up with solutions to the various challenges that present themselves. It's all the more satisfying when you say "I fixed that!" Keep up the good work! Patrick
-
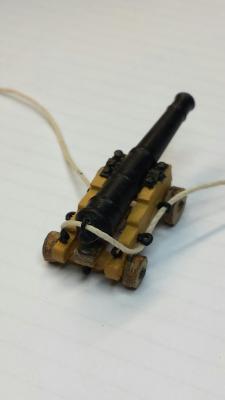
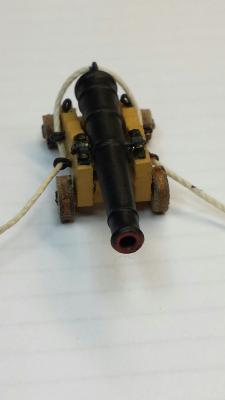
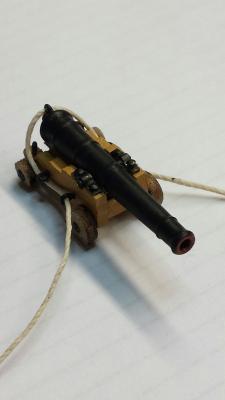
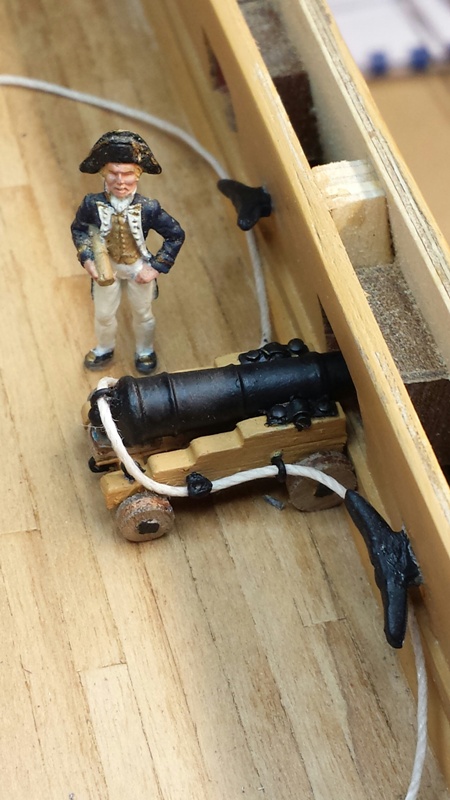
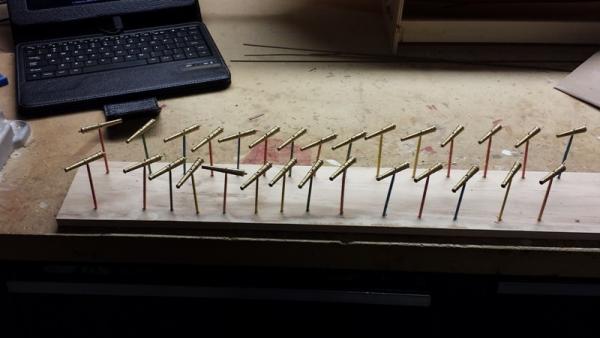
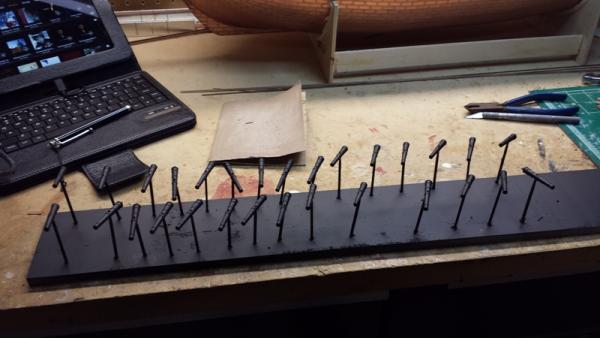
I've been away for the past week so not much activity to report. I made my first prototype cannon. I used copper rings for the eyebolts rather than the flimst brass etched eyebolts provided with the kit. Also used copper ring with the stem cut off for the breech rope ring on the trunion. The breech rope is 1mm thread rather than the 0.5mm suggested in the manual. I think it looks better and more realistic. After painting I did have to drill out the breech rop ring a little bit in order to pass the breech rope through it. I'm pleased with the result and as I get better at it I'll pick the best 10 guns to be positioned under the waist where they'll be viisible. This one will probably end up hidden under the quarter deck. Now in mass production of guns! Patrick