HOLIDAY DONATION DRIVE - SUPPORT MSW - DO YOUR PART TO KEEP THIS GREAT FORUM GOING! (Only 20 donations so far - C'mon guys!)
×


Patrick Haw
-
Posts
416 -
Joined
-
Last visited
Content Type
Profiles
Forums
Gallery
Events
Everything posted by Patrick Haw
-
Great work on the deck and treenails Sjors. I don't know how you juggle so many ships at once! Looking forward to more Aggy updates when you get back to her. By the way, did you know that the crew's nickname for her wasn't "Aggy", it was "Ham and Eggs"! Patrick
- 1,616 replies
-
- 1
-

-
- caldercraft
- agamemnon
- (and 1 more)
-
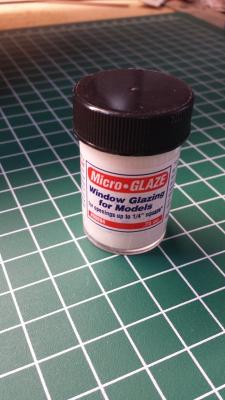
Grant, Come to think of it, it was probably your build log that gave me the idea for the Micro Glaze. I glazed my quarter galleries with the plastic sheet that came with the kit, but think I will cut that out and glaze each window frame with Mico Glaze prior to installation. Patrick
-
Rob, you're right, there's plenty of room for making mistakes and learning on parts of the upper gun deck that will be covered by the quarter deck, and trust me, I've made plenty of mistakes! I've been looking in on your build and you're doing great with your ladders and gratings on the upper gun deck. Patrick
-
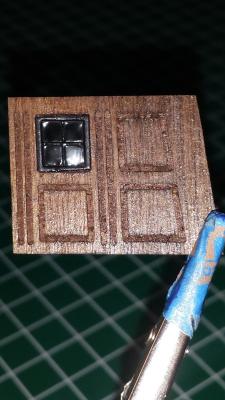
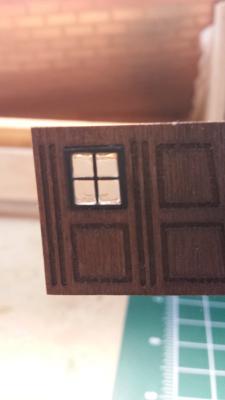
Still plugging away at planking the quarterdeck. Not as easy or straightforward as I thought, but coming along ok. For a change of pace I decided to start glazing the quarterdeck screen windows. I'd read about this "liquid glass" called Micro Glaze from MicroMark, so ordered some and it arrived today. It's a white liquid. You put some on a toothpick and run it around the edges of the window frame then use the toothpick to draw it across the frame opening, surface tension holds it in place and it dries clear. I think it's pretty good and the effect is of old glass which seems appropriate and it's actually quite transparent. Patrick
-
Hi Kevin, Purely for selfish reasons I need you working on Victory! I keep accumulating so much information from other Victory builders here who are much further along on their builds than I, and you're one of them. So get on with her! Patrick
- 1,319 replies
-
- 1
-
-
- caldercraft
- Victory
- (and 1 more)
-
Hi Rob, Just catching up on your build. Very nice job on the coppering. Mine took forever to do, but I'm pleased with the result. Once I completed the coppering I polished the tiles with copper polish and then sprayed two or three coats of clear satin polyurethane on the copper to prevent oxydation. So far it's holding up just fine and my workspace is subject to big changes in temperature, humidity, etc. Hope this helps. Patrick
- 295 replies
-
- 1
-
-
- victory
- caldercraft
- (and 1 more)
-
Well Jerry, she's looking very nice indeed. I can't believe the speed with which you've been able to reach this point. It must be a good feeling to be putting the masts in her. I'll get there one day! Patrick
-
Beautiful work David. She's alive, ready to drive into the French and Spanish fleet and do what she was built to do. Just wonderful! Patrick
- 439 replies
-
- 1
-
-
- victory
- caldercraft
- (and 1 more)
-
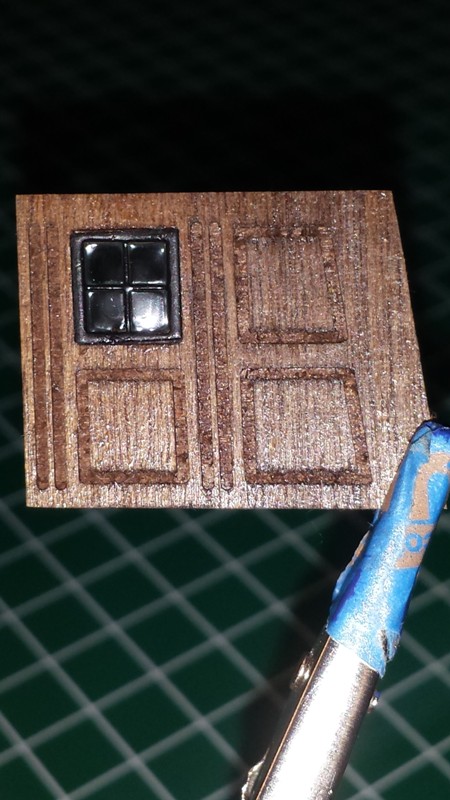
A quick update and a couple of photos. Skid beam support pillars are now in place and I've made up the quarterdeck screen and dry fitted it for marking on the bulwarks. Put a couple of coats of walnut stain on the screen, followed by clear satin polyurethane. I decided to make the window frames black rather than the yellow ochre suggested. Pictures of the real ship indicate these window frames were black or dark brown. I haven't glazed these windows yet as the screen will be set aside for a while and I'll glaze them before final installation. Just need to take off the stubs of bulkhead 14 and sand down to deck level and I'm ready to start planking the deck. Patrick


-
Hi Glenn, Coming along nicely. Slow and painstaking, but worth the effort. Don't worry about the slight bump in the gunport strips as they curve around the bow. I think everybody has experienced them. You're right, filling and sanding and everything will be just fine. Keep up the good work. Patrick
-
Fantastic work David. As you close in on finishing this amazing model are you going to miss building her, or glad it's over with? Patrick
-
Wonderful work Gil. The level of detail is just spectacular. Just fitted my quarterdeck so your finished quarterdeck is an inspiration for me to charge ahead and try, just try, to emulate you. I won't come close, you've set the bar pretty darned high! Thanks for sharing. (Oh, and go Niners ) Patrick
-
The quarter deck is in place and we move onto a new phase of the build! It went in pretty smoothly, although a few tense moments and is glued and pinned to dry overnights. There is a gap on one side of the skid beam surround but the surround will be sanded down and after the deck is planked there will be wood strips placed on either side of the skid beam assemply, so the gap won't show. It's been a good day. Quarterdeck is in and Chelsea beat Manchester United. I think I'll splice the mainbrace and (for my American friends here) will watch the San Francisco 49ers beat the Seattle Seahawks and head to the Super Bowl! Cheers Patrick


-
Hi Glenn, She's coming along fine. You'll find those balsa fillers at the stern and bow will make the planking a lot easier, although I only used fillers at the bow. Patrick
-
Looking good Sean. Always a good feeling to get that first plank on. You're on the way to having a hull! Patrick
-
Thanks Glenn & Rob. Here we go with installing the quarter deck. On problem I ran into was the positioning of the camber beams. According to the plans, they're all supposed to sit aft of their respective bulkheads, but the positioning the upper gun deck inner bulwarks to line the gun ports up with the outer bulwark gun port opening means that the slots for the camber beams don't all sit aft of the bulkheads, some sit in front of them. So some of my camber beams are aft of the bulkhead, some forward. I really don't think it makes any difference and nobody is going to see the camber beams anyway. So onward and upward. Installing the quarter deck isn't as complicated and intimidating as the manual makes it seem. The key is in preparation..sanding the quarter deck sheet so it fits just right, making sure the skid beam assembly fits easily into the waist cut out, making up the bitts, etc. In the pictures the deck is glued in place from bulkheads 13 to 17. The bitts are in place but just held by a clamp and will be glued to the upper gun deck later. I raided the Admiral's clothes pin supply and am waiting for the skid beam assembly to glue up, then will complete the installation of the quarter deck. Feels like I'm having fun now! Patrick


-
Thanks David, Sjors, Grant, and Eric for the posts and compliments. All cannon balls present and accounted for and I have finally finished the upper gun deck and have built the skid beams, upper deck fore brace bitt, and fore brace bitt pins, sanded and dry-fitted the quarter deck and am ready to start installing it. Should have the quarter deck in place by tomorrow so feeling like I've made a great leap forward after living with the upper gun deck for months! I'll put up some photos when the quarter deck is in place. Patrick
-
Hi Glenn, I moved to the United States about 40 years ago and now live in Maryland. I get back over to the UK fairly often though and have been up in Yorkshire re-visiting old haunts a few times. My grandparents lived in Marske so I'm very familiar with the Yorkshire coast...Bridlington, Scarborough, Whitby, Robin Hood's Bay. Hope you enjoy the Hartlepool Maritime Museum and maybe get a visit in with David. Patrick
-
Hi Gary, Welcome to the club. You're off to a great start and I will follow with interest. Good luck and enjoy! Patrick
-
Hi Glenn, Thanks for looking at My log. I've been at it for a year so you're on track. Enjoy your build. It's a hobby, not a race! I grew up in Hull, so going to Scarborough was a regular summer event. Patrick
-
Uh oh, just noticed there's a cannon ball missing from the rack at the front of the middle companionway! Somebody rolling cannon balls on the deck in the second watch? Not a good sign! Patrick
-
Time for a quick update. After poring over all the Victory build logs here I noticed that very few people did the side tackles for the uppergun deck guns, but only did the rear tackle. This makes sense to me as very little of the detail on these guns will be visible once the ship is completed (in abut 25 years at my rate of work!). So I decided to skip the side tackles too. Rigging the guns has been very time-consuming with a lot of trial and error and do overs. I orginally intended to attach hooks to the tackle blocks a la Gil Middleton. Made my own hooks out of copper eyebolts and everything, but when I rigged the prototype the blocks were too close together and didn't look right, so scratch that idea. I used 3mm blocks with a double block at the rear of the gun and a single block attached to the eyebolt in the deck. Looks ok I think. I then made rope coils for each tackle. Trial and error again. The trick is to get the right mix of water and PVA glue to brush the finished coils with. At first I used too little glue and the coils just fell apart when I peeled them of the masking tape backing. I just kept adding glue to the mix until I got it right and the coils dry into hard little disks. A bit of black paint touch up needed on some of the gun eyebolts, but no problem. I think I may be done with the upper gun deck this week and can move on to getting the quarter in place. Patrick


-
Hi Eric, Just catching up on your log and have to say I'm a bit confused. When you posted last in November you had completed the first planking and were working on the stern facia. In your latest post you mention receiving new hull parts and it looks like you're back to working on fitting the keel and bulkheads. What happened? Did I miss something? Patrick
-
Hi Glenn, If I were you I'd paint the entire area around the gun dummy barrel strips black...floor, bulwarks, the lot. They are all visible through the gun ports and unpainted wood will show with no way to fix it if you don't paint them now. Yes, fixing the ledges around the inside of the gun port openings now is a very good idea. It will save you a lot of time and grief later on when you line the gunports. You're doing fine, keep it up. Patrick
-
Hi Glenn, That looks much better...all the bulkheads in the right place and you're off and running again! Good luck with her. Patrick