yvesvidal
-
Posts
3,641 -
Joined
-
Last visited


.thumb.jpeg.ee4d205046163acd786c8b7e92026d43.jpeg)


-
 Fundysnapper reacted to a post in a topic:
Elsie by Fundysnapper - Model Shipways - 1:96 scale
Fundysnapper reacted to a post in a topic:
Elsie by Fundysnapper - Model Shipways - 1:96 scale
-
yvesvidal reacted to a post in a topic:
Bismarck by Jeff 59 - Trumpeter - 1/200 - PLASTIC
-
yvesvidal reacted to a post in a topic:
Bismarck by Jeff 59 - Trumpeter - 1/200 - PLASTIC
-
yvesvidal reacted to a post in a topic:
Bismarck by Jeff 59 - Trumpeter - 1/200 - PLASTIC
-
yvesvidal reacted to a post in a topic:
Bismarck by Jeff 59 - Trumpeter - 1/200 - PLASTIC
-
yvesvidal reacted to a post in a topic:
Bismarck by Jeff 59 - Trumpeter - 1/200 - PLASTIC
-
yvesvidal reacted to a post in a topic:
Messerscmitt Bf-109G-5/G-6 by BLACK VIKING - FINISHED - Airfix - 1/24 - PLASTIC
-
yvesvidal reacted to a post in a topic:
Bismarck by Jeff 59 - Trumpeter - 1/200 - PLASTIC
-
yvesvidal reacted to a post in a topic:
MV/HMNLS Macoma 1935/1942 by FreekS - 1:144 - 3D-print - RADIO
-
yvesvidal reacted to a post in a topic:
Smit Rotterdam by Riotvan88 - Billing Boats
-
yvesvidal reacted to a post in a topic:
Smit Rotterdam by Riotvan88 - Billing Boats
-
 robert952 reacted to a post in a topic:
Emma C Berry by cdrusn89 - Model Shipways - 1/32
robert952 reacted to a post in a topic:
Emma C Berry by cdrusn89 - Model Shipways - 1/32
-
cdrusn89 reacted to a post in a topic:
Emma C Berry by cdrusn89 - Model Shipways - 1/32
-
 Both methods have their challenges. Yves
 -
Yes, the box includes additional wood that can be used to build the scaffolding and stands. Yves
-
Canute reacted to a post in a topic:
Fischkutter by Bryan Woods - FINISHED - Laser Creation World - 1:35
-
Bryan Woods reacted to a post in a topic:
Fischkutter by Bryan Woods - FINISHED - Laser Creation World - 1:35
-
Fantastic work Bryan. That model looks so much like the old fishing vessel, I used to see when I was a kid in France. Yves
- 45 replies
-
- 2
-
-
-
- Fischkutter
- Laser Creation World
- (and 1 more)
-
scrubbyj427 reacted to a post in a topic:
HMS Portland 1770 by scrubbyj427 - 1:48 - 4th rate 50-gun ship
-
AON reacted to a post in a topic:
HMS Bellona 1760 by SJSoane - Scale 1:64 - English 74-gun - as designed
-
Absolutely amazing, I am in awe!! For having built the same model in 1/48th scale, I have to admire and respect the precision, and cleanliness of your construction, Mark. You are a true artist. Yves
-
ERS Rich reacted to a post in a topic:
HONDA CB750 Four K0 by yvesvidal - TAMIYA 1/6 and MPC 1/8
-
ERS Rich reacted to a post in a topic:
HONDA CB750 Four K0 by yvesvidal - TAMIYA 1/6 and MPC 1/8
-
Rustyj reacted to a post in a topic:
HMS Portland 1770 by scrubbyj427 - 1:48 - 4th rate 50-gun ship
-
Really tempted to get that kit. It would fit well next to my CAF Bellona.... Arghh... not enough time !!! Yves
-
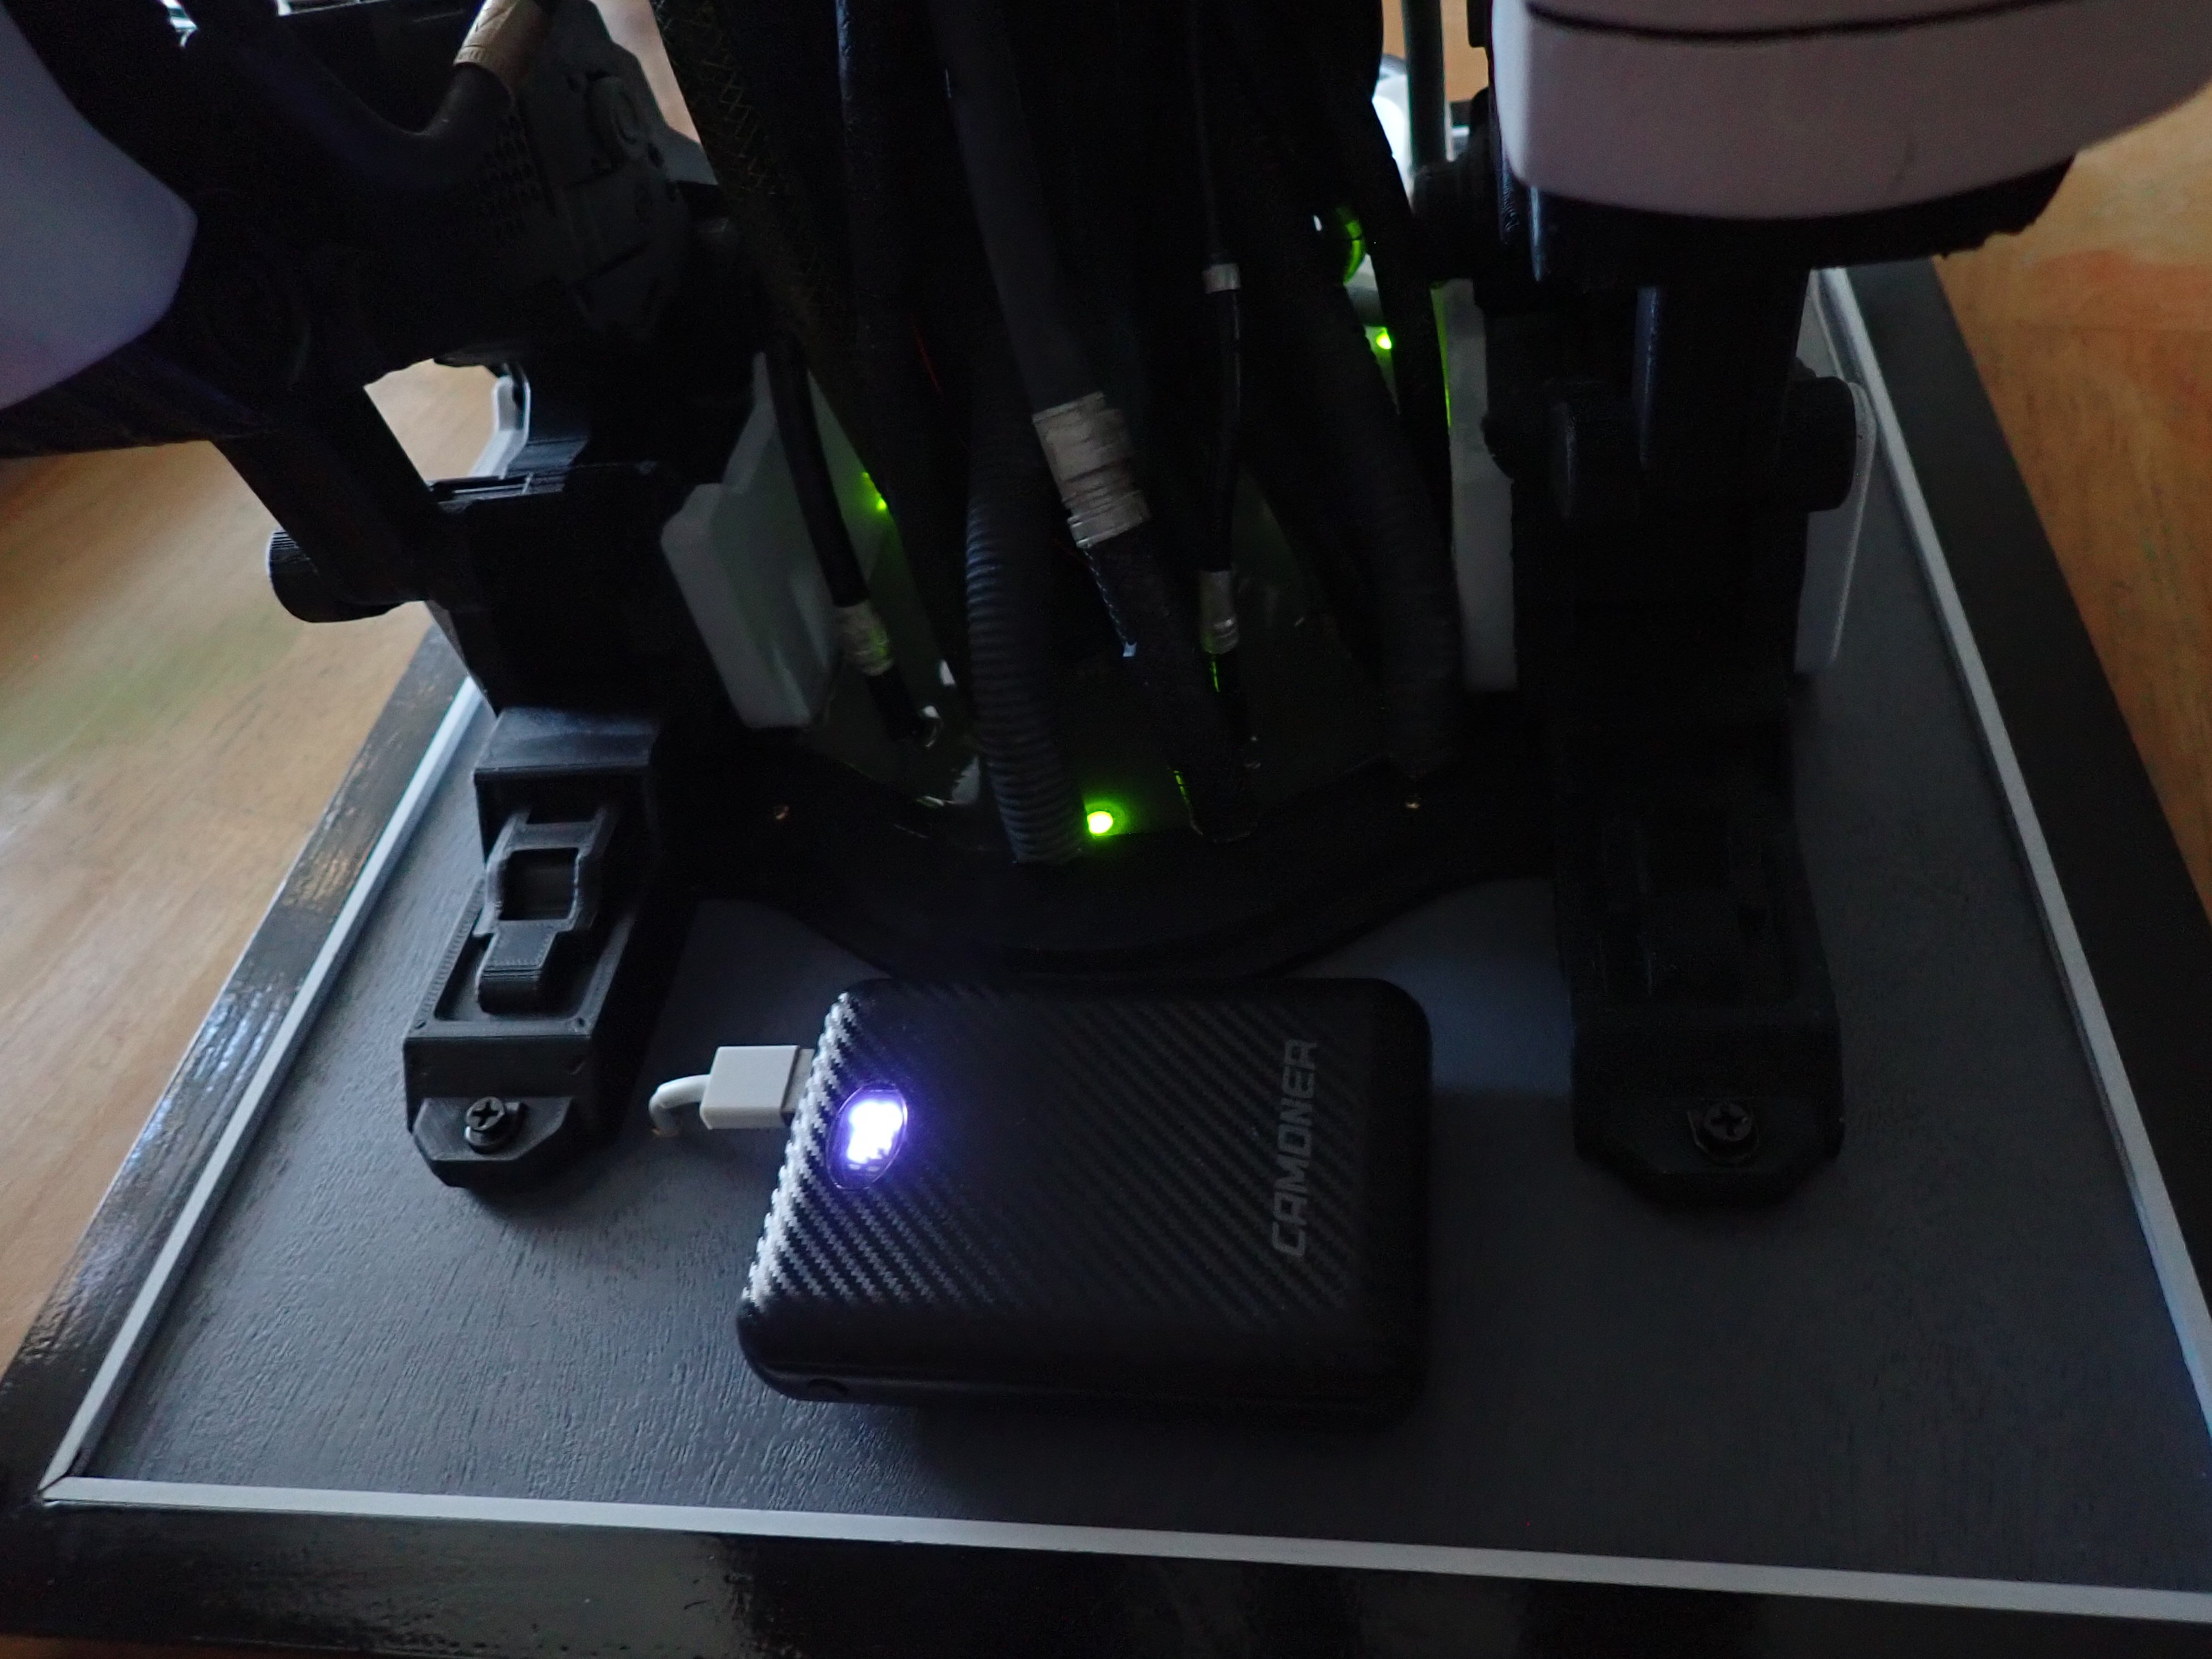
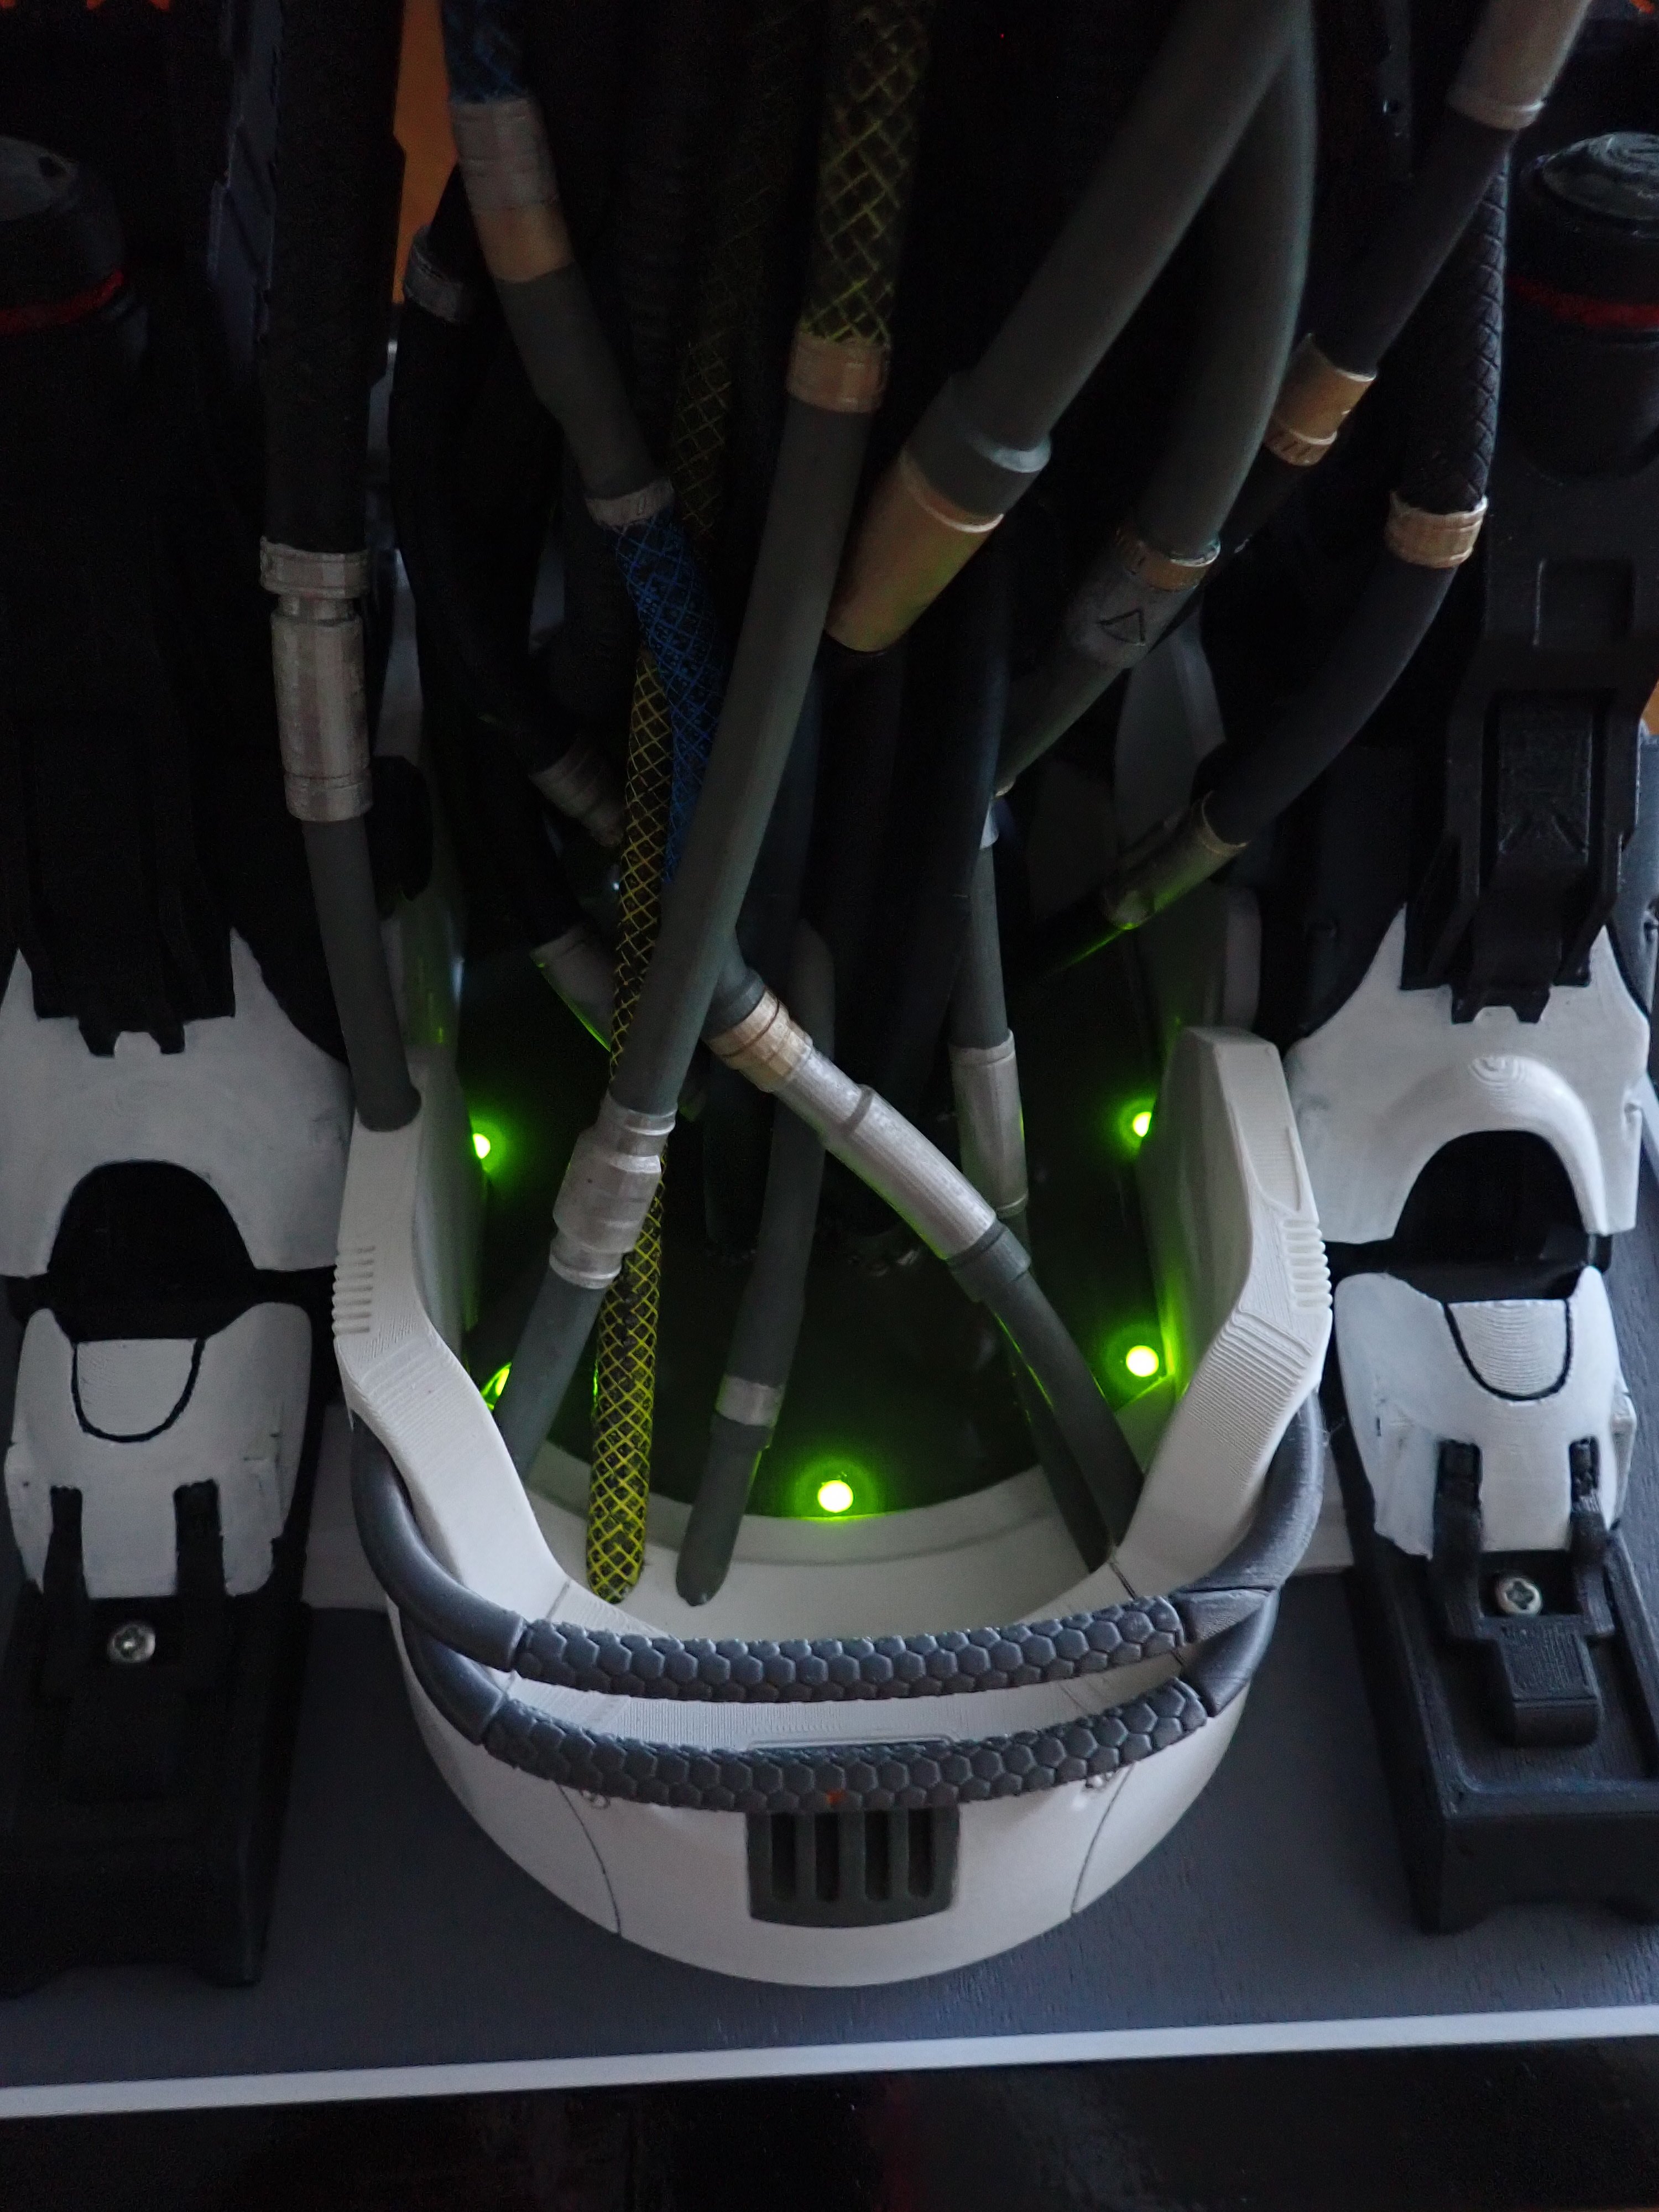
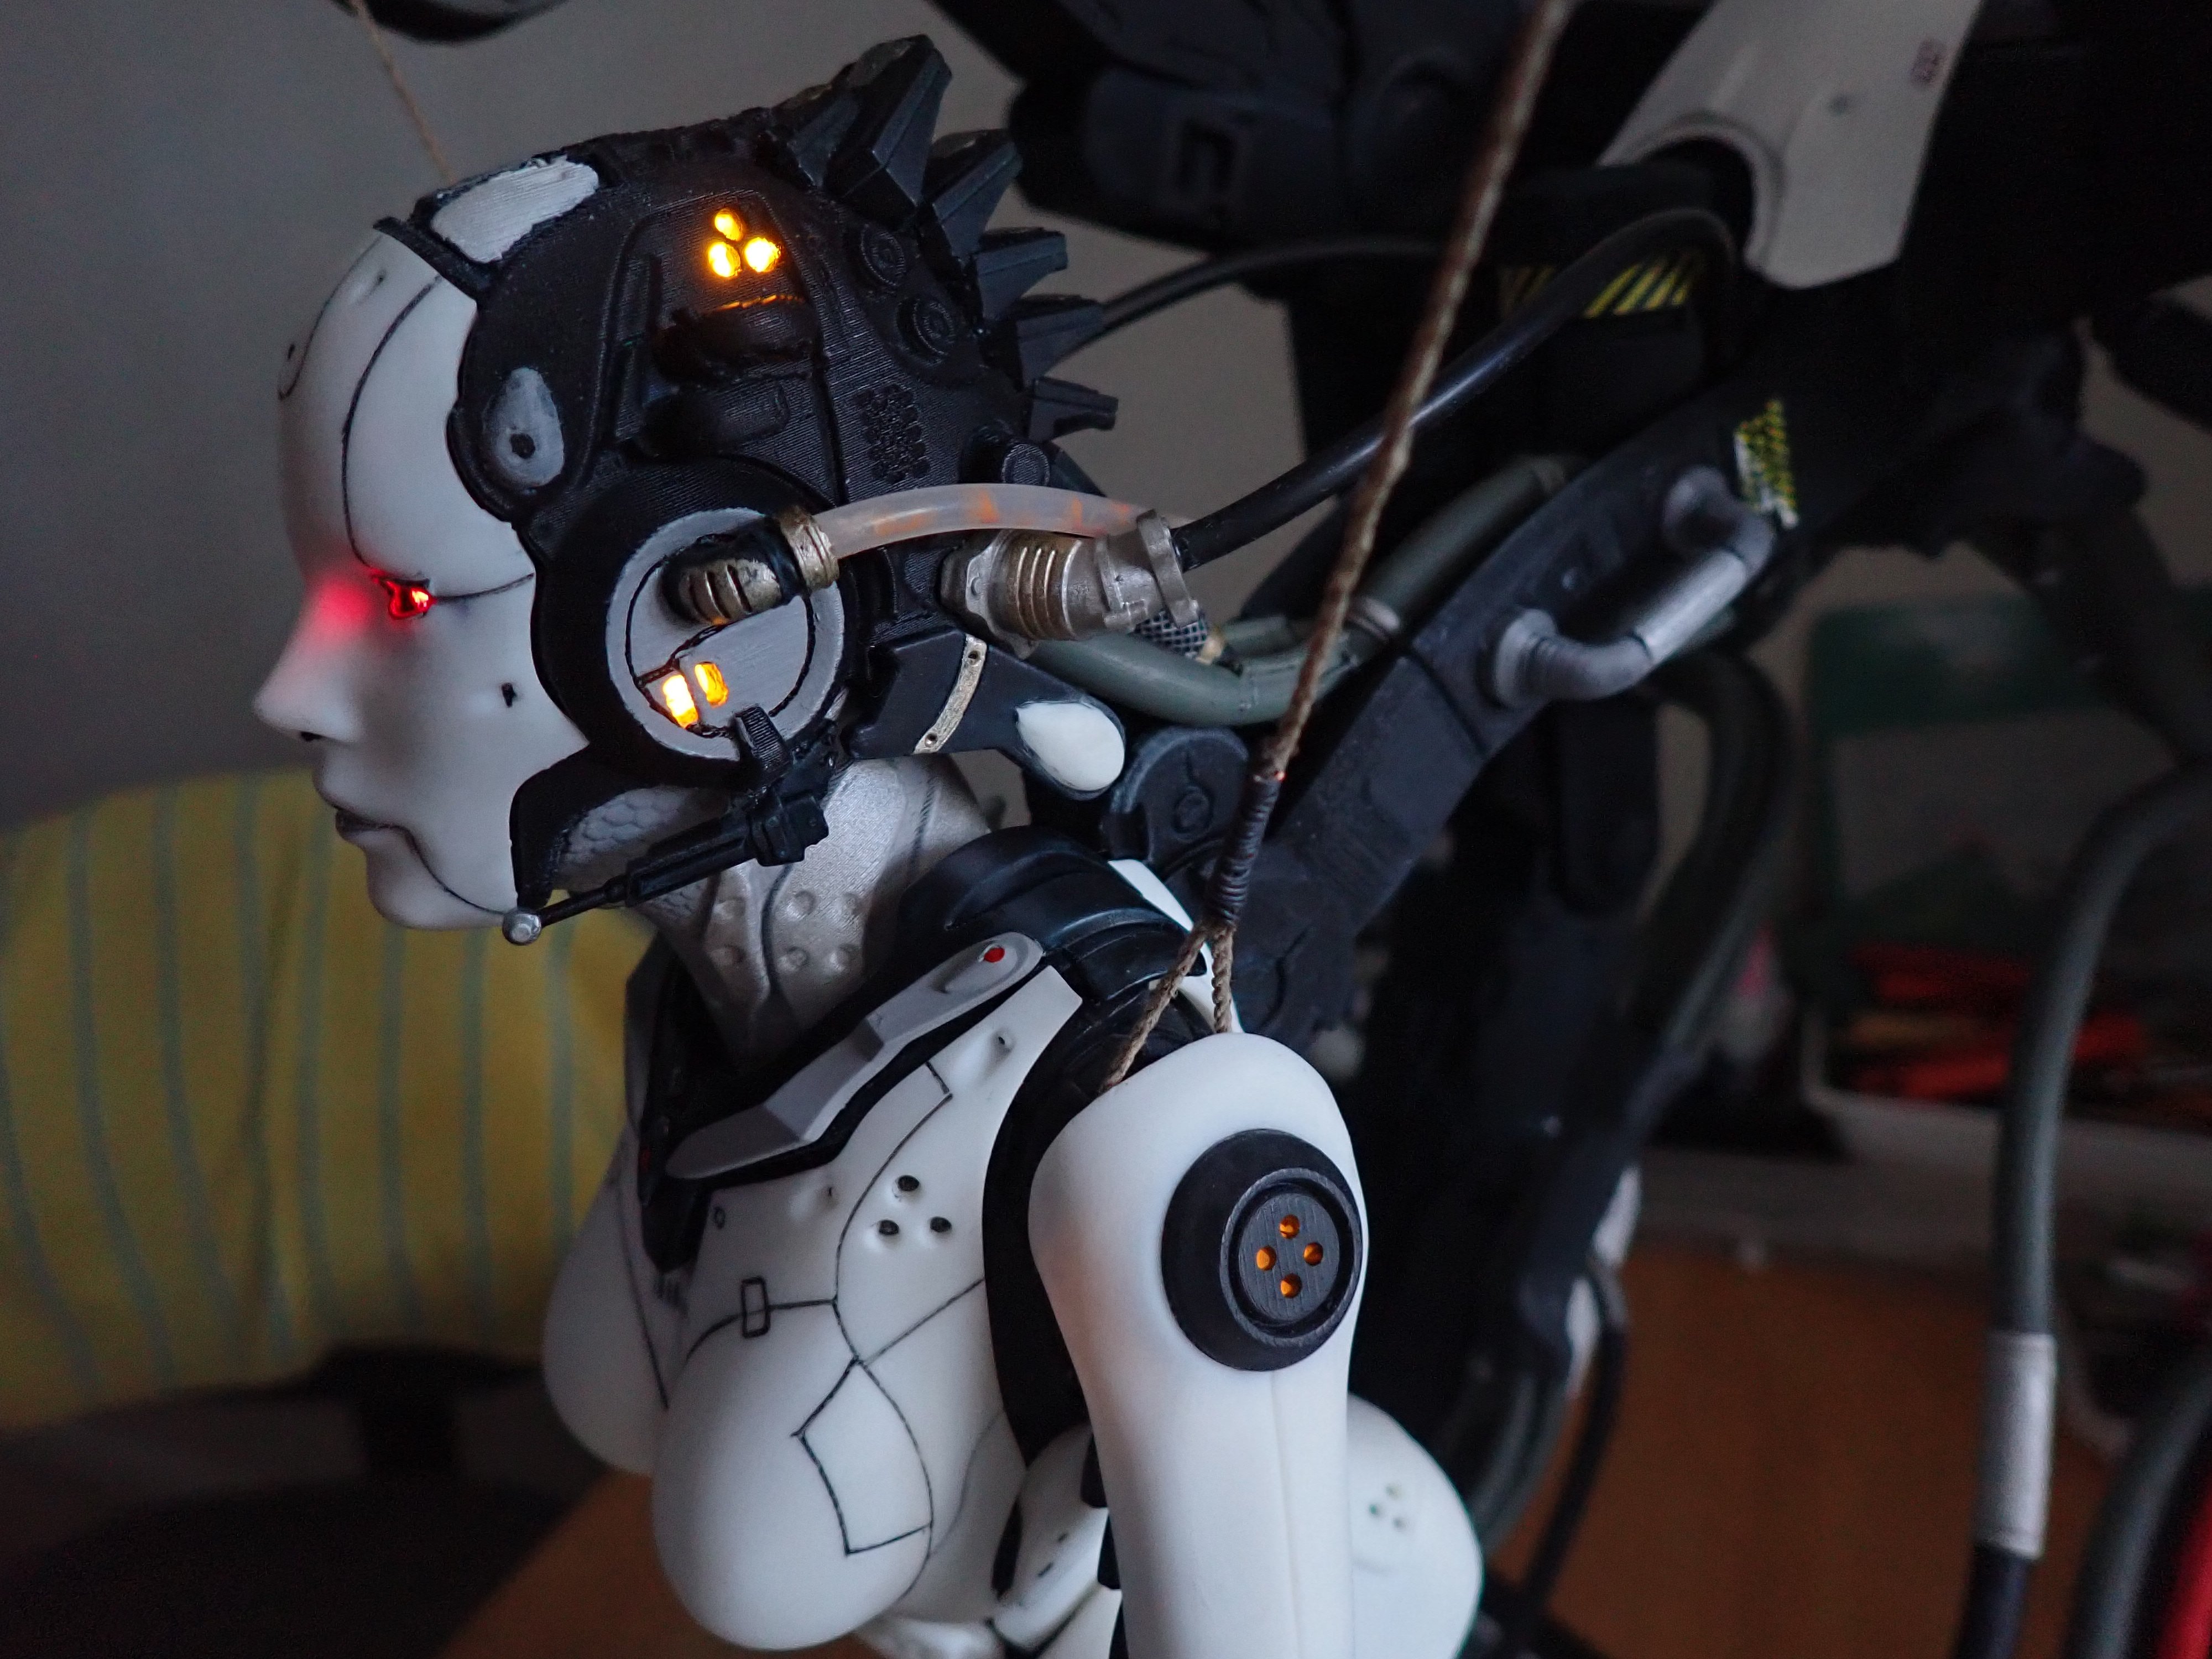
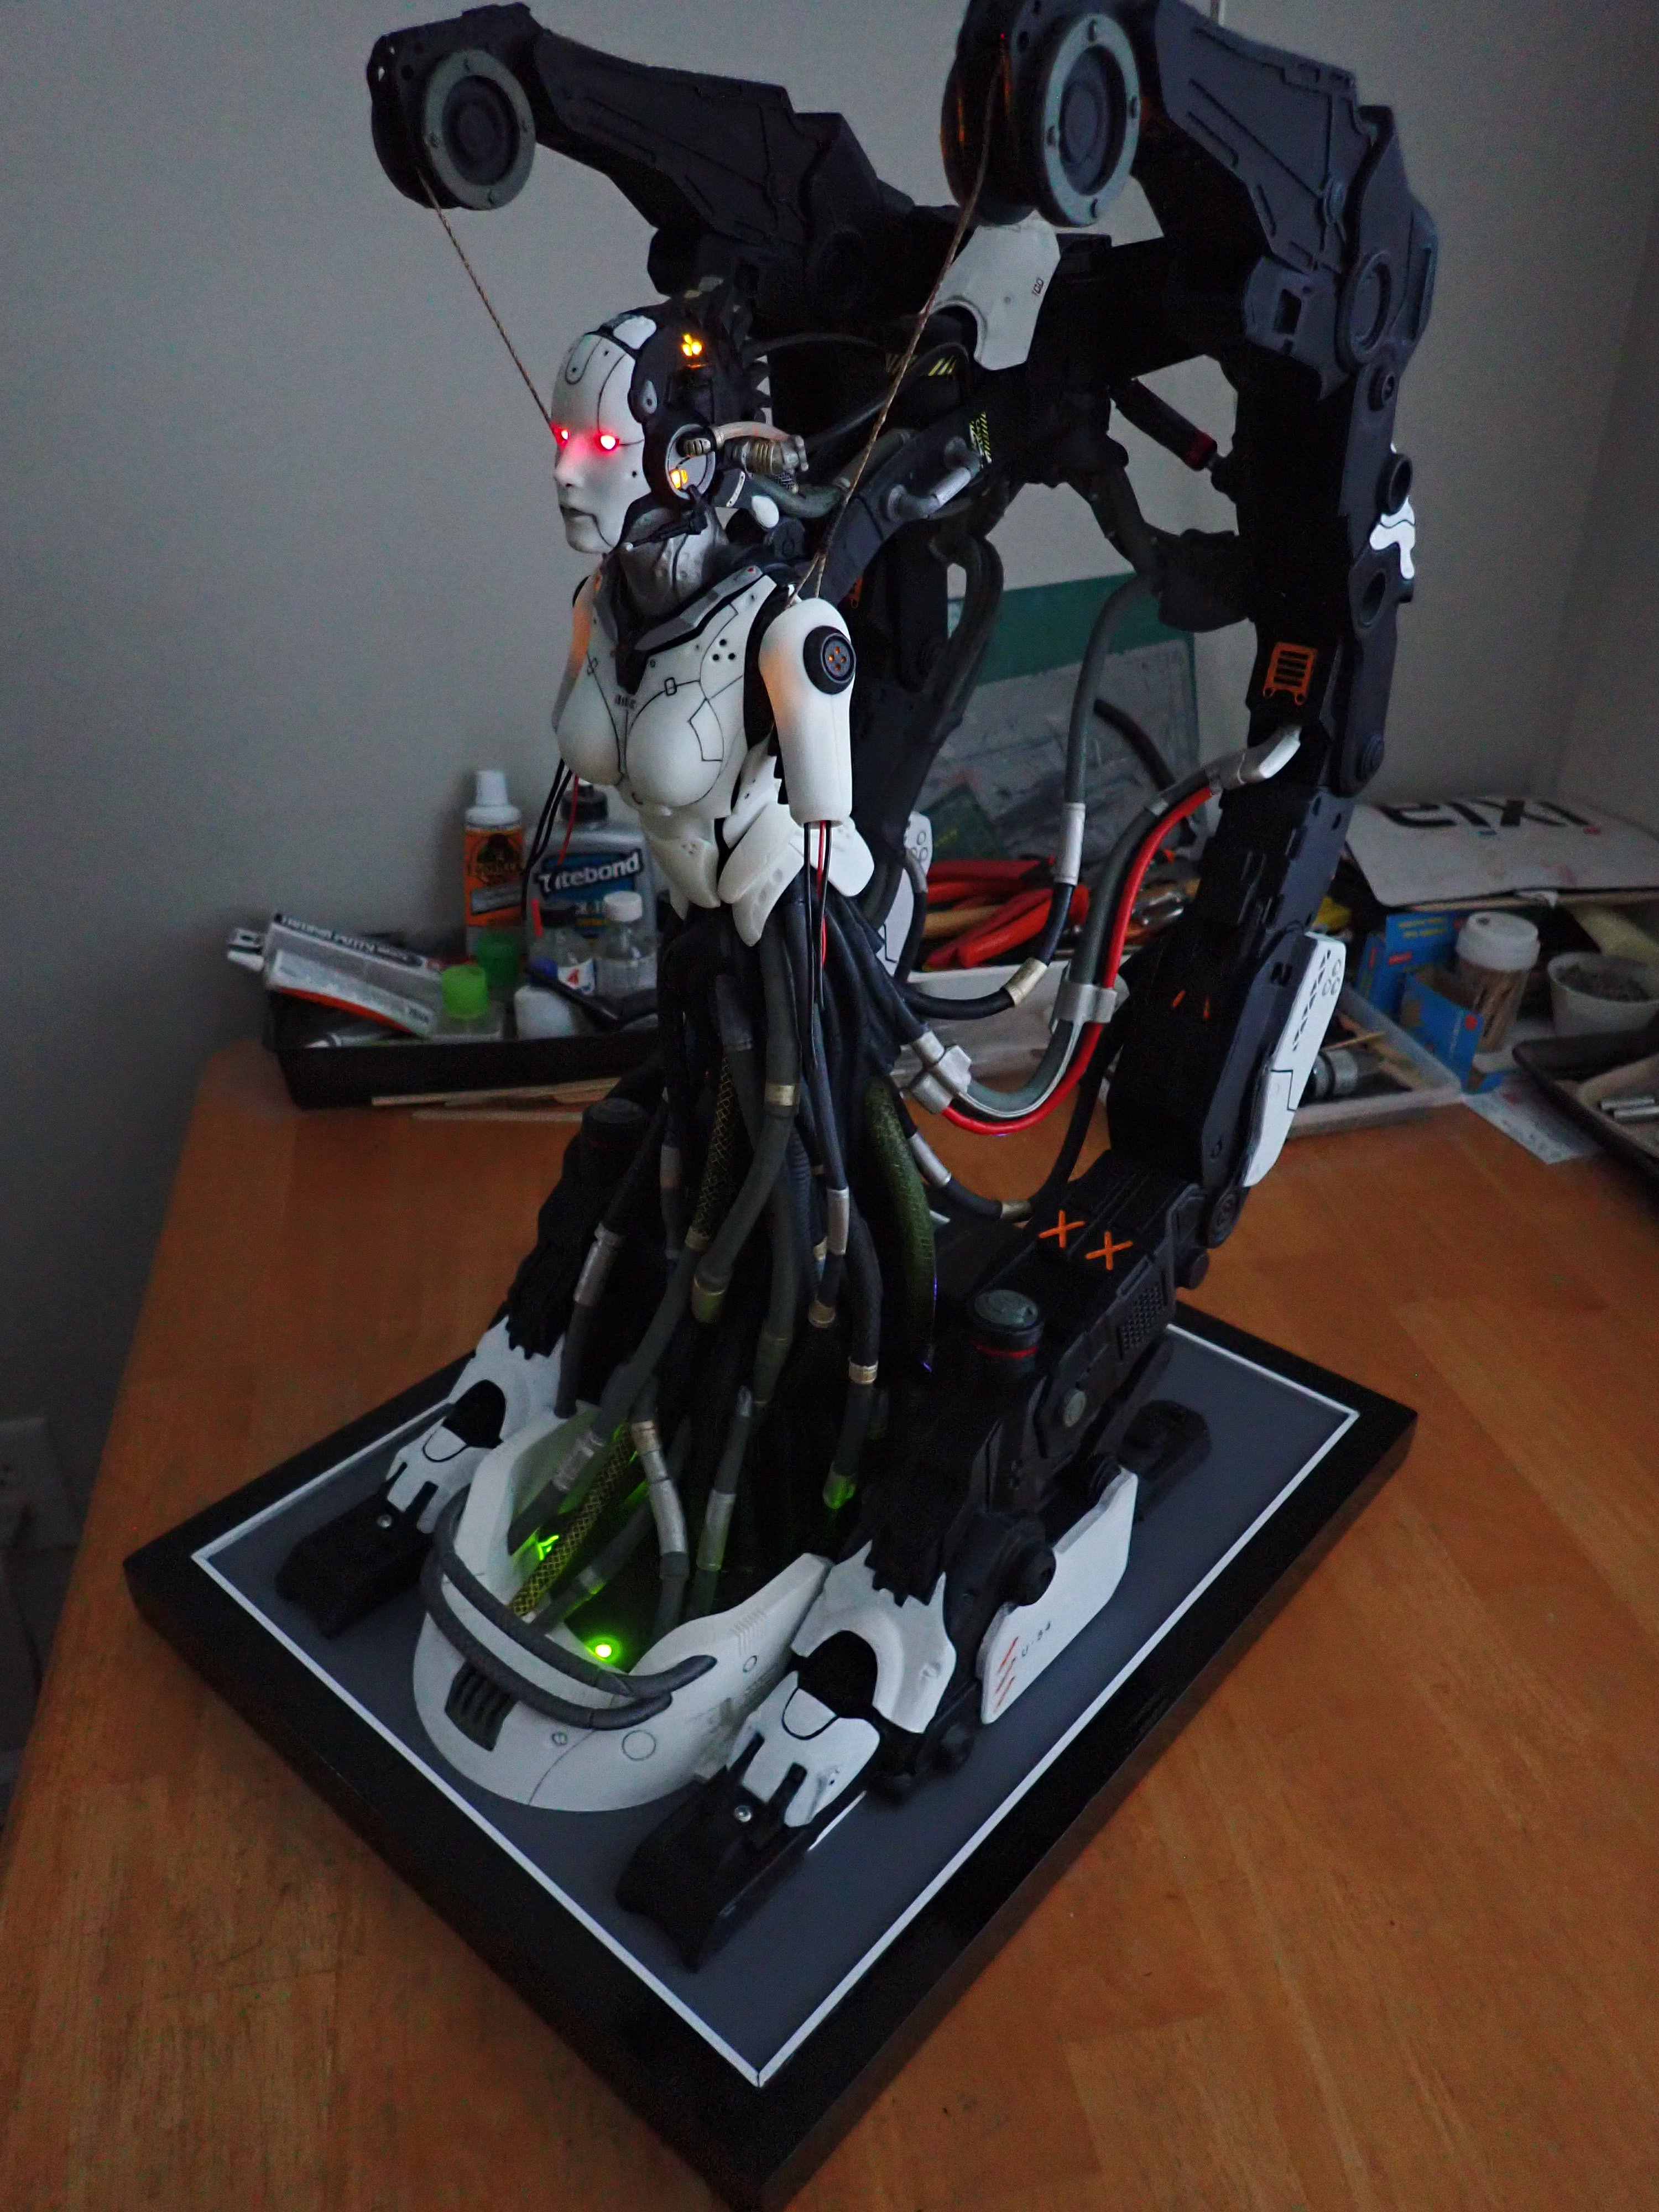
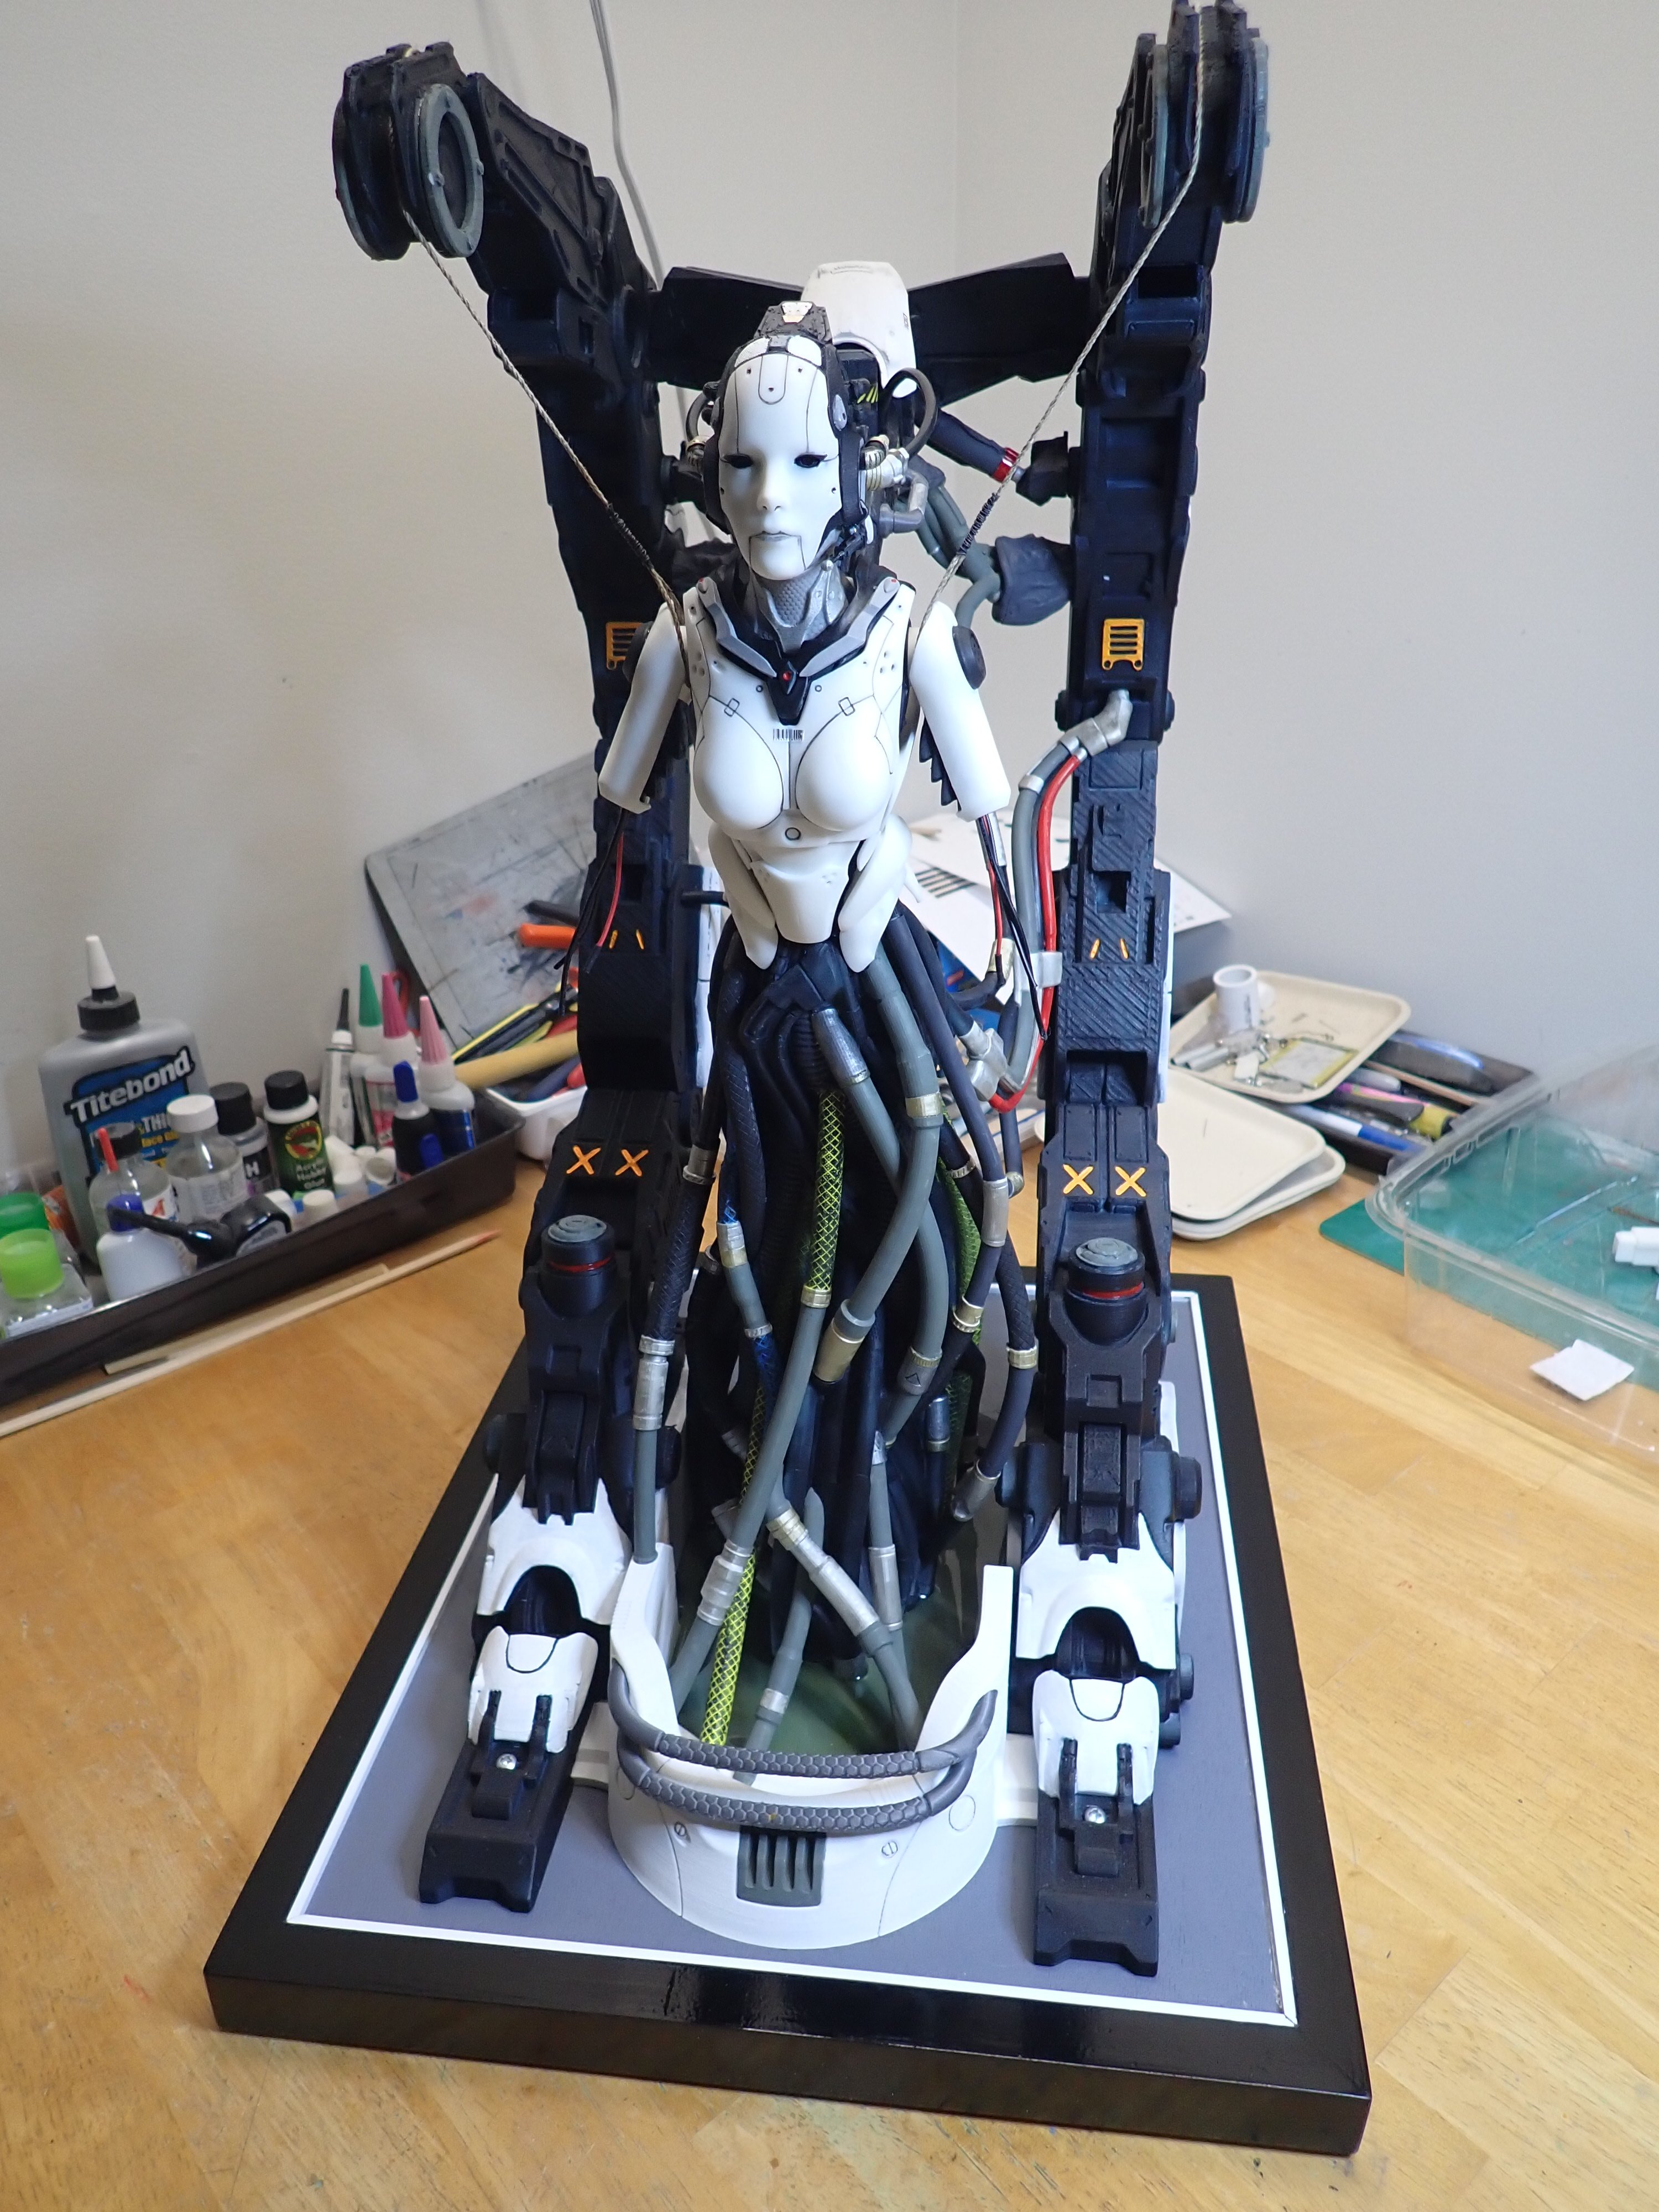
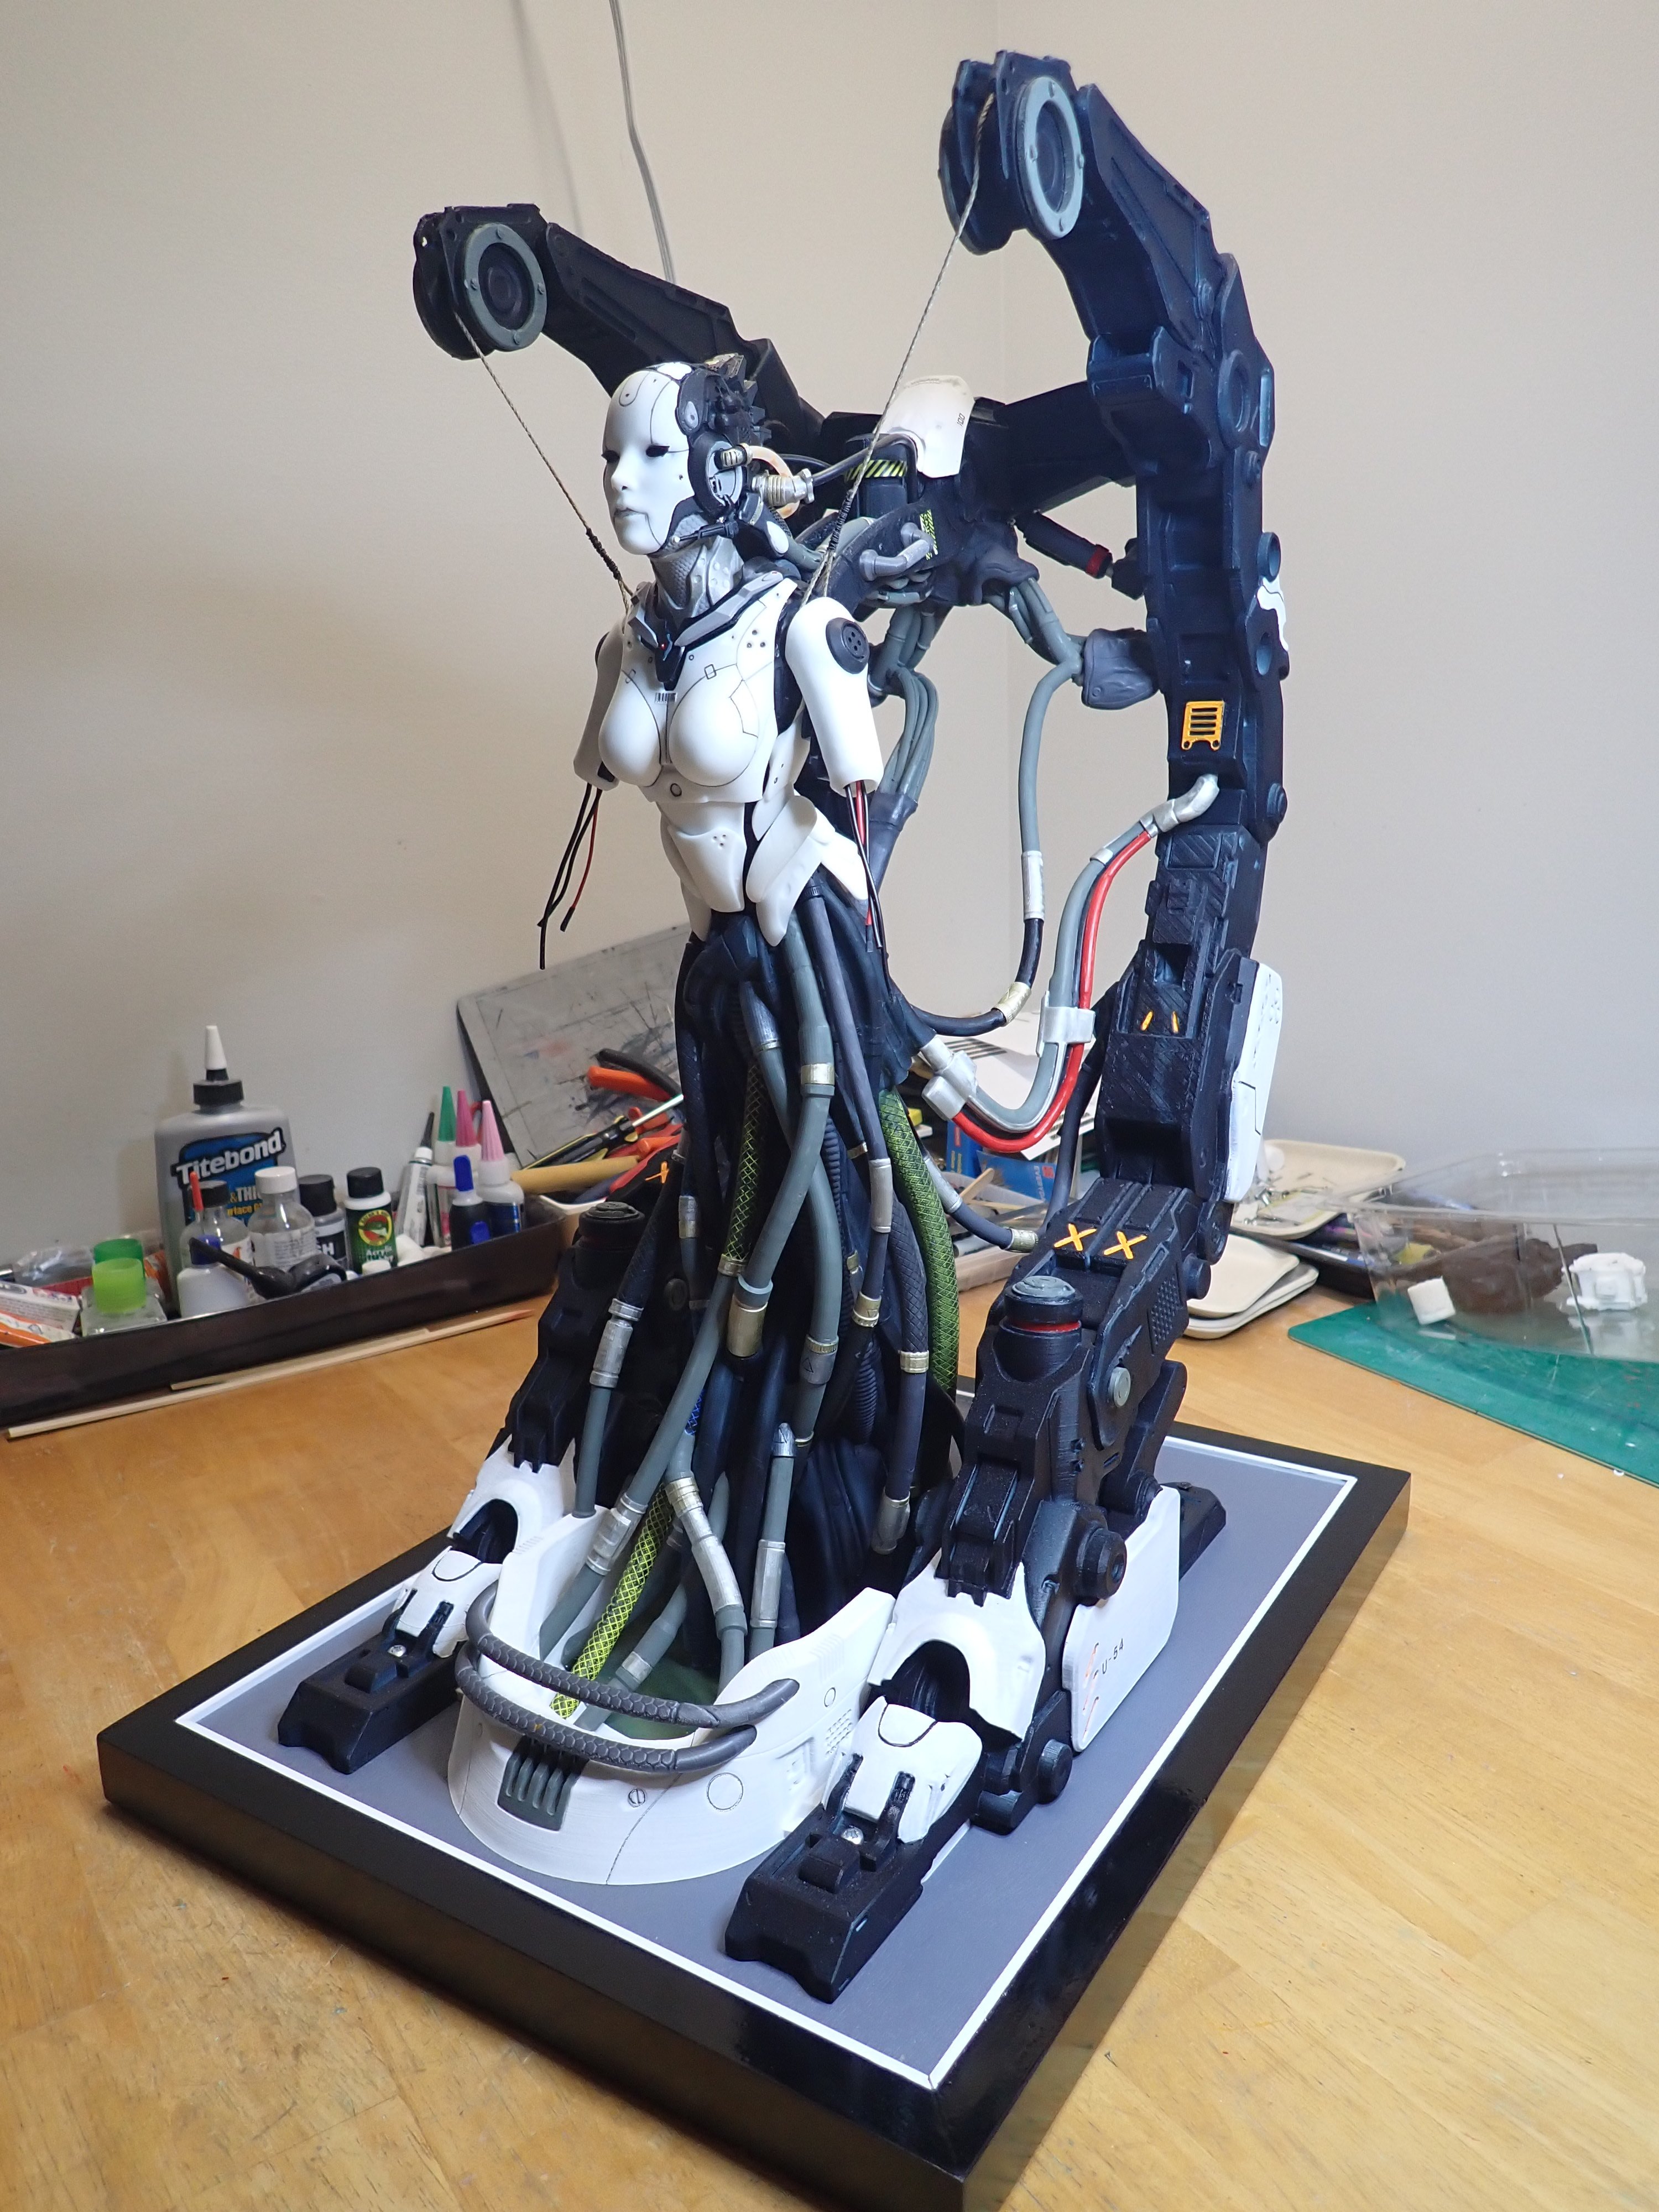
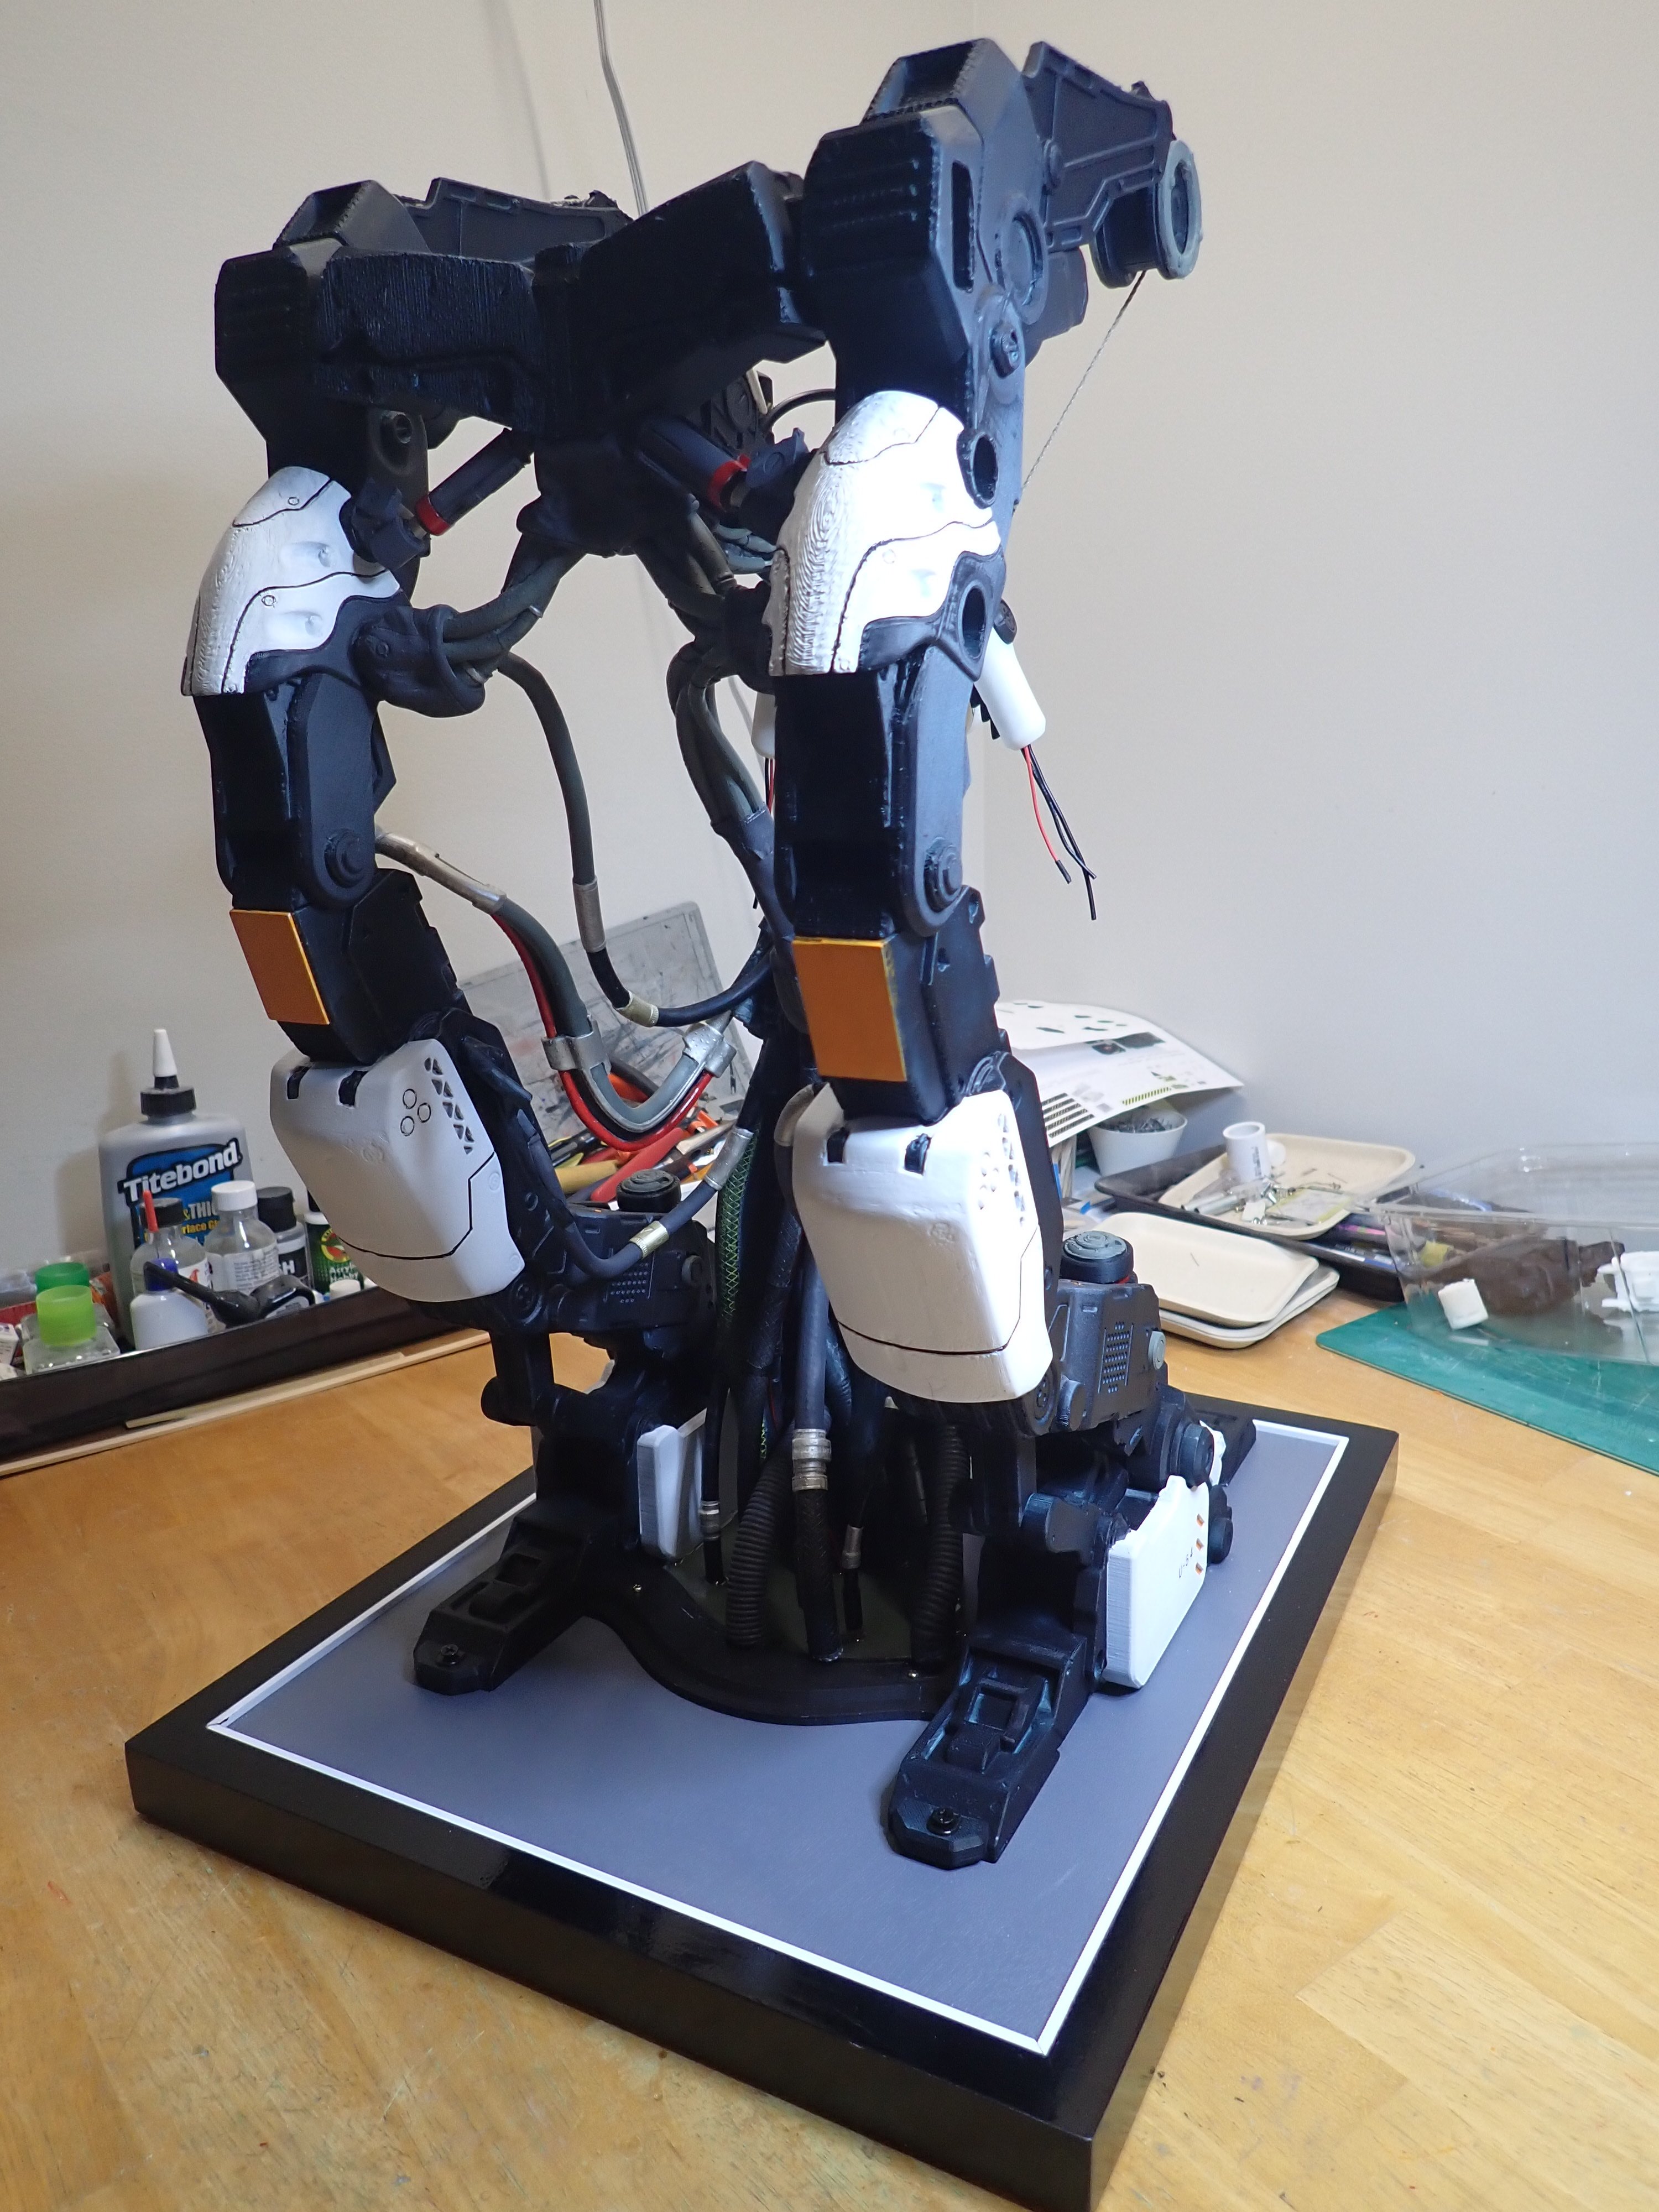
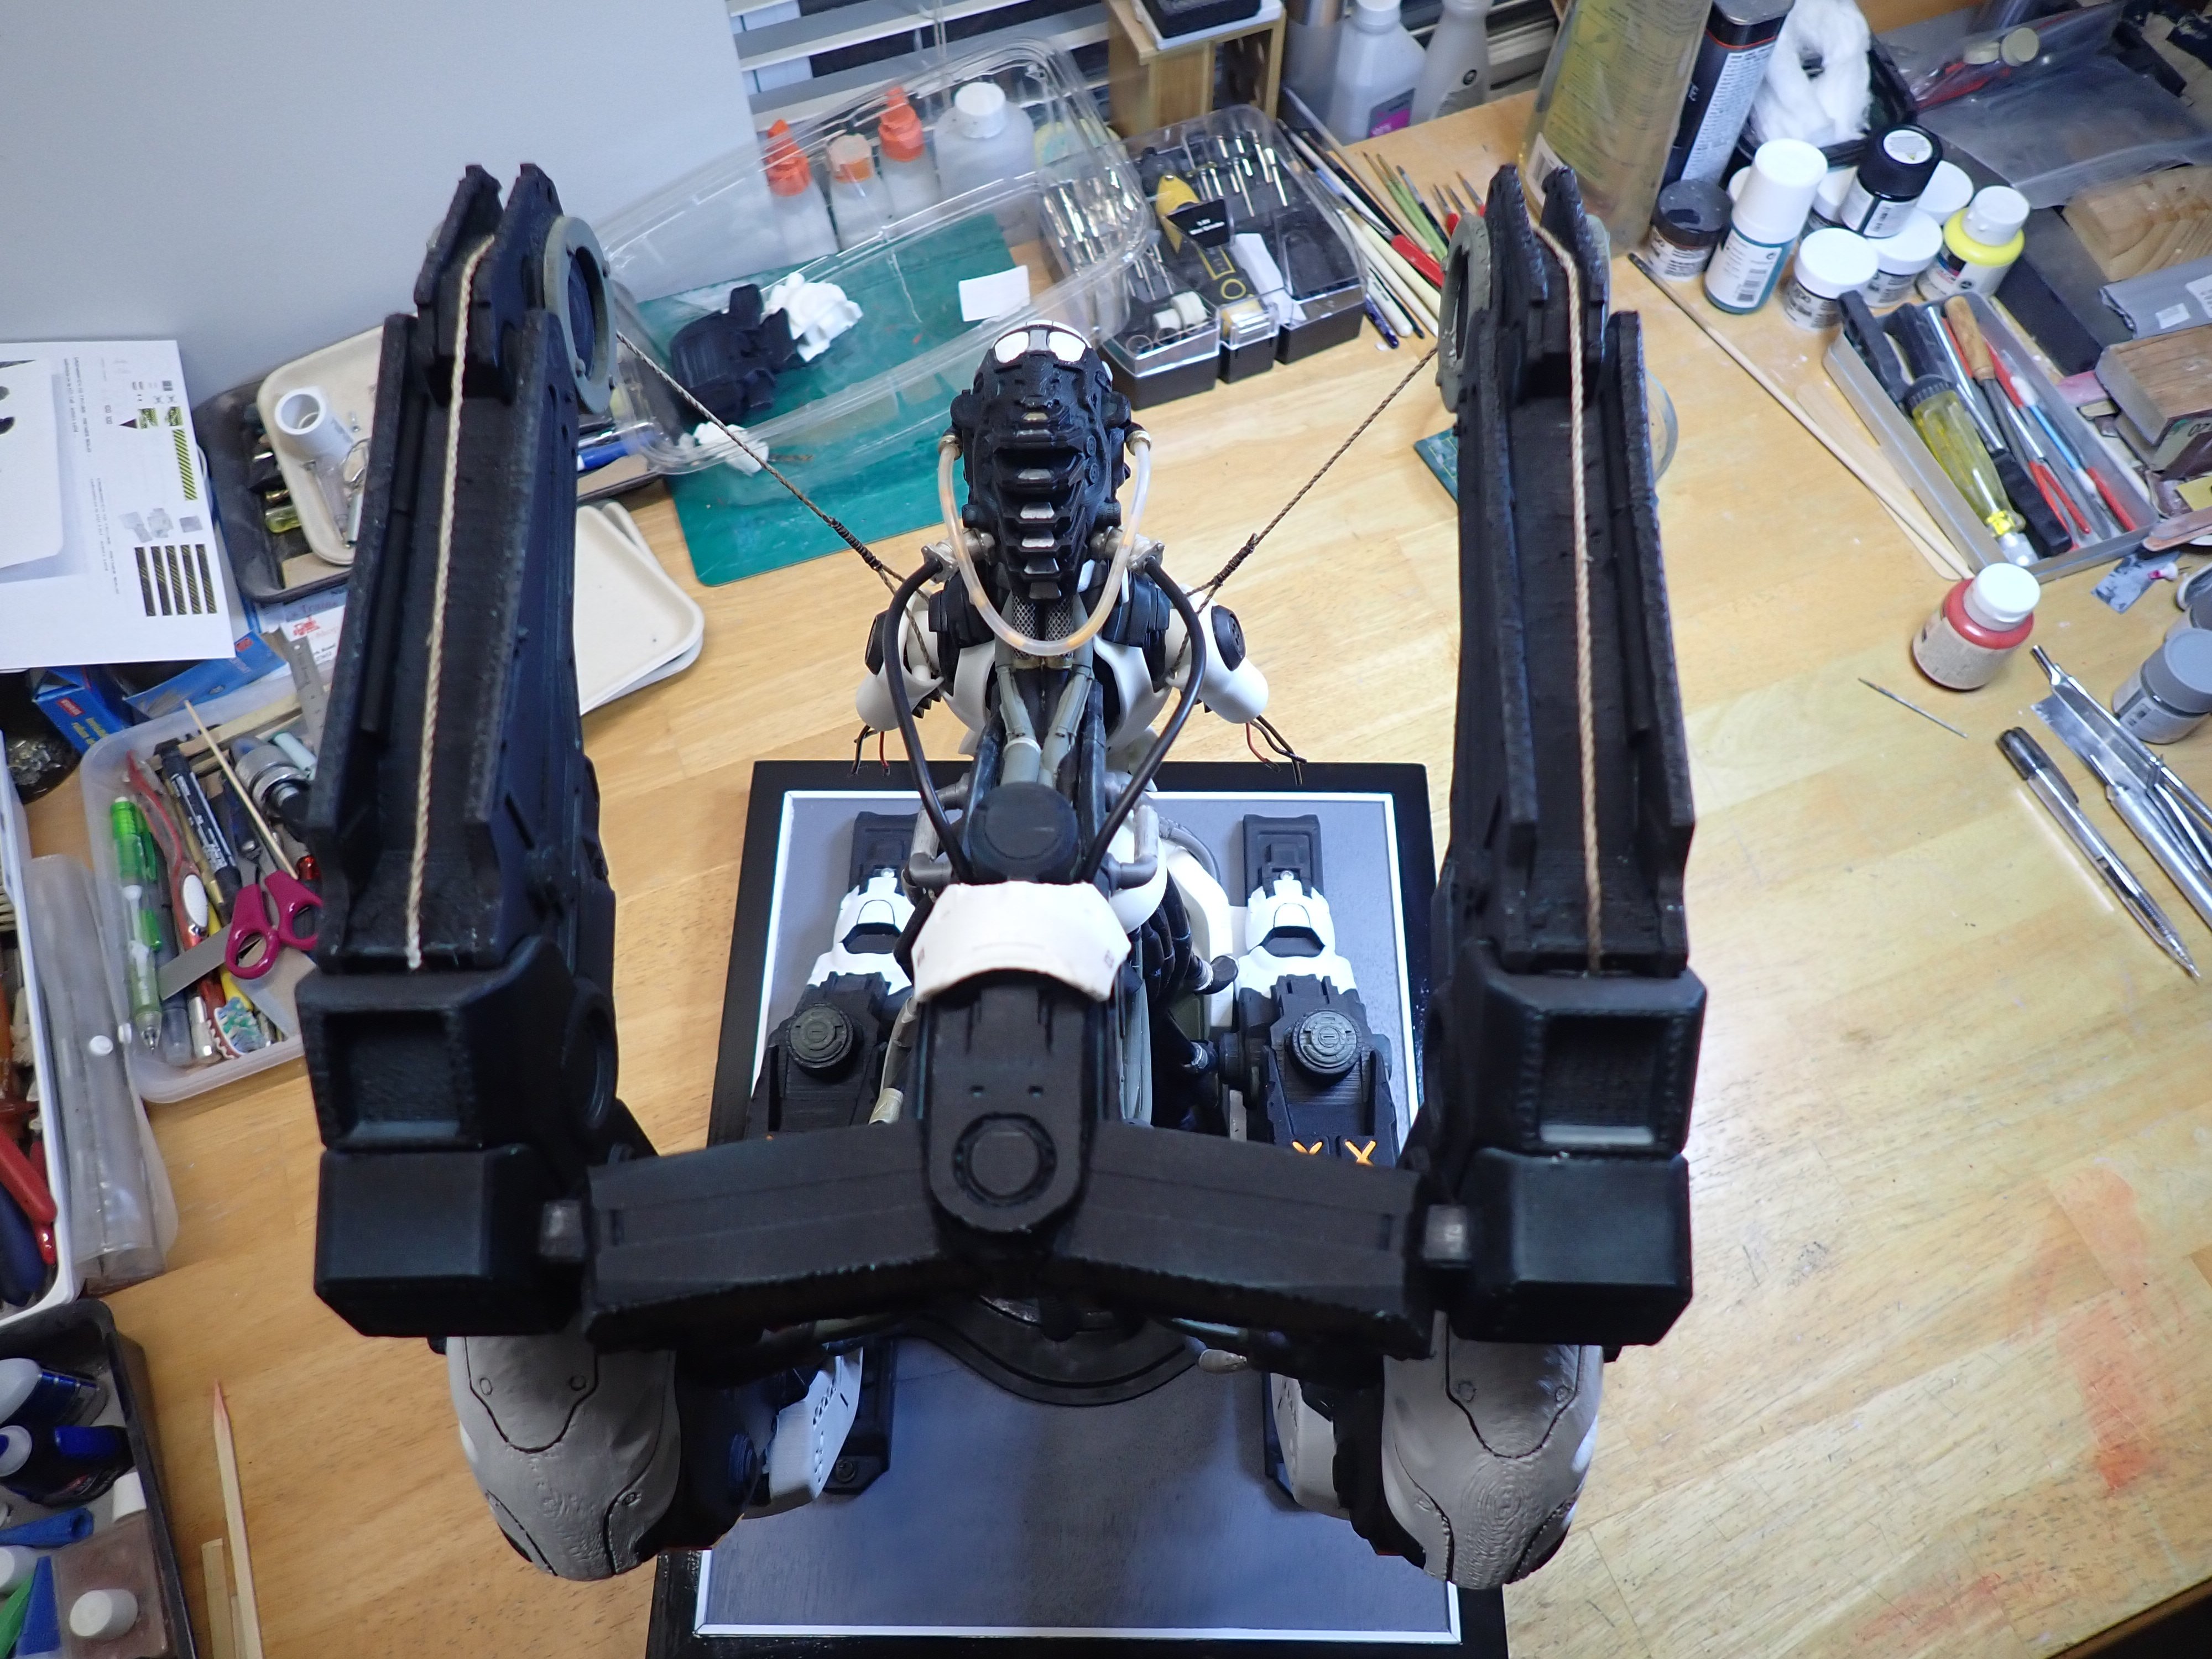
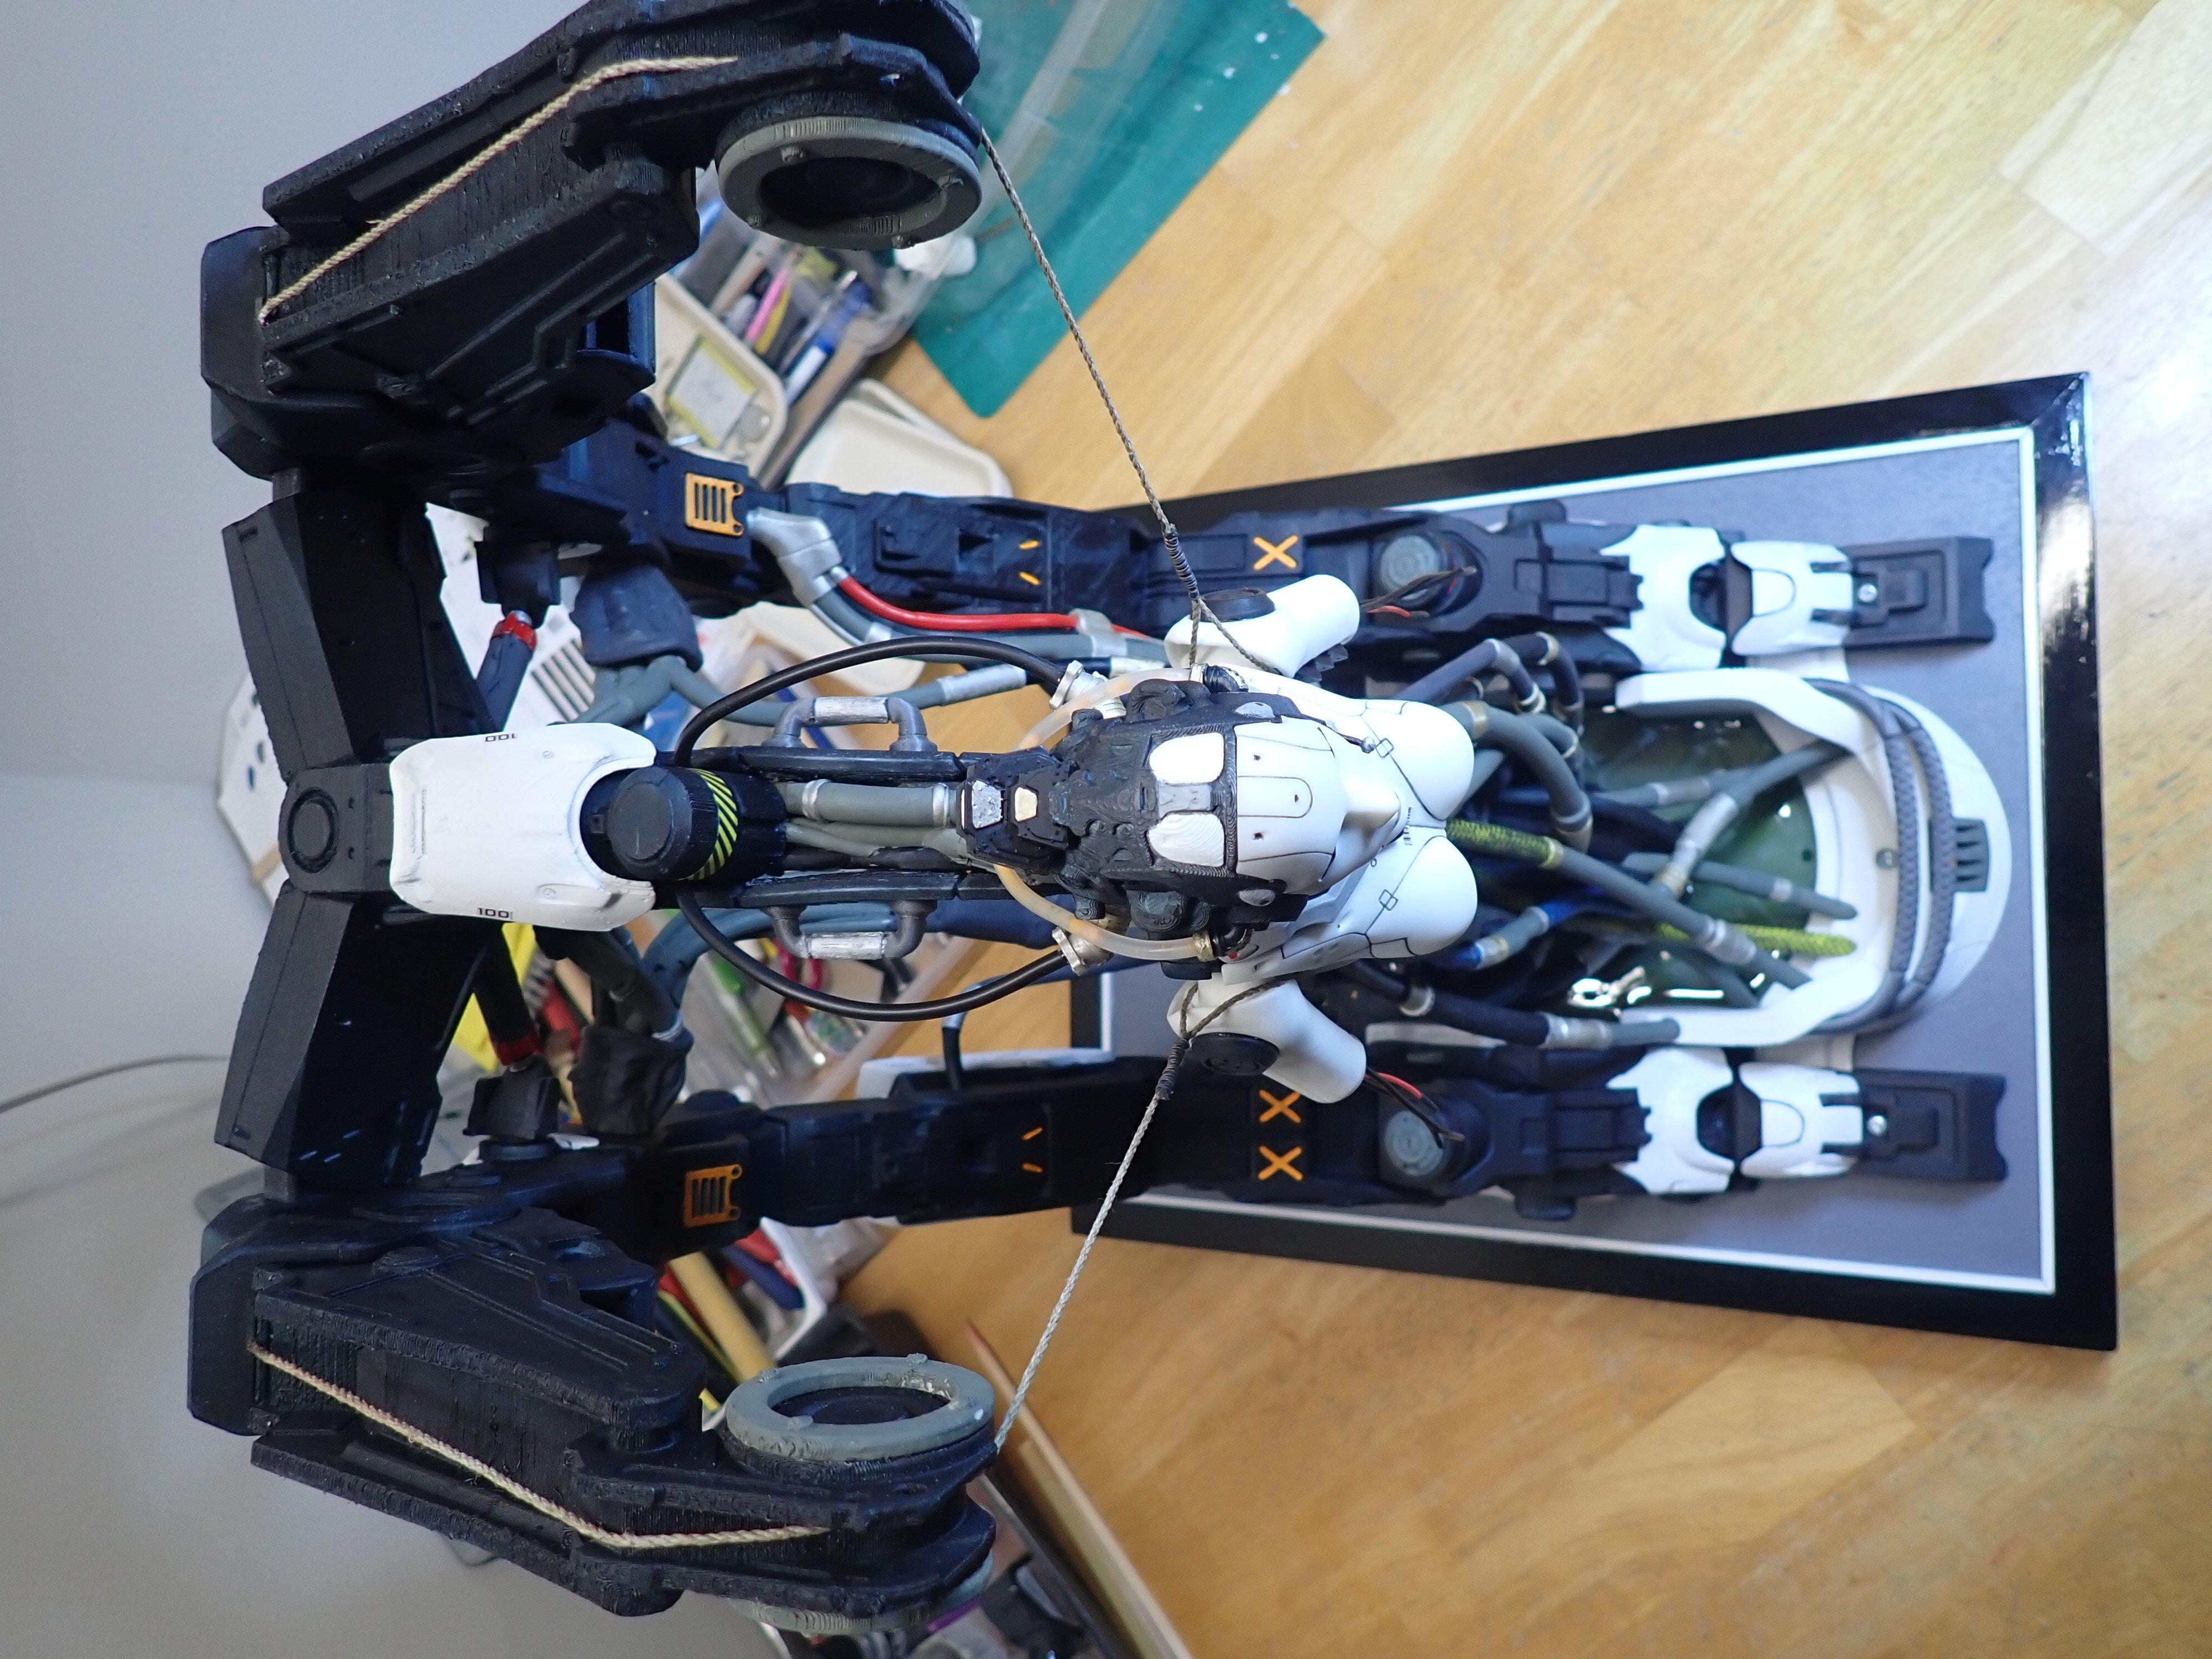
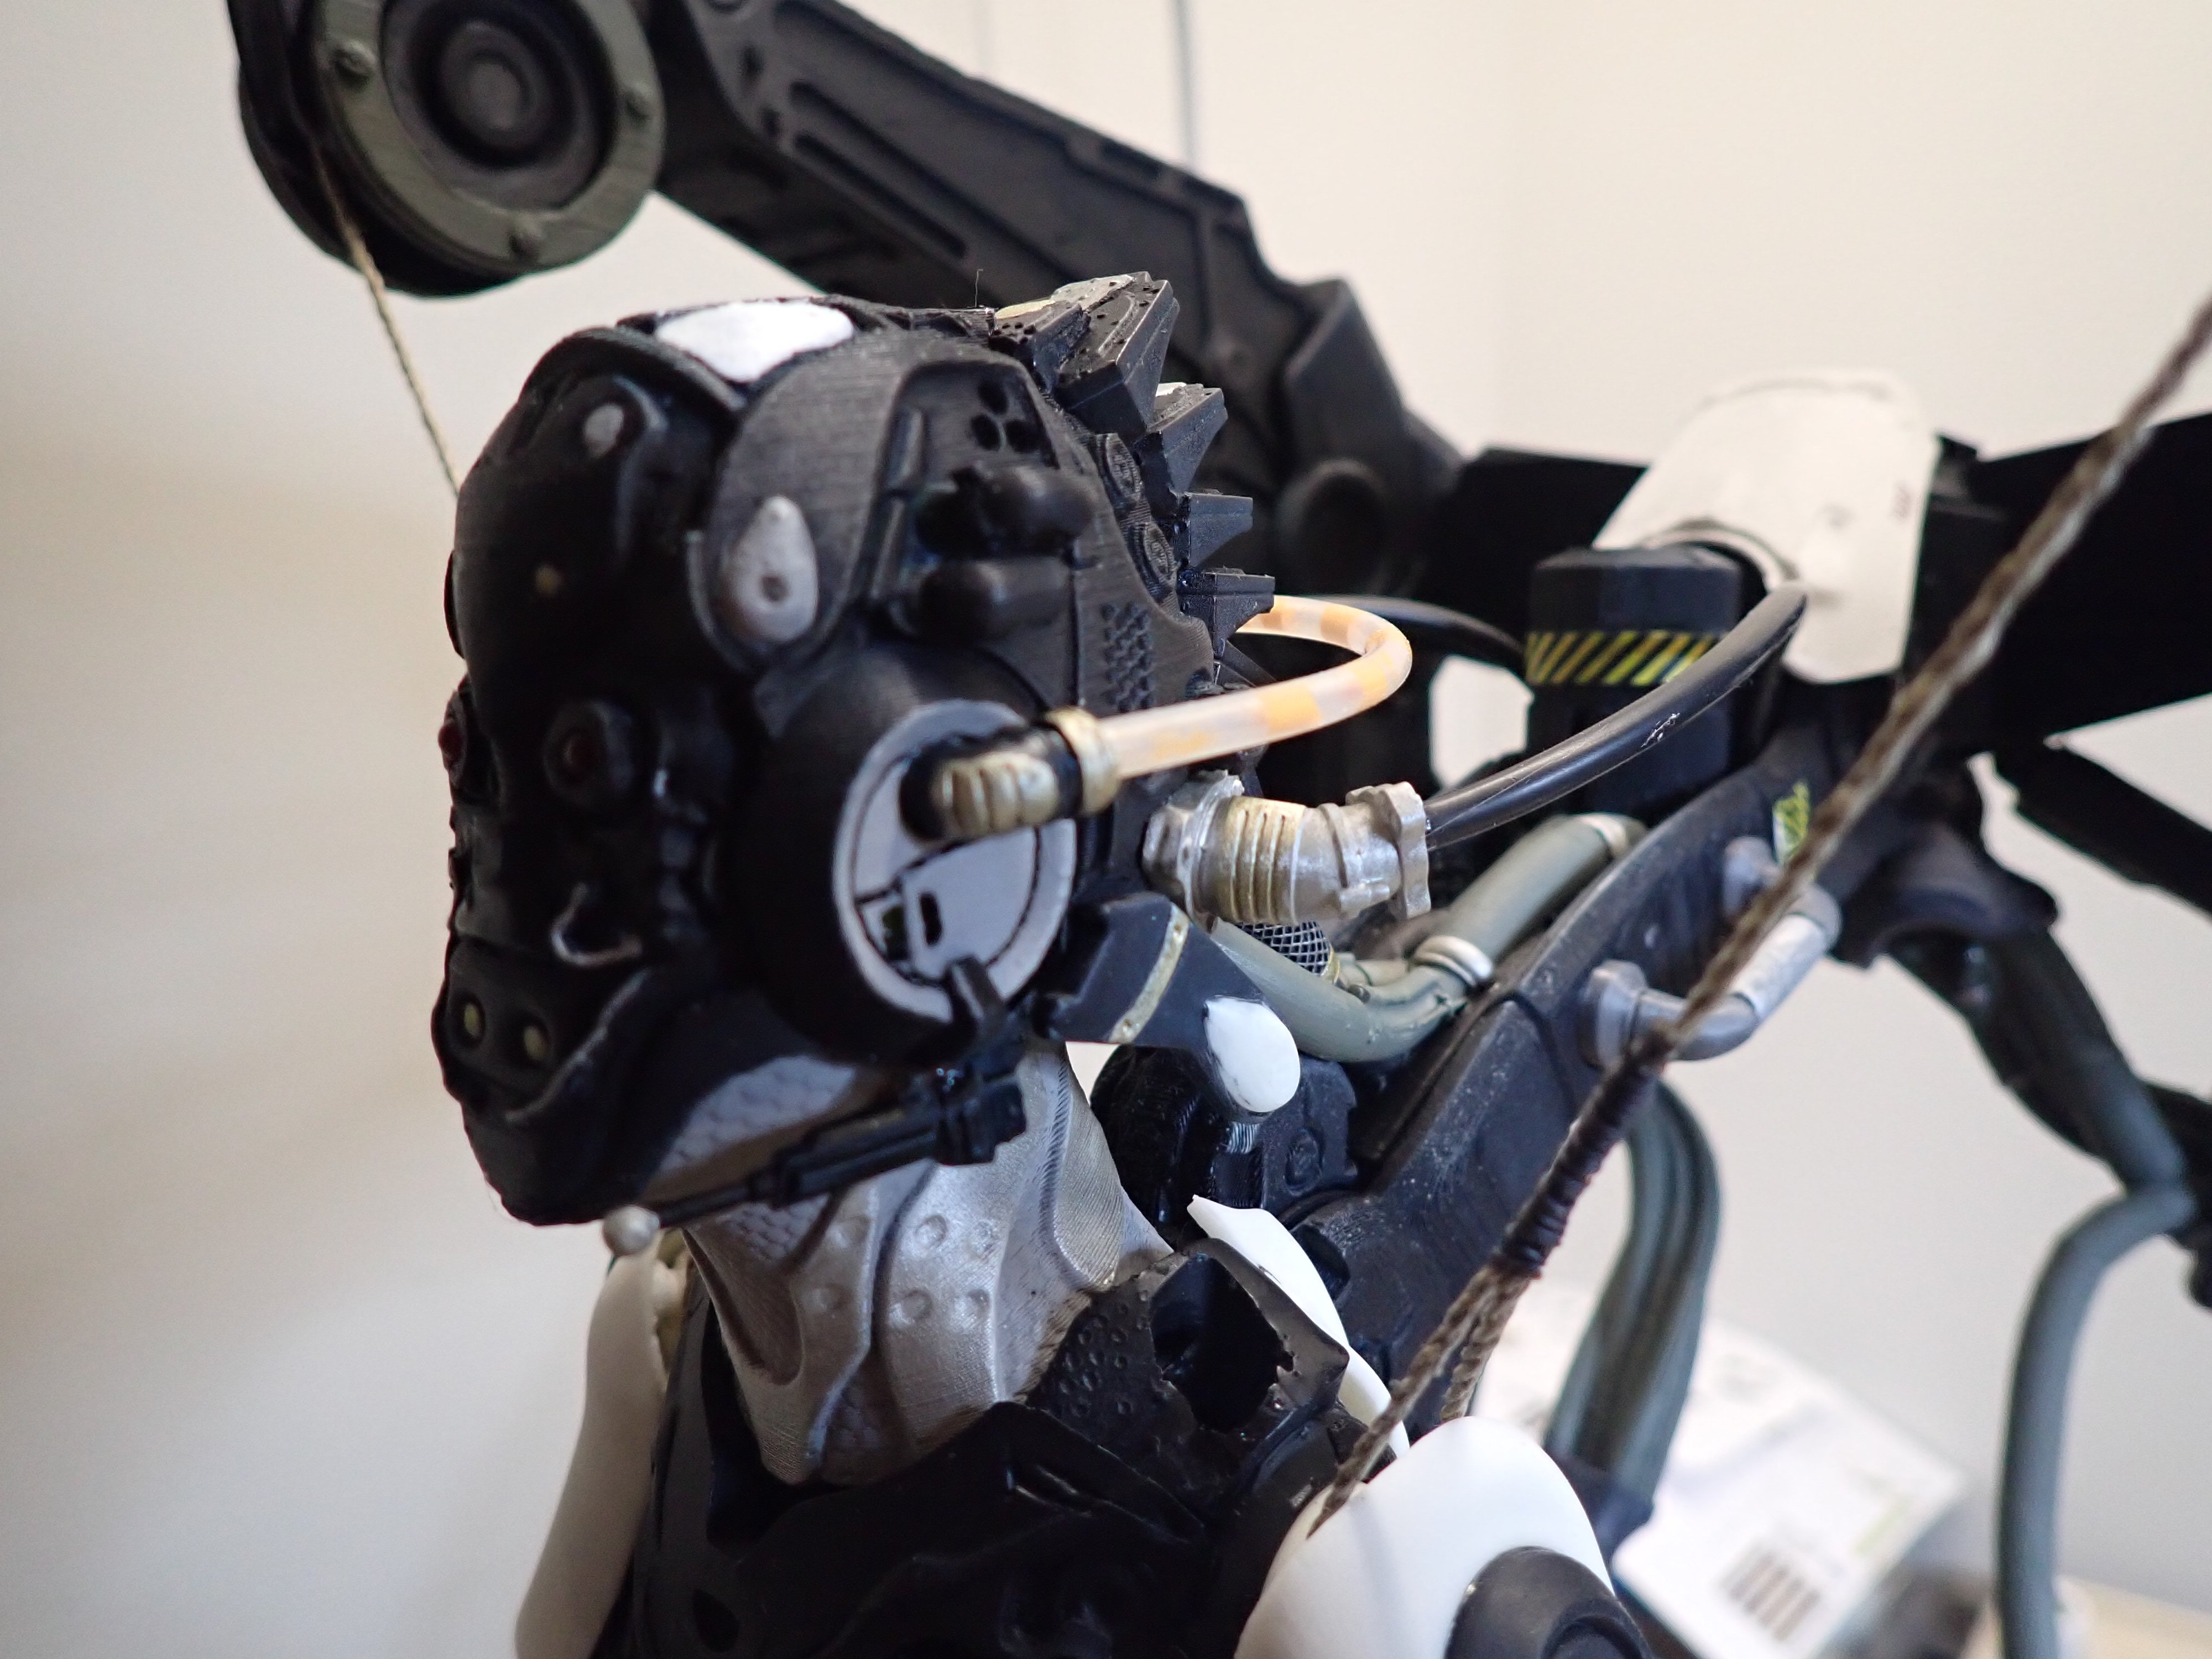
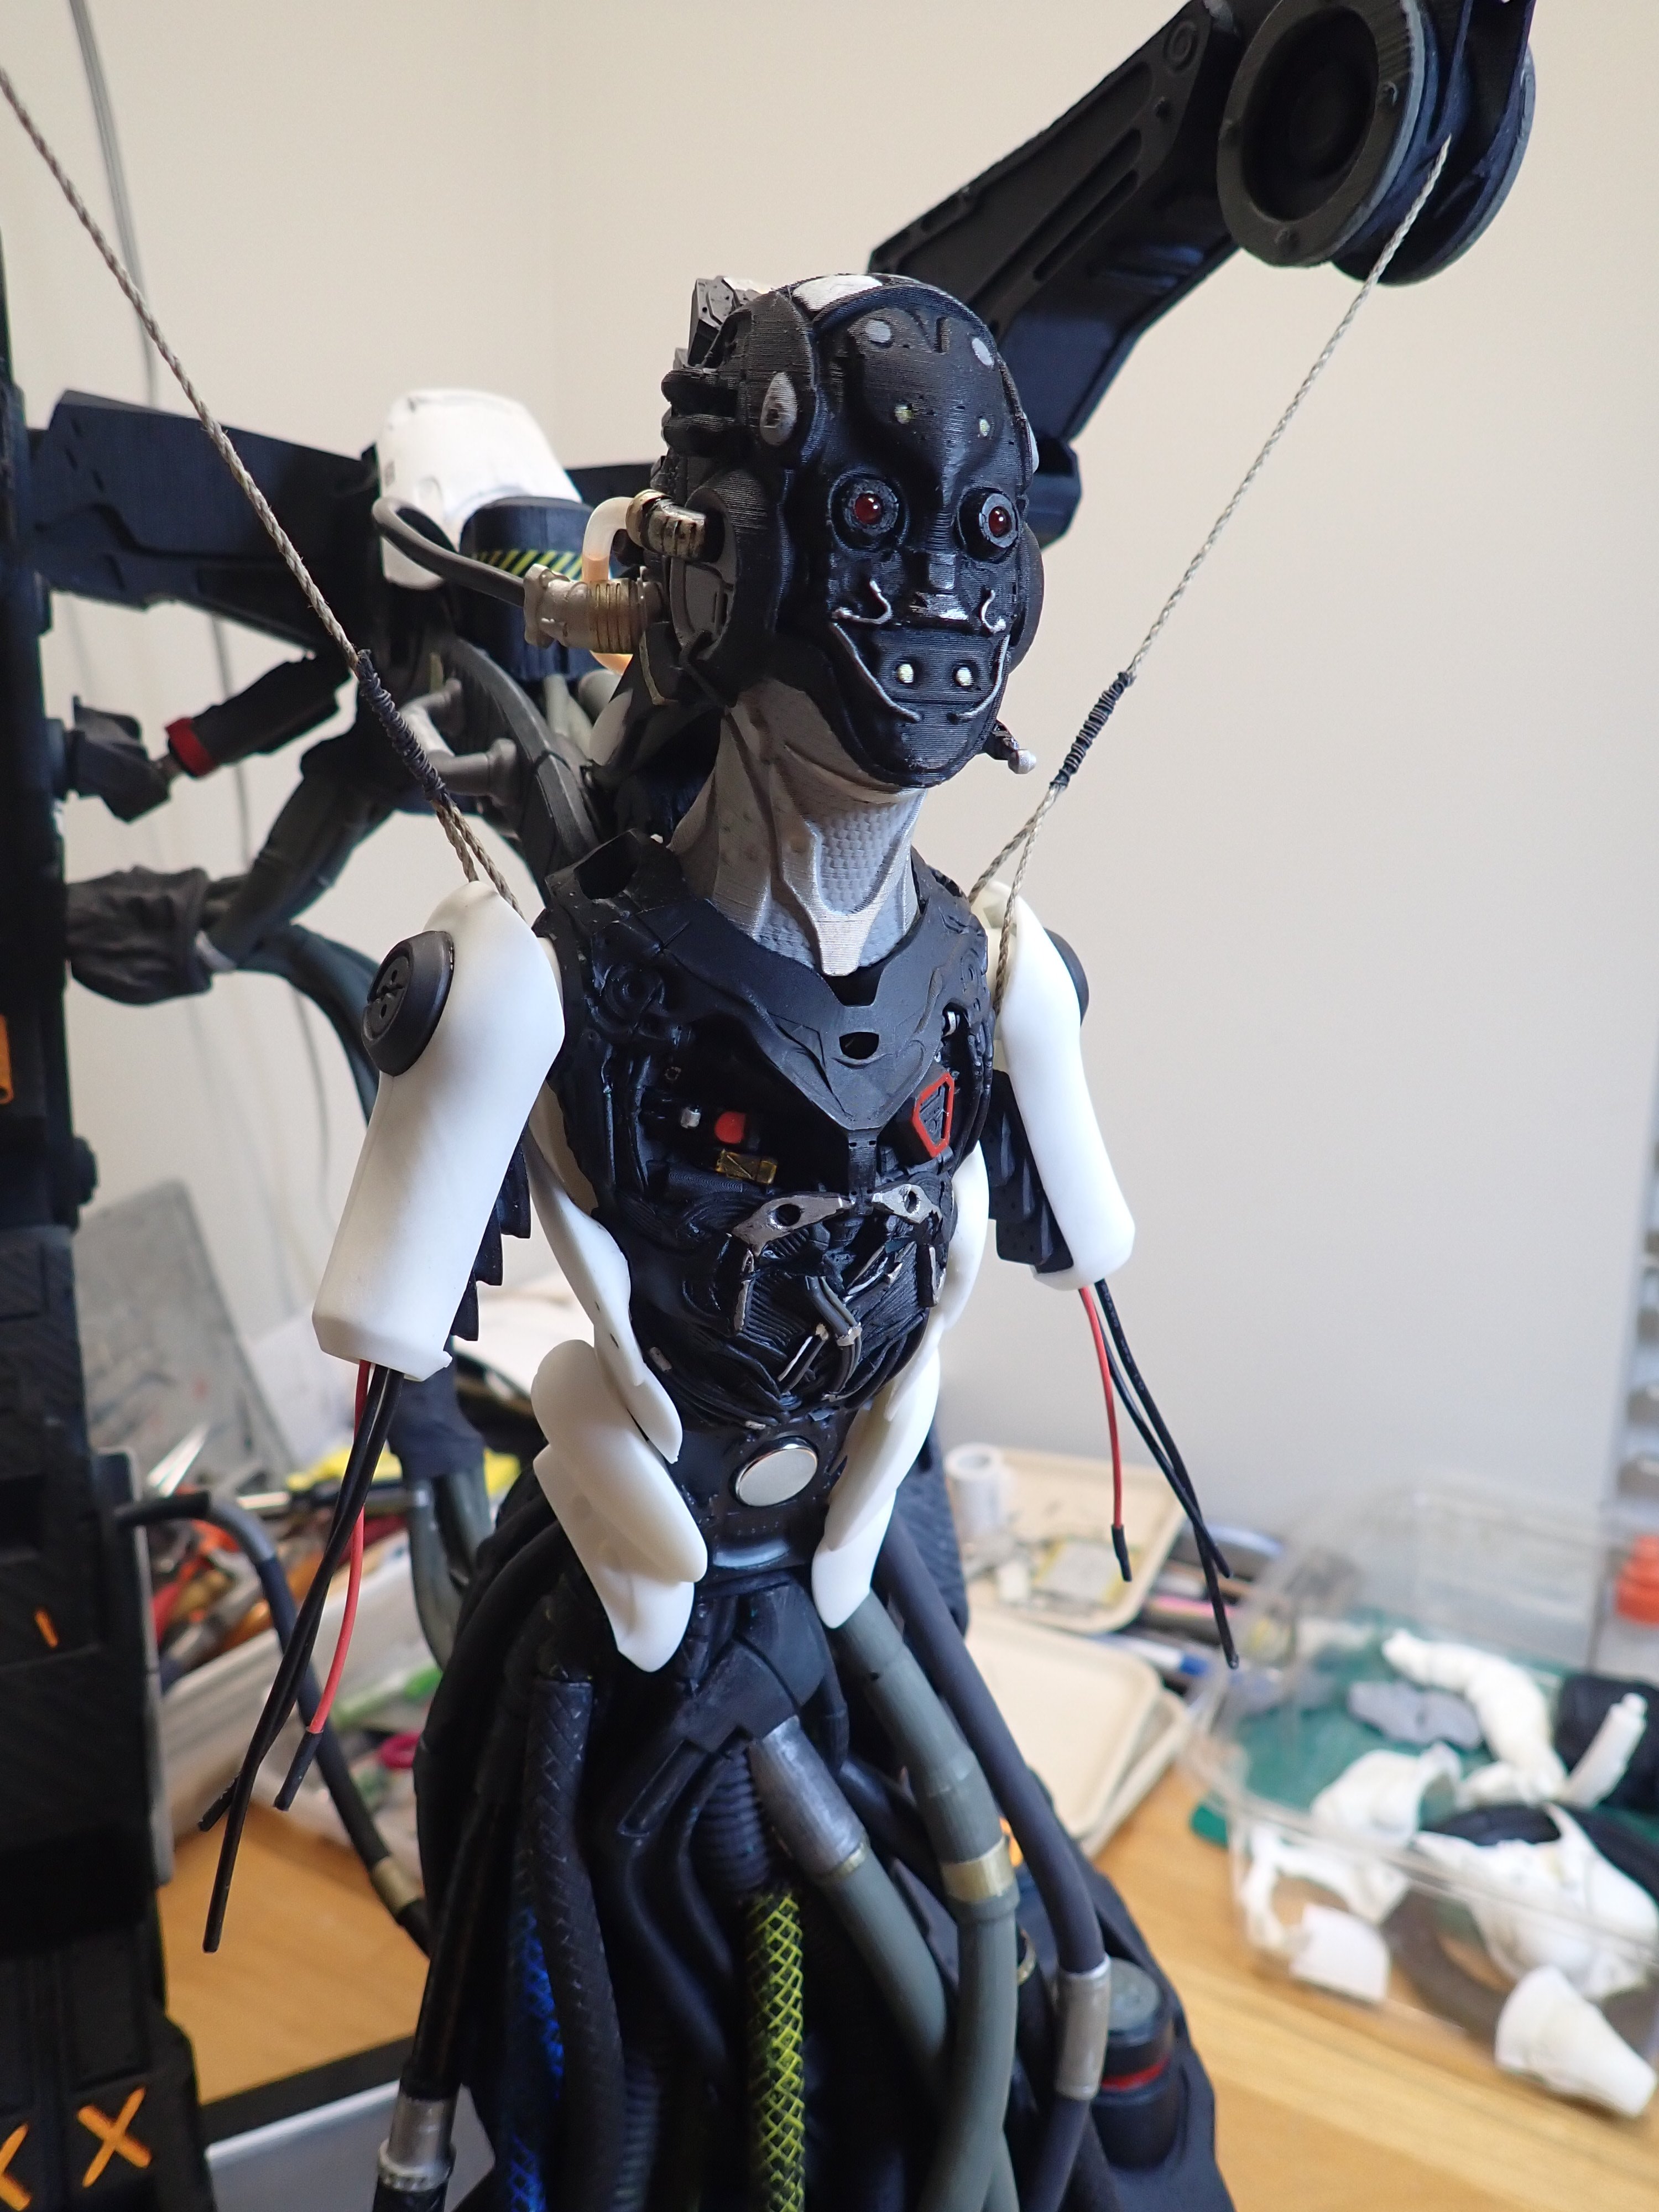
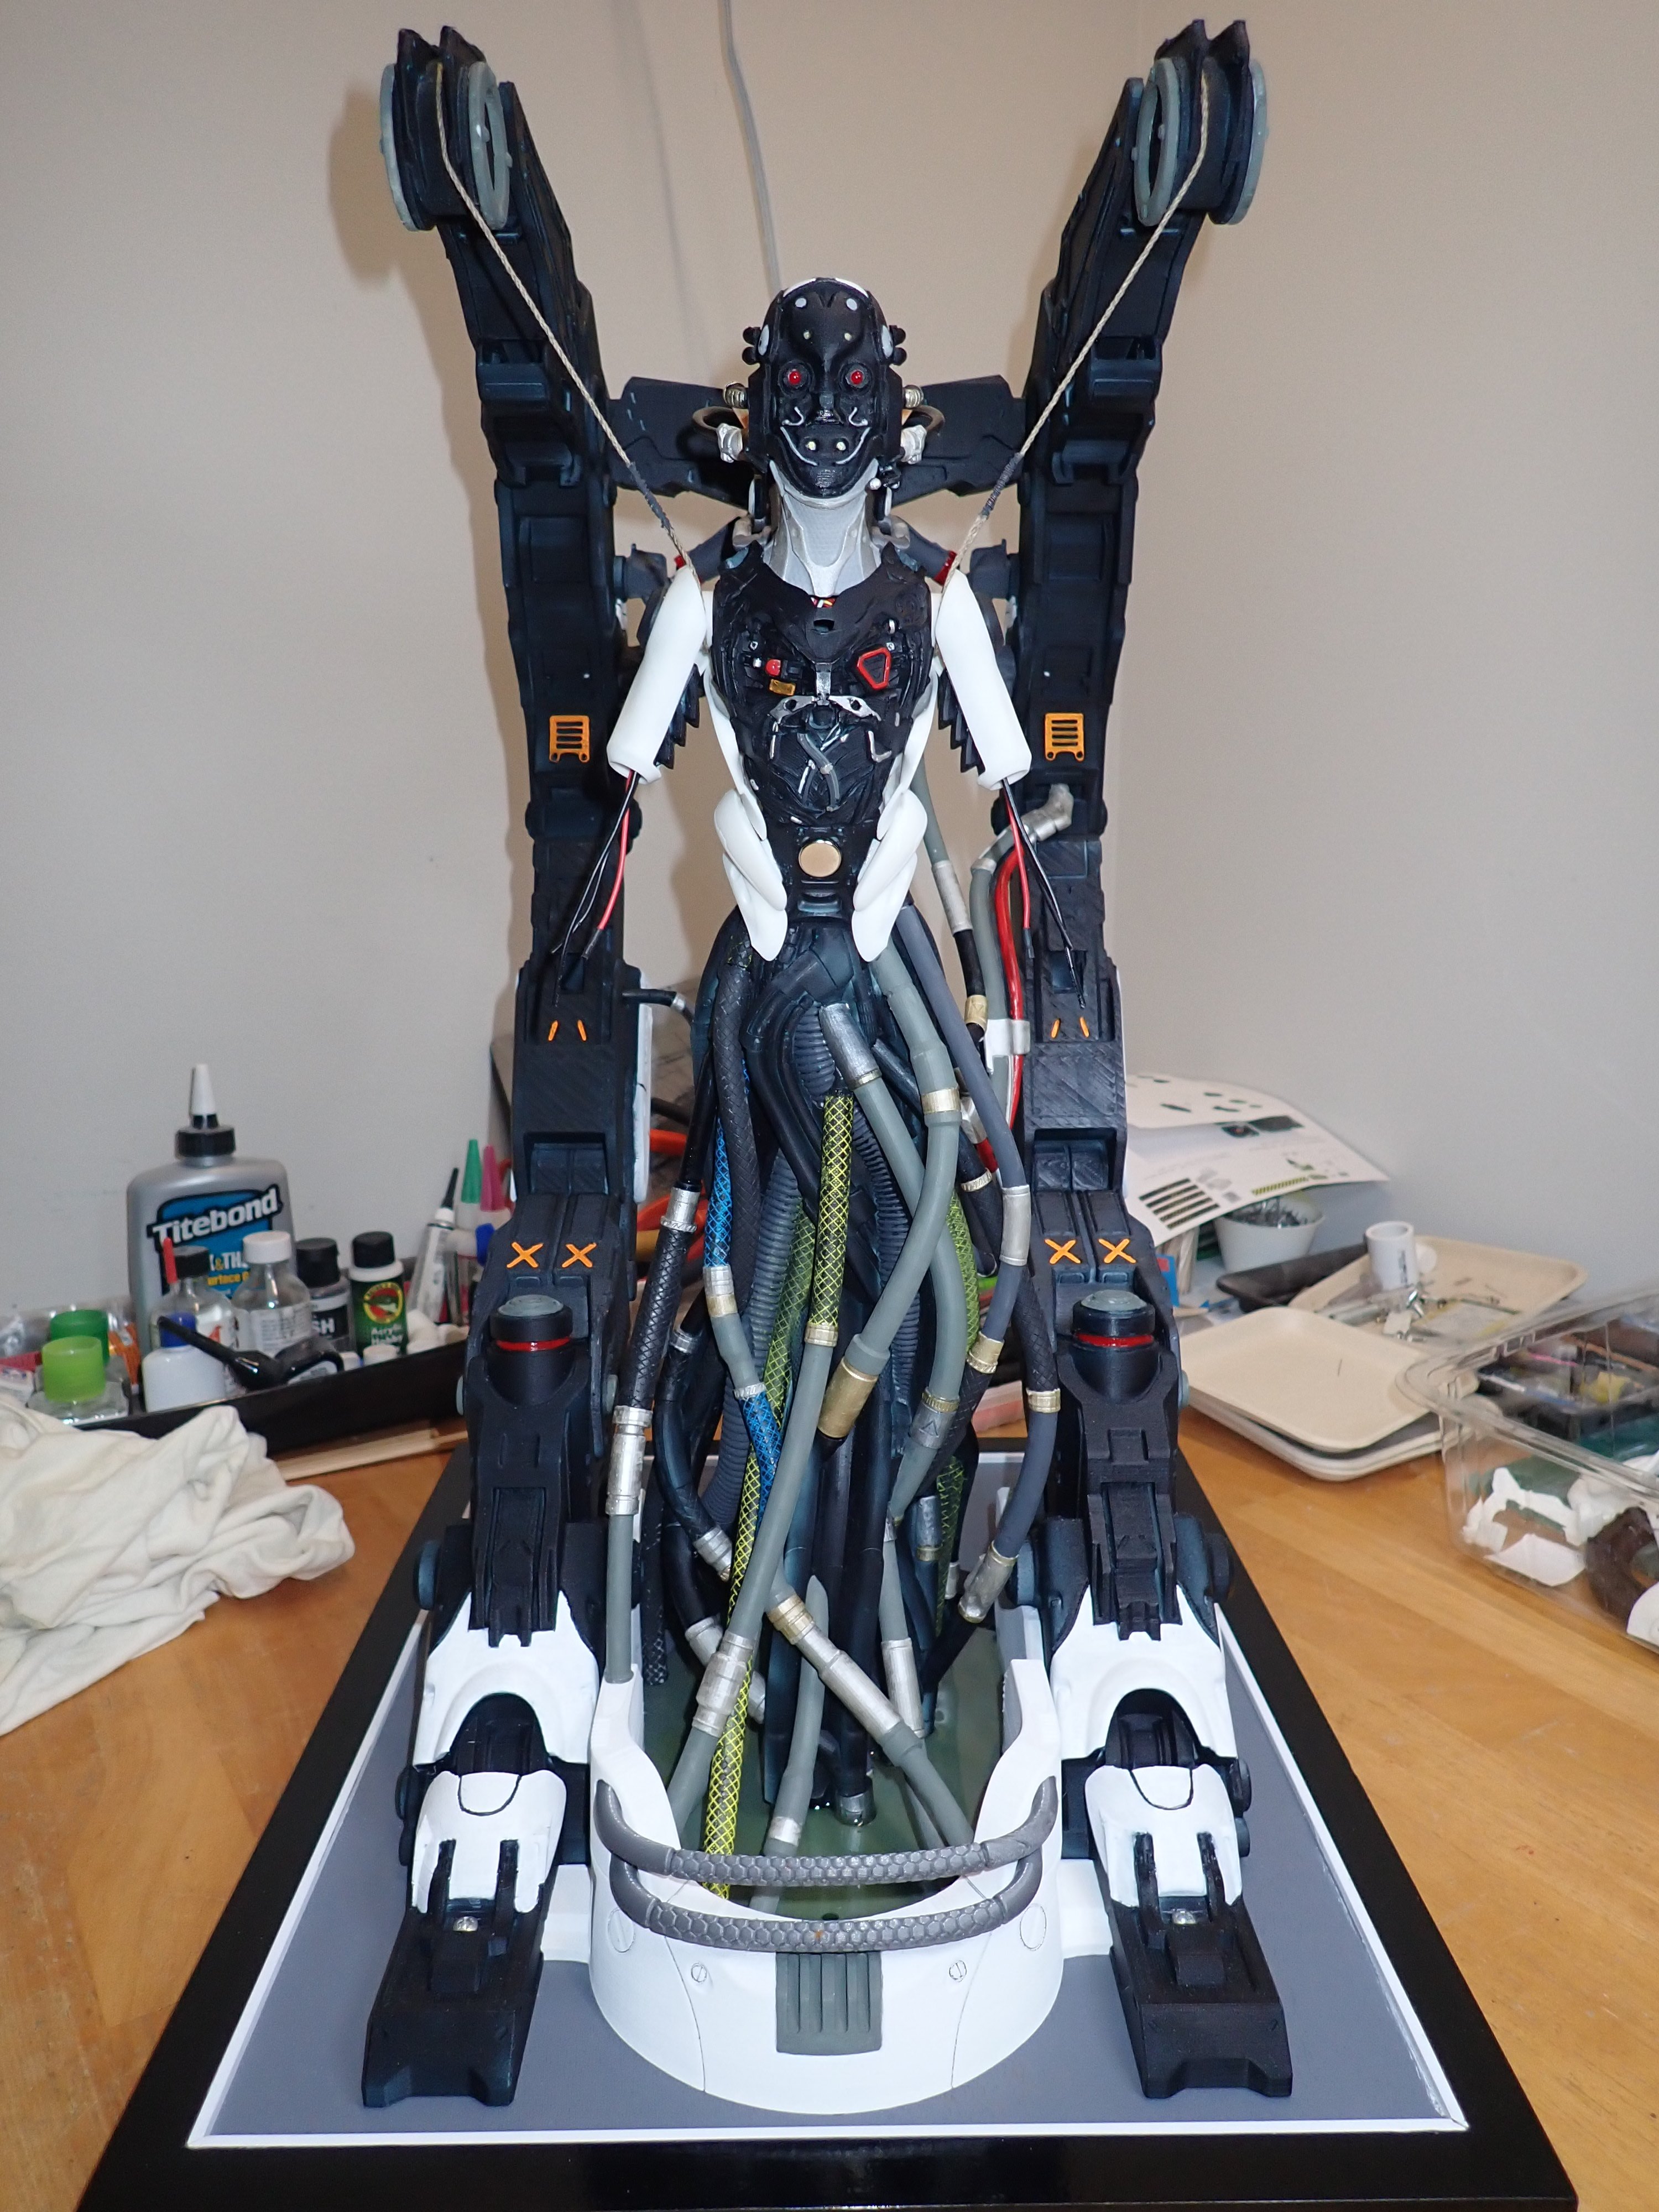
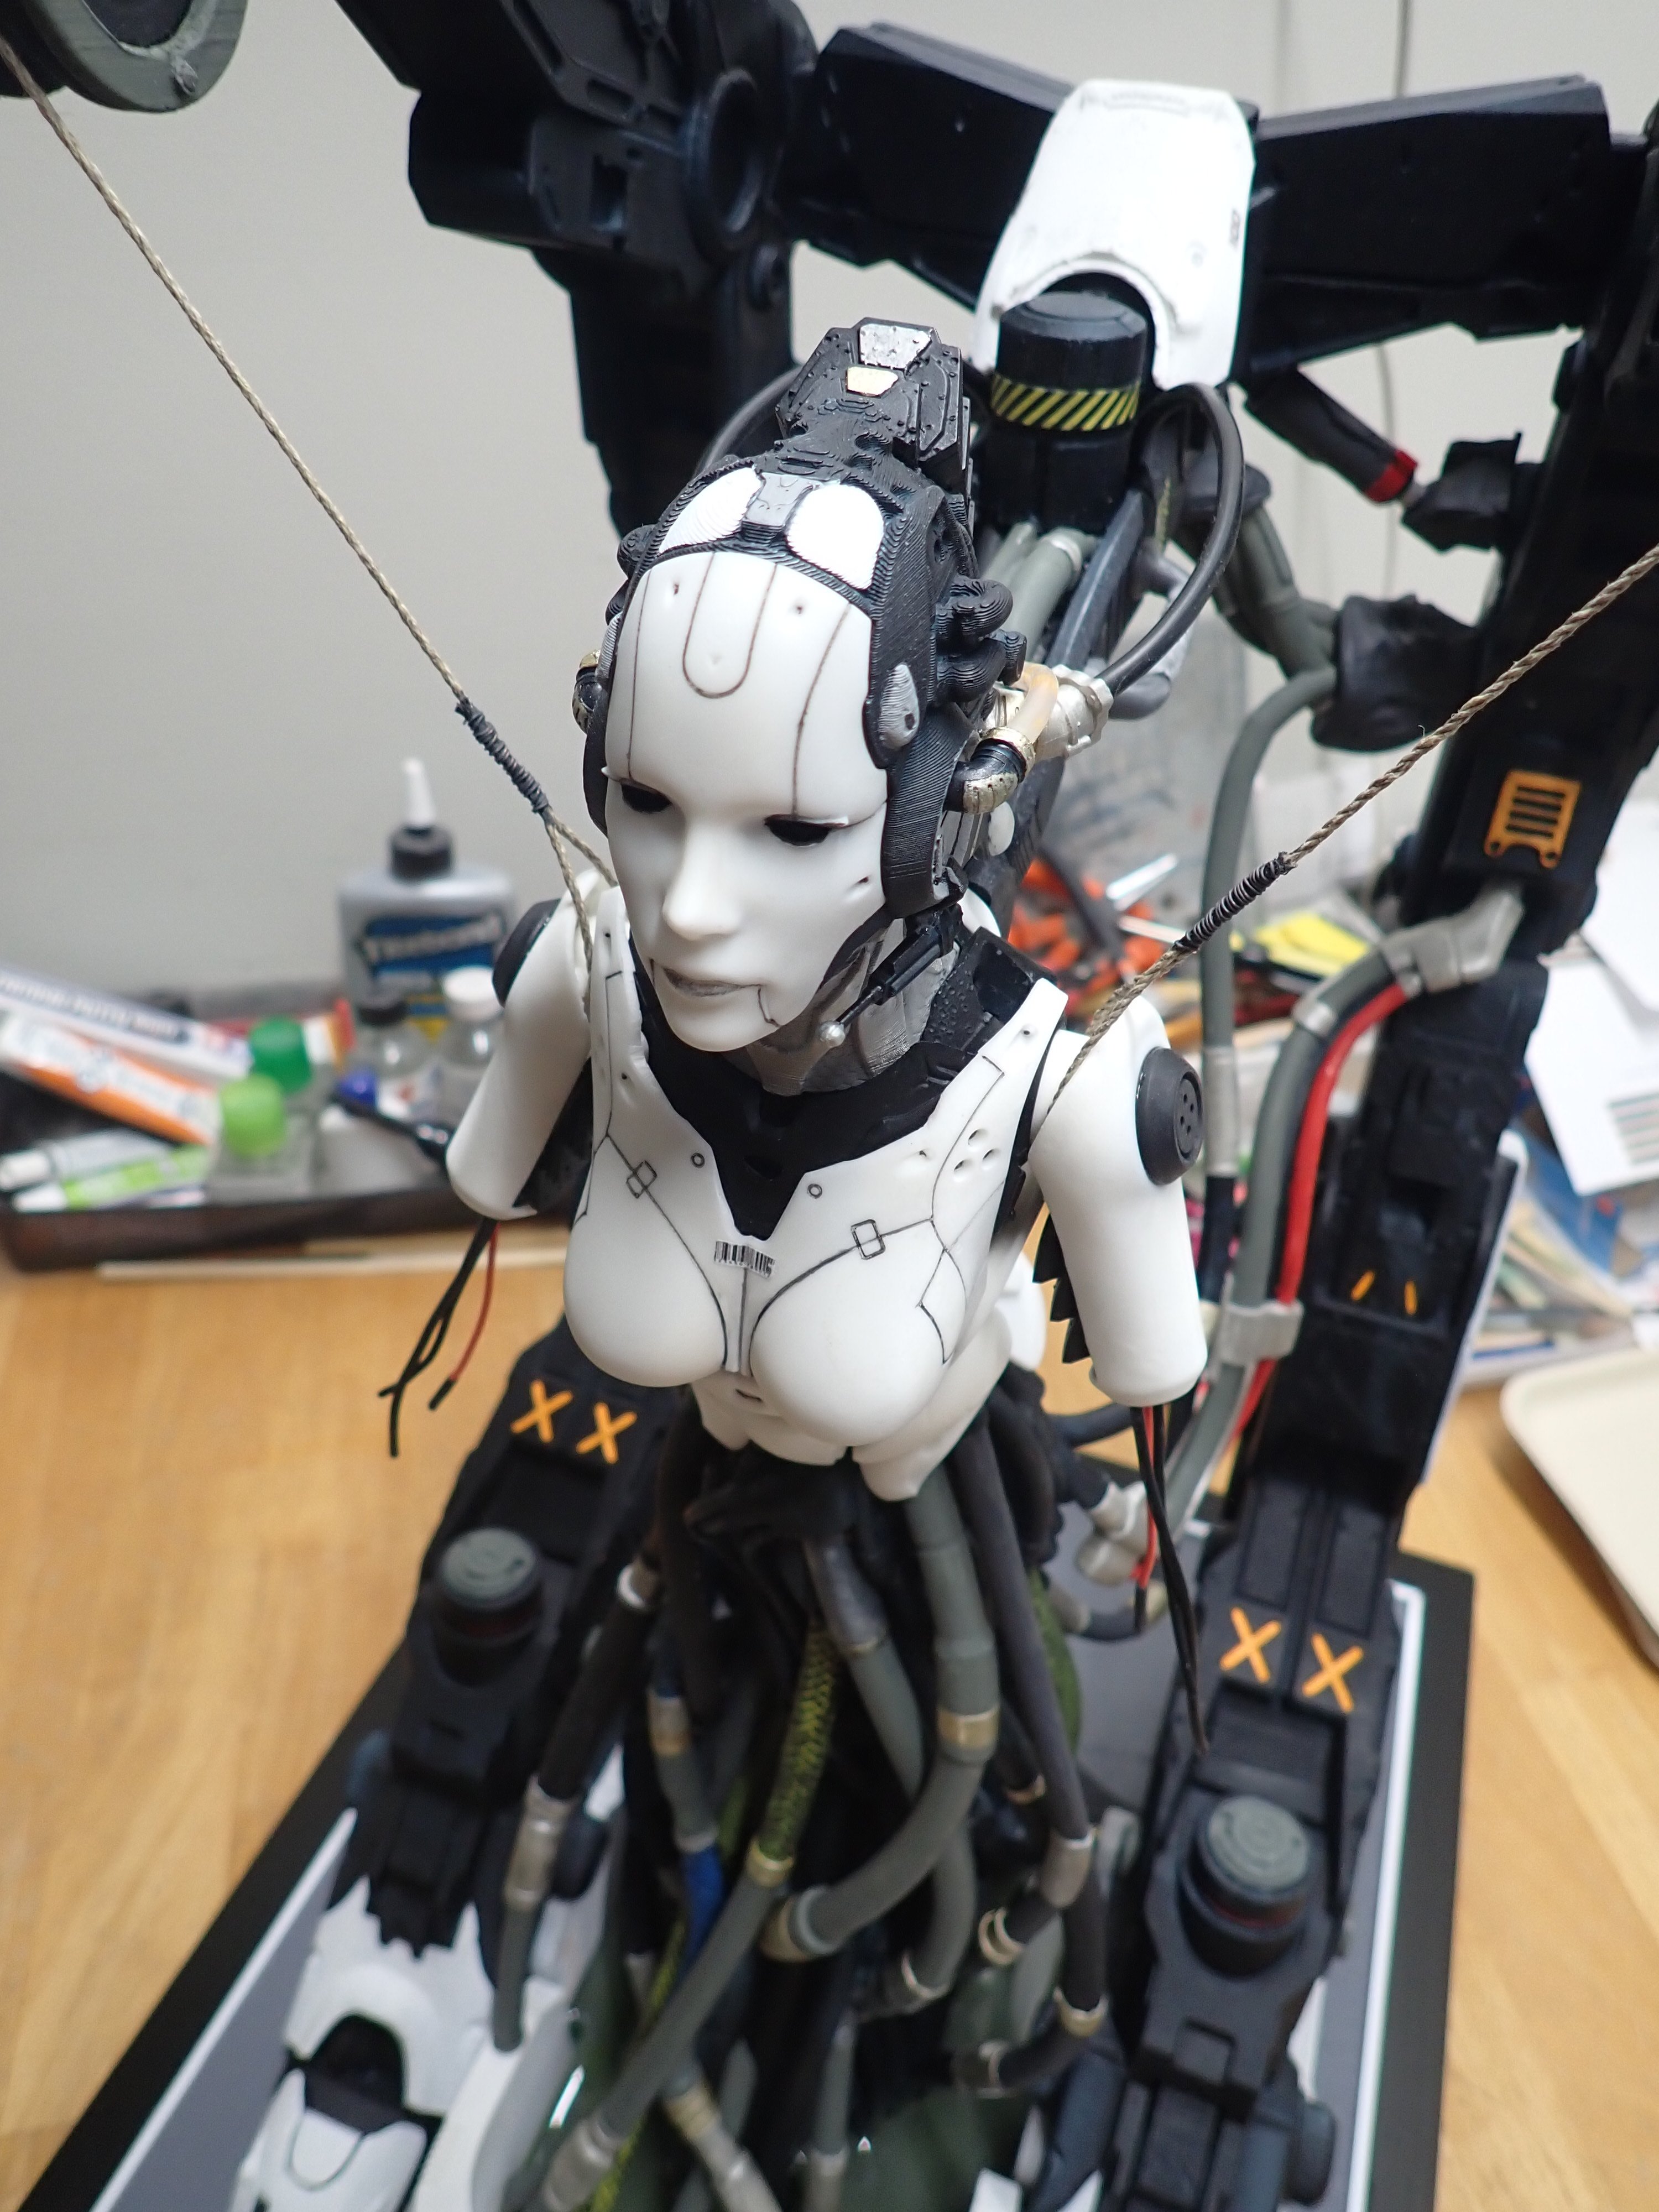
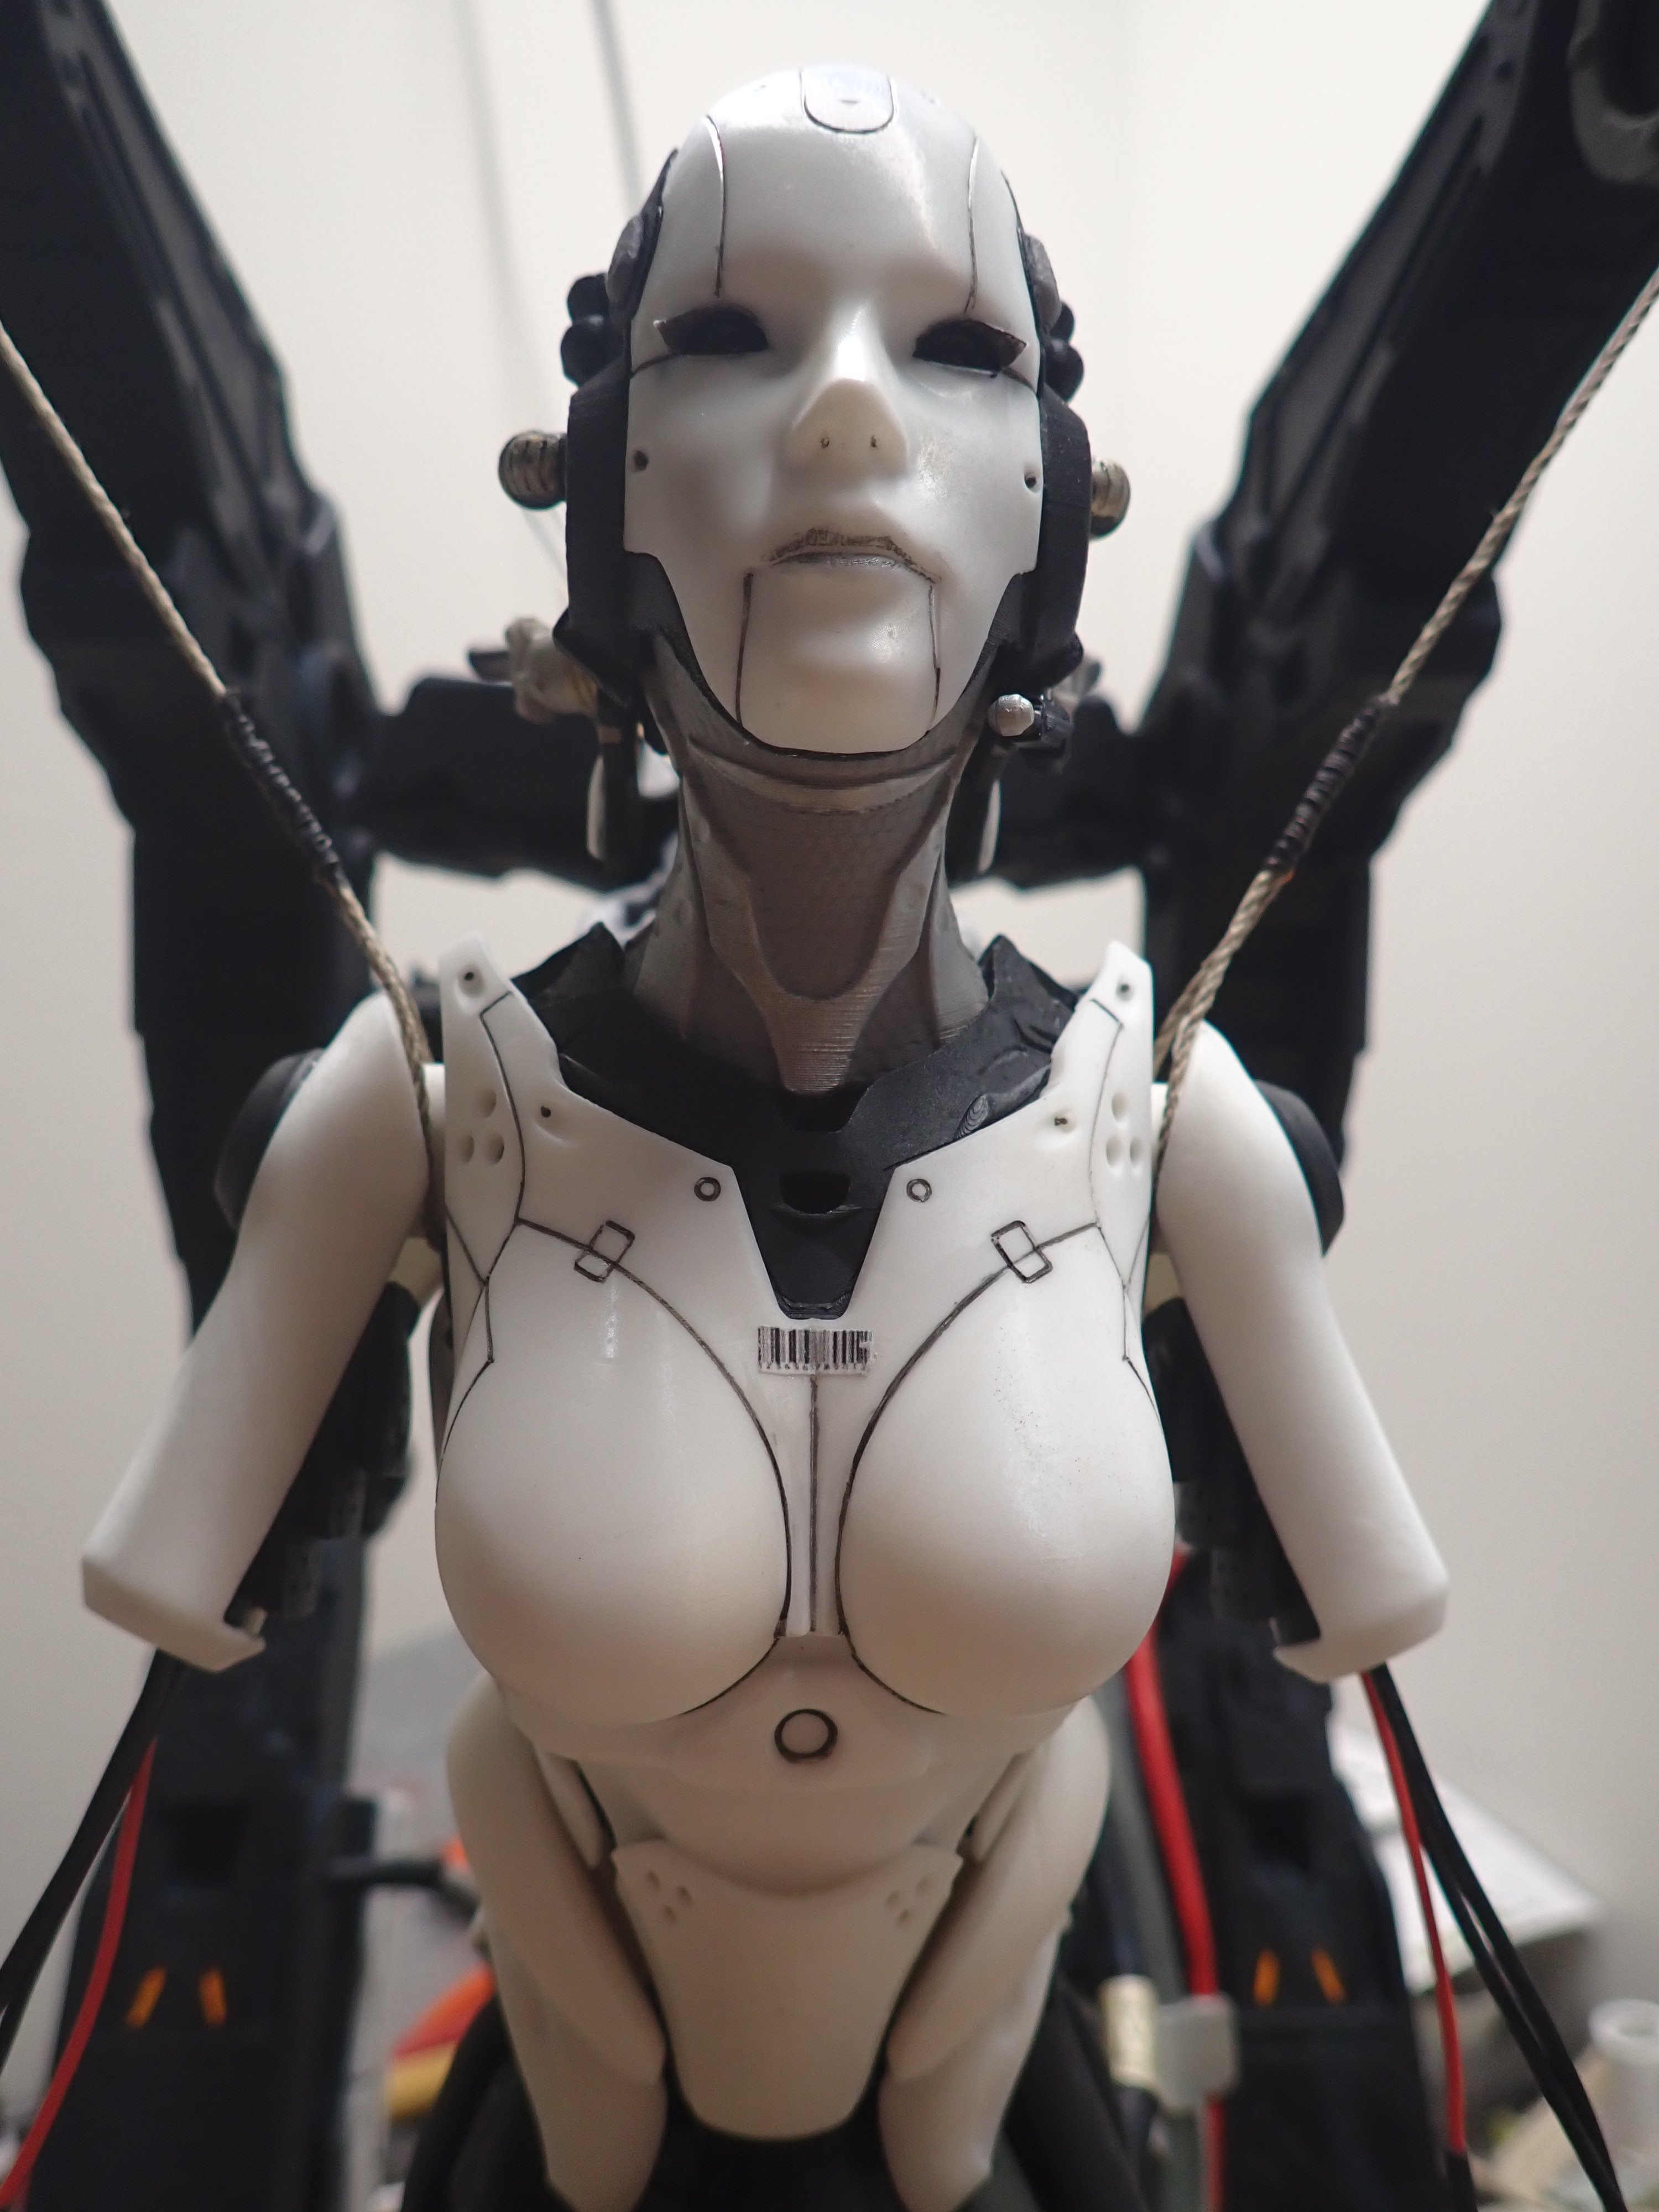
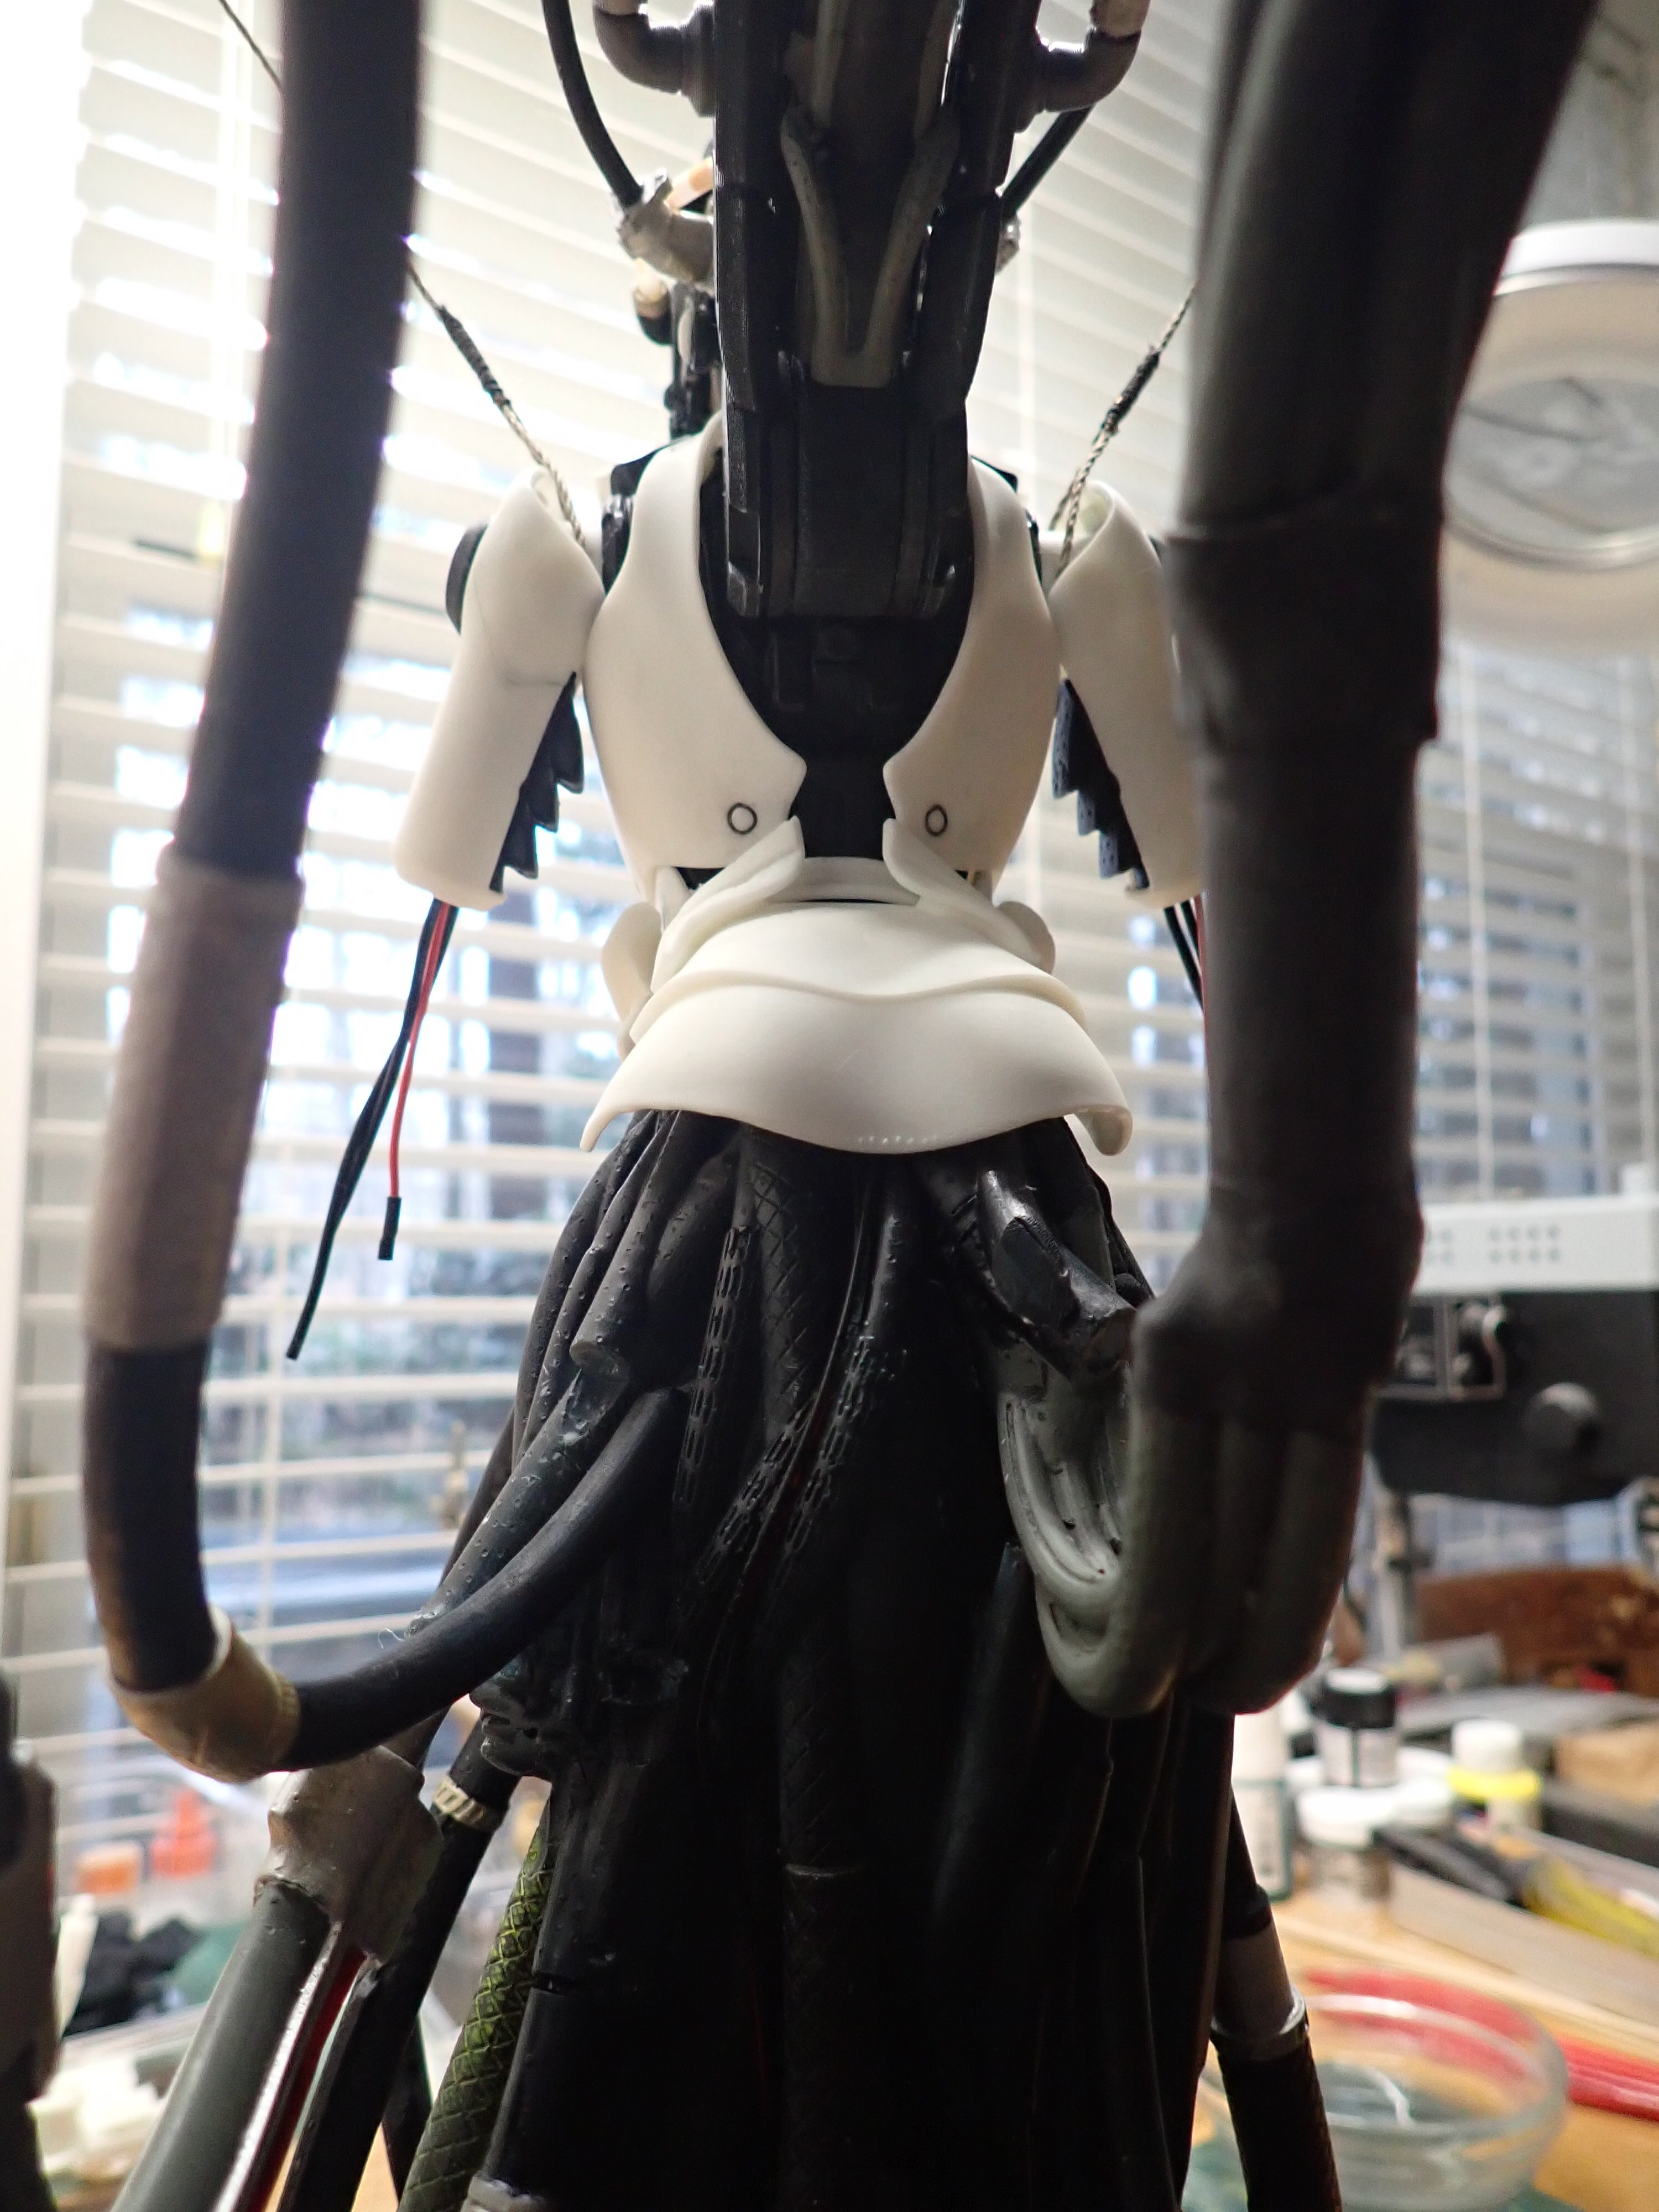
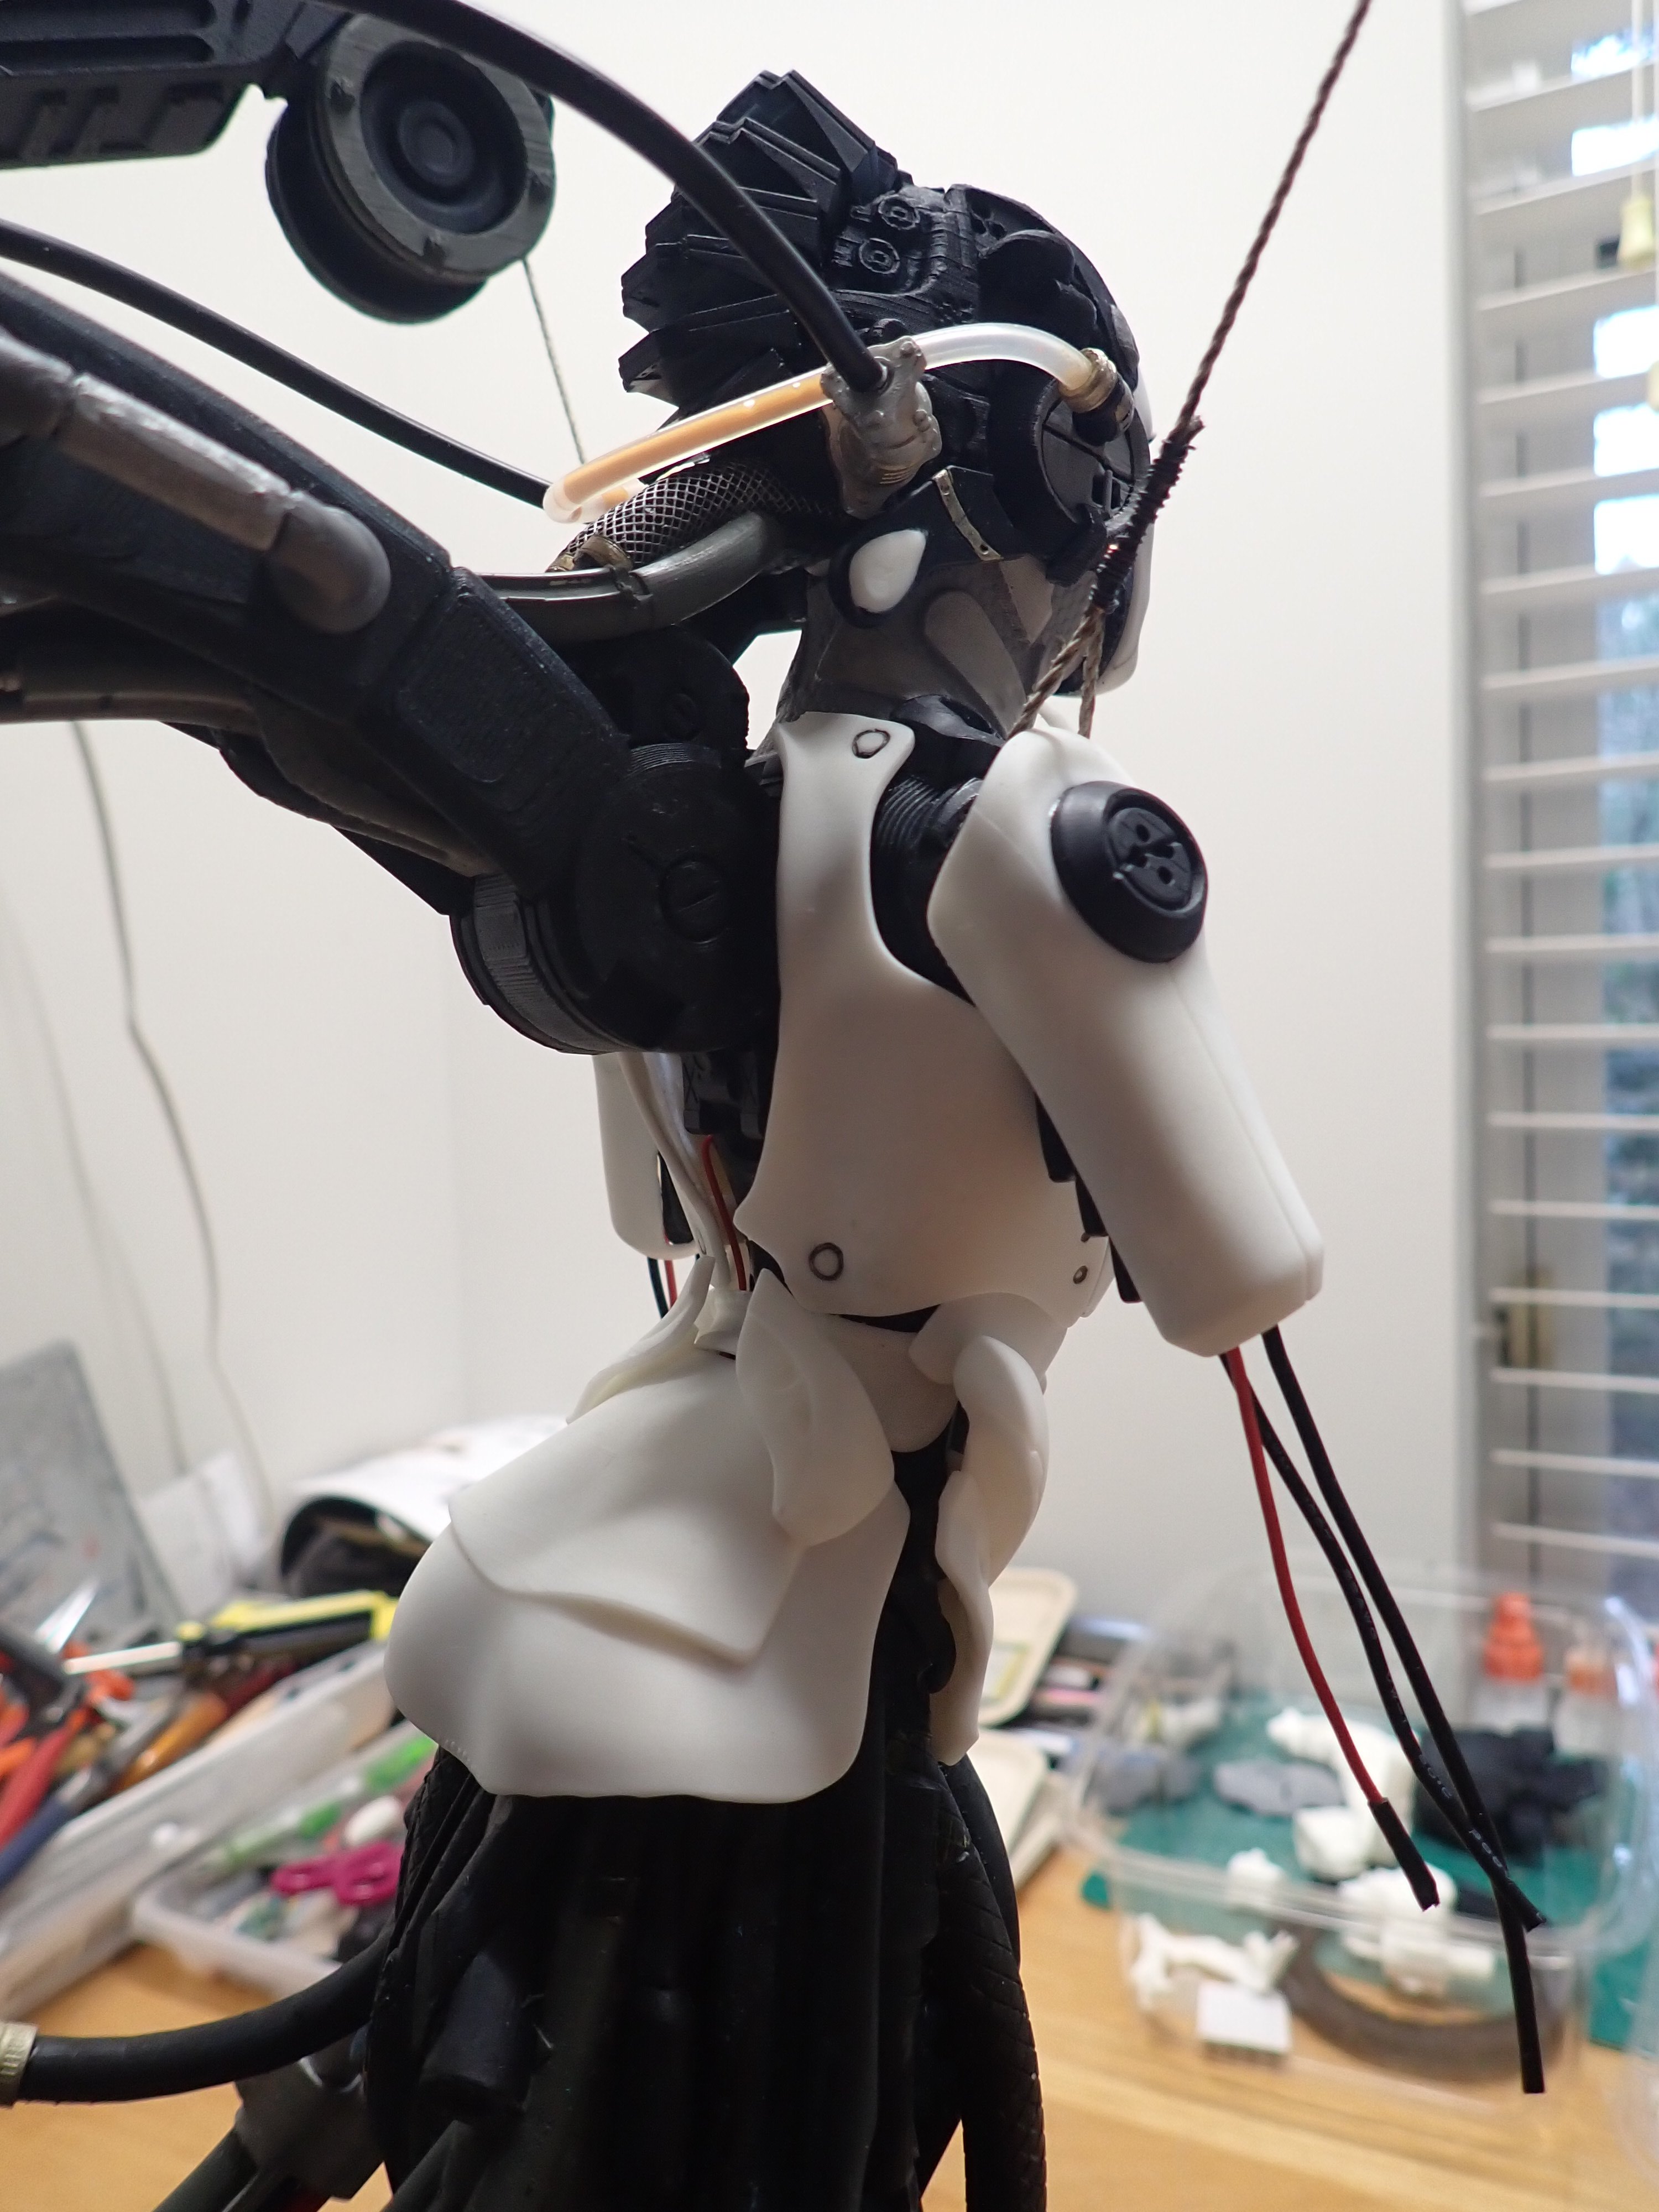
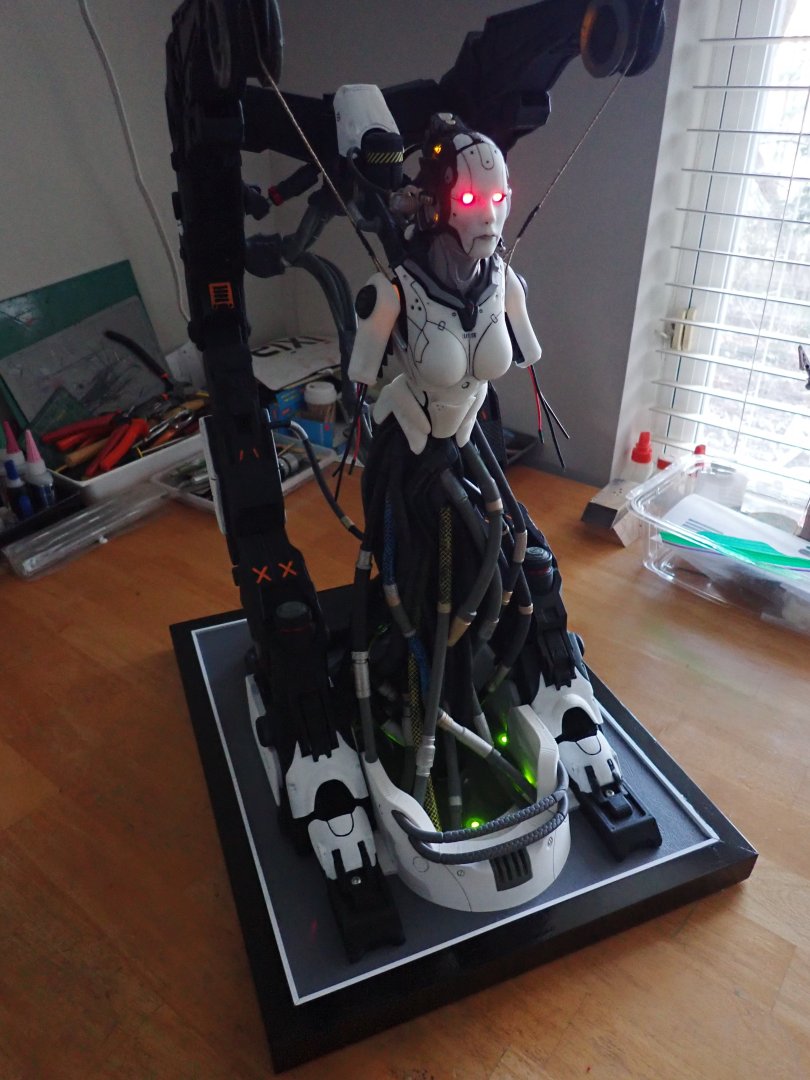
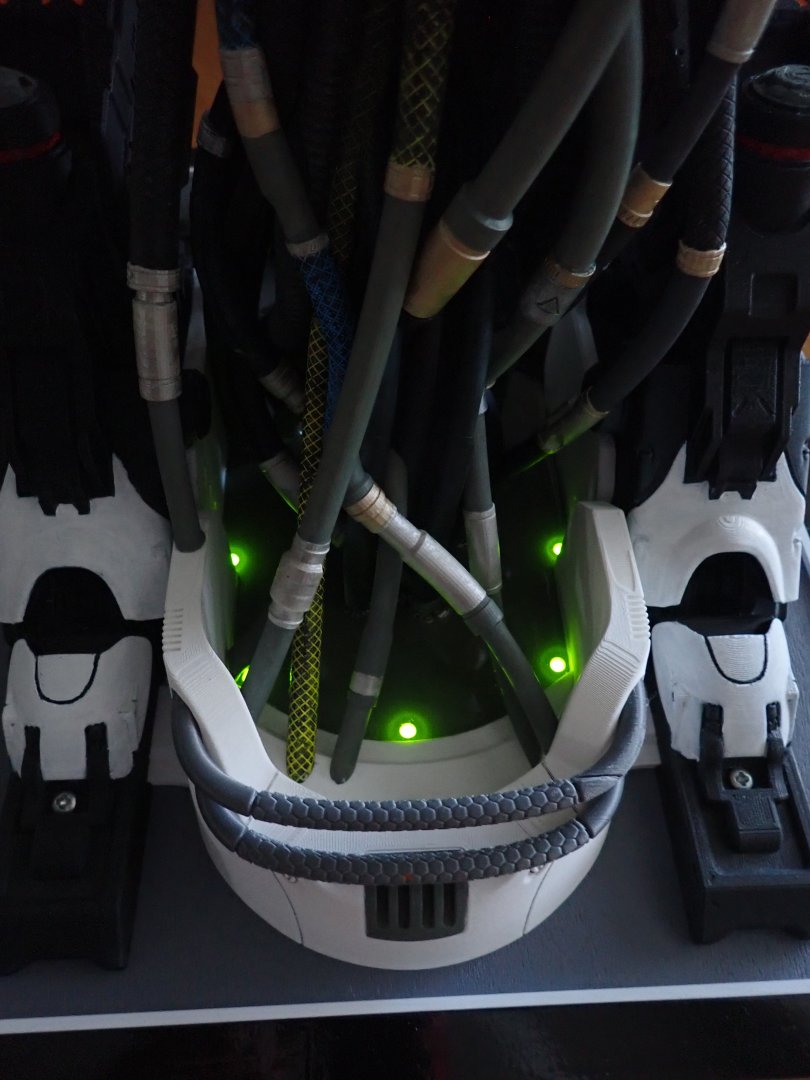
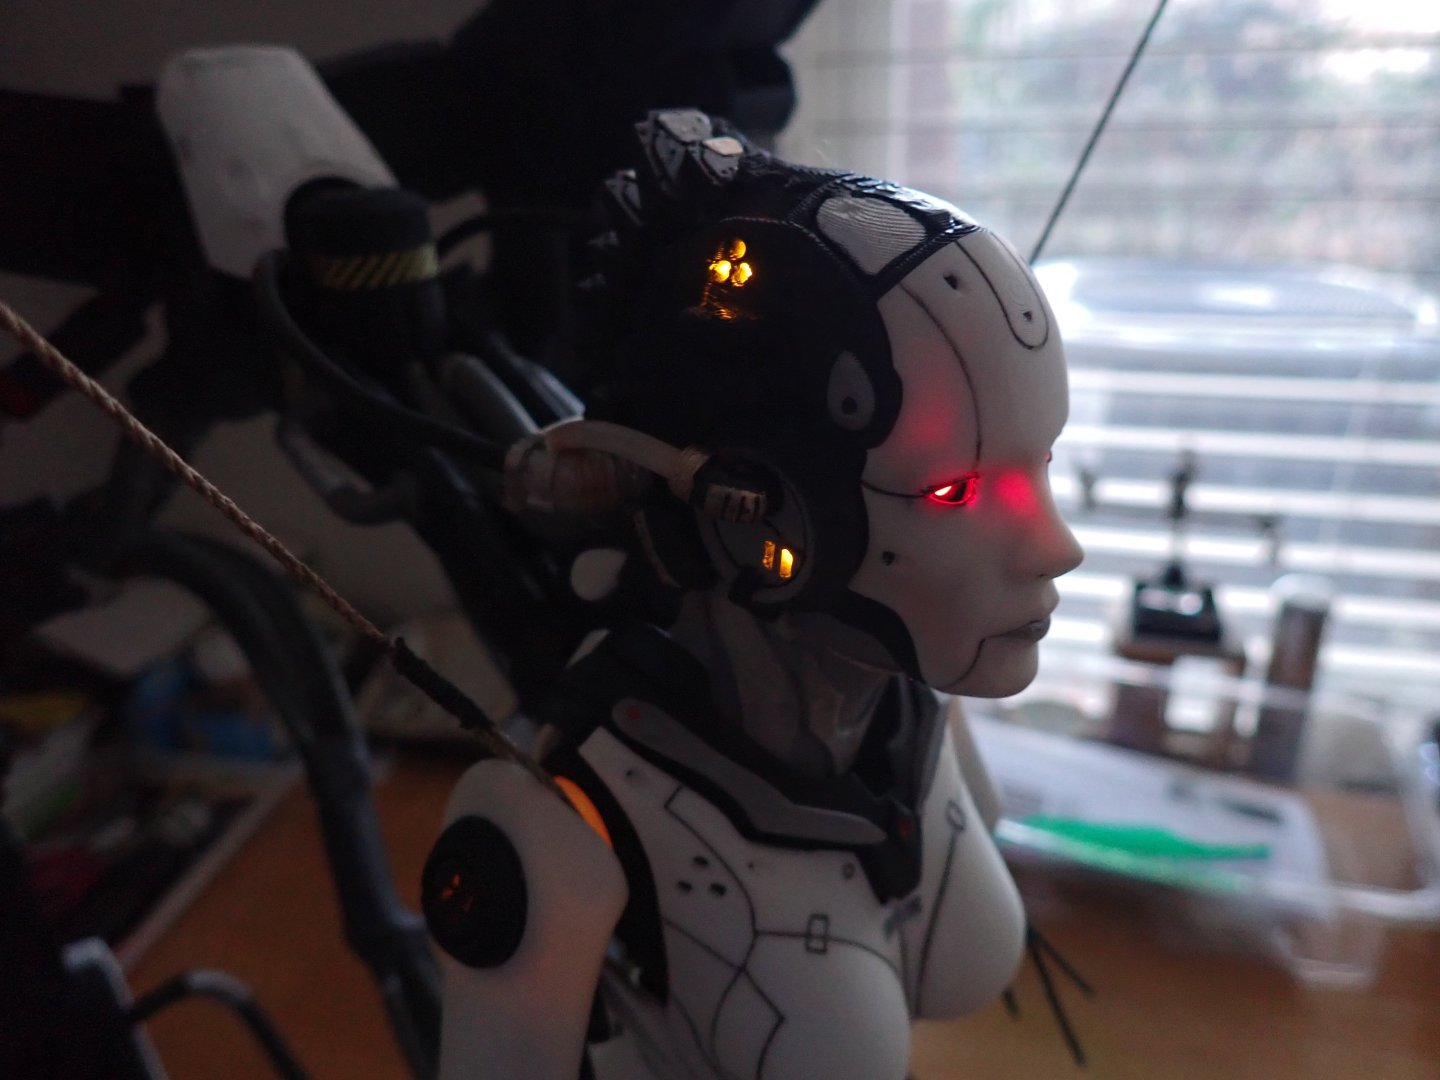
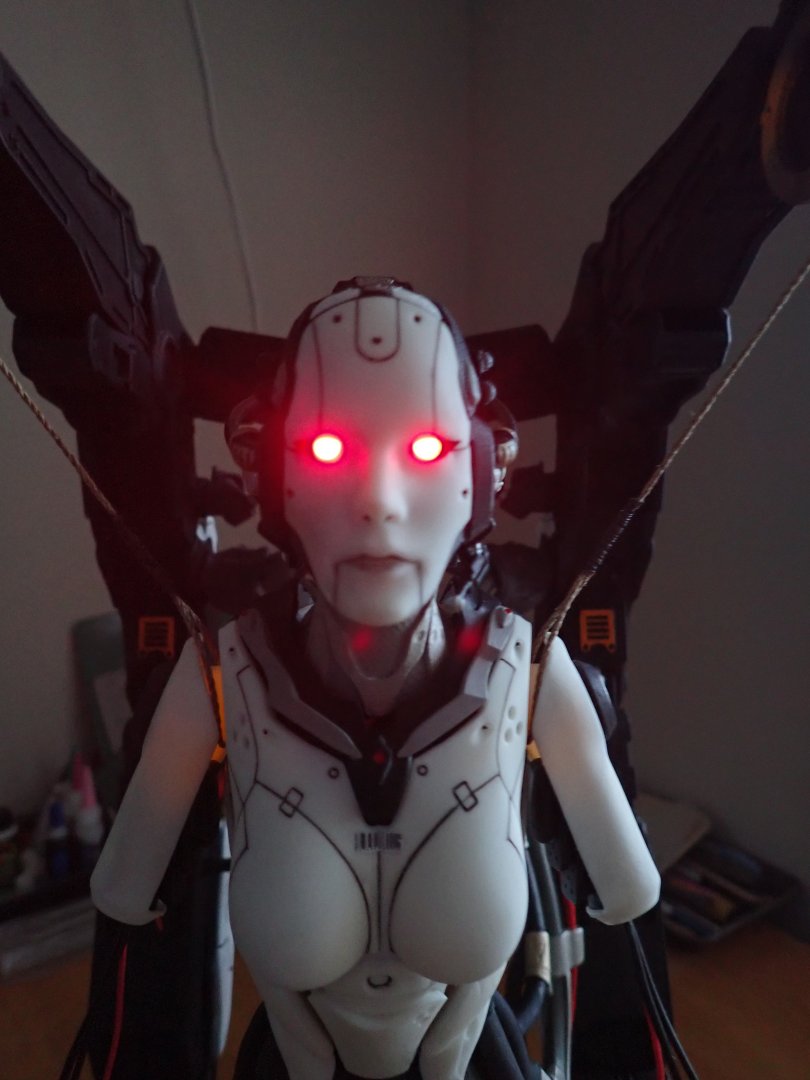
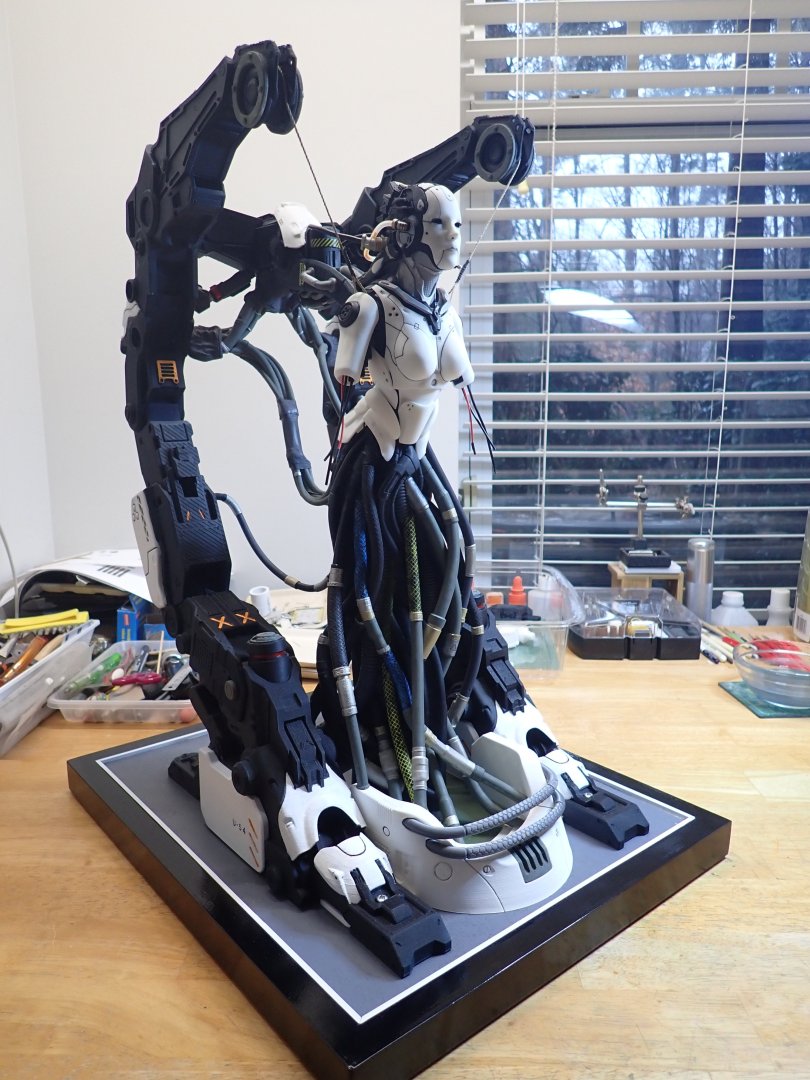
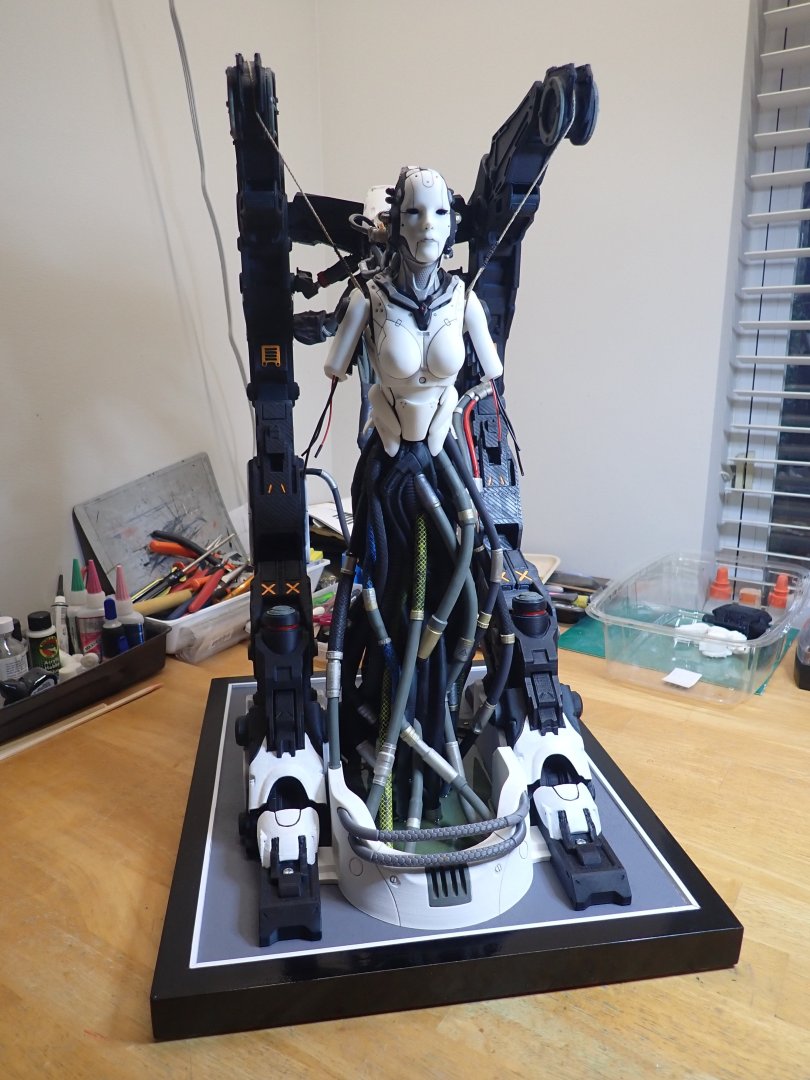
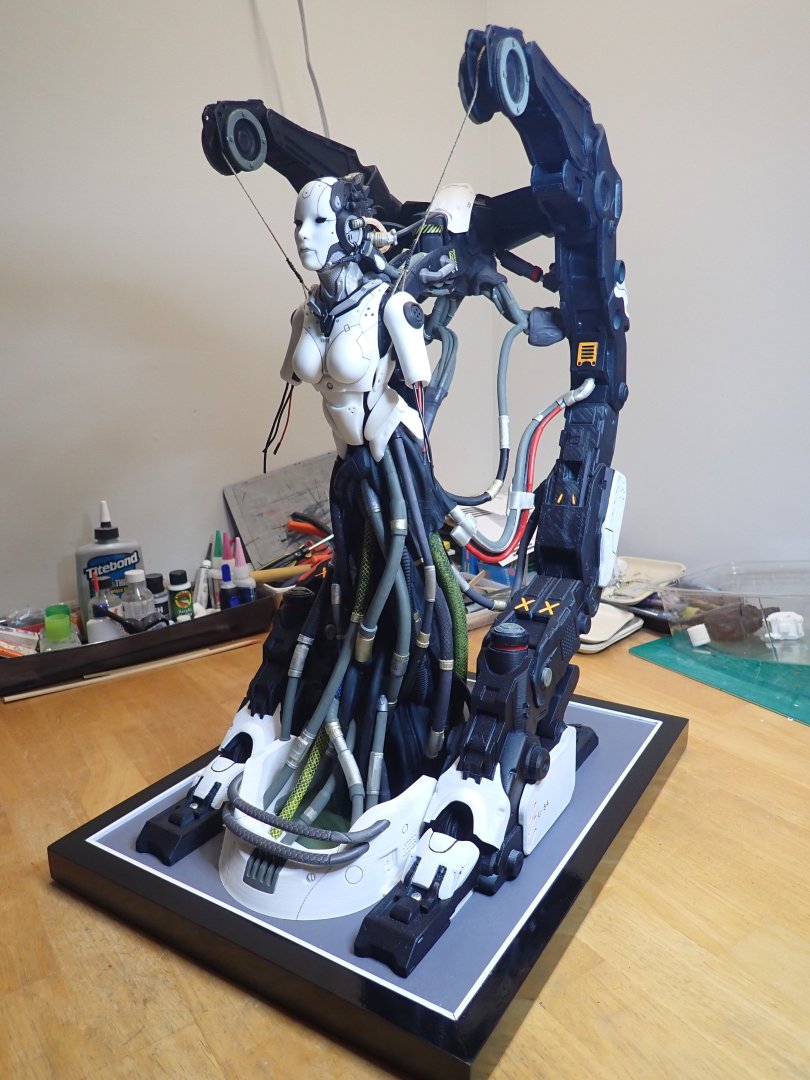
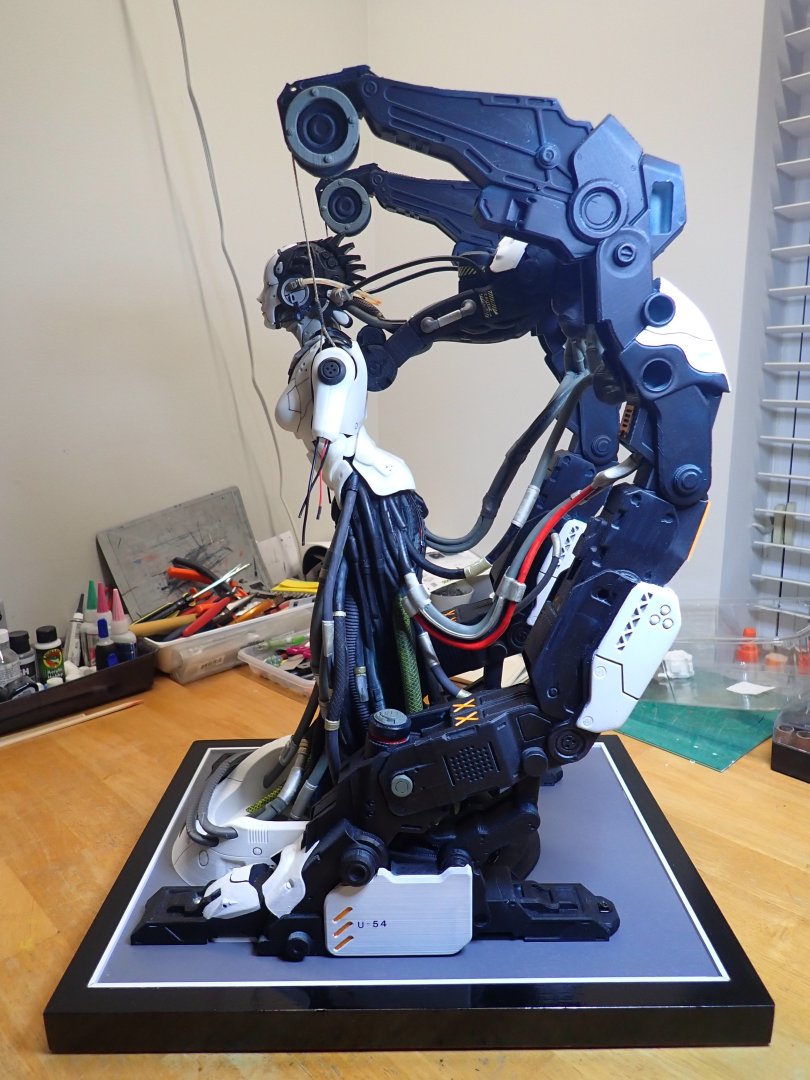
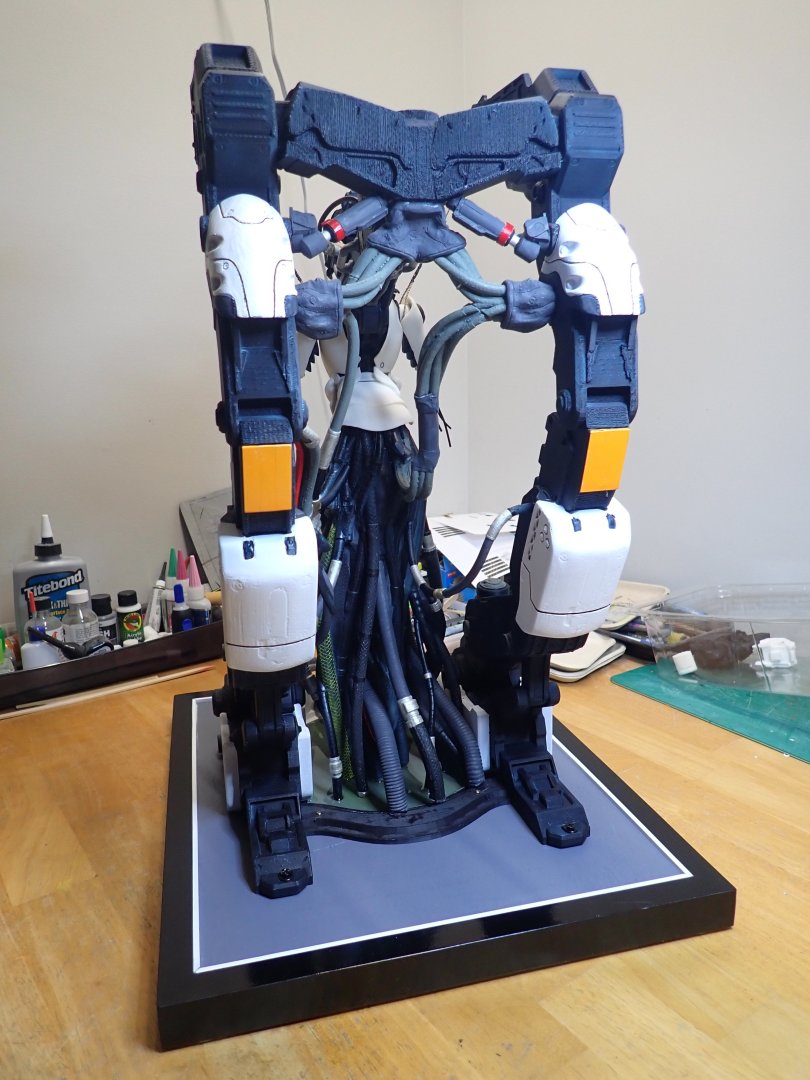
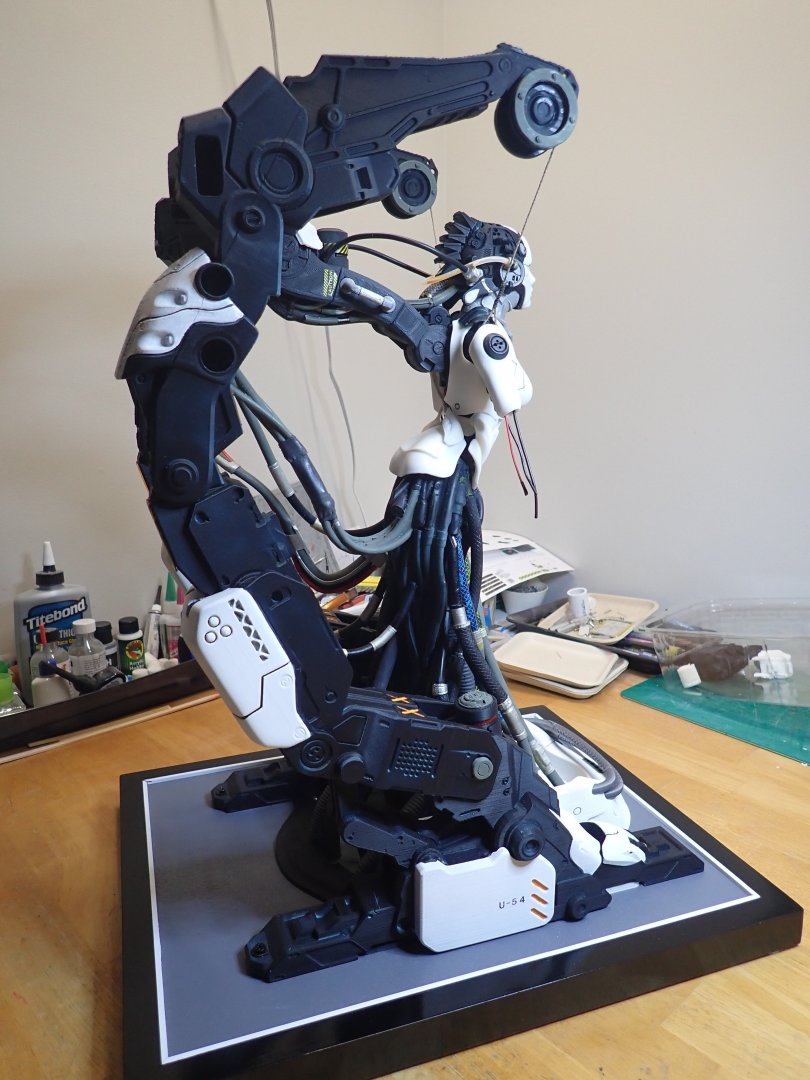
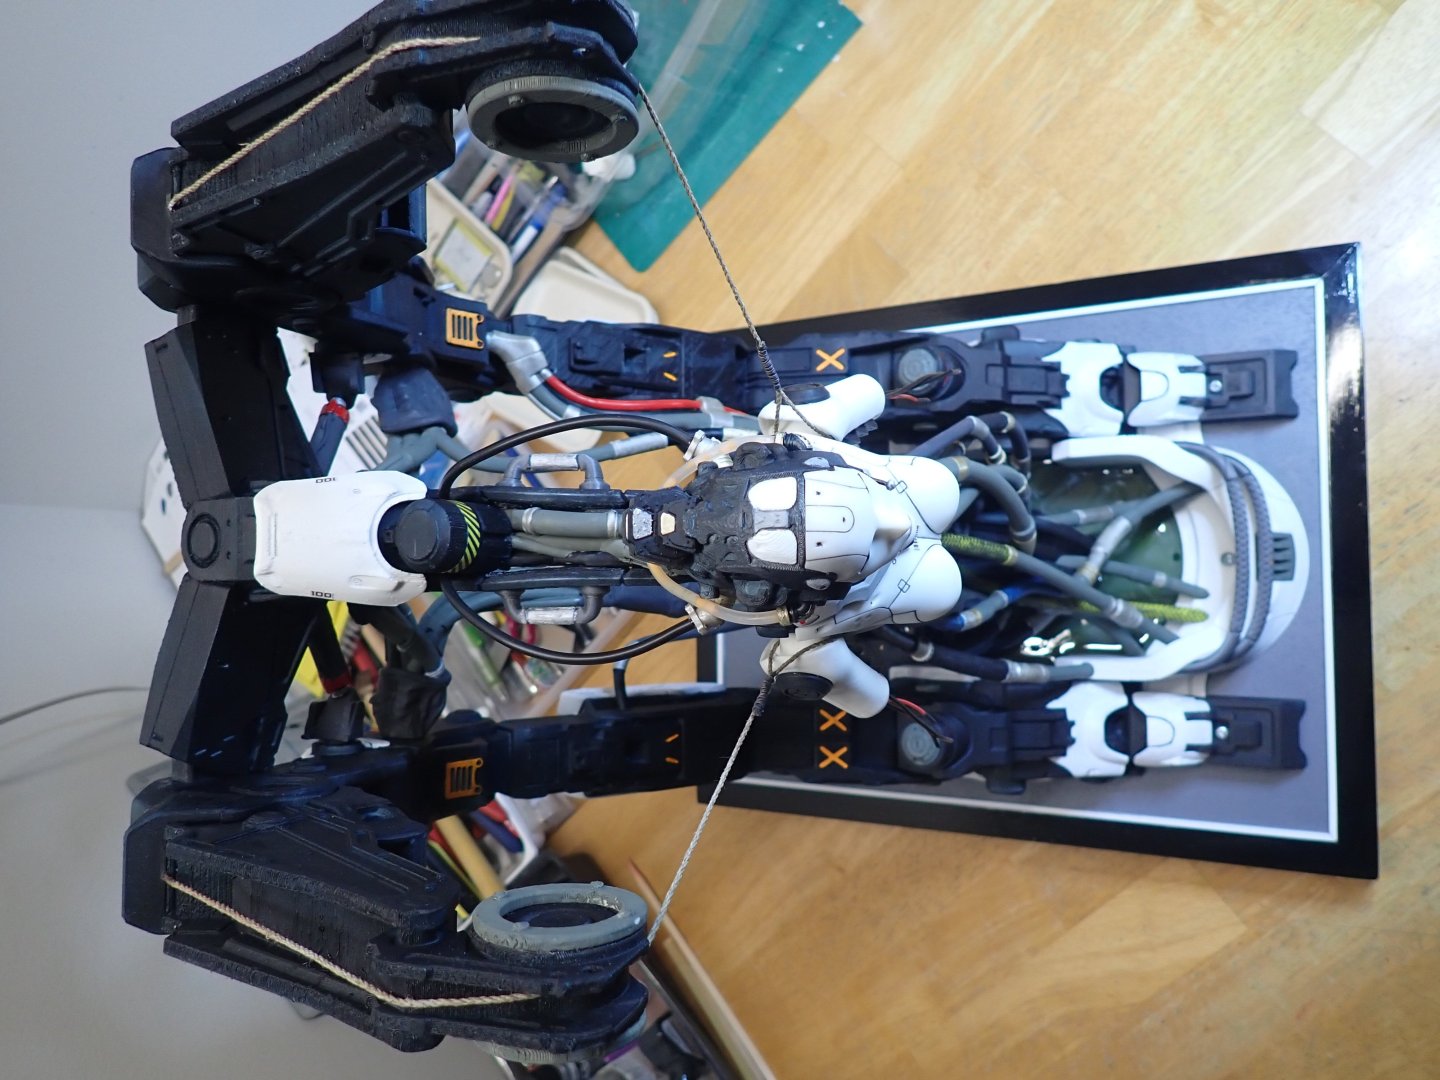
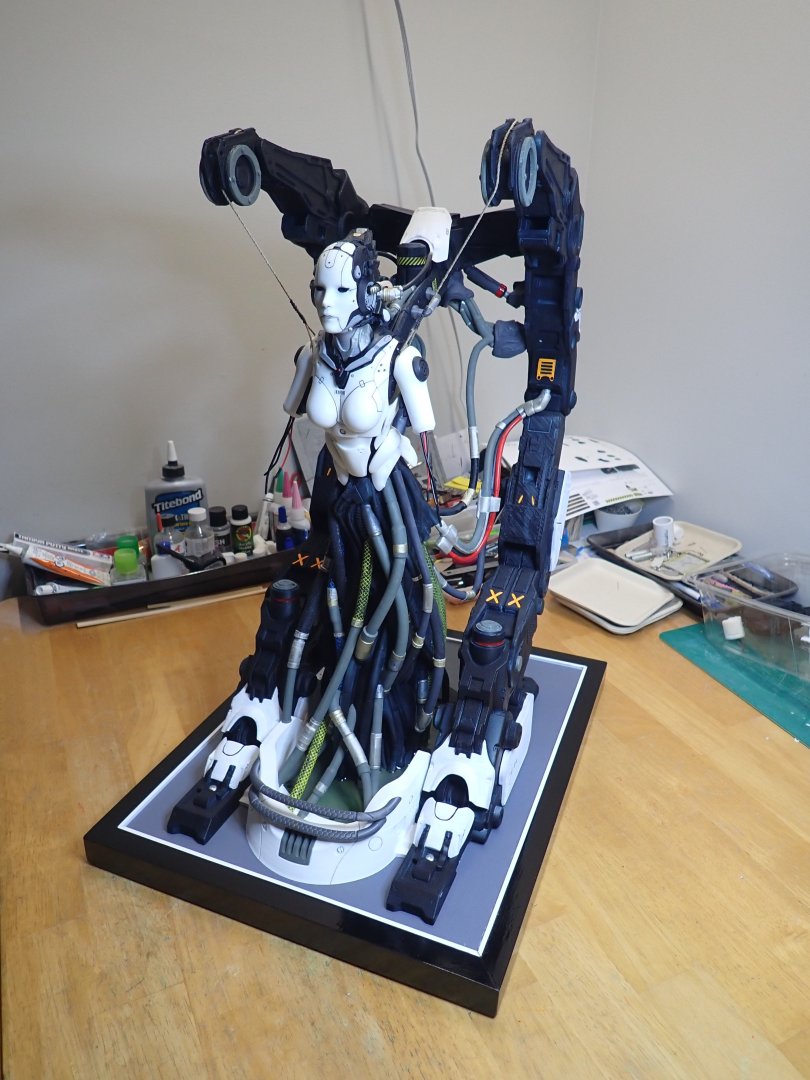
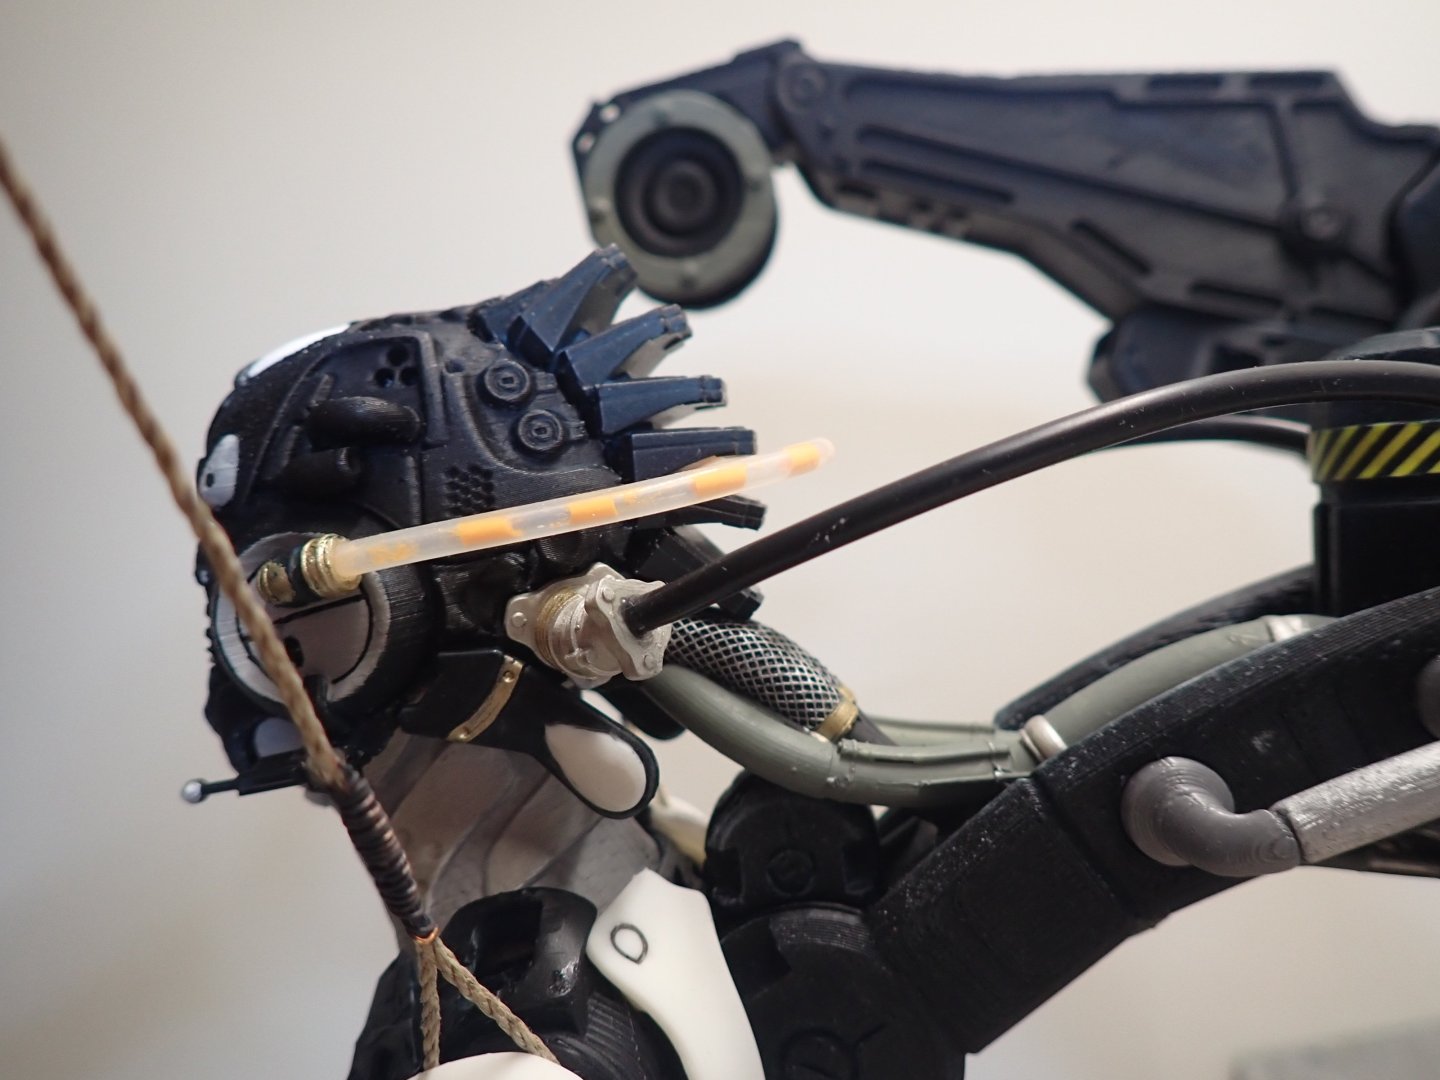
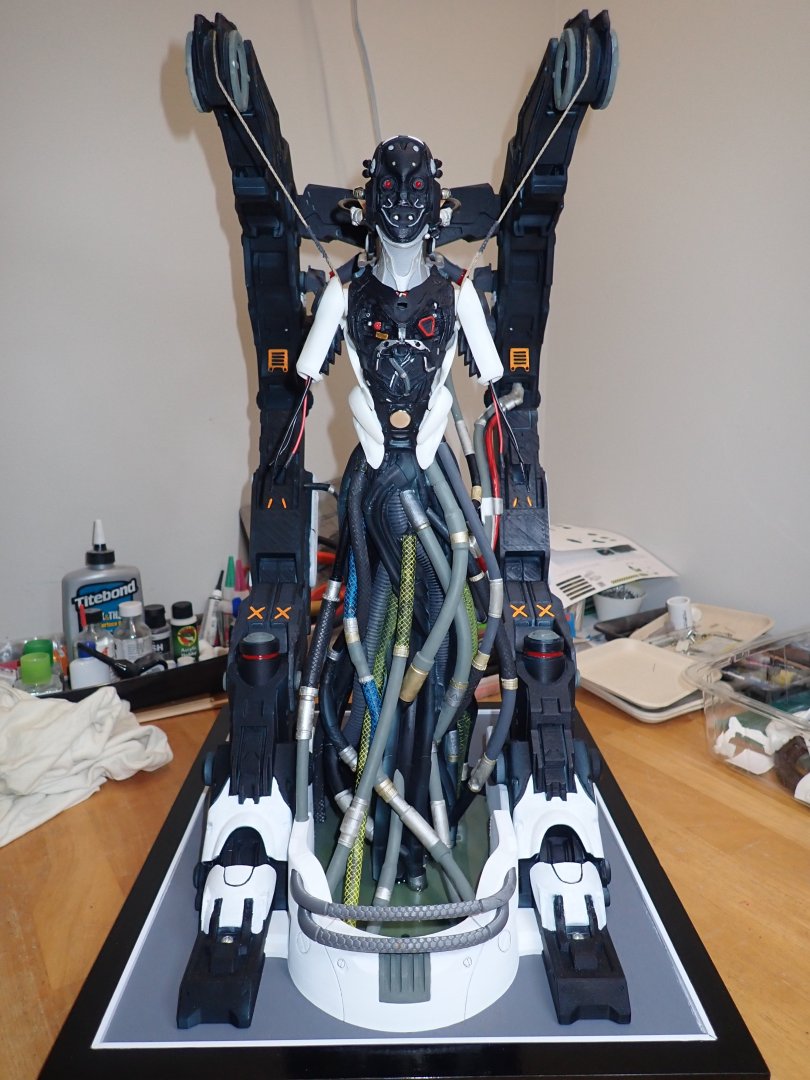
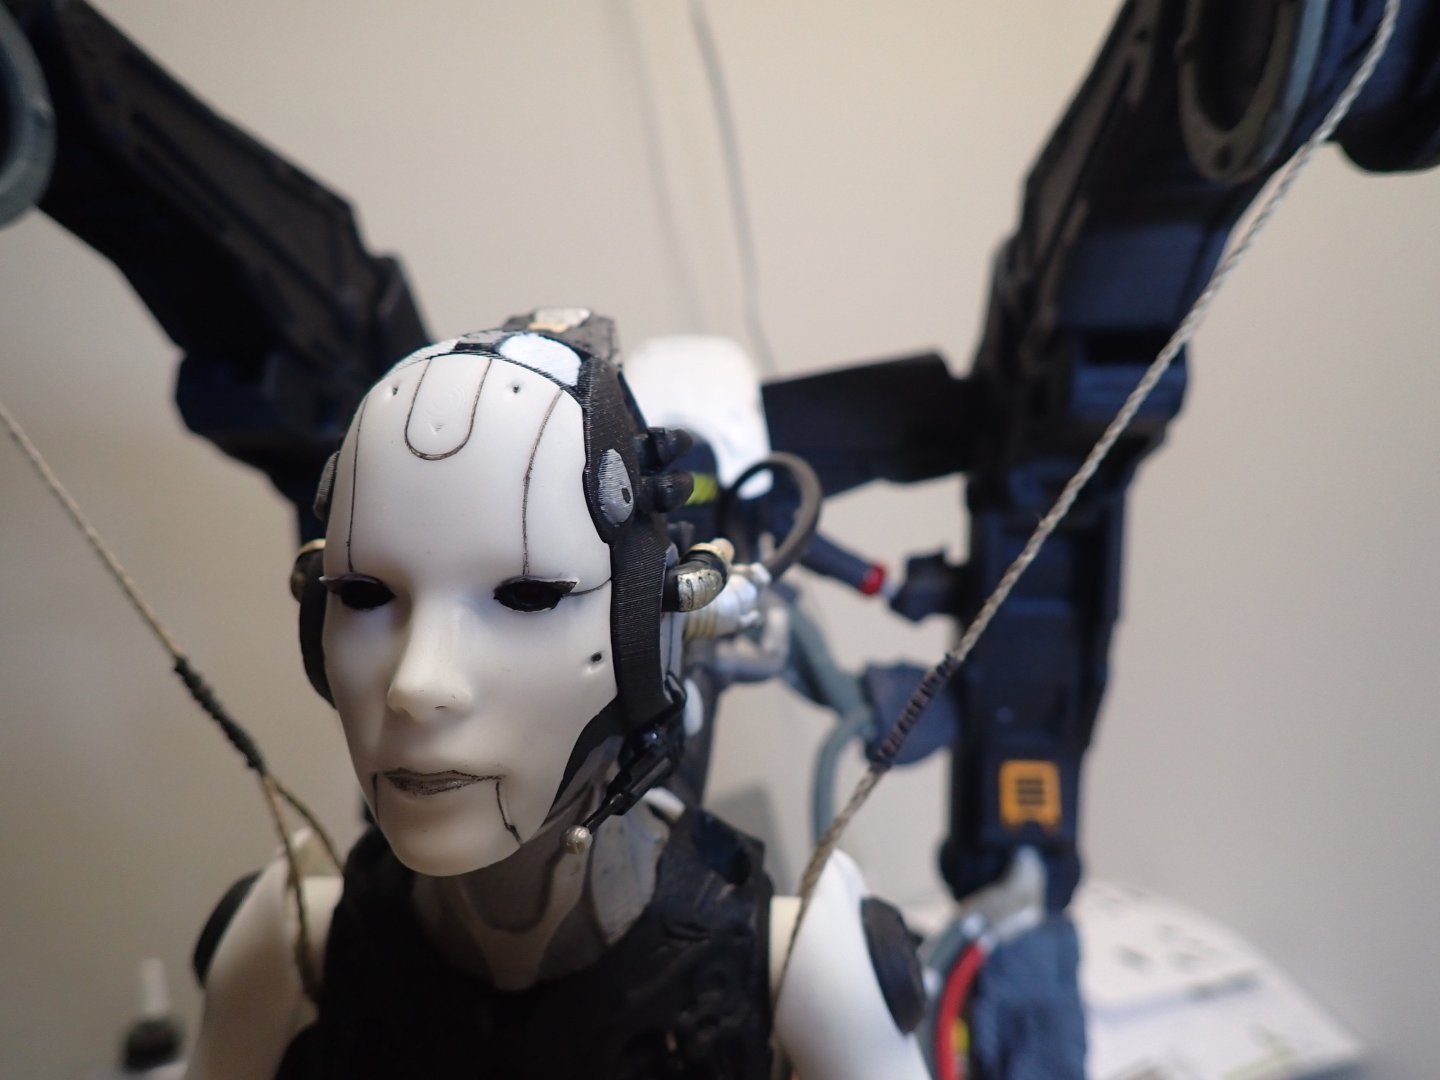
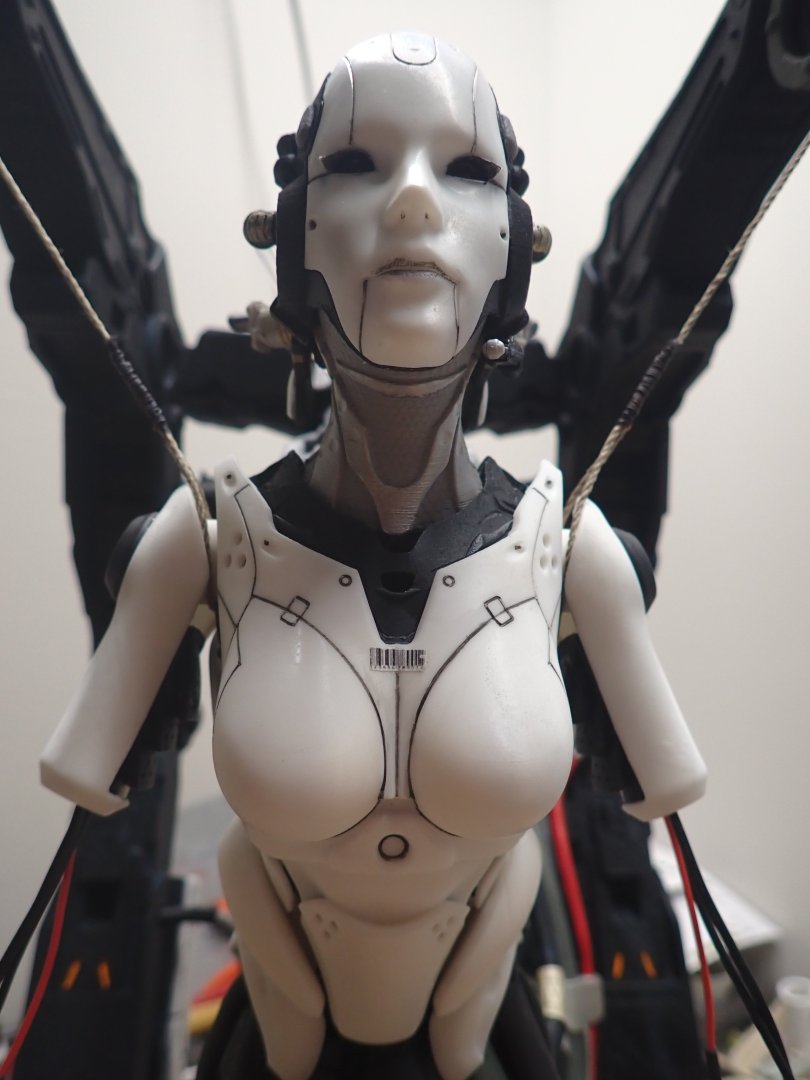
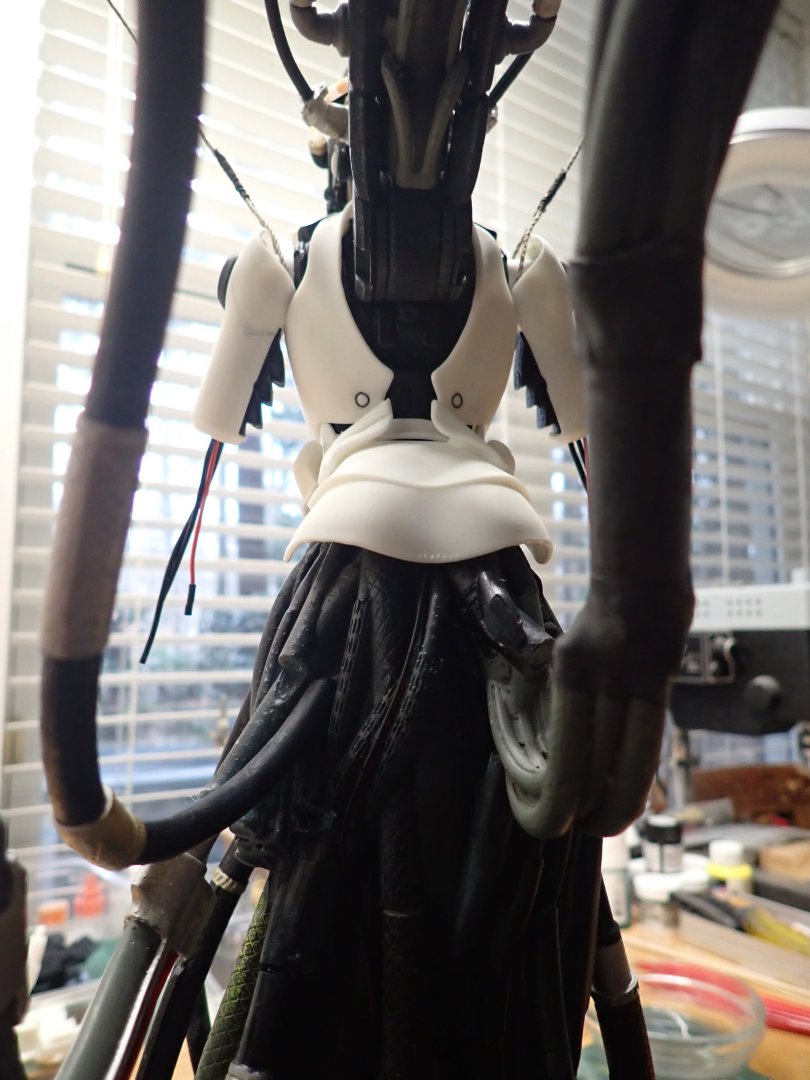
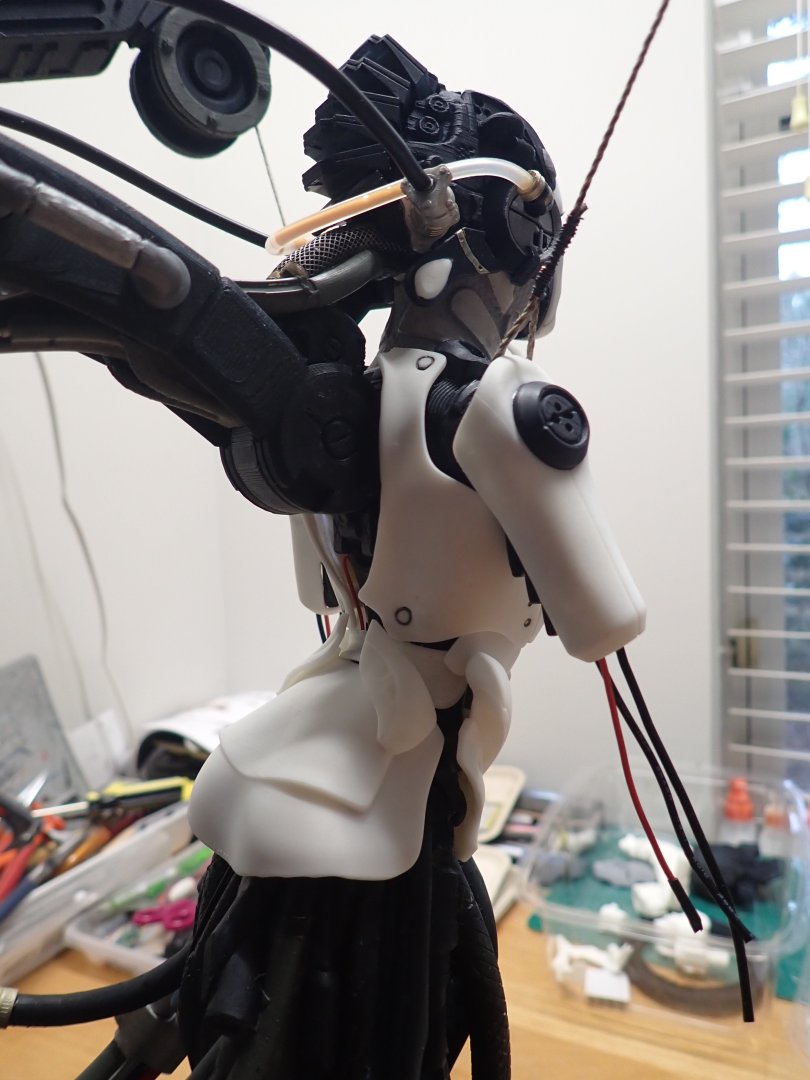
We are coming to the end of this build. It has been a steep learning curve overall, with filament printing (that I know a little bit better) and the new Resin printing process and equipment needed to fabricate all the parts. I don't regret investing in a resin printer and cleaning station as it opens many doors for beautiful rendering of figures and detailed parts for ship modeling. That AI creature had been taunting me for years, and I am glad that I was able to build it to completion. It will definitely be a piece for discussion.... I installed a power pack (5 Volts / 3 Amps) normally used for thermal clothes. A full charge can power the unit for more than a day. The murkiness of the cable pool.... Despite painting the back of the face mask in black, there are still some light leaks. A second coat will be required... And the eyes are reflecting on the base of the nose. That's it. Final step will be the computer interface to dialog with the AI creature. I hope you are and have enjoyed that project. Yves


-
I agree. This ship has always tempted me, but 1/35th is definitely calling for a monster, especially in height. I wish they would offer that model in 1/48th scale..... Yves
-
This feature is a sweeper that removes all ice, snow, rain and allows you to have a clear vision in front of you. Yves
-
For those of you who would like to see the AI Adjutant creature in action, youtube has a couple of videos: Yves
-
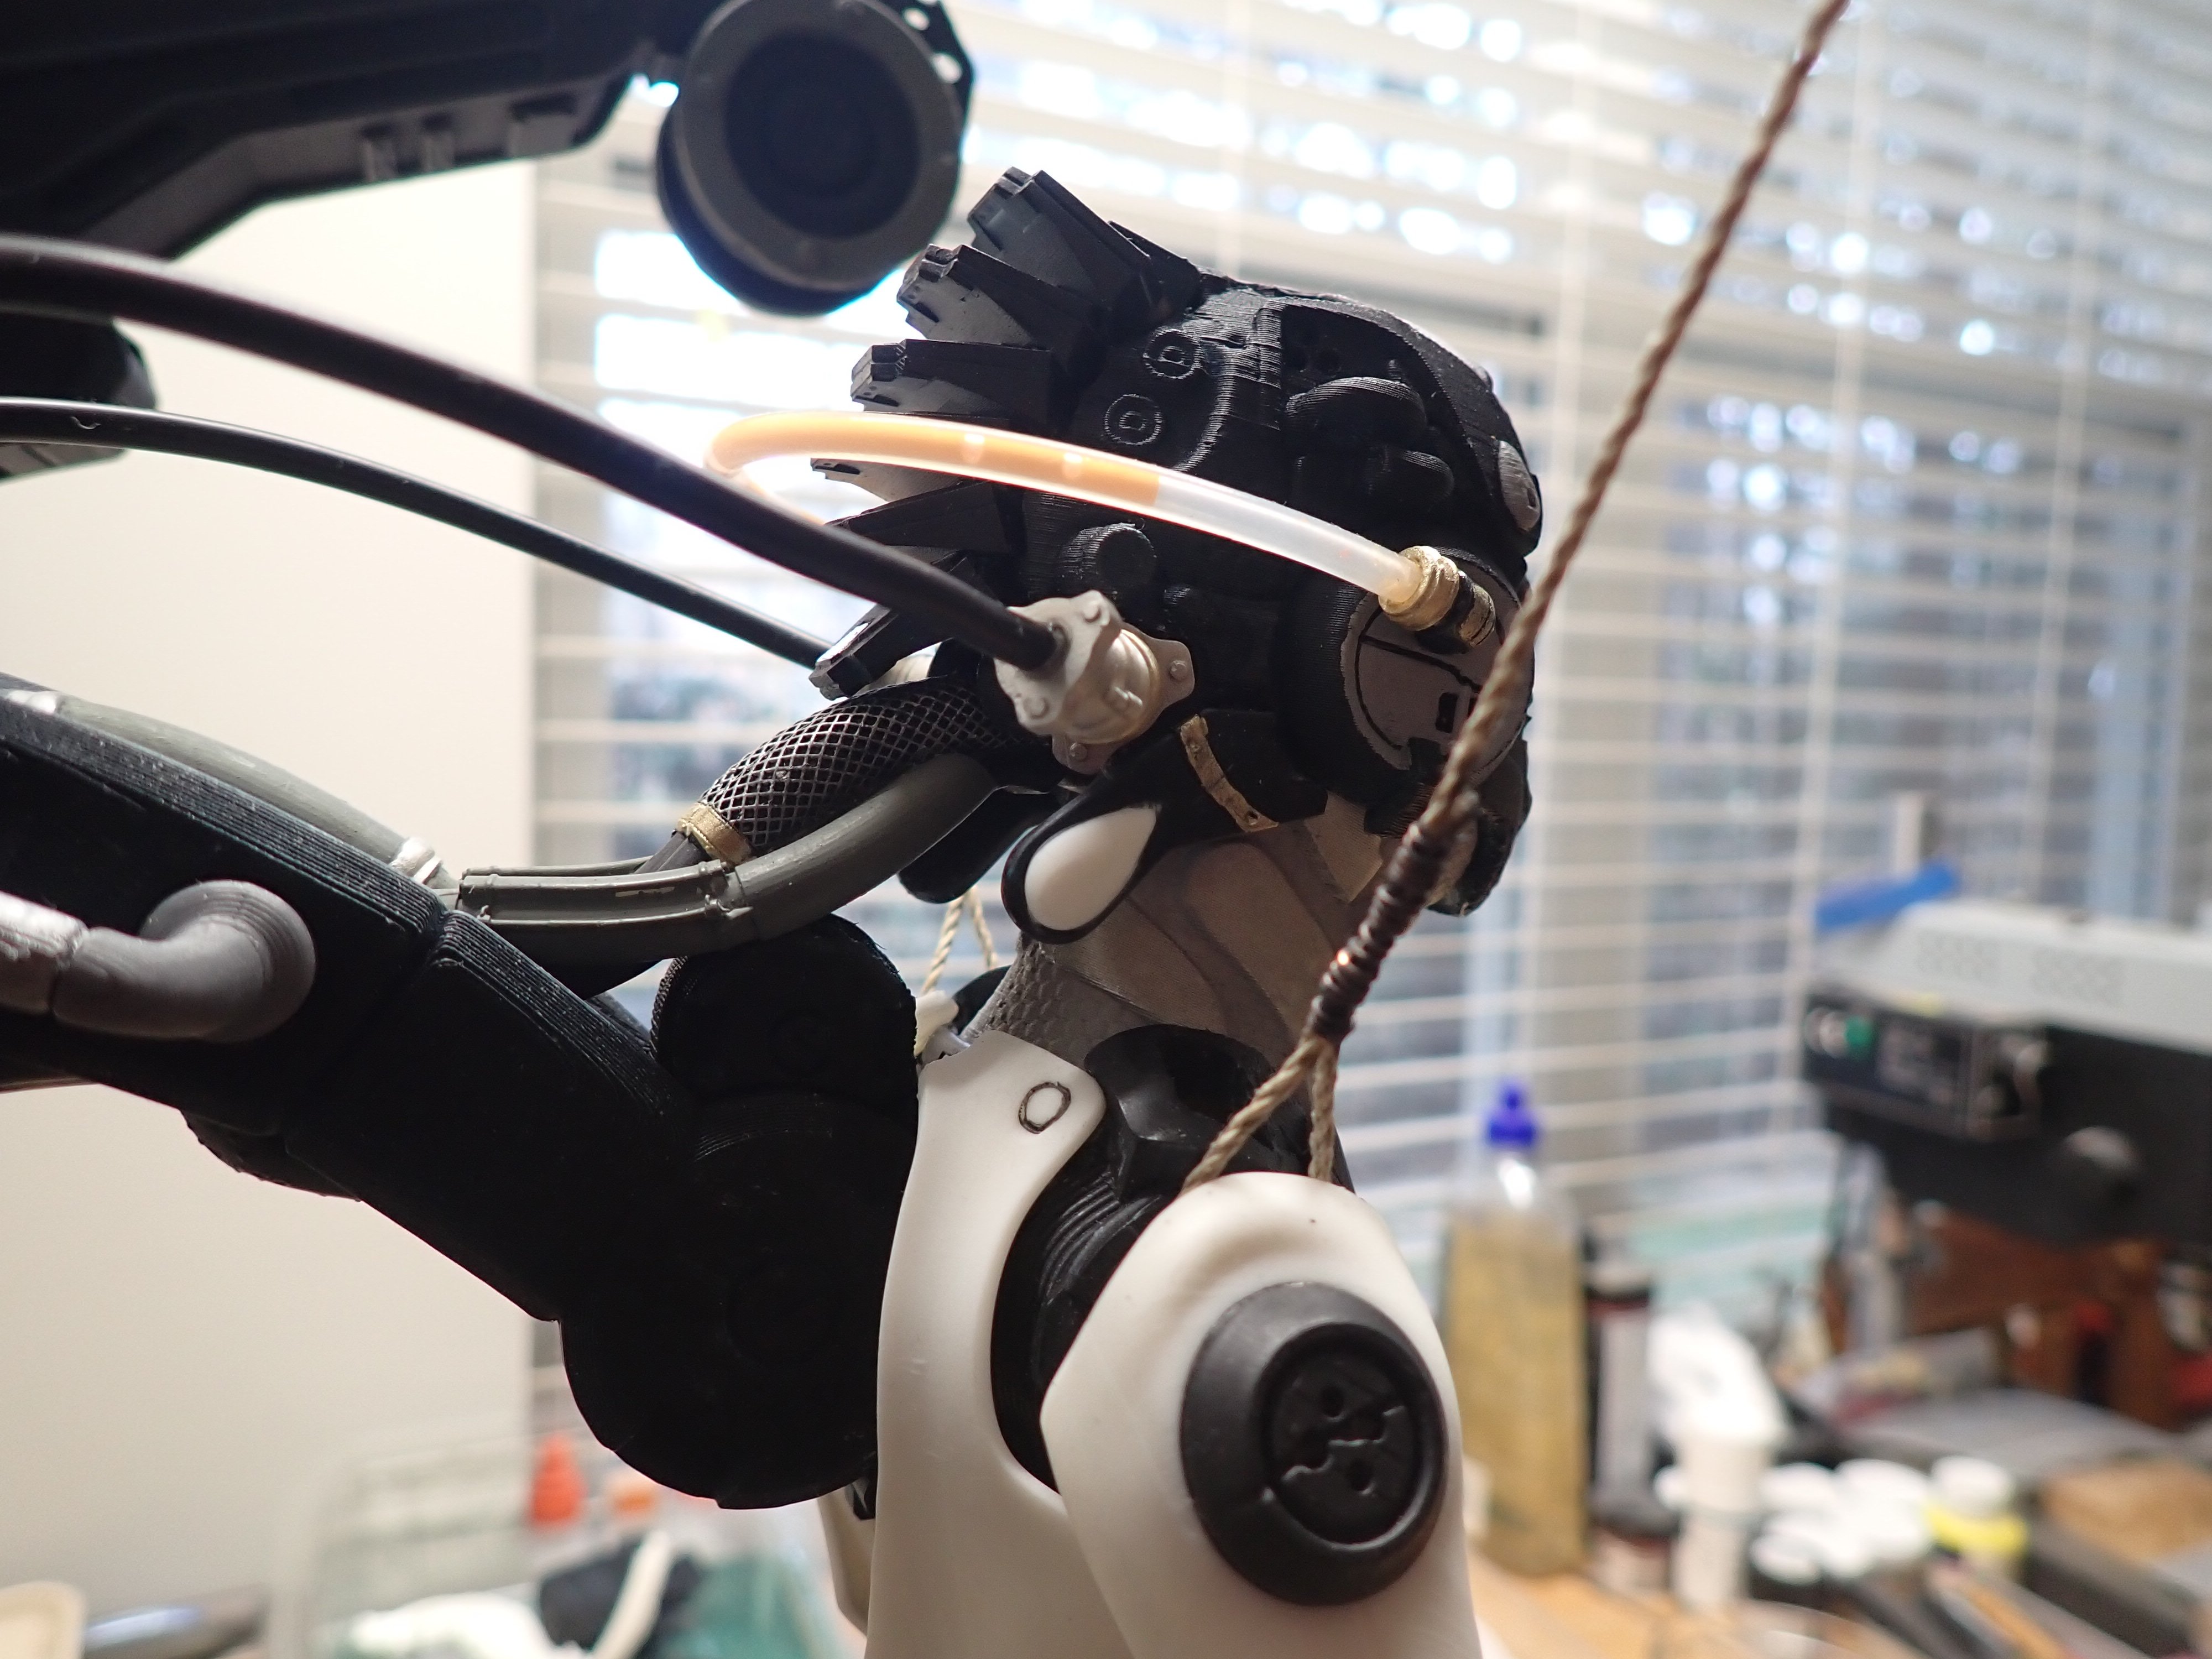
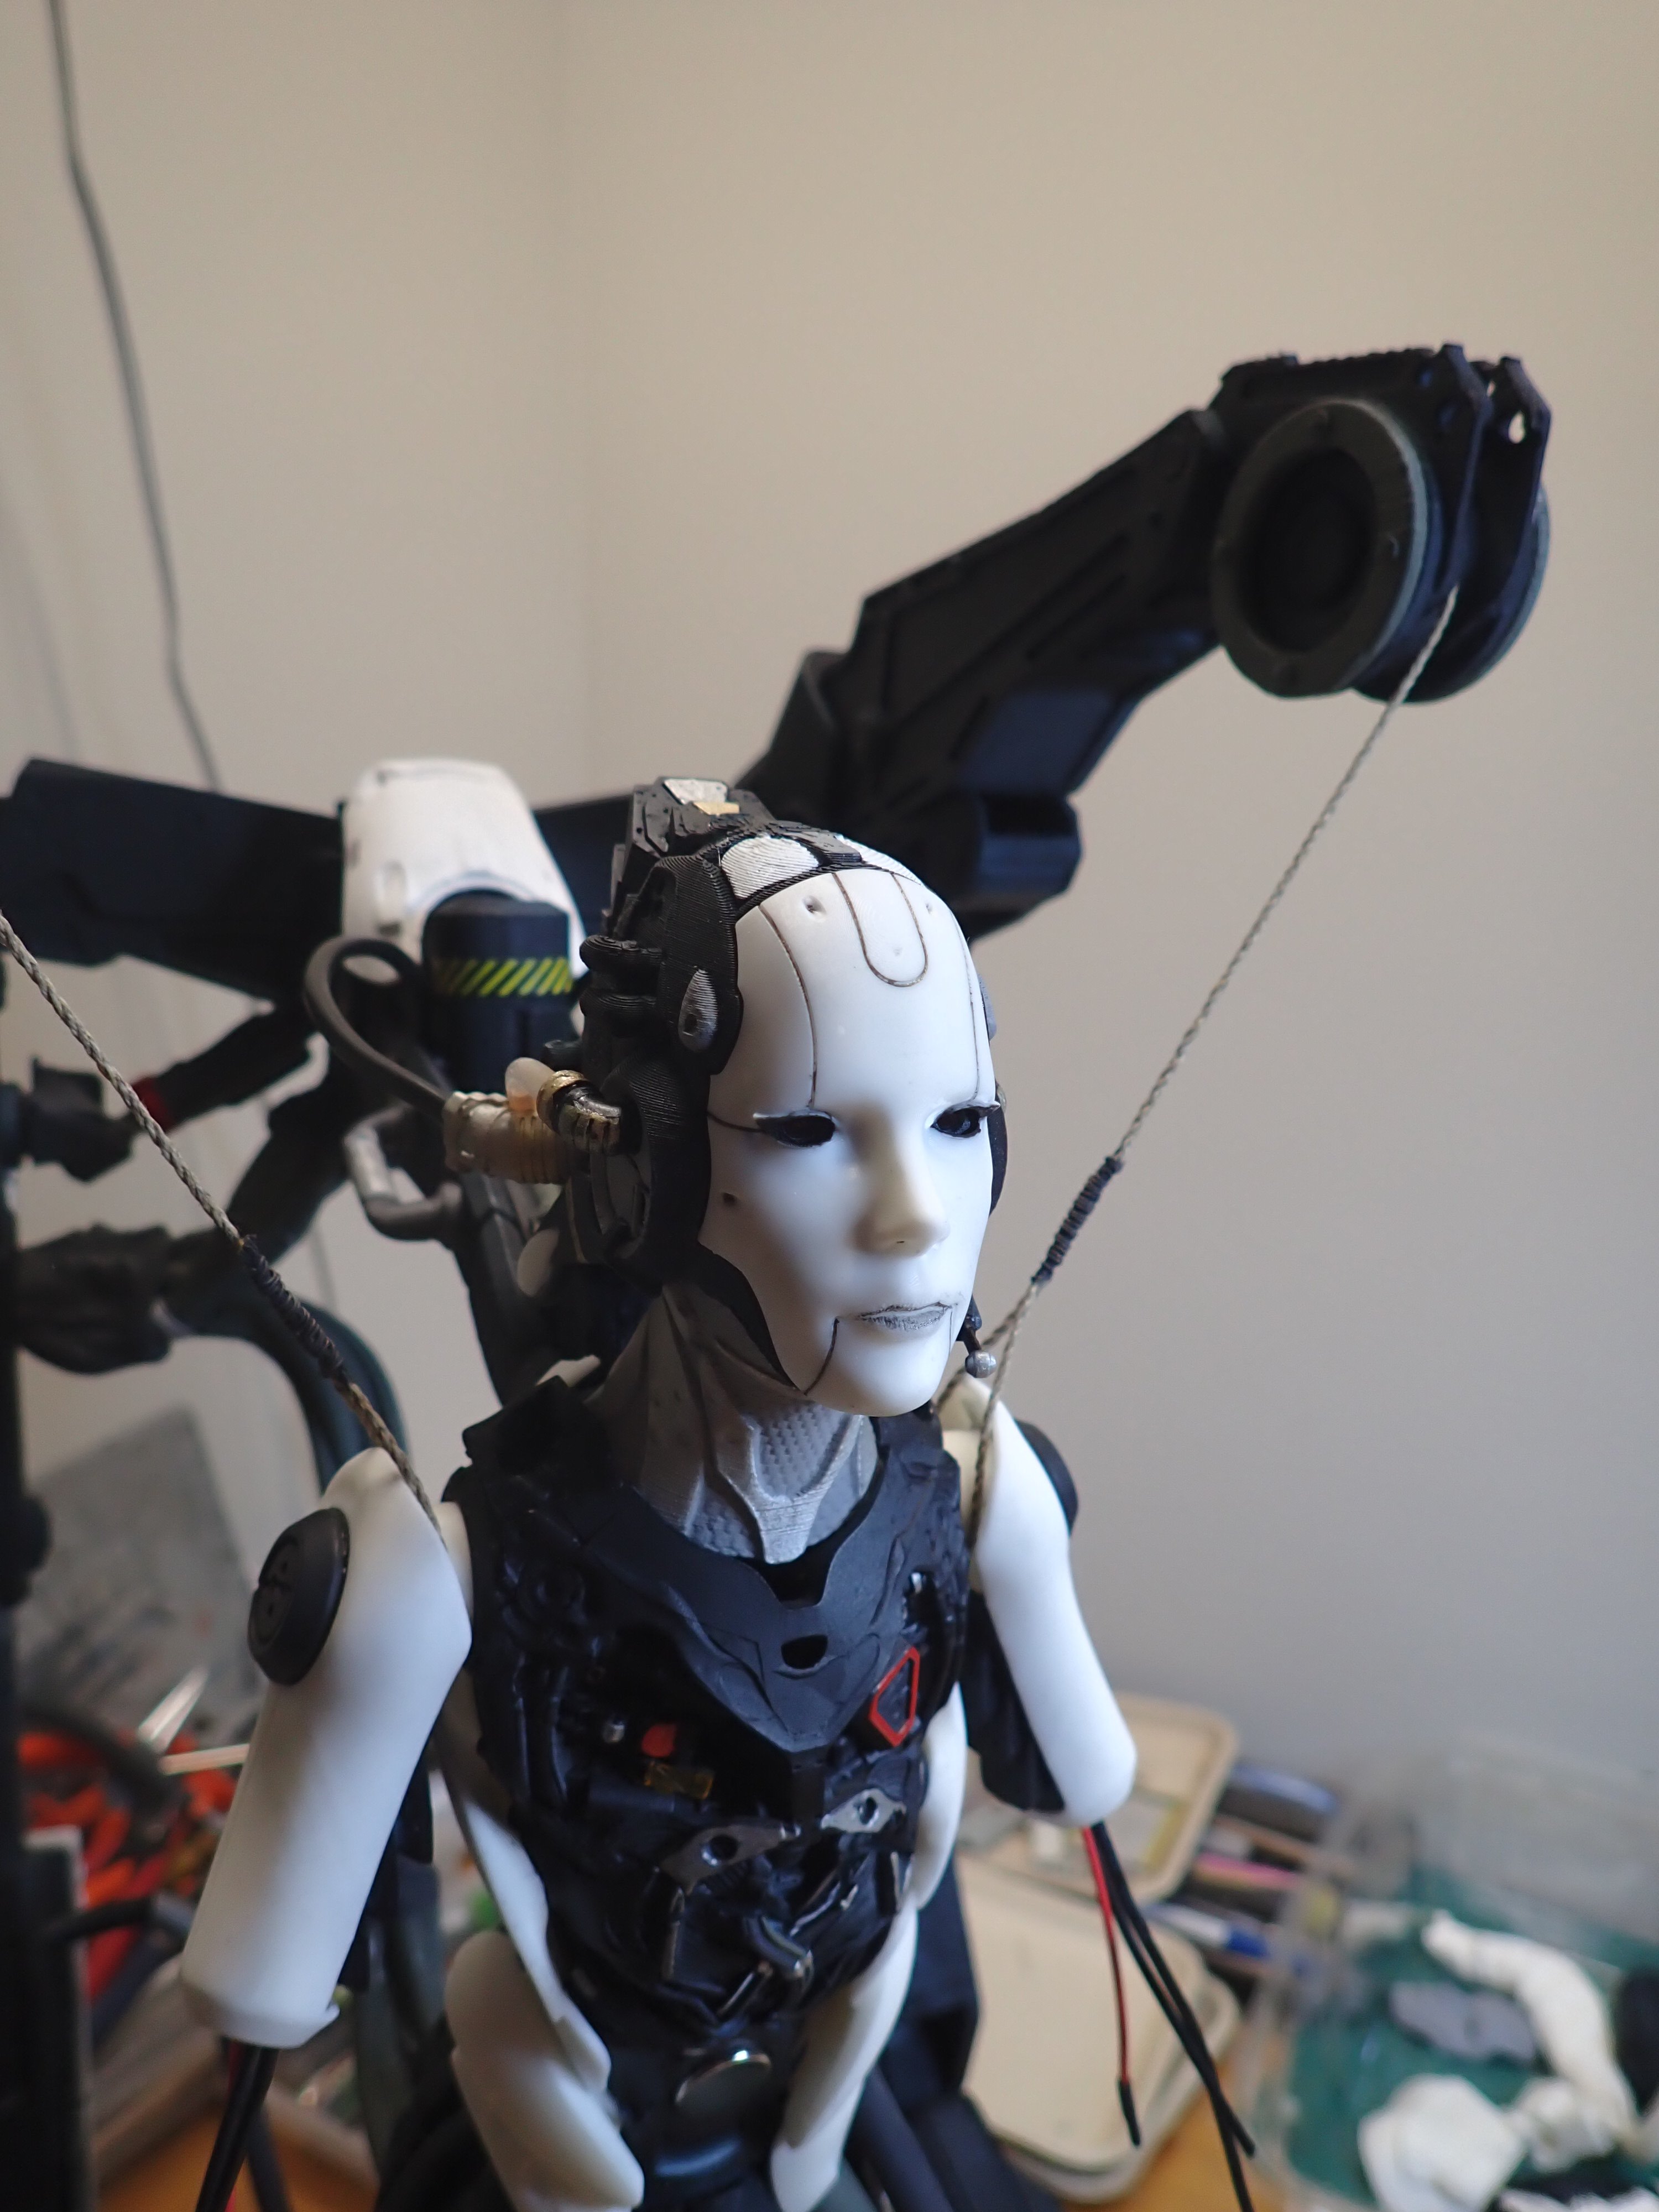
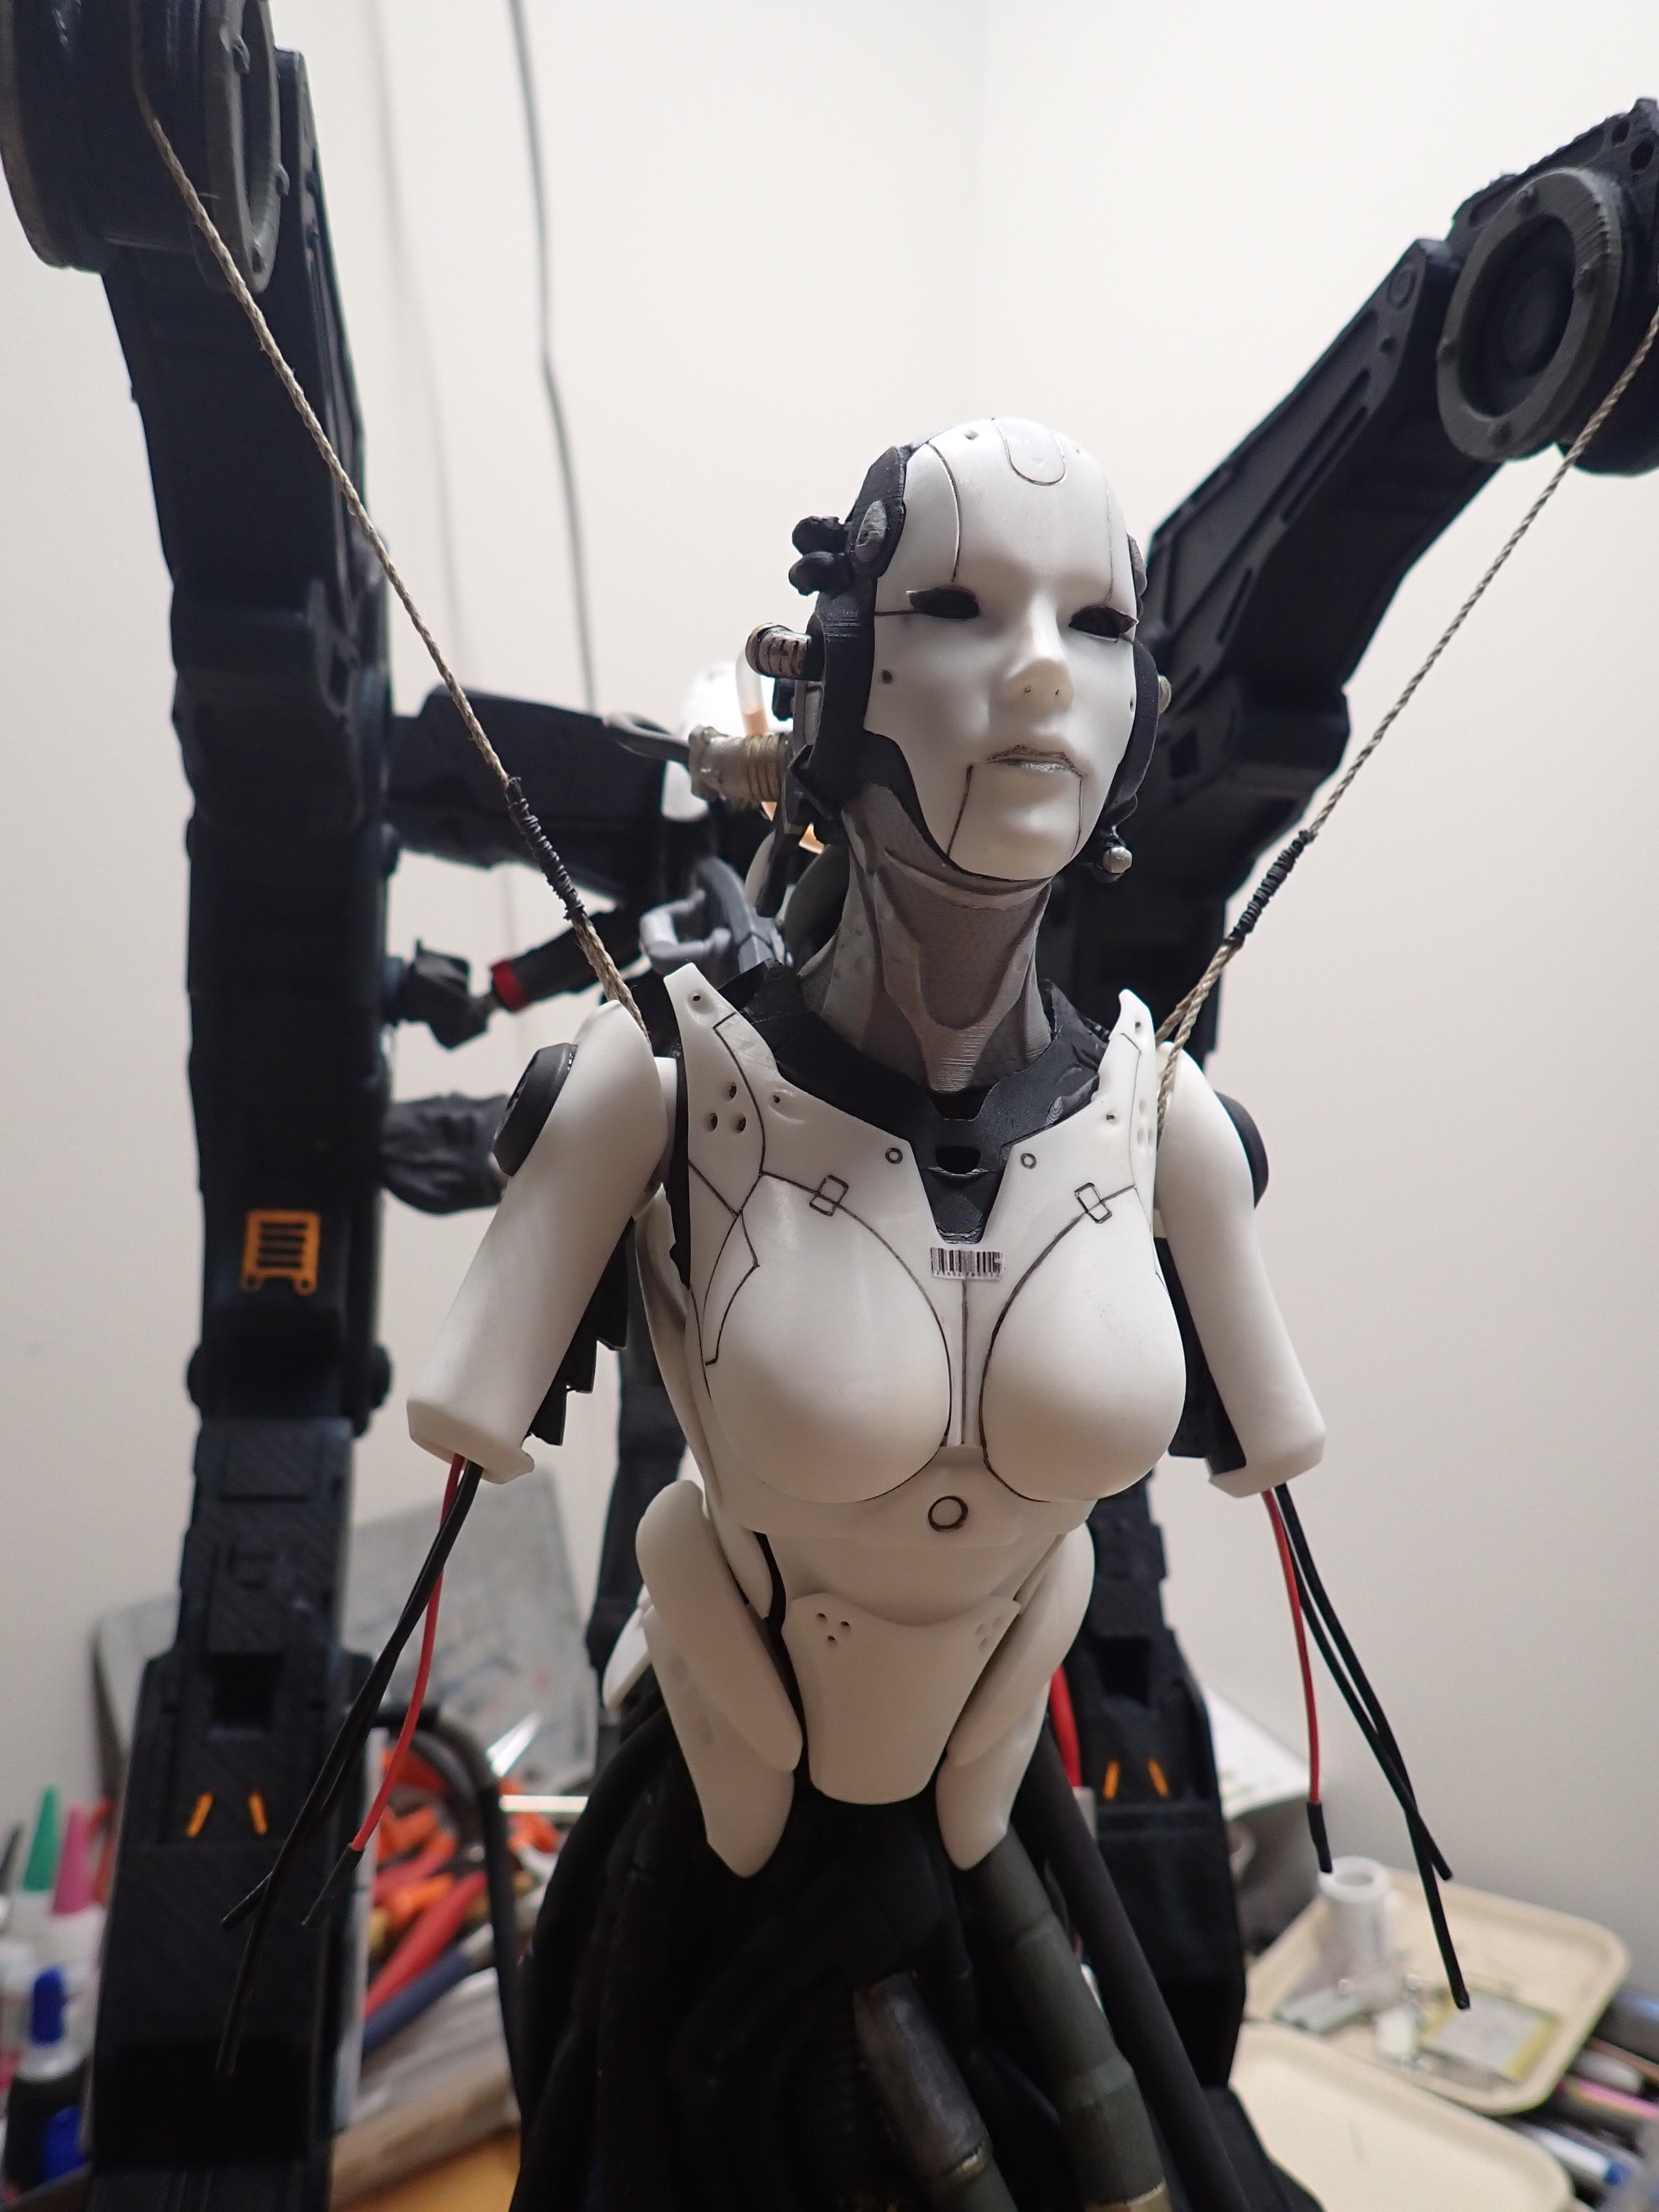
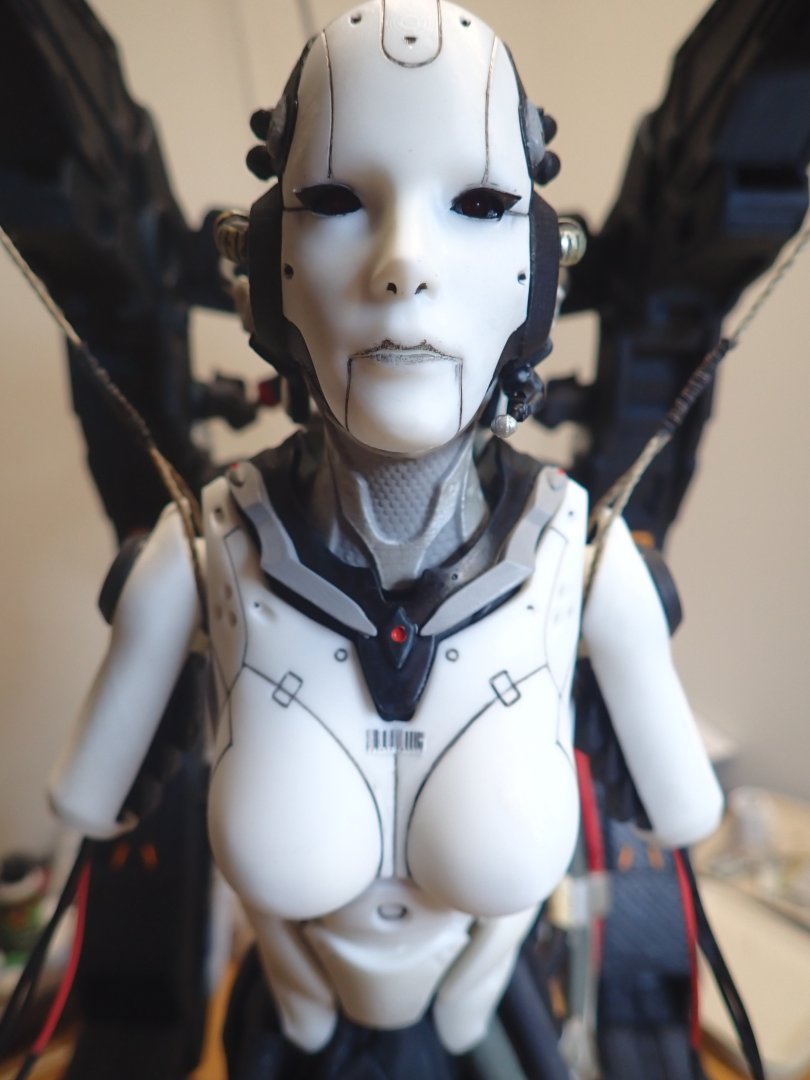
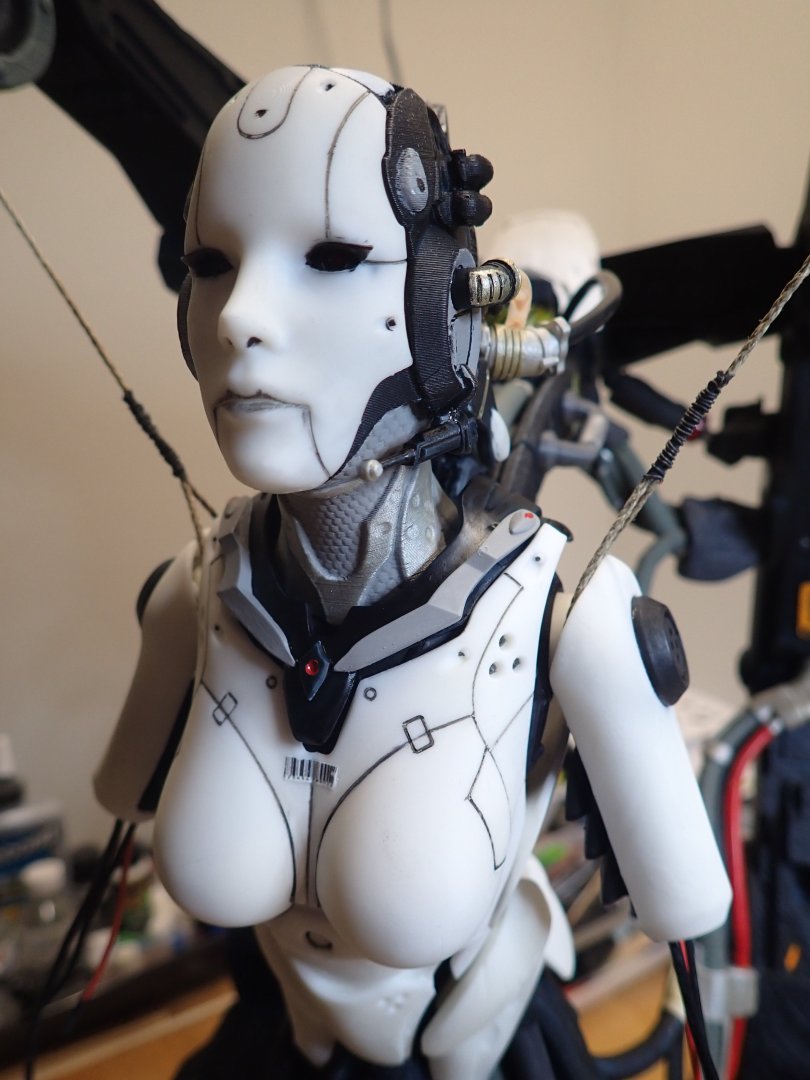
It is almost completed. The AI creature is done, neck armor painted and installed: There is still a need for finalizing the makeup of the face armor.... Overall views of the model: Et voila. The only things that remains are the installation of a rechargeable battery unit behind the hangar, to power the LEDs and the building of the screen/interface to interact with the AI. The original part was printed with filament and is kind of coarse to my liking. I will redo it, once I have re-installed my resin printer (preparing a move...). More to come.... Yves


-
Bentley Blower by RGL - Airfix - 1/12 - PLASTIC
yvesvidal replied to RGL's topic in Non-ship/categorised builds
Greg, your work as always, is incredible of realism and perfection. This will be my go to Build Log, when I start the kit in my stash. Yves -
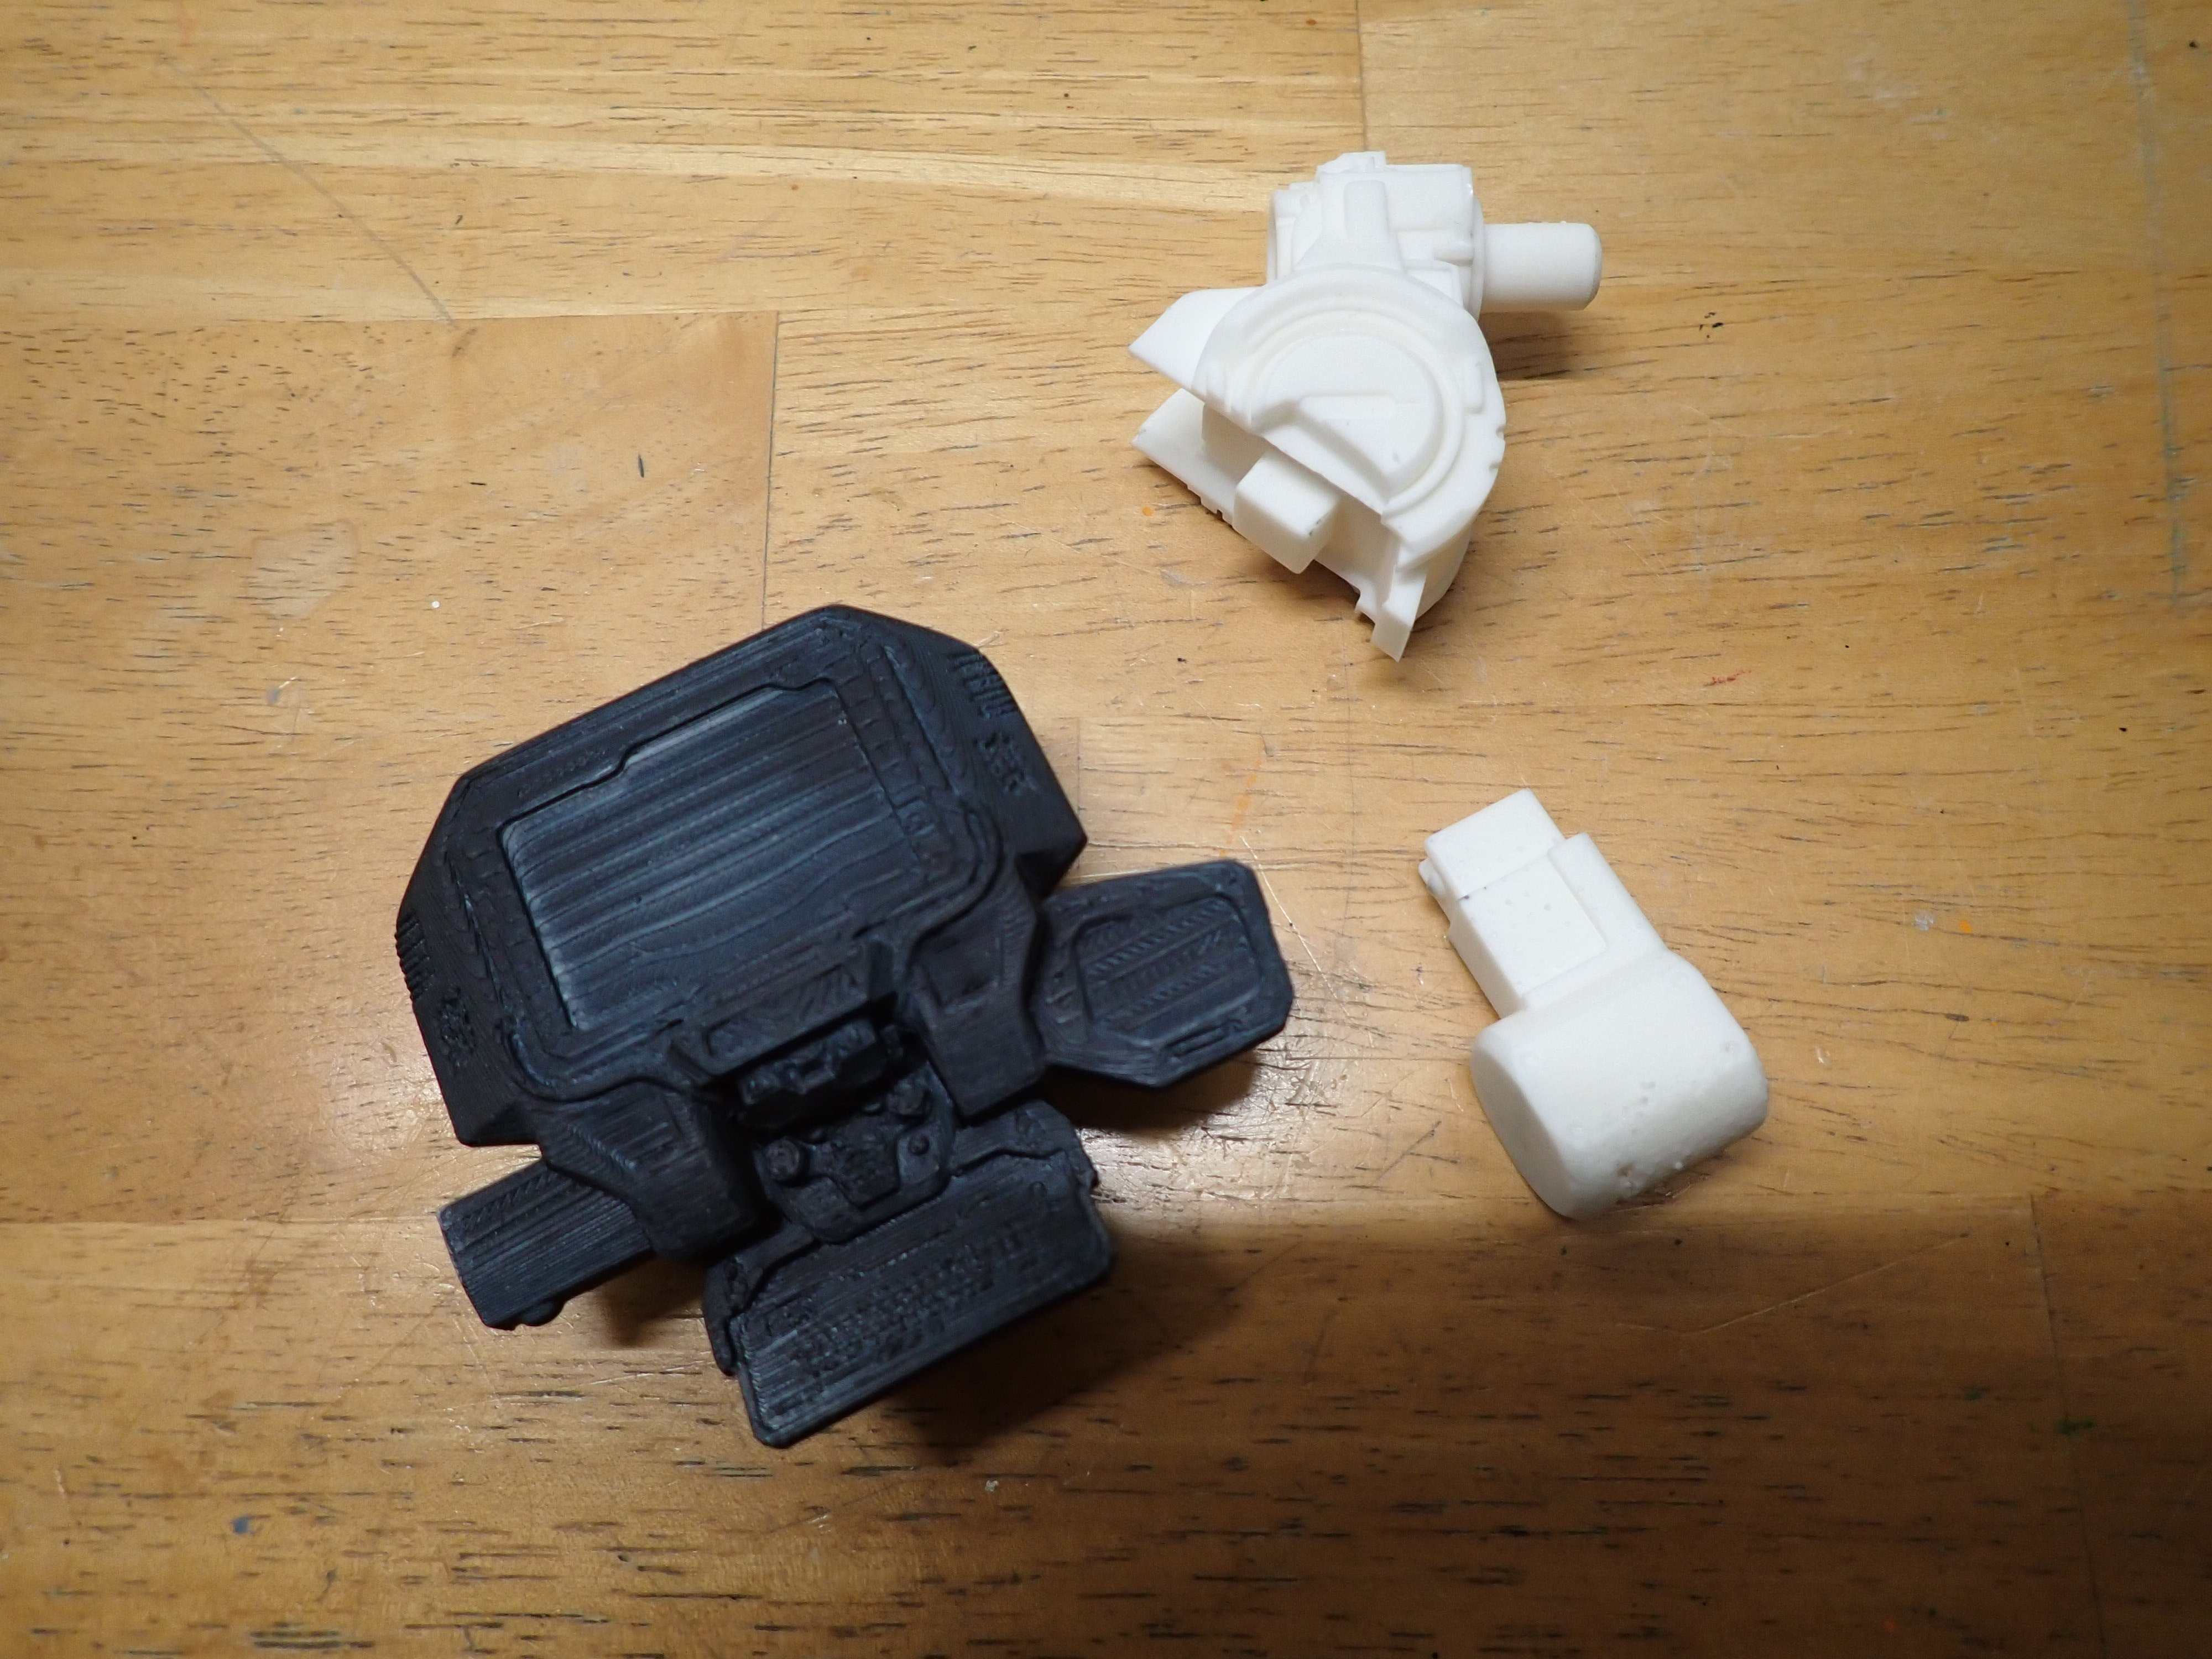
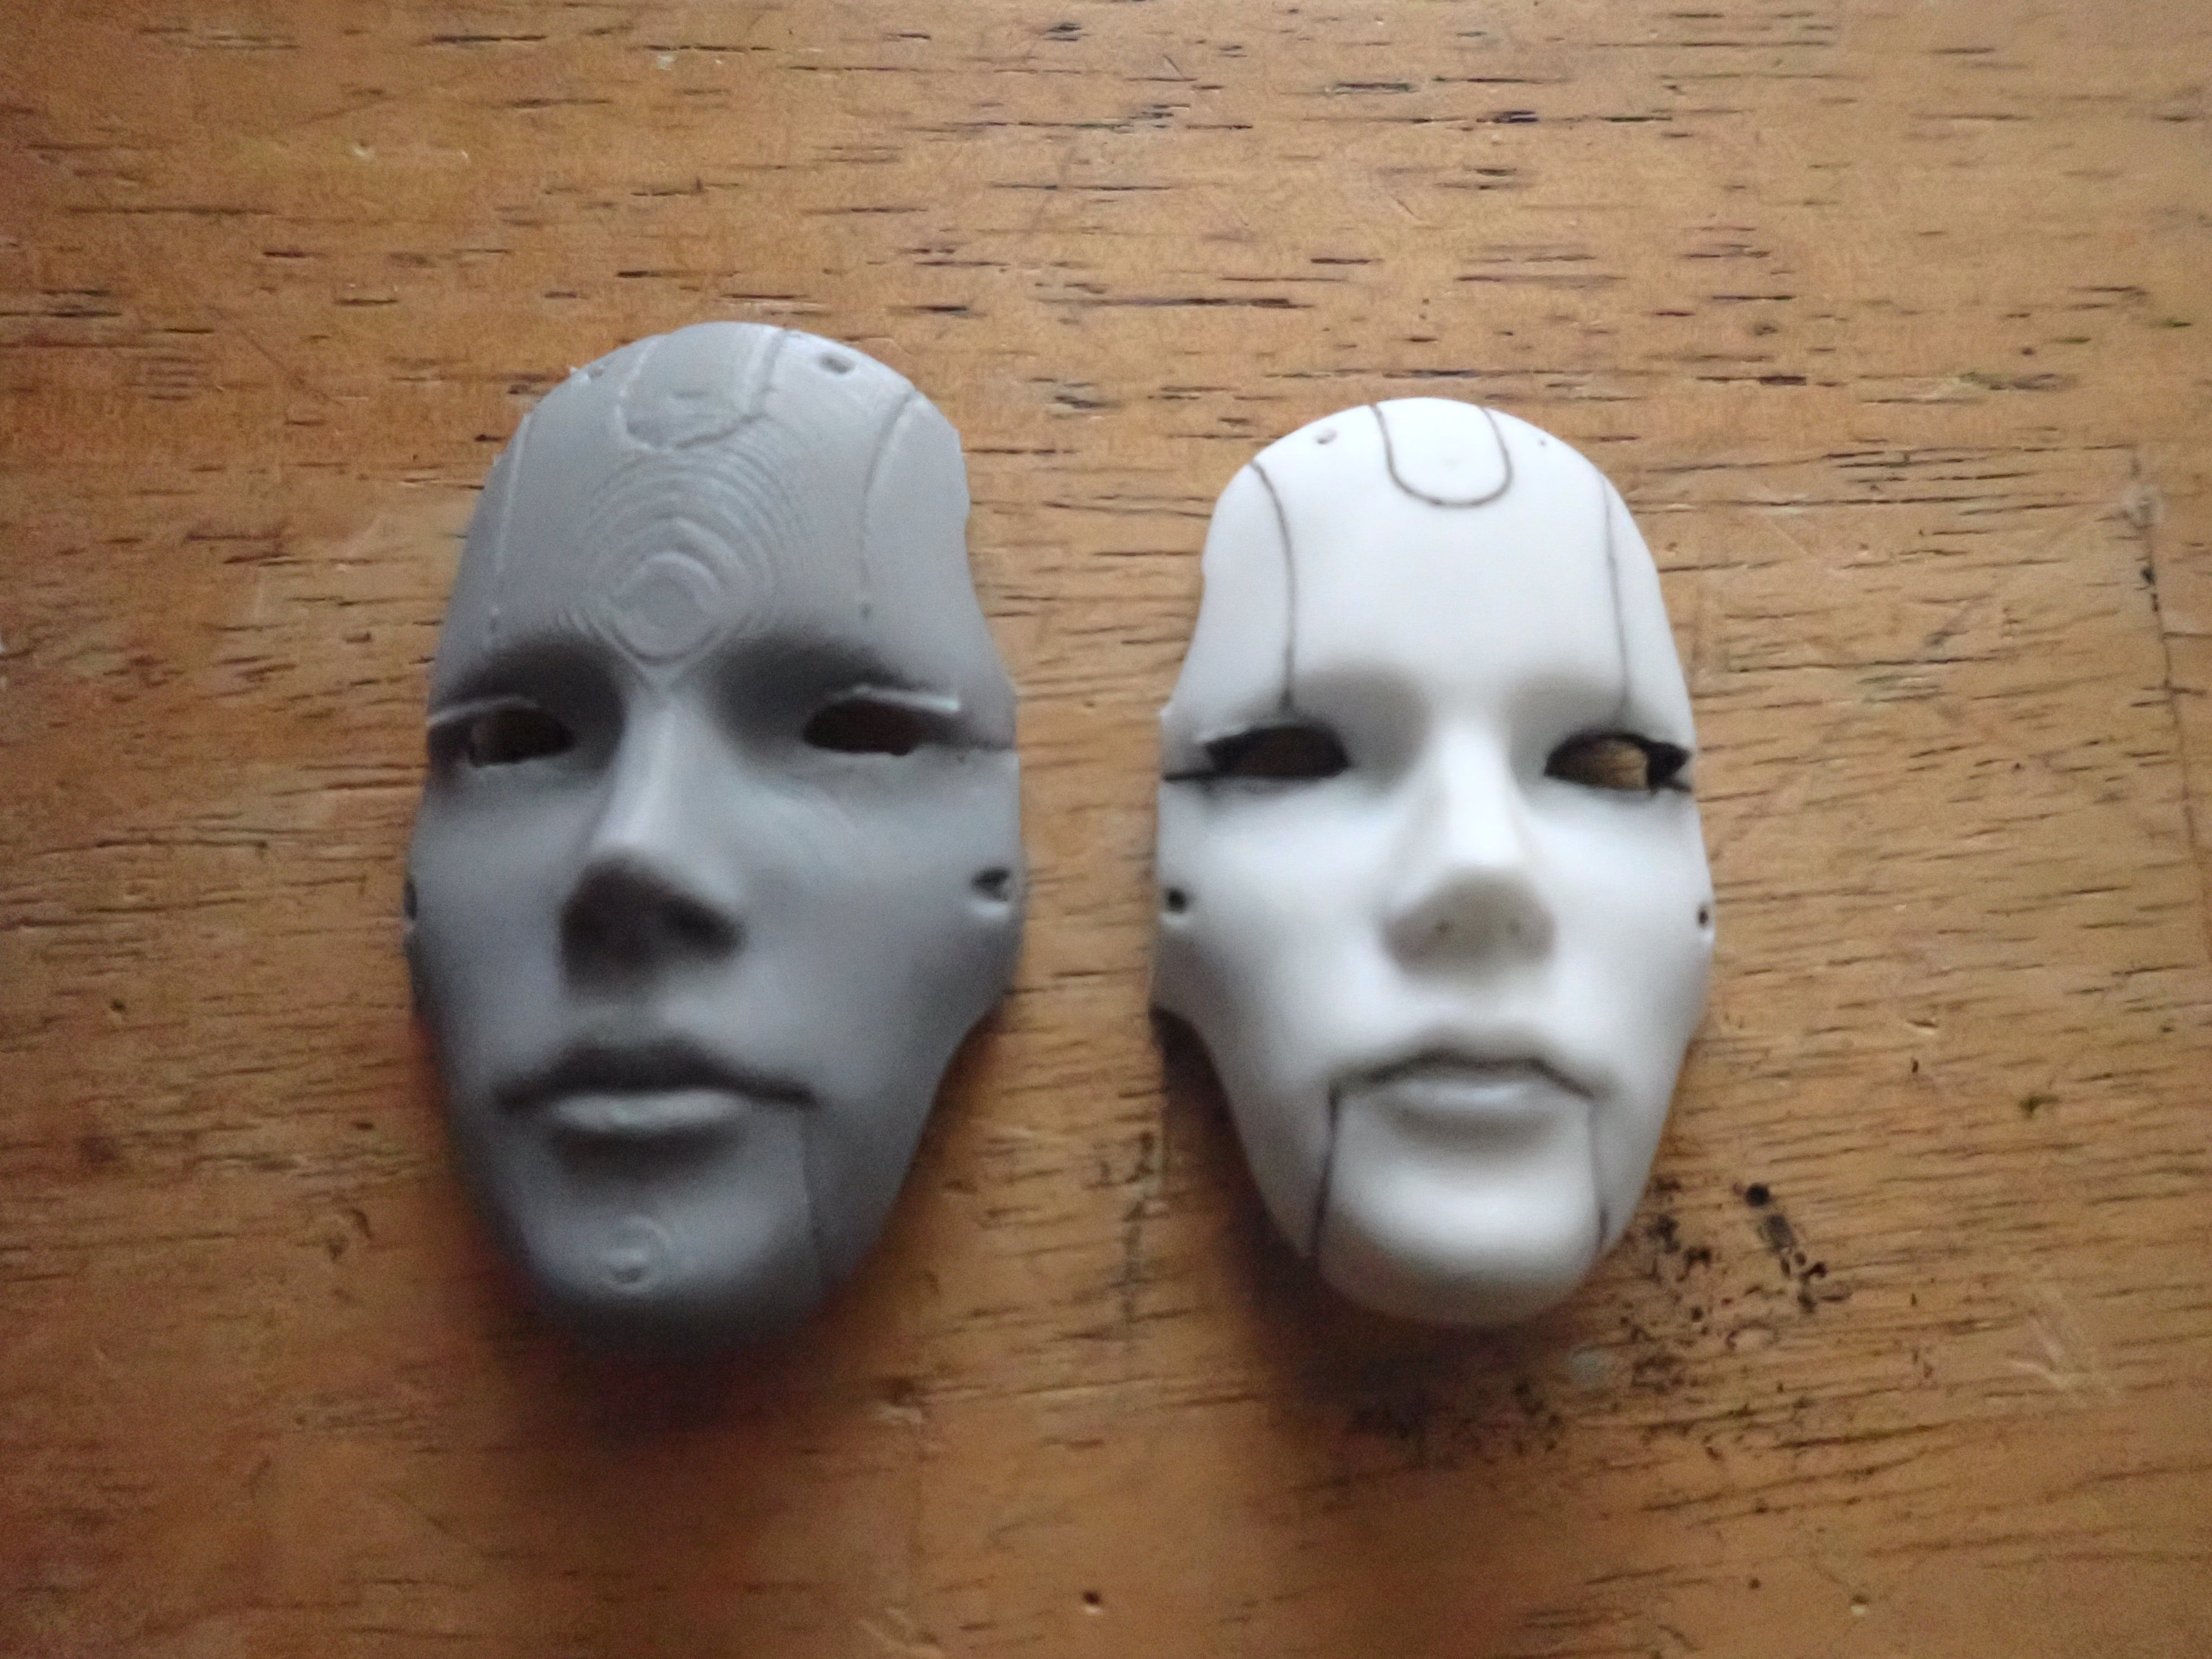
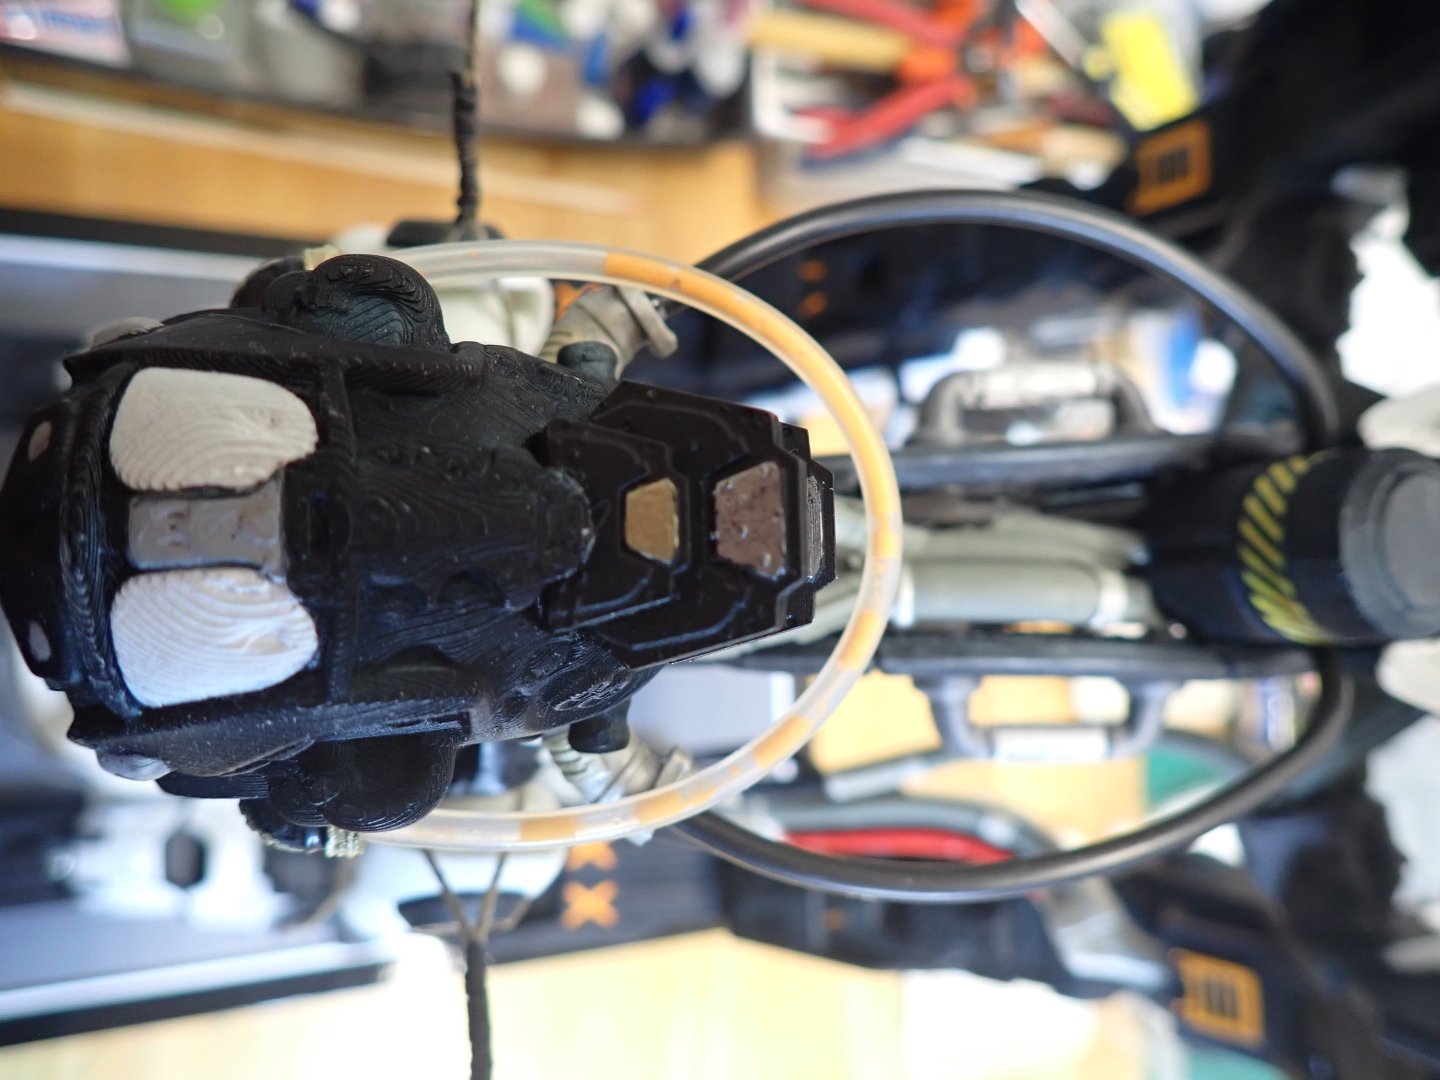
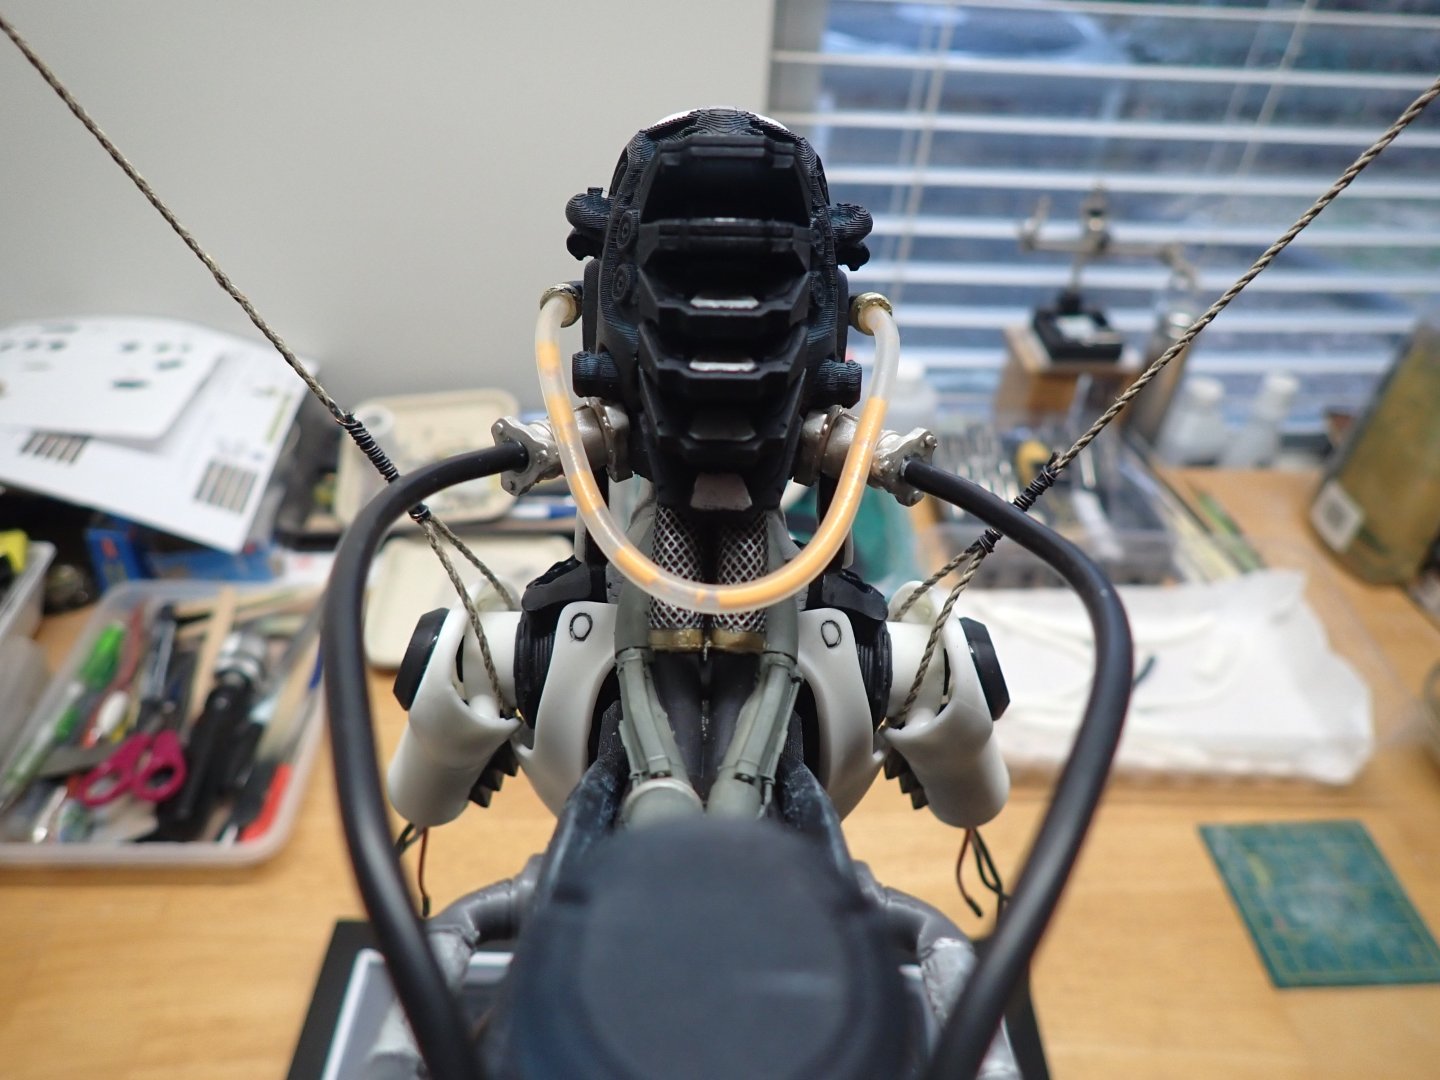
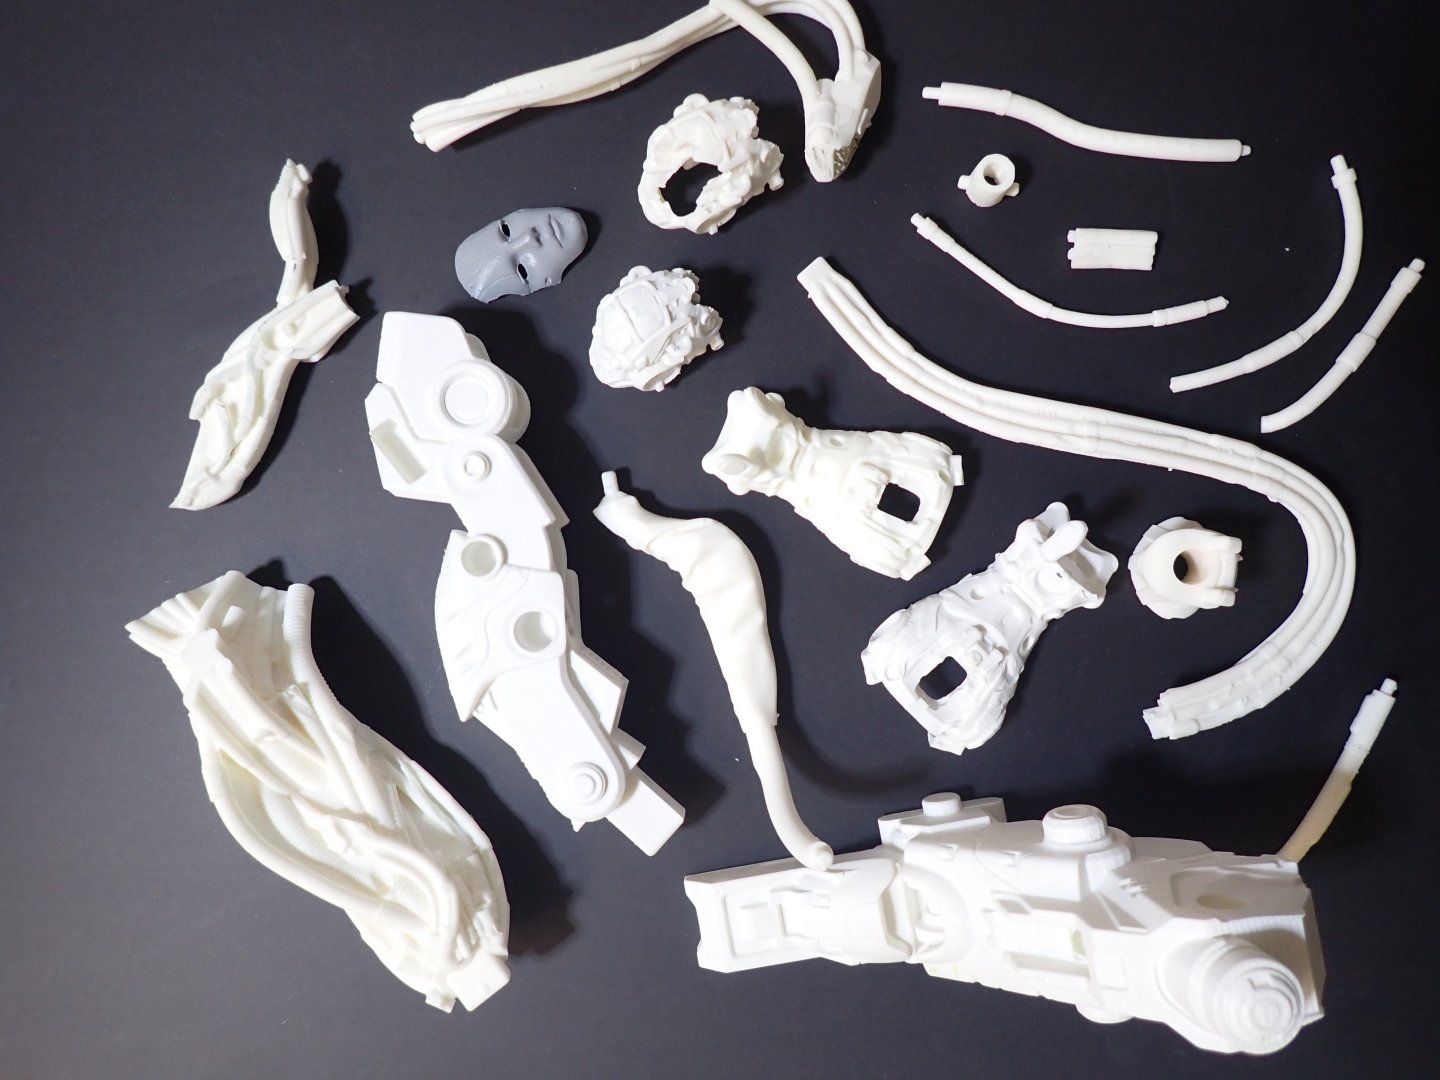
We are coming near the completion of this crazy project. In the meantime, here are a few pictures showing the progress centered around the head, mostly. Notice the ear rings with a fine titanium gold band, and the various wires and hoses used for cooling and data transfer. For the data transfer, I used what is called Multimeter cables in black. These cables are made of hundreds of very thin copper strands sheathed by a very soft and flowing insulator around them. They are perfect, as they flow naturally. For the cooling, I used small neoprene tubing that I had from my last visit to the O2 bar in Breckenridge, CO. I tried to fill it up with an orange concoction, but capillarity is playing against me. Overall view of the creature: The face is installed, after a very crude make-up session: More elements of the armor are added: Pelvic and chest plates. I need to correct the lines on the side of her chin.... Below is a comparison between 100% size filament printing and the 89% resin printing: Filament printing does not even come close in quality and finishing, at least on my old Ender 3 printer. The final picture for this update, shows all the mishaps that took place in term of printing, both filament and resin. It is a mixed bag of incorrect size, non-correctly-supported prints, filaments separating,,,and unused parts. I still have to work on the neck armor plate and the computer screen located on the side of the hangar. Stay tuned.... Yves


-
I am with you regarding the blotches/patches on the fuselage, on these German planes. I had the same issue when putting together that VTOL Focke Wulf. Like you, I used a cut brush. Not ideal, for sure. Yves
-
It is simply amazing that paper models can be so realistic and detailed. Truly, this is Alchemy done in South Carolina. Yves
- 96 replies
-
- 10
-
-
Bellisima !! In 1/96th scale, your work is pure marvel. Yves