HOLIDAY DONATION DRIVE - SUPPORT MSW - DO YOUR PART TO KEEP THIS GREAT FORUM GOING! (Only 36 donations so far out of 49,000 members - C'mon guys!)
×


yvesvidal
-
Posts
3,600 -
Joined
-
Last visited
Content Type
Profiles
Forums
Gallery
Events
Everything posted by yvesvidal
-
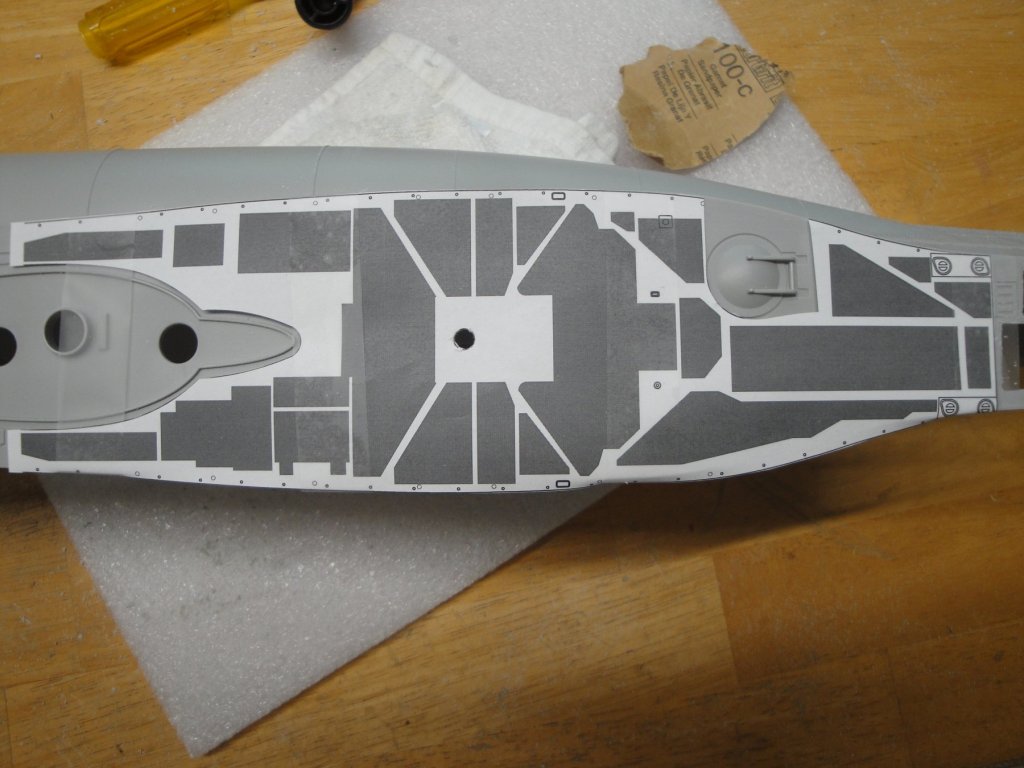
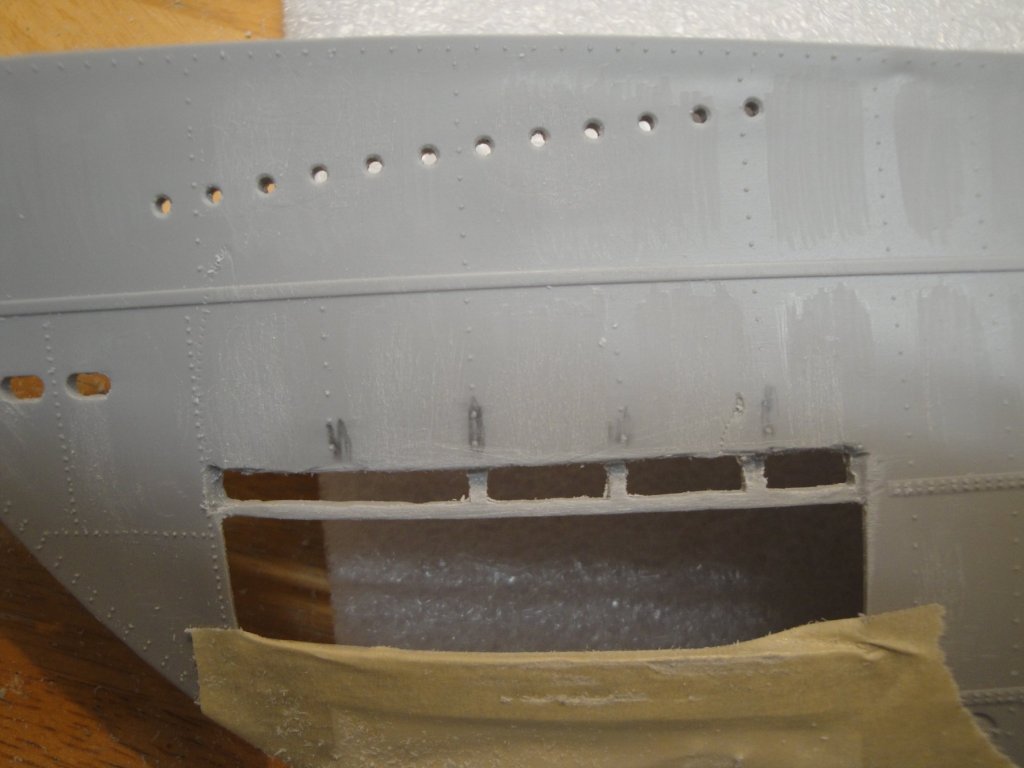
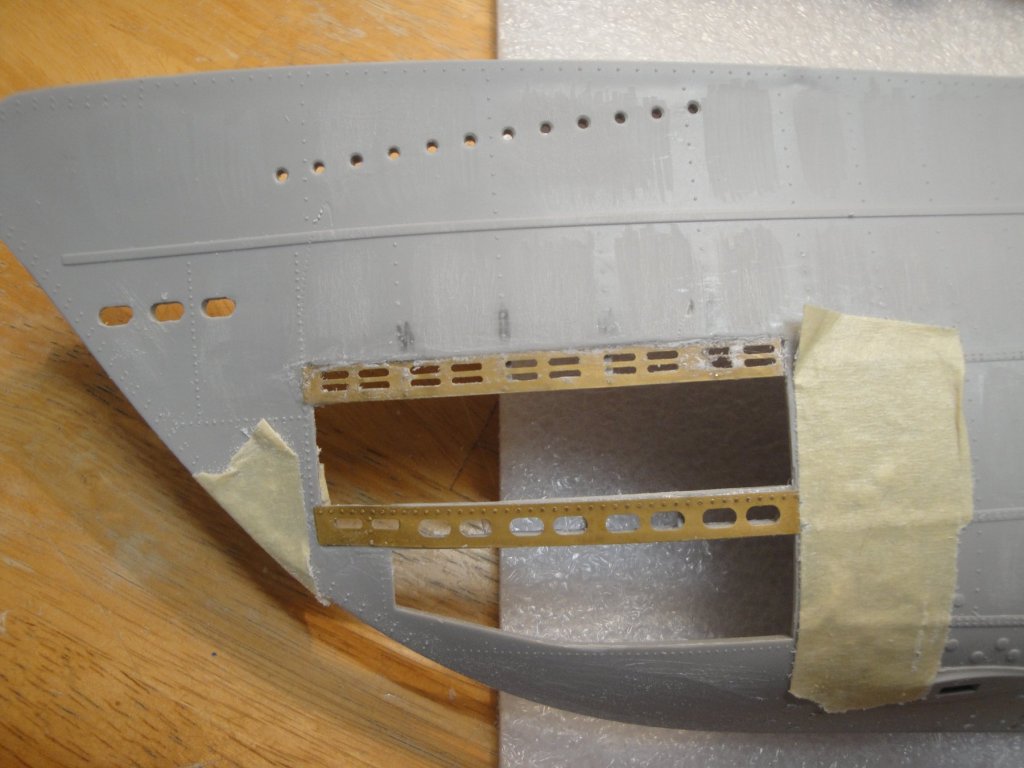
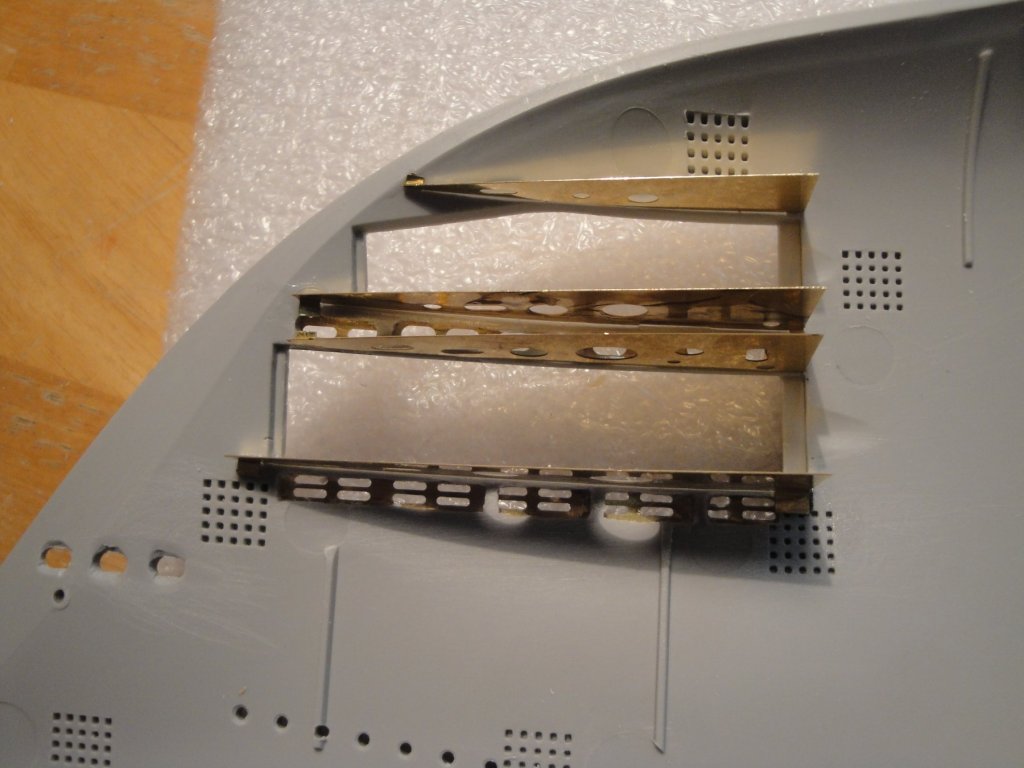
 Let me explain briefly how I am approaching the butchering of the deck. First, we take a deep breath and try to forget how much this kit is (+PE)...☹️ This is our starting point, a deck already butchered at the bow: Using a large file, we file away a few of the protruding molding, preserving the hatch. At that stage there is no coming back: The base for the kiosk also has to go, since the PE will cover everything. Then, we tape the template to the deck and I drill some holes to delineate the shapes that will have to be cut. Basically a hole in each corner: Then a rough contour of the shapes is done and we start cutting. Of course, we start with the starboard side (away from the hull), since the fabrication of the plastic "lace", weakens drastically the entire deck. At that stage, I am actually happy that Trumpeter molded the hull in a very thick way, even though it is nightmare to grind, cut and file. Every time an opening is done, I verify with the PE that everything lines up nicely. The hole for the gun is my reference. That is all for tonight, folks. Yves
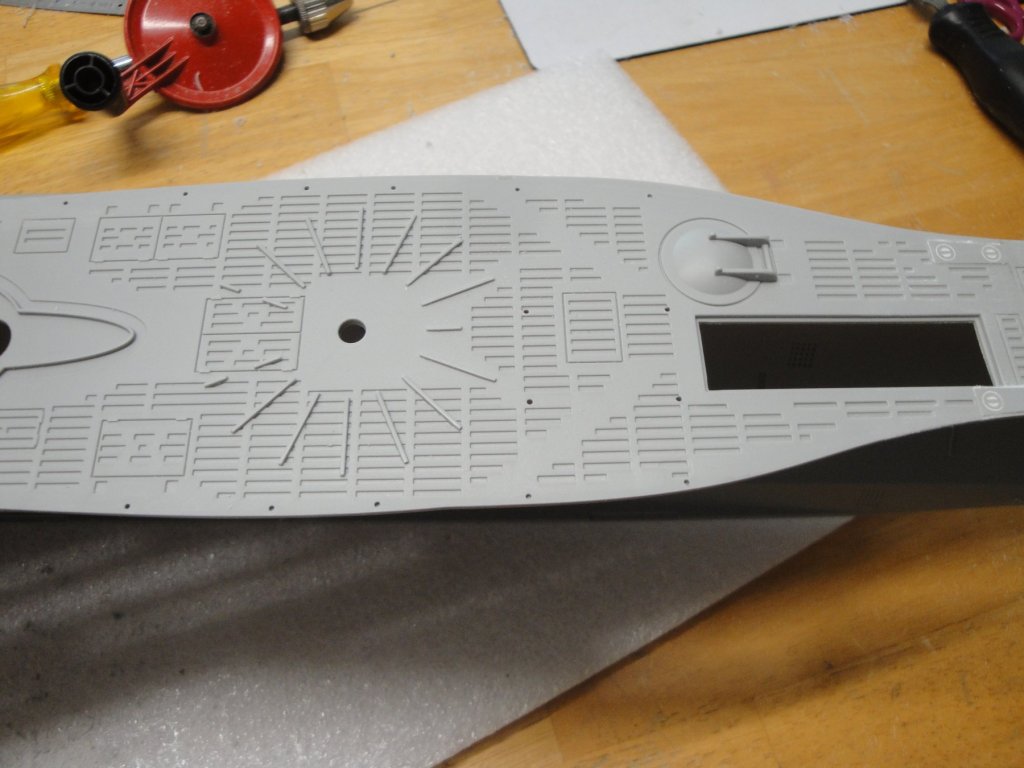


- 760 replies
-
- 15
-

-
The bow is starting to come along: as well as the deck. Of course, PEs will be glued at the last minute, when all the butchering of the main hull has been done and completed. The real stuff: Yves

- 760 replies
-
- 15
-
-
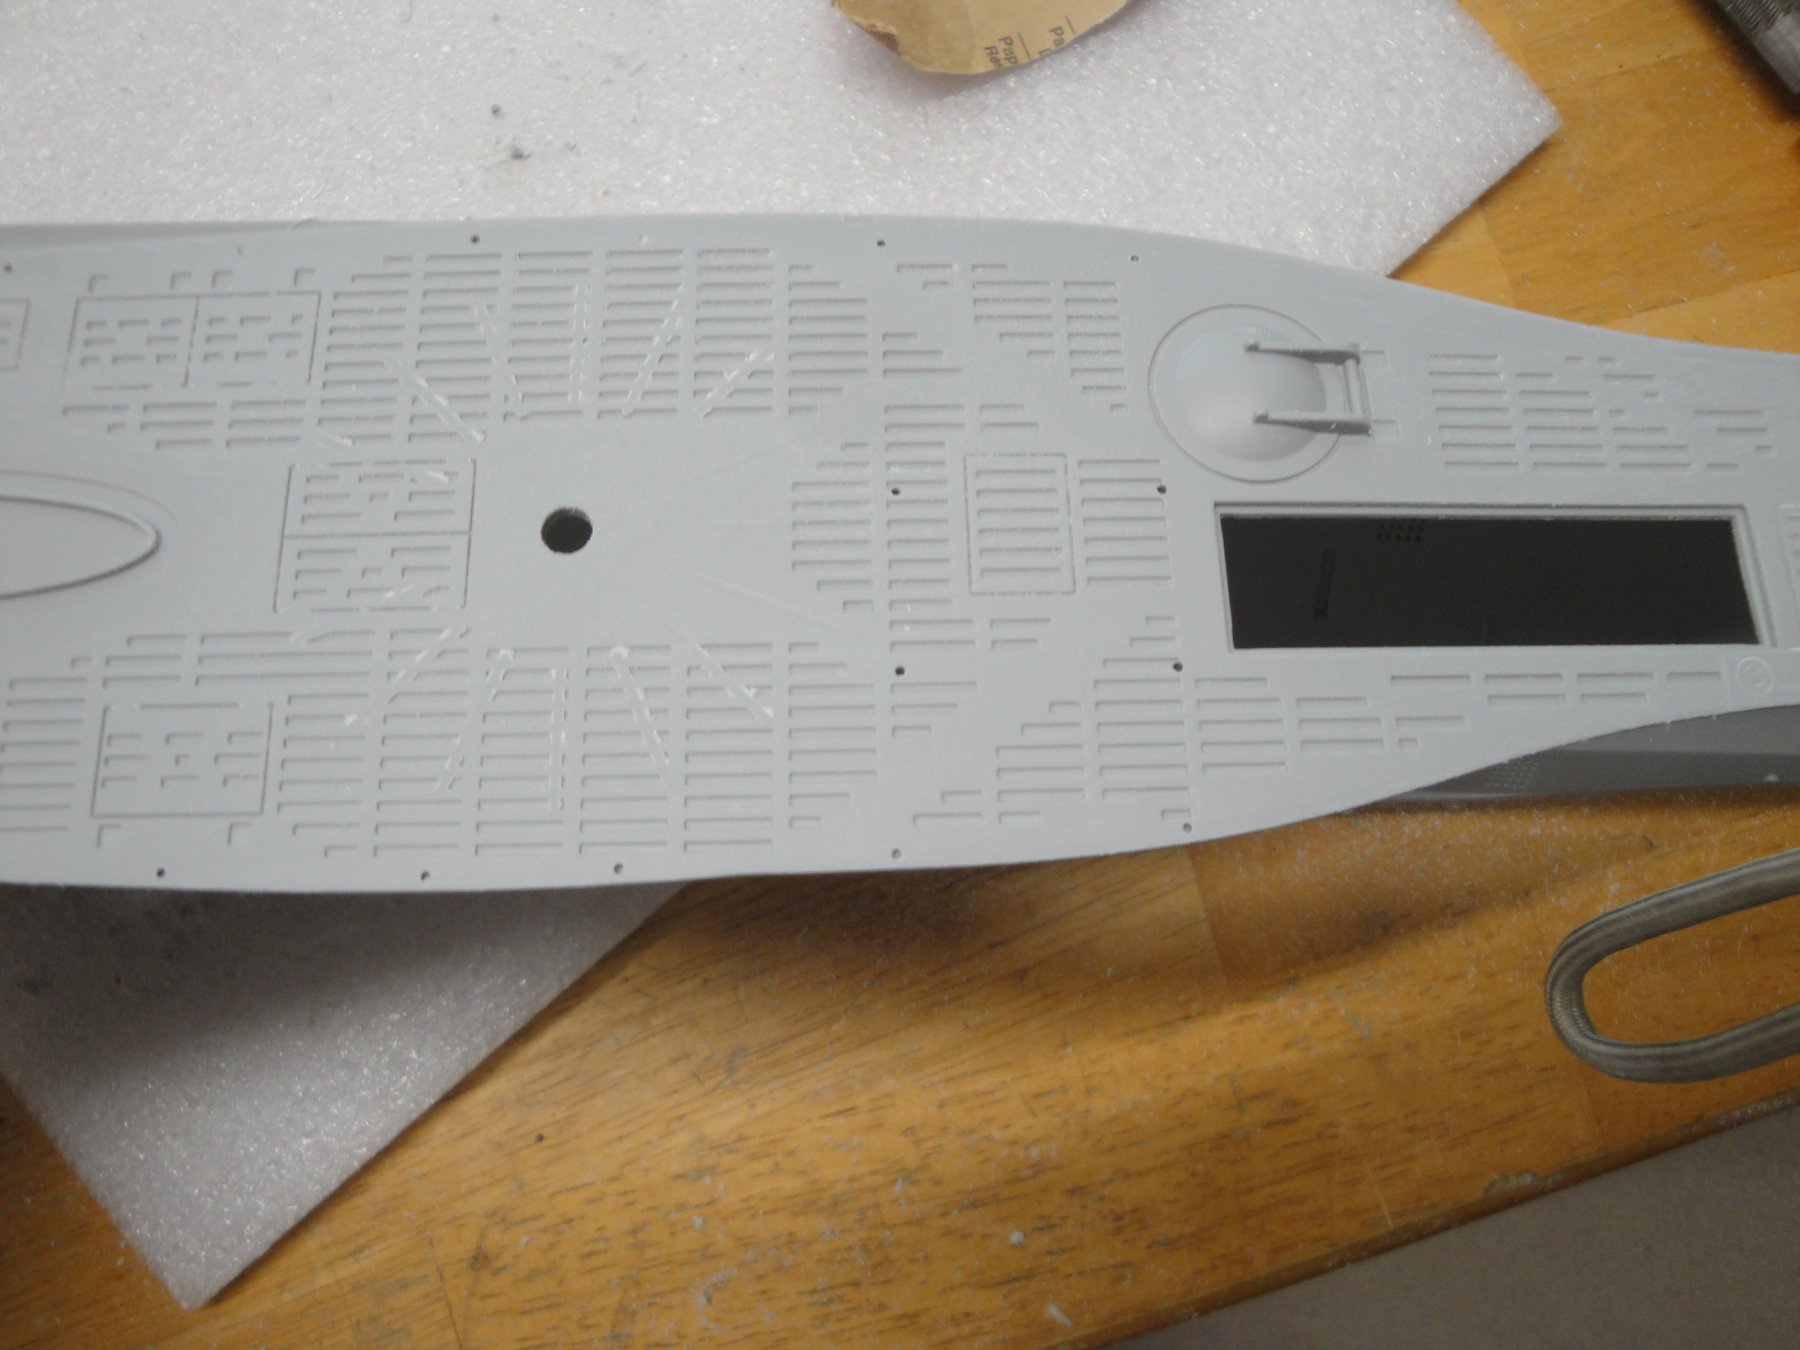
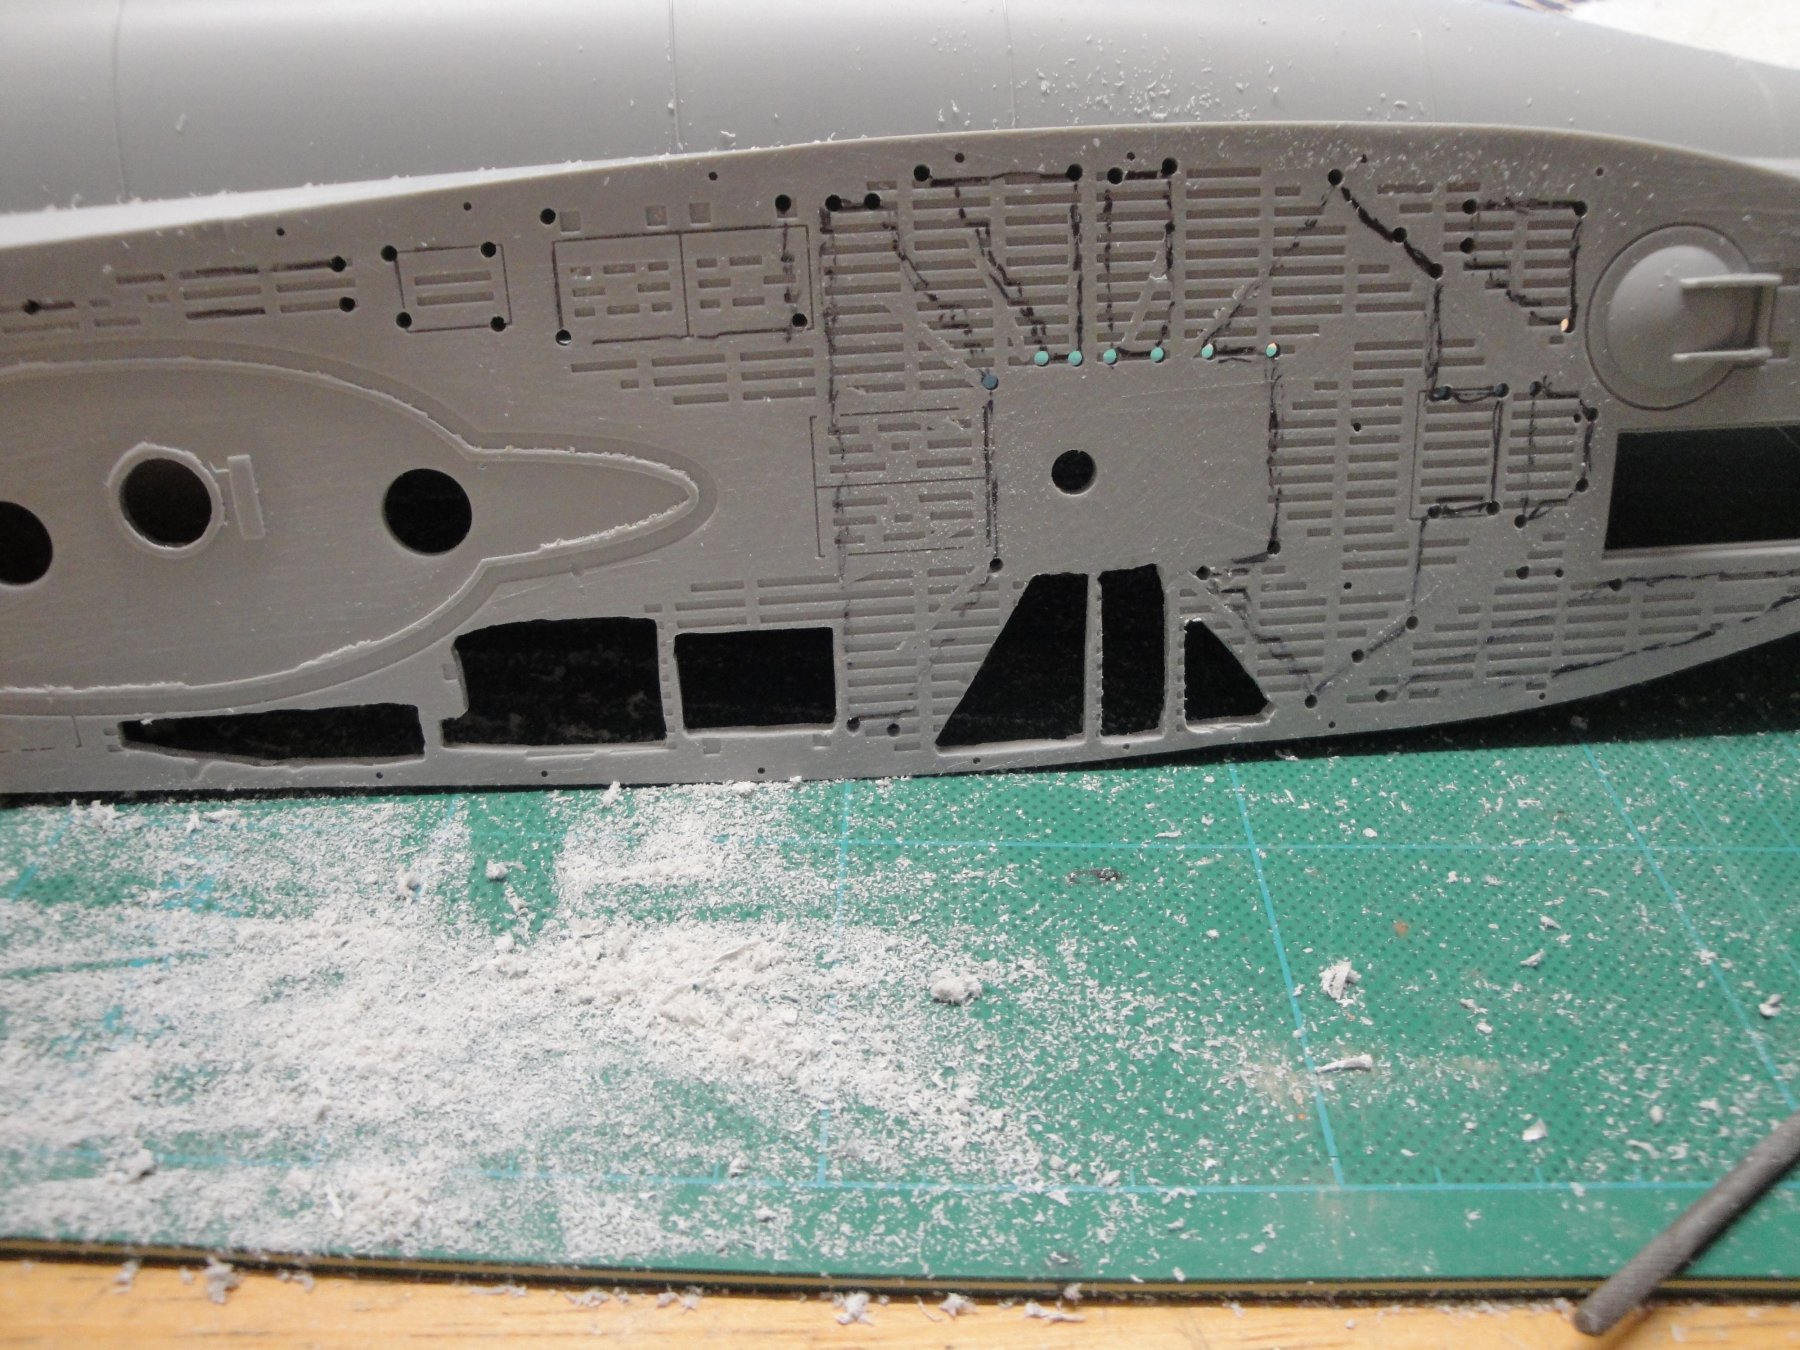
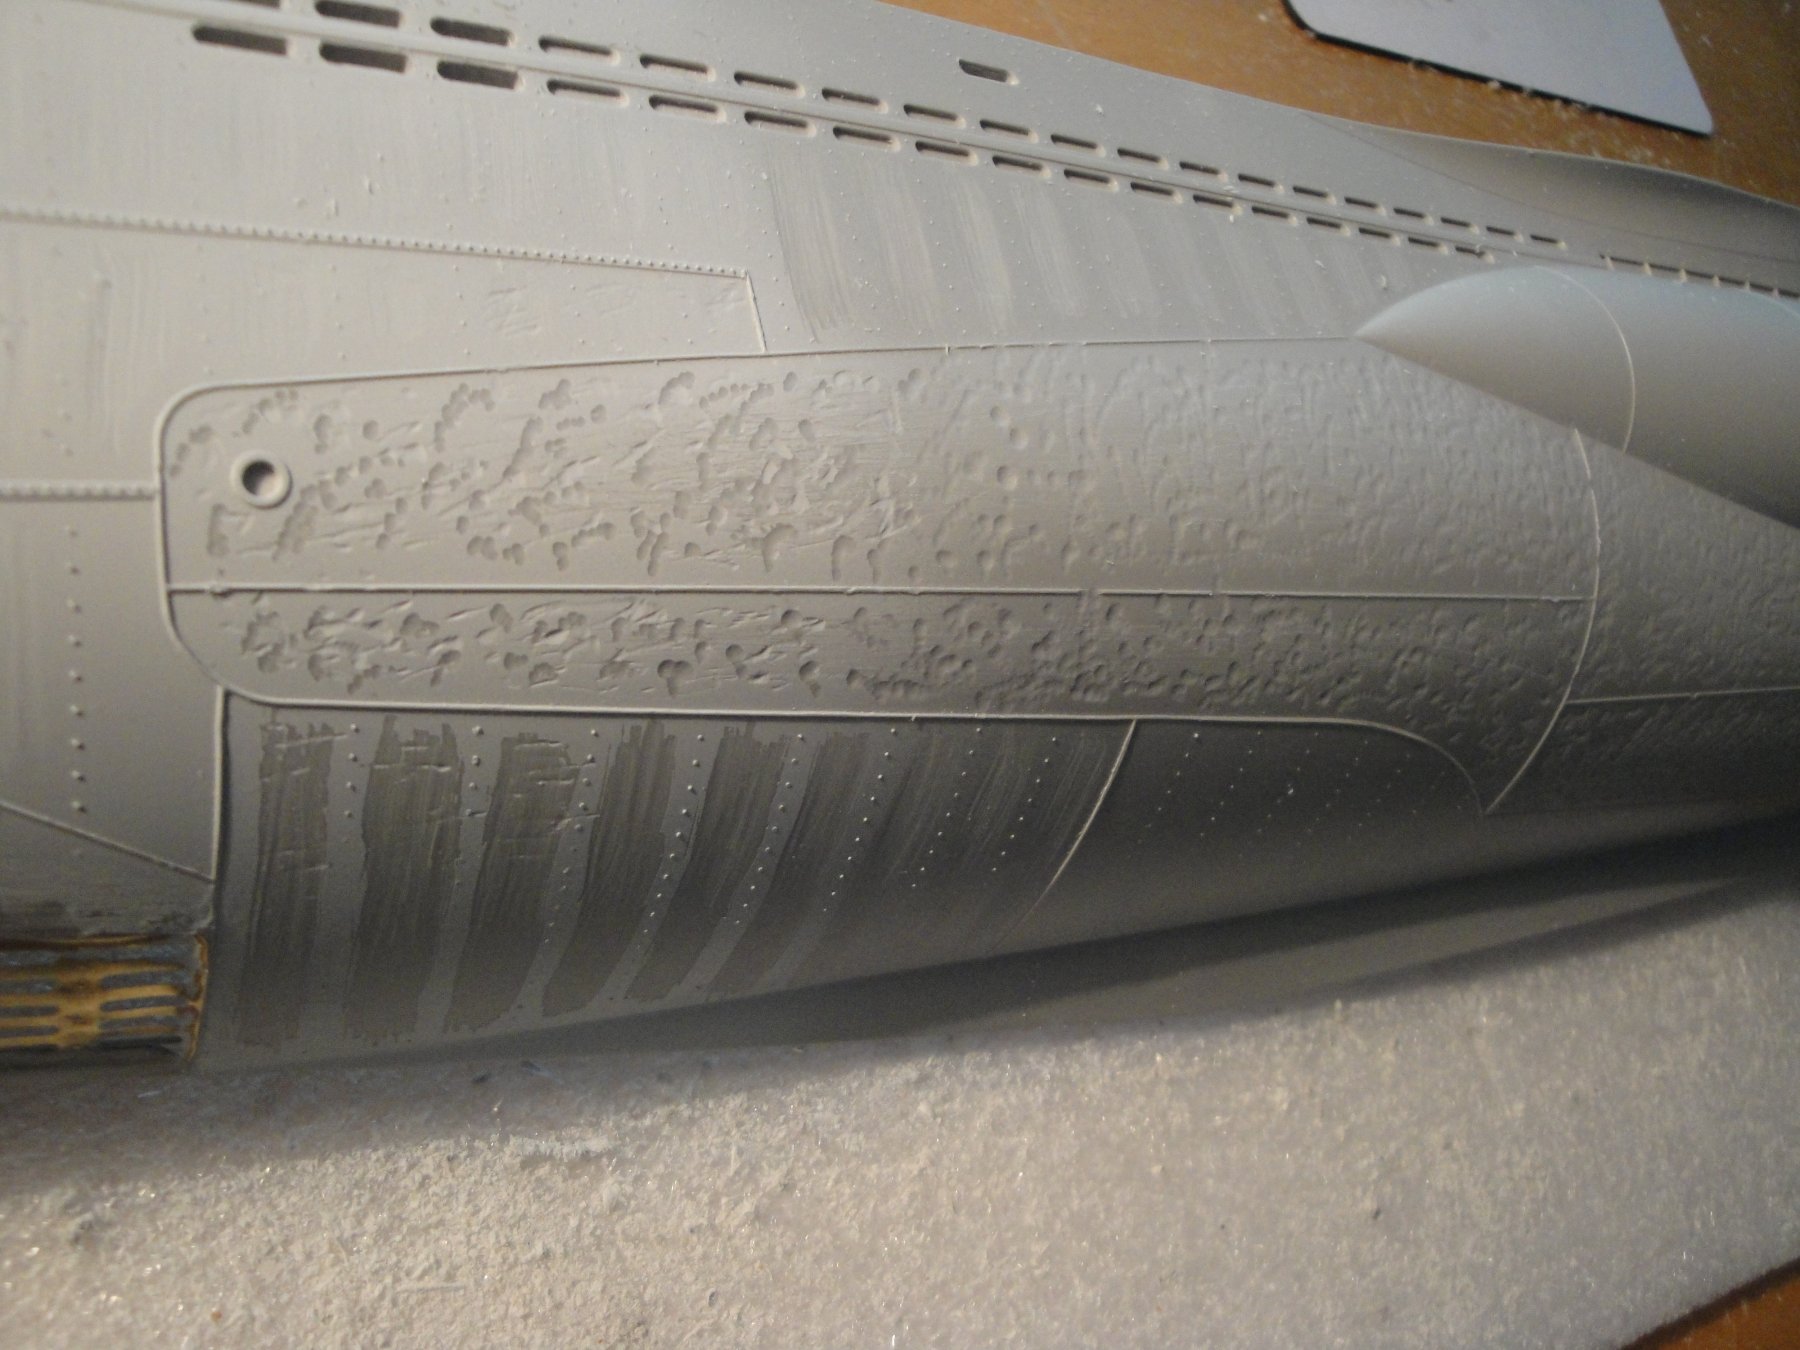
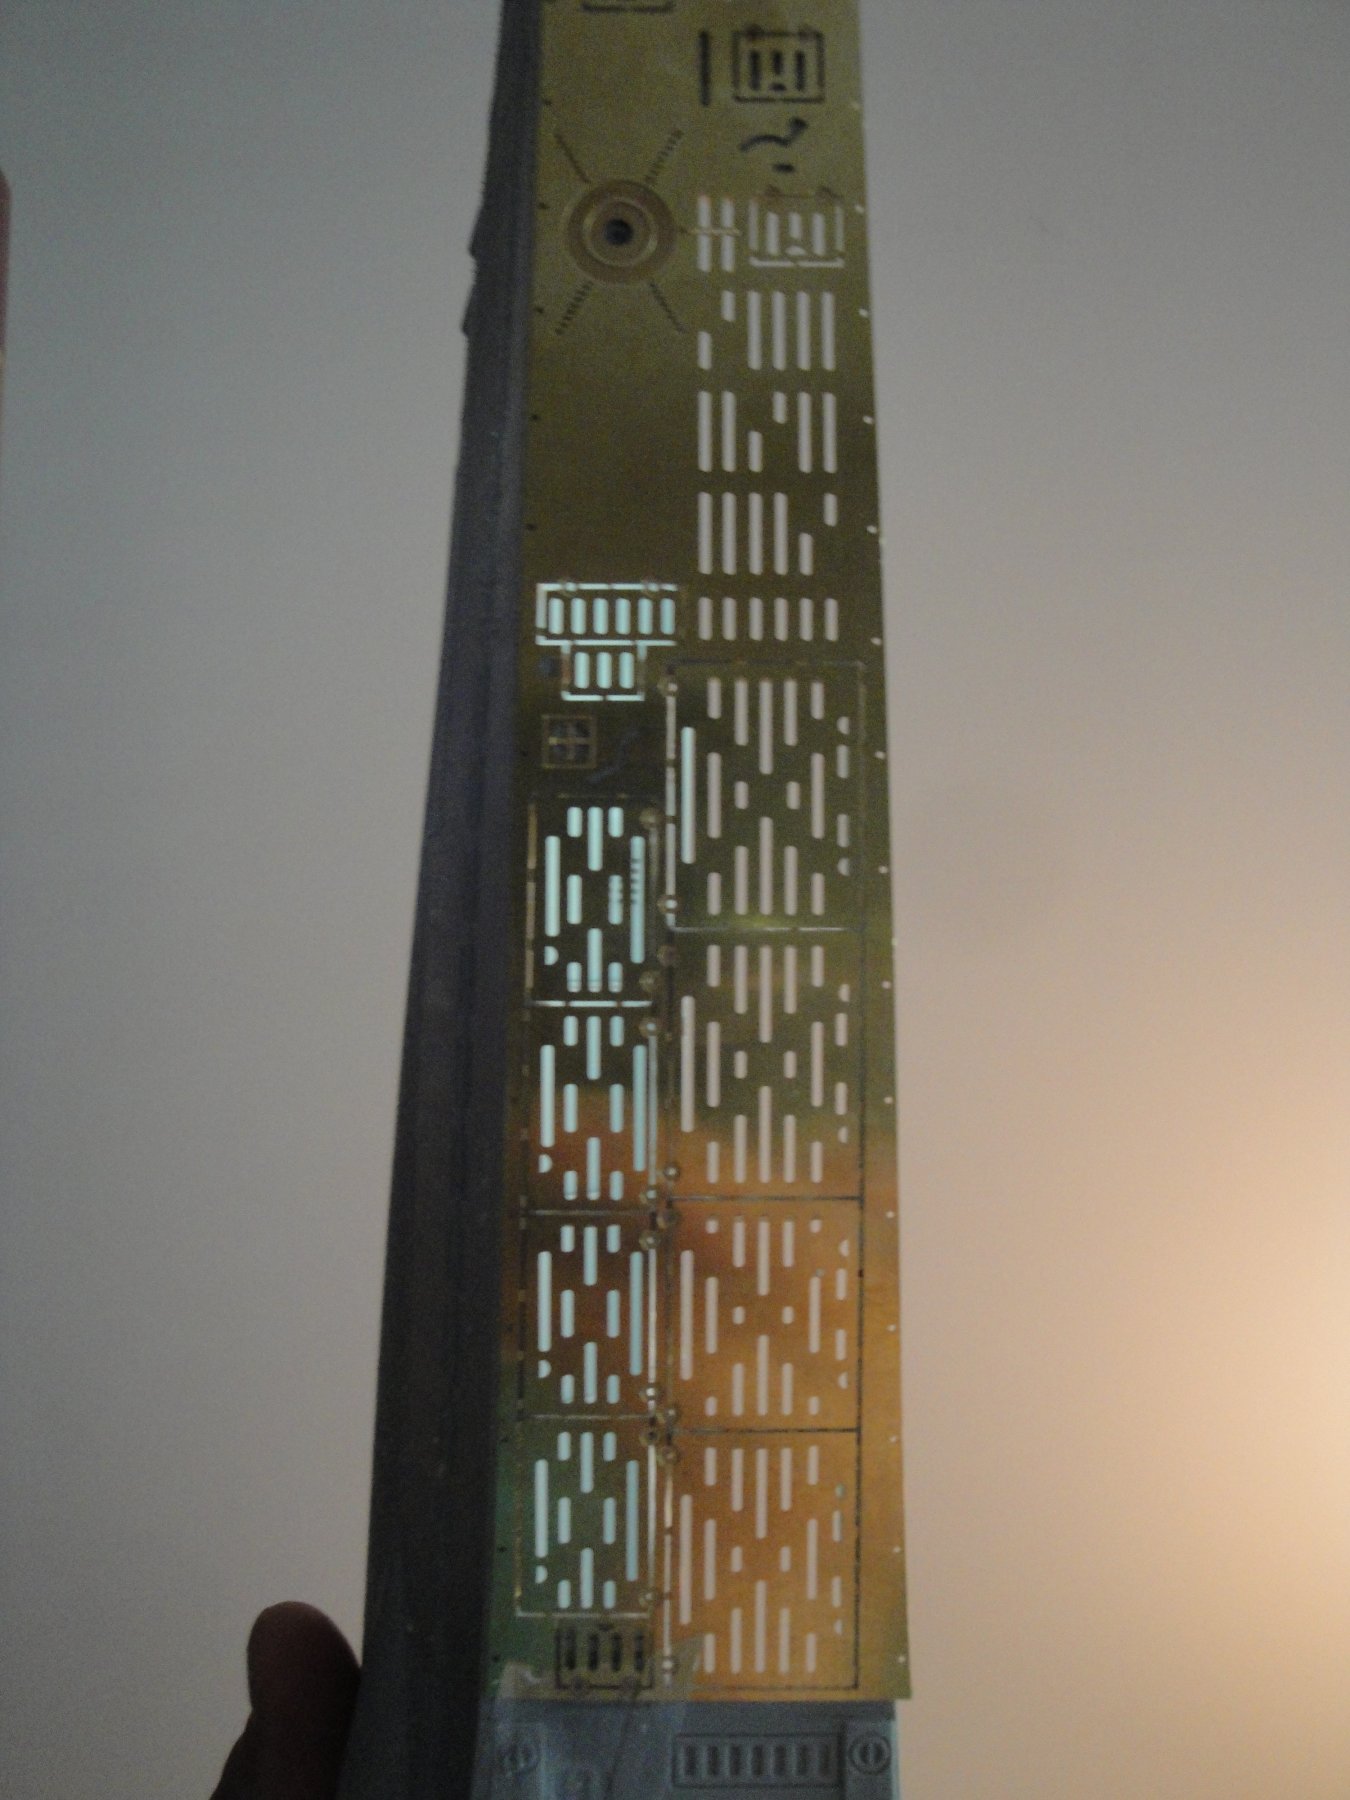
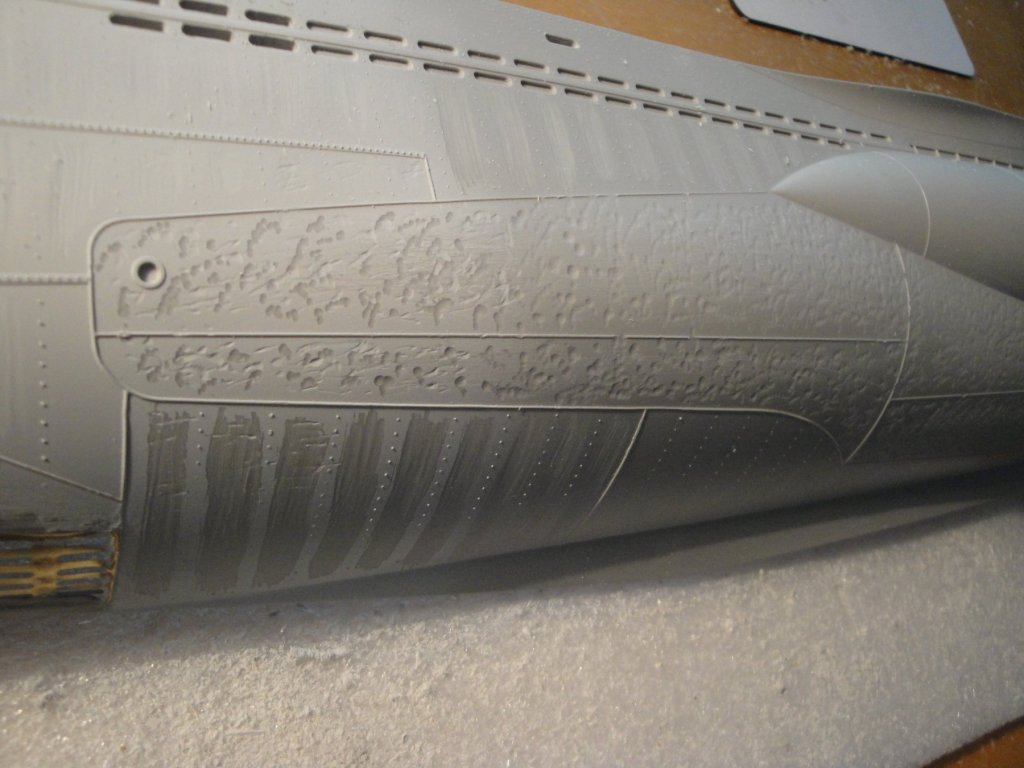
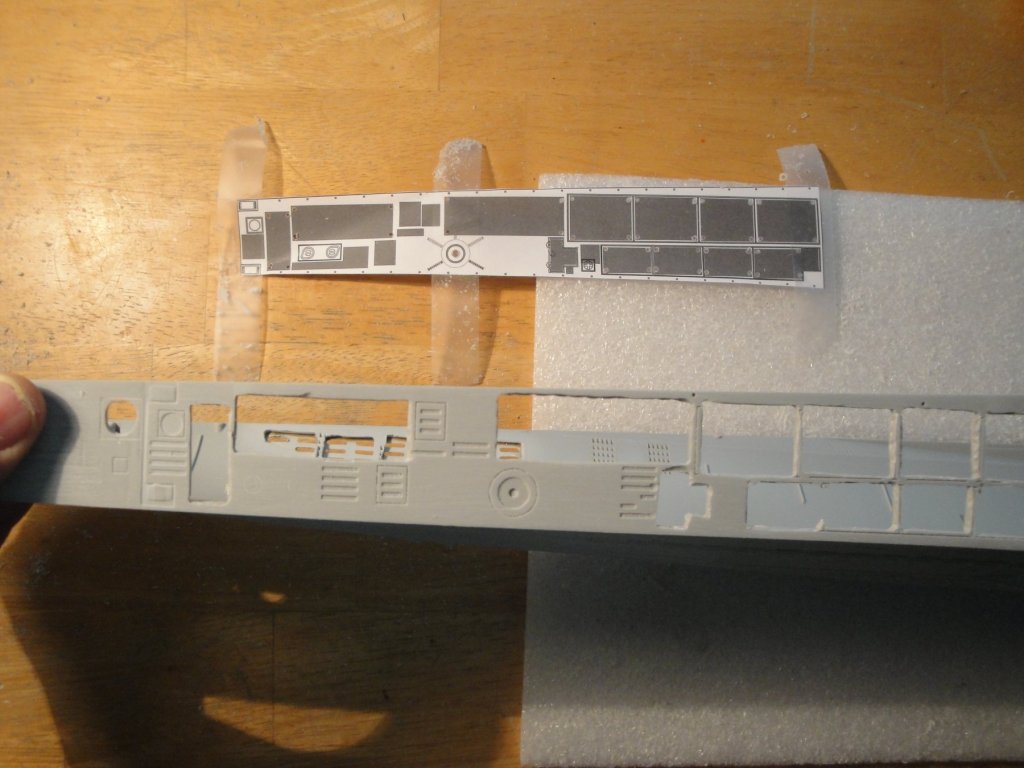
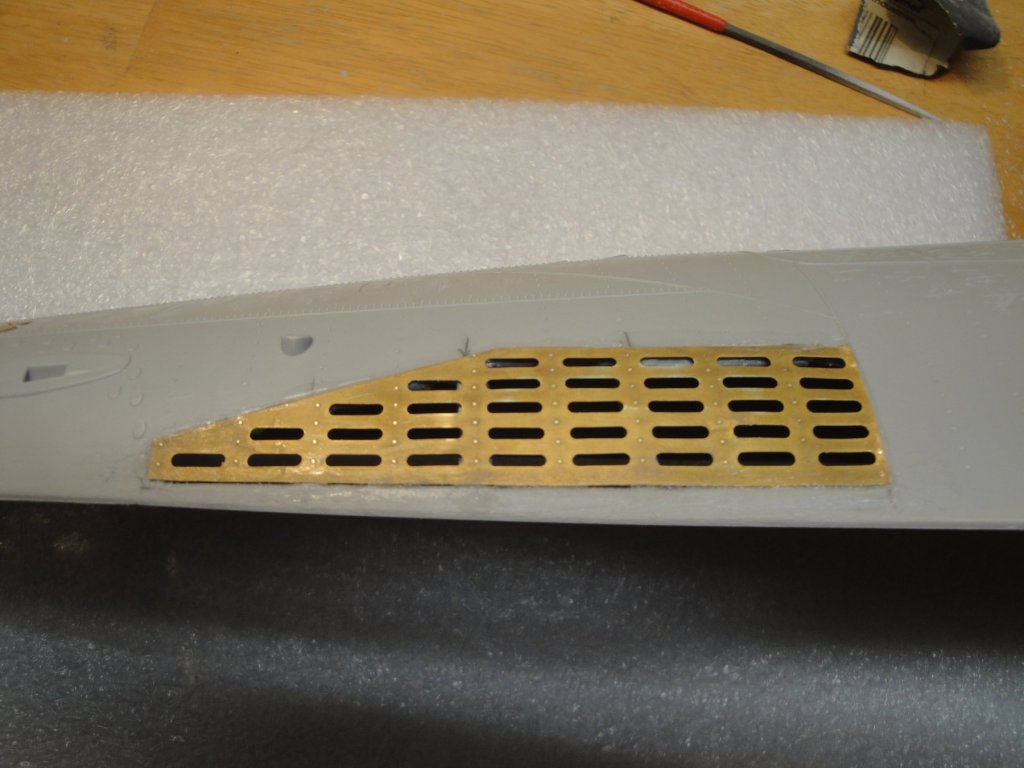
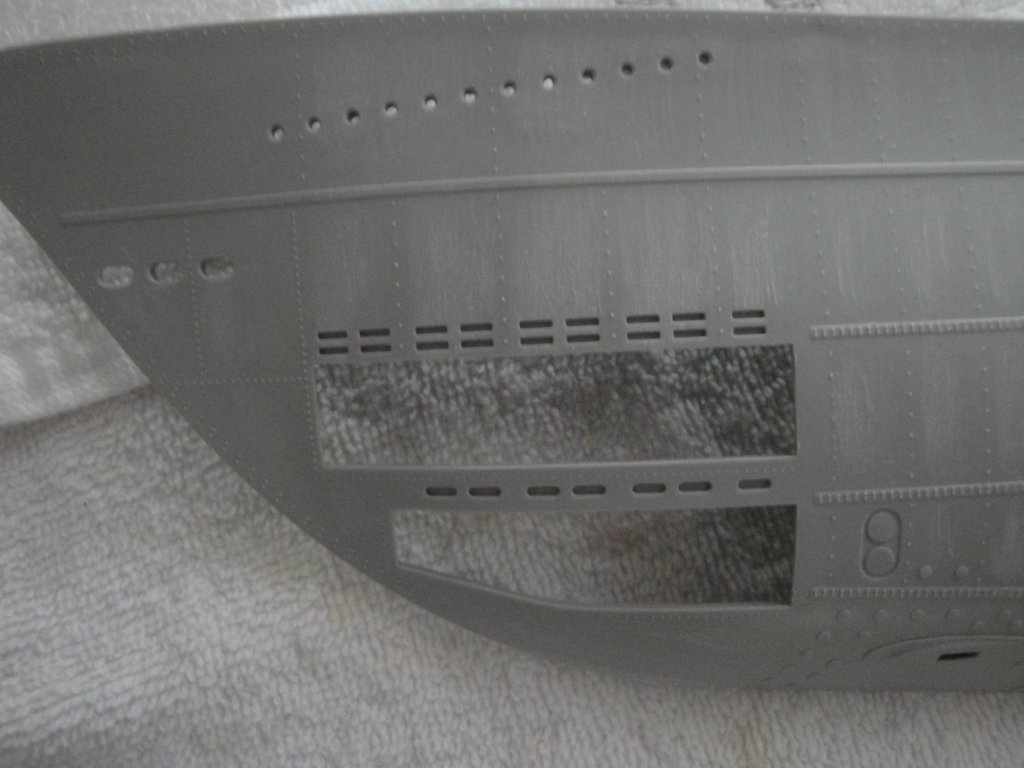
The port hull is in full swing. I have puttied and sanded a few seams: It is now a lot smoother. I started working on the beating of the main hull, and its moon like appearance. This is due to quick foundry work, lots of maintenance, underwater mines and all kind of abuses these machines were submitted to, during their very short lives: On the deck, we are fabricating a Nice slice of Swiss cheese, following the templates given by RCSUBZ: The amount of dust produced is insane. The fitting of the PE is perfect, once again, and the openings match ideally the template and cuts: Lots of cuts still to be done. And then we start all over on the starboard side..... Yves


- 760 replies
-
- 12
-
-
Looking good Christian. That is a big beast. I still remember seeing the original model made by Chuck, at Model Shipways in Florida: Very impressive. Yves
-
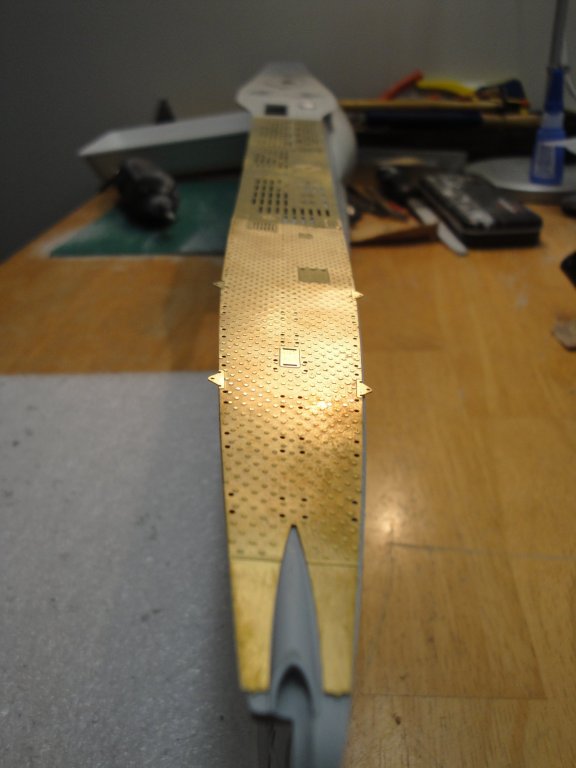
Another delicate PE insertion: That Trumpeter Hull is massive and so thick. We are talking about 3 mm or close to 1/8 inch. It takes time and energy to go through it . After a coat of Vallejo Primer, I can see the areas requiring some putty and sanding: Almost like the real stuff: Yves

- 760 replies
-
- 15
-
-
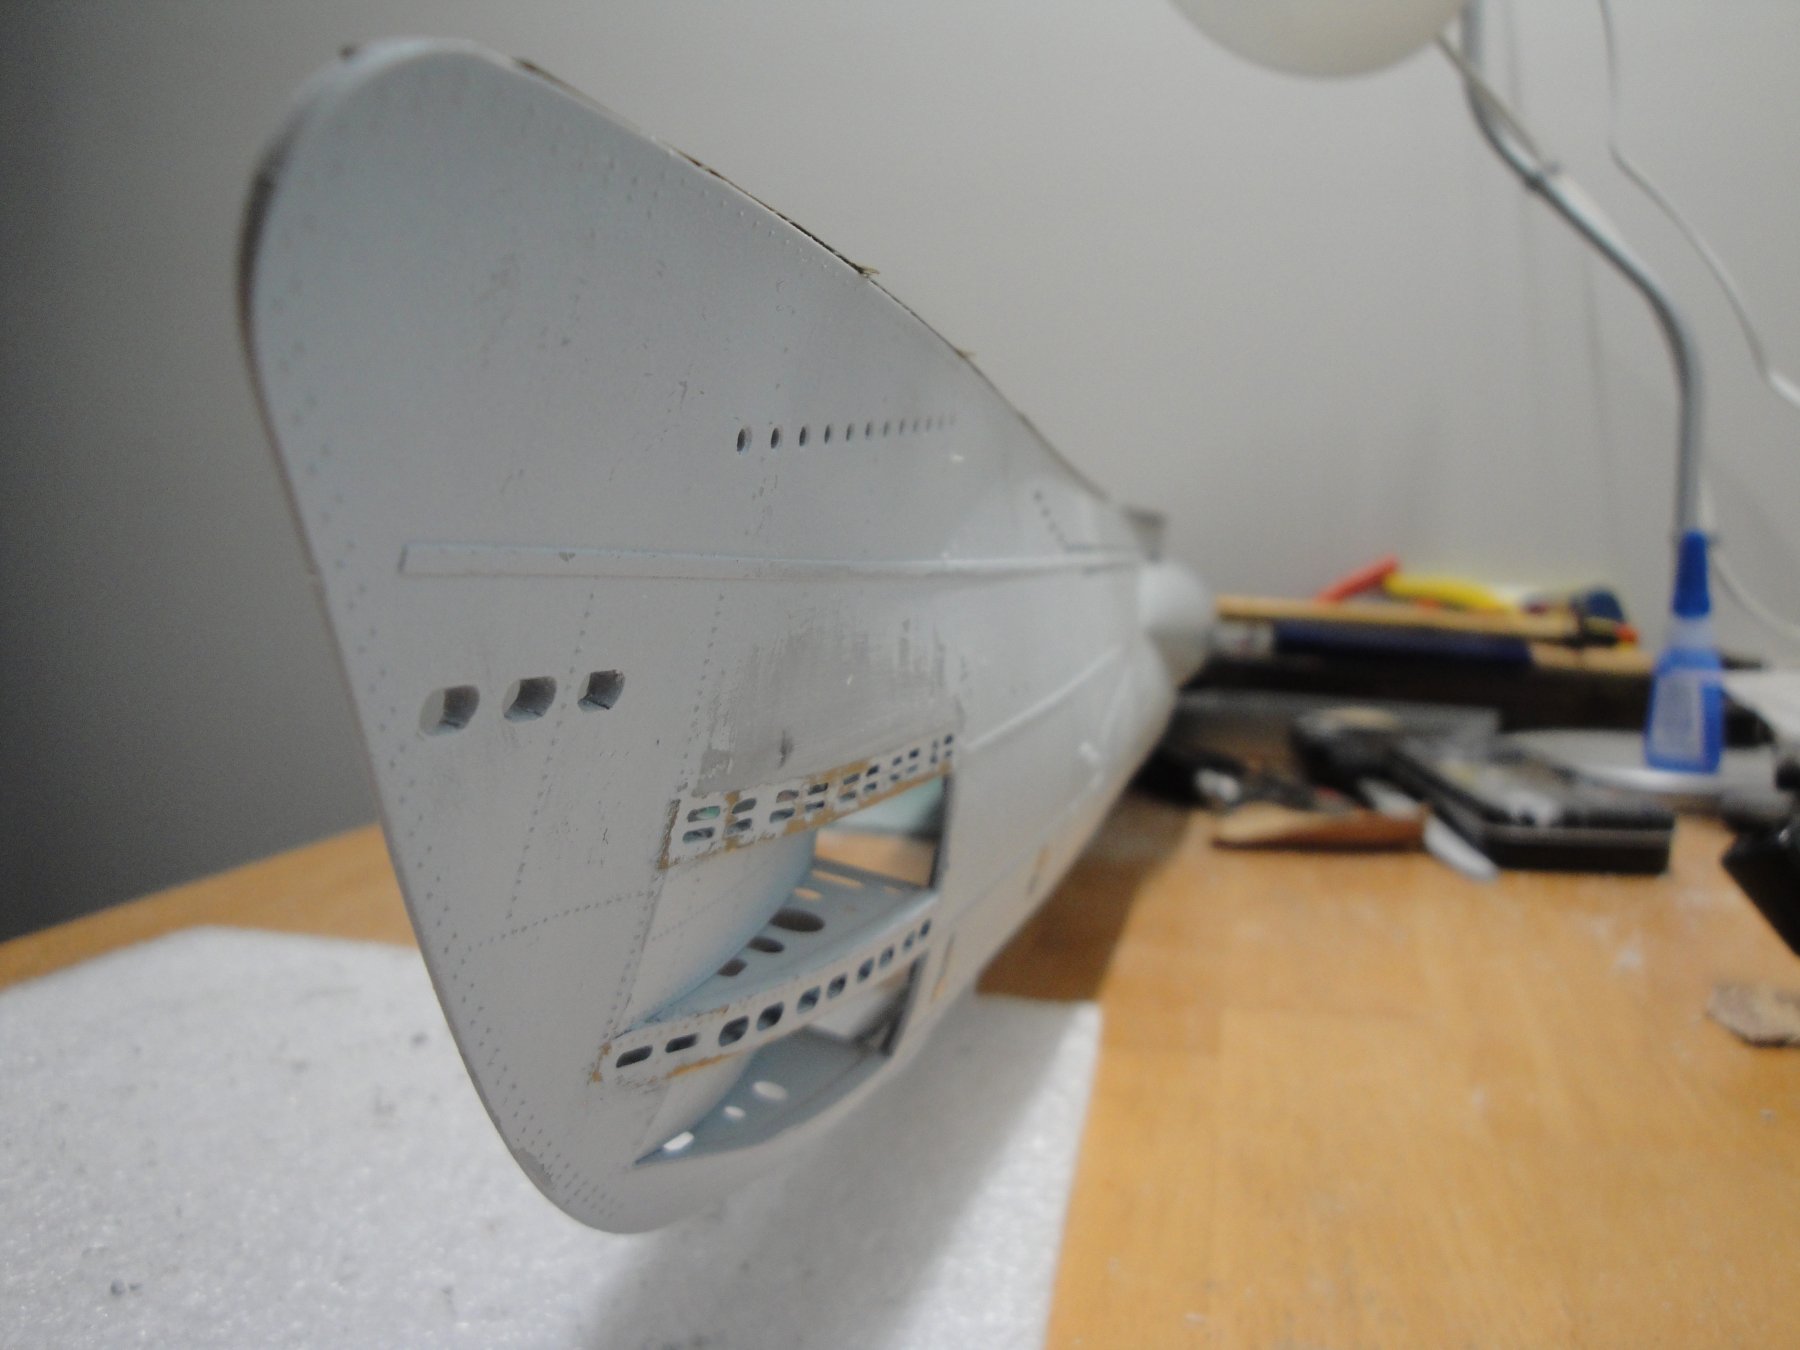
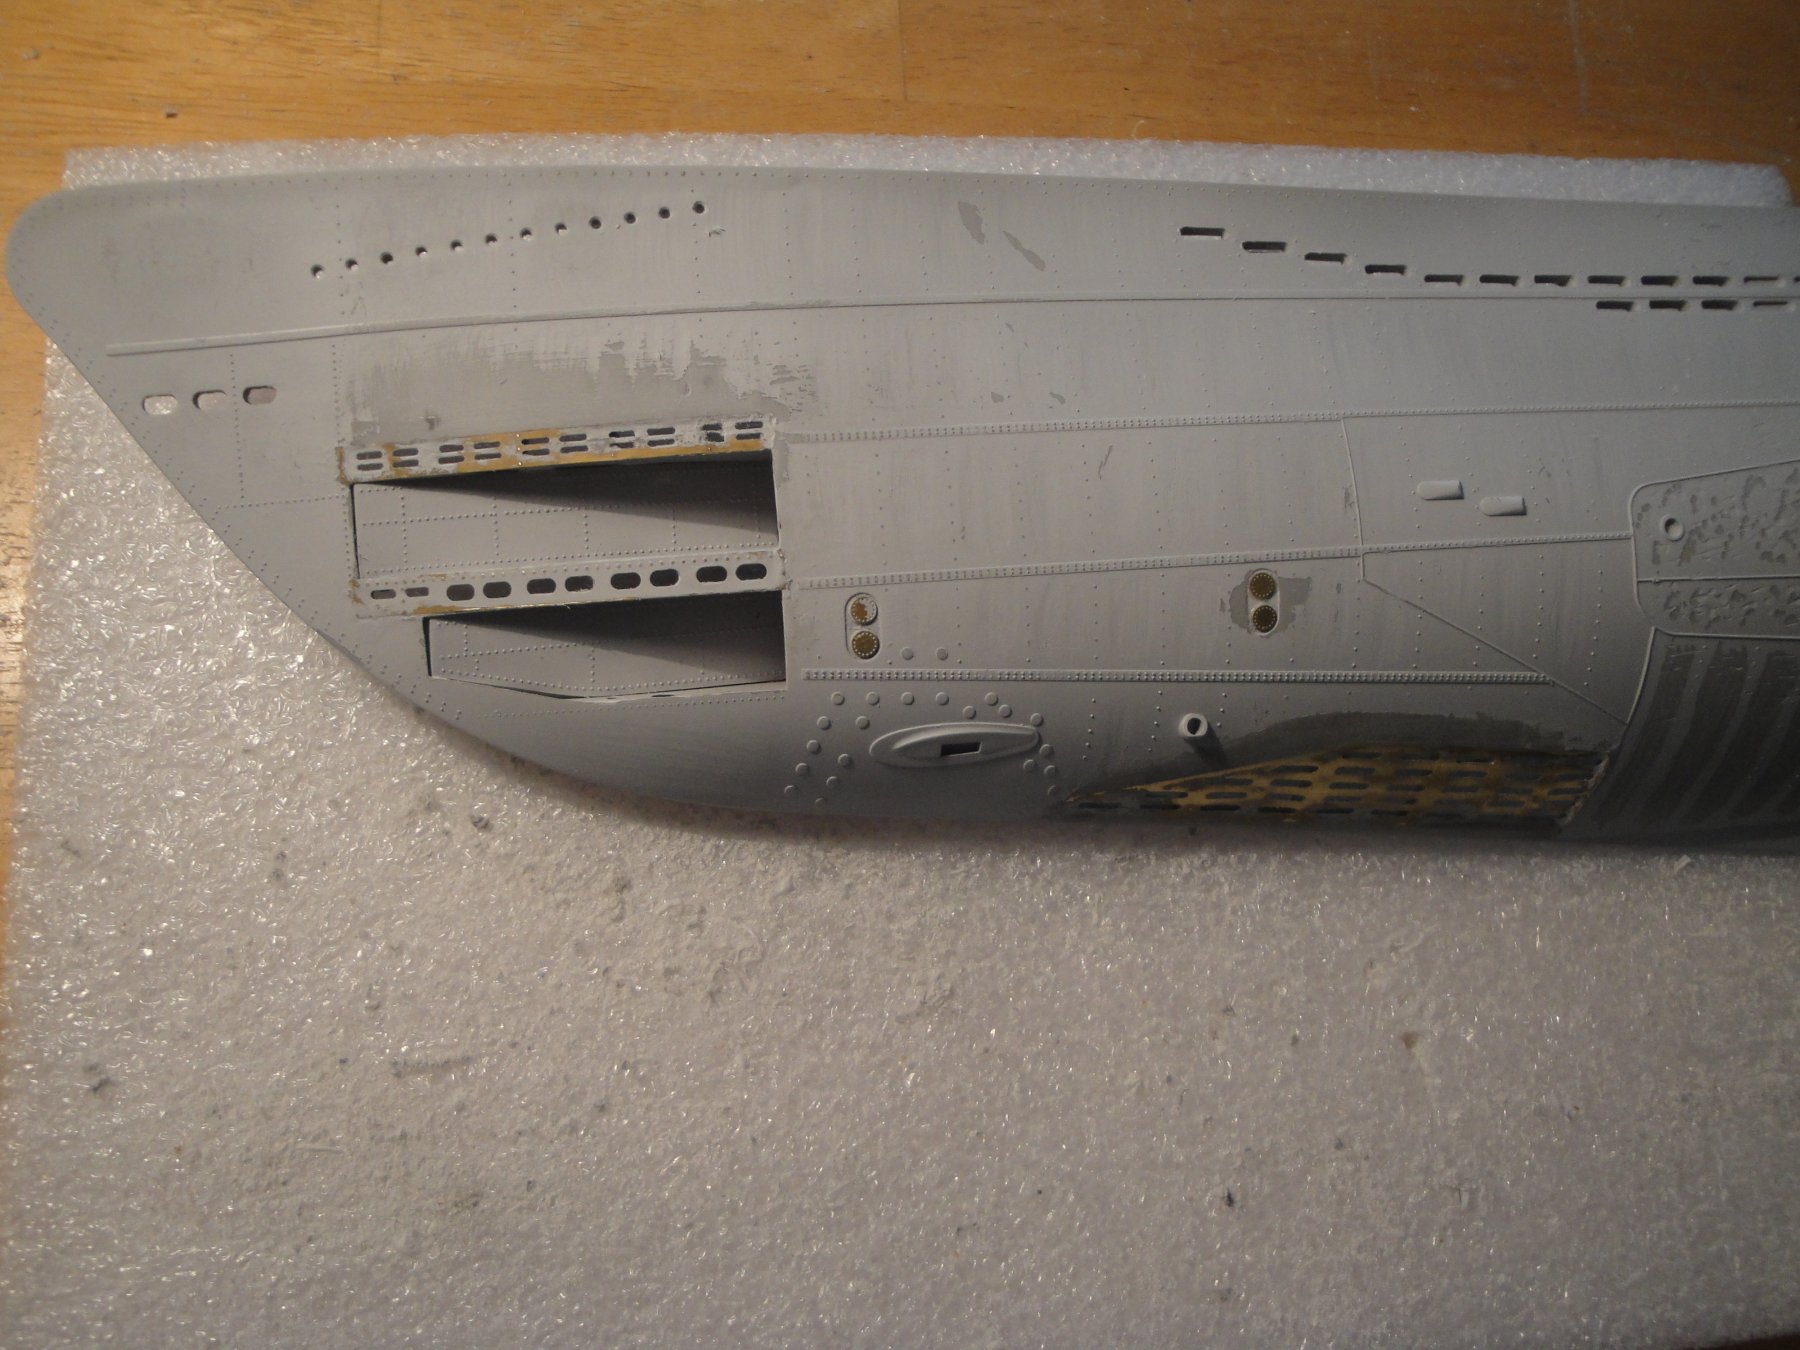
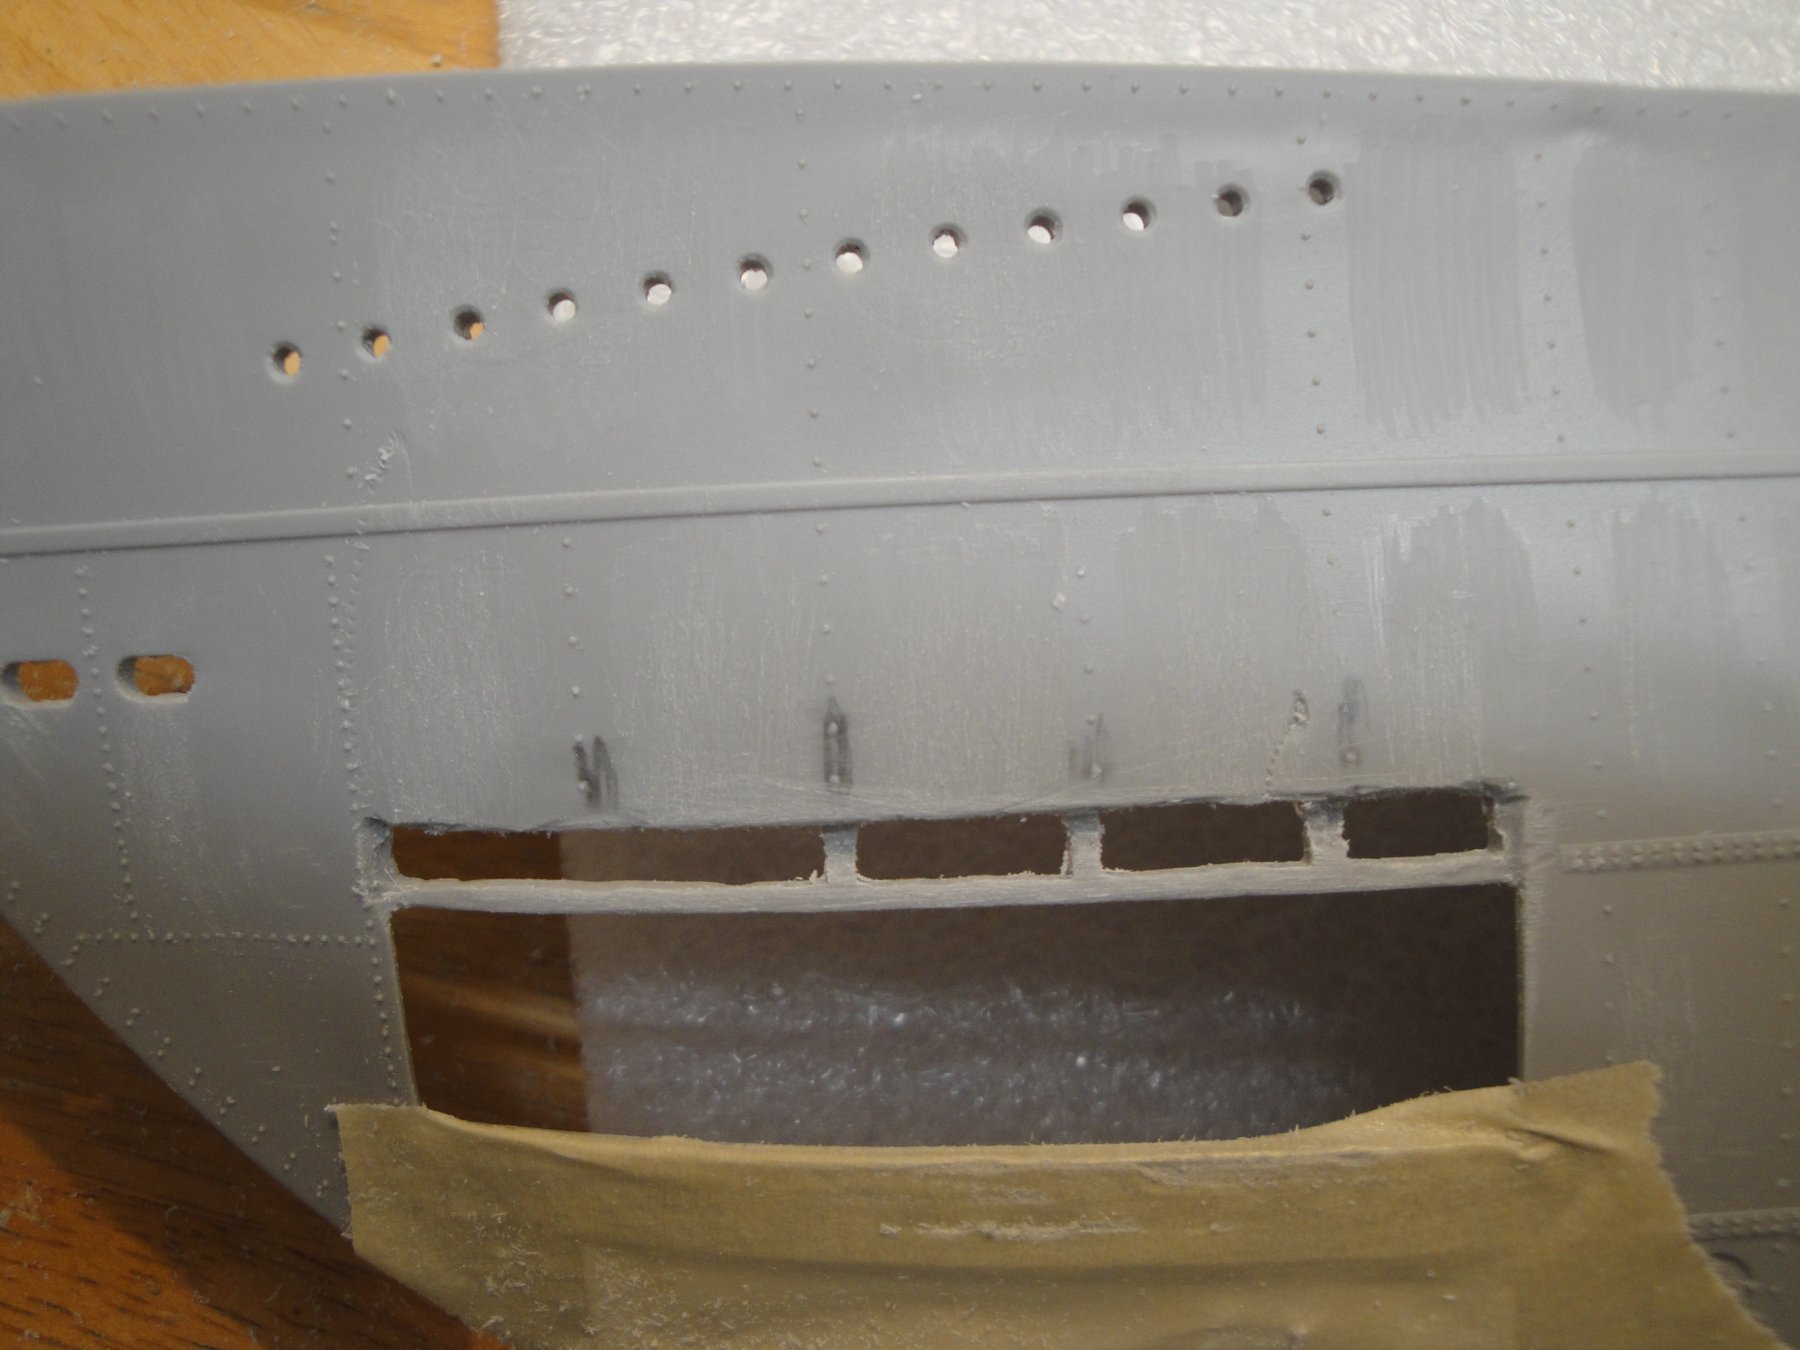
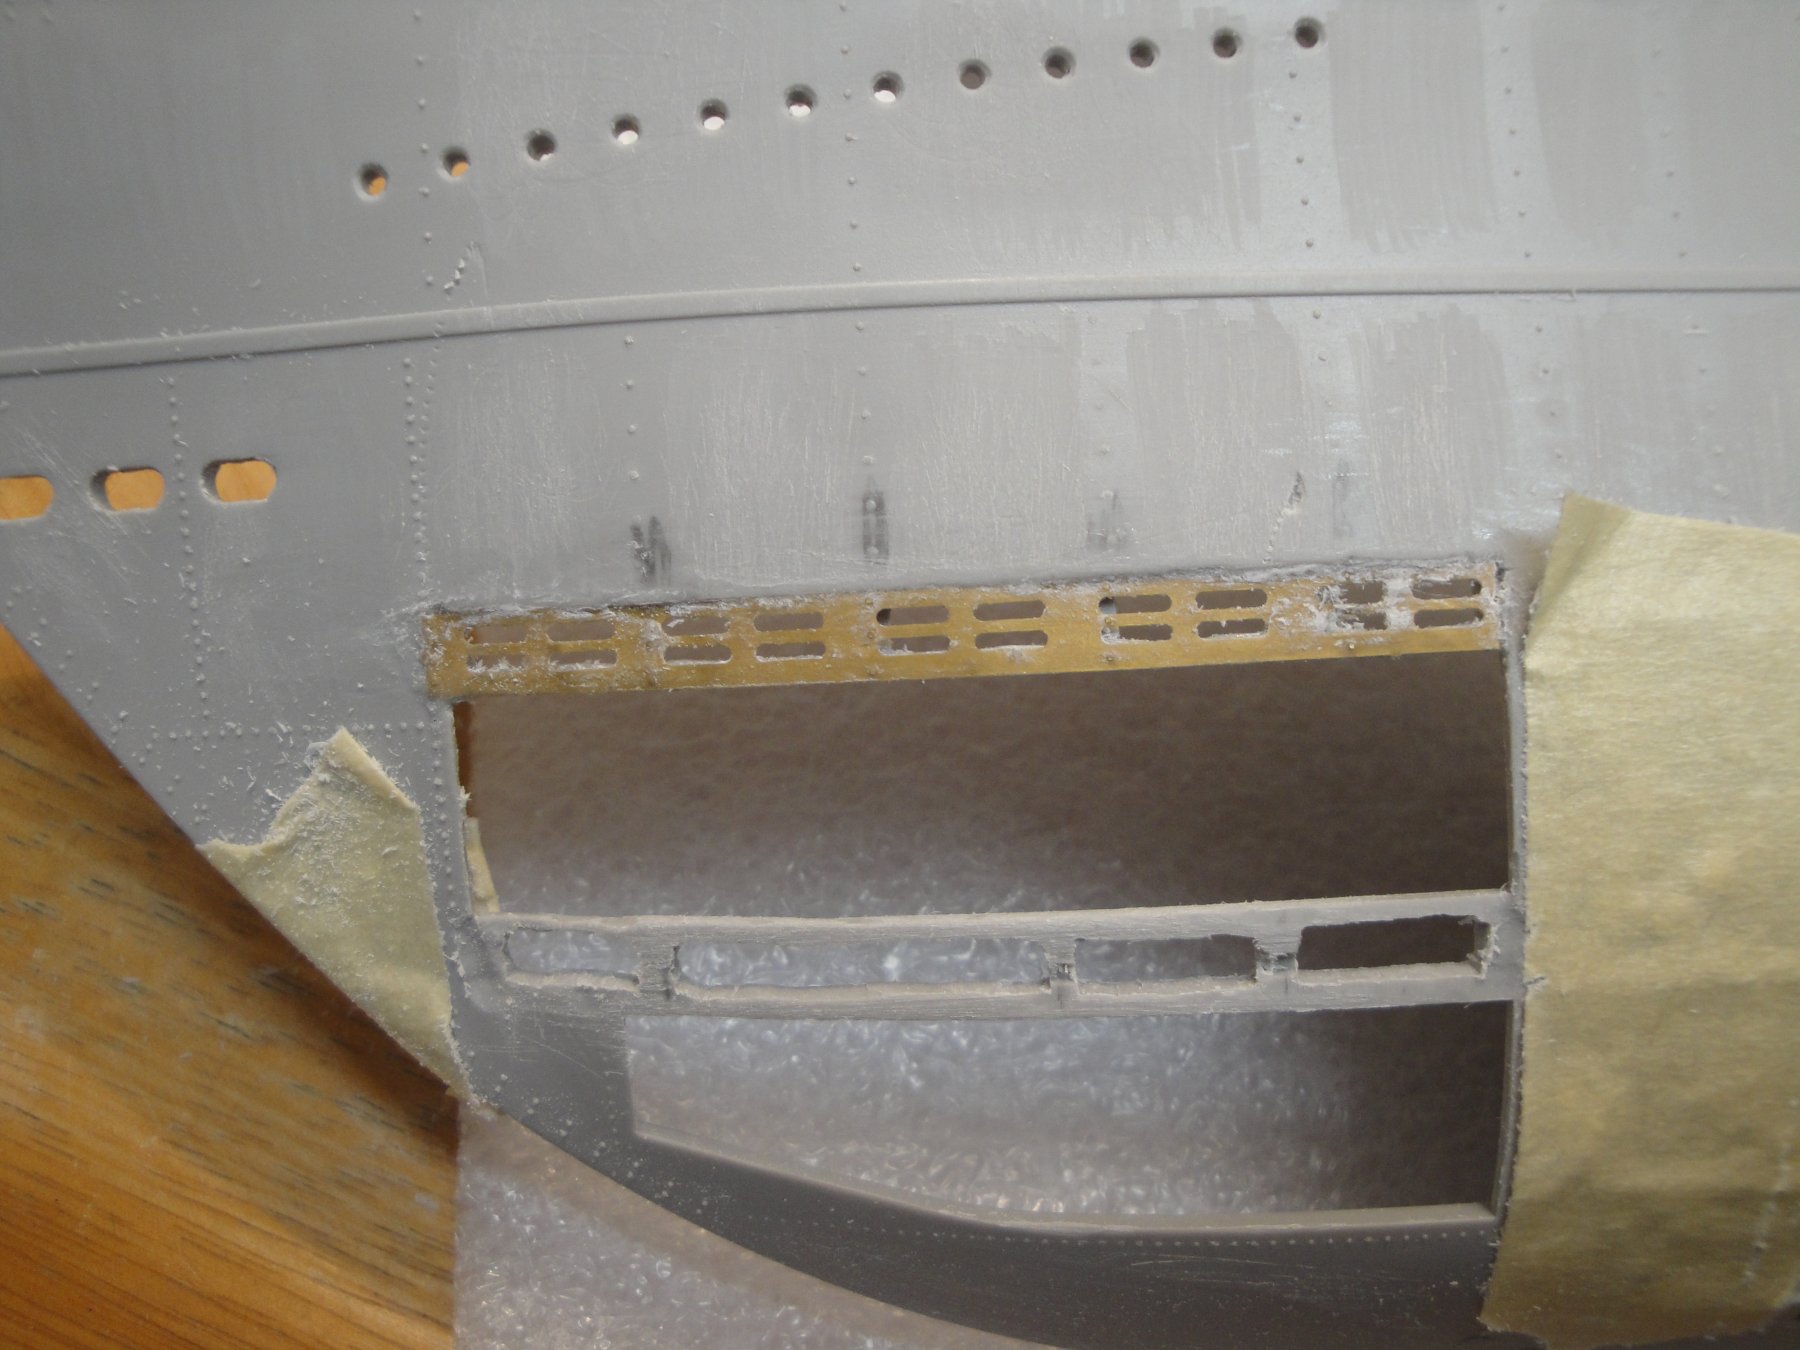
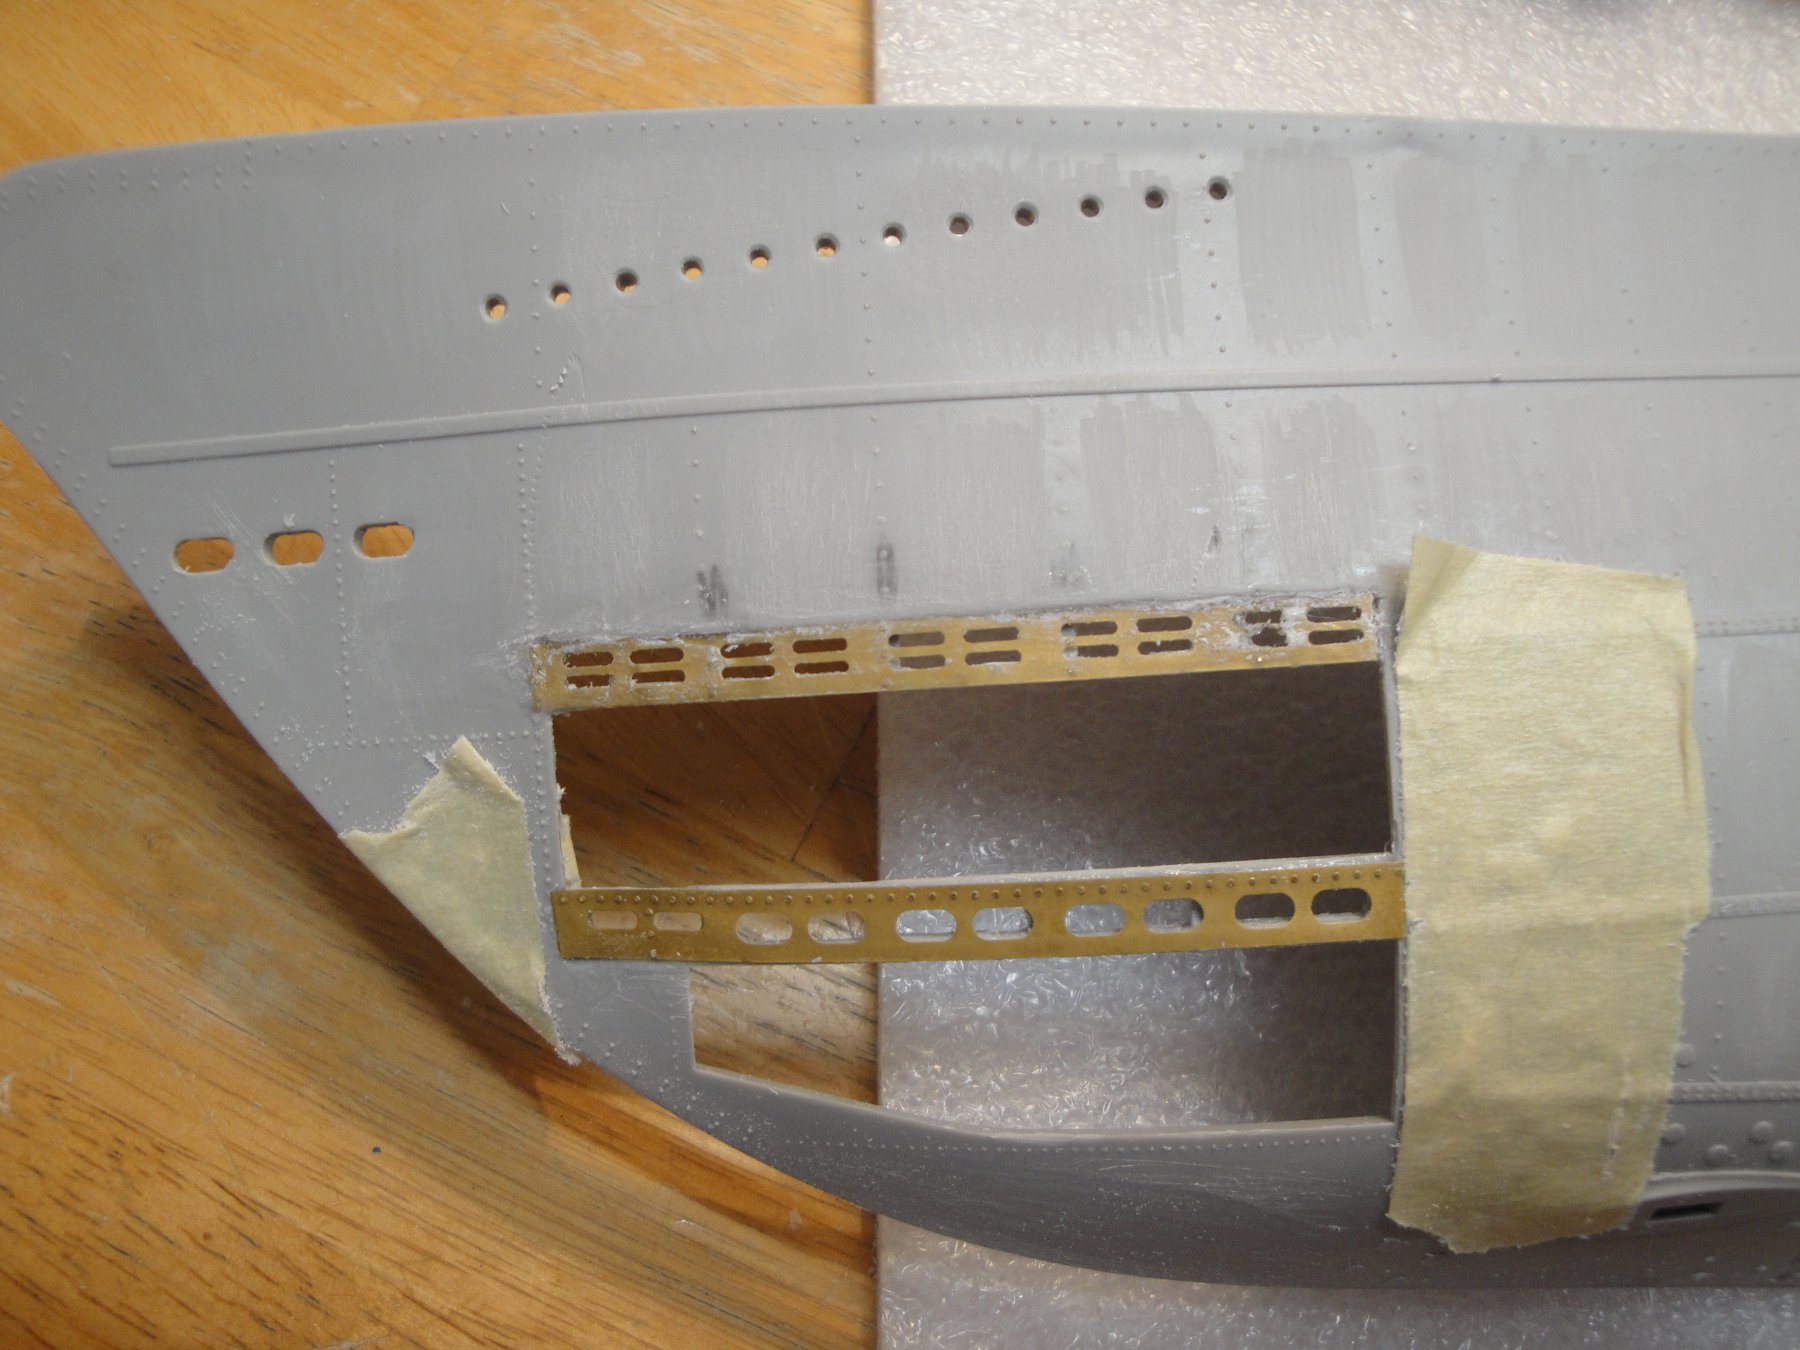
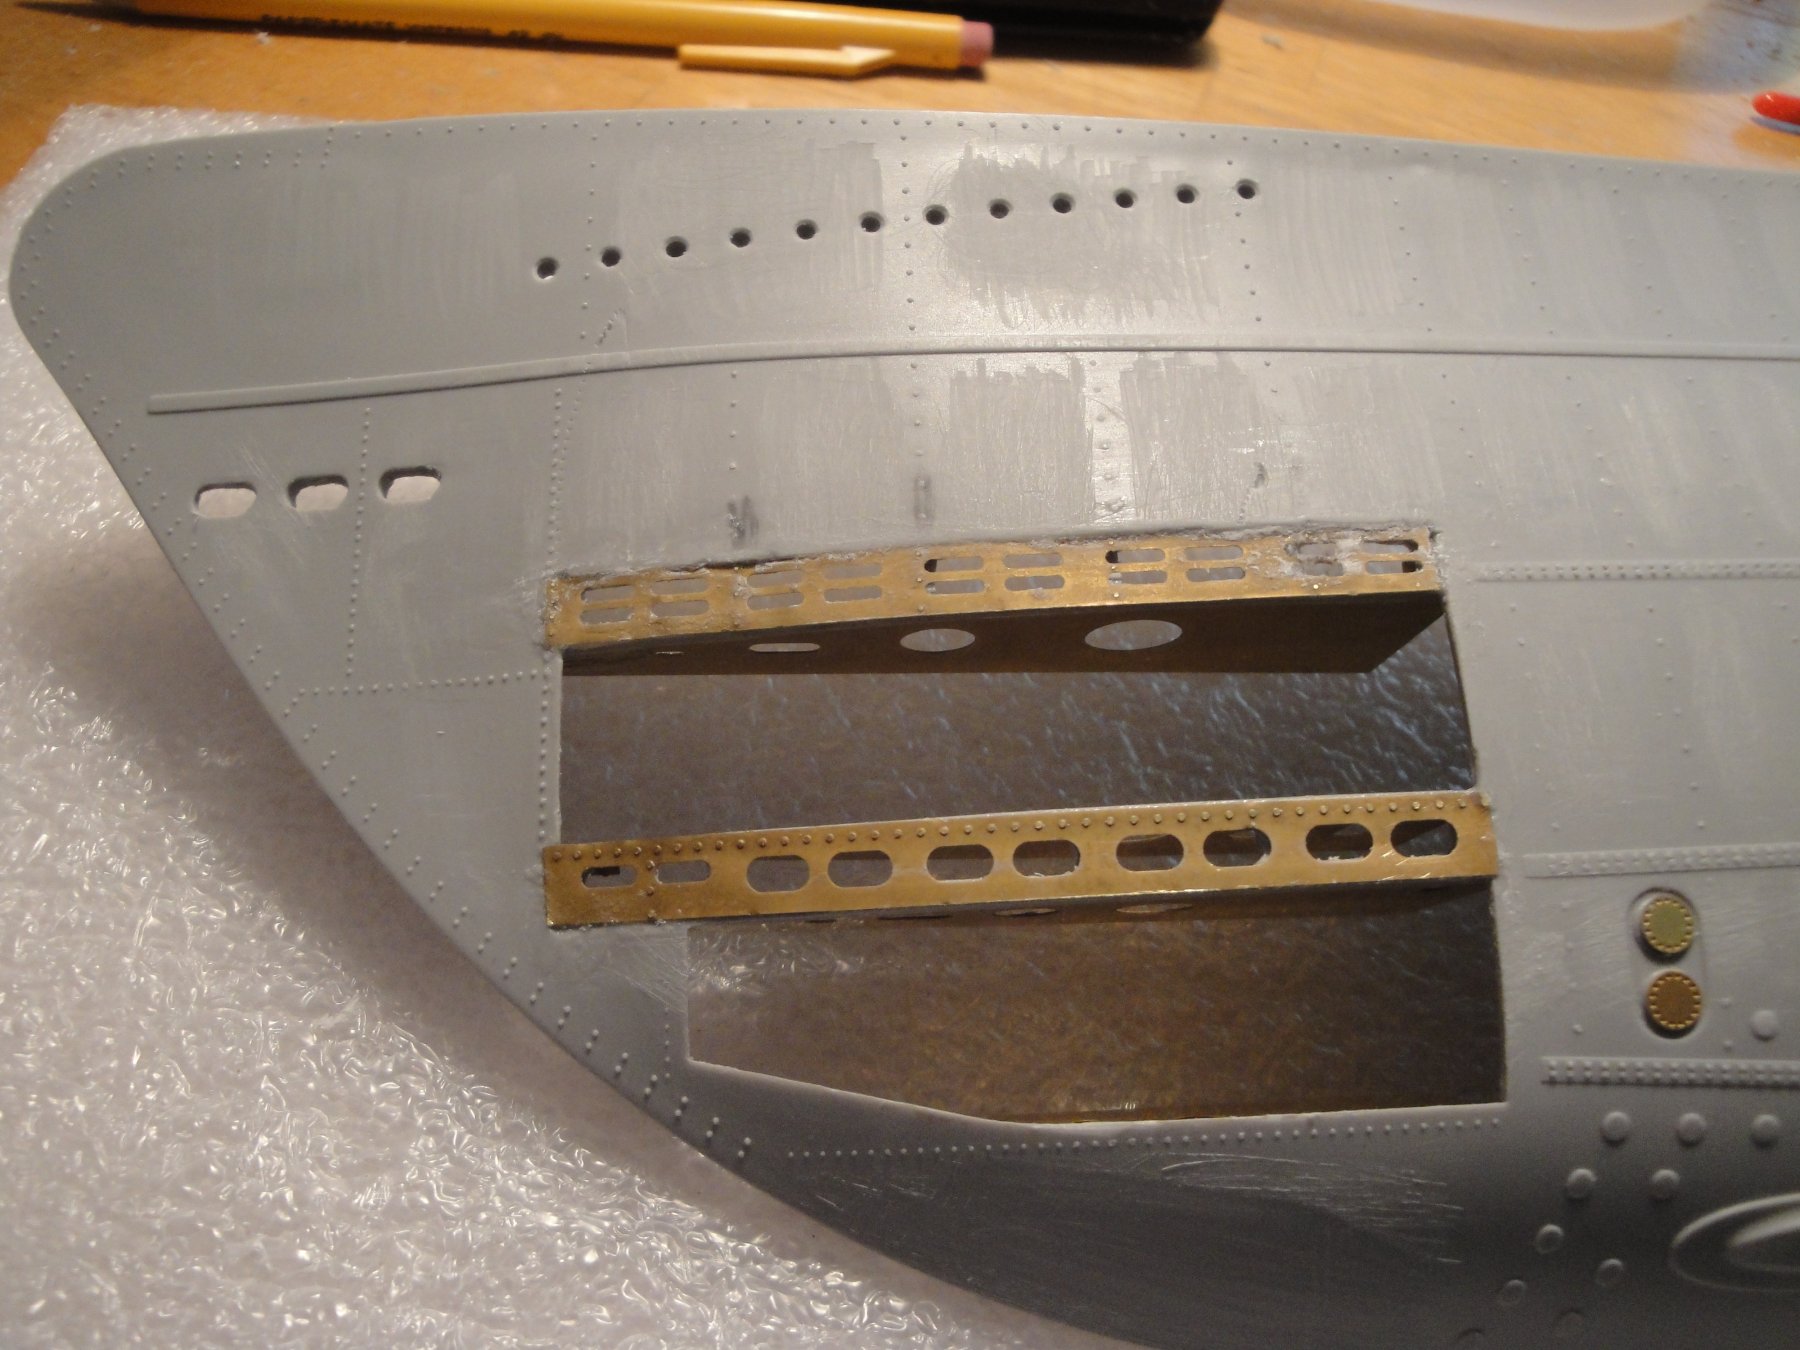
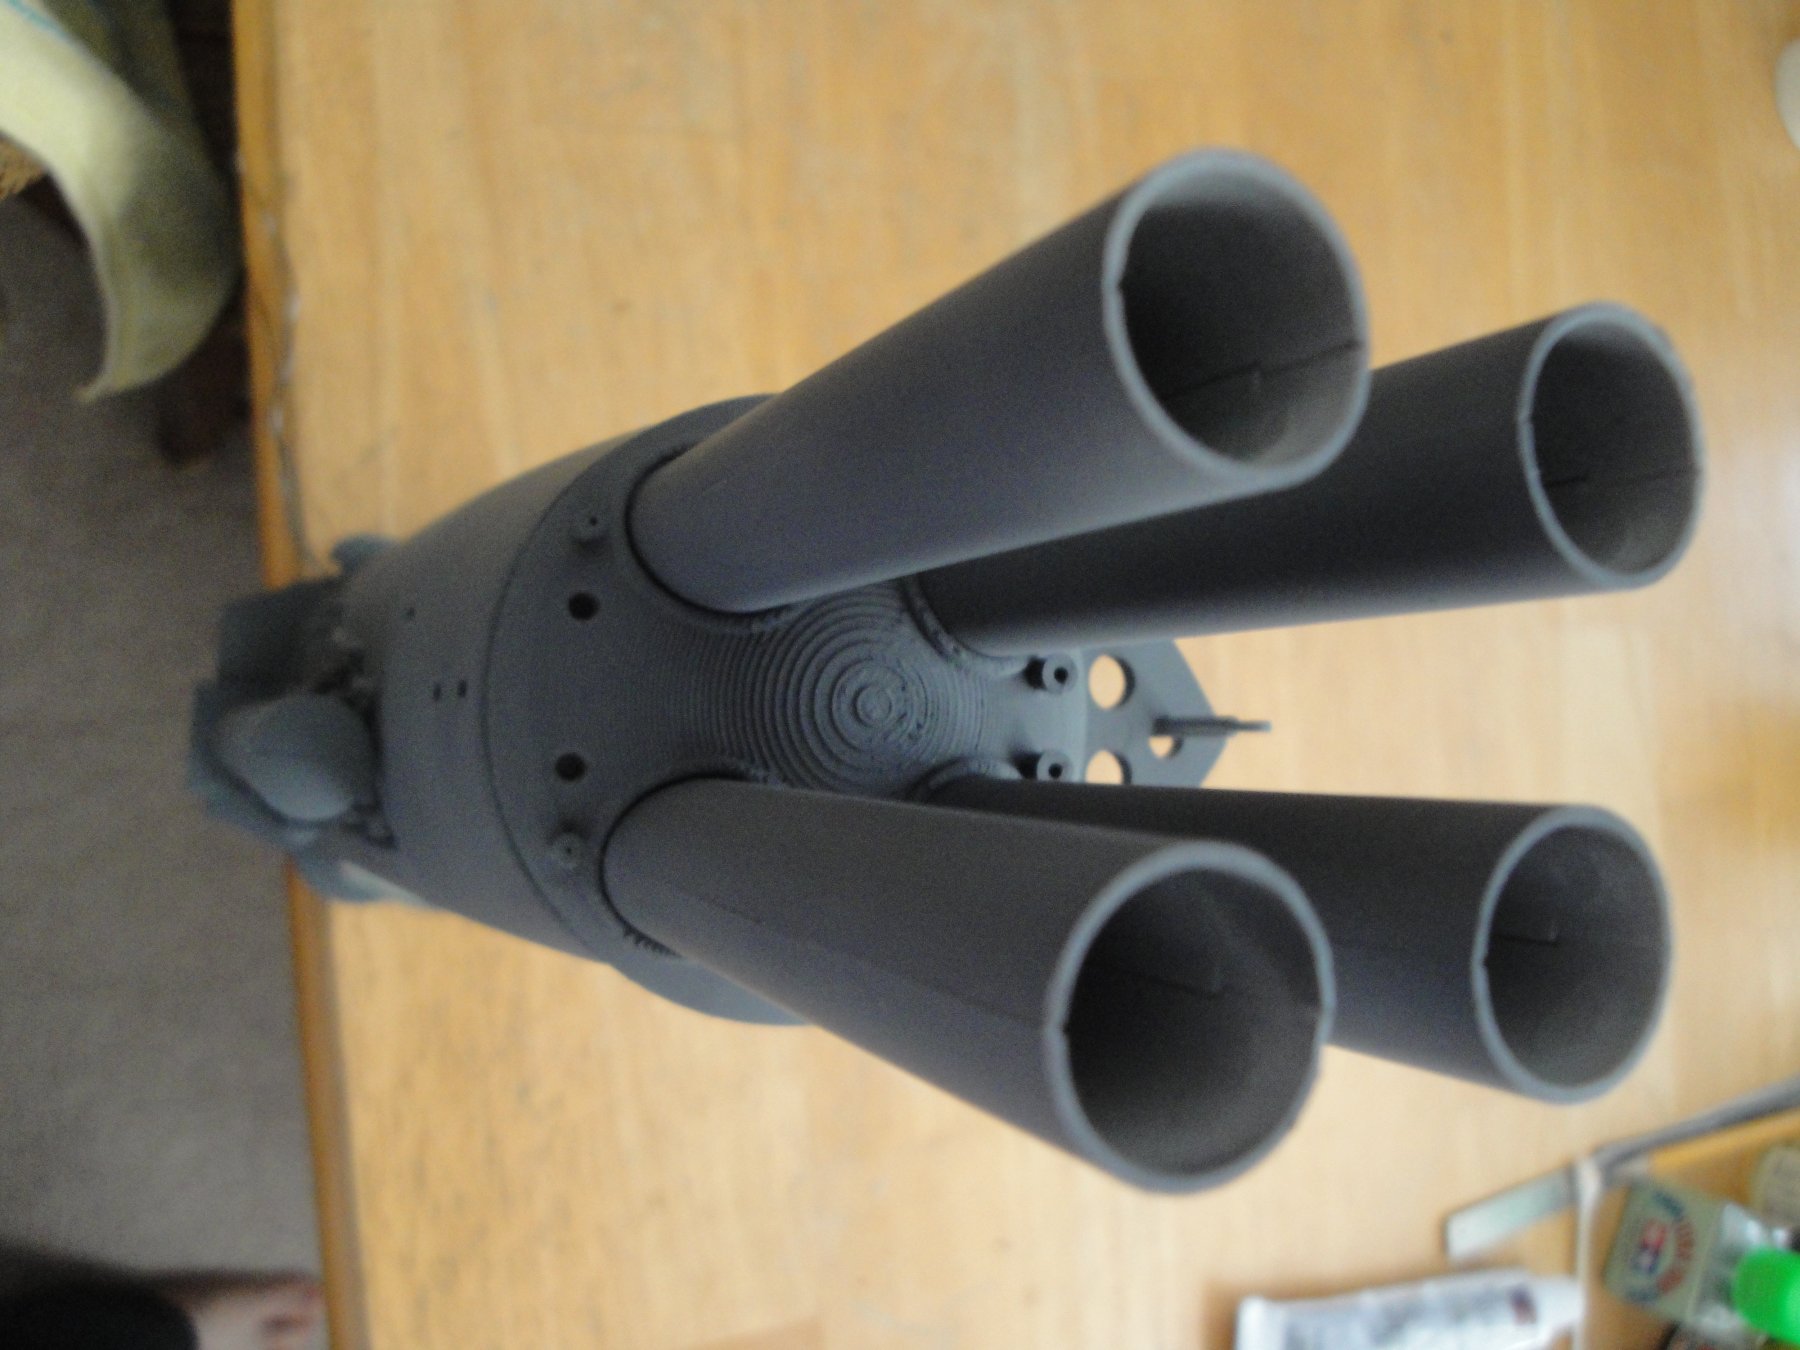
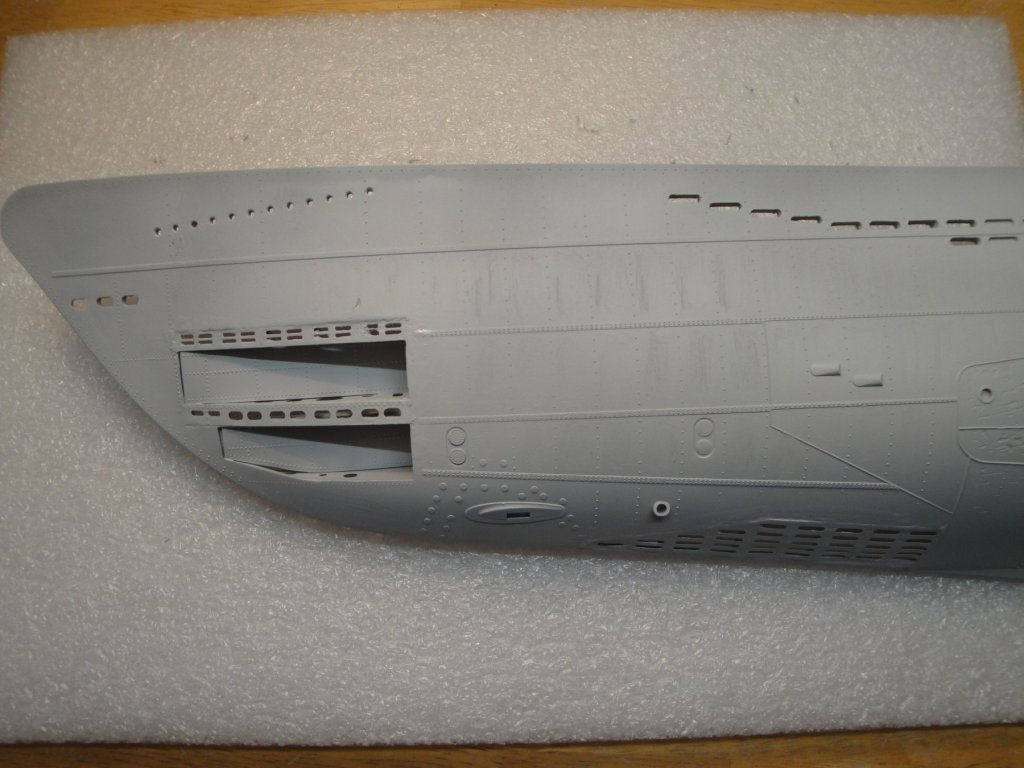
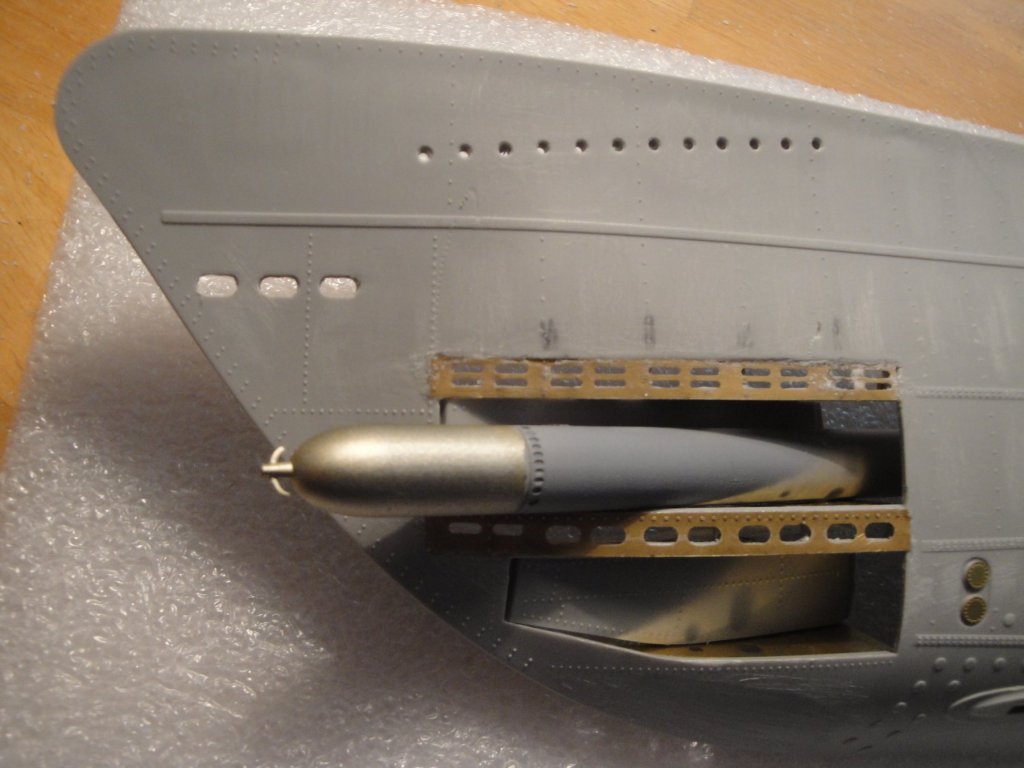
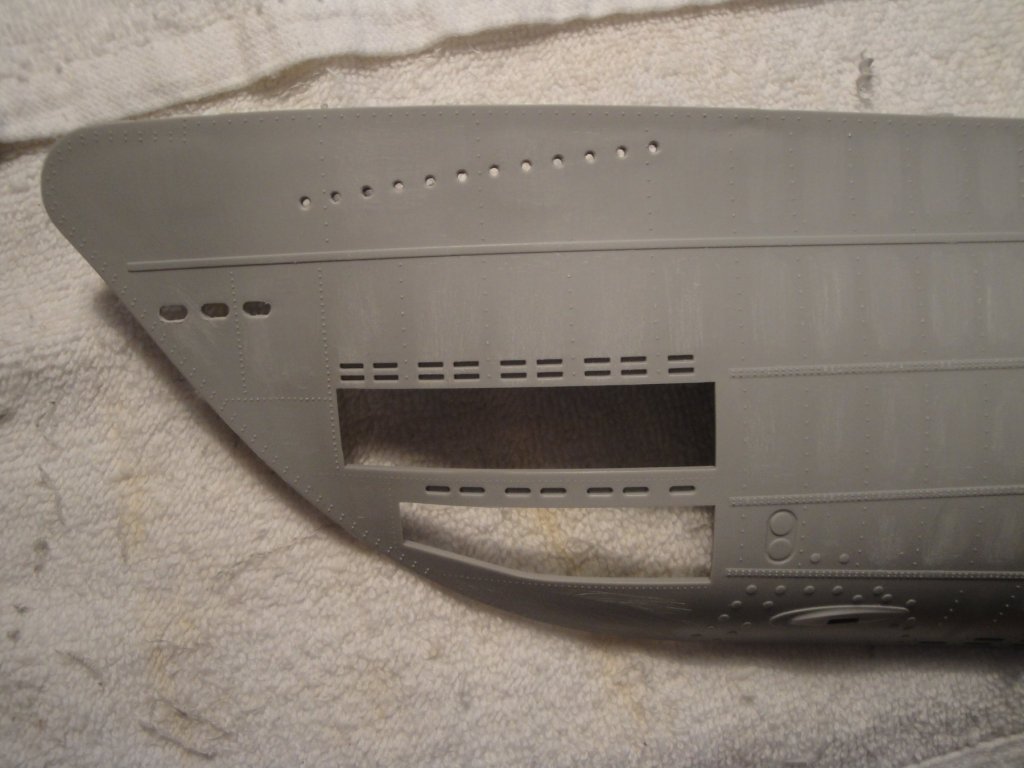
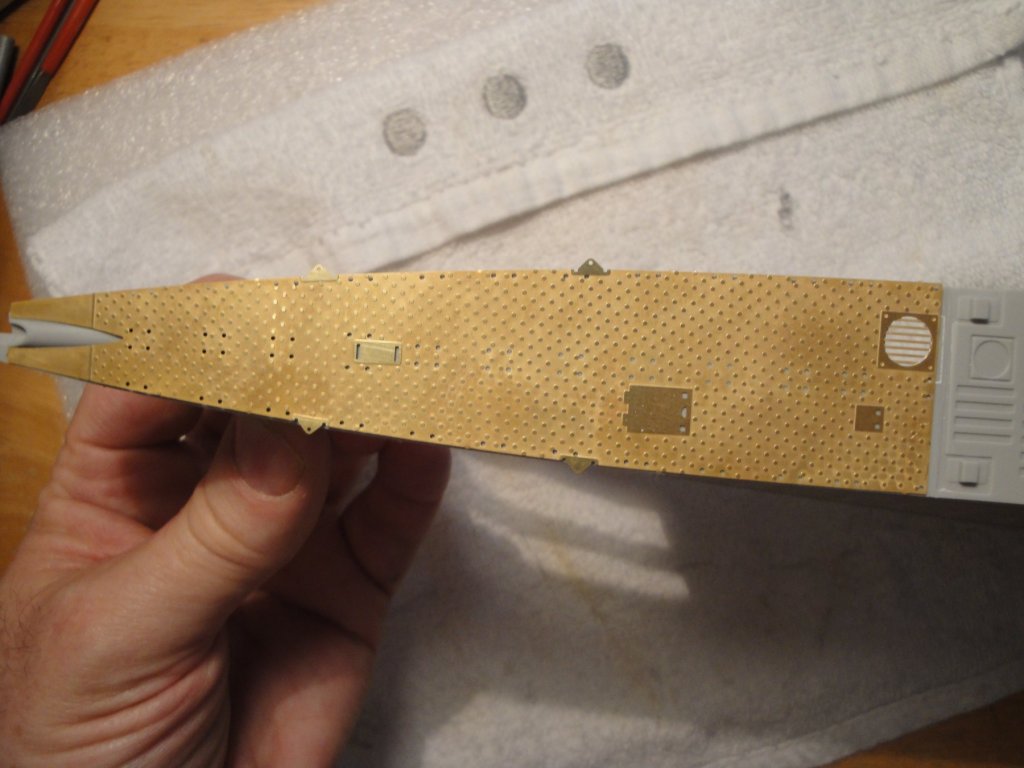
Working on the torpedoes doors and the bow. Before as provided by the kit: I just acquired a Dremel 4300 with a flexible cable extension and a few bits. I wonder why I waited so long to own one. It is such a fantastic tool. I am trying to remove some of the plastic to allow the insertion of the PE. Very tedious and delicate work. The Trumpeter plastic is very thick and robust. It will definitely require some putty, but not too much. Now, to install the framing of the torpedoes doors. This is a supplement PE set provided by RCSUBZ: From there, I have been thinking about how I will be presenting the model. The top door will be open and a torpedo will be pushed out of the tube. The lower tube will be also open but the inner door will be closed, showing the internal arrangement: It is starting to become difficult to see the imperfections of my work. I may have to spray some primer over this area, to figure out what needs to be puttied and sanded. Yves


- 760 replies
-
- 14
-
-
I decided to start working on the hull. Port side first. There is an enormous amount of work to make it presentable. There are hundreds of holes and openings to drill and file. I wish the "Trumpeter" would have done these for us. Maybe he should play less Trumpet and complete his casting work. Anyway, I am working from the bow to the stern, little by little: I wish to give the hull a slightly beaten up appearance with some oil canning. I started scraping each panel with a round X-Acto blade. We'll see how this goes. I have never done anything of that nature yet. The bridge is a daunting task as well. I filed the bow deck and drilled a large hole for one of the vent. I thought about it twice before butchering a kit of that magnitude.... and finally went for it. This is just the beginning as far as butchering the hull, as we will see later on: The Photo-etched parts from RCSUBZ fit perfectly: Next, I will concentrate on the front torpedo doors, which is a puzzle in itself. Yves

- 760 replies
-
- 14
-
-
Allons Christian, ne soyez pas si fataliste. Vous faites de superbes maquettes, dignes d'etre presentees dans un museum local ou le hall de votre mairie. Il serait dommage et regrettable pour la communaute des maquettistes, que vous mourriez. For the missing part, I would contact Model Shipways. They are usually responsive. Of course, the fastest will be to build it yourself. Yves
-
Valeriy, You are not painting the hull before gluing the deck planks? It seems to me that it is going to be a daunting task to mask all the decks. Yves
-
A final picture for this module, inserted into the main hull: I still have a couple of details to finish: The Pressure hull under the front planes link, some weathering and a couple of details inside the torpedoes room, to make it even more realistic. Most likely my next efforts will be directed towards the hull. It is a big piece, to say the least. I hope you have enjoyed the building of the first part of that enormous kit. Yves

- 760 replies
-
- 15
-
-
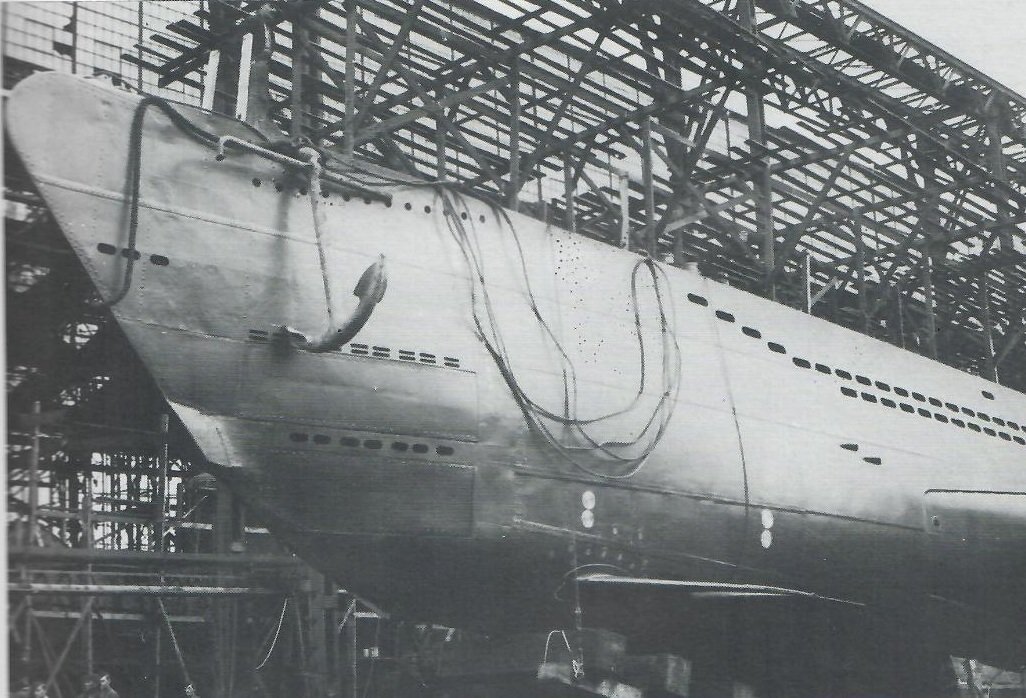
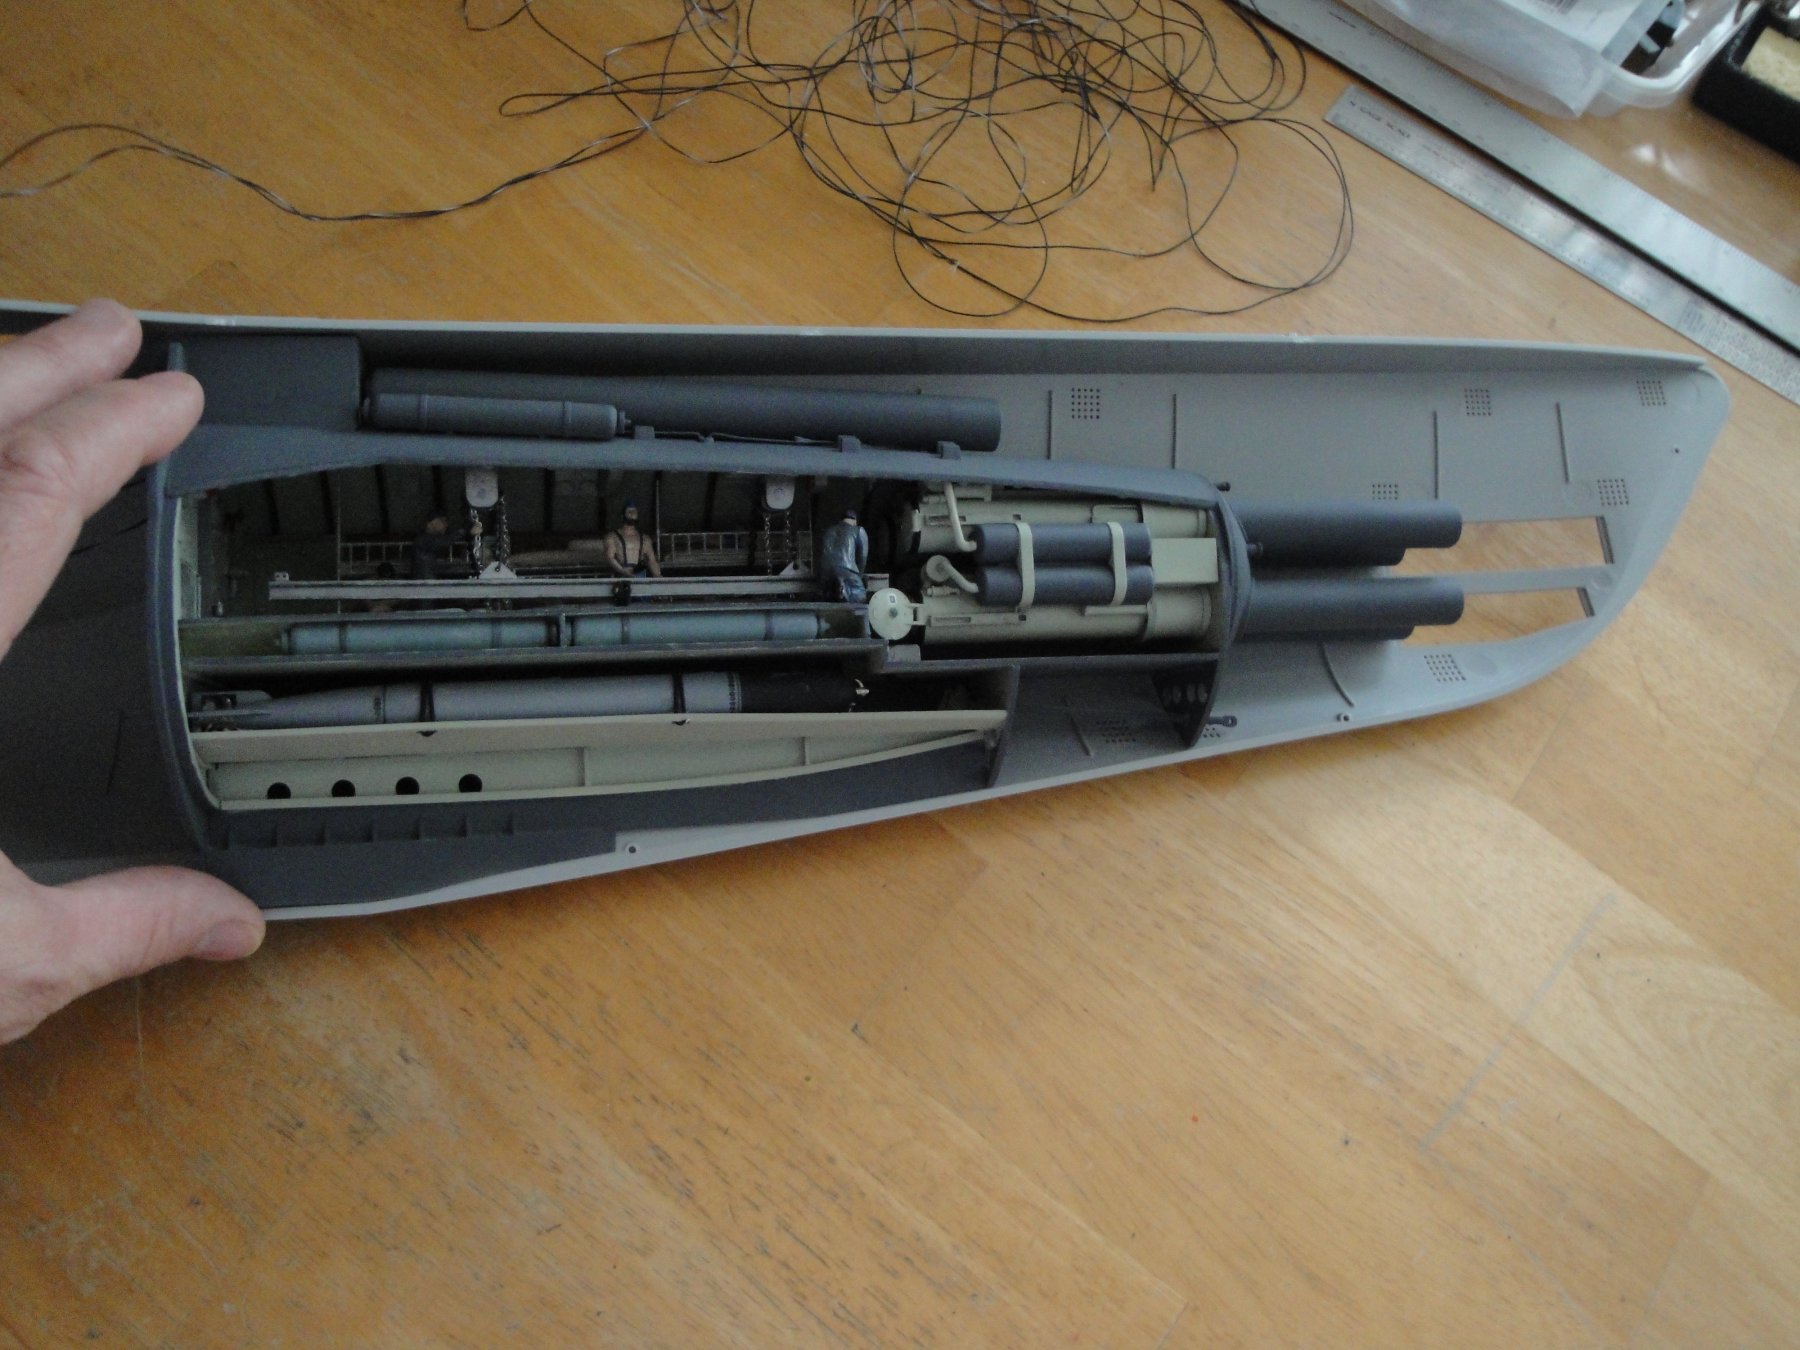
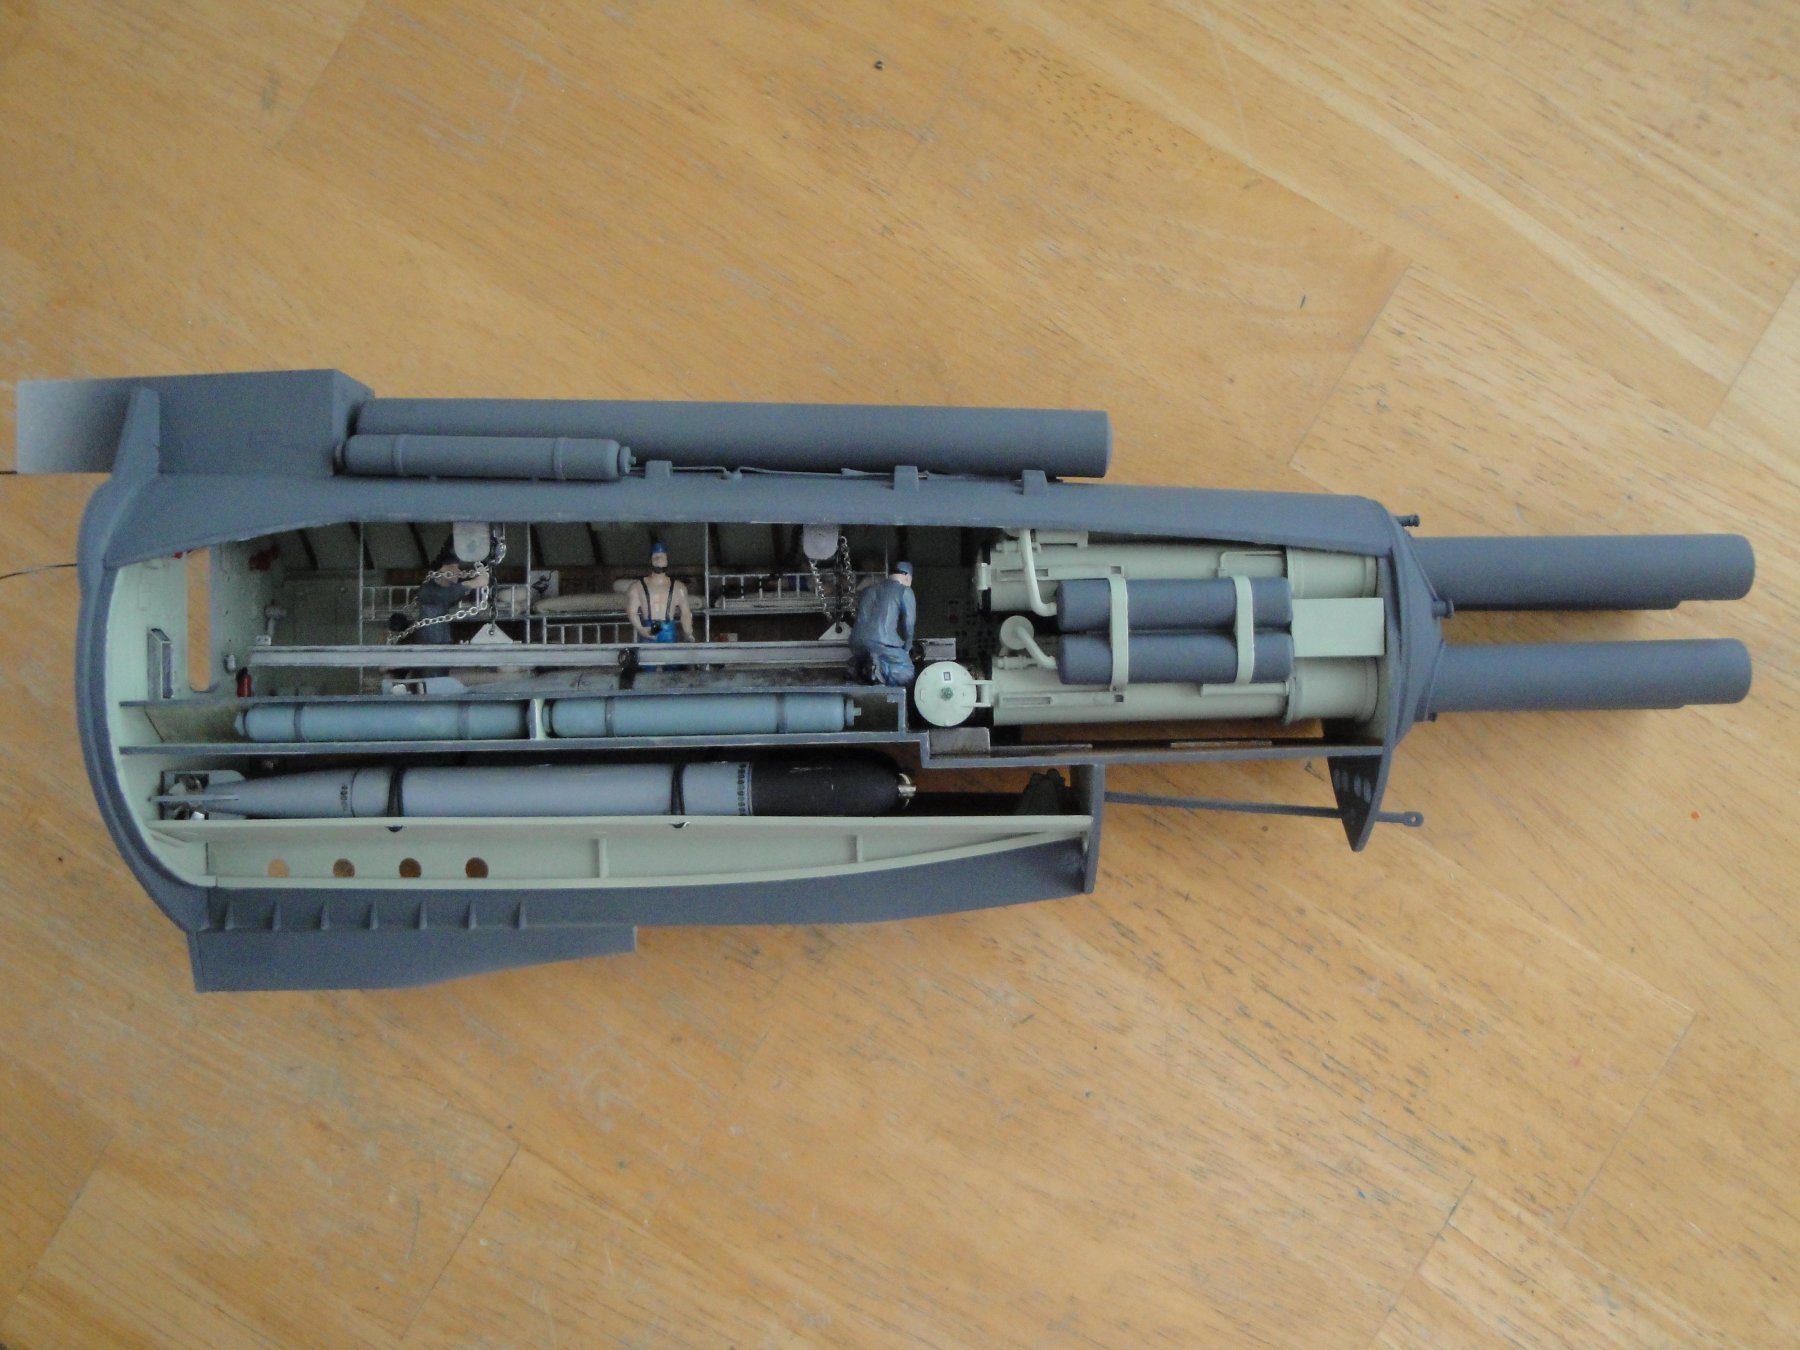
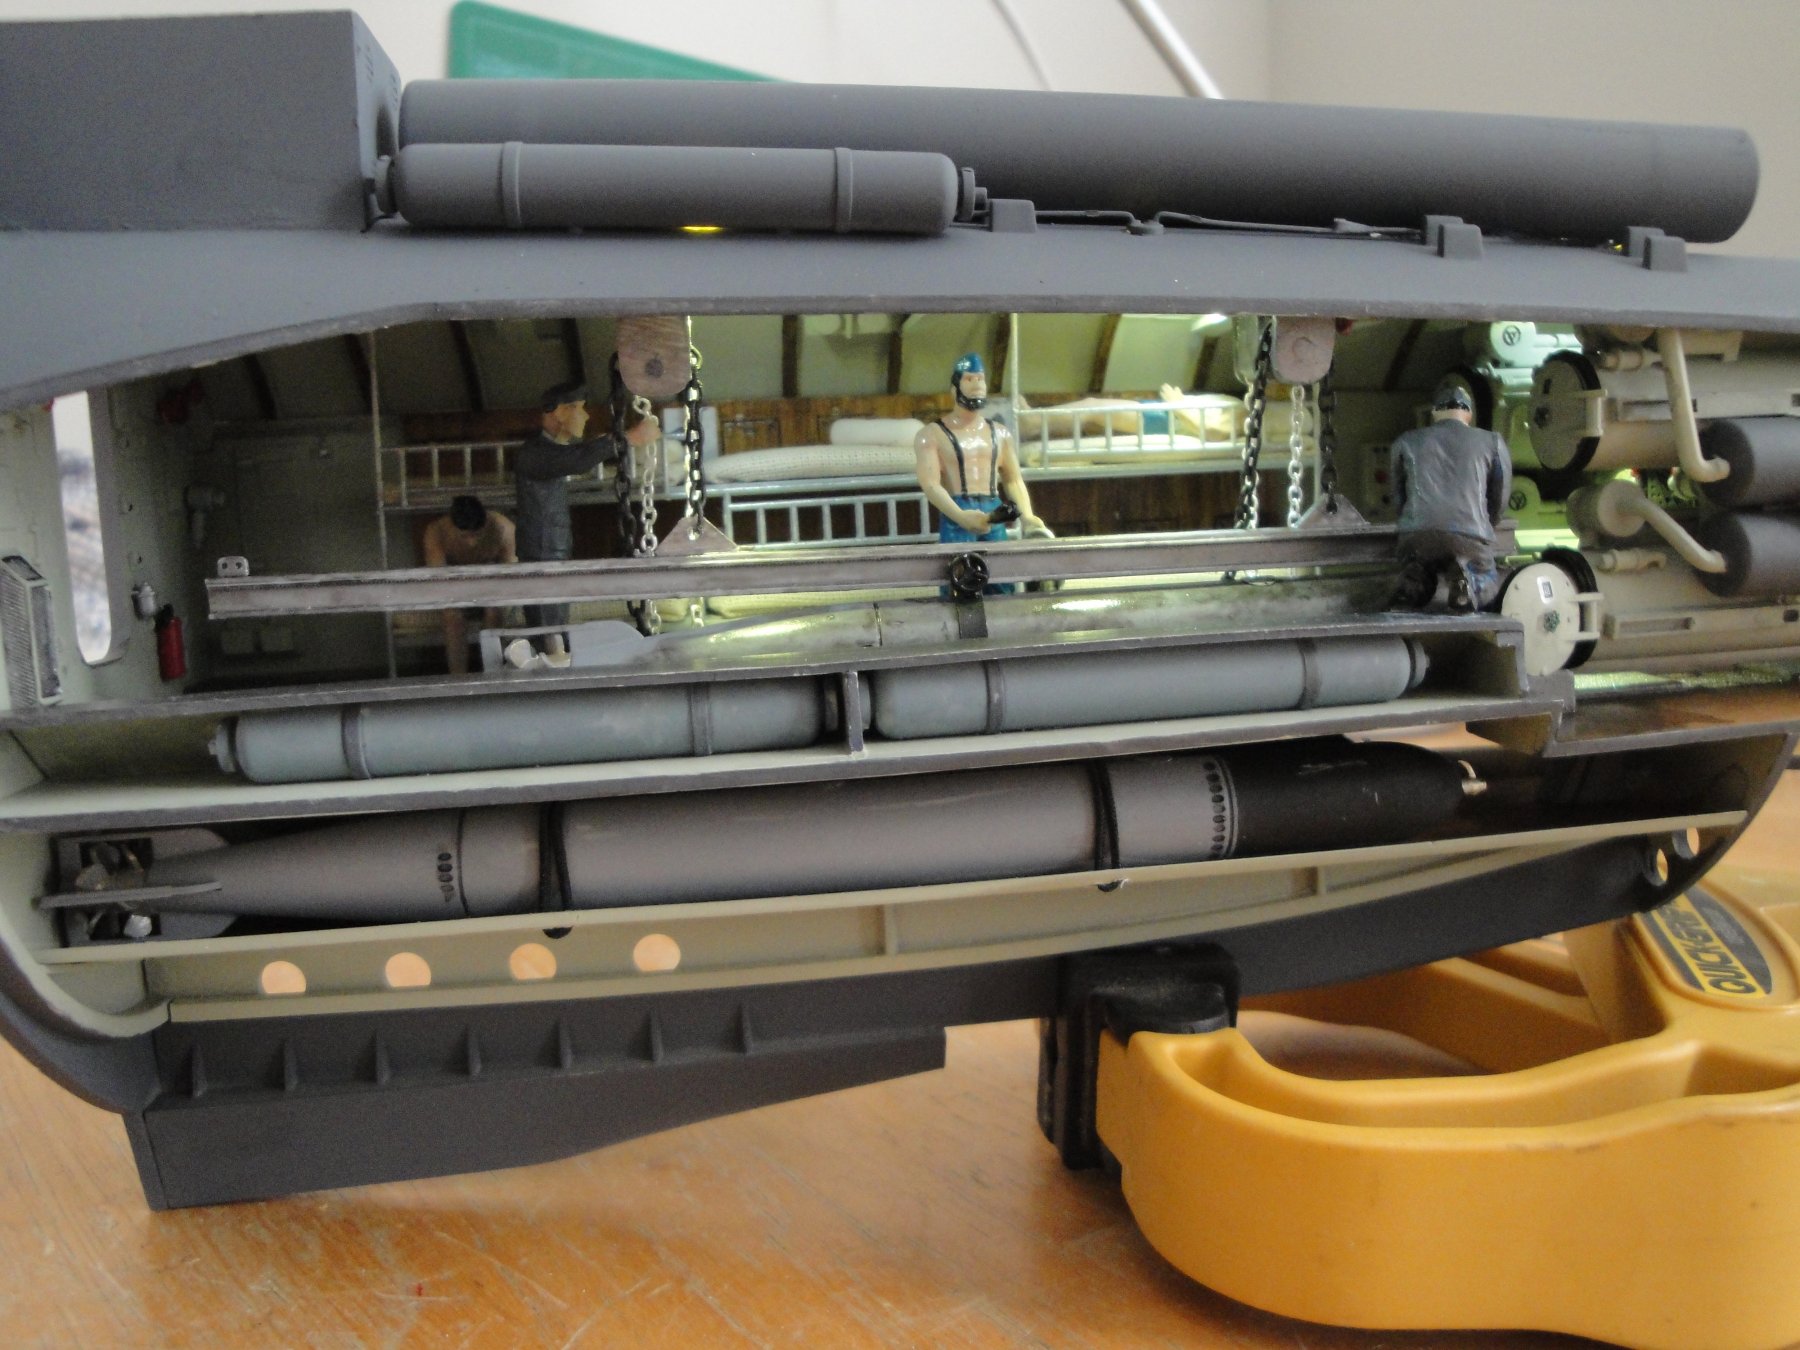
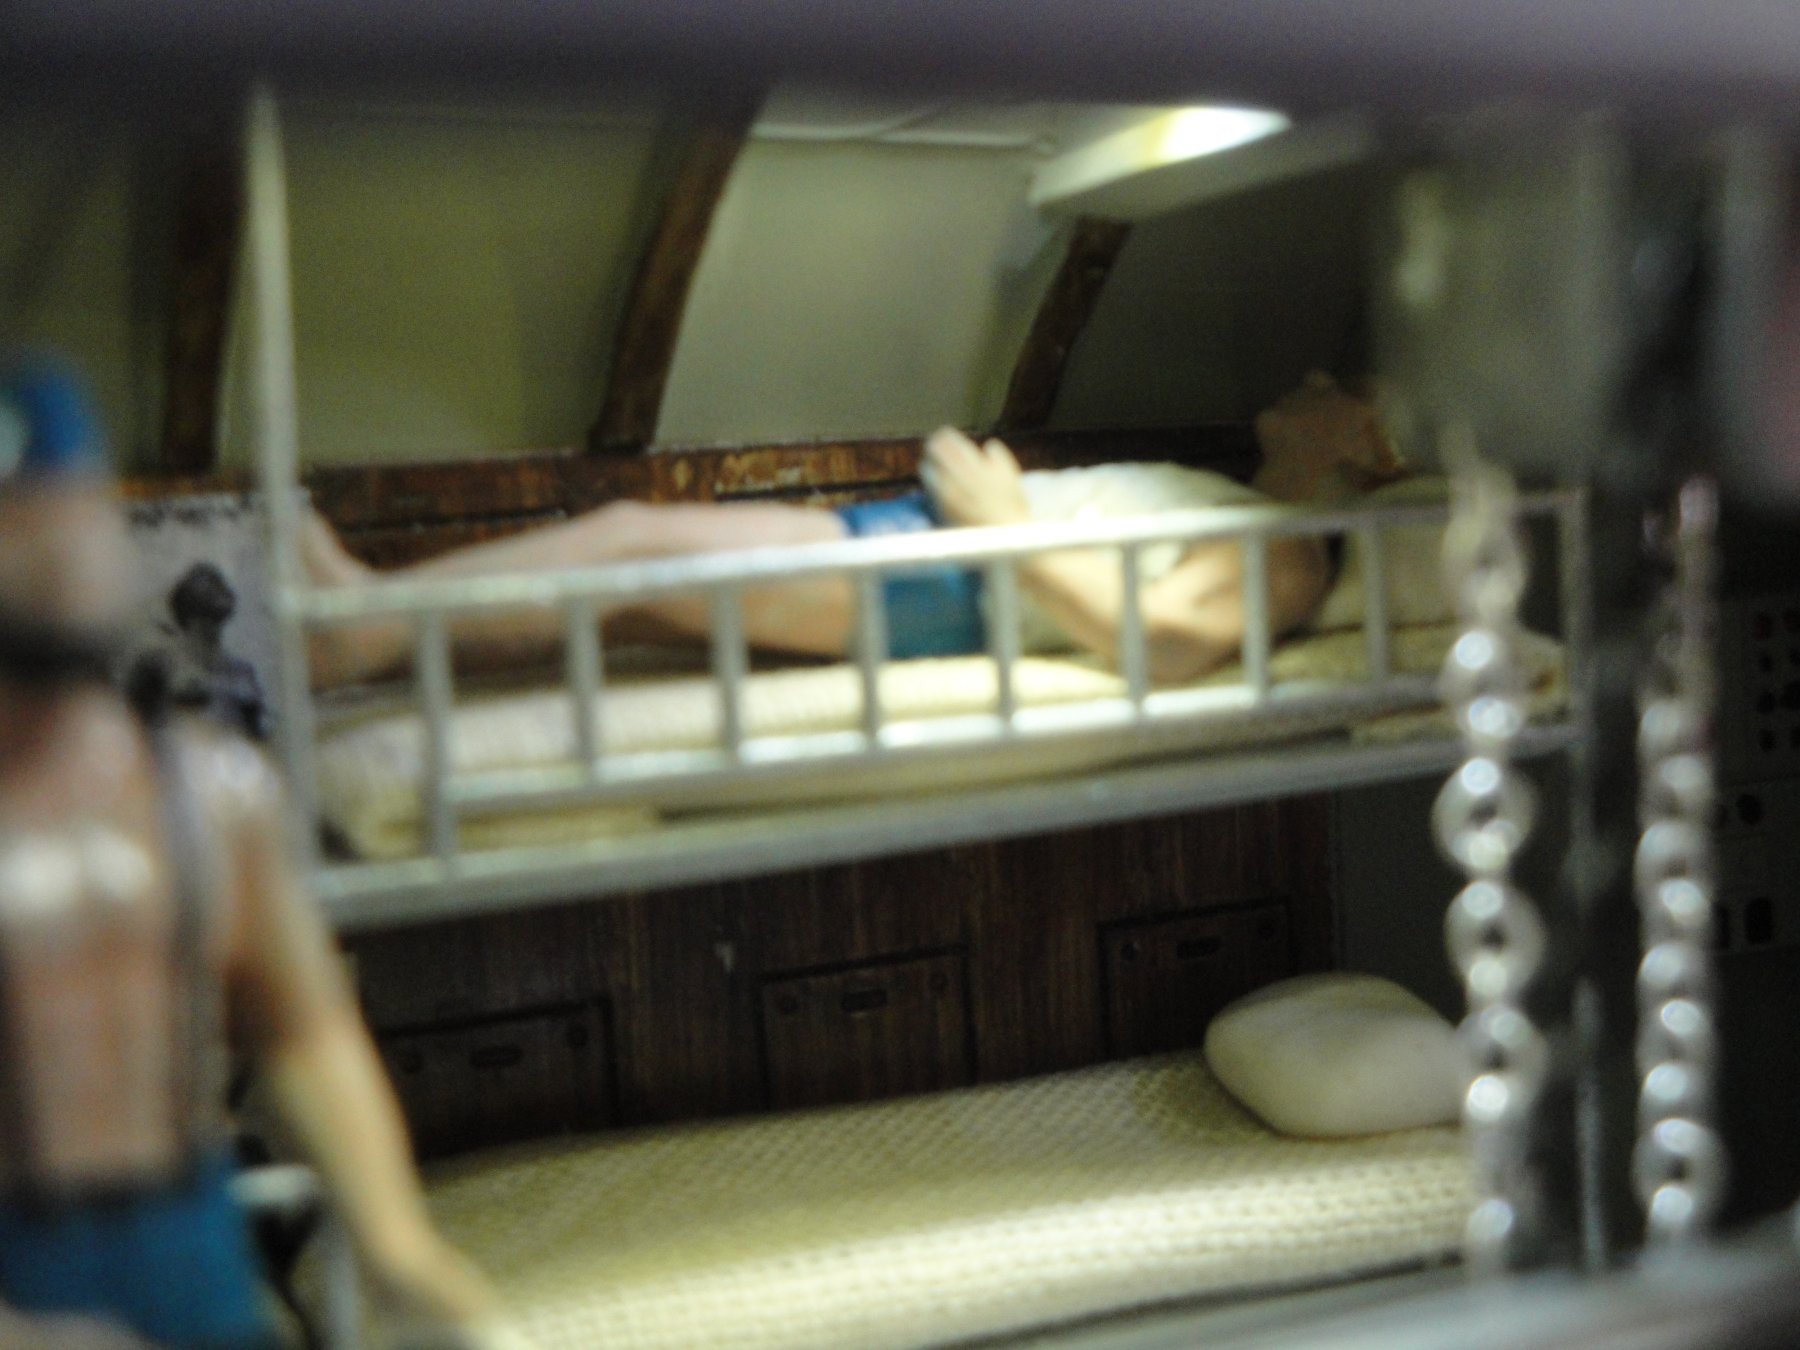
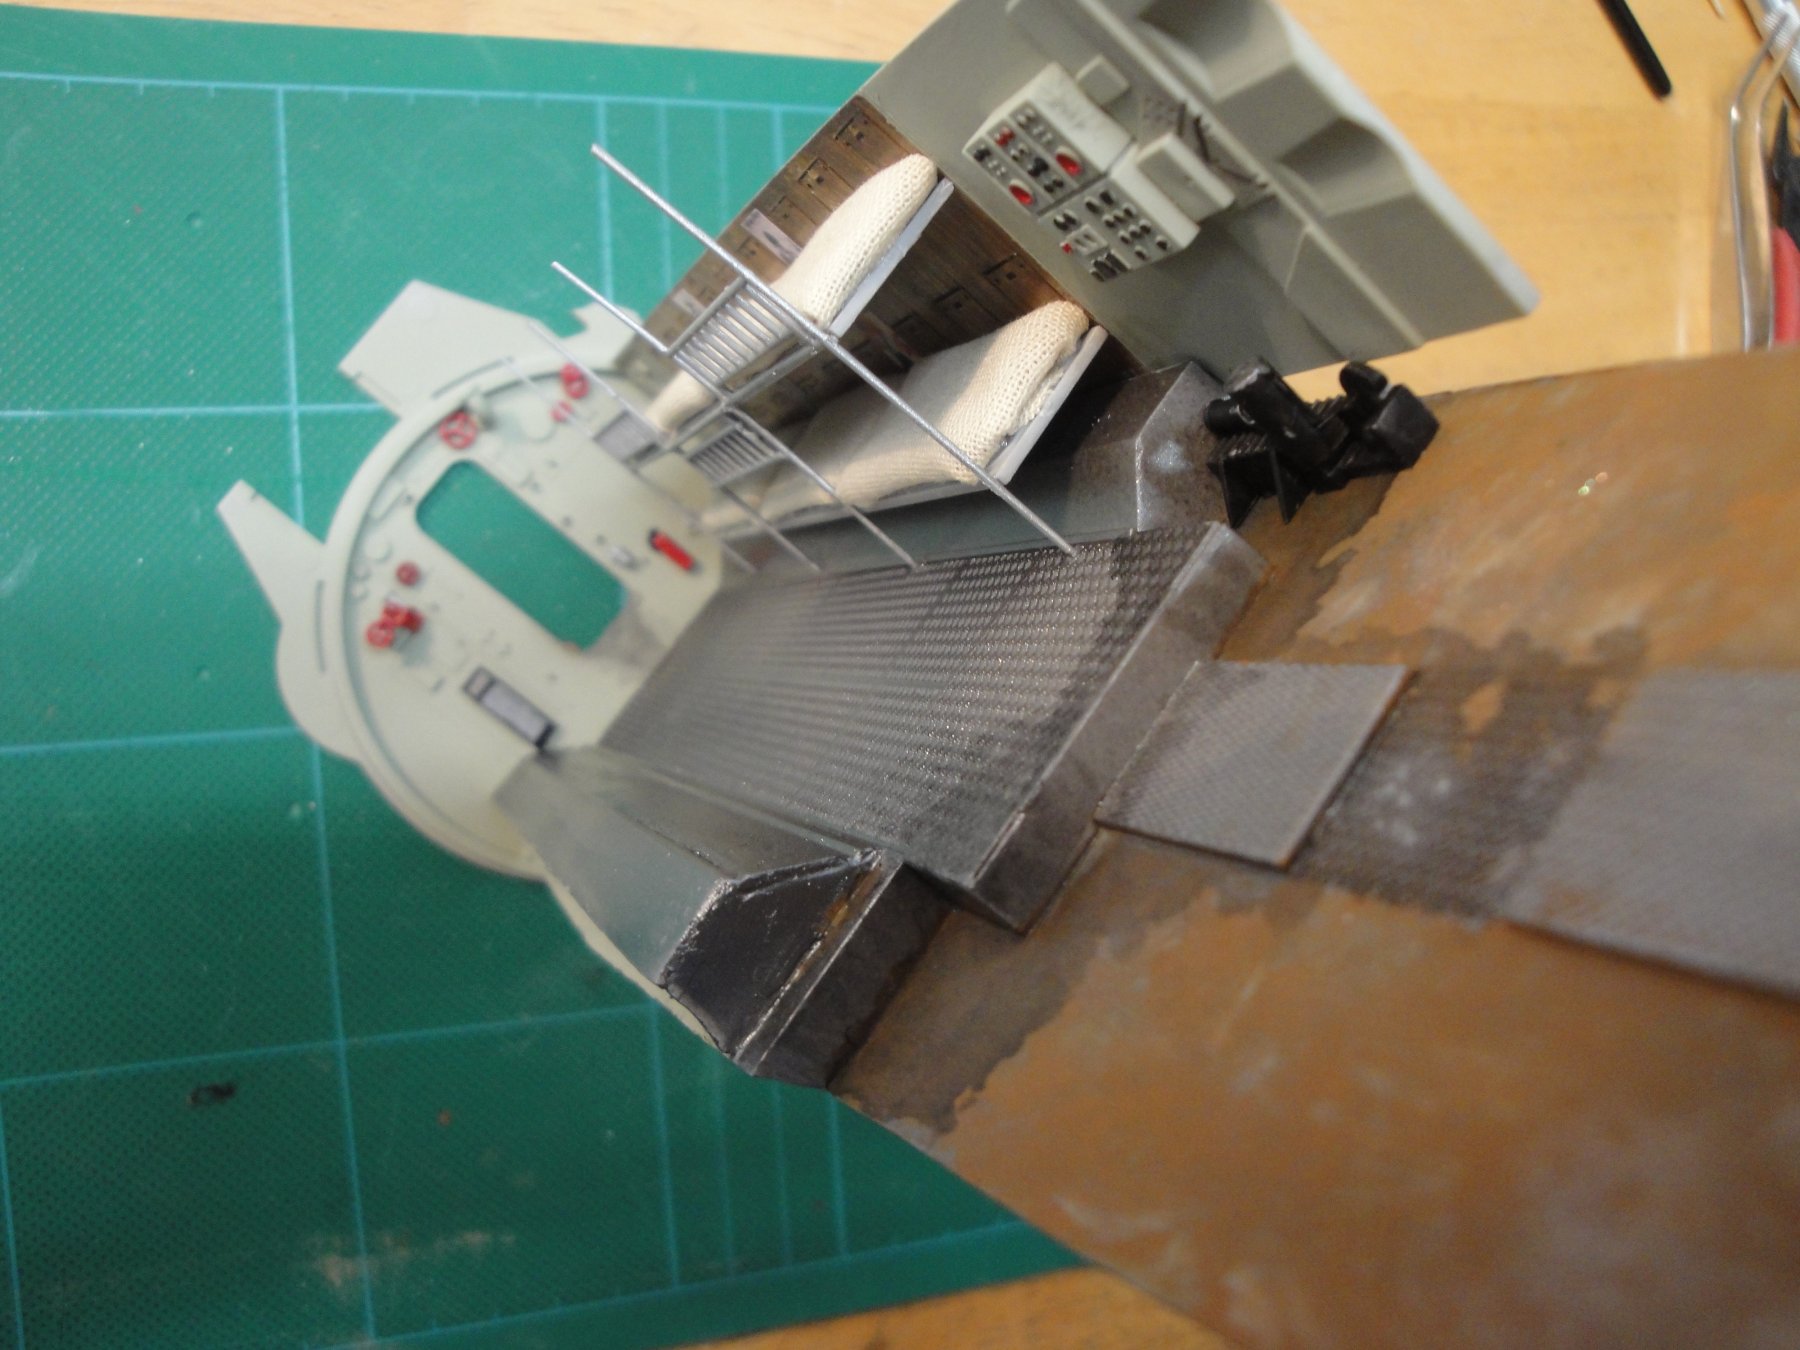
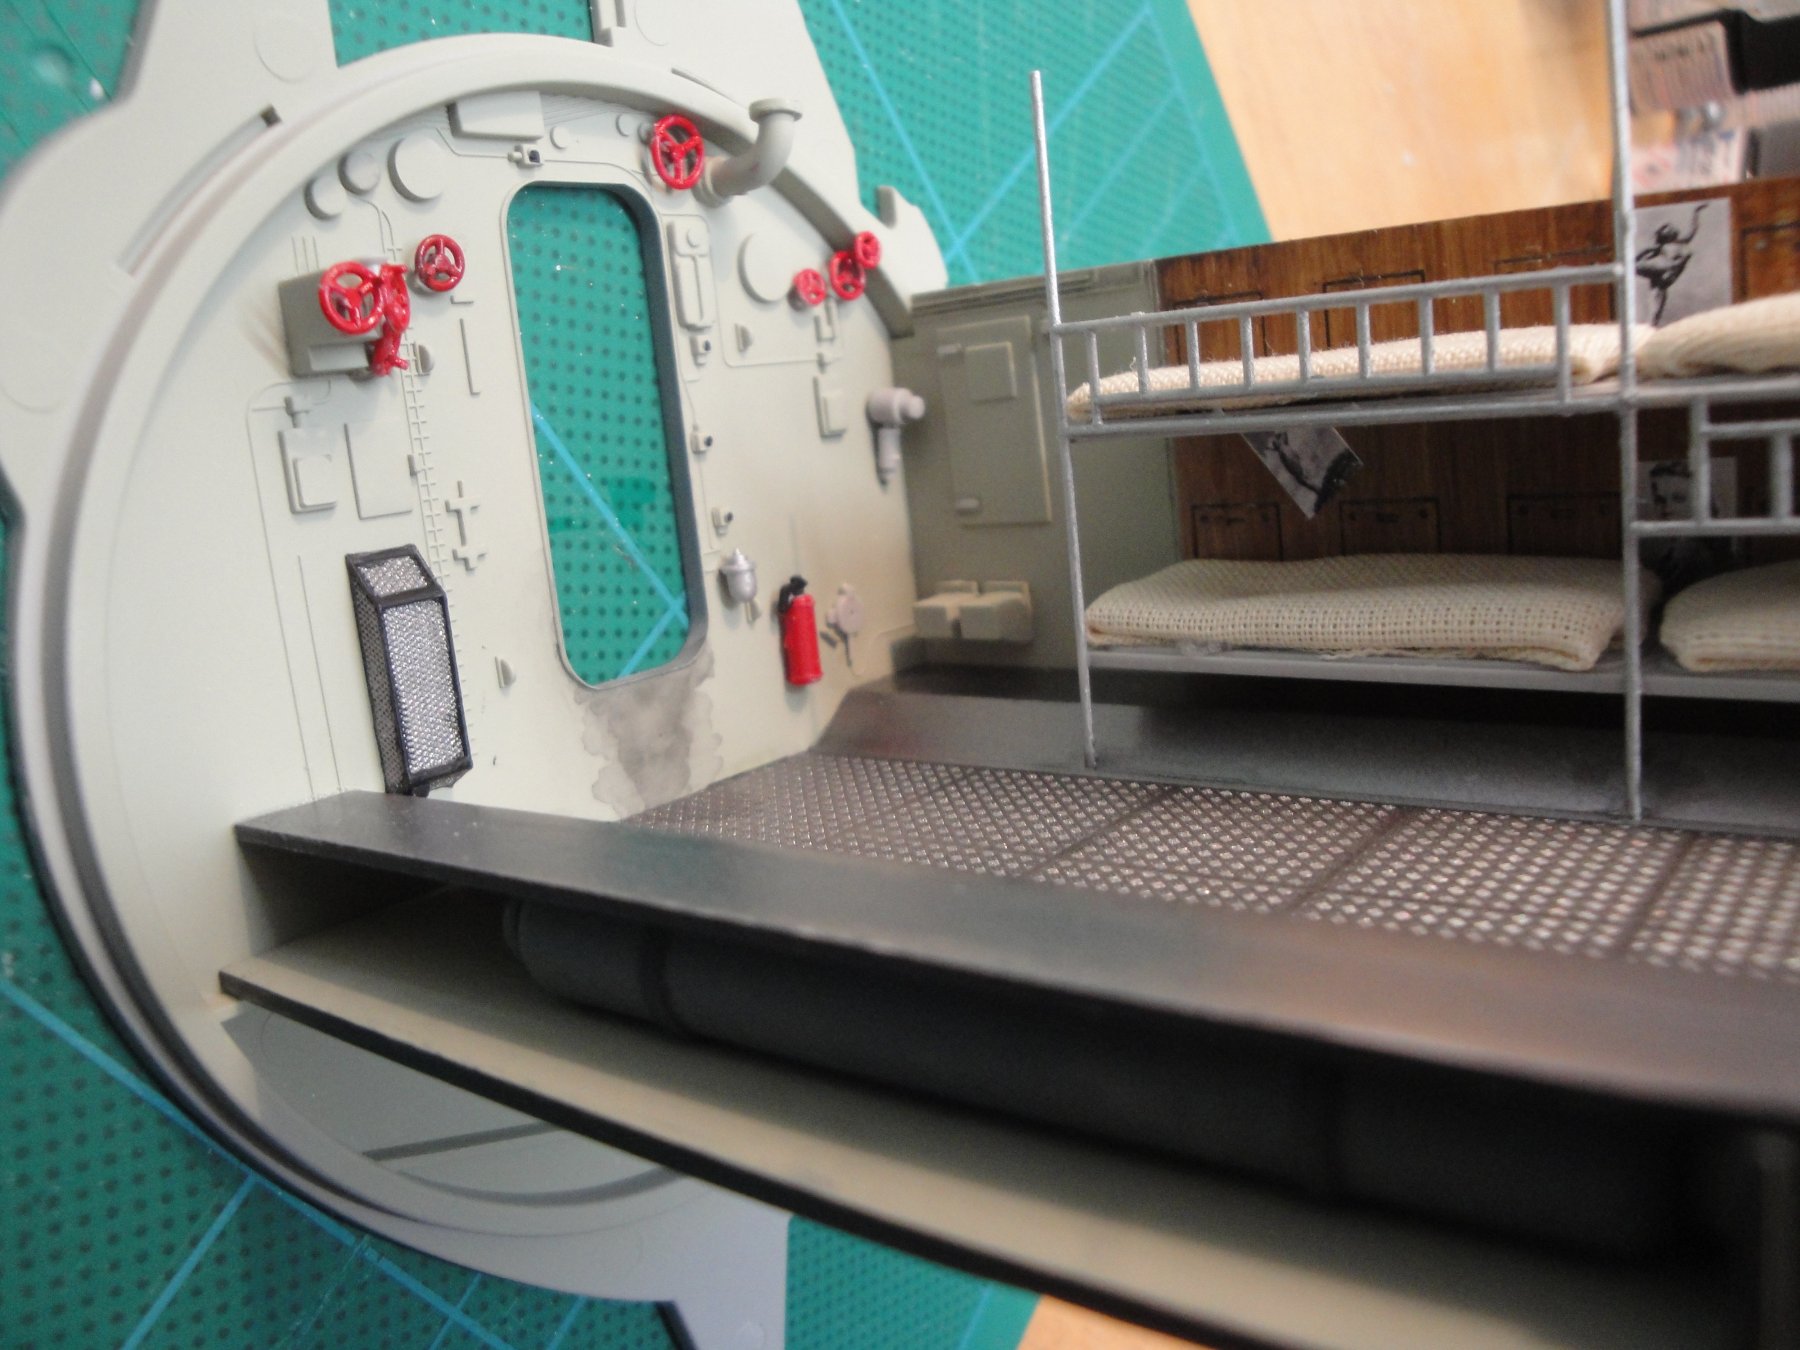
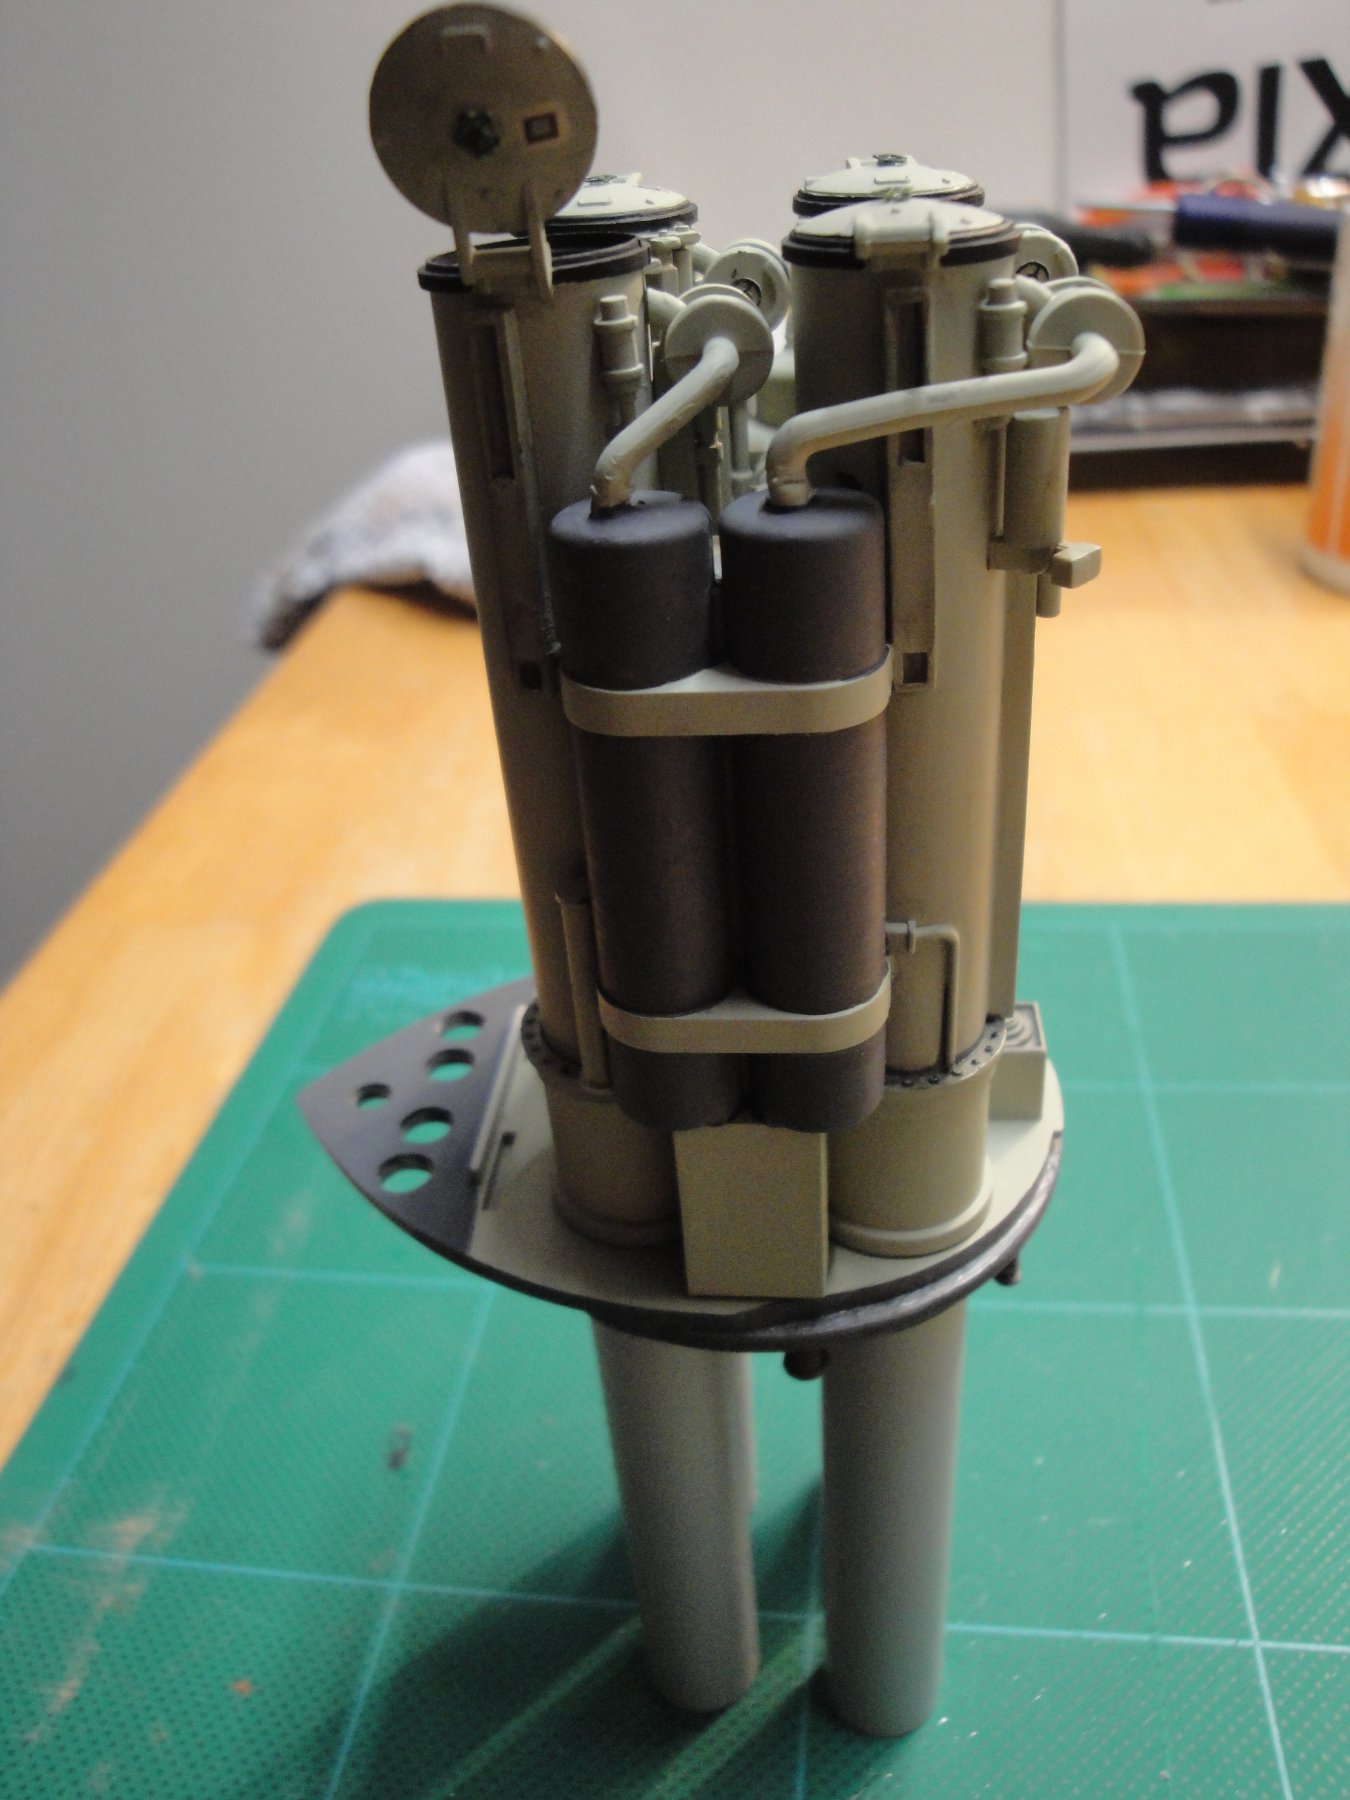
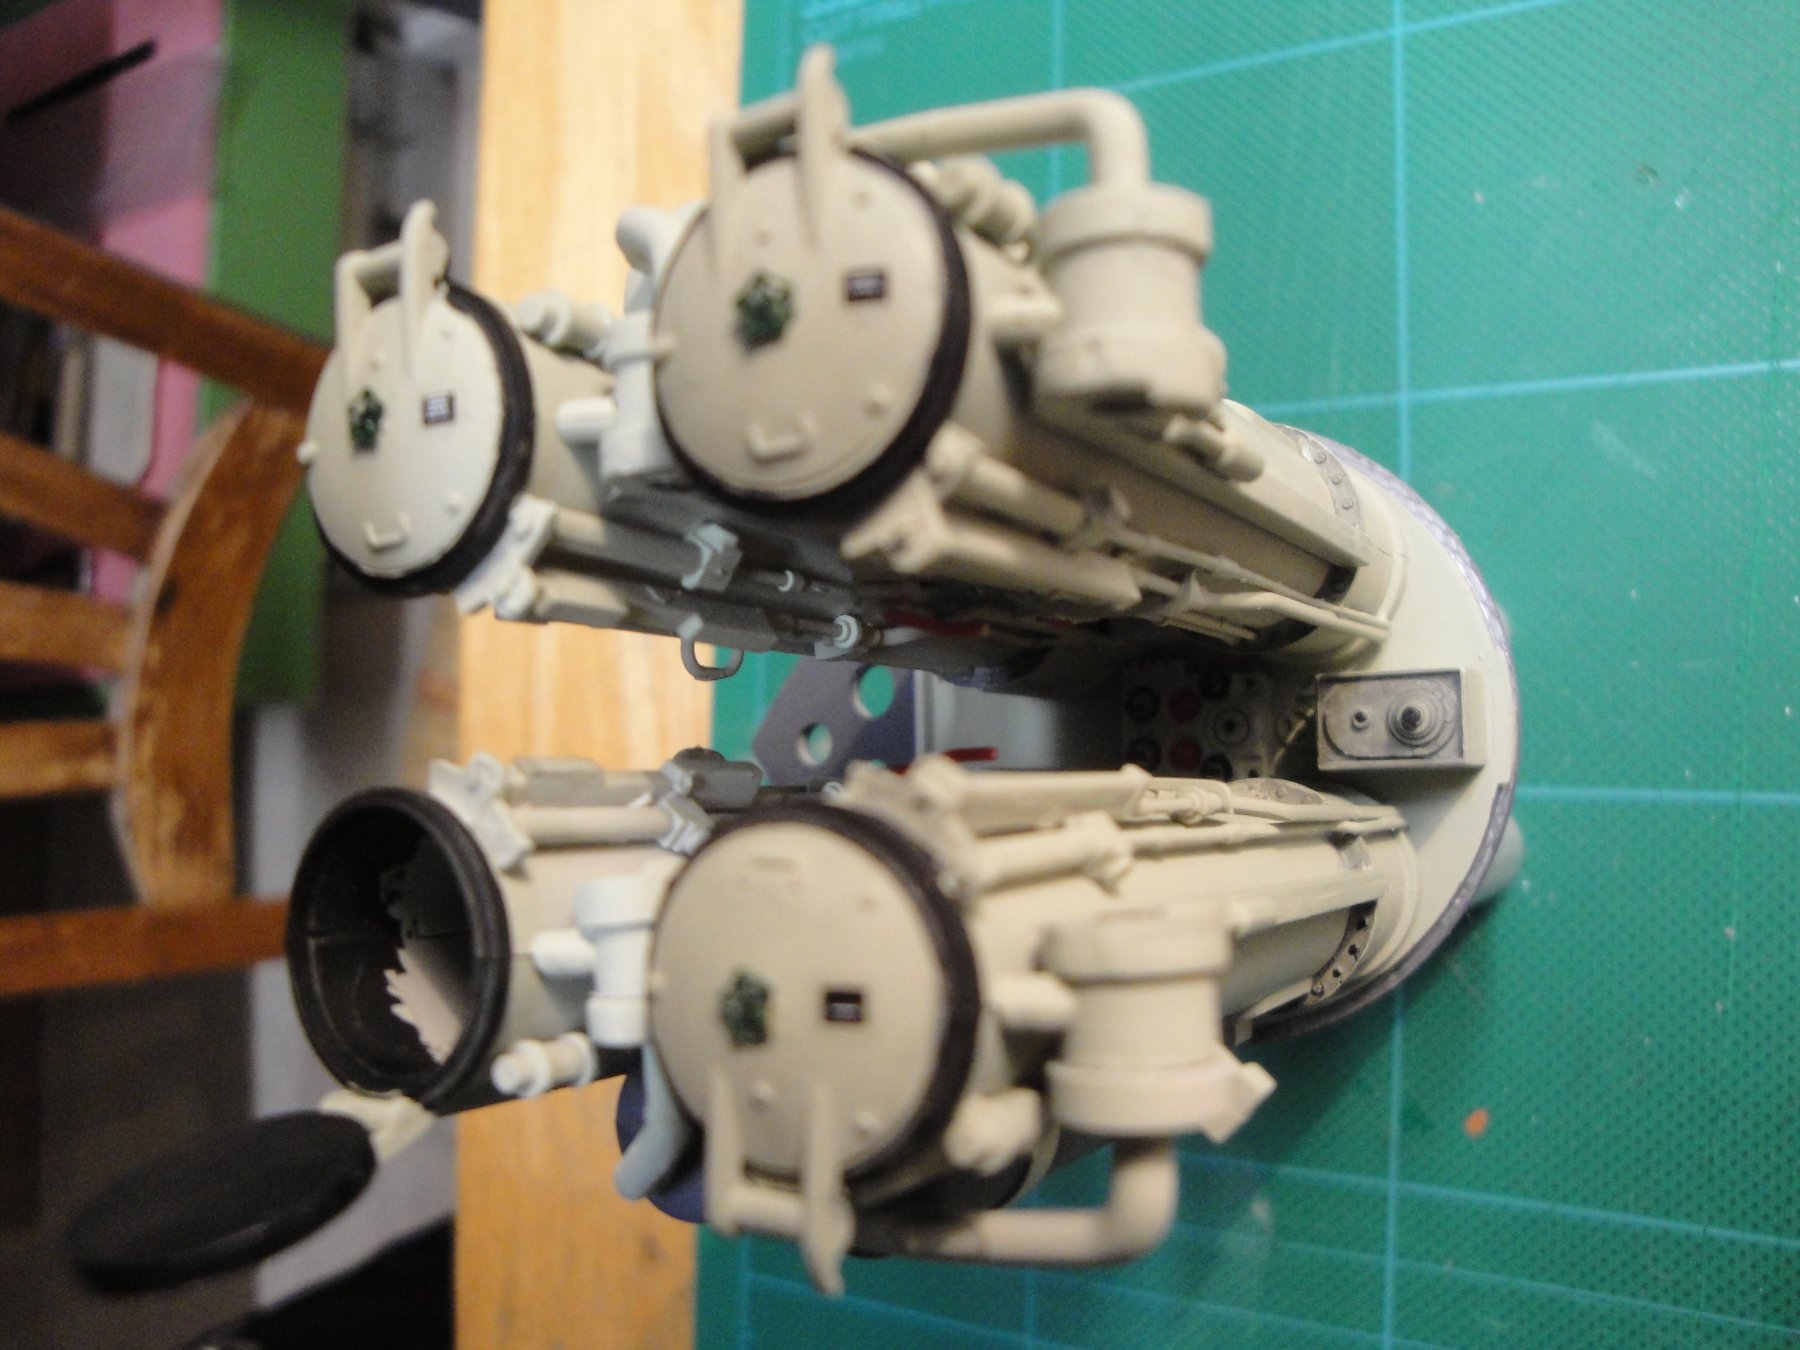
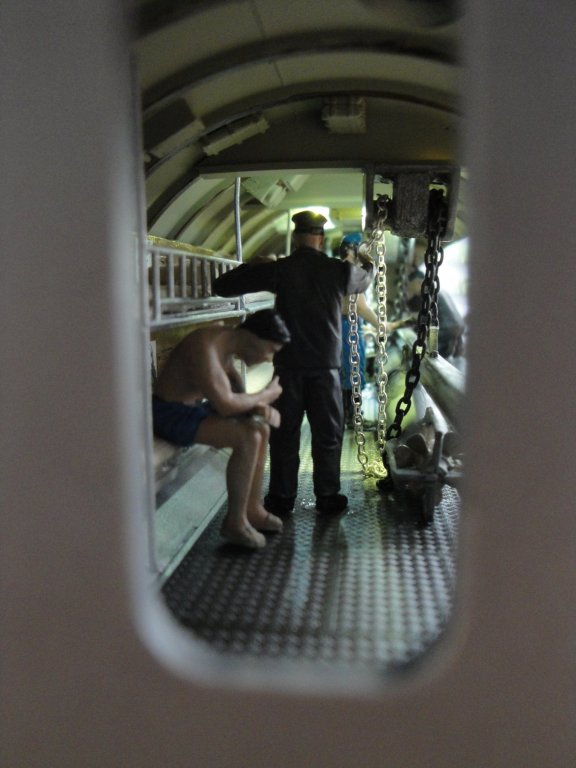
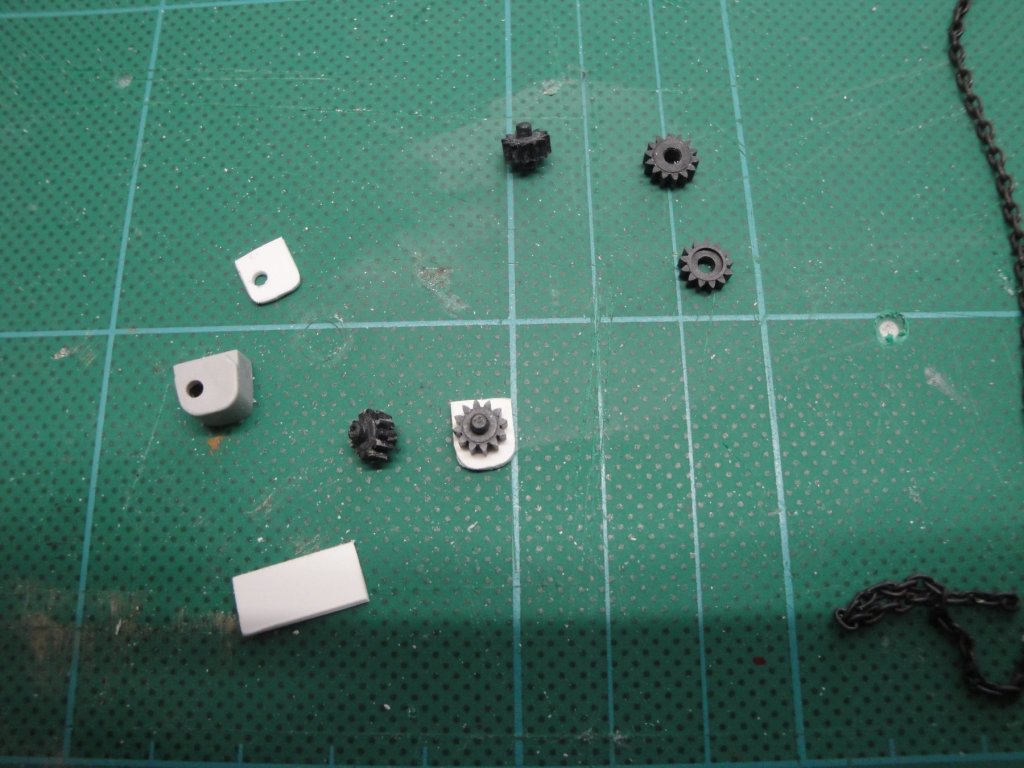
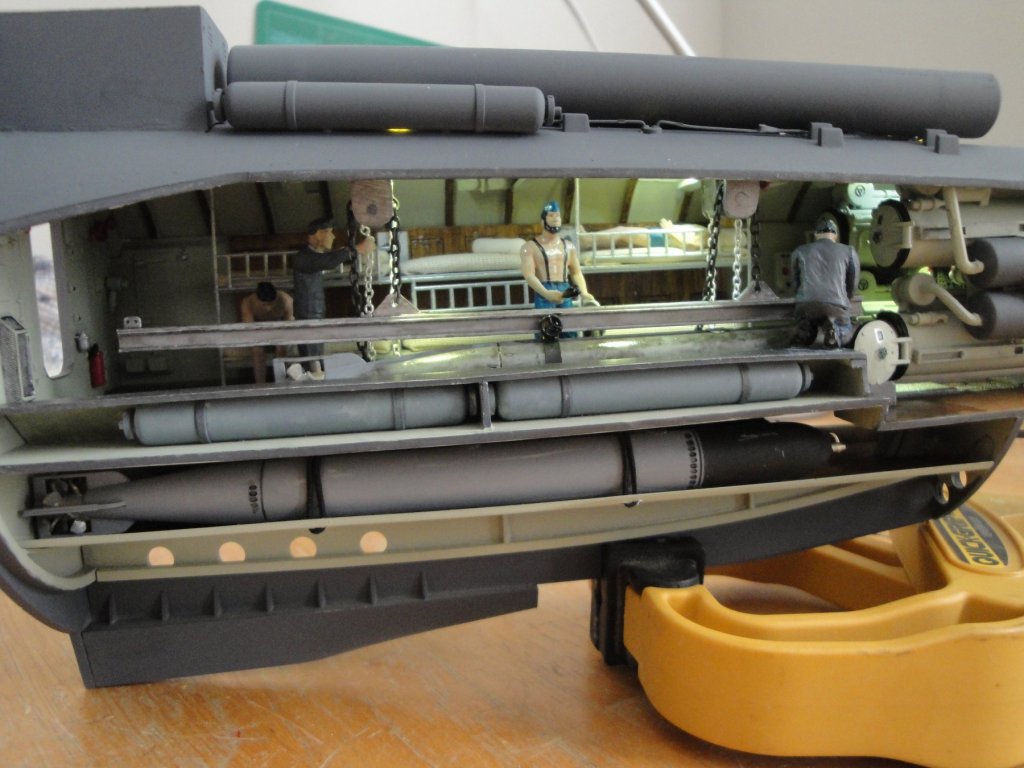
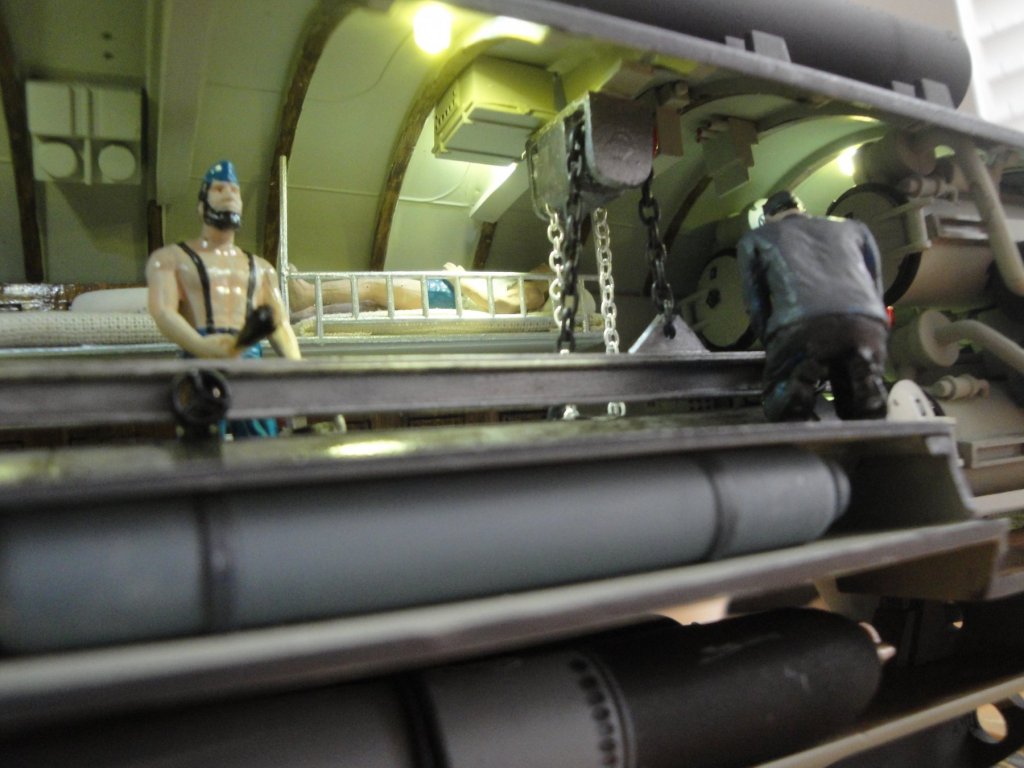
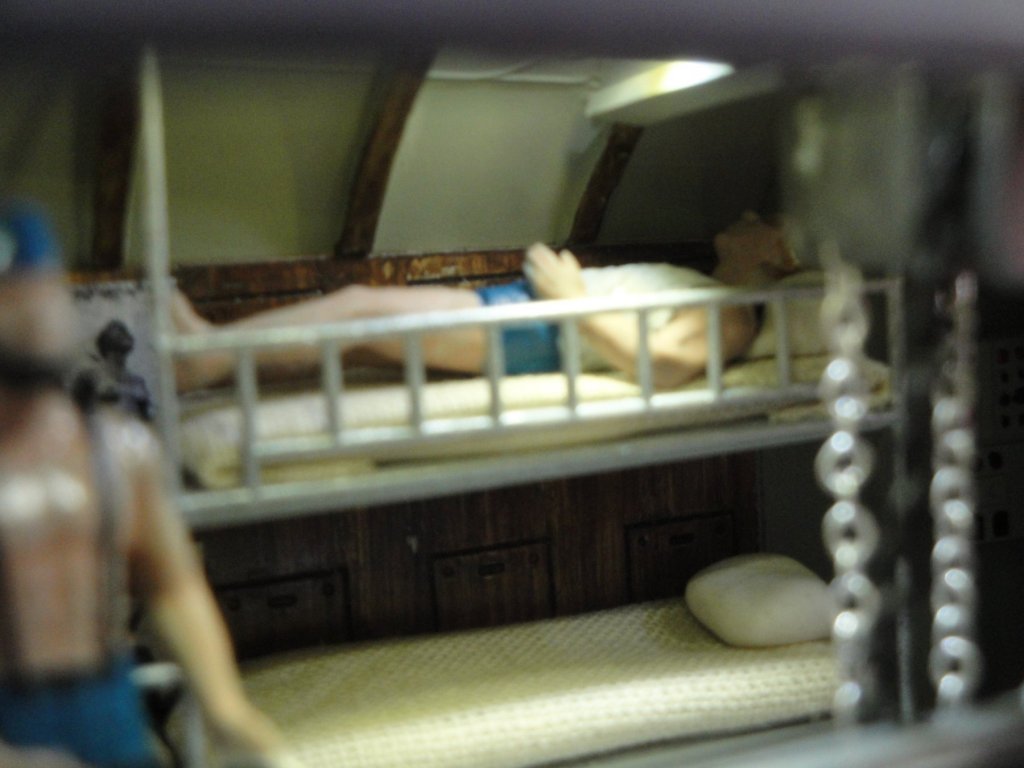
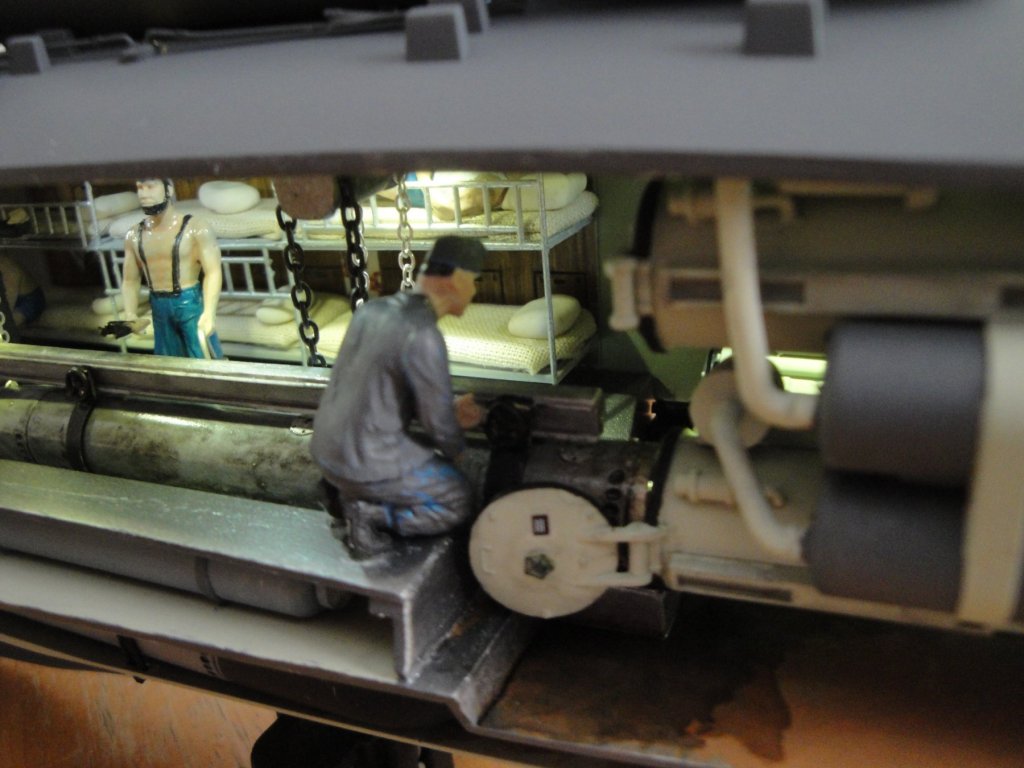
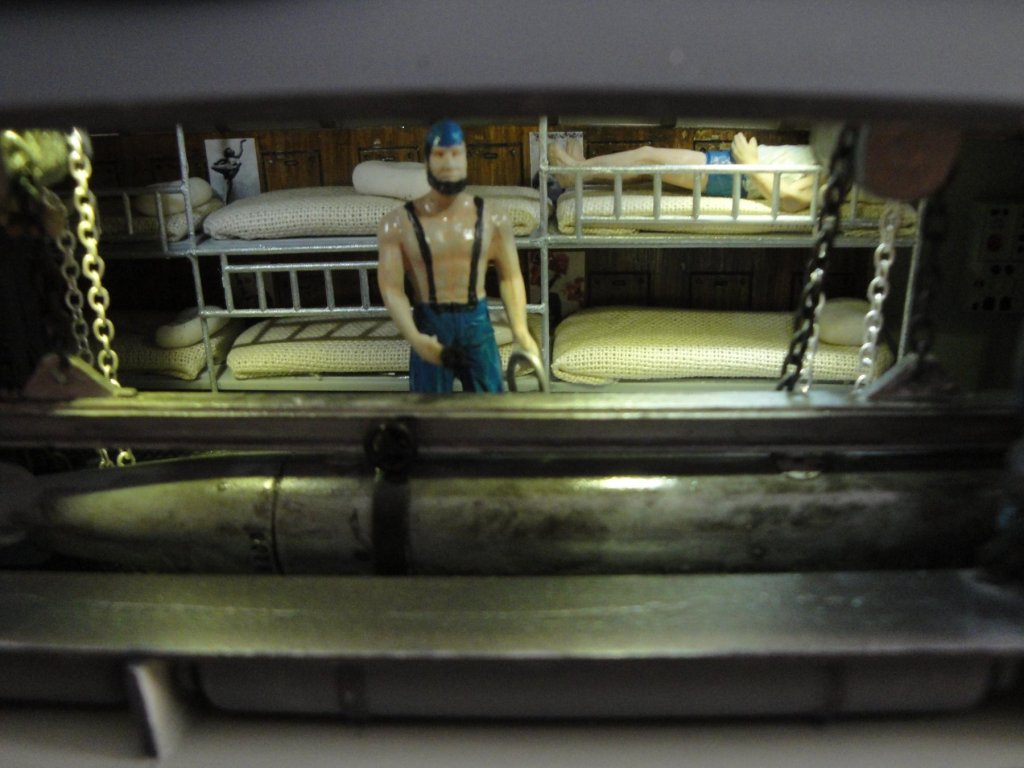
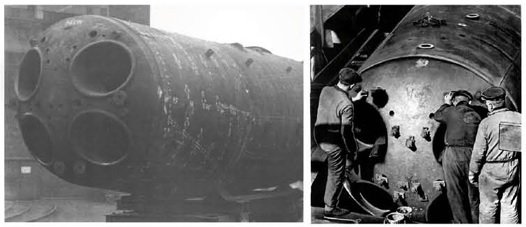
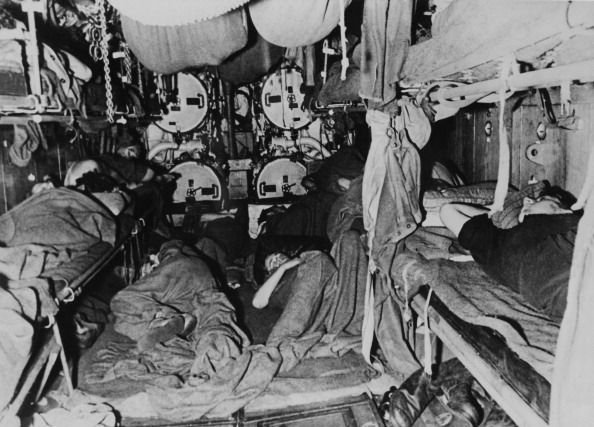
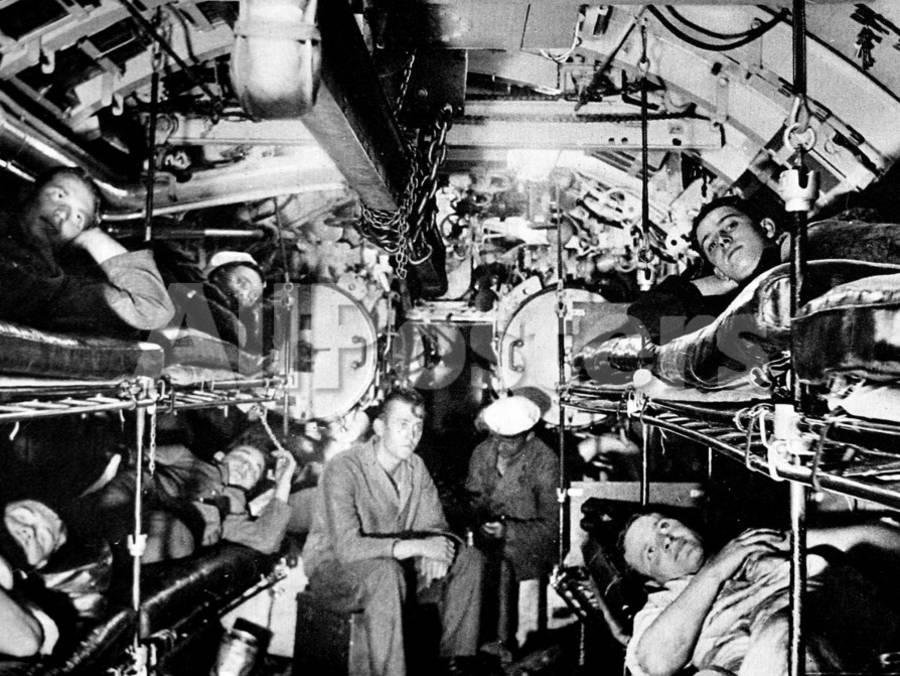
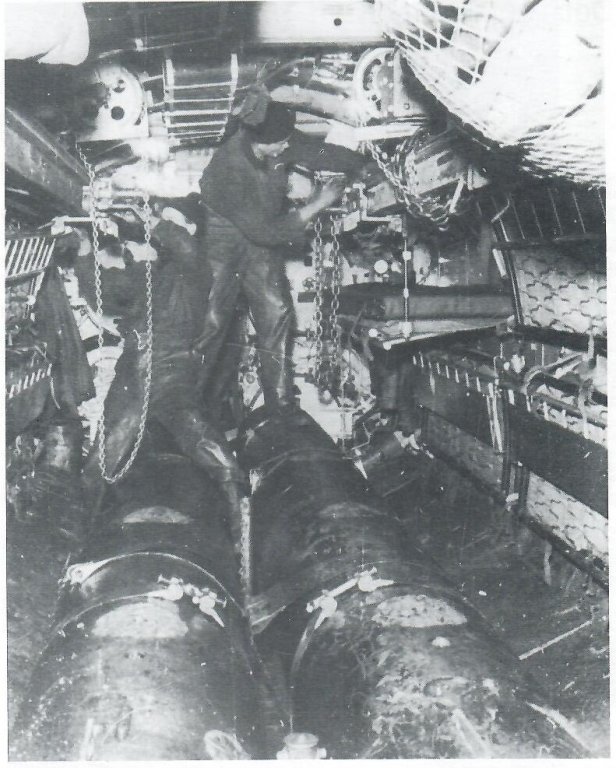
The front torpedoes room module is pretty much completed. I just have to attach the structure for the anchor windlass and build a simulacrum of pressure hull, under the front control link to the bow planes. Most likely this will be visible through the louvers of the main hull. This a big module and most likely the biggest in the assembly. I finally got rid of 3 sprues out of 29 !!!! Yeah. The 3D printed front bulkhead helps a lot in making the kit more realistic and prototypical: The protruding outlets are used for the control of the tube external doors. I will see what I can re-create when the module gets inserted into the hull. If you are building this kit, I strongly encourage you to purchase that 3D printed bulkhead. It is unfortunate that the rear bulkhead is not available. I probably will have to fabricate one, when the time comes. Below is the top of the module, with its air tank (right) and main storage tube for extra torpedoes or other things. All this will be slightly visible through the deck openings. I realize I forgot to add the watertight door to the storage area. Pictures help reveal mistakes or mishaps. Below are a few shots of the inside of the compartment, showing its intricacies and extremely tight arrangement: The "Trumpeter" only provides one winch to lift the torpedoes, whereas two (at least) are necessary. I had to build another one, using spare parts. I also had to rework the original winch which is totally incorrect and incomplete as provided in the kit. These winches use a closed loop chain for the control by the hands and a beefier open chain to lift the rail carrying the torpedo. Two little brass straps have been added to brace and lift the torpedoes. The longitudinal movement of the torpedo is done by the two sliders mounted on the rail. Each slider is connected to one brace and moved on the rail, using the small hand wheel (the rail has a geared column on the upper side) This system allows a close approach of the tube opening and a slow and careful insertion of the eel in the tube. Note that eels were always installed with their fins in a vertical position and the plates facing upward, for the final settings. As indicated before, a piston was pushing the eel outside of the tube, once the water pressures had been equalized. The grease was used to prevent the torpedo from being stuck inside the tube and to help its penetration of the water (drag reduction). To give a little bit more action, I decided to represent the loading of a torpedo in the lower tube. One man is busy watching and controlling the insertion of the torpedo into the tube, while his bearded (and sweaty) companion is lathing the marine missile with heavy grease and oil. A third lad, probably a petty officer, is in charge of controlling the rear winch. One sailor tries to sleep, while another one just woke up, disturbed by the maneuver. The original torpedo room had 24 people in it (12 sleeping or trying to and 12 working). A real nightmare of promiscuity and claustrophobia. Below is an extremely rare picture of the front of the pressure hull, showing the characteristic shape of the bulkhead: Finally, some original pictures showing the living conditions of the German sailors: Out of 40,000 underwater sailors, less than 10,000 survived. A terrible outcome, illustrating the absurdity and insanity of wars in general. Yves


- 760 replies
-
- 13
-
-
The YB-35 flew in summer 1946. The Horten flew in March 1944. YB-35 has 4 propellers. Horten has two jet engines located exactly like the B2. Anyway, it does not matter and everybody is entitled to his opinion ☺️ Let's go back to Type VII c submarines. Yves
-
There are many stories of secret techniques, treasures (Gold, art pieces) and other occult artifacts being transported towards the end of WWII, when the Nazis realized that the end was near. For instance, Dr. Mengelle ended up in Argentina (if I am not mistaken) and a lot of his research and discoveries were used by the American Government shortly after the end of the war. Through the Project Paperclip, the American Military-Industrial complex appropriated the best German scientists and discoveries and has been developing and perfecting what the German could not do. Most of these techniques have been hidden from the (American) public for a long time and still are. The Nazis were technologically very advanced and Hitler was versed and obsessed by occultism. An obvious example is the B2 bomber which is an enlargement of the Horten Ho-229 German plane. Yves
-
Surprising to see such a poor fit from Trumpeter. They have a reputation of excellent fitting, usually. Yves
-
Squadron does not have this kit in stock. I had an order with them and they told me it could be months before they get some kits. So, I cancelled and got mine on E-Bay for a better price (despite the 20% off). The good thing is that Micro-Mark has it back in stock, but with a steep price increase. Yves
-
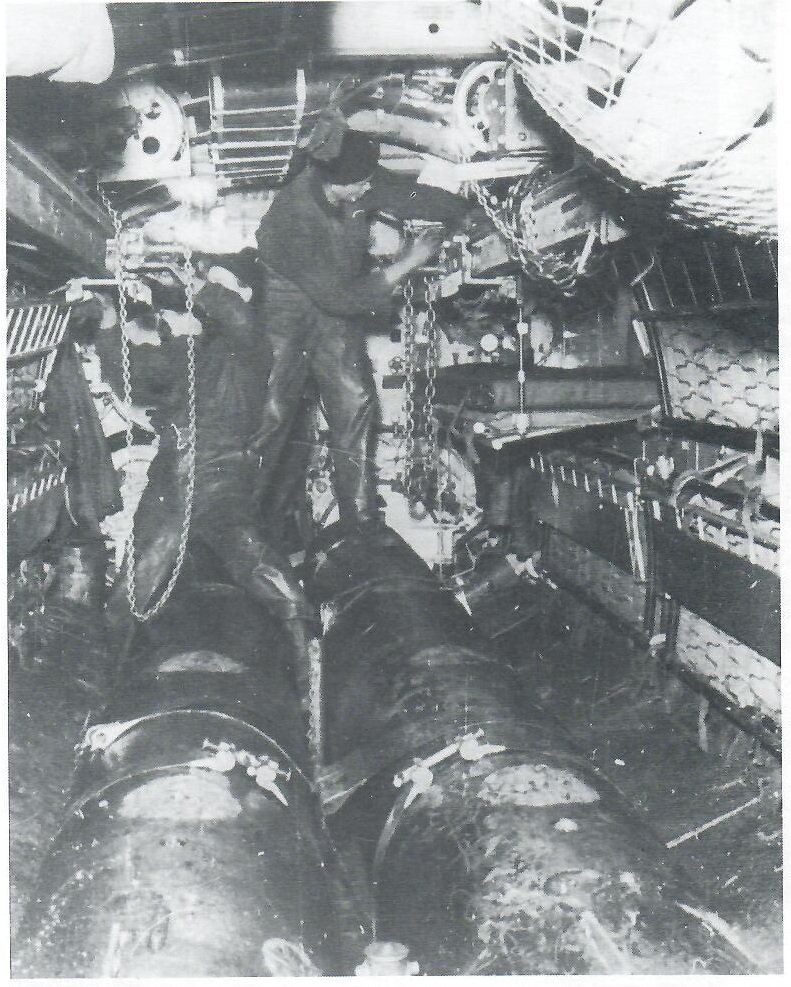
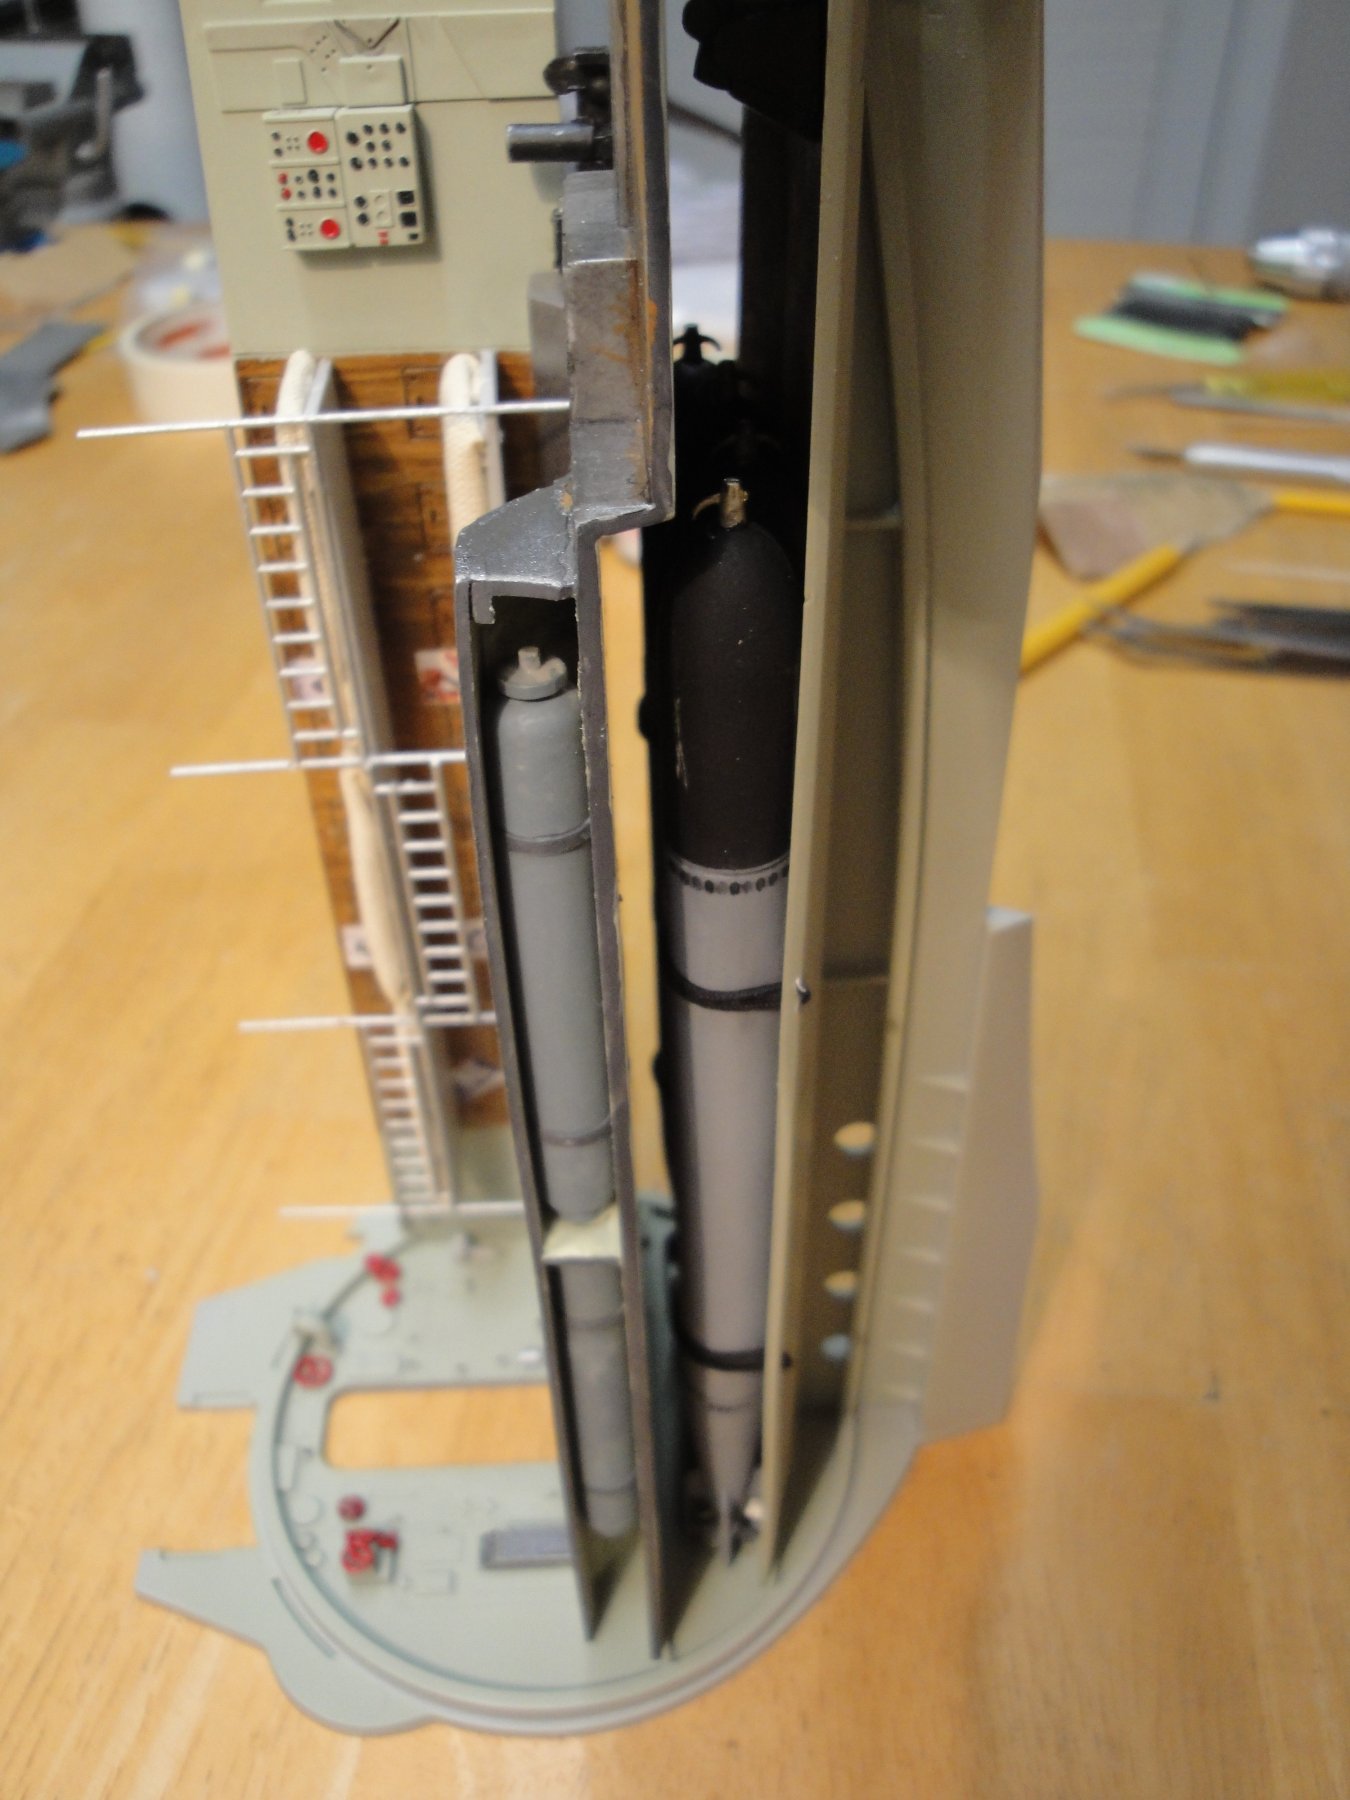
It is now time to install these torpedoes into their cradle: Of course, it is not easy to find information on how the torpedoes under the floor of the front compartment, were stored. I happen to have a book with a very rare picture showing the main floor with some eels stored on it. I can only suppose that the four torpedoes located underneath were held in a similar way. You can see that the torpedoes are secured with steel braces. This picture clearly illustrates the horrendous conditions in which these sailors operated. Keep in mind that each electric torpedo had to be reached every day for recharging. Anyway, once assembled, not much remains visible: I wish the "Trumpeter" had designed a half pressure hull to place behind the module. It is a lot of opened area that may have to be masked. We will see how it goes once the module is in the hull. Yves


- 760 replies
-
- 12
-
-
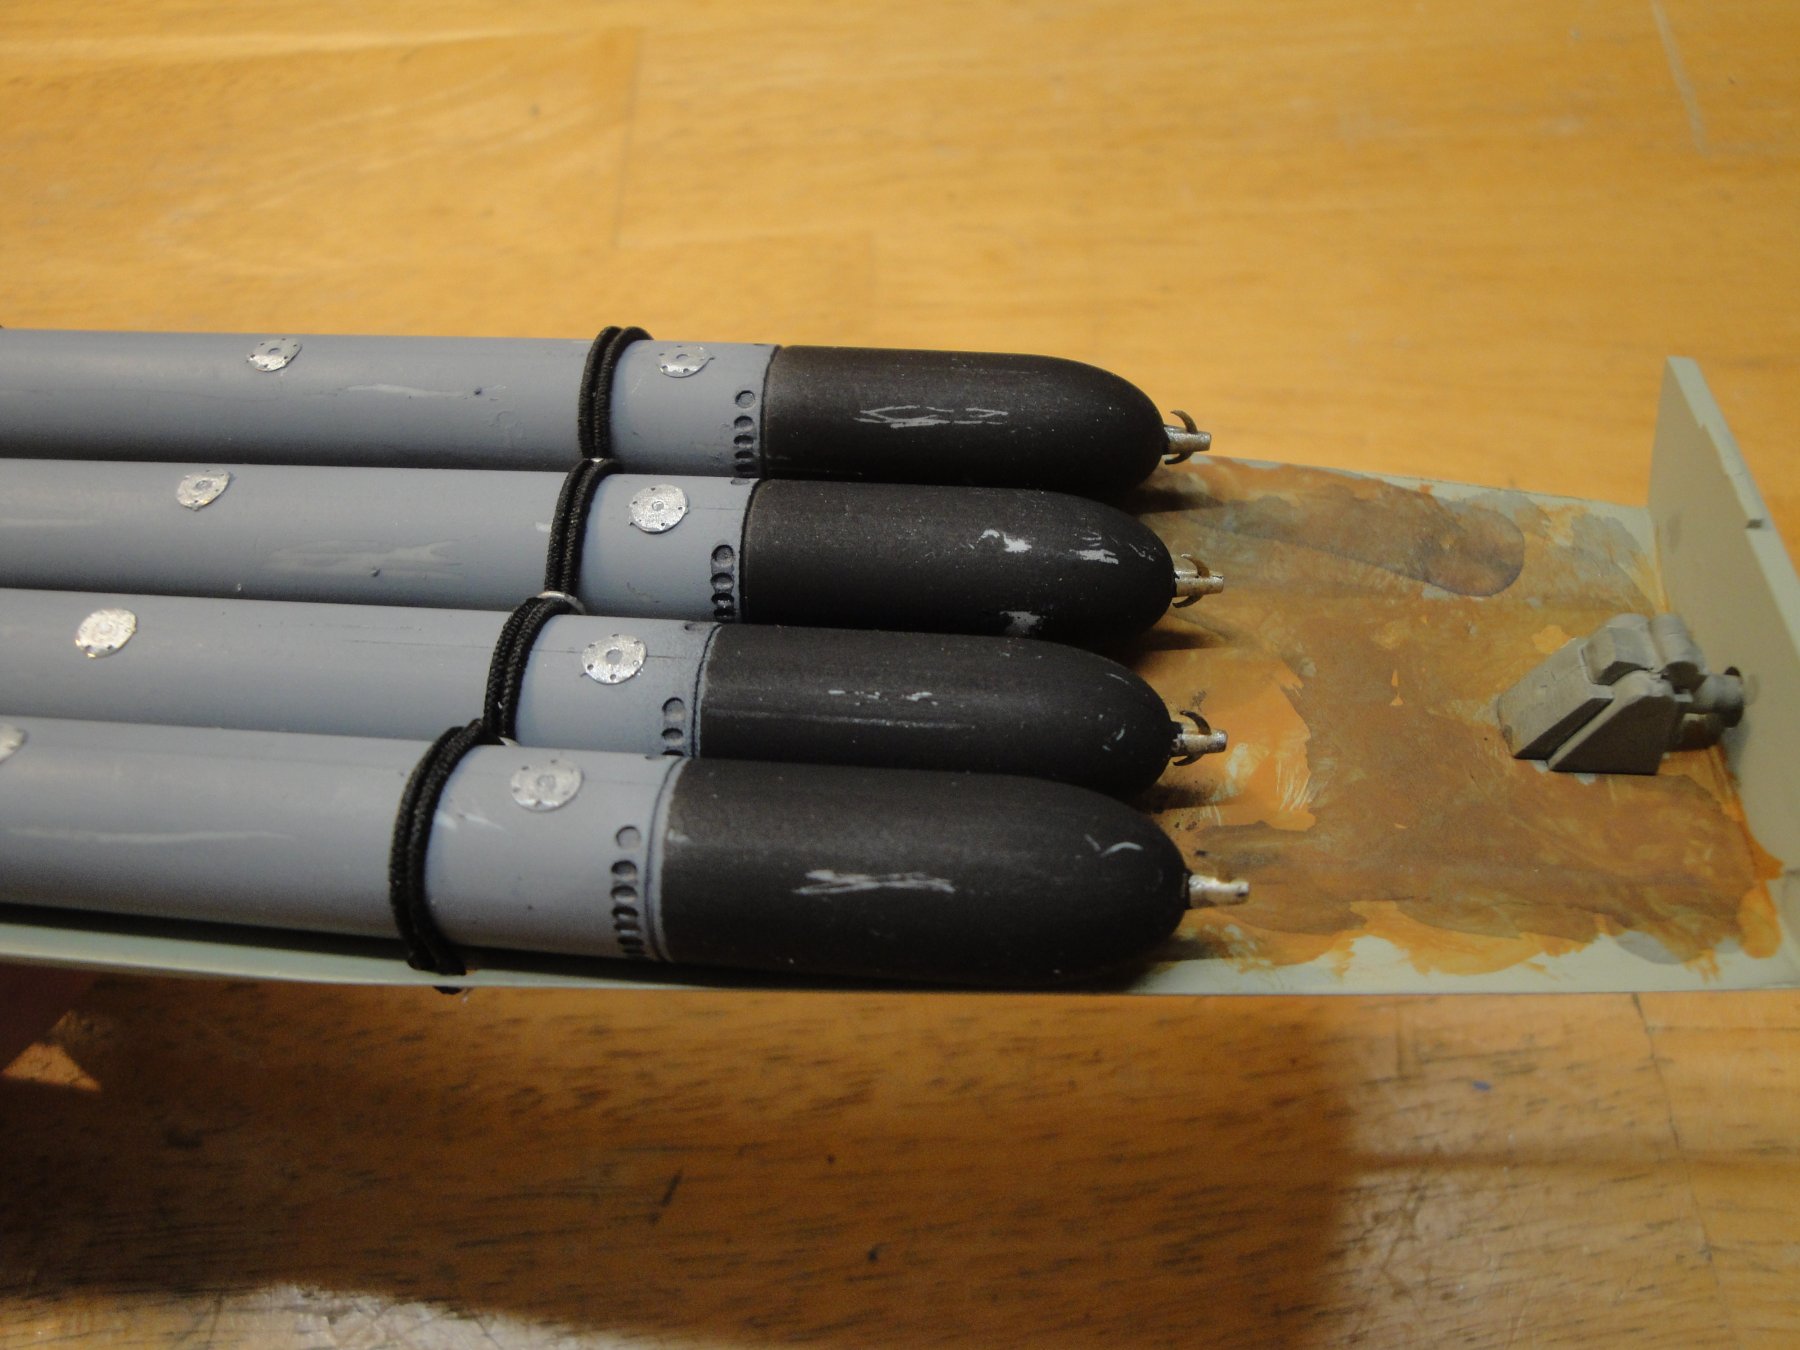
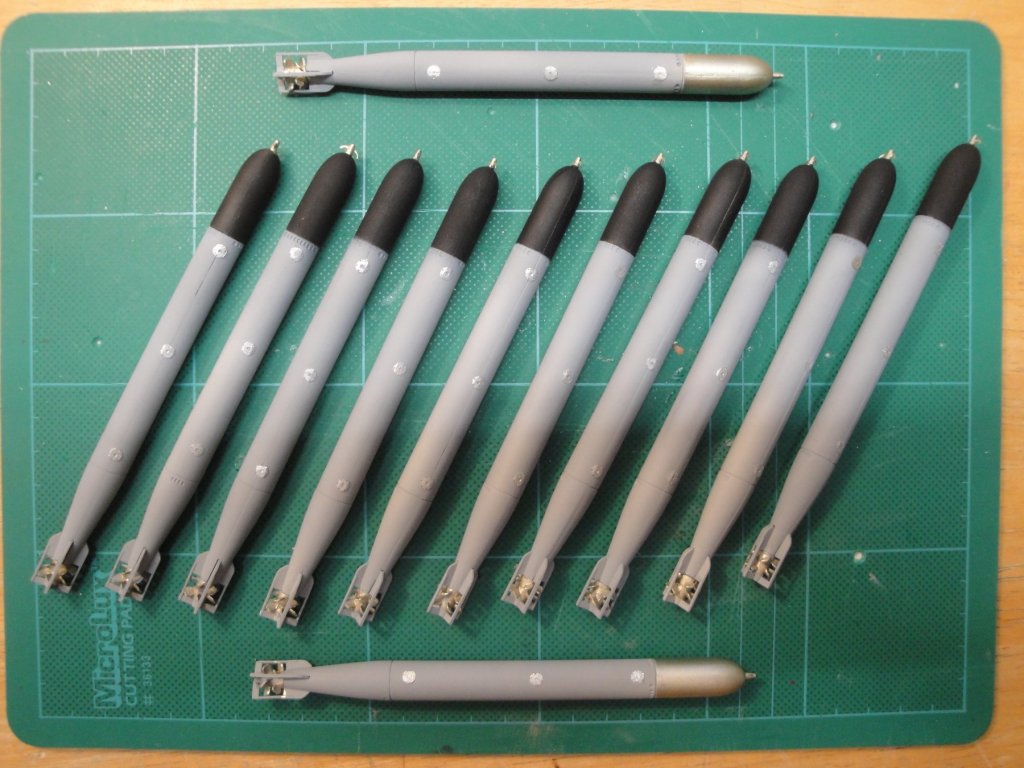
The eels are almost completed. I just have to apply some wash and the silver scratches of the loading: Most of the torpedoes with one or two exceptions, will be invisible. Rather sad! Yves
- 760 replies
-
- 13
-
-
For those who like U-Boot graphic novels, there are two (and probably many more) which are quite striking and depict so well the confinement and suffering of the sailors during WWII. These stories are not for the faint of heart, as they refer to the darkest side of the Nazis occult researches using U-Boots. The first one is drawn by Jean-Yves Delitte who is the official painter/artist of the French National Marine Museum, in Paris: This story relates the secret transfer of Dr. Mengelle who is a Nazi researcher working on cell mutations and cloning. He was nicknamed the Angel of Death, an extremely Machiavellian and dark being. The second story is in English and is very nasty. For the claustrophobic lovers: http://www.phillipkennedyjohnson.com/comic/bremen/ About 100 pages of pure terror.... Yves


- 760 replies
-
- 10
-
-
Thanks for the rods recommendation. Being careful (me) and being thin, the PE just rolled rather easily and conformed to the shape of the eels. Yves
-
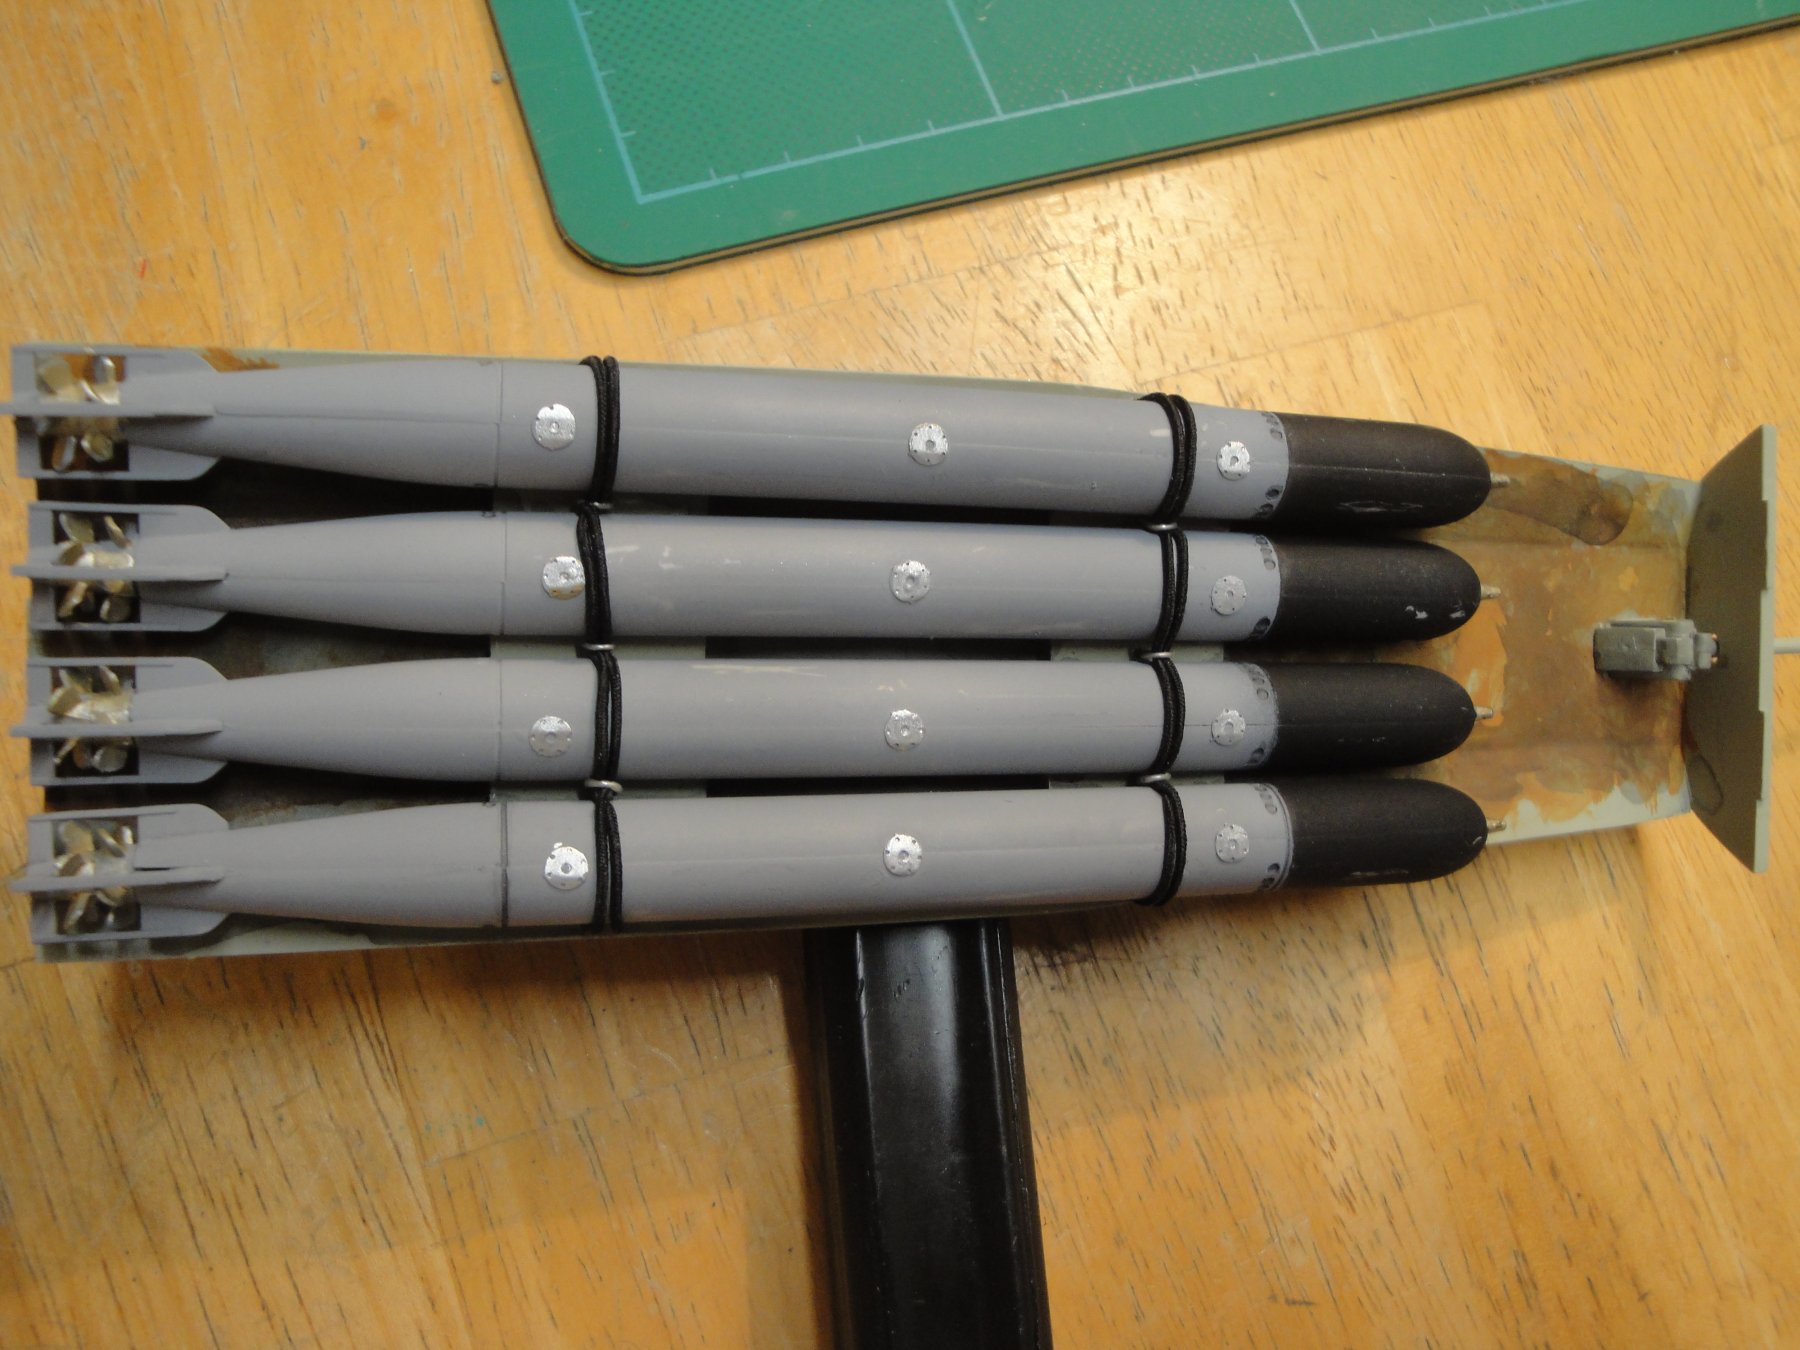
I worked on the 12 torpedoes and placed the 36 round access plates: The photo-etched plates are glued with CA. I then roll the torpedoes on a flat surface to bend the plates along the body. To be honest, these are my first attempts at using PE parts and it is kind of nice and realistic. I still have not decided how I am going to paint the "eels". I tried light gray and brass and may end up with light gray and black. Not sure yet.... Yves

- 760 replies
-
- 11
-
-
CDW, you will soon see what it takes to load a torpedo into the tube. Not for the faint of heart, for sure. G7e torpedoes used by the German weighted about 1 ton (2200 pounds) with close to 300 Kg of destructive charge in the head. Yves
-
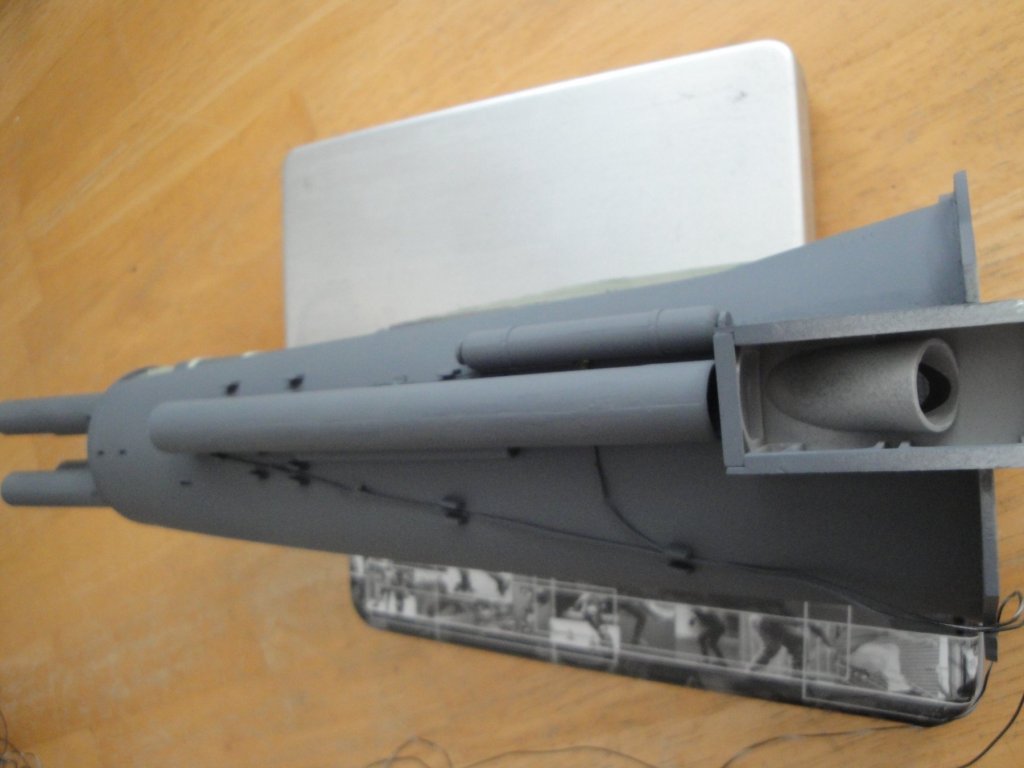
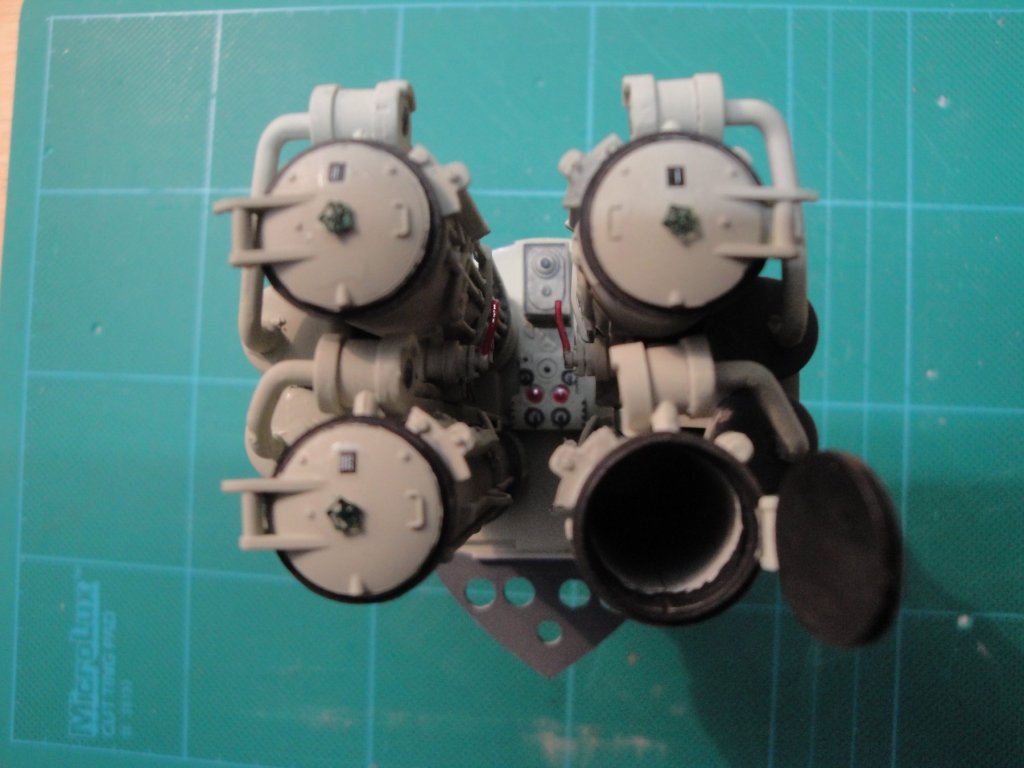
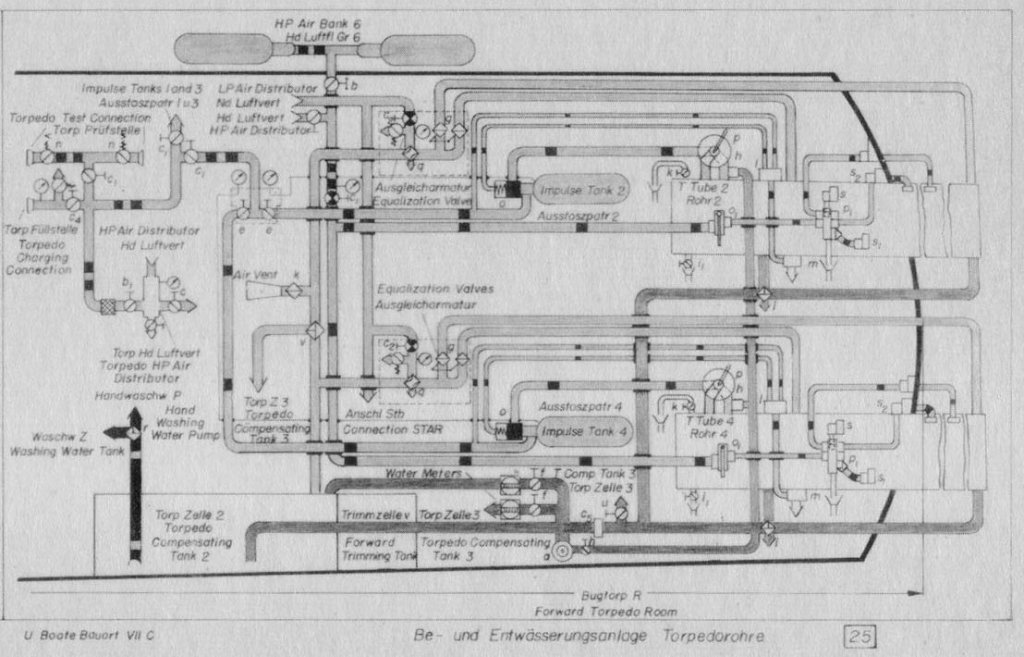
Some progress on the big "Guns": Unfortunately, most of the intricate details will not be visible once the module is placed in the hull. What we will see is quite limited: In the meantime, we can enjoy the details: You may wonder how to operate and launch torpedoes on a submarine. It is not an easy task and is quite similar to using the "John" on a U-Boot. The following is inspired from Wikipedia. Keep in mind that the torpedo is ejected with the help of a large piston, pushing it out: Make sure outside door are closed and tight. Drain the tube if needed. Open the breech door in the torpedo room. Load the torpedo into the tube. Shut and lock the breech door. Turn on power to the torpedo. A minimum amount of time is required for torpedo warmup in the case of chemical propulsion. It is faster for an electric engine. Flood the torpedo tube. The tube must be vented during this process to allow for complete filling and eliminate air pockets which could escape to the surface or cause damage when firing. Open the equalizing valve to equalize pressure in the tube with ambient sea pressure. Open the muzzle door. The slide valve allows water from the ejection pump to enter the tube. When the launch command is given and all interlocks are satisfied, the water ram operates, thrusting a large volume of water into the tube at high pressure, which ejects the torpedo from the tube with considerable force. The drain cycle is a reverse of the flood cycle. Water is returned to the ship's tanks and can be moved as necessary. The tube must be vented to completely drain the tube since it is usually by gravity. Open the breech door. The tube must be wiped dry to prevent a buildup of slime. This process is called "diving the tube" and tradition dictates that "ye who shoots, dives". Reload, Shut and lock the breech door. Finally, here is an excerpt of the Type VIIc Maintenance Manual, depicting the intricacies of the Front Torpedoes tubes: Yves


- 760 replies
-
- 14
-