SJSoane
-
Posts
1,650 -
Joined
-
Last visited
Content Type
Profiles
Forums
Gallery
Events
Everything posted by SJSoane
-
 Hi Gaetan and Greg, I take your points. How large a photo are you both posting? Are you controlling the overall size (I have tried to stay under 1MB), or resolution (72 DPI for screen), or both? Mark
 -
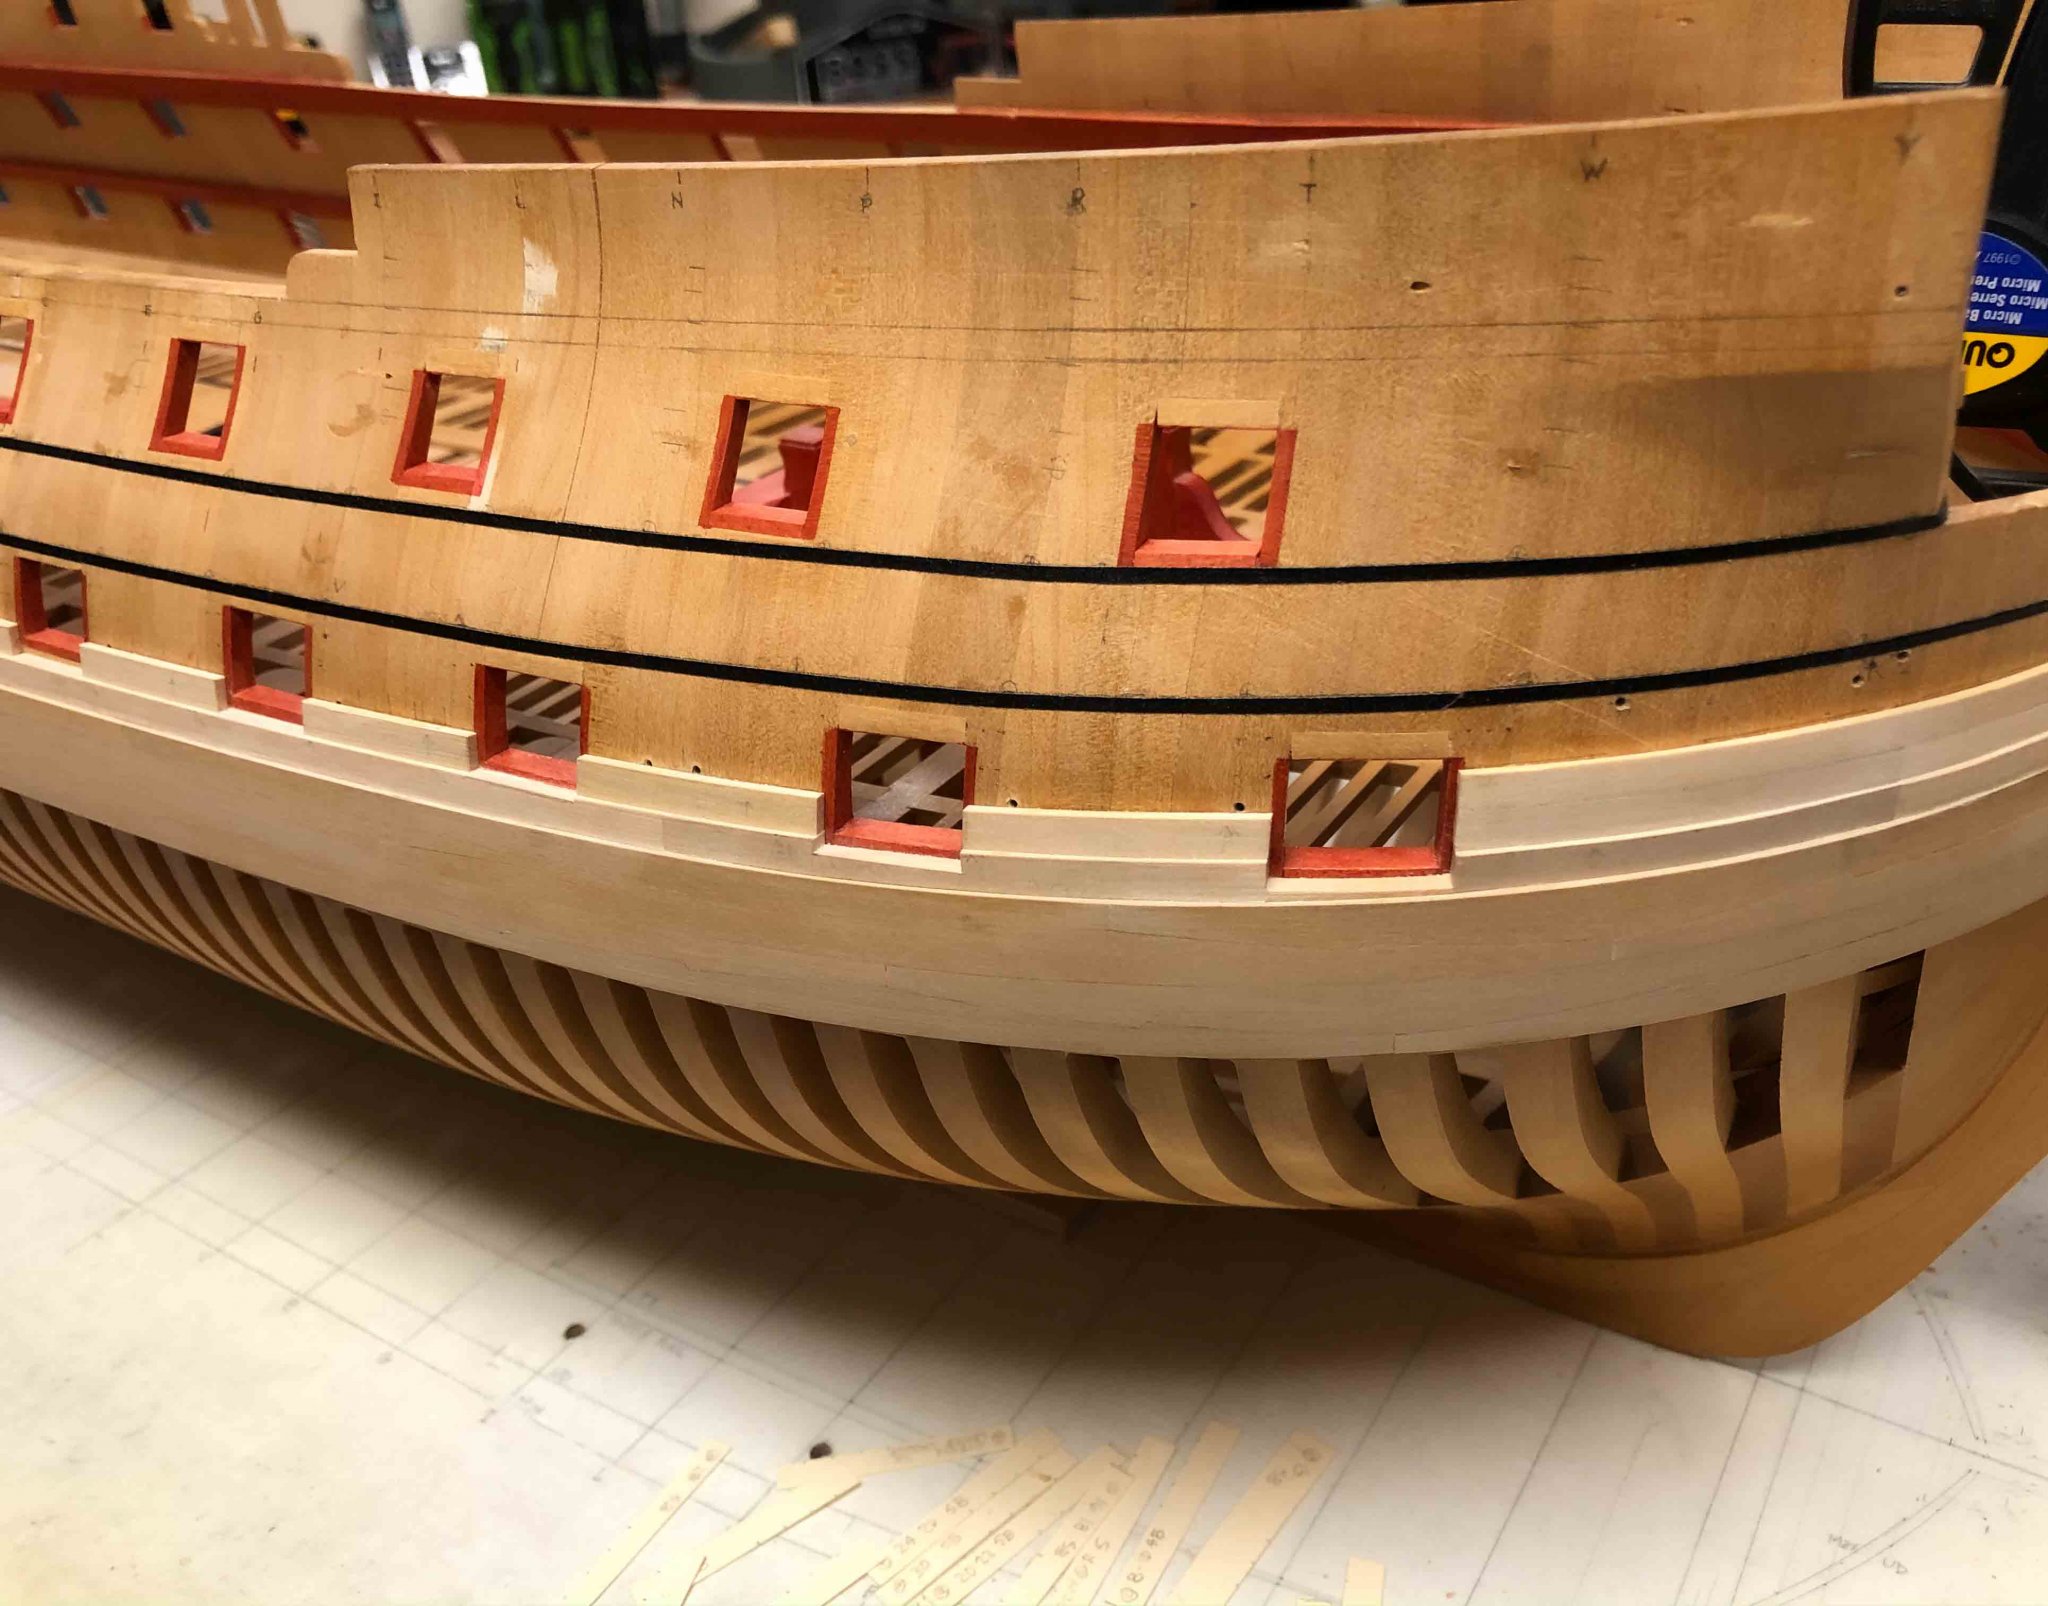
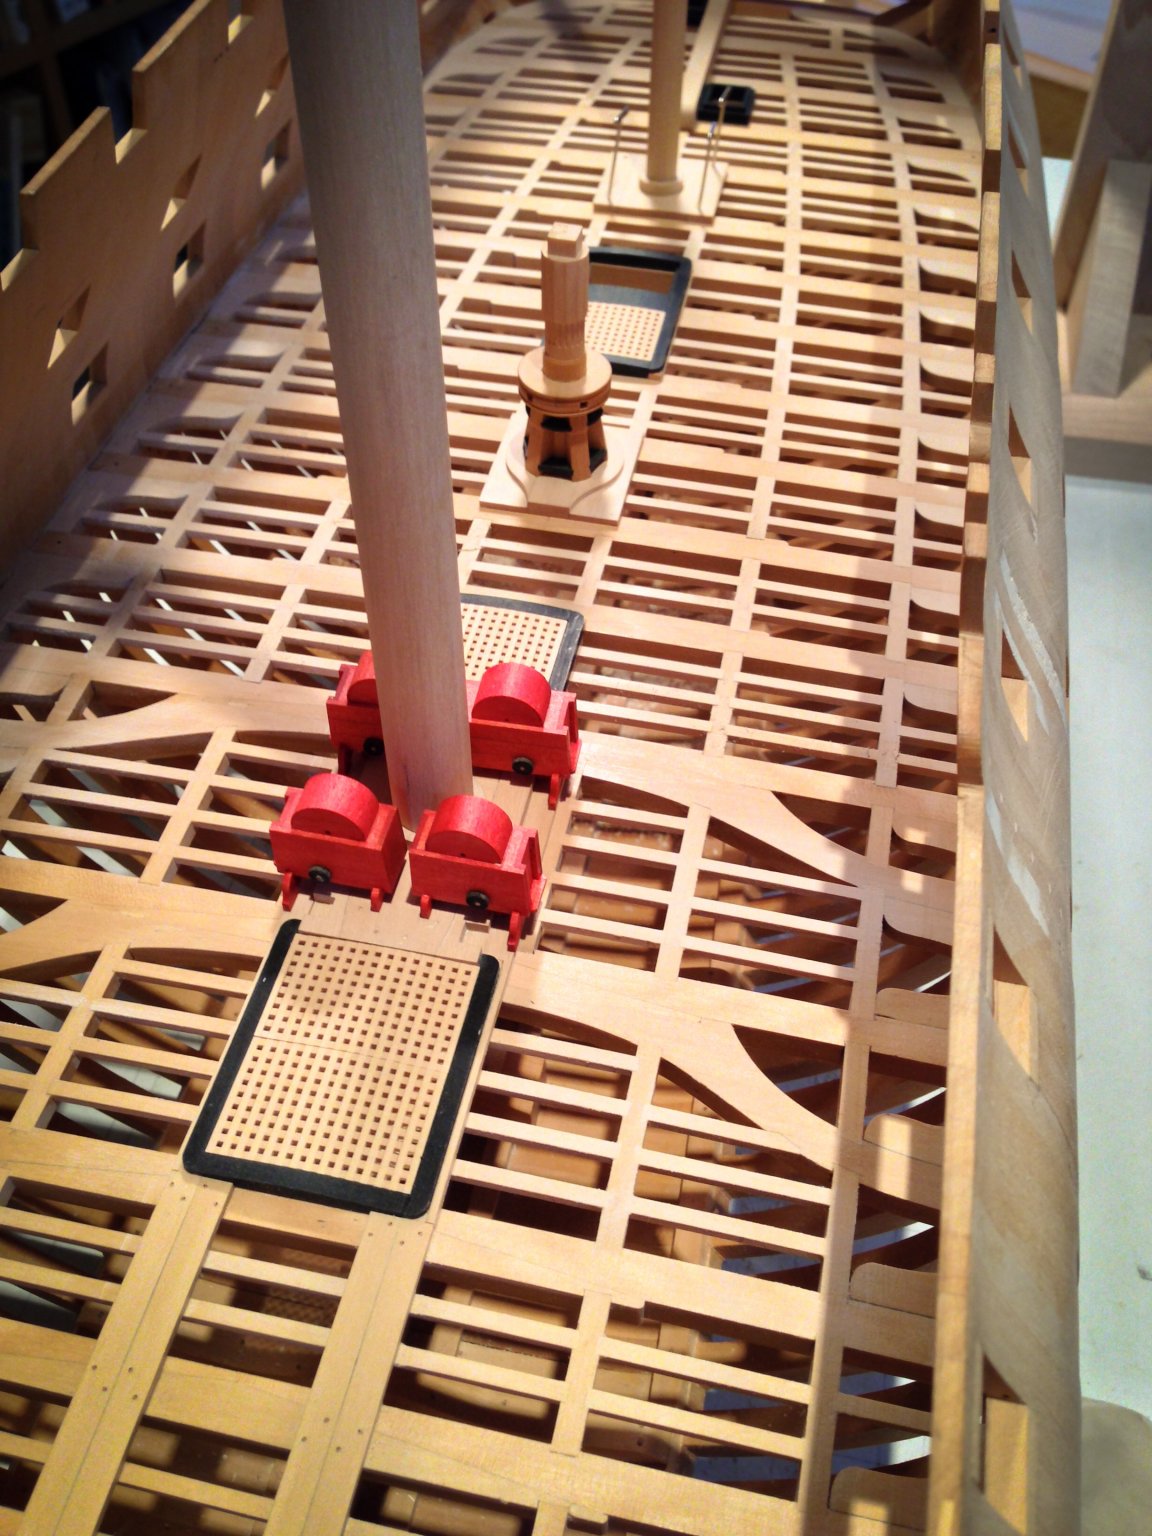
Hi Greg, I understand Hollywood actresses in older days always had their pictures taken with a gauze effect that covered up imperfections. I can see the value of that! Those super resolution closeups reveal more imperfections than I can see with my naked eye, and I much prefer to see it just as I see it without magnification. Having said that, I promise to increase my resolution when I get past the interim stages, i.e., after I sand and paint to my final finish. Then it is what it is! So here, for example, is the gun deck at its final finish, at a higher resolution. At a little lower resolution, because it still needs some work with sanding, trimming etc., is the next strake of 4" planks at the bow. This was a little trickier, working around the remnants of my mistaken hawse piece, and bending from the stem to the first port. But it is coming along! The hawse piece will cover up the planking forward of where the black strake changes color.


-
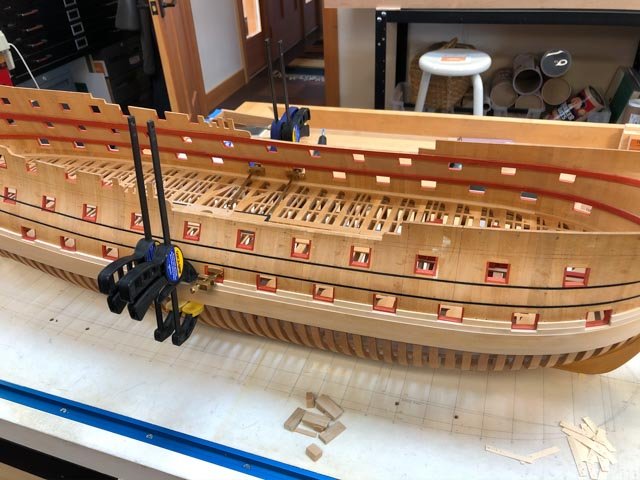
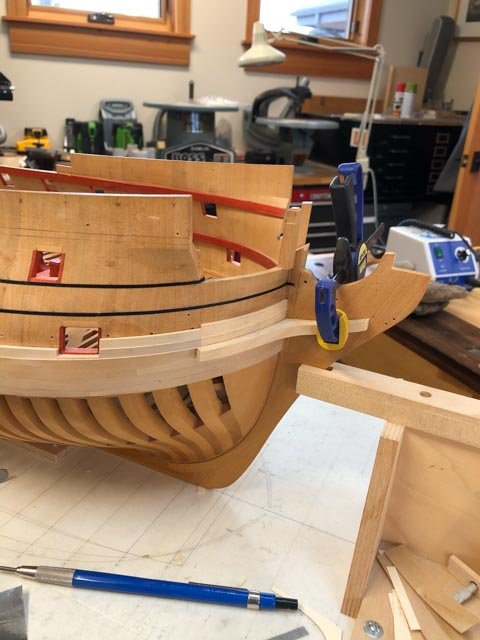
Small progress, finishing the first strake of 4" planking above the black strake. The aft-most last planks here were surprisingly challenging to shape. The uppermost curve did not fit any of my sanding templates, appearing to be more of a part of an ellipse than a circle. Although it is an arc of a circle when drawn straight on in the sheer elevation, because of the tumble-home in, and raking back, the actual curve is something more complex. Now I understand this, the next planks in this area should go more smoothly--or so I naively think before I actually try-- 🙂 I decided to trim the upper edges of the planking at the gun ports by turning the hull upside down and using a sanding stick through the opposite ports, as I learned from the Fully Framed Model books, and as I did when I first cut the ports in the hull. It is otherwise too hard to see the edge of the port framing to which the planking needs to align. The aft-most port has not yet been trimmed at the top in this photo. Mark
-
Hi Alan, Maybe take photos to the meeting? I am in awe of you doing a fully framed model. There are more pieces in motion at any given time than I ever had to deal with. And yours is looking great! Mark
-
Looking nice, Alan! I agree, captive nuts work well if you can get to the bolt heads (or nuts on threaded rod) from below. I also keep a small wrench of the right size next to my model, so if we suddenly have to leave the house in an emergency I can get the cat, wife and ship model all out together in short order! Hate to lose a ship model for want of a wrench to release it...🙂 Mark
-
thanks, druxey. I have been out of touch with my friend for 45 years or so, but I still owe him a great deal for that important lesson on craftsmanship early in life. Gaetan, I entirely agree with your view that the goal is to have fun in the construction process, not to create a perfect model. And an important lesson I learned from you a number of years ago is that the more one repeats a process (in the case you advised me on, hand cutting the mortises for the gun deck carlings and ledges) the better and faster one gets. Which gets closer to perfection, but never all the way! And thank you for the kind comment about my specialty. Best wishes, Mark
-
Thanks so much, druxey, Marc and Mark, for your kind comments. A few thoughts with coffee before launching into more planking this morning: Marc, when I started, I saw the craftsmanship of the original dockyard model builders as something to aspire to, but not something I could ever fully reach. In more recent years, though, I have seen that their perfection is not quite perfect, and so the bar is a little lower than I originally thought. The most interesting evidence is in Rob Napier's Legacy of a Ship Model, which shows that the old craftsmen sometimes screwed up, and they found interesting and satisfying ways to fix their errors. And sometimes, they let the mistakes stand as built if they were not going to be seen readily. That gave me greater leeway to worry a little less about getting it absolutely right the first time--which can become a debilitating thought in your head--knowing that I can probably fix it if I mess up. I have done enough of these now to feel confident in being able to do them in the future. A case in point was making the hawse liners in the wrong wood, and needing to pare these down to be covered by real hawse liners in boxwood. Tedious to fix, but it works. Mark, I think I mentioned a number of years ago on this build log that I learned the value of jigs from a moonlighting project I did while in architecture school. A friend and I had a project to build scale models of the condominiums soon under construction at the Big Sky Ski Resort in Montana just north of Yellowstone National Park. It had a very tight deadline. I was frantically cutting and gluing parts on the models, while my friend was building a jig. I urged him to stop messing around and start helping with the models. He ignored me, finished the jig, and then started cranking out perfectly crafted window and door frames, way faster than I would ever have done without a jig. I learned my lesson then and there. I started the Bellona using lots of jigs. I cut the stem knee with a full sized router and a jig, for example. I did not trust my hand tool skills, and jigs reduce risk. But as my hand skills have improved, I have used jigs less to control a tool, and more for alignment and fitting issues like the reveal around the gun ports. Also, they are great for making repetitive identical parts. By the way, I modified my gun port jig a little, gluing a wedge to one side. My fingers were too clumsy to hold all four pieces in place while I pushed in the locking wedge, sometimes while also holding the plank so it could be scribed against the jig... Back to work! Mark
-
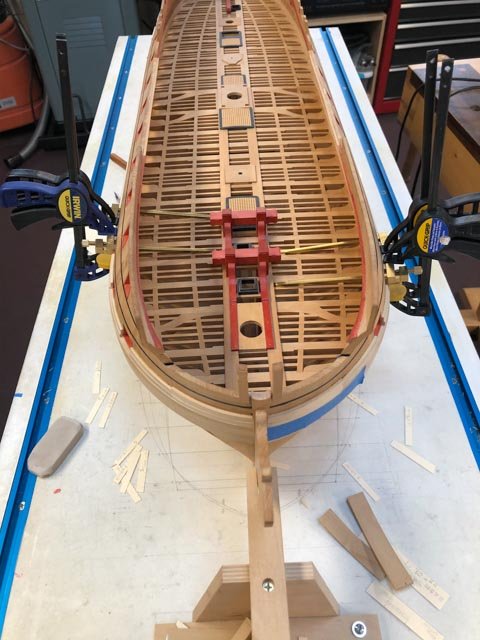
I have been pulled away from the shop for a time, but back to planking. This is a fairly tedious repetitive job. The row of planking above the black strake is mostly between ports, so no longer strakes are possible yet. In the past, I would work up one side, then the other. Getting started on the second side was always an uphill battle, because I had already worked out all of the problems and now it was just a slog on the other side. So this time, I decided to work up each side in parallel. This also allows me to leave one side glued, work on the other side, and the the first side is ready to go again. My little jigs for the reveal on each side of the port are working well. I first use these to get the angle for cutting the end of the plank, and then as a go - no go for fitting the planks between the ports. It is taking about ½ hour per plank between each port... Mark
-
Alan, I just read your account of the Bellerophon. A fascinating read! Kudos to you for accomplishing this great piece of research! Mark
-
Thanks, Paul and druxey, I will try heating up a hacksaw blade with a larger propane torch; the butane torch just could not get to red. And druxey, thanks for the ideas about how to clamp and finish the cheeks. I will try these ideas. I already cut the knee side too short for this, so I will have to temporarily glue on an extension. Mark
-
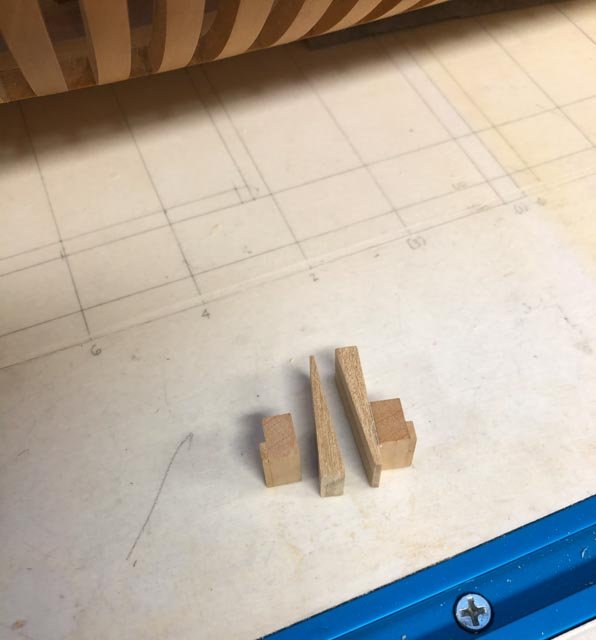
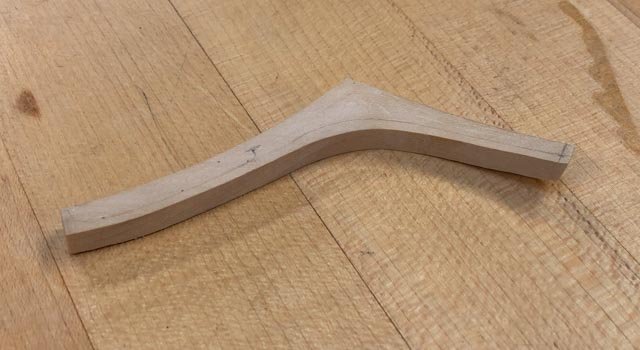
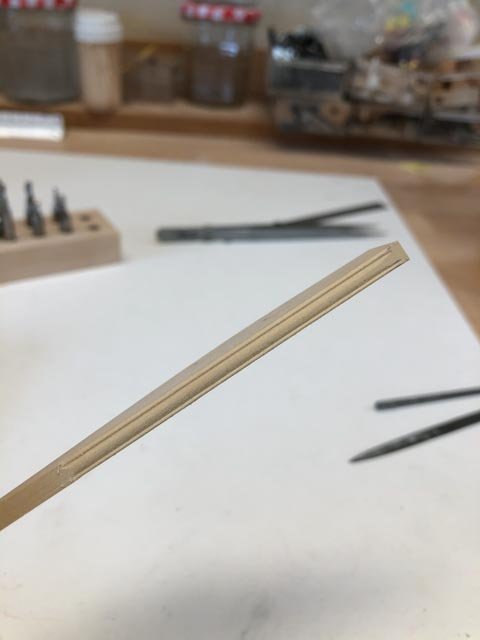
Thanks, Ed, for this additional advice. My first effort at a molding unfortunately comes on a piece that will be a challenge to clamp down firmly. Both legs are curved and/or tapered, so they will not clamp in a vise easily (and they will be both thinner and narrower than this roughed out piece shown below, as seen by the pencil lines). Perhaps I should consider lightly gluing a piece behind the long leg that will allow me to clamp that in the vise, then remove with isopropanol later? Also, I see I will need to glue an extension onto the short leg, so that the cutter can finish cleanly off the piece. The end of the long leg has to turn around a quarter diameter radius, which I will have to practice to see how I do that cleanly. Maybe I should have started my mold making with the waist molding, which is all evenly linear, just to get more of the hang of it before tackling this difficult to hold piece... Mark
-
Thanks, Allan, this is very helpful. I had tried clamping the metal in a cutter holder over blank bit, and dialing it in against the spinning disk. But the metal was clamped a little high that way. Holding it freehand on a tool holder like a manual lathe would solve this problem. Mark
-
Thanks, Alan, Mark, and Noel, for the comments about learning skills. This website is indeed the best thing we will ever have if we can't have a formal apprenticeship. Noel, I entirely agree with your thoughts about this. Even though most skills through most of time were acquired through some version of an apprenticeship system, whether formal or informal, the learner eventually became the teacher. And through constant use, and in the face of new challenges, the skills evolved into new directions. This is why we see throughout history a steady evolution of ideas and techniques, sometimes punctuated by revolutionary ideas. I think a good metaphor is how one acquires the language skill. One first mimics people already skilled in the language, until eventually the syntax and a base vocabulary become internalized. And then it is possible to say new things never heard before. Allan, so did you free-hand hold the Dremel grinder when making the curved sections. Very impressive! Mark
-
Thank you, druxey, Marc and John, for your comments. It is an interesting process, the initial learning of a new skill. In the old apprenticeship system, someone who already possesses the skill gives the apprentice the right tools and demonstrates how it is done, and then the apprentice gives it a try. The master then corrects, and the apprentice tries again. The apprentice starts into this with the right tools and also knowing that it can be done, because he/she has just seen it done. The apprentice also knows what standard to aspire to, because a good example is there to see. But when we try to learn a new skill without this guidance, it means a lot of additional uncertainties come into play. Do I have the right tool or material? How red is "cherry red" for heat? How hard should I press the cutter, at what angle? We have to do a lot of trial and error, to see what happens. If some good results come out, we are rewarded and keep going. But if things don't go well, then a thousand doubts can come into one's head. Was it the wrong material? Wrong tool? Wrong technique? Too many of these doubts floating around in one's head can easily make this look like a tall mountain to climb. This is made worse by the fear of wasting time or materials on a failure. The biggest challenge for me, as I get older, is that these questions and doubts start coming before I even start, causing me to procrastinate. If just I read a little more, thought about it a little more... And, of course, the answer to this is to just jump in and make mistakes! Trying, failing, adjusting, and trying again is how skills are learned. So I get past the procrastination by saying to myself, "for heaven's sake, just try it and let's see what happens". Once I get going, the natural process for learning a skill kicks in. And, of course, this essay on skill acquisition was a way of procrastinating on starting to make the second hawse liner this morning! Mark
-
After thinking about the hawse liner again, I decided to do it right, and trim the old maple piece down as if it were the planks coming to the bow: Then I could make the hawse liner as it was actually constructed, a thick piece with a rabbet in the lower edge for the thicker black strake to come through. I will overlap it a tiny bit onto the ends of the real planks, for a clean connection. The final shaping of this hawse liner, including the fit to the cheek below, will await the installation of the cheeks themselves. I should have done it right like this the first time. Does one ever learn that shortcuts hardly ever turn out to be shortcuts? 🙂 Mark

-
Gaetan, it is looking beautiful! Mark
-
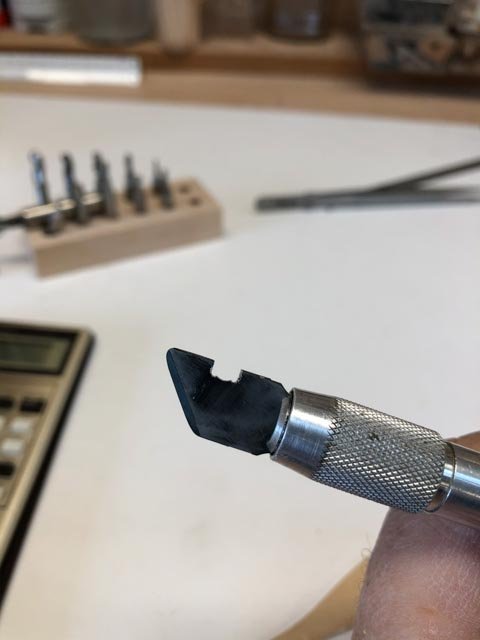
Thanks, Dave, for pointing me to the sharpening stone idea. As it turned out, I did not have much luck with heating a piece of old hacksaw blade to cherry red. I Just couldn't get it hot enough with my small butane torch. So I went back to the exacto knife blade, and discovered that I could get that to cherry red. And then it was easy to file. I ground down the old edge so I would not accidentally cut myself. After a few failures at hand filing, I put the blade in my Sherline mill, and cut down the rectangular profile with a flat bottom cutter, and then used a ball end cutter to cut the big curve in the center of the moulding. I then used a tiny round jeweler's file to cut the side rounds. that kept everything square and even. Thinking of Dave's idea, I then flattened both sides of the blade on my waterstones, which seems to have created a good, sharp edge. So, one more skill acquired! Thanks, everyone, for your help and advice. I have read and thought about this for 25 years, and now see how relatively simple it is, once you work out a few technical details that don't make sense until you try them. Best wishes, Mark
-
Thanks, druxey, I will try it. I spent a good part of the day trying to make a cutter out of an exacto knife blade, using an emory cutoff disk in my lathe. It worked well, until I was unable to round the non-cutting edges. No file I have could cut that hardened metal. And without the rounded non-cutting edges, the whole thing cut into the wood. Not a pretty sight. Paul, any insights into how to file the edges of the hardened metal? druxey, do you happen to have an image of the wooden holder you use? I have seen some examples using an exacto knife handle; but this means one hand is controlling the cut from the side, whereas I am going to need both hands on top to control adjusting to the diminishing thickness of the edge needing a moulding. Mark
-
I thought I would be a lot faster on the second lower cheek. I was, 5 ¾ hours for the port side instead of 6 hours for the starboard. But that included trimming down the maple hawse piece, which was not included in the 6 hours the day before. I am glad I speed up with practice....🙂 Next, trimming these down to final size. I am going to have to face the challenge of cutting a moulded edge on these. I saw a nice video from this site (Kevin Kenny) which uses an emory grinding wheel in a lathe to cut an exacto blade for the cutter. This avoids having to soften and then reharden the cutter metal. But my emory grinding wheel is too wide to the make the moulding below, so I will have to use fine files. And I assume these will not cut an exacto blade. So, can anyone point me to a video or good tutorial on how to soften and then re-harden metal in a home workshop? The oil bath quenching in particular has me baffled; what kind of a container, what kind of oil? Best wishes, Mark

-
I was trying to think of a cheeky comment, but couldn't come up with anything....🙂
-
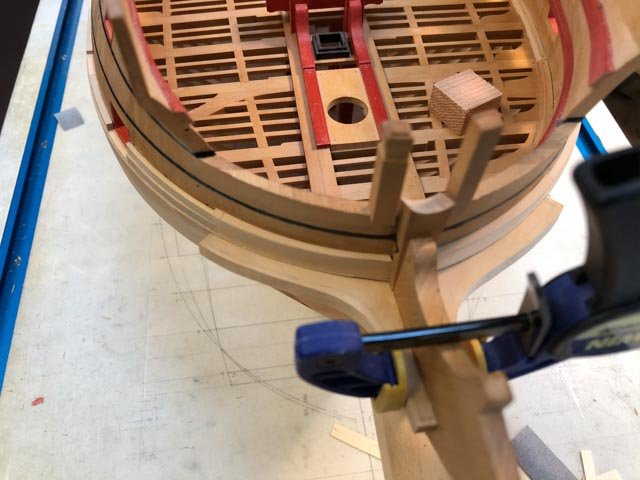
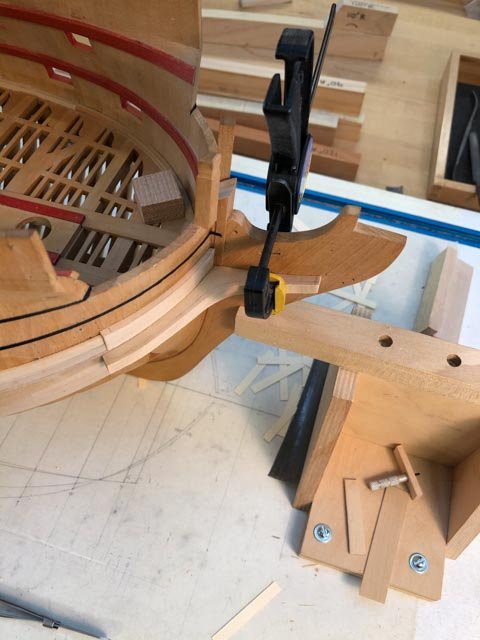
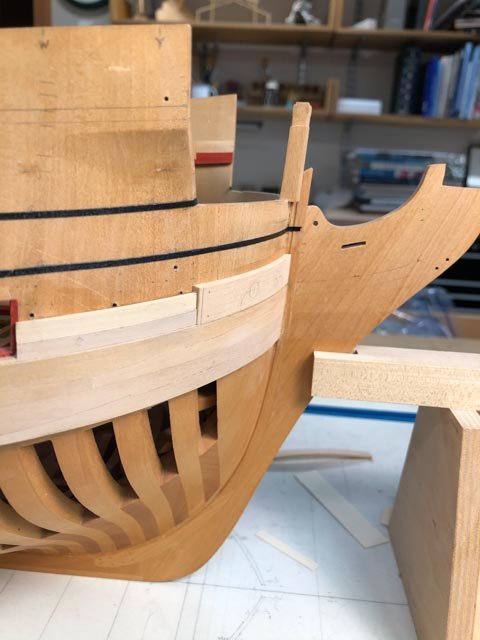
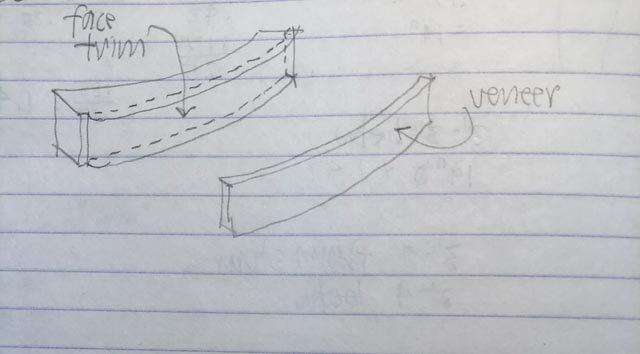
Thanks, druxey, that idea helped me re-think how to do this repair and move forward. I pared down the offending wood, and made a veneer. But I realized that the lower edge of the veneer wants to fay very closely to the lower cheek. And so I decided to make the lower cheek first. Then I can fit the veneer to it. The lower cheek is a seriously complex and subtle piece of wood. It looks so simple in the Bellona model. But it 1) fays to the face of the wales at the bow, which are both curving and changing angle to the horizontal as they sweep around; 2) fays to the tapered side of the knee of the head, with an angled notch for the stem; 3) curves to match the upper top of the wale; 4) tapers in vertical height from the aft most edge to the foremost edge; 5) curves up in the foremost segment to match the geometry of the head rails. Goodwin describes this as compass wood. It would have been an amazing find in the forest, I can now see. This was an entire day of filing, checking high points with graphite paper, filing, checking, filing, checking.... I got a good fit to the wales and the knee of the head, and started thinning in the sided dimension. After 6 hours of fitting, I decided to leave the final shaping of the lower and fore edges for tomorrow, when I can see it fresh and not screw up. I can also check the size of the bolster for the anchor cables, to confirm how thick the veneer needs to be when finished. So I guess my mistake on the wood was a blessing in disguise. This is going to be a much better fit of the hawse area than I had previously achieved. Mark

-
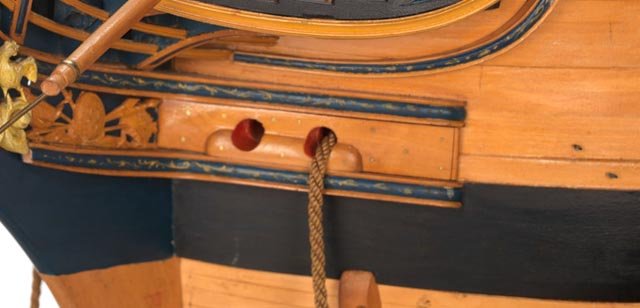
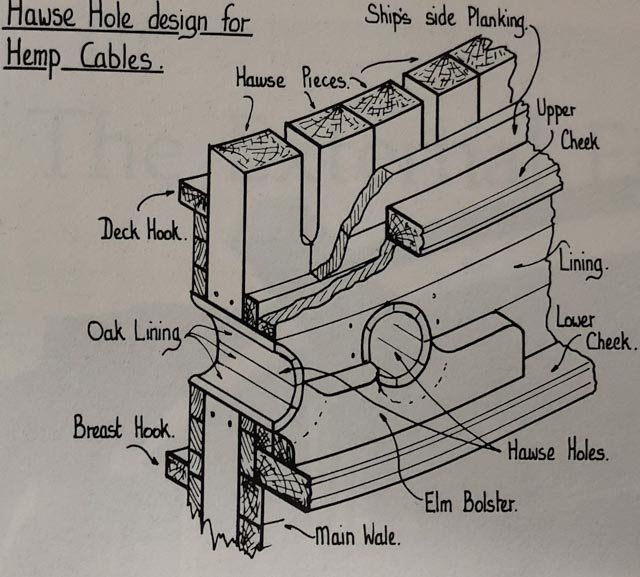
Thanks, Greg, Marc and druxey, Good moral and practical support in times of trouble is one of the many great things about this website. I am reviewing this again in the cold light of morning. It really does stand out as different wood now I look at it again, and in a prominent place. So it will have to be fixed. The first step is to review again just how thick this piece should be, when it is all said and done. Now that I am potentially building it as it would have been built, the thickness becomes more interesting to explore. Peter Goodwin's The Construction and Fittings of the English Man of War shows on page 179 how the lining at the hawse hole fays onto the face of the planking beneath: And in the 2nd model of the Bellona, we see that this lining is thicker than the black strake, because it sits over it, but it looks to me no thicker than, or just a little thicker than, the wale below. If it were exactly the thickness of the wale, this would make the lining 2" thick where it fays onto the black strake, 4 ½" where it fays onto the 4" planking above. 2" seems rather thin at this exposed position; perhaps it is an inch or so thicker than the wale? It is hard for me to see in this photo. It can't be too much thicker, because the bolster has to sit on its face and still be just thinner than the cheek below. Right now, I have made it flush with the wale: If I increase its thickness by just one inch, I only have to thin down the existing piece by 1/64" (1" in my scale), and add a veneer that is 1/32" (2" in my scale). Seems possible with a fine file! And as Greg pointed out, the veneer does not have to fit perfectly to the underlying surface, because we can never see the edges that will be hidden under the cheeks. So, out comes the file... Mark

-
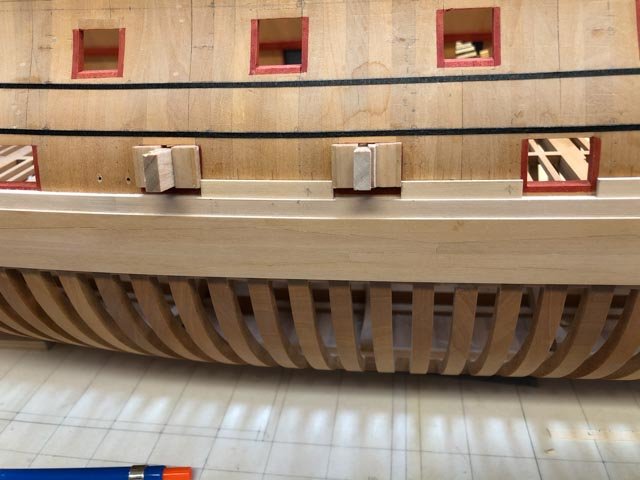
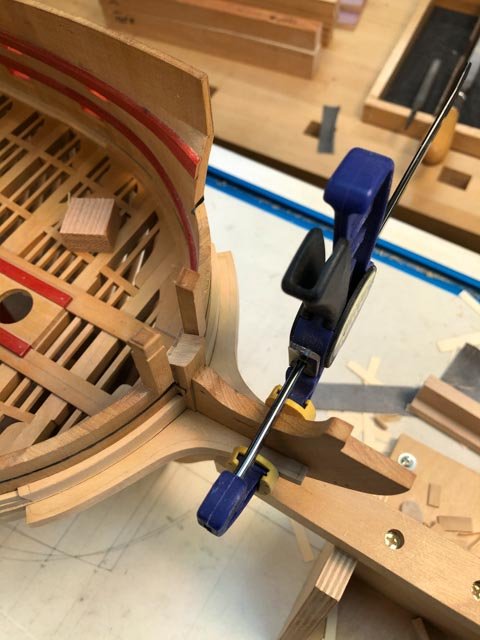
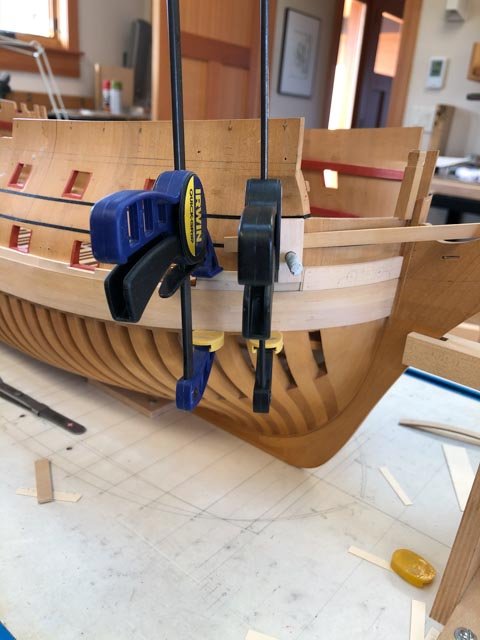
I started on the first row of 4" planking above the black strake, a moment long time in the coming. I also figured out a way to get more even pressure on the planking clamp at the bow, where it will really show if this gets twisted. I abandoned the soft metal jaw, and substituted a piece of wood bearing against a piece of wood above that is the same thickness as the plank. Perfectly even pressure. And while I was working in this area, I discovered a big and embarrassing mistake. In the spirit of full disclosure to all of you who have followed me through all my trials and tribulations with lots of support, I was looking through my magnifying lens at the clamp job, and suddenly noticed that the wood at the hawse holes was not boxwood. I accidentally fashioned these out of hard maple! I confess for just a moment I thought maybe I could ignore this, but then realized that it will not darken along with the surrounding boxwood over time. You can see the difference between the wales, which are recently sanded, and the frames below, which have been exposed to the air for many years. Busted! So, I will have to pare down the face of the hawse piece, and glue on a thin veneer of boxwood. The edges will be covered by the cheeks above and below, so it should be invisible. Indeed, if I had built this as in the original, I would have had a thin veneer like this over the tops of the planking anyway. This will teach me for getting too clever. Indeed, I can assume that the shipwright gods are getting vengeance for me taking a shortcut earlier. The funny thing is, I always had a vague feeling of something not quite right when I made these, like the feeling you get when you are about to do something stupid and dangerous at at table saw. Not as threatening to my physical well-being, but in the end humbling to my mental well-being. Always pay attention to those birdies on your shoulder, talking to you about your intended actions! Mark
-
Thanks, Navydoc, that is a better price at Lee Valley. And Mark, I entirely agree with your observation. I was shocked to see how expensive they are now. I just don't remember paying anywhere near that much a few years ago. Maybe the secret of their true value to modelers has been discovered, driving up demand!🙂 Mark
-
Hi Paul, Isn't it interesting, how we pick up tools on the idea that we might use them someday, even though we don't actually have a need for them now! I am afraid there are more that I never do use, and fewer that I eventually see a need for. You would think I would learn.... Mark