SJSoane
-
Posts
1,650 -
Joined
-
Last visited
Content Type
Profiles
Forums
Gallery
Events
Everything posted by SJSoane
-
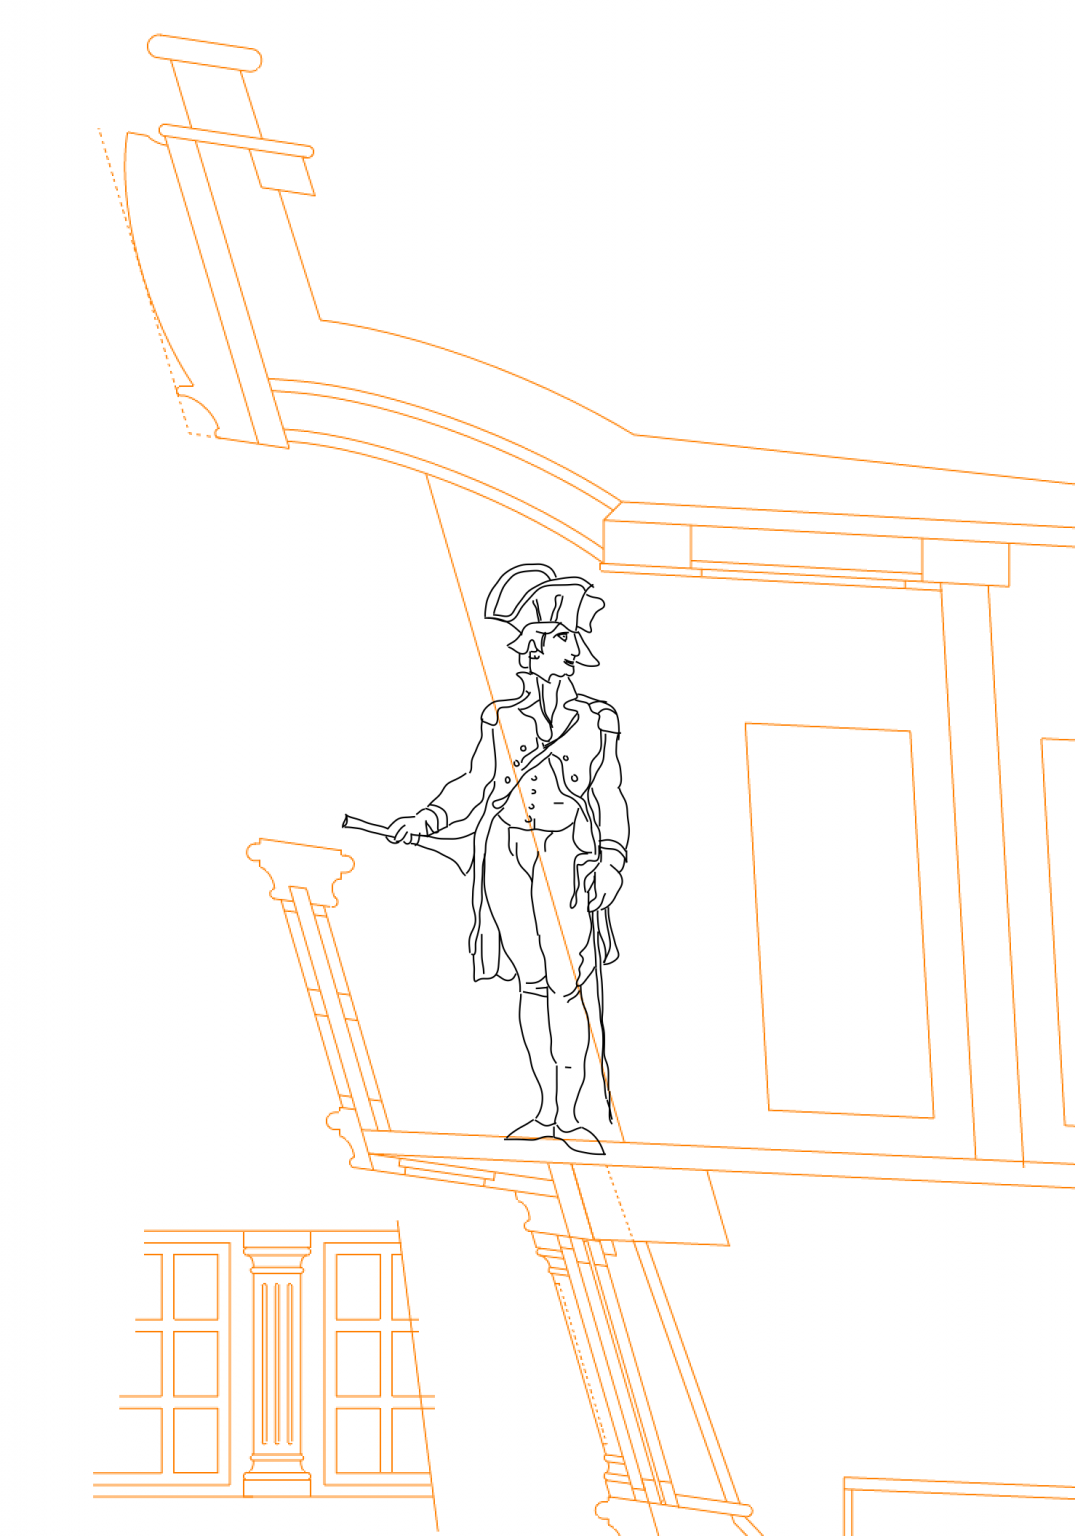
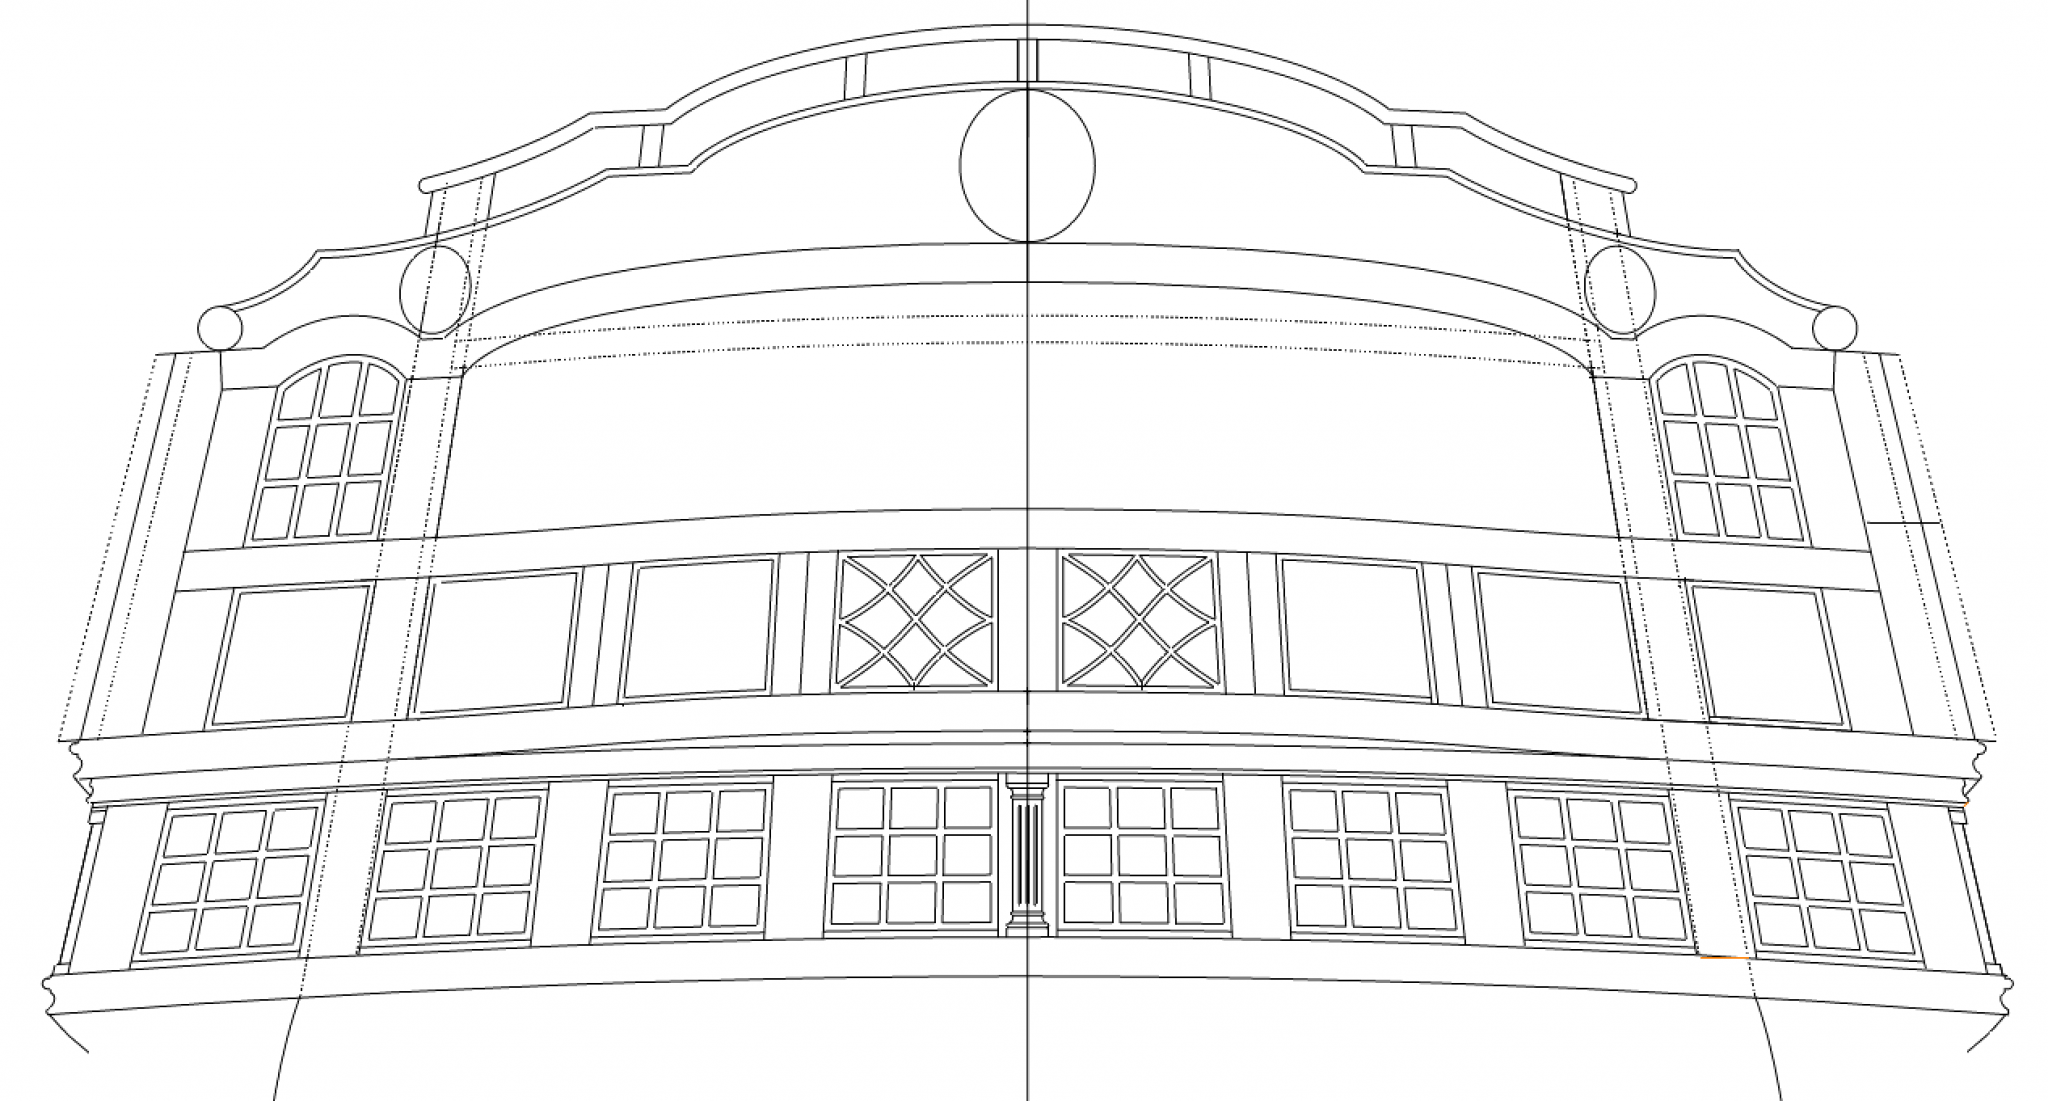
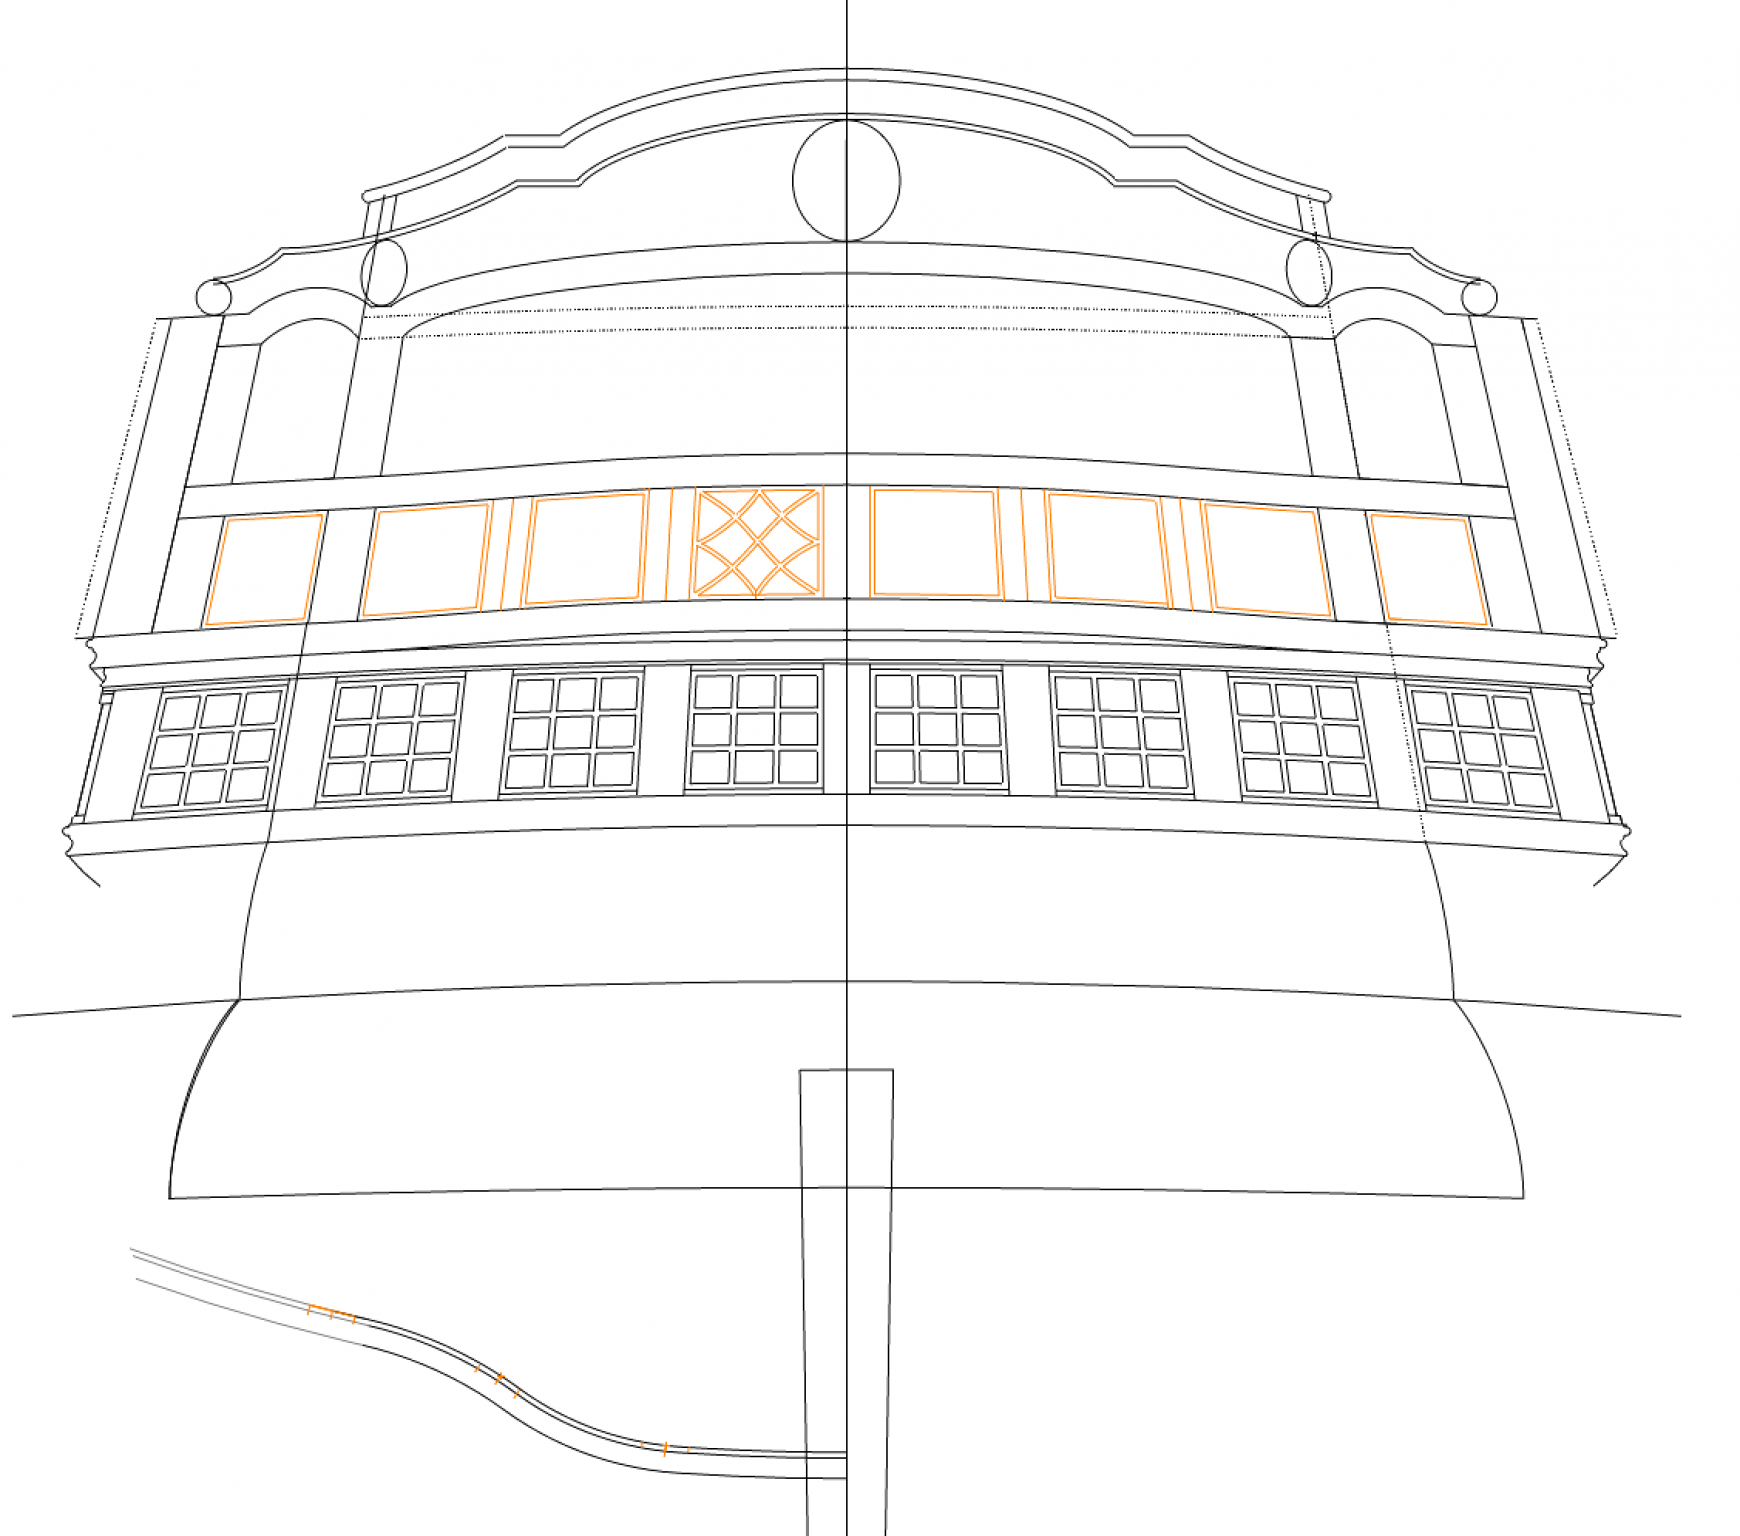
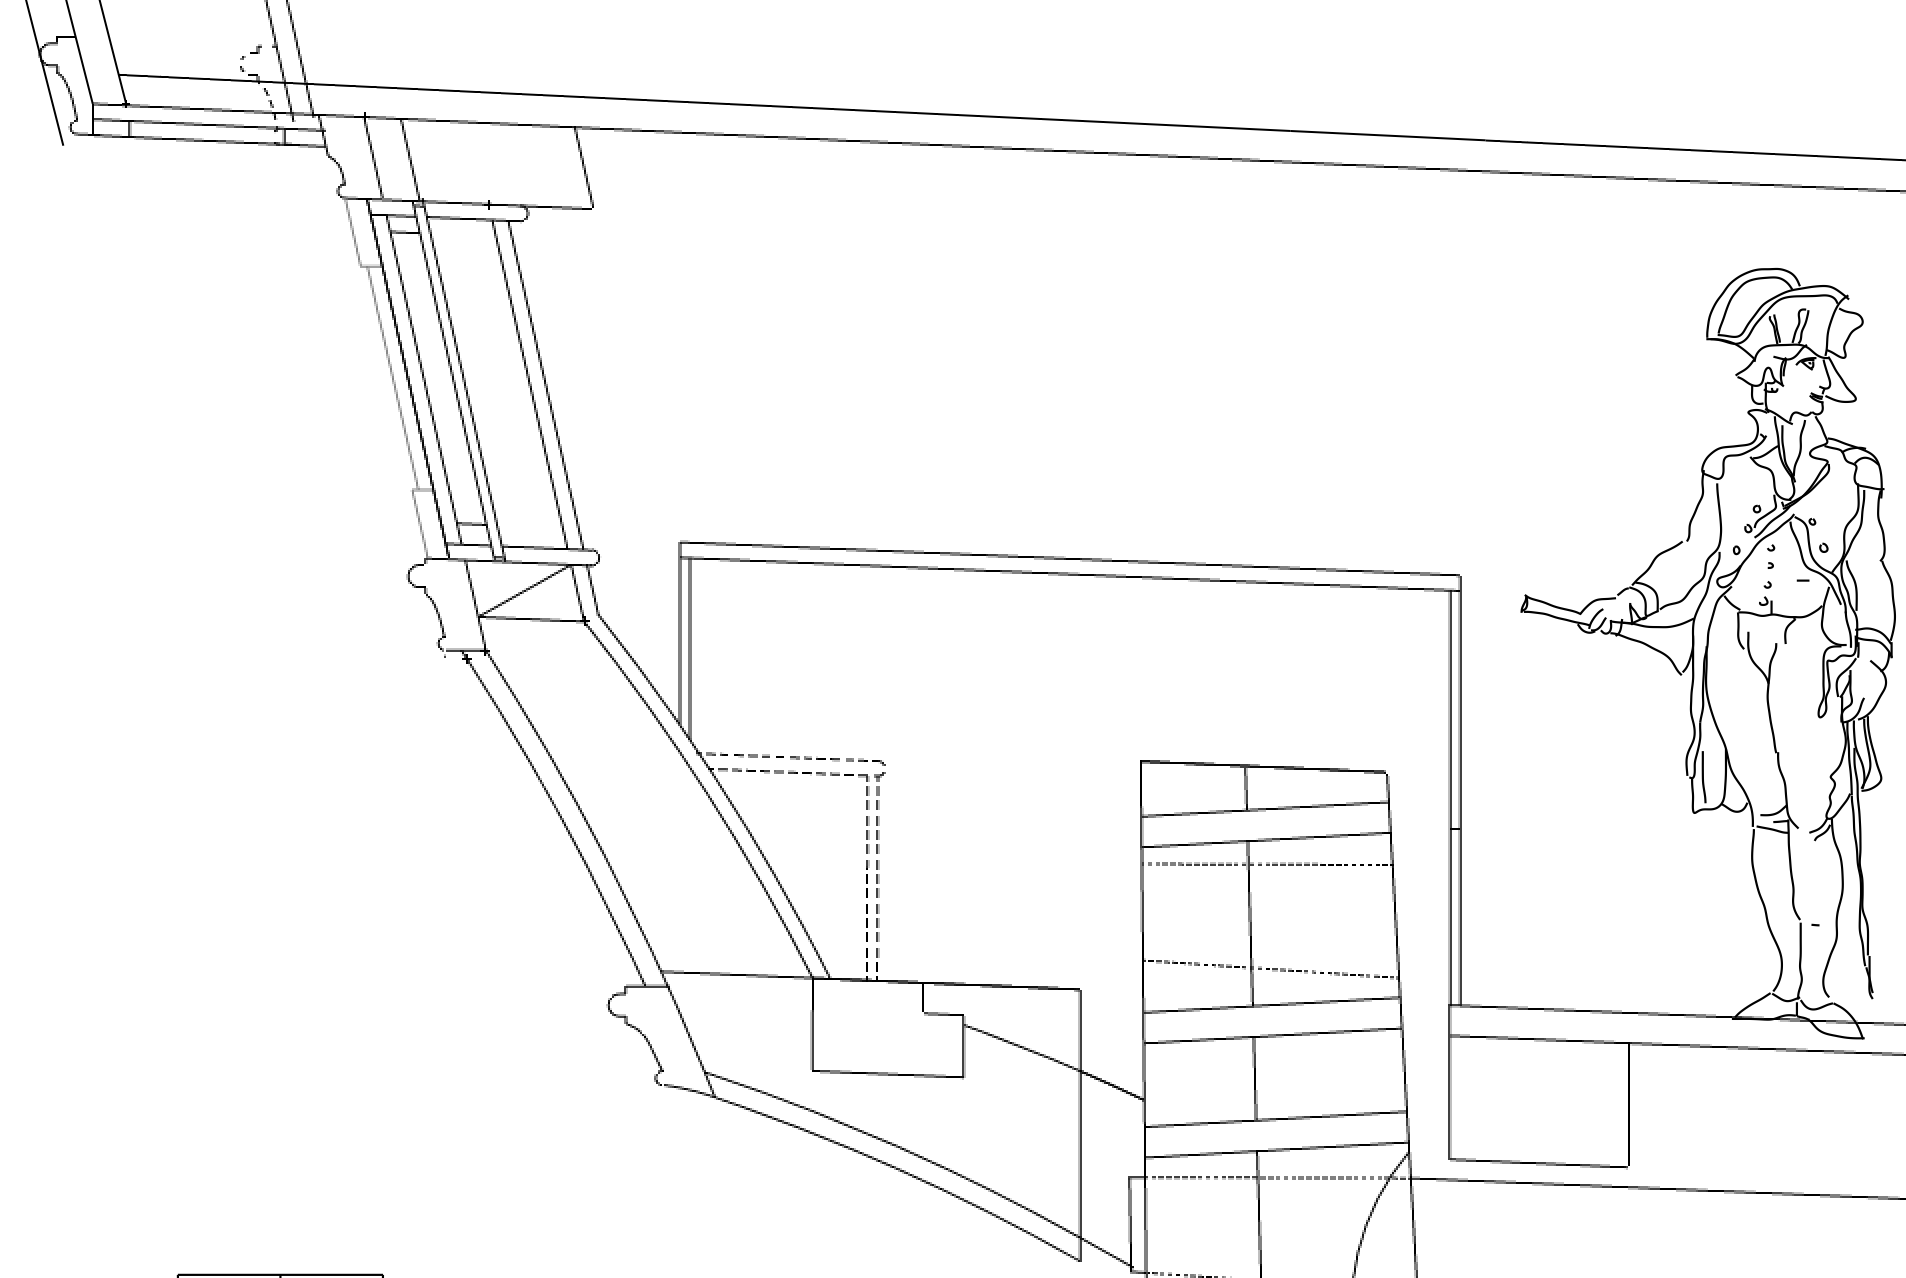
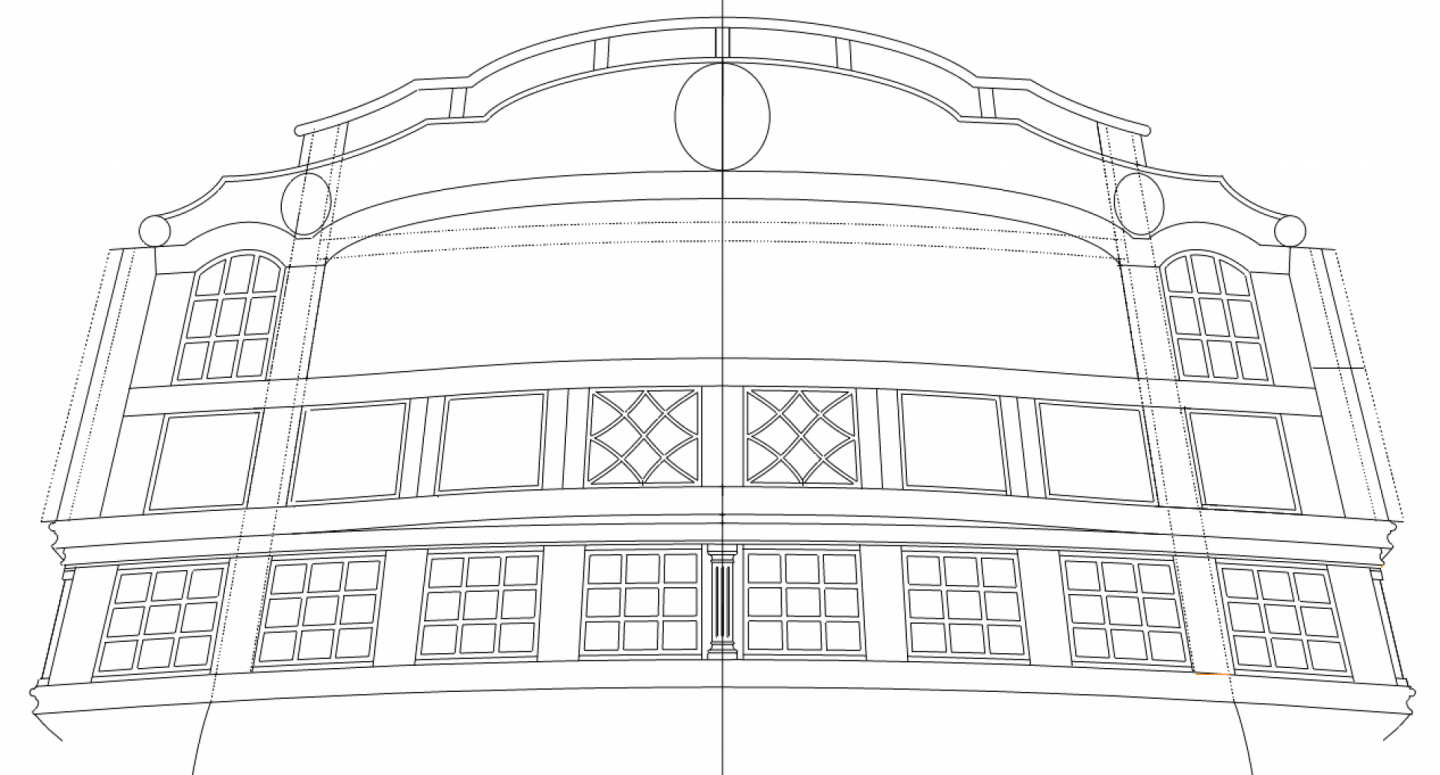
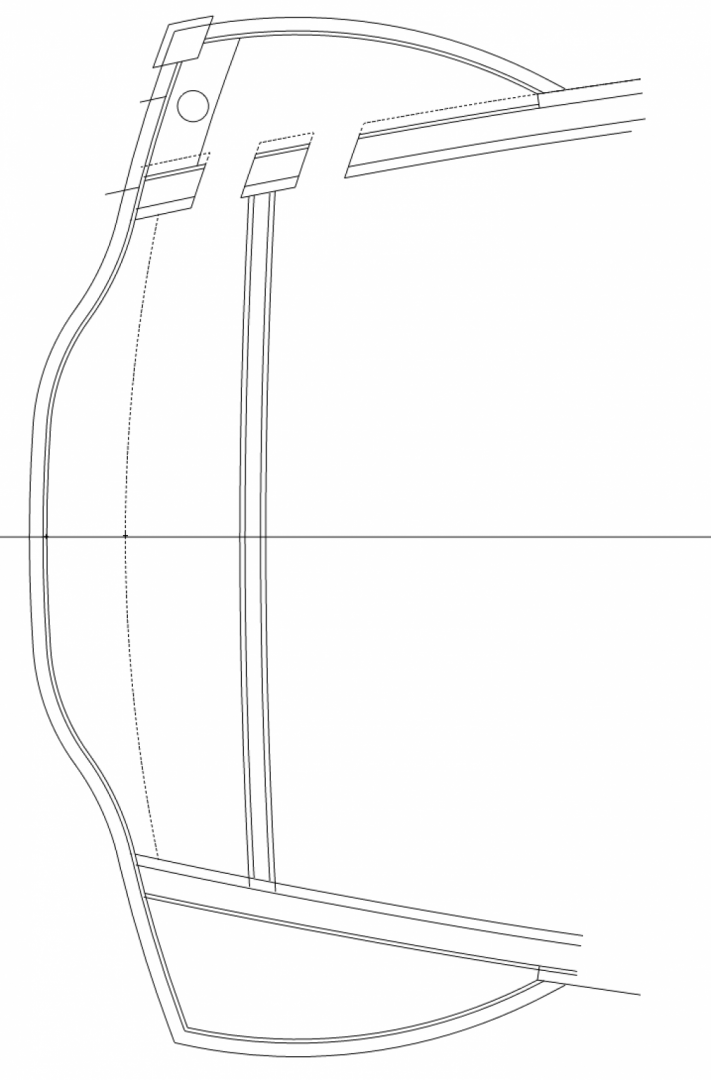
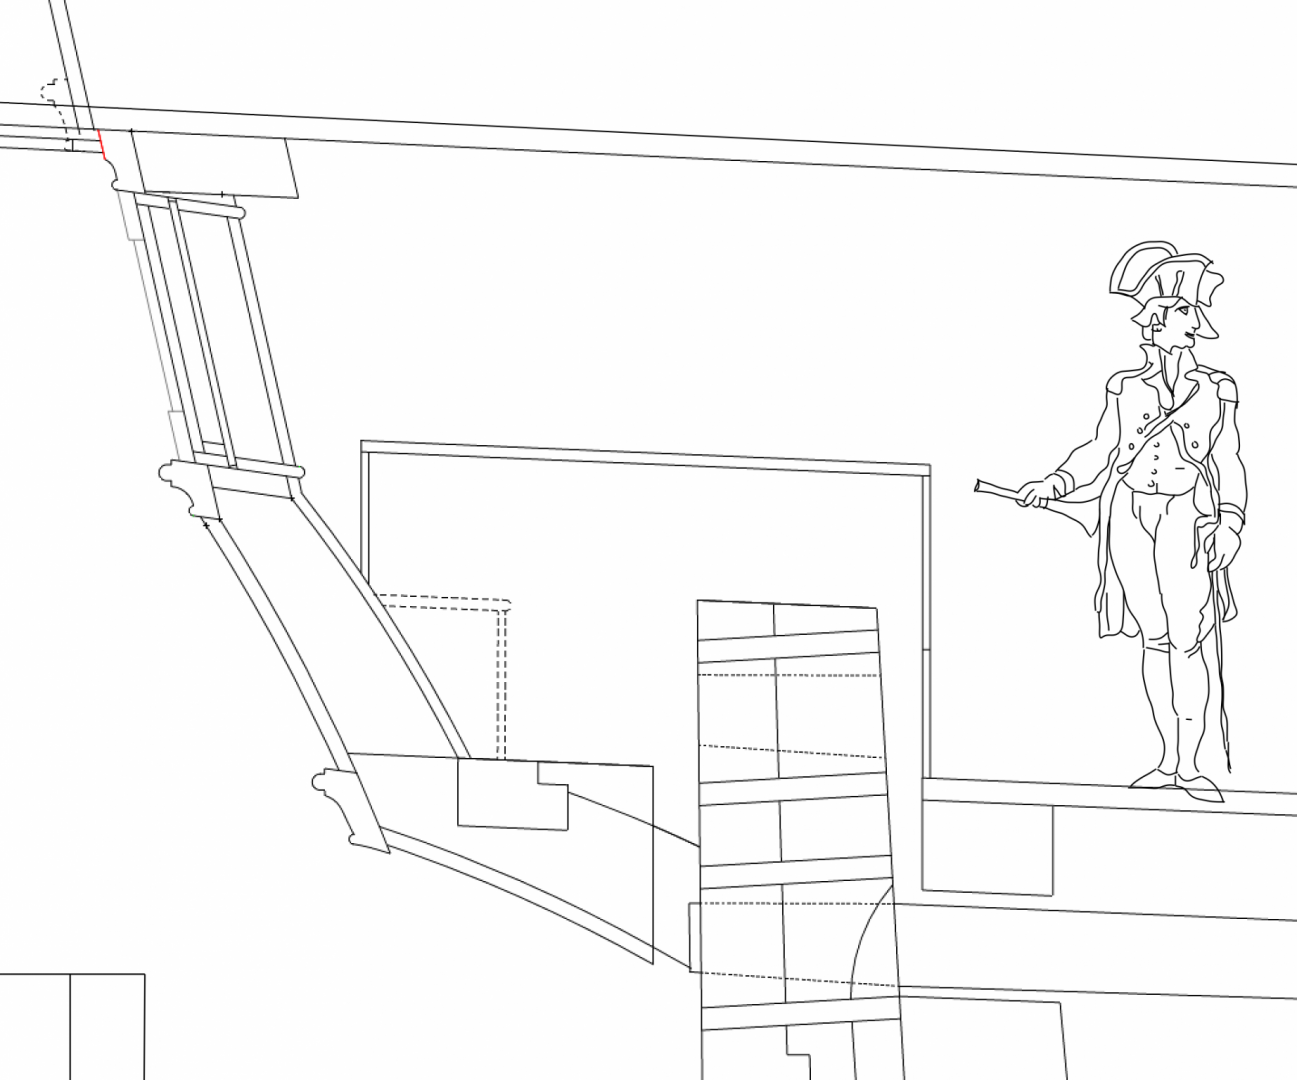
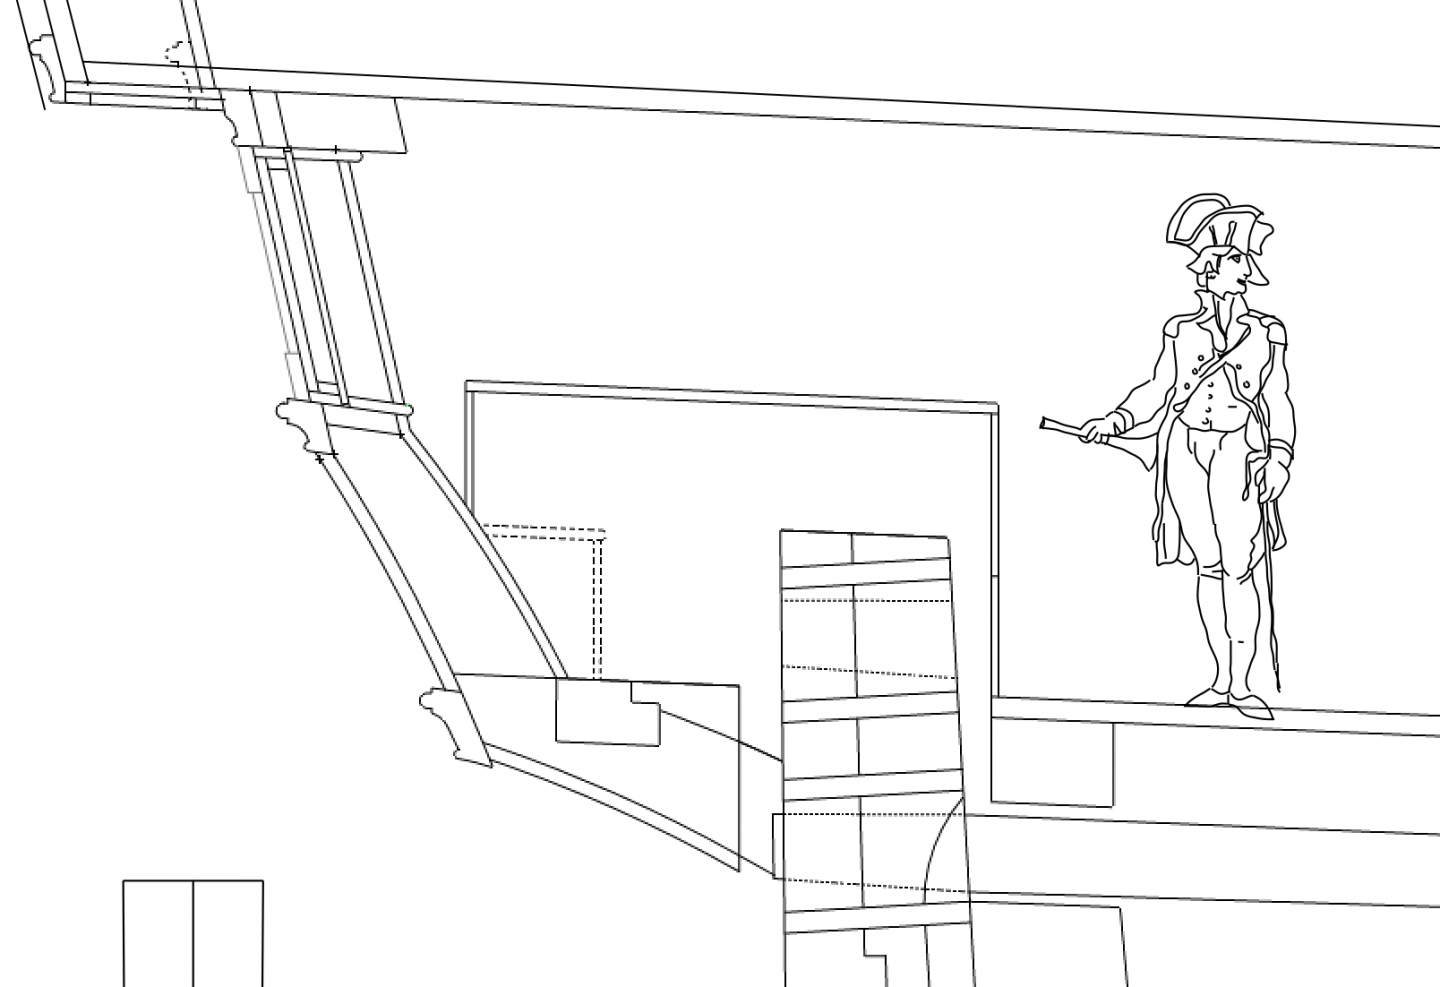
 More drawing. The Bellona has an interesting cove over the balcony, which took some time to plot against the plan and section before finalizing its shape in the stern view. I am not sure yet if the curve matches the curve of the stern screen wall, or the round back of the poop deck above. A dotted line in the plan shows it matching the round back of the poop deck. This shows how small the doors are to the quarter galleries. My captain definitely cannot wear his hat while entering. I have also confirmed that there is a soffit under the balcony deck, which is aligned with the sheer of the quarter galleries. I am showing a frame and panel system for it, as I have shown for the panelling in the ceiling of the balcony. Here I am showing with dotted lines the side planking at 5 1/2" thick, coming through into the quarter gallery. It definitely makes it a smaller space, but not impossible. And once these details were refined in the plan and section, I had to go back and change some things in the stern view. The cove had to drop at the sides, and the upper windows in the quarter gallery got shorter, both of which match better the photos of both Bellona models. So it must be getting closer to accurate! Mark
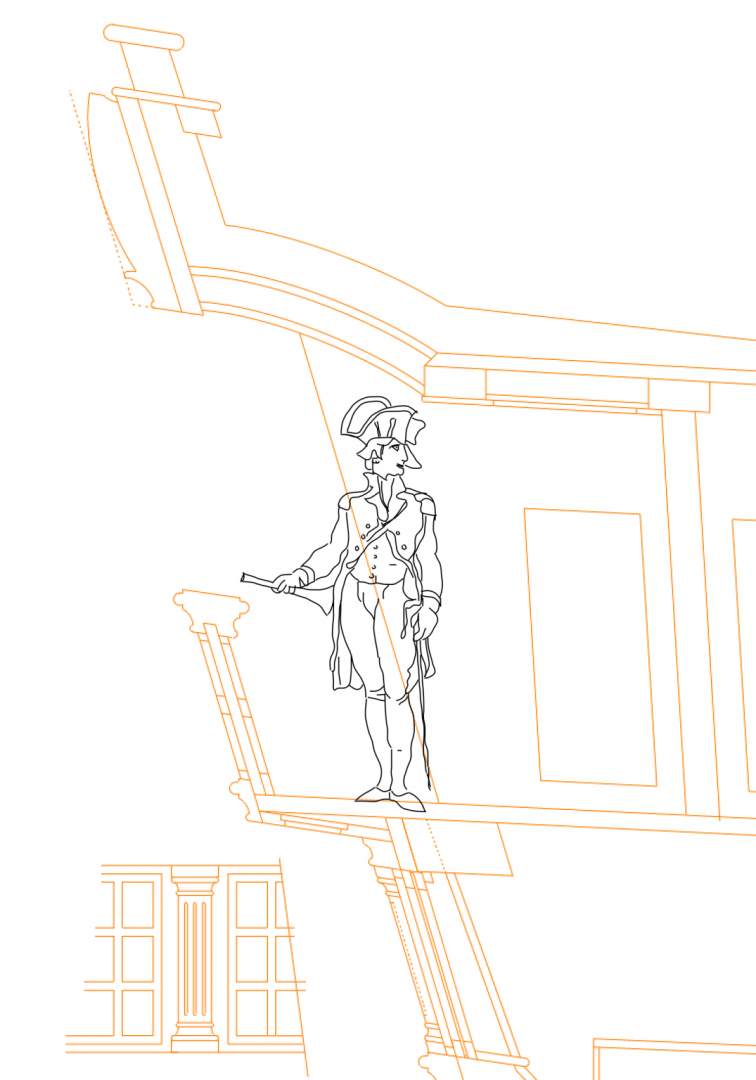
-
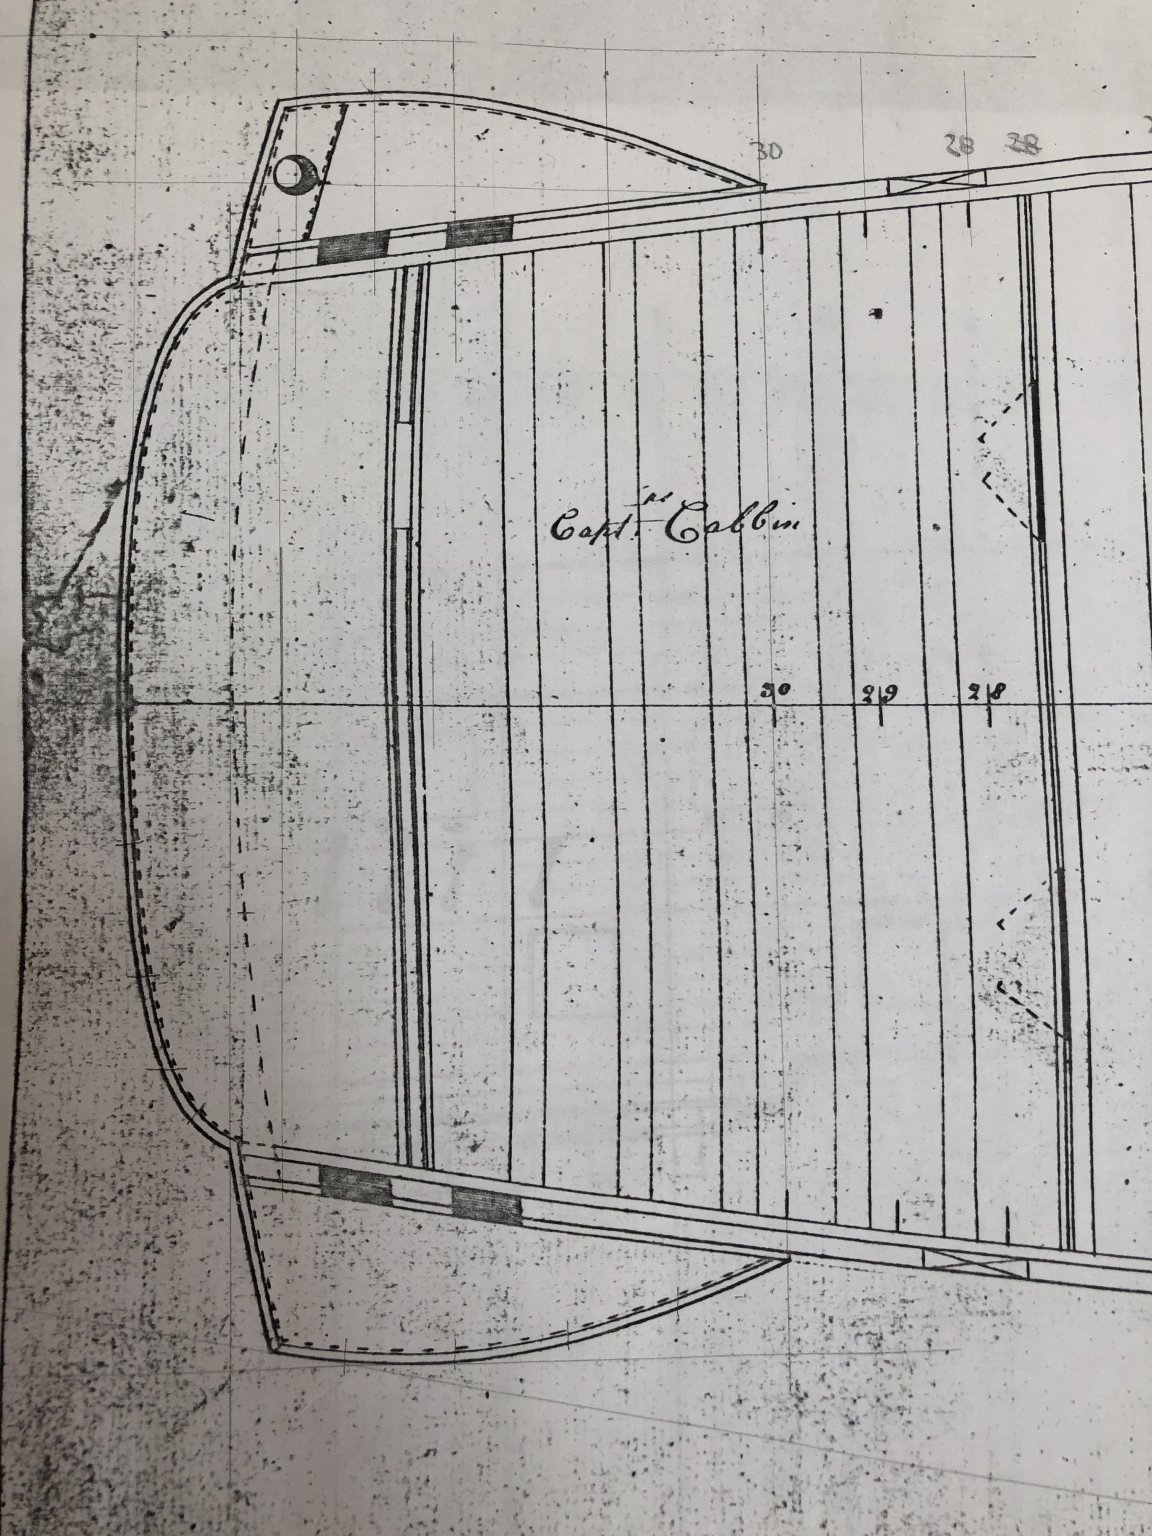
Hi druxey, This plan was a Xerox I bought from the National Maritime Museum back in the early 1990s, before their internet postings. It is of the Dragon, the Bellona's sister ship, because they did not have Bellona drawings for me at the time. I don't know if they do today, come to think of it. This quarterdeck plan is labeled Regd. No. 968, Box 19. These drawings are pretty basic, which I why I get to spend so much fun time reconstructing much of this ship! Mark
-
hi druxey it is the plan in posting #1652 above. The plank shown on the inboard side of the frame is accurate, about 4”. The planking around the outside of the quarter gallery is 1 1/2” as you would expect; but then so is the planking on the hull inside the quarter gallery. I don’t know how else to read this. If the planking were 5 1/2” thick here (it is the channel wale at this point), the seat would have to be shorter than is shown. Also, the planking would make the munion at this point way too wide at the stern. what do you think? Mark
-
Beautiful craftsmanship, and fascinating brass template. Mark
-
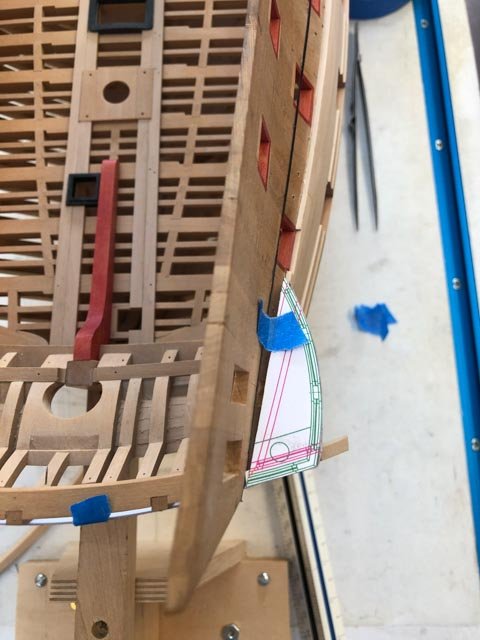
Thanks, druxey, I like the serpentine curve as well. It is a little unusual, as best I have seen in other ships of this period. I am very tempted to make solid balcony railings. I think it is likely beyond my skills to pierce those railings at 3/16" scale. There is still much more to do, but here is a status report. I finally figured out how to make that serpentine curved balcony, using 3 sweeps (compare to the hard break version of the balcony below the center line). I also discovered that the quarter galleries are arcs of circles; I found the point of the compass for the curve in my admiralty drawing. This is always exciting, to discover the hand of the original draftsman and how he made the drawing. I also discovered that the planking on the outboard of the frame, at the location of the quarter gallery, is quite thin, about 1 1/2" to 2". I saw this in the admiralty drawing, but did not understand it before. if the normal planking at this level came through to the stern, the interior of the quarter gallery would be very narrow indeed. And here is the stern drawing so far. I blew up photos of the models, and constructed scales based on a known size (width of the frame at the sill of the windows). I could then scale various parts. Since I used two different photos and two different scales, I was able to adjust for perspective while also comparing it to the admiralty sheer and section drawings. I think I am getting pretty close to the shape and location of stern details.

-
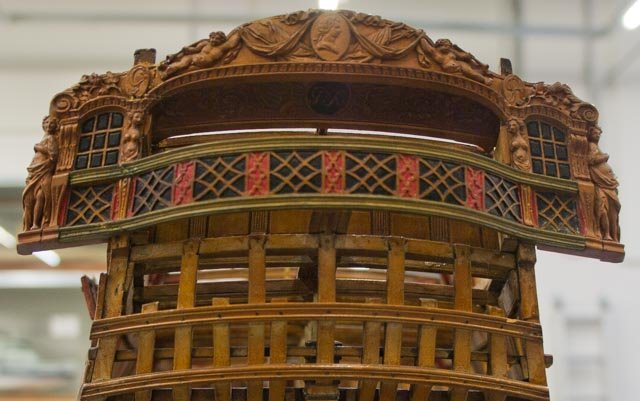
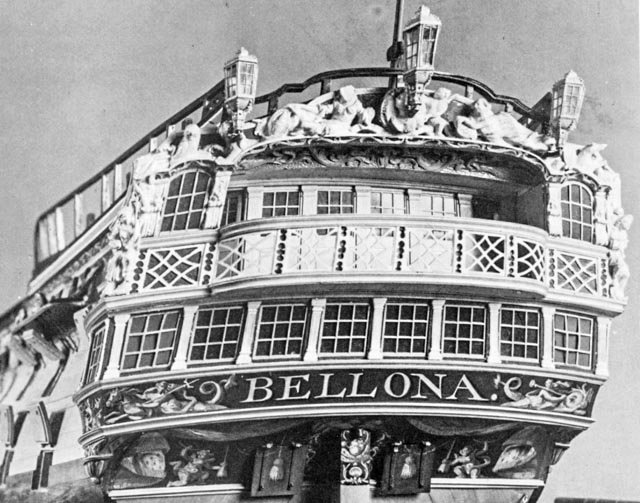
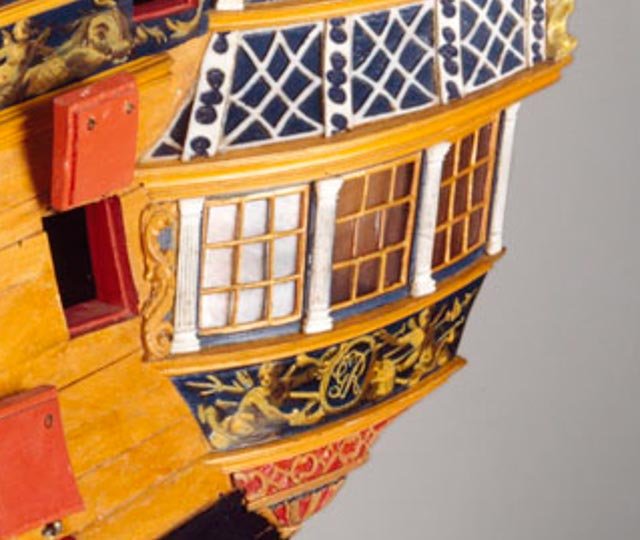
I am still working on drafting the stern, which is the biggest challenge of orthographic projection I have ever attempted. Good think I have nowhere else to go. I will have more to show later. But as I get up to the top of the stern, I have to make a final decision about which version of the Bellona I will build. I never did like the later 1780s remodel as shown in the second model, with its awkward railing on the sides of the poop deck: SECOND MODEL I much prefer the original design as seen in the original model below: ORIGINAL MODEL So to be consistent with the original design, I have decided to do all of the ornament as in the original design, which I also think is less fussy than in the second model. And to be consistent, I should probably construct the serpentine curve to the balcony in the original model, as opposed to the balcony with the sharp break in the second model. Although, the original drawings show a balcony with a sharp break: Hard to know how to get back to original... A question for those of you with extensive libraries of photos; notice that in the second model, the decoration in the railing is pierced, whereas in the original model, it is a solid railing with the decoration applied to a solid face. Do you think this was an expediency for the model maker, or are there examples of other ships with similar decoration on a solid rail? I notice in the original model that the quarter gallery windows under the arches are carved from the solid, which I don't think would have been in the actual ship. This suggests that the railing might also be an expediency. It sure would be easier to build if it were solid and not pierced.... Mark

-
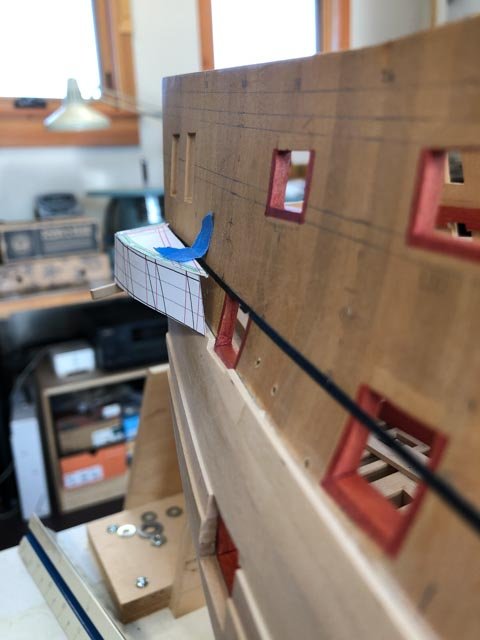
So a little paper shows a lot! My CAD drawing was accurate, and model reveals that if the top and bottom of the windows are parallel but offset, the top one has to pull out further from the hull in order for the lower one to just hit the side. In other words, there is a gap at the top one, as seen here: Looking back at the second Bellona model, it is clear that this is made up somehow by what druxey called the canting livre, as seen here: I see I need to lay out the window muntins from the lower sill, and leave the gap at the head. Then it is filled by that little triangle. Funny, I never knew what those were for, until I tried to lay out the quarter galleries! Mark
-
Thanks, druxey, so it is like on a cylinder not a cone. I put tracing paper over the Steel Plate VII, and sure enough, the upper and lower curves are the same, just shifted. On paper, this makes my lower cill too short to accommodate the foremost munition; so it must be a drafting error somewhere. I will try mocking up some cardboard parts on the actual model and see what is going on here.
-
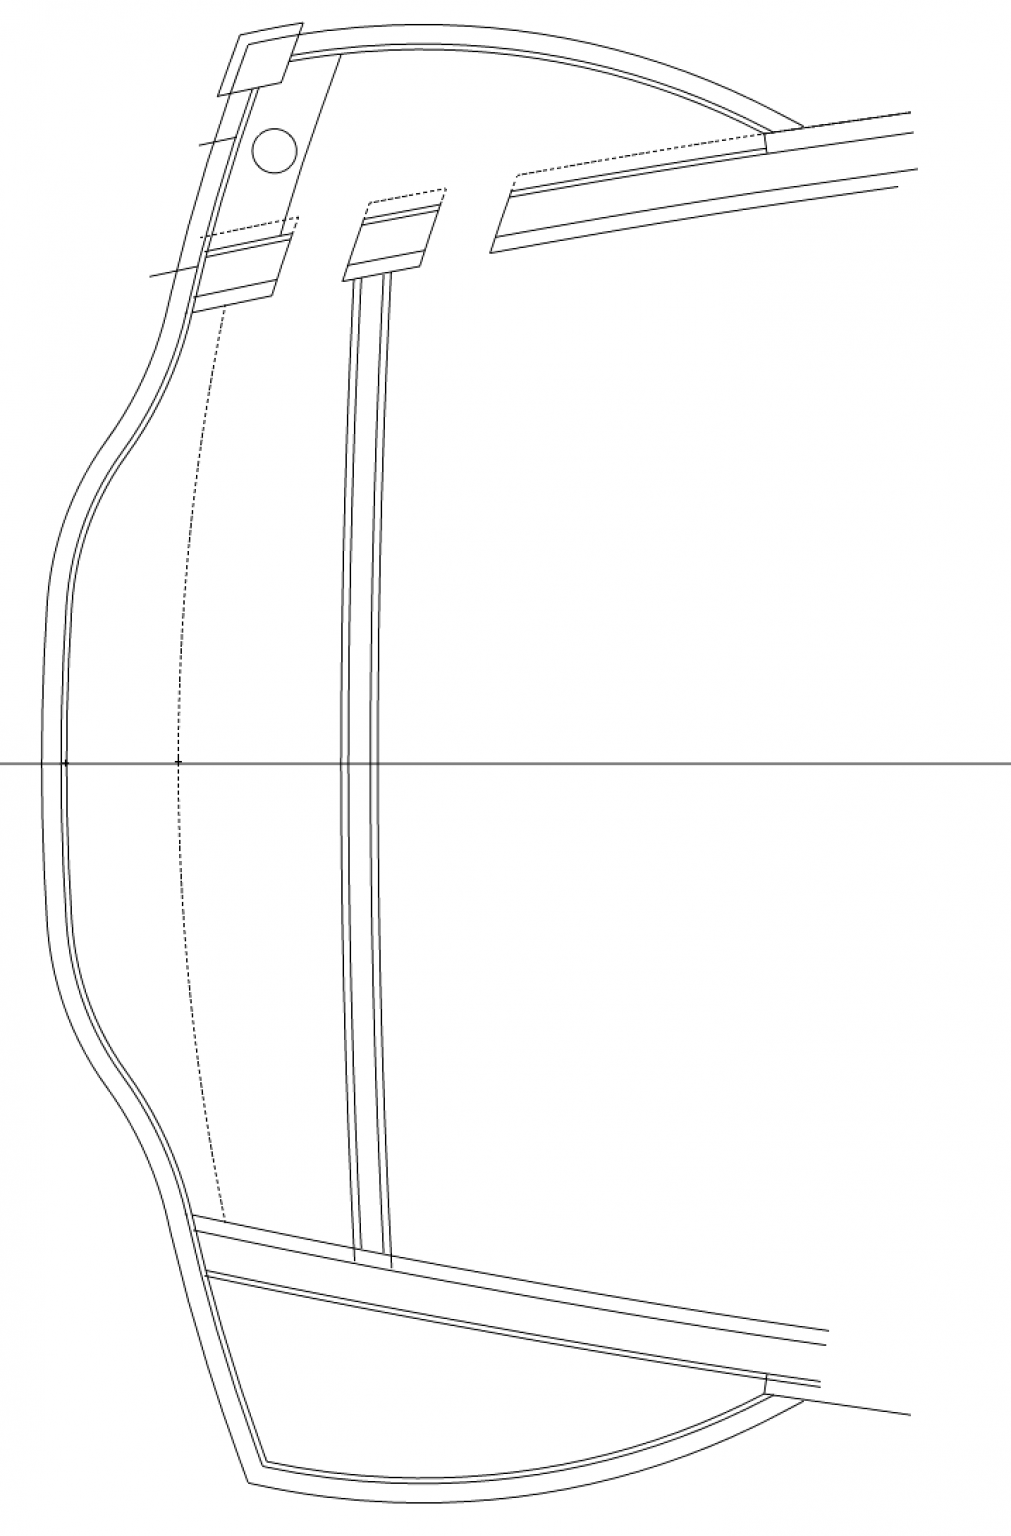
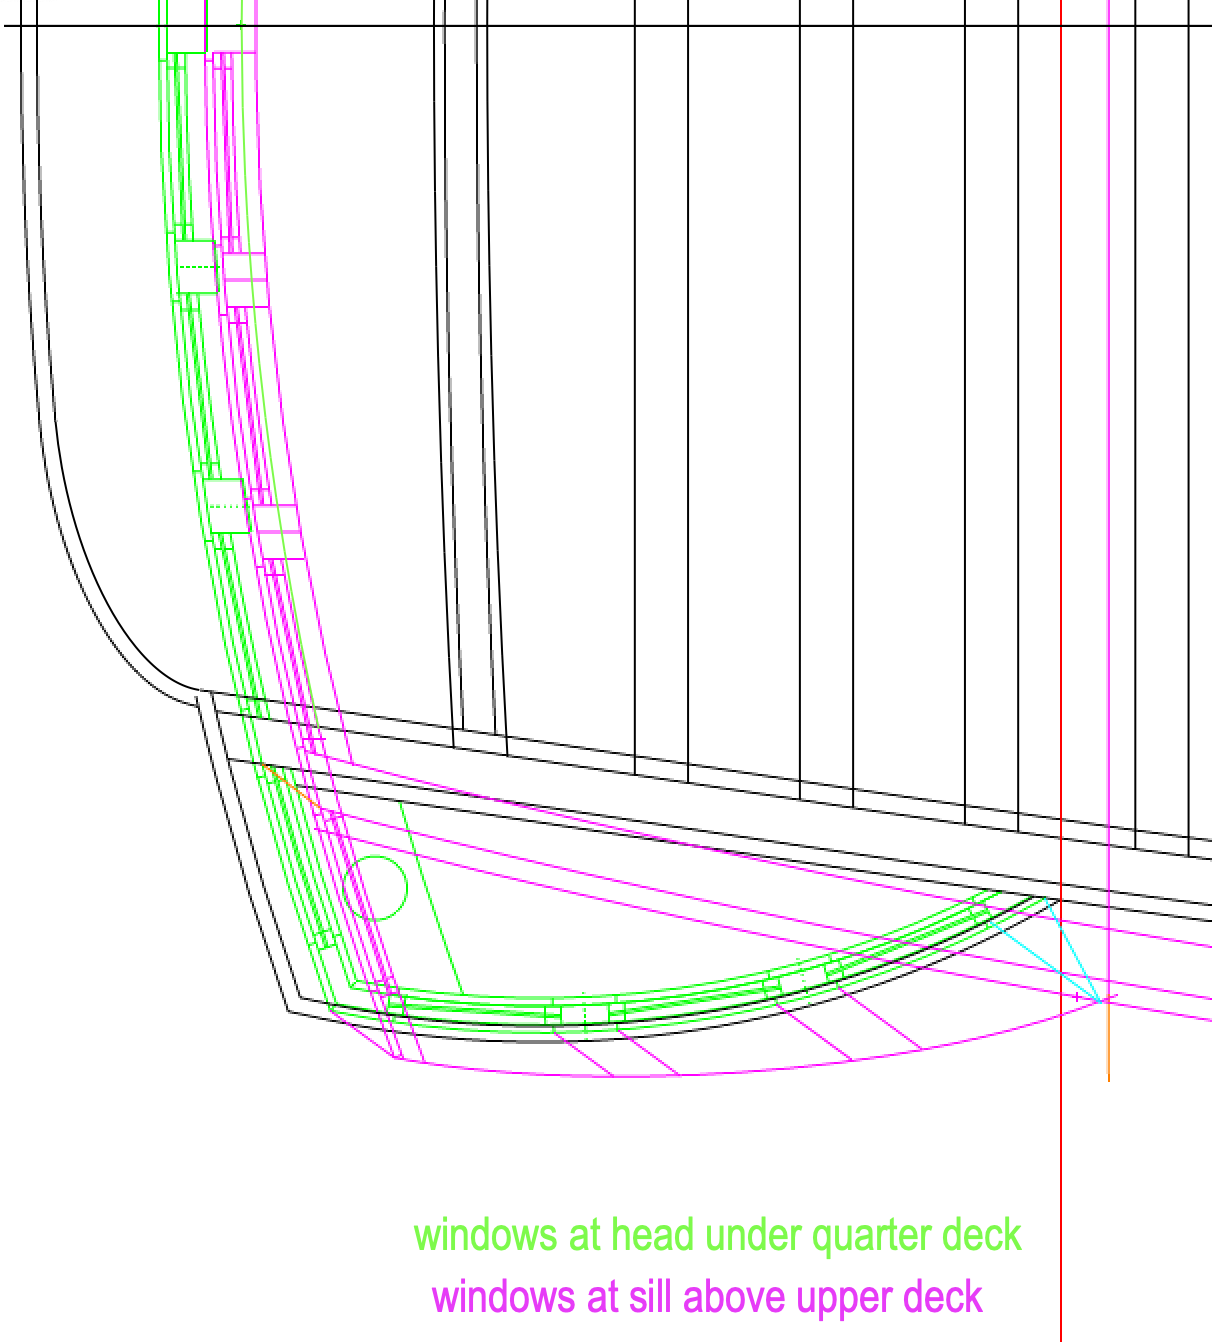
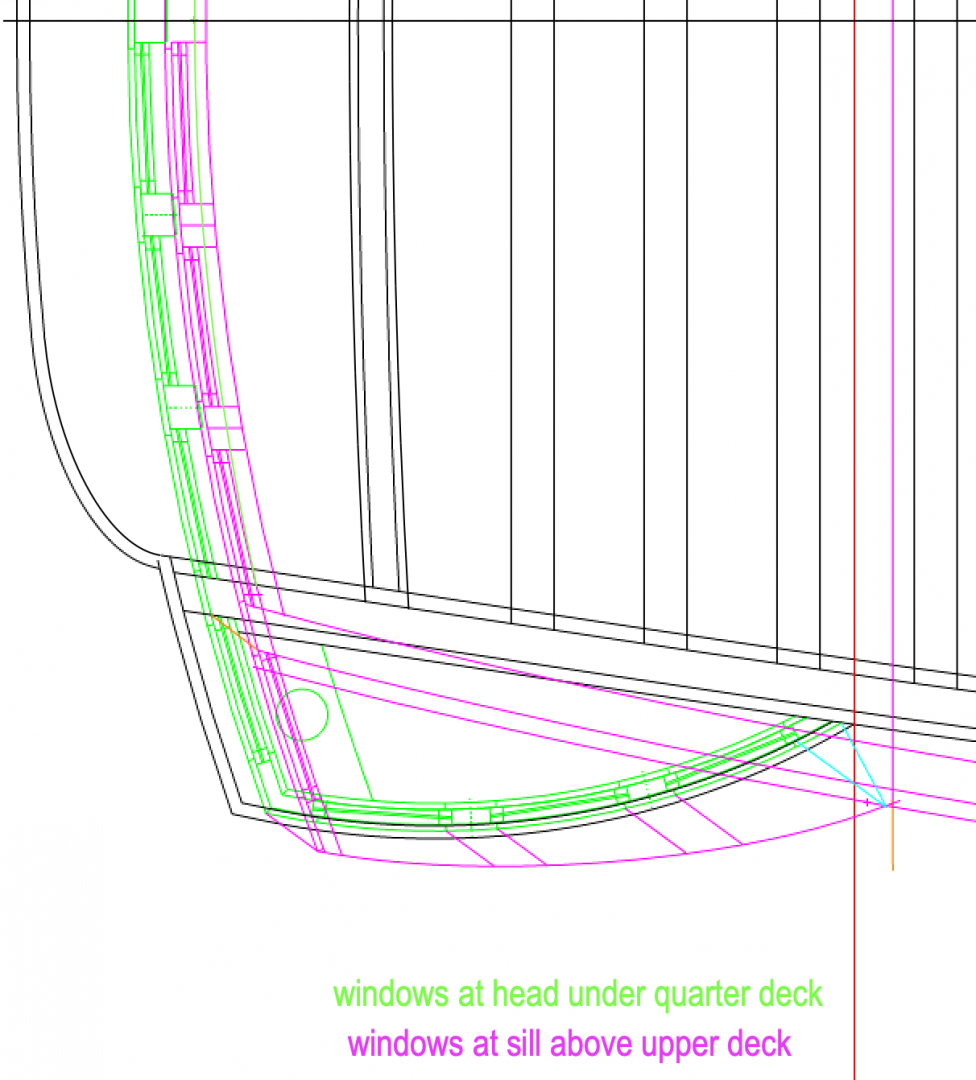
Mark, that is a very interesting cross section, for those of us focused on English construction. The tumblehome actually turns back out topside. Well, I have spent a very interesting day working out the geometry of the quarter galleries. The green below is the head of the windows just under the quarter deck, while the purple is the sill of the same window, up from the upper deck. According to Steel, the lines of the muntins between the windows in plan should be parallel, in order to ensure no winding in the window face (which would make it impossible to fit flat glass). However, when I get to the muntin at the fore end of the quarter gallery, the line is not parallel to the others. It should be the leftmost blue line which is parallel to the others, and it turns out to be the rightmost blue line, which is based on the original sheer showing where the gallery hits the side of the hull at each of these levels. So something is not lining up right. Did I read somewhere that the windows on the quarter gallery would have to be like the side of a cylinder, as opposed to the side of a cone, in order to ensure it is out of winding? Is that what the parallel lines insisted upon by Steel are meant to ensure? Maybe a fresh look in the morning! Mark
-
HI everyone, The stern galleries elicited a lot of good comments. Thank you! Ron, thanks for the photos of the Victory. I agree that the sills seem to line up with the deck; it would be interesting to see how far apart the outboard sheer is in relationship to the deck sheer. The Victory was originally built about the same time as the Bellona, and I believe had a similar sheer. When it was rebuilt for Nelson's time, did the sheer flatten? Also, it is interesting to see that the panelling below the windows inboard are recessed in-between the stern timbers; I have been assuming that the panelling was on the forward face of the stern timbers. My assumption makes the window frames quite wide, and the triangular piece at the head is prominent. But if the windows and walls were thinner, like in the Victory, this would be less obvious. I might explore that idea. Mark, thanks for the photos of those models. Those show your point well, and they also show some great detail like on the moulding profiles. I like your rule of deck sheer inboard, everything outboard follows the outboard sheer. That seems to apply to everything I have seen so far. And regarding the changing angles as a way of creating beauty, I notice they also reduce the width of the mouldings as they are higher in the ship; matts for drawings and paintings also have a wider base than the sides and top for the same reason--it gives a solid visual base. druxey, I was going to ask if you knew about the sheer of the mouldings because you had already found out the hard way...thanks for letting me learn from your initial mistake.🙂 Gaetan, I like your comment that the French ships are so much more rational. I know from my study of architectural history that the French were always known for a more rational approach to design, even when they applied elaborate Baroque decoration. So it is interesting to hear that they would be more rational in their ship designs. Gary, my drawings of the Bellona also show a big empty space at the aft end of the upper deck, no transom, no aft most beam, nothing around the rudder. I looked at a number of deck plans that druxey sent in previous posts, and kind of made up the curved beam as the only reasonable way to get a beam in the empty space and still avoid hitting the rudder head. All the rest of it is also conjecture about how to encase the rudder head. I wonder why the shipwrights did not show any detail in this area of their drawings... Steel says that the aft most knee should cast down to the beam fore of the curved beam; but I don't see how that works with a knee fore of the curved beam. So something isn't quite right here yet. And I assume there is a rabbet in the transom, to house the plank ends. But that is conjecture as well. I look forward to any other research you might turn up on this! druxey and Siggi, I am going to mock up with cardboard the lower stool, and stick my captain on it to see what happens with the floor of the quarter gallery. This is such a perplexing detail, clearly designed to look good on the outside with less consideration for what happens within. I wonder if the officers read old copies of the London Times, and if there was a little newspaper rack....😏 Mark
-
Beautiful, Karl. and I can see that it would be difficult for mutineers to attack the captain through those doors, with the pump handles standing guard! Mark
- 87 replies
-
- 3
-

-
- royal caroline
- yacht
- (and 1 more)
-
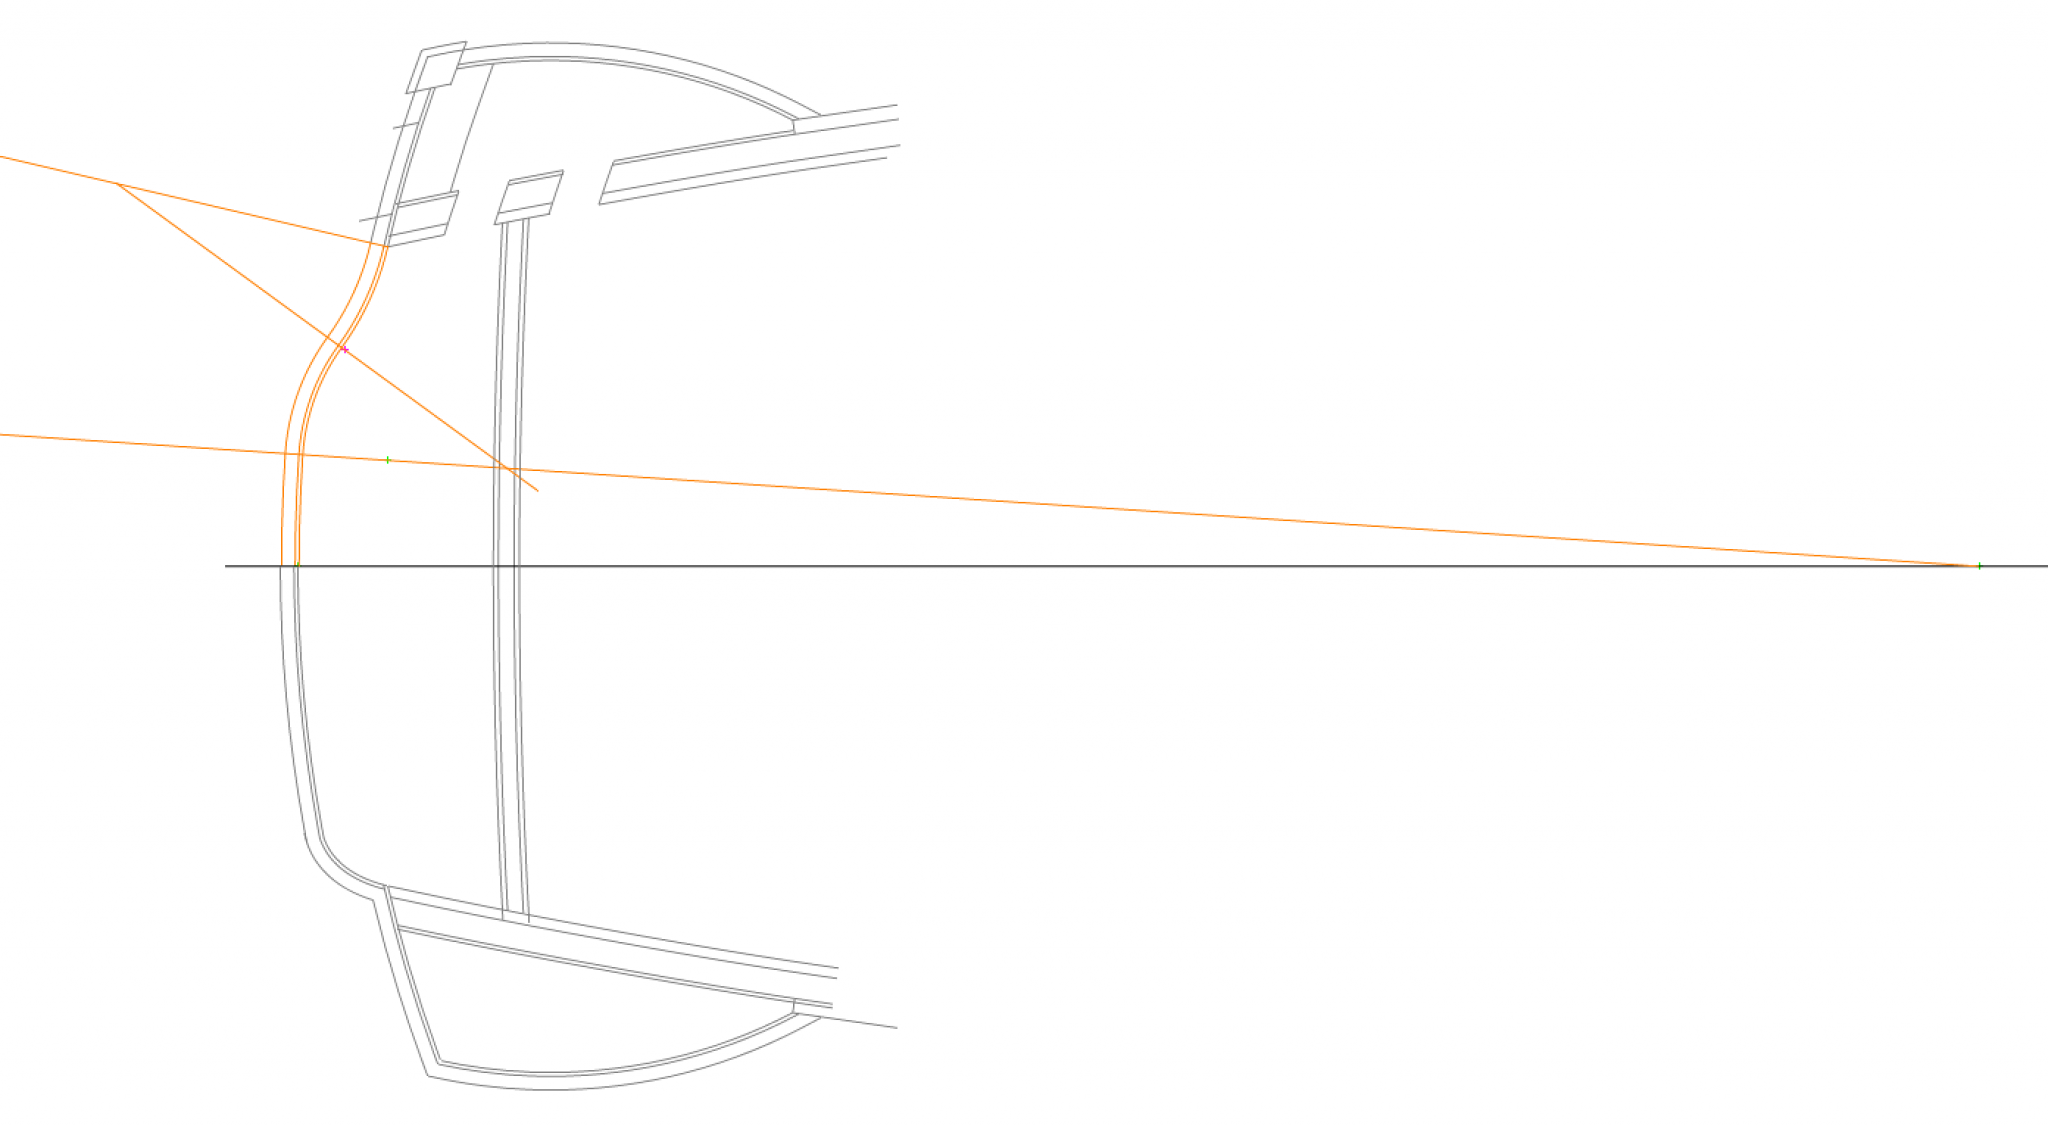
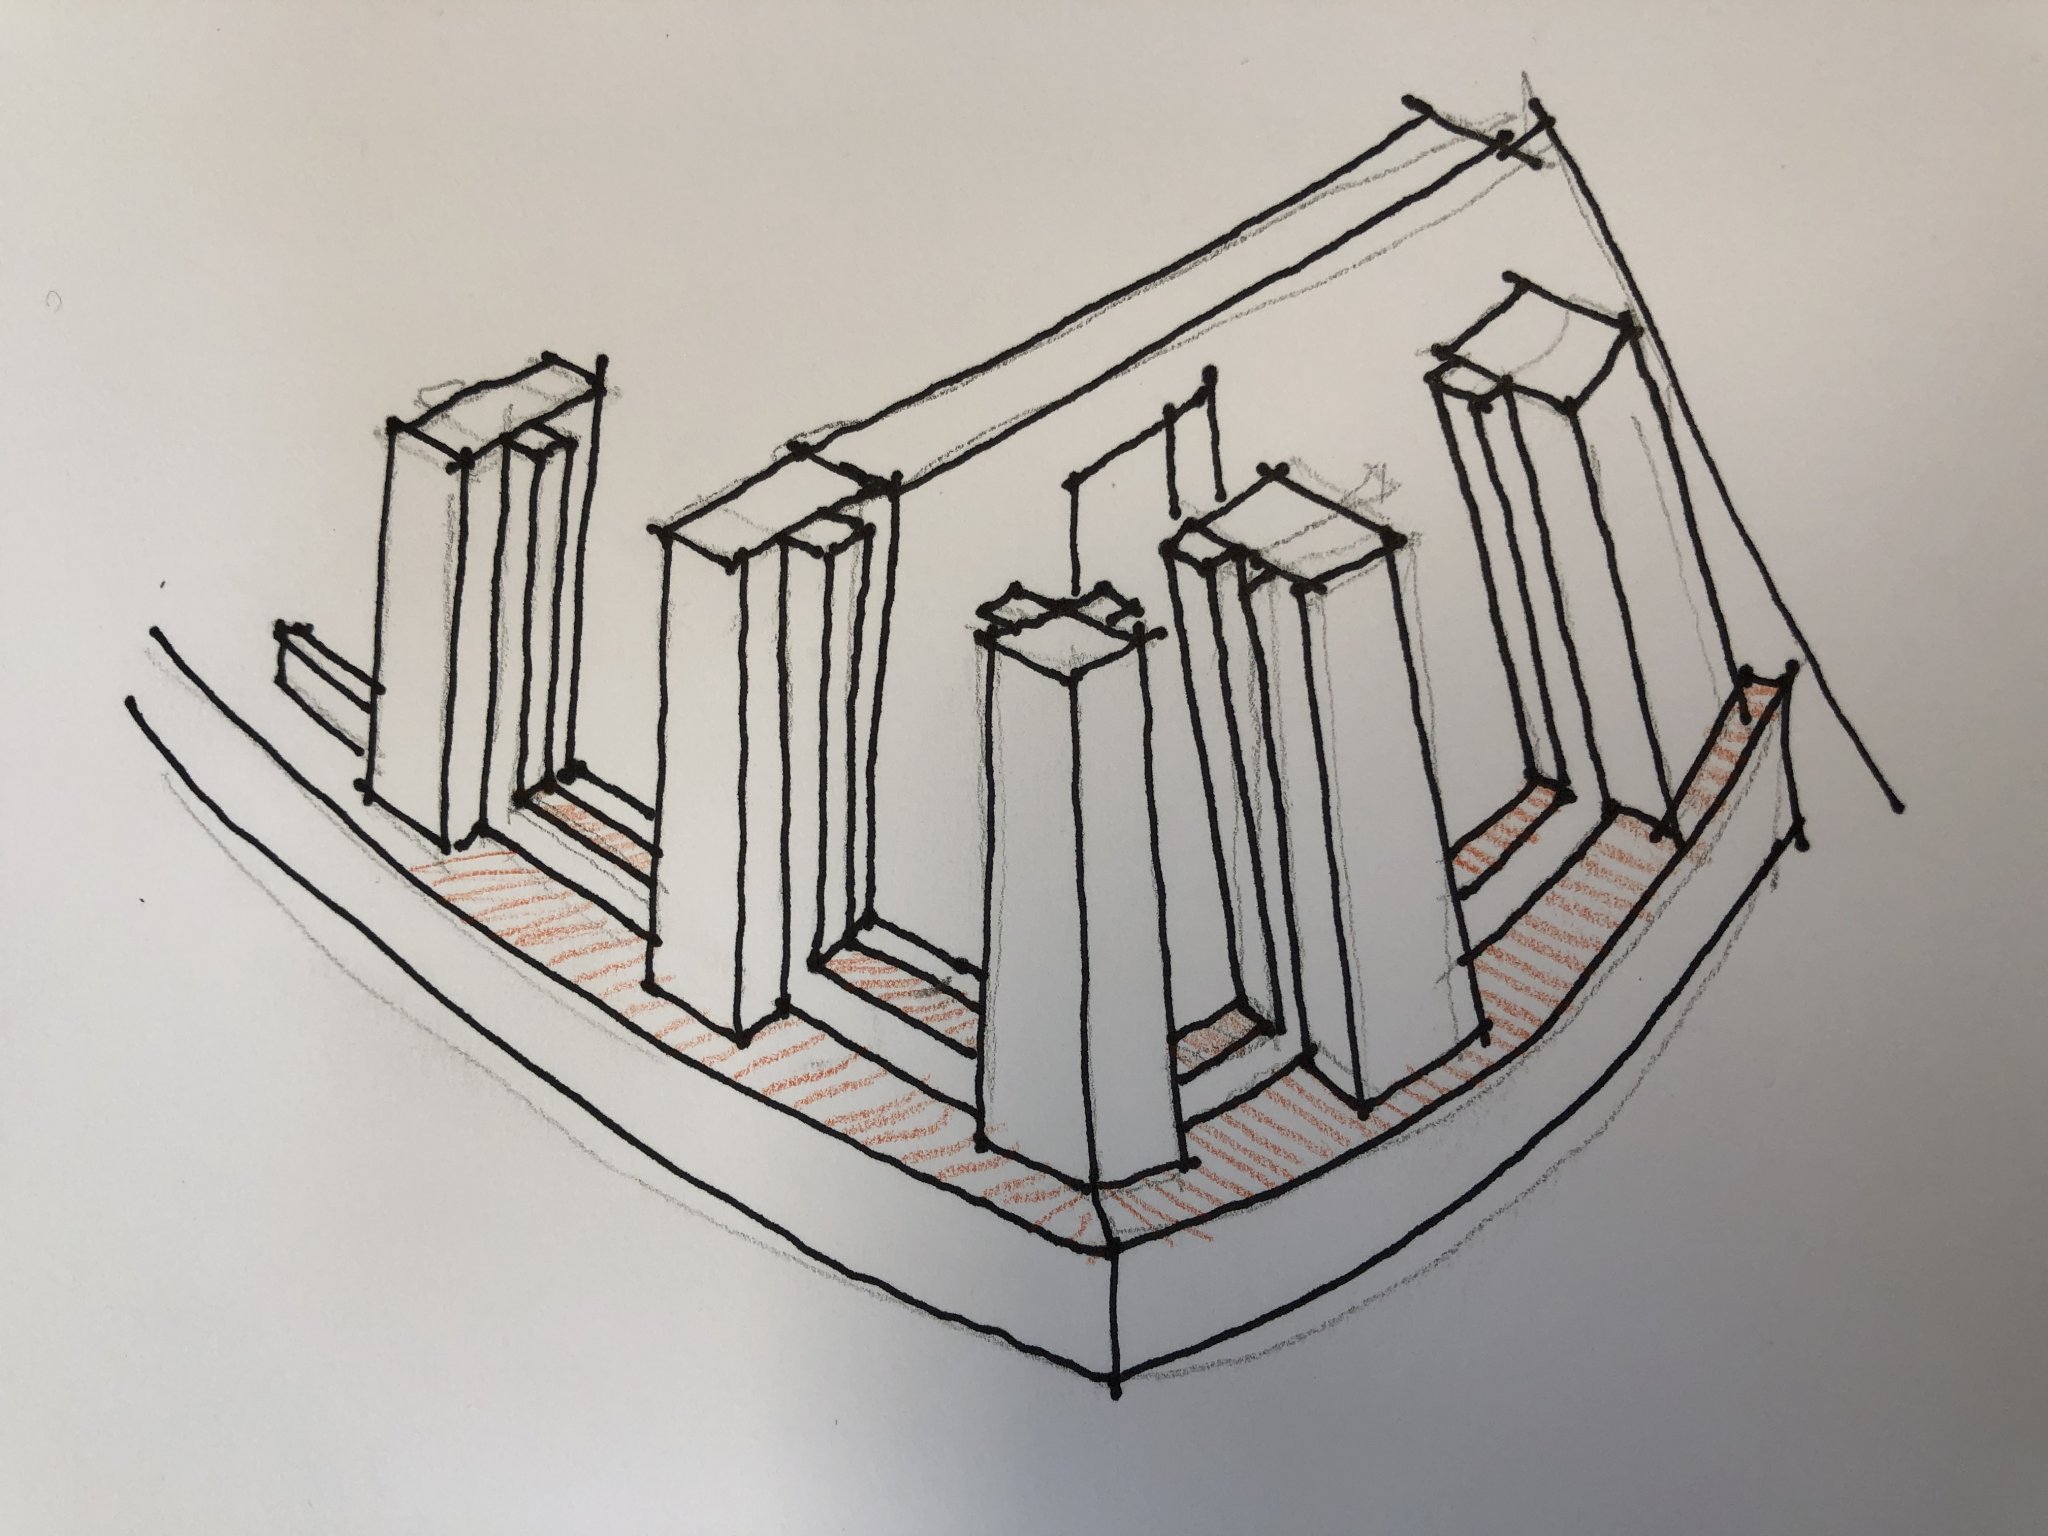
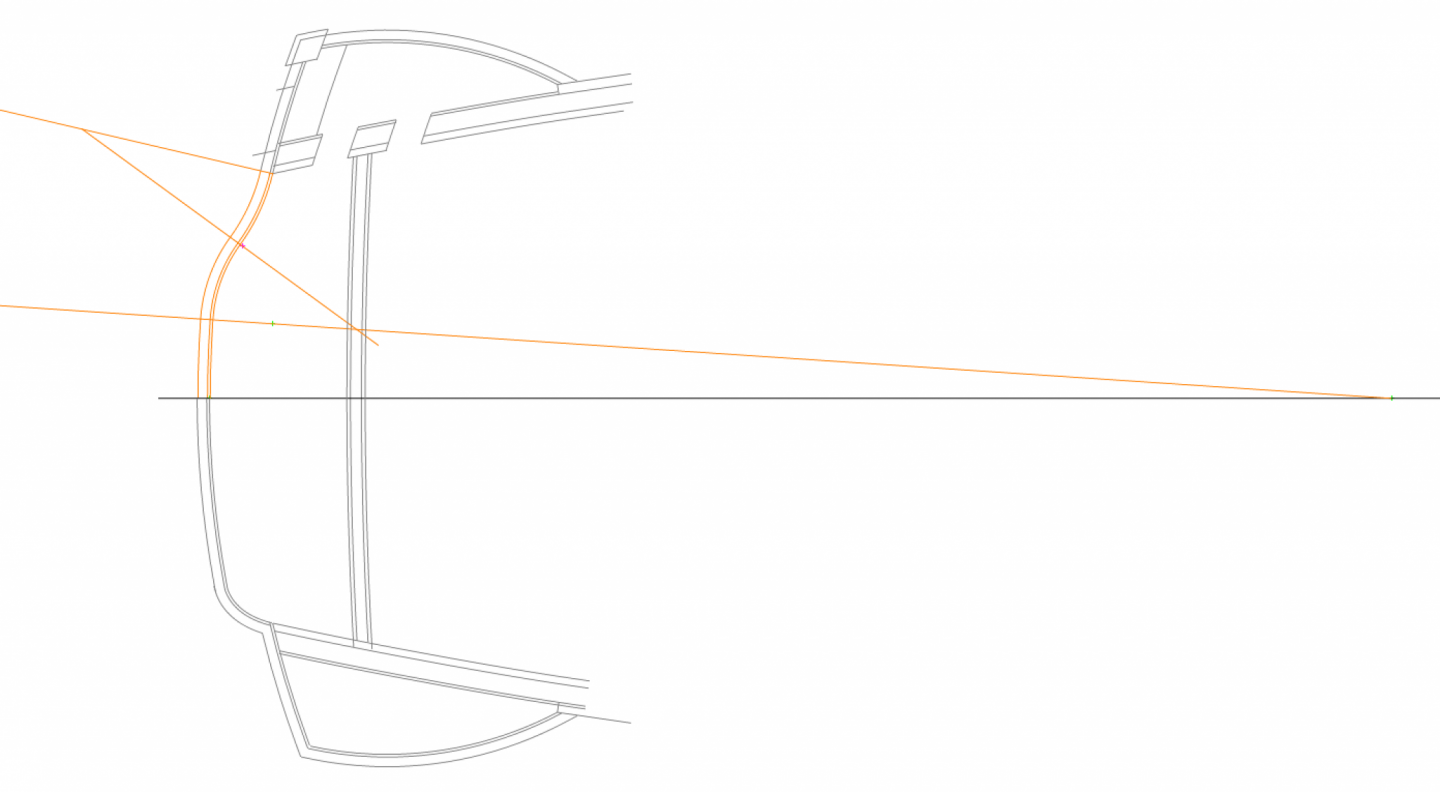
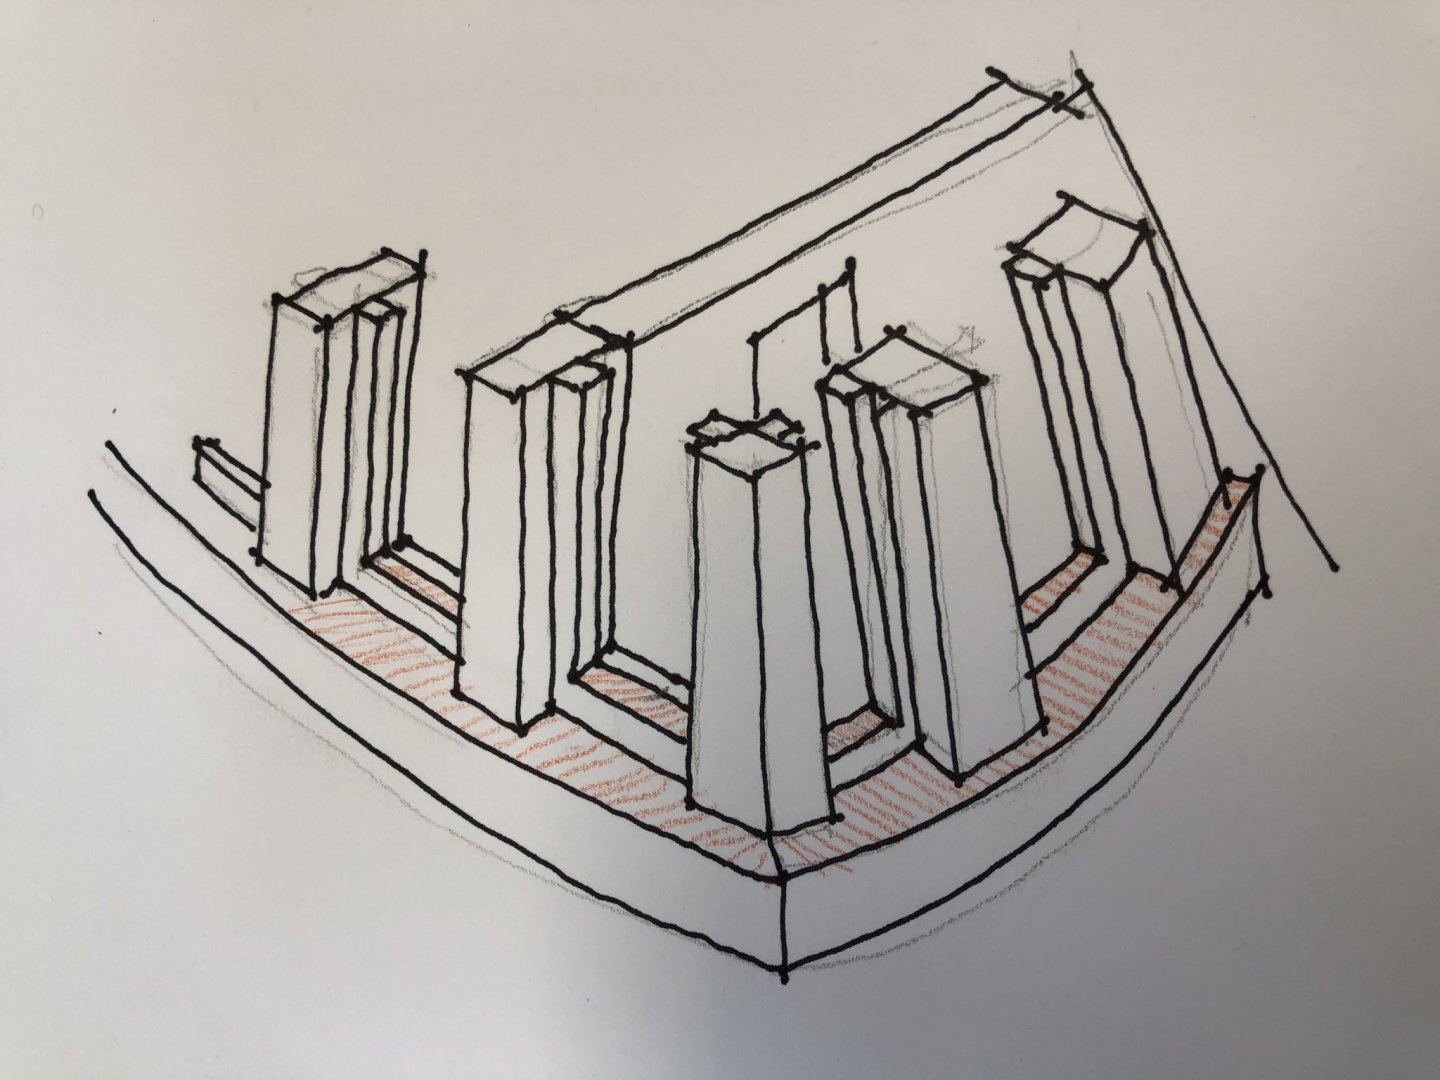
Thank you stuglo, druxey Gary, and rlb for your comments. This is an exceedingly subtle detail, I have discovered, and having many eyes on it will certainly make it better! druxey, you are right, I overlooked the foot rail at the aft edge of the balcony; it should have a drip and also align with the moulding at the face of the stern. I will work on that detail a little more tomorrow. Gary, by all means use any detail I came up on the Bellona for use on the Alfred. Because most of my details were worked out with the help of everyone especially including you, Gary. I look forward to seeing how it works out. druxey and rlb, that is an interesting question about whether the sills of the windows slope on the line of the outboard sheer, or the sheer of the decks. My reasoning for aligning it all with the outboard sheer is in this very crude and out of scale drawing. I think all of the surfaces shaded in orange need to be co-planar, if I use that term correctly. Otherwise, inside the quarter gallery, the window sill at the aft end of the quarter gallery would be higher on the inside than the window sill at the side. And they meet each other right at the inside corner of the corner post where the discrepancy would be obvious. I am not sure if this drawing shows this well enough, or if I have analyzed this correctly. All comments are welcome! rlb, I was also trained in architecture, and I have had the same feeling as you at times, that the details of this ship seem awkward in terms of how one would detail a building. Different systems kind of crash into each other, like at this window detail, or like how the gunports just cut right across the outboard sheer. It can really upset one's aesthetic sense of how things ought to go together logically and beautifully! On the other hand, this ship has so many multiple curved surfaces interacting with each other that the awkward moments are just about inevitable. It continues to amaze me how well they reconciled so much of this. Mark
-
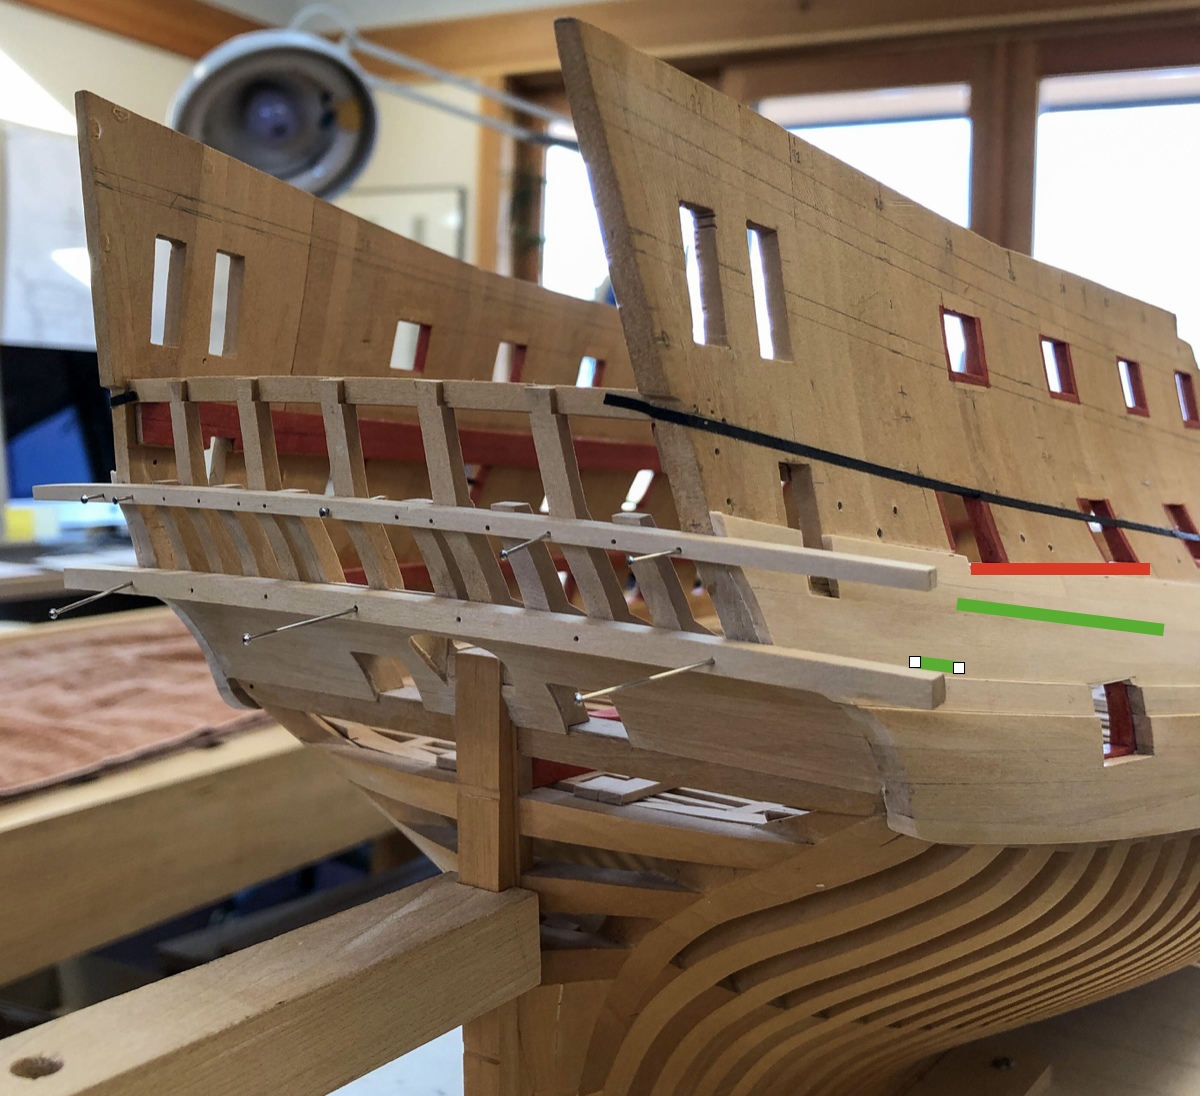
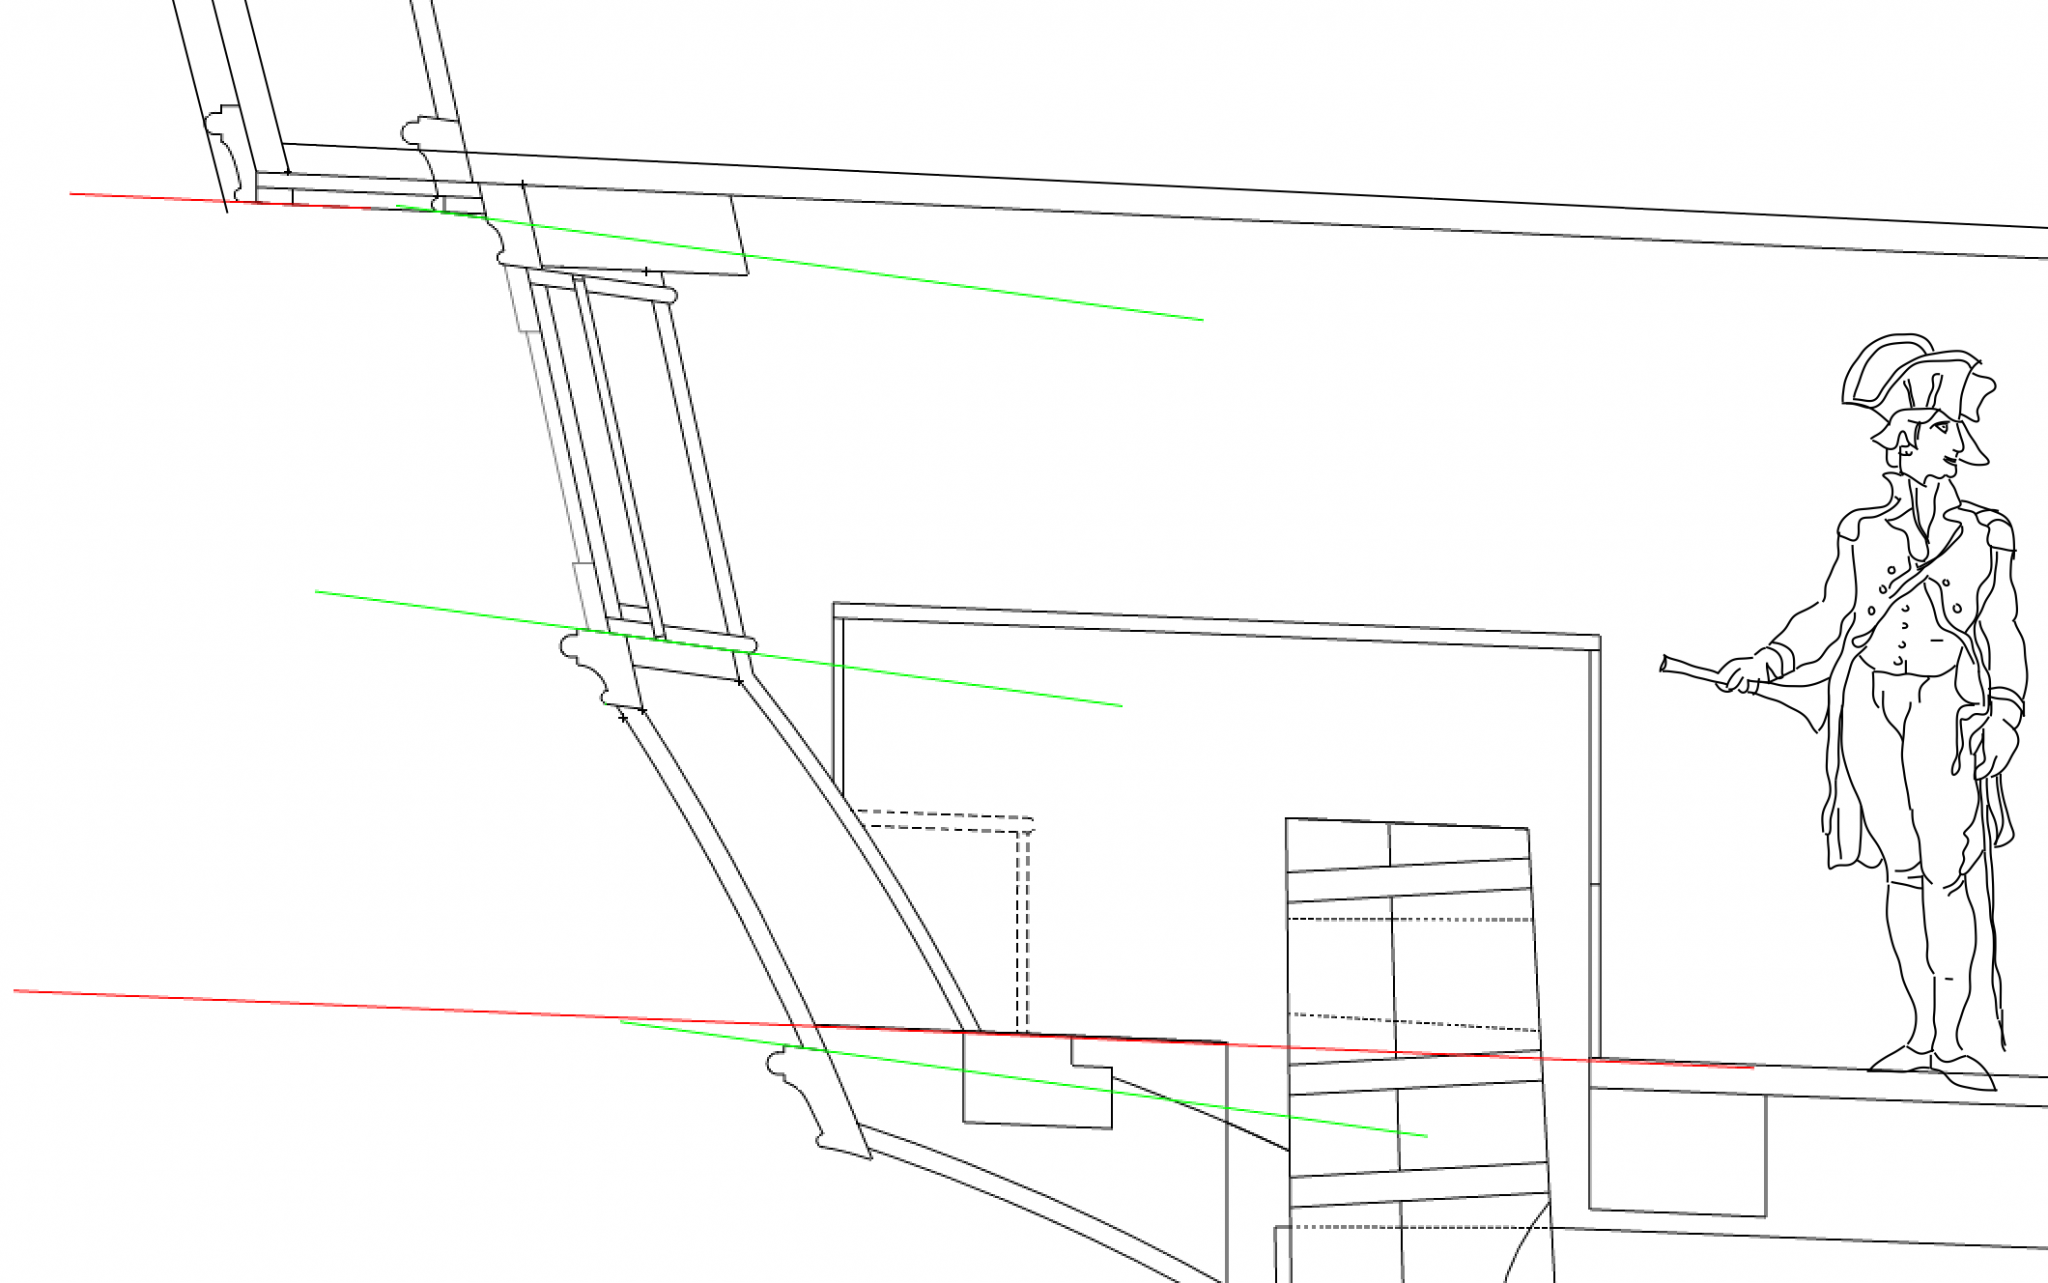
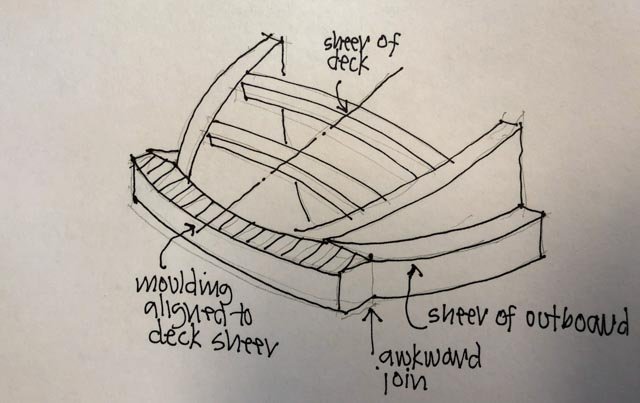
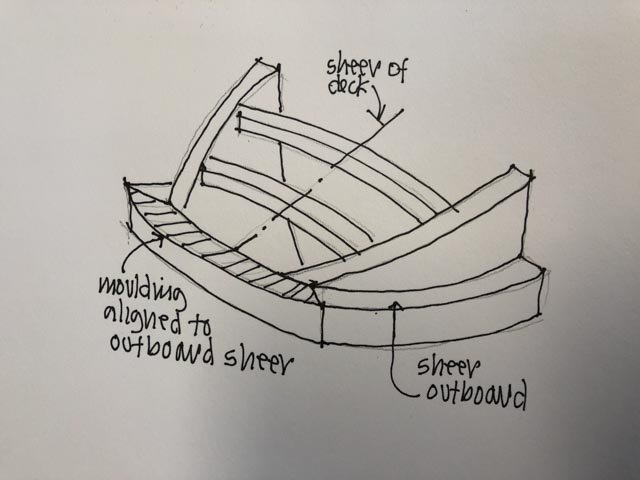
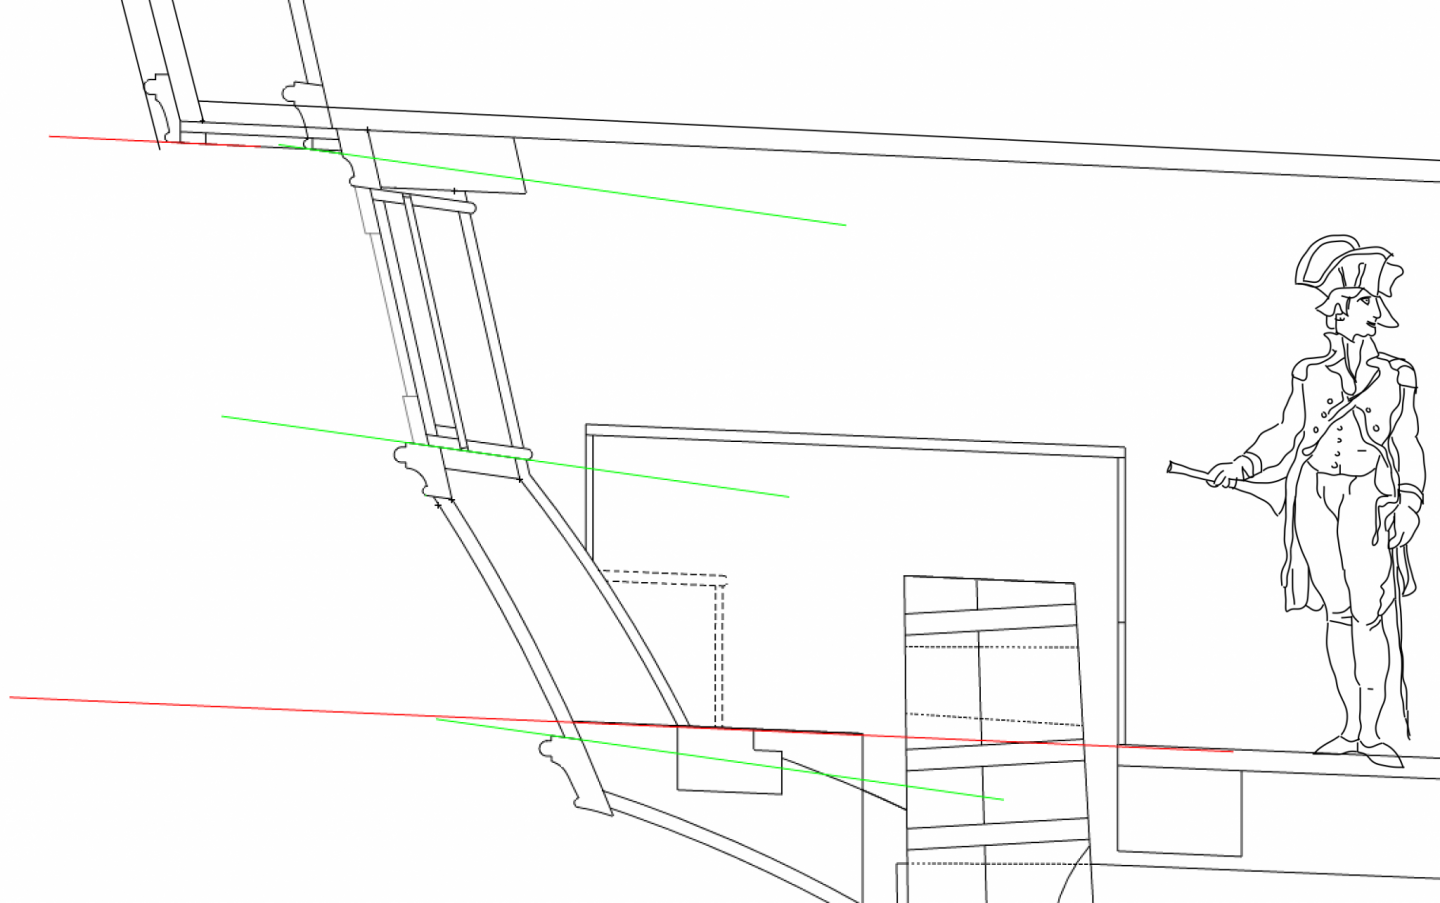
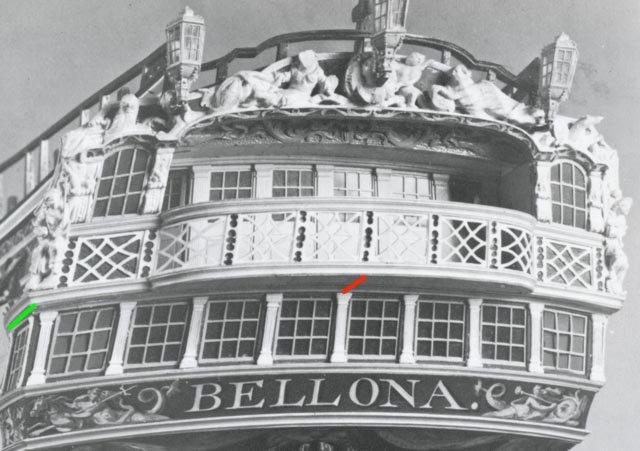
Apologies, everyone, for my disconnected posts over the weekend. I was really thinking out loud, rather than explaining what I was thinking about. The issue has to do with the mouldings at the knuckles of the upper and lower counters, and also at the head of the stern windows, which extend beyond the hull to form the quarter galleries. Until druxey clarified this for me, I had assumed that the upper and lower surfaces of these mouldings were parallel to the sheer of the decks. But the sides of the quarter galleries are aligned with the sheer on the outboard. which is steeper than the decks at the stern. In this photo, the red line corresponds to the sheer of the deck, while the green line corresponds to the sheer outboard. You can see here that the tops of my moulding blanks are aligned more with the sheer of the deck. The little green line at the outboard end of the moulding shows what the alignment should be. The reason for this is that the moulding wraps around the side of the quarter gallery, and will be at the line of the outboard sheer. If the top of the moulding across the stern were aligned with the deck, then there would be an awkward joint where the sides and the back come together: Instead, the top of the moulding needs to be aligned with the sheer of the quarter gallery and therefore the sheer outboard. So, all of the mouldings have to be designed as below, and the windows need to align with the outboard sheer, not the sheer of the deck. Below, green is the outboard sheer, red is the sheer of the deck. And you can see how the balcony is at the line of the deck, and so there is an inevitable but awkward junction between the two right above the windows. You can see that in the photo in post #1623 above.

-
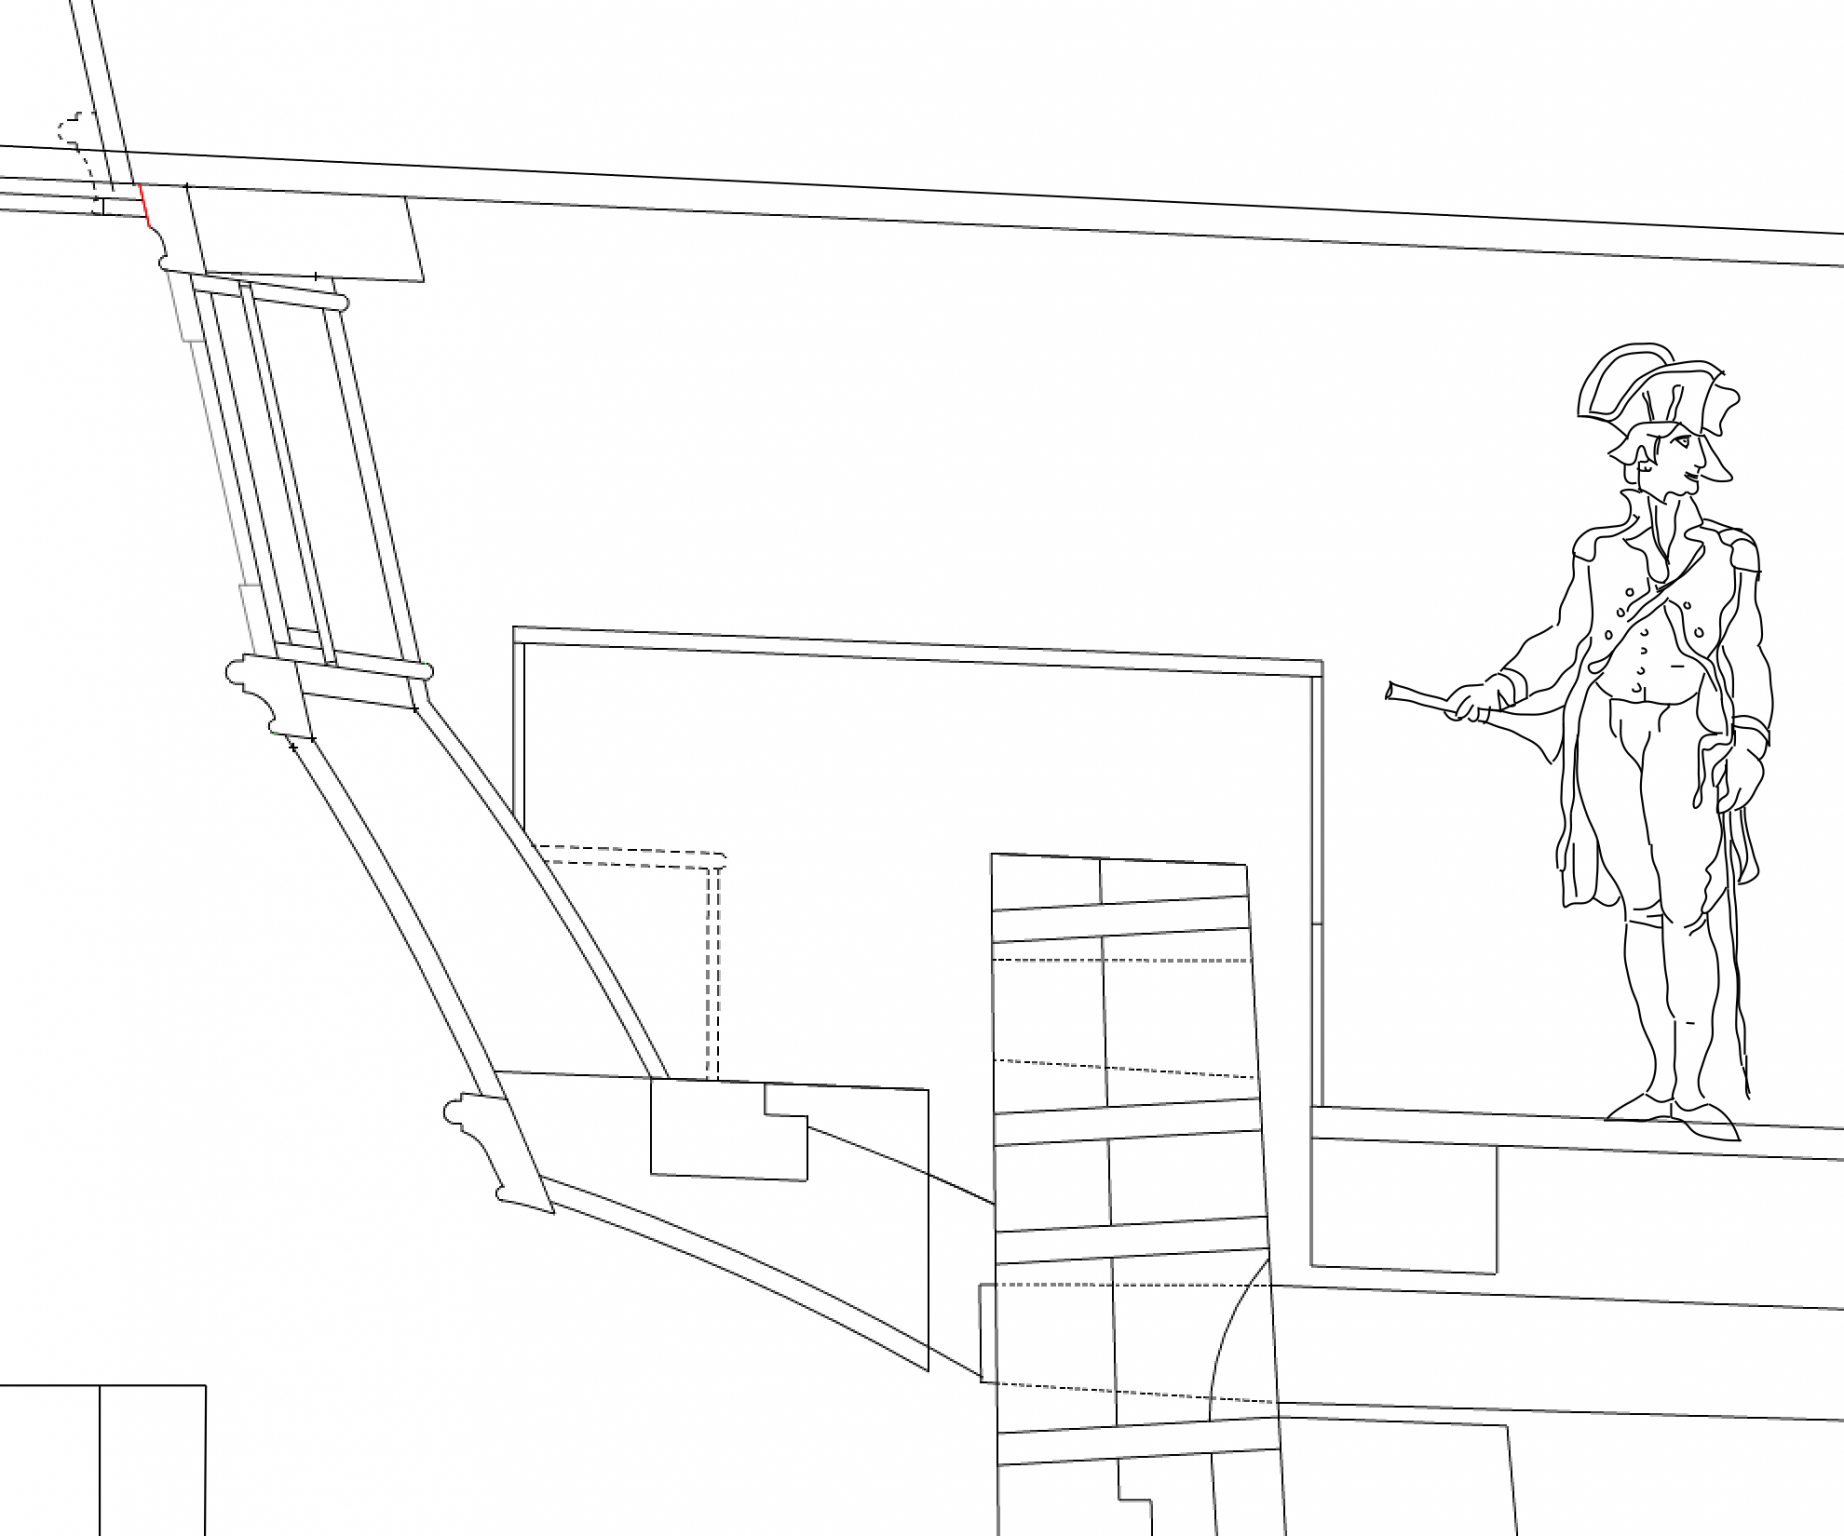
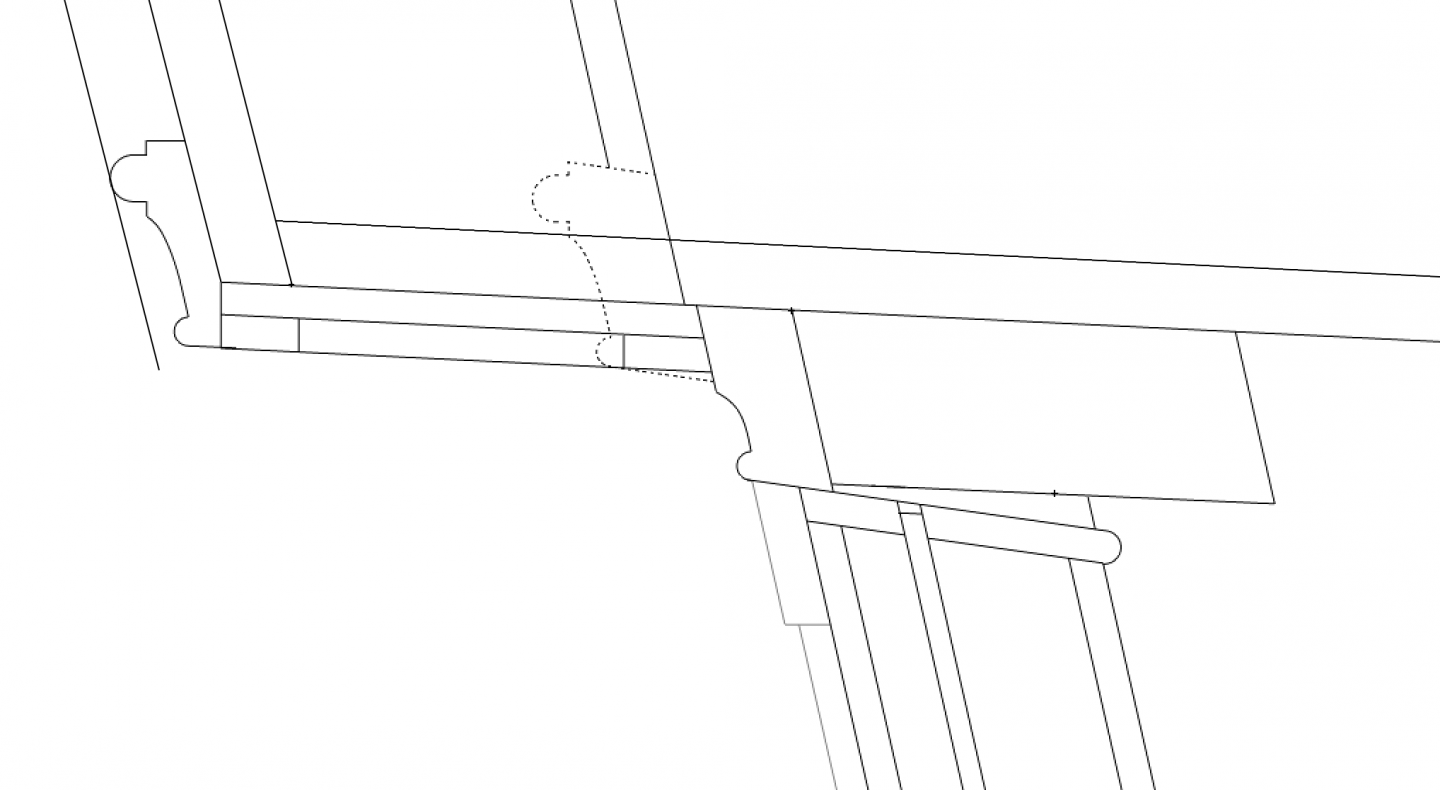
Like this: And since the balcony edge in plan is curved, the moulding will gradually adjust from the dotted on at the right (corresponding to the angle of the green line in the last post), to the one on the left (corresponding to the red line in the last post). How the original shipwrights worked out details like this to look good when it was all said and done is an increasing mystery to me!
-
Like this: And then there is a problem with the balcony above having to match the sheer of the deck, but the moulding at its face has to align with the sheer outboard. That means the soffit underneath the balcony is going to do something funny. In the photo below, the red line is the angle of the deck at the balcony, but the green line is a steeper line of the outboard sheer. So that moulding twists a little as it comes around the corner of the quarter gallery and flattens out under the balcony. I guess at 3/16" scale it won't be very noticeable!
-
Hi druxey, Here is a revision of the stern mouldings at the top and bottom of the upper counter, matching the sheer. I now see this has to work this way, so the mouldings wrap smoothly around the corner of the quarter galleries. Less obvious is the moulding at the head of the windows, where the balcony sails over the top of a transom. the transom has to align with the deck sheer, but the top of the window wants to align with the outboard sheer so the middle stool runs smoothly into it. So there must be a wedge between the transom and the top of the window frame?
-
Thanks, druxey, that answers the question I had about making the miter at the corner work. I'll try redrawing it...
-
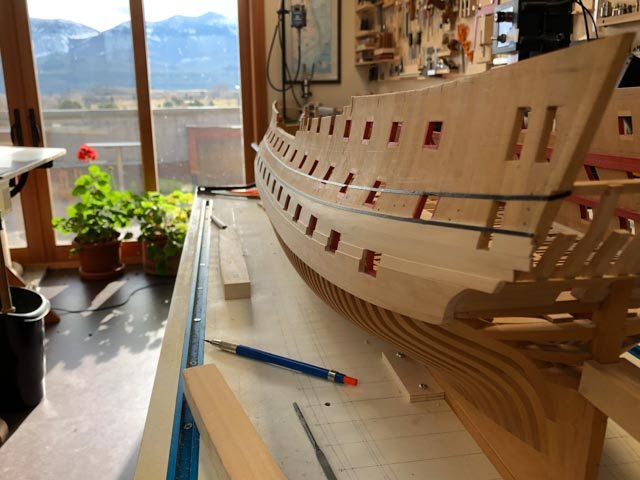
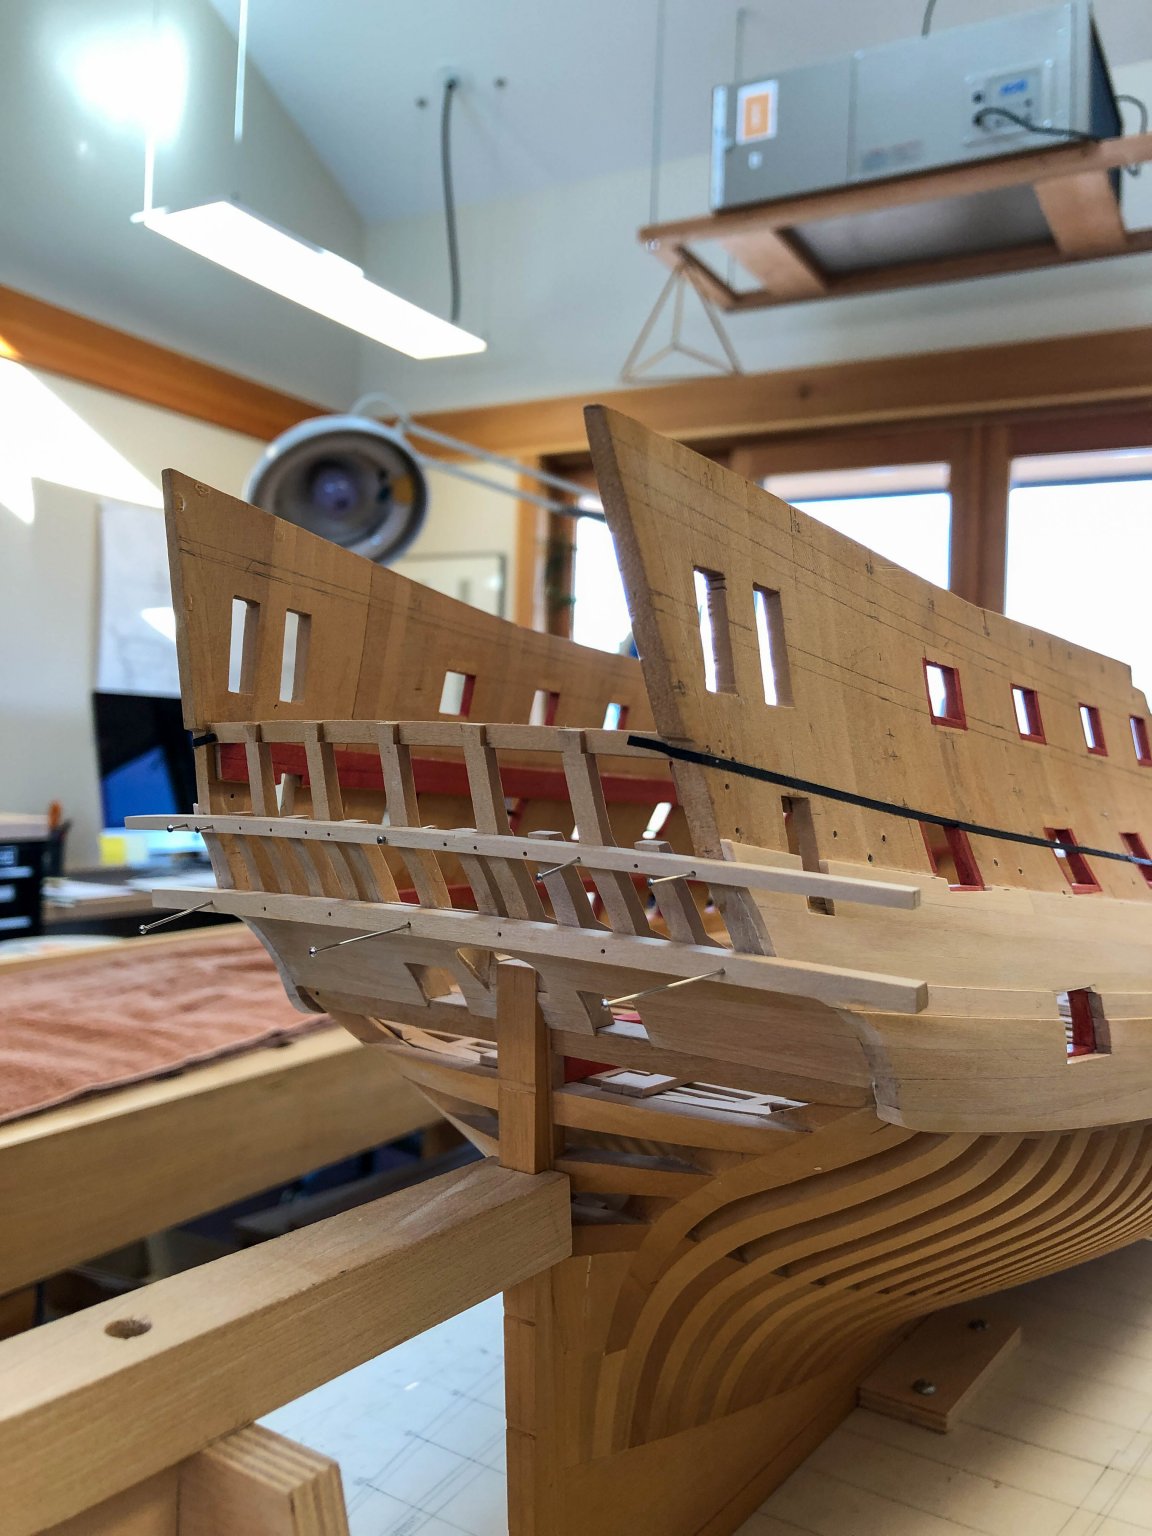
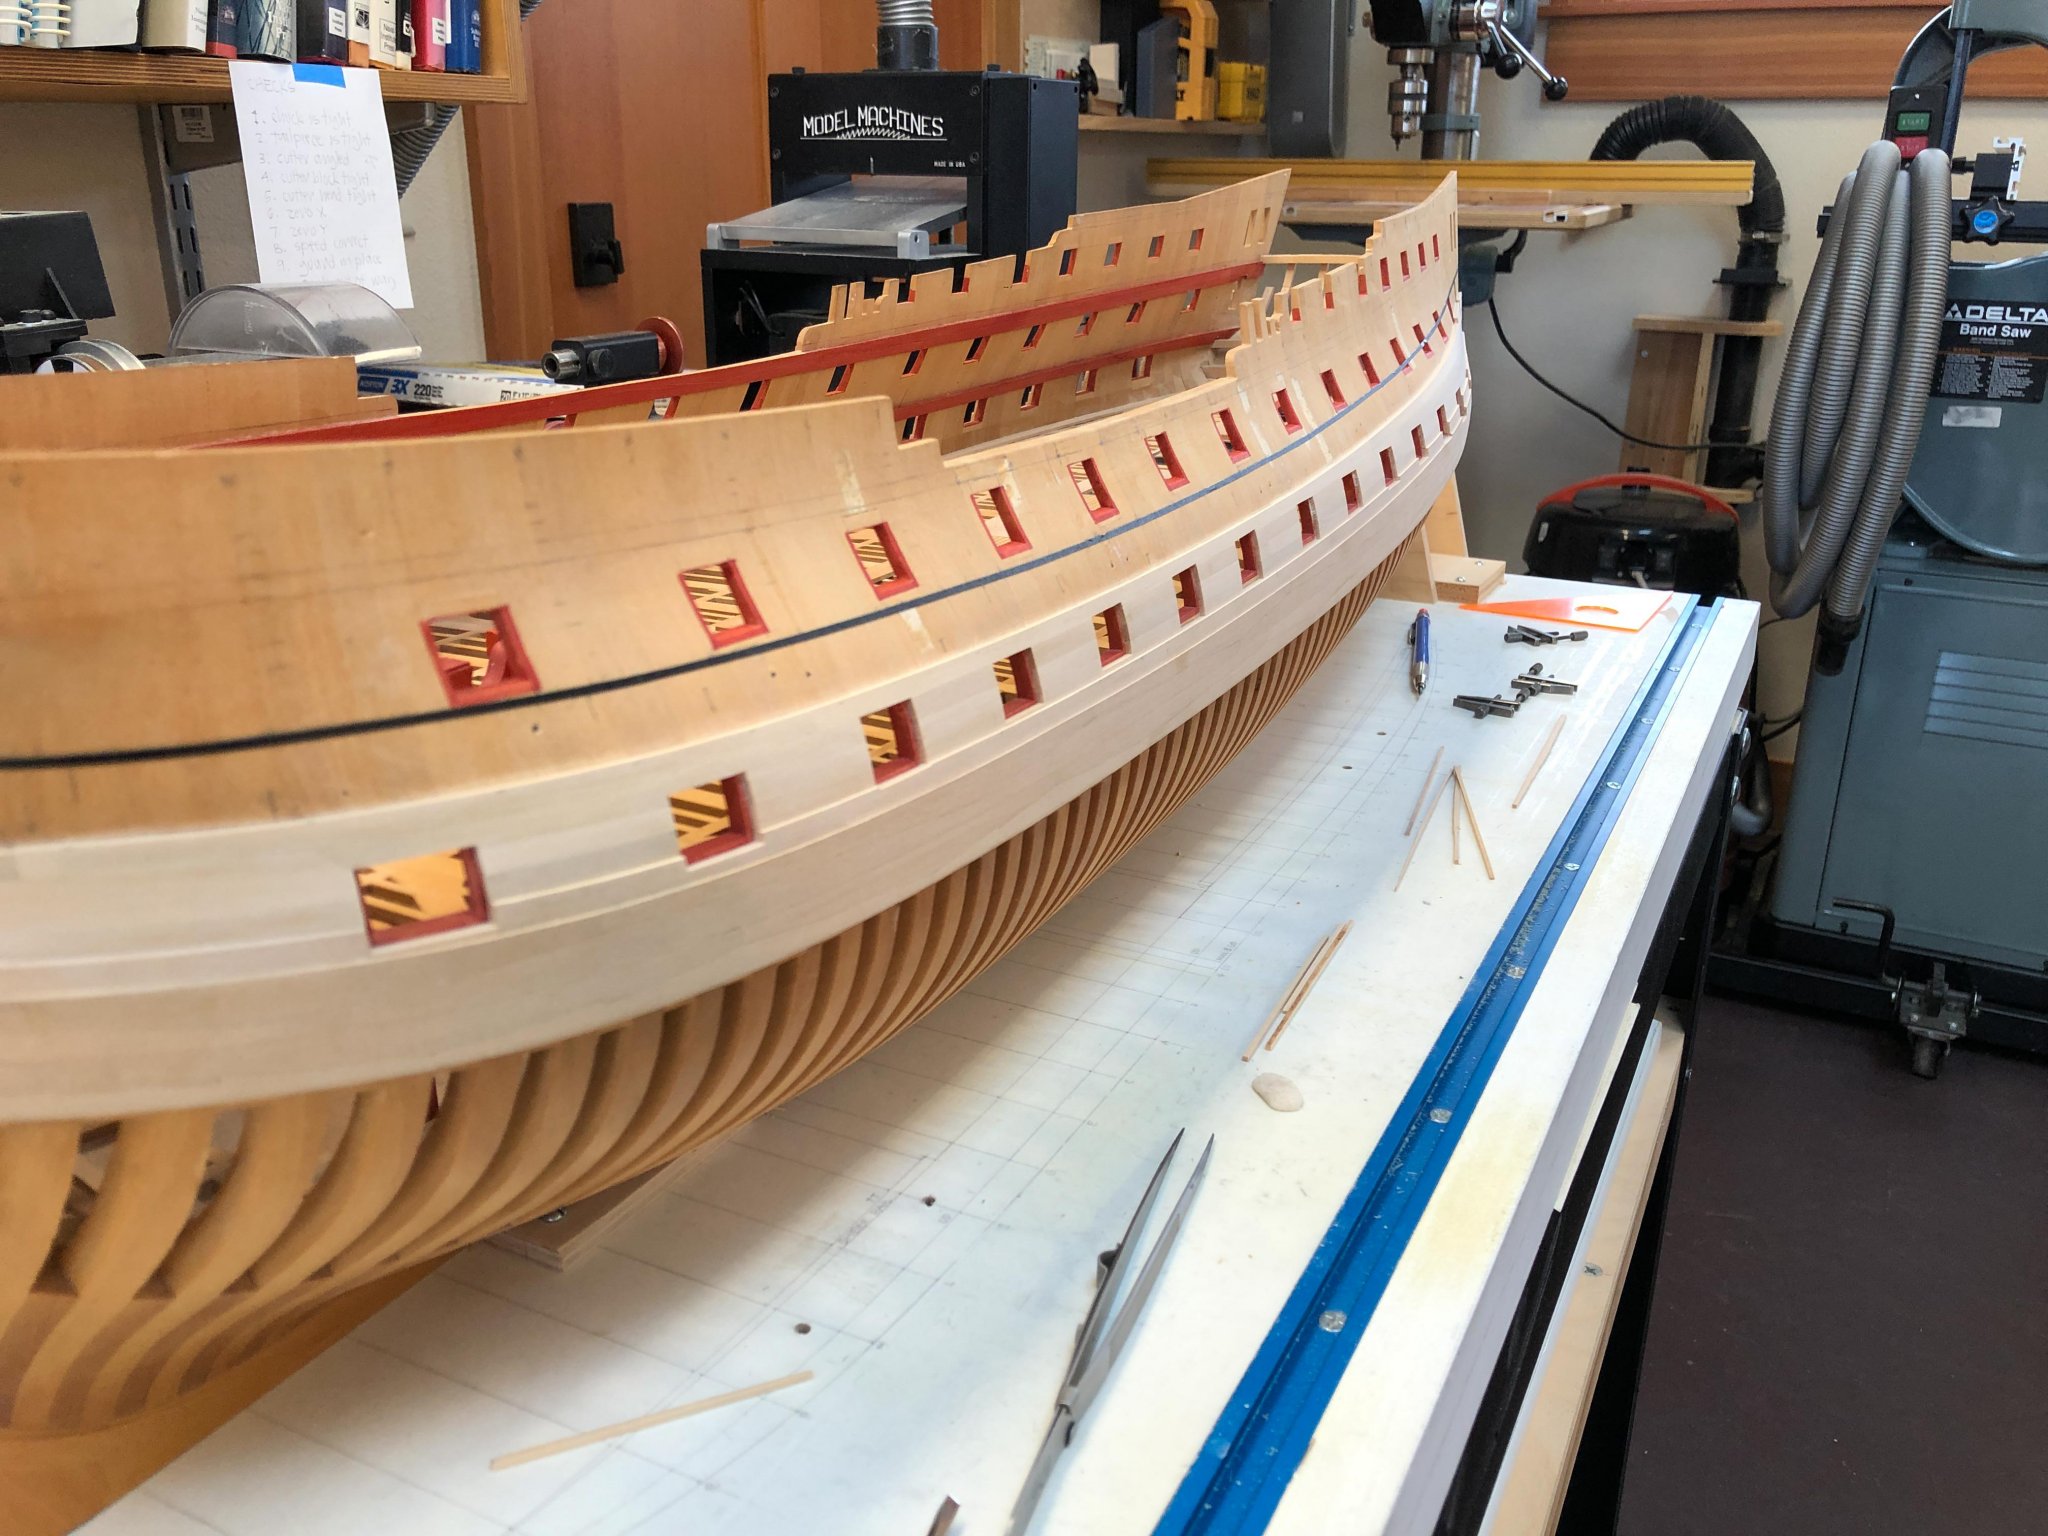
Thanks, druxey, I'll try a few experiments.... So planking got really boring, I need a break. I will play around a little with the stem cheeks and hawser liners, as well as the stern structure. Looking at the stern, first of all, I cleaned up the planking to match the curve of the upper counter, and could pin in place the two moulding defining the upper counter. This was best done upside down, and I held a small strip of sandpaper between the moulding blank and the surface to be sanded. Turned right side up, I am starting to ponder how that lower moulding turns around the corner of the quarter galleries. To make a mitre between the stern piece and the side piece, the moulding cannot tilt as it turns the corner, so the side of the quarter gallery corresponding to the upper counter has to be the same slope as that of the upper counter. So, I might try mocking up the quarter galleries, at least the lower half, in cardboard to see how this all works before I try moulding the edges of these pieces. Unknown territory here... Mark


-
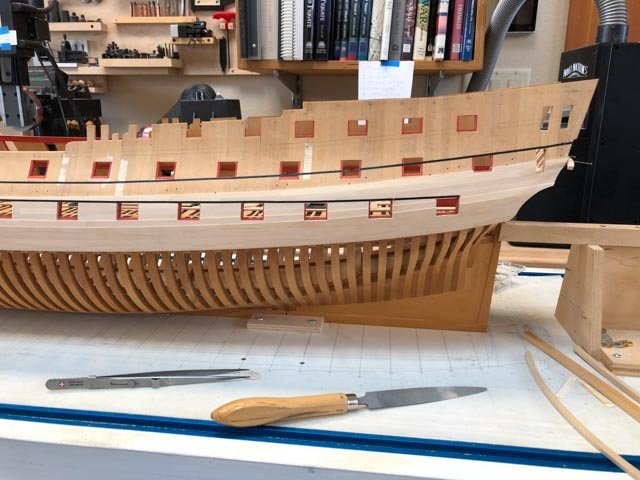
A quick update. I discovered this morning that the tops of the gun ports were not exactly faired. My best efforts at cutting each one as I planked nonetheless left a few slightly askew. So I put in a line of artist tape at the tops of the ports, faired it, and then trimmed a few ports here and there to line up. They were not off by much, but a little judicious filing straightened everything out. Having learned this, I will leave the planks over the upper deck ports a little full, to leave for trimming with a file later on. I knew I had leveled the plank with the sill behind when the file began to show a little red, which was the stain I put on the underside of the sills before I started planking. I will have to touch these up when I stain the edges of the planking red at the ports; but it was a handy way to know where I was with filing.
-
Jim, I don't know how I missed your postings all these years. These are first rate paintings, well composed, dramatic content, expressive craftsmanship. I used to teach drawing to architects, but we were always drawing buildings. Seascapes and ships are infinitely more challenging, in my view, and watercolor makes it even more so. As you well know, but others may not, the challenge of watercolor is that one has to think in reverse, leaving things white at the very start and working towards the darks. And it is very difficult to fix mistakes. One has to have a great deal of confidence to just "lay it down" without hesitation, to keep it fresh. You are a master at this! I hope you are considering producing a book of your paintings. Any progress on the Trafalgar scene with a submarine?🙂 Mark
-
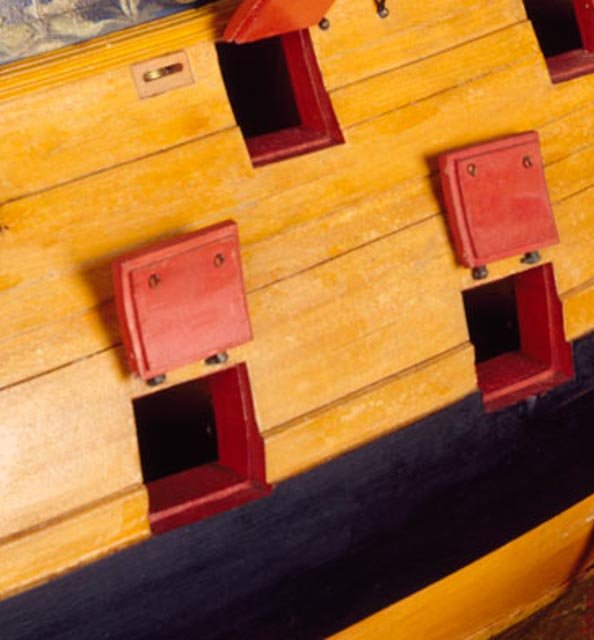
Thanks, druxey and Greg. I was having a hard time getting going again when the pandemic hit, but now we seem to be settled in for a long haul I am getting focused again. Better than watching golf tournaments from a year ago on TV... druxey, I have been debating back and forth with myself whether I should bevel the edges of the proud planks. On the one hand, I love the high degree of authenticity as seen in the Fully Framed Model series, and this has inspired me to make more detailed fittings than I otherwise would have considered doing. On the other hand, I am using the original Bellona models as my guide when making artistic decisions about the overall look of the project. And these models did not always follow the actual construction in the full size ships, I have discovered. In the photo below, for example, the planking does not drop down to the heads of the gun ports where the planking gets thin (see the plank just above the lower left gun port). And the edges of the planks do not seem to be beveled. The top of the black strake looks beveled at first glance, but compare it to the horizontal line of the gun port sill and it appears to be parallel to it and therefore horizontal to the ground. Relative to the tumblehome it looks beveled. I did drop my planks to the heads where necessary, for greater authenticity; but the beveled edges are still a quandary for me. At 3/16" scale in my model, the edges to be beveled are not very wide, and my early experiments on how to do this resulted in uneven bevels. Right now, I get a very crisp line of light along the proud edges, and I am nervous that it will lose some of this crispness with an uneven bevel. I thought I would move along a little more and ponder this as I see what the model looks like as I continue to add the different plank thicknesses. Do you have any tips on how to cut an accurate bevel here? Mark
-
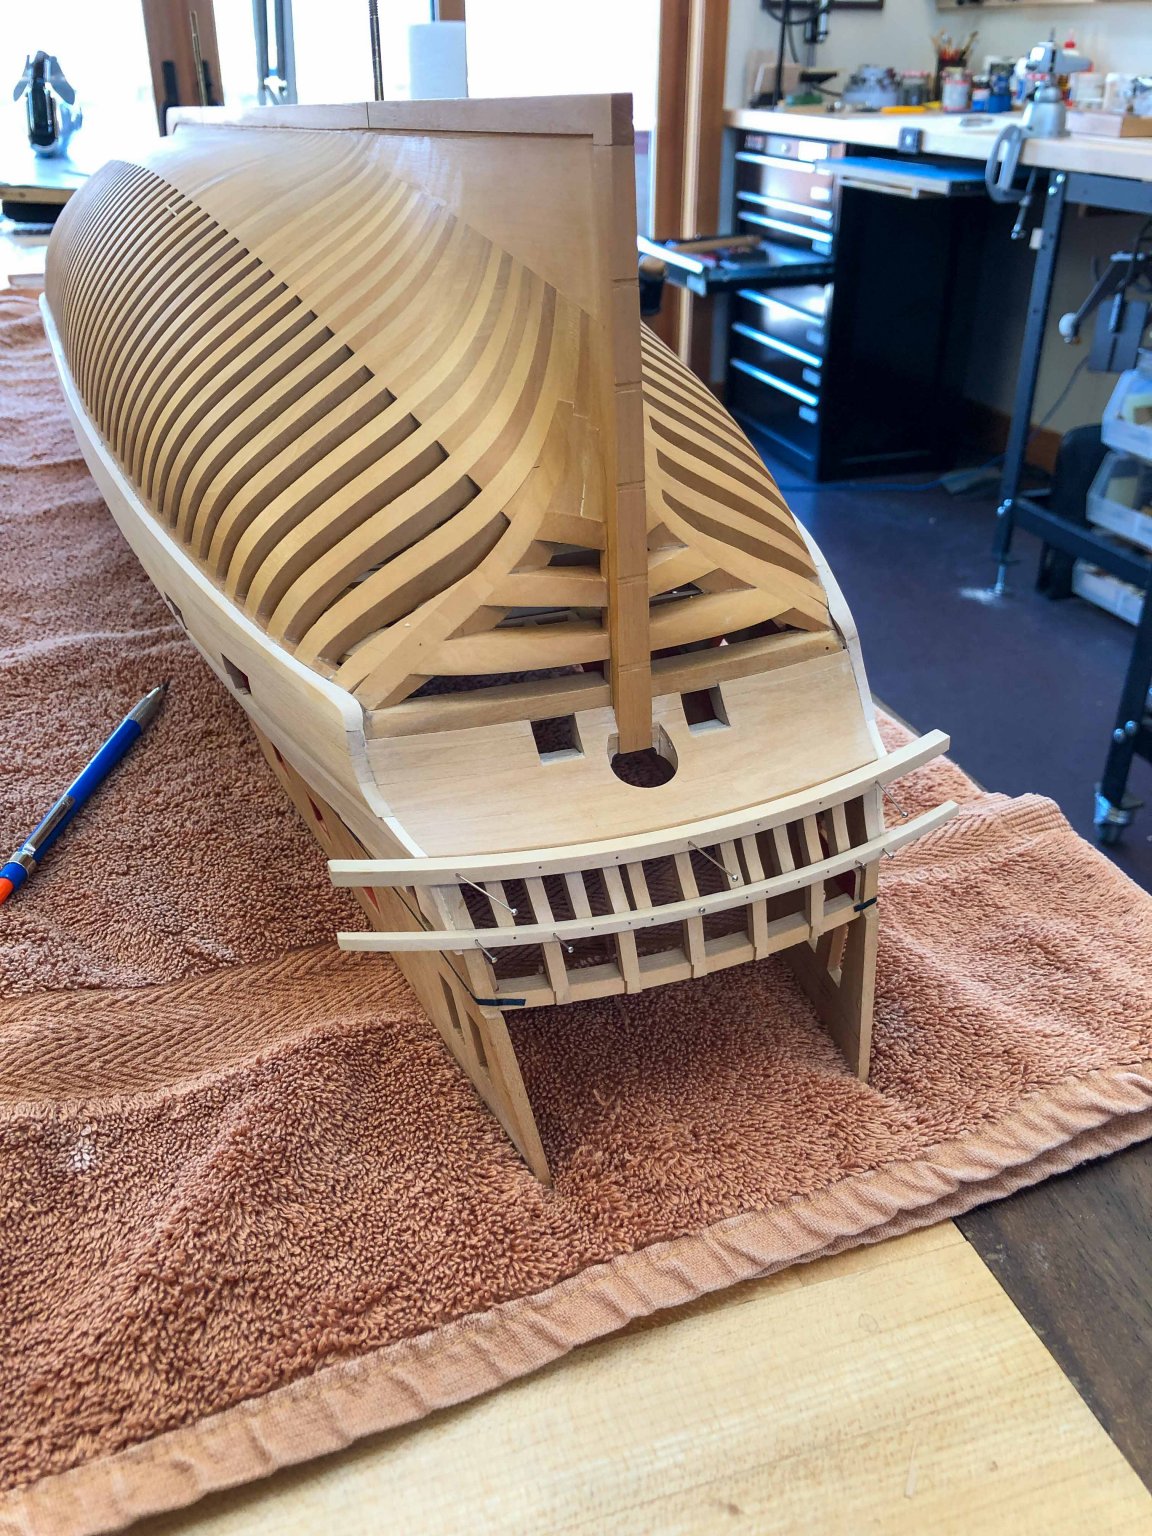
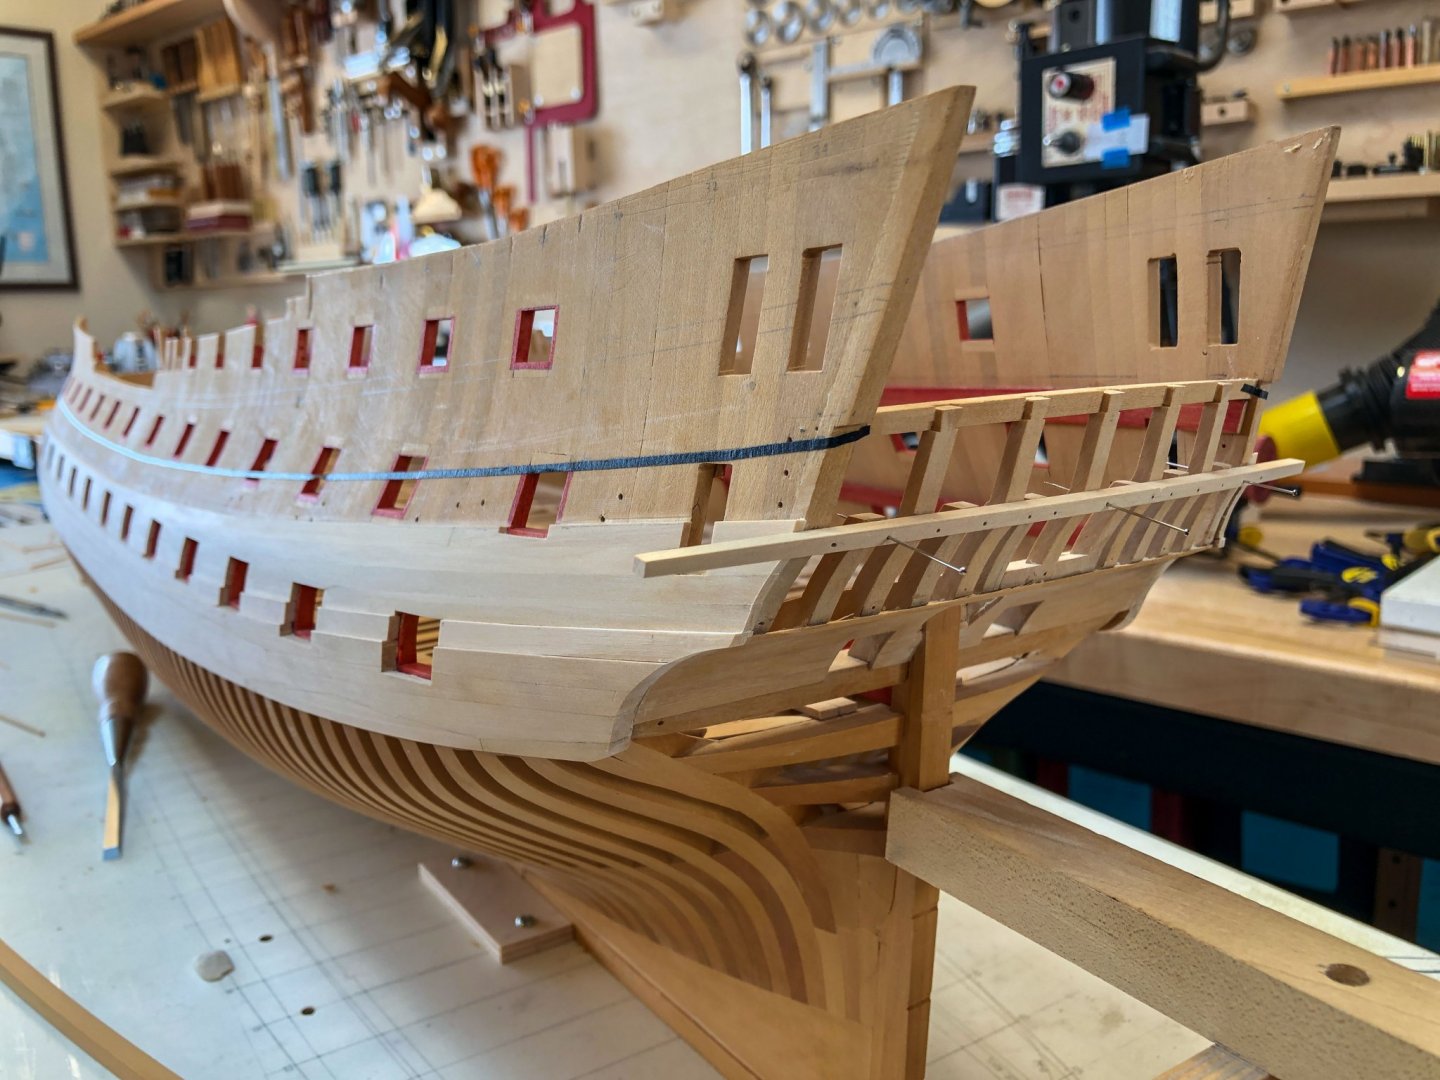
Thanks, Paul, my wife is starting to get nervous about how long it is taking me to finish this project. She doesn't know what to do with it if I pass on before it is done, and I think she is looking forward to putting my ashes on it and floating it out into the lake on fire. She hasn't noticed that it has no planking below the waterline...So I thought I better pick up the pace a little with some shortcuts. And thanks, Grant, I was afraid the secret would get out...☺️ We had a snowstorm last night, plus nowhere else to go while sheltering in place, so I got more done today. I was finally able to trim the planking back to the lower and upper counters, turning the hull upside down so I could see what I was doing. This was pretty tricky doing, trying to clean up the edge flush with the counters, while avoiding sanding anymore into the counter surface itself. I wrapped sandpaper around half the length of a large dowel, with manila file folder stock wrapped around the other half. This was to ensure that the manila folder stock would ride on the counter surface as a stop, preventing the sandpaper from sanding any more when it got to the final surface. Then turned upright again, I was able to attach the moulding at the top of the upper counter, just to see how the lines are looking. I still need to do some trimming on the planking at the lower edge of the upper counter, as you can see. You can also see in this photo how much the planking following the outboard sheer climbs quite high relative to the the line of the decks and therefore the ports. Although it is kind of visually awkward how the one just cuts across the other, it is also this exaggerated sheer that I think makes this generation of ships so beautiful.

-
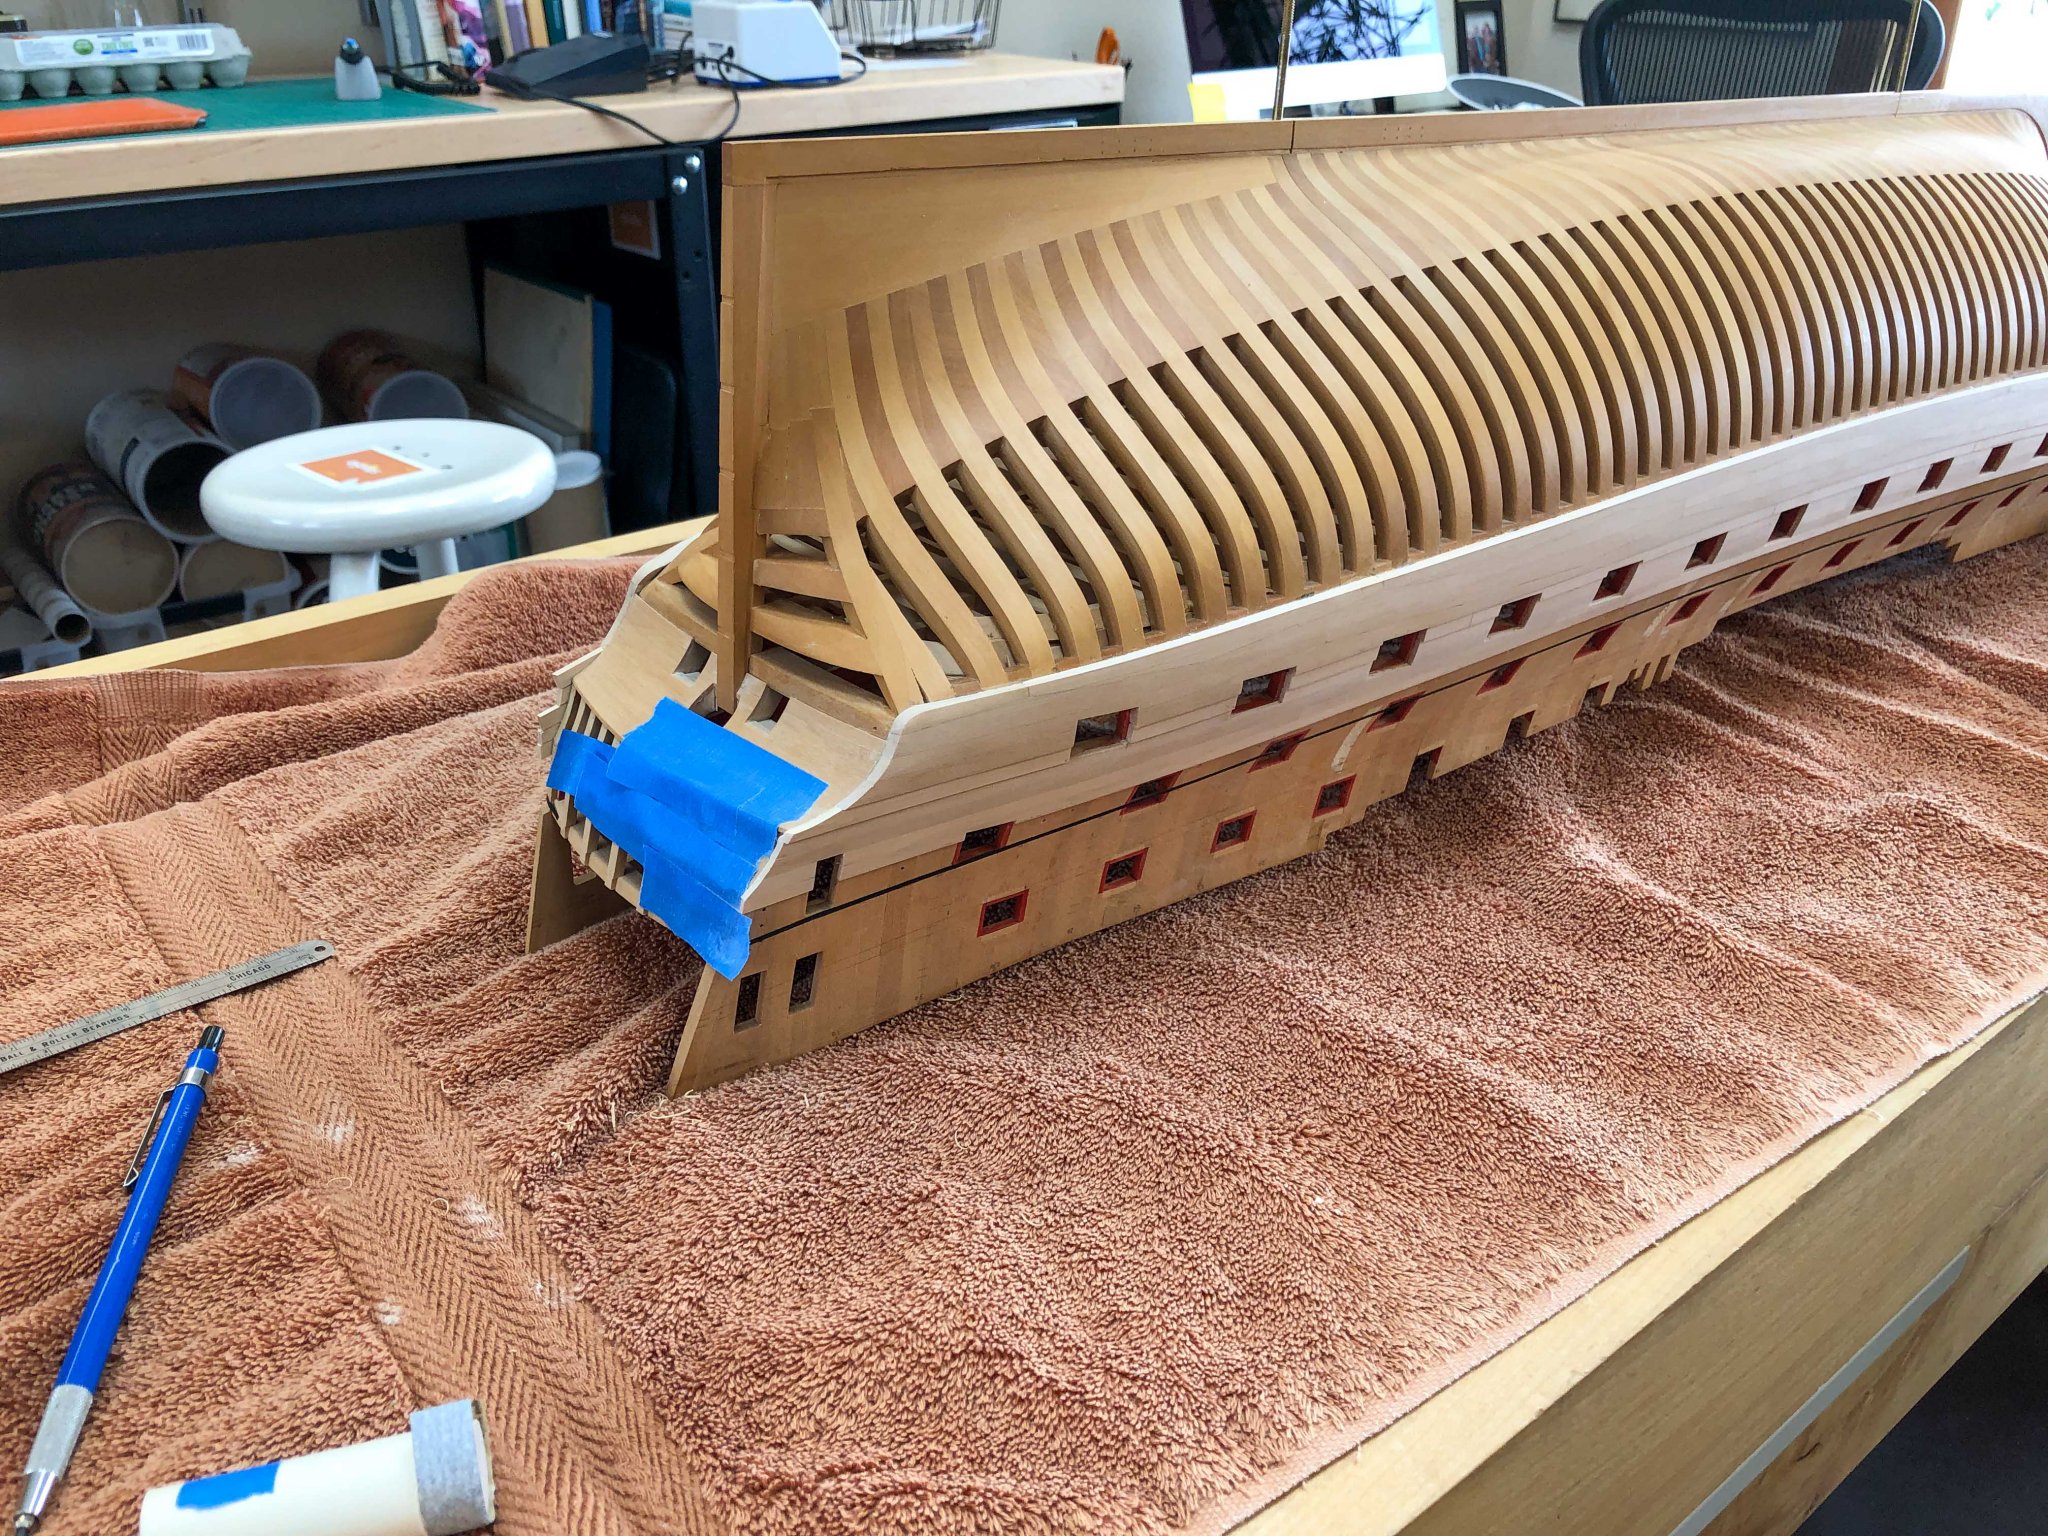
At last, I finished the planking between the wales. Now there is a bunch of clean up to do. First, I needed to fair the upper edge of the 4" plank. I cut the width of the top strake a little full to allow this. I replotted the line on the hull from my drawing, and used artist tape to lay down a fair line: I then used a fine riffler, a smooth flexible file, and curved sanding blocks to clean this up. Next, I needed to fill in below the ports in the 4th and 5th ports from the bow, with 6, 7 and 8 still to go. Strictly speaking, these would have extensions from the black strake, then thinned down to 4" to keep the line of the planking. But I decided it was easier to fill in than to cut the black strake full, then thin down. The difference is not noticeable, and I hope I have not disappointed anyone that I took this little shortcut... Finally, tomorrow, I will turn the hull upside down and sand the planking over the tops of the ports flat to match the headers in the hull framing. This should clean up the line of the tops of the ports very nicely. And, I can finally clean up the ends of the planks at the stern to match the edges of the lower and upper counters. Mark