flyer
-
Posts
1,016 -
Joined
-
Last visited
Content Type
Profiles
Forums
Gallery
Events
Everything posted by flyer
-
 Hi Mobbsie Excellent ratlines so far… only a zillion more to go. By the way – Why RAT-lines? Could this be a timid reference to the language used while setting them up? And thank you very much for the update on CC’s plans. I’m looking forward to Surprise although I think – judging by the prototype photos – there could be a few crinkles which need some ironing. I’m also thinking about a ‘Jack Aubrey’ –version which would need a costly replacement of most of the guns and this could mean some short rations for the family for some months to come… Cheers Peter
- 1,279 replies
-
- 2
-

-
- agamemnon
- caldercraft
- (and 1 more)
-
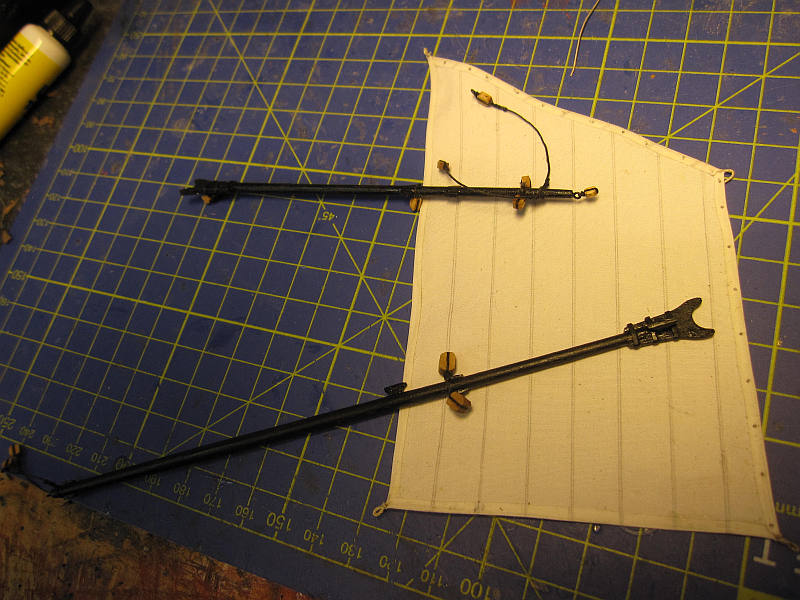
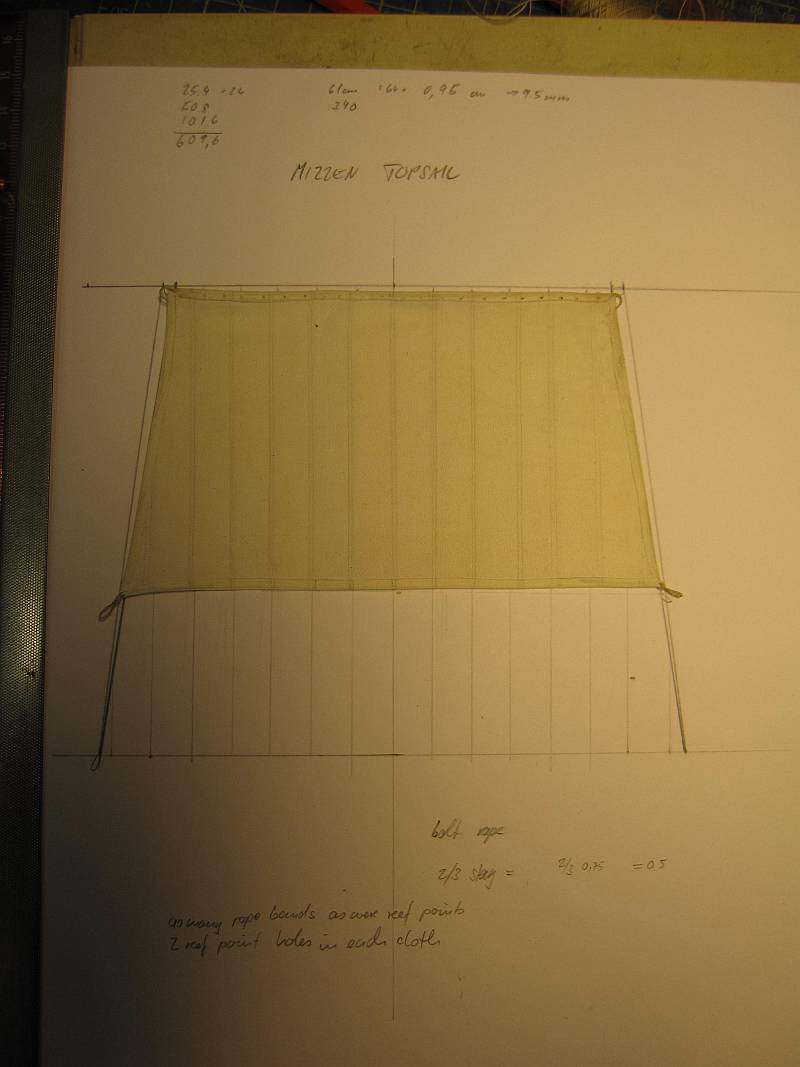
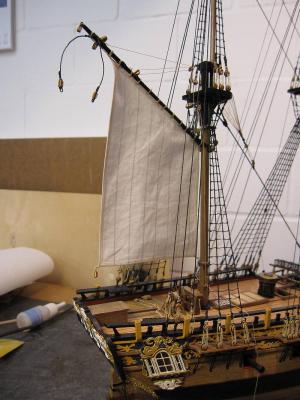
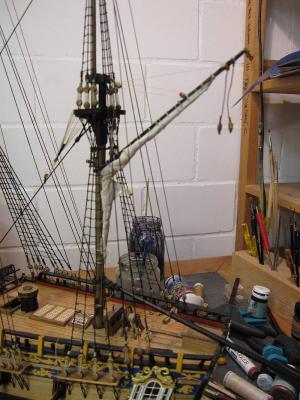
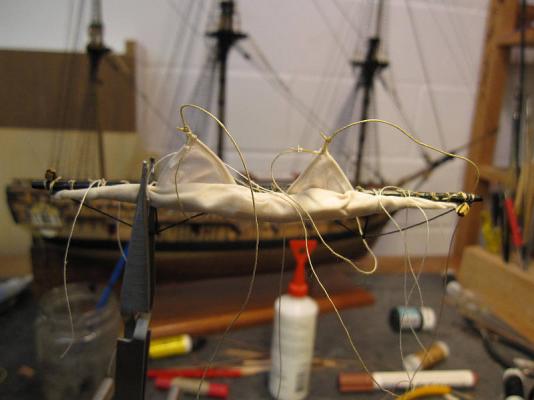
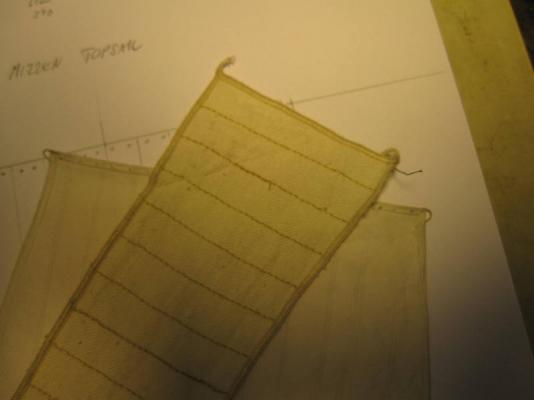
The next step was the making of the spanker. There was not much reduction in size possible. I just made a sail similar to a mizzen with the back edge vertical. I rather like the look of the finished sail and think it would be possible to make full sails with all the details that way for a future project. Two clamps were added to the boom. One is below the jaws to belay the spanker sheet; the other was bolted sideways onto the boom, above the taffrail, to belay the flag line. The flag line will be set up between two small blocks attached to ringbolts on the ends of boom and gaff. I think the flag line must be belayed on the boom otherwise (e.g. if belayed on the taffrail) you would have to reset it on every tack. Then I fixed the spanker to the gaff, set up the gaff and fixed the spanker to the mast. Then the spanker was furled. It still looks a bit untidy but will do as it shall not represent a harbour stow but a ship ready to make sails on short notice – at least that’s my excuse. Now the boom was mounted and I was glad to have that saddle. Vang pendants and boom sheets will be rigged when all the other work on the rigging to the mizzen mast has been finished. (Of course the very last lines will be most sheets and braces.) Then the crossjack was fixed with sling, parrel and lifts and now I’m about to hoist the mizzen topsail yard with its furled sail. Finished sail. On the boom are the two additional cleats visible. Gaff with attached sail mounted. Sail bent to the mast and furled. Boom attached and spanker sheet set up. Crossjack in place Detail of crossjack and gaff Work is in progress on the topsail yard.

- 431 replies
-
- 13
-
-
- pegasus
- victory models
- (and 1 more)
-
Hi B.E. Thank you. Yes, I rather like those yaws as well. The ‘iron bands’ which hold the whole thing together are an important addition. Unfortunately they are missing in many kits. Cheers Peter
-
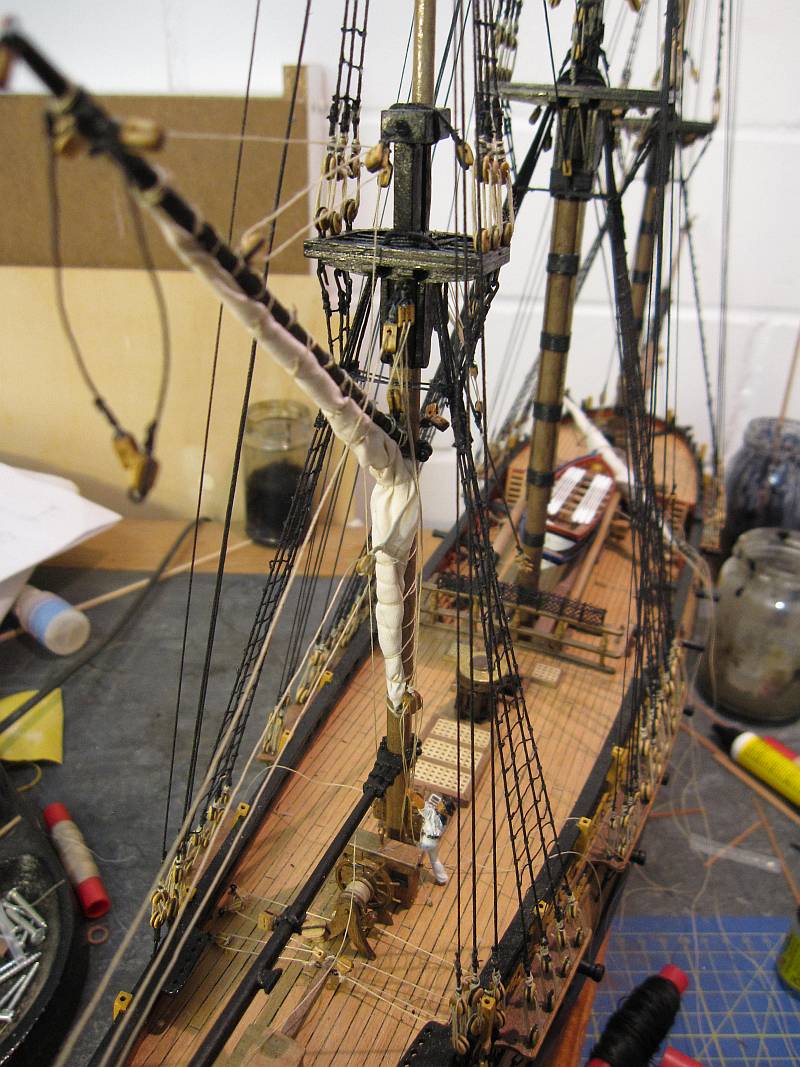
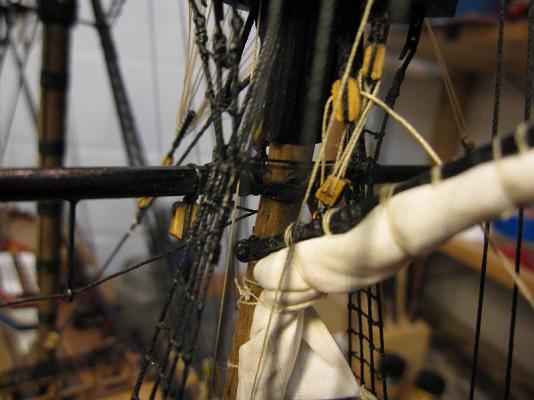
While checking which blocks might be missing to put up the furled spanker I couldn’t figure how to put up the boom. The gaff is held up by halliards at both ends but the boom’s inner end seems to be levitating. Lees wasn’t too clear either and therefore I decided to attach a saddle to the mizzen in a similar fashion as on Granado. To fit it around the finished mast I fabricated a ring from leftover ply wood, cut it in two (and made a small quoin to fill the gap resulting from some mistake with the measurements) and glued all together with 4 supports to the mast. The boom should hopefully mask the tinkering.

- 431 replies
-
- 6
-
-
- pegasus
- victory models
- (and 1 more)
-
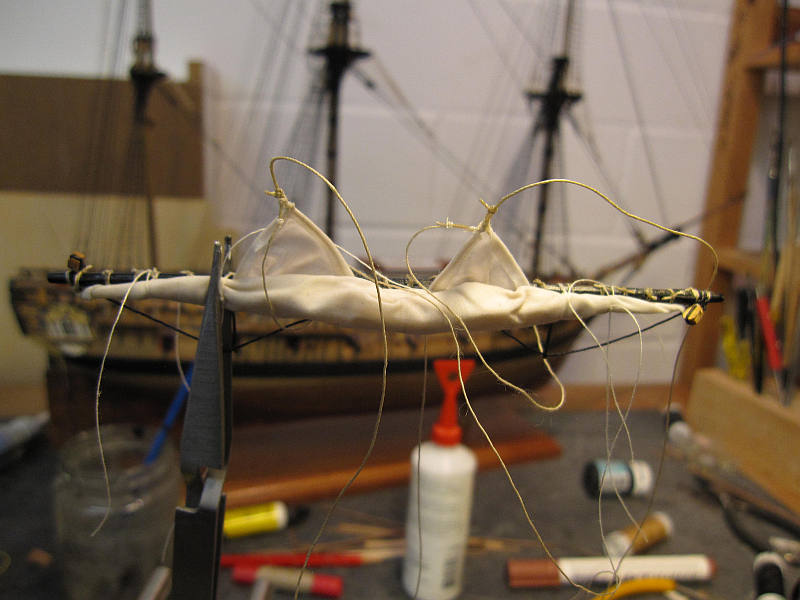
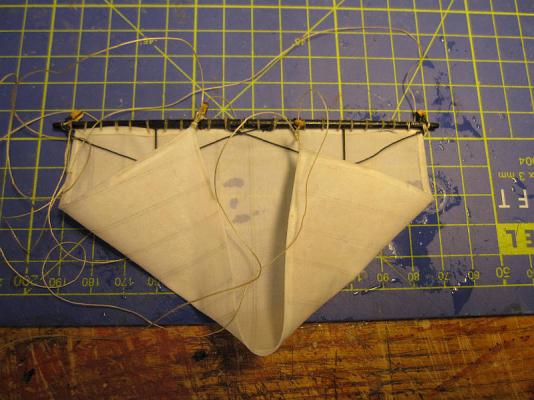
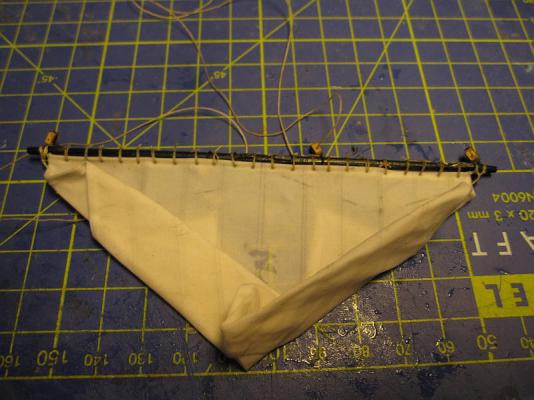
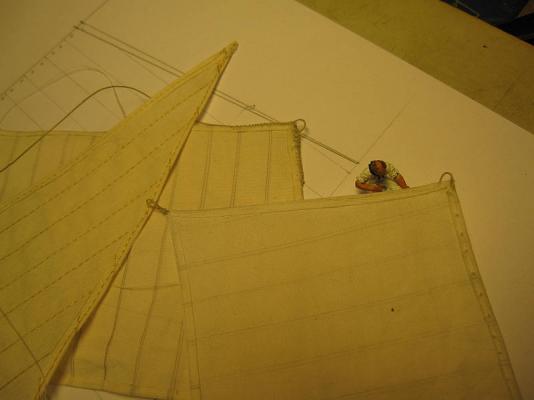
First the lines for sail handling were checked. I will not rig leech lines or reef-tackles but buntlines, where necessary. When no mizzen topgallant sail is carried, the topsail doesn’t need buntlines (fortunately). But on main and fore topsails I will have to add the missing buntlines and necessary blocks. Then the sail was wetted with a little water. In former projects I found it could be tighter packed this way. Now it was furled and fixed with gaskets. The sail was first pulled up by the clues, but leaving a little way to the corners. Then it was rolled up over the front, leaving the corners protruding. The gaskets were put on alternately left and right from outboard inwards. The corners fall down over the front. The furling is not very tight and my excuse is that it is not supposed to be a rigid harbour stow but just for lying at anchor, ready to sail on short notice. While furling some of the glued hems opened a bit. Lesson learned: use more glue and above all fix it with a smoothing iron as recommended. The furl is not yet tight enough. I will try to rework it. The yard with the sail will not be mounted yet. I think it will be easier to fix first gaff and boom with the spanker, then the crossjack and then the topsail yard. By the way – while trying to figure how to attach the driver boom I couldn’t see how its jaw would be fixed in height. I think a saddle on the mizzen mast is missing altogether and I will have to attach one. The corners of the wet sail are pulled up Now it is rolled up over the front side Gaskets added, corners remain protruding Corners pulled down over the front. When dry I will try to tighten the furl and perhaps add a few more and tighter gaskets before attaching the yard to the mast.

- 431 replies
-
- 5
-
-
- pegasus
- victory models
- (and 1 more)
-
Mobbsie! But you did put some doubt into my mind and that’s good. Sharing thoughts that way not only may improve our builds but is also fun. Mankind is a communicative species and men are just now gradually catching up on communication. Don’t let admiralty and other communication professionals keep a monopoly on doubts, hints, questions and shared thoughts. Cheers, mate Peter
-
Hi Mobbsie What patience? You should hear some comments about my driving style. About the robands: I didn’t find any dimensions in Lees and took the smallest thread delivered with the kit (0.1). You could take some smaller sewing thread but this often has a fuzzy appearance and I wonder what size they actually used. Of course you spread the pull of the sail on all robands, but hardly equally and there is the thing about the weakest link to consider. Do you feel they are a bit heavy? Cheers Peter
-
Hi Jay Thank you! The crew was hired from Amati via http://www.cornwallmodelboats.co.uk/acatalog/amati_crew.html They come in cast metal. I cleaned them with some cleaning agent from the kitchen and painted with Caldercrafts ‘Admiralty Water Based Paints’. They even have a decent ‘Flesh’ color. Cheers Peter
-
Hi Chris Yes, I was hesitant to give up the idea of properly stitched sails but when even pulling threads looks out of scale, you have to go with the small, penciled line or leave the seams off altogether. Cheers Peter
-
Hi Michael No, but I didn’t know about the whales. Maybe next time. Cheers Peter
-
Hi B.E. I’m bowing to the applause. Thank you. You are absolutely right about the heaviness of real stitching. Even pulling the threads looks already a bit heavy. If you will not trouble yourself with furled sails I then presume you will show full sails in all their glory on your Pegasus!? Certainly, a sailing ship, especially one with those outstanding qualities as yours, will look a bit incomplete without sails, won’t it? Cheers Peter
-
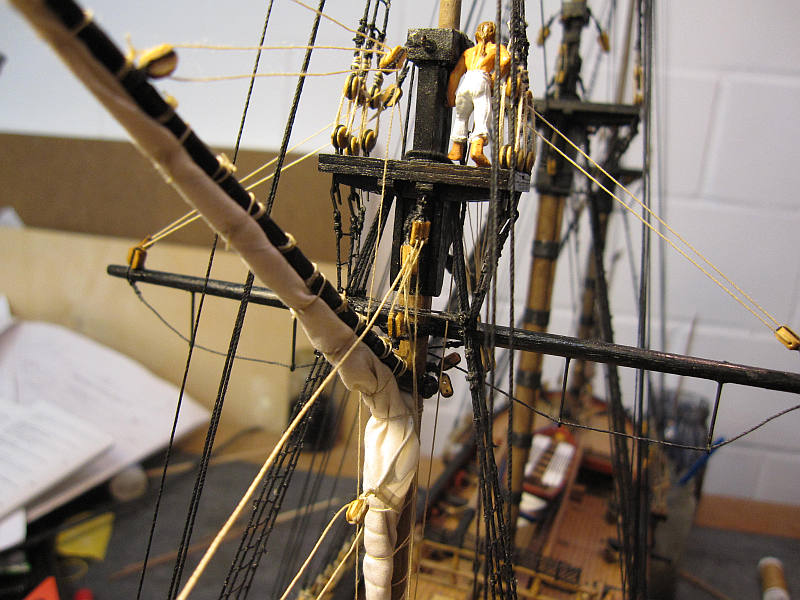
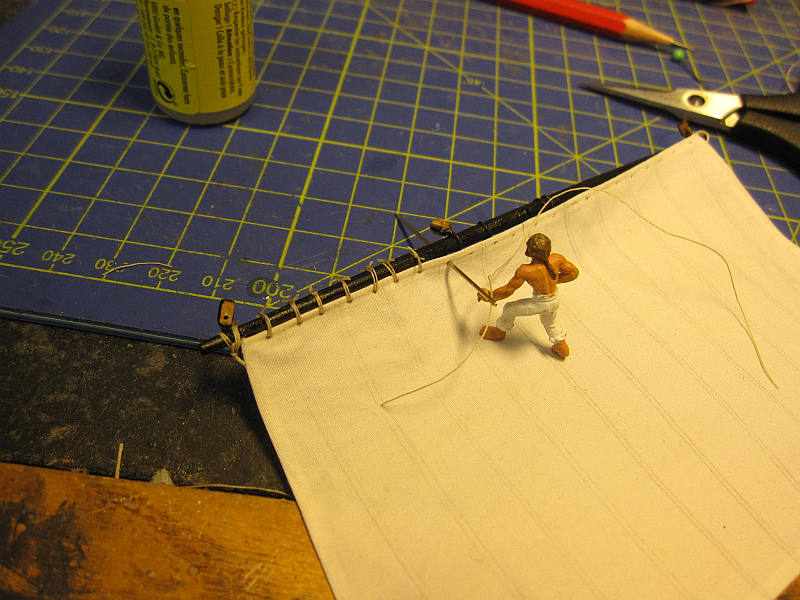
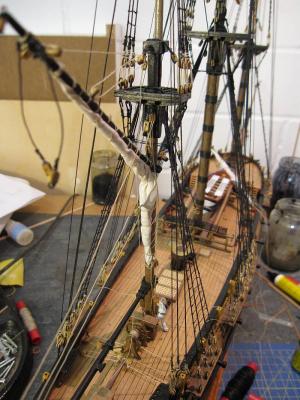
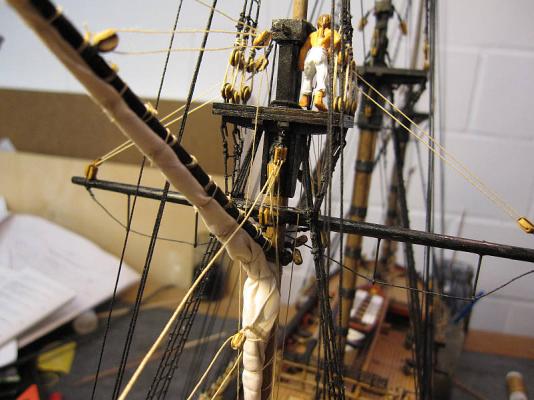
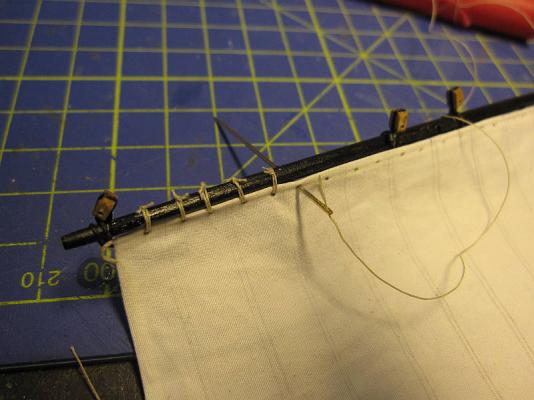
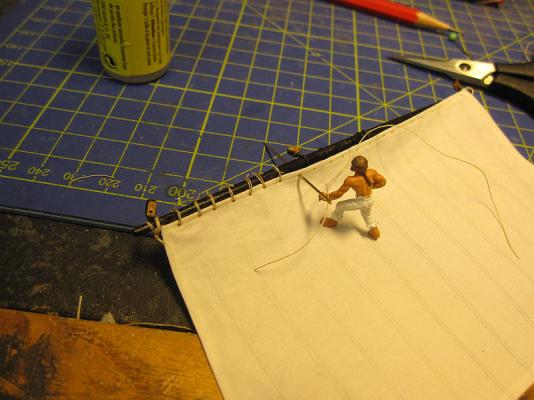
Presently I’m bending on the first sail, the mizzen topsail. Sometimes I wish I was only a dumb officer, just having to order what has to be done. But being also an unskilled sail maker, carpenter, seaman etc. provides me with a lot of repetitive work where I find nobody to delegate to. Perhaps a hobby with fewer repetitions would be better. I wonder if I should try base jumping... Bending on the sail with 2 robands per cloth Setting the sail makers crew to work on it somehow achieved no progress
- 431 replies
-
- 5
-
-
- pegasus
- victory models
- (and 1 more)
-
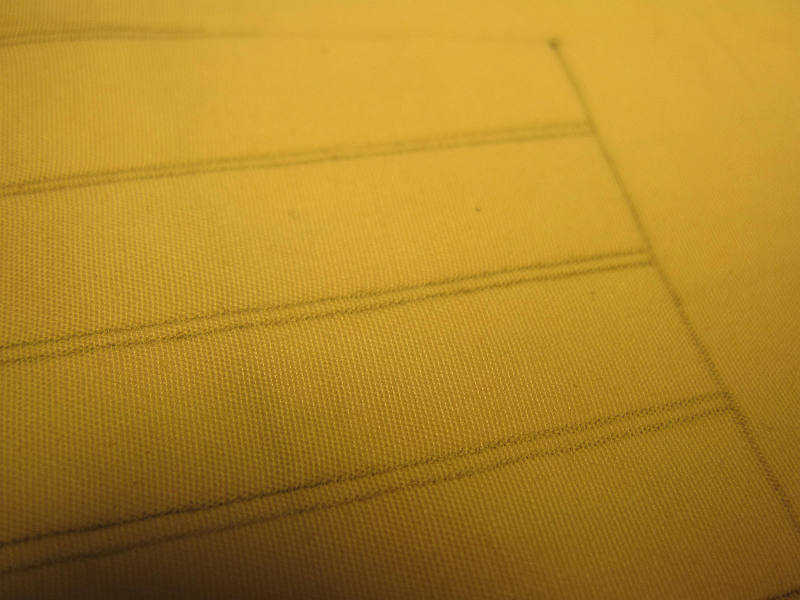
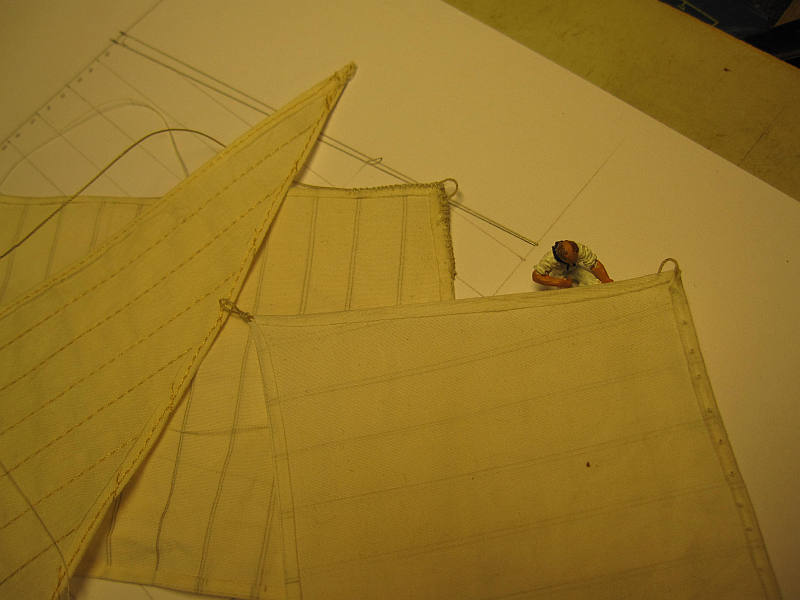
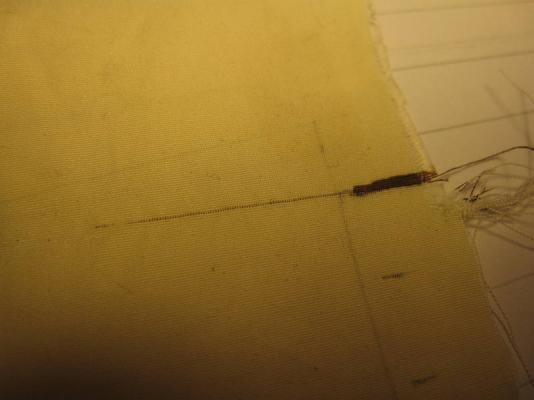
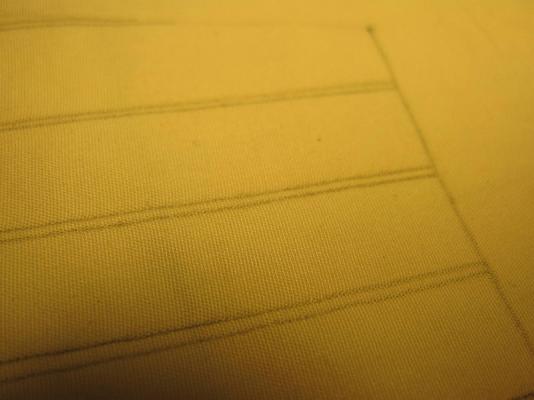
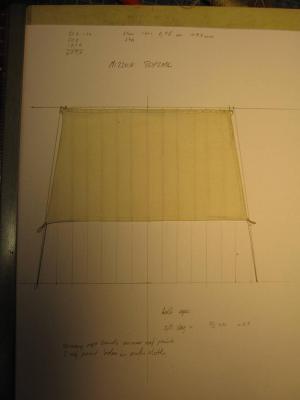
Then I tried to make the seams by ‘pulling threads’. First tries were encouraging but trying to do it in grander scale brought some problems forward: The progress was very slow and the thread kept snapping, making a whole sail useless. Then I saw that a lightly penciled seam looks practically the same way as a laboriously pulled thread. The boltrope was first hand -sewn on. This looked too ugly. It was then glued into the hem according to the following very interesting link: http://modelshipworldforum.com/resources/Rigging_and_Sails/ScaleSails.pdf This provided so far the best result with a moderate amount of work. The sail was shortened by about 30% to reduce its bulk when furled. Pulling threads provides a fine result but... A pencilled seam looks adequate with less work, producing no rejects Finished sail on the drawing of the sail in full size
- 431 replies
-
- 3
-
-
- pegasus
- victory models
- (and 1 more)
-
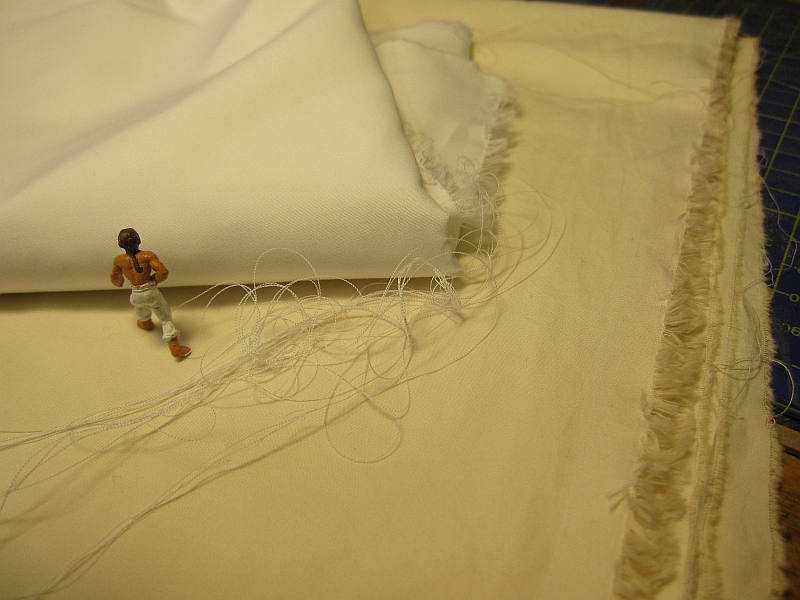
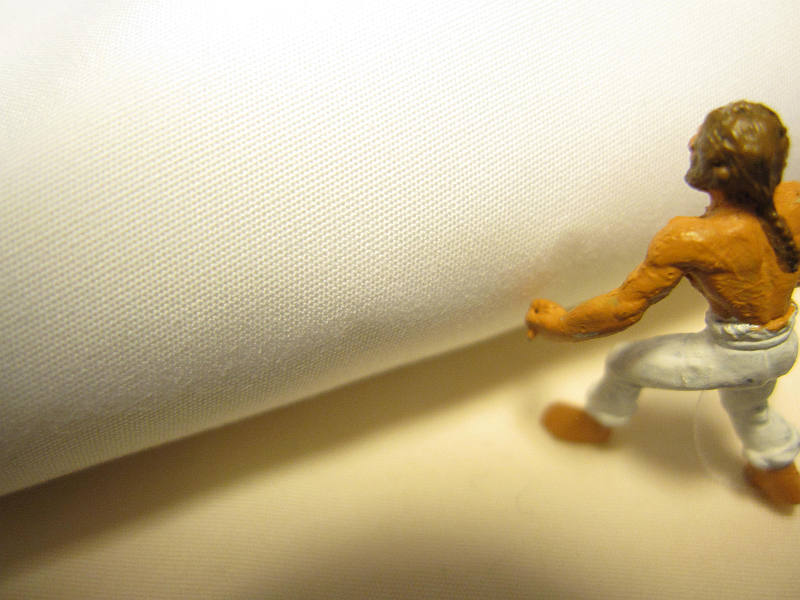
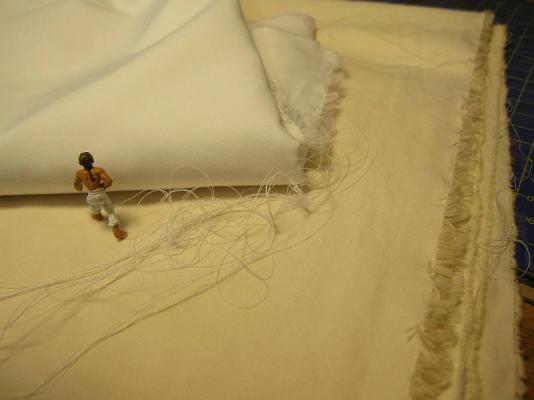
First the finest cotton I could find in a drapery was lightly colored with a mixture of black and sage tea. Here I was following again the advice of Wolfram zu Mondfeld. The aim was to get a light brown-grey tone. The sail maker inspects the original cotton, lying on top of a dyed part This is the finest fabric I could find

- 431 replies
-
- 3
-
-
- pegasus
- victory models
- (and 1 more)
-
While working on the boats I also tried to figure out how to make Pegasus’ furled sails. Earlier solutions included sails sewn by my mother (35 years ago, for Dolphyn), bought whole from the kit supplier (for La Gloire, ugh), sewn by a professional seamstress with self applied bolt ropes (on Granado, still much room for improvement) and all were not truly satisfying. Sample sails: left side: one unused staysail from Pegasus, made by a seamstress, no bolt ropes yet middle: glued sail with hand sewn bolt rope – sigh right: glued hem with boltrope glued into the hem, seams are penciled on – the best An example of a sail from the store, bought for La Gloire
- 431 replies
-
- 1
-
-
- pegasus
- victory models
- (and 1 more)
-
Hi Michael Strange. I was able to follow your beautiful, beautiful Vasa uninterrupted. Perhaps the connection was reestablished both ways by the fact that I eventually could stay again 2 days in LA after a long interval. Spending some time on the beach at Point Dume certainly connects me somehow to California – a truly nice place. Take care Peter
-
Hi Martin Thank you very much. But sometimes I hate that skipper. Peter
-
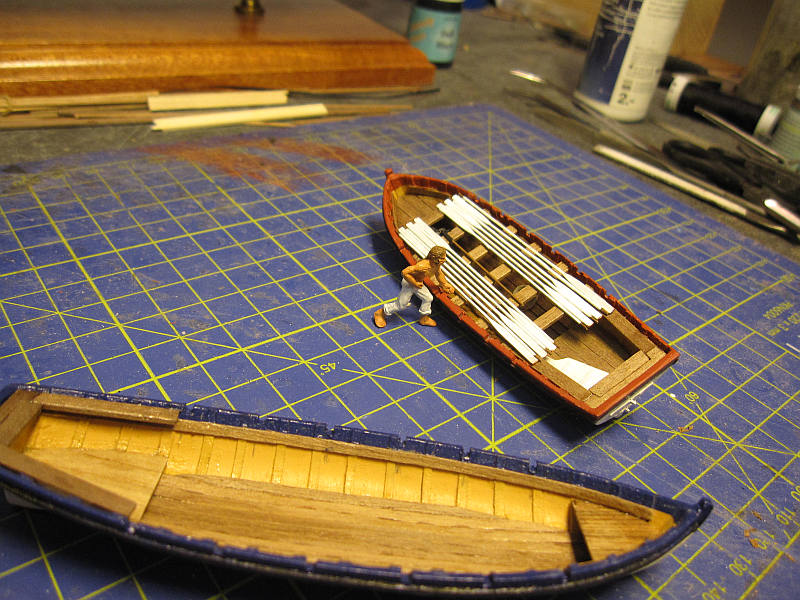
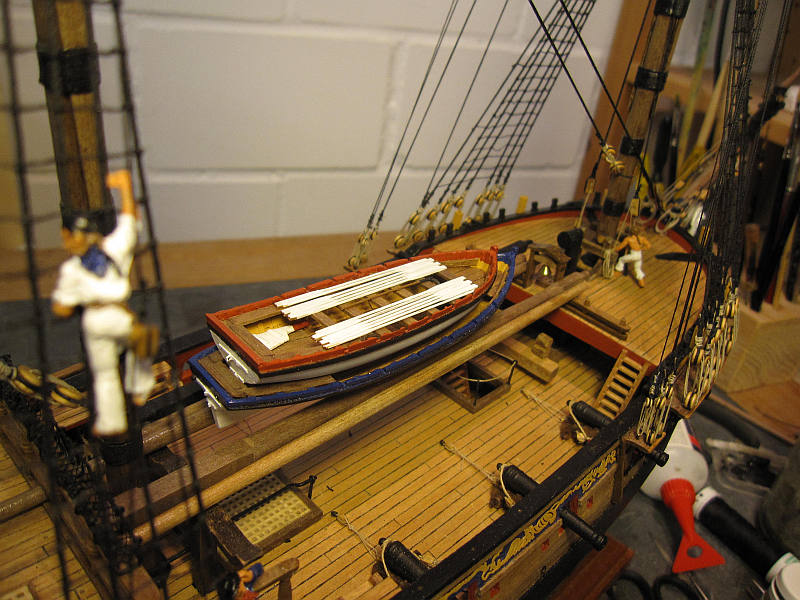
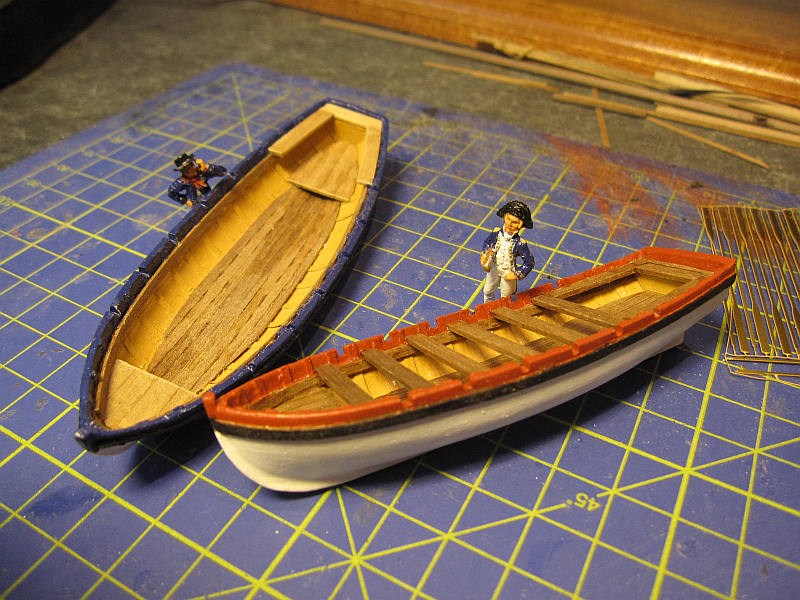
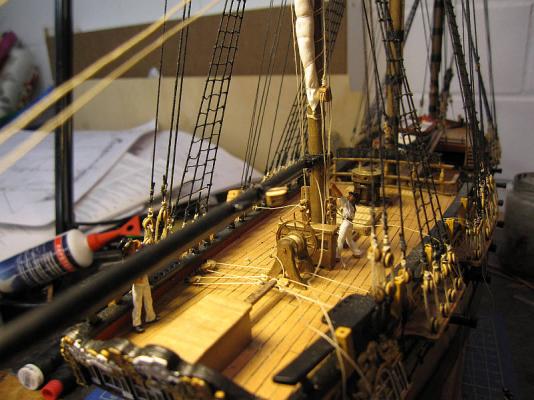
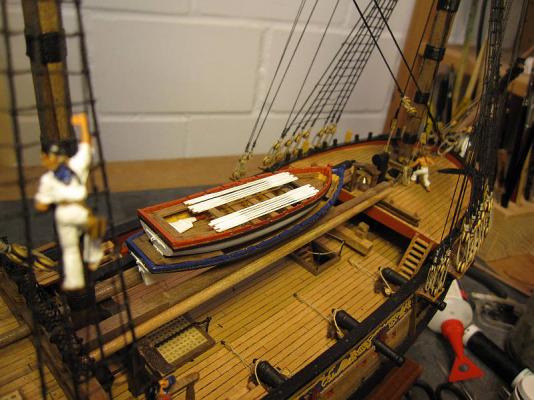
Well, of course it went the way I dreaded, the way the skipper wanted. I had to remake the rear bench and that little deck in the bow of the longboat. The details of the launch were completed and fortunately it fit into the reworked longboat without any additional supports. Provisional stowing on the spare spars seems to show a piece of luck - that it should be possible to fix those two boats there just as they are. Reworked longboat and detailed launch Boats provisionally stowed

- 431 replies
-
- 7
-
-
- pegasus
- victory models
- (and 1 more)
-
Hi Martin Just found your log and must say that’s a very neat looking Snake you have here. The Mamoli kits are not too bad as they are but your improvements are really bringing your ship dangerously close to the dark arts of scratch building! Keep up the good work Peter
-
Hi Vitus That great cabin will be the envy of the whole fleet (of Flies and Pegasuses). And I love that stove too. Those are great improvements. If you allow a little but… In my opinion the decoration on the bow sit’s on top of the whale (at least on my Pegasus). I would close the whale and put the decoration on top of it. I think this looks better. Keep up the good work! Cheers Peter
-
Hi Mike Those furled sails look really good! Thank you for sharing your technique and your research. One thought about that working order: On my first model I started according Wolfram zu Mondfelds advice for masting and rigging: Start aft and low and work upwards and forward. So far it always went quite well that way and also on Pegasus the first installed yard will be the crossjack and the first furled sail the mizzen topsail. The way you reduce your sails seems quite daring. I’m just asking myself if I should reduce a bit less. By keeping the original form and reducing it just by perhaps 30% (also an advice from aforesaid W. z. M) I hope to retain a certain bulk in the furled sail. You achieved quite slim forms. Perhaps those would be a bit too elegant for my working horse. I hope you don’t mind what is in no way meant as criticism. I just like to share my thoughts with somebody who is as well working to achieve good looking, furled sails. Keep up the good work! Cheers Peter
- 153 replies
-
- 2
-
-
- badger
- caldercraft
- (and 1 more)
-
The 19’ launch from CC was constructed similar to the longboat but with slight improvements. It will be fitted out with oars etc. It looks a bit better than the longboat and there might an improvement of the later become necessary. The captain inspects the new launch Unfortunately the skipper seems to like it and the look in his eye tells me that he would like the longboat to be of the same standard. (In fact you see the bosun already calling the carpenters to work on that. I’m afraid they will be busy elsewhere and the work will end up on my table – as almost every time.)

- 431 replies
-
- 6
-
-
- pegasus
- victory models
- (and 1 more)
-
Hi Andy That is a great build you have here. And it must be fantastic to be able to combine hobby, profession and calling in such a way. Merry Christmas and a happy new year! Peter
- 382 replies
-
- 1
-
-
- stadacona
- sylvan scale models
- (and 1 more)
-
Hi Mike Thank you and all the best for you and your family as well! Yes, there will be furled sails. I’m still in the experimenting phase but pulling the threads to simulate seams seems to work OK. Following your lead I will glue the seams as far as needed (I found glue which seems to work fine but of course there is always room for improvement). So far I intent to sew on those parts of the boltrope which are needed but there will also be some experiments with gluing. By the way – your Badger is looking mighty fine! Cheers Peter
- 431 replies
-
- 1
-
-
- pegasus
- victory models
- (and 1 more)
-
Hi Frank Thank you. All the best for you and your loved ones! Take care Peter
- 431 replies
-
- 1
-
-
- pegasus
- victory models
- (and 1 more)