captainbob
-
Posts
3,498 -
Joined
-
Last visited
Content Type
Profiles
Forums
Gallery
Events
Everything posted by captainbob
-
Michael, Google copper electroforming and see what artists are doing with it. Bob
- 348 replies
-
- 6
-

-
- pequot
- cable ship
- (and 1 more)
-
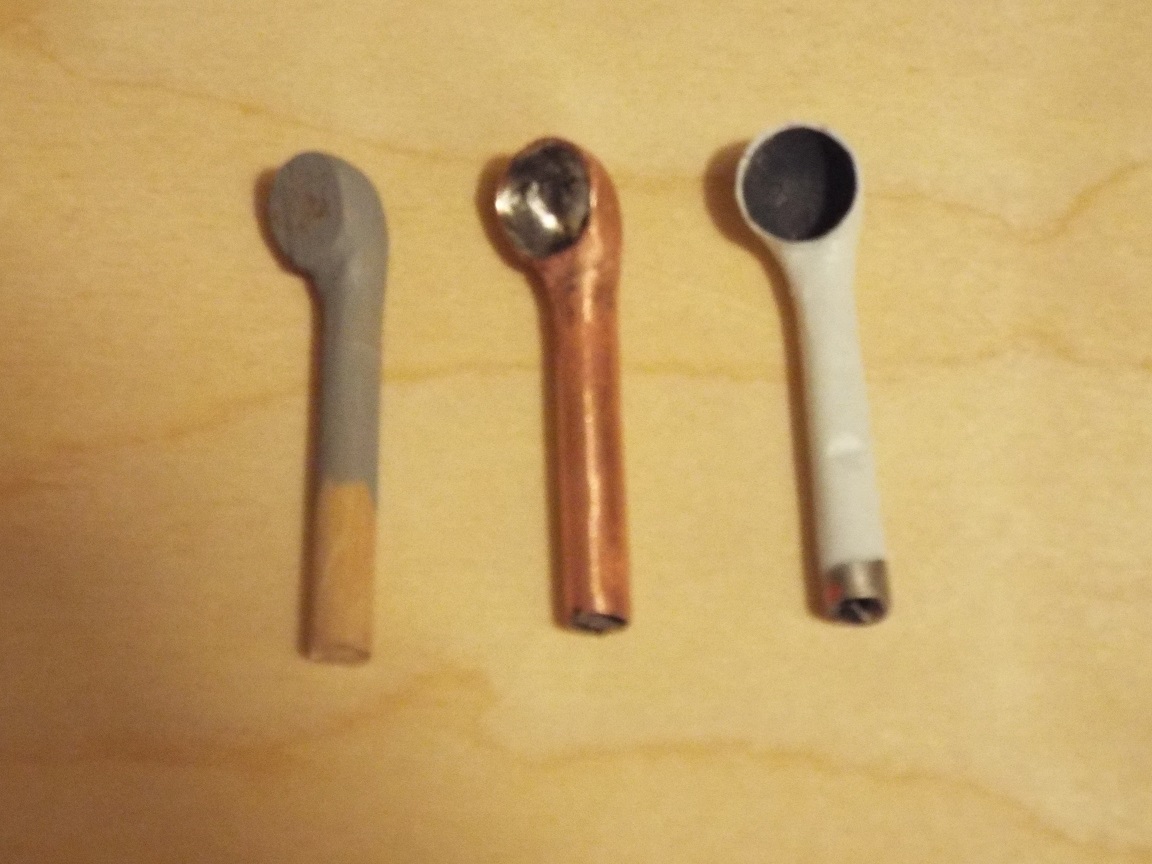
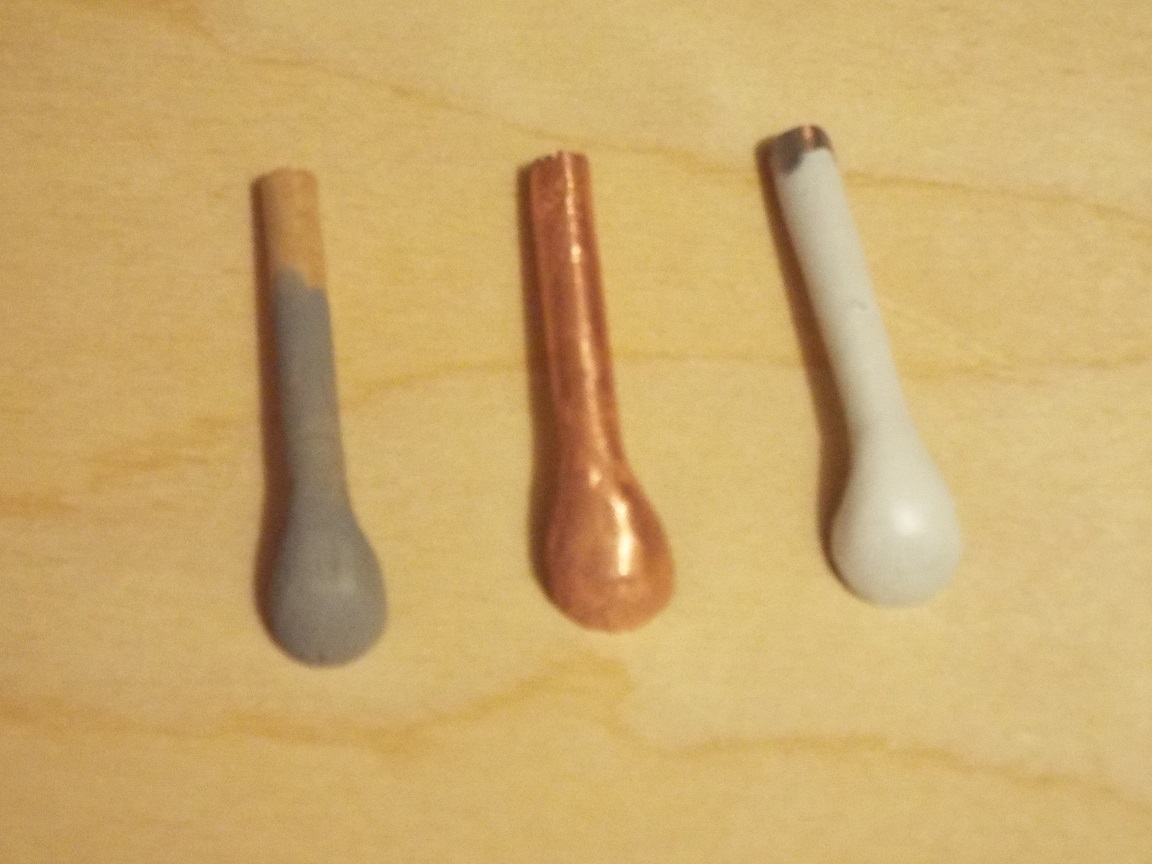
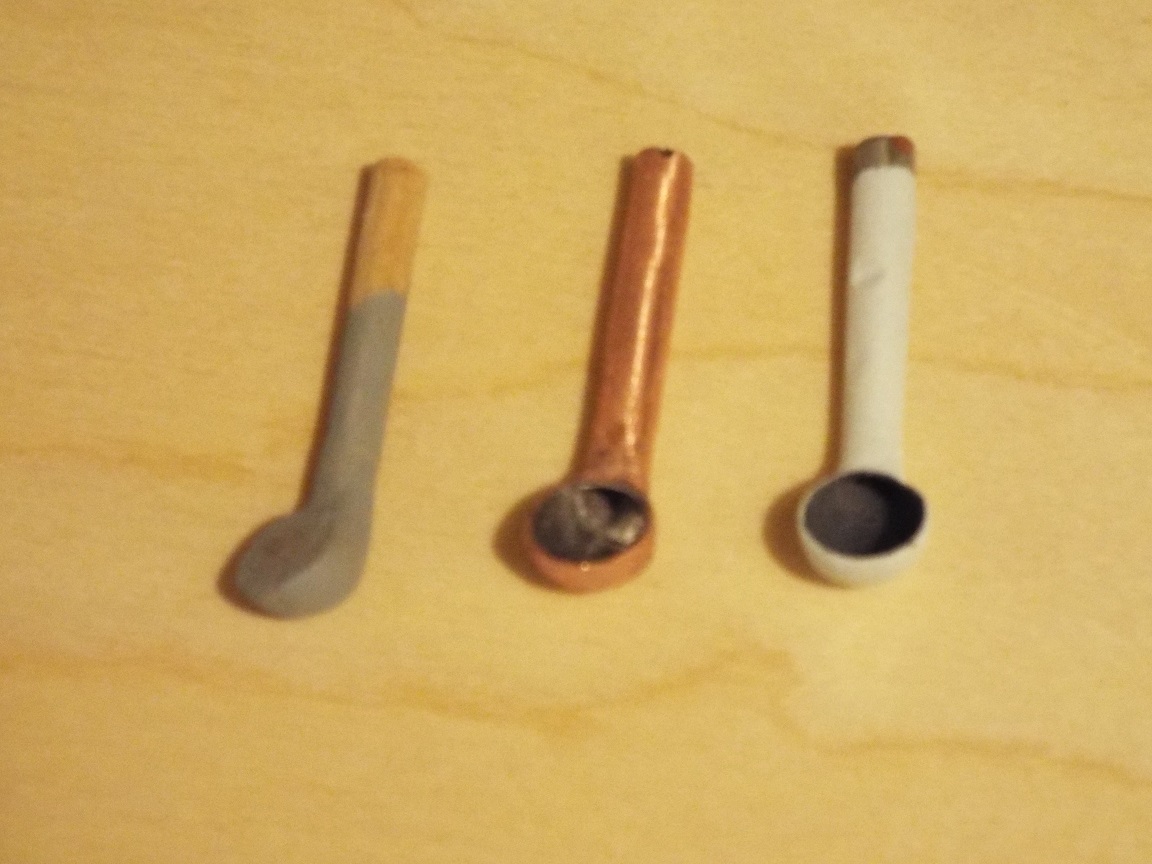
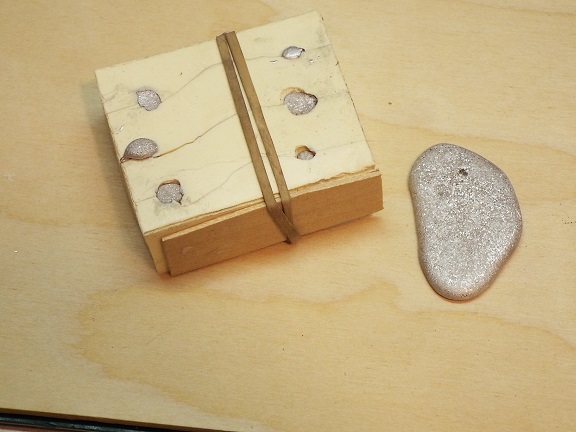
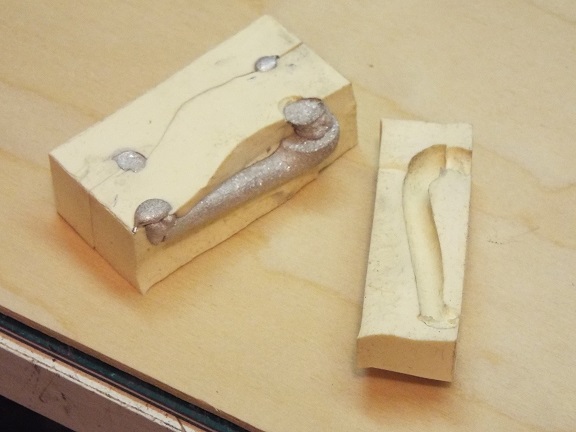
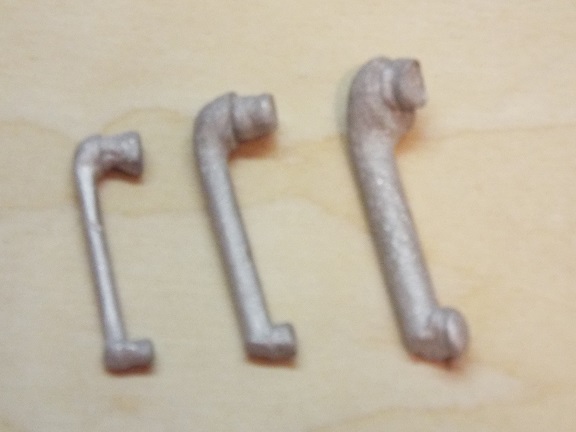
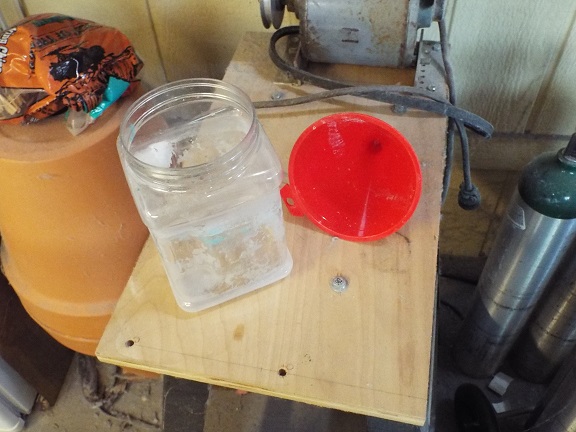
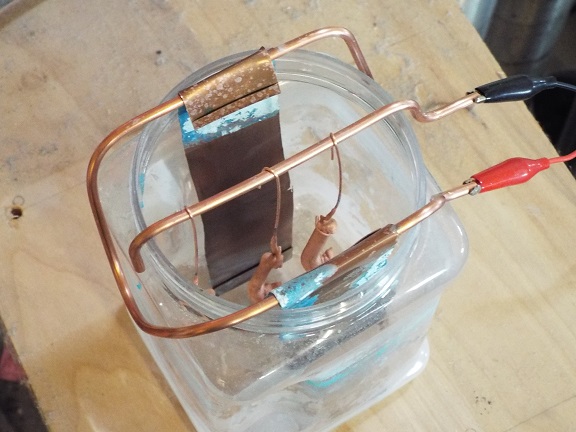
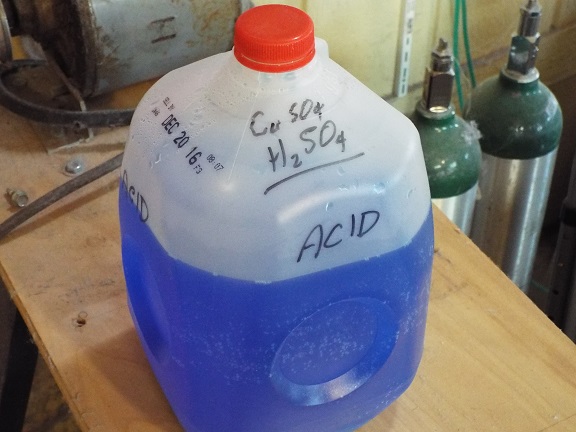
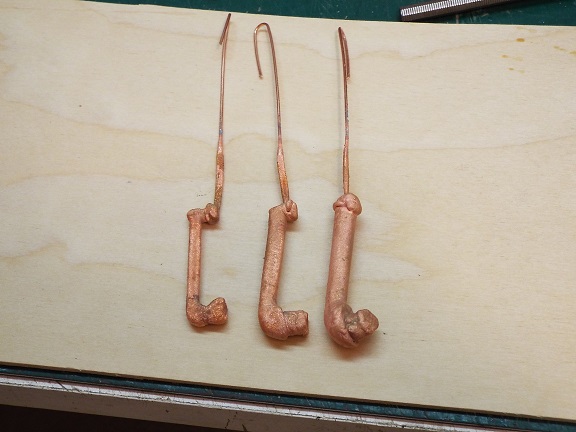
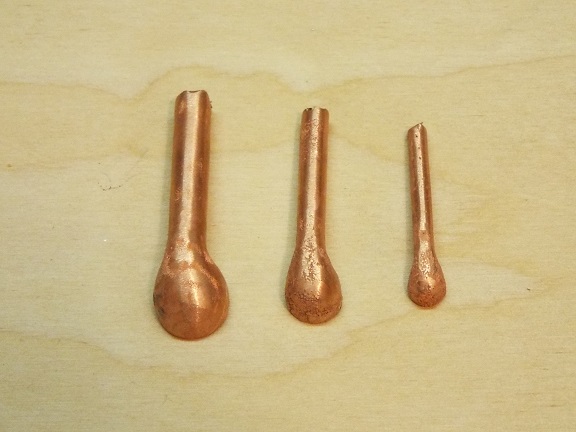
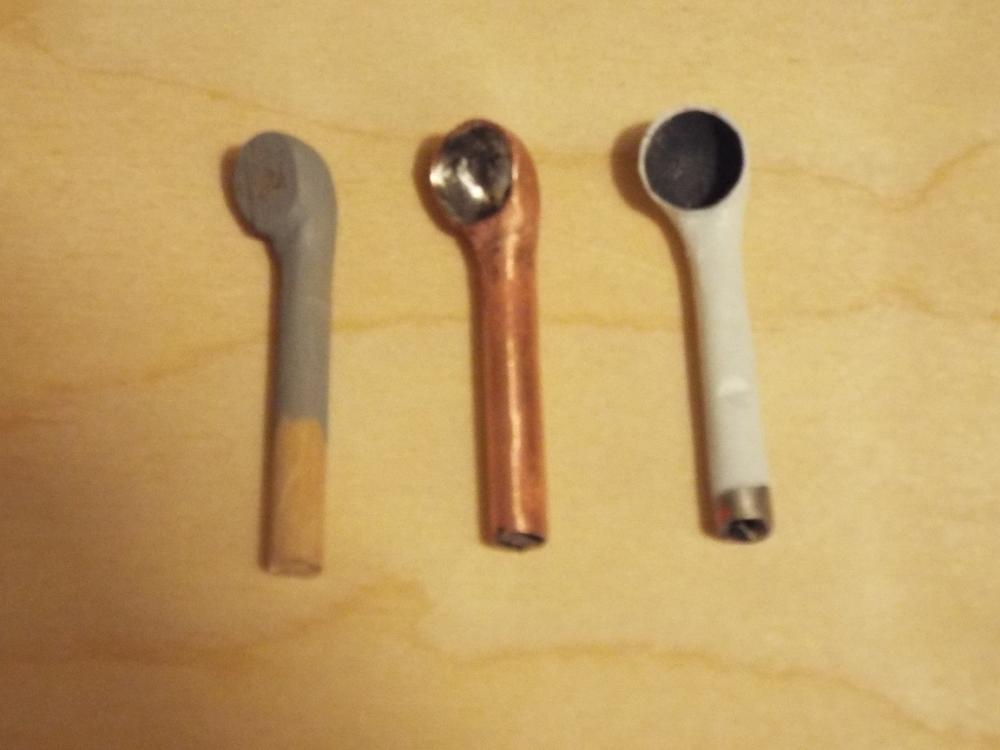
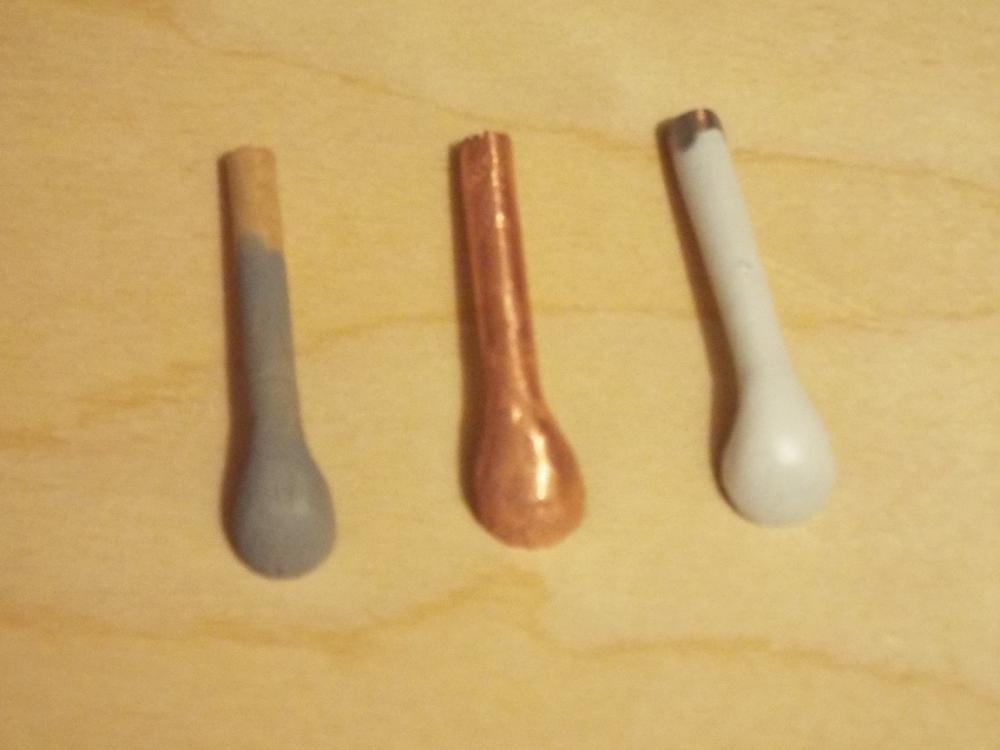
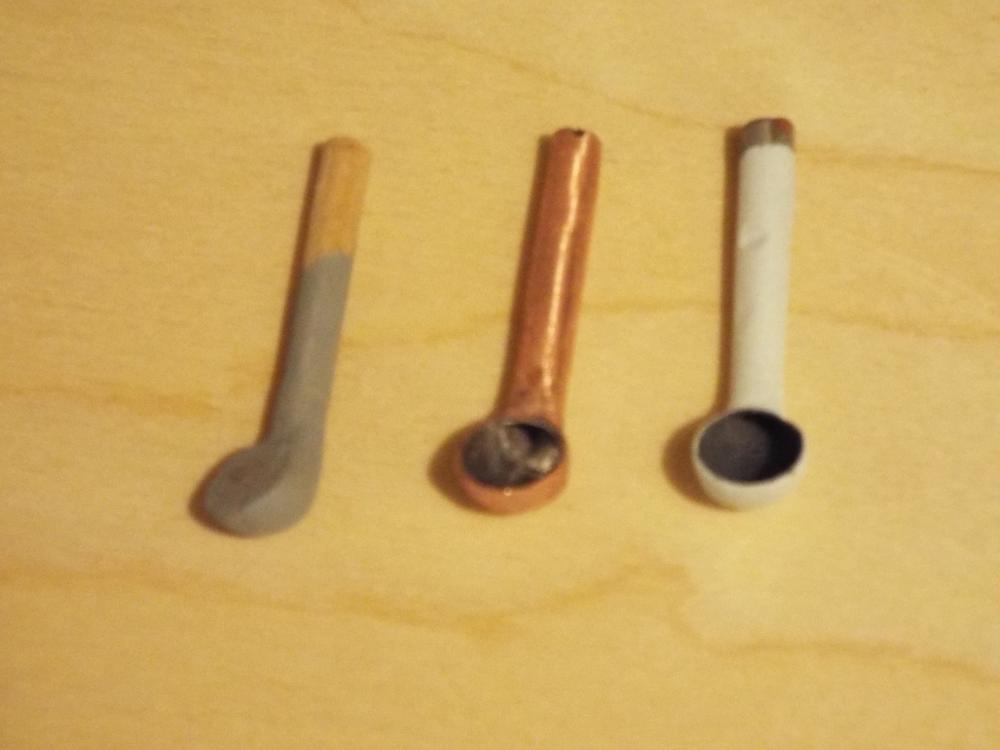
Thanks All, for the kind words and likes. A lot of you have asked how the cowls/vents were made so here goes. Electroforming is an old process, played with by Faraday and Edison. There are several ways to do it: cheap or expensive, safe or dangerous. Since I only had a vague idea of what I was doing I started cheap and safe. Electroforming is electro plating to the extreme. That is to say in plating only a few microns of material are plated to cover the base metal. Electroforming is much thicker and the base metal is usually removed. Here’s what you need: A beaker of glass or plastic 1 gal. distilled water. Get it with a screw on lid, you don’t want the top to come off whan you are mixing it. A power source, batteries or power supply Copper wire, both light and heavy. Scrap copper Mold making material Copper Sulfate A low melting temperature alloy. There are several on the web. I bought a 158F alloy from Amazon. Copper sulfate is available at chemical supply houses, or you can go to the hardware store and buy a drain cleaner such as Root Kill just be sure the label says copper sulfate. Buy two pounds. To mix the copper sulfate pour out and save about one third of the distilled water and pour in the blue crystals of the Copper sulfate. Shake it well. Not all the crystals will dissolve but the liquid should be saturated. Now fill the gallon with the water you saved. You need a model of what you want. In this case the vents. I want the wall of the finished part to be about .015 - .020” so make the model smaller by that amount. I then made a mold of the models. I only had enough mold material for one mold so I had all three in the one mold. In making the mold make sure there is an opening at both ends so you know when the mold is full because it comes out the other end. Once the core models are made you need to fasten a wire to them. I drilled a small hole in the sprue and attached a 22ga. wire about three inches long. All that is needed is electrical contact. It is time to set up the equipment. This can be done as simply putting a scrap piece of copper tubing in the beaker. That is how I started; the pictures show how I ended up. What happens is the plus side of the power source is connected to the scrap copper and the negative is attached to the part to be plated. The current will flow through the bath taking some copper ions from the scrap copper with it into the bath and copper ions from the bath will be attached to the part to be plated. I started with two “D” cell batteries. And the platting was fast but it was quite rough. I then played around with various batteries and found the one “AA” cell was pretty good, but I wanted more control and I wanted to know what power I was using. So I bought a power supply. Those on the web that tell about plating say you should have 0.1 milliamps per 1 sq. in. of plated surface. The voltage doesn’t seem to matter because some say low some say high. I set the power supply for 0.3 Ma. at 3 volts. It took about 24 hours. I used calipers to periodically measure the part to know when the plating was thick enough. I then rinsed the plated part in water. Then I cut the spurs from both ends and put the plated parts in boiling water. As they got hot the core material drained out of them and I was left with the hollow part. Some that seemed to know what they were doing said to add sulfuric acid to the mix (I said it could be dangerous) so I did. This did seem to make it a little faster and smoother, but I'm not sure it was worth it. When mixing the bath before you re-add the water you saved, pour in 2/3 cup of the sulfuric acid. ALWAY ADD ACID TO WATER, NEVER ADD WATER TO ACID. Here again you can buy the acid from a chemical supply house or you can go to the auto supply store and but battery acid. It's the same acid and much cheaper. Battery acid and Root Kill may not be as pure as what you get from a good chemical supplier but they seem to work just fine. When disposing of the bath the copper sulfate without the acid can be poured down the toilet, that’s what it is made for. If you added the acid contact the local authorities to see what must be done. If you have any questions please ask. Bob Molded cores My beaker Oh yes you will need a funnel for mixing and pouring. This is my set-up. Copper sheet on the plus (red) side and the cores hanging from the negative (black) side. This would then be filled with the bath. The bath chemicals. I like to mark them. The cores after plating. Parts ready for finishing.
- 348 replies
-
- 13
-
-
- pequot
- cable ship
- (and 1 more)
-
I do not have access to the journal but I would like to see those few pages. He ma describe it better than I could. Bob
- 348 replies
-
- 4
-
-
- pequot
- cable ship
- (and 1 more)
-
I'm sorry for the long delay in anything new from my boatyard. I just looked back. It was March 8th when I posted the wheelhouse. A while ago I saw some ship vents that a modeler made that had a flared bell and looked real. The caption said he molded and plated low temperature metal and then melted out the inner metal and was left with the hollow vents. This is all new territory for me. First learn how to make a mold. Then melt and pour the metal alloy. The hardest part was the heavy copper plating, referred to as electroforming. There is no one around here that is even plating let alone electroforming. So it was searching the web and trying to figure out what to do. Here is what I ended up with. The wooden model, the raw formed copper and the finished part. Bob
- 348 replies
-
- 18
-
-
- pequot
- cable ship
- (and 1 more)
-
And they're not just chairs, but designer chairs. Do you build the full size? I'll take a set. Bob
-
Steamboats and other rivercraft - general discussion
captainbob replied to Cathead's topic in Nautical/Naval History
I don't know about the Heroine but pertaining to later paddle wheel boats they did not use as much wood as much as you might think. Years ago I read (don't remember where) the boats were built as light as possible in order to carry more cargo. The hull and decks were built of 3/4" thick boards, the walls on the main deck were 5/8" thick and the walls on each higher deck were reduced in thickness by 1/8". Some of the wheel houses had walls as thin as 1/4". So the riverboats were not built with the thick frames and planking of an ocean going boat. Maybe that is why they were so easily sunk by running into snags. Bob- 281 replies
-
- 5
-
-
- Steamboats
- riverboats
- (and 3 more)
-
Beautiful detail on the mast. You do such fine work. Bob
- 2,625 replies
-
- 4
-
-
- kaiser wilhelm der grosse
- passenger steamer
- (and 1 more)
-
Steamboats and other rivercraft - general discussion
captainbob replied to Cathead's topic in Nautical/Naval History
Thanks Gerhard, It does show the benches on the upper deck. And some more history: Thealka is an unincorporated community in Johnson County, Kentucky, United States. It was created by the North East Coal Company in 1906 and was originally called Muddy Branch. In 1911, it was renamed "Thealka" after the steamboat known by the same name. Both the community and the steamboat were named after John C.C. Mayo's wife, Alice Jane Mayo, who was given the nickname "Alka". Thealka is in the 41240 ZIP Code Tabulation Area, which includes the nearby city of Paintsville. Bob- 281 replies
-
- 3
-
-
- Steamboats
- riverboats
- (and 3 more)
-
Steamboats and other rivercraft - general discussion
captainbob replied to Cathead's topic in Nautical/Naval History
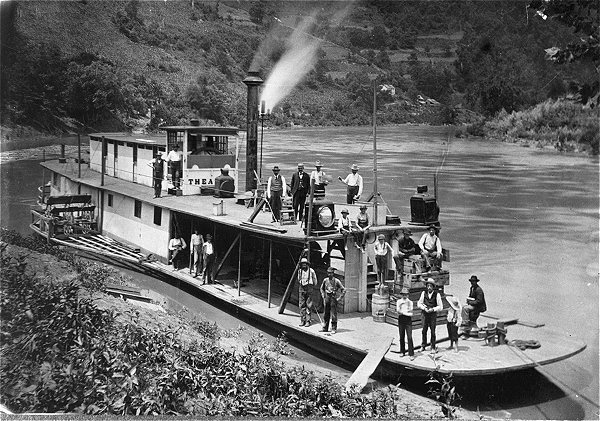
That is how I've always felt. I like the workboats. One of my favorite pictures is of THEALKA. I hope to build her someday. Bob
- 281 replies
-
- 14
-
-
- Steamboats
- riverboats
- (and 3 more)
-
It has been a joy following your build. Well done she looks great. Will you display it together or all the decks separated? Bob
-
Steamboats and other rivercraft - general discussion
captainbob replied to Cathead's topic in Nautical/Naval History
I've enjoyed what little research I've done on riverboats. It seems that the Mississippi boats were mainly for passengers but carried cargo as well, whereas the Missouri boats were for cargo but carried passengers. Was this true or is it just my imagination? Bob- 281 replies
-
- 6
-
-
- Steamboats
- riverboats
- (and 3 more)
-
I wonder if they knew what the conditions would be like before they sailed. Bob
- 649 replies
-
- 6
-
-
- dunbrody
- famine ship
- (and 2 more)
-
And you did a little happy dance singing, "She floats, She floats". Looking good, Walter, looking good. Bob
- 77 replies
-
- 2
-
-
- robert wiltsie
- sloop
- (and 1 more)
-
I was thinking of your hull and here's another idea. Build it out of wood to look the way you want. Fill any gaps with clay then fiber glass the inside and wash out the clay. This way the gaps would not be filled with anything but the fiberglass on the inside would waterproof it and hold it all together. Bob
-
Nice work on the mast and booms. Bob
- 2,625 replies
-
- 4
-
-
- kaiser wilhelm der grosse
- passenger steamer
- (and 1 more)
-
You might leave gaps between some of the planks, like a dried out derelict, and fill the gaps with clear epoxy. I'm sure whatever you do it will look great. Bob
-
We would have used petroleum jelly in the groove and a rubber band hooked from the keel to the bottom of the deck allowing the deck to be lifted just enough to unhook the rubber band for removal. Bob
-
That's the same thing I said when they wanted me to switch from the drafting board to a CAD system. Bob
-
Google "derelict boats" and go to images, you will get tons of pictures. Bob