


wefalck
-
Posts
6,413 -
Joined
-
Last visited
Content Type
Profiles
Forums
Gallery
Events
Everything posted by wefalck
-
 However, be aware, the copiers often distort images and that the scaling factors may not be exactly equal in x and y. It is a good idea to draw a not too short scale for both axes onto the drawing and check, while in the copying office. Also lines will be 9% wider then. A better way may be to scan or to have them scanned and print them out scanned. The advantage is also that you can print at home blow-ups of details as working drawings, e.g. for adding measures etc.
 -
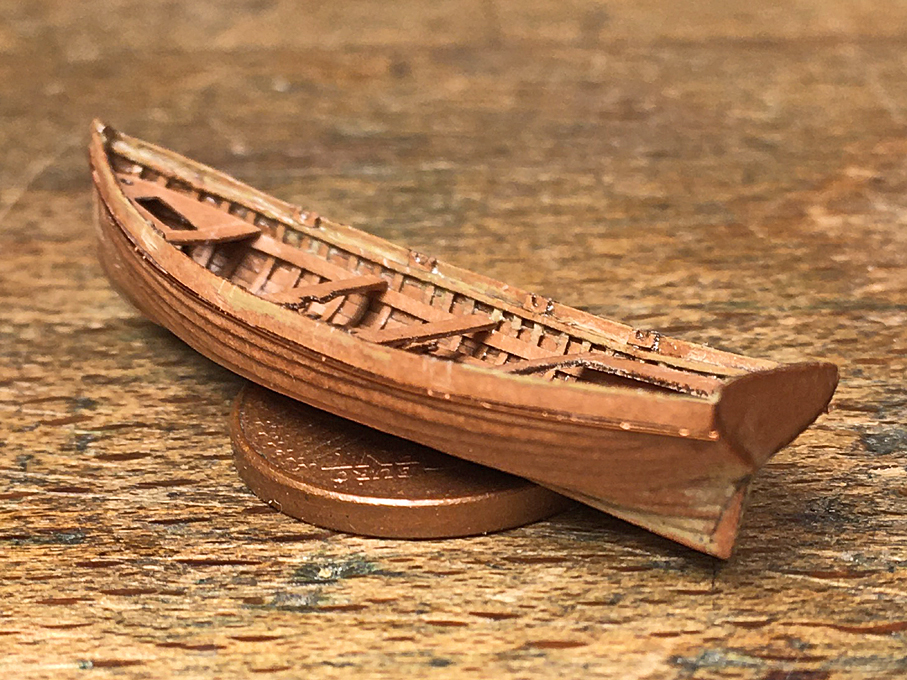
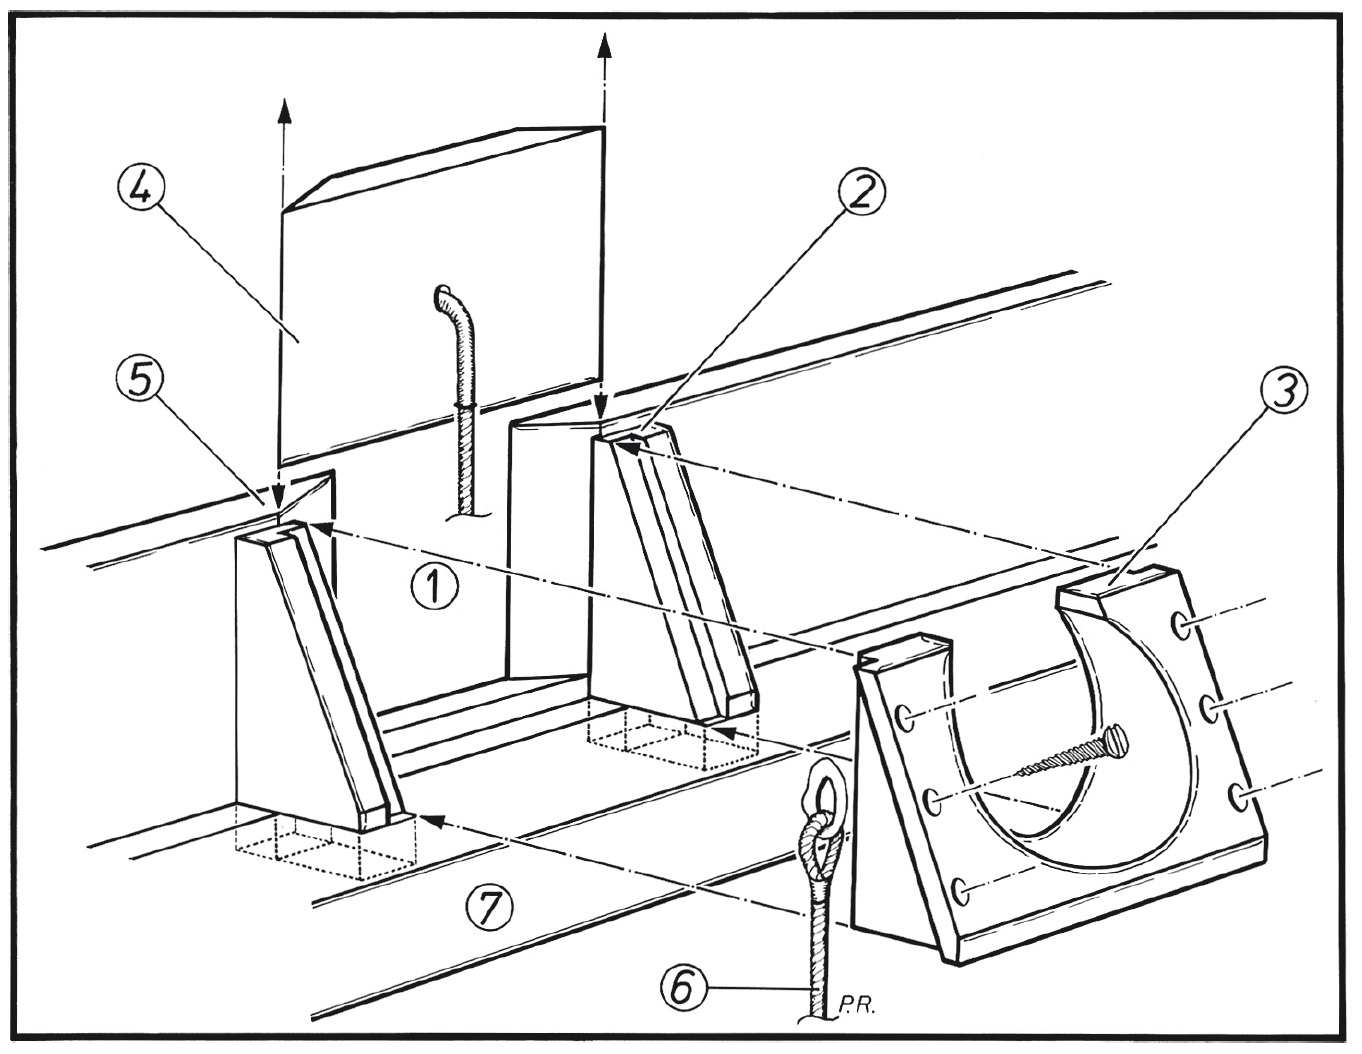
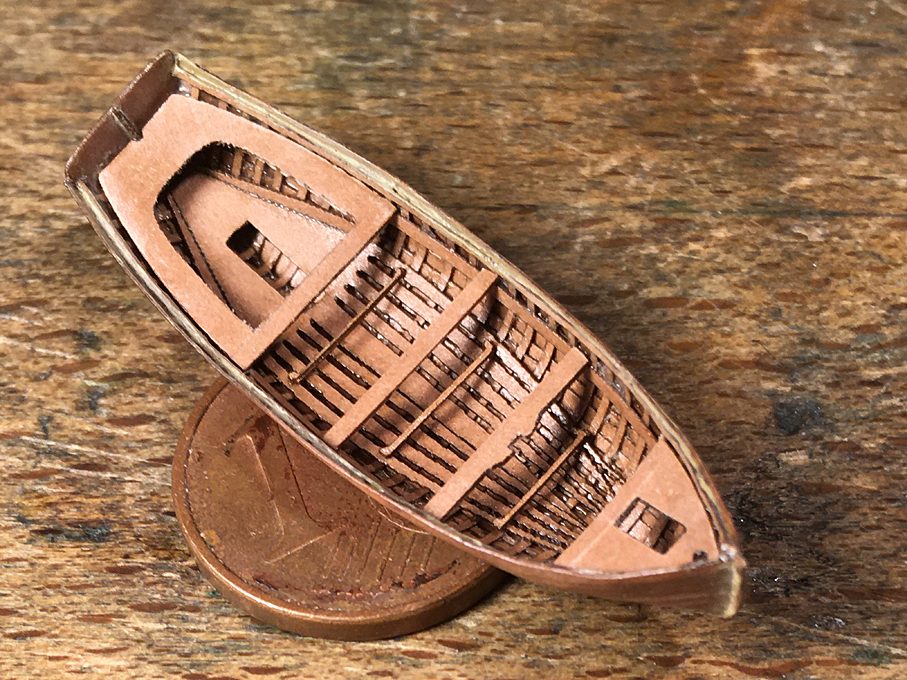
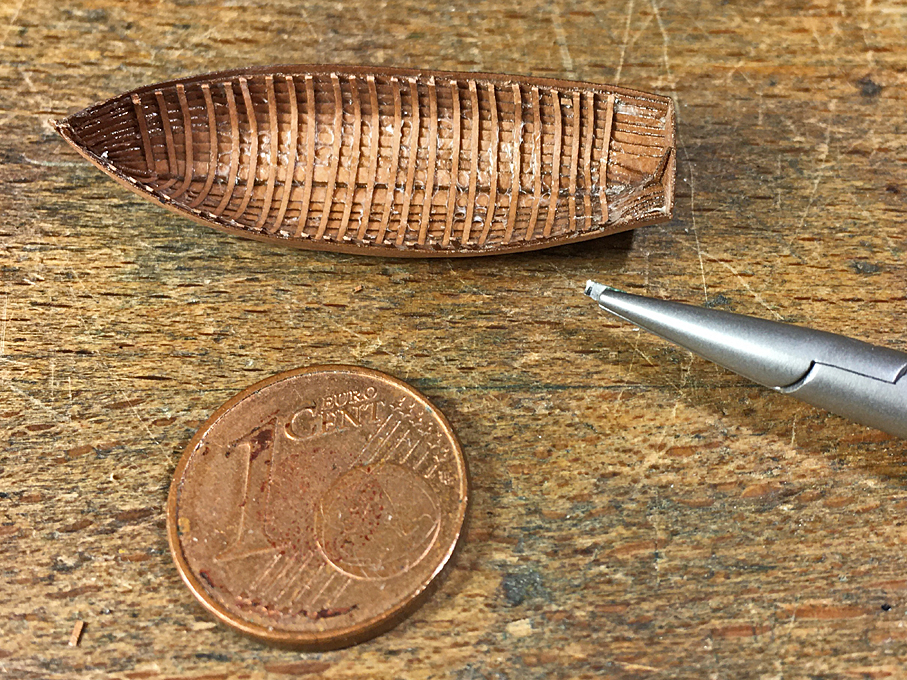
Glad to hear that I lived up to your expectations *************************************************** Jolly-Boat continued 5 A short update before painting begins. A couple of small details were still missing, including the rubbing strake, for which again 0.2 mm copper wire was used, the stanchions under the seats, and the row-locks. The stanchions were composed from three layers of laser-cut paper. Perhaps I should have milled them from brass rod, but I was somehow too lazy to take out my micro-mill. Design of the row-locks. Drawing by Peter Rückert in LOGBUCH 2-2019. The row-locks actually form the stanchions for the wash-strake, which structurally and strictly speaking is not part of the hull, but attached to it to heighten the free-board of the boat. They consist of two wooden clamps on which the actual row-lock in cast bronze sits. The wash-strake has square cut-outs for the oars, which are closed with wooden ‘shutters’ fitting into bevelled slots. To illustrate this, I enclose a drawing by a colleague and expert on the Imperial Navy boats, who sadly died last year much too young. The basic shape of these tiny specs of paper were cut out using the laser-cutting and lacquered into place. Originally, I had envisaged to fashion them from brass, but had the feeling that they were just too small to make this practical. I decided to show the locks closed, which saved me the trouble of having to cut out the square openings in the wash-strake. I just little scored them with a not too sharp scalpel. With this, the boat is ready to be painted. There is still some iron hardware that has to go on, but this will be installed after the painting, as it is supposed to be galvanized iron. I am actually not sure, whether the iron-work was painted over or left bare, but think it will add more detail to leave it bare. The first of paint on the outside is now drying … To be continued ....
- 935 replies
-
- 18
-

-

-
There are two solutions for this - use an (improvised) steady-rest as described above - the card-board will not survive more than one yard (the spar tapered on both ends), but will work. The same can be used also in the tailstock to protect machined surfaces. - turn two half yards and pin/glue them together.
-
Not exactly wheel-chair-friendly the deck ... one has to really pay attention not to trip over the lines leading to whinches and then the cleats ...
-
Well, may be you should get yourself a 2D-CAD, then up- or down-scaling is jsut a question of pushing a button ... I wouldn't put much trust in zu Mondfeld, rather check out the long list of contemporary anchor-drawings provided in the Danish archive. They begin largely from No. G 4445 and are often associated with particular ships and dated (see the one for the Jagt HELLEFLYNDEREN above).
-
Thanks, gentlemen, for your kind words! Brian, I would rather use styrene sheet, but my little cheapo laser-cutter just doesn't deliver enough energy to evaporate/burn even thin styrene - plus the high reflectance of white material. Black styrene might work, but I don't think they make it in 0.15 mm, 0.2 mm or 0.25 mm thickness. Paper has a lot less of mass per volume to burn, than plastics. Pat, I got it through ebay from China, search for 'surgical blade breaker'. I saw them decades ago in a catalogue for surgical instruments, but they were extremely expensive. I gather the Chines now sell 'seconds' through the Internet or just produce cheaper, so the stuff becomes affordable for non-professionals. However, for Europeans this source kind of dried up, since we are charged import duties now from the first cent on - and I am not happy with the geopolitical developments there.
-
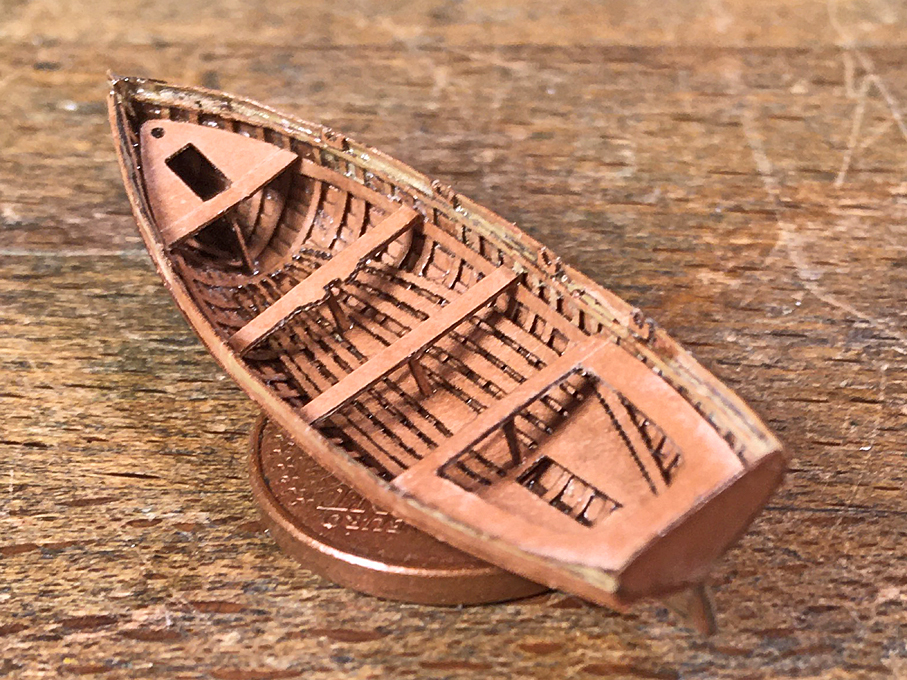
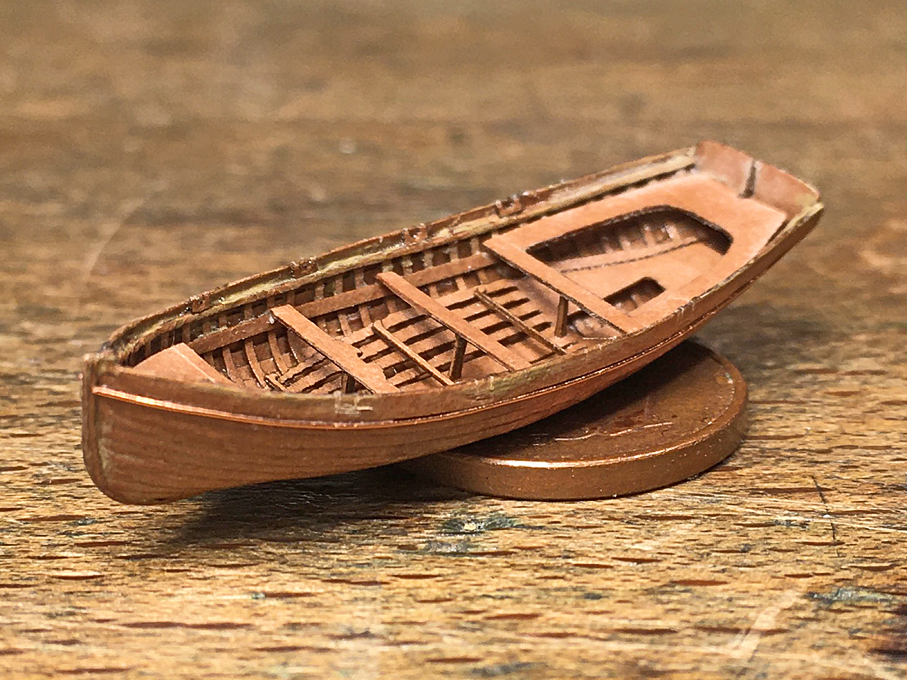
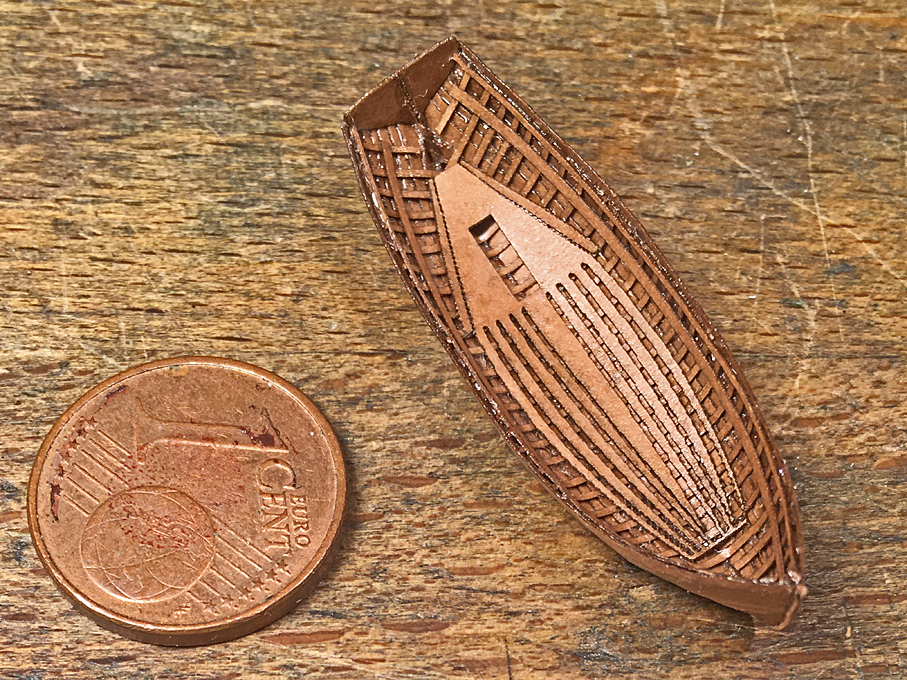
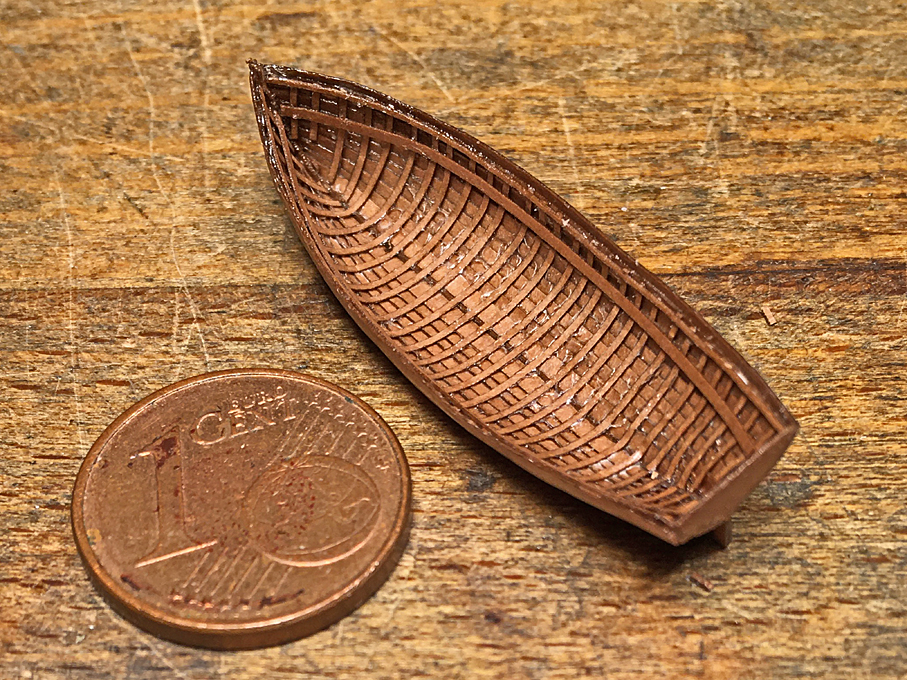
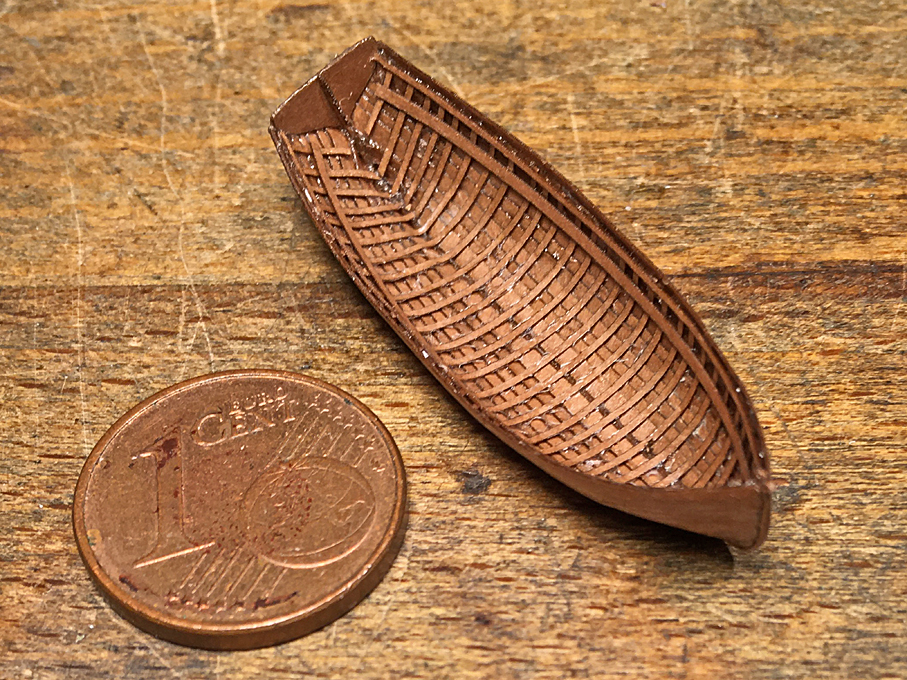
Thanks again for the friendly encouragement! ********************************************** Jolly-Boat continued 4 After some deliberations, I decided to cut the top of the frames back to gunwale level using a sort of micro-scalpel made from a piece of razor-blade just under 1 mm wide and held in a holder meant for that purposes (they come from the biological/medical realm). Hull with frames cut back to gunwale level Next went in the gunwale, laser-cut strips of paper 0.35 mm wide and 0.12 mm thick, and the inwales on which the seats rest, 0.5 mm x 0.12 mm. These were all lacquered in. Hull with gunwales and inwales On the prototype the floorboard, of course, were individual planks, but aligning them properly would have been rather difficult, so I cheated a bit and joined them. This will be barely visible under the seats eventually. Floorboards installed in the hull As my building was not as precise to the drawings, as I would have wished, the stern-sheets and the little platform in the bow required a bit of trial and error, and re-drawing for the laser-cutting. Still a bit of sanding to fit was required. Sanding paper is not that much fun, but re-soaking it in lacquer after a few strokes with a diamond-file keeps fraying under control. Stern-sheets, rowing seats and bow-platform installed I also laser-cut some foot-rests for the rowers – these parts are double layers of paper, with the actual rest about 0.2 mm x 0.2 mm in cross-section The footrests for the rowers are visible just before the rowing seat behind This concludes the main structural parts, but a lot of small bits and pieces still need to be done.

- 935 replies
-
- 29
-
-
-
I always use momentary switches, as you just have to lift the foot to stop the machine - much faster and safer. When you use a ball-race in the tailstock, you need to make some sort of bushing to hold the material you are working on in order to prevent whipping in a too large bore. For long parts you probably will also a 'fixed steady' to keep deflection down. This can be simple L-shaped piece of wood that is clamped down to the bed and has a fairly large hole in the upright part. This hole is covered with a thick piece of cardboard into which you punch a hole to match the diameter of the work-piece - old-time machinists' emergency trick.
-
Dimmers work by cutting off part of the A/C sinus wave - if you hook this up to another A/C device with a similar speed-control built-in, the results are going to be unpredictable, depending on what phase the two speed-controls work at any moment ...
-
Fitting of combined lift and sheet blocks to the yard.
wefalck replied to DaveBaxt's topic in Masting, rigging and sails
Don't look at other peoples' projects, look into the reference books, that's a much safer option. Other people might have just guessed ... -
Turn a scalpel blade into a saw
wefalck replied to bruce d's topic in Modeling tools and Workshop Equipment
Sounds like an interesting idea, indeed, and I have to give it a try. I can see uses for it to make small incisions and slots. I don't know about the relativ hardness of ordinary razor-blades and files, but that could be another application of the idea. I haven't heard of jewellers using beeswax for hardening/tempering and have to check on this. Normally, one controls the hardness through the tempering temperature, which is indicated by the oxidation colour. Have to watch the video tonight in order to see what the guy actually does. -
Tilting mount for Proxxon Vise for MF70
wefalck replied to ChrisLBren's topic in Modeling tools and Workshop Equipment
My personal preference would actually be to use the smallest tool-makers vice available (1" = 25 mm jaw width), as used in EDM to hold electrodes. They sell quite cheaply, I think around 40€/USD and are precision-ground on all surfaces. They have holes tapped M4 for attaching them. You can make yourself two brackets from L-shaped aluminium or steel profile with matching holes at exactly the same height to take M4-screws to go into the tapped holes in the vice. Holes in the other shanks allow you to bolt it down onto the table of the MF70 or wherever. With the help of angle-gauges or a protractor, you can set the desired angle. The advantage of this is that you loose less height under the spindle than with the above type of 'sine-plate' (well, it's not exactly one, but looks a bit like it). I made myself a slightly more elaborate version with the brackets in one piece for easy set-up: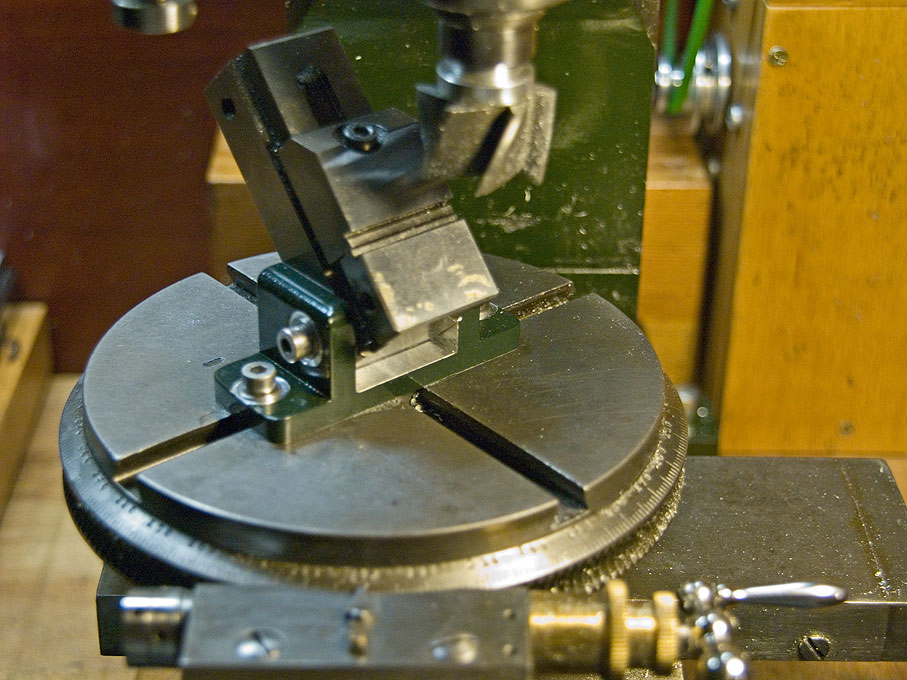
- 10 replies
-
- 10
-
-
I am not so sure that you will be happy with that road ... these electrical drill are very noise and perhaps run at a too high speed to be save. What do you actually want to do with the lathe. The set-up seems to indicate some work on masts and spars? You can buy on ebay these days lots of bits and pieces to make some make-shift lathes, such as small DC motors together with drill-chuck or ER11 collet chucks, which is a better option. There are also revolving tailstock centres. In fact, both, motors and tailstocks come with brackets to mount on a board or some rail, so that you don't have to worry about height adjustment. One thing I would consider essential is a foot-switch. This is even more important, when you work with sand-paper on your mast, as it can easily get caught and rip on your fingers, or the spar slips out of the tailstock and starts whipping - then you don't want to waste time reaching for the switch on an electrical drill ...
-
Fitting of combined lift and sheet blocks to the yard.
wefalck replied to DaveBaxt's topic in Masting, rigging and sails
What kind of literature do you have? For ENDEAVOUR, Lever or Steel should give you some indications. This is the link to a 1843 edition of Lever, but I don't think the plates have changed since the 1st edition: https://archive.org/details/youngseaofficers00leve -
Here you are, the translatiopn of 2001-II – Sail-plan Note: the ending ‚-en‘ in Danish nouns is the definite article ‚the‘, ‚-er‘ ist he plural form Copie Tegning - Copy of Drawing På seijlere samt dimensioner af mast og rundholter til en af de nye type Konge Jagter, førende 12 stykker 4 lb canoner og 12 lb haubitzer – For the sails and the dimensions of the mast and spars for one of the new type of Royal Yacht, which carries 12 pieces 4 pounder cannon or 12 pounder howitzers. Lang i mellem spündigerne – Length between the rabbets: 64 fod/feet 2 tom./inch Heele Længden Fod – tom Whole length Feet - inches Diameter Tomme - inches Top og nokker Fod – tom Top or end Feet - inches Masten 79-6 20 7-6 Stangen til wandtets plads – topmast down to doubling 21-1 Toppen til boven topsejl – top until above the topsail 19-6 Heele Længden of Stangen – whole length of topmast 35-6 35-6 8 1/2 19-6 Bougsprydet uden for Steven – bowsprit outside stem 29 Inden for ditto – within for the same 10-6 Heele Længden 39-6 39-6 14 Klyverbommen uden for Bougspr. – jib-boom outside stem 16 Within for the same 30 Heele Lngden - Whole length 46 46 7 1/2 1-6 Bommen for stor seijlet – main-sail boom 56 13 1-10 Gaffelen - gaff 30-3 9 1-3 Den mindste gaffel – the shortest gaff 18-9 6 1-3 Bergine raae – bagien yard 42 8 3-6 Topseils raae – top-sail yard 32 6 3-8 Boven topseils raae – topgallant yard 21 4 2-8 Under laeseils spirer – lower studding-sail boom 20-4 4 2-8 Under læseijls raae – lower studding-sail yard 6 2 1/2 2-6 Boven læseijls ditto. – upper studding-sail yard 10-8 2 1/2 1-6 Breedfokke og underlæseijls – main-course and lower studding-sails 27 5 1-6 Driver udlageren eller spiren – driver boom 27 5 1-3 Ditto. Raae – dito. yard 6-10 2 1/2 2-3 NB. 1790 den 26de July blev giordt en tegning til en nye inden klyver, hvis under lig tilligemed revet er truket op prikled med rødt samt bemærked med C+, hvoraf den forfærdiges og som skal væere af den fiineste og beste af dette slags dug. 1790 on the 26th of July a drawing was made for a new jib-sail, on which the reef is drawn dotted with red and marked with C+, from which it is completed and which must be of the finest and best kind of cloth. NB. 1806 den 9de Decbr. blev beordret at forfardige en stor klyver til de nye slags Konge Jagter hvilken er trukken herpå med grøndt tilligemed den befaleder forandring af stor masten samt fokken. 1806 on 9th Dec. was ordered to make a big jib-sail for the new style Royal Jagt which is drawn on here with green as well as the ordered change of the big mast and the jib. Actually, for us Germans written Danish is not that difficult, if one understands some basic differences. There is also GoogleTranslator, but it struggles with the nautical terms and the orthography of old documents has to be adapted to the modern one, e.g. aa now is å, oe is ø, etc. Danish pronounciation is a different matter, of course So it seems that drawing 2001-II is a copy of the original sail-drawing (F146) on which changes made in July 1790 and December 1806 are indicated.
-
Give me time until tomorrow evening. I manage reasonably well with technical Danish ...
-
Indeed, these are copies from the old paper registers (Findbuch in German) of the Rigsarkivet. I remember flicking through them, when I visited the archives a couple of times in the late 1990s (during a time when I had a business trip to Copenhagen every other month or so). The most valuable aspect of these register pages probably is, that they list which drawings belong together, because as one can see from the numbers, they may be dispersed throughout the archives. The reason for this (probably) is, that they were organised on a subject-basis. So, for instance, the drawings G44XX and G5XX are anchors, G45XX and G45XX stoves and baking ovens, etc. In fact this is the royal yacht HELLEFLYNDEREN (THE HALIBUT). Not quite a packet, but obviously in the basic structure similar. B156: C192 F149 F151 (not sure it really belongs here, but it shows indeed a deep, narrow course ...) G520a (the ship's boat) G520b (sail-plan for the boat) G1998 G1999 G2000 G2001 G2001 II G4455 G4597
-
Are you aware of this drawing in the Danish Rigsarkivet (archive of the navy yard): https://www.sa.dk/ao-soegesider/billedviser?epid=17149179#190381,31921412 The drawing is from 1789 and gives the spar dimensions. Their shape then can be reconstructed using the methods of the time.
-
Nice drawing - one doesn't see hand-drawings that often anymore theses days. The yards actually look quite narrow. The main course (Breitfock) then appears to be rather narrow and heigh. Top- and topgallant-sails look more in the typical proportions.
-
Harriet McGregor by Boccherini
wefalck replied to Boccherini's topic in - Build logs for subjects built 1851 - 1900
Looks actually very nice! Ship-shape, Bristol-fashion! For me PVA (white gule) would be the standard glue for wood and I would rather not use contact cement. The latter, due to its high viscosity, sits on the wood surface, while PVA 'keys' into the wood-grain. Such bonds are virtually impossible to separate without ripping the wood into pieces, while bonds with contact cement can be sheared/pried off. One solution to deal with moving parts, such as the roof panels, is to glue them on a piece of silk-paper and once set, to glue the assembly in place. I would also make it oversize and then trim/sand to an exact fit. It's easier to deal with one problem at a time. -
Harriet McGregor by Boccherini
wefalck replied to Boccherini's topic in - Build logs for subjects built 1851 - 1900
It's noise only, I suppose, when you are milling wood at high-speed. When milling metal, you work at much lower speeds and hence less high-pitched noice. -
Harriet McGregor by Boccherini
wefalck replied to Boccherini's topic in - Build logs for subjects built 1851 - 1900
Excellent approach! Some people also glue sections tangentially and cut to form a hexagon, or rather two hexagons offset by 30° for added strength, to better represent full-scale practice. -
Indeed, I have been (partly) following Joe Pies' lathe-project. He currently works on the shaper by PM Research. And yes, Stuart's kits in a way are more 'authentic', as they use cast iron, rather than aluminium.
-
So Stuart dodged making proper thrust-bearings ... normally, the bronze bushings would have tapers turned/ground into them, to which tapers on the spindle would correspond. The double nuts then would take out the end-play from the spindle. I gather this would have been quite a challenge to make and this is 'only' a model anyway. Nice machine machining, as always 👍, btw.
-
Harriet McGregor by Boccherini
wefalck replied to Boccherini's topic in - Build logs for subjects built 1851 - 1900
Yep, jigs are a 'professional' approach to making and installing things (though personally I am often too lazy to do it ...). Copper wire is indeed too soft normally to be turned. One can try to strech it to 'work-harden' it by holding one end in a vice and give it a jerk with pliers. However, it general it is difficult to work on leghts greater than two times the diameter. The same applies to most brass. I found that using small brass-nails as starting material helps - the nails are sort of drop-forged and this hardens the material. The general recommendation is to not turn unsupported pieces that overhang more than three times the diameter. With steel you can get away with more, with copper a lot less and brass or wood are somewhere in between. For longer workpieces one needs a dead centre in the tailstock or a fixed steady. A question: did you use the template to form-turn the balustres or just to control the shape, while turning with a normal tool? I am asking, because you seem to have it mounted to the rear.
