


wefalck
-
Posts
6,648 -
Joined
-
Last visited
Content Type
Profiles
Forums
Gallery
Events
Everything posted by wefalck
-
Well, plastic is not plastic. It depends on the molecular formulation, whether the surfaces are hydrophobic (water repellent) or more hydrophilic (water spreads out, rathern forming droplets). Some plastics, such as acrylics are more hydrophilic ... When you smear some goo (paint, glue, varnish, whatever ...) onto polyester thread two things will happen: - there will be a physico-chemical interaction with the 'surface', either it is repelled or attracted; organic solvent-based goo tends to be attracted by hydrophobic surfaces, while water-based goo (say acrylic paint, PVA-glue) would be repelled by such surfaces and vice versa. - however, the goo also penetrates the structure of e.g. a polyester rope and solidifies in there, i.e. it keys into such surface structures. In this way water-based goo may stick to hydrophobic material by purely mechanical interaction.
-
 I have been out travelling the past two weeks, so missed the beginning, but have caught up now. That kit tempted me too, when I saw it on the Internet some 20 years ago. However, my watchmaker milling-machines wouldn't have been big enough to tackle the stand I think. Size-wise, my machines are somewhere between this model and the 'real' thing (though more leaning on the model-size side ...). My Dixi-horizontal miller stands just under 26 cm (10") tall (with spindle raising block): If your lathe cuts threads, I would cut these left-hand threads between centres, taking very light passes and finish them off with a die to kind of calibrate the profile - this takes out any 'bulging' in the middle of the threaded part due to deflection by the tool . The lathe ensures the uniform pitch.
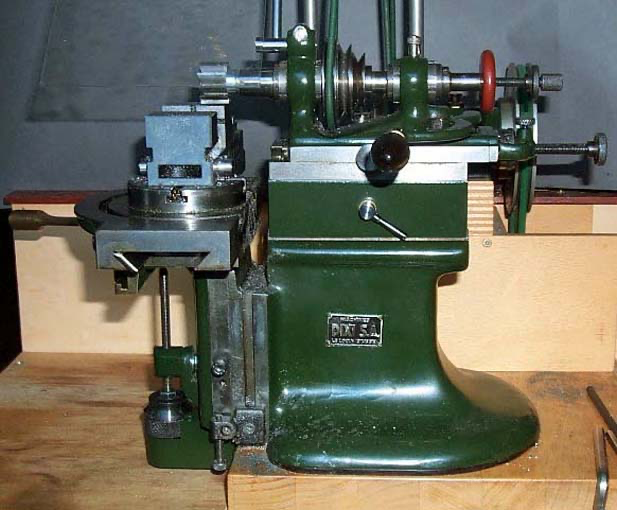
-
The rocky coasts around the North America, Scandinavia, the UK, France etc. give the opportunity for some nice condensed scenic settings (I avoid the term 'diorama', as in most cases people do not install a background and viewing frame). In my home-country, coasts are mostly flat and quite open with buildings spread out, so that such condensed sceneries are rarely seen. Looking forward to the progress of this project.
-
I have no issues with using nitrocellulose-based lacquers on polyester-threads (I am using fly-tying threads, rather than Mara, which is still too coarse for my scales) and partly washing it off using acetone. Polyesters are another group of chemical compounds than polystyrene and have a much higher chemical resistance to organic solvents (which is why you can dry-clean fabrics made from them). I wonder why dying seems to be such an obsession in the discussion here, as particularly Mara seems to be available (in principle) in so many different shades of beige, grey, brown to black. Even for my fly-tying threads I can find suitable colours in the ranges of different manufacturers. Otherwise, a 'tarred' look, where the strands appear lighter than the grooves between them could be achieved by giving the rope a wash with an ink and wipe off the excess.
-
Porcelain-painters use similar arm-rests, but only one for the arm with the brush. Watchmakers use high benches with those arm-rests and their nose almost on the bench, because of the close working distance of their loupes, particularly, when assembling watches. The idea of the arm-rest is good, but I don't use them, because they are so many varied movements of the arms and they would get in my way all the time. Sometimes I just my arm on the vice that is screwed to my bench. When doing prolonged work of the same kind, such as painting figures, I have used just a solid cardboard-box on the bench. Perhaps this Chinese guy in the advertisement for the hand-steady could do away with it, if he dumped the glove - no way to work with such gloves, no feel whatsoever. Coming back to the original subject, miniatures: what 'knightyo' said about about the impression on 'lay' audience a larger model makes is so true ...
-
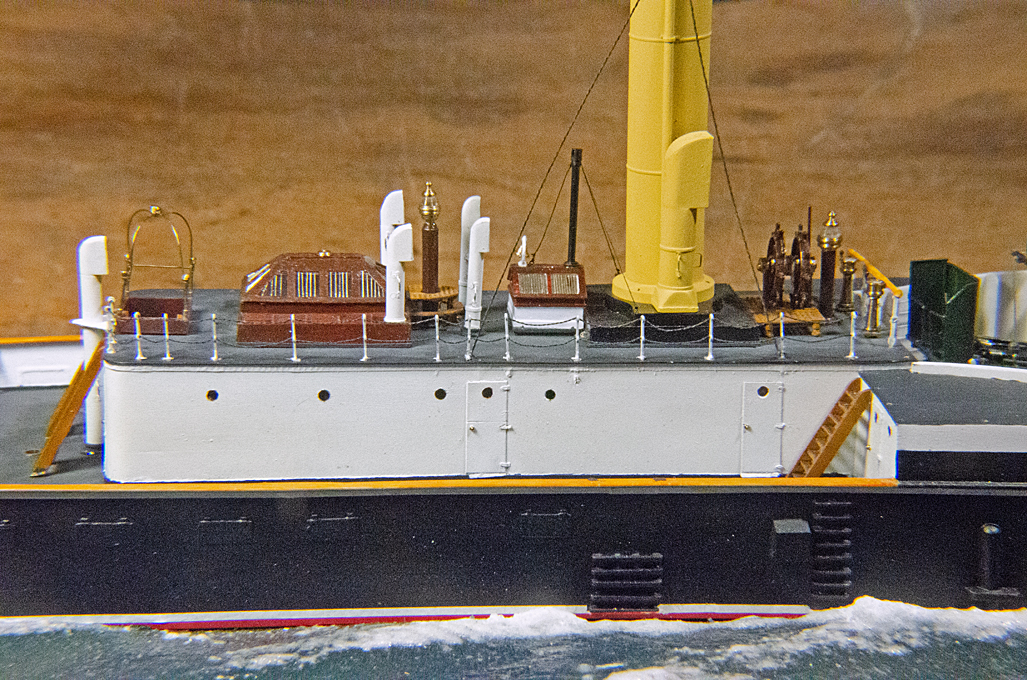
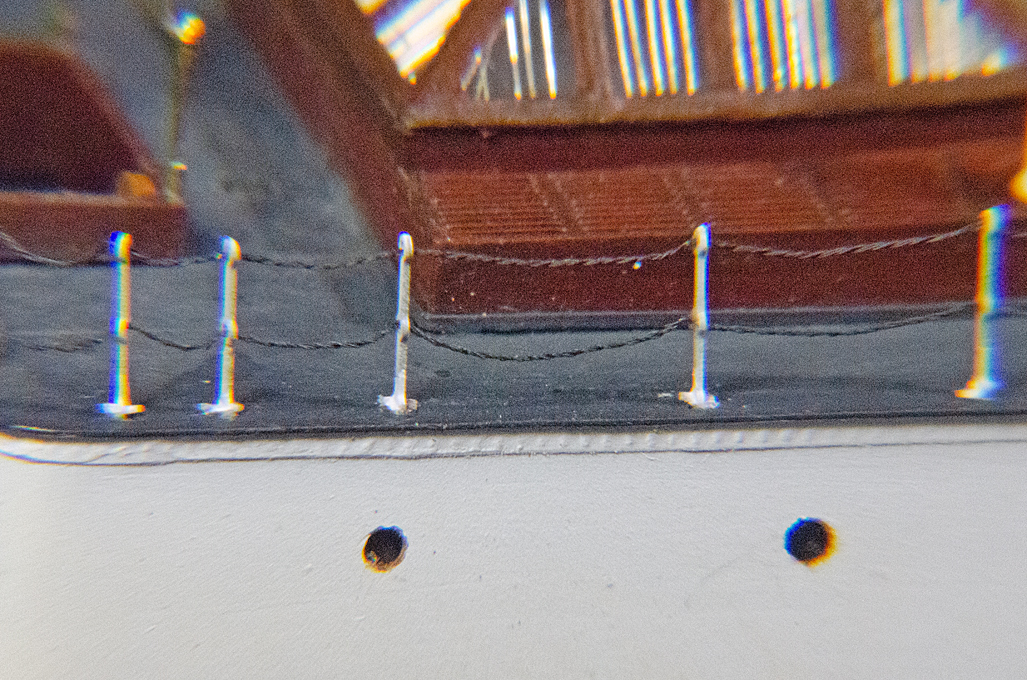
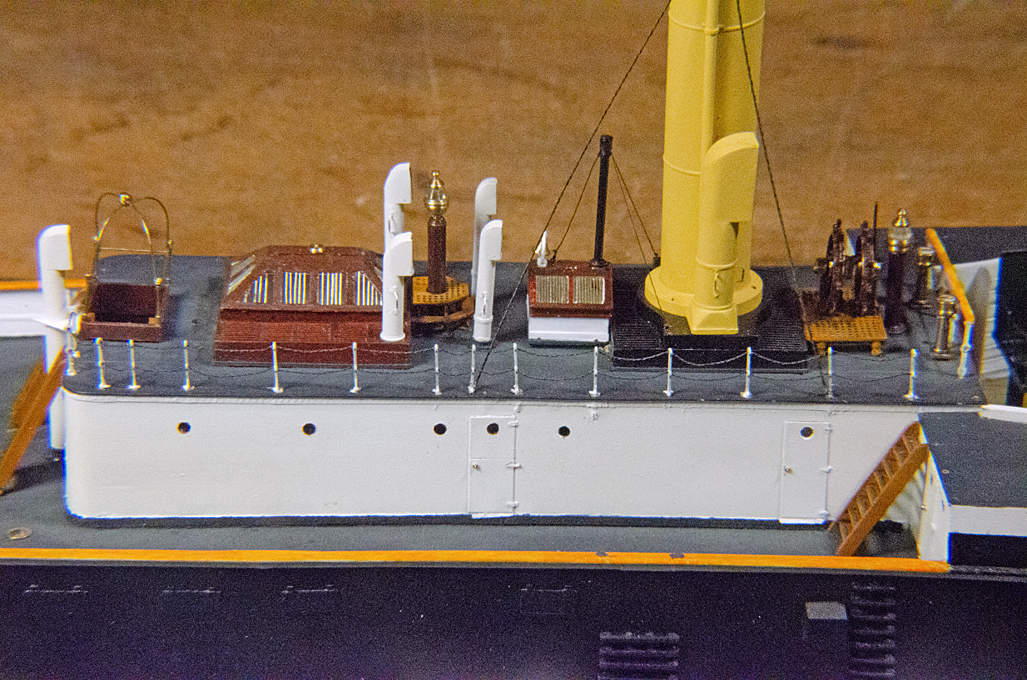
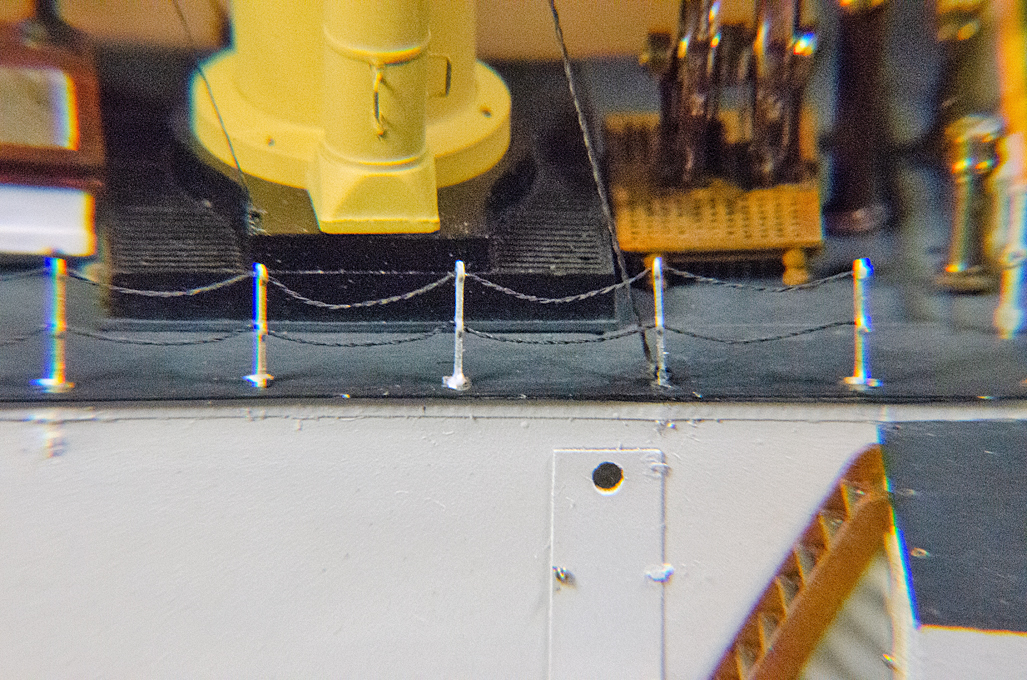
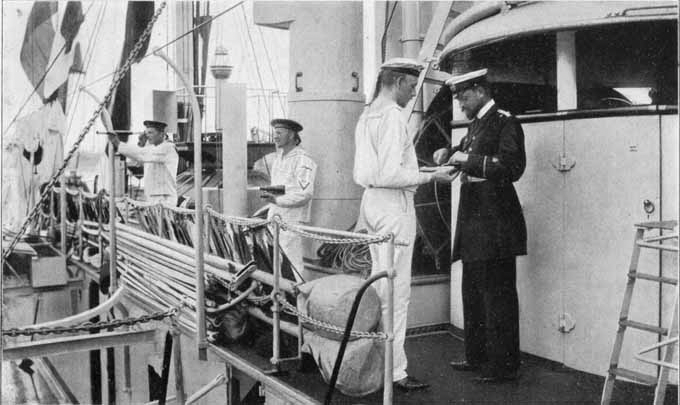
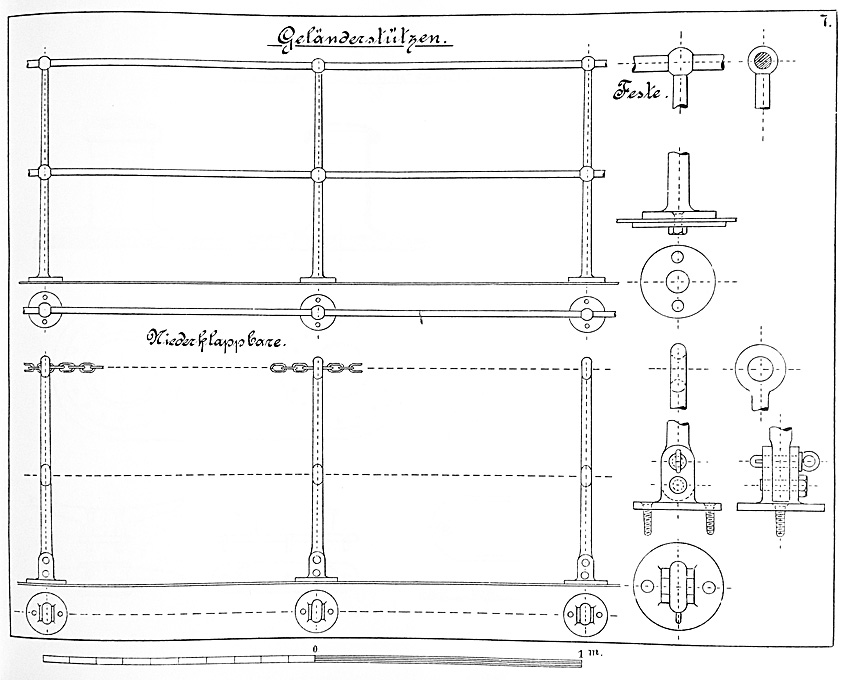
Chain-rails and smoke-stack stays Due to several business and private travels over the past month not such much progress has been made … In the meantime, I had received some special material for simulating the various small chains, namely for the railing and the stays for the smoke-stack. The material is black-oxidised Konstantan™-wire of 0.06 mm and 0.07 mm diameter. Konstantan™ is a CuNi-alloy that is characterised by a very constant specific resistance over a wide temperature range and low temperature extension coefficient. However, I am not interested in these properties, but it is the thinnest black wire I could get and its breaking strength is somewhat higher than that of pure copper. The idea is to twist together two strands of wire so that the pitch is approximately that of the length of chain-link. Two strands of this twisted wire then are twisted together in the opposite direction. To the naked eye and with my +3 loupe this looks quite convincingly like a somewhat twisted chain. That is a close as I can get in this scale. Chain-rail on folding stanchions (from WAAP, 1900). There is a photograph that shows details of the railing on the deck-house quite clearly and there is an instruction book for draughtsmen (WAAP, 1900) that has a drawing of the folding chain-railing as used by the Imperial German Navy. There is a scale bar that allows to calculate the various dimensions and the height tallies with the railings in the lithographs of the WESPE-Class. According to this the stanchions are around 85 cm heigh which translates to 5.3 mm in 1:160 scale. The chain-links are 60 mm (0.4 mm) long with a wire-diameter of 8 mm (0.05 mm). Chain-rail around the deck-house on a WESPE-Class boat (LAVERRENZ, 1900). Years ago, I had drawn my own stanchions and etched them from 0.2 mm brass-sheet. The idea was to solder two together in order to arrive at the correct thickness, without problems with under-etching in my primitive set-up. However, when I recently saw the commercially produced etched stanchions by SÄMANN-Ätztechnik in Germany, I realised that my home-made one could not compete quality-wise. However, their two-chain ones in 1:150 were too high (even at that scale). The three-chain ones, on the other hand, where of the correct height when using the lower ring to simulate the hinge for folding down. With the laser-cutter I also cut some small plates to simulate the foot-plates. The holes for the stanchions were enlarged at the top with a round burr, so that half of the lower ring would be embedded. It would have been nice to have also photoetched parts for the foot-plates, which would have looked much crisper … The chain-stays for the smoke-stacks caused me some head-scratching, in particular the connections to the stack and to the deck. The chain was done as for the railings, but with the 0.07 mm wire. Making and fitting shackles of less than 1 mm in length was physically impossible. So, I resorted to some dark grey thread. Not ideal, but there are just some physical limits that are impossible to overcome. In order to not damage completed work, I am working from the centre of the ship outwards. For this reason, I also had to put on first the inner stays of the smoke-stack and then the railings. As always, close-up photographs are rather discouraging, but the rails look quite reasonable at normal viewing distance (me thinks). A problem is the springiness of the wire, so the double-twisted wire is more forgiving than the simple wire. It is not so easy to shape a nice catena that properly sags downwards, with the upper and lower chain in one plane. Luckily, deviations are only noticeable, when looking straight down. I still have to work on the stays … To be continued ....
- 935 replies
-
- 22
-

-

-
That's going to be an interesting project! I am also surprised that there aren't any more bulkheads. The hull is rather sleek, but the distances between the stations are rather wide. It almost looks, as if the drawings were for a solid hull plug from which a negative form would be taken to laminate the actual hull into. With a solid plug, one would have enough 'meat' to fair the hull. Good luck!
-
US 6” gun by RGL - FINISHED - Panzer Concepts
wefalck replied to RGL's topic in Non-ship/categorised builds
This camouflage is very efficient, one doesn't almost recognise the shape and details ... -
Too bad, but at least the thumb is still there 😇 ... I gather, we are patient until your thumb mends.
- 333 replies
-
- 10
-
-
In the fabric trade there are also so-called thread-counting loupes that are grated for measuring or measuring-loupes with grate in fractions of millimetres. I don't have one, but know that some colleagues use them successfully.
-
On the other hand, modern authors have to draw on either printed sources of the time or on archival material. Over the last few years many, if not most, of the printed sources have become available as digital copies through national libraries. Unfortunately, for most of the works that were digitised on behalf of Google they did not bother to unfold the plates/tables and, therefore, such copies are often pretty much wasted effort. The BnF usually does a good job in digitising their works. The main value of modern works is having evaluated archival material (if really done), as this typically (still) is not accessible remotely. Archival work is time-consuming and costly, when involving travel. Otherwise, if the research was done properly, the reference list may be the most valuable part in modern works - useful to give indications where to look further.
-
It is indeed all about the capacity to transfer heat relative to the amount of metal that needs to be heated. The rule is to heat the metal and not the solder, but on the other hand, a drop of solder transfers heat much better than the tip of the iron alone, because the touching surface is bigger. In fact, when looking at how electronics guys solder, they don't grill their wires and components, but just touch the pre-tinned joints for second with the iron with a tiny blob of solder. Chemically pre-tinning is also a good preparation for soldering and does not add real thickness. I have systematically pre-tinned my (home-)etched parts before soldering.
-
What do you mean by 'making your thinner'? Normally, thinners are a simple chemicals, such as (distilled) water, alcohol, acetone or white spirit. OK, you could do a bit of moon-shining and make your own alcohol or distill some water, but the others you cannot make at home
-
From my literature list for the 19th century. Most of the pre-1900 works are available as digital copies e.g. from the Bibliotheque Nationale: Busquets i Vilanova, C. (2013): El cañon naval pesado. Medio siglo de poder naval.- 247 p., Madrid (Edita Real del Catorce Editores). Cavalli, J. (1849): Memoire sur les canons se chargeant par la culasse sur les canons rayes.- 88 p., Atlas (missing), Paris (J. Corréard). Carrasco, A. (1887): Memorial de Artilleria de Bronze.- Madrid. Carrasco, A. (1889): Memorial de Artilleria de Hiero. CORNULIER, E. DE (1841): Memoires sur le pointage des mortiers a la mer et sur les améliorations de système des hausses de marine.- 238 p., 3 pl., Paris (Correard). CRONEAU, A. (ca. 1893): Canons, torpilles et cuirasses. Leur installation a bord des batiments de combat.- Encyclopedie scientifique des aide-memoires, section de l'Ingénieur: 202 p., Paris (Gauthier-Villars & Masson). DELAUNEY, J.F., GUITTARD, A.C.A.J. (1889): Historique de l'artillerie de la marine 1692-1889.- 328 p., Paris (D. Dumoulin). DELESSAEY, A. (1890): Cours speciale le matériel de côte, à l'usage des cadres de l'artillerie de la marine.- 274 p., Paris (Imprimerie Nationale). GADAUD, L. (1869): L'artillerie de la marine française en 1868.- 157 p., ? pl., Paris (Arthus Bertrand). GADAUD, L. (1872): L'artillerie de la marine française en 1872.- 160 p., 90 figs., 2 pl., Paris (Arthus Bertrand). HENNEBERT, E. (1887): L’Artillerie.- Bibliothéque des Merveilles: 329 p., Paris (Librairie Hachette et Cie.). JAMOIS, T. (2011): Indret, manufacture de canons pour la Marine (1777-1827).- 119 p., Paris (Centre DCNS de Nantes-Indret). LAFAY, J. (1850): Aide-memoire d'artillerie navale.- 721 p., 50 pl., Paris (J. Corréard). LEDIEU, A., CADIAT, E. (1889): Le nouveau materiel naval.- Tome premier: balistique, agentes explosifes, canons et mitrailleuses, hydraulique de manoeuvre pour l’artillerie, fusils, électricité en marine, piles, accumulateurs, dynamo et magnétos, lumière et éclairage èlectriques, torpilles.- 762 p., Paris (Vve Ch. Dunod éditeur). LEDIEU, A., CADIAT, E. (1889-1890): Atlas du nouveau materiel naval.- 2 vols, 4 p. + XXXIV pl., 4 p. + XVII pl., Paris (Vve Ch. Dunod éditeur). E Lewal, M.L. (1863?): Traite pratique d'artillerie navale et tactique des combats de mer. Tome Deuxieme. Guide pour l’instruction des batteries des vaisseaux. Pointage et chargement, manoeuvres, exercices et tirs des batteries des gaillards des vaisseaux. Instruction d'une deuxième batterie. Instruction d'une première batterie armée de canons rayés. Manoeuvres des pièces d'embarcations et des batteries de canons rayés employées à terre. manoeuvres de force à bord et à terre. Données d'expérience sur la manoeuvre et le tir des bouches à feu marines.- 400 p., 1 pl., Paris (Arthus Bertrand, éditeur). E Lewal, M.L. (1863?): Traite pratique d'artillerie navale et tactique des combats de mer. Tome Premier. Recherches et donnees d'experiences sur installation, le pointage et le tir des bouches à feu marines. Sabords. Champ de tir. Appareil de pointage. Écouvillons. Gargousses. Inflamations accidentelles. Culots et crasses. Dégradation des lumières. Valets. Étoupilles à friction. Installation des vaisseaux anglais. Données d’experience sur le tir. Mesure des distances. Déviations dues à la vitesse. Passages des poudres et projectiles.- 484 p., 6 pl., Paris (Arthus Bertrand, éditeur). NICOL, E. (1894): Traité d'artillerie à l'usage des officiers de marine.- Bibliothèque du Marin: 349 p., Paris/Nancy (Berger-Levraulet et. Cie.). PAIXHANS, H.-J.. (1822): Nouvelle force maritime et application de cette force à quelques parties du service de l'armée de terre.- 458 p., 7 pl., Paris (Bachelier). VERDIER, M. (1837): Nouveau manuel complet de la marine. Seconde Partie. Manoeuvres du Navire et de l’Artillerie.- 288 p., Paris (Librairie Enciclopédique de Roret). VIGO, J. (1947): Historia de la artilleria Española.- 3 vols.: Madrid. I have also some official works on the French naval artillery covering roughly the period 1864 to 1890 with very detailed drawings, but I gather you be more interested in the time up to the 1850s? Lafay would then be the authoritative source for the period 1830 to 1850 and the book is free to download.
-
Where are you going to put the ship on the stocks? This scenic setting is coming on very nicely 👍
-
US 6” gun by RGL - FINISHED - Panzer Concepts
wefalck replied to RGL's topic in Non-ship/categorised builds
How did you the dividing lines between the colours, free-hand or with more masking? -
Ahh, that's not a 'primer' in the technical sense. In art it would be called under-paint and was indeed used by the Old Masters, say green under areas of skin to provide depth. Now I understand your point. I also use 'under-paints' or base-coats, when a model is made up of different materials to have a common starting point for the actual paint, if it is with a pigment that may not be covering very well, say red for example.
-
Yes, acrylic primers may not adhere very well to 'non-polar' surfaces, such as metals or most plastics (with the exception of acrylics/Plexiglas/Perspex). Solvent-base primers do better here. We have over in Europe also pure acrylic-solutions, without anything added, that are supposed to be good primers for metals. I rarely prime, as it is not really needed for static models, so I don't know, wether is any advantage in those pure acrylic solutions.
-
But the primer is the thing that normally provides the 'grip'. I don't understand why you want a 'sealer' and a 'primer'. If you use the acrylics as a primer, you can go on painting on these straightaway.
-
Holding small parts for soldering
wefalck replied to BETAQDAVE's topic in Metal Work, Soldering and Metal Fittings
Learned that in my teens -
Holding small parts for soldering
wefalck replied to BETAQDAVE's topic in Metal Work, Soldering and Metal Fittings
Have to try that - have both Tamiya masking tape and a selection of soldering irons of various sizes and a small (reflow) heat gun for no-touch soldering. -
Why would you apply an acrylic 'sealant' on metal - sealing metal against what ? Normally, metal primers are there to increase the adhesion of paint to metal surfaces, for instance by slightly etching them. I can understand the use of a primer on certain plastics, if you want to continue with organic solvent-based paints, but acrylic 'sealants' are probably based on a polar solvent, such as water, which do not show very good adhesion to non-polar surfaces that most plastics have. So what are the advantages of using acrylic 'sealants' on plastics?

