HOLIDAY DONATION DRIVE - SUPPORT MSW - DO YOUR PART TO KEEP THIS GREAT FORUM GOING! (89 donations so far out of 49,000 members - C'mon guys!)
×


Mike Y
-
Posts
1,557 -
Joined
-
Last visited
Content Type
Profiles
Forums
Gallery
Events
Everything posted by Mike Y
-
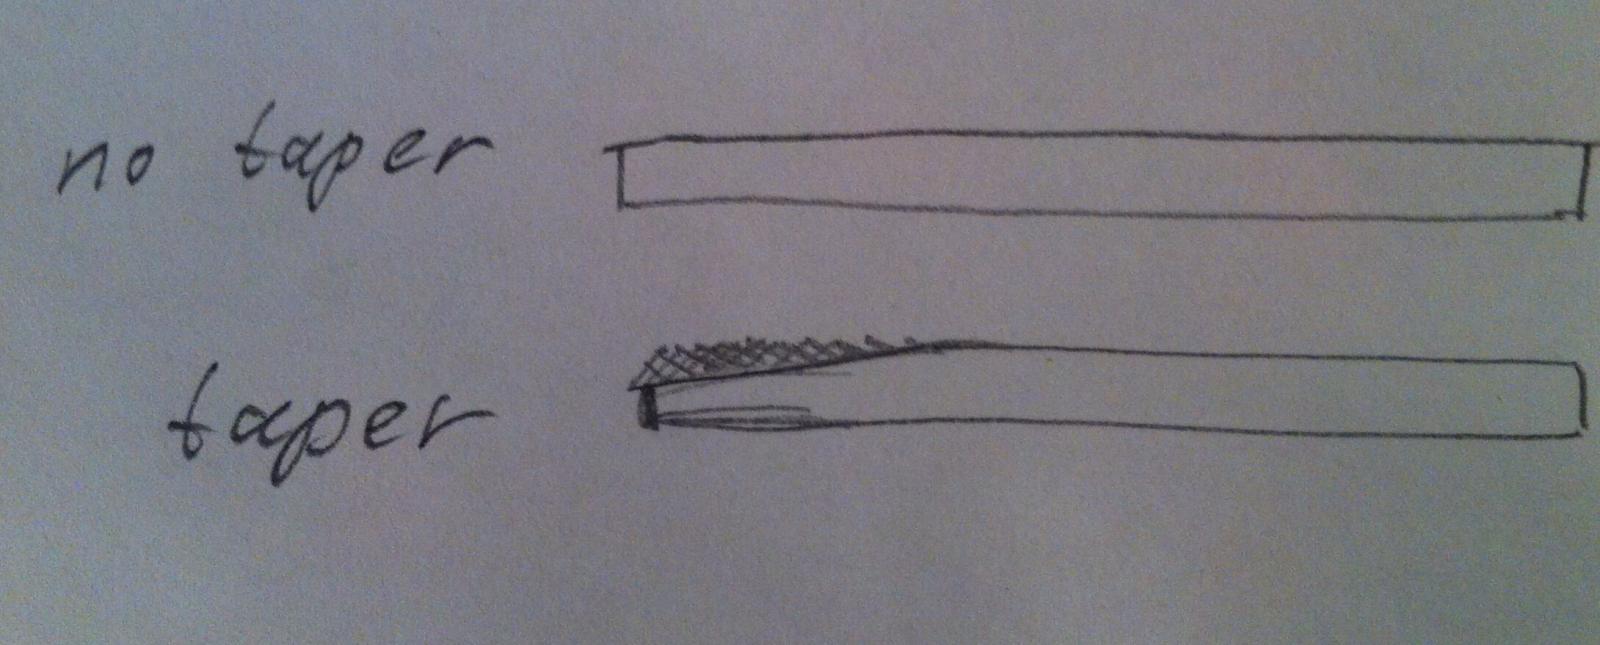
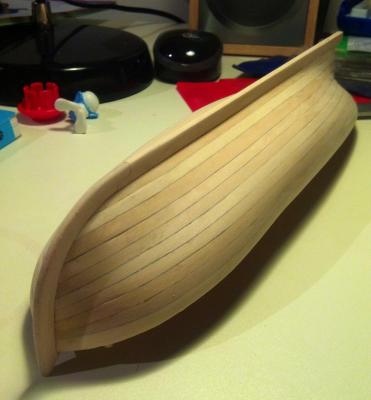
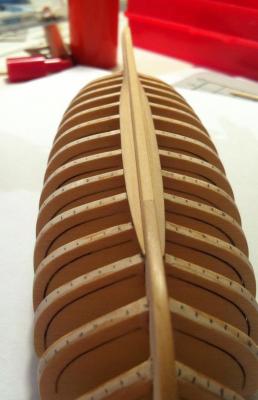
 It looks pretty good actually! No, seriously. No gaps between planks, should look amazing when finished and sanded smooth! Just one thing to mention - there is a problem around second planking streak (from top of the hull, so on your photos - second from the bottom), the place where it is attached to first bulkhead. It should be tapered, to smoothly follow the curve of the hull. Then you will avoid that "warping" around first bulkheads. Tried to illustrate it.. Or maybe it's just a camera angle? Can you make a photo looking on a stem, instead of a side photo? Here is an example, looks not very good, but illustrates the point. Notice that plank is getting narrower around a stem:
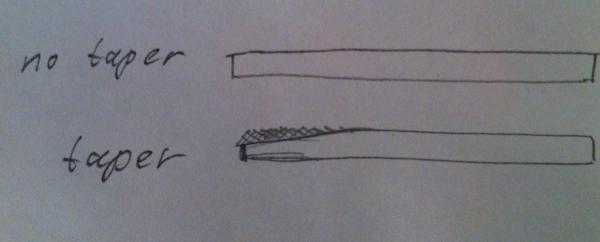

- 132 replies
-
- 3
-

-
- 18th century longboat
- model shipways
- (and 1 more)
-
Both options are possible - I planked Pinnace with a perfectly straight gardboard plank, no bending. It just forces to taper planks heavily, because there is less room for planks at the stem Terminating gardboard plank earlier gives you more space, hence less taper.
-
Ouch!! But looks fixable with a good wood glue? Joint between stem and keel will handle the load, and false keel is thick enough to be edge glued?
- 335 replies
-
- 1
-
-
- 18th century longboat
- Finished
- (and 1 more)
-
Also, pardon a bit of critics, looks like the second bulkhead from the top is not fully inserted, it looks higher then other bulkheads. Or it was just dry fitted on that photo, not glued?
-
It is in my build log, here: http://modelshipworld.com/index.php?/topic/6801-18th-century-longboat-by-mike-y-model-shipways-148/page-2#entry201485 I just made a jig that makes sure that * keel is 90 degrees to the table * bulkhead is 90 degrees to keel in all projections That is enough to get a proper alignment. No need to mark bulkhead centers, they will automatically match if all angles are straight. But, again, any kind of 90deg jig will work! Or I misunderstood the question? What alingment is problematic? Do you have some photos illustrating it?
-
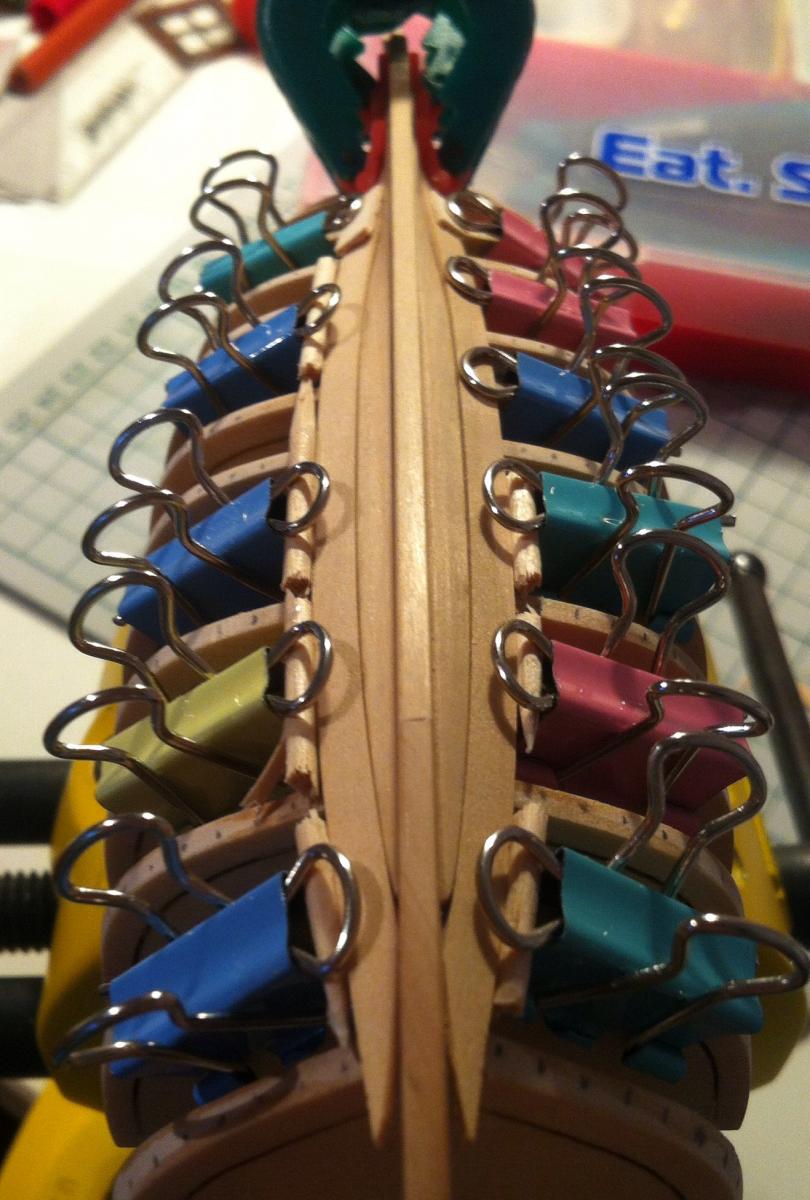
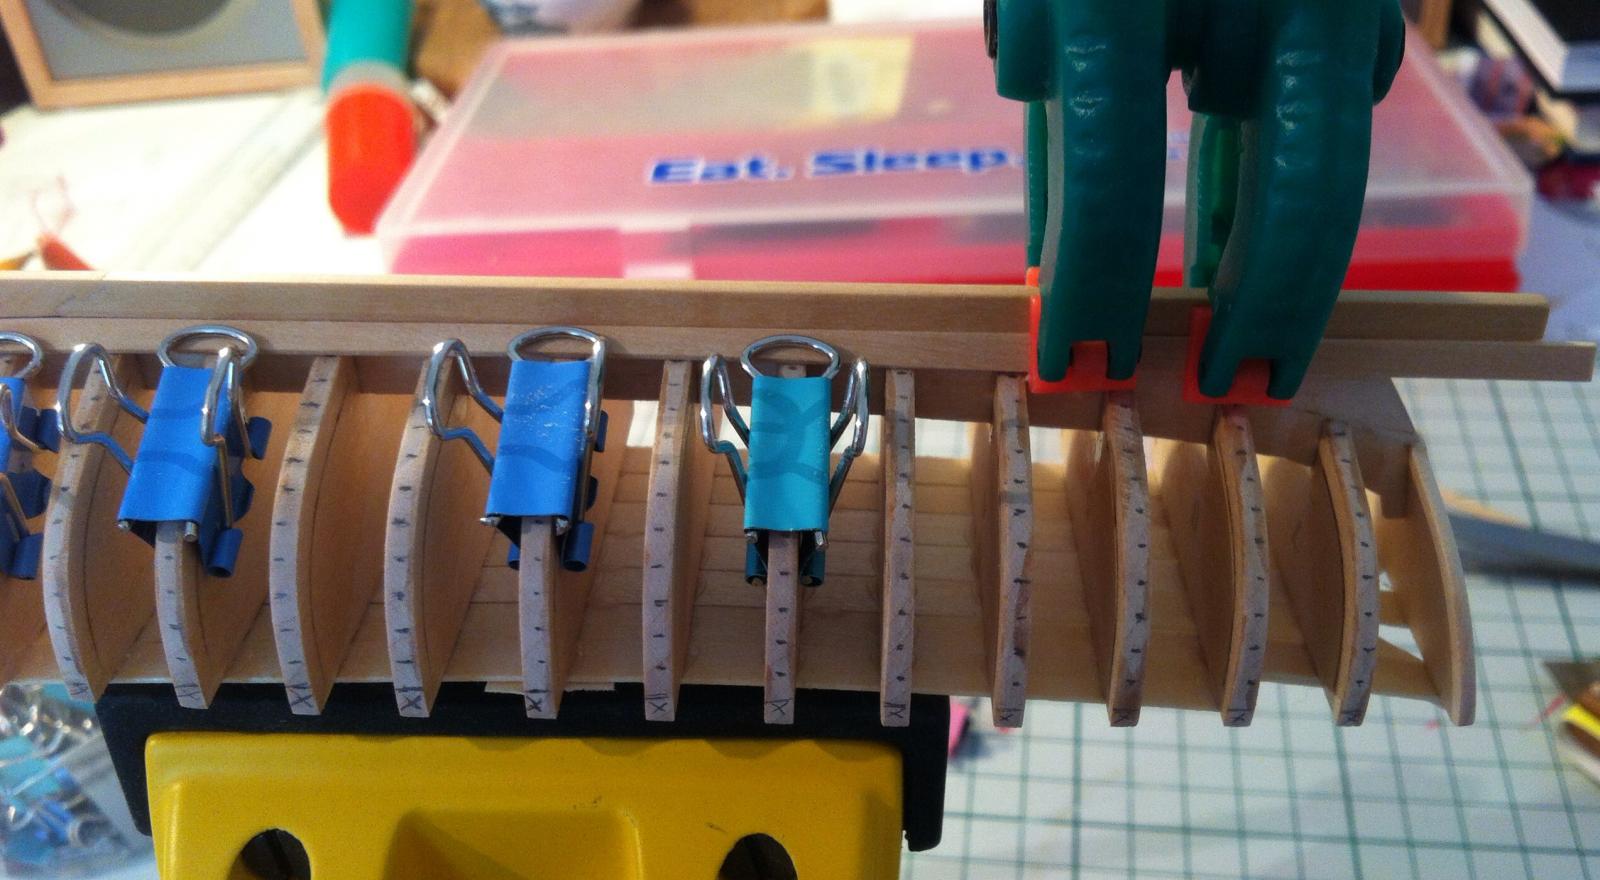
About edge bending. Conventional method (clamping under glass) do not work very well for me, because planks remain pretty wet even after a day of being clamped. Which is reasonable, moisture have no way to escape if it's under glass. And when you lift the glass, planks kicks back and loose half of the bend. Probably this is the point where hair dryer would be useful, but I don't have one. I only have a heat gun, which I use to start the grill. Used it once, it accidentally melted my clamps So instead I'm doing edge bending by simply clamping soaked plank to the previous plank and leaving it overnight: Works pretty well with boxwood. Jeff mills them with a good tolerance, as a result - planks are thicker then the kit ones. So it bends evenly, without warping up or down. That will not work really well with basswood (tried it), or with big bends probably.. But there is no kickback, next evening it's fully ready for final installation. And if you need to have a very severe bend - that something is not right anyway. I guess that next update will take a few weeks, so far it's just a iterative process, where I install one-two pair of planks per week... Happy summer!
-
There should be at least 10 right ways to align the bulkheads properly That is a good part of our hobby - each builder solves the challenges in a different way, very interesting to compare the solutions from different people!
-
Yes, as I wrote in the first post - I use castello boxwood from Hobbymill, for all parts apart from false keel and frames.
-
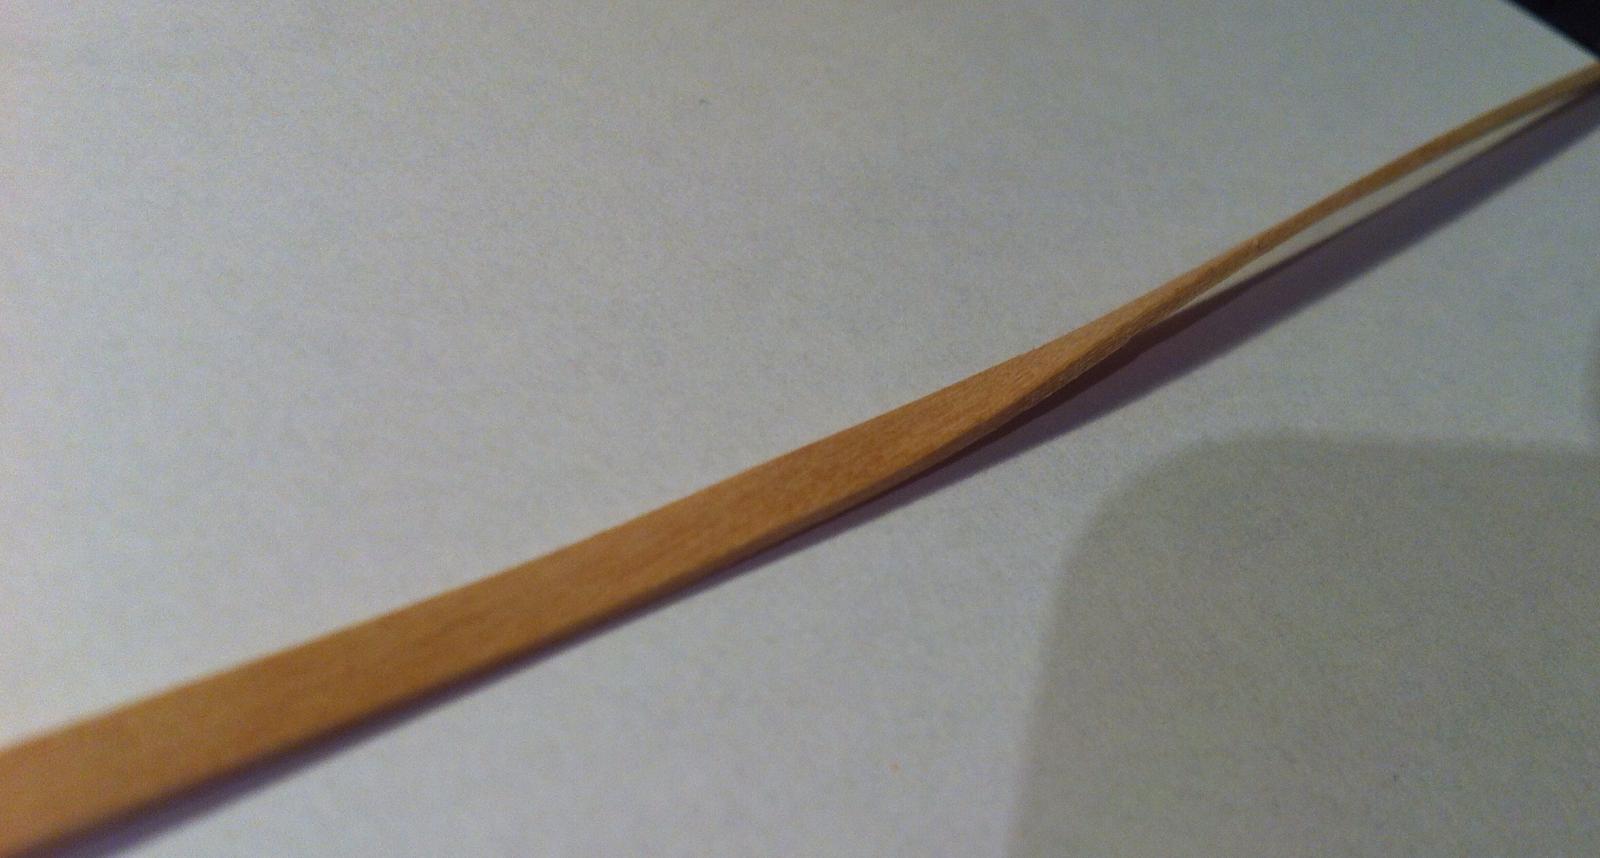
Toni, thanks for an advice! I count mostly on edge-bending, just a bit of spiling to have a good fit in the end of the plank. Using Castello. So far had no problems with it, soaking in boiling water for 15sec, then clamping under a glass: Then fitting to the hull and clamping until it's dry: Bends well, pretty elastic, no cracks. Just a pleasure to work with it! The main problem is actually on a stern, there is an extreme bend due to the angle of rear bulkheads: It's different from Pinnace, bulkheads there have a smooth curve in the bottom, even the rear bulkheads. Thinking on adding some fillers..

-
Interesting deck planking, with non-rectangular planks. Is that correct, or just for beauty? If it's correct - then would appreciate if you can shed more light on it, when such type of planking is used instead of rectangular planks?
-
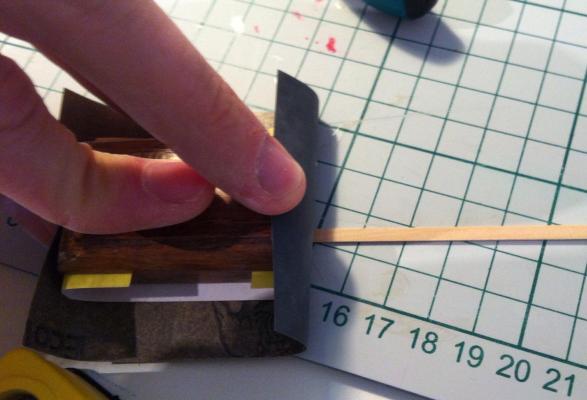
Floyd, sorry, but I have no tricks there - just traced the shape of the stem to a piece of boxwood, using same grain direction. Then used table saw and dremel to shape it, then sand-sand-sand - and you have a stem! Same for keel The only thing is that you need to use sanding block to have a straight edge on a consistent 90 degrees. "Decoration" on top of the stem was done with a round file, with stem clamped in a table vice. So no tricks to share.. What is the problem with the stem and keel? Maybe I can help if you show the photos?
-
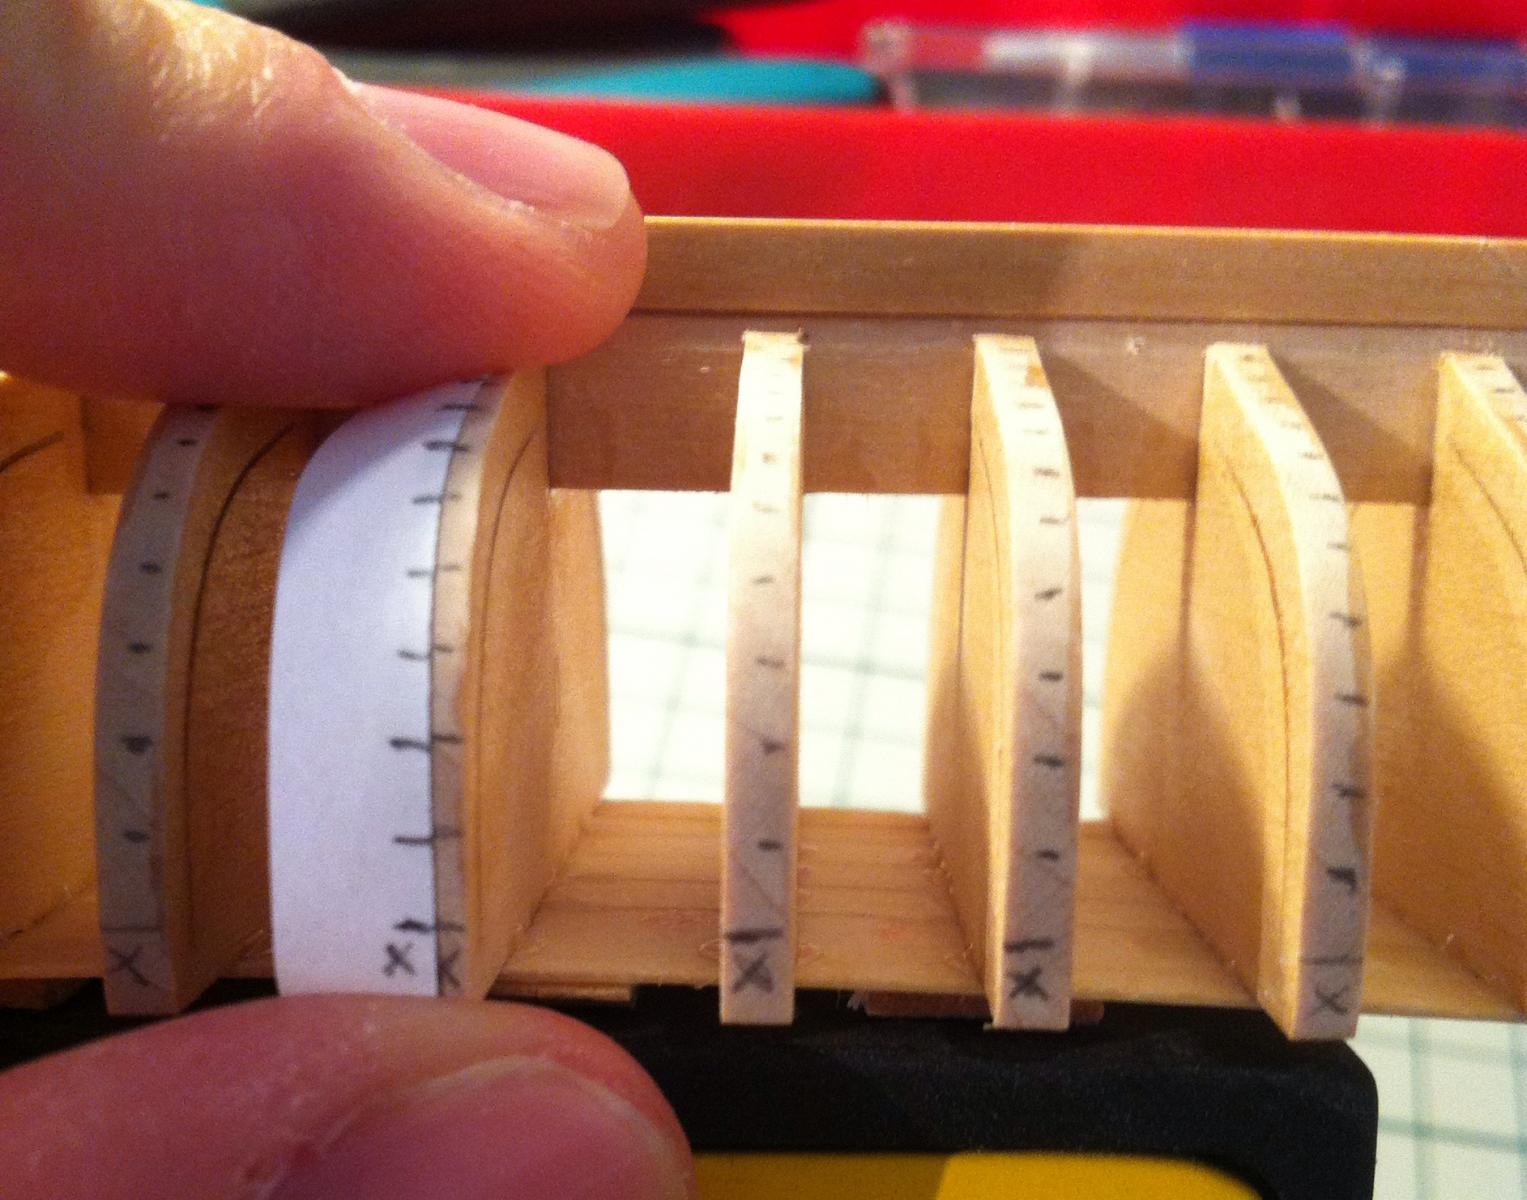
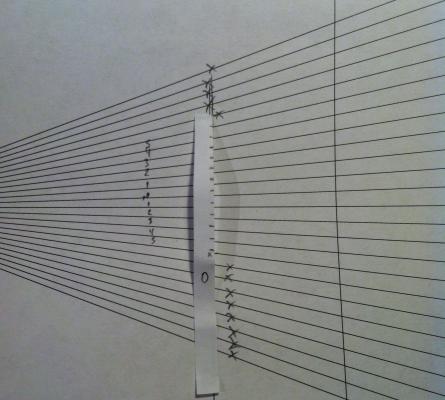
Thanks everybody for comments! I now found where the problem is. Exactly as Grant said, number of ticks should change for smaller bulkheads. Then you will have taper and less edge bending. On Pinnace I had no reference marks, and just planked ad hoc. As a result, there was just a tiny edge bend, planks were tapered, and gardboard plank was straight, no curve at all: Decided to continue with wrong reference lines and see how it looks. Should be a significant bend, and very small taper. Then will compare results, and redo the planking if it will look bad Luckily Jeff supplies double amount of wood for planking, so there is a room for experiment
-
David, you are right. I was thinking about adding taper, but how to calculate it? And why is it needed? Then traced all streaks - hm, number of streaks should reduce enough to avoid taper. However, I see that lots of edge bending is required to terminate bottom streaks earlier. With tapering less edge bending is required. So it is kind of compromise. I did Pinnace with taper and practically no edge bending, but will do Longboat with edge bending, but without taper. Let's see what is better! Thanks for a feedback, please feel free to critic and comment! That is the only way for improvement
-
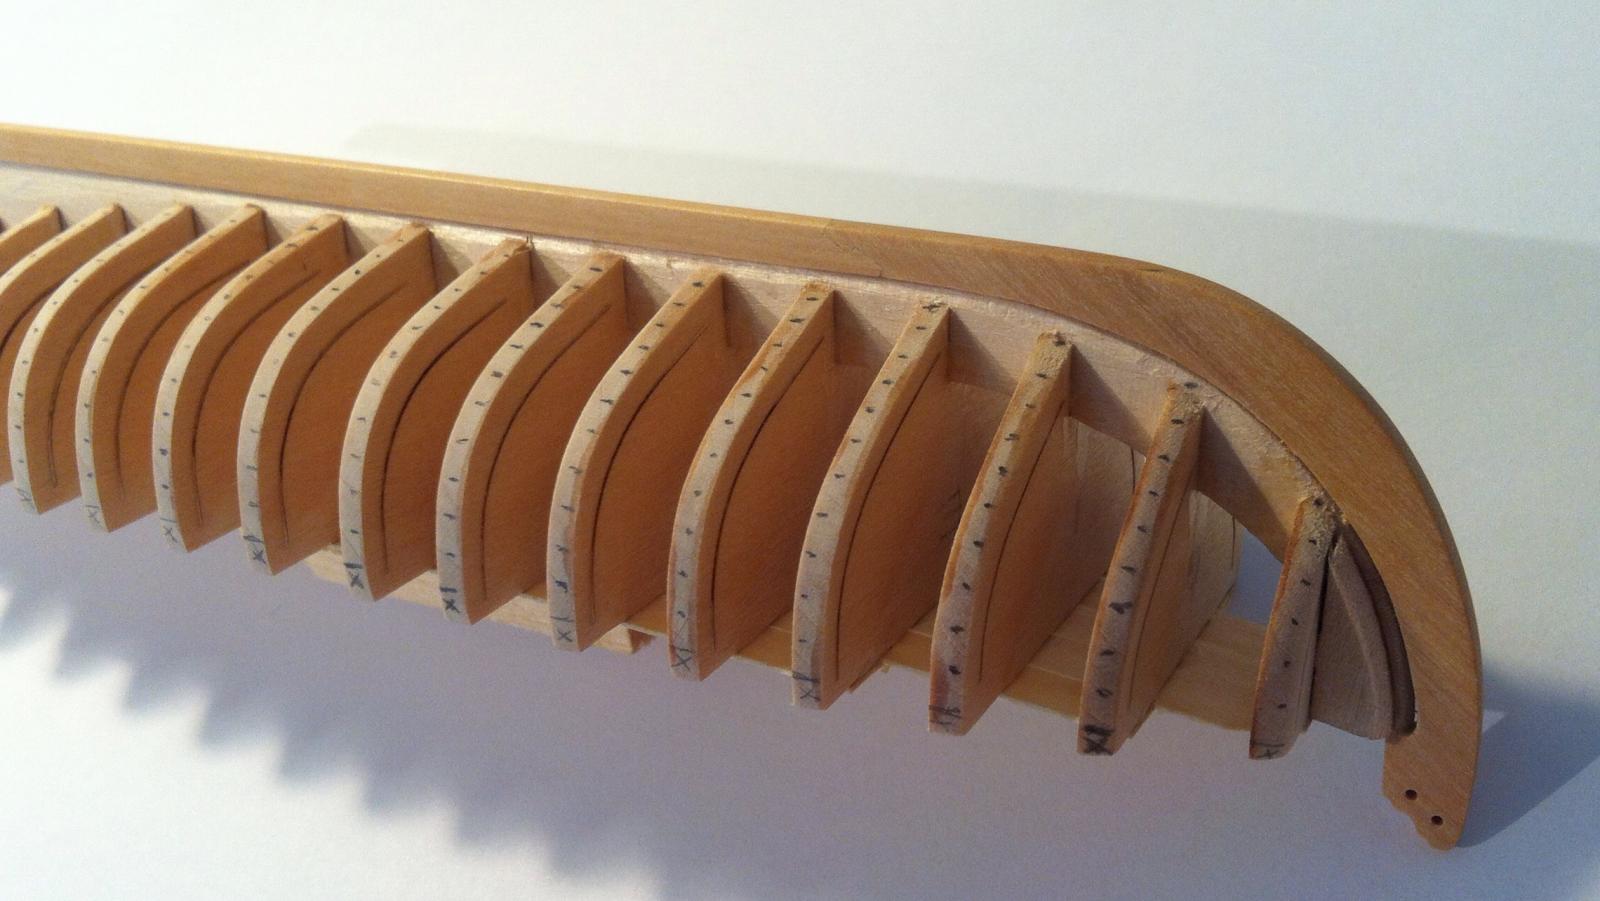
Yep, Pops, I share your confusion. Spent some time fitting next planks and trying to find what is wrong. So far nothing is wrong, or I lack experience to spot the problem. Whats good with that build - it is just 12 strakes, so if I made a mistake indeed - not a big problem, have enough spare planks and PVA-based glue, which is easily dissolved with water. It is a great planking training platform indeed! And much easier then pinnace - bulkheads are much wider. Anyway, installed the gardboard plank. The curvature is quite smooth, it should help to reduce edge bending.
-
Hi David, Yes, I simply shape it with file and sanding block. Not perfect, but works pretty well. I also glue edges of planks together, so if shaping is not perfect - glue hides it. Also that shaping angle is variable, due to different curvature on different parts of the hull. As for substraction - I also skip planks, if I see that it already terminated before that bulkhead. So I just cut off a piece from the template, and now it have 10 planks, then 9, then 8, etc. The calibration point is a sheer line, not the keel. But, again, I have a feeling that reference lines on a bow are wrong, because there is no taper. Let's see how it goes, I'll probably find the mistake after planking a few strakes.
-
Pops, I used same template, because planks width is the same. Not all planks will reach the top bulkhead, some will terminate earlier. However, I have a gut feeling that my marks on the bow are wrong - everything looks clean and logical, but there would be no taper, according to the marks. So maybe I will adjust them later... Your way of planking also makes sense, but it will look differently (very thin planks at the bow). Less edge bending though.
-
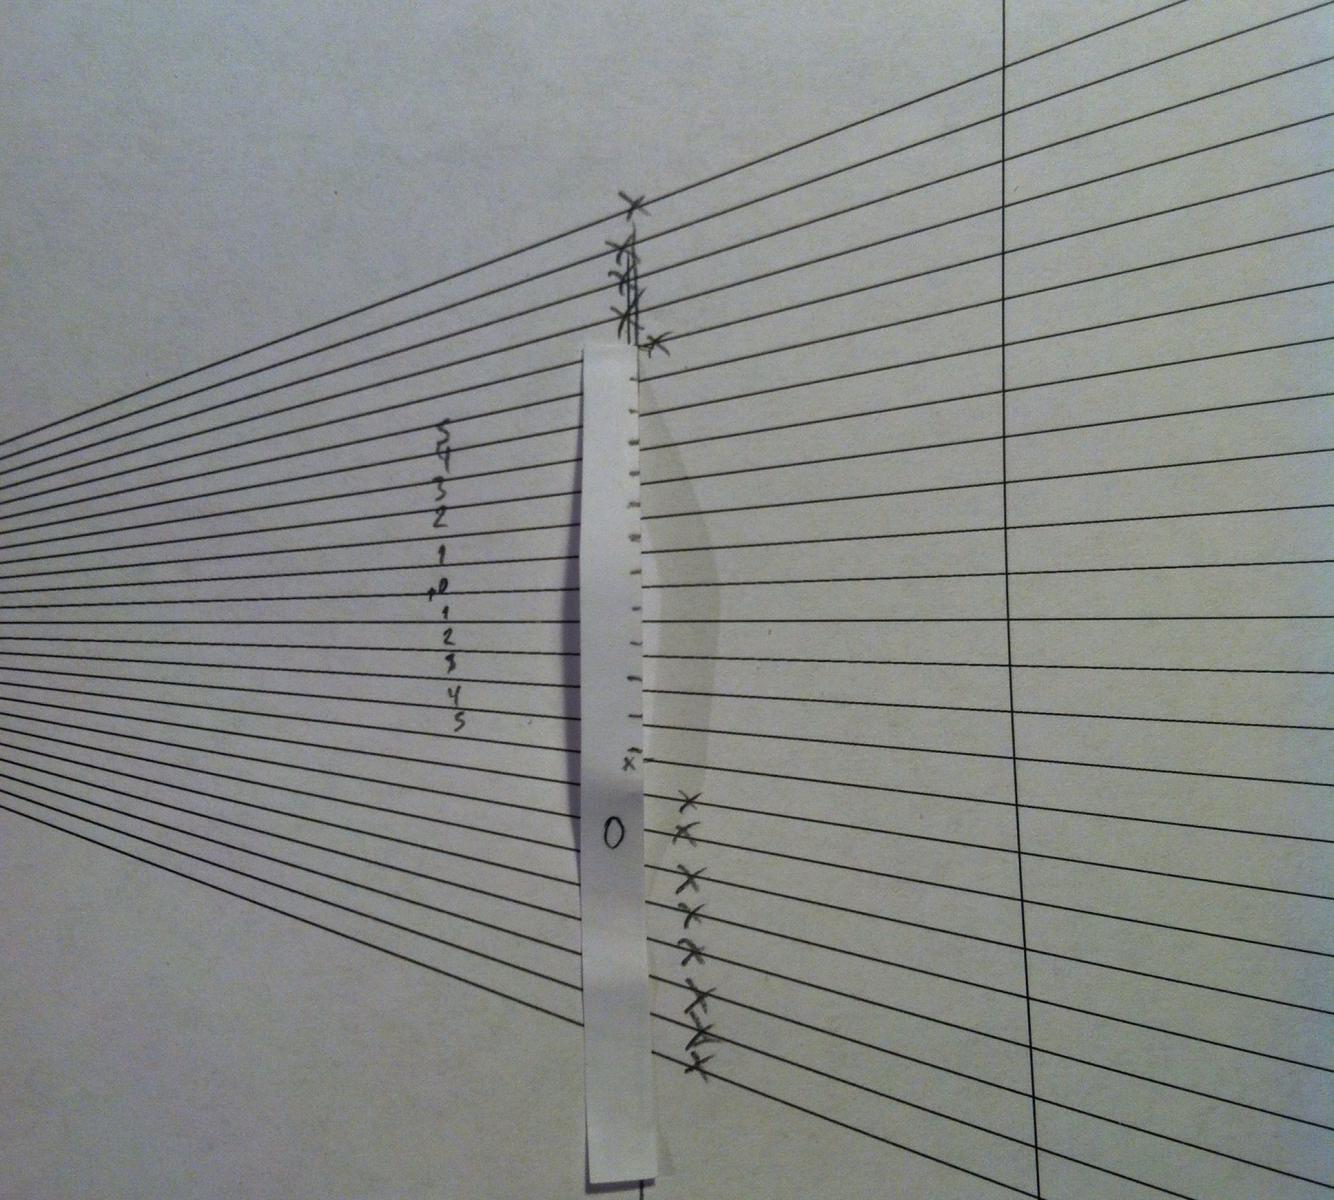
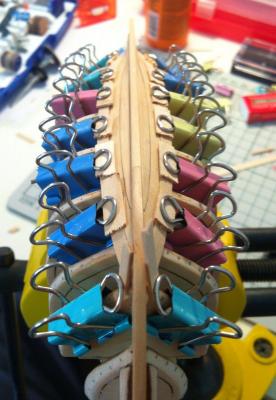
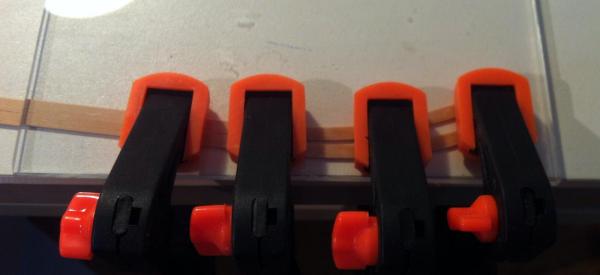
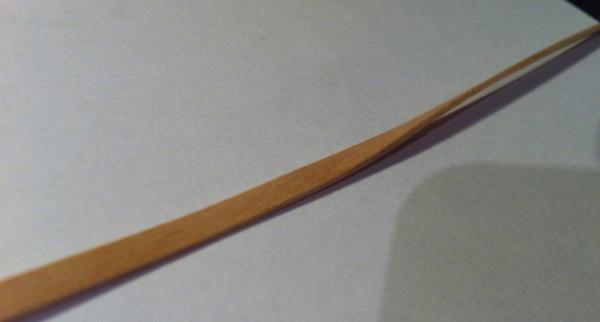
I'm not an expert in planking, and all that methods are created and described by other builders. Highly recommend to read Longboat build logs from Bob F and Stuntflyer, and of course Chuck's manual. Plus there are lots of good tutorials in downloads section on this website. But maybe my photos and description would be useful for somebody, so why not posting them. Decide how many plank streaks are you going to have. Manual suggests 12, Bob was using 13, some people use 11. Pretty much depends on width of your planks and desired "curvature" of a hull. Wrong number of streaks is not a big deal, but if streak width is too small, then you will need to make plank thinner to fit into reference lines. Make a card template for reference lines. Length of a template is equal to length of biggest bulkhead, and it's broken down into 12 parts using template available in downloads section of this website: Mark top plank line. "Default" line is suggested on a plans, and you can adjust it to get a more/less banana-shaped hull. Then, starting from that line, add marks on bulkheads: Now you can easily see the lines of future planks. Not sure I got it right in the bow, I remember that on Pinnace I tapered planks a lot of fit them on a bow. Maybe this time I will avoid it, or my reference lines on a bow are wrong I will start planking from bottom to the top, to have even plank thickness and avoid "meeting" in between. Reference lines will help to make sure that both sides of the hull will be planked symmetrically. Plank edge is shaped to fit with next plank or keel on a proper angle. I think it's very important, otherwise it's really hard to have no gaps. It's a very obvious thing that is not mentioned anywhere, strange. Edge not shaped: Shaped edge: Then I sand inside surface of the plank. It would be very hard to do it later. I use 1200 -> 2000 grits for boxwood, it adds a really nice shine. It makes gluing a bit harder, though. Using sanding block to avoid smoothing plank edges. Then I soak plank in a hot water for 10-20 seconds, shape it gently with hands, and clamp onto the hull. I use a very simple clamps recommended on this forum: http://modelshipworld.com/index.php?/topic/611-easy-planking-clamps For basswood, make sure you put some wood or card between them and planks. For hard wood, that could be not necessary. Notice the bend of gardboard plank closer to stern. Better select a plank with fibers oriented on same angle, then this bend would be easier and plank will not break: I will shape the front part of gardboard plank when it's dry and fit to shape. So now let's leave it for a few hours and have a rest! This method of planking is slow, basically one plank streak on a day. If planks is glued too early - it will shrink and leave a tiny gap.


-
Also, Chuch is designing a POB kit for Winchelsea, and he make much more bulkheads then usual, specifically to make the hull lines smoother and planking easier. Here is the build log: http://modelshipworld.com/index.php?/topic/99-hms-winchelsea-by-chuck-1764-english-32-gun-frigate-pob-164/
-
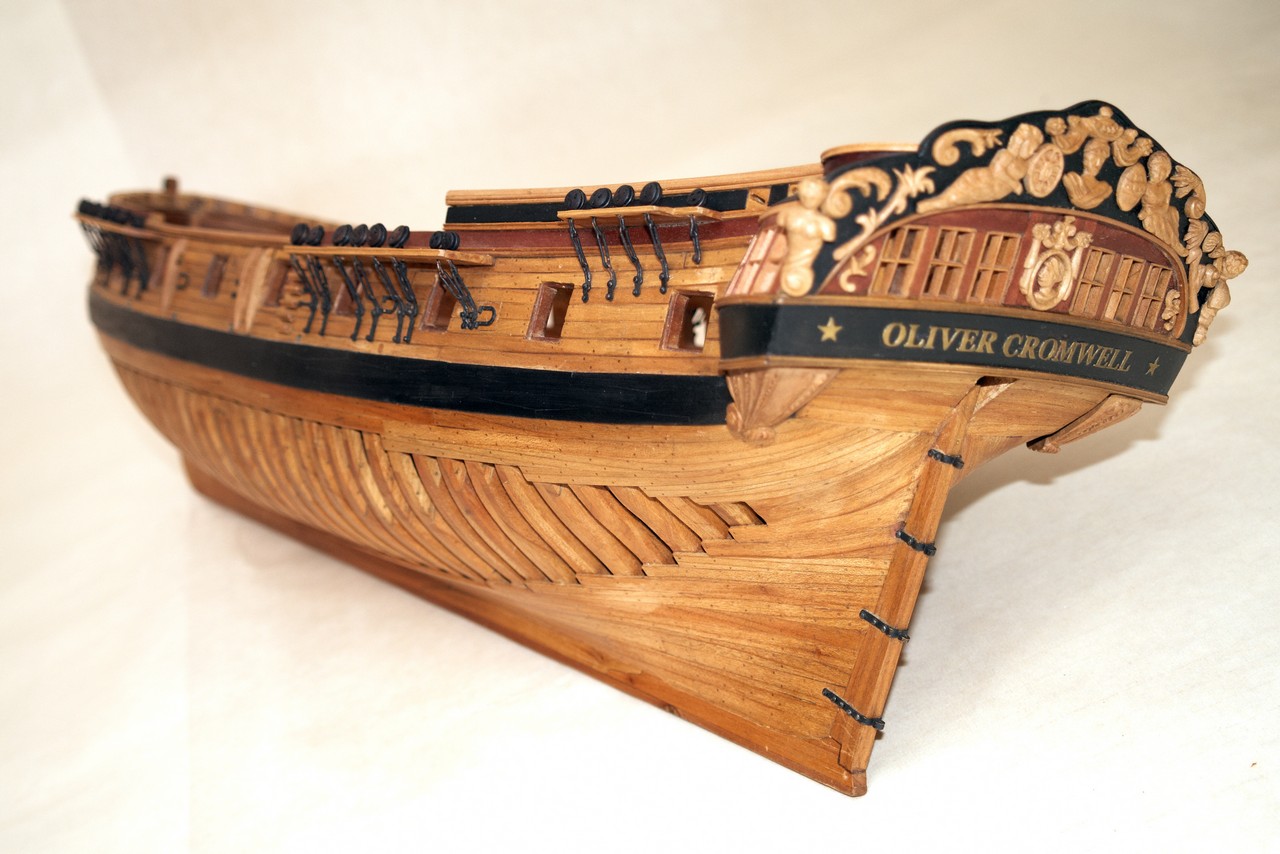
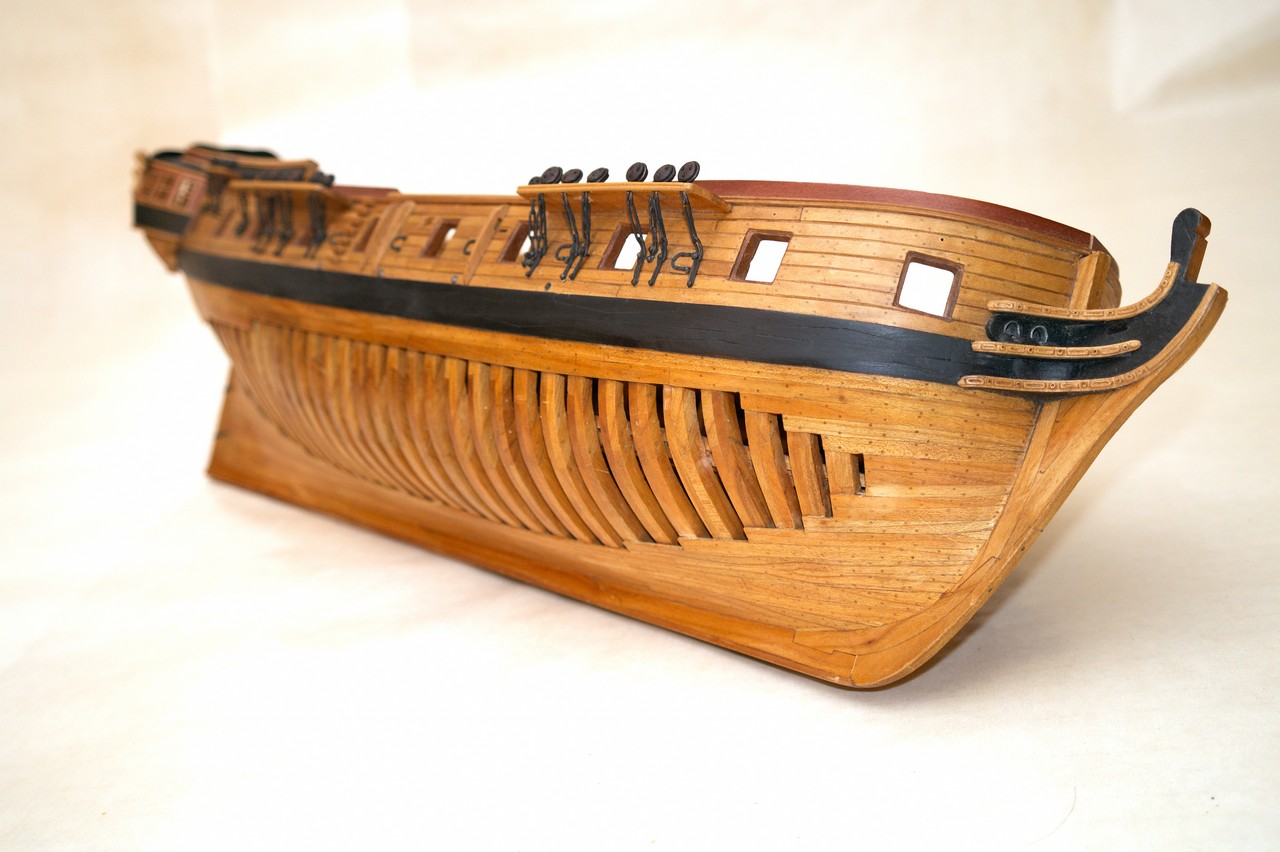
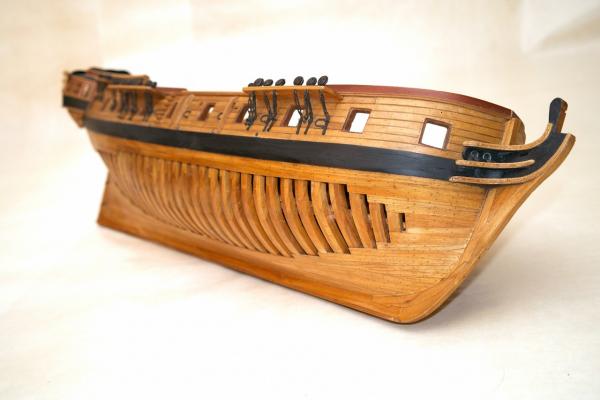
Accidentally found a photo of Oliver Cromwell model (unfinished), planked in same style: Looks interesting actually!

-
Pops, yes, only in single direction. In the direction how plank is installed (hence it is one direction in front part of the hull, another - in rear part). For the scarf - no, I used dremel cutting disk to start a joint, and then file to shape it accurately. It is hard to cut thick boxwood with just a blade accurately enough.
-
Hi Floyd, About the bulkhead not lining up - not sure I understood the question. I had no such problem, sockets in false keel and frames should be widened a bit with a file, they are too tight. That is on purpose, and as far as I remember - described in a manual (at least, in Pinnace manual). If they are widened - then bullhead can move a bit, and then I used a jig to align them to 90 degrees. Of course, they should not be too loose - otherwise the glue joint will be weak, and bulkhead could be shifted to one side, causing a wrong hull shape. For the poly - I did it after sanding to have a consistent layer of poly closer to outer edge of the frame. It could be damaged while fairing s frame. However, applying poly before gluing frames could be also ok. I strongly believe that there is more then one right way of doing it
-
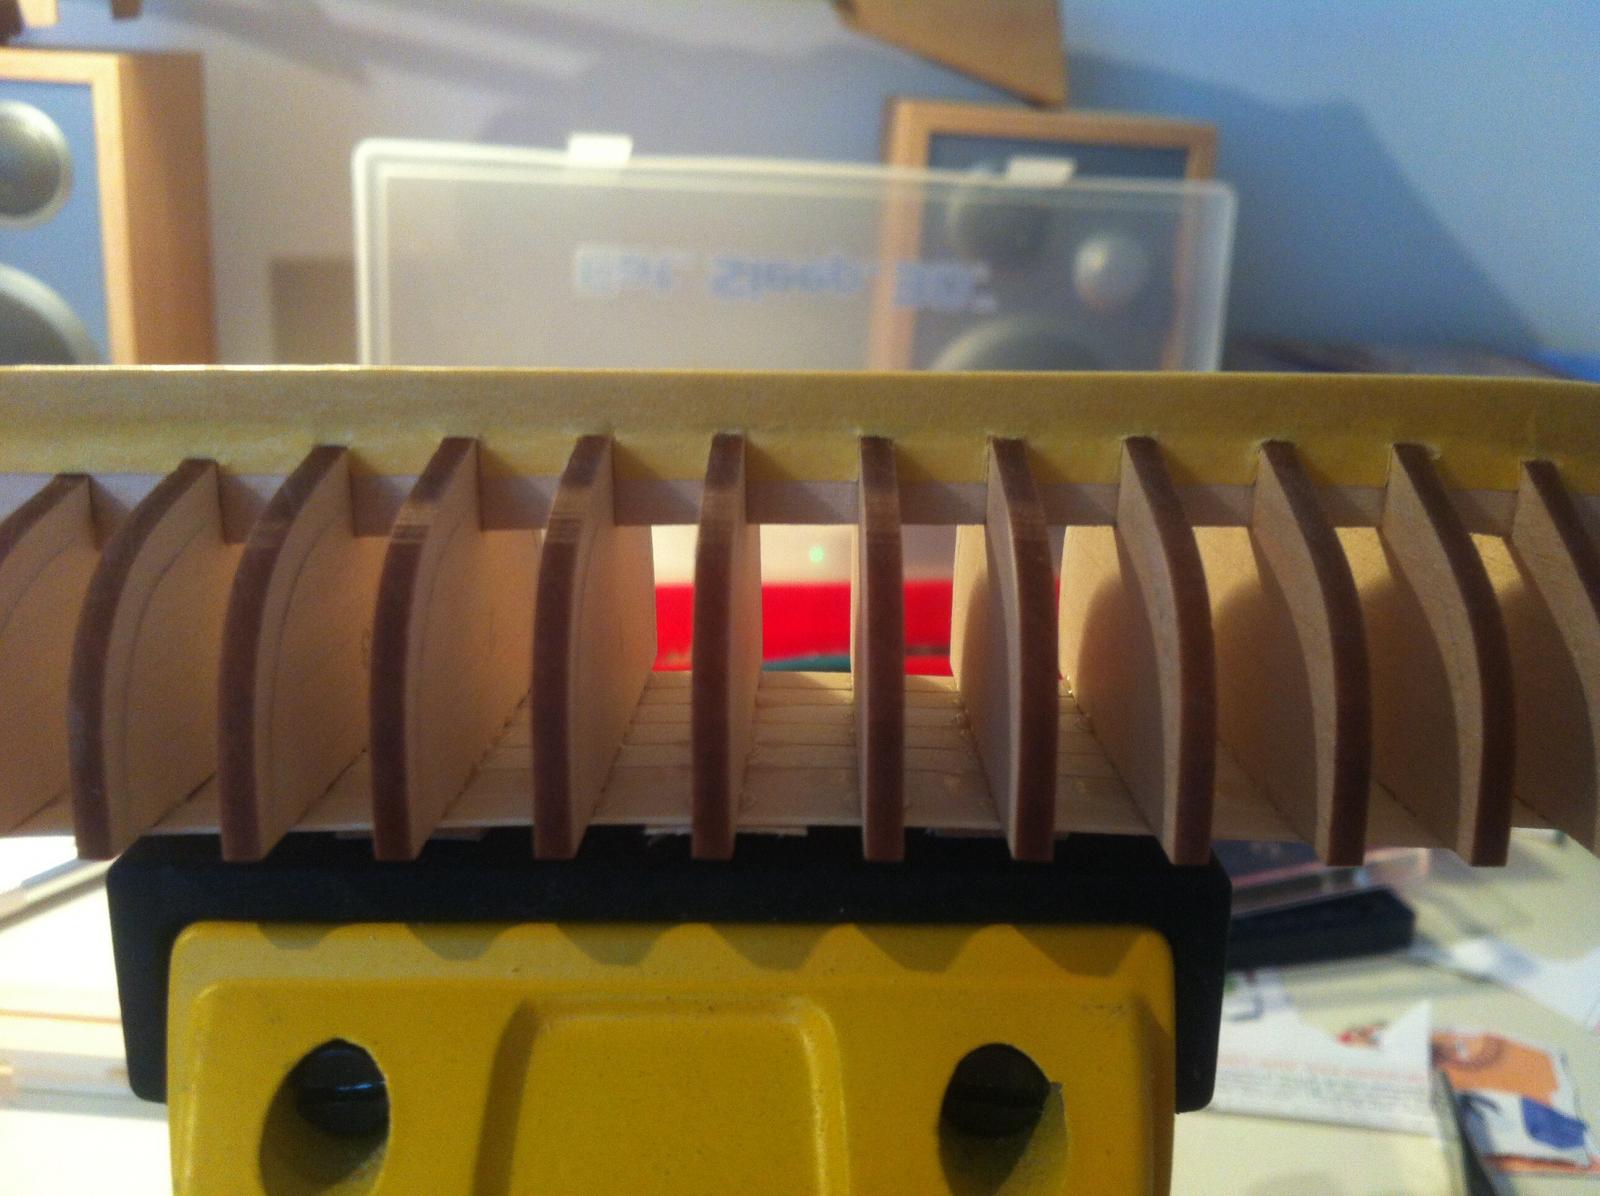
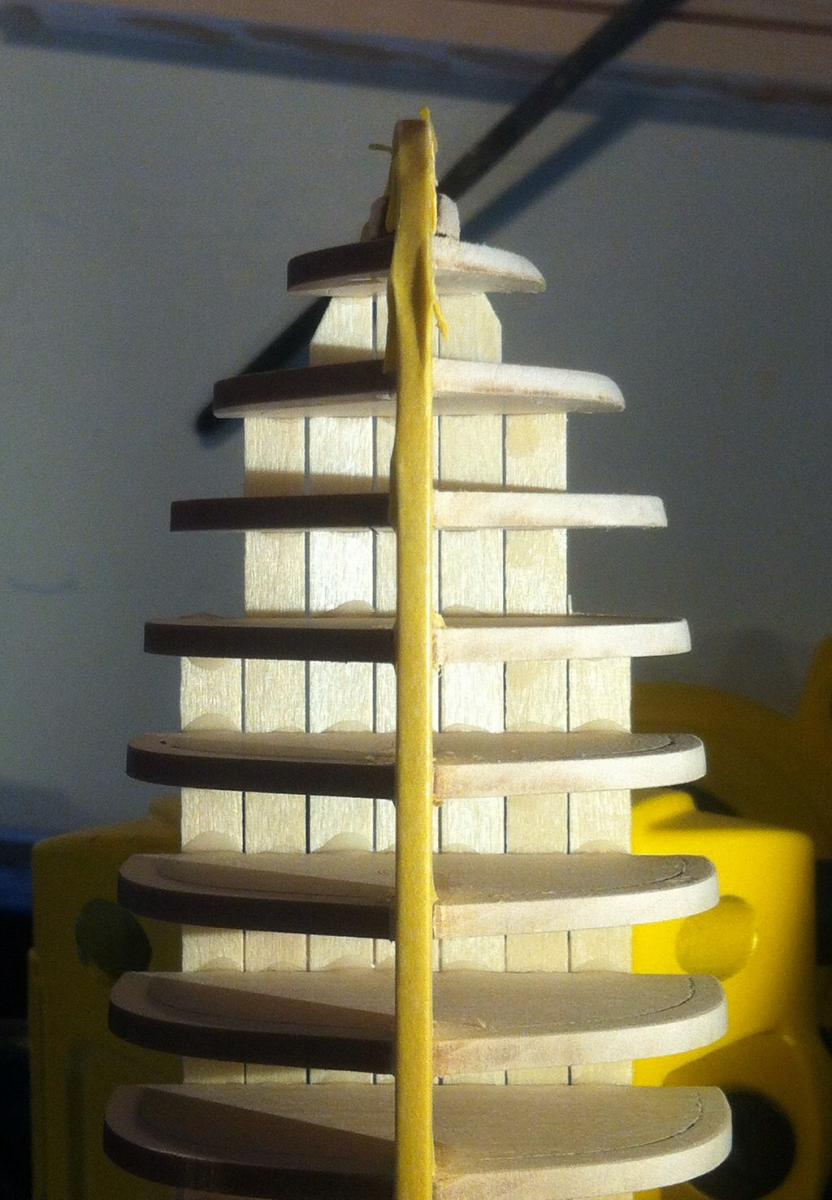
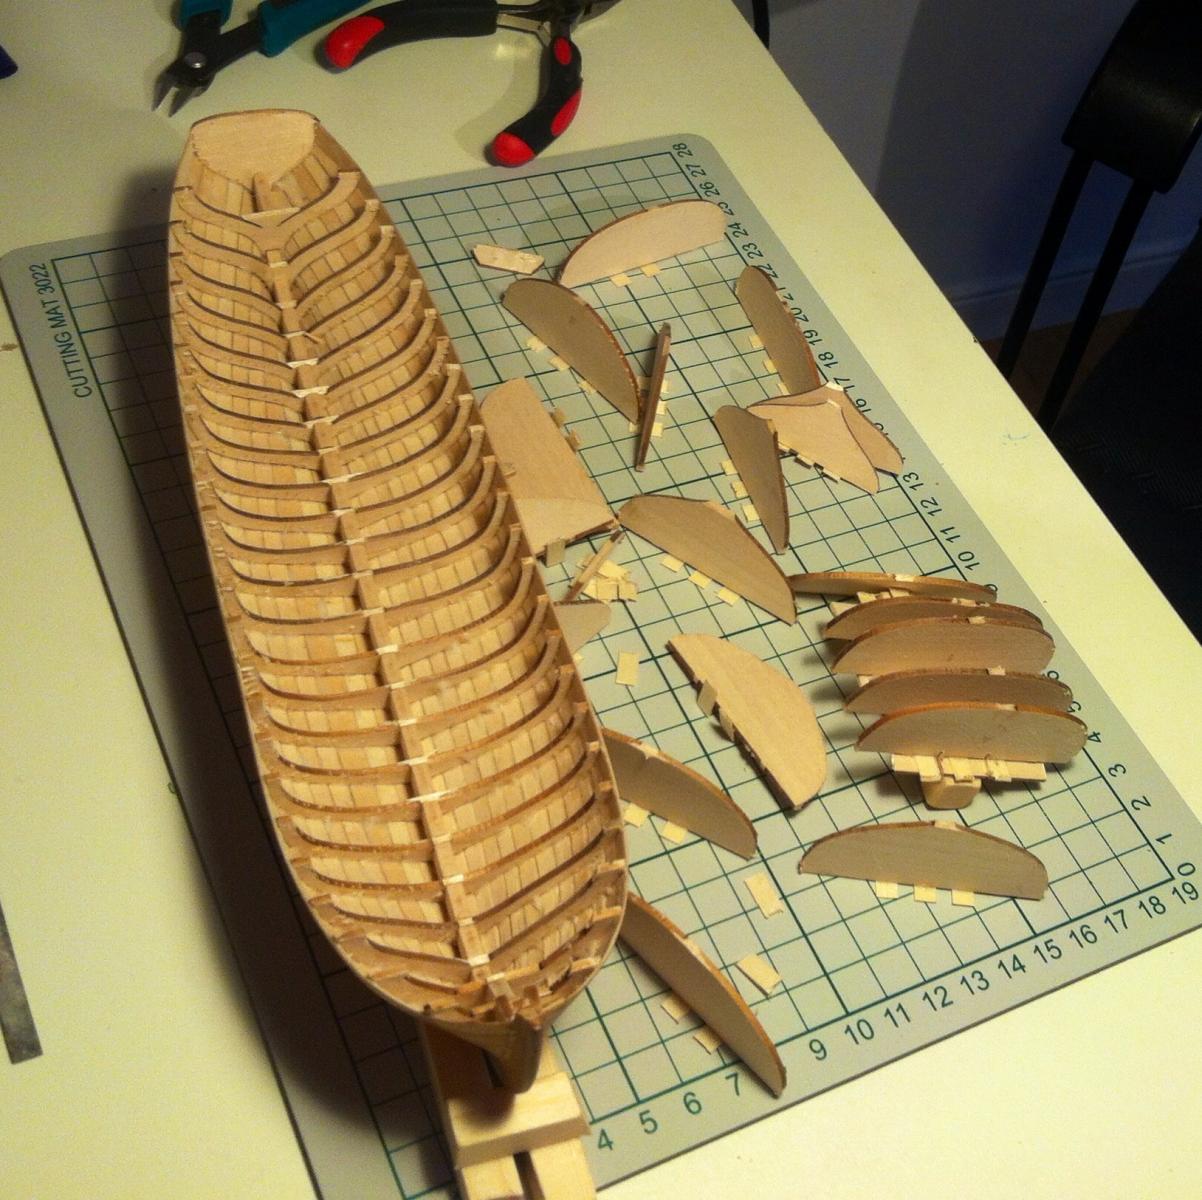
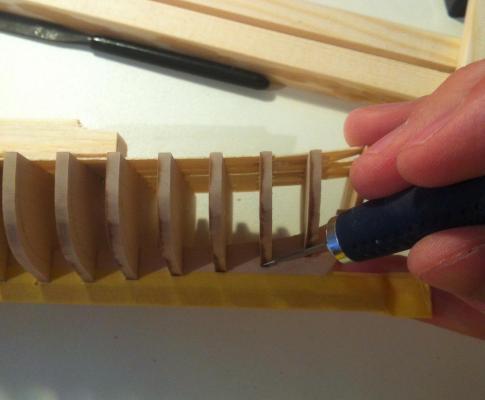
For Pops - frame fairing. First I protected the nice shiny keel from scratches with a masking tape: Then the idea is simple - sand away all corners, but do not sand too much to avoid skewing frame shape - laser cut char is a handy indicator, tiny strip of char remaining means "ok, enough". Any tools could be used - sandpaper, sanding block, files, whatever is preferred. Just don't rush it, make light passes. It will take an hour or more for each side. Some frames should be trimmed near the false keel: Left side - not faired, right side - faired. Tested the fairing using a plank, it should lay smooth on each frame, there should be a full contact. It will make glue joint stronger. After all, sanded inside part of all frames with a light grit, and applied a coat of poly: it would be tricky to do it later in that part of the frames, without leaving drops of excess poly between frames and planks. So better do it now. Lets have some fun - it's time for planking!


-
Per, before removing the frames I cut the "false deck" into pieces using dremel disk cutter. Or I misunderstood the question? Notice the remainings of false deck on frame centers on that Pinnace photo:

-
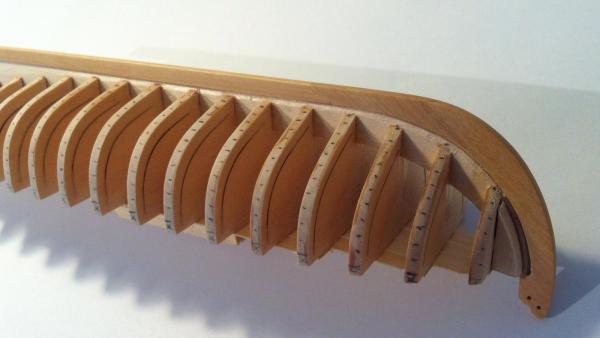
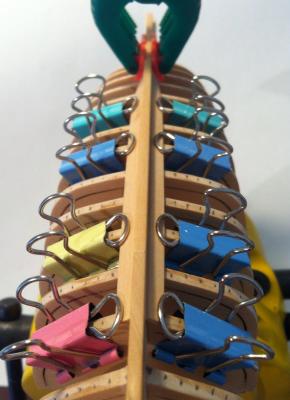
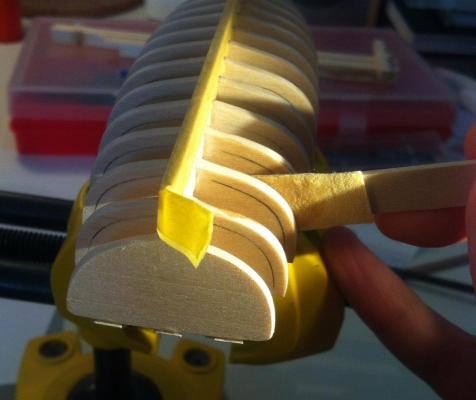
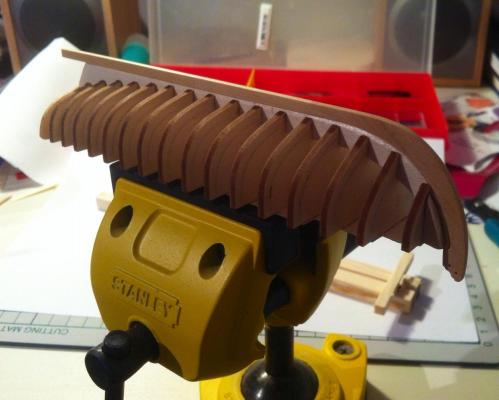
Connected frames together with a kind of false deck planking. It adds stability, frames or transom will not wobble. Scrap piece of wood on top is used to clamp the hull upside down into the table vice - it would be in that state while planking and treenailing. Now let's wait for glue to set - and it is ready for the frame fairing!

-
The most silent disk sander
Mike Y replied to Mike Y's topic in Modeling tools and Workshop Equipment
Thanks Mark! Yes, I also do it this way to send something flat Anyway, decided to use a sanding block with sandpaper glued to it, for perfect 90deg angle that would be fine. And silent. Thanks everybody for opinions!