HOLIDAY DONATION DRIVE - SUPPORT MSW - DO YOUR PART TO KEEP THIS GREAT FORUM GOING! (89 donations so far out of 49,000 members - C'mon guys!)
×


Mike Y
-
Posts
1,557 -
Joined
-
Last visited
Content Type
Profiles
Forums
Gallery
Events
Everything posted by Mike Y
-
 Remco, thanks a lot for a detailed explanation! Will practice that methods
 -
Book on evolution of ships construction (1600-1800 period)
Mike Y replied to Mike Y's topic in Nautical/Naval History
Wow, it is a perfect match! That is what I was looking for. Indeed, nuts and bolts are for "anatomy of the ship" series and TFFM books, but this one is more historical and high level. Many thanks! -
Is there some good book focusing on ships from engineering point of view, and describing the evolution of a construction process, shipyards? What were the challenges, how the requirements were changing? How the planning phase looked like, what were the engineering methods to calculate characteristics of a future ship when it's just a batch of blueprints? Etc etc etc.. I saw some small remarks about construction and design process when it comes to a particular ship. But looking on a more general overview, not looking on a specific vessel, but more on the development of shipbuilding industry, from engineering point of view.
-
Slowly starting a pleasuring preparation for the next build, which would be in that period. Looks like internet is not a good source for that... Main question is - how different was the design of British warships (taking famous Swan class as an example), versus similar sized and armed ships in US, like Confederacy? Main point of interest is not a gun setup or things like that (they are pretty well documented for each ship), but more the internal structure, layout of rooms inside the ship, etc. Can I assume that they were very similar (because, probably, shipbuilding expertise was already quite globalized at that times)? Or they were different, and it's better to study US ship construction separately? The only book I have is Hahn, "Ships of the American Revolution"... And it kind of ignores that question, assuming it's not a big deal. Which makes sense, since Hahn was more of an artist, and cared about "historical correctness" only to certain extent. Would appreciate any hints, links, experience!
-
Also, what is your technology for making such an accurate joints of deck beams? Like on that photo: http://modelshipworld.com/uploads/monthly_12_2013/post-20-0-91612300-1385926869.jpeg Please pardon me for such a flood of questions, but just really can't stop looking on that pictures again and again.. You raised a bar to the sky! The "treat every part as a small model" approach is genius! It's all about the process, does not matter if a build will take 10 years, but if it is _that_ quality..
-
what is the ideal modelling table?
Mike Y replied to AON's topic in Modeling tools and Workshop Equipment
Hm.. Modelling the tables to model the ships could be as interesting as modelling the ships themselves! Currently designing the work bench for a living room builders. It should be nice (so there would be no need to hide it somewhere), not big (only most used tools in it, other goes to the storage shelf), but also it should have a shape allowing an easy dust cleaning. And safe from kids. -
Just use some reversable glue, so you can add alcohol or water and remove incorrect plank. It is tricky on such open hull, and do not count on sanding to make it smooth - planks are too thin. But just take it slowlt, you will make it!
-
Wow! How do you make such a crisp edge? What is the trick for such a finishing? Could you please share some of your techologies? I guess it is hand plane and chisels, and then sanding with a sandpaper wrapped around a block, to avoid smoothing the edges? Or there is something else? Or you skip the sanding completely, and use only chisels and magic? I understand that question sounds strange, "please explain your mastership in a few words", but really hope to learn proper techiques! Spent evening re-reading the whole log again, fantastic level! Such a pleasure to see! And how do you finish the wood, for example, frames and beams? On a photos I even don't see the poly, or it is a very thin layer?
-
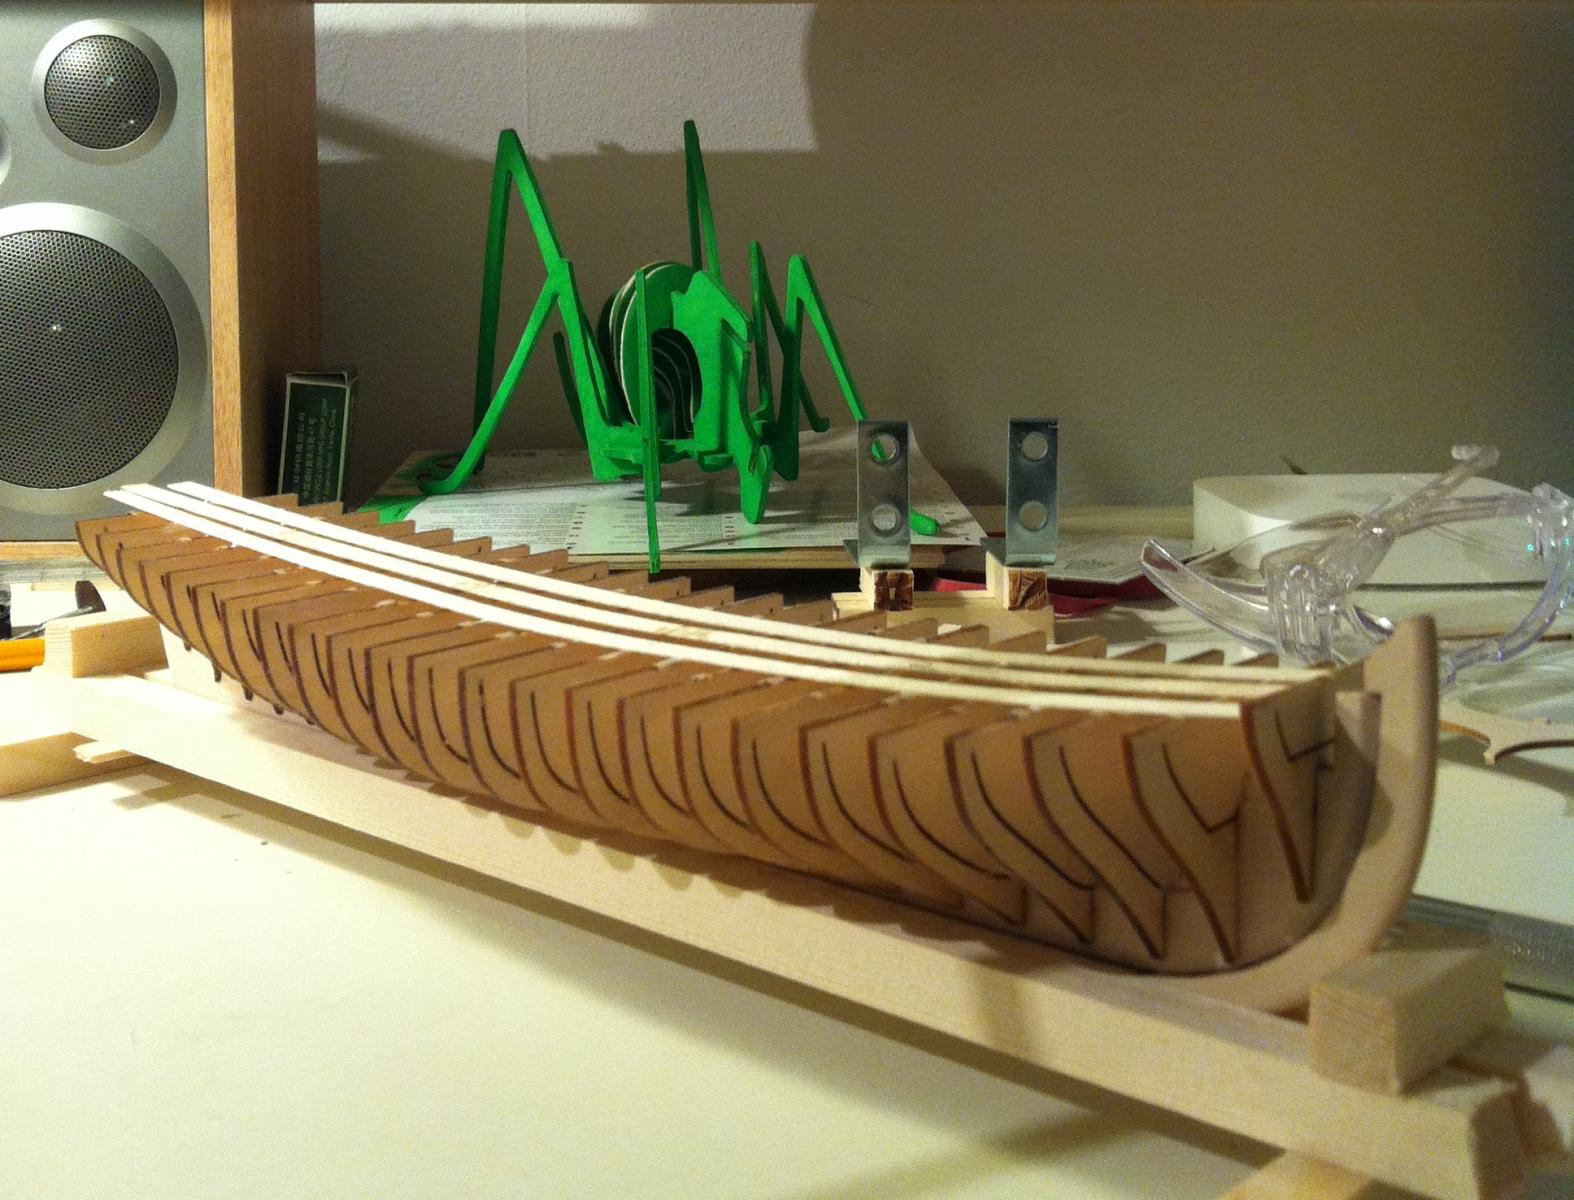
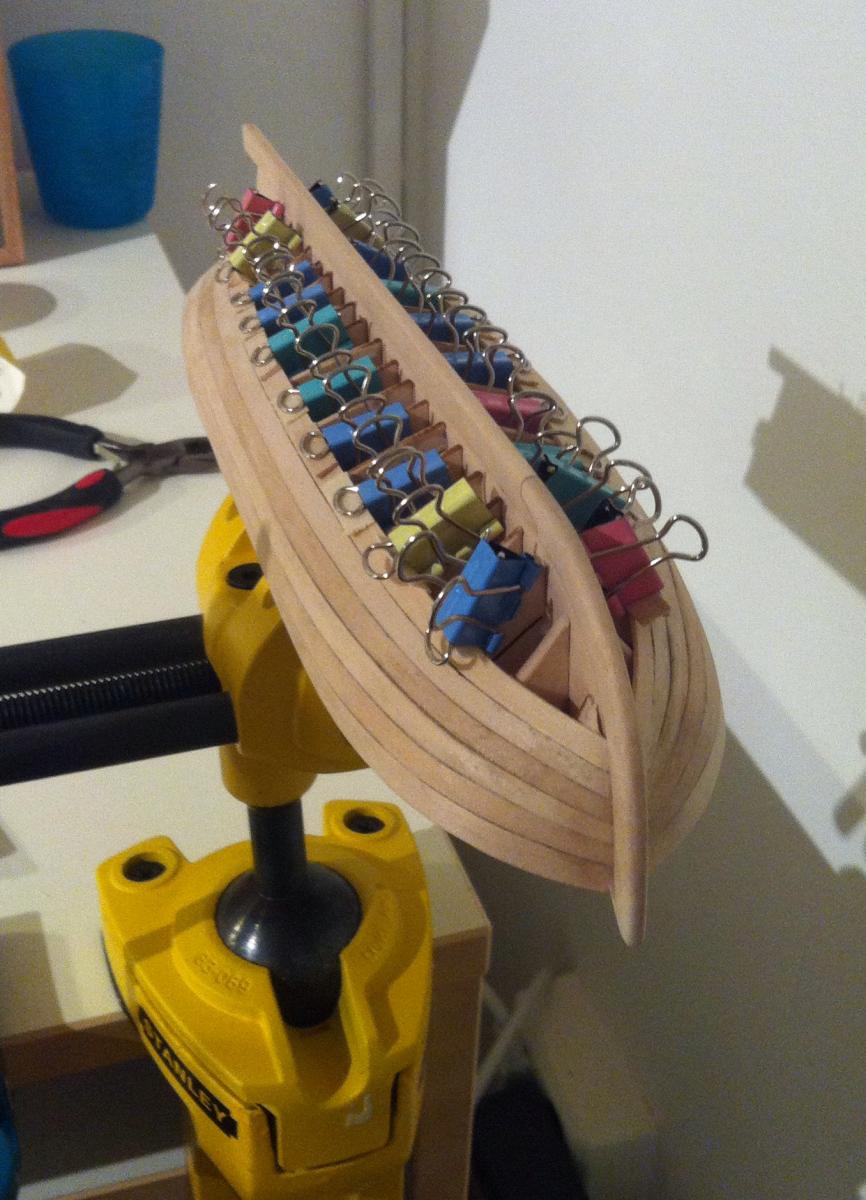
Looks good! Doublecheck that all frames are properly aligned, so there would be no "holes" and "bulges" because some frame is a bit non-aligned. I did that mistake on my pinnace, it's unfixable on later phases. Take a plank and see how it goes, hull must be perfectly symmetric. Small hint - it would be easier to make a planking if you glue all frames together with a few strips on top: And then glue some scrap wood in the center of the hull, to just clamp it into a table vice: It is much easier to plank when hull is firmly fixed, you don't need to hold it, and frames are not wiggling (because they are glued together). All that strips will go away when you remove the frame centers, so they do not affect any end result.


- 132 replies
-
- 4
-

-
- 18th century longboat
- model shipways
- (and 1 more)
-
You can fair them after installation on a keel, to get a proper shape. However, do it carefully to avoid breaking the frames. Knife or some light touch of a dremel, or whatever tool you prefer. But only up/down sanding, do not sand back and forth, otherwise a frame can break.
-
Not sure if there is any, it's quite straightforward: take a plank, put it on a future frames like you are doing the planking, and make sure that all bulkheads have a full contact with the plank, not only in a small point.
- 132 replies
-
- 1
-
-
- 18th century longboat
- model shipways
- (and 1 more)
-
Is there any book like this, that you can use to read more about internals of such ships, look on some reference pictures, etc? I understand there are lots of them, but which ones are considered good? Will definitely buy that book, but it's coming in the end of the summer..
-
That wood is quite thick, coarse sandpaper will not sand it away. Also, 240 grit is just to remove the char, then you use higher grits (320 -> 600 -> 1200) to make it smooth and shiny At least, that worked perfectly on pinnace, sister kit for longboat. Will try it on longboat itself in a few weeks, but as far as I remember, the wood is the same, and they are produced on same laser cutter.
-
Not yet, but she is close And I also need to build a display case, already bought some plexiglass for it.
-
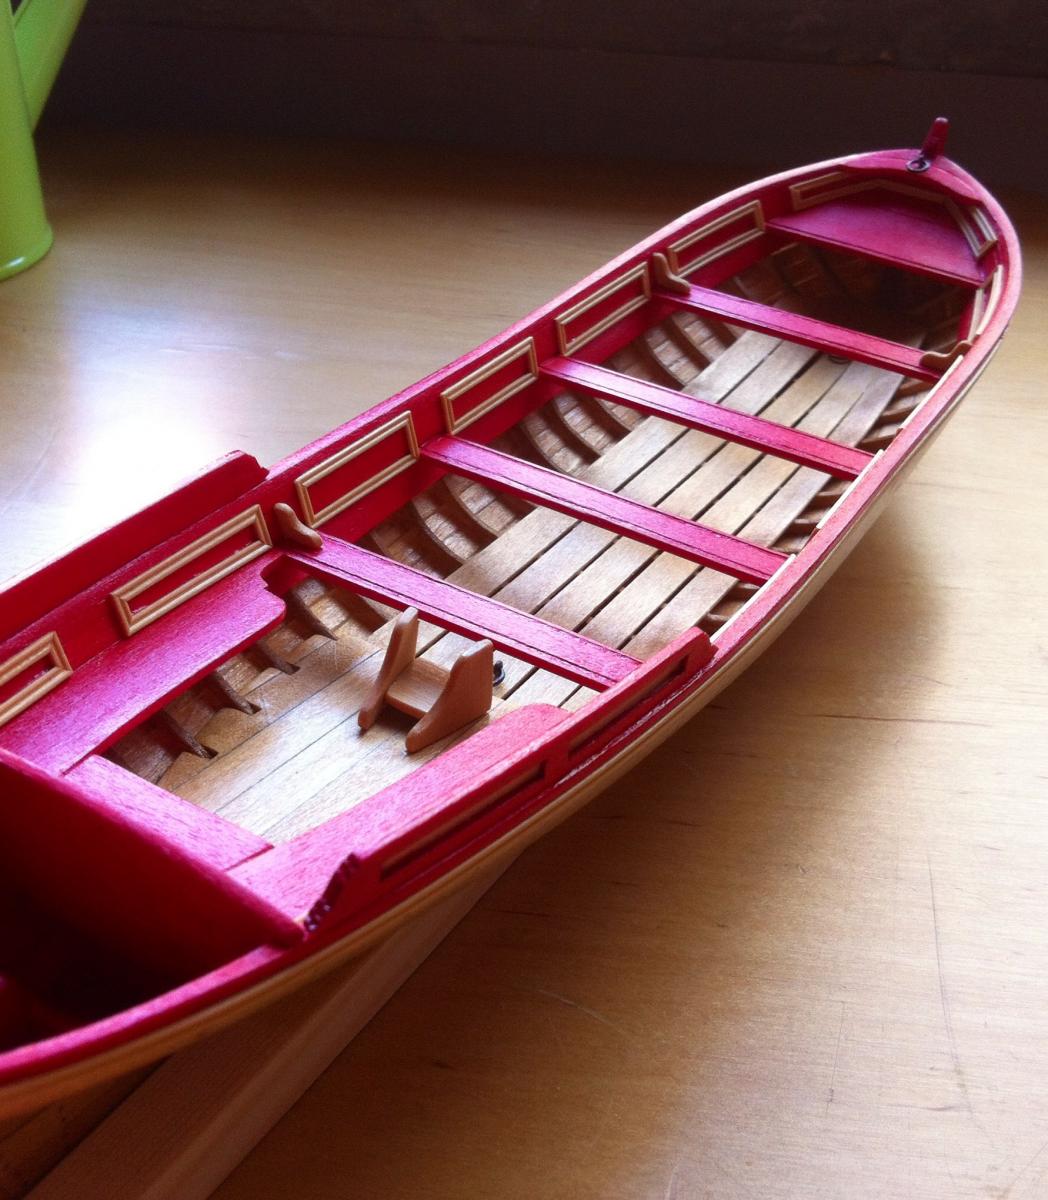
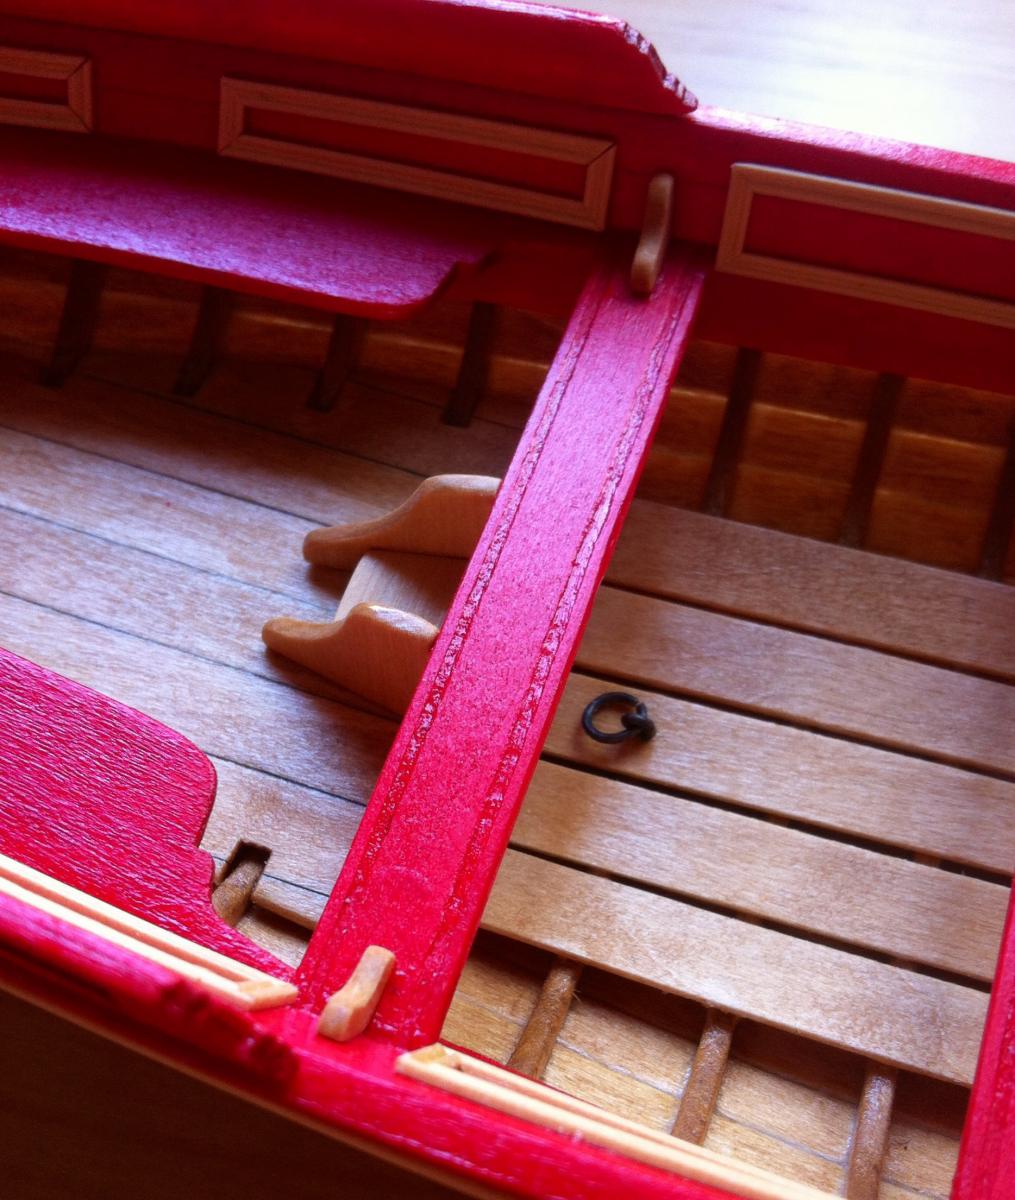
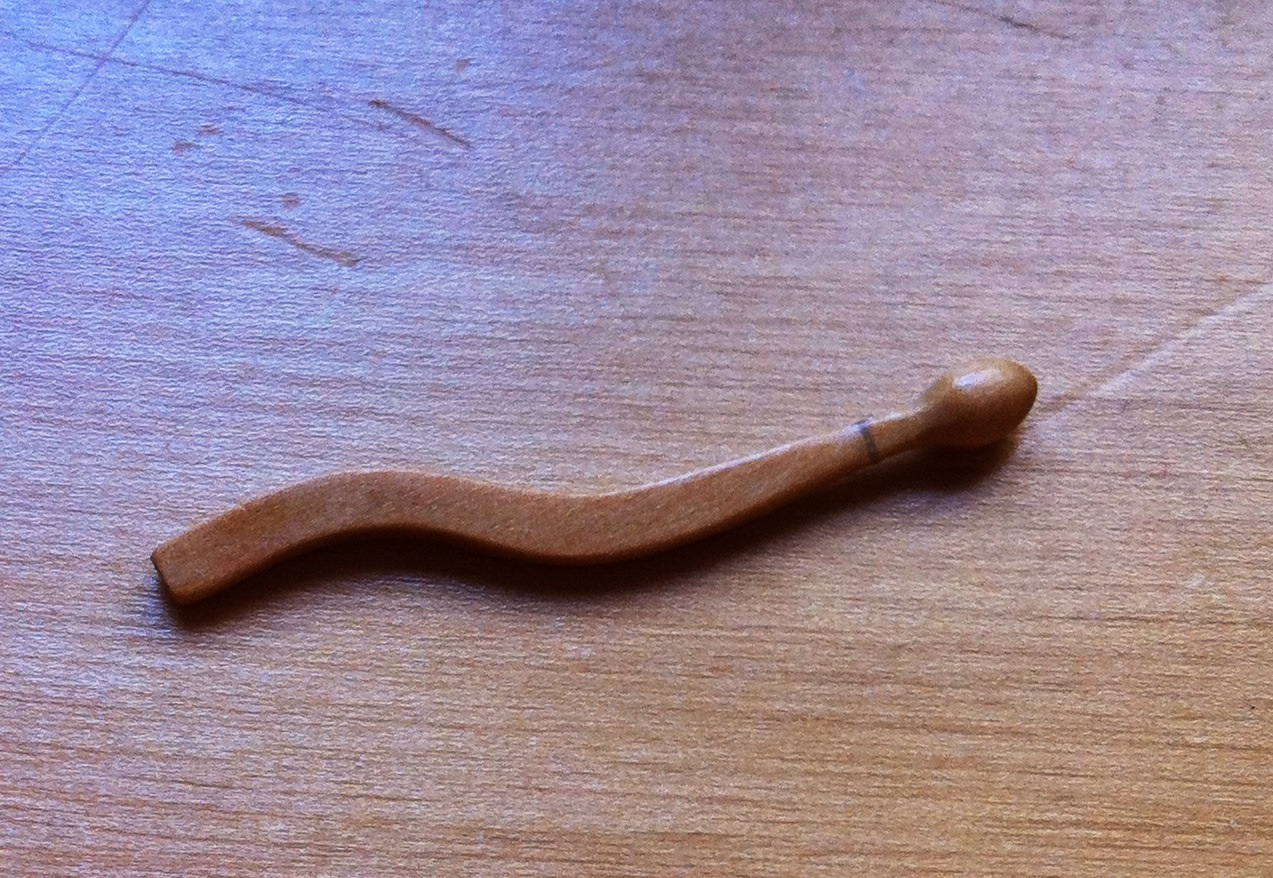
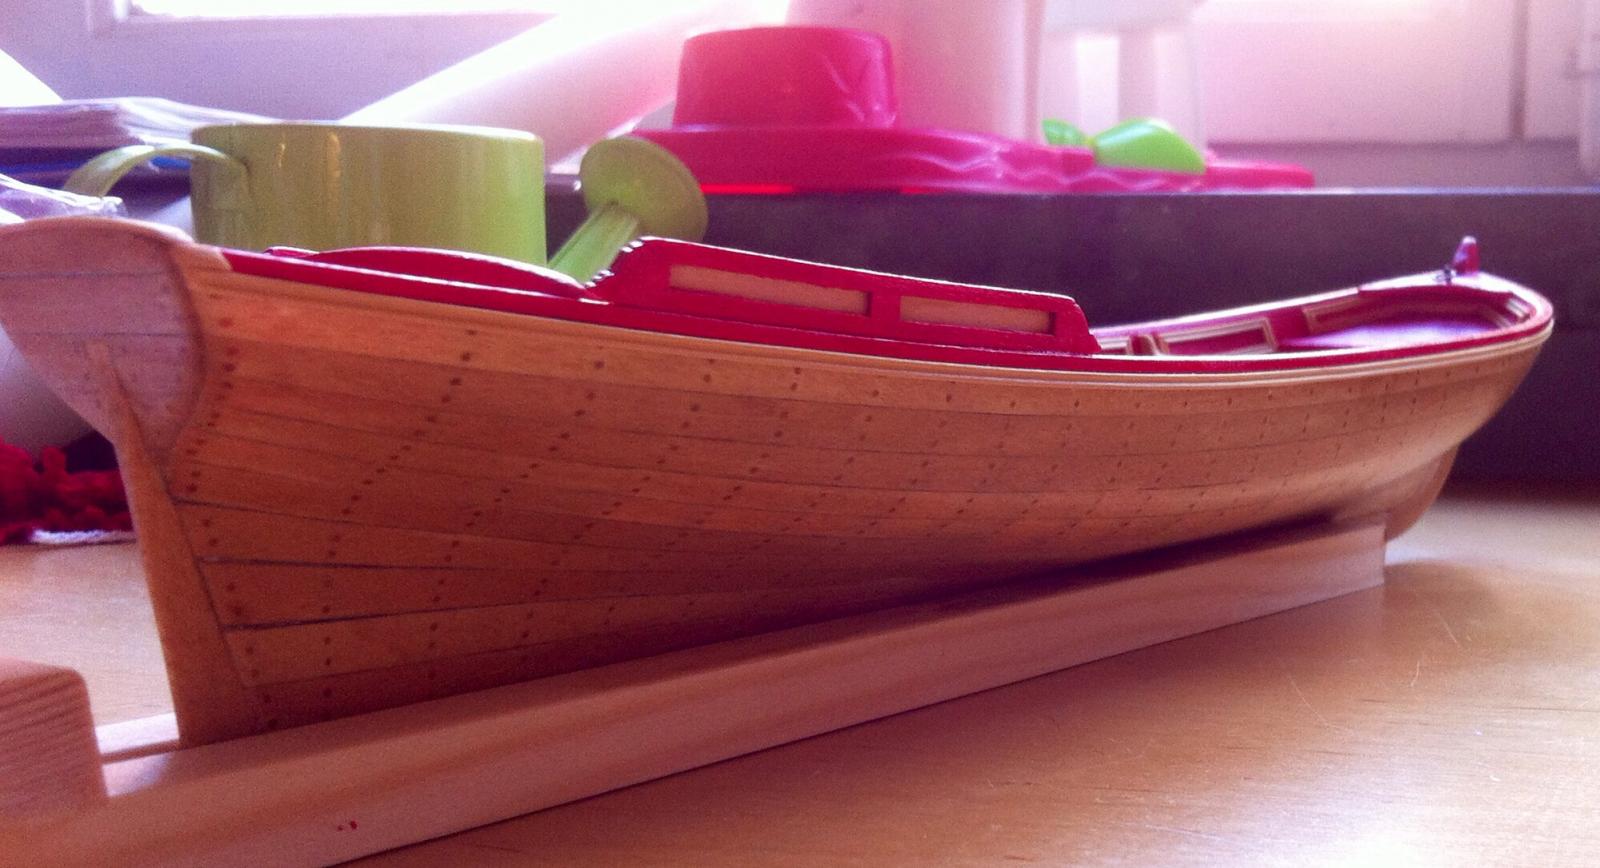
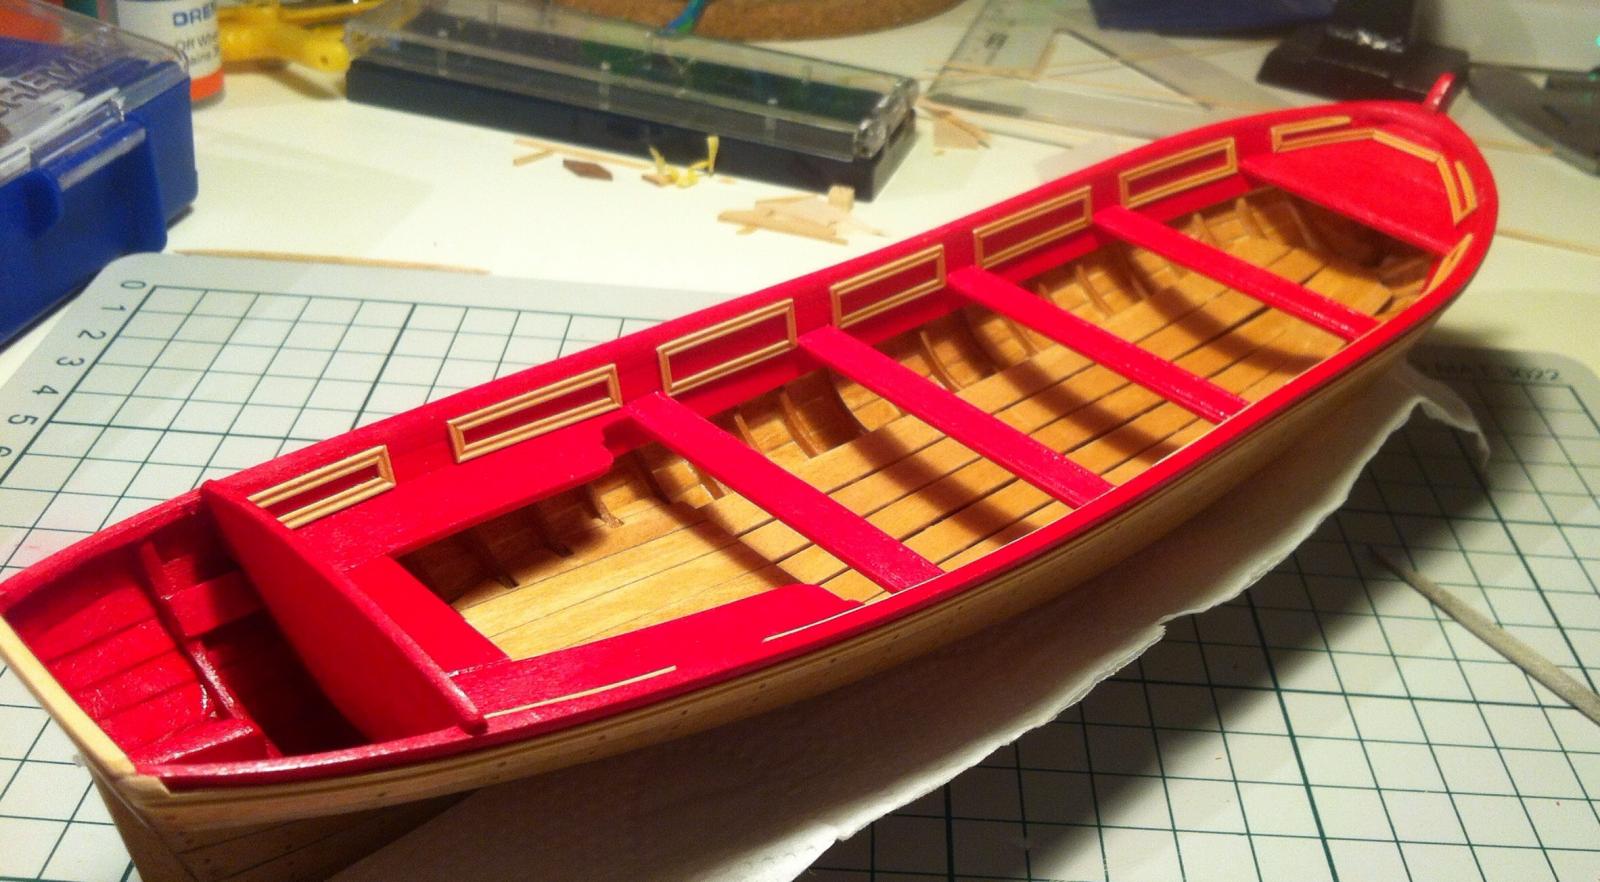
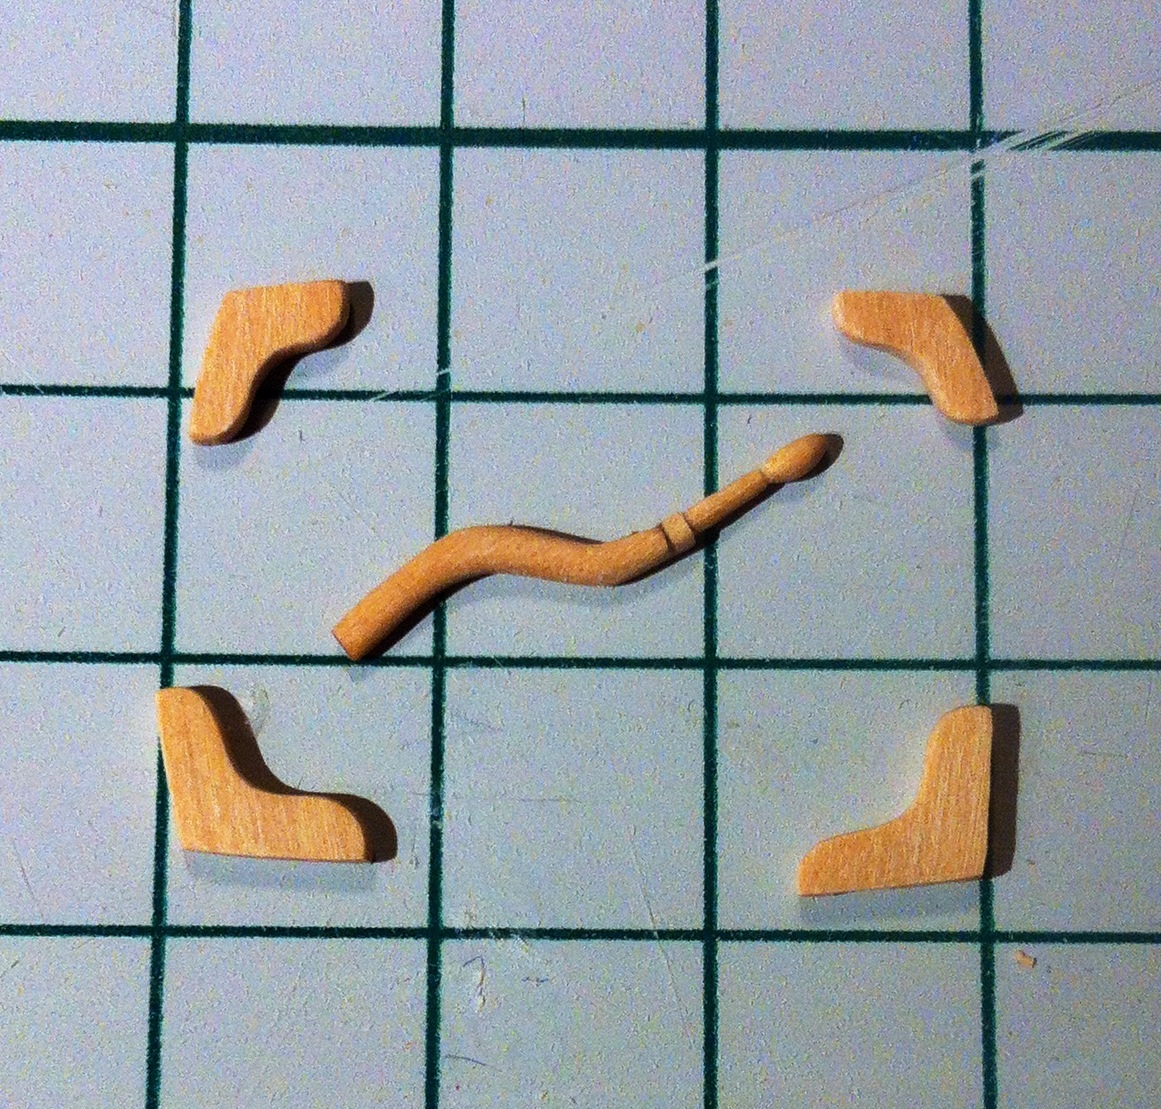
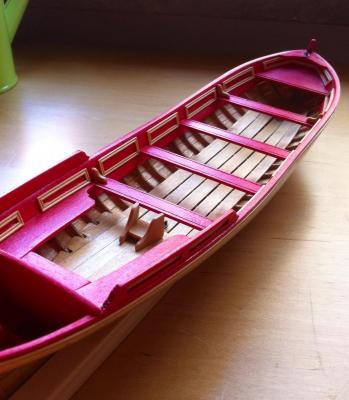
Slowly finishing interior details. Mounted splash protectors, rings, some decorative things near a few twarts, small ladder for a captain. Some things are done not according to the manual (different position on splash protectors, etc). So far I like the modified parts compared to pictures in manual Rudder tiller was nice, but too small for that scale. Made another one, bigger. Maybe it is not in scale, but now it will not break if a fly poops on it Connection between carved part and turned part is enforced with a small brass rod. It is a pity that connection is visible, will try better next time: And that is a moulded boxwood strip instead of friesers (that look like an overdecoration imho). I understand that are a part of contemporary model, plus the whole point of captain pinnace is to flash, so it was overdecorated. But I like a more laconic design, so replaced most flashy parts with less flashy, but elegant:


- 137 replies
-
- 12
-
-
- finished
- model shipways
- (and 1 more)
-
I sanded it away with 240 grit easilly, does it work for you? Congratulations, following the build with interest! I will also start my boxwood longboat build in a month or so
- 335 replies
-
- 1
-
-
- 18th century longboat
- Finished
- (and 1 more)
-
It is the first model where even the dust looks authentic! Exceptional!
- 227 replies
-
- 1
-
-
- cumberland
- 74 gun
- (and 1 more)
-
Sanding the inside of boat hulls.
Mike Y replied to Modeler12's topic in Modeling tools and Workshop Equipment
The sanding drums come in different grits, so you can use the fine one. Sorry, that's the only picture I managed to google, with a coarse grit But yes, they are to remove most of the material, while the final polish is always manual. -
Sanding the inside of boat hulls.
Mike Y replied to Modeler12's topic in Modeling tools and Workshop Equipment
That drum sanders for dremel do the same thing, very handy: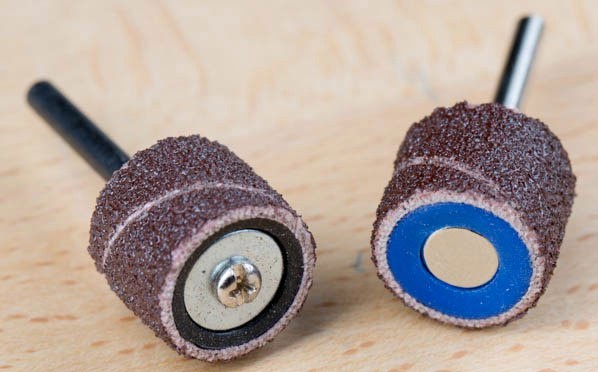
-
Sand them away with a rotary tool, trim edges with a knife, remove remainings of the glue with water or alcohol, depends on type of a glue? Should work nicely!
-
Wow! What kind of a glue do you use? And how do you prevent the hull from warping when wet? Planks will expand, and then leave the gaps when dried. Or there is a trick to prevent that? Looking forward to see the video of first voyage, and more detailed photos! Incredibly interesting project!
-
Just out of curiosity - if you apply the poly to frames now, how can you sand the internal side of the hull later? Or you will skip that step?
-
Wow, the nose filler looks really good!
-
Killed around 10hr on inboard panels, and not sure if they make things nicer or not. Probably, I should have definitely skipped the panels on the rear part of the ship. Very hard to get a proper precision with such small things. Even if they are nice on micro scale, under magnifier, on a larger scale panels are not perfectly aligned together: Also finished a rudder tiller. It have two pieces - carved part and turned part glued together. I am very happy with boxwood, so strong wood and so easy to carve! On that photo, one cell is 5mm (1/6 inches): Now will try to cover all that small particles with wipe-on poly and install to the model.


- 137 replies
-
- 7
-
-
- finished
- model shipways
- (and 1 more)