HOLIDAY DONATION DRIVE - SUPPORT MSW - DO YOUR PART TO KEEP THIS GREAT FORUM GOING! (89 donations so far out of 49,000 members - C'mon guys!)
×


freewheelinguy
-
Posts
130 -
Joined
-
Last visited
Content Type
Profiles
Forums
Gallery
Events
Everything posted by freewheelinguy
-
How to serve forward most shroud?
freewheelinguy replied to freewheelinguy's topic in Masting, rigging and sails
To the end it is. Would think Steel the correct source. Thanks for taking the time to post. Most greatly appreciated. -
How to serve forward most shroud?
freewheelinguy replied to freewheelinguy's topic in Masting, rigging and sails
Now I'm back to confused. "Anatomy of Nelson's Ships by Longridge" page 228....Foremost leg of the fore pair, both the fore and main mast, is served throughout its whole length down to the deadeye. Is Longridge correct? -
How to serve forward most shroud?
freewheelinguy replied to freewheelinguy's topic in Masting, rigging and sails
Janos, Thanks so much for the response. Len -
Trying to find out how much of the forward most shroud on a mast is served. I believe all the other shrouds on a particular mast should be served for a quarter of each shroud, but my information indicates the first shroud is fully served. By saying completely does this mean even around it's deadeye or does it stop before the deadeye? Would greatly appreciate any clarification on my question. Happy modeling, Len
-
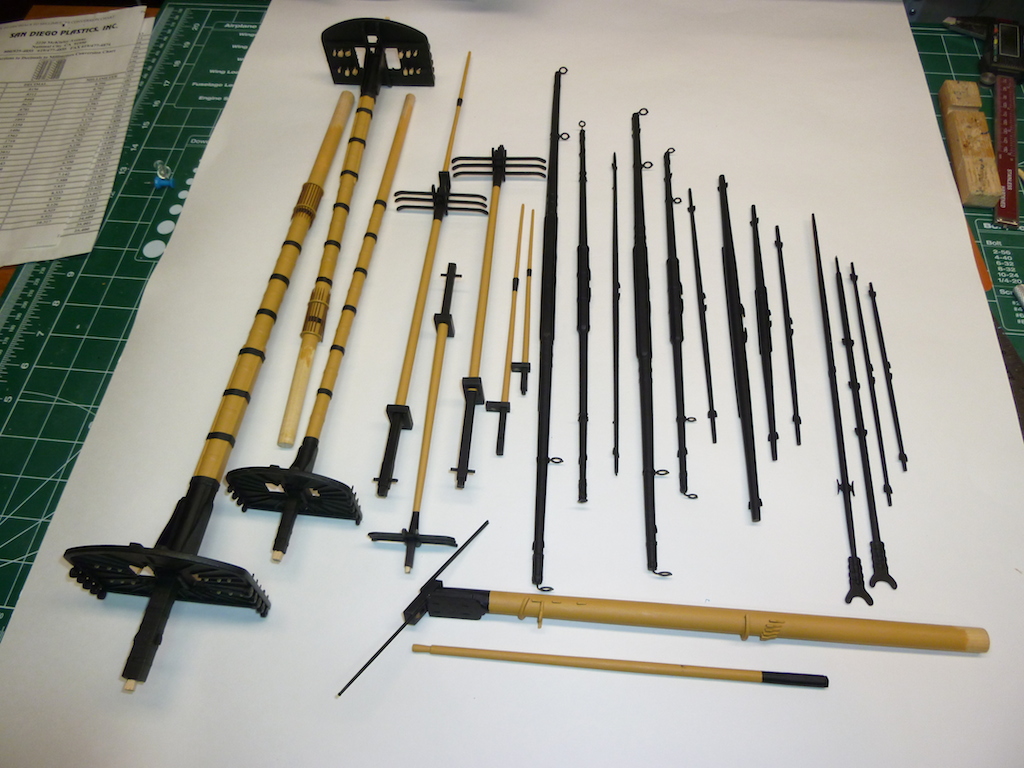
Build Update: Completed all masts, bowsprit, yards. Couple of things I deviated from plans: Drawing shows boarding pikes going through both mast rings. I brought the lower one down, so pike bases would rest on ring bottom. Some of the smaller yards said for center to be 16 parts instead of the usual 8 parts (with or without battens). I just left these rounded. This scale don't think would have shown. I also left top gallant yards rounded for same reasons. Next up all the blocks and such to be added to these pieces. Everyone: Wishing all the best upcoming year yet. Happy New Year and hoping Santa brought everything you wanted. Happy modeling, Len
- 122 replies
-
- 17
-

-
- bellerophon
- victory models
- (and 1 more)
-
Gil, Wonderful build. Always enjoy reading and seeing your updates. Thanks for posting your detailed information. I noticed in your last pic's a lazy susan? This has been on my mind as I got closer to starting the rigging. My other builds were small enough to just turn in my hands. This is exactly what I want to do. I'm just finishing up the bowsprit and the lazy susan table top to extend my work surface is next before rigging starts. Did you put in stops or it it free moving? Len
-
Jud, Good point. Forgot about a gun aft of me blasting my head off. I know when we took our first shake down cruise to fire the guns. The shipyard people (yardbirds) had these large metal containers for bringing equipment on board from the dock (guessing about 8/10 ft sides 1/4" thick or larger, 1968 is a long time ago) aft but forward of turret three and after firing these boxes were quite deformed from the blast percussion.
-
I guess cause NJ was the only Viet Nam era not much interest for 3rd party stuff. I've only been aboard once on the initial invitation opening for previous crew members. At that time there was limited internal access, so I couldn't access my berthing area. Yes, I was in the fourth division. After I made 2nd class my berthing changed to just forward of the main deck aft head and showers on the port side. Wouldn't allow me to stay back berthing with the lower class enlisted men. Too funny. Did like the head of line eating privileges though. As far as I can recall all 5" mounts had metal hoods top rear. My last general quarters station was 56 mount captain. The fixed hood covered the mount opening with only the front totally open. Never knew the proper name, but sight hood does work even though no sights just naked eyes. I would stand on a platform with my head and shoulders up in the hood. I don't have access to my cruise book or the Life book (at my wife's house buried in the attic somewhere) but if you do maybe the overhead shots going through the Panama canal would show the hoods. Don't know why the forward most mounts would have them removed, so 52/54 show them in your latest info? Len
-
Morning Hank, So another is crossing over into the world of plastic. I am as well after my Billy build, but starting my experiment into plastic with a lesser build to get my feet wet. Plastic isn't the same as when we were kids. I was totally blown away what can be achieved when I attended a IPMS show down in Richmond a couple years back. These kits with their after market upgrades are very impressive. Plus the 1/200 scale for ships that are hitting the market allows for much more visible detail. If there's any questions primarily pertaining to the 5"38 guns, just give a yell. Glad I was assigned to these instead of the 16's (much too large, lol). My bunk was just inside where the whale boat was on the port side main deck. Looking forward to further updates. Have a blast. Len
- 187 replies
-
- 4
-
-
- new jersey
- trumpeter
- (and 2 more)
-
Kevin, That site looks interesting. Thanks for the link. At first thought all the material pertained only to aircraft, then noticed the step by step for the Bismarck. Looks like it may be worth the cost of joining, especially for you. Enjoying your updates immensely. What I mentioned before plus your build log has got me to have a go myself. I'm not as brave as you, so I'm starting with a smaller ship to get my feet wet. Should arrive under the Christmas tree.
-
Hi Glenn, Looking good. Always enjoy reading your updates. I get to the same point as you. Unless I can show a different aspect there's no need for posting. I'm at the rigging stage and there's many marvelous details in other logs already. This is an accurate paint scheme before it was converted over to the Nelson Checkerboard. I do the same as you after painting. I find this prevents later maring and lowers touchups. I also now use Vallejo matt medium over the Admiralty paints to tone the shine down. I also agree about doing another ship of the line, unless the Victory is released before I croak. This model is big. I just set in the masts and had to raise my overhead light fixture. Rigging this beast isn't going to be easy. My space is limited. You're making a smart choice not to. Happy modeling, Len
-
My preference is Vallejo. Since I only paint with a brush and these are formulated not show brush marks, it's a huge plus for me. They have a large selection of color, washes and mediums for just about any shade or appearance you are trying to achieve. My present build I started with Admiralty paints ( nice color but shiny) and switched over to Vallejo. I used Vallejo matte medium over this paint and it toned down all this shine.
-
Thanks for the heads up, Arthur. I experimented serving lines and making served strops today. Results very satisfied. Typically, I use DMC Ecru thread for the running rigging and the same but stain with Minwax Jacobean (dark brown) for the standing rigging. I bought General Finishes Water based stain (wanted to try). Satisfied results. So the plan is: Expresso: standing rigging (close match to Jacobean) Antique Oak: running rigging (matches Chucks color closely from todays trials). I have tried a couple of other Minwax colors in the past (results not satisfactory for running rigging - too yellow). Since the bulk of the rigging is in smallest sizes and can't really see the rope detail unless under magnification, I'll only be purchasing rope in the larger sizes. It's just too expensive for me to justify the cost of purchasing all the rigging for this build. I've purchased minimal various lengths of Chucks rigging rope as a sample to make my build choices. This rigging line is super as well as his blocks.
-
Kevin, PE looks great. Should be a very rewarding experience. This is becoming quite tempting, but must get Billy done first. If you wouldn't mind whenever you can, to give a width and length on a typically full deck plank from one of the deck sheets? Just curious. I know on other forums it's mentioned that the plastic deck pattern on the kit is wrong. To me a scale deck plank width should be probably a little less than 1mm (guessing real width around 6 inches), but can't find any information on a full deck plank length. Len
-
Build update: Just finished up assembling and painting all three masts. All mast sections won't be glued until the following and only the bottom sections will be glued until all the ratlines are finished. Still need to add the various blocks. Before I can do this I must make a decision on what color for the standing rigging. I typically use line stained with Jacobean minwax. This time I may use Chucks dark gray rope, but I need to experiment with doing some servings first with appropriate color. This will determine my decision to do servings and also may make up my mind on the color I want to use for standing rigging (dark brown or gray. So it's off to experiment on serving. Til later. Happy modeling, Len
- 122 replies
-
- 2
-
-
- bellerophon
- victory models
- (and 1 more)
-
Being a little prejudice by serving on the USS New Jersey 1968-69 mount 56 mount captain (Iowa class battleship), she would have kicked her butt. Even though these four ships were commissioned during the later part of WWII, none were sunk. Kevin, I apologize for commenting on your build. Just some old pride coming out. Happy modeling, Len
-
Hi Kevin, Thanks for the links. Here's another link useful although you might know about it already. http://www.kbismarck.com Besides other links and forums, you tube has many videos of builds and movies plus the many clips of the wrecks that filmmaker Cameron made. I have only experience on wooden models but was thoroughly blow away when I attended a model show with mostly plastic or resin built models a couple of years ago. I am definitely interested after my present build for purchasing this model as well. The level of detail that can be achieved with aftermarket upgrade kits is staggering. I think it's a good diversion with a whole new set of skills to learn. Since reading the many forums for these, quite a few modelers do both mediums. Looking forward to your future updates.
-
Chris, Glad all went well. I'm sure you're happy to be back home. I like you do or thought the Vanguard was big. The picture sure shows those difference. Wow! Thanks for taking that shot and posting it for us to see. Take care, Len
-
Chris, I too, hope you have a safe trip. Hopefully, your bosses will realize what a wonderful product you have developed and expedite it to market. Take care, Len
-
Brian, Don't think I have any pictures of the hull planking. I didn't worry about most of it because I knew it would be covered by copper tape. Thanks Arthur for the heads up on the bowsprit cap. I still have to make one, so not a problem for me. I won't be making this for awhile until I absolutely need to add the bowsprit after quite a lot of the rigging is in place. This model is very large and I'm sure I would be snapping it off many times. I don't have much space to work and will have to bring my work desk out into the middle of the floor once rigging starts. I don't think anything is attached to these. I looked as well and came up dry. I then looked in several books I have and most just mention the four eyelets on each, but not for their use. In Lee's Masting and Rigging does mention the use of these for top ropes then taken off once the masts were set. Steels mentions similar for bringing up the top mast. Seems there's also a sheave used for a block and tackle and run down to a deck eyelet..... My explanation isn't very good. I just don't fully understand how it was used. Guess this falls in the category of like eyelets we add on deck, but don't add anything to them. Hope this helps.
-
Build Update. No pix's, but wanted to mention things experienced in assembling the masts. Many things can go wrong, if not attentive on order of assembly. I was originally going to just build the lower masts, add standing rigging then finish the building of the additional mast pieces. Now I will build all the masts pieces to be assured they all play well together. Good heads up, by Arthur, was given about the pike mounted rings. These would have never fit on my masts. Also holes for the pikes needed to be open to accept them. I also needed to shape the etched pikes to have a point. Off the sheet they are rectangle. The plans show the pikes mounted through the top and bottom ring holes, but thinking and seeing a picture of the real world the bottoms seat in the bottom ring, not through. I've completed building the lower three masts and their tops. While making the caps for these I noticed the fore top part is the same as the main mast top. Checked the plans and should be different size (believe Arthur pointed this out ). Made a new one to match plans. Also mizzen top holes on part don't match alignment on plans, so new part made there as well. Just completed fore topmast and now know why some caps are in half, although this one wasn't. If I followed the plans directions I would have been ok which have the bottom thin enough to slip the cap on before the additional buildup material is added. I used a dowel that was big enough where this wasn't needed, so cutting the cap was necessary. I also made square holes where the masts connect to these caps (plans and parts show round holes). Will post pix's once all these pieces are built and assembled. There is much to do, so it will be a while.
- 122 replies
-
- 2
-
-
- bellerophon
- victory models
- (and 1 more)
-
Want to wish all those who are attending this event a wonderful time and a safe trip there and back. Take and post many pictures for us who aren't fortunate enough to attend. Happy modeling, Len
-
Thanks for all the replies, so far. My post was to find out the real size and model size doesn't come into play for my asking. Seems like, if someone was told to go down to the boatswains locker to get material for servings he would be issued a certain type of line. Guessing same size used for all applications whether 20" or 8" circumference rope. Material would have to be listed somewhere. My original thought for asking was to find out what size was used in the real world, then apply scale size line sample and make a decision, if it is worth it. I've seen several models with servings that look wonderful. For me, this is a detail that I would like to incorporate, if I think it's worth the effort. To me this fits in the same category as treenails, deck caulking, and similar details. I have 6/0 and 3/0 fishing line. The 6/0 has the smallest dia. (.005") which is close to 1" circumference line, druexy indicated. I will try this thread for serving on the superb rigging line I just received from Chuck's Syren Modeling. I will post the result. John, you didn't attach the link, but a fast copy of the words "En...rigging" got me here. Thanks. http://www.anmm.gov.au/webdata/resources/pdfs/endeavour/Signals94_pp02-11_Endeavourstandingrigging.pdf Additional replies are much welcomed and appreciated. Thanks again for all the replies, Len
-
Fellow members, I have been looking through several books (Lee's, AOTS Belona, Vol4 David's, Anatomy of Nelson Ships) and can't seem to find any definitive answer on what size the serving line is on different lines of a ship that require it. Some give seizings and/or formulas for different rope size proportions, but none for servings. Is there a formula for this? Happy modeling, Len
-
Thanks for the encouraging comments. They are greatly appreciated. Arthur, Caught me not reading the instructions again. Might just leave it that way unless the height of the cutter causes problems with the rigging.