
HOLIDAY DONATION DRIVE - SUPPORT MSW - DO YOUR PART TO KEEP THIS GREAT FORUM GOING! (89 donations so far out of 49,000 members - C'mon guys!)
×


Kelp
-
Posts
117 -
Joined
-
Last visited
Content Type
Profiles
Forums
Gallery
Events
Everything posted by Kelp
-
Titanic's Waterline
Kelp replied to Kelp's topic in Building, Framing, Planking and plating a ships hull and deck
Hello Wefalck, I have just looked at a model of the Titanic, and yes, what you have said is very true in Titanic’s case. The waterline on the model appears to sag on each end. Having the slight curvature would eliminate this illusion. I had always thought waterlines were perfectly horizontal, and am now seeing situations were that isn’t necessarily the case, where cargo loading and simple aesthetics come into play to want to give the waterline a curve. Thanks for your reply. Don -
Titanic's Waterline
Kelp replied to Kelp's topic in Building, Framing, Planking and plating a ships hull and deck
Roger, Thanks for your response regarding the waterline. As you mention, maybe it had to do with the cargo and loading. I’ll check into this topic a little more. Thank you, Don -
Titanic's Waterline
Kelp replied to Kelp's topic in Building, Framing, Planking and plating a ships hull and deck
Hi Henry, The article was describing the waterline, where the oxide red and black colors would have met. As Roger says in his message, it may have had to do with the loading of the cargo. I’ll do a little more research and let you know what I find out. Thanks for your reply. Don -
I have just read an article about how Titanic's waterline curved upward at a gradual slope towards the bow and stern. I've always thought waterlines were flat, so what would be the reason for having a slope in the waterline? Thanks, Don
-
Evan, You have done a fantastic job on the rudder. The scratch build was well worth doing. Thanks for sharing your construction process. Don
-
Hi Tom, What is your opinion regarding the KA upgrade set? I see it costs about the same as the model and was wondering if it is worth getting. Are the photo etch sheets an improvement over the kit photo-etch sheets? I see having the wood deck and brass masts are a definite improvement. How about the resin parts, do you need to look closely to see the improvements over the kit plastic parts, or are the improvements obvious? Thanks, Don
-
Evan, You are creating an excellent build log! The diagrams are really helpful towards explaining the work you are doing. All the Best with building this model. I’m looking forward to continuing to see your progress. Don
-
Hi Evan, I am really looking forward to having a front seat to watch your progress through this beautiful model. Yes, it’s a tragedy ship, but with the KA set, you will have the opportunity to put your modeling skills to this test to tackle a challenging model, which will give awesome looking results when completed. I’m sure your daughter will treasure this model. What a great gift! All the best with your progress! Don
-
Hi Jake, Did your Victory kit have laser cut bulkheads or did you have to cut them out with a saw? I have the old pre- laser cut version and since you mentioned your kit is about 30 years old, I’m trying to guess how old my kit is. Thanks, Don
-
Hi Spyglass, This is an old Sergal HMS Victory kit. Back from the days before laser cutting. I still have to cut more bulkheads on the scroll saw this weekend, but can then do a dry fit. I think the lower decks may help the correct the warping. If not, I’ll trace this bulkhead and cut another one. Thanks, Don
-
Thanks for all of the good suggestions. I’ll be putting a couple of these ideas to use. Don
-
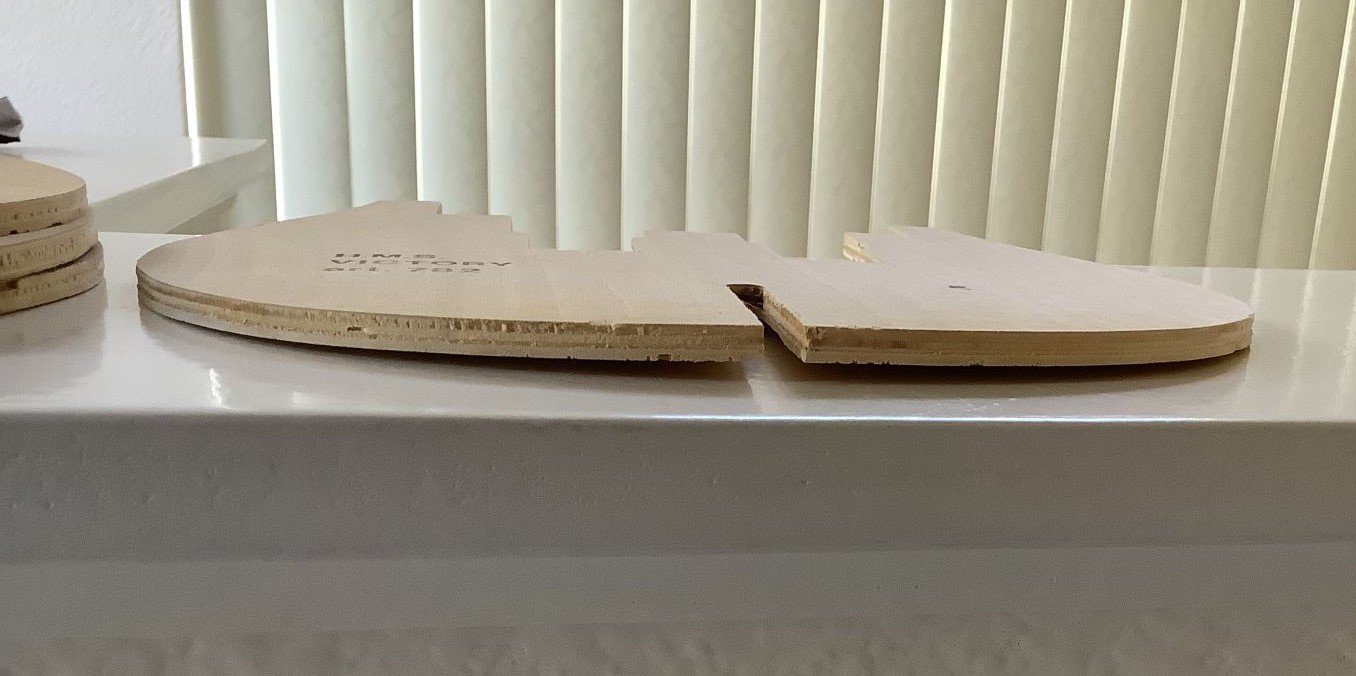
Any suggestions on how to flatten this warped plywood bulkhead? Thank you, Don Any suggestions on how I can flatten this warped plywood bulkhead? Thanks, Don
-
I have installed the Original Ships in Scale CD's onto my hard drive. The new NAV.htm file is working fine. My question is about using "Browse Issues". When I click on Browse Issues I only get the list of magazine photos from 1983 to 1987 (the first disc). Does anyone know how to fix this to be able to also get the list of magazines from 1988 to 1993? Thanks, Don
-
1/200 Trumpeter IJN YAMATO - issued by MRC/Gallery Models
Kelp replied to yvesvidal's topic in REVIEWS: Model kits
Same with the Titanic. The Trumpeter model is beautiful, but I’m not sure if I’d like to look at a ship that had such a historic tragedy in my house every day. Maybe Trumpeter can come up with a large scale Queen Mary? Yves, good luck with your build. It looks like it will be a fun project, with all of the parts and detail. I’ll pull up a seat and enjoy watching your build. Don- 104 replies
-
- 4
-

-
- MRC/Gallery
- Yamato
- (and 1 more)
-
Your model is looking great! Nice job on the coppering. It’s worth the time and effort. Can you tell me how many sheets of plans came with the kit? I’m thinking of purchasing a used kit and would like to have an idea of the number of drawings that should be included. Thanks, and keep on with your nice work! Don
-
Your model is off to a good start. It looks like it was nicely built. Feel free to ask the folks here when you are ready to repair the damaged areas. You will get good advice on repair techniques. I’m sure the damage can be fixed where it will be hard to see the repaired area, with care and patience. Where you able to get the rest of the kit, including the masts and yards? A couple of good books about the Victory with lots of helpful drawings are The Anatomy of Nelson’s Ships by Longridge, and the Anatomy of the Ship HMS Victory (author?). These are pretty easy to find and may even be at your local library. I like seeing models like this get saved. Best of luck with the Victory! I’m looking forward to watching your progress. Don
-
I like the bulwark stanchions you’ve added. It’s a big improvement over the triangular shapes that were molded on the hull. What did you use for cutting off the triangles? Any technique for removing them? Excellent model! I enjoy watching your progress. Don
- 481 replies
-
- 4
-
-
- Cutty Sark
- Revell
- (and 2 more)
-
Pre-spiled wood would probably be good for a beginner’s first kit, to get the person familiar with the techniques of working in wood. Making the wood pre-spiled would probably more likely enable the person to finish his/her kit and to then be encouraged by the final result to continue with the hobby and then attempt a kit a next step up in difficulty as a next project. Don
-
You are doing a very nice repair, Sir. A complex job, but it is coming out very nice. Best of luck with this project. Don
-
Hi Ken, I see you also had the brass plating pieces for the upper part of the hull (see post #22). The drawings say to cut out the square scuppers with an exacto blade. This Seems a little dangerous. Is this how you cut out the scuppers or did you use another method? Also, I did a dry fit of the plates around the bow and the fit seems to be off a little. Did you need to reshape these brass pieces around the bow? Thanks, Don
-
It’s looking really good Bob! The green you used looks just like the green on the real ship. I’ll be watching your progress on this model. Don
-
Thanks Kevin and Ken for your replies. Don

