HOLIDAY DONATION DRIVE - SUPPORT MSW - DO YOUR PART TO KEEP THIS GREAT FORUM GOING! (Only 36 donations so far out of 49,000 members - C'mon guys!)
×


Boatsinc2000
-
Posts
108 -
Joined
-
Last visited
Content Type
Profiles
Forums
Gallery
Events
Everything posted by Boatsinc2000
-
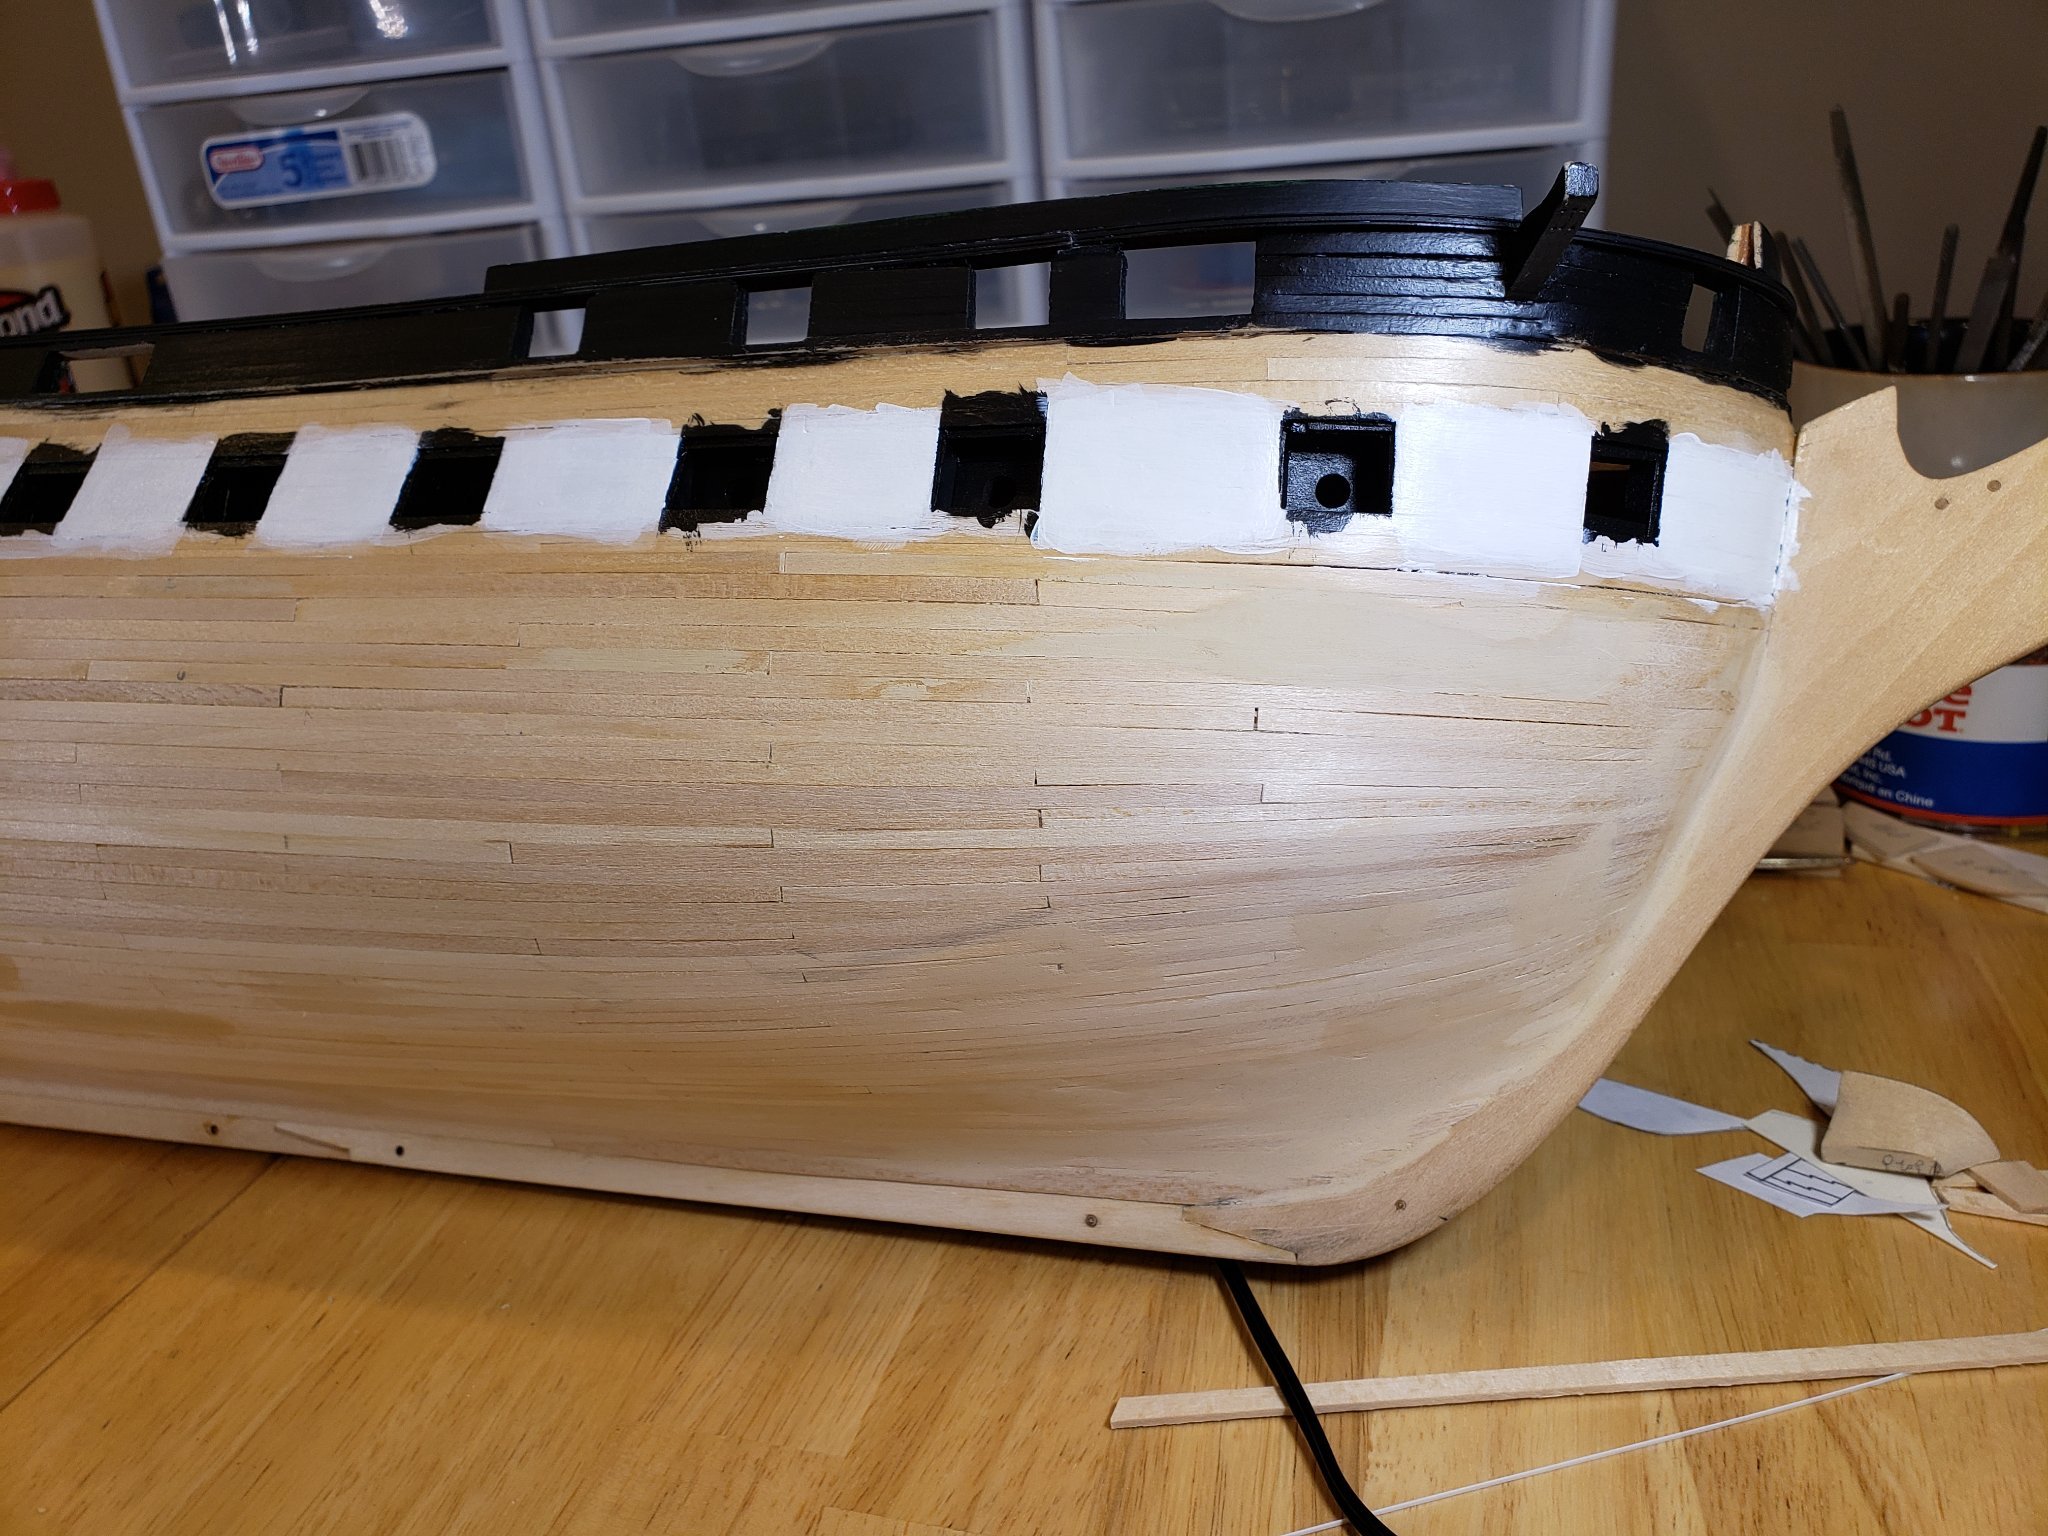
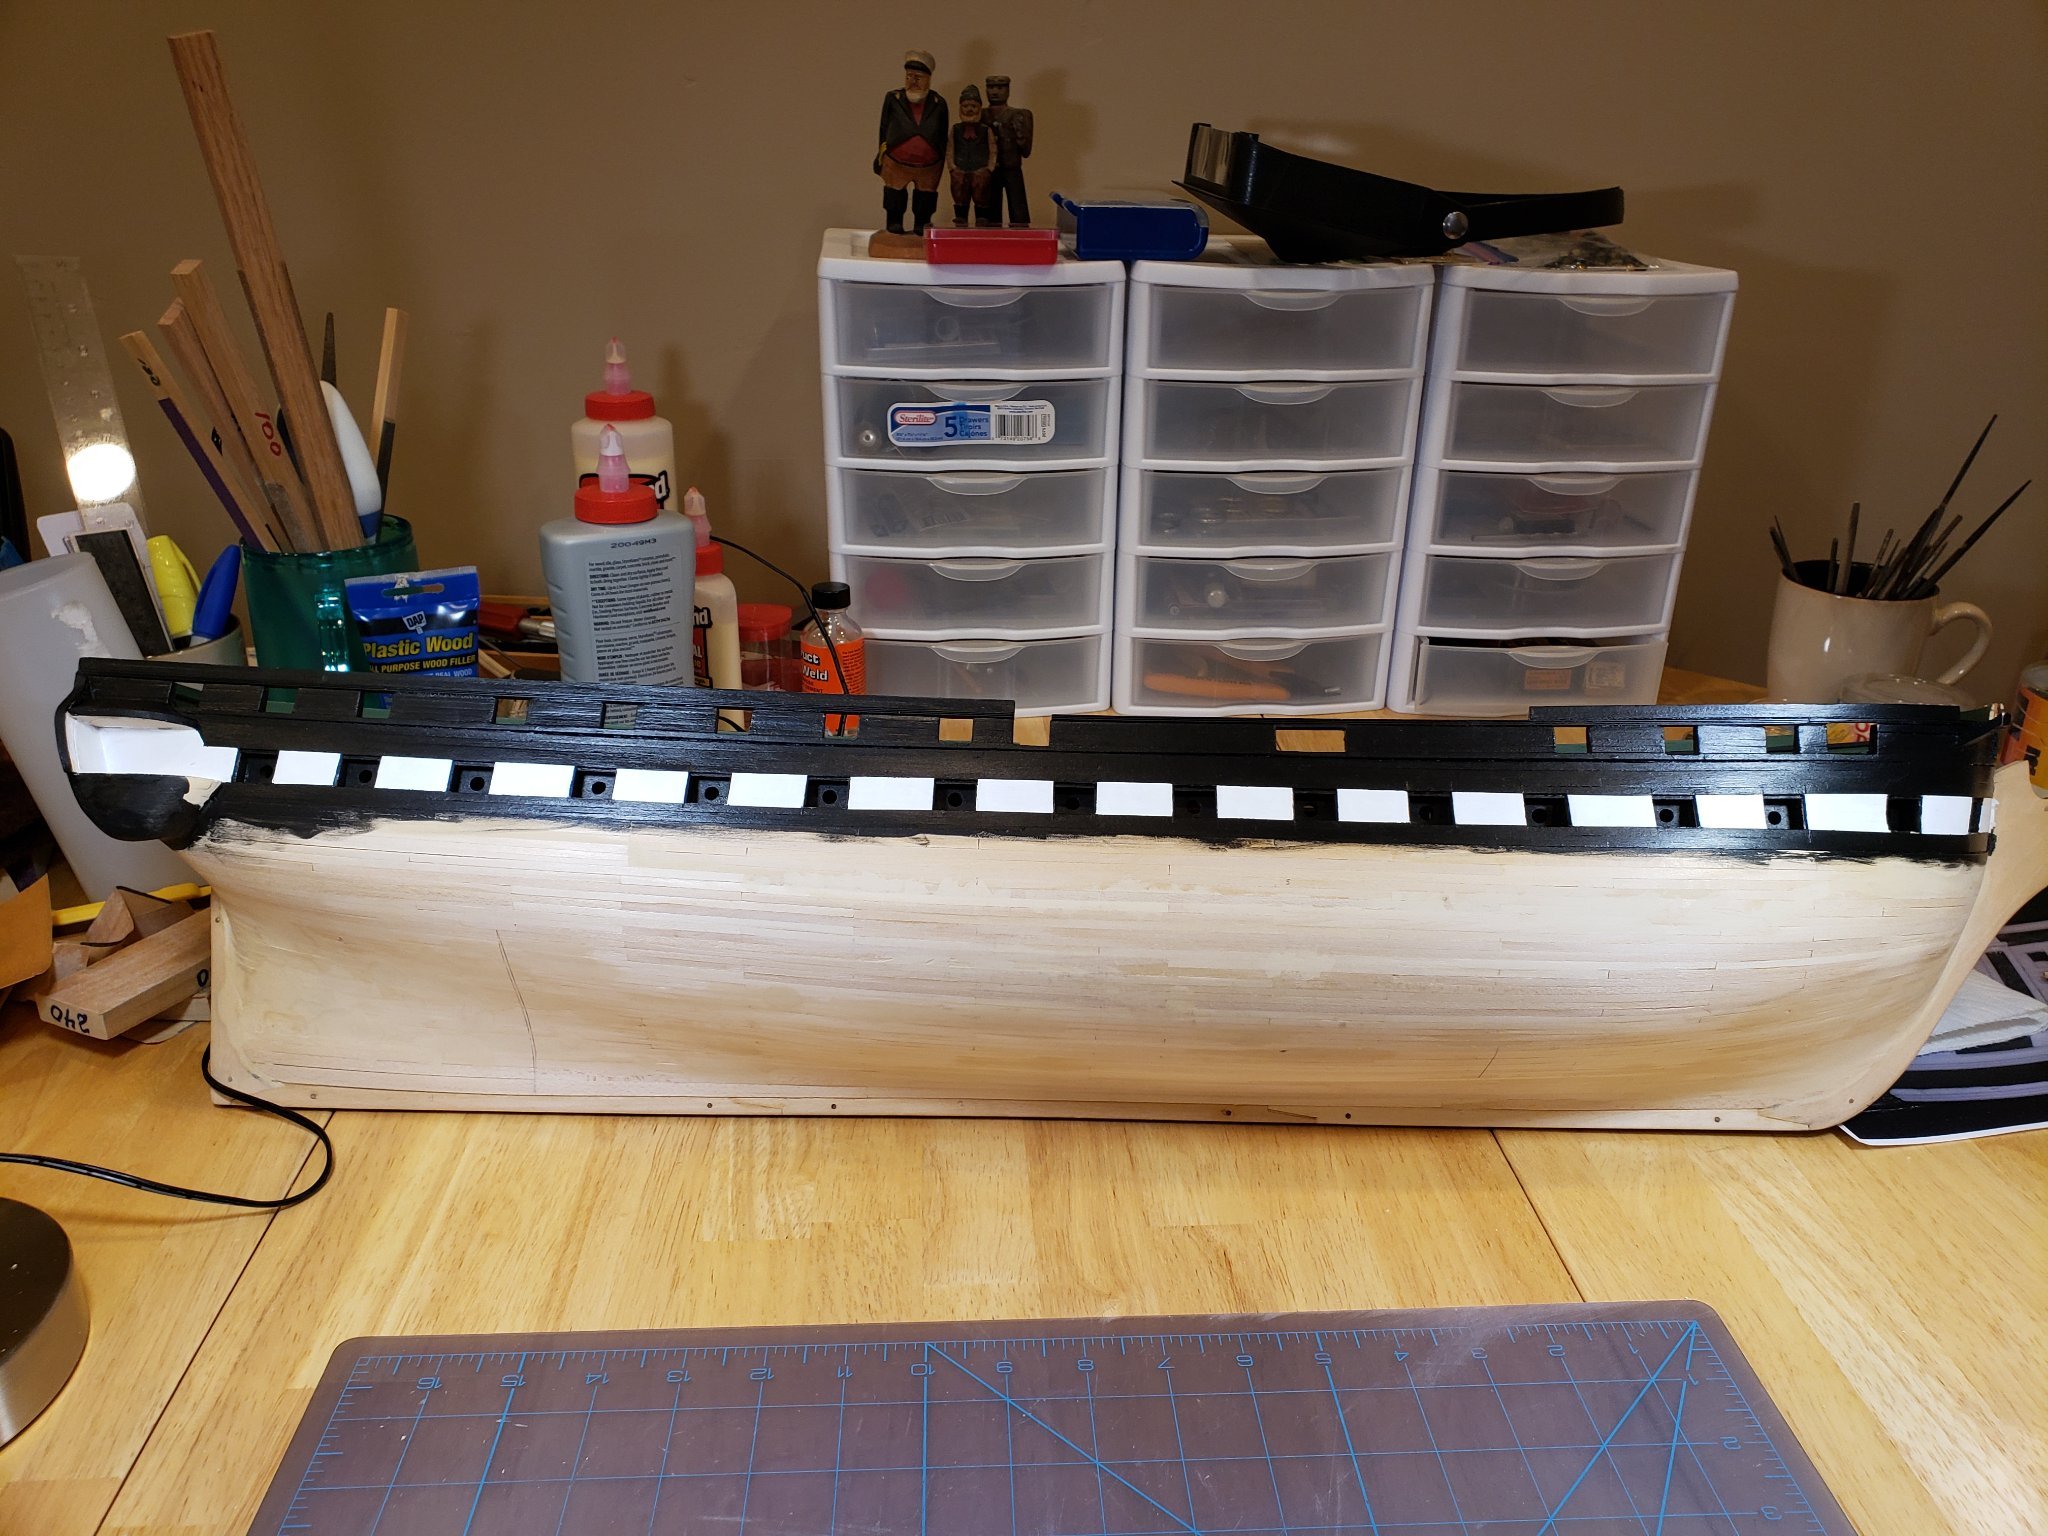
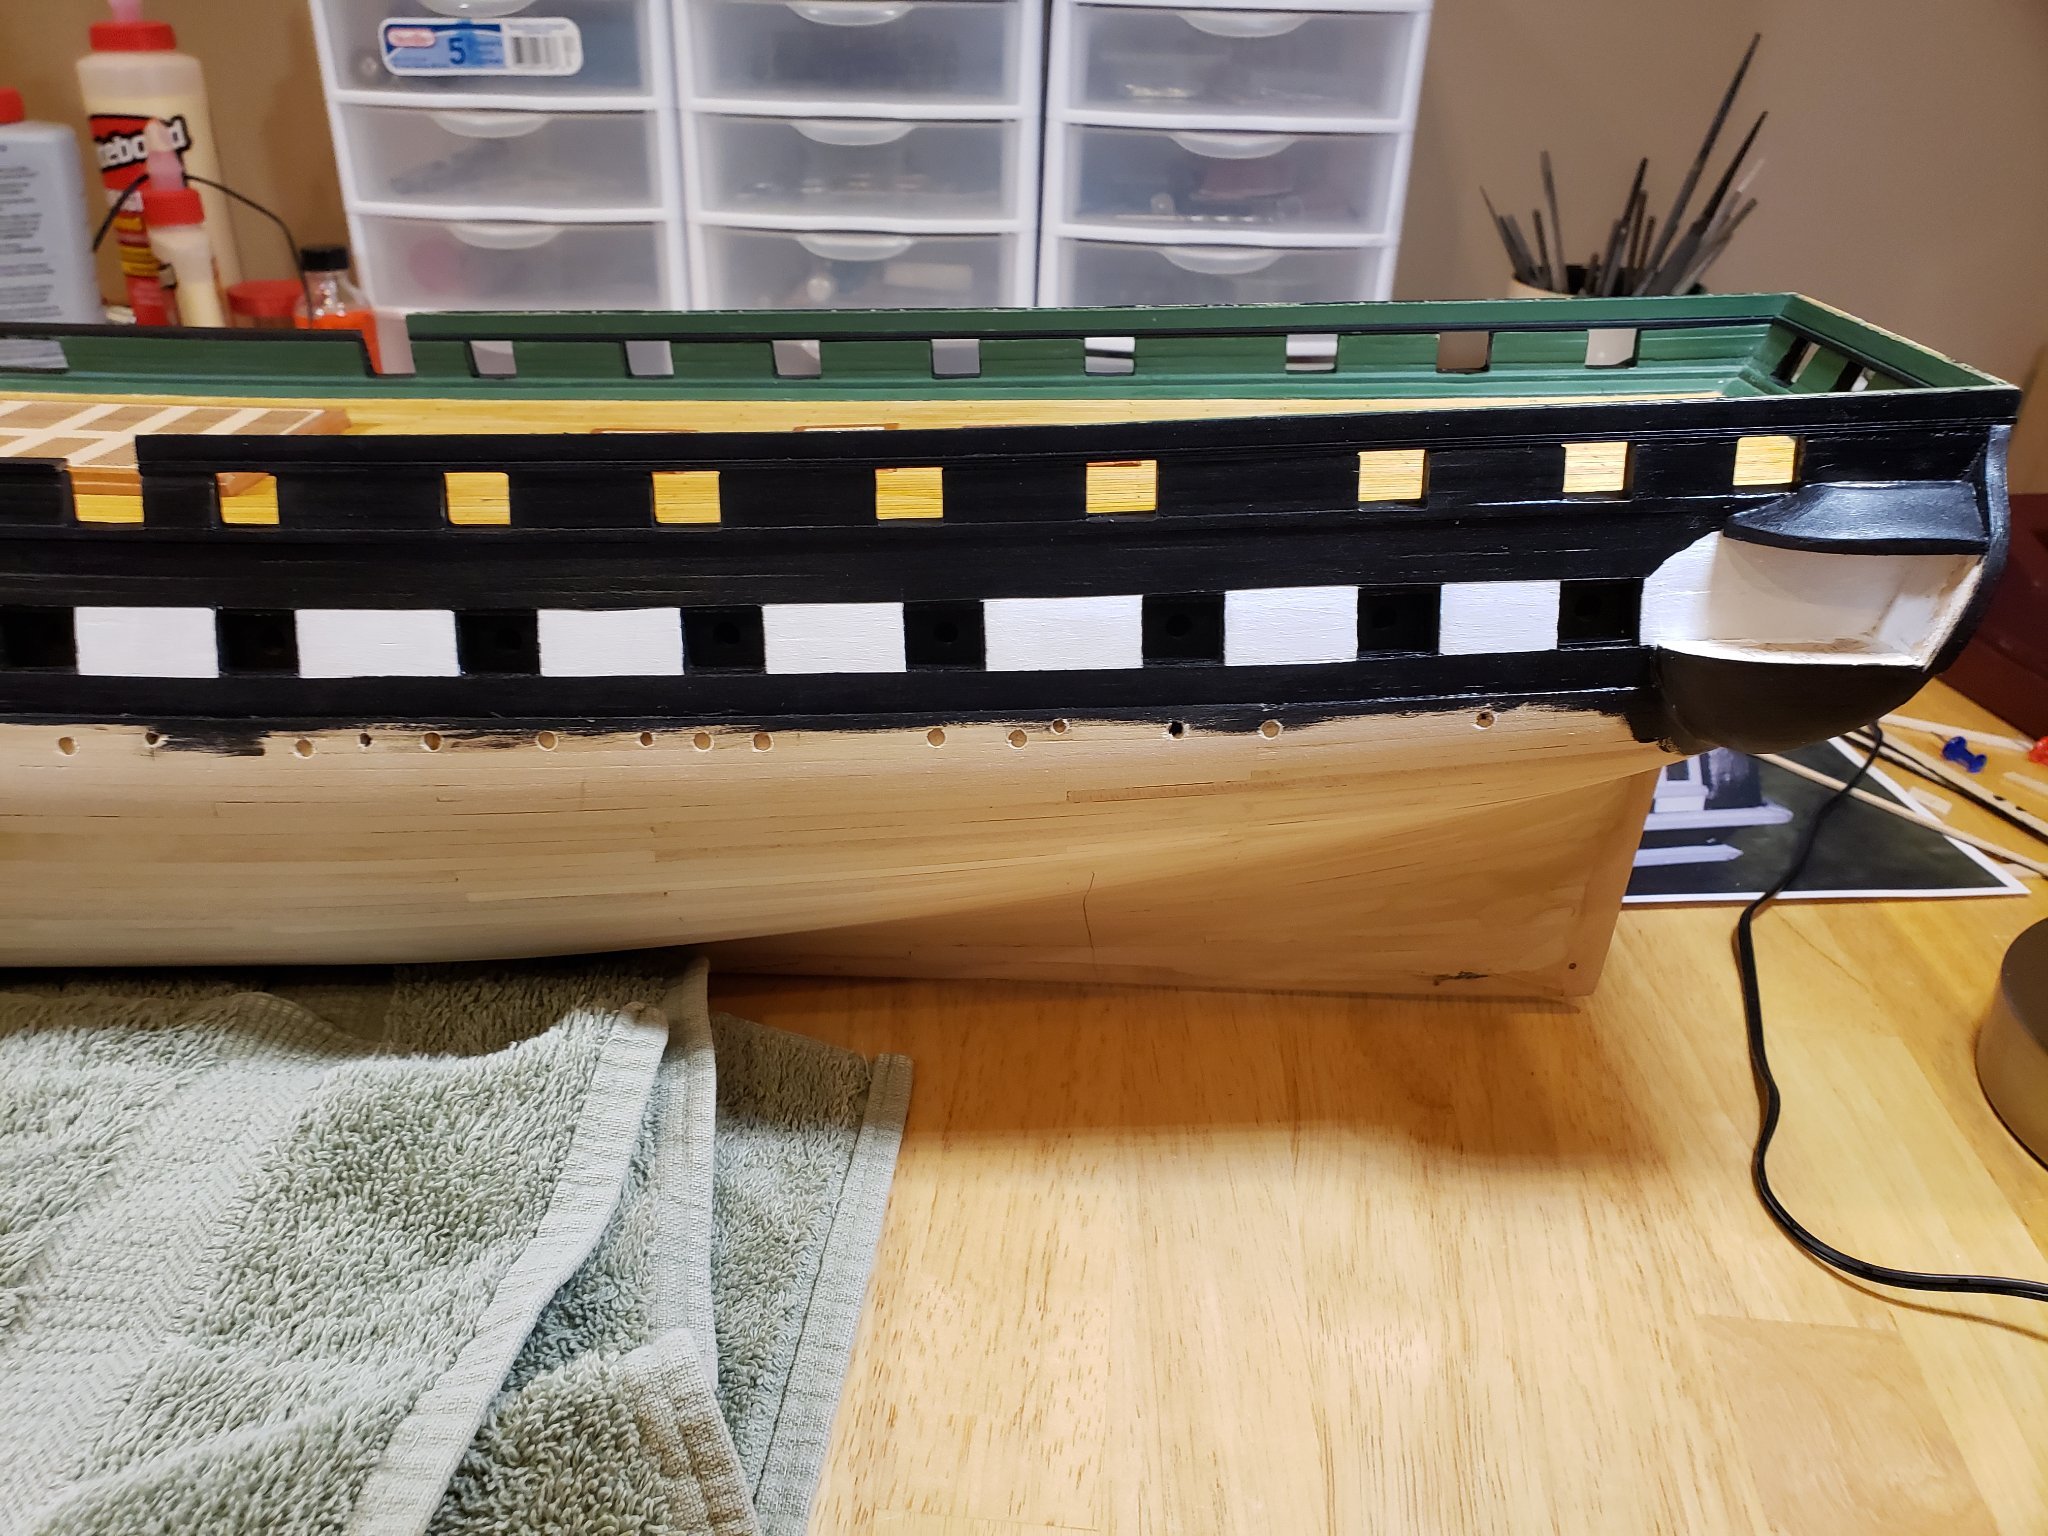
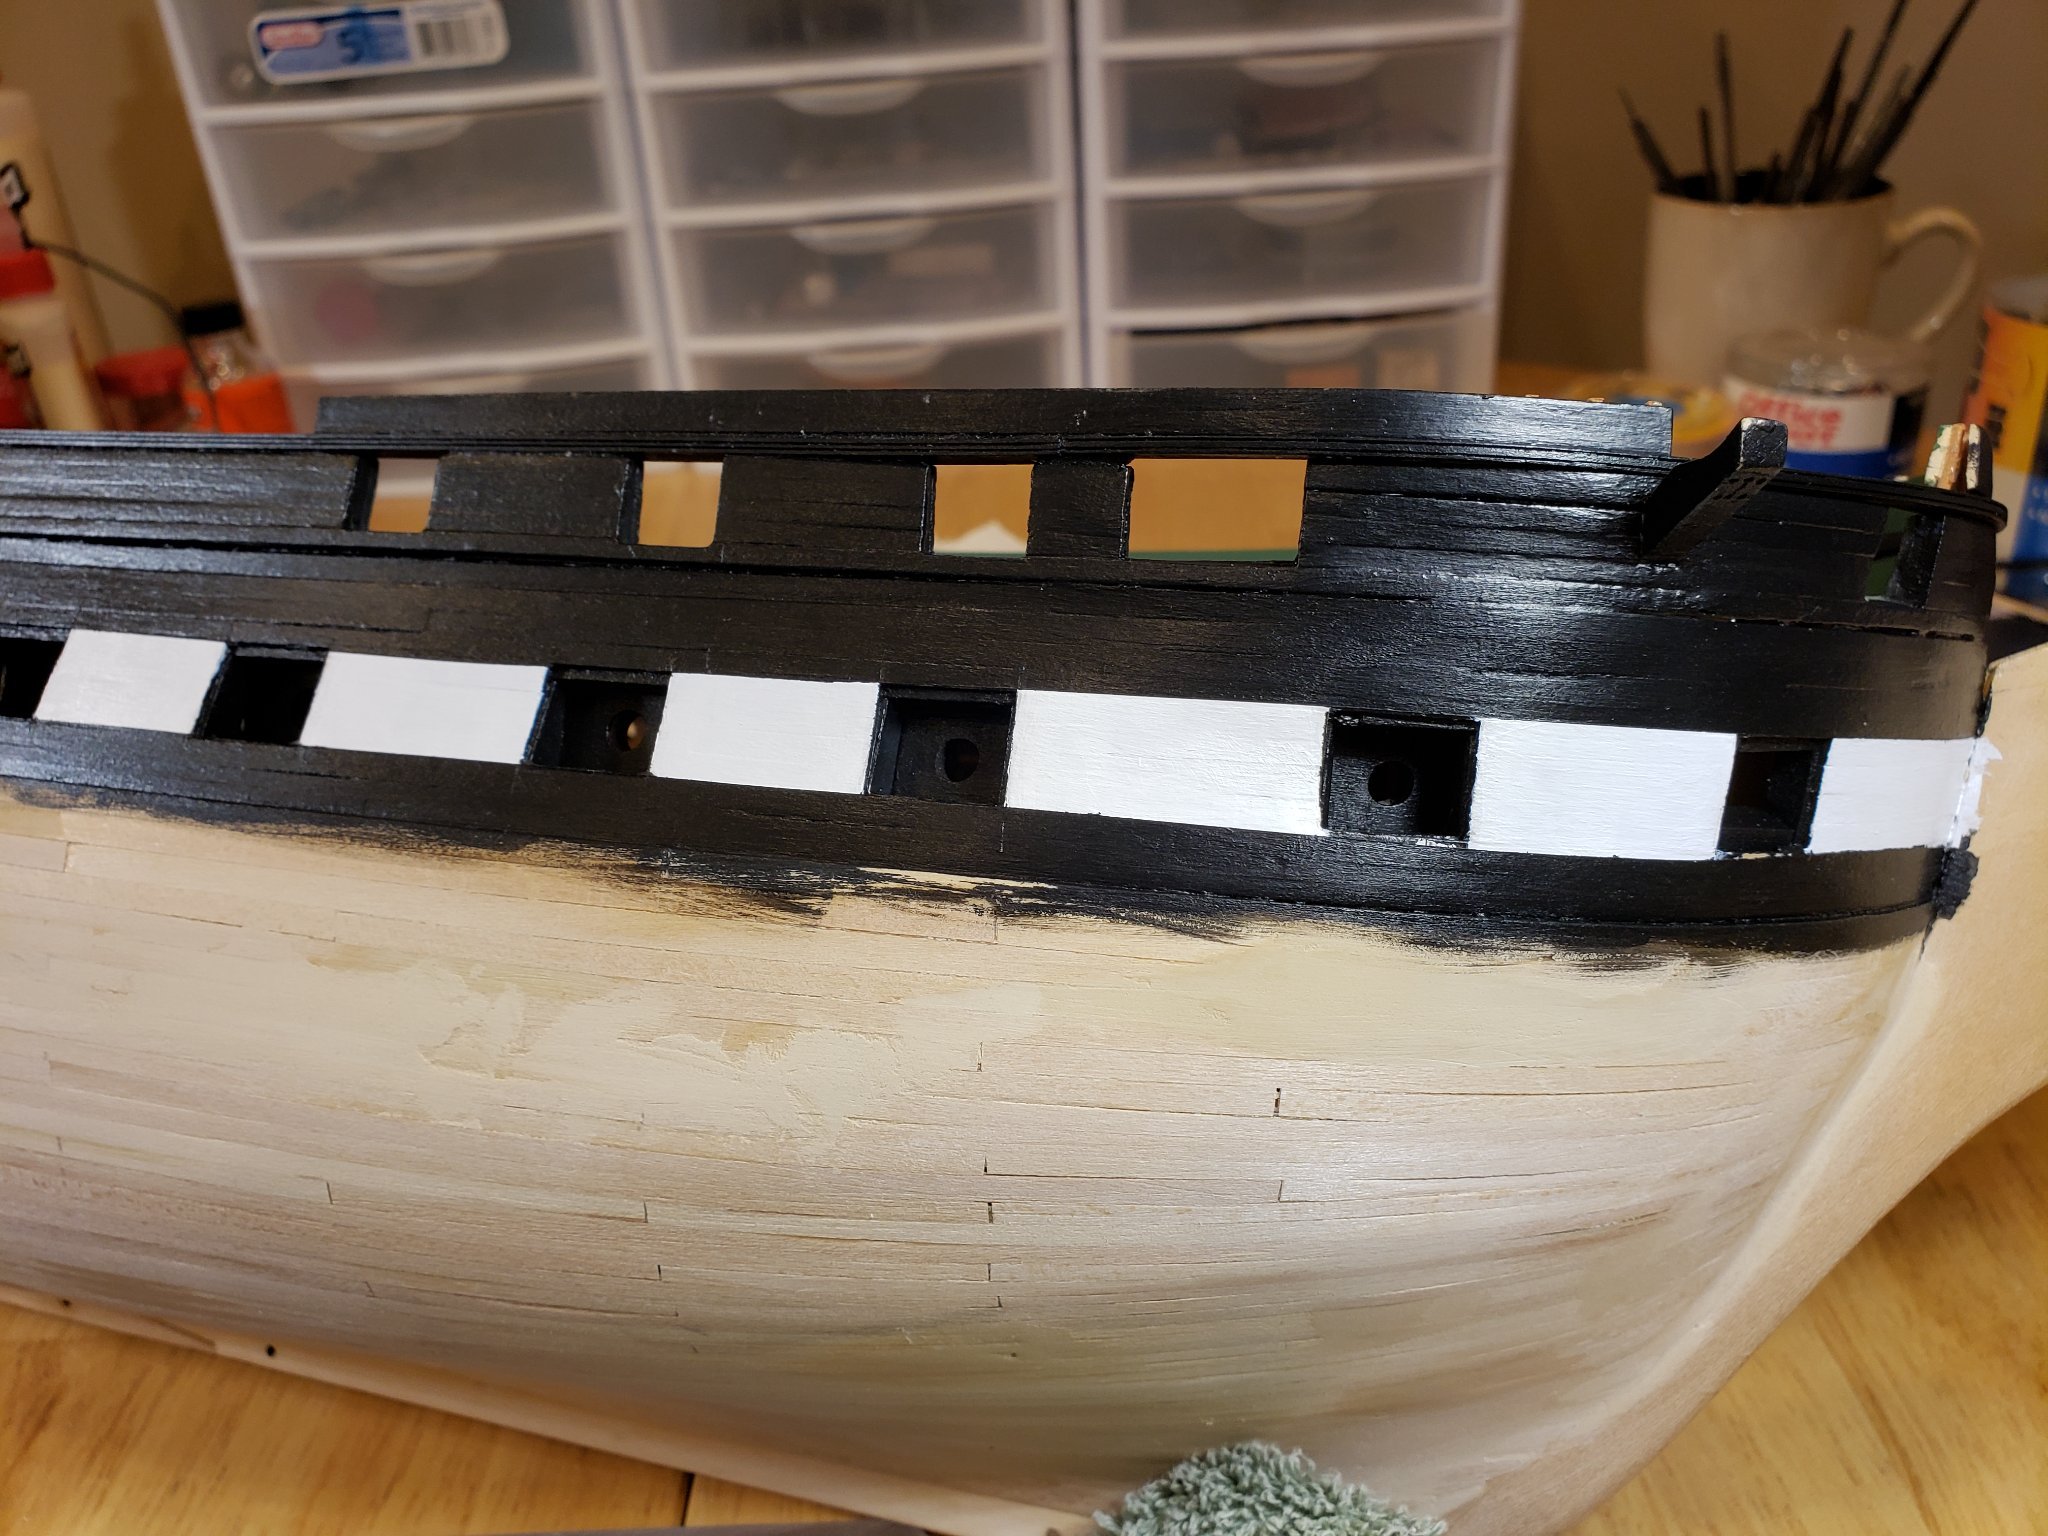
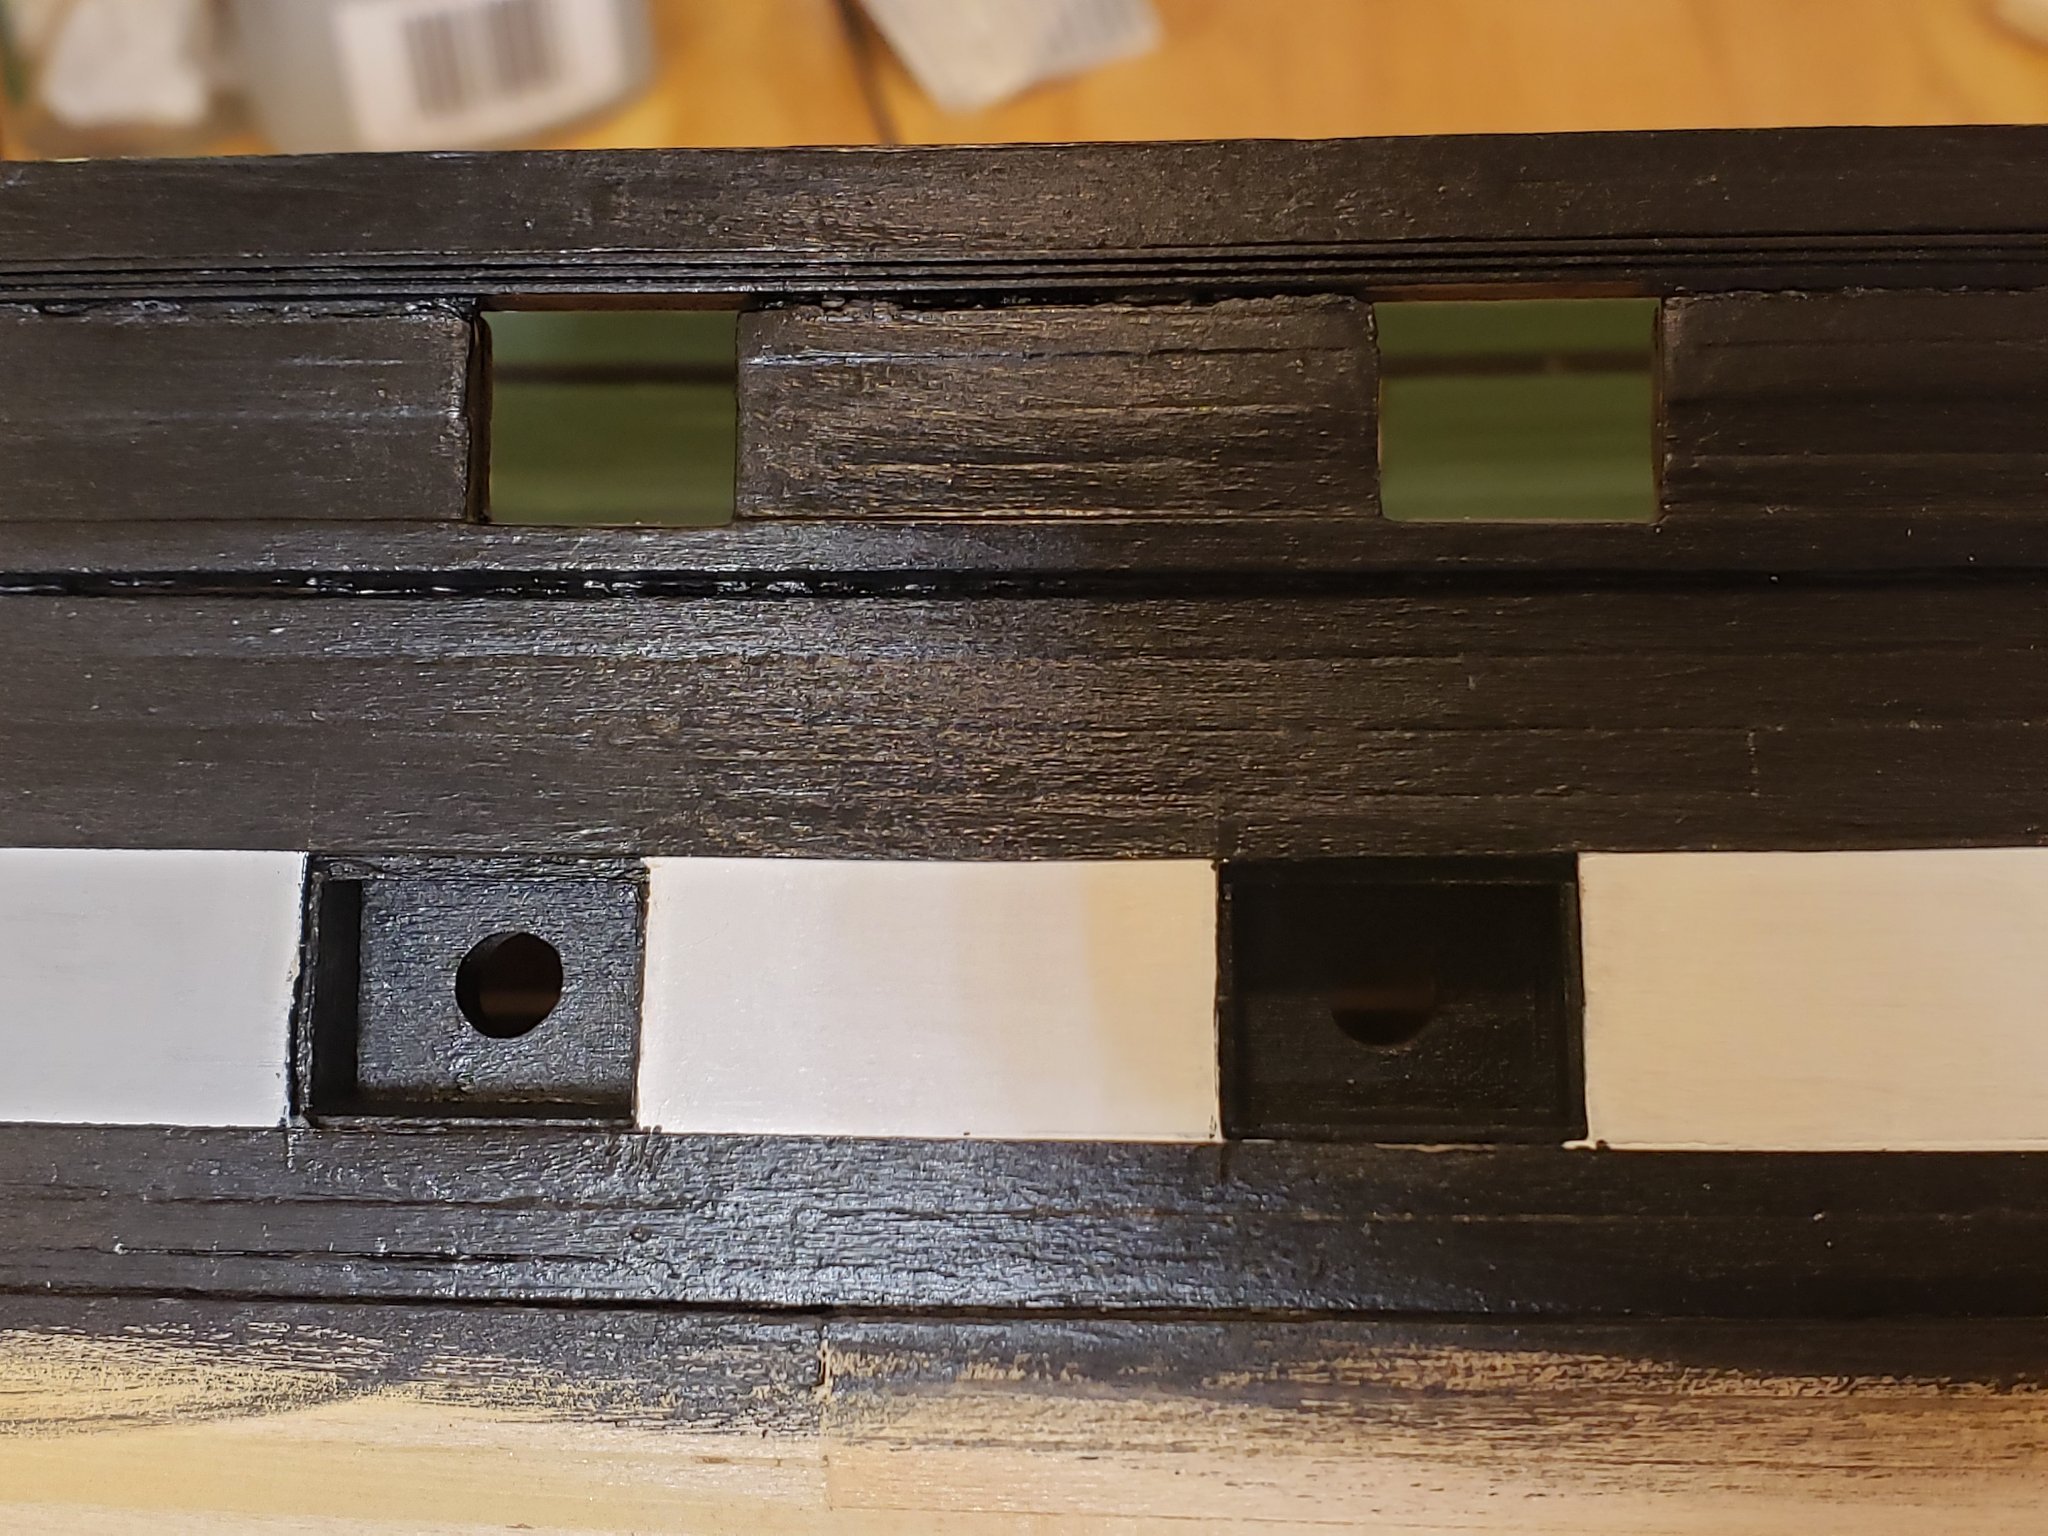
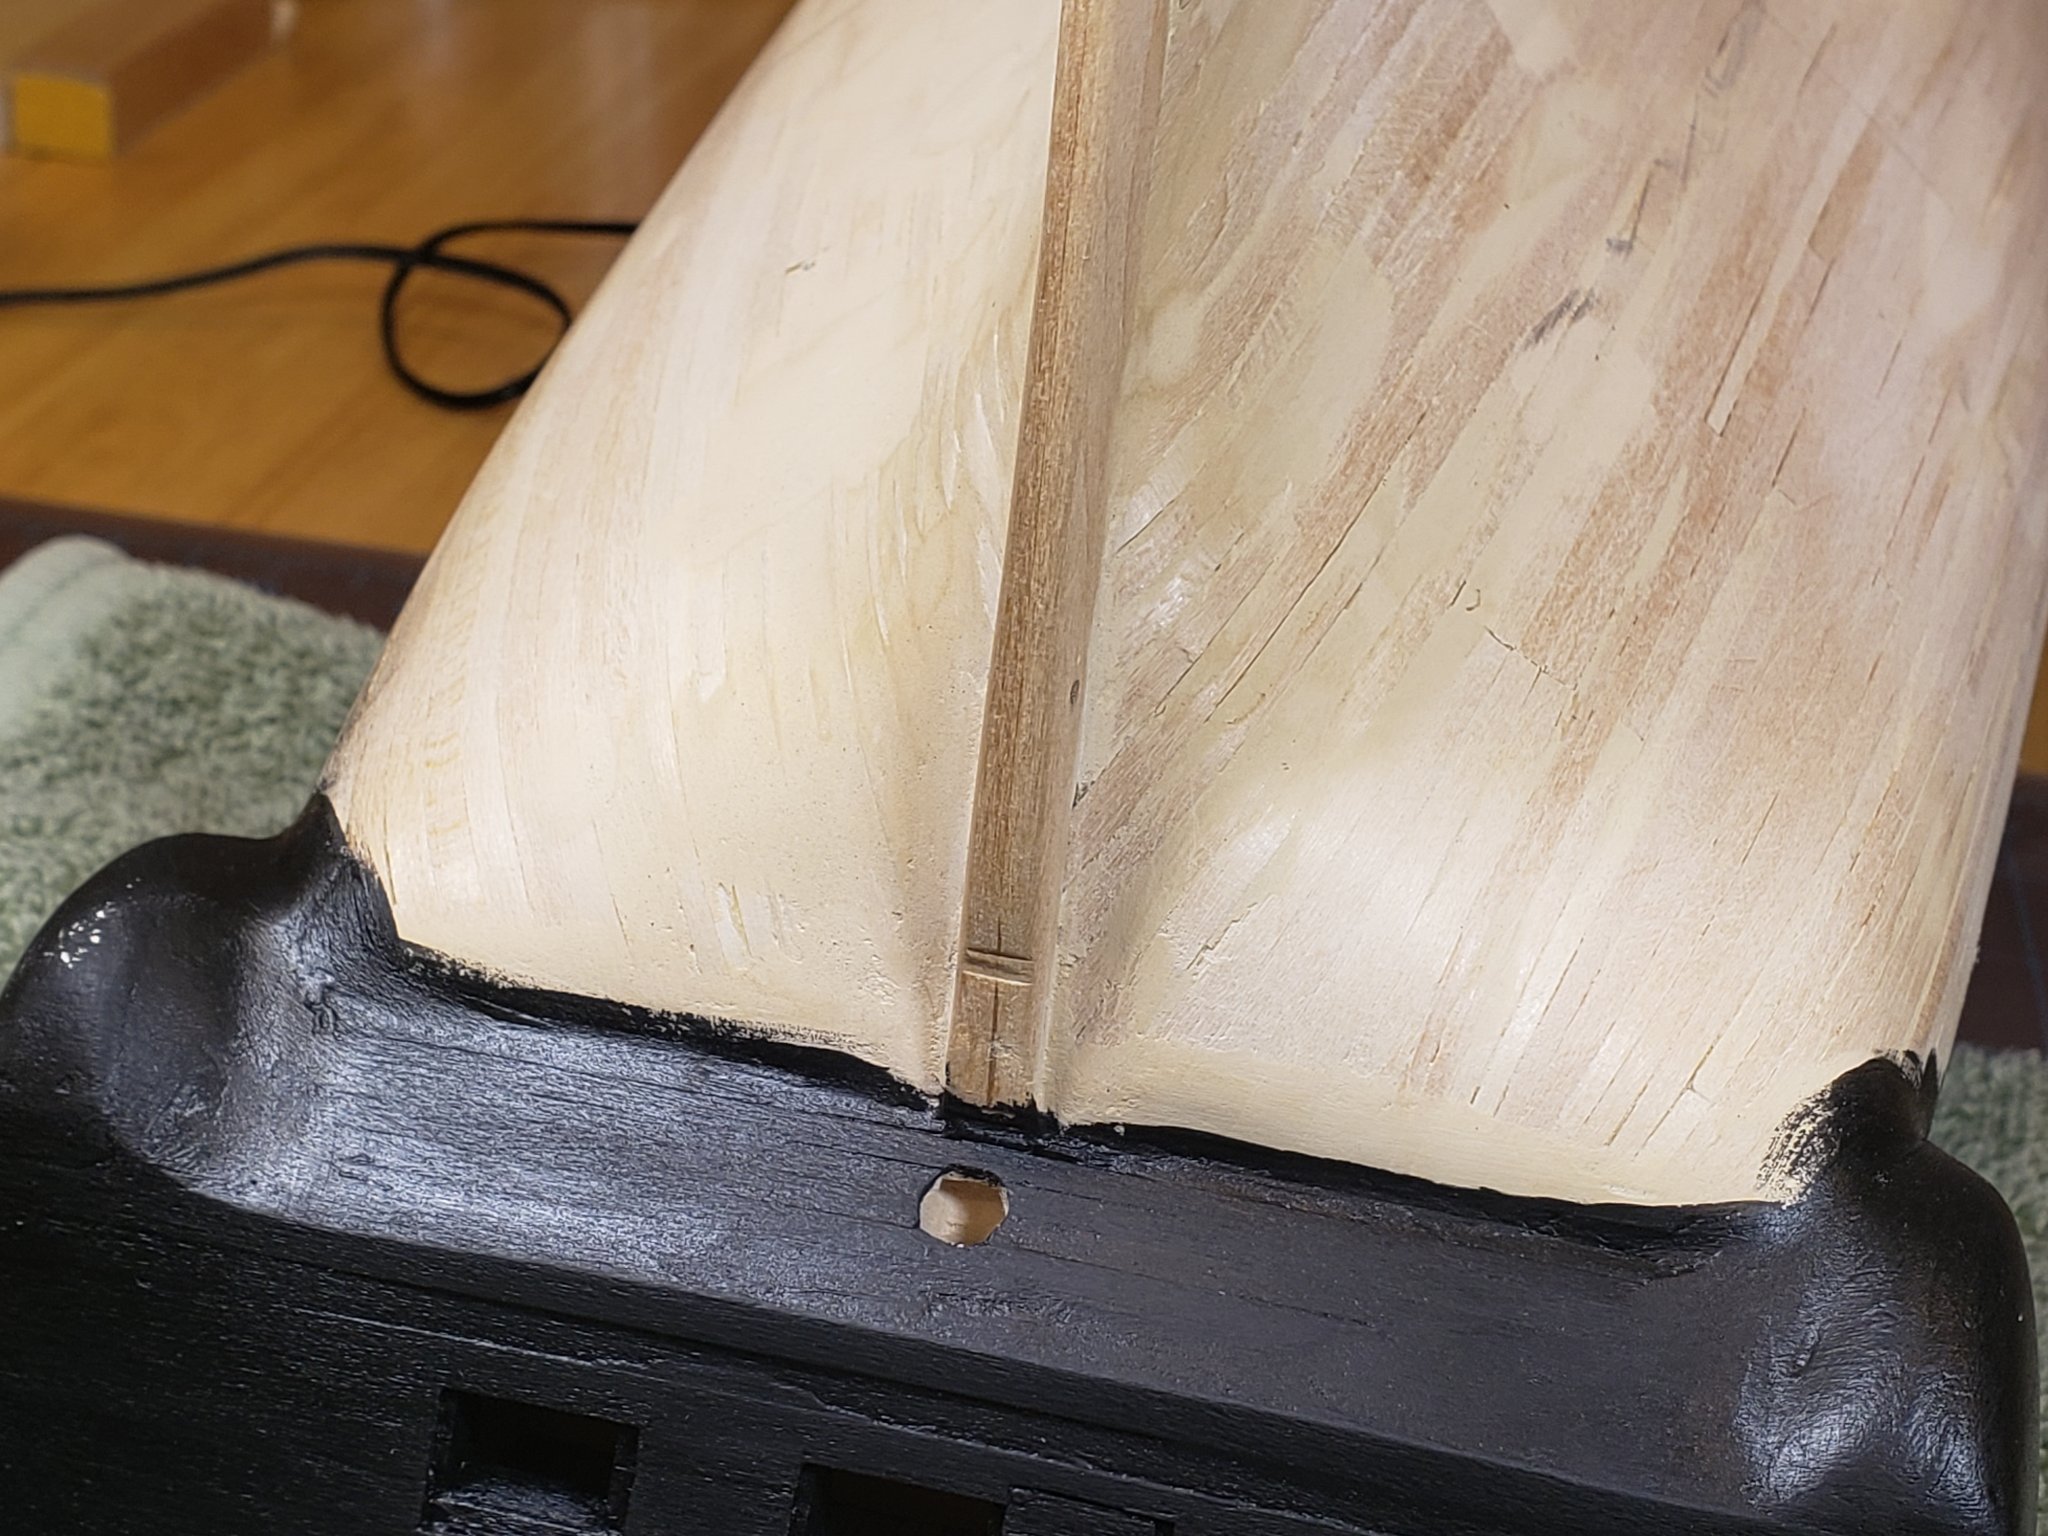
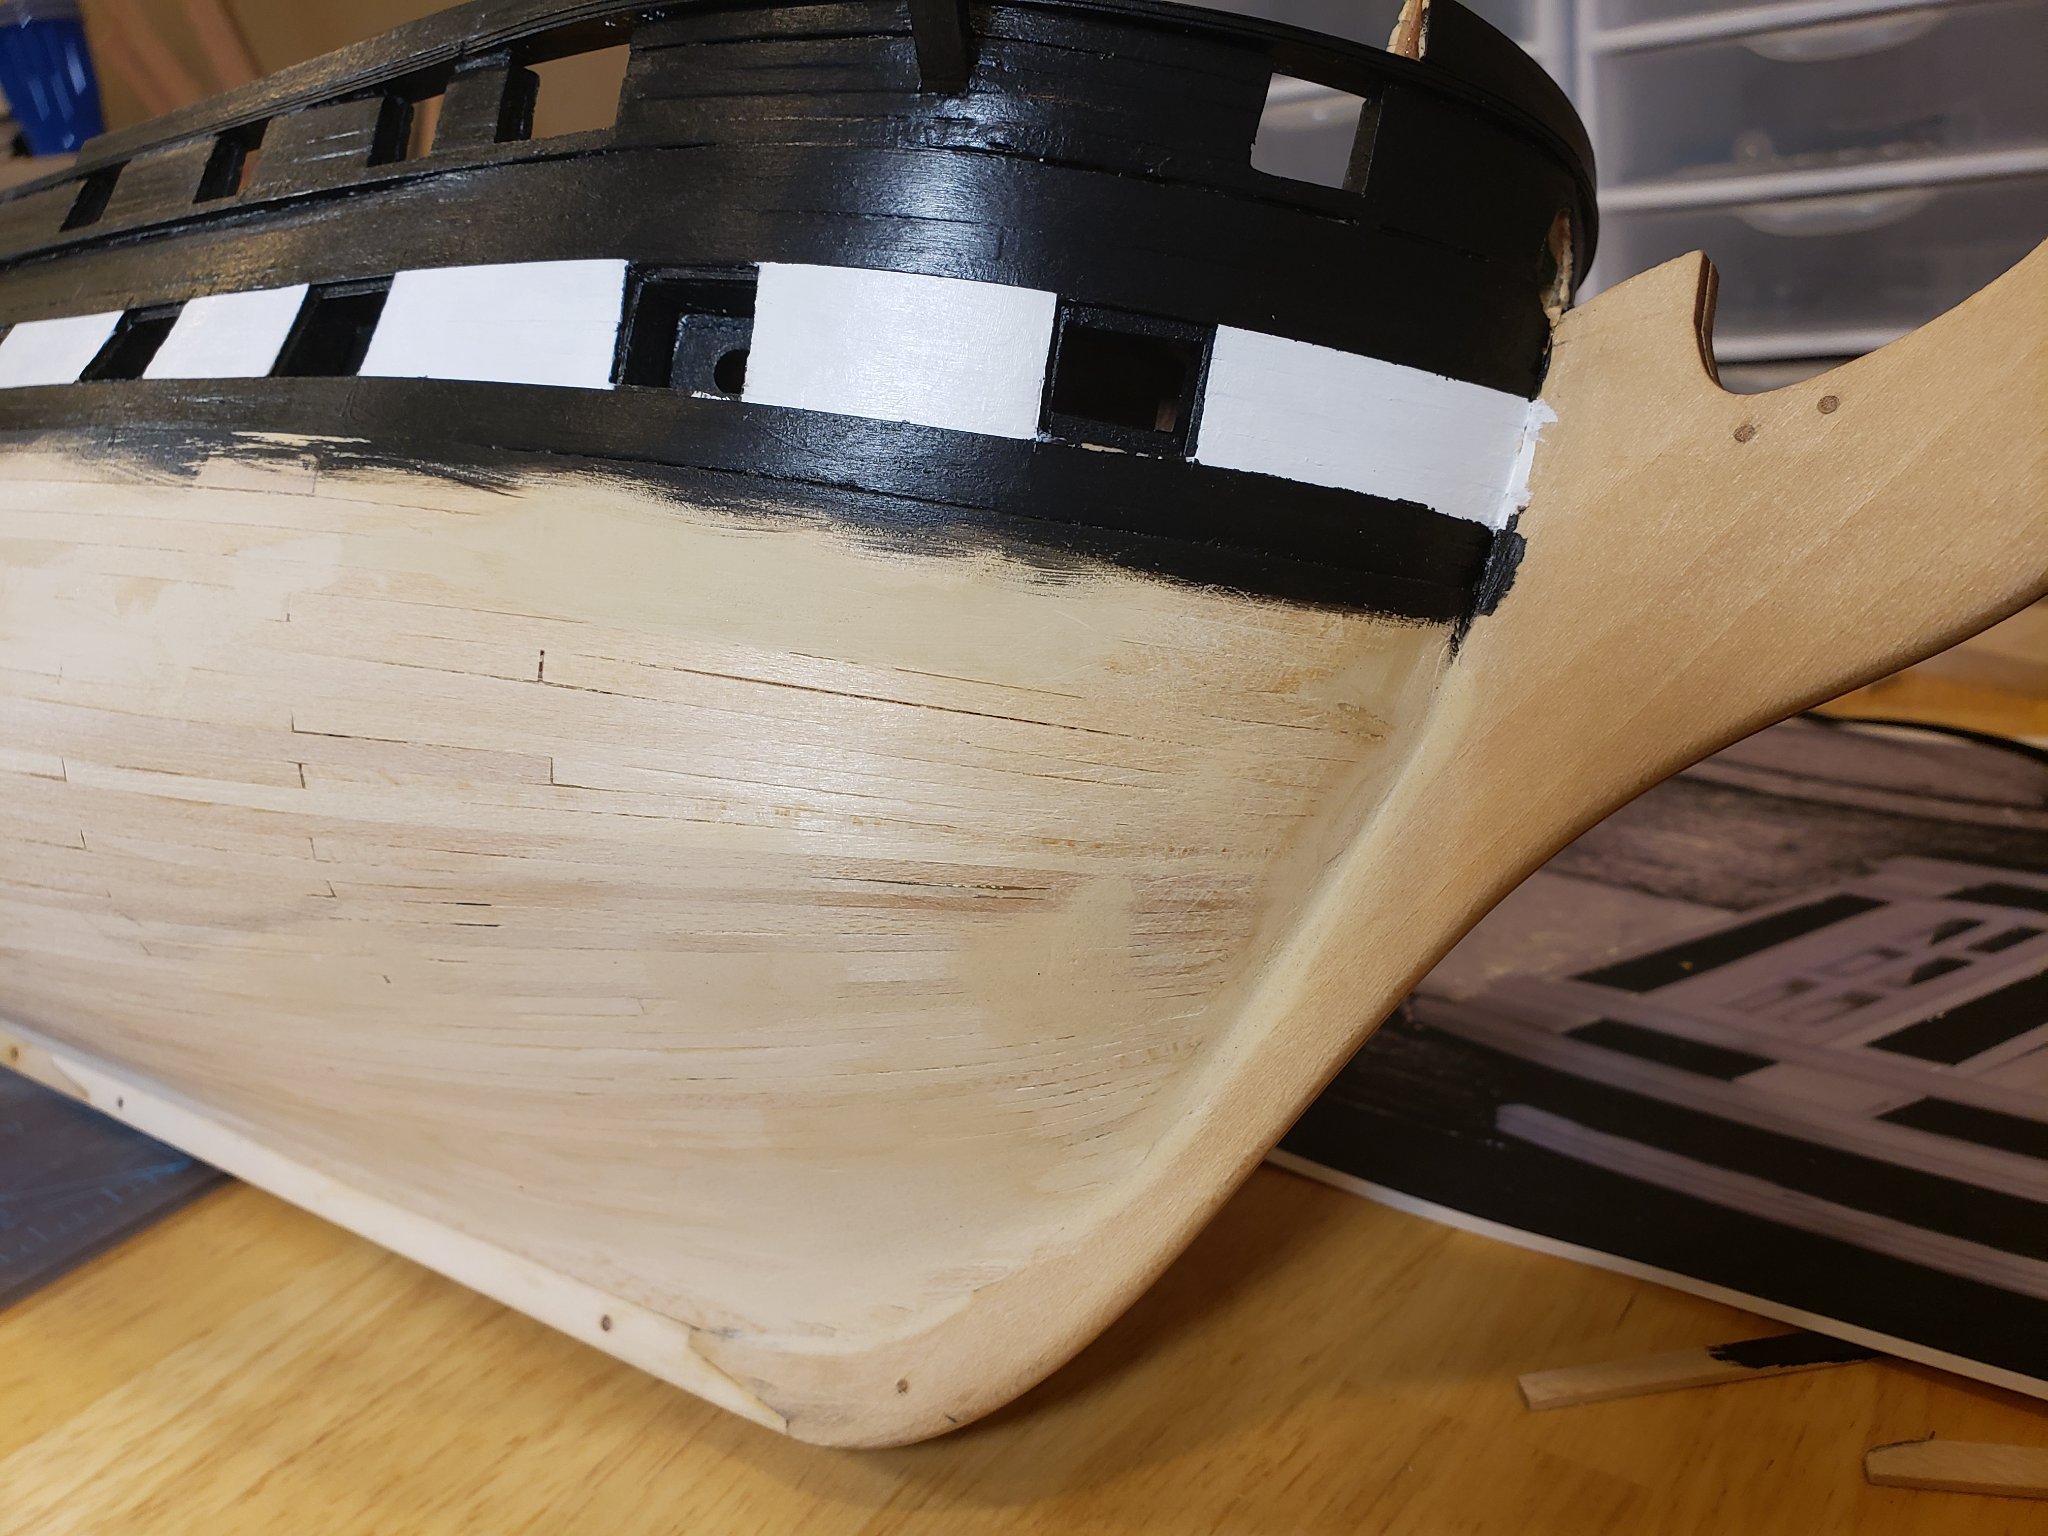
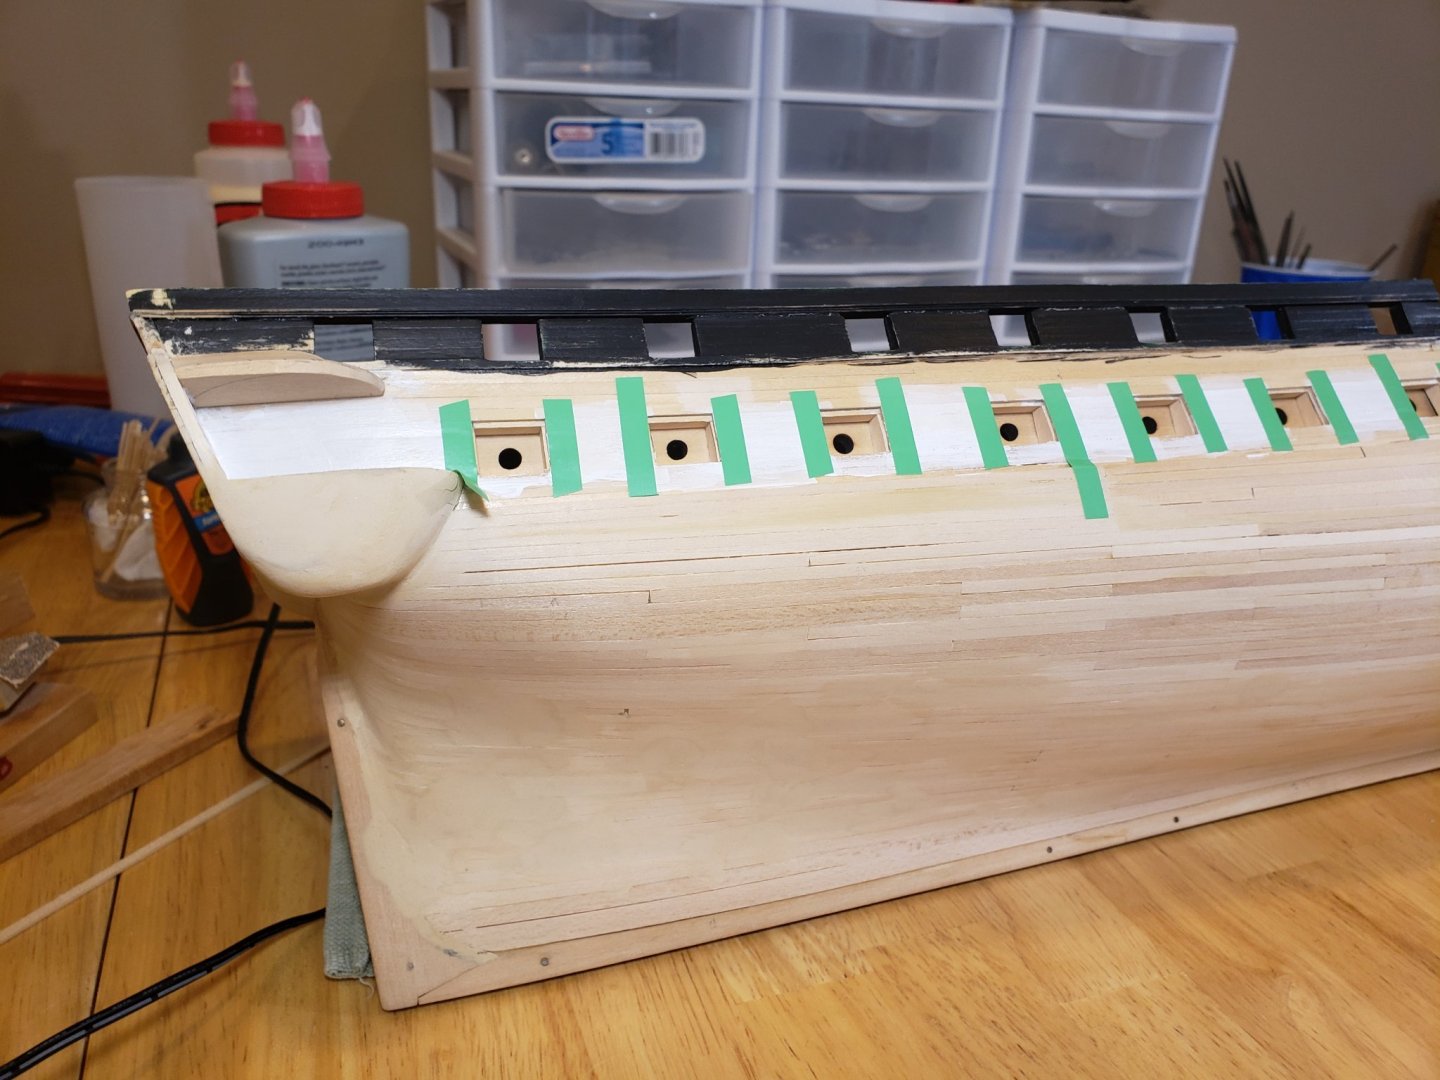
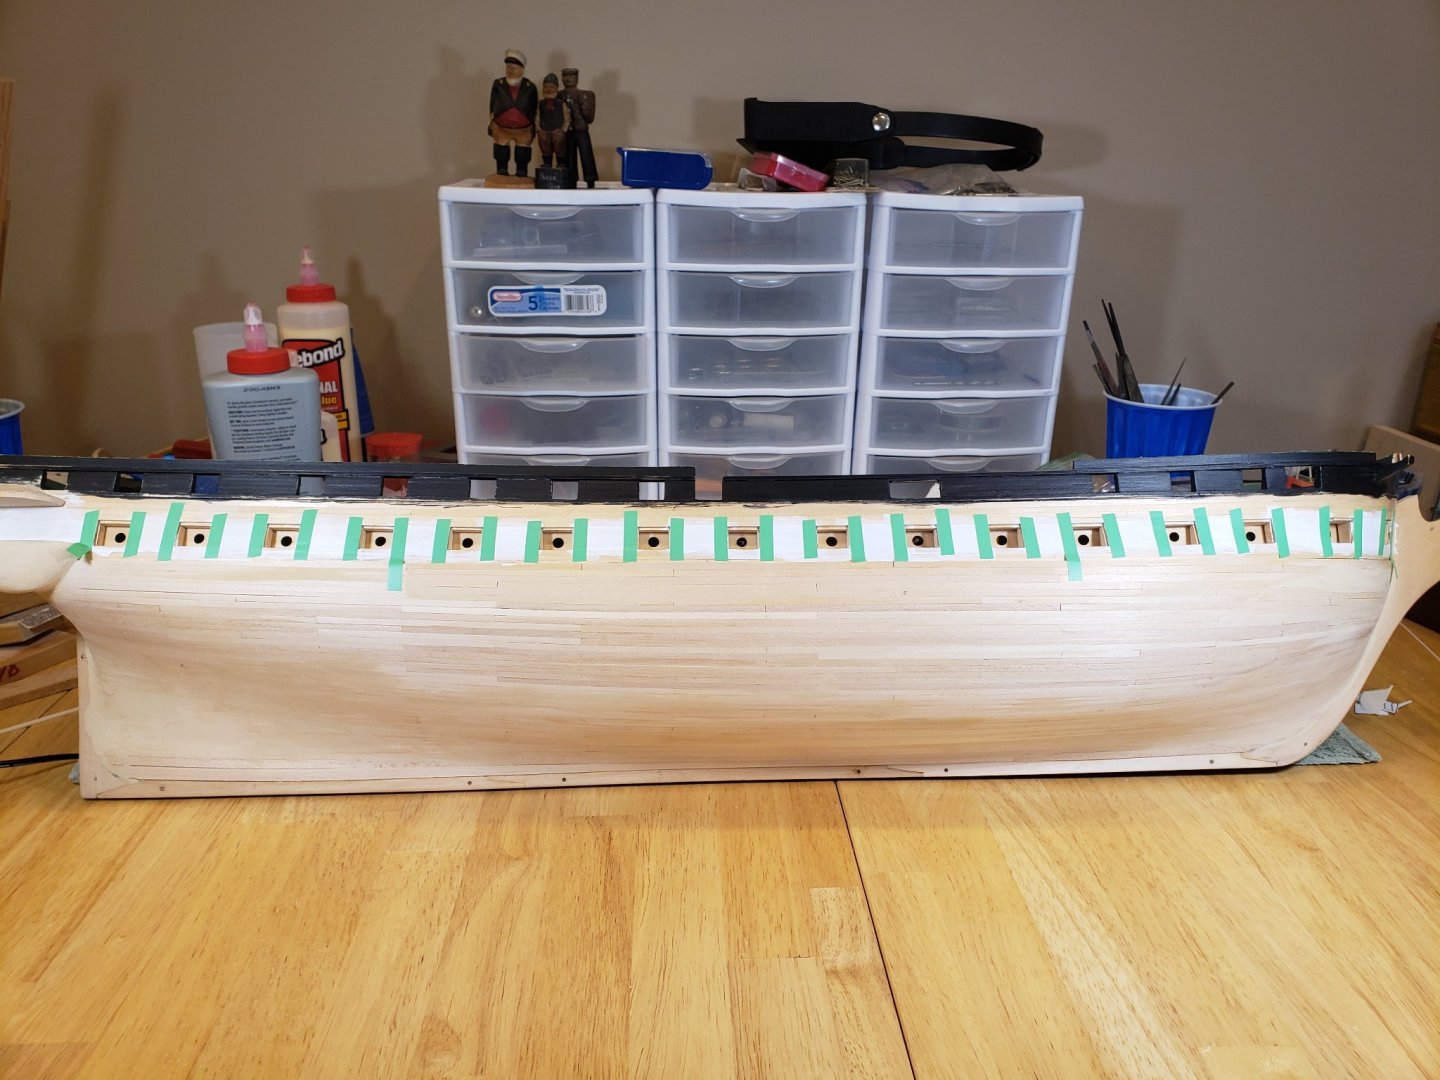
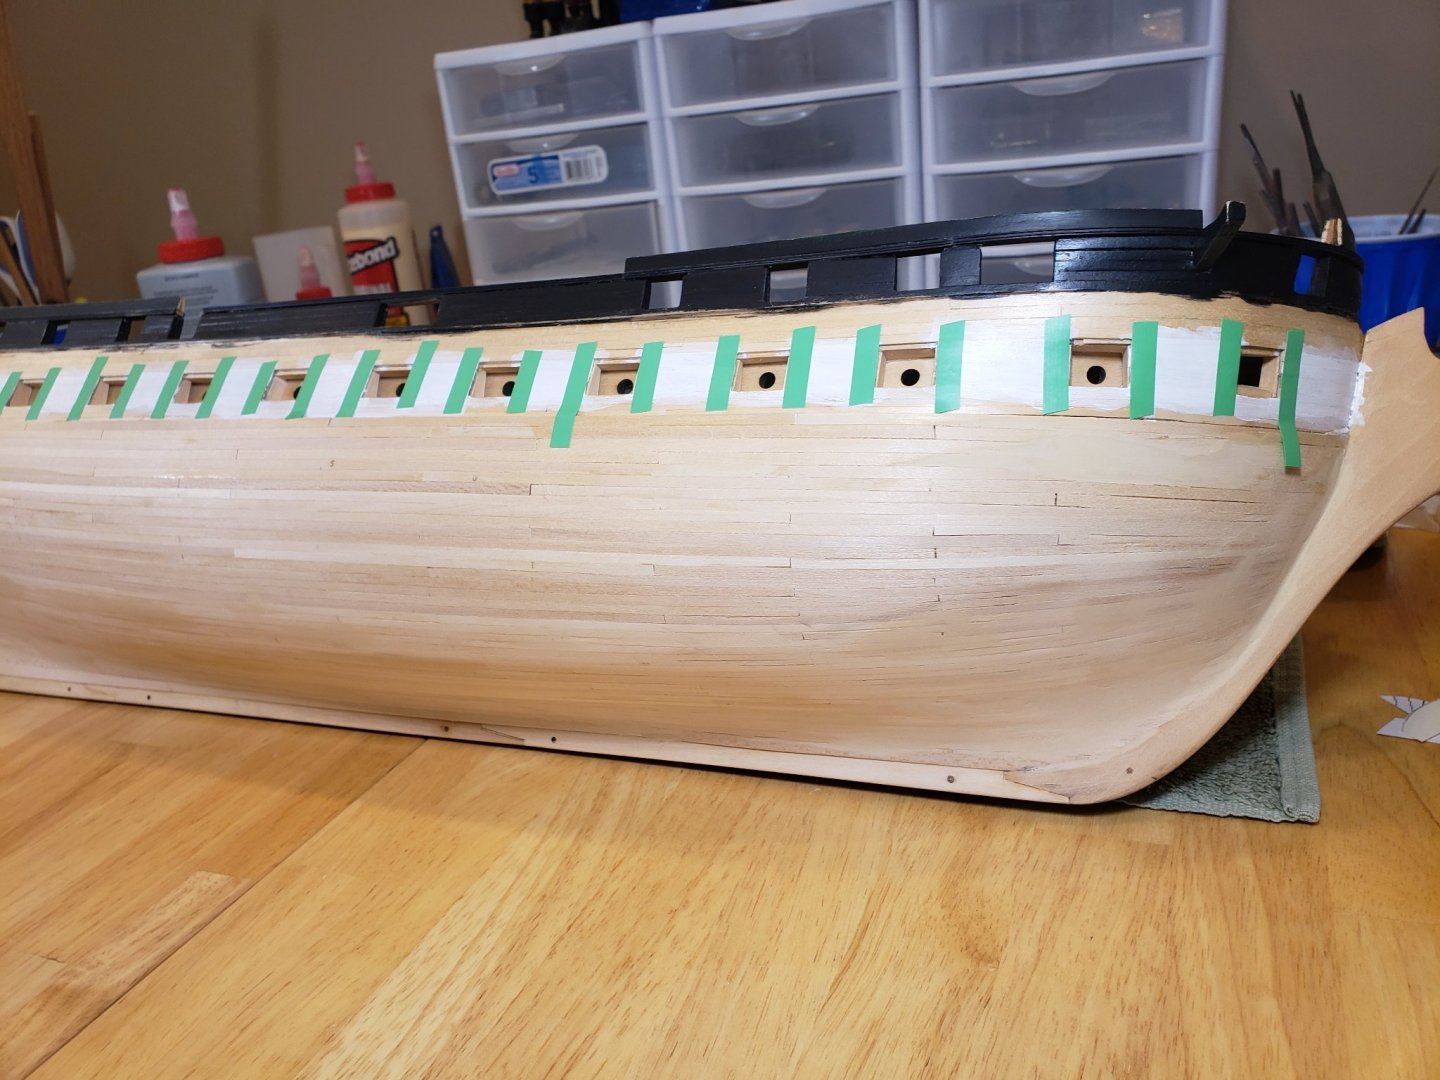
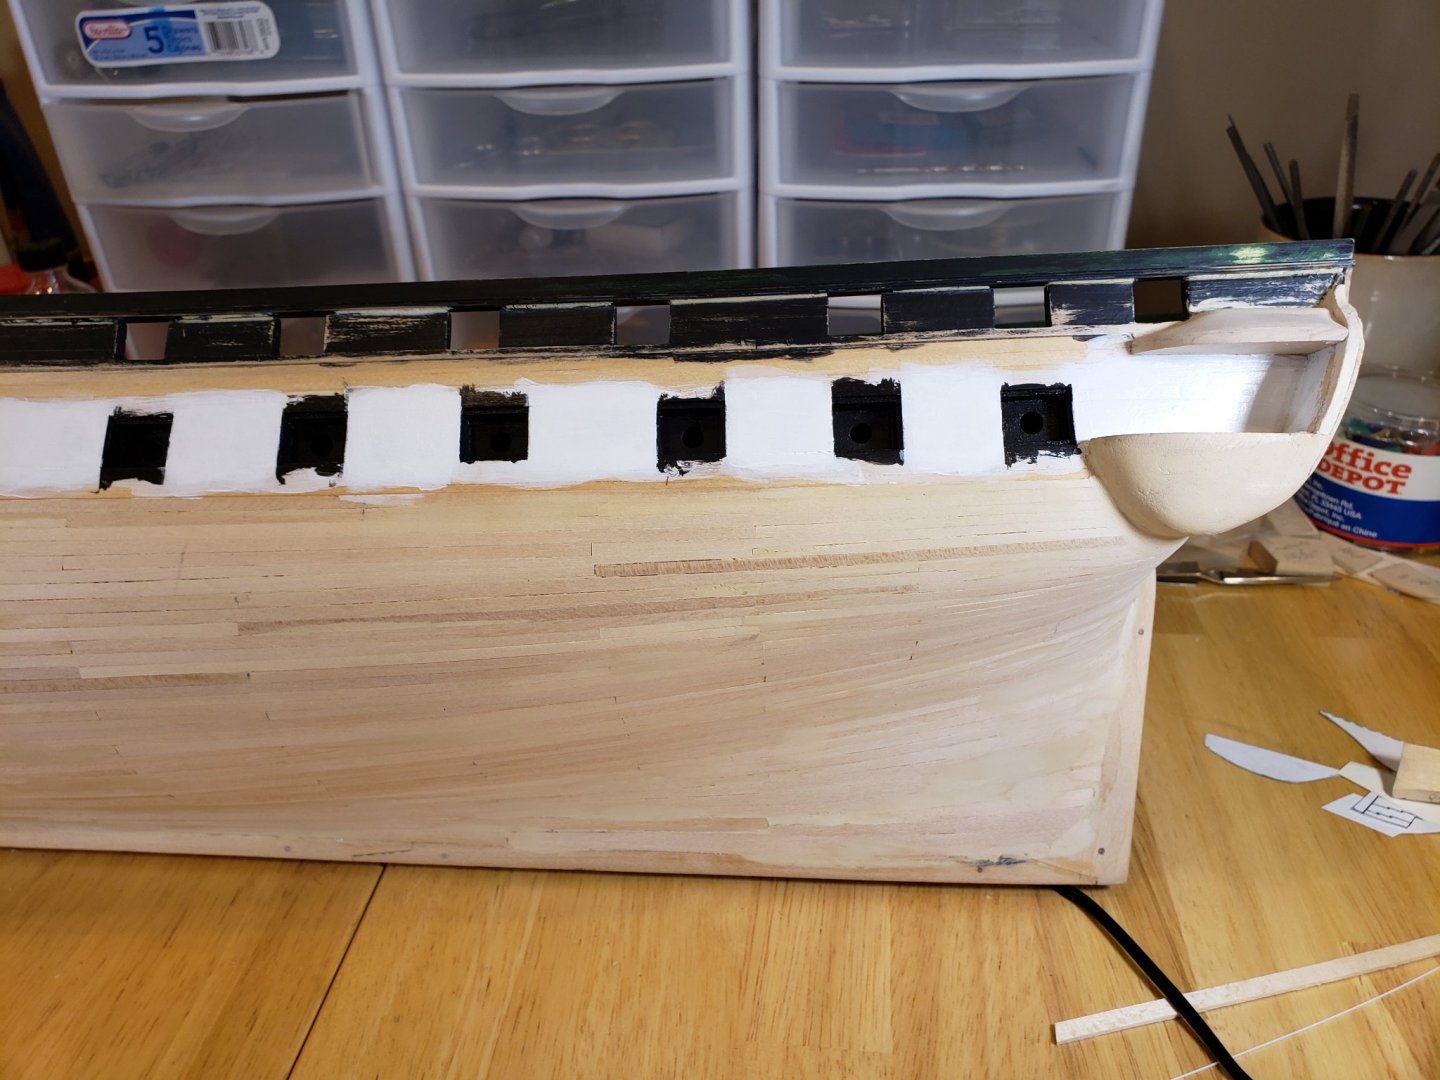
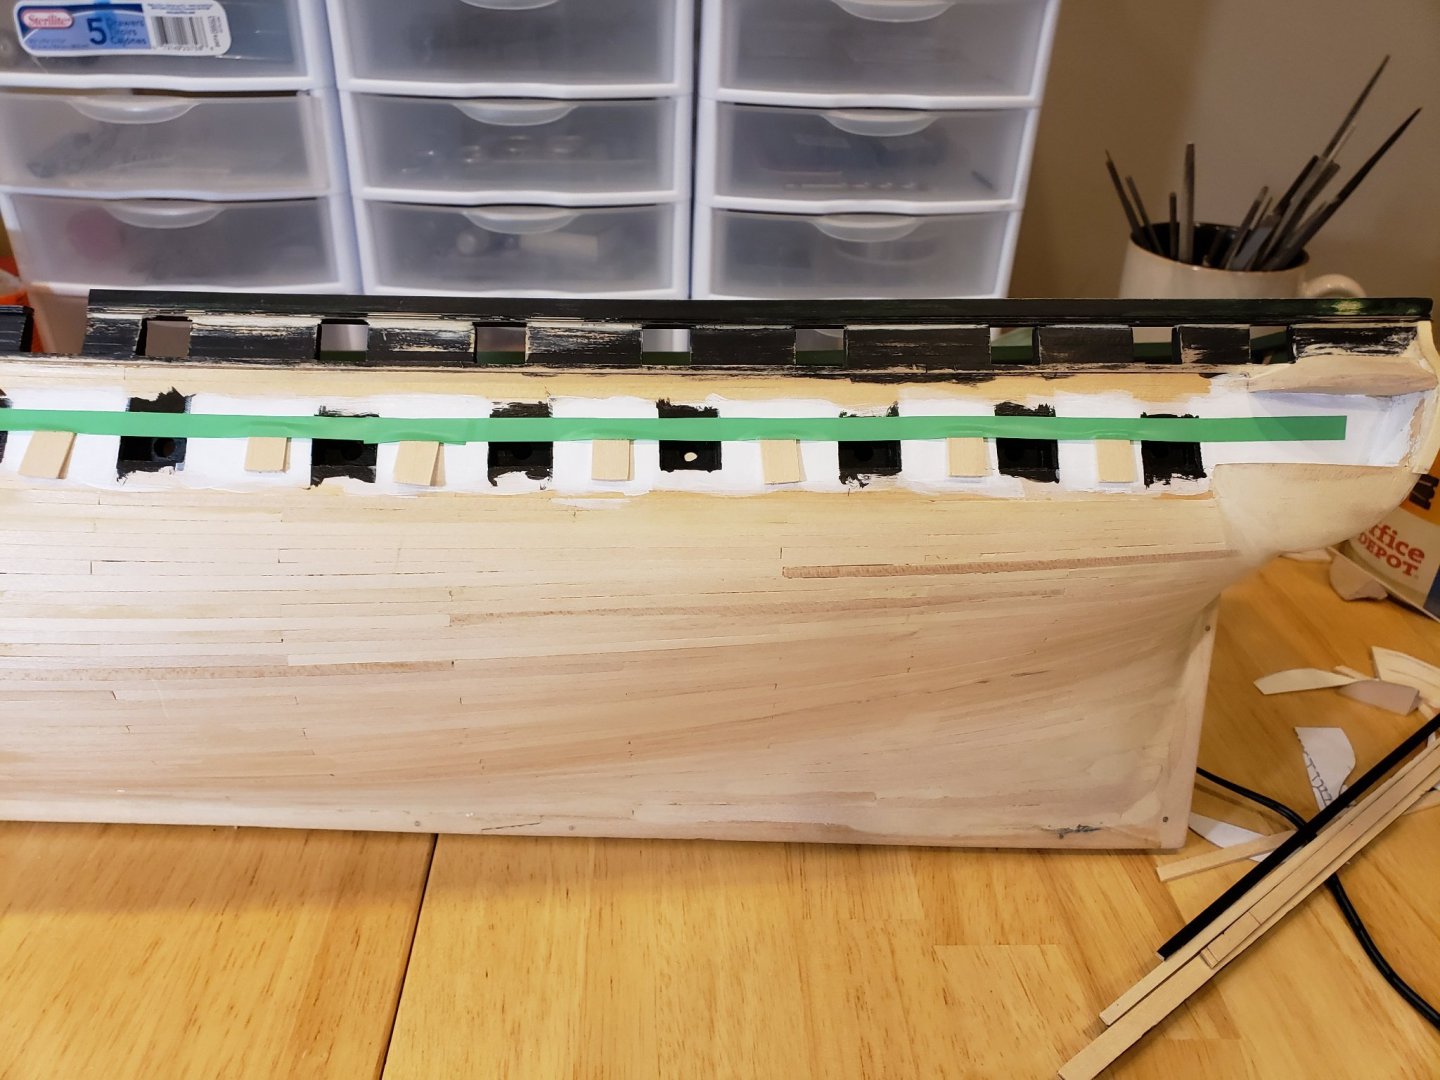
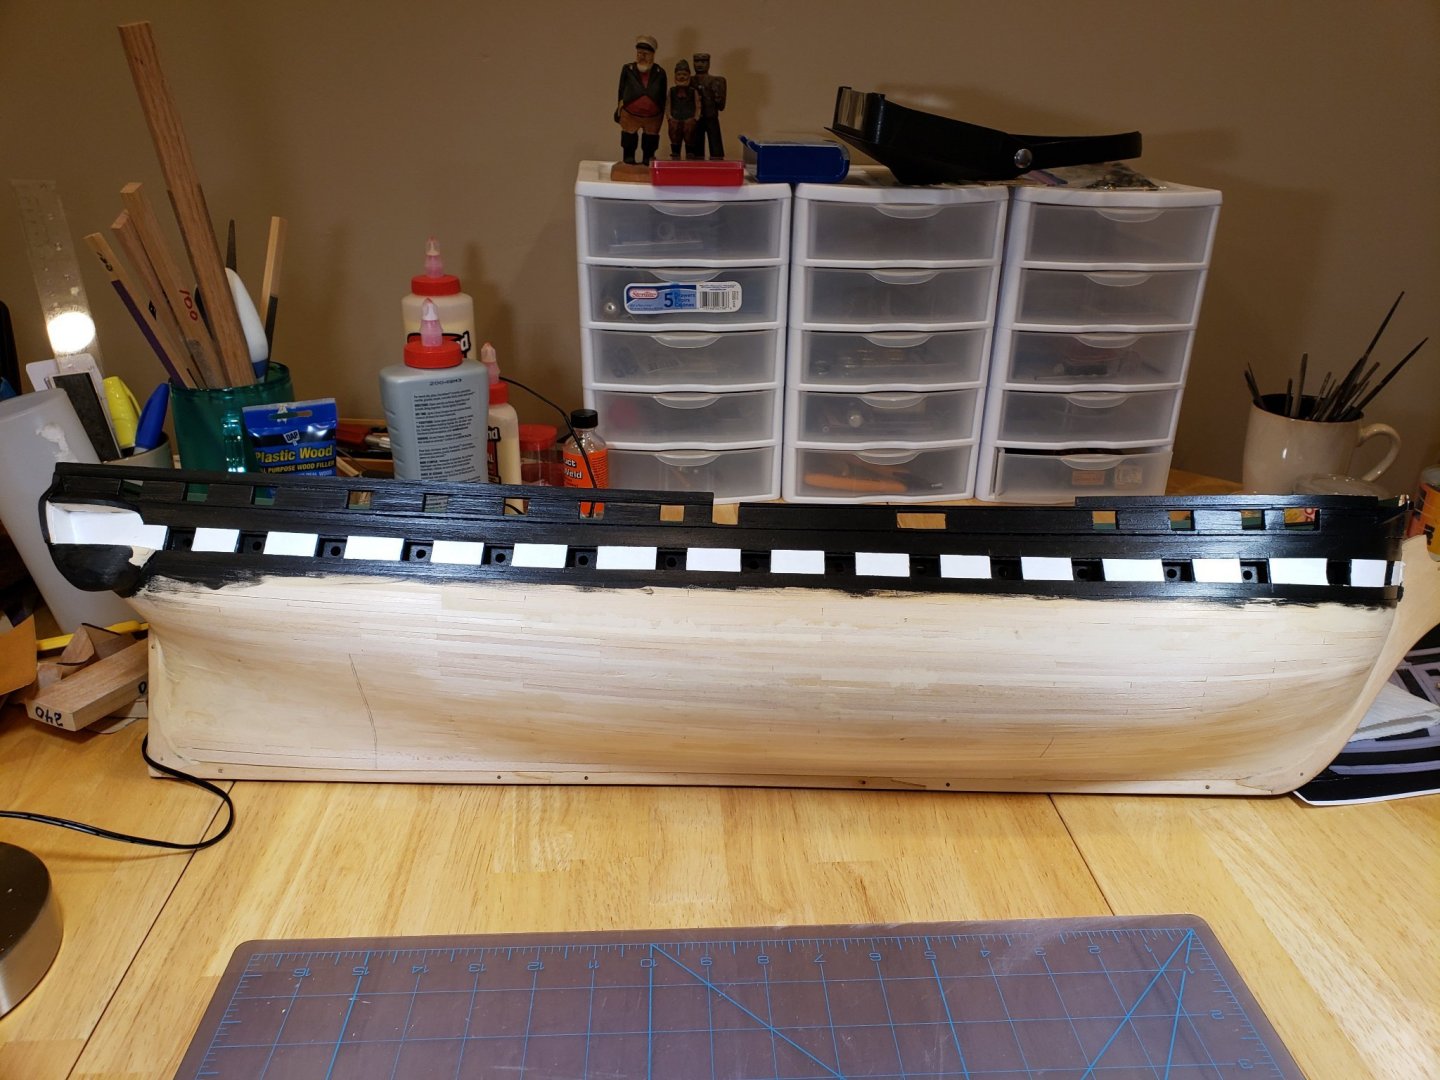
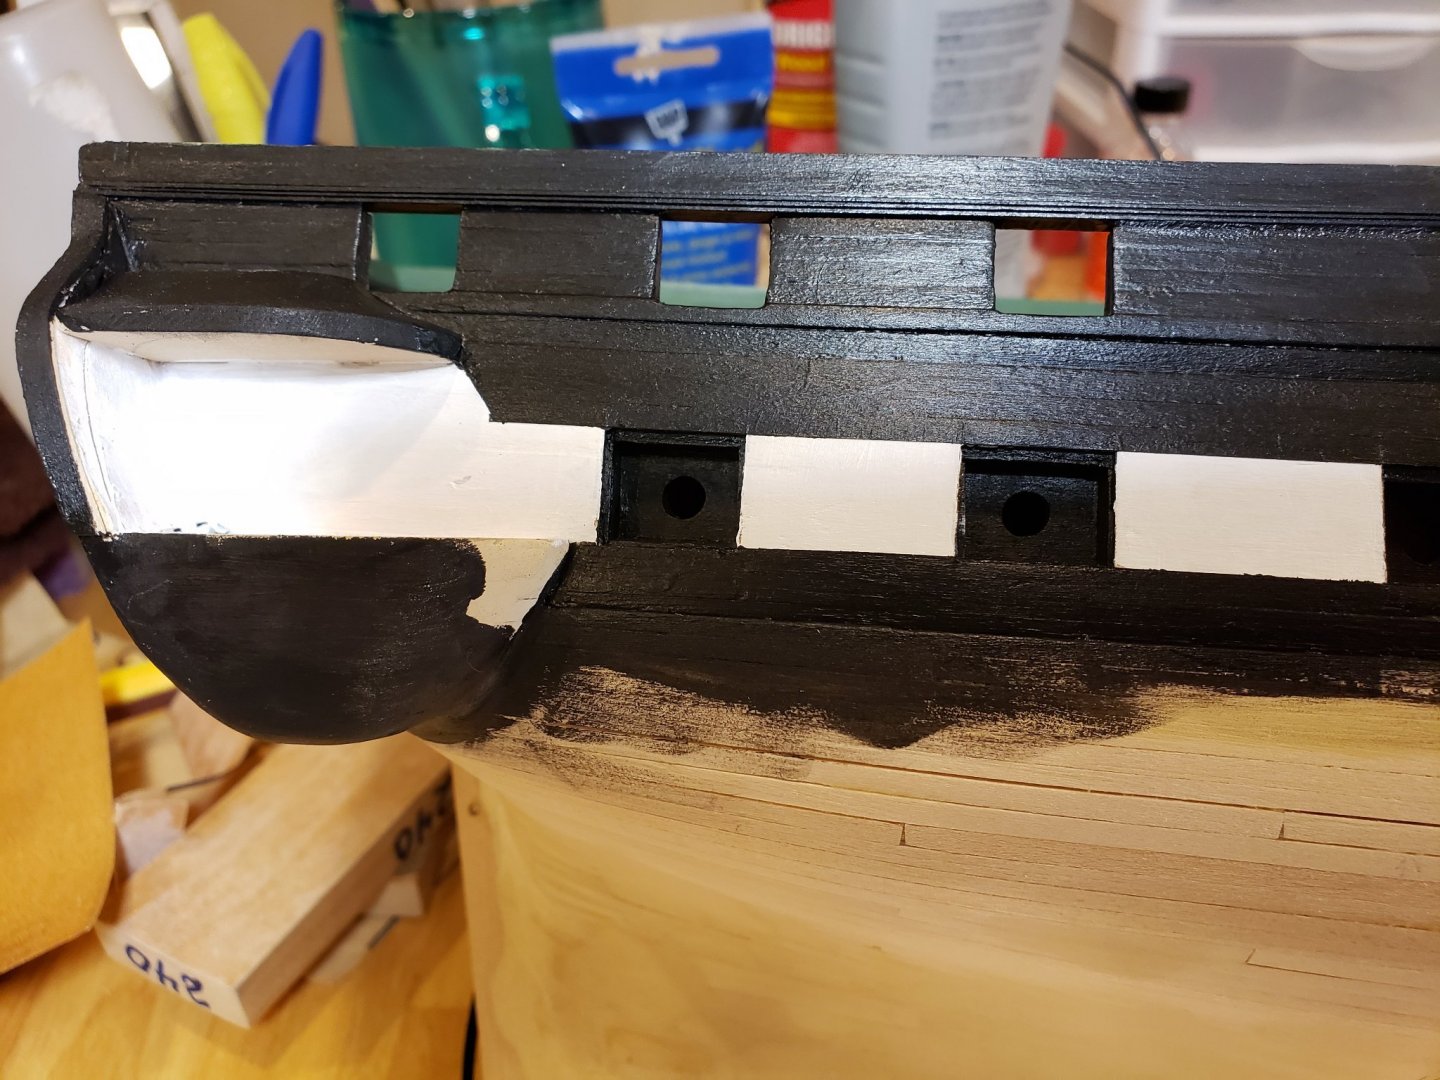
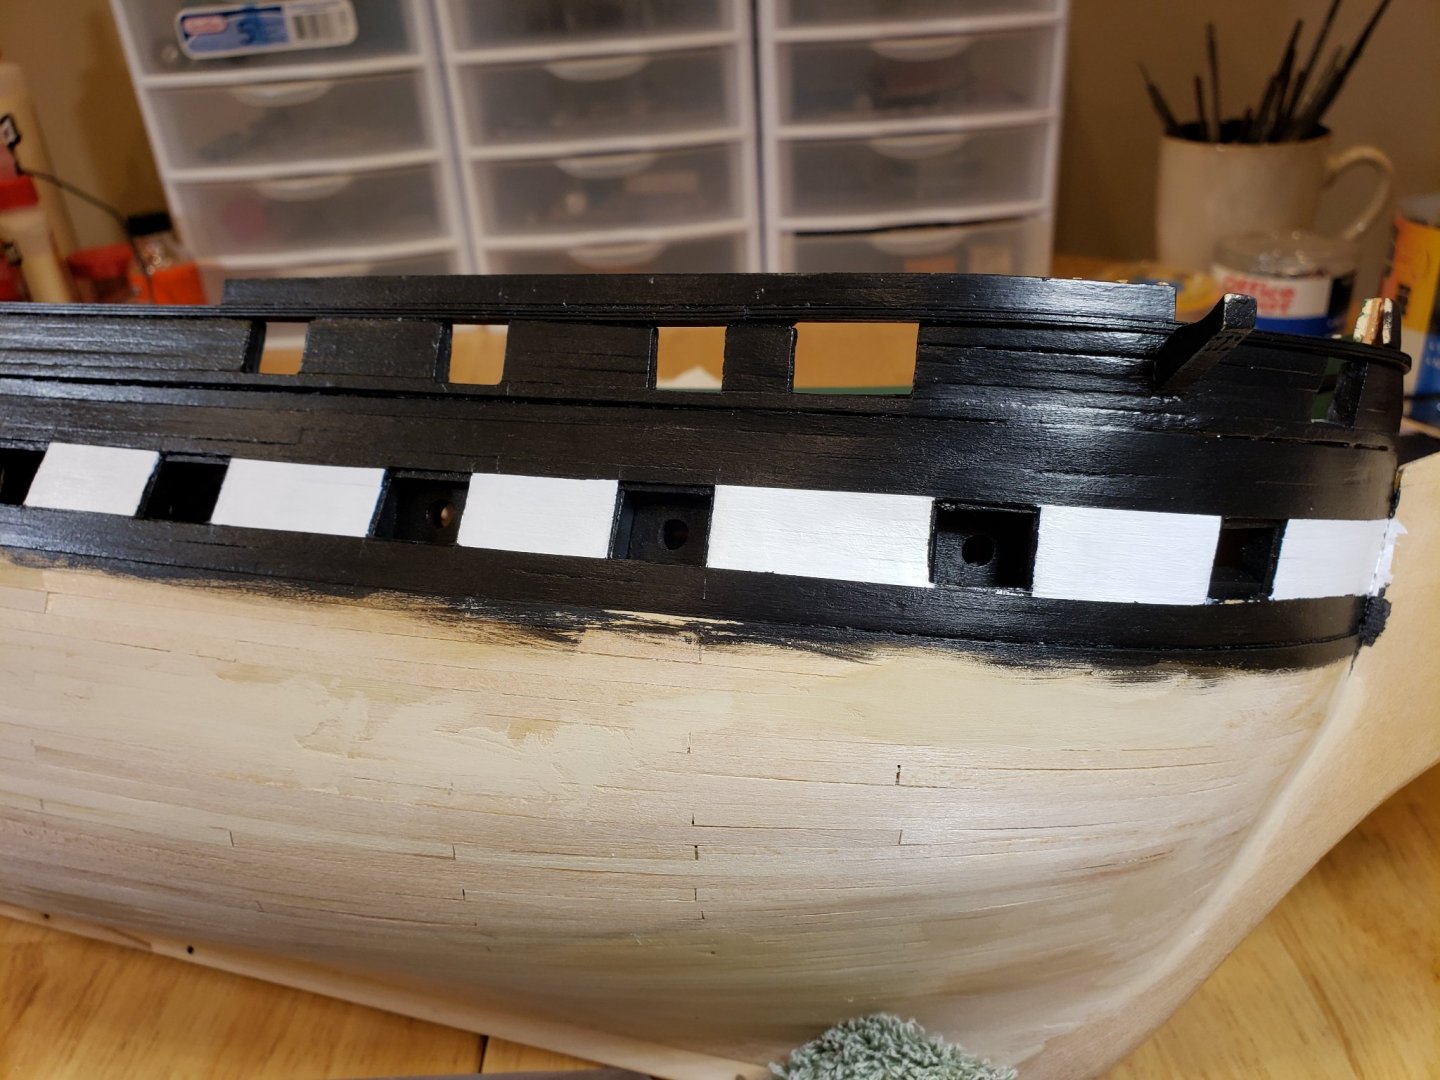
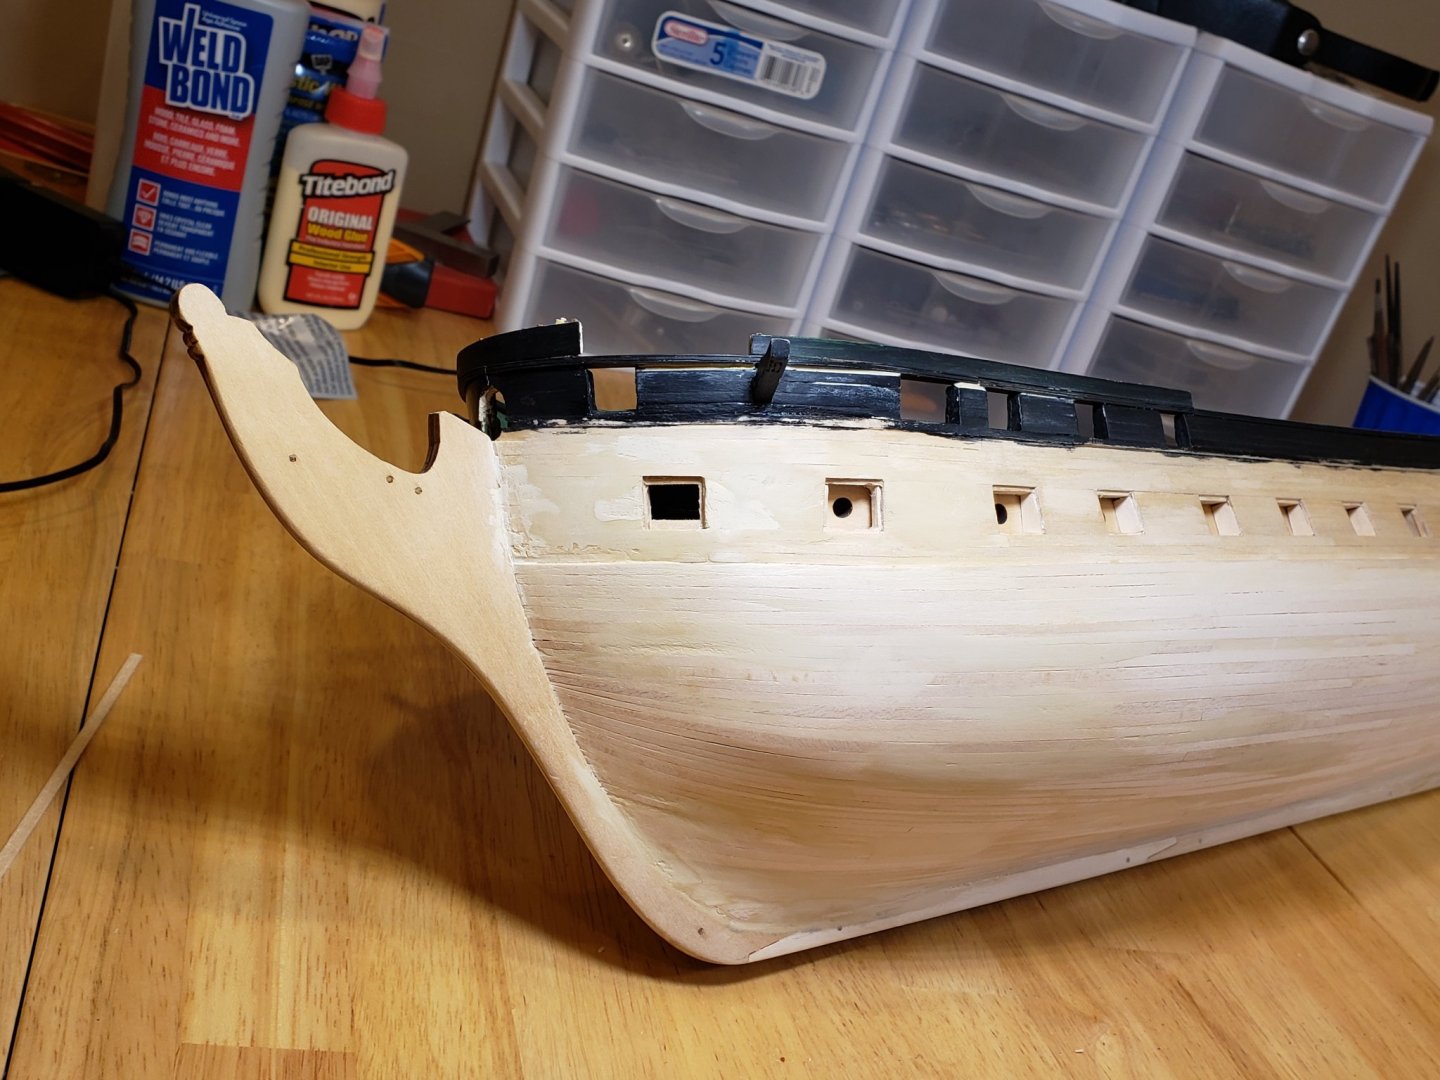
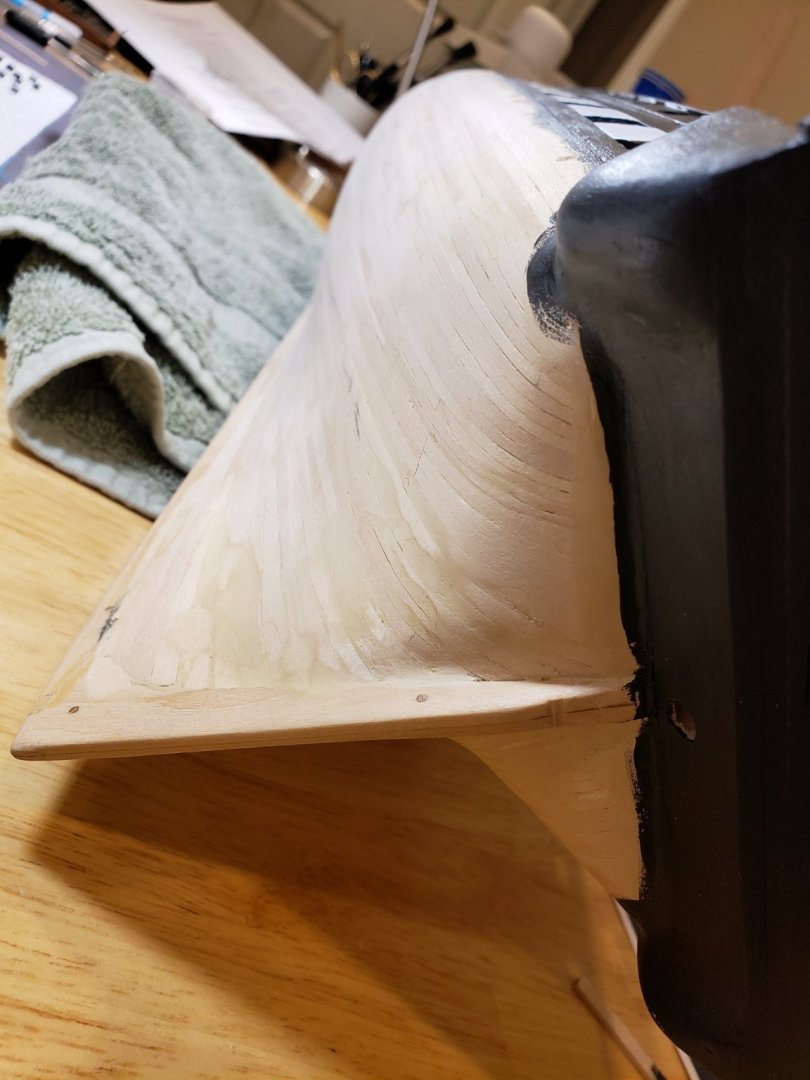
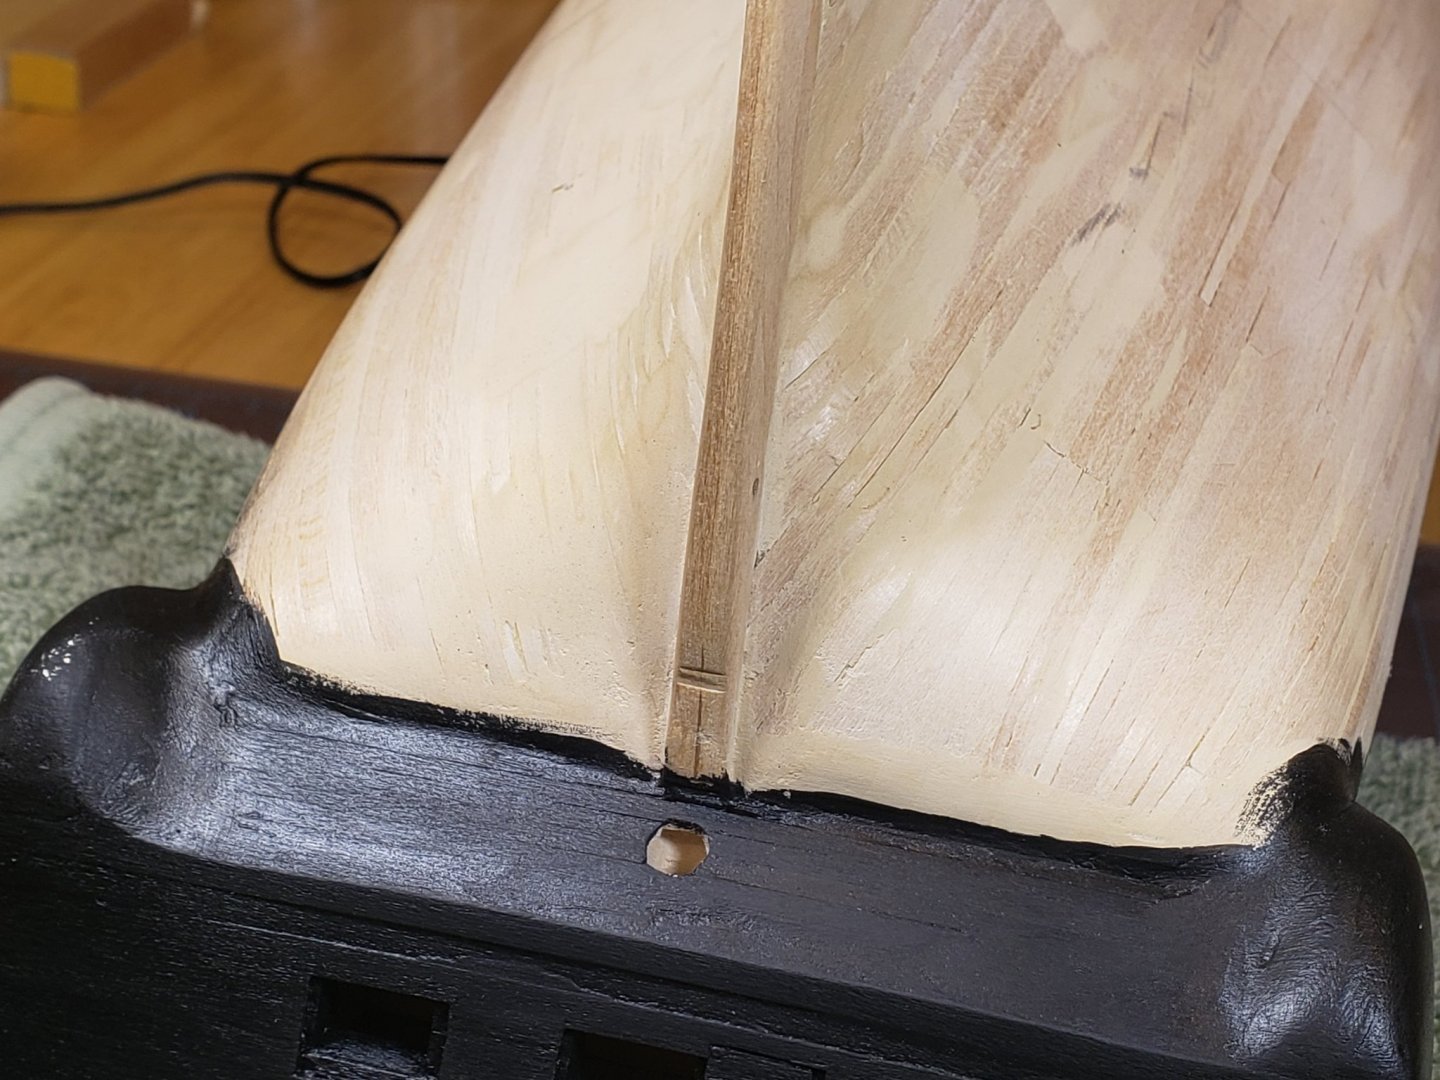
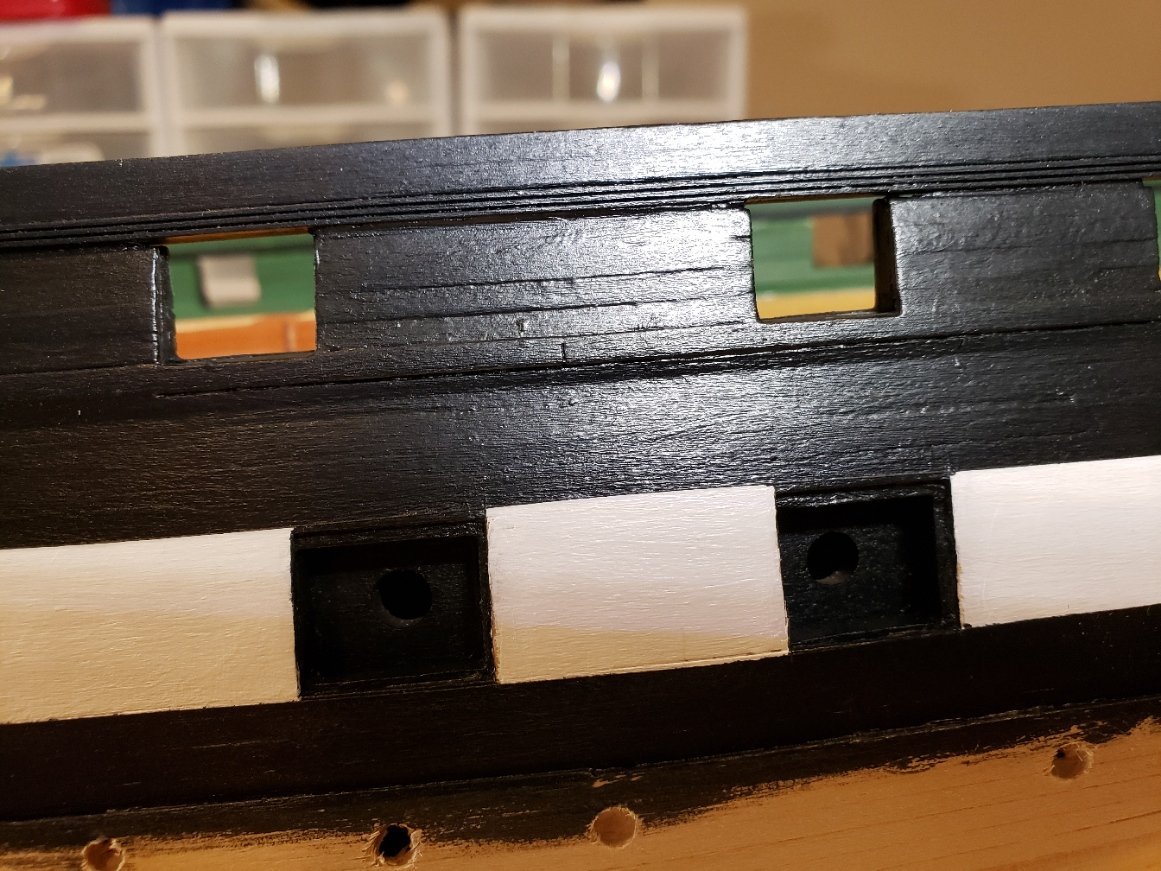
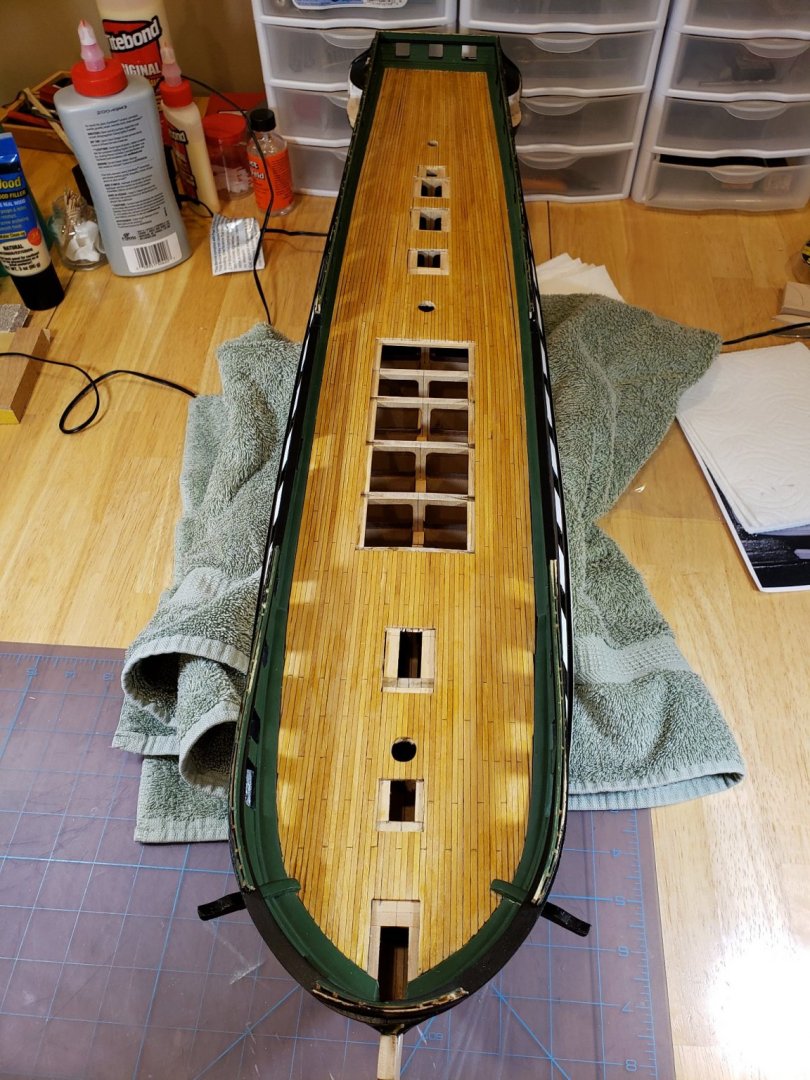
As my work is progressing I'm continually seeing flaws in the hull or with the wood filler. Sanded another half dozen spots just this morning. The practicum suggested going ahead and painting the entire hull, but I'm thinking that it may be best to wait until most of the stern and bow are completed. I've already noticed some scratches with just my handling. After 4 or 5 rebuilds to the galleries I feel pretty good about the roughed in portions. Used a scroll saw for the rough shapes, followed by a disc sander, and finally a dremel for the roof. The galleries stuck out a little beyond the transom so I had to redo the planking on it a couple times. Really suggest waiting on planking the transom and perhaps counter until the galleries are roughed in. Decided to begin some painting and add the white stripe. Only problem was that I forgot to paint the lower gun ports first. So these pics show where I'm masking them off for painting. Was pretty concerned about the fine line tape pulling off the white acrylic, but quickly found out that its all about the direction of the pull once you're removing the tape. Once that was completed I could mask off the top and bottom of the gun ports and paint the black areas both above the ports and down to the wales.


-
Jonathan, Spent some time last night reading your log. Can't believe all of the details that you've added to your build. It really motivates me to do a better job. I'll really use your ships boats section when I get there. Keep up the great work! Jeff
-
Sorry for the slow response...I'm relearning the MSW interface and it seems as if whenever I learn something else there are 3 more aspects that I need to learn, too. Thanks for all of the likes! Mark, Ryland, and Glenn thanks for looking in. It's really great to reconnect with friends! I've been building for several weeks and with summer here in AZ we'll have a few more months of extreme weather so that should afford me some quality build time. Really appreciate the kind words but all of you have created a great learning base and some high standards to aspire to. Jeff and Glenn, thanks for the comments on the scraper. I'll search for Chuck's tutorial whenever I have a moment...great idea. My issue was in just cutting / shaping the metal scraper. What tool did you use? As I said, a dremel and thin cut-off blade exploded a couple times so I gave up. Do have a variable speed dremel now.
-
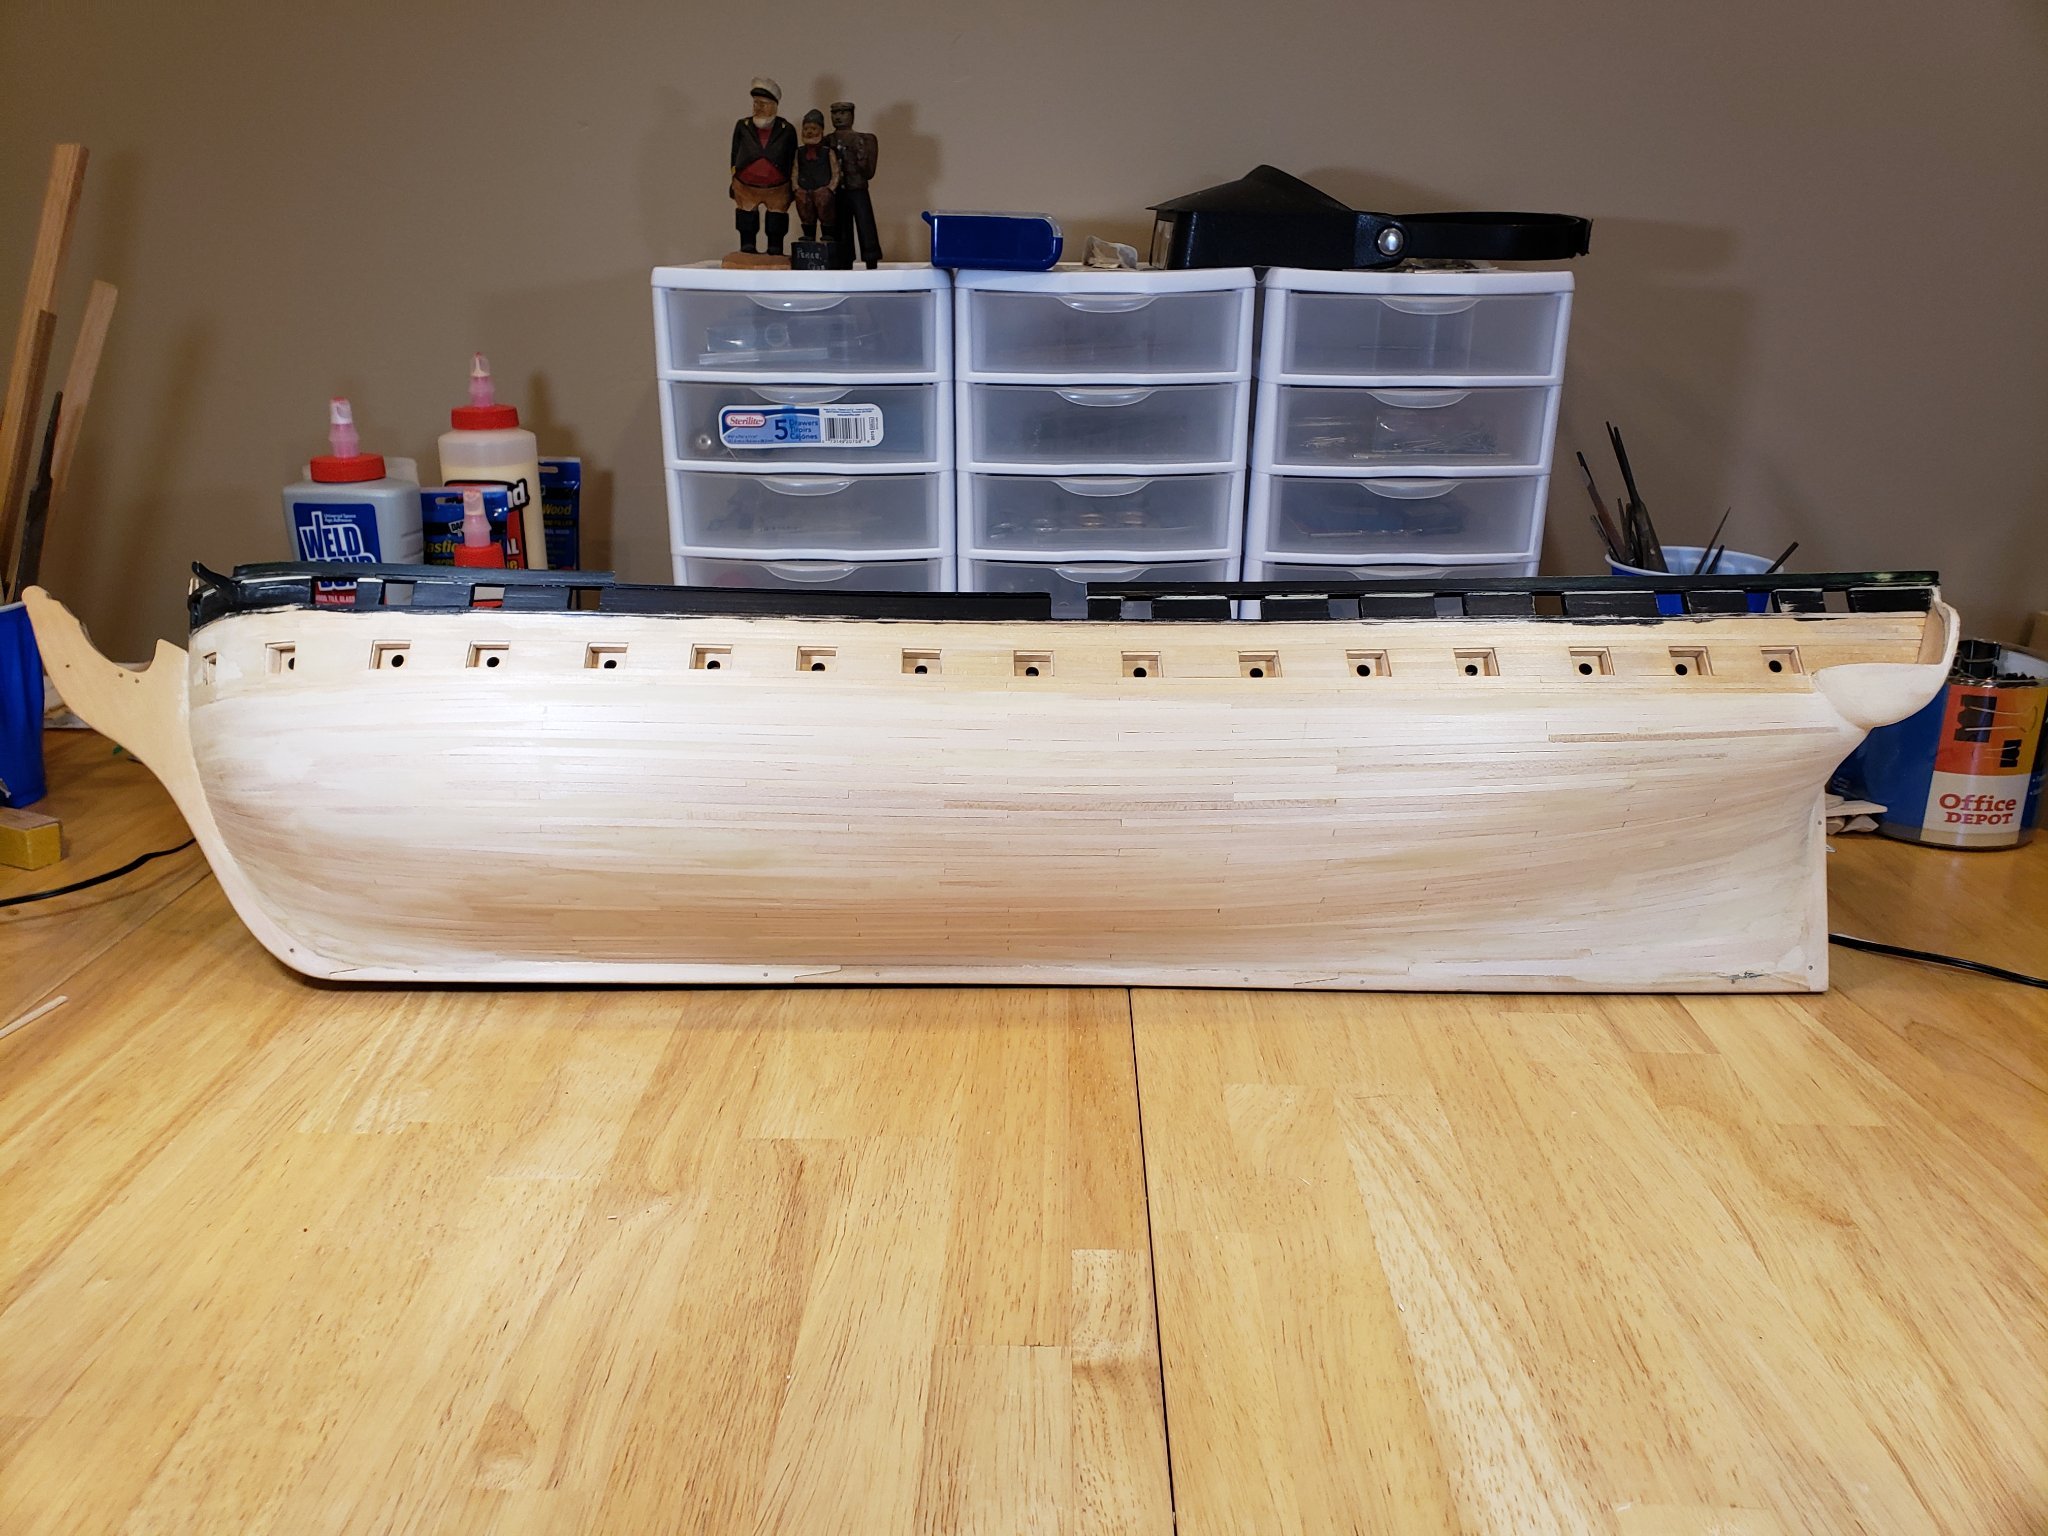
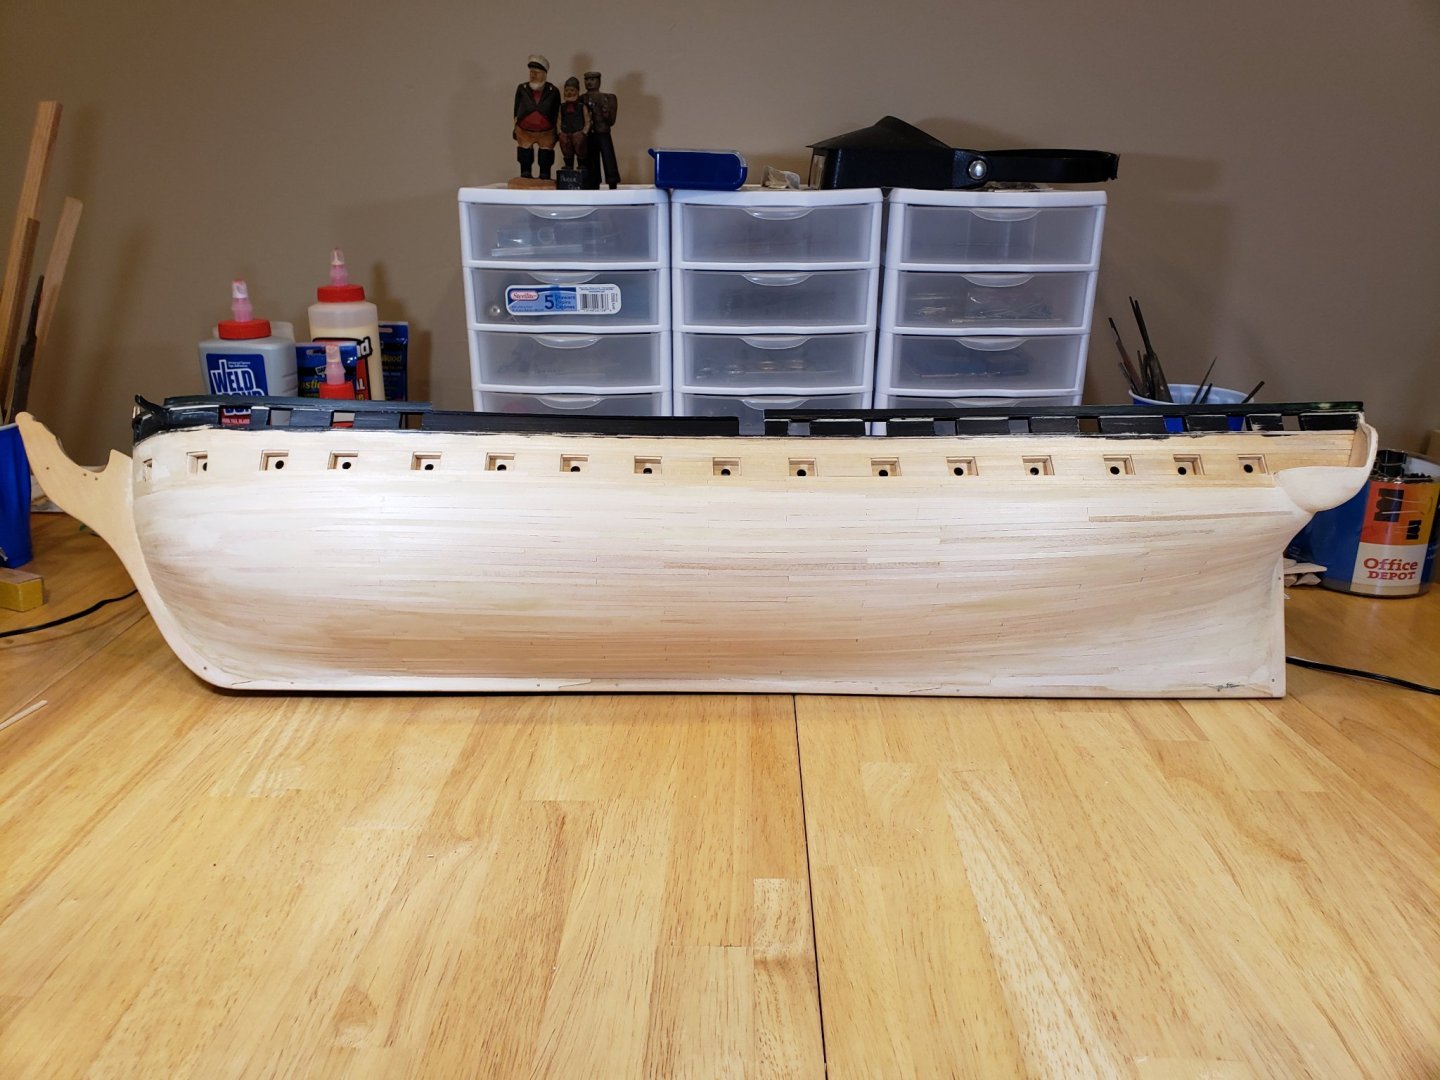
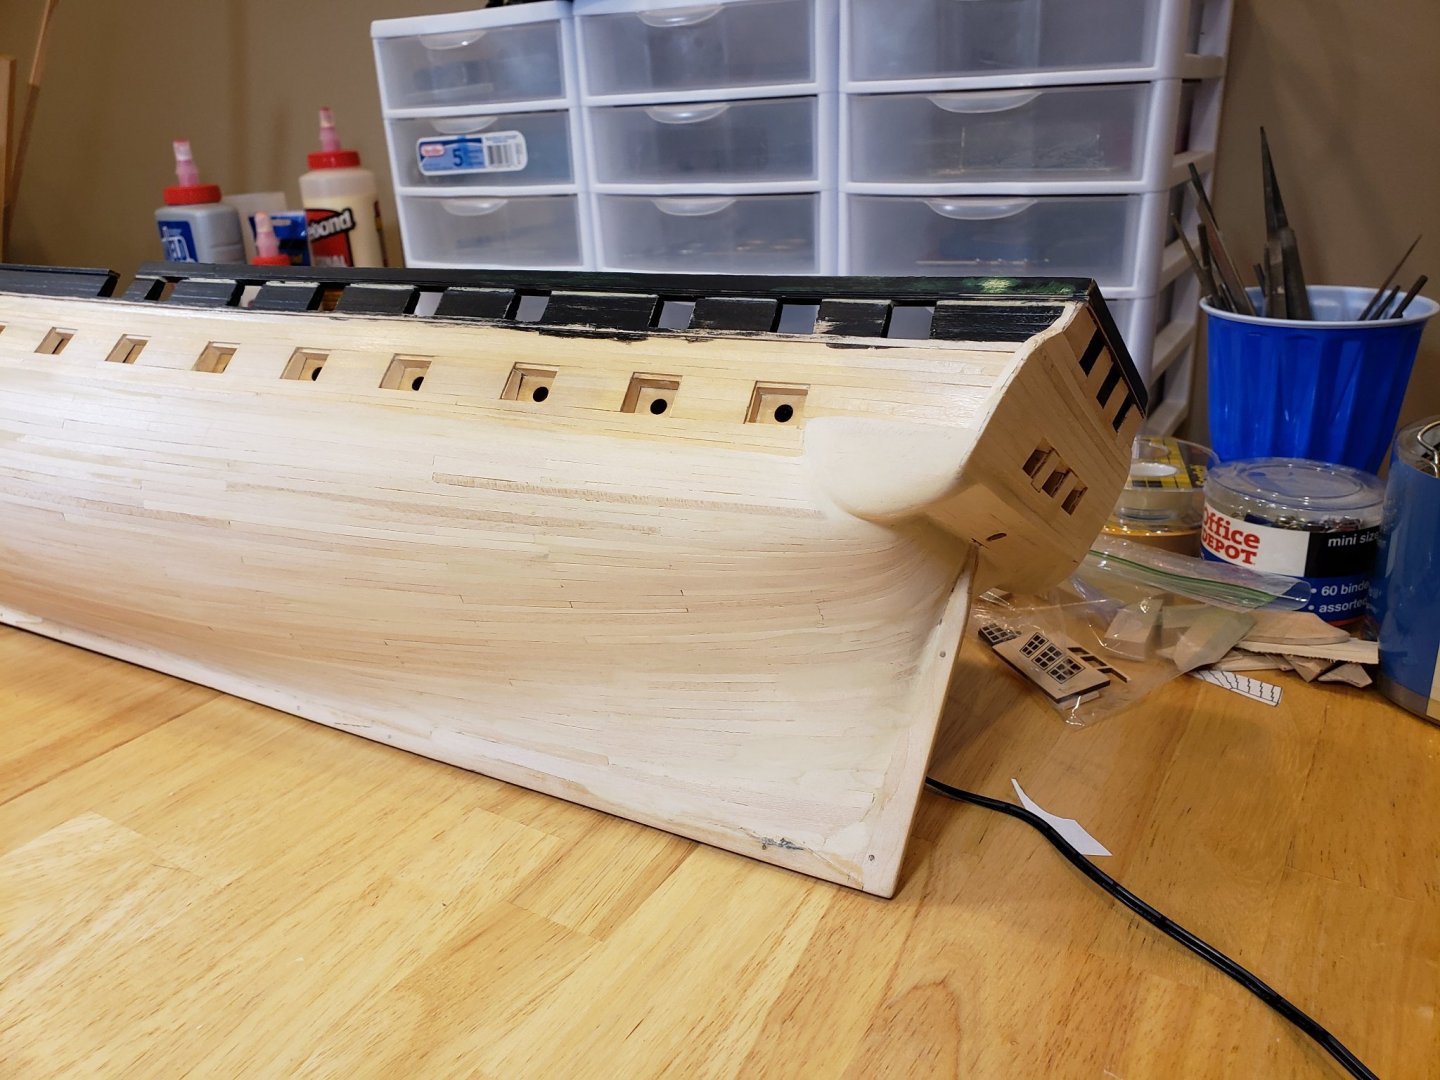
Hull Planking I finished planking the hull a few weeks ago. Unfortunately I didn't take any pictures along the way. I used nearly all 1/6x1/8 planks except for a few wider ones towards the bottom and at the stern. A few lessons learned... When I did the initial construction and faring of the bulkheads, I could have done a better job as there were some dips where I needed to add some supplemental strips of 1/32 material along the way. If I were doing this build over again, I would add extra blocks both fore and aft (between A and B, and between Q and R) because that is where there is a significant amount of bend Not sure if the counter and stern filler blocks are shaped correctly on the plans or perhaps it was just me. Seems like everyone really struggles with planking the stern. On a redo I think I would perhaps make the stern block with a little less severe bend and at least check it out with some planks before winding up that portion of the build. Do a better job of laying out the planking belts. In my case I didn't fully understand some of the issues and should have looked more closely at some of the other builds on MSW. I found myself redoing some of the belts part way through the planking simply because I was a newbie. Hold off planking the transom and counter until after the galleries are completed. I needed to redo this section because the galleries stuck out too much. Hunt mentions this but doesn't give any details and I think he had to redo that section as well. If you can check the thickness of the planking stock so that most of the planks are the same thickness this will help a lot when you go to sand everything. Towards the end I milled some of my own planks from the same sheet of stock and I was amazed at how nice they came out. If a plank doesn't fit, then don't force it by using glue. Instead reshape it. Experienced builders know this. If a plank dips or doesn't look right, fix it before you go on. Everyone says that they will fix the problem with wood putty, but that is really the wrong approach and most of us are disappointed with the results of using wood putty. Found that diluting wood filler before applying and then sanding with 240X or finer works better. Be really gentle and try to fair out any edges from the wood filler. All of these are pretty well known concepts to the experienced builder, but perhaps they will be helpful to a newbie on this build. Here are some pics of the hull after planking. Will add some more pics as soon as I work on some details of rotation and editing pics.

-
Thanks Chuck and Jeff! I did produce a supplemental wood package for the hatch combings and main rail per Bob's practicum. In my case I was never able to make the scraper out of razor blades so I used my Preac to mill the grooves for the rail. Next time I need to create a scraper I need to search MSW for a better approach. Following Bob's instructions I can remember the cuttoff blade exploding when trying to make the scraper and luckily I had my glasses on. Thinking that I used a .010 blade on the Preac for the groove. Jeff
-
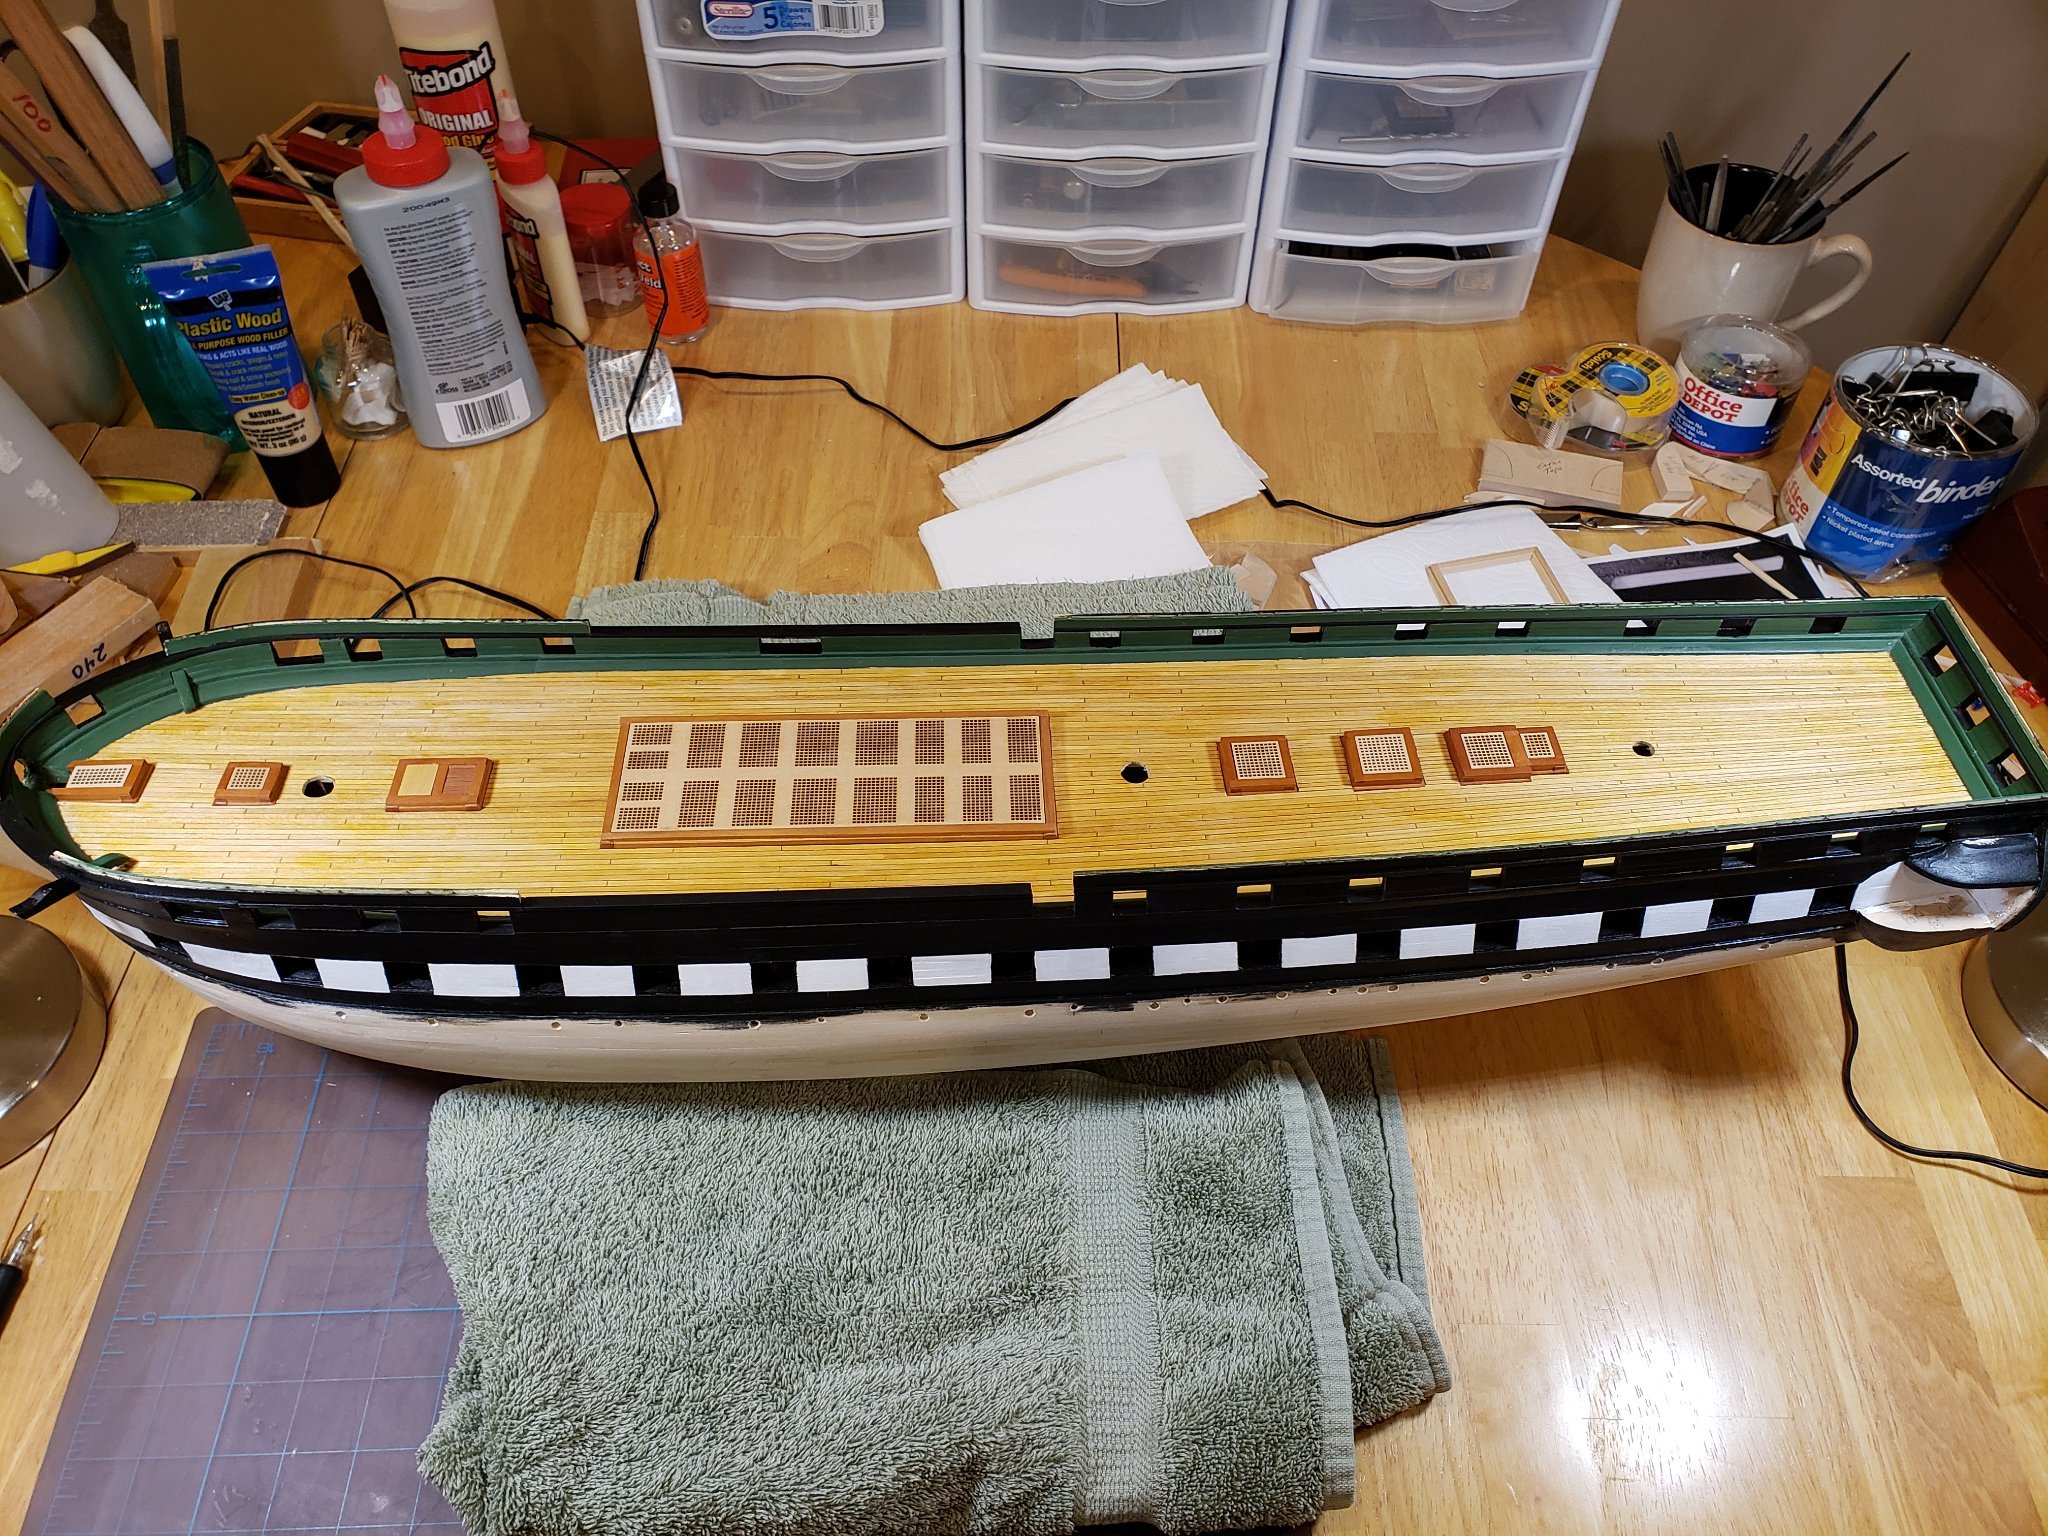
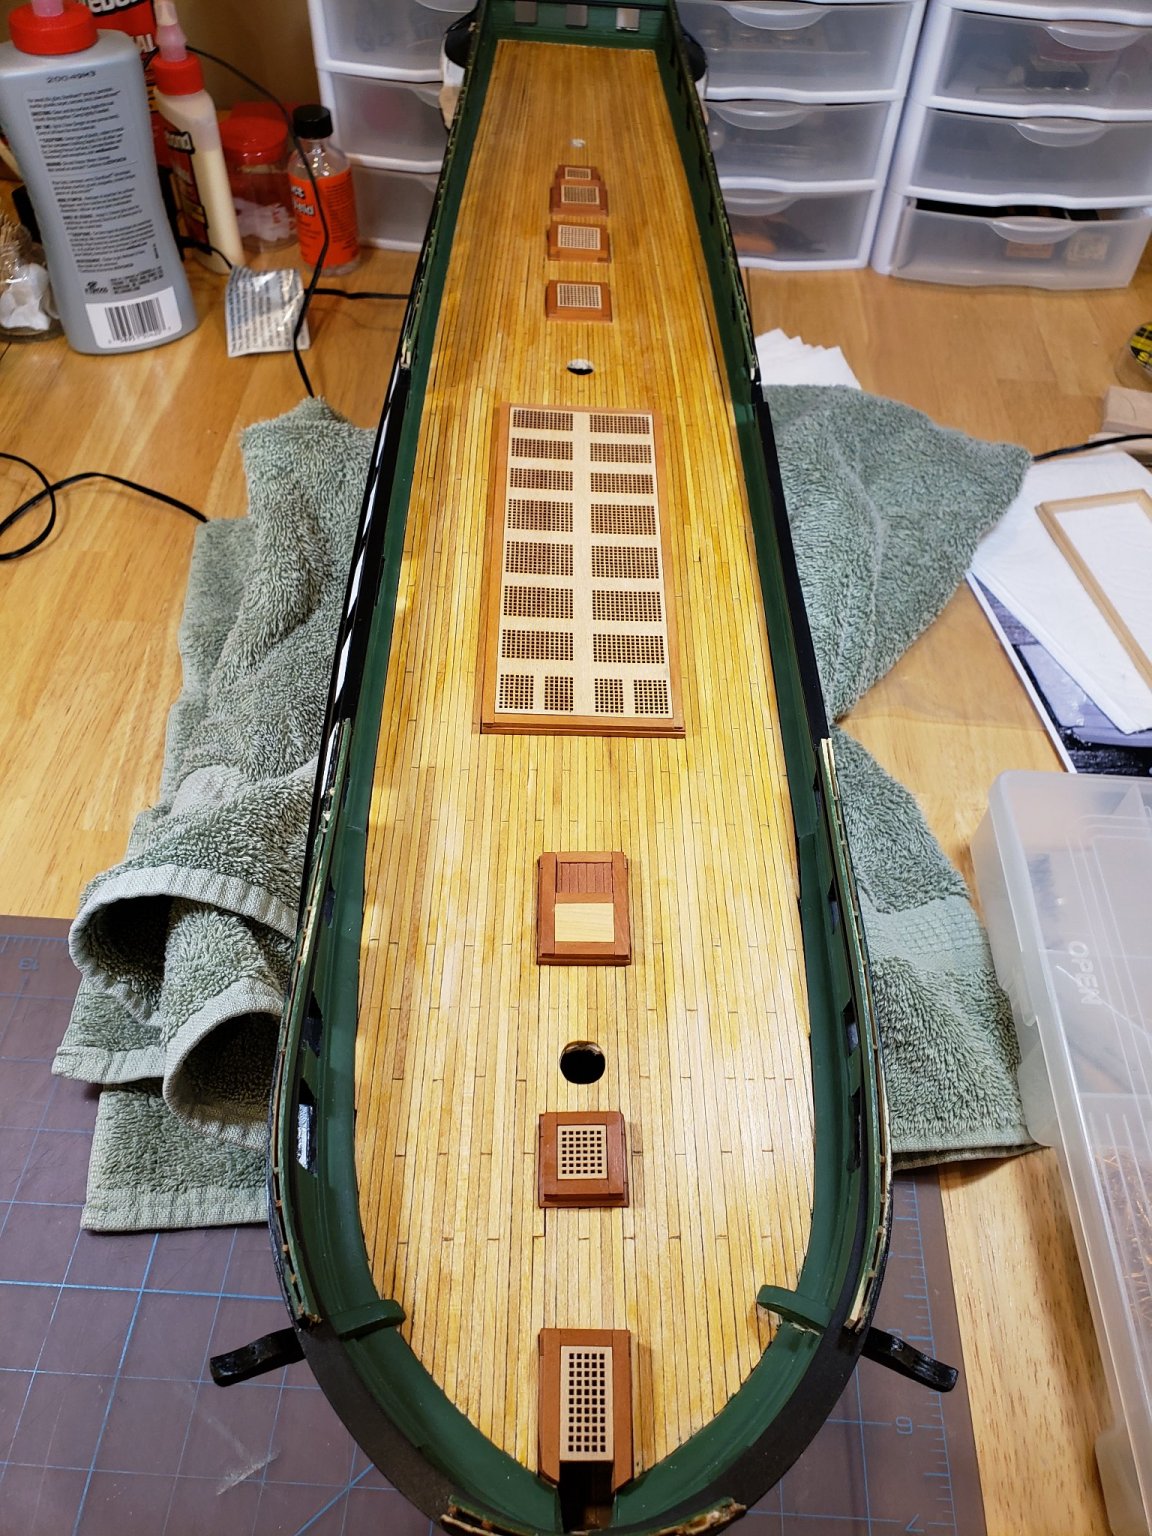
As I mentioned in the last post I had started this build a very long time ago. At that time I had completed building the deck, hatches, bulwarks, and planking down through the wales. In the recent past I've spent time planking the hull and wasn't going to do a log unless I successfully completed the planking. Having completed the planking here are some pics. For the most part I'm using the kit supplied materials. The deck and bulwarks were all completed long before HobbyMill existed. Didn't care for the historically correct stain used on the deck so 17 years ago I used shellac. I omitted adding the rivets and the green is a Floquil paint that is no longer available, so that may be an issue going forward if I need to do any touch-up. Here is a pic with the hatches... Gratings are kit supplied with some wipe-on poly. Hatch frames is some swiss pear that I had milled a very long time ago when I first got my Preac saw.

-
First some background... I started this build in 2004 using Bob Hunt's practicum so my build will continue to use the practicum. About 6 months into the build Bob was looking for someone to mill wood for his new kit business and that was the start of HobbyMill. So the kit has laid idle for 17 years while I did HobbyMill and eventually relocated to Phoenix from Cincinnati. This is also my first build so I'm making all of the typical mistakes of a newbie. Over the years I've had the privilege to observe so many great builds and learn from the commentary on this site so I was a little intimidated to post a log. However, after spending some time lurking here recently and the wealth of information that I have received, I decided to try to give something back...even if its just all of the mistakes that I'm making. Lessons Learned: Modeling is a lot harder than milling wood Don't wait 17 years between steps in a build Once I figure out how to upload some pics, I'll start my build. Unfortunately I must have deleted some of my early pics from 2004 so we'll start from where we are today. Jeff
-
Ben, Great to see that you're back working again! Holly looks fantastic! I'll be following your build. Hope all is well! Jeff aka HobbyMill
- 399 replies
-
- 4
-

-
- winchelsea
- Syren Ship Model Company
- (and 1 more)
-
Joe, Thank you so much for providing such a high quality service to our community! It's greatly appreciated by everyone. Not sure if I will need your service in the near future; however, if I need any wood I will certainly reach out to you. Doesn't look as if you need any assistance, but if you need anything such as wood package contents please feel free to reach out to me. Jeff Hayes HobbyMill
-
Byrne's saw accessories question..
Boatsinc2000 replied to CPDDET's topic in Modeling tools and Workshop Equipment
Thanks Glenn, Gave my equipment away, sold our house, and moved cross-country to Phoenix. Enjoying retirement. -
Byrne's saw accessories question..
Boatsinc2000 replied to CPDDET's topic in Modeling tools and Workshop Equipment
At one time Jim had built-in .008" back taper, but with my saw setup I found that adding .005 - .010 was needed. Thicker sheets and harder woods needed more. Ebony or bloodwood always needed the most. Some sheets look perfectly straight but have alot of internal stress which is released when you start to mill strips and the strips can move into the back of the blade. Sometimes flipping the sheet helps. Jeff Hayes aka HobbyMill -
I've used Malco too with success. Another mfg would be Niagara. They make top quality tooling. I've used their blades and was one of their distributors for 25 years in another life. Usually sold through industrial distrbutors like MSC Industrial Direct. Update - Just did some searching and it looks as though Niagara no longer sells saw blades. Jeff Hayes HobbyMill
-
Have some inventory left over and I'm planning on having a sale after the Holidays. I'll post details here on MSW when I am ready for the sale. Also I would recommend Crown Timberyard as a great alternative to my products. Cheers, Jeff Hayes HobbyMill
- 28 replies
-
- 10
-
-
Mike, That is a hard one to give a single answer. Assuming that where you are storing your wood is at room temp and the humidity isn't at one extreme, then probably not using the plastic sleeves would be a good idea. On the other hand if the environment tends to have high humidity during the year or varies significantly, then leaving it in the sleeves and sealing it when the wood is around 40-50% humidity would protect it from condensation and mold. Just think of the sleeves as adding a barrier around the wood. If the wood is at the proper moisture content and the atmosphere where you store it is a constant 40-50% then there is no need for the plastic. On the other hand if you seal the wood in plastic when the humidity is really high and then put it somewhere really cold there will be condensation. Storing it wet with elevated temperature will promote mold. I guess the silica bags would work, but then you would want to leave the wood sealed in plastic with the silica. Don't know how well that would work or if it would be too dry, but it could be expensive. Over time silica would collect moisture from the air if it isn't sealed and become saturated. It's just common sense and again be sure to check it periodically because your "stable environment" might change over time. With respect to bugs, kiln drying should kill any borer eggs. Also any bulk woods that are imported go through a fogging treatment too. So any bugs are most likely to come from you local environment. Cheers, Jeff
-
I agree with everything that Augie mentioned in his post. 1) Store you wood at a constant temp and humidity. Ideally at room temp and around 50% humidity. My shop is environmentally controlled so I'm adding moisture during the heating season and running dehumidifiers in the summer with the A/C. You can pick up humidity gages pretty cheaply these days so you may want to consider one. 2) Light and oxygen affects nearly all woods. Most will darken over time with some like cherry being more susceptible to exposure. Holly yellows, boxwood picks up a golden tone that varies with each piece, swiss pear darkens too, but not as much as cherry, redheart turns orange, yellowheart darkens to a golden yellow, walnut will lighten, bloodwood darkens just a little, and ebony doesn't change much. So store milled wood away from direct light or wait to mill it until you are ready to use it. If color stability is important in your model then use a sealer with a UV inhibitor and resin that doesn't yellow. Acrylics are known for not yellowing where most others yellow over time. 3) Store your wood sheets flat. Most wood has internal stresses and the wider the sheet and thinner they are there will be a tendency to curl. Also wide variances in temp and humidity will increase the curling. If the humidity is controlled then you should be able to stack the sheets and add some weight to minimize curl. Suggest that you check the sheets periodically, especially if you have high humidity. Stacking also minimizes exposure to light and oxygen. Of course this assumes that the wood was milled from properly dried wood to start with. Milling green or high moisture content wood is another issue altogether. 4) Stripwood storage is less of an issue, but it should be stored flat and away from light with constant conditions. 5) Just use common sense and inspect your wood storage regularly. Hope this helps. Jeff HobbyMill
- 9 replies
-
- 10
-
-
Akrowood sells catello box and they will dimension it for you too. Because they are in the European market the price and shipping won't be too bad. Otherwise use Crown Timbers here on MSW for a US source. Jeff HobbyMill
-
How to avoid table saw fuzzies?
Boatsinc2000 replied to Keith_W's topic in Modeling tools and Workshop Equipment
Keith, Thanks for the pics. You may have tried this already, but you may want to reverse your cut by cutting the back of the carriages first. The tear out usually occurs on the backside of the piece so instead of having the fuzzies on the stepped edges it would be on the more consistent front edge. Also adding some masking tape to the backside of the cut will help too. It's a common carpenter's trick. Couldn't tell from the pics if you have a stop setup on the fence ahead of your cut. If not, you may be experiencing kickback. Typically you should not use the miter and the fence on a cut without a stop. Pick up a book on tablesaws at your local library as there should be some good tips regarding setup. Finer pitched blade may help a little, but mostly changing the orientation and adding the tape should get you most of the way home. Also going slowly when the blade exits the wood on the backside will help too. Good luck! Jeff -
Use castello box, but save yourself the headache and buy Chuck's. Great value and use your castello for planking and other parts of your build. Arko was selling some really nice castello. Jeff HobbyMill
-
How to avoid table saw fuzzies?
Boatsinc2000 replied to Keith_W's topic in Modeling tools and Workshop Equipment
TPI...saw blade selection. Go finer. Jeff Hobbymill -
Treenails
Boatsinc2000 replied to wallyh's topic in Planking Techniques's Click Here for Topics dedicated to planking!!!!
Primary difference between Jim's draw plate and a jeweler's drawplate is that a jeweler's drawplate is designed to compress metal whereas Jim's is designed to cut wood. That's why jeweler's drawplates don't work well for treenails. Jeff -
Richard, It's a sulphur yellow. Brighter yellow than box and most woodworking stores like Rockler or Woodcraft carry it. As Mark says, it is a coarser grain than box, but not as coarse as walnut. Hard wood that holds edges. Main uses are accent pieces and accent planking strips. Works pretty easily as planks. Mostly I sell planking strips or sheet stock in thinner sizes. Sold a fully planked hull once, but I never saw the pics of that build so not sure if it was too bright. Got a surplus in stock so feel free to order some before I shutdown on 12/32/14. 25% discount for MSW members. Just ask for the discount when ordering. Jeff HobbyMill
-
Keith - Please contact me regarding your order. You may want to check your spam folder as I sent you an e-mail a couple days ago that has gone unanswered. Thanks, Jeff Hayes HobbyMill
-
Hi Pat, I fully understand and agree with your logic. That was the premise by which PayPal was founded...not giving out credit card information to a host of small suppliers. As for the fees, there are always ways around that issue too. However,in my case I had an actual identity theft issue directly linked to PayPal and it has been documented that they have been hacked in the past. I realize that PayPal competes with banks, but when I was changing some of my financial security procedures, my banks gave PayPal low scores on security. So, unfortunately it is really sad, but I don't believe that any payment processing system is totally safe. I realize that there are customers who will not be awarding me their business due to my decision not to offer the convenience offered by PayPal, but it is a business decision based upon my own experience and, more importantly, my sense of personal security. Sorry! Perhaps if I had a different experience then my opinion would be more in line with so many of you who have had a positive experience. Jeff HobbyMill
-
Help with a Byrne's Saw - end of cut problem
Boatsinc2000 replied to rtropp's topic in Modeling tools and Workshop Equipment
Hi Richard, Causes: The issue is that the wood is moving on you and touching the back portion of the blade. This is caused by releasing the internal stresses in the sheet and you may even see the material moving towards the blade (gap created by the blade kerf is narrowing towards the back side of the cut). Not so much with basswood, but there also can be changes in the direction of the grain that will cause the same issue. Some blades that are too thin or dull will follow the grain and you can see that the piece that you are cutting is actually getting wider as you cut and consequently binding. Seems as though the thicker the stock and the wider the piece that you are cutting, the more that you will see this issue. Refer to the last page on my website regarding use of a Byrnes saw. Solutions: 1) Use your .040 kerf blade instead of your .030 kerf blade. (thicker kerf tends to reduce binding and blade deflection) 2) Add back taper on fence. Start with adding .005, then add another .005, if necessary. This will have a big impact on this problem 3) Turn piece end over end. This changes the direction of the grain of the wood and helps if the blade is following the grain instead of release of stress in the wood. Usually not an issue with basswood, unless your blade is dull. 4) Try cutting from the other side of the piece or go to a different sheet all together. 5) Change saw blade to new sharp saw blade. Probably not needed in this case unless you have been using it for really hard exotics like ebony or bloodwood. Once I use a blade on those woods, I do not use it again on my regular stock such as cherry, box, pear, or holly. Richard, I hope the above is helpful. In the end #2 will help the most because with these slitting blades the teeth and the body of the blade are essentially the same kerf. Using a carbide blade will also eliminate the problem because the teeth are a wider kerf than the body of the blade and that provides additional clearance.. This is a common issue, so you are not alone. It all has to do with using the slitting blades instead of a carbide tipped blade. Cheers, Jeff HobbyMill -
Pat - Thanks for all of your comments throughout the survey. I'll probably wait to add any additional comments unless there is a question to add clarity. Just don't want to sway any input. As for the meeting, it probably won't happen. I tried to get Sky TV to offer coverage down your way but they declined due to lack of entertainment value and Fosters wouldn't provide sponsorship! Ned & Chad - Thanks for the kind words. Chad, wish I lived 20 min from Gilmer...Right now I've got one of their shipments stuck on a train somewhere outside of Chicago. Thanks to everyone for their "likes" and continued support. Dave - Thanks for the continuing input. You seem obsessed and paranoid over a topic that you feel has no value. I really have difficulty grasping that concept. I know that you enjoy the discussion as much or more than the content, but I won't be responding any more. Our philosophies are at either end of the spectrum and we will never be on the same page, but feel free to post as much as you like. I agree that we are not competitors. Not because we have our plates full, but because we offer totally different products. I just offer mainly milled sheets and strips; whereas you offer a host of other products. The only place where there could be any overlap is perhaps milling wood. You don't indicate your milling specifications, but from what you have posted on MSW my approach and yours are so totally different that they are at either ends of the spectrum. So much so that they are not even comparable. You have a loyal customer base and you have added a lot to the hobby, especially for customers who prefer to do their own dimensioning. The only issue that I take is when you say that you know best what is needed by your customers and more closely dimensioned products are unnecessary. As you have said, your customers just take what you ship them and they are very happy with your products. If that is the case, then why is it that a portion of HobbyMill's business has always been to provide replacement wood to your customers? I just received 2 more replacement orders within the past 60 days where your customers were not satisfied with the dimensioning and finish of your products. That is just not right and it validates to me my philosophy that tighter dimensioning is appropriate. Thank you also for your obsession with how I run my business as a service to this Hobby and the economics lesson. Not really sure how it fits with a quality survey? However, you forgot to include that I used to give away product to Ohio customers and for a while I was also giving away boxwood end-cuts to customers. Dave, I had a very successful career as president of a good sized company and then the head of a division of a public company which, I believe, afforded me both the business acumen and financial resources to run a hobby business after retiring at 52. But thanks for your concern! I understand your thoughts on the video...but you missed my point. I believe that it is called "Paying it Forward." That is a big portion of what this whole exercise on the survey is about...establishing some standards for both suppliers and customers that will help the hobby go forward, but you missed that too! Jeff Hayes HobbyMill
- 26 replies
-
- 16
-