keelhauled
-
Posts
788 -
Joined
-
Last visited
Content Type
Profiles
Forums
Gallery
Events
Everything posted by keelhauled
-
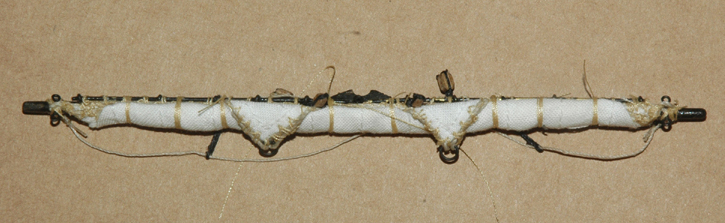
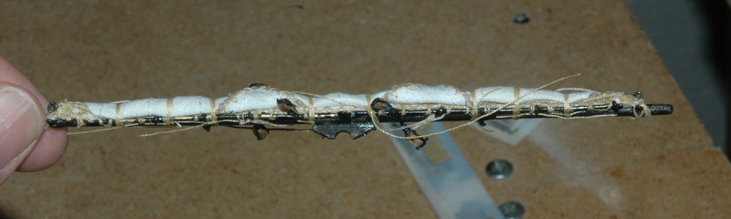
 Oh, I forgot. Here is photos of the third attempt at the furled sails. It is about 25 to 30 percent of the original length. The bulk has been drastically reduced. Here is what it looked like before: From the front And the top And trimmed down: From the front And the top By the way, in case you wondered, it is faster to bend a fully set said than a furled one. Much faster! thanks marc

- 525 replies
-
- 4
-

-
- cutty sark
- mantua
- (and 2 more)
-
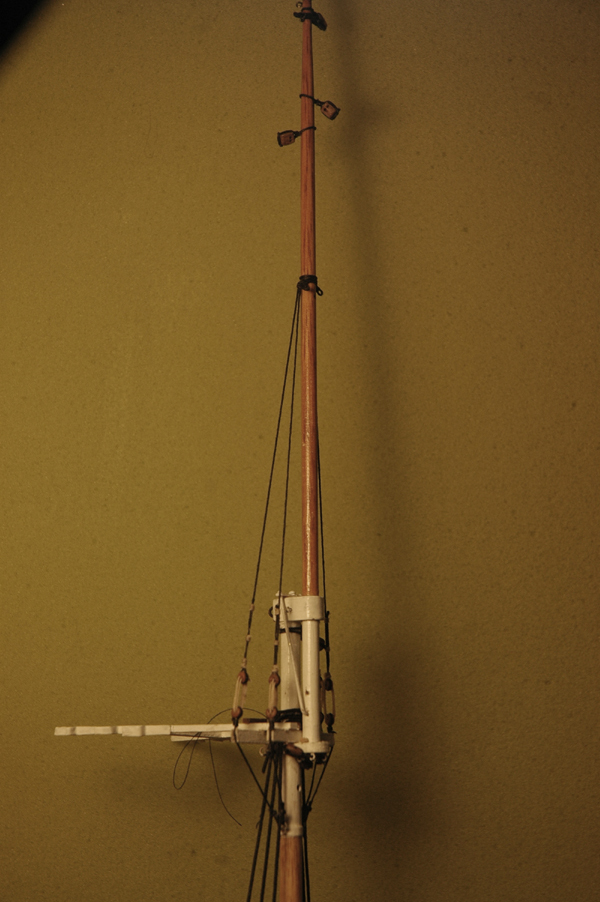
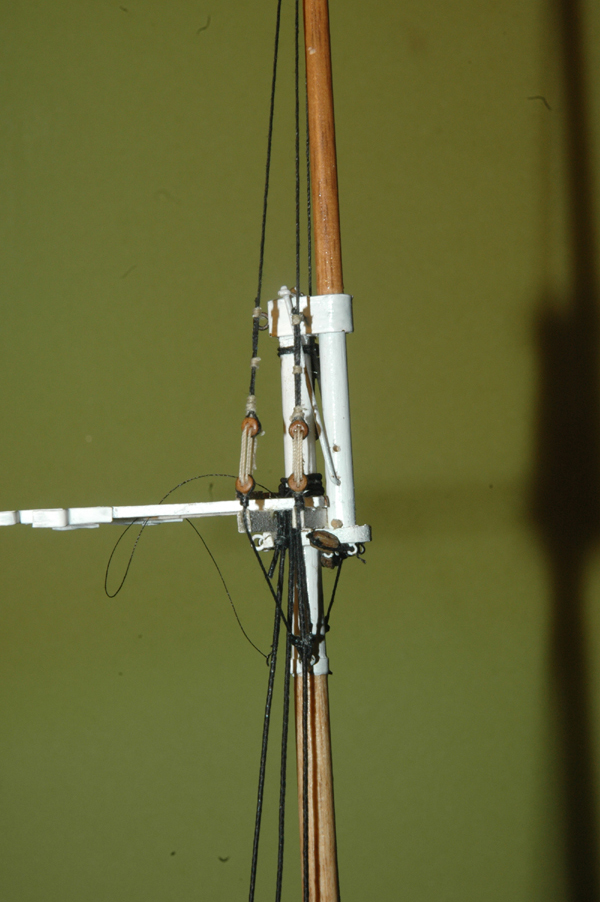
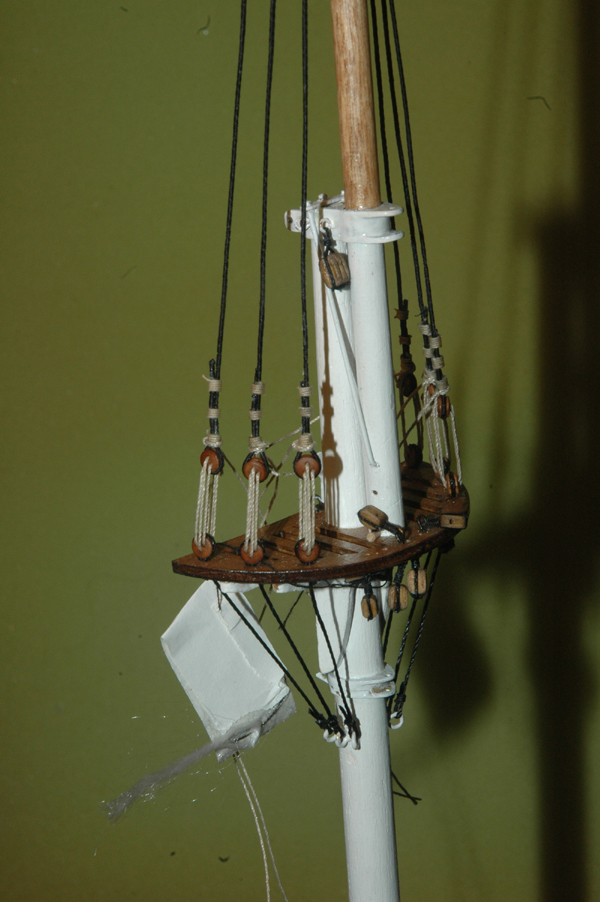
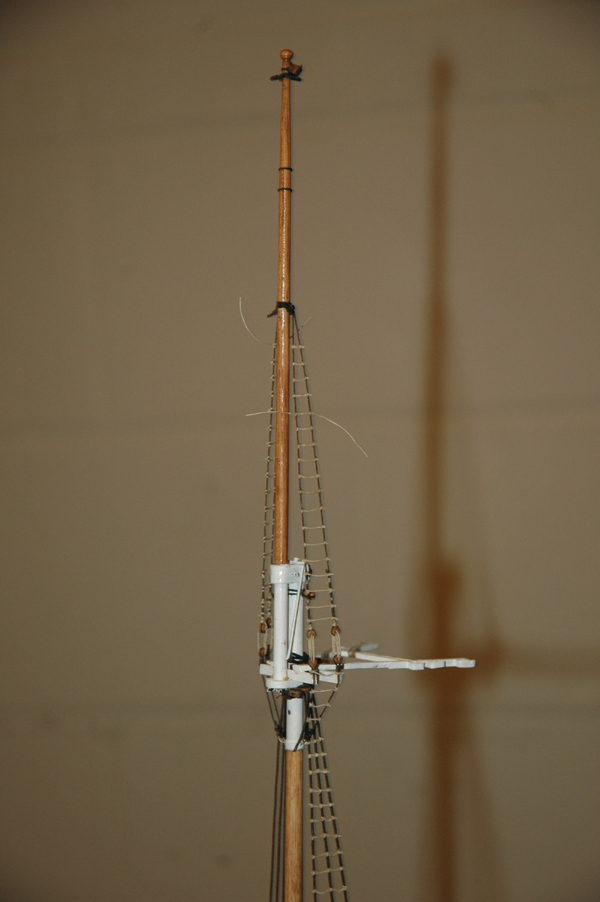
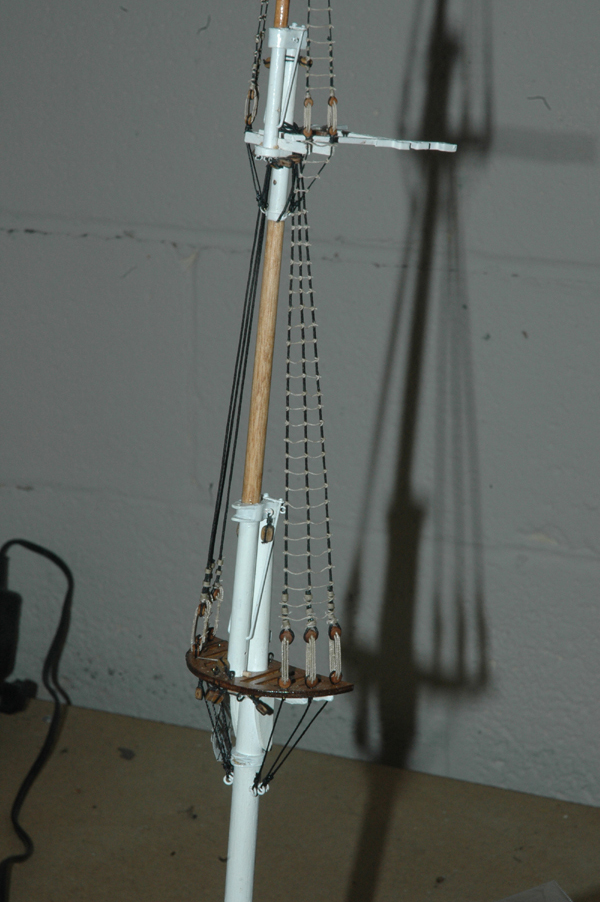
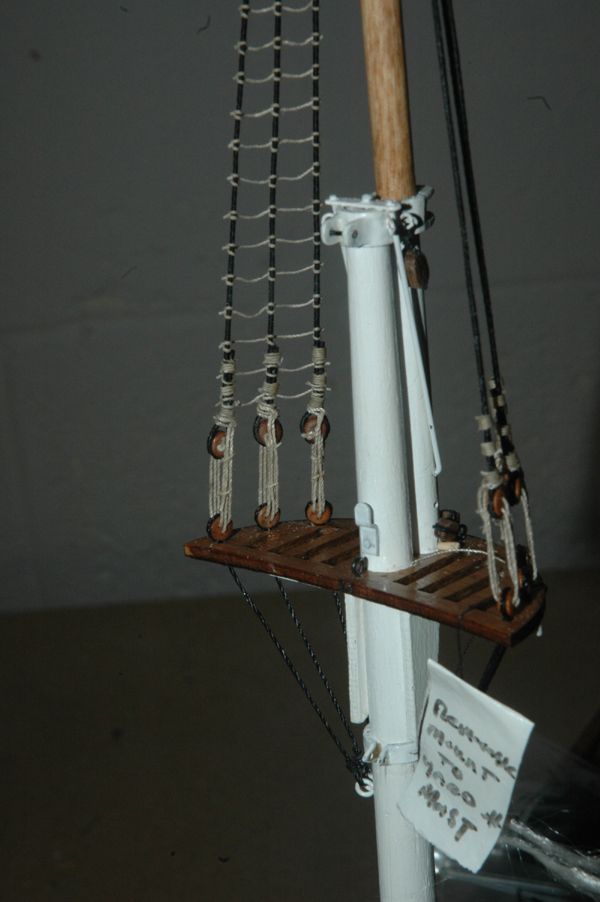
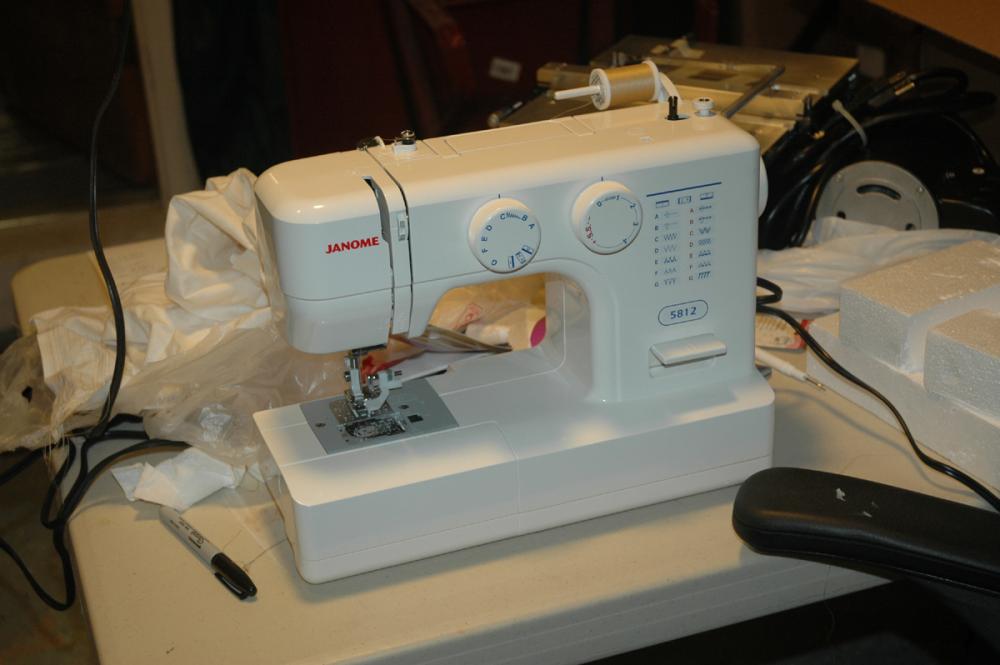
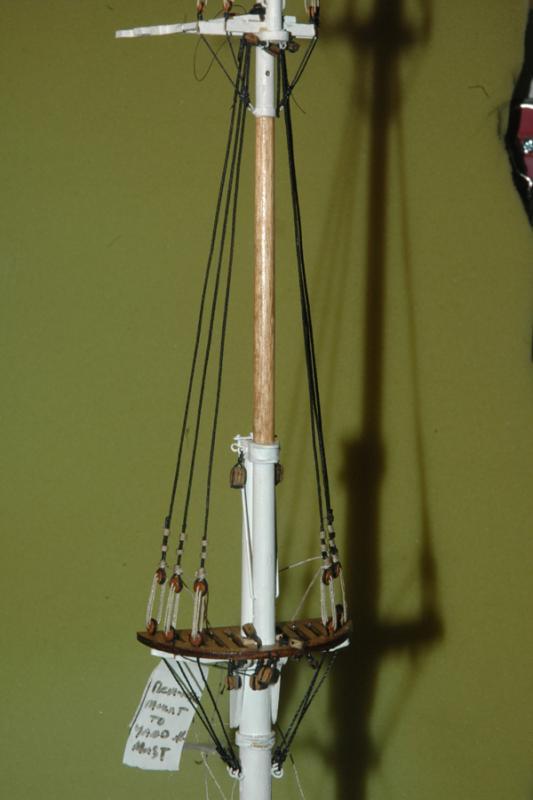
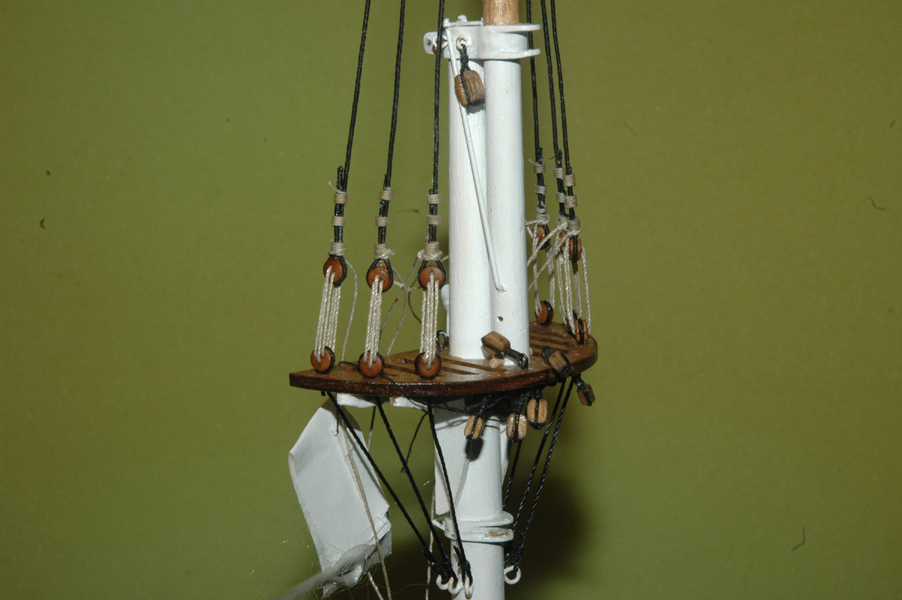
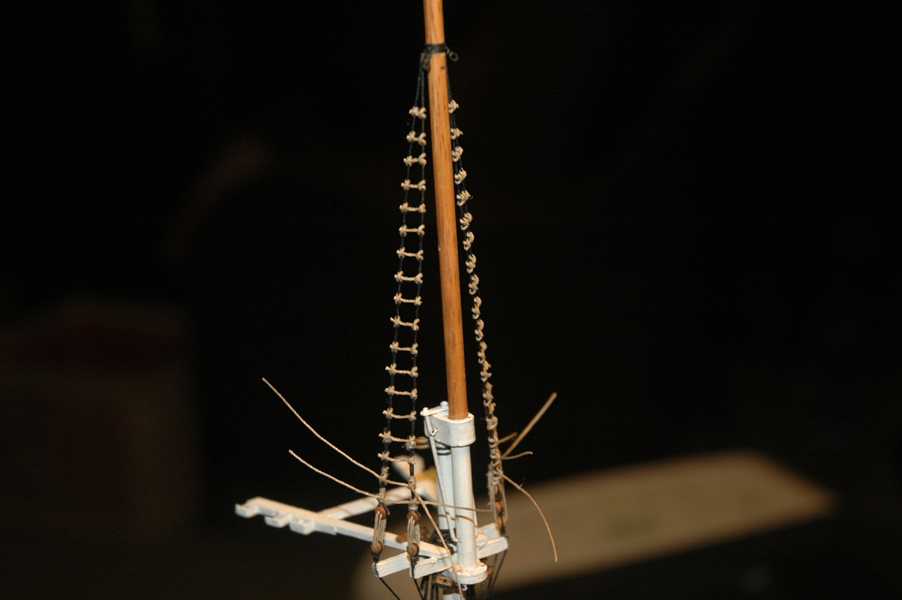
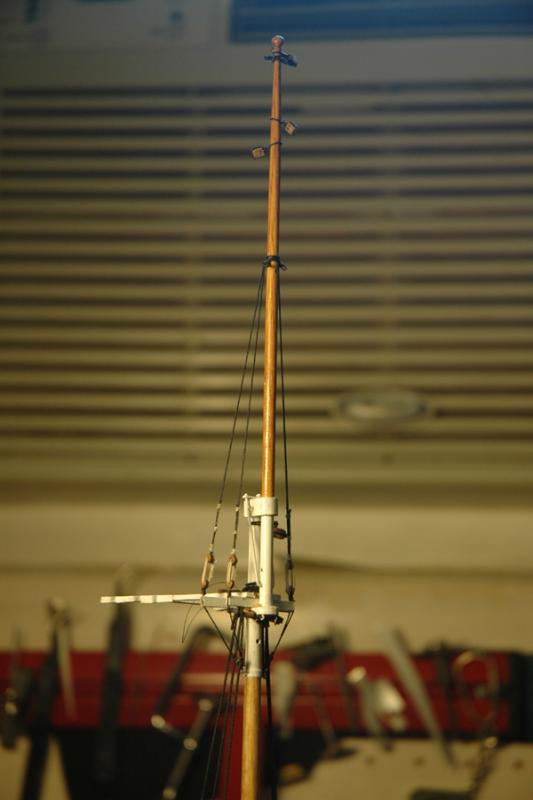
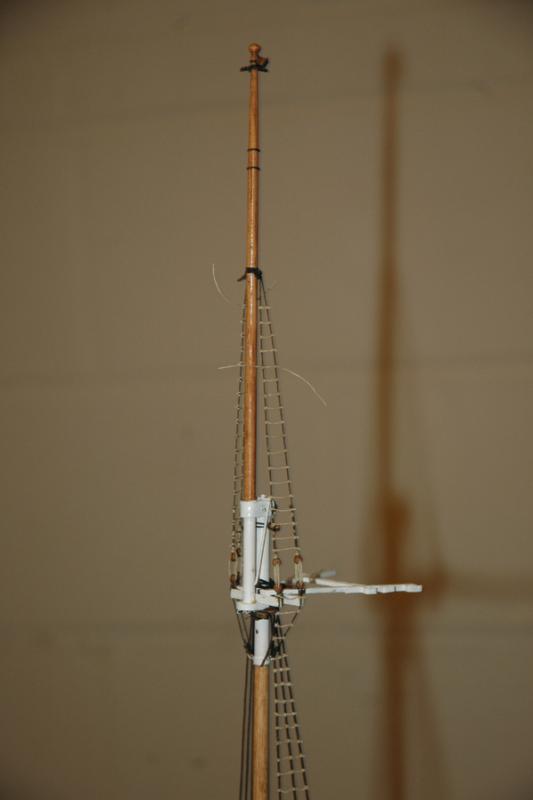
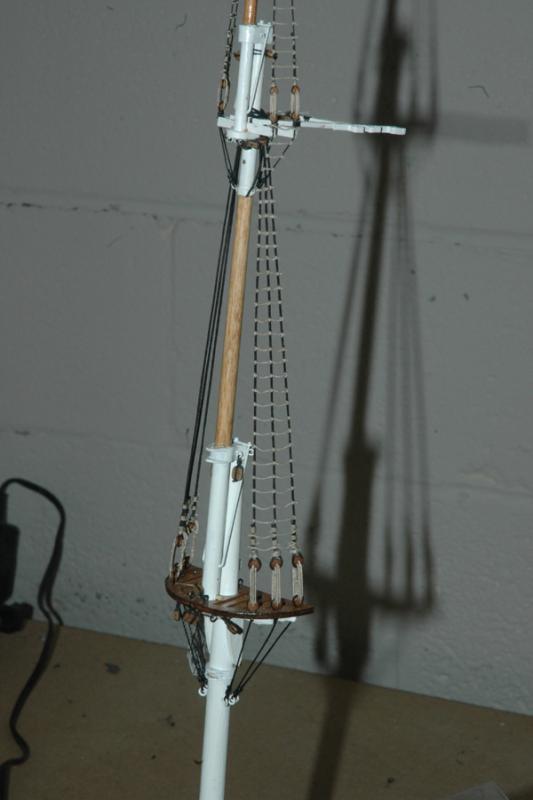
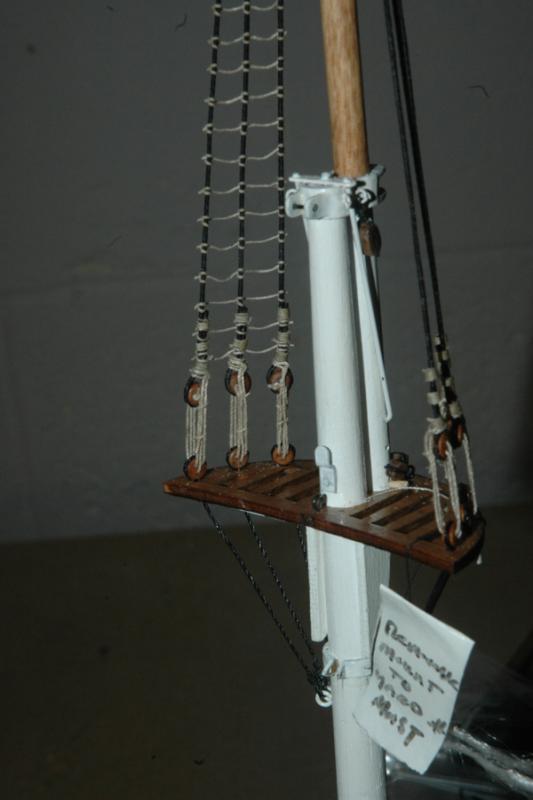
Hi everyone. Sorry I haven't posted with updates in quite a long time. I've been traveling internationally pretty heavy since January - about one to three weeks a month. At least half of my weekends were taken up with this as well. But.......I have made progress on the model. So some updates. I've been working hard on the sails for what seems like years. All of the sails have their bolt ropes, earrings, foots, and reef lines. All of the corners of the bolt ropes were served before attaching. All of the staysails except the jibs need their hanks. All of the courses, top sails, t'gallent, and royal and sky sails have been bent to their yards. So today, I realized I didn't take photos of any of this. I'll take some photos of the sails as they are and post soon. Until then, here is my sewing machine. Apparently I had the mind to take a photo of this and not the progress on the sails. You can see my sail cloth and sails behind the machine. (Edit - I just realized that I didn't address the sail cloth in the background. In addition to the sails that I commissioned, I ended up sewing some replacement sails for the jib, royal, some stay sails and the furled sails. what I found is that they are tedious and a real pain to sew. took several attempts. So the sewing part of the sails represents work by Radek and myself). So while, I was making hanks for the jibs I realized that I never made the mast head preventer clamps. I took a break from making and sewing hanks. I think that this detail is important to the character of the Cutty's mast. I made them from brass. I guess you can see from the shrouds in the photos. I never took photos of this step either. So that brings me to the shrouds. I looked at all of the rigging photos, The comments on Campbell's plans. ALL of the Shrouds are completely served!!! Well, I have become very close friends with Chuck's serving machine and have become good at dealing with serving three foot lengths of shrouds. I have to tell you through, it gets pretty tedious and boring at the same time. But they look great! . During this process, I also learned that they need to be hung with weights to straighten them out. Now here comes my first screw up. while I was working on the serving, I wanted to make the jig for the top deadeyes. So I made one spacing jig based on the distance between the deadeyes as they should be according to Campbells plans. I did a test run with unserved lines set up with deadeyes using the spacers. After the glue dried, I ran the lanyards. The shrouds ended up stretching over a couple of days under tension. I figured they would, which was the point of the test run, so that I would know how much they would end up stretching. So I re-made the spacing jig for the top deadeyes ran the test again and the change worked perfectly. Yeah So I ran the served shrouds around the mast and seized them according to the books. I used the new spacer and secured the shrouds around the deadeyes. the next day I set up the lanyards through the deadeyes and let the mast sit for a few days. No stretch. Two weeks, no stretch. A month later, no stretch! Now the decision about what to do. It took hours and hours to serve those shrouds. start from scratch. or try to save them. I decided to try to save them. They had been glued with Elmer's wood glue. So I was able to unglue the shrouds and remove the deadyes. The shrouds wanted to stay in a curved shape where the deadeyes had been glued. I was going to soften the risidual glue, then it hit me that the serving was kept in place by the same glue. If I wasn't careful, I'd end up removing the serving. I applied alcohol and rolled the line through my fingers which helped relax the bend in the line. For the most part this worked ok. I made a new jig and refastened the deadeyes and setup the lanyards. This rig sat for several months due to travel, but I also wanted to make sure that there wasn't much stretch if any. I adjusted the tension the lanyards made sure that the masts were straight in all directions. I don't think that it turned out too bad. And since the sails will probably obstruct the entire rig, it probably doesn't matter anyway. Now on to the ratlines. So here I screw up again!! I did the calculations and had to decide between a diameter that was much less than what it should be or one that was slightly larger. I tried both and ended up going with the slightly large diameter (actually it was slightly thinner than the same diameter that Mantua supplied for the ratlines. Above IS NOT a photo of the mast with the slightly larger ratlines, but is a photo of the completed t'gallent ratlines - that's right BOTH sides - with line that is TWICE the diameter of the line that I chose and intended to use!! So..........luckily, I had used diluted carpenters glue. So, I removed two nights work and replaced it with the correct line. And the top ratlines Here's a photo of the cow hitch used on the lanyards I attached it as semi close to the way that is shown in campbell's plans Thanks marc


- 525 replies
-
- 3
-
-
- cutty sark
- mantua
- (and 2 more)
-
Cutty Sark by NenadM
keelhauled replied to NenadM's topic in - Build logs for subjects built 1851 - 1900
Ahhh details no one will ever see! wait to you see how much painstaking details of the mast and rigging will be covered by the sails!!! I believe we are crazy- 4,152 replies
-
- 5
-
-
- cutty sark
- tehnodidakta
- (and 1 more)
-
Cutty Sark by NenadM
keelhauled replied to NenadM's topic in - Build logs for subjects built 1851 - 1900
Your Cutty is Beautiful!! Also Hothead's work was great! very nice!- 4,152 replies
-
- 3
-
-
- cutty sark
- tehnodidakta
- (and 1 more)
-
Tasmanian, When I reworked the furled sails they were about 25 percent of the original size, which is slightly less than the size you remembered seeing. They may still be too bulky, but they are good enough. thanks for the info! Popeye, thanks for the encouragement. I'll try to get some post done this weekend.
- 525 replies
-
- 1
-
-
- cutty sark
- mantua
- (and 2 more)
-
I've been traveling, but I've been building! I'll post all the updates soon! Marc
- 525 replies
-
- 2
-
-
- cutty sark
- mantua
- (and 2 more)
-
need opinions on furled sails
keelhauled replied to keelhauled's topic in Masting, rigging and sails
Hi Frankie, I actually used your video to furl the sails originally. I followed the video pausing and executing step by step. Fairly close at least. But as you say, too much bulk. However it was fun and challenging to furl the sail as close to that video as I could. The biggest trouble is the tucking in of the sail under the skin. AVSJerome and spyglass. I'm planning on having the main and fore courses brought up into its gear as you have posted. thanks for the help. Marc -
I posted a question about the furled sails: http://modelshipworld.com/index.php/topic/12588-need-opinions-on-furled-sails/ It sounds like the consensus is that there is too much bulk. Right now they are only 50% of the length. I'll cut another 25% out. I'm not going to start from scratch. I'm going to just literally cut the bottom half off and furl the upper half and stick the corners out the top. If i really screw this up, I already have a full set of full length that are almost completely finished for these yards. My plan was to only have the royals and the sky furled with the main and fore courses pulled up in their gear. The rest of the sails set (excluding stunsuls which I wasn't going to include). Thanks for the feedback guys. I really appreciate it. I've learned that it's much easier just to set the sails then it is to furl them. Just in case anyone thinks that they will be saving work by furling their sails!
- 525 replies
-
- 3
-
-
- cutty sark
- mantua
- (and 2 more)
-
need opinions on furled sails
keelhauled replied to keelhauled's topic in Masting, rigging and sails
Thanks for the responses guys! I'll get rid of more sail to reduce the bulk. Maybe play with other material. I also made full versions. If I can't get a better furled version, I can go to set versions of the sails. Marc -
Cutty Sark by NenadM
keelhauled replied to NenadM's topic in - Build logs for subjects built 1851 - 1900
Nenad, Really nice work on the stand! I miss it when I am not able to stay up with what you are doing. However, I love catching up. Hope all is well with you and the kids, Marc- 4,152 replies
-
- 6
-
-
- cutty sark
- tehnodidakta
- (and 1 more)
-
Thanks George and Sampson! George, you are right about the work for the furled sails. For me, it adds a good hour or so onto the job for each sail. Those sails take so much time, it amazes me. I think that when its done, I'll have easily two to three times the amount of time that it took to build the yards and masts in the sails. Marc
- 525 replies
-
- 1
-
-
- cutty sark
- mantua
- (and 2 more)
-
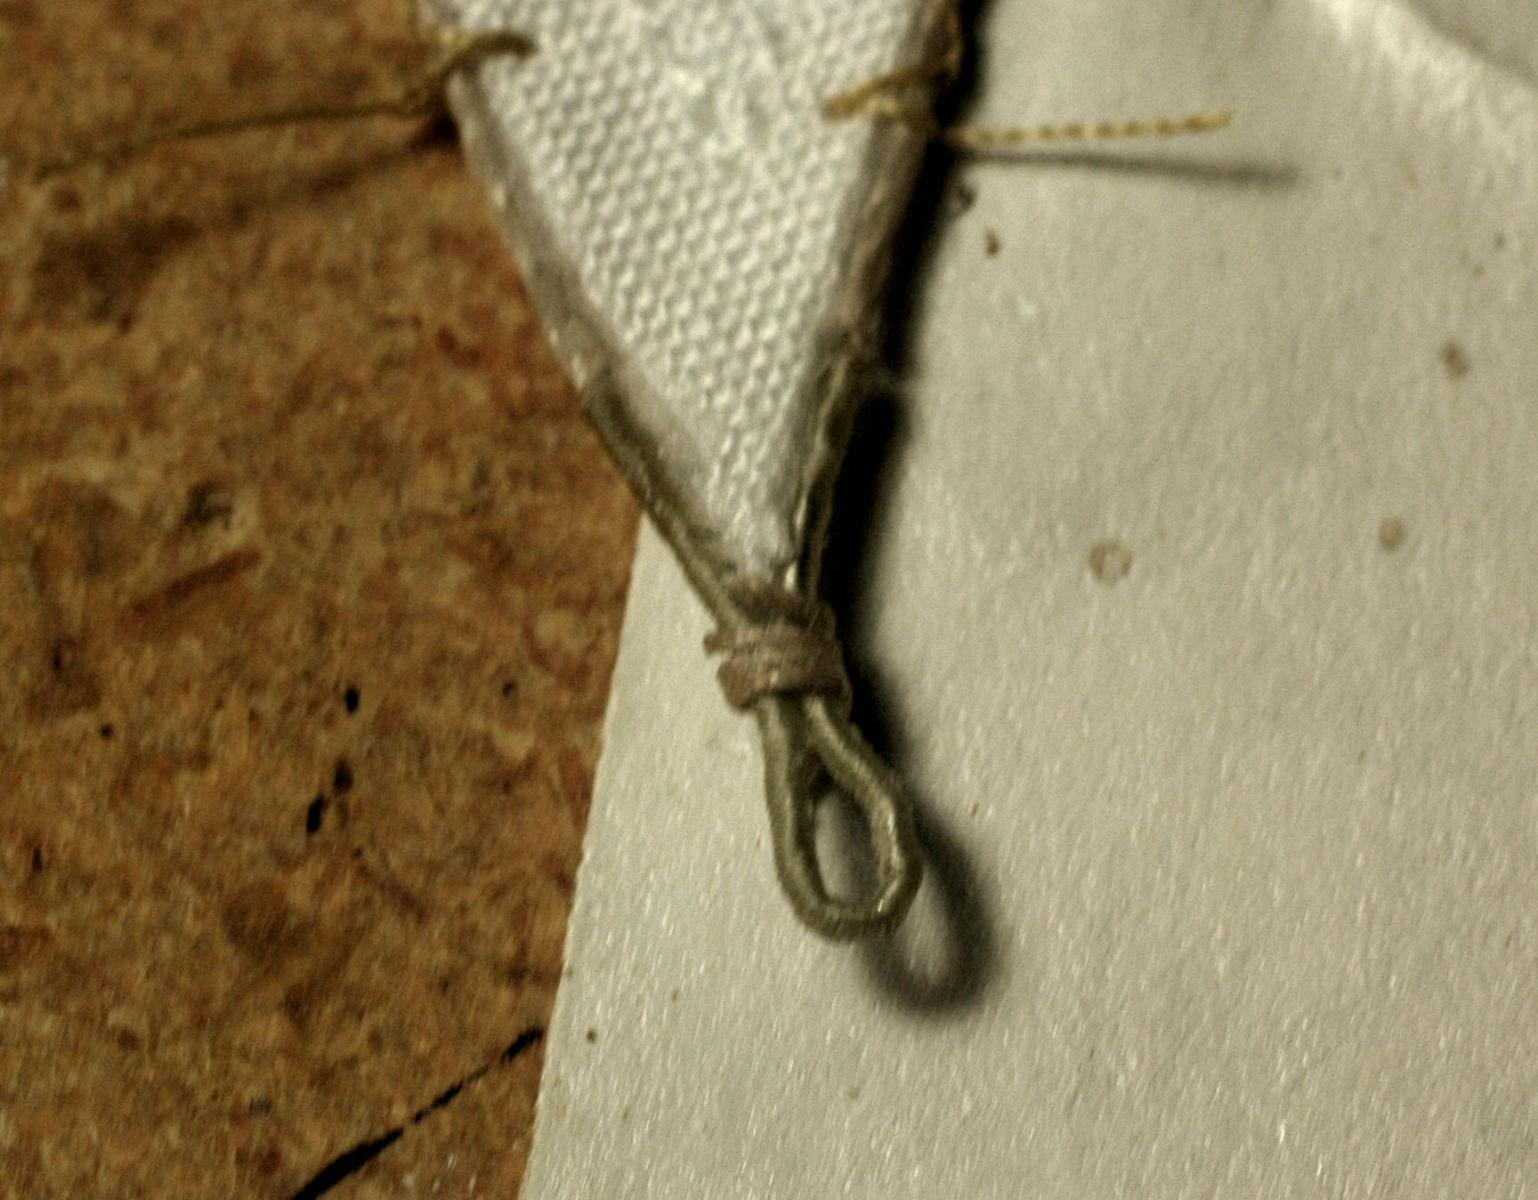
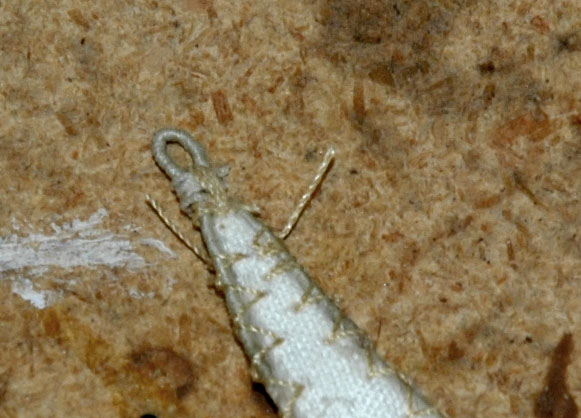
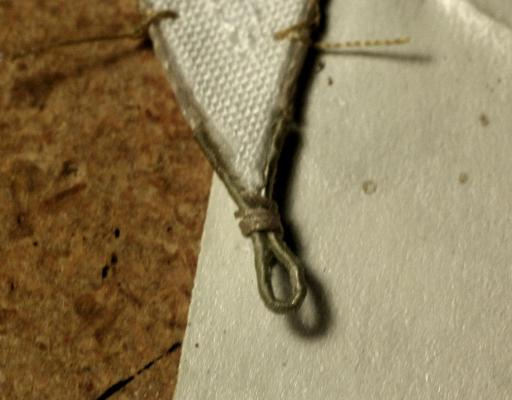
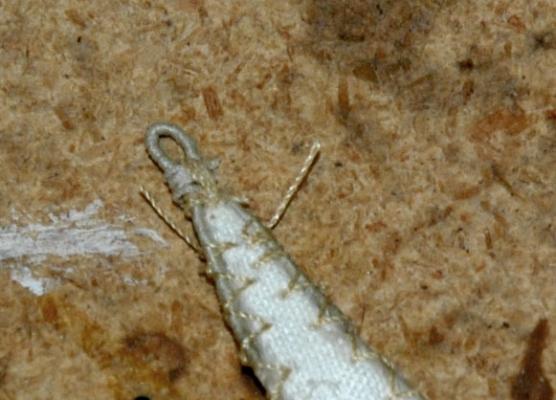
So, I continue to work on sails. I've sewn on all of the bolt ropes for the close to 30 sails. Also, I decided to serve the earrings and cringles for all of the stay sails and jibs - and have finished that work. some examples of the serving I completed the royals and sky sail with all of the details and then bent and furled them. , A detail of the earring from the port Currently, I'm tyring to decide whether I bent them properly. I've seen them bent two different ways and tried both methods I haven't posted lately because quite frankly you can't tell that I've done any work after 40 hours of sewing. I just keep sewing the same parts sail after sail. I think that this it the more efficient way, but you don't have much to look at. One day all of the sails will amazingly appear ready for bending. I still have all of the earrings to finish. I'm currently working on these areas: the fastening of the yard through the eyes. I also have the rings at the feet - the bolt ropes loop through and must be lashed/served and the yard run through the corner of the sail and ring. -marc


- 525 replies
-
- 8
-
-
- cutty sark
- mantua
- (and 2 more)
-
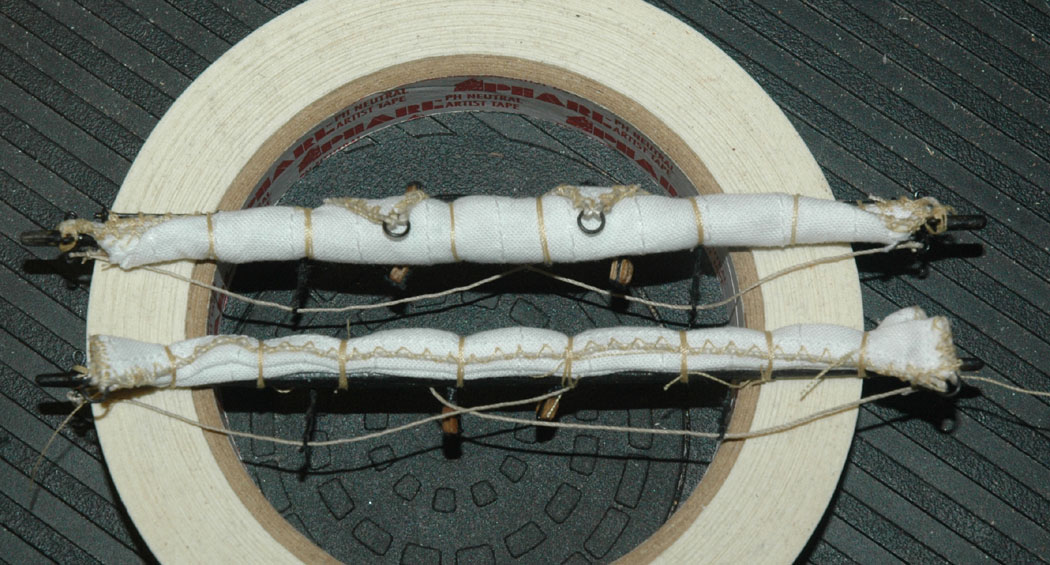
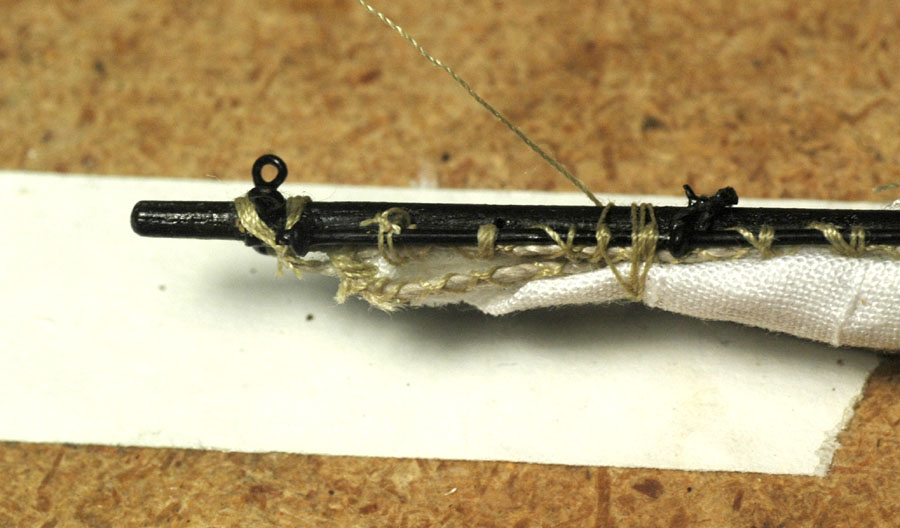
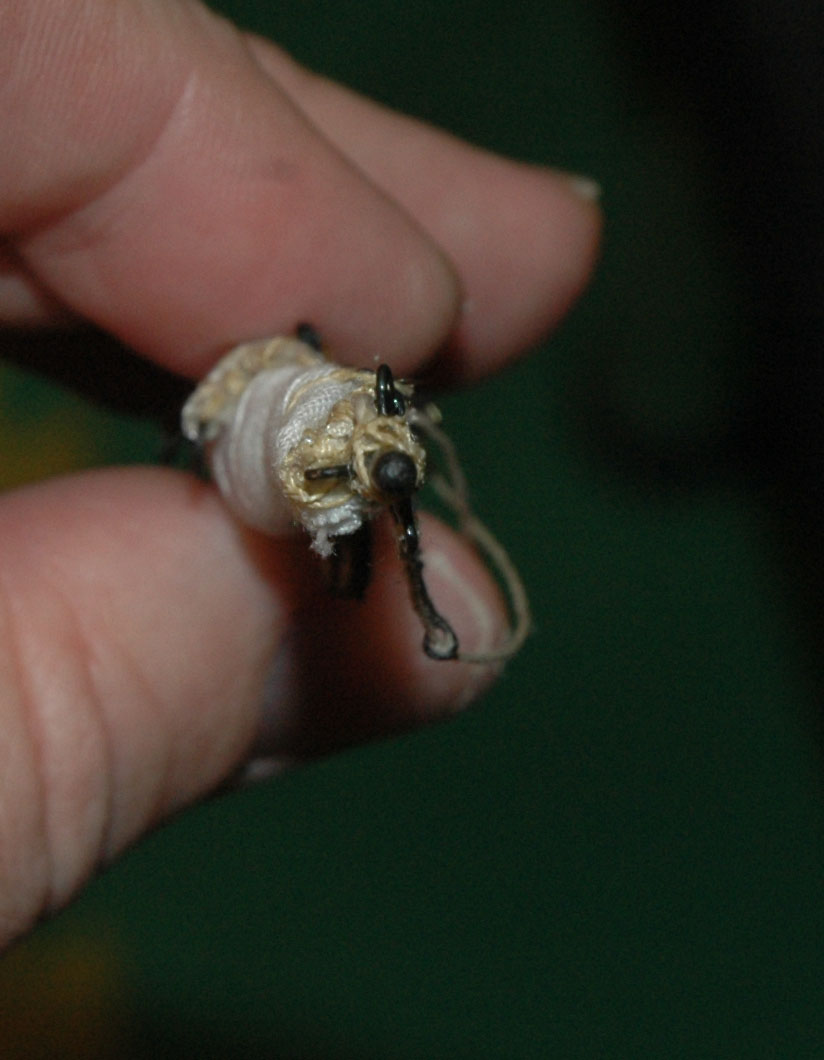
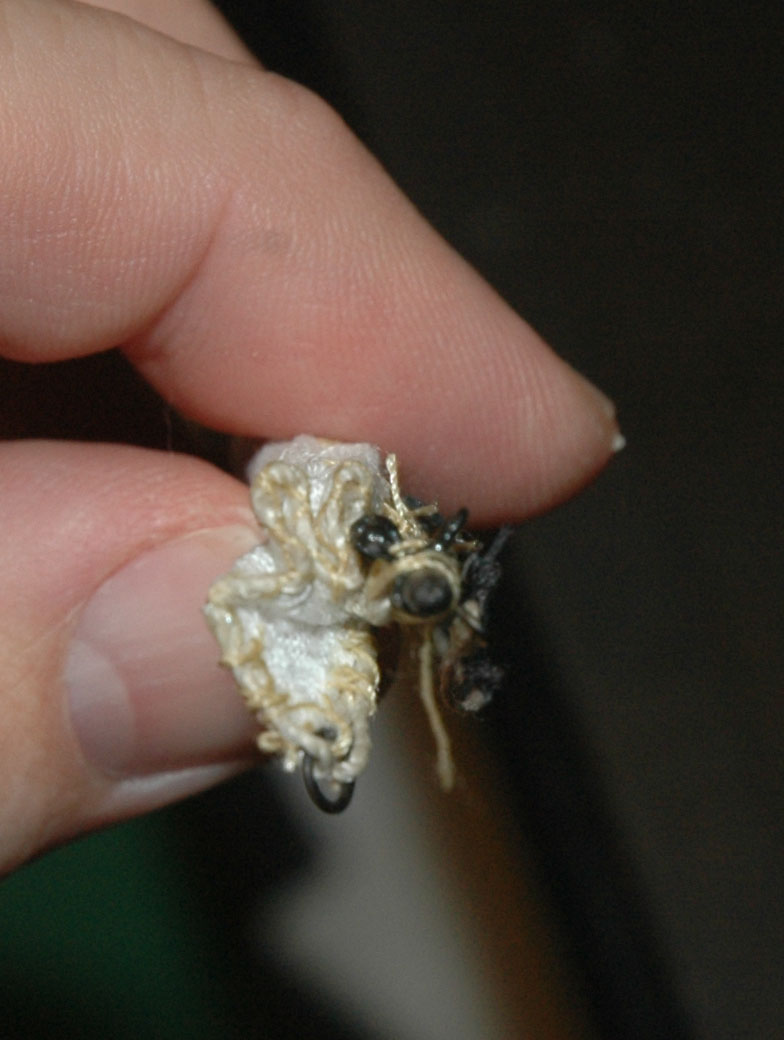
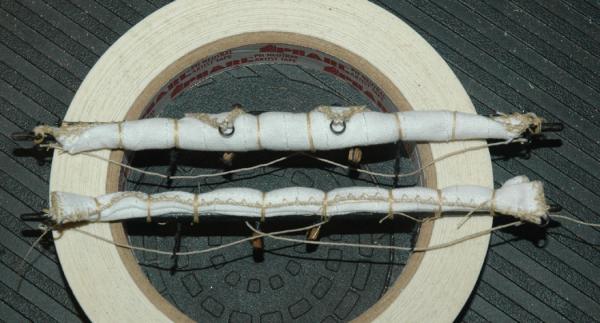
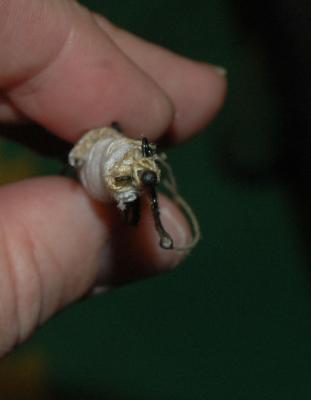
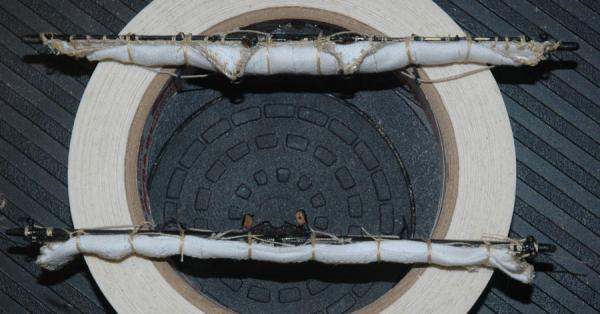
HI, Working on the Cutty Sark and need some feedback on furled sails. I'm calling the top version option 1 and the lower version option 2. I've looked at different references of the Cutty as she was during the tea trade and as the Fierra and have seen the royals furled differently. I made sails with the heights cut in half to reduce bulk. I finished the sails and bent them to the jackstays then furled. The sails and yards in the photos are the mizzen royal and the sky which are essentially the same size. Neither is furled below the yard. I've tried to pull the sails up as high as I could and still attach the slings, although option 2 is actually on top of the jackstays. This is from the front Option 1 is at the top Option 2 is on the bottom This is from the top I have to say that I'm not as happy with the accordion look of option 2 from the sides. Option 1 port side Option 2 port side Comments? Which would you go with? thanks Marc


-
Are bolt ropes/earrings served?
keelhauled replied to keelhauled's topic in Masting, rigging and sails
Thanks Duff, I hope that it helps someone with the same questions that I have, I had the luck of being there at the right time. -
Cutty Sark by NenadM
keelhauled replied to NenadM's topic in - Build logs for subjects built 1851 - 1900
Hi Nenad, Merry Christmas! I see that you are looking at how to mount your model. I'm glad that you are going with a cradle. One way to deal with the tipping over issue is to mount the cradle to a wider/heavier base. I mounted the middle cradle of my ship from below the base with recessing the screws. I was also looking at ways of screwing the hull into cradle. But with Balsa for the planking I don't think that screws would structurally hold the ship to the cradle. Is the keel a hard wood? if might want to have three support positions, spaced to prevent hogging. Don't know if it would be an issue or not, but those are the things that keep me up at night. All the best to you and your family, marc- 4,152 replies
-
- 5
-
-
- cutty sark
- tehnodidakta
- (and 1 more)
-
HMS VICTORY 1759 by isalbert
keelhauled replied to isalbert's topic in - Build logs for subjects built 1751 - 1800
Amazing and Beautiful! The wheel is a work of art Marc! -
Hi guys, I've been working on the bolt ropes... and working...and working... much labor not much to show. I'll take some photos this weekend. I've figured out a method to serve the cringles without driving myself crazy. I've also been on the road almost half the time. So, not as much work on the Cutty as I would have liked. However I have gotten more info on the sails and bolt ropes. I posted the following in another forum on this site where I was asking about the Cutty's sails, but I wanted to share it here as well. I was traveling in Sydney in October and was able to talk with two sailing masters about bolt ropes, cringles, and serving. I was able to speak to the master of the HMB Endeavor. I noticed that some of the cringles on the stay sails aboard the HMB Endeavor were wormed and served while others weren't, while still others were wormed, served, and leathered. Further these were analogous cringles (for example tack cringle on one stay sail vs. tack cringle on another). So I asked the master why they were different. She said that it depended upon whether they had an eye (a detail I didn't notice) or how much they would they were used or chance of being chaffed. She said if the cringle would experience a great deal of wear and abrasion, then a metal eye was used and the bolt rope was wrapped abound the eye and seized without serving. She said that no serving of the line was needed if the metal eye was used since the eye took all the wear. If the cringle was expected to have less wear, but still substantial then the cringle was served and leathered. If the line had even less wear then it was just served. I was able to also talk with the sailing master of a restored ship that was in Sydney harbor for a few days. I took the name, but I can't find it right now. It turned out that he also loved the Cutty Sark and was very knowledgeable about sailing ships of the late 1800's. He told me essentially the same info that the HMB Endeavor's Master had provided about the cringles. He added that the earrings of the square sails were often served even if they did have a metal ring since the sails were in contact with the yard arms. Concerning the bolt ropes, he said that he had also come across historic accounts of the Cutty as well as other ships where the information did not match between sources. He said that it was because the details of how the sails were set up, such as serving, metal eyes, etc.were up to the Master. Also the Master may change some of that set up at sea depending on how the sails were wearing. So if you went aboard the same ship during different times with the same master or a different master, those sail details and even the size of the sails might be different. He said that he wouldn't sweat those details on a model, any combination of serving, eyes, etc would be acceptable. I told him of the HMB Edveavor's stay sails not all being set up the same. He said that it was a perfect example of what he was talking about and showed me examples of the same inconsistencies on his ship. On his ship the top sails had their lower bolt rope - the foot rope- served. He said it was because they rub against the stays. I told him that I have accounts of the Cutty with and without it's foot ropes served. He said that it probably depended upon which sails and when the observations were made. If the observations were from the early 20th century when she was a training vessel or when she was being used as the Frederica it was probably because of the same issue as his ship and they wanted to make the sails last longer without having to replace the foot rope (bolt rope) of those sails. However, she probably didn't have the foot rope served when she was in the tea and wool trade trying to break records. He said that the bolt rope adds weight to the sail and doesn't allow it to have as rounded a belly for the square sails, so the master would have sucked up having to repair the sails more often for the gain in speed. He also said it wouldn't have been two unusual to have 2 or 3 suits of sails, light weather sails, a duplicate or heavier set and a foul weather set. He also showed me where the standing rigging was served to prevent chaffing of the standing rigging from the running rigging or other standing rigging. We were talking about working on the yards. He said that when he was kid he almost never used the foot ropes that hang down from the yards. He said that they used to walk out on the top of the yards and then hop down and swing over to the foot ropes when they got to the end of the yard. He said that you can't do that anymore due to safety concerns and everyone is harnessed onto the yards. He said that they also used to go between the mast by walking along the stays. He said that there were usually enough lines that you could grab one to another as you walked across. I also asked him the royal and sky masts in old paintings and models. They don't usually have Jacobs ladders or rat lines. He said that they weren't needed - any sailor could get up those masts just by shinnying up the mast, they could also just go up a shroud. He said that many professional sailors can still go up that way. A crew was working on the ship and when they came down, the master told one to go up the back stay to the top for me. The guy went over to the rail and grabbed the stay (I noticed he didn't have a harness on, but I didn't say anything). He went up hand-over-hand very quickly to the top and then slid back down the stay. He also went up the fore castle without using the ladder for me. I had a question about how hard it was to get up when you're at sea and the steps are stowed away as they were on the Cutty. He just stepped on the Windlass and grabbed what I think was a jib sheet and when right up onto the deck, then just swung/stepped down. He was actually much, much, faster getting up and down to the fore castle this way than I was using the steps. Finally the same sailor went back to work going up the ratlines and over the outside to the top without slowing when he hit the futtock shrouds. The only thing that slightly slowed him down was transferring his safety line and that didn't slow him much. When I have seen videos of crews, mainly volunteer crews work a tall ship it was much different than watching this professional sailor. It is always amazing how helpful and friendly sailors are when you show an interest in their work and have some knowledge about the ship and its working. These guys were great at filling in some of the gaps! So in the end, it seems like I can detail the sails almost however I like and not be out of line with reality. Marc
- 525 replies
-
- 3
-
-
- cutty sark
- mantua
- (and 2 more)
-
Are bolt ropes/earrings served?
keelhauled replied to keelhauled's topic in Masting, rigging and sails
I have some additional insight. I was traveling in Sydney in October and was able to talk with two sailing masters about bolt ropes, cringles, and serving. I was able to speak to the master of the HMB Endeavor. I noticed that some of the cringles on the stay sails aboard the HMB Endeavor were wormed and served while others weren't, while still others were wormed, served, and leathered. Further these were analogous cringles (for example tack cringle on one stay sail vs. tack cringle on another). So I asked the master why they were different. She said that it depended upon whether they had an eye (a detail I didn't notice) or how much they would they were used or chance of being chaffed. She said if the cringle would experience a great deal of wear and abrasion, then a metal eye was used and the bolt rope was wrapped abound the eye and seized without serving. She said that no serving of the line was needed if the metal eye was used since the eye took all the wear. If the cringle was expected to have less wear, but still substantial then the cringle was served and leathered. If the line had even less wear then it was just served. I was able to also talk with the sailing master of a restored ship that was in Sydney harbor for a few days. I took the name, but I can't find it right now. It turned out that he also loved the Cutty Sark and was very knowledgeable about sailing ships of the late 1800's. He told me essentially the same info that the HMB Endeavor's Master had provided about the cringles. He added that the earrings of the square sails were often served even if they did have a metal ring since the sails were in contact with the yard arms. Concerning the bolt ropes, he said that he had also come across historic accounts of the Cutty as well as other ships where the information did not match between sources. He said that it was because the details of how the sails were set up, such as serving, metal eyes, etc.were up to the Master. Also the Master may change some of that set up at sea depending on how the sails were wearing. So if you went aboard the same ship during different times with the same master or a different master, those sail details and even the size of the sails might be different. He said that he wouldn't sweat those details on a model, any combination of serving, eyes, etc would be acceptable. I told him of the HMB Edveavor's stay sails not all being set up the same. He said that it was a perfect example of what he was talking about and showed me examples of the same inconsistencies on his ship. On his ship the top sails had their lower bolt rope - the foot rope- served. He said it was because they rub against the stays. I told him that I have accounts of the Cutty with and without it's foot ropes served. He said that it probably depended upon which sails and when the observations were made. If the observations were from the early 20th century when she was a training vessel or when she was being used as the Frederica it was probably because of the same issue as his ship and they wanted to make the sails last longer without having to replace the foot rope (bolt rope) of those sails. However, she probably didn't have the foot rope served when she was in the tea and wool trade trying to break records. He said that the bolt rope adds weight to the sail and doesn't allow it to have as rounded a belly for the square sails, so the master would have sucked up having to repair the sails more often for the gain in speed. He also said it wouldn't have been two unusual to have 2 or 3 suits of sails, light weather sails, a duplicate or heavier set and a foul weather set. He also showed me where the standing rigging was served to prevent chaffing of the standing rigging from the running rigging or other standing rigging. We were talking about working on the yards. He said that when he was kid he almost never used the foot ropes that hang down from the yards. He said that they used to walk out on the top of the yards and then hop down and swing over to the foot ropes when they got to the end of the yard. He said that you can't do that anymore due to safety concerns and everyone is harnessed onto the yards. He said that they also used to go between the mast by walking along the stays. He said that there were usually enough lines that you could grab one to another as you walked across. I also asked him the royal and sky masts in old paintings and models. They don't usually have Jacobs ladders or rat lines. He said that they weren't needed - any sailor could get up those masts just by shinnying up the mast, they could also just go up a shroud. He said that many professional sailors can still go up that way. A crew was working on the ship and when they came down, the master told one to go up the back stay to the top for me. The guy went over to the rail and grabbed the stay (I noticed he didn't have a harness on, but I didn't say anything). He went up hand-over-hand very quickly to the top and then slid back down the stay. He also went up the fore castle without using the ladder for me. I had a question about how hard it was to get up when you're at sea and the steps are stowed away as they were on the Cutty. He just stepped on the Windlass and grabbed what I think was a jib sheet and when right up onto the deck, then just swung/stepped down. He was actually much, much, faster getting up and down to the fore castle this way than I was using the steps. Finally the same sailor went back to work going up the ratlines and over the outside to the top without slowing when he hit the futtock shrouds. The only thing that slightly slowed him down was transferring his safety line and that didn't slow him much. When I have seen videos of crews, mainly volunteer crews work a tall ship it was much different than watching this professional sailor. It is always amazing how helpful and friendly sailors are when you show an interest in their work and have some knowledge about the ship and its working. These guys were great at filling in some of the gaps! Marc -
Jim Byrnes Model Machines
keelhauled replied to Mahuna's topic in Modeling tools and Workshop Equipment
Pretty fast. I think that it was only 2 to 3 weeks. May take longer the closer you get to Christmas However long it is, the saw is worth the wait! Jim even mounted the micrometer and miter guide extension for me. Their attention to detail and customer service is great! -
Jim Byrnes Model Machines
keelhauled replied to Mahuna's topic in Modeling tools and Workshop Equipment
Congratulations Barry! My wife is giving me the saw for Christmas! It already arrived and she allowed me to open. I convinced her that I needed check everything and fire it up. Then I had to box it back up until the holiday. I guess I can wait. The saw is even better than I imagined. The motor is quiet and the saw has no vibration! Have fun! Marc -
Cutty Sark by NenadM
keelhauled replied to NenadM's topic in - Build logs for subjects built 1851 - 1900
Looking good! keep it up! marc- 4,152 replies
-
- 4
-
-
- cutty sark
- tehnodidakta
- (and 1 more)
-
Cutty Sark by NenadM
keelhauled replied to NenadM's topic in - Build logs for subjects built 1851 - 1900
Looking wonderful!!! I can't wait to get off the road and back into the ship yard. I'm very jealous of you! Keep up the wonderful work! Marc- 4,152 replies
-
- 5
-
-
- cutty sark
- tehnodidakta
- (and 1 more)
-
Are bolt ropes/earrings served?
keelhauled replied to keelhauled's topic in Masting, rigging and sails
It is a great book! It's harder to find information on Merchant ship sails. Thanks again Ed! marc -
Are bolt ropes/earrings served?
keelhauled replied to keelhauled's topic in Masting, rigging and sails
Thanks Ed! -
Are bolt ropes/earrings served?
keelhauled replied to keelhauled's topic in Masting, rigging and sails
Thanks guys! Great info. I really appreciate the replies! Marc