keelhauled
-
Posts
788 -
Joined
-
Last visited
Content Type
Profiles
Forums
Gallery
Events
Everything posted by keelhauled
-

Byrnes thickness sander
keelhauled replied to rtibbs2018's topic in Modeling tools and Workshop Equipment
Ditto, Bob!!! -
Welcome aboard! I agree with Mark, a build log would be great! best Marc
-
Wow. what a beautiful build!!! Great Work Chuck!
- 421 replies
-
- 6
-

-
- medway longboat
- Syren Ship Model Company
- (and 1 more)
-
Hi Ric, thanks for the compliments. I'm happy to help you any way that I can! As far as the plans - my recommendation is to get Campbell's plans and Longridge's books and put the plans in a drawer somewhere. The kit plans are wrong in numerous ways- I've listed many here. I ended up not using 90% of the kit. The pumps, anchors, bells, figurehead, maple strips, walnut strips, the side pin rails (huge mistake!) and some mast fittings are about all that I kept. Everything else was build and rebuilt from scratch, including the deck houses (although I did keep some decoration of the panels). Best Marc
- 525 replies
-
- 1
-
-
- cutty sark
- mantua
- (and 2 more)
-
Thanks Dennis! I'm sewing hanks on the stay sails tonight. I hate this particular job; not sure why. I have to finish the main stay sail hanks and bend those sails then I can get back to the stays. It's been about a year since I realized that I needed the main stays in place to go any further on the fore mast rigging. However, it's still progress, just in different places! Best Marc
- 525 replies
-
- 2
-
-
- cutty sark
- mantua
- (and 2 more)
-
Hi Harry, You and I are on the same page. But, thank you very much about pointing out the brace info. I have the eyes and tackle ready mounted to the main mast for the braces, but if I didn't and you hadn't pointed it out, I would have had some real issues! Somewhere earlier in the postings I rant about the Mantua treatment of the backstays and incorrect number of deadeyes. Unfortunately it was too late in the build when I caught it. It's also why I'll never build another kit. I have some kits on the shelf, but I'll only use them for parts not the plans, frames, etc. I'm using Campbell's plans for the rigging. That being said, since the model doesn't have the correct number of deadeyes, I have had to make adjustments. These are as follows for the main mast (bow to aft): 5 shrouds correct, topmast backstay 3 is missing , capstay present, top mast 2 missing, topmast backstay 1 present, 2nd t'gallent backstay missing, 1st t'gallent backstay present, royal backstay present, sky backstay present. The deadeyes for the last three stays are raised to a higher level as those backstays are on the cutty. The rest of the rigging is according to campbell. Wherever Campbell is silent I go to photos and Longridge, then to Underhill. Nenad, Thanks for the complement!!! I hope all is going well with you and that you are enjoying the summer! So, I'm currently making hanks from wire and a jig for the main stay sails. I'm only going to fly two of the three. They are complete minus the hanks. Hopefully by the end of the week I can add the sails and actually rig the stays, then I'll finalize tension of the backstays then onto ratlines. best marc
- 525 replies
-
- 4
-
-
- cutty sark
- mantua
- (and 2 more)
-
Great work!!! super nice model. Your sails look great. I sewed several sails for my Cutty Sark (some were sown by me, some by a vendor with a CNC sewing machine based on kit supplied measurements) so I know what you're going through. very nice work. The hammocks (bed rolls) are stowed vertically in the crane and nets as you show in your photo. The will line all of the cranes and nets. sometimes open for airing out as you have them, other times with canvas covering the entire cranes to protect from rain. best marc
-
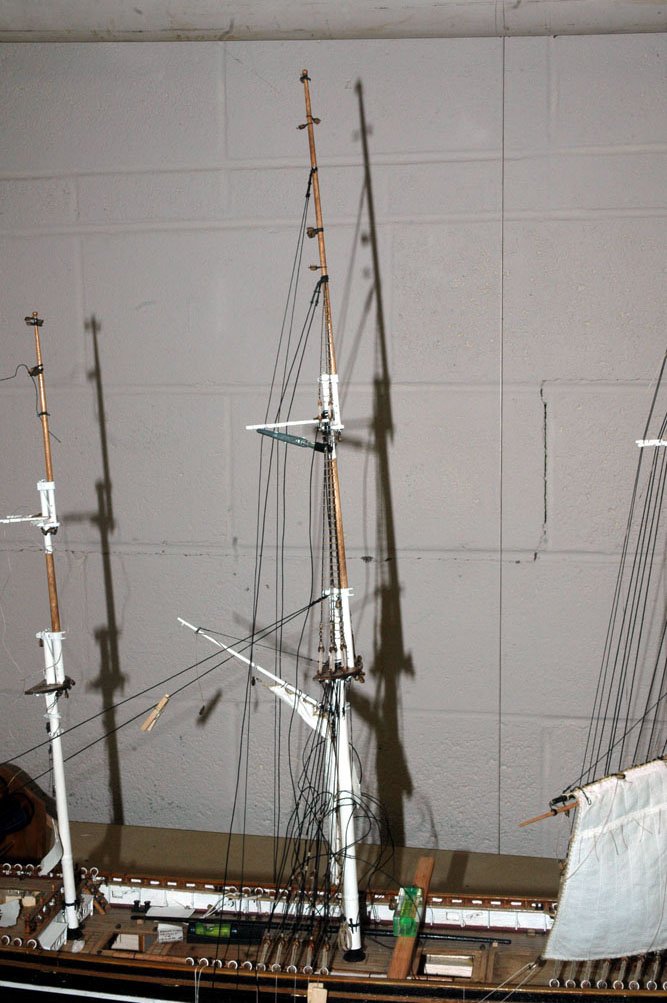
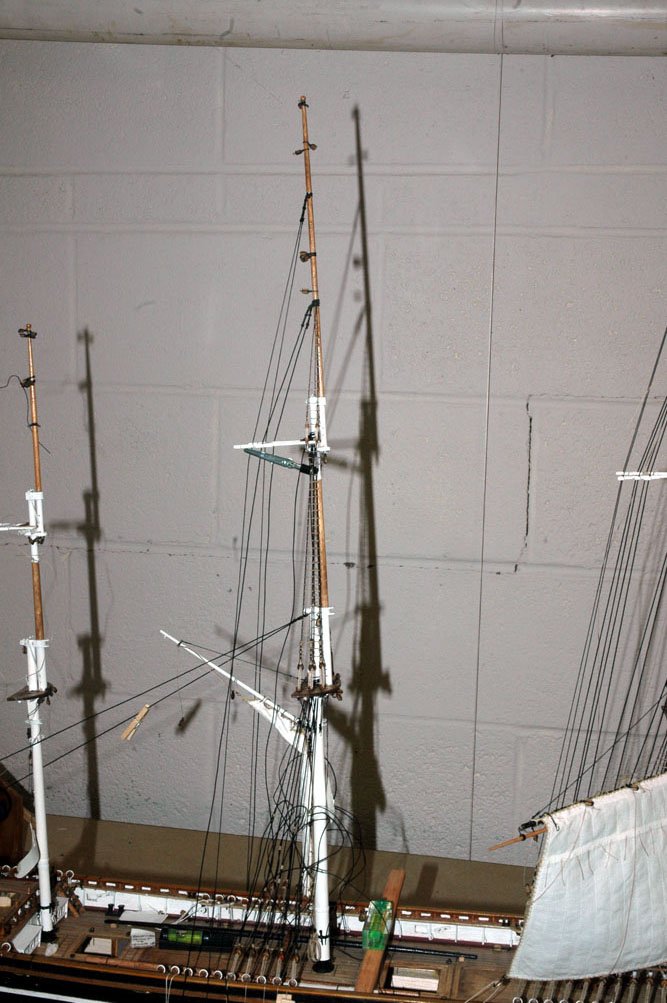
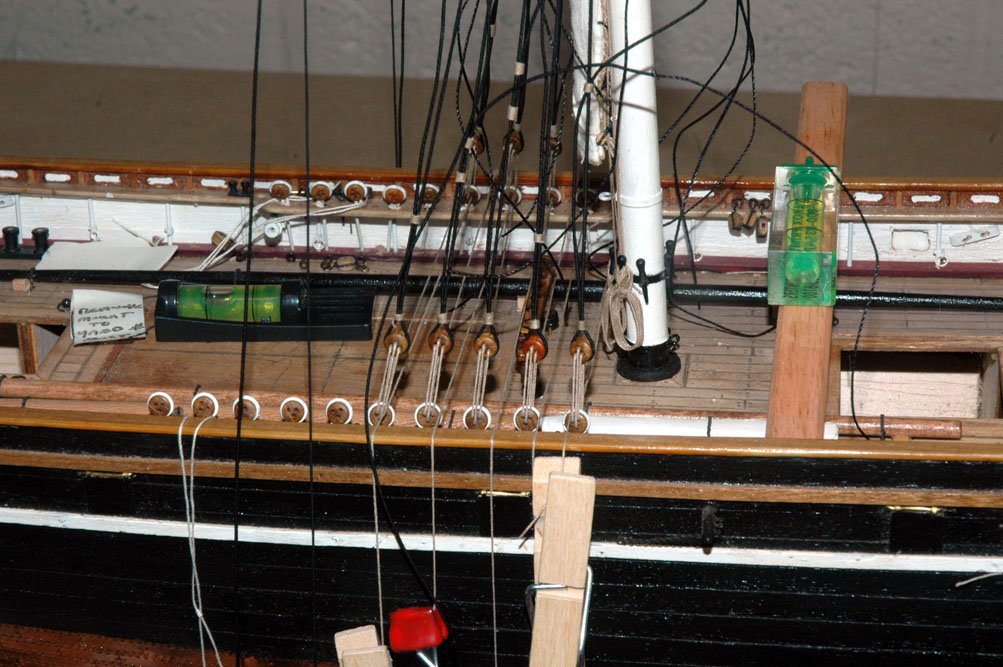
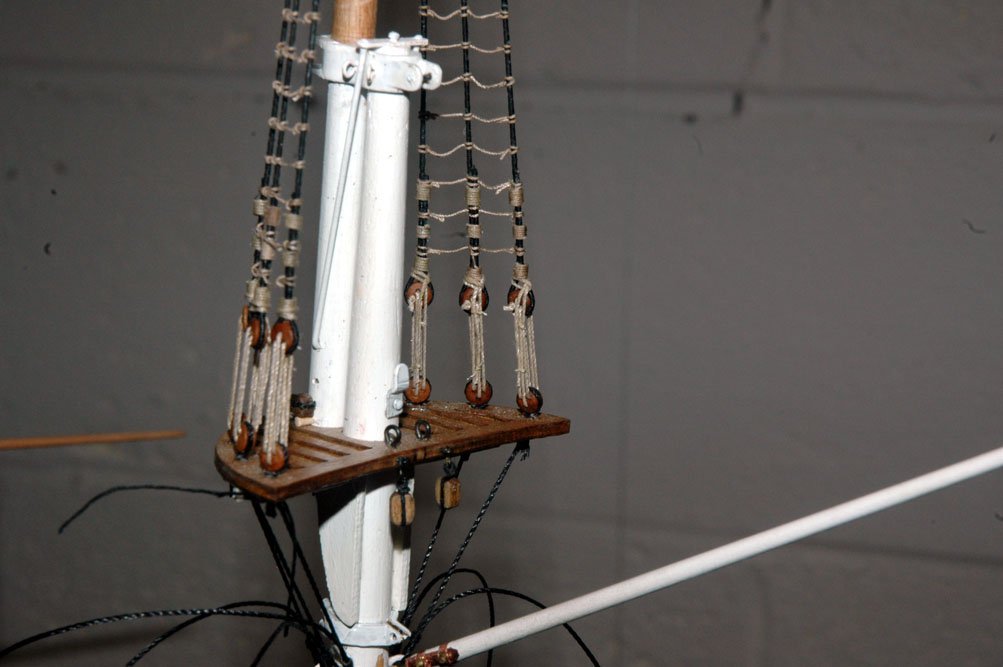
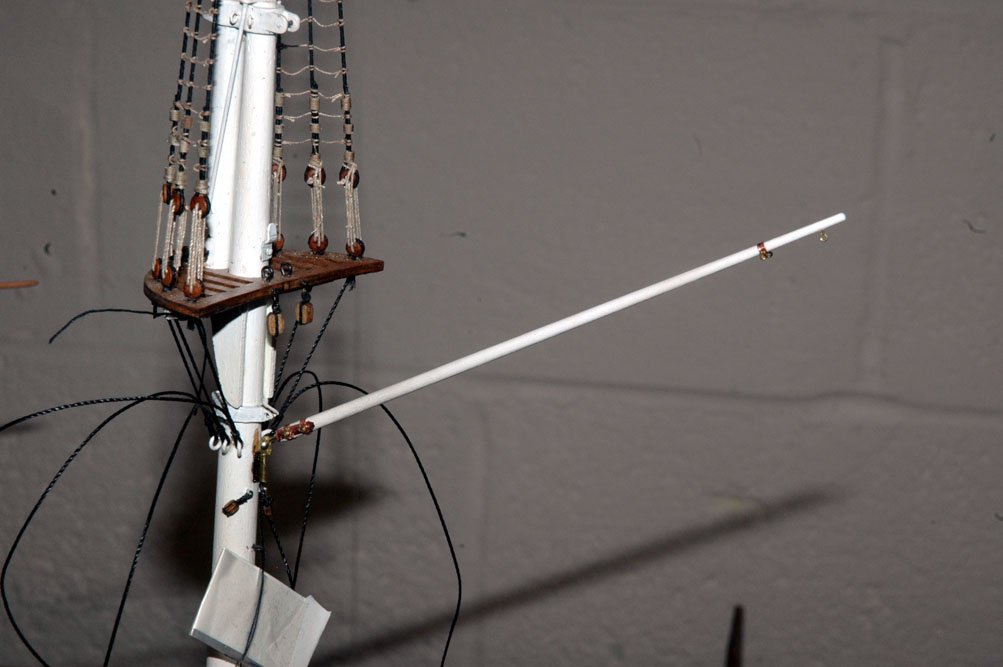
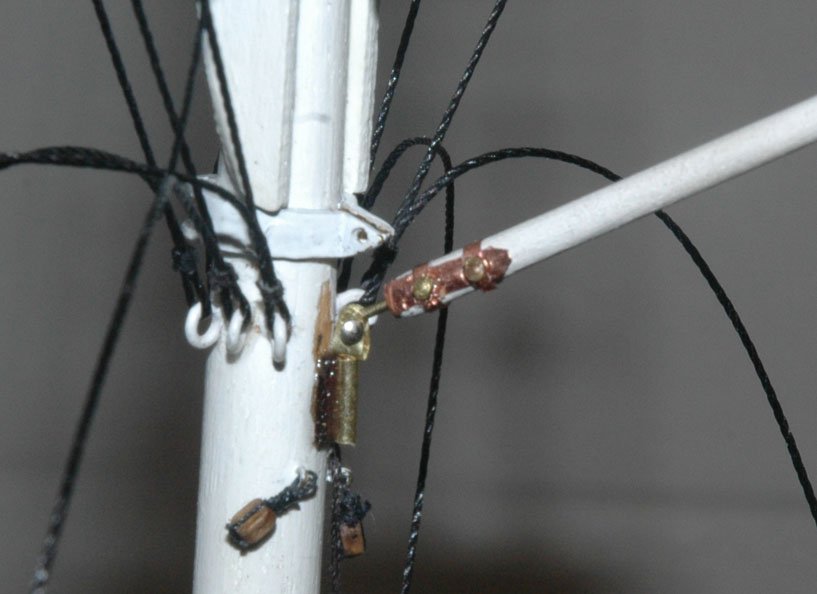
Harry, Melbourne was cold and extremely rainy and windy!!! A long two weeks of work. Since my return, I've been working in the dock yard I've been serving yards and yards of lines (the Cutty has all of here standing rigging 100% served!!!) Chuck's serving machine is still holding up fine. I rigged the spencer sail to the main mast. I took photos, but can't seem to locate them neither on my phone or camera! It was actually a fun sail to rig, I really liked the brails. After learning how the operate and I had fun playing with them until finally furling the sail. One interesting aspect was that it appeared that three brails shared the same pin as the halyard and downhaul. There are some photos of the cutty and other ships where you can see clearly that two or three lines share the same belaying pin. I guess it makes total since that the brails would share the same pins as the lines to take in our out the sail that they are attached to, however it makes rigging the model a little challenging. I was able to belay the lines and then applied coils made off ship, although I wasn't able to attach four coils to each pin, so I chose to attach three to one and two to the other to assess how they look. It maybe hard to see, but the starboard pin in view has four lines figure eight belayed and three coils belayed to a single pin. It looks like the photos of the Cutty's pins. Actually mine are neater than the coils in most of the old photos of the Cutty. a View of the spencer Here's a photo of the lower shrouds attached and the lanyards temporarily tensioned. And on to fitting the backstays! And onto dry fitting all of the main shrouds, backstays, and stays. All of the backstays and shrouds are completely set up and ready for the lanyards to be set with the cow hitch. The fore stays are just clamped in place. I wanted to tension everything up, let it sit for a couple of days to make sure that there wasn't any stretching or adjustments in tension that needed to be made before finally setting the lanyard. all of the lanyards are waxed and will actually hold the tension, but the lanyard running through the last hole in the deadeye sometimes relaxes slightly while I'm tying the cow hitch, so when I'm a confident of the tension, I add a little bit of dilute wood glue to the line and hole -just enough to hold the line from moving but easily unglued with alcohol. The white tags on the stays have writing reminding me that I need to mount the stay sails before finally rigging the stays. I spent tonight making hanks for the sails!! The hemostats are for keeping tension on the lanyards from the other side. Helps me when I'm adjusting the tension of the line. Best marc


- 525 replies
-
- 10
-
-
- cutty sark
- mantua
- (and 2 more)
-
Cutty Sark by NenadM
keelhauled replied to NenadM's topic in - Build logs for subjects built 1851 - 1900
very cool!- 4,152 replies
-
- 4
-
-
- cutty sark
- tehnodidakta
- (and 1 more)
-
Cutty Sark by NenadM
keelhauled replied to NenadM's topic in - Build logs for subjects built 1851 - 1900
I know how it is!!! She'll be there when you have the time- 4,152 replies
-
- 2
-
-
- cutty sark
- tehnodidakta
- (and 1 more)
-
Thanks Harry!! You did a great job with your build. I'll be down in your part of the world - sort of. I'll be down in Melbourne and Craigieburn (Rather be in Wellington!) But since I'll be in the office all day, it probably doesn't matter. Cheers! Marc
- 525 replies
-
- 1
-
-
- cutty sark
- mantua
- (and 2 more)
-
Hi Barbara, I'm not able to express how impressed I am with the ship or the amazing attention to detail. Truly spectacular!!! I'm also glad that you and your father have the hobby to share with each other. Your patience and outlook is awesome. Not that your father needs any help, but should you need help or assistance with the build, this site is full of wonderful people that love to help each other. My life and model building experience are much richer due to the group here. Feel free to reach out to other builders of the Victory through their build log or the builder of any log and I'm sure that you will get a great deal of help. Just posting a question in your build can also generate helpful responses. Thank you for sharing this wonderful model and the journey forward. Best, Marc
-
Cutty Sark by NenadM
keelhauled replied to NenadM's topic in - Build logs for subjects built 1851 - 1900
thanks for sharing the artwork with us.- 4,152 replies
-
- 3
-
-
- cutty sark
- tehnodidakta
- (and 1 more)
-
Thanks Mark! I wish that I had your building skills. Your Licorne build is beautiful!
- 525 replies
-
- 2
-
-
- cutty sark
- mantua
- (and 2 more)
-
Mark, I've been doing some catch up on your build. Truly impressive and beautiful! I'm in awe! thanks for sharing your work with us Marc
-
Hi Jeff ,Michael, and Dennis! thanks for all of the kind words and encouragement! Michael, I like the idea about the TV and Stereo, but I think the admiral would shut down the ship yard. I already feel bad that I'm spending too much time in the ship yard. However, I do have a 4K 60 inch screen (she picked it out) with a 1500 watt stereo system about 20 feet away! - Just in case I need something to do while I have to wait for glue to dry. Dennis, you are always too kind. Sometimes I worry that I have too many supplies, until I need something that I don't have and can't make (usually wood). Then I'm furious. It's also why I build more and more scratch built items including metal and wood fittings. I've made brass and wood thimbles, brass eye bolts, bollards, etc. That way I never worry about loosing, running out or breaking items. If I need another fitting, I can just make it. It's very liberating. But you're right I have bought a crap load of stuff prior to learning how to make it or having the equipment to do so or items that I won't be able to easily make - like very fine brass chain. Best! Marc
- 525 replies
-
- 3
-
-
- cutty sark
- mantua
- (and 2 more)
-
Cutty Sark by NenadM
keelhauled replied to NenadM's topic in - Build logs for subjects built 1851 - 1900
Hi Nenad, your art is very beautiful! You're very talented! best Marc- 4,152 replies
-
- 6
-
-
- cutty sark
- tehnodidakta
- (and 1 more)
-
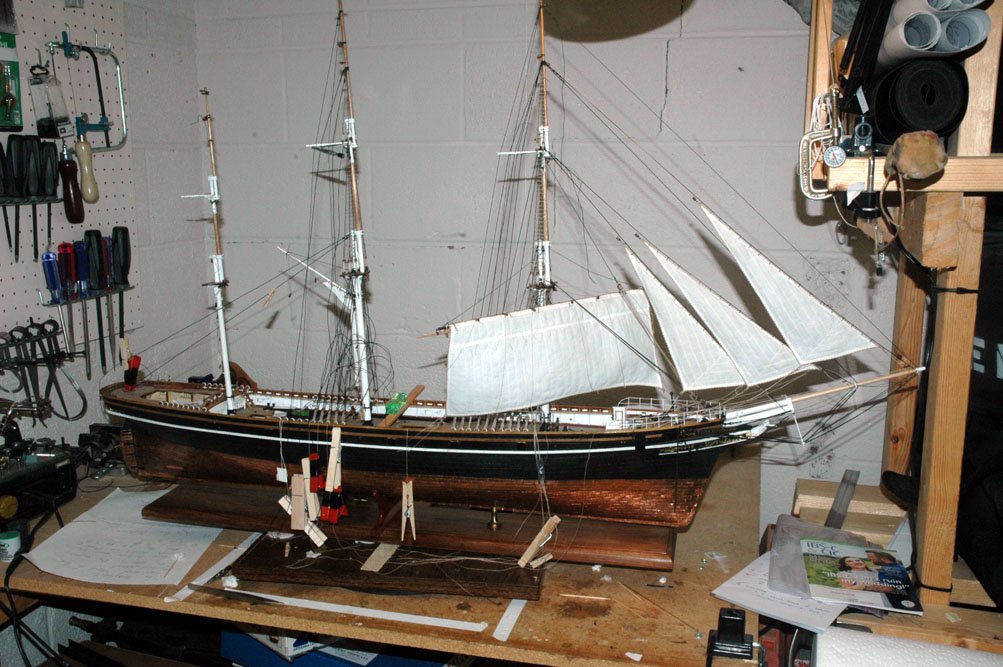
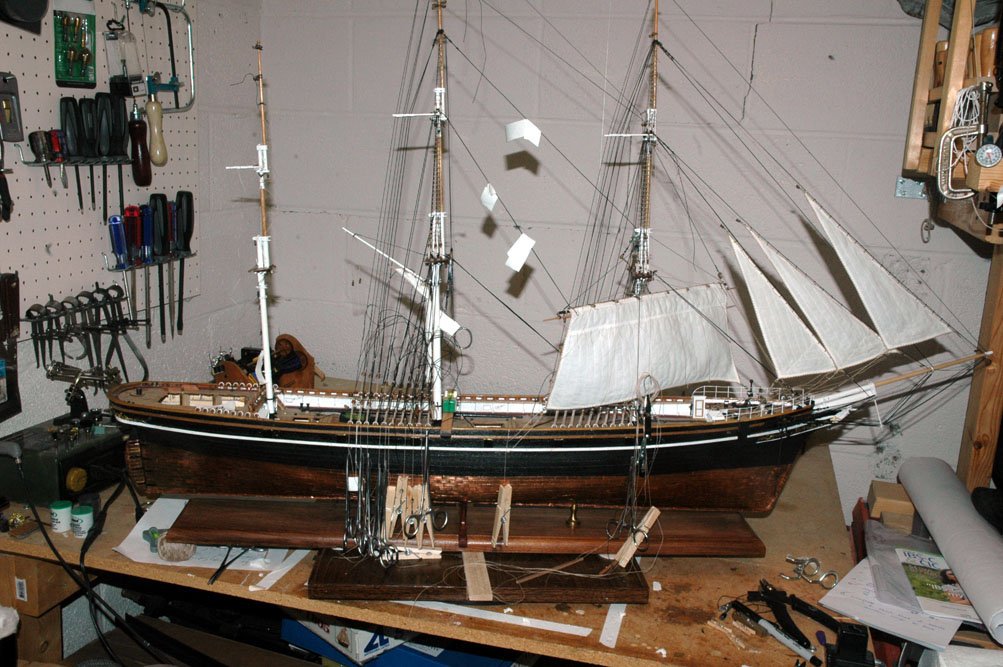
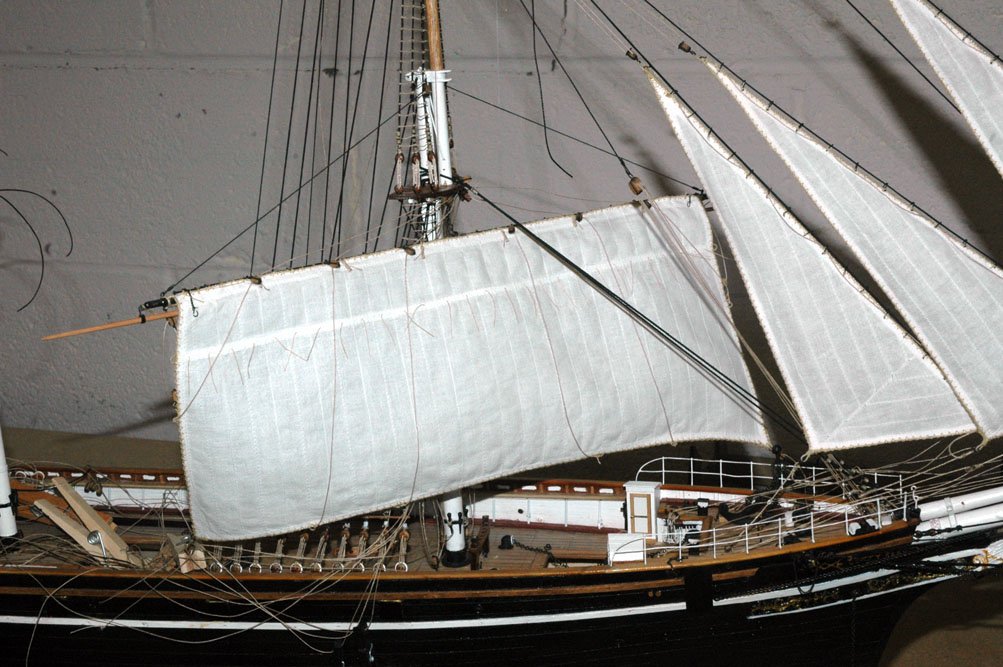
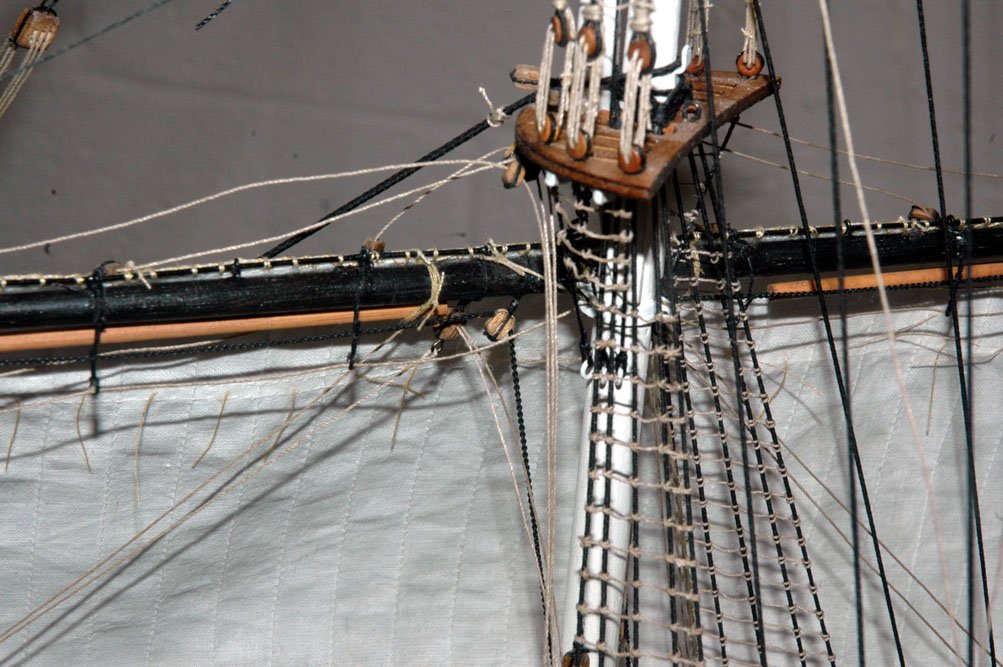
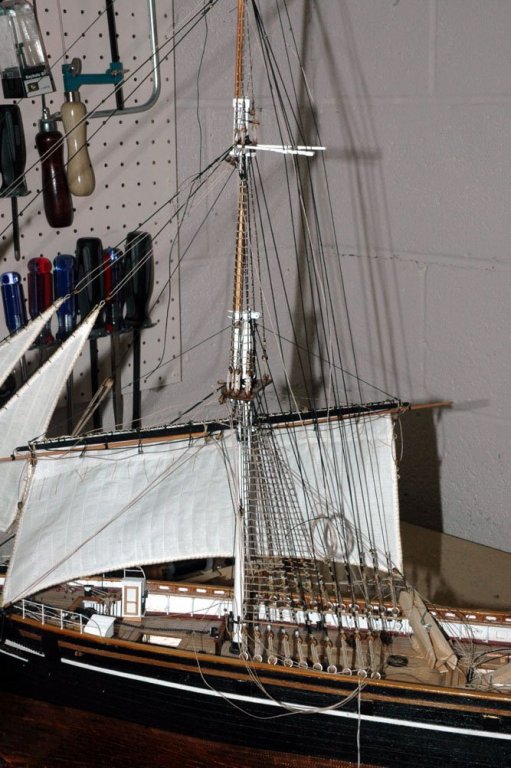
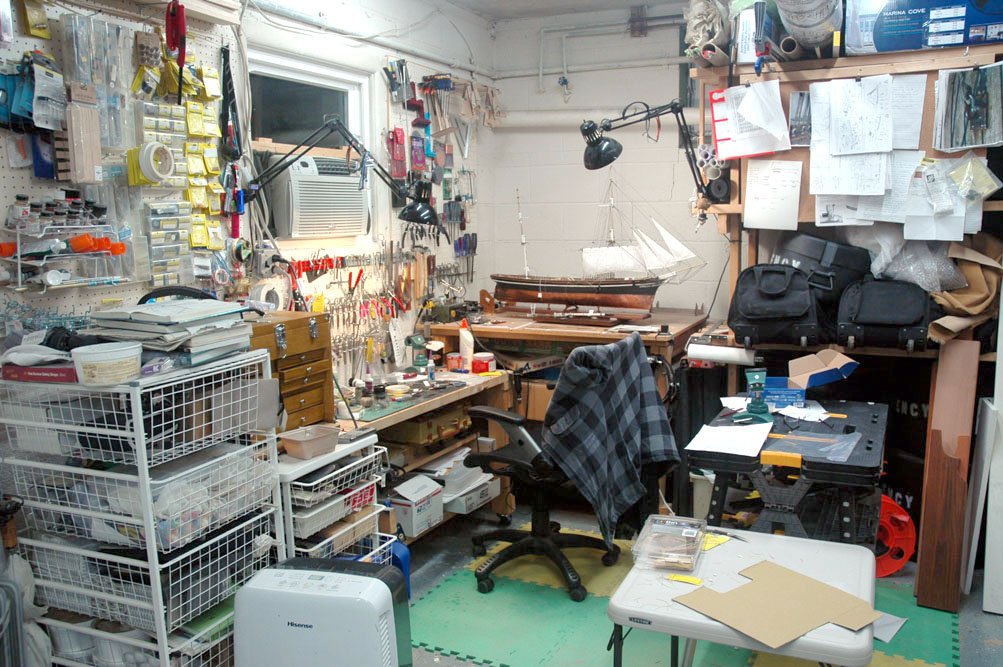
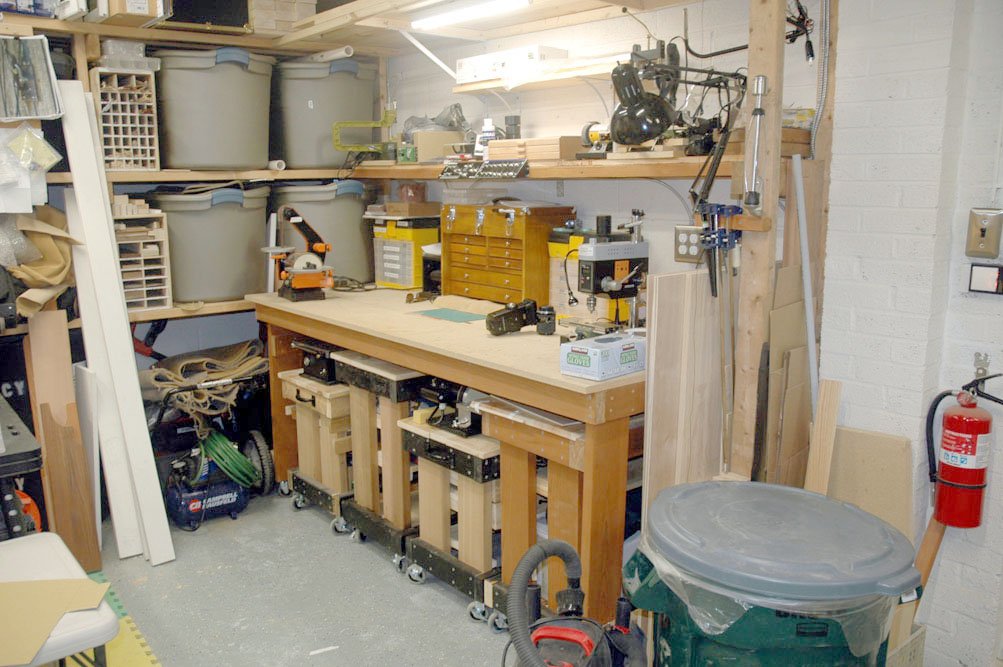
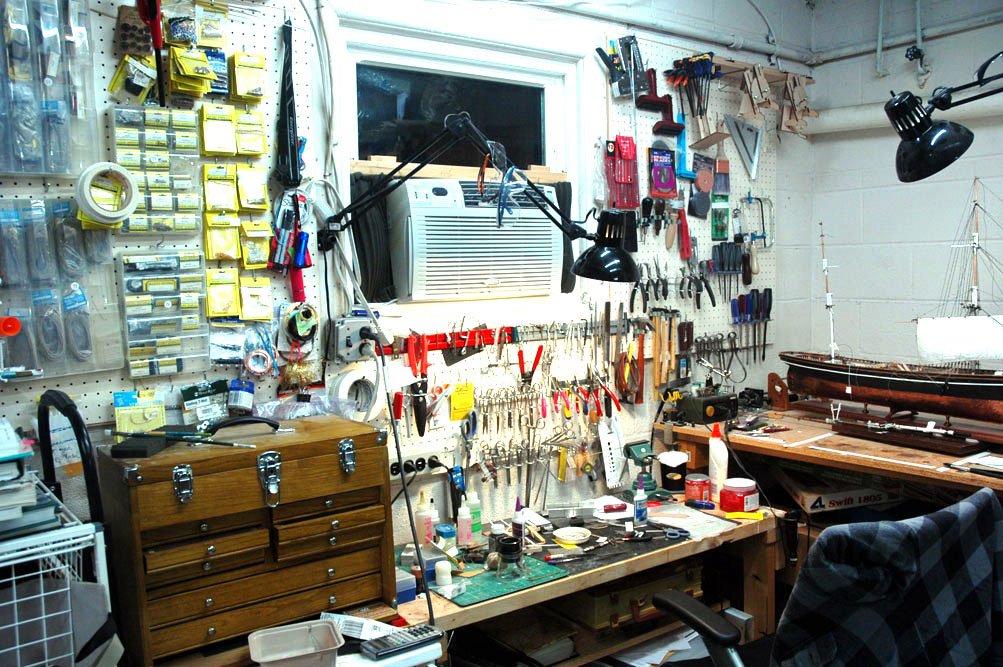
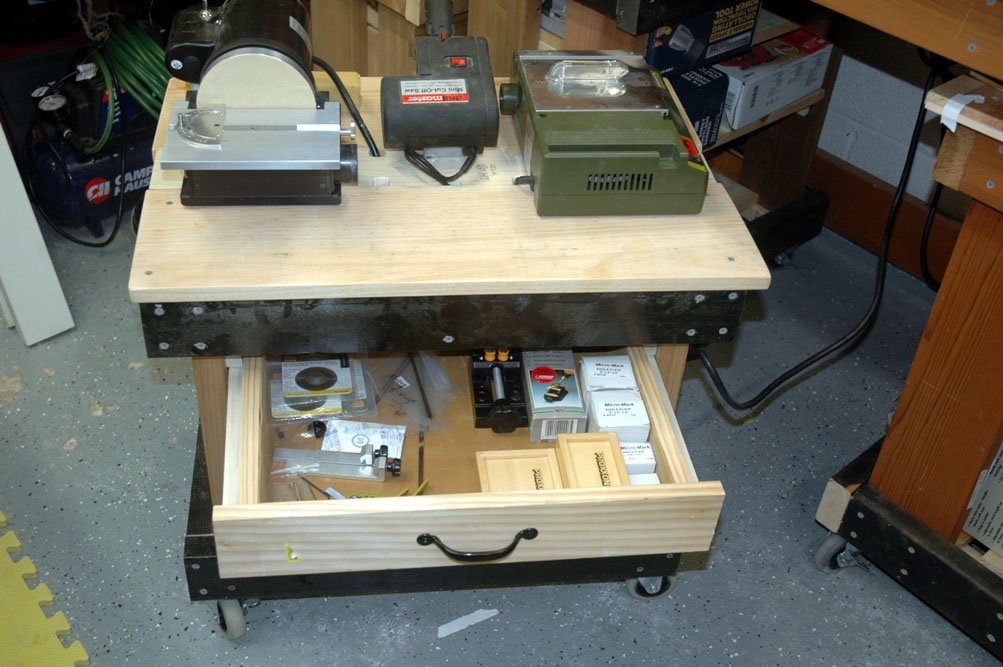
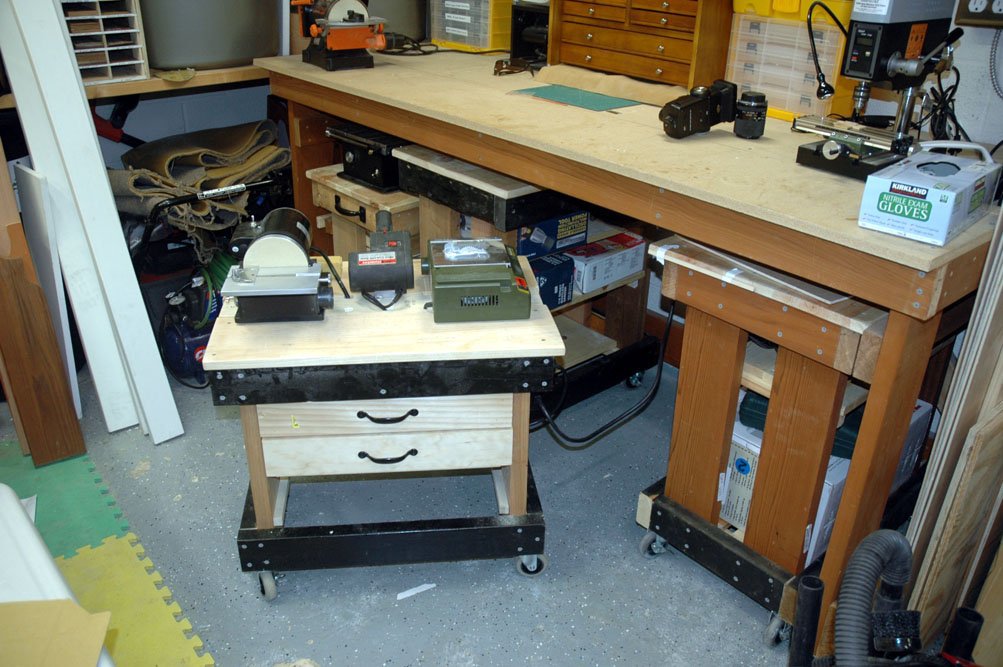
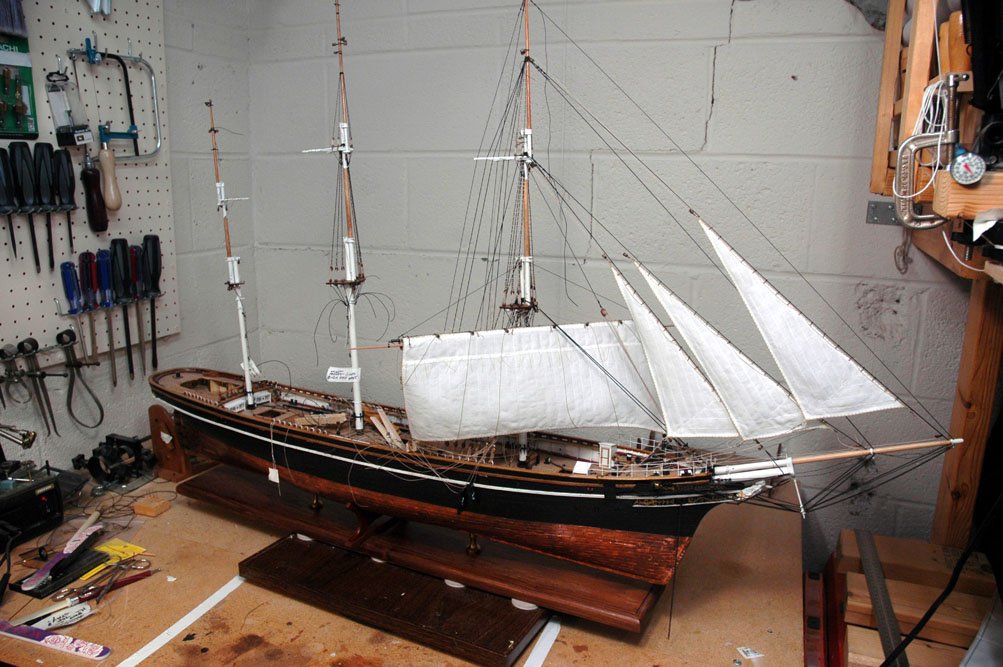
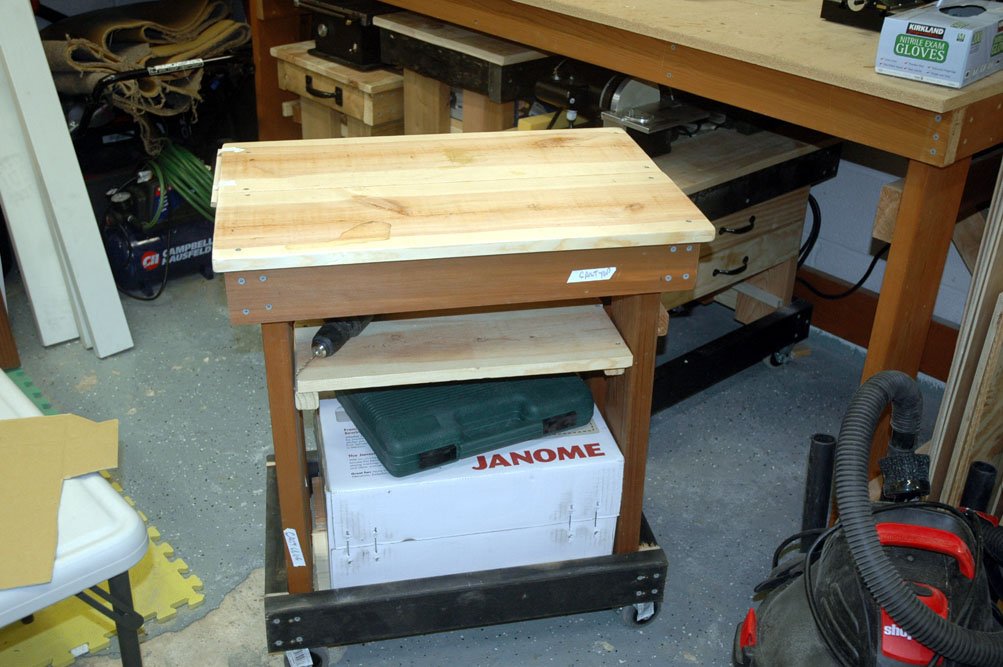
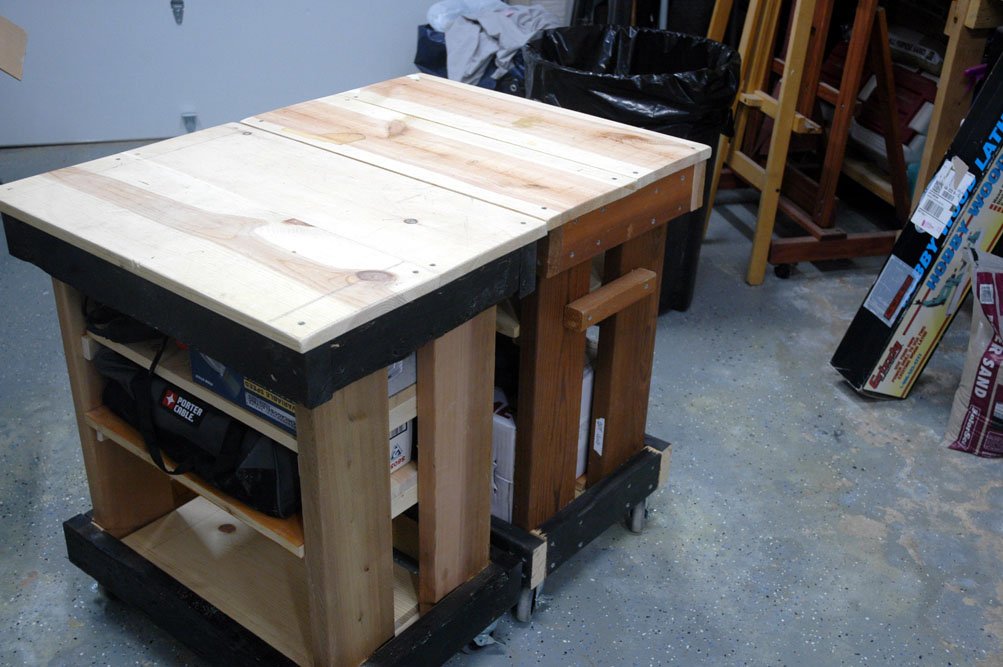
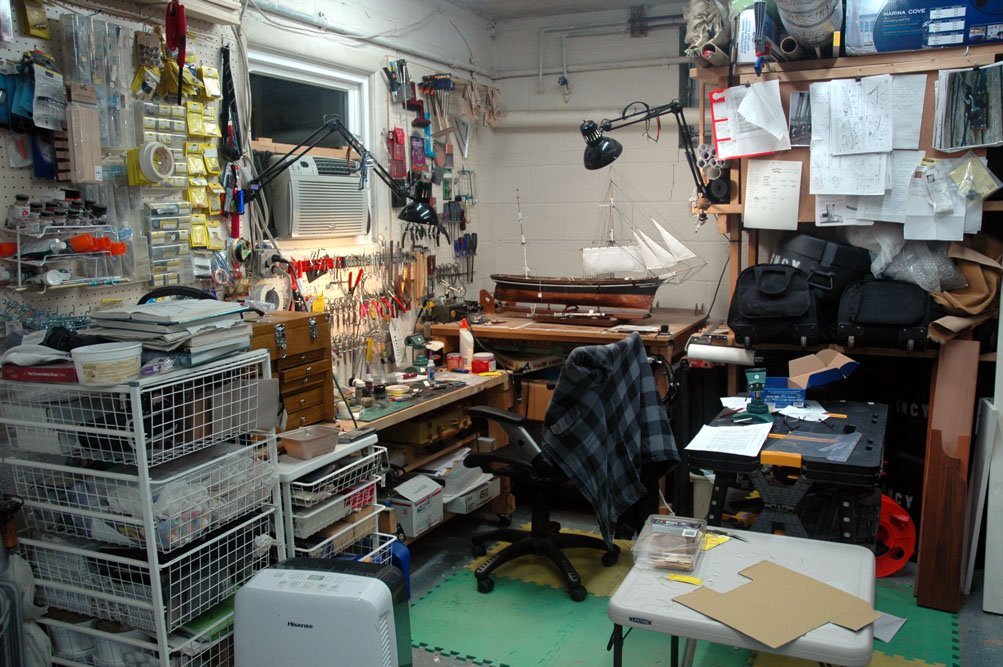
Hi everyone, So I'm still alive. And I have worked on the Cutty over the past few months with several long breaks due to travel etc. and a side track into improving my working area. I'll cover the side track in improving my work space. The side track was due to being aggravated that my gear was always boxed up. So I built a workbench on the opposite wall of the garage and then noticed that there was no lighting nor an electrical. So I had two lines pulled to the garage and four new four outlet power boxes and seven LED shop lights installed. Now I have lots of light!! I also added more space for more tools! Excuse the mess, I was in the middle of working when I took the photo The other side of my workspace. this is the new bench with my new toys from the past couple of years. Finally out of the boxes (almost - the lathe is still back in its box, but it has its own storage shelf). As I said, up to this point, if I needed to use the sander, table saw, drill press, etc, I had to unbox the tool. Move the ship to another location, put the tool together put it on the bench where the ship was, use the tool, box the tool and put the ship back into its original location. UGH! Problem is now solved. Almost all of the wood was left over from two pergolas that I had built for our house or other left-over scraps. so the benches and carts are the prettiest, but the function well and I saved a ton of money. So under the bench are four carts that roll out and are full of equipment storage. There are two short and two tall carts. The short carts have the Byrne saw and sander as well as the Proxxon table saw and a chop saw permanently housed on their tops. I also made drawers for these carts and lined them with velvet from several yards of velvet from the bargain bin I found in the fabric store. The two tall carts are exactly the same height and can be clamped together to create larger work tables. They are also the correct height to act as out-feed tables for the Byrne's. I made a bridge that attaches to the Byrnes saw and the edge of the tall carts for that purpose. Now on to the ship! I have the fore sail in place as well as all of it's rigging is attached, but not belayed yet. In a previous post I spoke about the need to step the Main mast and install all of it's standing rigging before I can continue with the fore sail. I've also rigged and jibs and have belayed all of their rigging except the halyards which are run through the blocks but not belayed yet, waiting for the Main mast standing rigging to be executed. I think that the shape of the sails look good. To me they look like they actually have wind blowing on them. In the next photo you can see the sheet chains from the lower top sail sheet running through the fore course yard. I can tell you that these chains are a royal pain to rig through the mast and blocks. the fore rat lines with the bunt and clew from the course sail feeding through the fairleads detail of the fairleads - nothing is had been pulled tight yet or belayed. Last night I built the spencer gaff goose neck and other rigging eyes and installed the gear into the main mast and spencer gaff. Sorry for the great delay in posting, but a great deal of work was in serving all of the standing rigging for the main mast, which took forever because the cutty has the standing rigging 100% served! UGH! Also, I didn't think showing progress of rigging the ratlines on the fore and main mast exciting so I didn't take any photos or post that work. I ended up having to tear all of the upper ratlines out and re-rigging them because I used the wrong size line!!! oh well, I'm always doing one step forward two to four steps back! But I'm still having fun! thanks for checking in! Marc


- 525 replies
-
- 13
-
-
- cutty sark
- mantua
- (and 2 more)
-
Cutty Sark by NenadM
keelhauled replied to NenadM's topic in - Build logs for subjects built 1851 - 1900
Hi Nenad, Happy to see you back in the ship yard! Also I'm glad that all went well with the surgery. all the best Marc- 4,152 replies
-
- 5
-
-
- cutty sark
- tehnodidakta
- (and 1 more)
-
Great news. Thanks for saving these models! I was heart broken when I heard about the fire. I've always been impressed with these models and glad they will continue! All the Best! Marc
-
Cutty Sark by NenadM
keelhauled replied to NenadM's topic in - Build logs for subjects built 1851 - 1900
Hi Nenad, Happy to see you back in the ship yard! I hope all is well with you and your family! Great vacation! The captain's gig looks good! Marc- 4,152 replies
-
- 5
-
-
- cutty sark
- tehnodidakta
- (and 1 more)
-
Hi Tim, I know what you mean about the candy store. I spend hours and hours walking through builds on this site. Let me know if I can help answer any questions you have. If you haven't visited Nenad's build, you should - look at the top of this page and you'll see a post from him with a link to his build He is a great guy and does great work. all the best, Marc
- 525 replies
-
- 1
-
-
- cutty sark
- mantua
- (and 2 more)
-
Hi Tim, Sorry for the late response. Life has gotten in the way. Although I did get half of the shrouds on the main mast completed. I'm hoping to return to building soon. I had a few time sensitive projects that I've had to tackle. As to which side I'm displaying........that's a good question. I haven't decided yet. I keep going back and forth. I will probably leave it to the Admiral. All the best!! Marc
- 525 replies
-
- 1
-
-
- cutty sark
- mantua
- (and 2 more)
-
Cutty Sark by NenadM
keelhauled replied to NenadM's topic in - Build logs for subjects built 1851 - 1900
Hi Nenad, The captain's gig looks good! very nice Marc- 4,152 replies
-
- 4
-
-
- cutty sark
- tehnodidakta
- (and 1 more)
-
Cutty Sark by NenadM
keelhauled replied to NenadM's topic in - Build logs for subjects built 1851 - 1900
Hi Nenad nice work on the boats! What type of wood are you using to carve the boats? Marc- 4,152 replies
-
- 5
-
-
- cutty sark
- tehnodidakta
- (and 1 more)