-
Posts
788 -
Joined
-
Last visited
Content Type
Profiles
Forums
Gallery
Events
Everything posted by keelhauled
-

How I make Clue (Clew) Blocks by Dan Vadas
keelhauled replied to Dan Vadas's topic in Masting, rigging and sails
thanks for the tutorial. Very informative! -

Cutty Sark by NenadM
keelhauled replied to NenadM's topic in - Build logs for subjects built 1851 - 1900
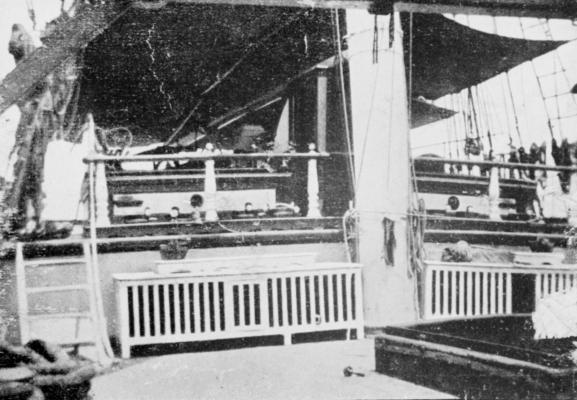
Nenad, I just realized that the doors are open in Woodget's photo. At least you can see the height of the opening. The painting has the doors closed. There are two half width doors. If you need me to shoot a photo let me know. I looked for the other photo and couldn't find it. I included one similar, but it has the new entrance. Notice the difference in height of the entrance between this photo and the Woodget photo in the last post. Just a side note The forward hatch to the crew accomodations also had two half doors in the same manner (and a booby hatch since it was so short). Note that both the forward hatch and the aft booby hatch were only lashed and easily removed (they used the aft hatch to load tea, just like the hatches in the middle. I included a photo of the aft hatch removed Note that although the photo is old it has the modern entrance to the aft deck house When she was the Fierra you can see photos of the forward accommodation hatch removed with just a flat cover.- 4,152 replies
-
- cutty sark
- tehnodidakta
-
(and 1 more)
Tagged with:
-

Cutty Sark by NenadM
keelhauled replied to NenadM's topic in - Build logs for subjects built 1851 - 1900
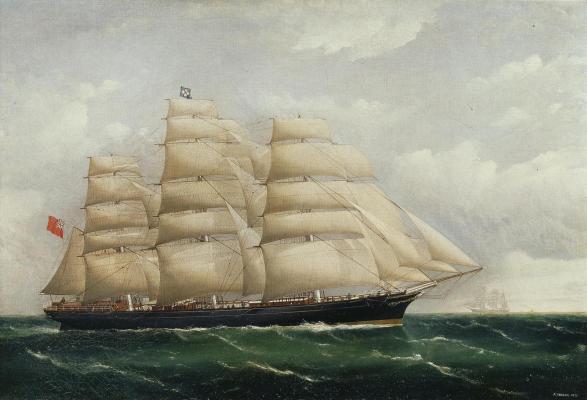
grating looks great! I built the aft deck house with only one entrance as in campbell's plans The painting is supposed to have been painted for Willis around the time of her launch. It has a clear shot of the doors, and yes it shows that the buckets and rail continue in front of the door. Hard to see, but they are there as in Campbell's plans I have a 1:1 print that I purchased twenty years ago. If you need that area larger, let me know and I'll take a photo. The area is dark, but you can see the doors. The photo is during Woodget's time and has the single entrance. Also notice the buckets! I know Woodget took another photo of the aft hatch with the deck house in the back. I'll look for it. The photos are fairly large so you can zoom in. Marc- 4,152 replies
-
- cutty sark
- tehnodidakta
-
(and 1 more)
Tagged with:
-
she's looking great. Love keeping up on your build!
- 1,319 replies
-
- caldercraft
- Victory
-
(and 1 more)
Tagged with:
-

Cutty Sark by NenadM
keelhauled replied to NenadM's topic in - Build logs for subjects built 1851 - 1900
nice grating. I'm looking forward to version 2. I know you, you'll have an updated version tomorrow- 4,152 replies
-
- cutty sark
- tehnodidakta
-
(and 1 more)
Tagged with:
-

Cutty Sark by NenadM
keelhauled replied to NenadM's topic in - Build logs for subjects built 1851 - 1900
Nenad. The grating is a nice touch. There is also one by the ship's wheel to keep the deck from wearing down. Sometimes they are also in front of the companion ways. Izzy, nice photo. It's my understanding that it is similar to how the Cutty operates. According to Longridge, the Cutty has a turned up angle on the tumbler rod that holds the cat stopper chain. When the tumbler is rotated the chain slides of the bent portion of the tumbler. As to the scale and cleats. I'm right there with you. I was drilling a line of holes for my fairleads with #77 size holes in a piece of walnut with a 1/64" x 1/64" cross section by hand. Crazy. No one will ever see something that small or care. I ended up switching to 1/32 X 1/32 to make my life easier and no one will ever know that they are off scale 1/64 of an inch. Also finally broke down and purchased an x-y table for the drill. That should help as well! Marc- 4,152 replies
-
- cutty sark
- tehnodidakta
-
(and 1 more)
Tagged with:
-

Cutty Sark by NenadM
keelhauled replied to NenadM's topic in - Build logs for subjects built 1851 - 1900
Nenad, What are the rectangles beneath the windlass handles on the drawing? The cleats you have identified for the jibs (3 on each side), I think that they are eye rings for attaching the blocks for the jib if I remember correctly. You might want to check it against some other clipper plans. Looking good!- 4,152 replies
-
- cutty sark
- tehnodidakta
-
(and 1 more)
Tagged with:
-

Cutty Sark by NenadM
keelhauled replied to NenadM's topic in - Build logs for subjects built 1851 - 1900
nice work. If I had to do it again, I think that I would build up the capstan like you instead of turning one piece on a lathe.- 4,152 replies
-
- cutty sark
- tehnodidakta
-
(and 1 more)
Tagged with:
-

Cutty Sark by NenadM
keelhauled replied to NenadM's topic in - Build logs for subjects built 1851 - 1900
my decision was easy...I turned the capstan on my home made lathe and then screwed up the alignment of the holes when I was drilling them. So..I have the bars stored in the rack. I was also going to have the ship with all of the sails set, so I thought that they would be such a hazard on the real ship, they would never be left in place while under way. Still, sometimes it's nice to have details like this. Thus why I'm going to have my anchor chains around the windlass and attached to the anchors (like yours). Under way they would "ship" the anchors onto the fore deck and stow the chain in the locker. But I'm sure everyone would think that I forgot to attach "ropes" or chains to the anchors. The choice is yours, but in the end....the spice must flow- 4,152 replies
-
- cutty sark
- tehnodidakta
-
(and 1 more)
Tagged with:
-

How would you improve your Byrnes tools?
keelhauled replied to Keith_W's topic in Modeling tools and Workshop Equipment
Very nice work on the modifications and sled! -

Cutty Sark by NenadM
keelhauled replied to NenadM's topic in - Build logs for subjects built 1851 - 1900
Looking splendid!- 4,152 replies
-
- cutty sark
- tehnodidakta
-
(and 1 more)
Tagged with:
-
shrouds look much better with shorter space between deadeyes. I agree about the waxing. I wax the lines of the ship. Don't know how you would go about waxing rigged lines. Might actually cause damage if you try to do something with them rigged.
-
I'm with Russ. That stiffness makes life Much easier!
-
Use an index twist drill and drill from the outside of the hull so that you don't get a burr with the plastic. Take the ends of the line and touch CA (super) glue to the tips so that it is stiff and thread it through. As Joel said, you can just knot on the inside of each one individually. good luck, Marc
-
I built this model in college with rigging it from scratch. Can you post a photo of what you are asking about.
-
Hi, What year did you purchase the kit? It looks improved since the one that I purchased in 2003. Thanks marc
- 47 replies
-
- cutty sark
- sergal
-
(and 2 more)
Tagged with:
-

Cutty Sark by NenadM
keelhauled replied to NenadM's topic in - Build logs for subjects built 1851 - 1900
Sounds like a good Saturday to me! The eyebolt on the top of the tip of the cat is for the "fore tack." A block is fastened to it for the fore course tack when the yard is hard braced over such that the sheet can't be used.- 4,152 replies
-
- cutty sark
- tehnodidakta
-
(and 1 more)
Tagged with:
-

Cutty Sark by NenadM
keelhauled replied to NenadM's topic in - Build logs for subjects built 1851 - 1900
Looking great! Nice Cats!- 4,152 replies
-
- cutty sark
- tehnodidakta
-
(and 1 more)
Tagged with:
-
Thanks Nenad, The photos were much appreciated!!!
- 525 replies
-
- cutty sark
- mantua
-
(and 2 more)
Tagged with:
-
Gyula, Thanks for the comments! George, As always, thanks for the likes and keeping up with my progress! Marc
- 525 replies
-
- cutty sark
- mantua
-
(and 2 more)
Tagged with:
About us
Modelshipworld - Advancing Ship Modeling through Research
SSL Secured
Your security is important for us so this Website is SSL-Secured
NRG Mailing Address
Nautical Research Guild
237 South Lincoln Street
Westmont IL, 60559-1917
Model Ship World ® and the MSW logo are Registered Trademarks, and belong to the Nautical Research Guild (United States Patent and Trademark Office: No. 6,929,264 & No. 6,929,274, registered Dec. 20, 2022)
Helpful Links
About the NRG
If you enjoy building ship models that are historically accurate as well as beautiful, then The Nautical Research Guild (NRG) is just right for you.
The Guild is a non-profit educational organization whose mission is to “Advance Ship Modeling Through Research”. We provide support to our members in their efforts to raise the quality of their model ships.
The Nautical Research Guild has published our world-renowned quarterly magazine, The Nautical Research Journal, since 1955. The pages of the Journal are full of articles by accomplished ship modelers who show you how they create those exquisite details on their models, and by maritime historians who show you the correct details to build. The Journal is available in both print and digital editions. Go to the NRG web site (www.thenrg.org) to download a complimentary digital copy of the Journal. The NRG also publishes plan sets, books and compilations of back issues of the Journal and the former Ships in Scale and Model Ship Builder magazines.


