keelhauled
-
Posts
788 -
Joined
-
Last visited
Content Type
Profiles
Forums
Gallery
Events
Everything posted by keelhauled
-

Cutty Sark by NenadM
keelhauled replied to NenadM's topic in - Build logs for subjects built 1851 - 1900
looking beautiful! really nice work! Glad you made it home safely! Marc- 4,152 replies
-
- 6
-

-
- cutty sark
- tehnodidakta
- (and 1 more)
-
Hi HOF, sounds like you don't have anything to worry about. My hull is really heavy. I used balsa fillers and completely filled her below the waterline and she is about an inch thick between the waterline and the lower deck


- 525 replies
-
- 3
-
-
- cutty sark
- mantua
- (and 2 more)
-
Looking good! I think that showing us the process for molding your canons would be interesting to see. Hope you include it! Your last photo is much improved in its' sharpness. Maybe more light will help the camera reduce it's shake if you can't put it on a tripod. take care, marc
- 69 replies
-
- 1
-
-
- admiral vernon
- steingraber
- (and 1 more)
-
Hi Nenad, Most of the cloth is just for playing. It was scraps. The final sails have very nice cloth that is translucent enough that you can see the thickness differences of the hems and reef line when the sun shines behind. Very much like a real sails. They are a very thin cotton. In most of the photos that I've seen and historic sails that I've seen in museums, the bolt rope and the lines that connect it to the sails are tan, while the sail stitching seems to be the same color or close too it as the sails. Still I may play with lighter colors. thanks Marc
- 525 replies
-
- 2
-
-
- cutty sark
- mantua
- (and 2 more)
-
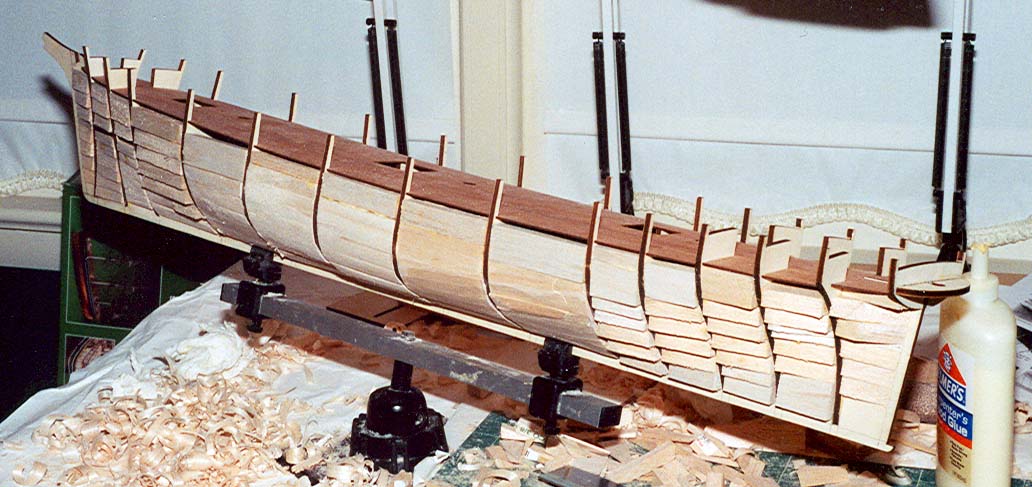
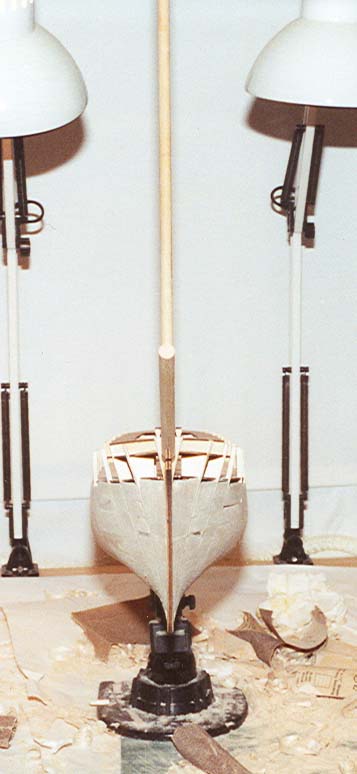
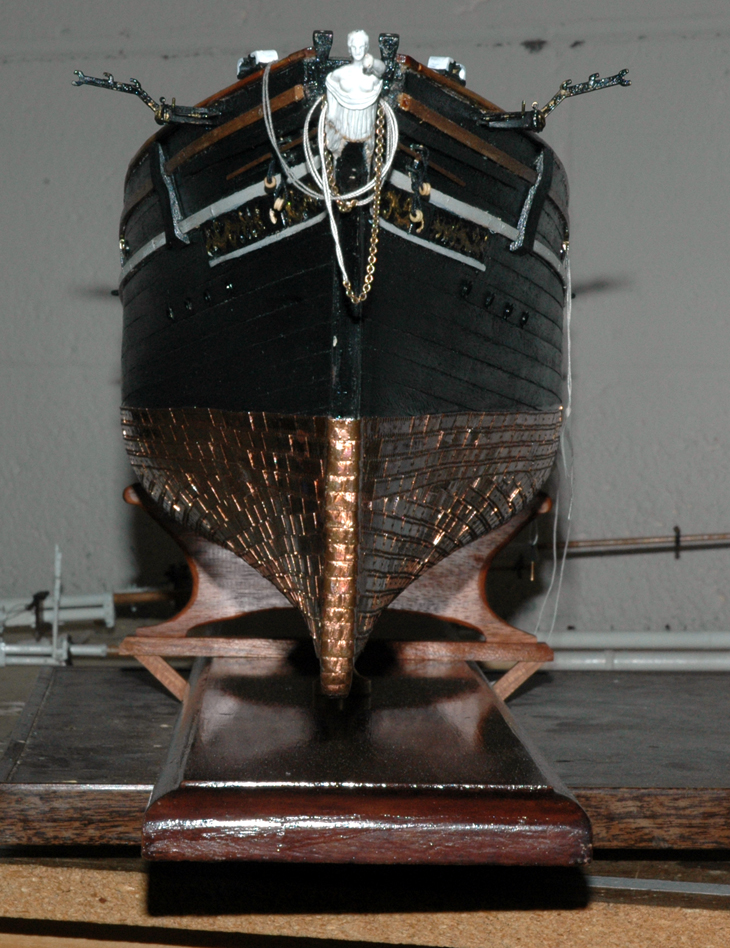
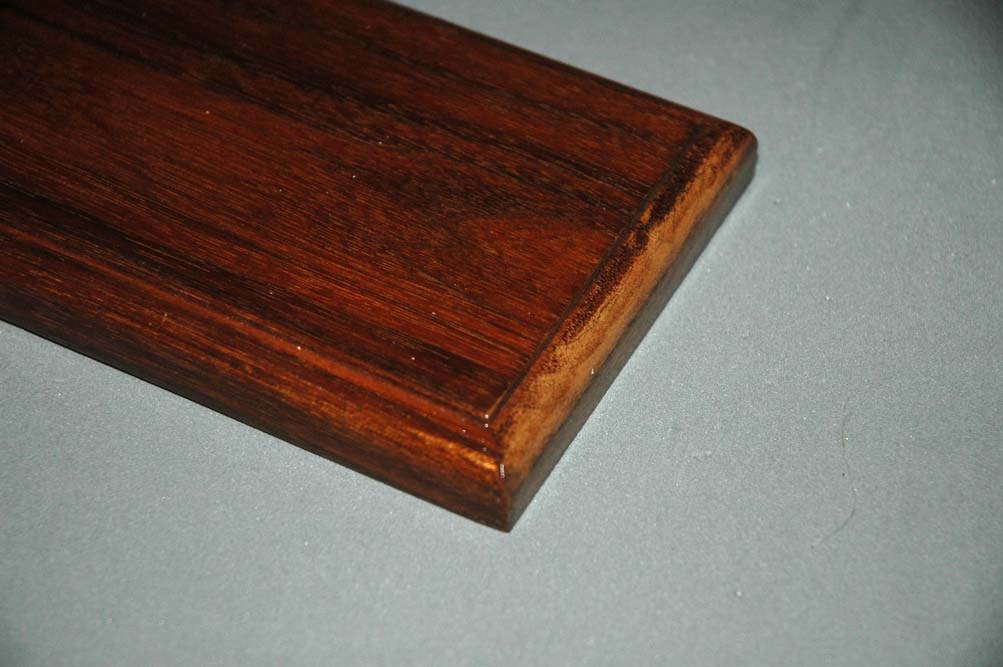
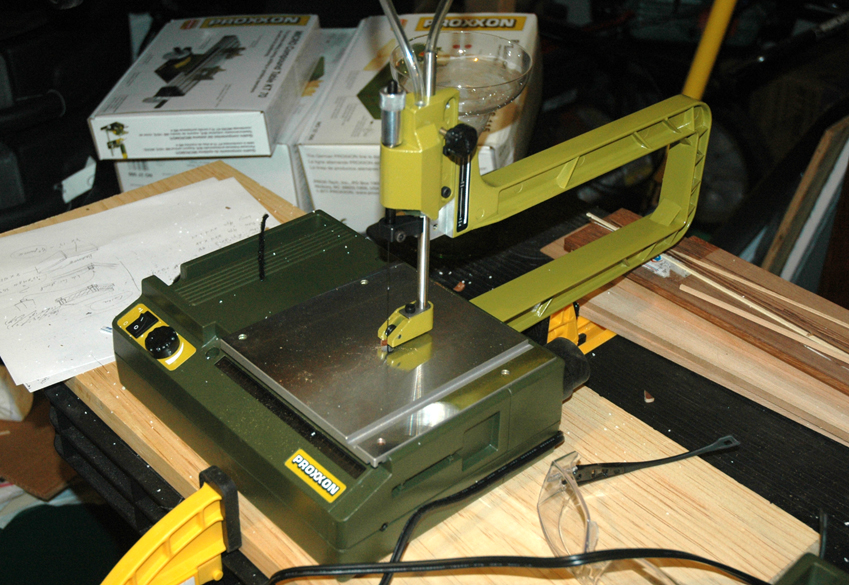
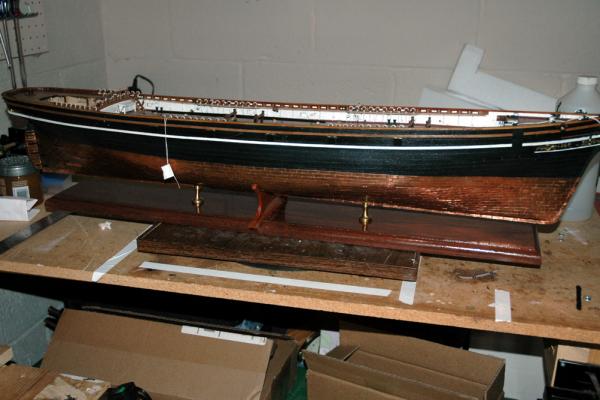
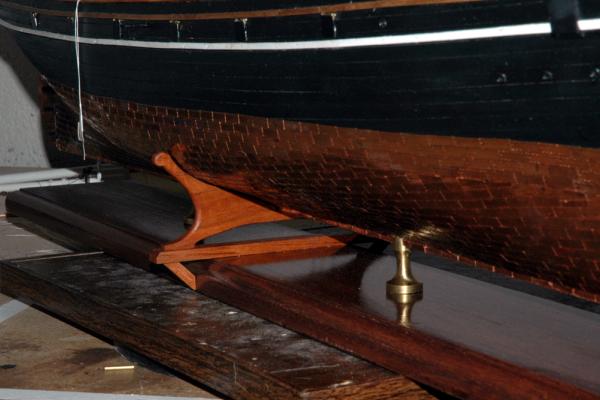
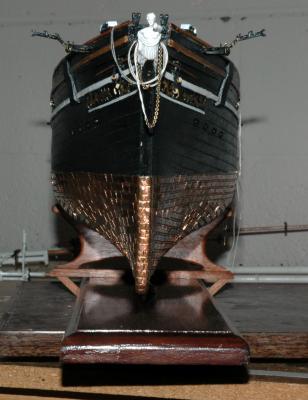
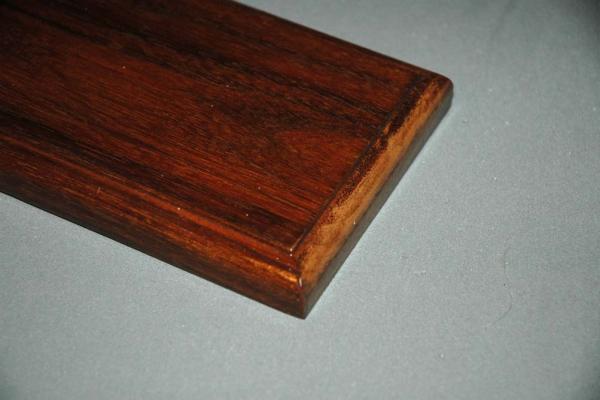
After I had completed coppering the hull, I mounted it to two bronze pedestals. I can't seem to find photos. Over the years, the ends and part of the top changed color. I thought that maybe the walnut had been dry before I stained and coated it with acrylic. I stripped the acrylic off and soaked the walnut base in lemon oil then tung oil regularly over months All surfaces looked the same. I then stained the surface then coated it in acrylic All surfaces looked the same. Two years passed and then it occurred again. Here is what I'm talking about I posted the issue I was having. The reply was that sometime woods have issues in the transverse or ends of the boards. So I stained over the acrylic on the ends, let it dry and coated it with acrylic after 2 year it was still fine. I read that some where that this technique is used for woods that don't stain evenly. While I was waiting the last two year period, the ship was in a construction cradle and I had time to think over a concern that I had struggled with for several years. I was always concerned about the stability of the ship using only the two pedestals. I was worried about the straightness of her keel and of the ship model rolling side to side and breaking her mount, yards, masts, god knows what. The model had always felt solid in the pedestals and had been in that mount for over five years without issue. Still I had always been concerned, taken measurements of the keel to the base, never seen any movement. The hull is very heavy due to all of the filler block and double planking. Then I came across two posts where the models had rolled off the pedestals, With one the damage was fairly severe to the hull. Both had serious damage. That was enough for me. I really liked the pedestals, but wasn't going to risk my model over it. I saw several examples, new and hundreds of years old, where rods were used at mid-ship to help support the ship and keep it from rolling. Then I saw an admiralty model where a cradle was used at mid-ship with the pedestals. I really like the look, so I made my own. I used Brazilian Cherry. Beautiful, but hard, wood. I learned that I'm not good manually using a jewer's saw to cut the wood. After 5 hours to cut the top out and sand it down. I gave up on the manual saw and ordered the proxxon saw. I mounted the wood jewler's saw blade and the other three cuts took me about 15-20 minutes each! I really like this saw. Anyway, here's the results. The cradle is contoured to the haul and just supports the ship while, the pedestals have large screws that are about three inches into her and holds her down. The cradle will not let her yaw/rotate or roll. She is locked securely in place. The cradle also is attached to the base by pins, so It can't move either. The base has a set of T-nuts on the bottom to secure the base down to a table or the base of a case using 1/4 inch bolts from underneath. She should be secure.........I hope. Marc

- 525 replies
-
- 5
-
-
- cutty sark
- mantua
- (and 2 more)
-
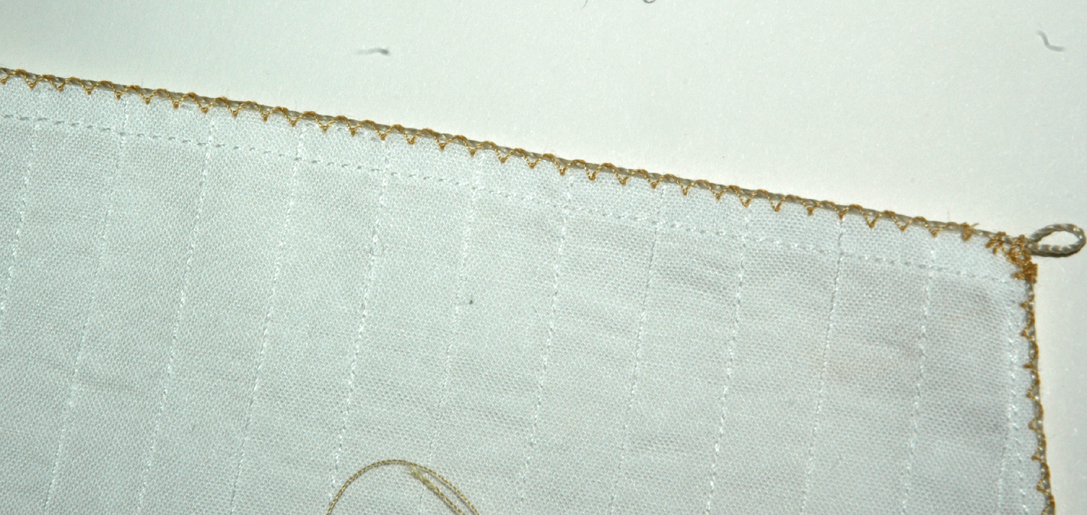
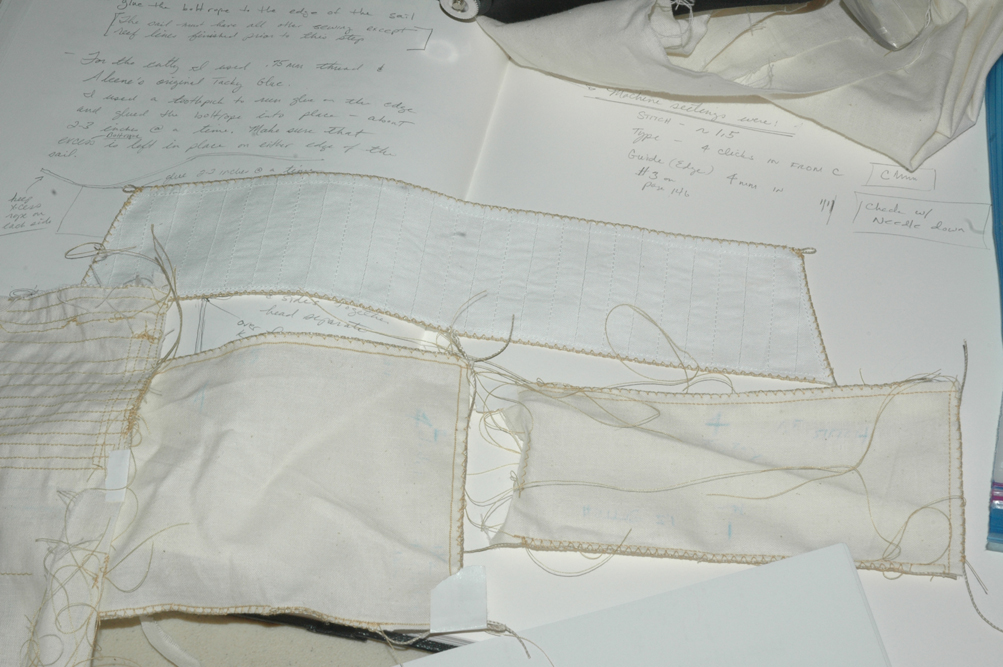
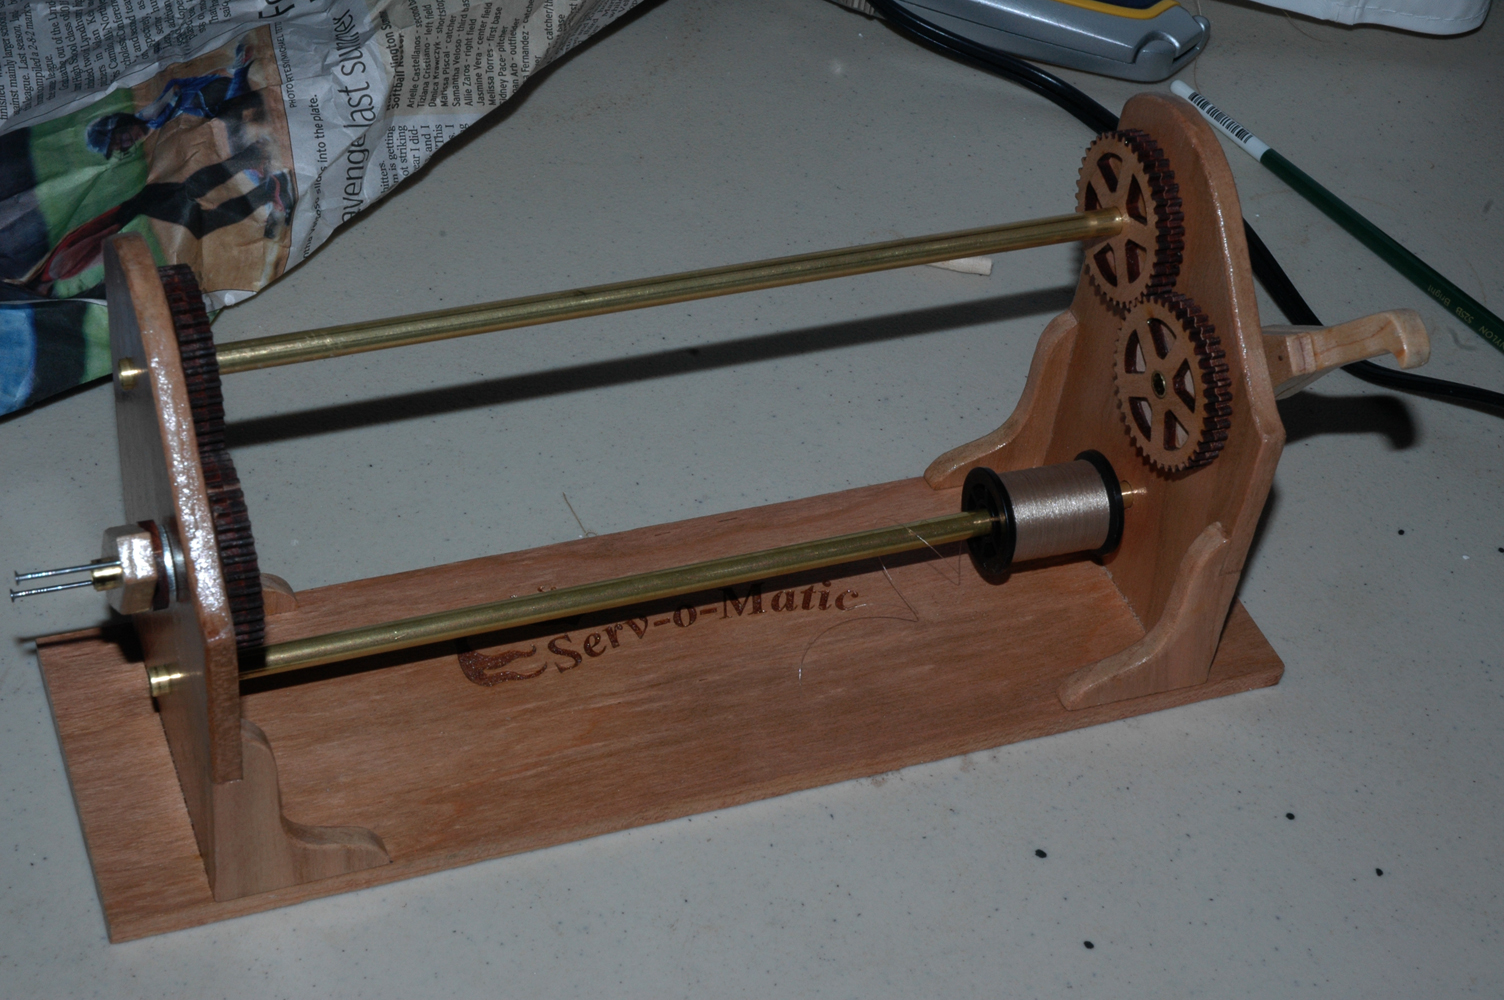
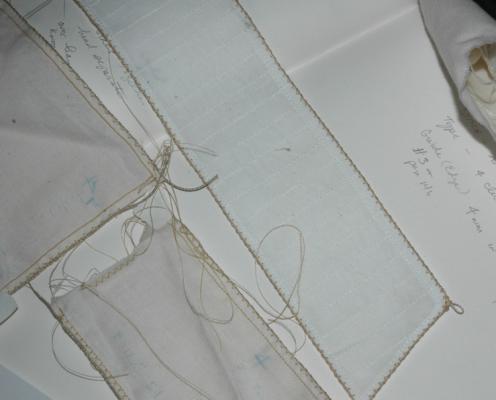
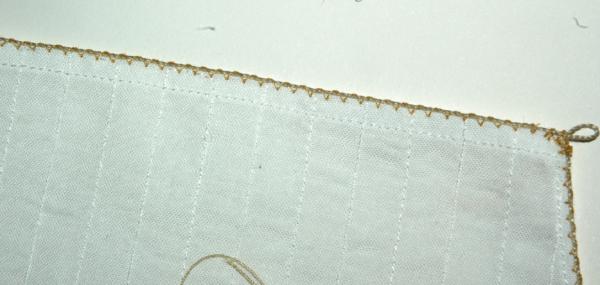
Doing research on the bolt ropes. It's sounding like earrings were wormed, served, and had leather stiched, while the bottoms had the bolts, wormed and served around a ring that sort of looks like Mickey Mouse's head. Still looking into it. In the mean time, I've been playing with the sewing machine and serving machine. some examples of different stitching lengths widths and hand sewing mixed with machine

- 525 replies
-
- 5
-
-
- cutty sark
- mantua
- (and 2 more)
-
Cutty Sark by NenadM
keelhauled replied to NenadM's topic in - Build logs for subjects built 1851 - 1900
New deck houses are looking good. that is some serious bracing you have going on! All the best for your Mother-in-Law!- 4,152 replies
-
- 5
-
-
- cutty sark
- tehnodidakta
- (and 1 more)
-
Hi, Need help. I'm building the Cutty Sark and getting ready to put bolt ropes on the sails. Should the earrings of the bolt ropes be served? Thanks marc
-
Nils, I keep going over and over your build. So much valuable information! Thanks for sharing and your ship is amazing!bo Also I bought a sewing machine and the hemming foot that you posted for bolt ropes because of your posts. Thanks for the inspiration and teaching! Marc
-
Cutty Sark by NenadM
keelhauled replied to NenadM's topic in - Build logs for subjects built 1851 - 1900
I just had a large boxwood shrub die on me. Can't figure out why. Just turned brown over a week period while I was gone. I never though of trying to mill the wood. Doesn't seem to have many straight pieces or branches that are wide enough to do much. Maybe when I cut it down I'll try to see if there is anything that can be used. Nenad, I wouldn't cut down a healthy shrub. As you said, they take forever to grow. Is there a boxwood tree? Surely people are using wood from the shrub. Marc- 4,152 replies
-
- 4
-
-
- cutty sark
- tehnodidakta
- (and 1 more)
-
Thanks Nenad. George I see your like. So I take it that you think that I should serve the earrings. So I guess that I'm jumping on the crazy train and going down the devil's road!
- 525 replies
-
- 1
-
-
- cutty sark
- mantua
- (and 2 more)
-
Beautiful wheel!!
-
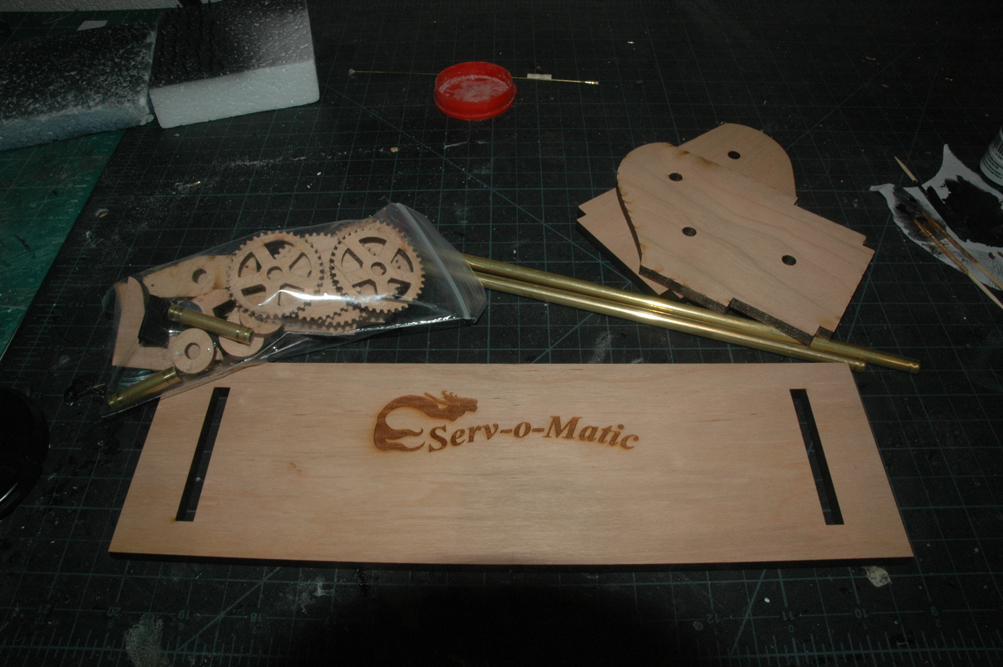
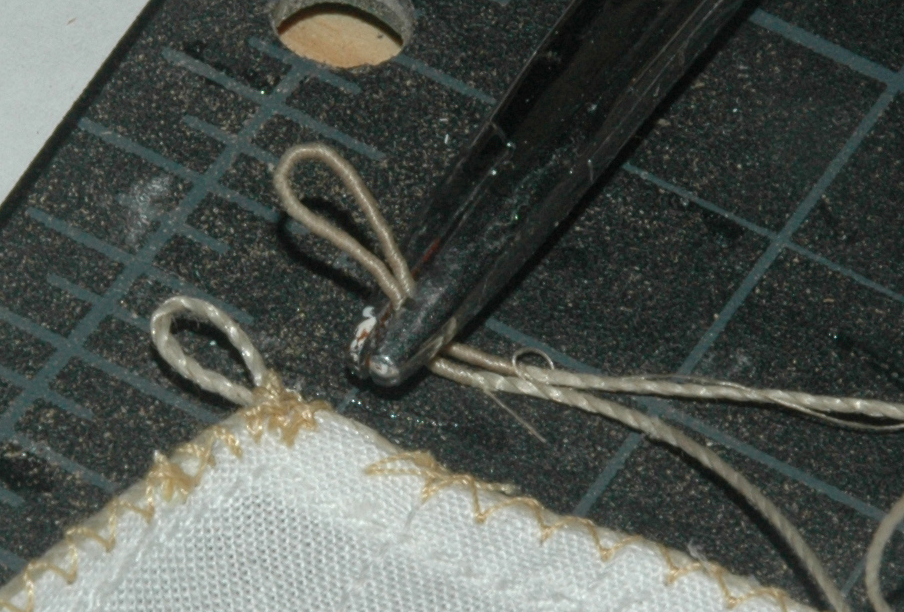
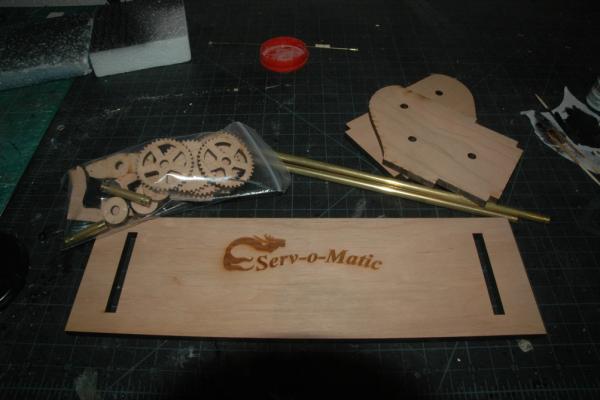
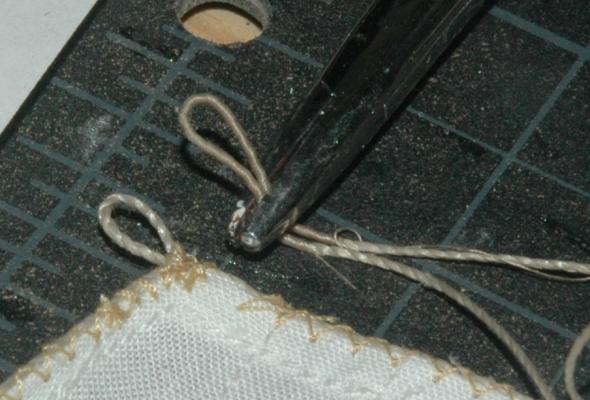
So I got a serving machine from Chuck! Nice Cherry wood! Before assembly after assembly I played around, but will need to practice to make the serving nice, but not so tight it compresses the line. Nenad, here is a problem. To serve the bolt rope earrings or not? As you say..maybe I'm sliding down the devil's road! After the earrings are lashed there isn't much of it still exposed. Also at any distance you can't really see the tan serving too well. Also, it will add considerable time for 28 or so sails. But...somtimes I do crazy things. What do you think? Anyone else want to weigh in?

- 525 replies
-
- 6
-
-
- cutty sark
- mantua
- (and 2 more)
-
Cutty Sark by NenadM
keelhauled replied to NenadM's topic in - Build logs for subjects built 1851 - 1900
Really nice looking deck house! Great work!- 4,152 replies
-
- 4
-
-
- cutty sark
- tehnodidakta
- (and 1 more)
-
SCRAPBOOK EYES Bollards Here is another use of the scrapbook eyes (See post 292). Bollards. These eyes come in many different sizes and I've used several different sizes to make bollards. I drilled holes into a bronze sheet to match the skinny diameter of the eye. Epoxy the eye into the hole so that the large portion of the eye is the top of the bollard. I filled the shaft with epoxy. Paint etc. Here are small bollards that I made for the pin rails of a 1/76 ship Marc

- 396 replies
-
- 9
-
-
- Idea
- Bright Idea
- (and 1 more)
-
Thanks George and Nenad. I was sewing more bolt ropes last night. Fighting sinus infection today! George, thanks for the source for saw blades! Marc
- 525 replies
-
- 1
-
-
- cutty sark
- mantua
- (and 2 more)
-
Made bollards from those same eyes (used for scrap booking) that I used for the anchor chain pipes above. I drilled holes in a piece of brass an then epoxied the skinny side into the brass. I then filled the tube full of epoxy all the way to the top. After curing I painted the mees. I used various sizes to make various sized bollards. Here are the tiny ones that go on the pin rails

- 525 replies
-
- 6
-
-
- cutty sark
- mantua
- (and 2 more)
-
SCRAPBOOK EYES There are eyes for scrap booking that are great for many uses. I use them for portholes and any time that I need a circular flange. They come in many sizes. In this example, I used two sizes of the eyes and a wooden dowel to make an anchor chain pipe. Marc
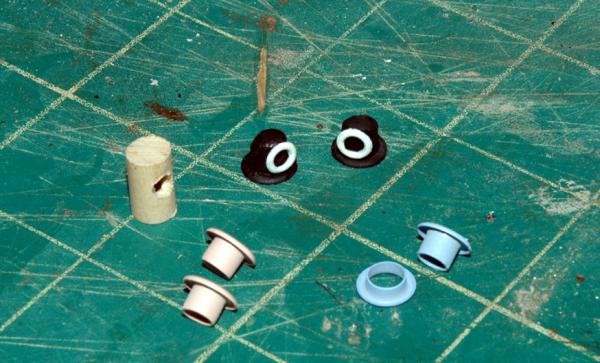
- 396 replies
-
- 9
-
-
- Idea
- Bright Idea
- (and 1 more)
-
Your planks might be too thin in addition to having too few ribs. If you increase the number of planks and still have the issue try using a thicker plank. If you want to keep the thickness of the thinner plank you could use a plug to build around, then add ribs to the interior if you are showing the inside. Also it doesn't look like you faired the ribs. If they aren't faired the planks won't run smooth. Keep up the good work! marc
-
Cutty Sark by NenadM
keelhauled replied to NenadM's topic in - Build logs for subjects built 1851 - 1900
Beautiful work!!!!- 4,152 replies
-
- 5
-
-
- cutty sark
- tehnodidakta
- (and 1 more)
-
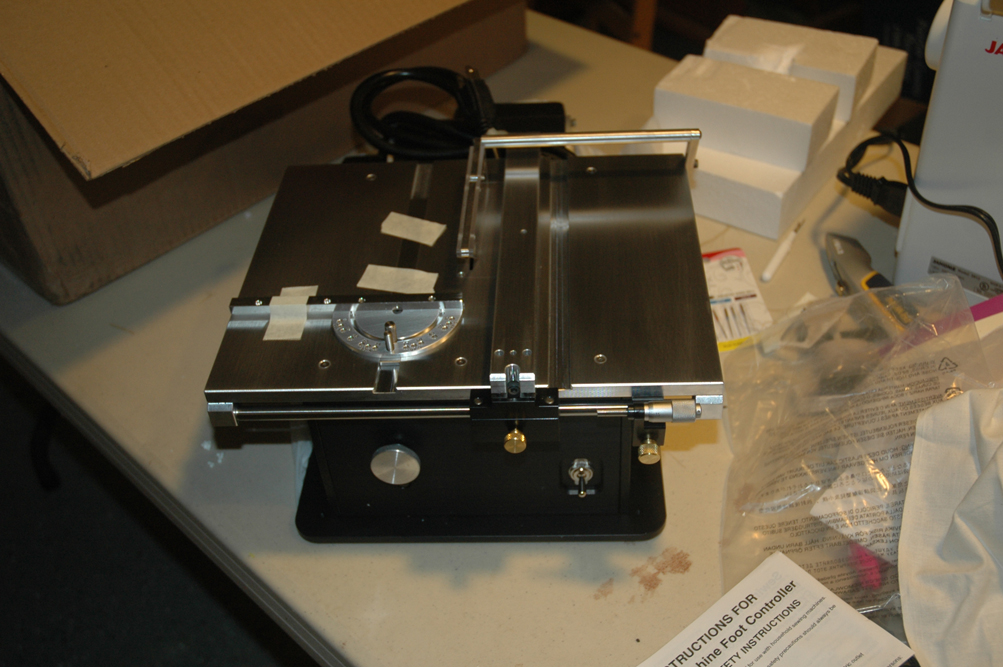
Thanks Chris and Harry! Been on the road, but I have made progress, just haven't posted. In between trips back and forth to Europe, I've worked on bolt rope prototypes, chained the spare yards/masts to the deck, made and mounted bollards, built a cradle to hold the middle of the hull and remounted the ship onto it's final base and pillars. I also did some other stuff. I'll try to catch the posting back up with the build. My wife has given me several gifts consisting of equipment, some I'm using now some will wait for Christmas. One that is watiting for Christmas is the Byrnes Table Saw! It has every option except the tilting table! I couldn't think of any real need for it that my disk sander couldn't handle. I checked it over before putting it back into the box for Christmas. I can't believe how quiet the motor is! almost no vibration. just amazing. Every piece is machined/milled and finished like artwork. Here are anchor chain pipes that I made from eyes for scrap booking and a wooden dowel. I drilled the dowel from the bottom and side so that the chain can actually run through them. I used two sizes of the eyes. Marc

- 525 replies
-
- 6
-
-
- cutty sark
- mantua
- (and 2 more)
-
The small dark spots looked raised; are they? I see some of the same spots that I had/have from the oils on my fingers etching/oxidizing the copper. I believe that is the large area seen in the second photograph. Did you use super glue? superglue will adhere to fingerprints also and can appear light or dark. some glues will bubble and spread out around the plates under heat (had that problem with the move from Florida. You might be able to pop off the dark bumps if they are adhesive and clean the plate, but then the plate may stand out. I second Nenad's approach. I also applied a sealer - clear acrylic after a couple of years after applying the plates (I wanted them to get a patina.
-
Good news!! Do you remember where you left off on these ships? Marc
-
Great Build! I am glad to hear that you are doing better in the health department. All the best! Marc
- 962 replies
-
- 7
-
-
- sovereign of the seas
- ship of the line
- (and 1 more)
-
Paul, What book are you using for the studding sails? Thanks marc