Elia
-
Posts
551 -
Joined
-
Last visited
Content Type
Profiles
Forums
Gallery
Events
Everything posted by Elia
-
 figuerres, Very nice work on your Bluenose model. The hull, deck furniture, and masting and rigging all look very good. I look forward to seeing future work. Cheers, Elia
 -
Sarah, I'm now just catching up with your Harriet Lane build here at MSW 2.0. Your model and progress look great. That little jig and the resulting deadeyes and chainplates are impressively tiny. Very nice work. Cheers, Elia
-
Jcoby, It is good to see your build log again! Really nice work here. Elia
-
Ron, Nice little jig there. I like the approach, the soldered ring and drilled metal sheet, and the results look good to me. Very nice. I think hardwood is the way to go with the deadeye material - provides strength of breaking or tear-out in the small finished detail. Very nice. Elia
-
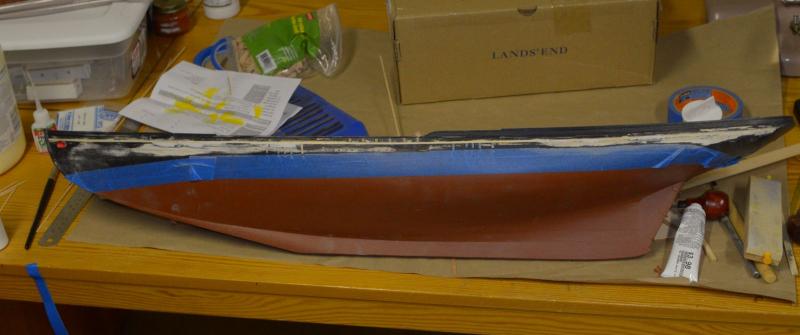
Bob, One last thought - I had considered removal of the entire strake in which the cove was cut, but chose against that course of action due to all of the quarterdeck scuppers being cut into it. I would have had to really finesse cutting those in without damaging the stanchions, and I'm certain damage would have resulted, both to the stanchions and the waterway/covering board. Elia
-
USF Confederacy by Rustyj - FINISHED
Elia replied to Rustyj's topic in - Build logs for subjects built 1751 - 1800
Beautiful work Rusty, beautiful work. Elia -
Alfons, I've only got a few sources of information pertaining to mackerel seine purse fishing. They are the following: 1. Smuggler model, plan sheets and instructions, by Blue Jacket Shipcrafters. Kit, plans and instructions were created by Eric A. R. Ronnberg, Jr. Excellent. No need to elaborate on this for you. 2. Benjamin W. Latham model, plan sheets and instructions, by Model Shipways. The principal plans and instructions were created by Eric A. R. Ronnberg, Jr. in 1973. Also excellent. The model plans were revised to a POB design by Ben Lankford in 1994. The plans include a sheet pertaining to the details of boats and equipment of seine purse fishing. The schooner was built in 1902, so it is about 25 years later on than Smuggler. There may be subtle differences in the seine equipment due to the difference in era - I don't know if differences exist or what specifically they might be. Similar to the Smuggler plan sheet the Ben Latham plan sheet includes plans for a dory and a seine boat. It also includes the following: (i) dip net detail, (ii) a dory scoop detail, (iii) kerosene lantern details [used for night fishing illumination], (iv) a splitting knife [tiny at 1/48 scale], (v) a mackerel plough [another knife, also tiny at 1/48 scale], (vi) a seine purse net weight, (vii) barrel details, (viii) splitting board details [a tray on which the fish were dressed], and the piece de resistance (ix) the seine purse net. The seine purse net is ~1400 feet long by ~140 feet deep. Obviously very difficult to model to scale - it might look like a giant pile of cheese cloth if I tried it. Bob Steinbrunn did a very nice job on a 'representative' seine purse on his Smuggler model, as seen in SIS last year. 3. Down to the Sea, The Fishing Schooners of Gloucester, by Joseph E. Garland. Probably my favorite book on these schooners and the Western Atlantic fisheries of the 1870s through 1920s. It covers the evolution of the fishing boats, the fleets, the technologies employed, and colors a pretty grand picture of the Gloucestermen and Canadians who fished the banks, from Georges out to the Grand Banks. Stories on the dangers and difficulties fill the pages, along with the fishermen's races, life as a fisherman, etc. The book has many black and white photos from which a myriad of details can be seen. There aren't any dimensioned drawings which a modeler could use, but the photos and descriptions are well worth the purchase price. 4. The American Fishing Schooners, by Howard I. Chapelle. The definitive volume on the (Western) Atlantic fishing schooners. Not a great deal on seine purse schooners or gear here, but always worth a look. I hope some of these are of use to you. Cheers, Elia
- 169 replies
-
- 1
-

-
- BlueJacket Shipcrafters
- Gloucester fishing schooner
- (and 1 more)
-
Bob, Well done on the jaw repair. Elia
-
Robert, That hooked scarf jointed rail looks great - well worth the time and effort put into it. Cheers, Elia
-
Tim, That hull looks too sweet. Very very nice. Cheers, Elia
-
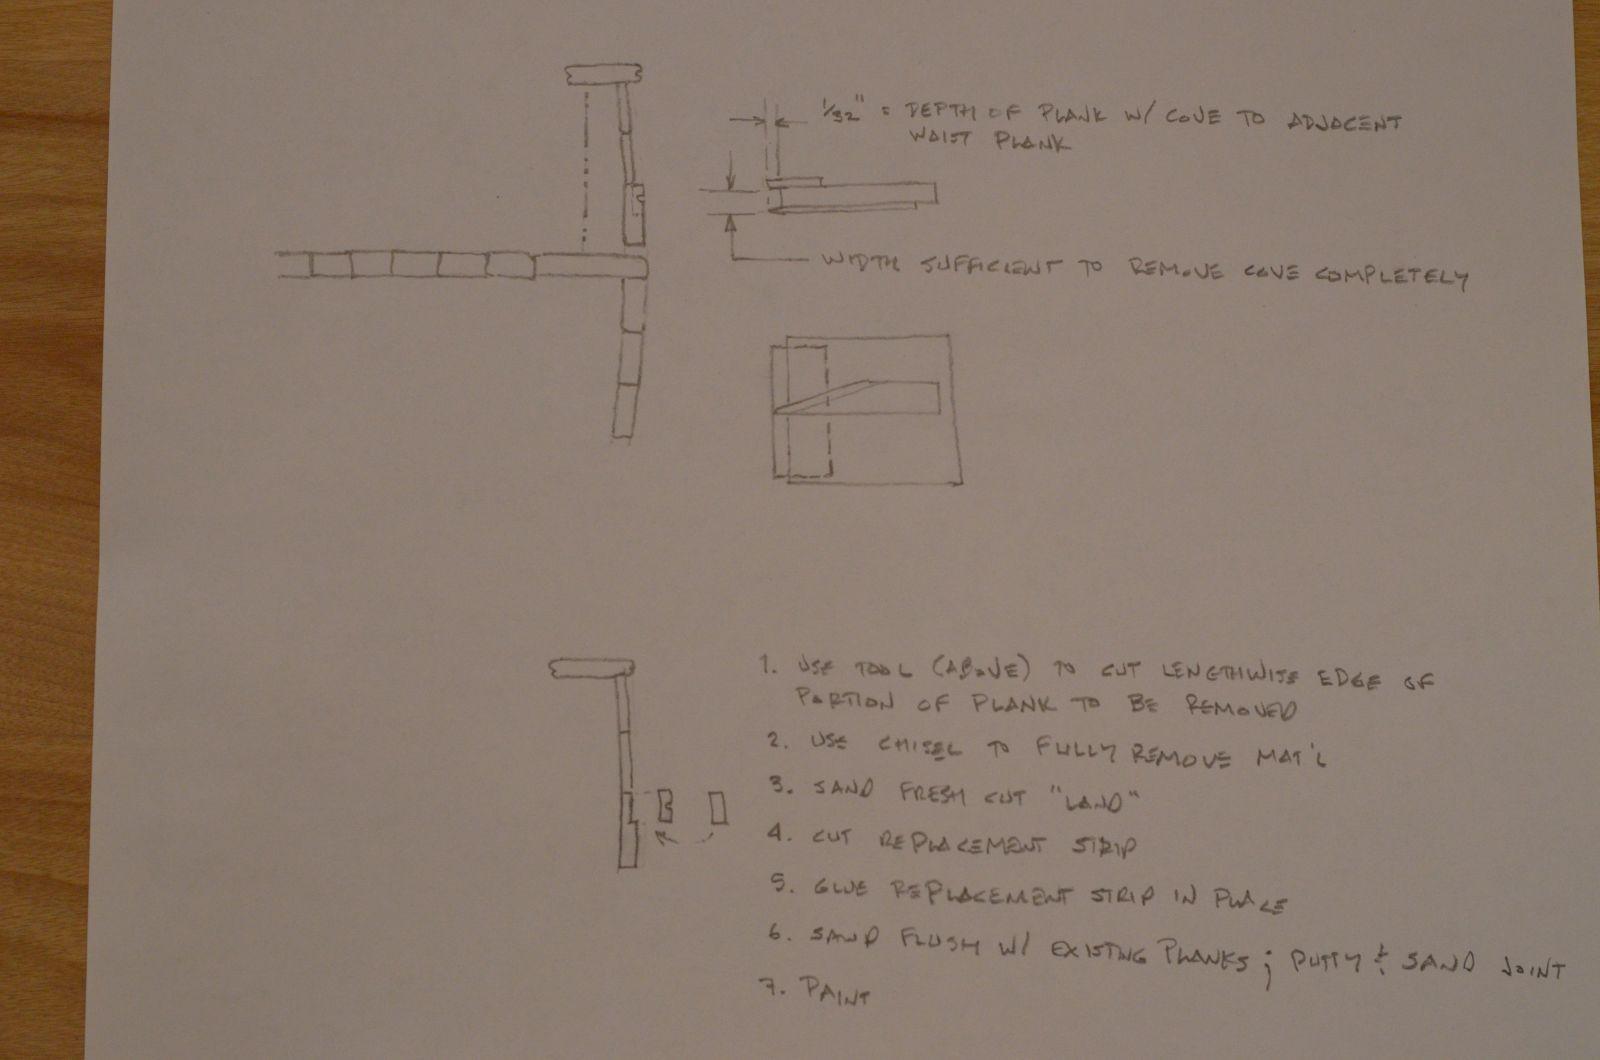
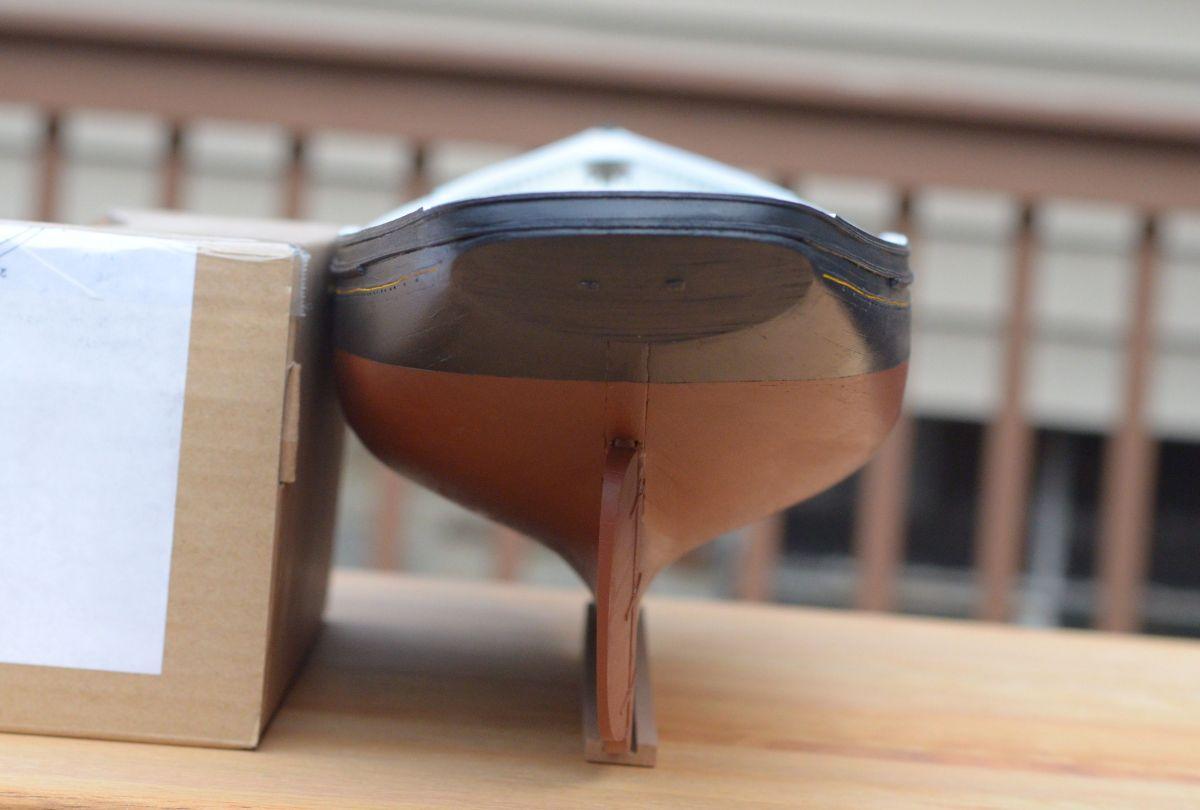
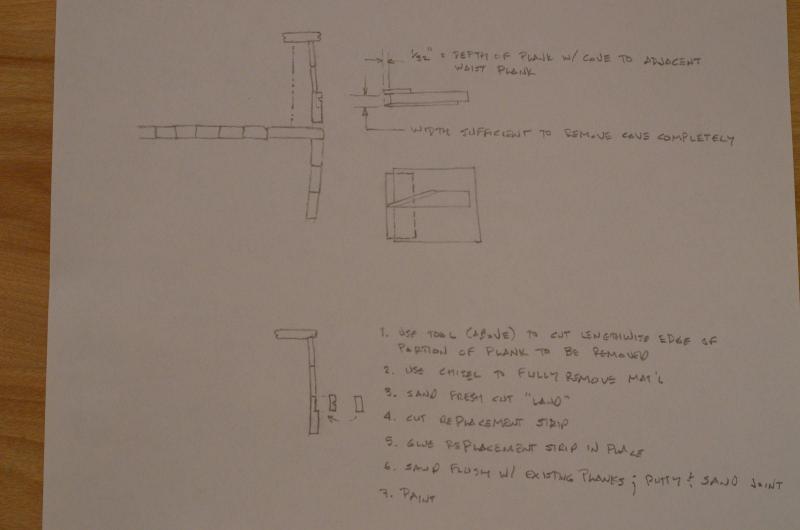
Bob, I'm afraid that once this shipbuilding crew here gets their mind set on something - there is no stopping them. Attached is a current picture of the progress. The horror of it all!! I had intended to take pictures in-process but became engrossed in seeing the remediation through. The old cove section has been cut out of each waist/side. A new un-coved strip of wood has been glued in its place. The wood was taller (stood proud of the adjacent loft surface) than required and was subsequently chiseled and sanded near flush. Putty/filler was applied to fill the inevitable gaps and gouged damage which resulted during the extraction/removal process (ham fisted shipwright in action). Then it was all sanded flush. A few touch-ups with the sand paper, a cleaning of the surface, and I'll apply some primer/sealer. Then on with the yellow striping. My decision to remove the cove, and not fill it with putty/filler, was due to a concern that the cove was so small that putty/filler wouldn't get a good bite or grip, and during the painting (and masking tape removal) process it would peel or break out. With the new strip of wood the yellow strip will only be painted over solid wood. I think the masking tape will be able to be burnished well on the wood, will seal well (fingers crossed), and a decent yellow stripe the result (again fingers crossed). I haven't yet taken a photo of the little cutting tool I made but can do so if anyone is interested in seeing it. It pretty much looks like the sketch. With a little modeling time I think I'll be able to proceed ahead again soon. Cheers, Elia
-
Bob, That dory looks absolutely great. I hope mine look half as good as that. On my model, Arethusa employed 10 to 12 dories. Regards, Elia
-
Alfons, Nice work on those soldered joints. They look great in the picture, which probably something like 5X scale, so they must look really sharp at full size. Regarding the note on the dories by avsjerome2003: Smuggler was a specialized type of fishing schooner, termed a Mackerel Seiner. The typical mackerel seiner carried one dory and towed a seint boat. Some of the larger of these schooners carried two dories, and in rare cases, two seine boats. The seine boat is double ended, looking very similar to a whale boat, but larger. Instead of dory fishing (for halibut, cod, etc), where 10 to 14 boats were used, the mackerel seiners used their seine boat and dory to deploy a very long net, weighted at its lower edge, cork floats along the upper edge. When a mackerel school as found the seine boat was rowed as quickly as possible around the school until it met up with the dory, thus encircling the school by the seine net. The bottom of the net was laced, and drawn closed, termed 'closing the purses' by the seine boat crew. The net was then moved aside the schooner and the fish were scooped by a dipping net and transfered onto the schooner. Elia
-
Bob, Neat little build you have going here! I've got to make a few for my schooner (at 1/48 scale) and am glad to see you embarking on this. Elia
-
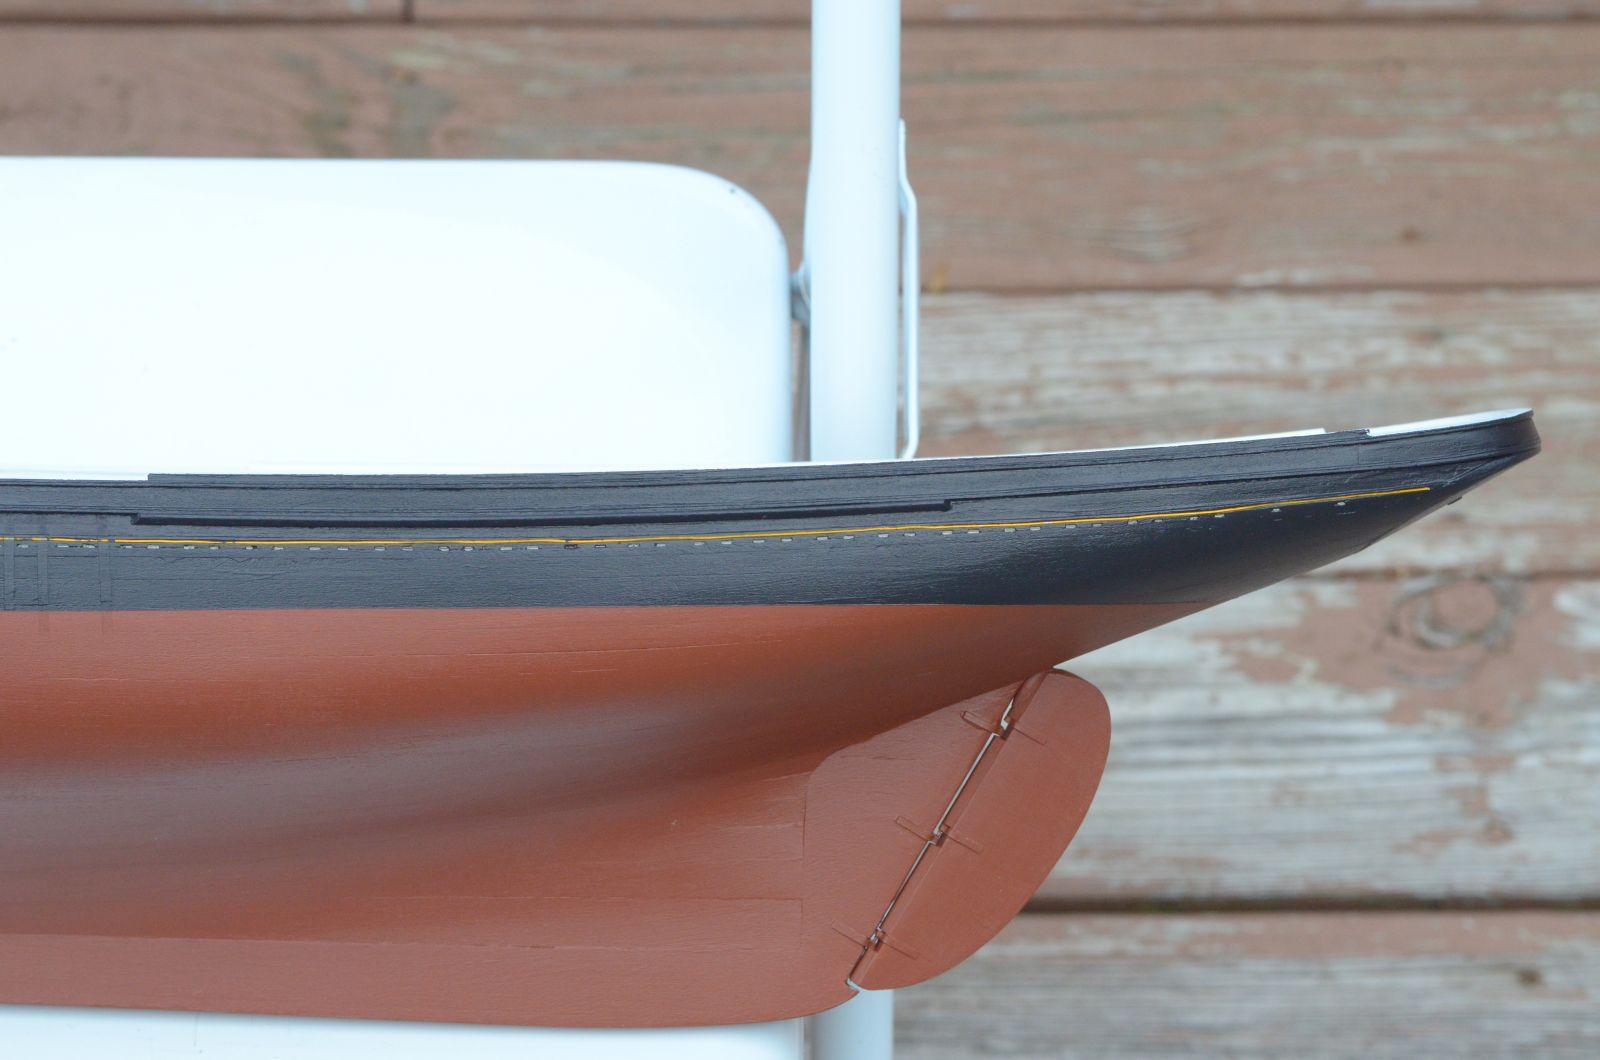
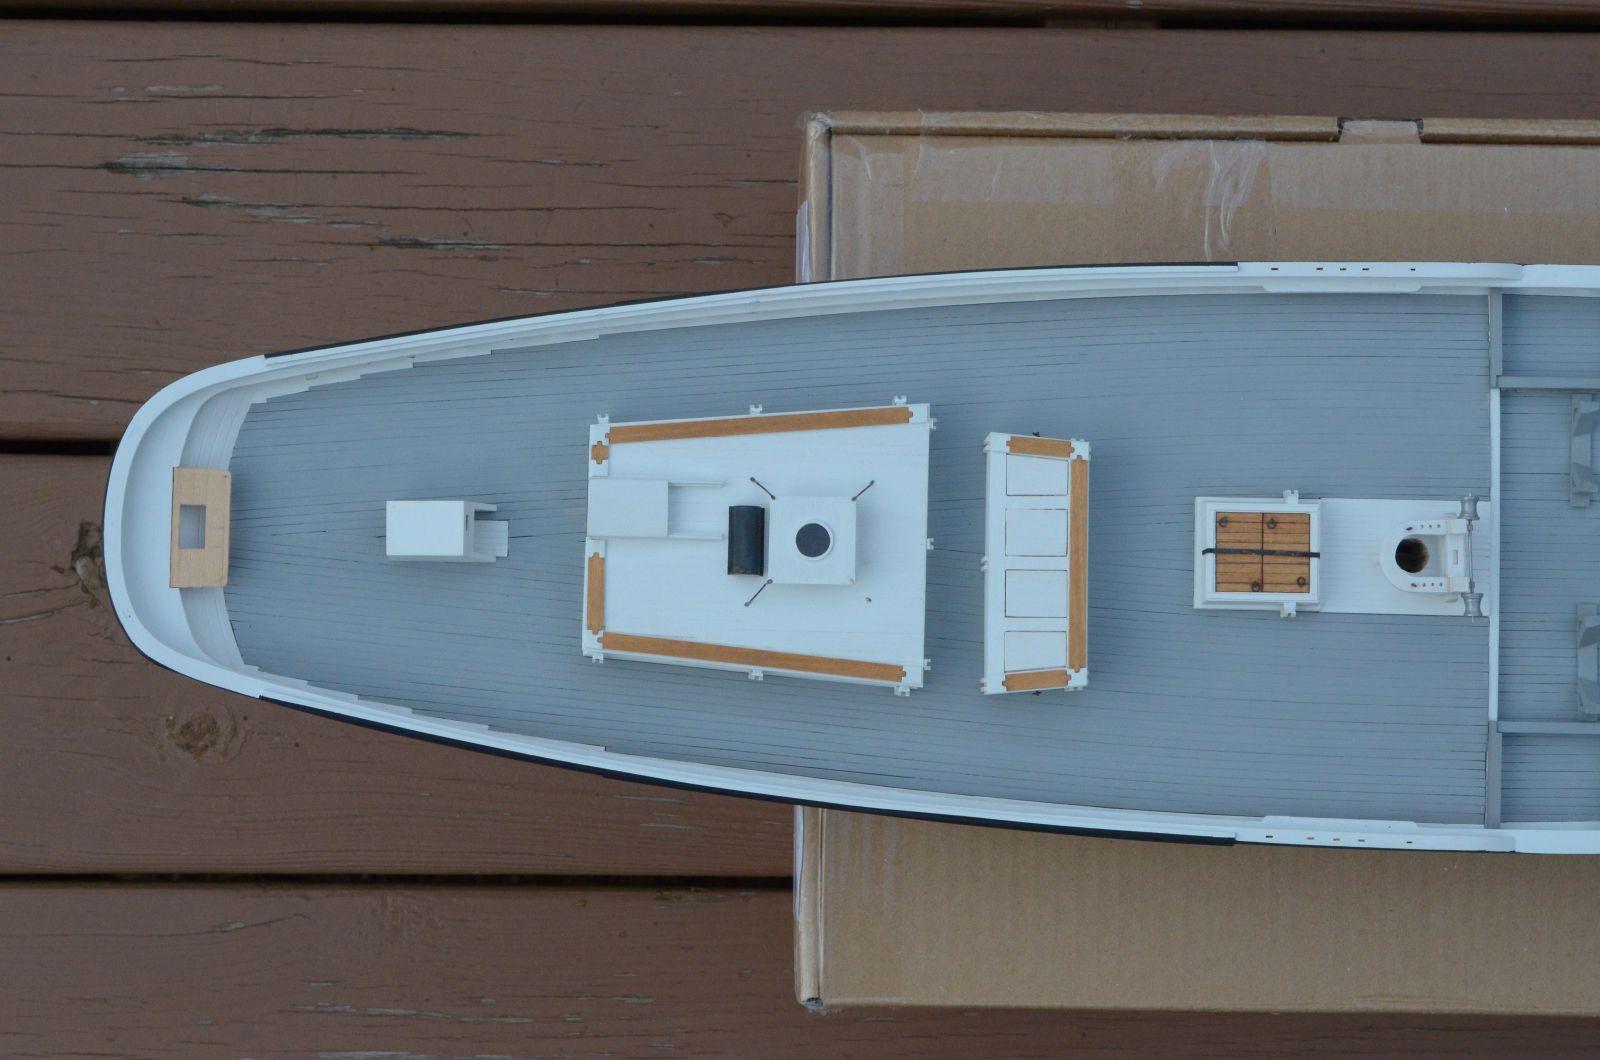
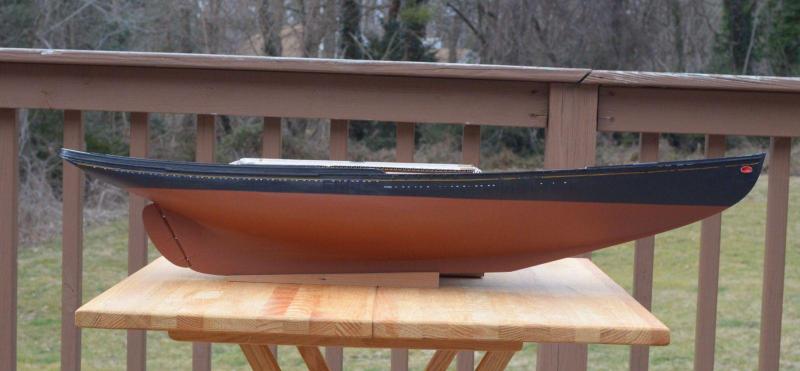
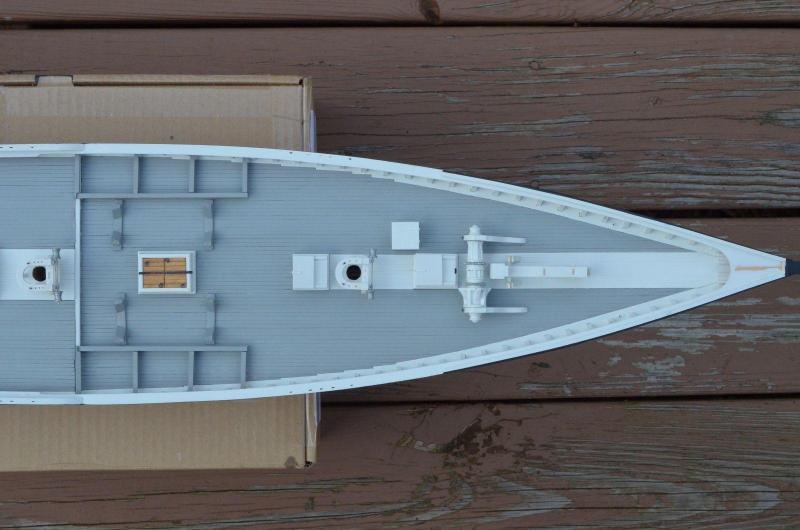
I noted previously that I was dissatisfied with my execution of the thin yellow cove on my. I'm attaching a photo of the aft port side of the ship showing that wandering yellow cove. I think many will understand why I need to fix this. The second photo is of the plan I've embarked upon to remove and repair that wood region. I'll add another update to show the progress in the near future. Cheers, Elia

-
John, That little cutter is sweet. Those are quite a set of spars for it! You mentioned furled sails. Have you settled on a material for the sails? At 1/96 scale I image the material wants to be very fine. Cheers, Elia
-
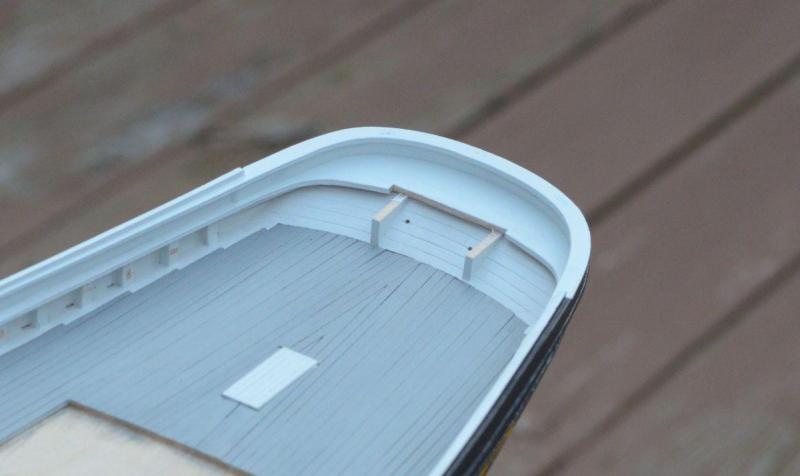
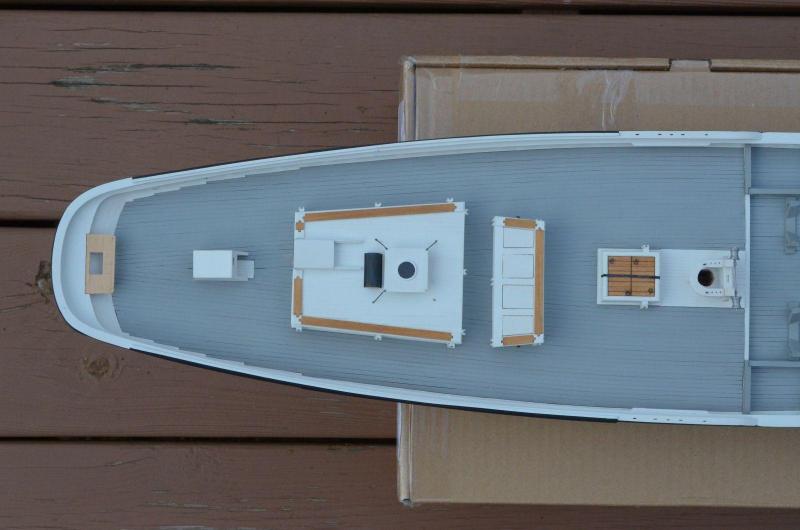
Gerty, Michael, Alfons, Thank you all. I appreicate your checking in on my adventure here. Michael, I plan to add a little more deck furniture than most kits have to help illustrate how crowded the decks of these schooners were. The fish pens just forward of the grub (great) beam are part of that. I'll have the two stacks of dories (10 or 12), There will be main and secondary rope hawser coiled piles. I've added the checker board supports on the cabin, the bait gurry, and main hatch, and once I get the opposing supports located on the main and monkey rails, I'll add the checker boards too, along with barrels and tubs of fishing lines. Lots of fun little stuff. Right now I'm mid-process of (trying to) correct my cove boo-boo. Once I see the light at the end of the tunnel I'll post some pictures. Cutting and tearing into a model for a repair is sometimes a little unnerving, but after the first cut it full speed ahead. Cheers, Elia
-
Bob, Very nice work on the masts, their ironwork, the mast head details like the cross and tressletrees, etc. The color of stained masts looks great for what I imagine slushed, varnished masts would look like. Very nice work. Elia
-
Dick, I've been using a blue plastic-like masking tape purchased from Tower Hobbies (if I recall correctly) for most of my paint / edge masking. It works pretty well, without much under-seepage. The cove is a unique problem, I think. For those who aren't familiar with the little cove decoration on these fishing schooners it is a small 'gutter' cut next to the edge of the thicker waist plank above the deck and margin plank / waterway. On the real boats the cove was less than 1" wide; if I recall correctly from Chapelle, it was more like 1/2" or 3/8" wide. On the model my cove is less than 1/32" wide, maybe 1/32" at it's widest. The masking tape I had purchased for it was 1/64" wide. From a dimensional perspective the tape should have fit within the cove. But the cove wandered around, and the 1/64" masking tape couldn't bend easily to fit within it. I did try burnishing the tape, within the cove, to seal it's edge and for the most part it worked. I think if the tape were on a smooth, continuous surface it would have prevented much of the bleed through that occured. My current plan is to cut away the edge of the plank in which the cove resides and replace it with an 'uncoved' piece. I'll then just paint the thin yellow stripe on that. I've made a little tool to locate a #11 blade a specific distance off the edge of the plank in question - tonight I'll see if it works. Cheers, Elia
-
Toni, I've just caught up with your build and log reconstruction. It is great to be able to see your model and its progress from the beginning again. Outstanding work. Elia
-
Michael, That deck is beautiful. Super nice work there. Elia
-
Ron, It is great to see your Oneida build again. And through the 'magic' of a log re-build, it occurs quickly, unlike a real build (where we all have to wait for the work to occur). Your hull planking is outstanding, as are the forest of treenails. I just took note of your making the draw tool for the transom trim - I need to incorporate that into how I make my draw tools in single edge razor blades. I had forgotten that you had framed and planked the lower deck, with gratings no less. So very very nice. Cheers, Elia
-
Alfons, Very nice dory rail and very very nicely done oar. I have to say again that's a great looking dory you've built. The smoothness of the wood finish, along with the paint job, makes for a really attractive little boat. Elia
- 169 replies
-
- 2
-
-
- BlueJacket Shipcrafters
- Gloucester fishing schooner
- (and 1 more)
-
avsjerome2003, Ron, Tim, Russ, Dick, Many thanks! I am happy with the mixed colors. I used Liquitex soft body acrylics, on the recommendation of Eric Ronnberg. The paint has a lot of very fine pigment, and can be mixed to suit any color desired. I think the only down side of the Liquitex paints are their thickness. Even when thinned appreciably they seem thicker than many 'modeling' acrylics (except for Model Shipways paints, at least the ones I purchased years ago). If the paints have another drawback it is they tend to dry glossy, or semi glossy. That includes thinning them with Medium Matte. I plan to spray the hull with Dullcote once the outside is all finished, with the ship's name, hail, etc., so that will resolve the glossy nature. Ron, yes I did try the outdoor lighting - nice overcast (but somewhat chilly) day. My home deck shows it is in need of a paint job too. The light really helps to show the model clearly. Dick, I look forward to seeing your Helen B Thomas. I'm happy with you 'stealing' pictures. I hope they are of help to you. I look at lots of other models, either finished, or their in-process build photos, so as to get ideas for how to accomplish tasks along the way. I am always trying to learn more about the art and craft of ship modeling (and MSW is an awesome place to learn ). Cheers, Elia
-
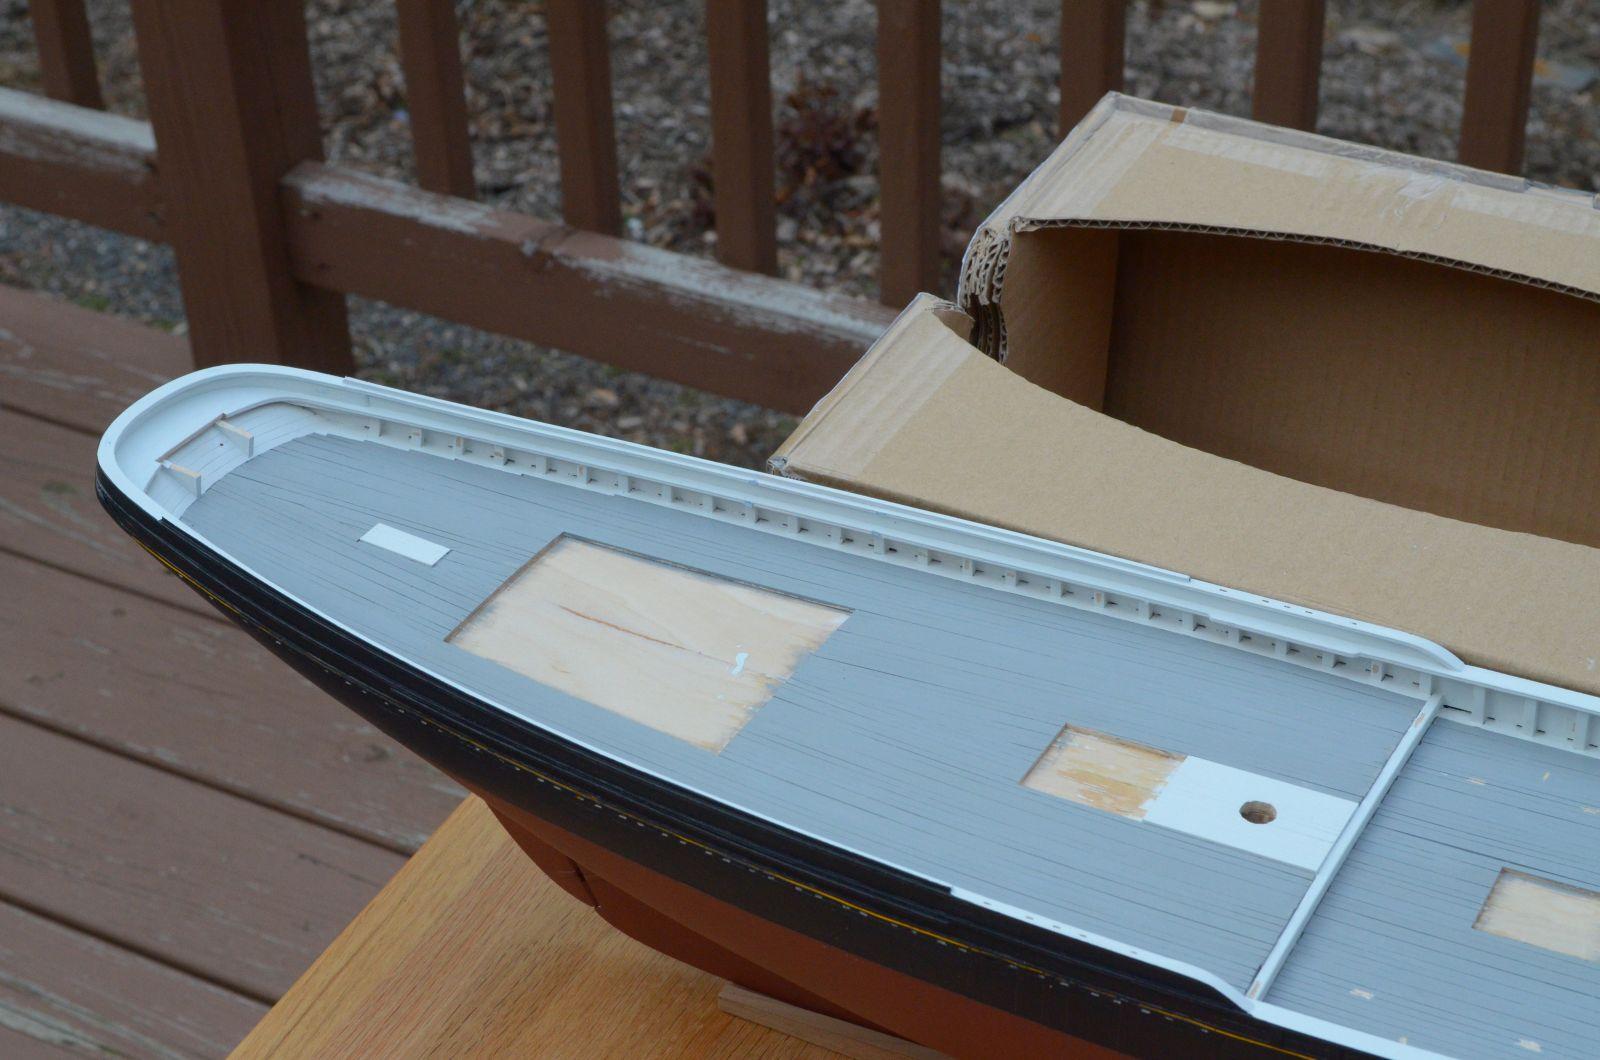
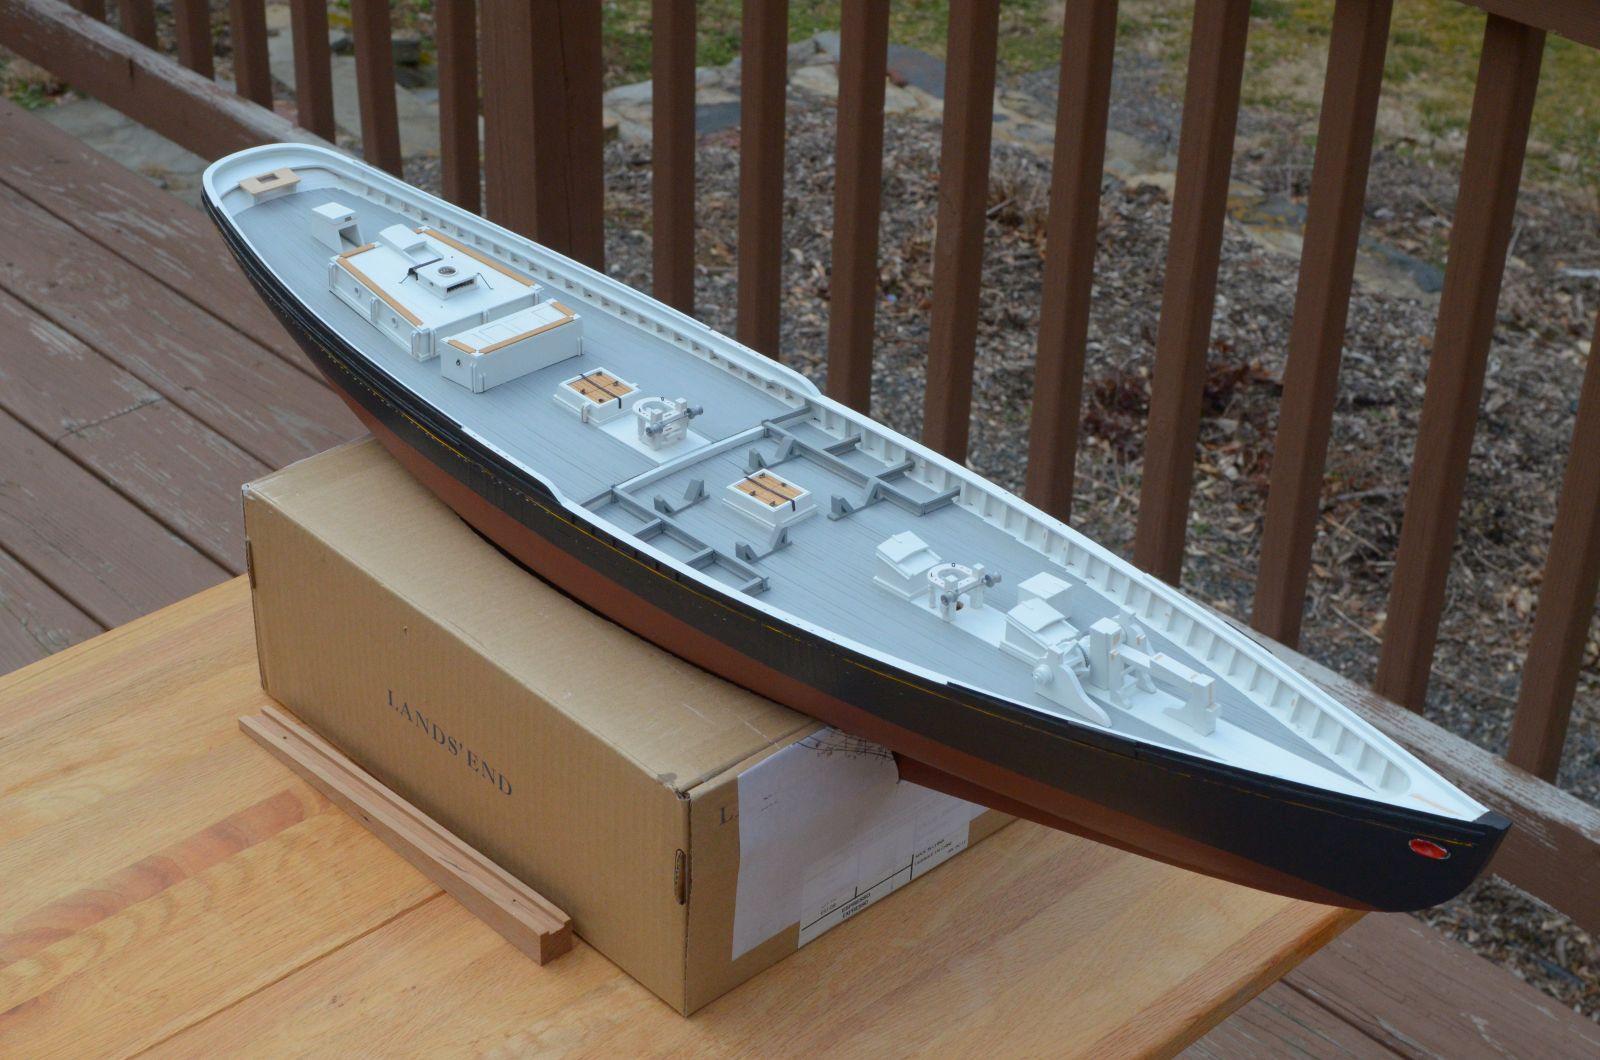
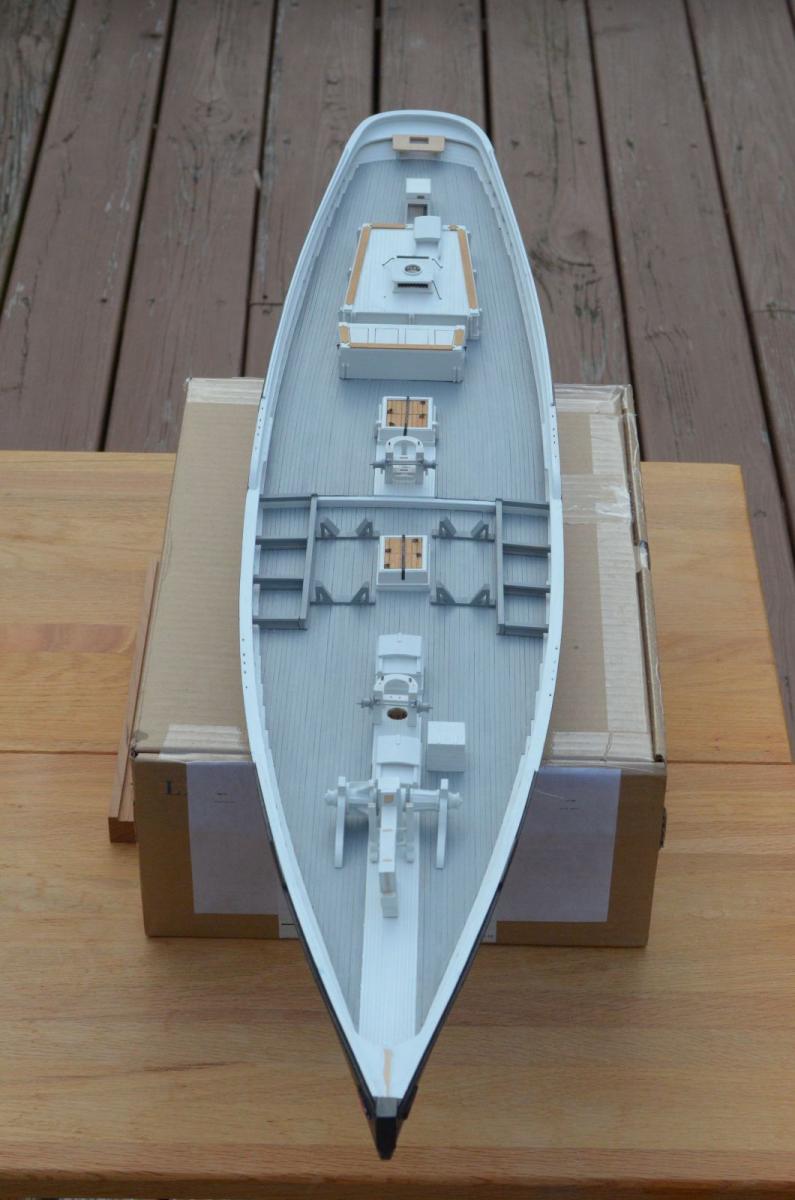
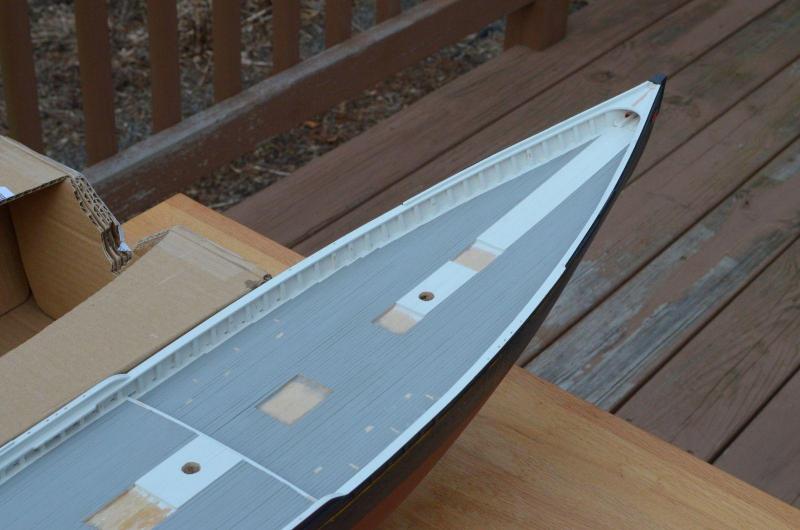
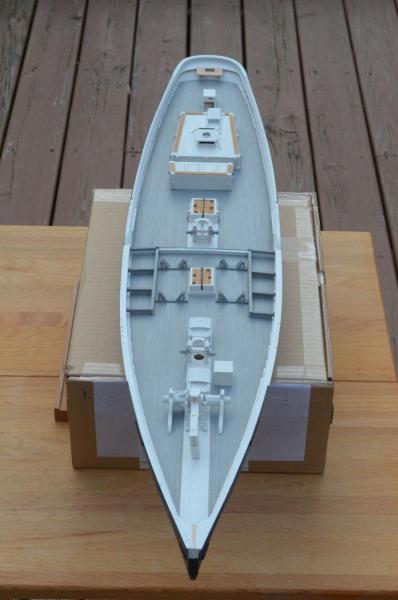
I've spent the past few weeks preparing for, and painting, the rails and hull. For the most part it was turned quite acceptable to me. There is one glaring exception, and I'll focus on that later. Once the Monkey Rails were completed I proceeded to apply a sealer/primer to the rails, perform a light sanding, and then apply two coats of my white mix. The only masking done was to protect previously painted deck and bulwarks. A while ago, when planking the hull, I built an inverted stand for Arethusa, one that located the hull by the two mast holes and a number of contact points on the deck. The stand allowed the inverted hull to located such that the waterline as horizontal, parallel to the surface it was placed upon. This stand, very crude compared to some of the tools and stand folks here build for their models, came in quite useful a number of times. I used the stand to mark the waterline with a pencil, a light line, on the hull. I then applied two coats of the anti-fouling red/brown lower hull paint. I purposefully carried the red paint up above the waterline mark. After painting all of the rails white and the hull red, and allowing a couple of days for full drying, I masked the edges of the rails where the hull black and rail white meet. I also remarked the waterline with my handy dandy stand, and then masked the edge of the black paint at the waterline. I had previously used a draw plate/template to form the very narrow cove along the edge of the waist plank. In full scale the cove is something like 3/8” wide, so one can image how narrow it is for a 1/48 scale model. I was able to carve a fairly narrow cove into the plank, but it wasn’t very even. In the process of scraping it into the plank I felt it wander, almost catching on the wood grain as it went. I’ve looked at this detail for quite some time and had mixed feelings about it. I was proud of having made such a narrow cove, but unhappy that is wasn’t straight and perfectly parallel to the plank edge. Herein lies the problem I encountered. I painted the yellow of the cove, two coats, extending the paint above and below the cove to ensure the cove was fully painted. Once that paint had cured I applied masking tape to the cove. I had found 1/64” wide masking tape from an on-line modeling supplier and purchased it. This stuff is rather amazing in it’s narrowness. When I tried to apply the tape to the cove I found it very difficult to get the tape to nest down into the cove - it wanted to wander about in the cove...reminiscent of when I scraped the cove some time ago. I applied tape edge sealing coats of each of the three paint colors - white along the edge of the rails, red/brown along waterline, and yellow at the cove. This was done to seal the edge of the tape and not allow the over-coat color to bleed under the tape. Once those had dried I was clear to apply the upper hull black paint. Two coats were applied. The white/black edge along the rails worked quite well, as did the red/black edge at the waterline. There were one or two very minor bleed spots, but all in all I think a good success. Now....back to that yellow cove. Once the black paint had dried I peeled back that 1/64” tape...and....not good. The thinness of the yellow was excellent. But, the masked sections wandered along the wandering cove. And there was appreciable black paint bleed beneath the tape. I am very disappointed in this and am stewing over ways to correct it. Following are a few photos of the painted hull, without and with deck furniture. The quarterdeck of these schooners had a unique deck planking run - the planks were set parallel to the cabin, as that was a large cutout in the deck (a strength issue), to provide as much continuous planking strength as possible. Thus, there is some unique nibbing of the outboard planks along the margin plank/waterway. The fish pens and dory skids are shown also. The bait gurry isn't located quite properly, either. Cheers,


- 200 replies
-
- 15
-