HOLIDAY DONATION DRIVE - SUPPORT MSW - DO YOUR PART TO KEEP THIS GREAT FORUM GOING! (Only 13 donations so far - C'mon guys!)
×


Elia
-
Posts
548 -
Joined
-
Last visited
Content Type
Profiles
Forums
Gallery
Events
Everything posted by Elia
-
Wouter, I too don't have a Proxxon scroll saw, but do own the DeWalt 788. I hear Proxxons are very nice tools. The DeWalt is an excellent scroll saw - deep throat for longer wood pieces, very low vibration, and adjustable speed. The slower speeds are good for very tight radius work. If those are also attributes of the Proxxon you are looking at then it sounds like a good choice. I find my scroll saw very useful for many small modeling cuts and tasks. Cheers, Elia
-
 Ryland, Excellent work on your AVS. She's a very sharp looking model. Cheers, Elia
 -
Bob, Bluenose looks as great as before! I had forgotten how you cut your chainplate slots into the rails. That tool worked very well. Nice. Elia
-
Padeen, Thank you! I haven't visited many of the logs yet. I don't think I have been to Danny's Swan build yet - I'll have to pop over and check it out. On my next update I'll give this method of weaving in pictures and text a try. Cheers, Elia
-
Alfons, That is one sweet dory! Very nice. Elia
-
Well....that doesn't look too 'integrated'. I tried to copy/paste from an iMac document (I think called 'Notes') into the reply/post box, with interwoven text and photos, then tag the ? boxes to the uploaded images...the software didn't seem to like that. Does anyone have a tip on how to interweave photos and text in a post? I received a warning saying the forum didn't accept the document (I forget if that is the term used) or doc extension...and I was using jpegs. Thanks in advance, Elia
-
John, So nice! Thanks for adding those back in. Elia
-
Stephan, It's good to see those prior pictures of your Hesper reappearing. I look forward to more.... Elia
-
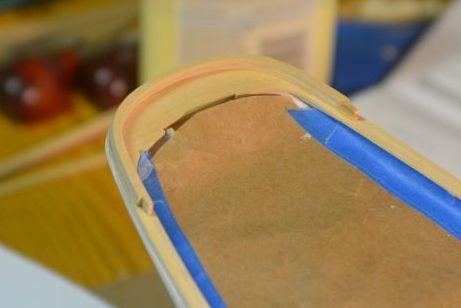
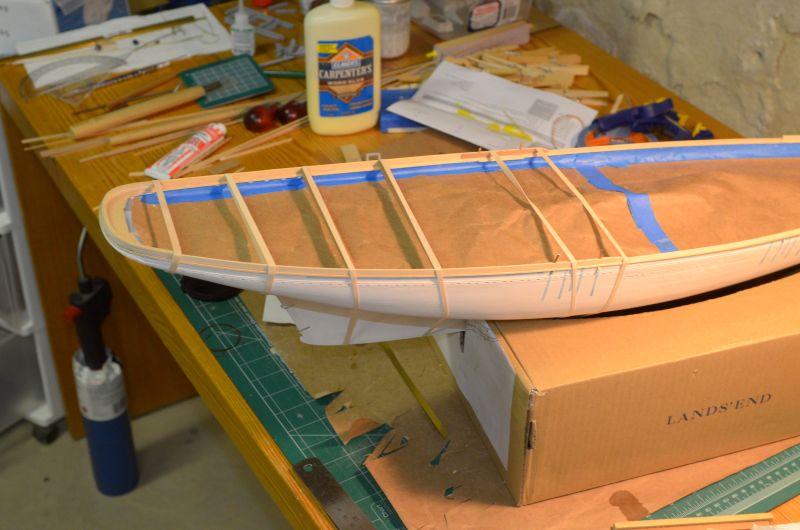
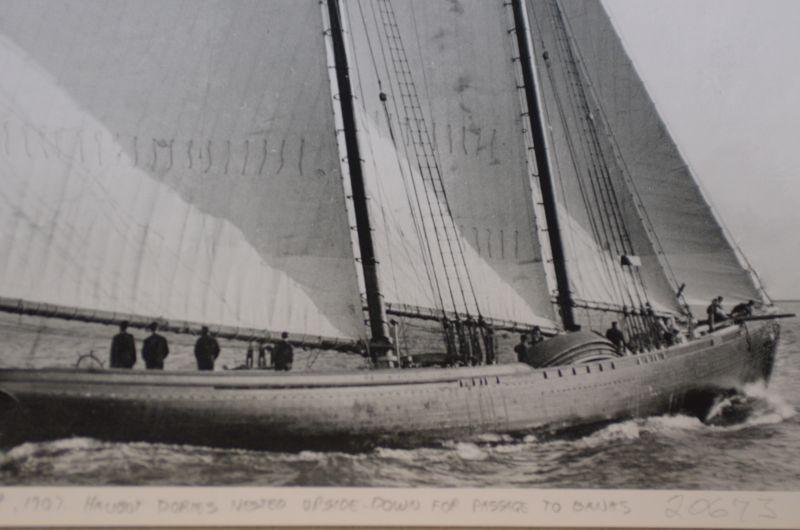
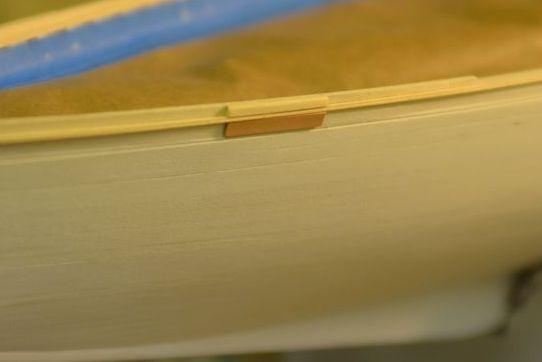
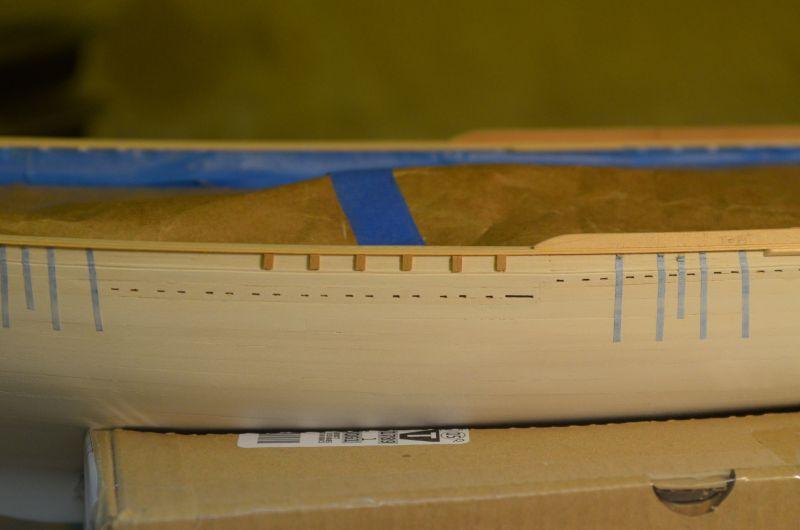
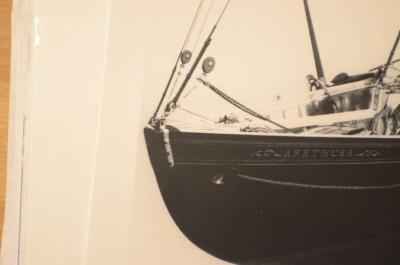
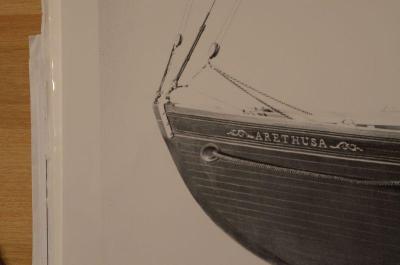
Shipwrights I’ve been puttering along, stealing a minute here and there to do small modeling tasks. I painted the deck the darker gray, per the color previous investigated, fabricated some fish pens and dory skids, to be located athwartship the fore hatch, have worked on the rails, and am now in the process of painting the hull. I used some plans and photos of Arethusa to arrive at the fish pen and dory skid details and geometry. I don’t have any handy photos of these, but will include them in the near future, once I begin adding deck furniture to the model. I started on the rails, or more precisely, near the rails at the transom. The fashion pieces on Arethusa have a peculiar shape to them. I resorted to gluing extra wood pieces on and sanding them to shape. It took me a couple of tries before I found them acceptable. They are small, subtle details and I wanted them to be reasonably representative of those on the real ship. Not exact, but close enough... The main rail is composed of three strips of basswood on each side. I learned of doing this from Charlie Cook, the Blue Jacket Shipcrafter’s on-call modeler (for customers). When building Smuggler years ago I had many questions on modeling and he was quite helpful. The thin strips allow for a nice continuous curve of the rail. One of the nice benefits of using the three strips to build up the main rail is that placement of the chainplate holes through the rail is fairly easy, and they can be aligned with the cant of the chainplates readily without having to resort to drilling through the rail after it was complete. The transom rail (or taftrail), and stem seat, was shaped from a single piece of 1/16” thick basswood sheet. For both the stem and transom rail seats I transferred the uppermost bulwark or transom plank edge onto heavy paper stock, then offset the desired amount to provide a slight overhang of the main rail and seats over the waist planks of the bulwark. I then transferred those templates onto the sheet stock and cut them out. After gluing them to the bulwark stanchions and planks, and then installing the main rail stripwood, I sanded them all flush to each other and in smooth, continuous curves. A single edge razor was ground with a Dremel tool into the profile for the main and monkey rail inboard and outboard edges and used to finish the main rail off. I’ve mentioned this before - I just struggle with this, both the grinding of the profile and getting a good edge on the receiving wood strip. I’m in awe of modelers here, too many to mention, who do this regularly and whose drawn planks look like they’ve been milled by some miniature woodshop. At times mine look like an angry beaver has just used my strip stock as a toothpick. I then moved on to the Monkey Rail and Monkey Board. The Monkey board is the vertical plank or boards (still formed into compound curvature in a plan view)which sits atop the main rail along the quarterdeck. The Monkey Board around the transom was a challenge. Instead of piecing it together with three or more pieces that run along the rail periphery, as was traditionally done in Essex, MA, I made a three layer lamination of 1/16” thick basswood sheet. I did this so that I could then cut and sand it to a profile while retaining some strength of the piece during handling. Once the wood lamination was glued and dry I transferred the outboard transom seat edge to it, the scroll saw cut it to it plan view profile, leaving a little extra all around. I then sanded it to its final shape, checking it constantly to the installed transom seat outer edge. When that looked satisfactory I offset inner monkey board thickness and repeated the scroll sawing, then sanding, and check-check-checking. When the monkey board profile was complete I sanded the lower surface of it to the transom seat, which had a slight curvature to it, fore-aft, by putting sanding paper on the seat surface and gently sanding the monkey board to it. This allowed for a reasonably tight fit, and when glued it didn’t require a great force or preload to get it to bond to the transom seat. The monkey board forward ends were also challenging due to the way the main mast chainplates were installed through the monkey rail and board on Arethusa. On other schooners the chain plates pass through the monkey rail, just outboard of the monkey board, and typically the main rail outer edge is cut away to allow the chain plate to pass it. On Arethusa the chainplates pass through the monkey board, through the main rail, and then exit on the outboard side of the bulwarks. Here is a picture of Arethusa where the sun reflection and angle of the boat in the photo clearly show the main mast chainplates and how they pass through the monkey board and rail. Eric Ronnberg Jr.’s model built for Thomas Hoyne also exhibit this detail, as do other photos of the ship. After a little thought and contemplation on this I decided I would try to install the main mast chainplates in the proper manner for Arethusa. For the monkey board I chose to fabricate it from two strips of wood. The outer one is 1/16” thick, whereas the inner one is 1/32” thick. The 1/32” thick stuff is swiss pear I had purchased from the Hobby Mill years ago. It was perfect for the task - really beautiful wood. I transferred the chainplate holes in the main rail to the 1/16” monkey rail piece and used a square cross section fine file to “cut” the hole depth. By doing this I was able to follow the orientation of each of the chainplates (from the plans I used). I then glued the 1/32” thick piece onto the 1/16” thick piece and voile’ - a monkey board with internal passages for the main mast chainplates. This ended up thicker than scale Monkey Board, but I’m satisfied that the extra thickness isn’t obvious, and it allowed a sound method of creating the slots for the main mast chainplates. I’m sure there are other ways to do this, maybe easier, too. It ‘appears’ to have worked out fine (yeah for small victories). Time will tell...with the rigging of those chainplates and main mast shrouds. Here is a photo of the outer of the Monkey Board planks being glued in place atop the main rail. One can see the thinner, darker Swiss Pear strip on the forward inboard side of the Monkey Board adjacent to the main mast chainplate locations. I had glued those in place, locally, prior to gluing the Monkey board onto the main rail. At the forward end of the main rail I’ve added some buffalo chocks and rail fillers at the location of the anchors - additional wooden fillers which were used to strengthen and protect the buffalo chock and main rail, and the thinner waist planks, from the anchor when raised, lowered, and stowed for passage. I’ve also added small amidship waist plank reinforcements. These were placed along the thinner bulwark planks in the region where the dories were onloaded and offloaded from the schooner. Similarly I added strips just below the main rail just aft of the main mast chainplates...I assume to protect the main rail from damage during hauling fish and equipment up from the dories. Once all of the rails and things were shaped and installed I applied a white sealer/filler, sanded the roughness smooth, and applied the white rail finish paint. As noted earlier I’m now painting the hull - bulwark white is complete, the anti-fouling red/brown is on, the thin yellow cove has been initially painted, and following some masking, the hull black goes on. Then she’ll really resemble a proper Gloucester fishing schooner and I’ll post more photos. [folks - this method of weaving in pictures is new to me...it doesn't look right in the editor/preview...so my fingers are crossed that it looks OK posted]...{I've tried Padeen's suggestion and it appears to have been just the ticket - thank you Padeen} Cheers!


-
Hi Padeen, Thank you for popping in and looking at Arethusa. You are too kind. Arethusa is a lovely ship in my eyes and I hope my efforts would make Thomas McManus proud. While I sometimes feel the stuff I'm working on is small....there are folks here who work at 1/2 the scale I do and have the same level of detail. How do they do it?! Cheers, Elia
-
Hi Pasi, Welcome back! I too am very glad to see you here at the new MSW and that you've got your Rattlesnake build re-established. Cheers, Elia
-
Hey Stephan, Thanks for stopping by here. I'm looking forward to seeing your Hesper log return. She's a fine looking pilot boat. Cheers, Elia
-
Tim, Neat! I'll be following along, watching your build here. After Pat Matthews did his SIS articles on an RC PT boat a number of years ago the thought has crossed my mind every year or so of building one. I've always wondered what the Blue Jacket Shipcrafters kit was like - and here it is! You've got a very good start going there....I'm looking forward to seeing more. Cheers, Elia
-
Jamie, Beautiful detailing there. The ironwork and blocks, the spar wood details - very clean, neat, and crisp. Very very nice. Cheers, Elia
-
Dave, I'm now just catching up with your Bluenose build (again, post MSW 2.0). She looks great. Looking at that casting - it looks like the right shape for an iron cathead. Is the flared end open? (so as to receive a rope line or chain through it?) On the anchor stock looks about right for a large Banks anchor. Those were much, much longer stocks than the harbor stocks (of iron). Very nice work! Cheers, Elia
-
Robert, I'm glad the pictures will be of some use to you. Jamie, Thanks for checking in! Cheers, Elia
-
Robert, That scratch capstan looks fantastic, far better than the kit supplied one. Very very nice work on that inlay, too. Very very nice small scale work. Cheers, Elia
-
Jamie, It is great to see you back. Yes, the loss of old MSW content is staggering, but the folks here have dug in and have begun rebuilding... It is impressive what has been rebuild so far in such a short time. Looking forward to seeing that beautiful Smuggler model continue... Cheers! Elia
-
Roger, It is good to see you rebuilding your Syren log. You've built such a beautiful build - I'm glad we'll get to see it again. Many thanks! Cheers, Elia
-
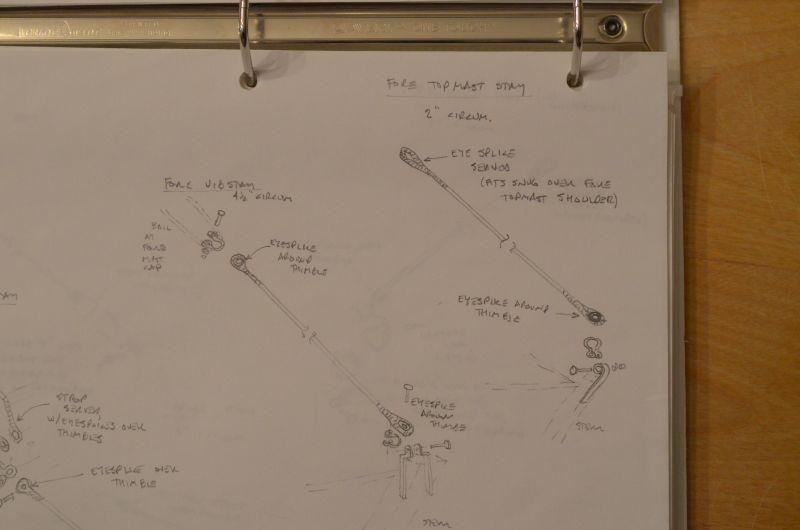
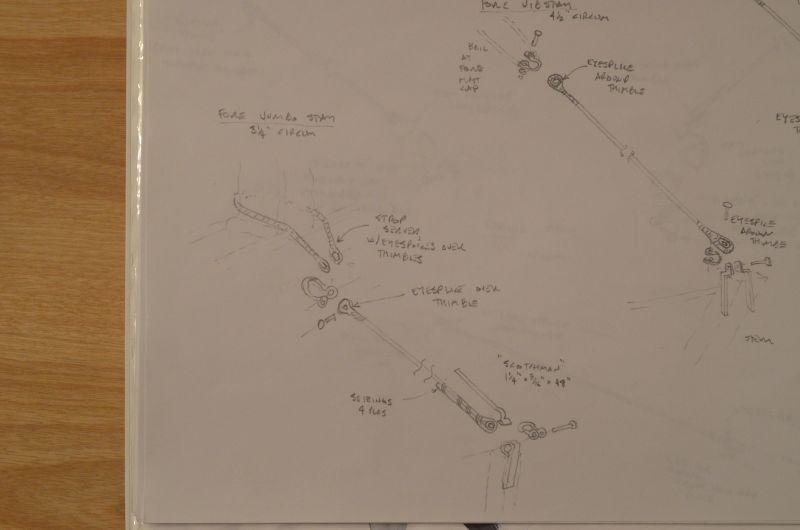
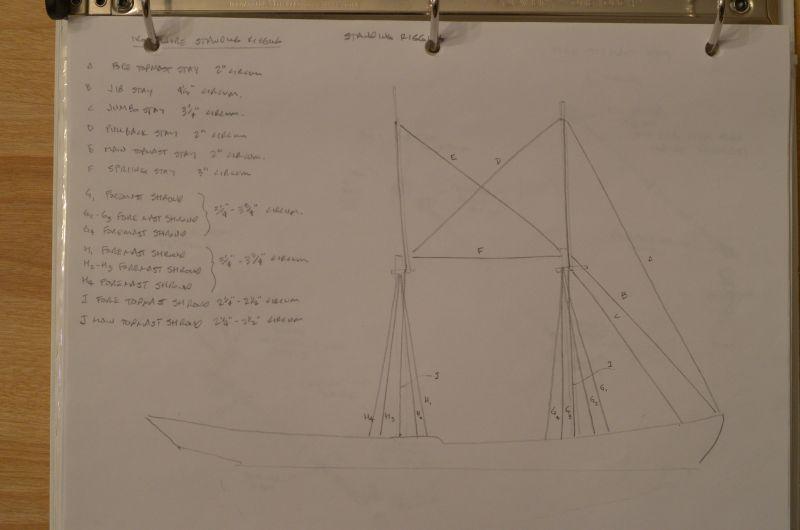
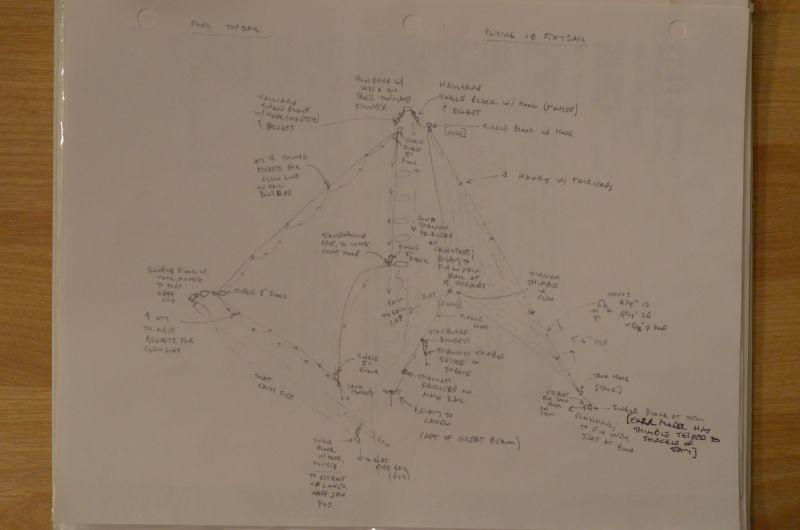
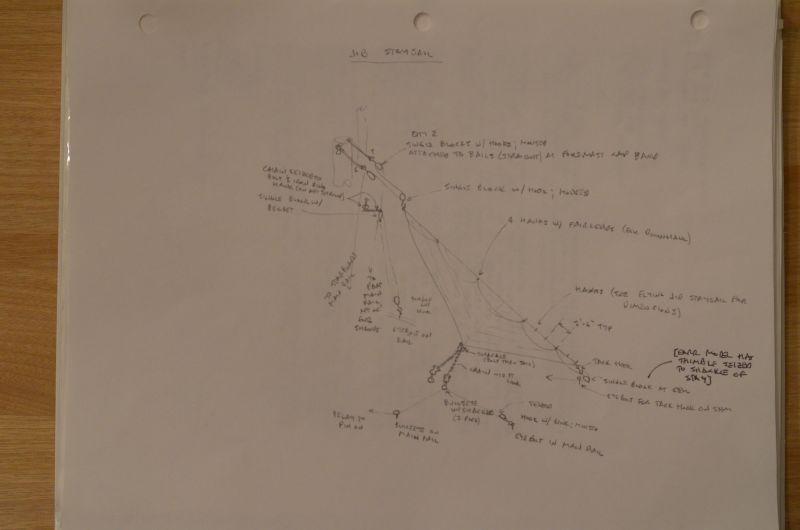
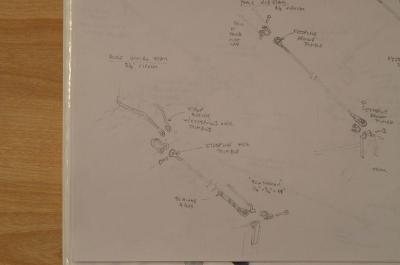
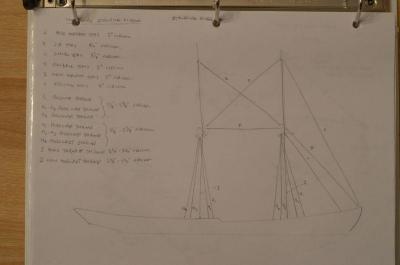
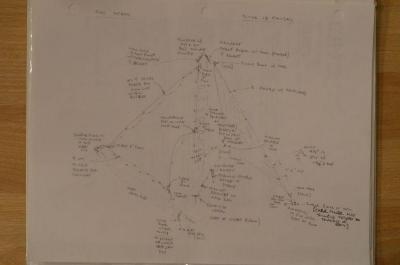
Rusty, Robert, Druxey, Mark, Many thanks for popping in here and for the kind words. Dick (rhcronan), While I've been puttering along with my rails I took a little side excursion and snapped some pictures of (a) Eric Ronnberg Jr.'s Arethusa model photo reproductions he had provided to me, and (b )some of the sketches I had made early one in my Arethusa build. Here are forum sized images of them. I think they should help illustrate the stem ironwork on a knockabout...at least Arethusa. I did the sketches based on H.I. Chapelle's book appendix of American Fishing Schooners, and much of those sketches agree with Eric Ronnberg Jr.'s model quite well. I've included the sketches for both the standing and rugging rigging at the stem (along with the jumbo stay on a post forward of the Samson post). I hope these help you on your Helen B. Thomas model. If you are so interested PM me and we can arrange for my sending you higher resolution images. Cheers, Elia


-
Popeye, Too sweet! Elia
-
Robert, Your Mars build is superb! Did you fabricated and install those treenails, or did you use the a tool to imprint them on the planking? They look fantastic. I'm embarrassed to say I had missed your build on MSW 1.0. I will definitely check in on it now. Outstanding. Cheers, Elia
-
Alfons, Superb. I'm so glad you've begun your log again. I'm just finishing the monkey rail on my schooner and I've come to your log for reference numerous times. What a crisp, sharp model you've built. Cheers, Elia
-
USF Confederacy by Rustyj - FINISHED
Elia replied to Rustyj's topic in - Build logs for subjects built 1751 - 1800
Rusty, Big thanks for reposting your Confederacy log. Your's is such a beautiful model, and I'm always drawn to it ....maybe one day I'll muster up and build one. I have liked Confederacy since having seen it on the Lumberyard's website years ago...just fell in love with it. Then Chuck went and designed a proper kit of it..sooo nice. Cheers, Elia- 149 replies
-
- 1
-

-
- confederacy
- frigate
- (and 1 more)