HOLIDAY DONATION DRIVE - SUPPORT MSW - DO YOUR PART TO KEEP THIS GREAT FORUM GOING! (Only 20 donations so far - C'mon guys!)
×


DelF
-
Posts
1,409 -
Joined
-
Last visited
Content Type
Profiles
Forums
Gallery
Events
Everything posted by DelF
-
 Magnificent Glenn. That hull is a thing of true beauty - almost a shame to clutter her up with all that messy rigging and guns and stuff! Well done! Derek
- 778 replies
-
- 3
-

-
- cheerful
- Syren Ship Model Company
- (and 1 more)
-
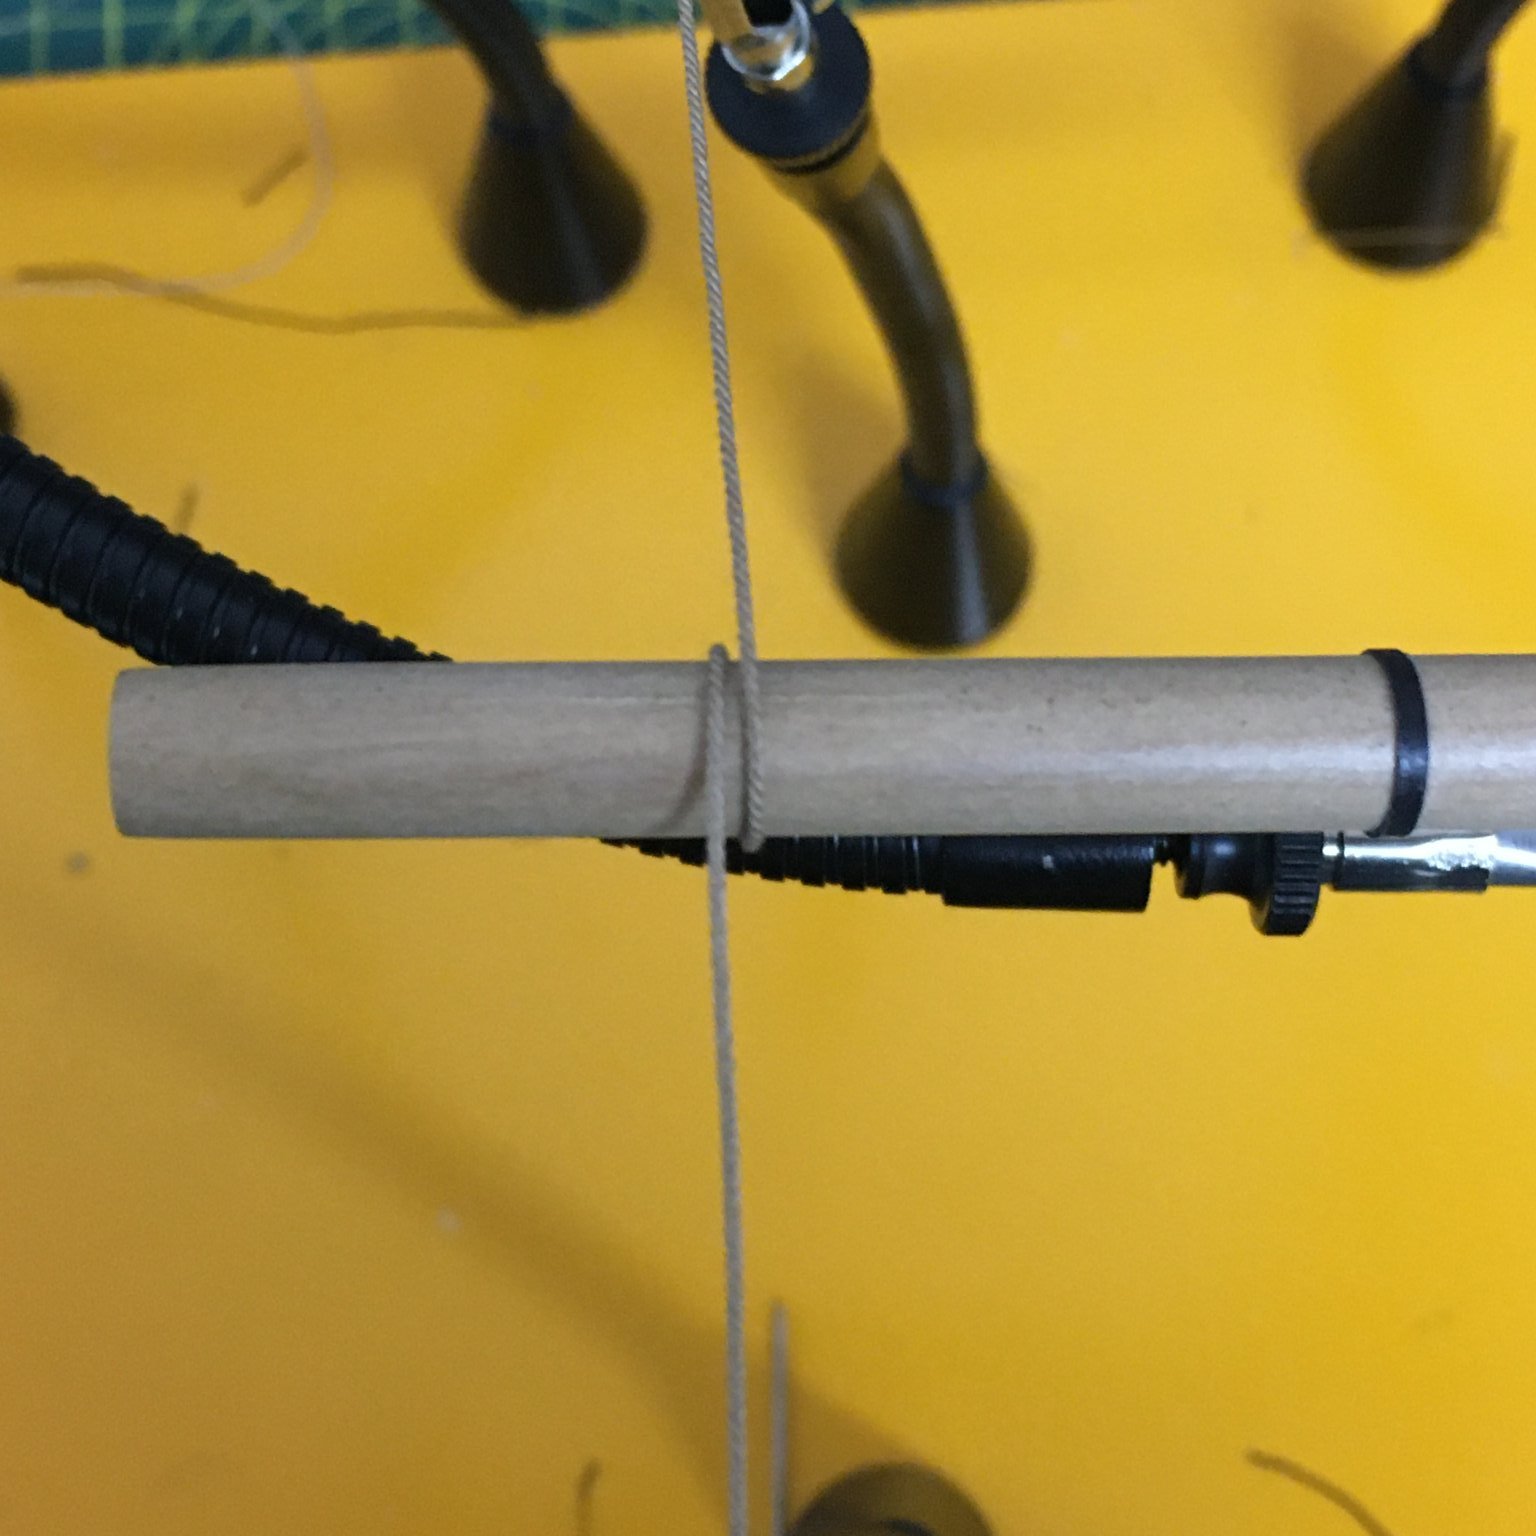
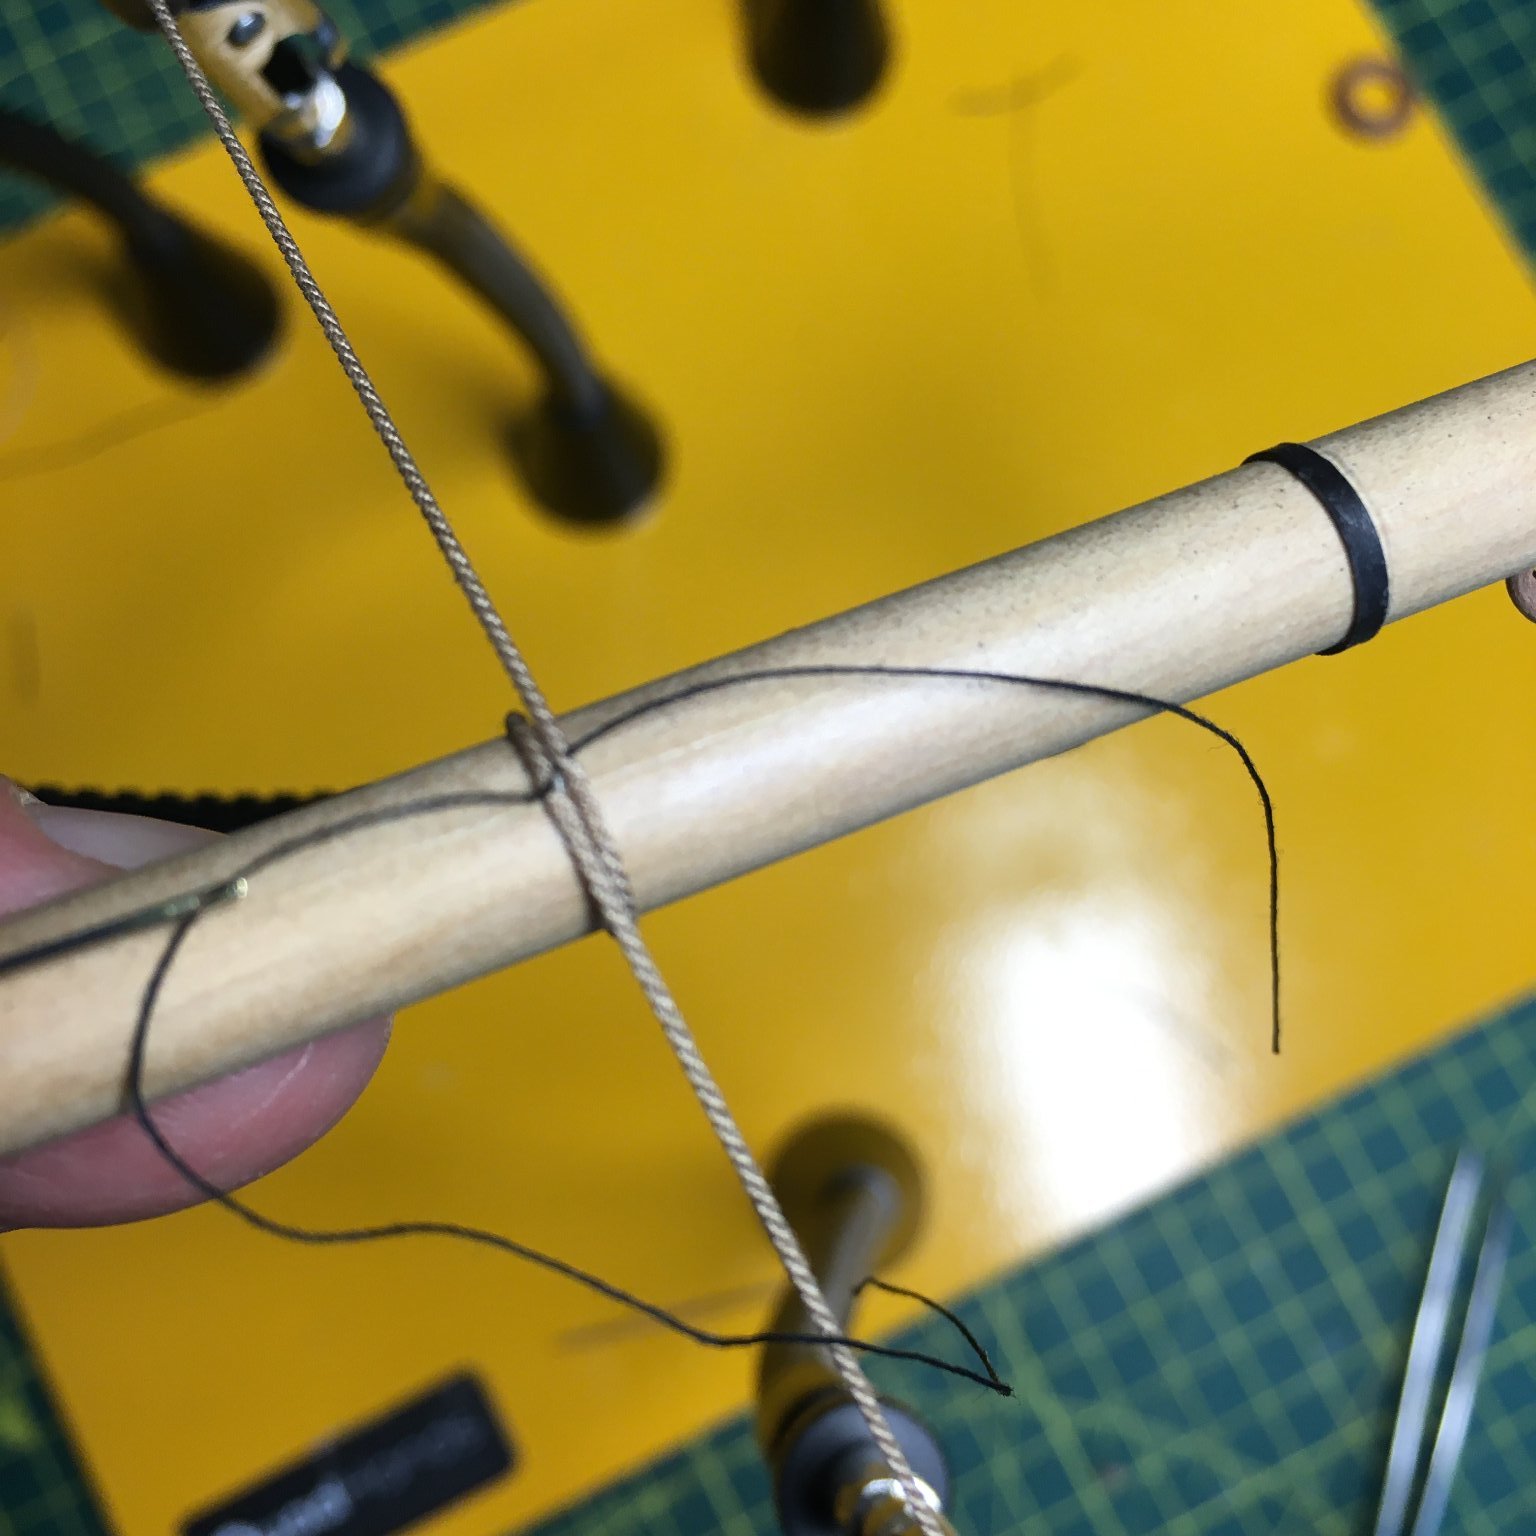
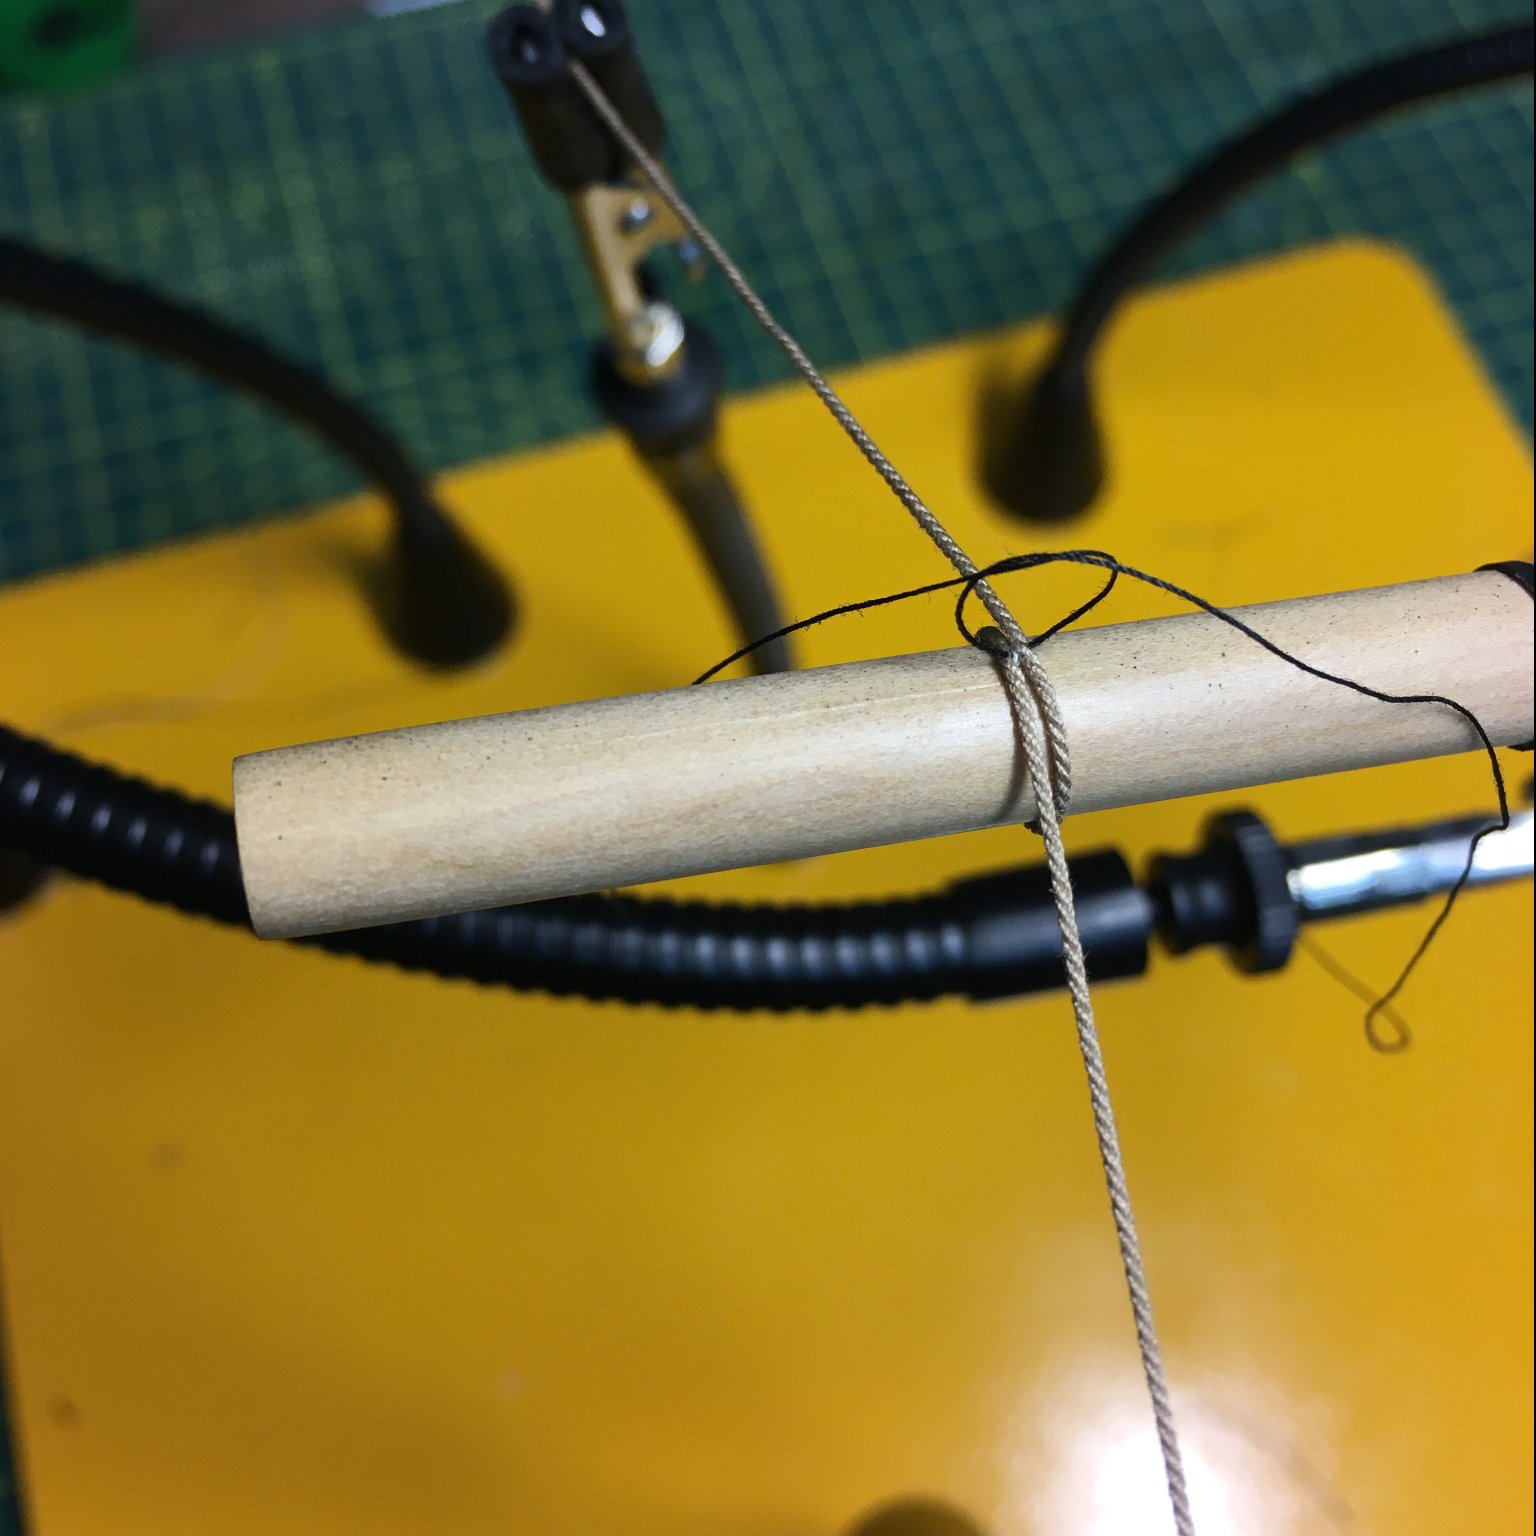
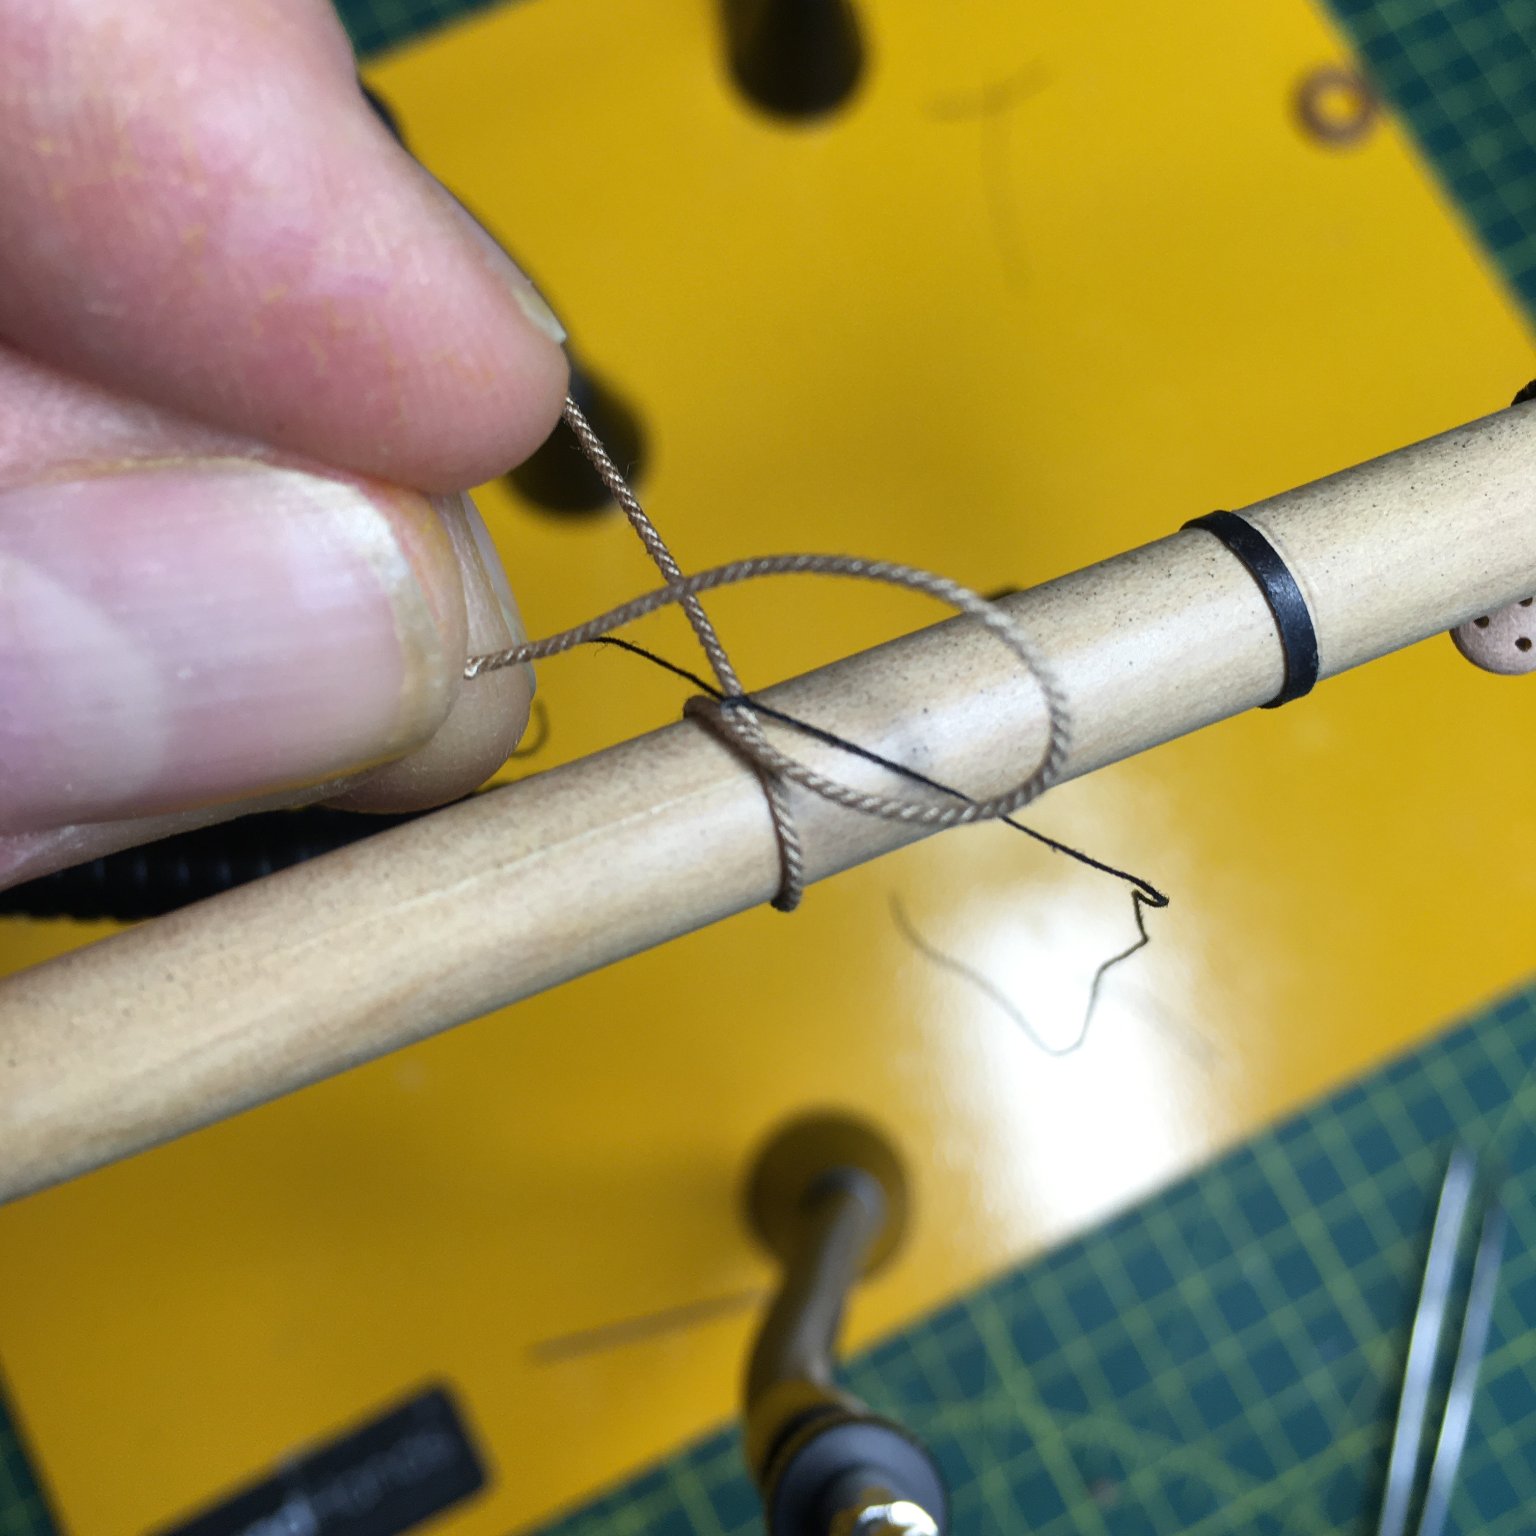
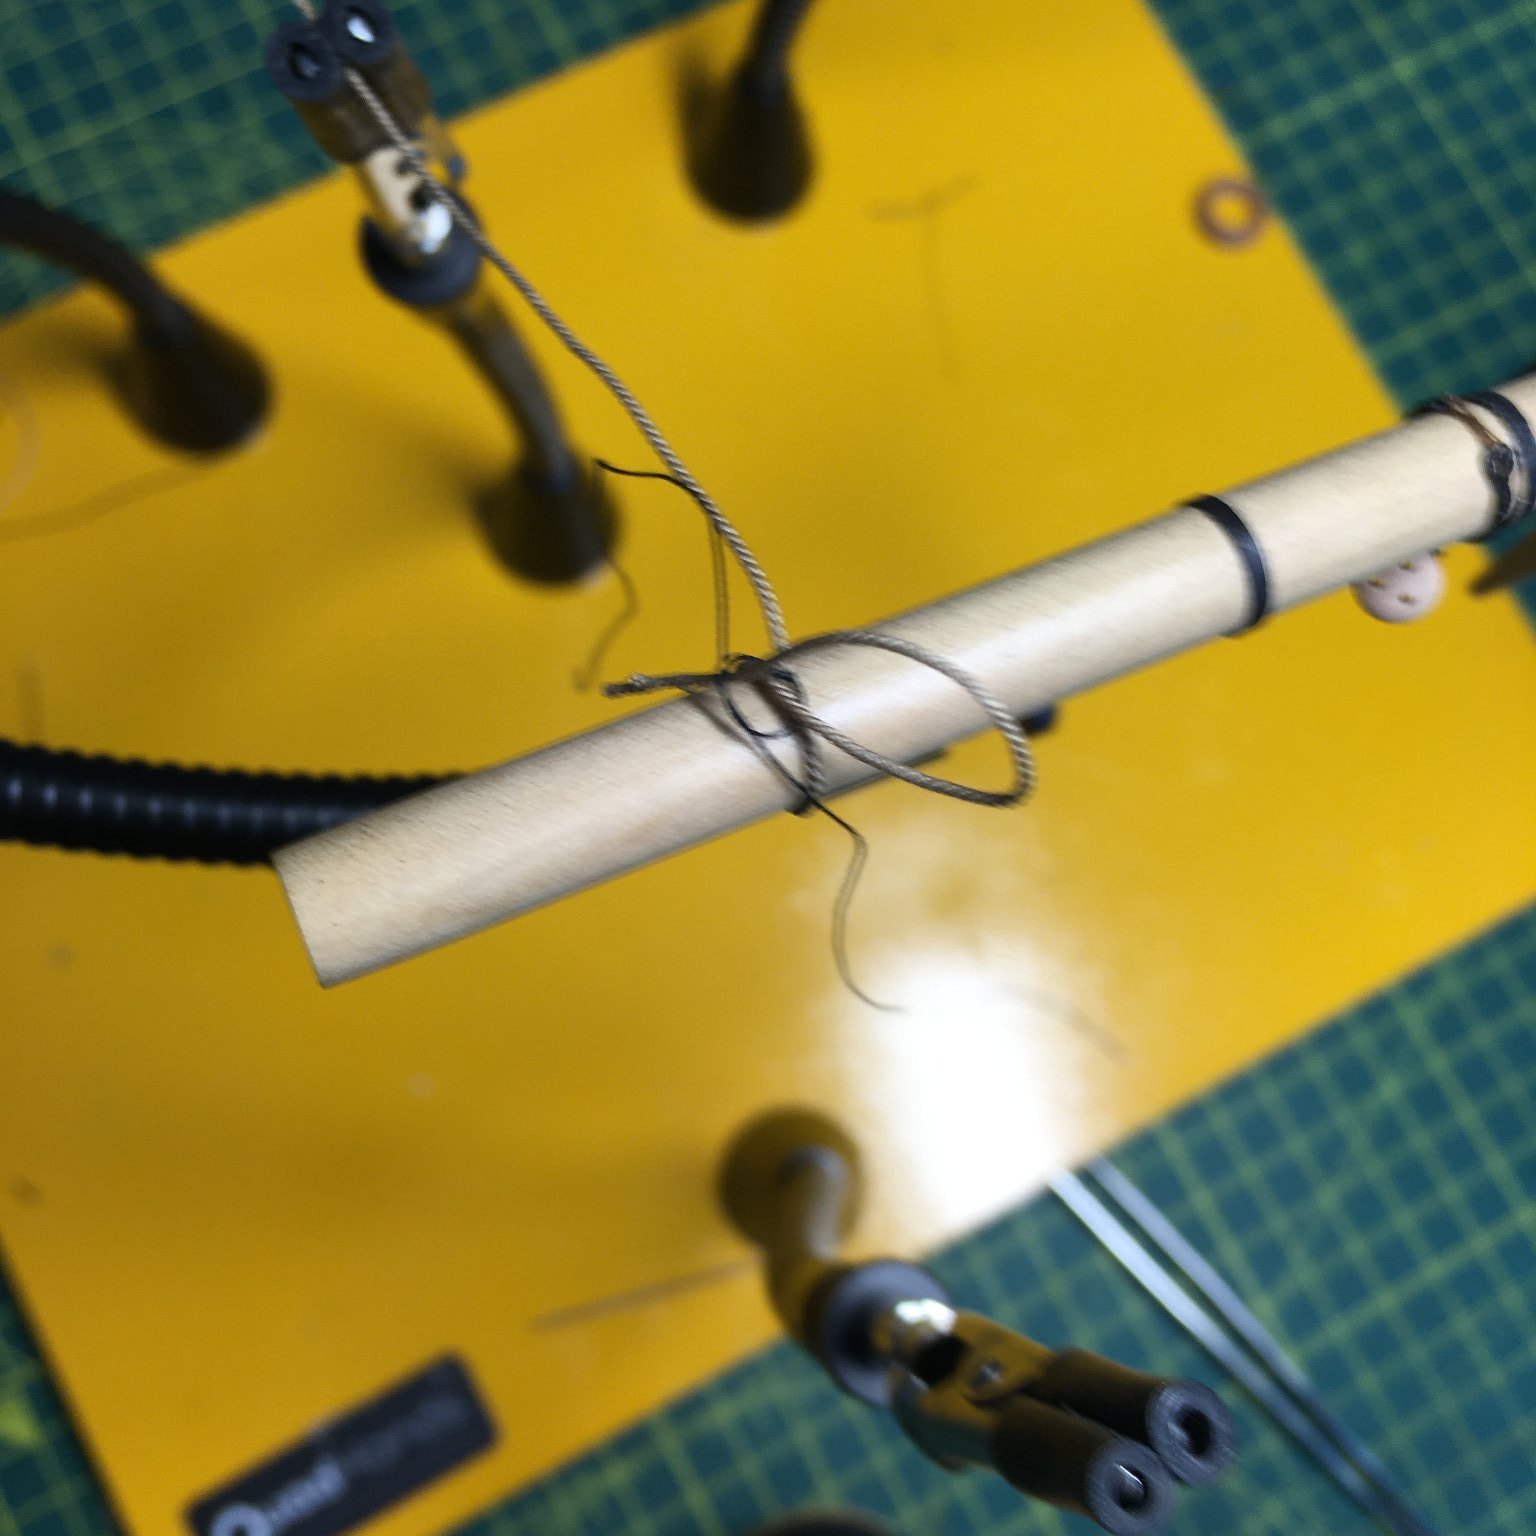
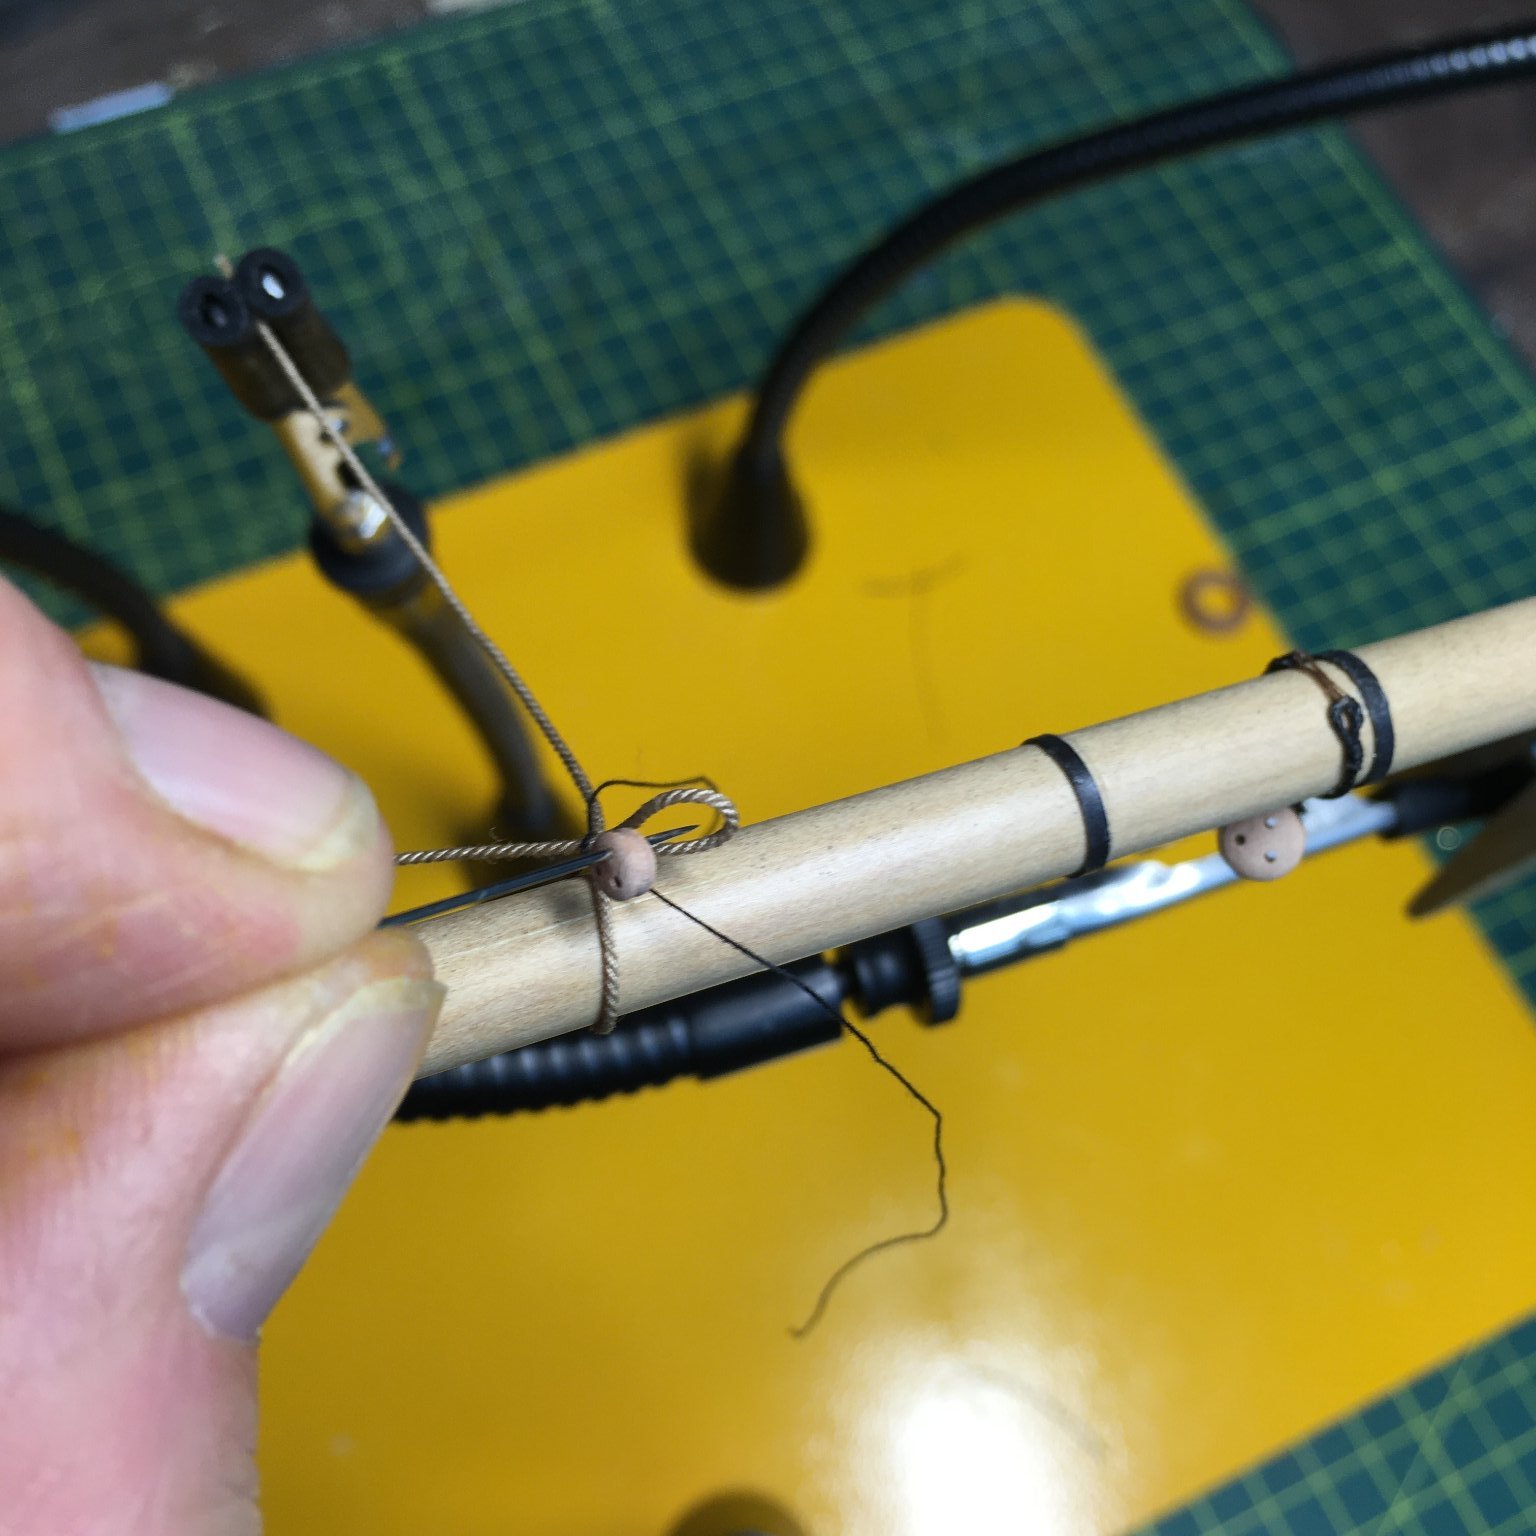
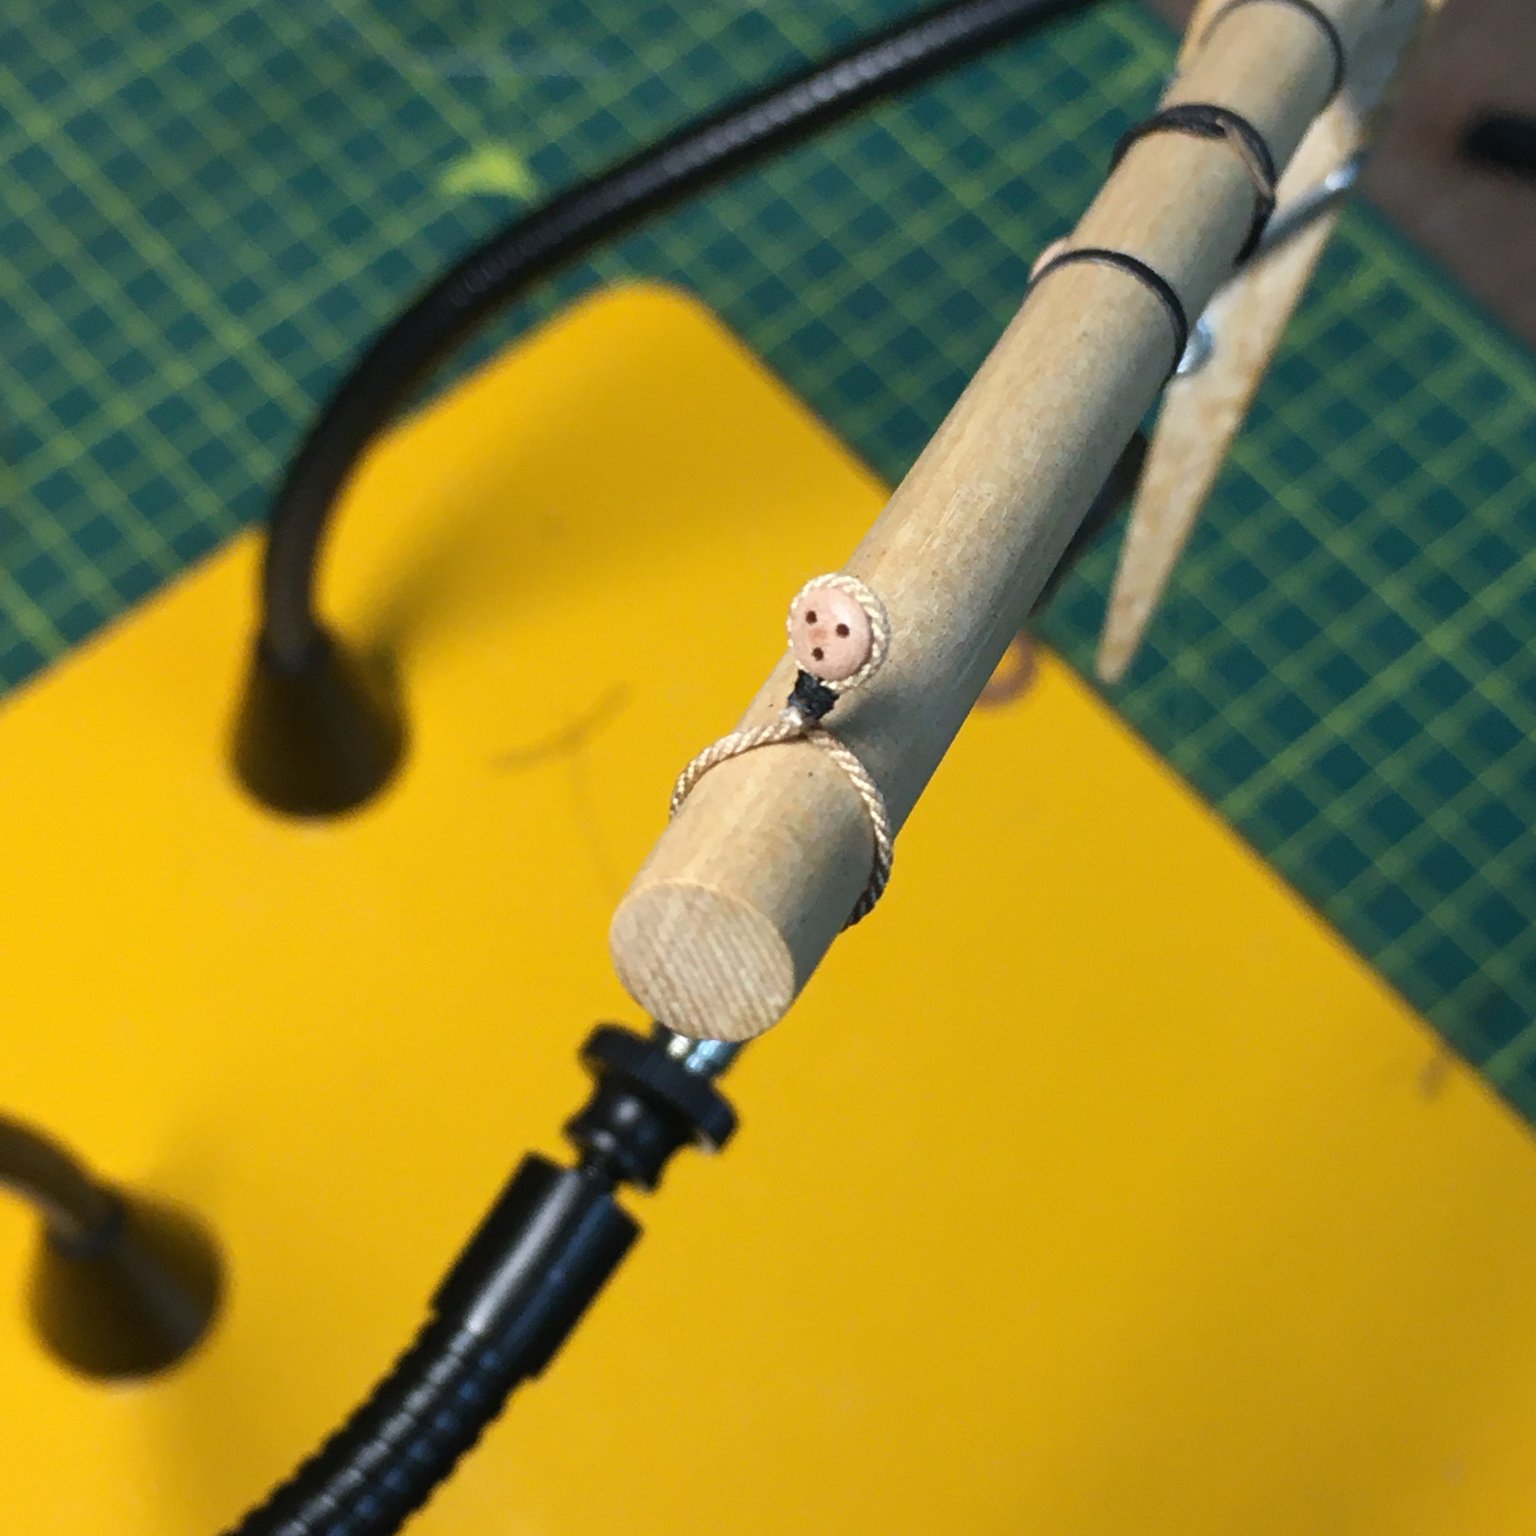
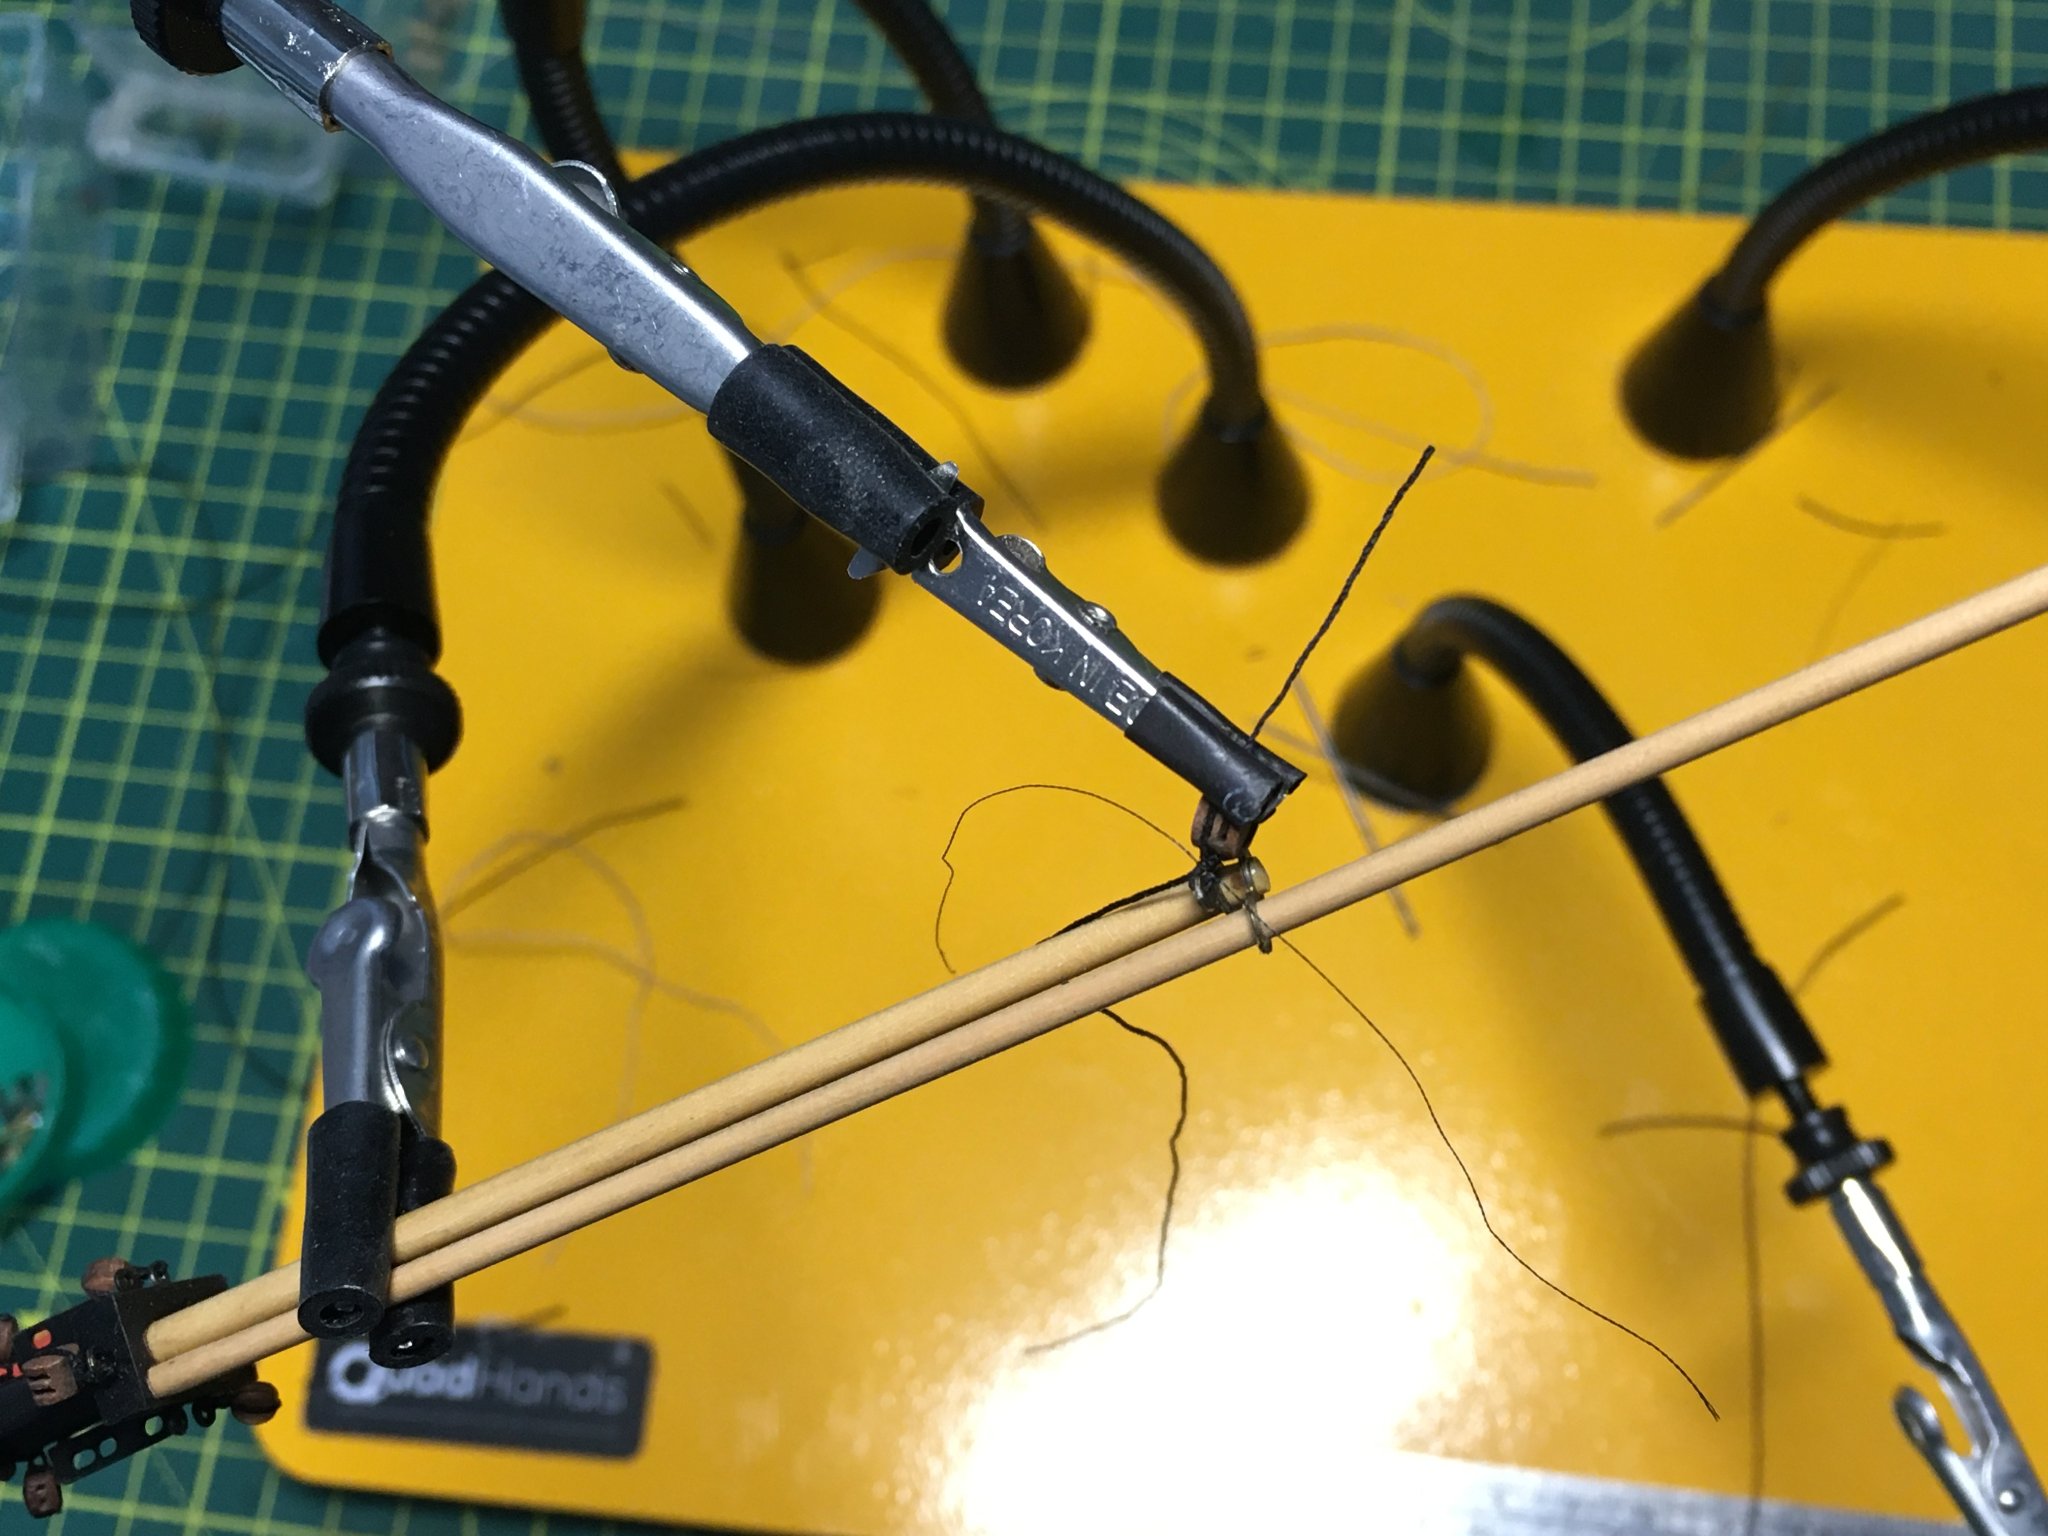
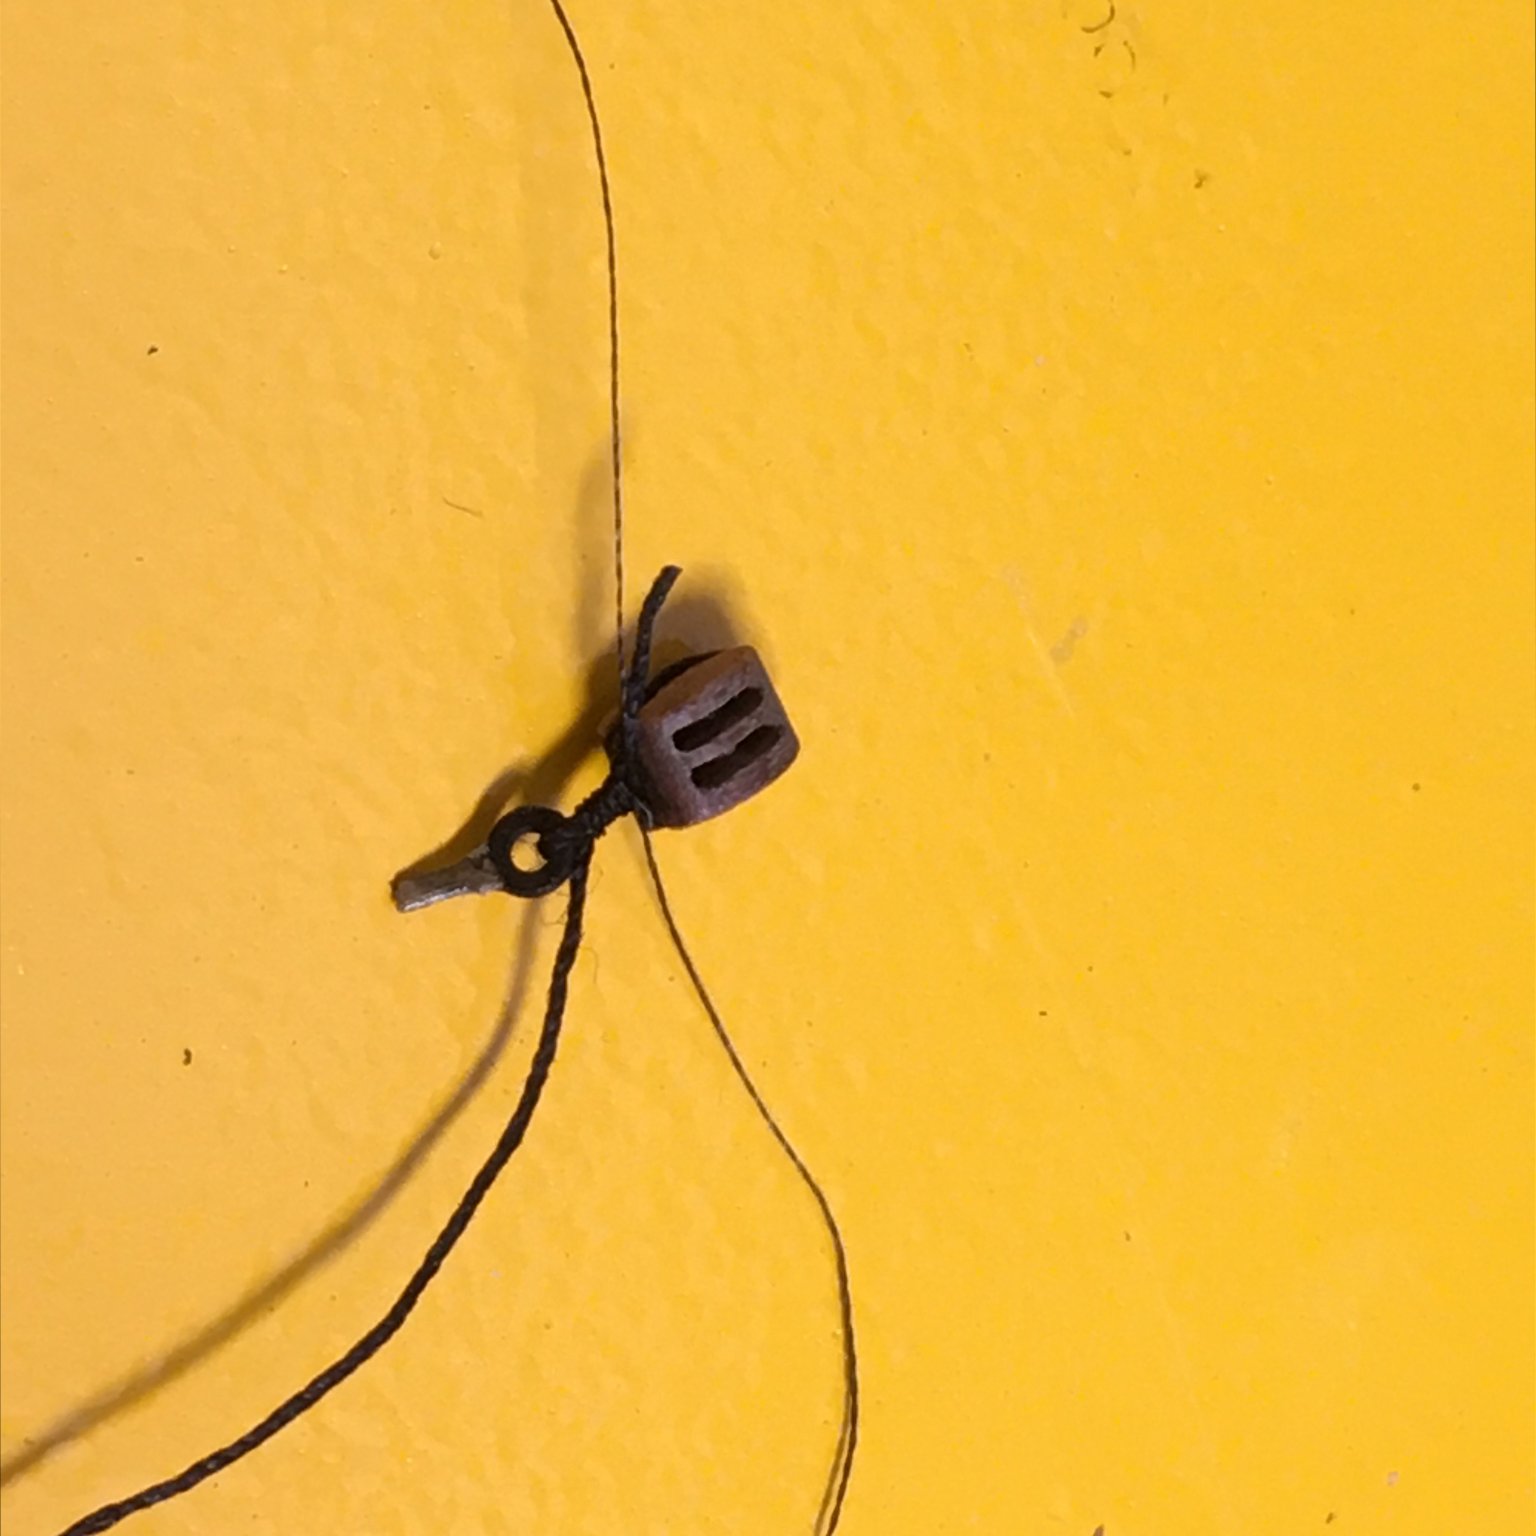
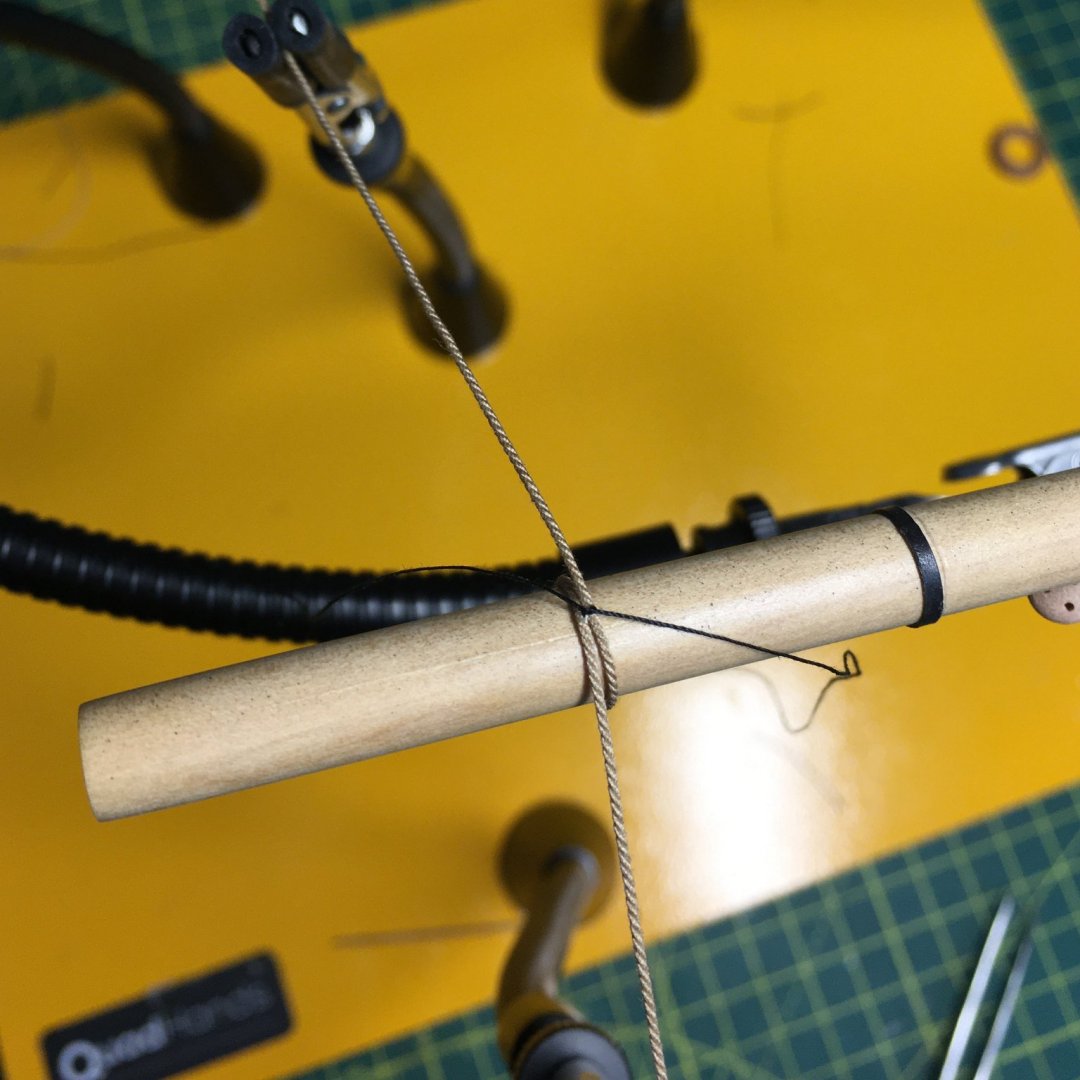
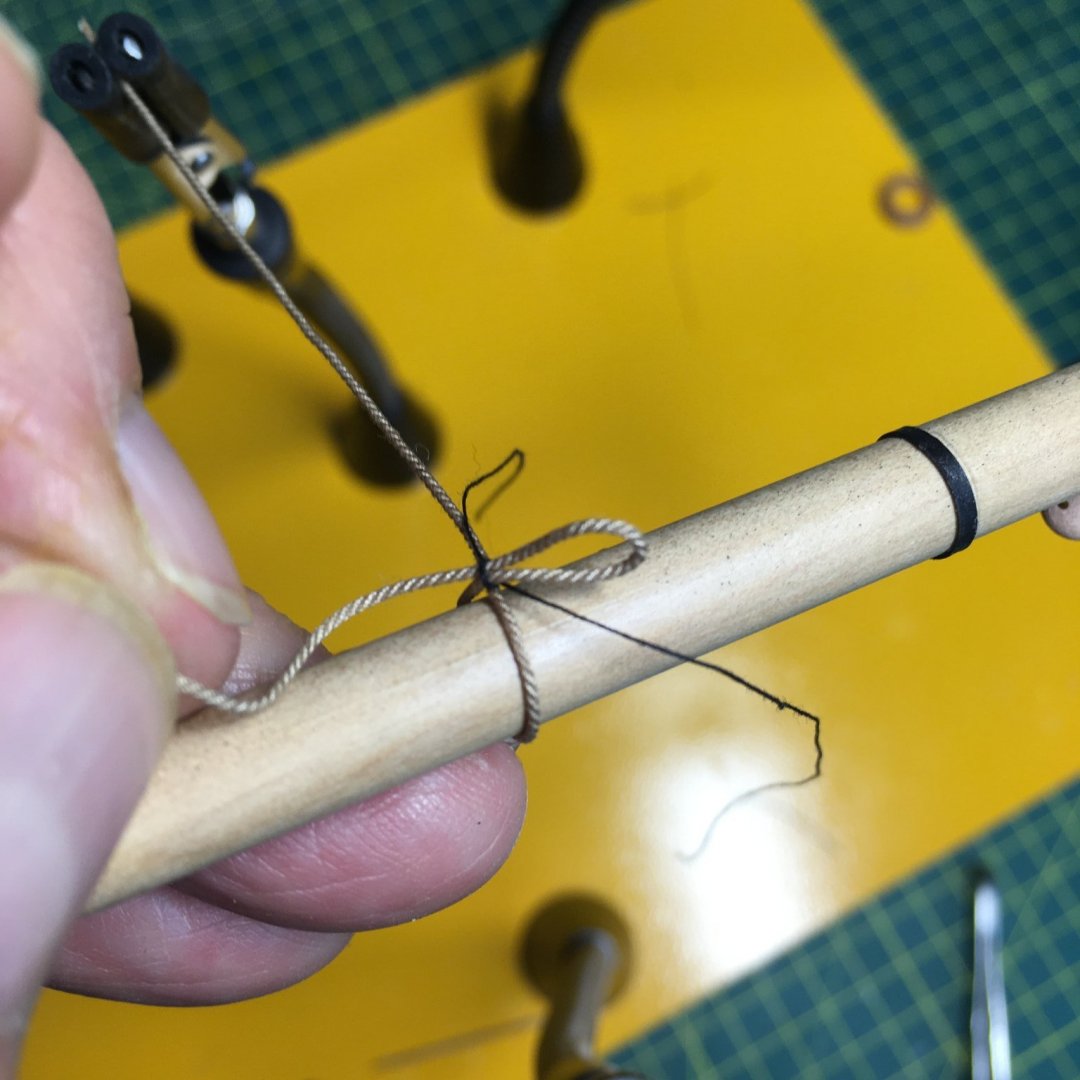
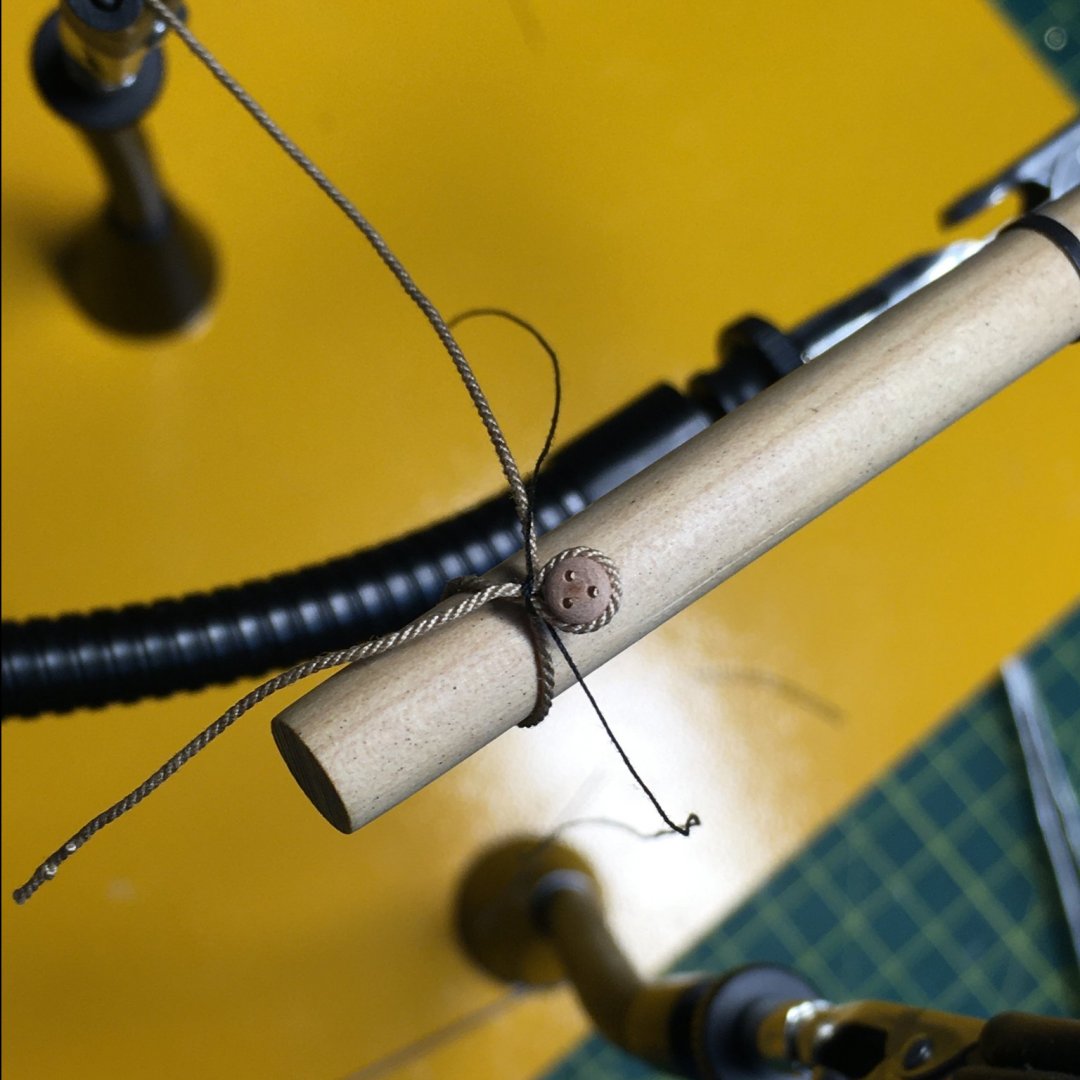
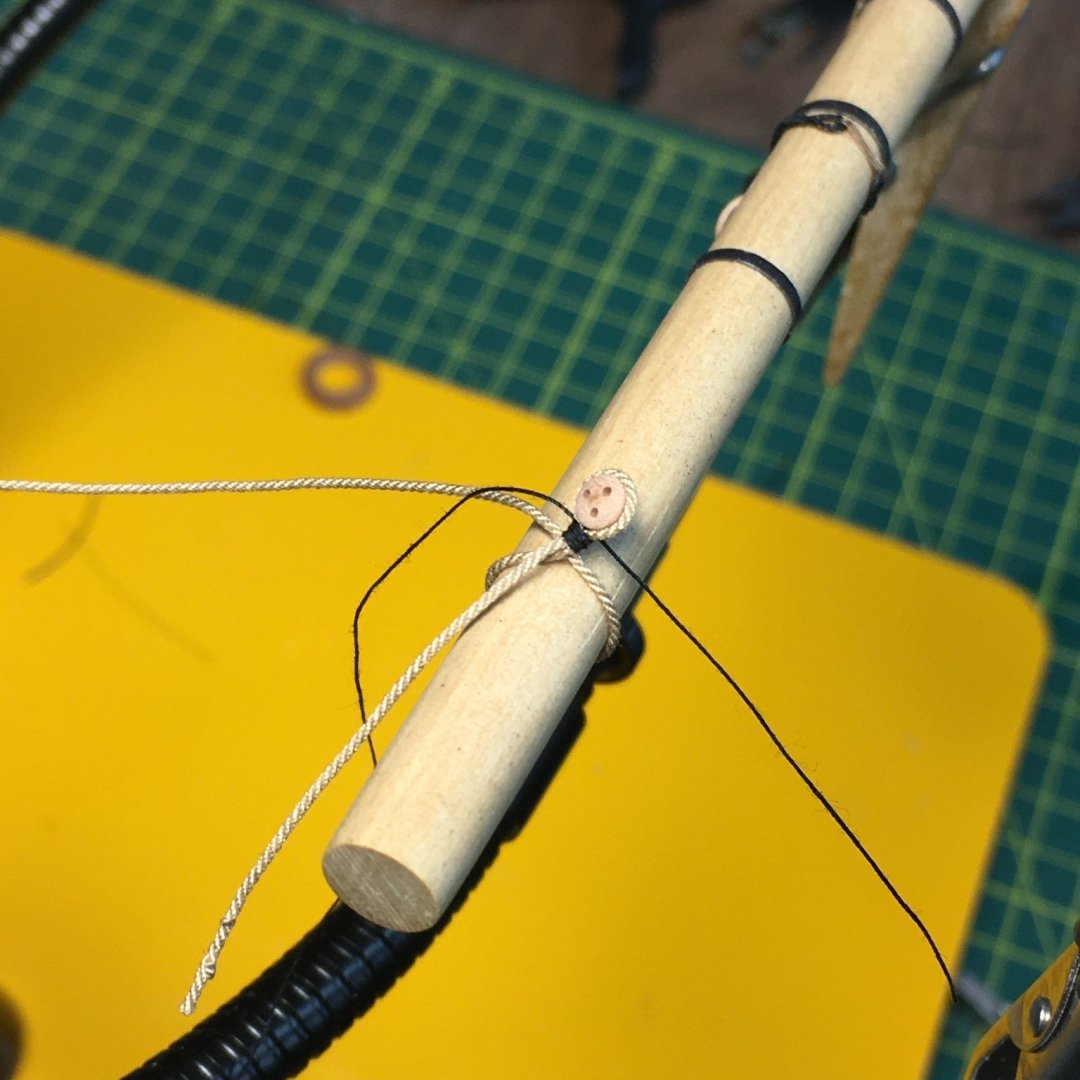
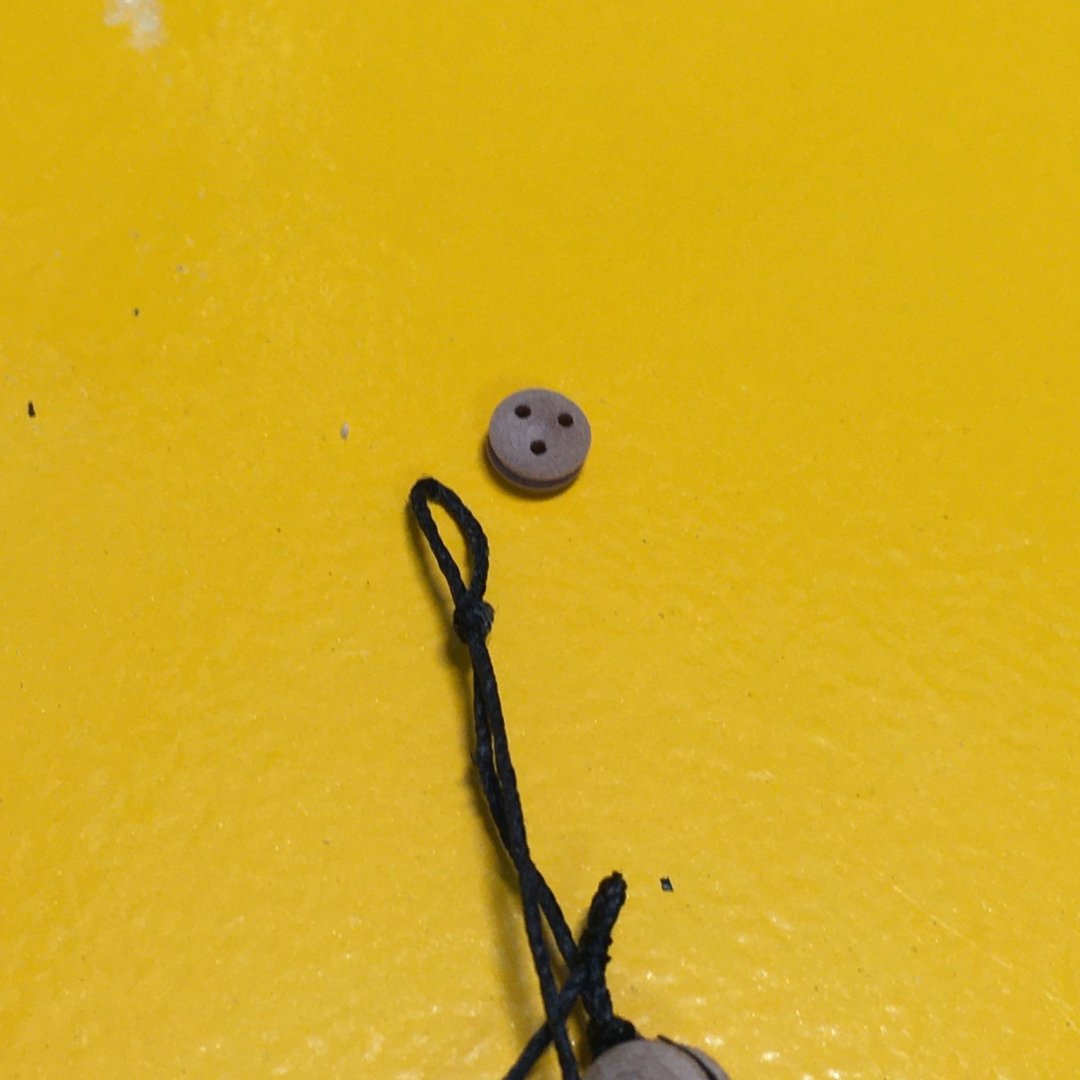
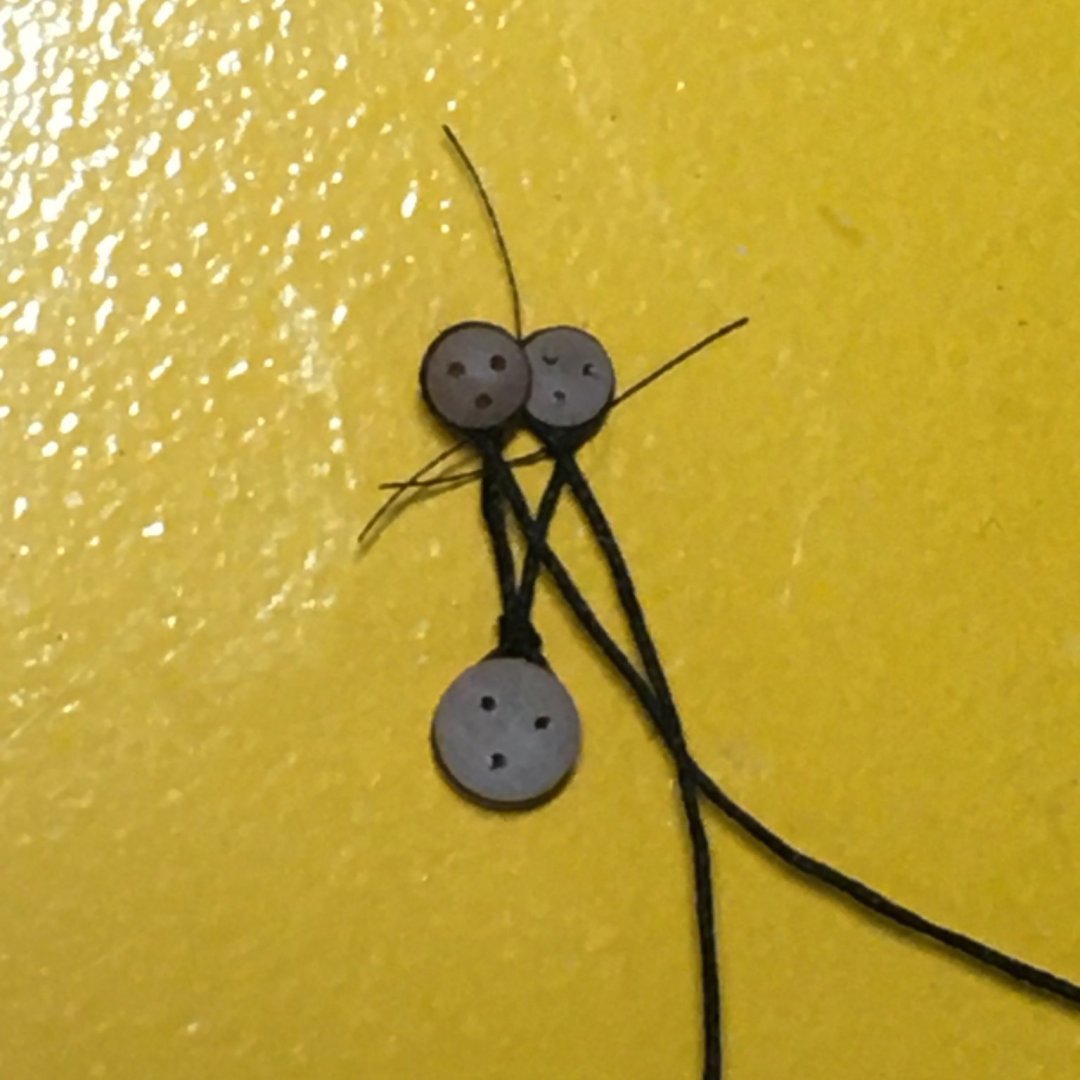
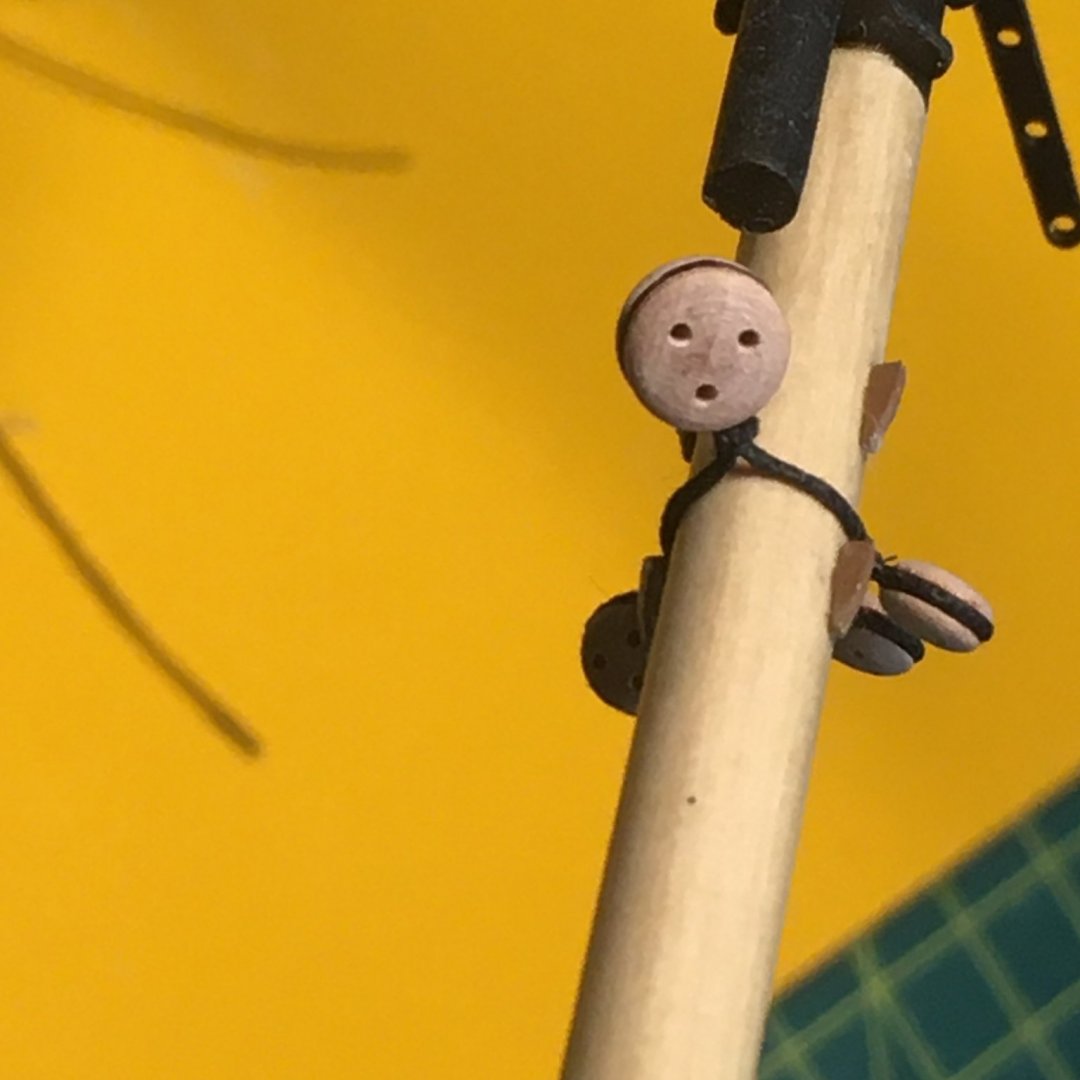
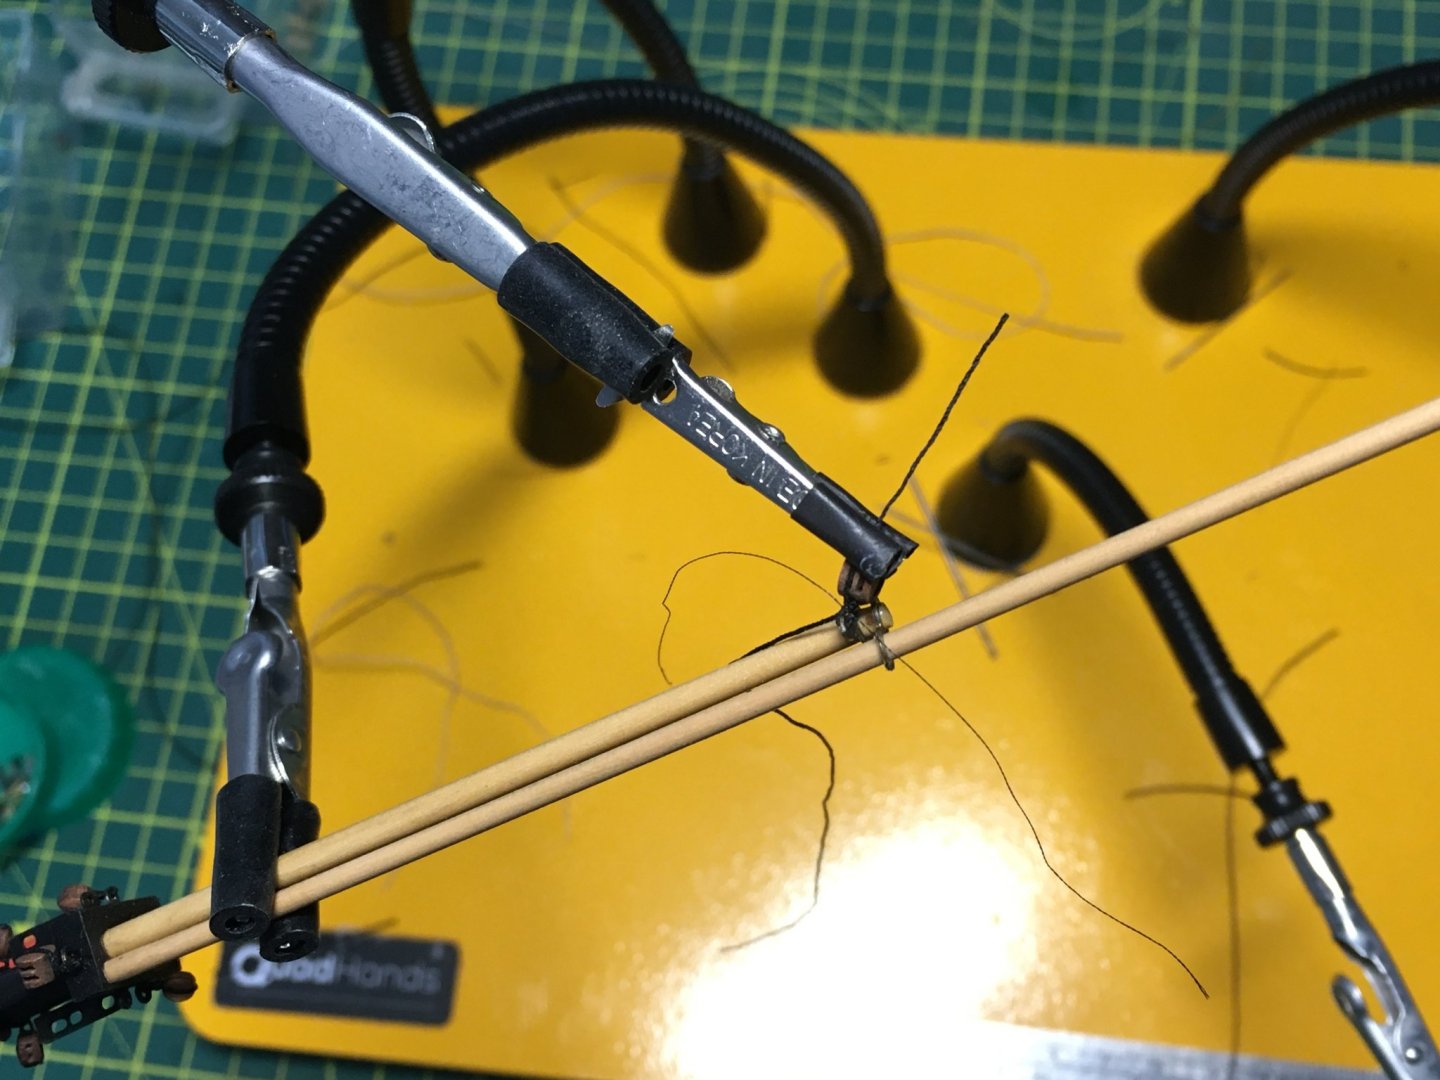
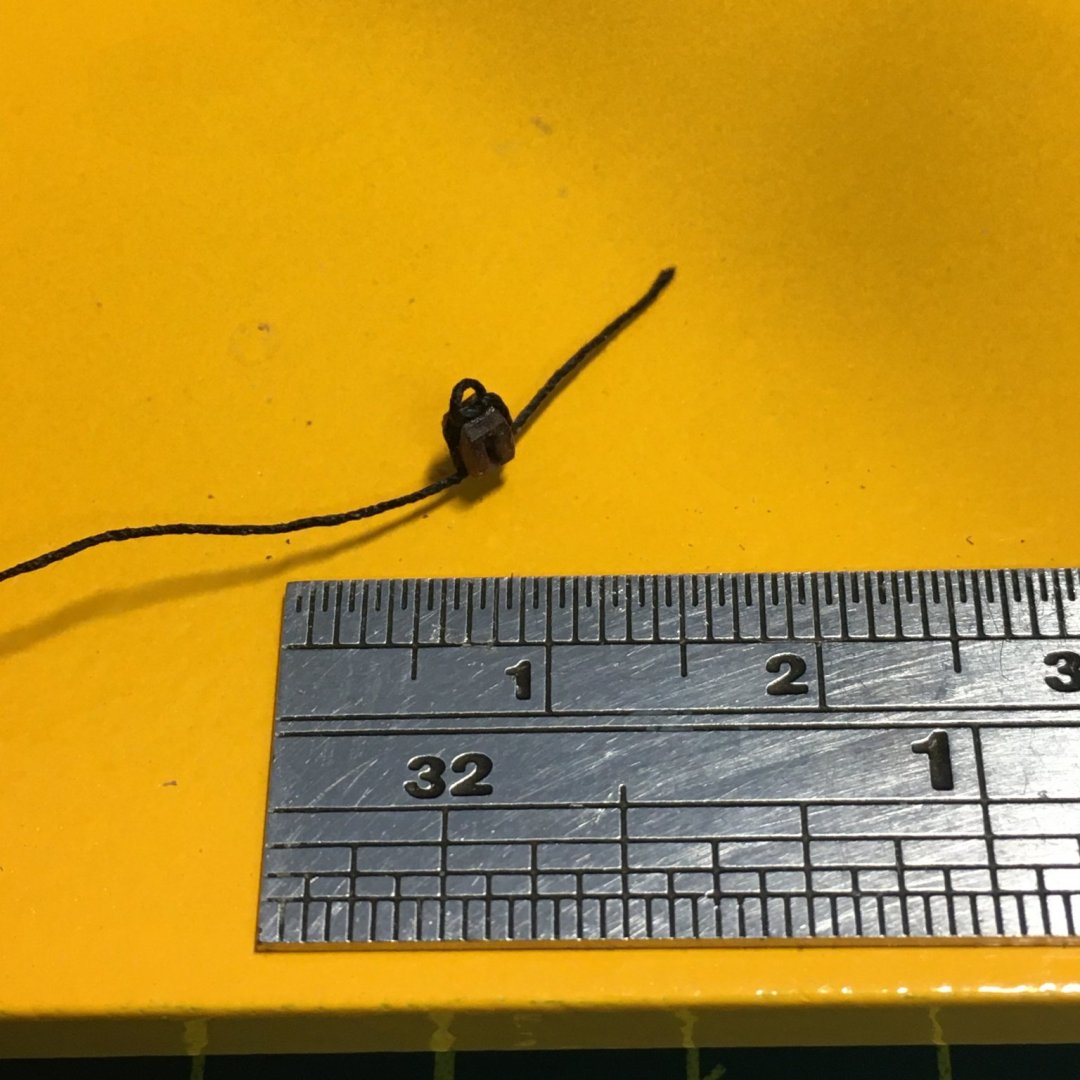
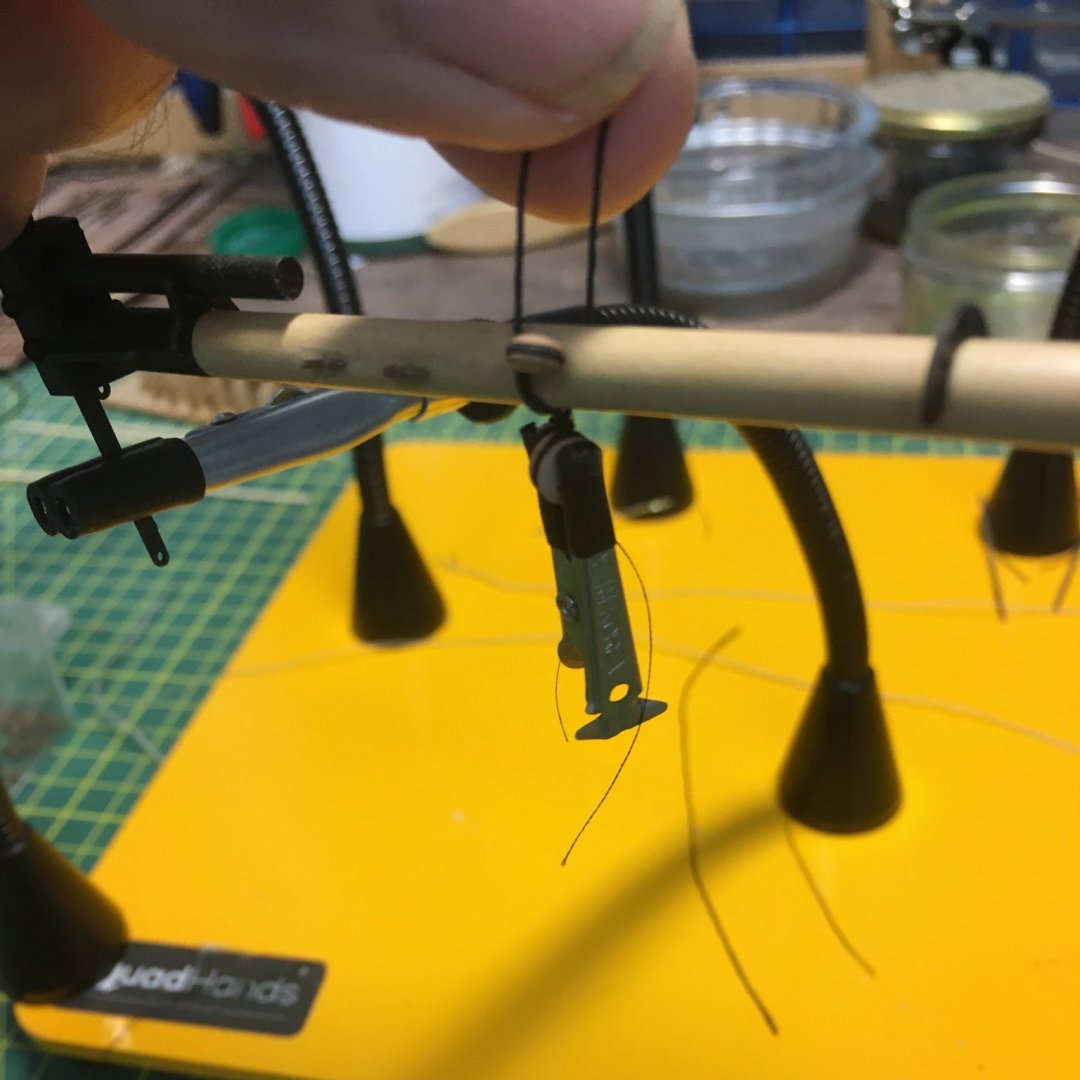
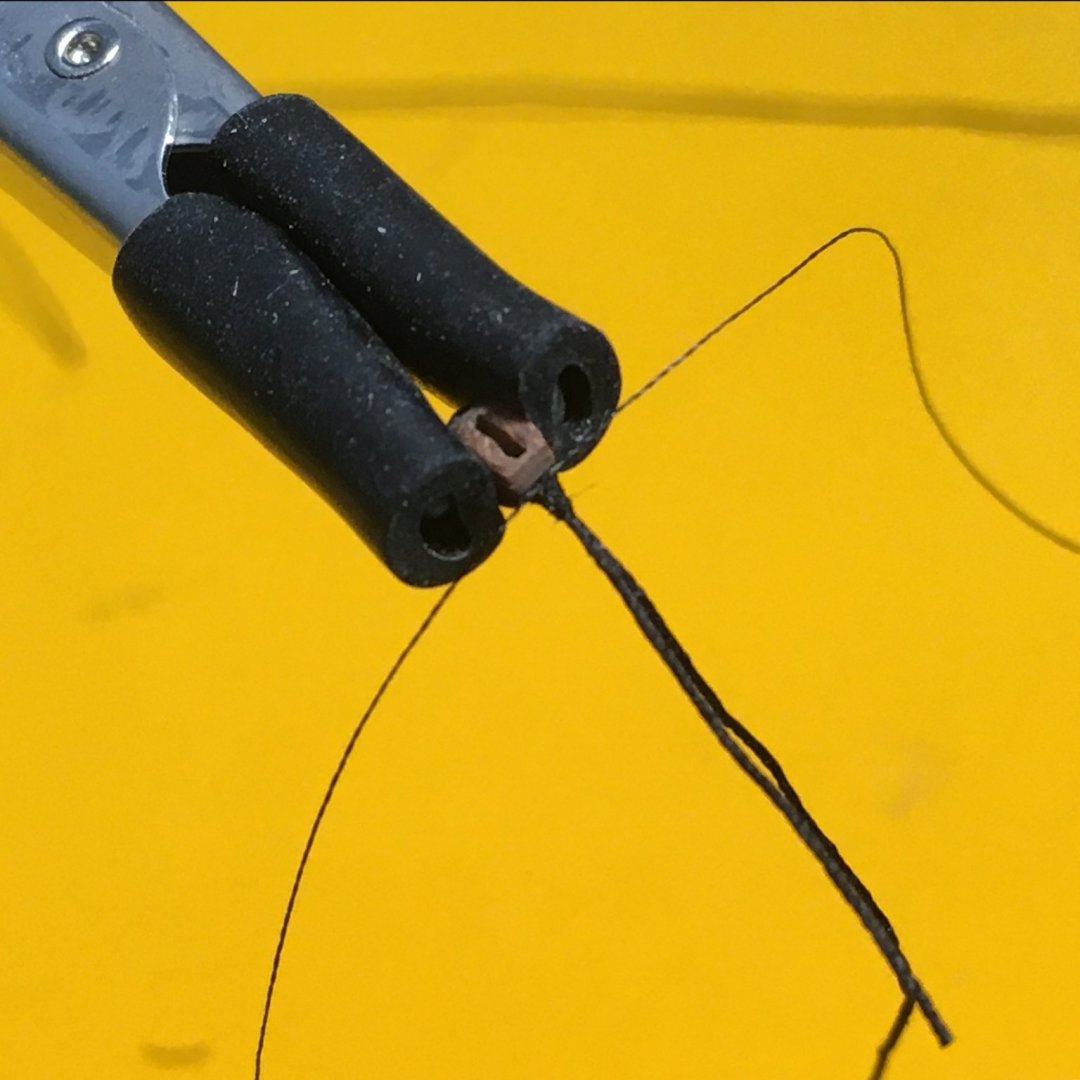
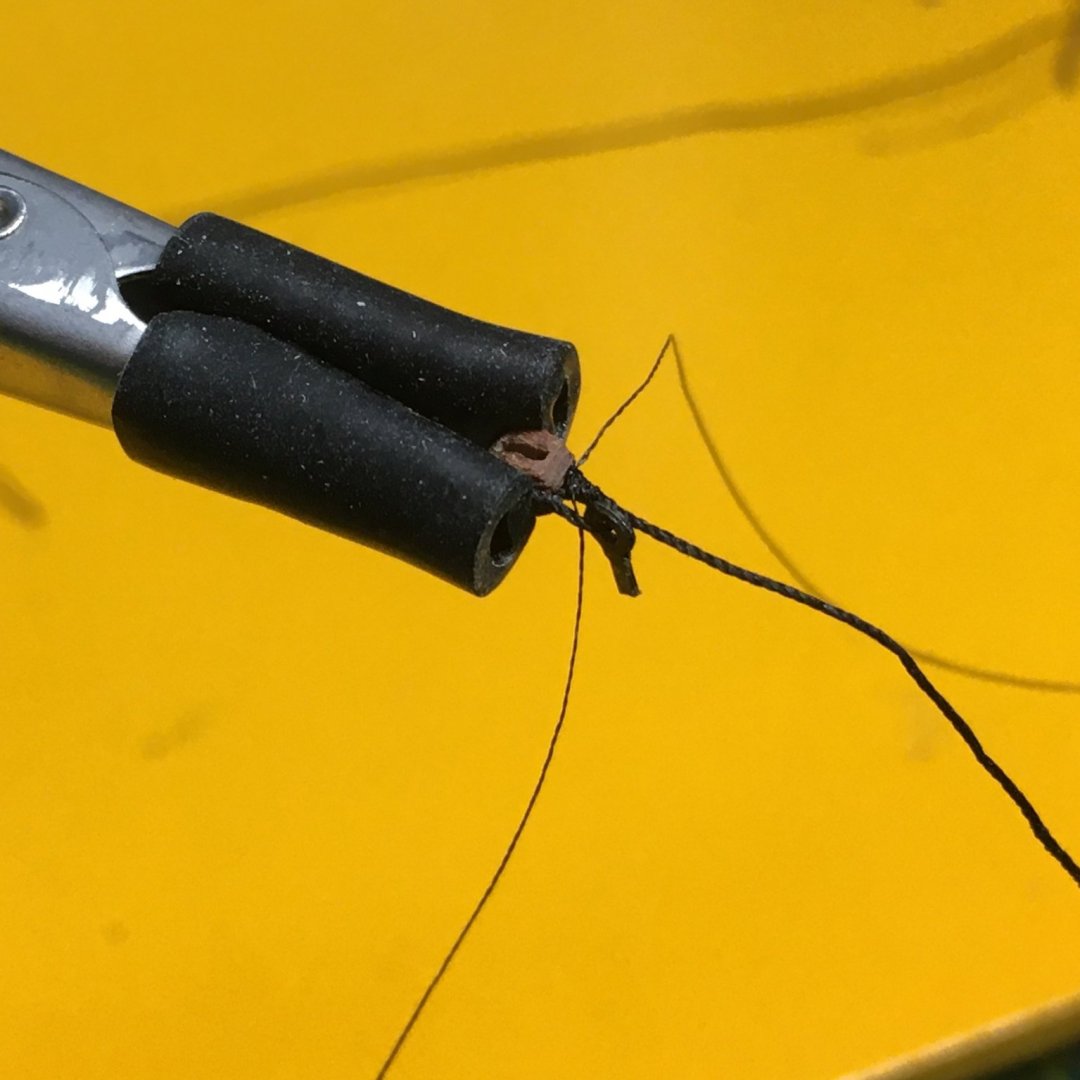
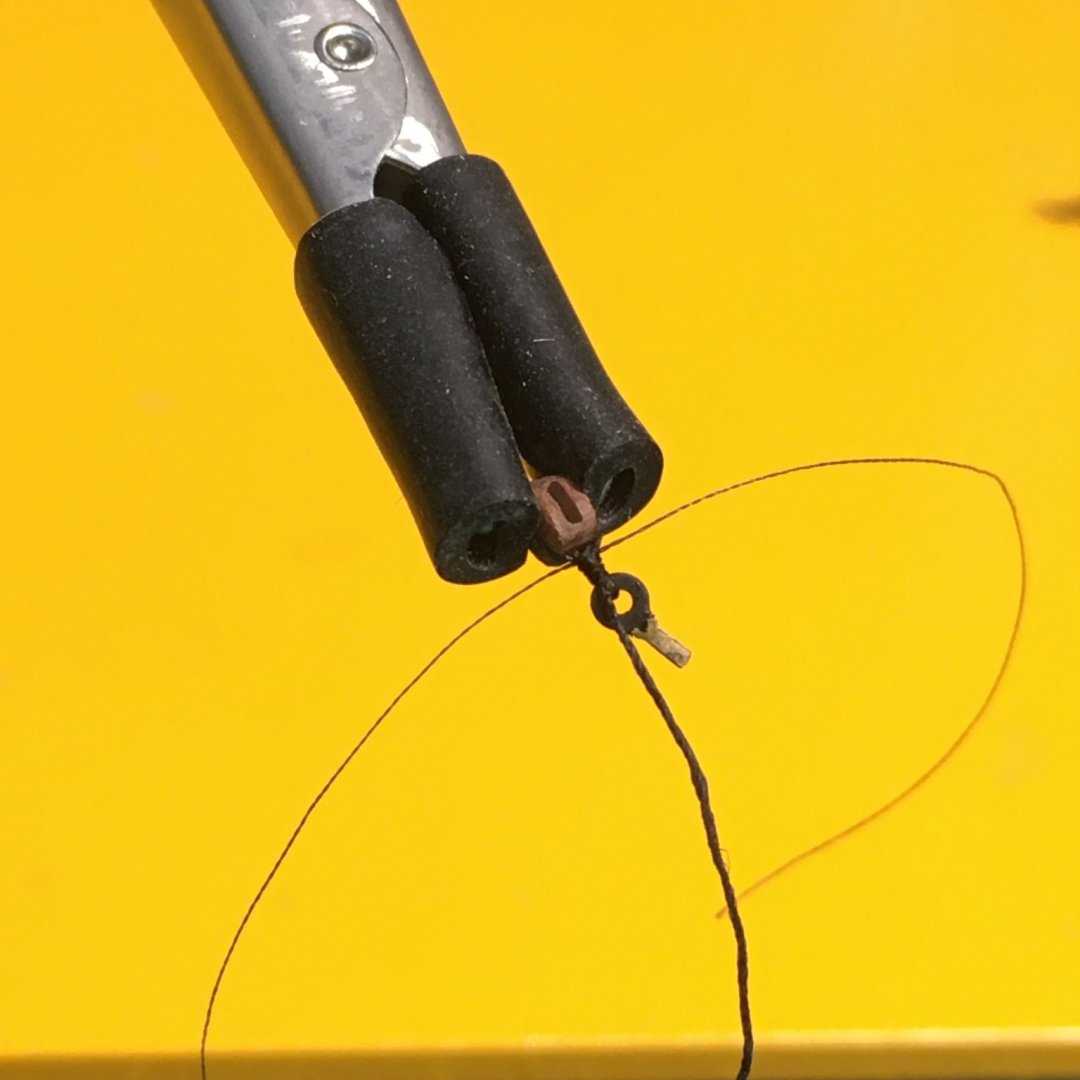
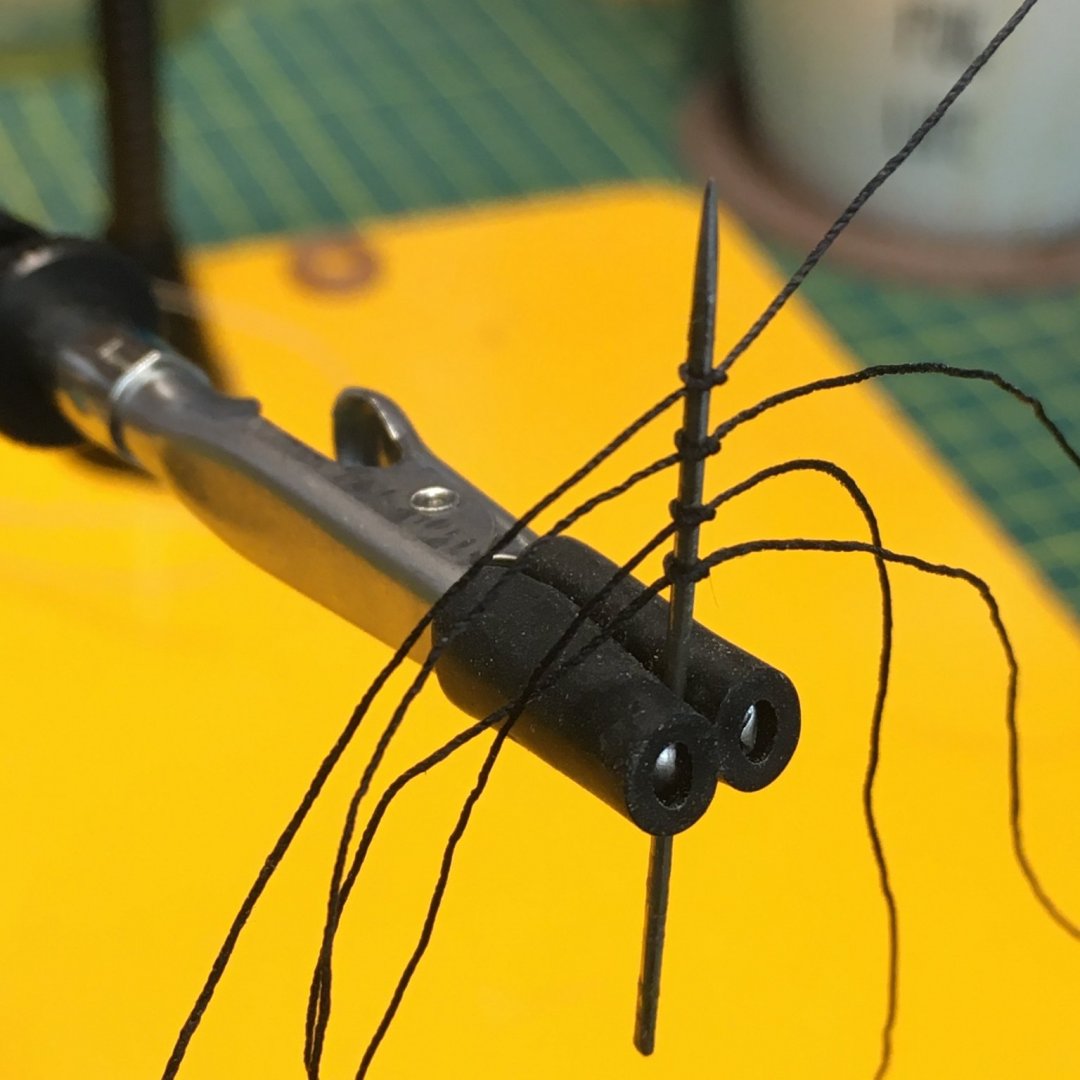
Glenn - re-reading my post I can see that part isn't clear from my description, so I've had a quick go at photographing the process in more detail. To make things clearer and simpler I've used a single line of rope with no additional blocks, and I've used paler rope to make the seizings stand out more. Also, I've "borrowed" the end of Speedy's fore mast for the exercise, the wider diameter making it easier to see what's going on than on the bowsprit. Apologies as usual for the poor focus on some shots - hopefully the technique is still clear. I start by winding the rope once round the mast, holding the ends in the quadhands. Small weights such as clips would work equally well - the idea is just to hold the ring reasonably tight while you work on it. Next, I take about 6"/150mm of seizing line (for this I used the finest Gutermann sewing thread) and using a suitable needle work it through both strands of the ring rope at the point where the final deadeye will go. Through, not under. I'm not completely sure this is necessary, but on the bowsprit I just tied the strands together and I found it a bit awkward to keep the ring tight around the spar. In the next two shots I'm tying an overhand knot in the seizing thread then tightening it. In the interest of speed I left it at just that one knot for this exercise. For a proper job you should wrap the thread round several more times to make a decent seizing. You'll probably need to use the needle as the rope will be tight, although of course this time you can you under the rope not through it. Next, I take one end of the rope off the quadhands and bring it near to the seizing to form a loop: Then, I use the seizing thread to catch the loop in an overhand knot. Depending on how springy your rope is you may need to use a small clip or piece of tape to hold the loop in place while you do this. In the second photo I've tightened the first knot and moved to the other side of the loop to do a second knot. The second knot just helps to keep the loop reasonably secure for the next part... ...where I'm gently pulling on the loose rope end to tighten the loop until it's just larger than the 3mm deadeye. In the second shot I've jammed the deadeye on my needle to position it whilst I finish tightening the loop, which is shown in the third shot. Next, it's back to the seizing line to do a further series of overhand knots, alternating between the front and back of the deadeye. I worked from the mast end towards the deadeye as this helps tighten the rope around it. I finished with a reef knot tight against the deadeye: A blob of thin CA and a careful trim and this is the result: Not too shabby for a deadeye you'll hardly see on the finished model. I suspect there are better methods around, and if so I'd love to hear them! I know it would be easier if you could fashion the ring off the model and slip it over the end of the spar you're working on, but this wasn't possible on the bowsprit as the ring of deadeyes is positioned behind other fittings. Anyway, this method works for me and I hope others find it useful now I've explained it more fully. Derek


- 725 replies
-
- 13
-
-
- vanguard models
- speedy
- (and 1 more)
-
Superb! You must be very proud.
- 221 replies
-
- 4
-
-
- queen anne barge
- Syren Ship Model Company
- (and 1 more)
-
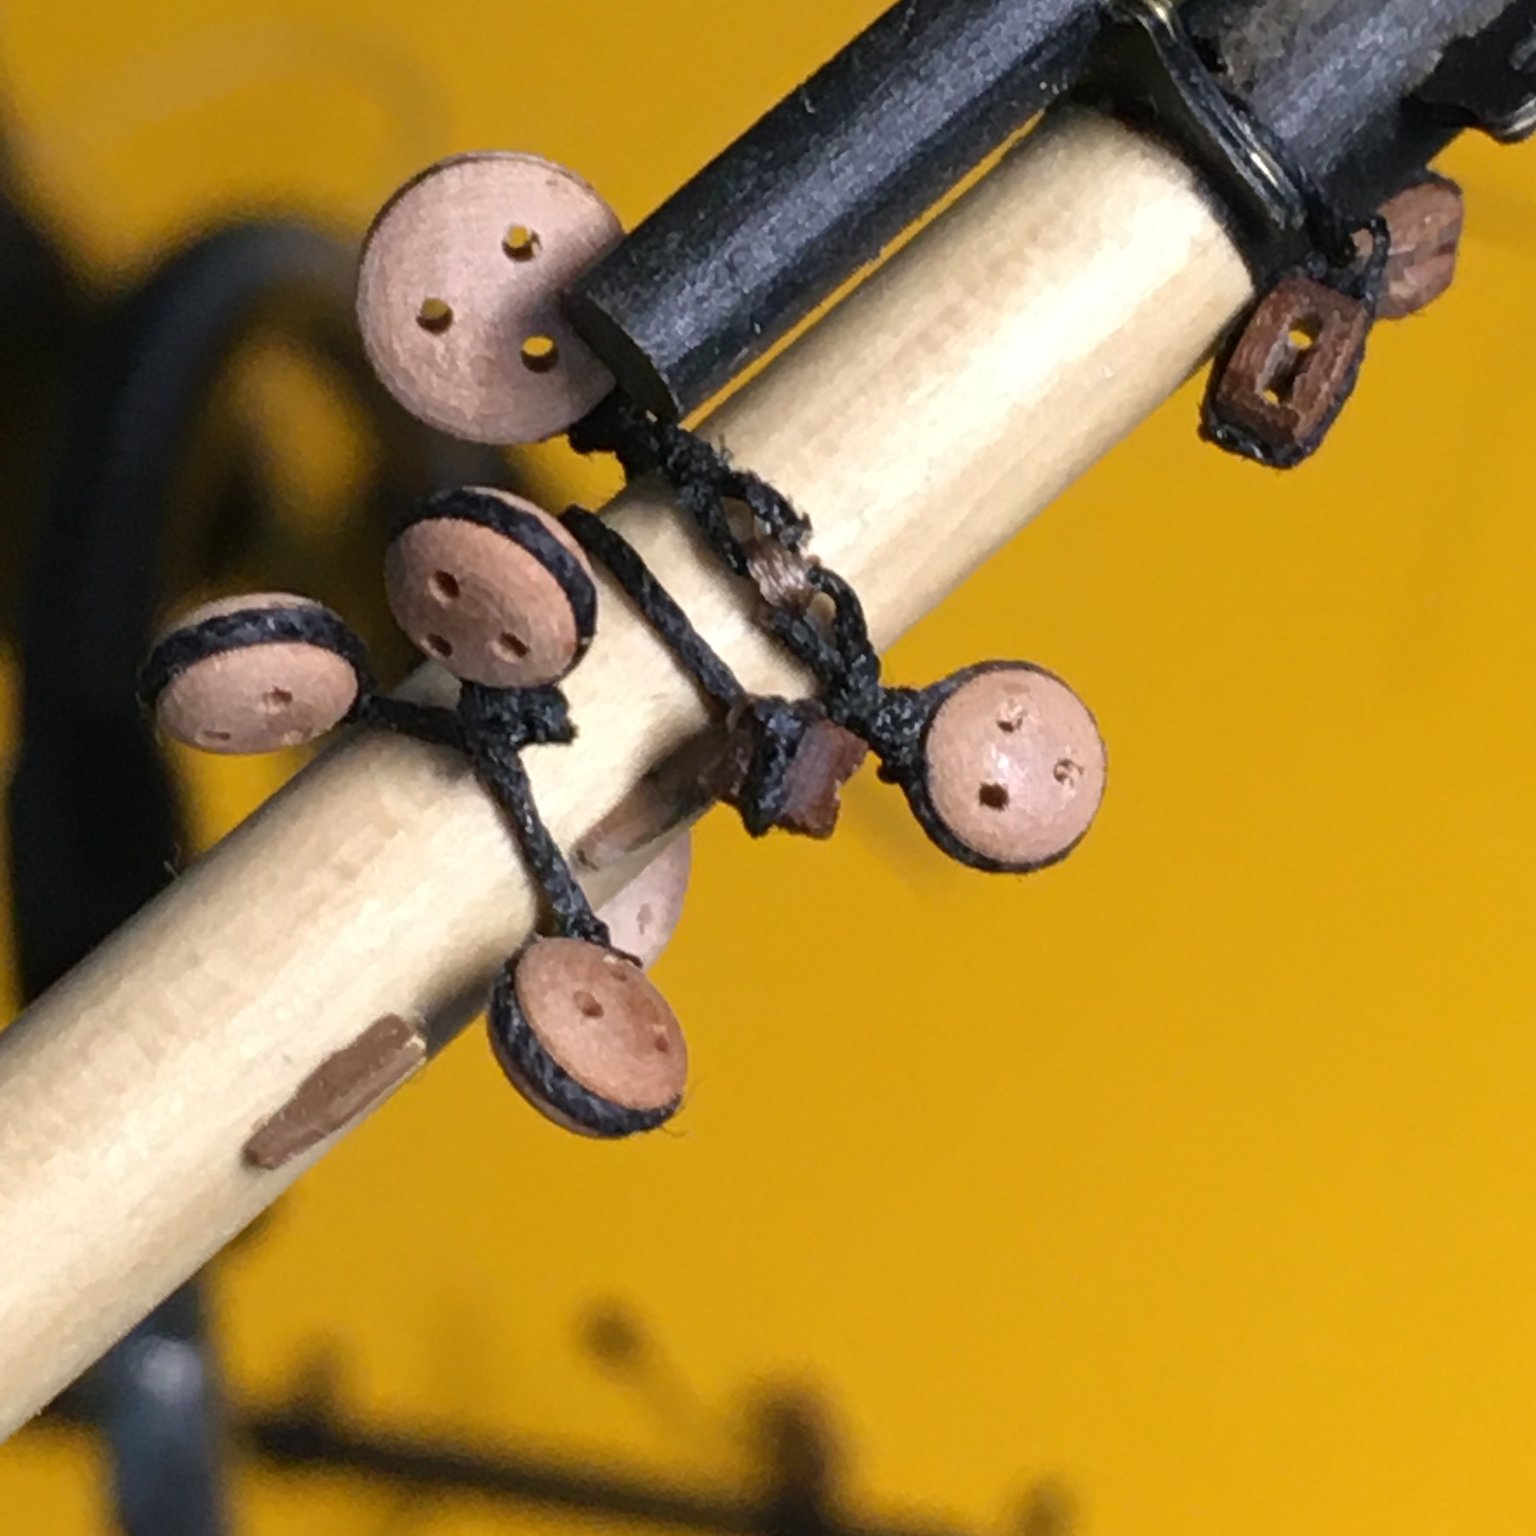
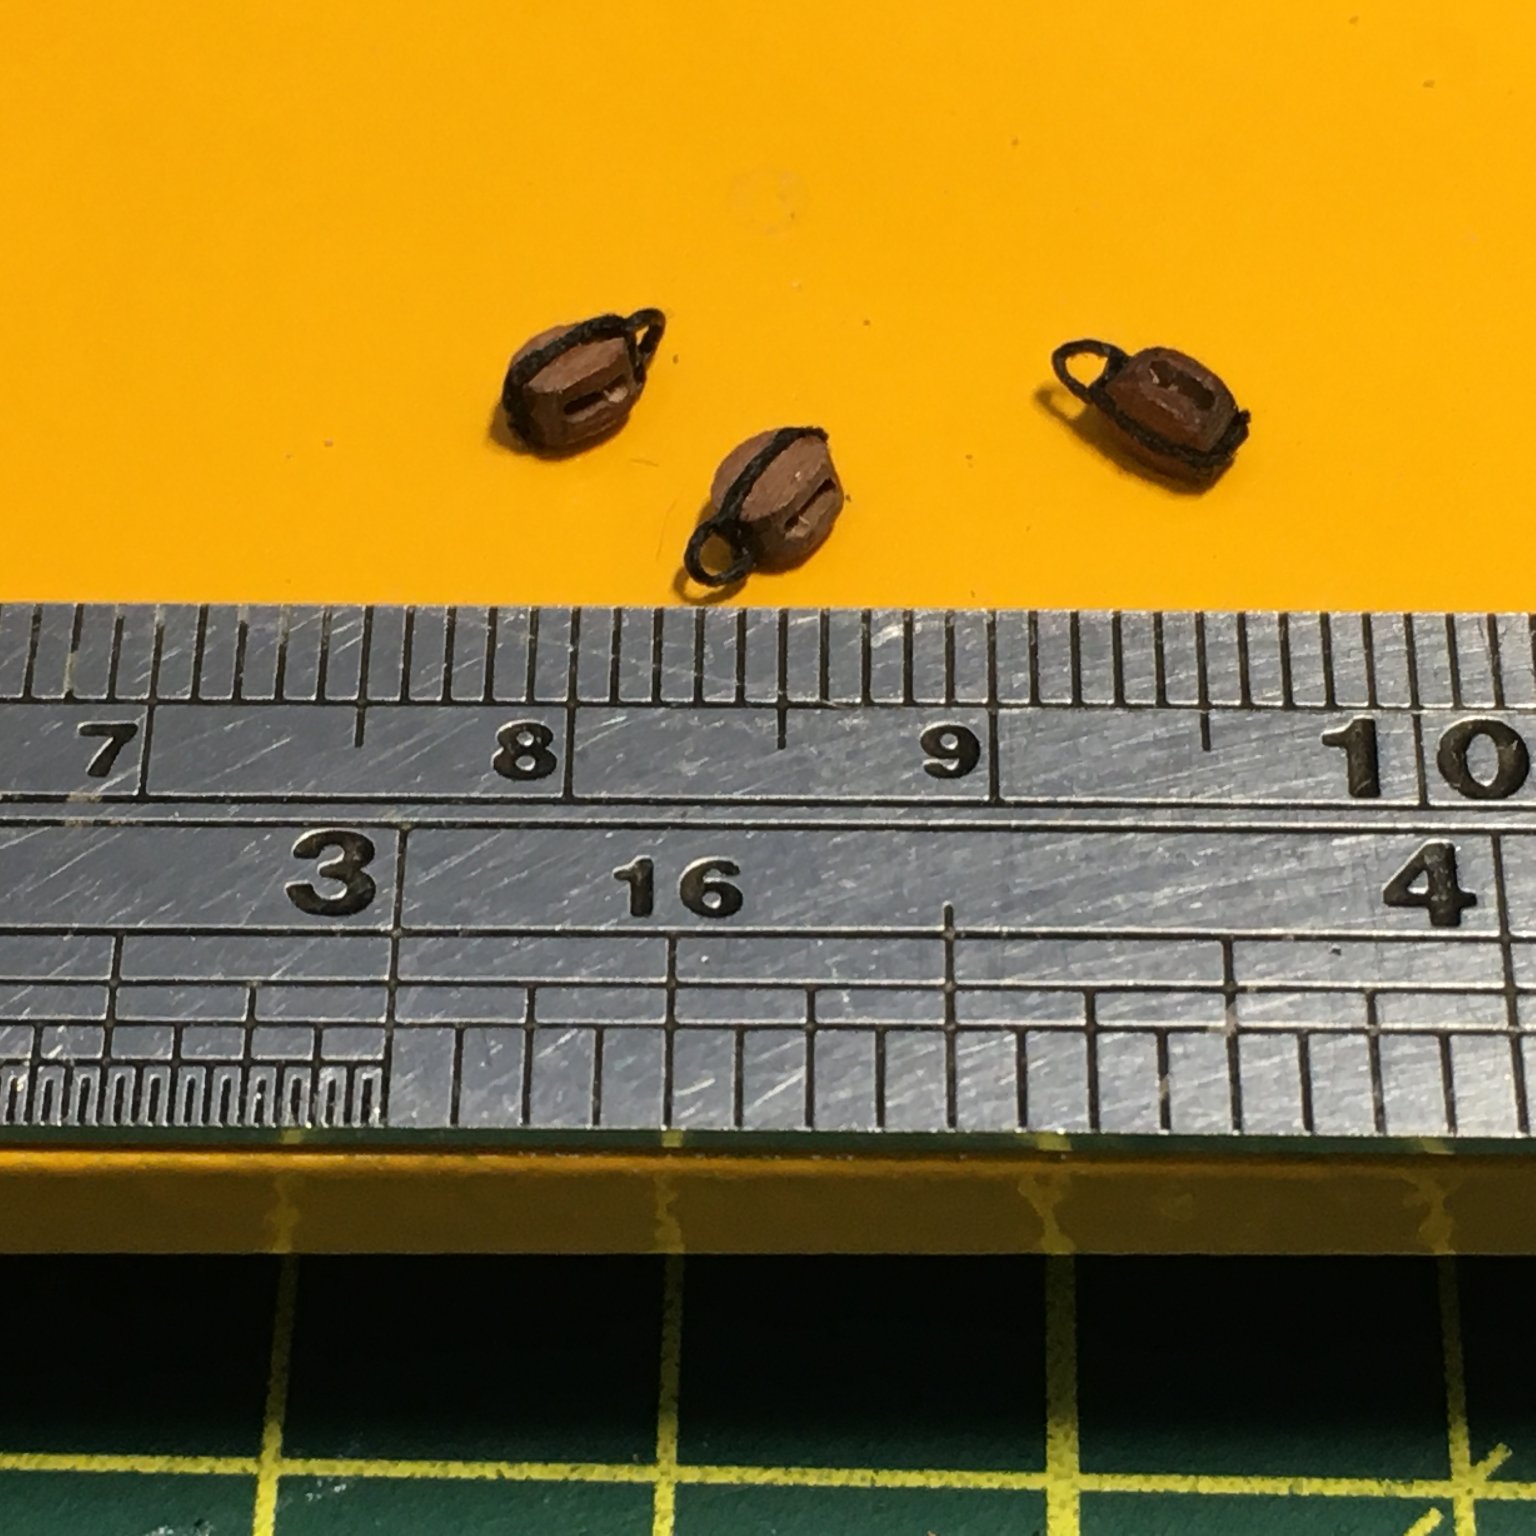
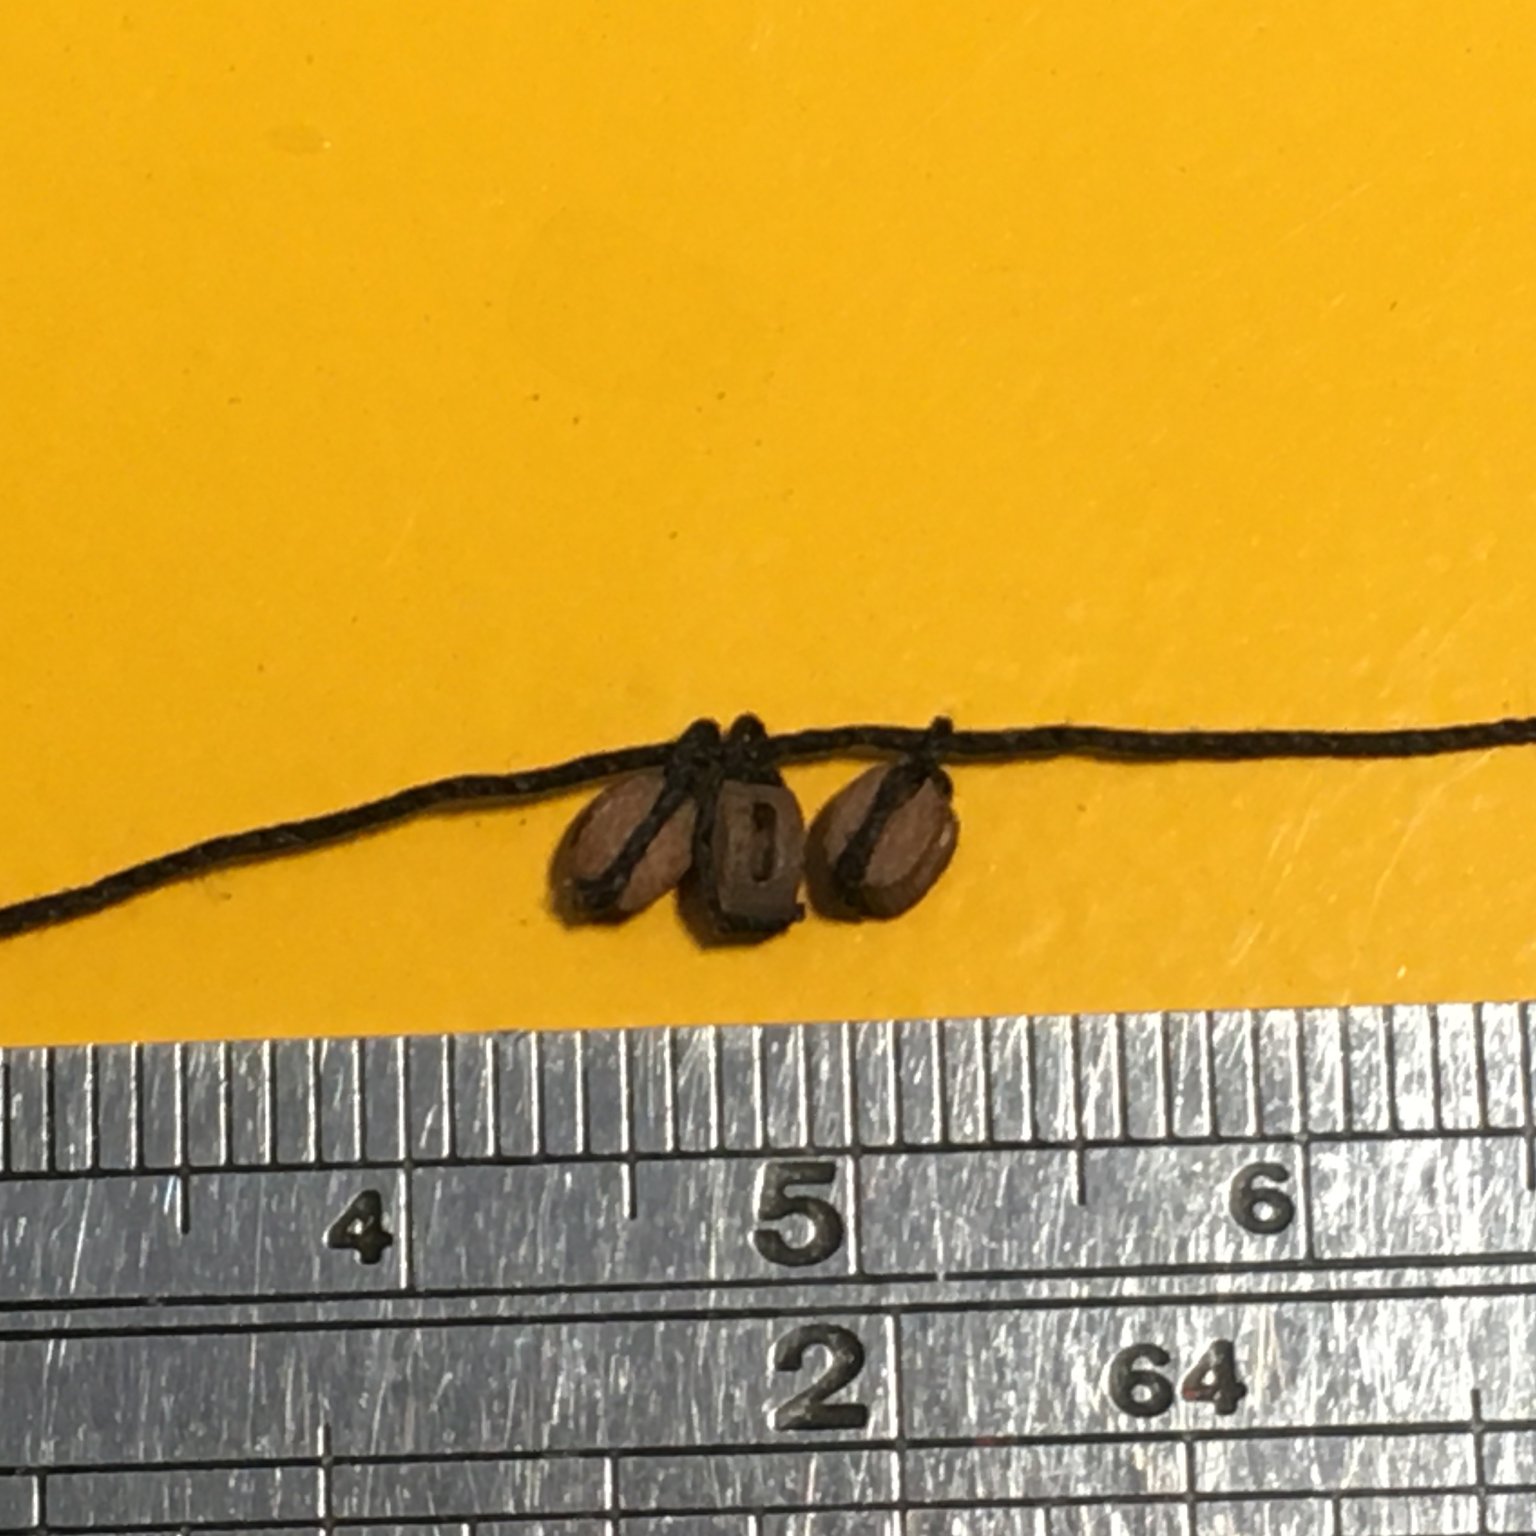
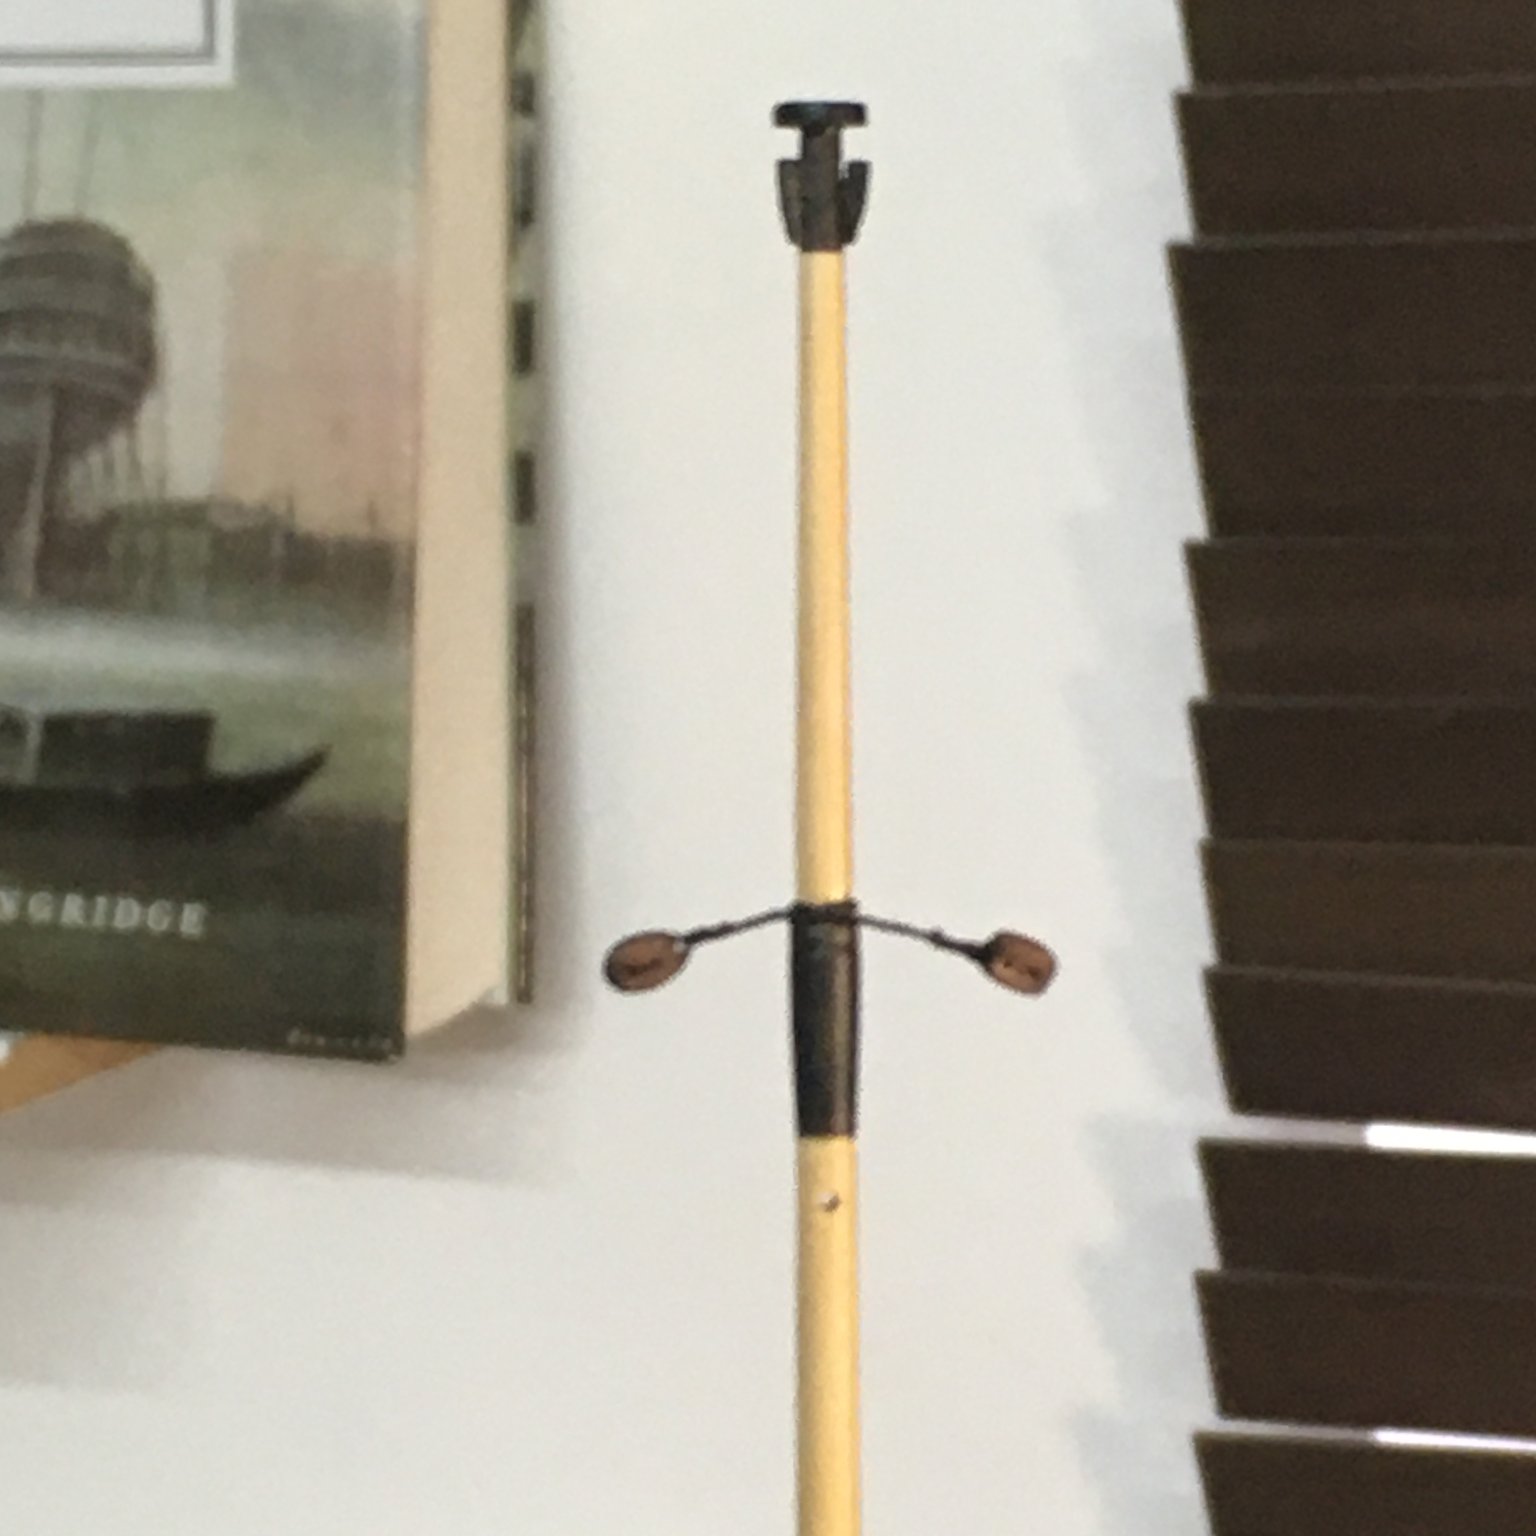
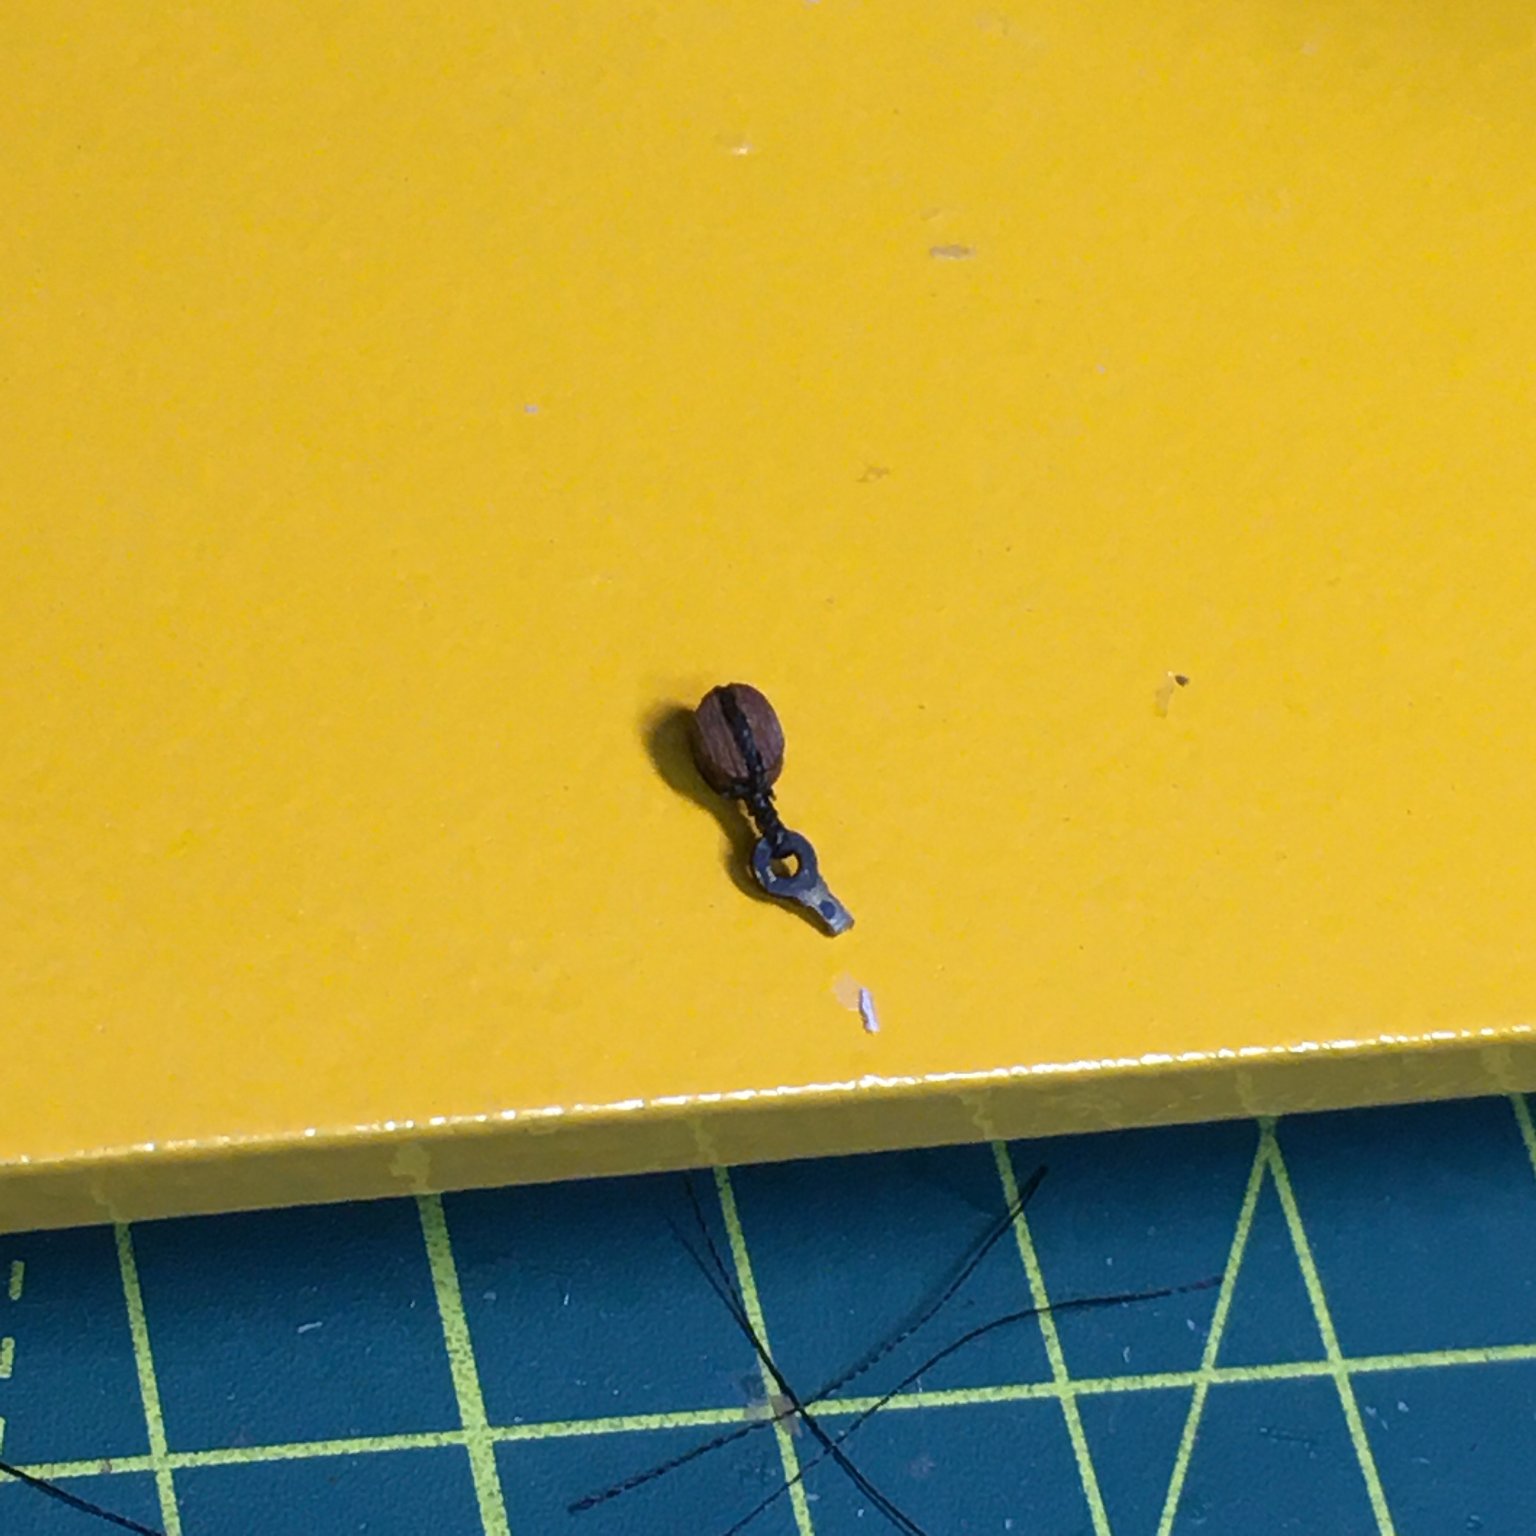
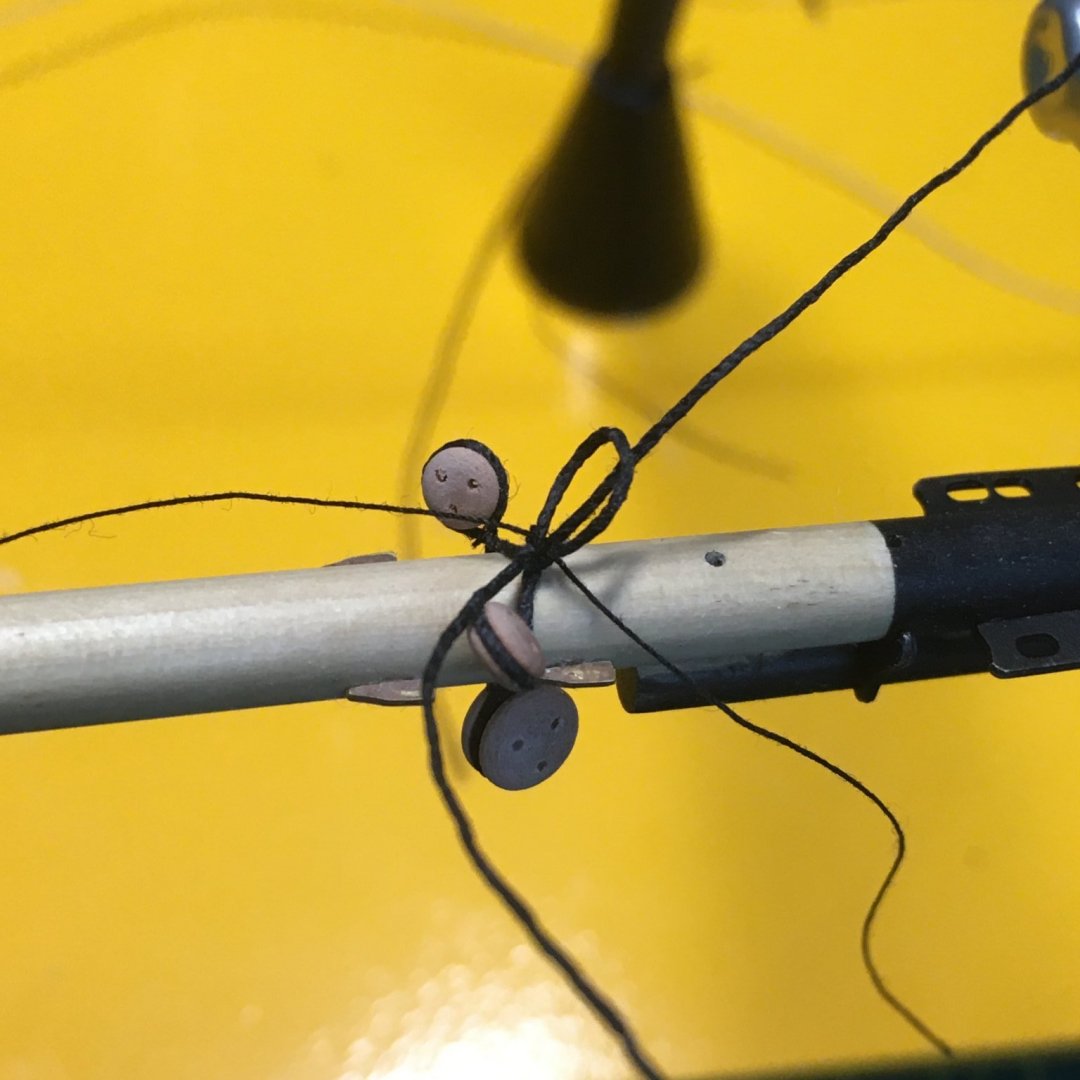
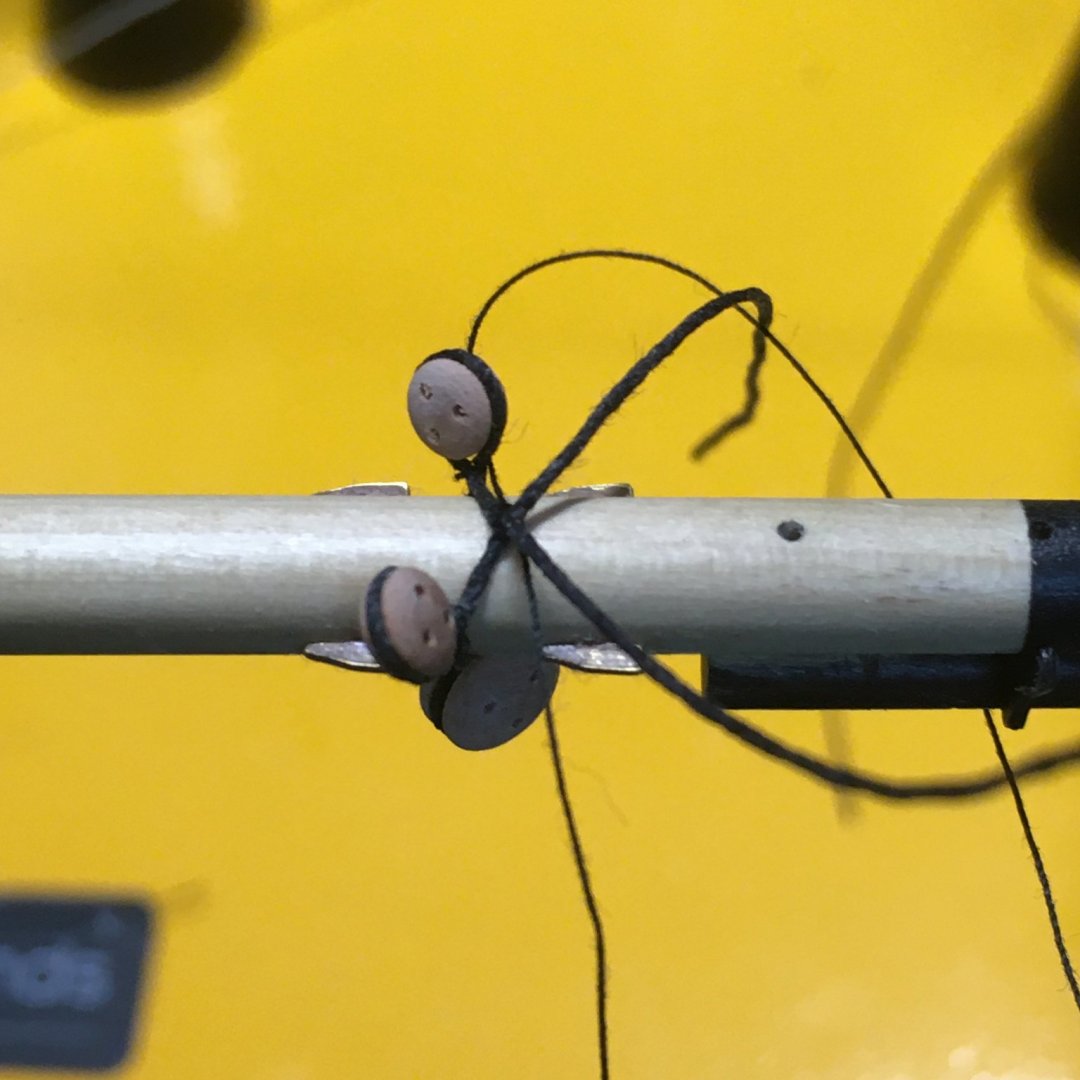
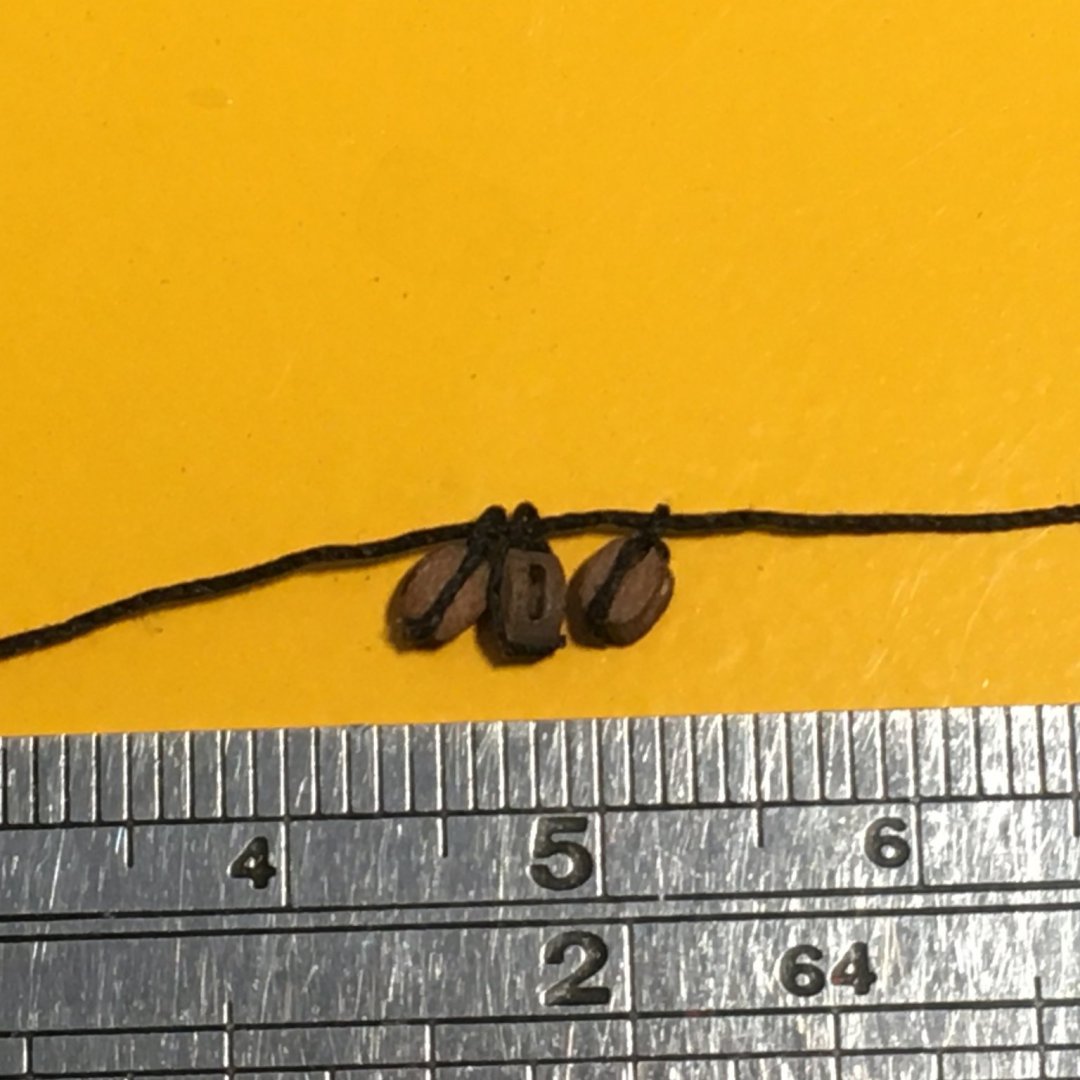
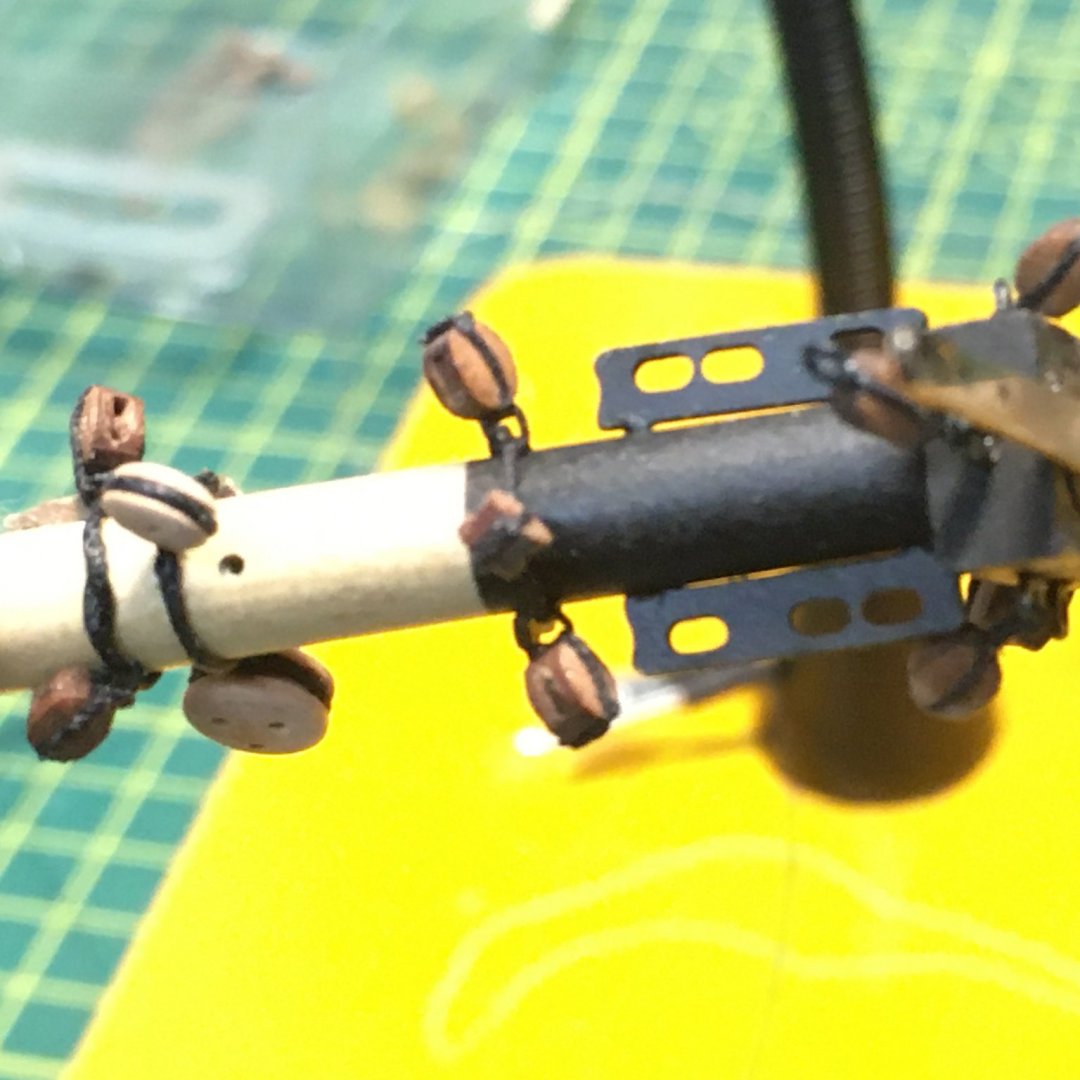
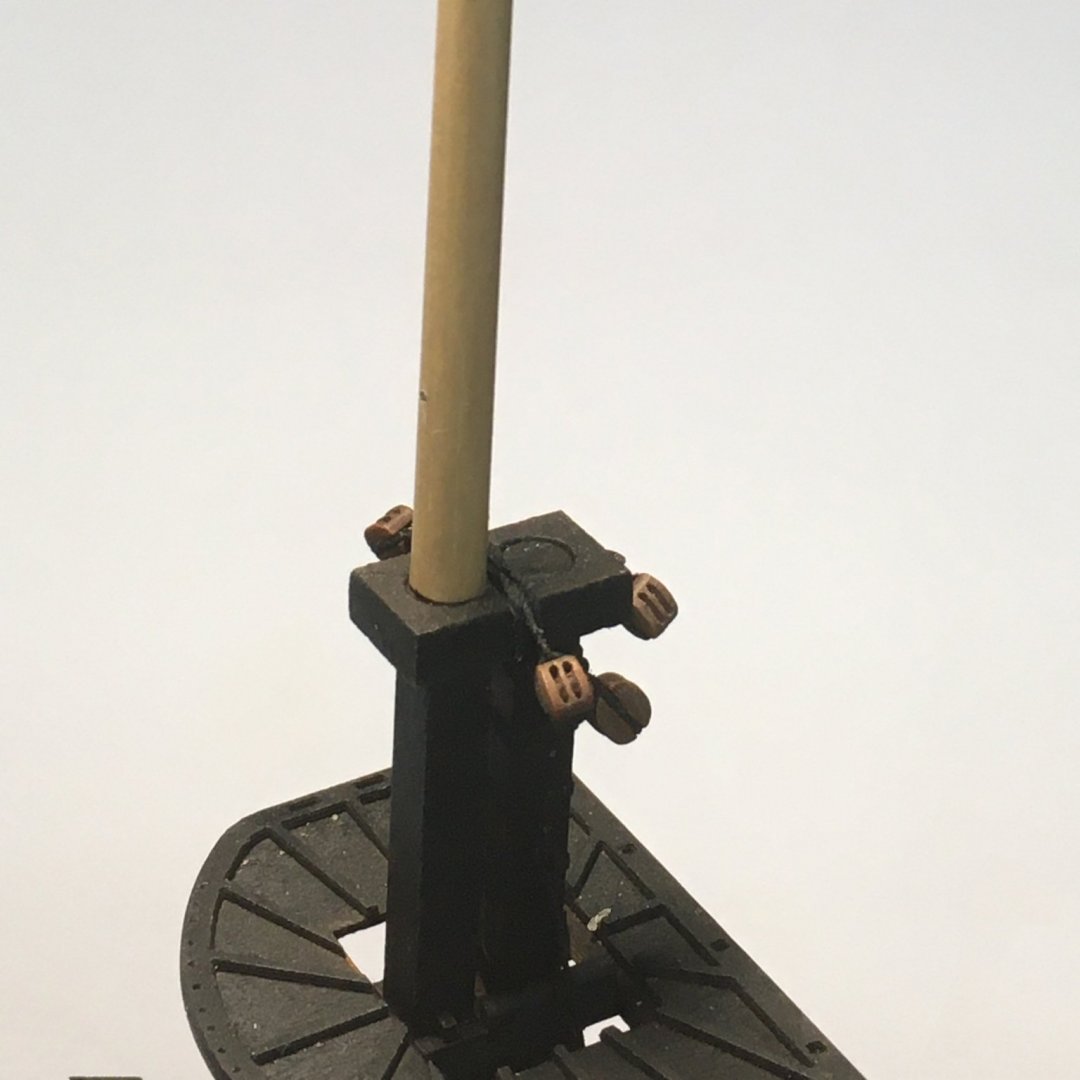
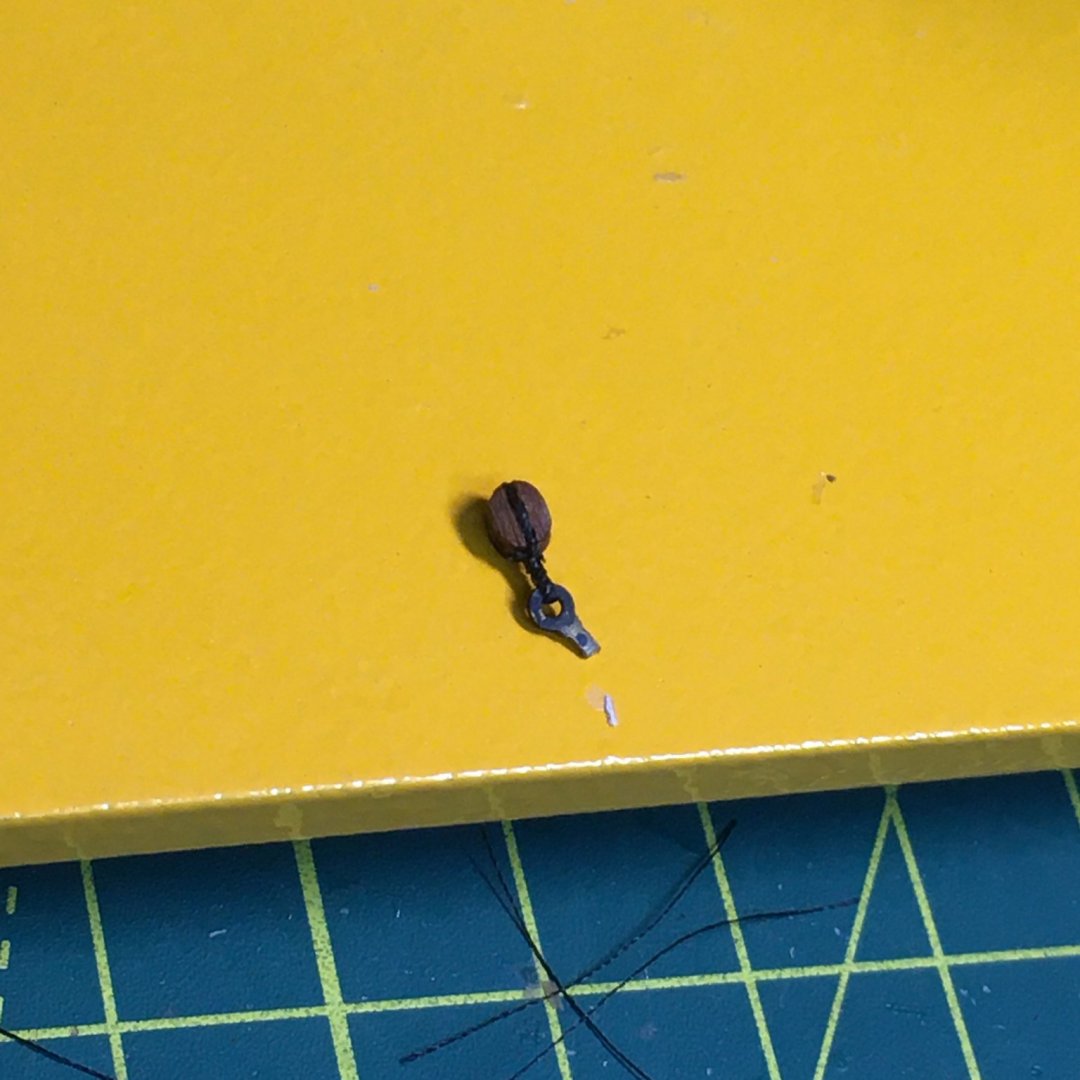
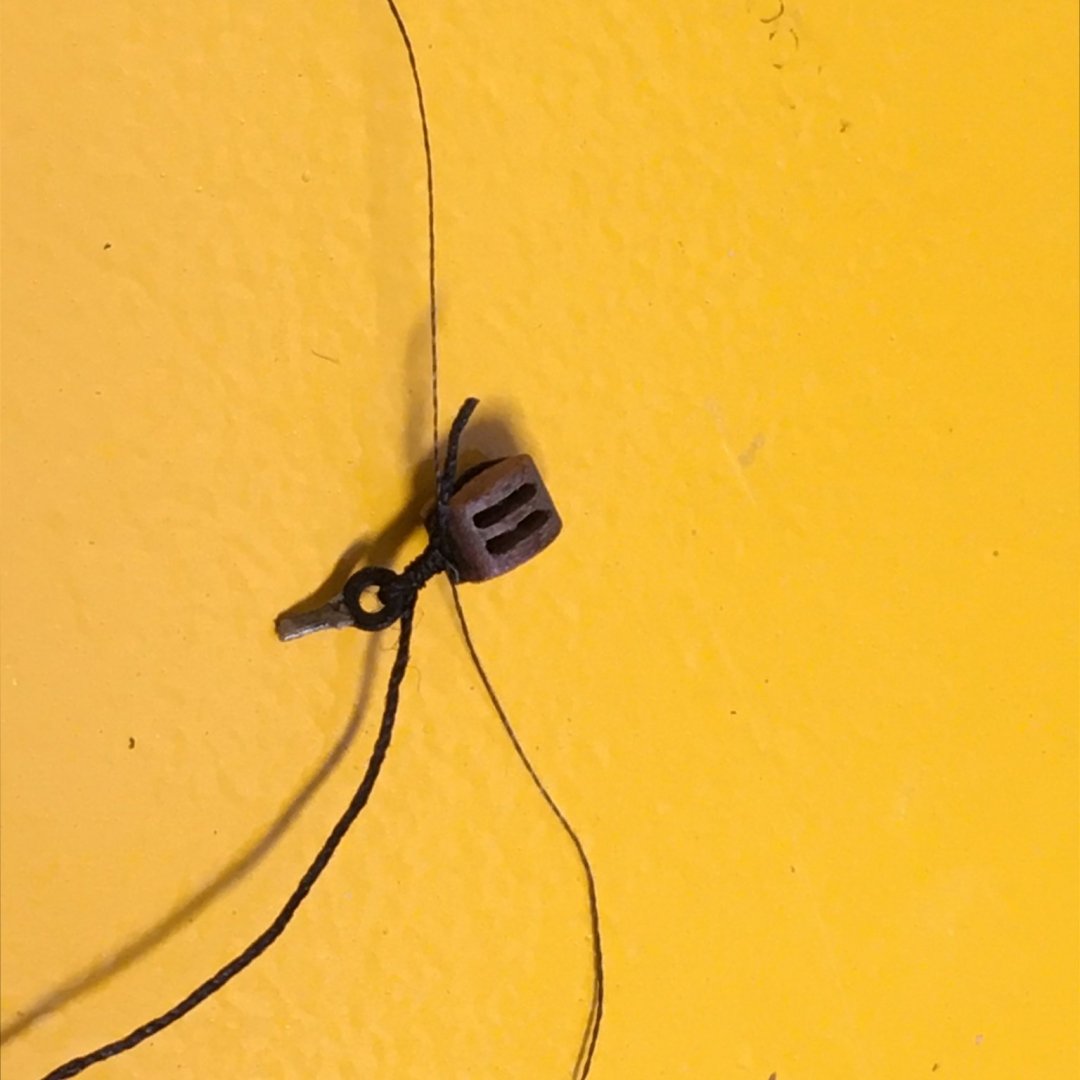
Rigging the bowsprit #2 Thanks Don. When I started I found it difficult to find information on how to do some of the basic stuff - I suspect more experienced modellers thought such techniques were too obvious to need description. They weren't obvious to me! So I like to go into detail when I can, partly to help others but also because it's amazing how much one forgets between builds. On to the deadeyes. One of the trickiest elements of the bowsprit rigging is a ring of four deadeyes designed to set up the fore stay and various bowsprit stays. There is a 5mm deadeye on top of the bowsprit in the 12 o'clock position, with 3mm deadeyes at 4, 6 and 8 o'clock. Unlike blocks you can't rig deadeyes with rings that would allow them to be moved round once in place, so at first I found the process of rigging them a bit hit and miss. I started trying to be clever, using the circumference of the bowsprit to figure out how far apart to seize the deadeyes into a length of rope to get the correct spacing. That didn't work too well - you just have to be a millimetre or two out for the resulting ring to look a mess. I considered starting out with a ring of rope around the bowsprit, to which I would then individually seize each deadeye. But that would mean a separate strop on each deadeye which would have to be tied or sewn to the ring of rope, and I didn't see how I could manage that at all neatly. In the end I found the solution by chance. I found that if you seize your deadeye into a rope using fly tying line then seal it with fly tying glue (see here), the resulting seizing is tight but not stuck to the rope. With care, you can move the rope through it, which means you can work a loop into the position you want. Here's how it worked, starting with seizing the 5mm deadeye into the middle of some 0.5mm rope (I didn't use fly tying thread for this as hopefully it won't need to move!): I seized a 3mm deadeye into the same rope in approximately the right position, then held the rope around the bowsprit to eyeball the result: I found it easier to check with the bowsprit upside down and using the weight of a small clip to hold the 5mm deadeye in the 6 o'clock position. I wasn't quite happy with the small deadeye so I noted how far it needed to move and in which direction. It was then a simple job to remove the deadeye and work the loop of rope through the seizing to the new position: I replaced the deadeye and tightened everything up. A quick check back on the bowsprit showed everything in order. With the 4 o'clock deadeye in the right place I knew I just had to seize the eight o'clock fellow the same distance the other side of the big guy for everything to be symmetrical: Setting up the fourth deadeye was slightly tricky, but as it was directly underneath the bowsprit I figured it didn't have to be the neatest. I started by taking the deadeye rope round the bowsprit (still held upside down in the quadhands) and seizing it to itself. I used fine sewing thread for this rather than fly tying thread as I wanted something robust to hold the weight of the deadeyes and rope. In the second shot you'll see I've formed a loop from one end of the rope, again seizing it to itself using the same length of thread. The final step is to insert the remaining 3mm deadeye, pull the rope tight to hold it snug, complete the seizing and trim in the normal way. Job done: A bit clunkier than I'd like but it won't show. By the way, the left hand shot shows another technique I tried - closer to full-size practice, where loops are formed in the ends of ropes which are then seized together to hold the rigging tight around the spar. I might cover this a bit more in the next post. Derek


- 725 replies
-
- 7
-
-
- vanguard models
- speedy
- (and 1 more)
-
Rigging the bowsprit Not much time in the dockyard recently. Ten days ago my wife had an operation to repair a leaking heart valve, so for once I've been happy for family and domestic duties to take precedence over modelling. However Mrs D. is making good progress and now that she's home I've been able to slope off to the workshop briefly now and again to start on the bowsprit. The bowsprit, along with the jibboom and flying jibboom presents some interesting challenges with numerous blocks and deadeyes. Some are relatively straightforward, such as the 4mm double block at the tip of the jibboom, which I was able to seize to the ring on the spar with the help of quadhands: Others were trickier, especially where two or more blocks or deadeyes had to be seized in a ring around the bowsprit. For blocks, I found it easiest to strop them with rings. I made the rings with 0.25mm line as previously described, then tied the strop under the block with a simple overhand knot and a dab of CA. Once trimmed, the blocks were threaded onto heavier 0.5mm line: The 0.5mm line was tied round the bowsprit with another overhand knot and a drop of CA where it would not be seen, then trimmed. The rings allow the blocks to be moved round the bowsprit until they are in the correct orientation. Rings don't work with deadeyes so I needed a different approach. I'll describe the method I used for a ring of four deadeyes in my next post. Derek

- 725 replies
-
- 10
-
-
- vanguard models
- speedy
- (and 1 more)
-
Fine work Glenn. Sorry to hear about the kitchen problem - thought you'd been a bit quiet recently. Derek
- 778 replies
-
- 3
-
-
- cheerful
- Syren Ship Model Company
- (and 1 more)
-
As Slog says, silver solder paste is the way to go. I recently covered this in some detail in my Speedy log, here. Derek
-
Neat work Tim. If you upload a photo but don't use it in your post, it will appear at the end of your text. When you edit the post you have to delete it from the images area otherwise it will just keep popping up again. Derek
- 436 replies
-
- 1
-
-
- vanguard models
- alert
- (and 1 more)
-
An interesting discussion, and I suspect there is more to agree upon here than to disagree. Bob has helpfully illustrated the difference between miniature versions of full size tools and tools specifically designed for miniature wood working. Others have pointed out that their Veritas miniature tools are very capable of serious miniature woodworking. I have both types of small tools and would argue that each has its place on the workbench. For example, when tapering spars or planks I will often use a Stanley #101-style plane for bulk removal of material but for the last few finer cuts I prefer the better 'feel' I get from a Veritas low angle block plane held in my fingertips. And there are occasions when a Veritas tool is clearly superior - for example getting into tight spaces with a miniature chisel where a full size handle would be impractical. Horses for courses, as they say. These Veritas miniatures are definitely not toys, as evidenced by the quality of materials and manufacture - especially the blades. If properly prepared and set up when new, they will perform extremely well with regular light honing.
-
👍 Well done!
-
Hi Sjors. I ordered my quad hands through Amazon UK. Would Amazon be an option for you?
-
No, I'm using the quadhands to hold them while I work on them. One of the best pieces of kit I've got in ages. Sorry to hear about the water leak - nightmare!
- 725 replies
-
- 4
-
-
- vanguard models
- speedy
- (and 1 more)
-
Rigging the spars - odds & sods Many thanks for all the likes. I had hoped to move on to the bowsprit by now, but some half-decent Autumn weather has kept me on various outdoor chores with only very limited time in the dockyard. Also, finishing off rigging the masts wasn't quite as straightforward as I'd expected, so I'll log another couple of wrinkles I've had to deal with. First, I realise now that I was somewhat premature in gluing together the various components of the fore and main masts, the problem being that it now makes it more awkward to rig some of the required blocks. For example, a block and a thimble have to be set up on the fore topmast head as part of the rigging for the main topgallant and royal stays. With the fore topgallant mast and cap in place you can't just slip a loop of line over the masthead, and I found it impossible to seize the block or the thimble in situ. I resorted to cheating, which in this case meant seizing the block/thimble into the middle of a short length of line then tying the line round the masthead in such a way that the simple half knot was concealed in the gap between the masthead and the heel of the topgallant mast. A dab of CA and careful trimming with a scalpel and hopefully the 'cheat' is invisible: Lift Blocks I had more substantial problems with the fore and main lift blocks. The kit shows these as pairs of long tackle ("fiddle") blocks seized into spans, ie lines that wrap around the main and fore caps. Impossible once everything is glued in place, as the gap between the mastheads and topmast heels is too narrow for the blocks to fit. A worse problem in my case was the quality of the fiddle blocks. These are the only components I have come across that fall below the otherwise very high standard in this kit. They were out of scale (at 7mm they should have been 1.4mm thick according to the ratios laid down, not 3mm), they were not well finished and the sheave holes and grooves were off-centre making them difficult to rig. I made my own fiddle blocks from boxwood for Royal Caroline and was going to do so for Speedy, but when I checked standard references (including Rees's The Masting & Rigging of English Ships of War) I found that ships of this period could be rigged with either fiddle blocks or ordinary double blocks. I opted for the latter. The only fly in the ointment was that Rees also noted that from 1760 blocks would be seized to an eyebolt in the cap rather than to a span. I was loathe to drill the caps for eyebolts at this stage so I chose to assume that Speedy's builders hadn't caught up with the changed instruction and fitted spans 😬. In this instance I was able to rig the span partly in situ. I started off the model by seizing a double block into one end of a line which I then set round the cap in a clove hitch as per full-size practice (I've got to do some things right!). It was then a relatively easy task to seize the second block into the free end of the span: The clove hitch also came in handy when it came to setting up pairs of blocks at the topgallant heads: Much easier when you can get right round the spar in question! Talking of knots, apart from the indispensable Ashley Book of Knots, my other goto reference is this website Animated Knots by Grog. Worth checking out if you've not used it. One final point before I forget - I've found that the sheave holes in the blocks are only just big enough for their intended line. To avoid any problems in rigging on the ship, I've been drilling them all out to a very slightly wider diameter as I fit them to the various spars. On to the bowsprit. Derek


- 725 replies
-
- 8
-
-
- vanguard models
- speedy
- (and 1 more)
-
They range from 180 through 400, 600, 1,200, 1,800 to 8,000. I've got finer ones but I rarely go beyond 1,800. Btw, I read somewhere that European and American grit sizes are different, but I checked that these figures I've quoted are American. I use the honing fluid on the sandpaper but it's not necessary so long as you have some form of lubrication. From memory, I think Paul Seller uses automotive glass cleaner in a spray bottle. Mmmm. I've seen your 1:48 version.... Derek
- 778 replies
-
- 4
-

-
-
- cheerful
- Syren Ship Model Company
- (and 1 more)
-
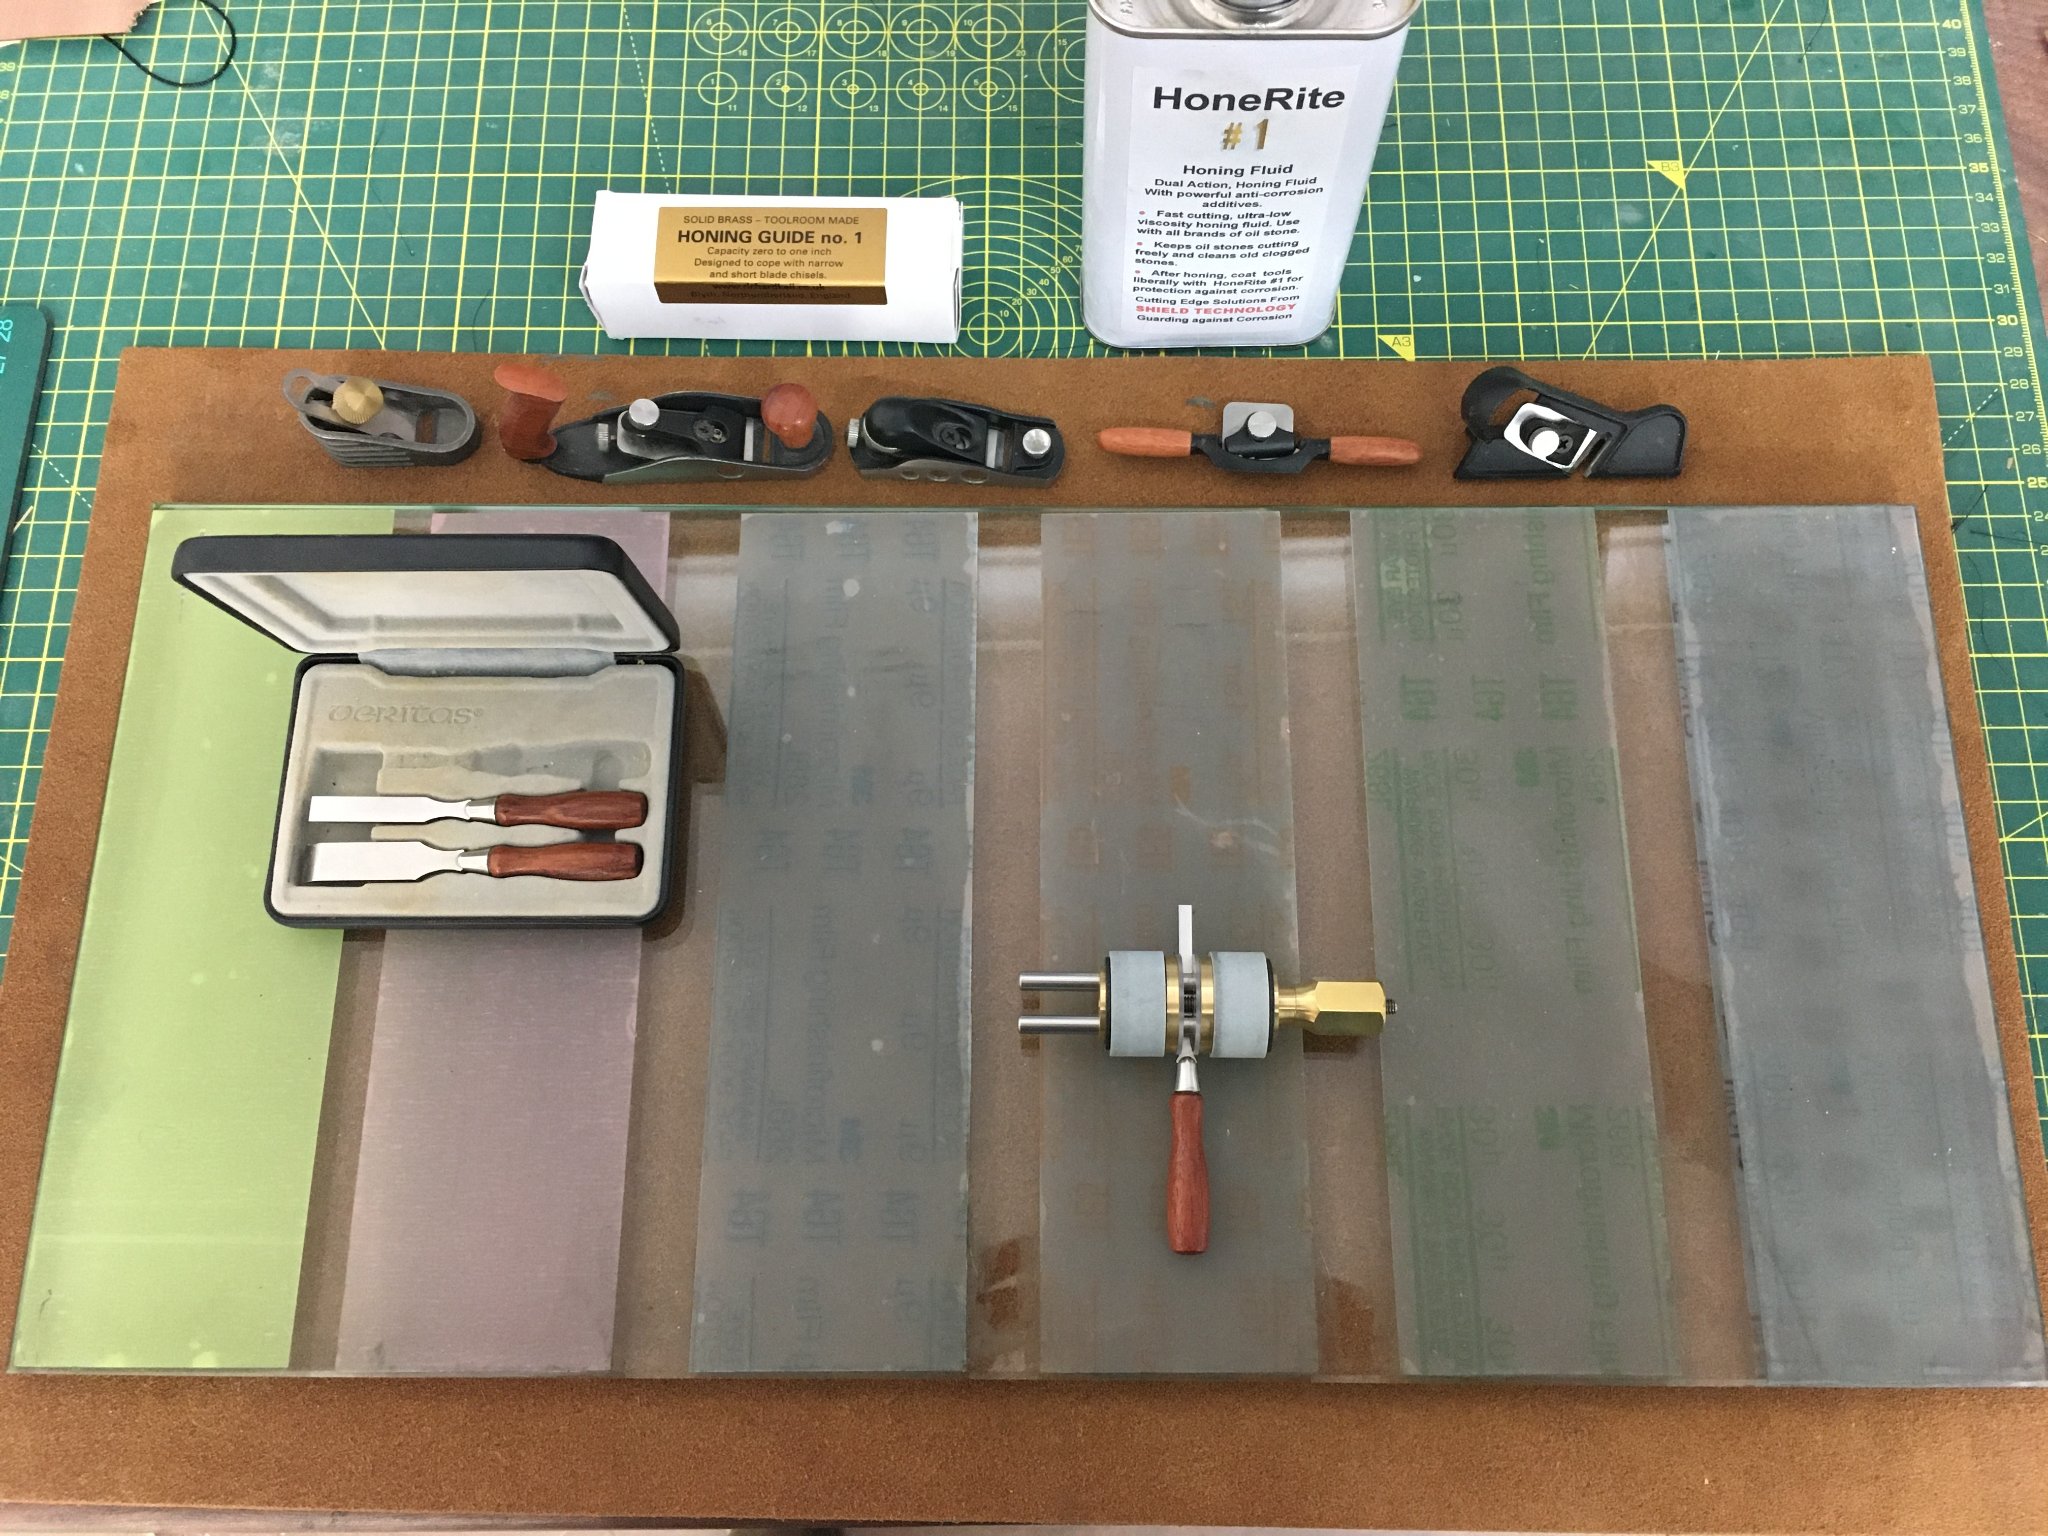
Glenn, I have the Veritas guide John mentions. Like all Veritas products it is well made, but with very narrow chisels I find it can be difficult to get the blade to sit absolutely square, and with a single roller it can be difficult to avoid the blade rocking as you move it up and down the sharpening surface. The best guide I've found for these blades is the No.1 Honing Guide from Richard Kell. Richard is a one-man-band based in Northumberland, although his products are available through US retailers. Here it is on my sharpening station (I couldn't resist including my collection of Veritas tools !): The key feature is that the blade is clamped between two rollers and so is held dead square. I've got the 1/8" chisel in it, but it will take up to 1". Because there are two rollers it doesn't rock, and because you can mount a blade under the two steel guide rods as well as over them, it can handle very short blades which otherwise wouldn't project far enough from the guide to get the correct honing angle. I've found it for sale on this US site, but if you look on Richard's own site under <links> you will find others. I ordered mine direct from Richard which may be another possibility if it is out of stock at your retailers. A couple of other points. You'll see from the photo that I've abandoned traditional sharpening stones in favour of sandpaper. Stones inevitably wear and need to be reground or replaced. So does sandpaper, but it is considerably cheaper and, when glued to 1/4" plate glass it stays dead flat. Plus, it is easier (and cheaper) to have a wide range of grits to suit your needs. Another point - and I apologise if this is teaching granny to suck eggs - but when you say you haven't sharpened your chisels yet it occurred to me that you might not realise that chisel and plane blades bought straight from the manufacturer are not best suited for immediate use. They need a degree of preparation, sometimes called initialisation - even Veritas tools! This takes a bit of work on the sharpening station but once done it becomes quick and easy to hone your blades back to perfect sharpness. Paul Sellers does the best videos I know on woodworking - here's his explanation of initialising new chisels. Interestingly, Paul is using three sharpening stones in this three year old video - he now uses sandpaper. If you decide to set up a sharpening station like this you'll find you will be much more inclined to keep all your blades in tiptop condition, and you'll be surprised just how much difference truly sharp tools will make. They will slice through wood with minimum effort, and will make woods like box a joy to work with. Remember the difference you found when you switched to Vallorbe Swiss files? You'll find a comparable difference between tools straight out of the box and properly sharpened tools. Sorry to hog your log. Derek

- 778 replies
-
- 9
-
-
- cheerful
- Syren Ship Model Company
- (and 1 more)
-
Btw, I see you have a set of Veritas miniature chisels - some of my favourite tools. They take a very keen edge with careful sharpening. How do you find them?
-
Really superb Glenn. I particularly like the third shot up from the bottom - the one from low down on the starboard stern - as it shows off the lines of the hull and the quality of your workmanship beautifully. As Edward says, the mouldings are spot on - the boxwood goes well with the cedar, and is a lovely wood to work with. Great stuff. Derek
- 778 replies
-
- 2
-
-
- cheerful
- Syren Ship Model Company
- (and 1 more)
-
Excellent result Tim - well-rigged guns really add a huge amount to the visual impact. Well done! Derek
- 436 replies
-
- 3
-
-
- vanguard models
- alert
- (and 1 more)
-
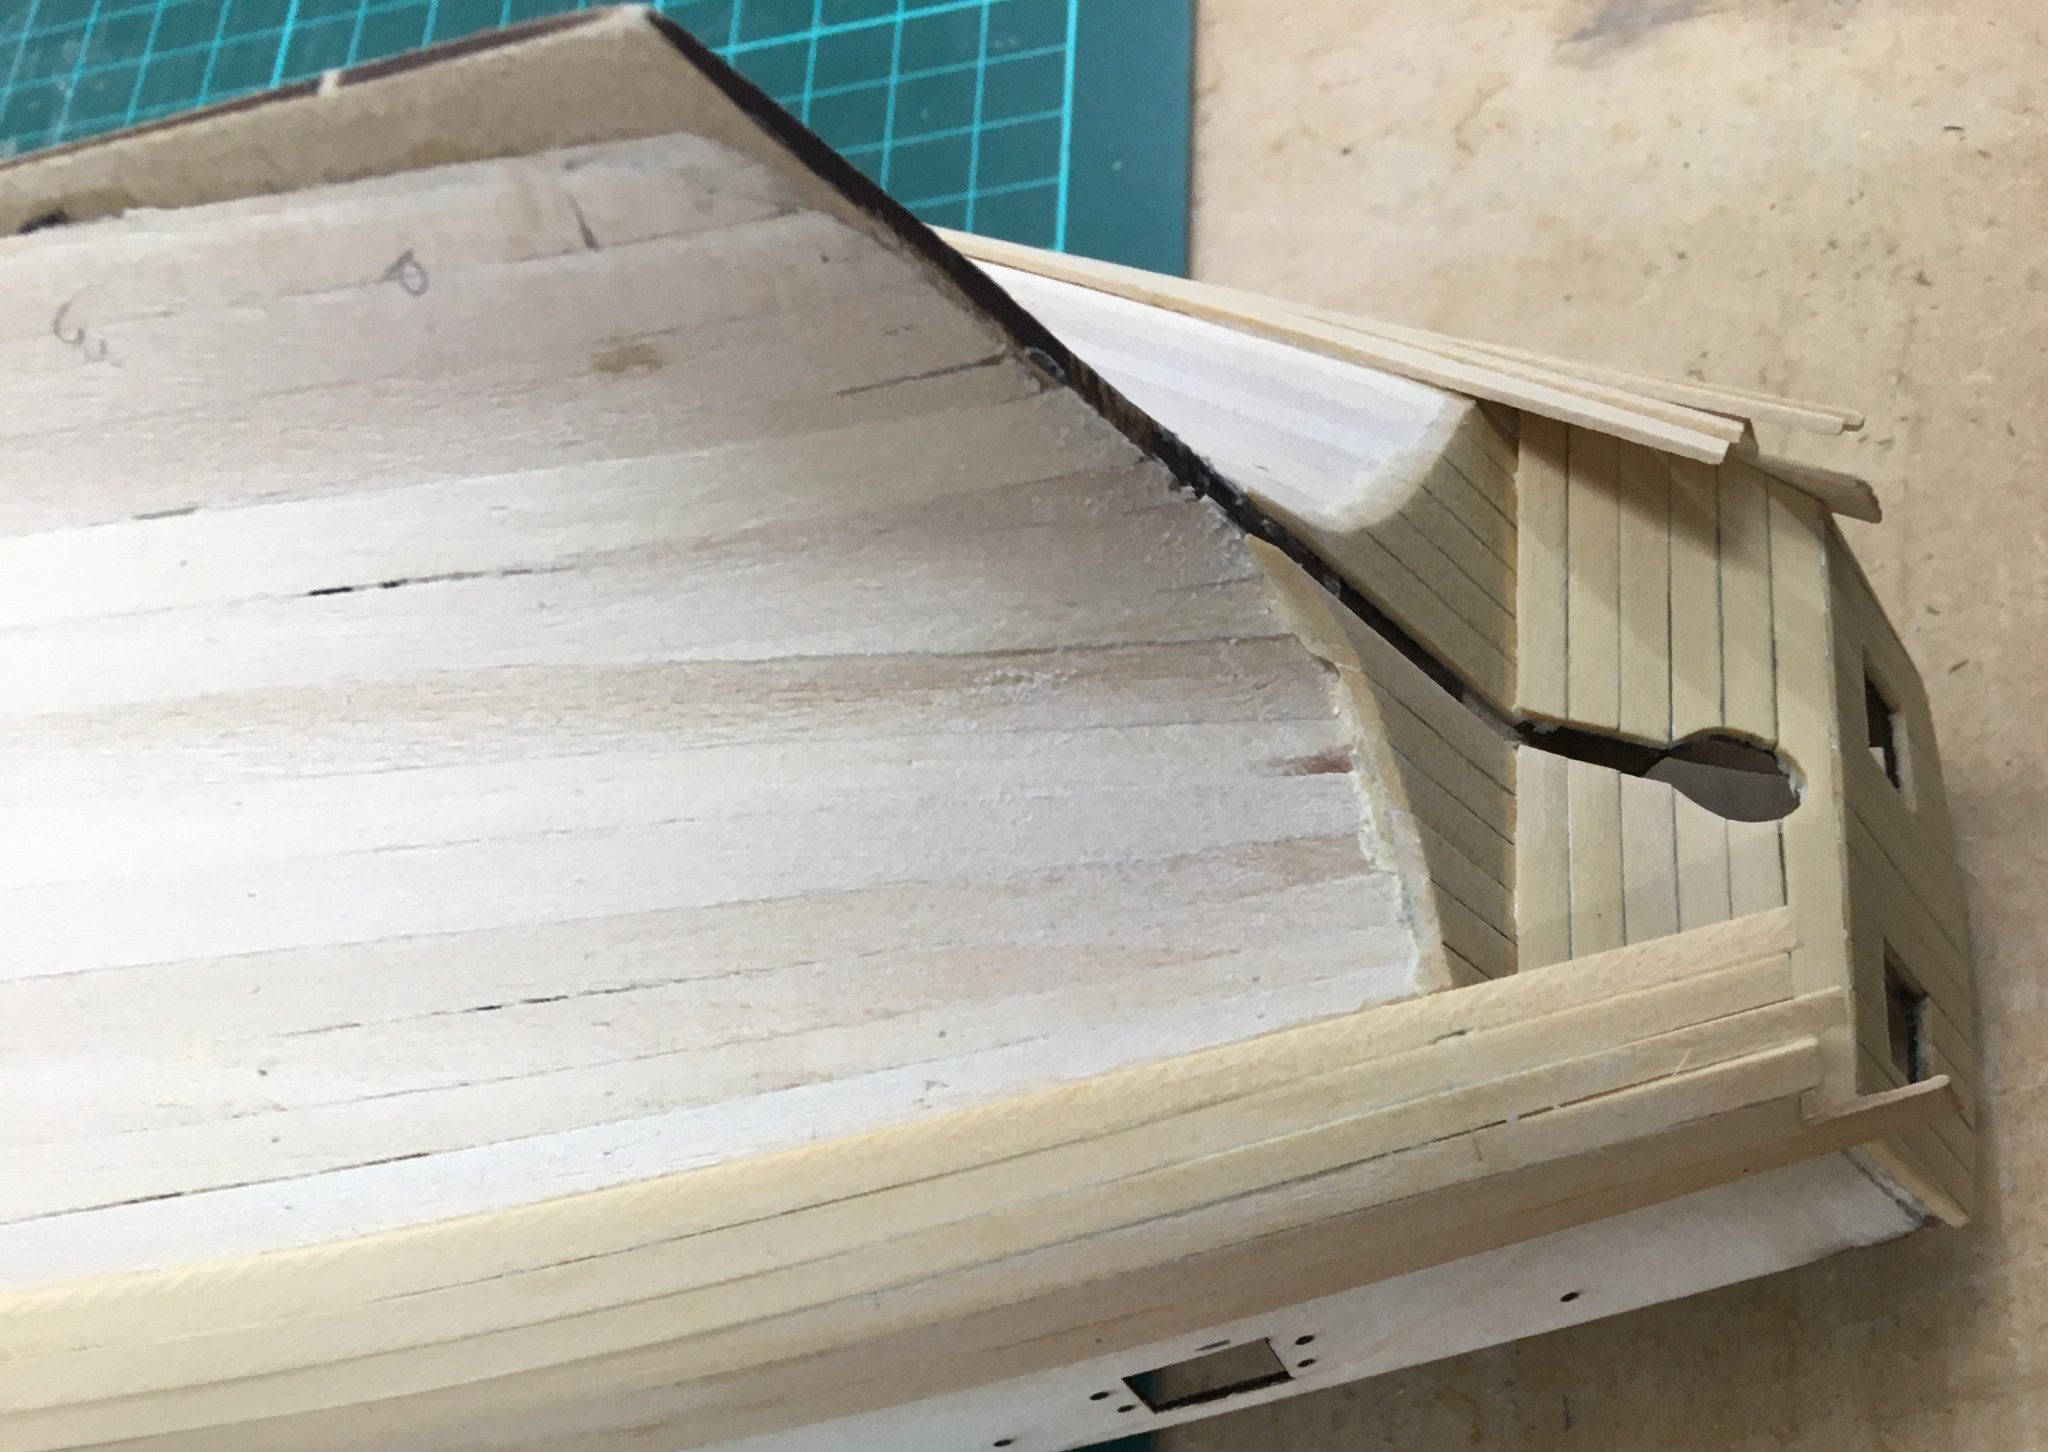
No, although that might work if you were careful. In my photo you can see that some of the MDF has been sanded down, especially at the point. That was unintentional - I did it when sanding the planking. However it wasn't a problem - you can easily lose mistakes like that under second planking and coppering. As I said before, filler is your friend! The crucial point is to make sure that the combined width of the MDF and planking at the stern is the same as the width of the sternpost. You want the hull planking to flow smoothly into the sternpost so there is no obvious step or angle where they join. That's why the manual suggests that, before second planking, you file/sand the sternpost area to 1.5mm so that when you apply the second planking it sits flush with the sternpost. Derek
-
Rigging the spars - stropping blocks Thanks as always for the likes and kind comments. I should have said earlier, but one reason I'm not giving a blow-by-blow account of the rigging is that I've decided to follow the kit plans fairly closely, so anyone else building the model would learn little. On my previous fully-rigged ship, Royal Caroline, I did extensive research through the AOTS book on the royal yacht, Lees's Masting & Rigging and The Fully Framed Model (the 4th volume is great on rigging a 6th rate similar to RC). But that was primarily because the kit plans were so simplified and/or inaccurate, whereas I'm sure Chris has done the research needed to produce an accurate rigging plan for Speedy (so far as that is possible at 200+ years remove!). If I do decide to enhance the rigging in any way - anchor buoys is one possibility - I'll cover that in due course. Meanwhile I'll just stick to logging any unusual points, or points that might be of more general interest. Given that there are over 130 blocks and deadeyes to fit, I thought I'd say a little about the methods I'm using to strop them and fix them to the spars. Previously I mentioned the simple method I'm using where a block attaches directly to a yard (link here). However this method isn't always appropriate, for example where the knot would be visible or where you need more separation between the block and the spar. There are lots of ways people have developed to skin this particular cat; some, such as following full-size practice by making strops out of line spliced into seamless rings, lie outside my skill set. In the end I went for a variation on a method I first saw as a video, which in turn was based on this forum post by Bender. This technique works fine for larger blocks, but I found it fiddly for the many 3mm tiddlers on Speedy, and I thought the end result looked a bit clunky. For my slightly modified method I used (for 3mm blocks) 0.25mm black line from the kit, 18/0 fly tying thread (as previously described) and thin CA. I normally use fly tying cement to fix rigging knots, but in this instance I decided I needed the added security of CA. This is because the seizing formed by the fly tying thread will only be 1 to 2mm wide and will need to hold the strop in place against any tension in the rigging. I started by seizing the block into a length of 0.25mm line, using the method I described when I was rigging the guns - ie knotting the thread alternatively above and below the line (link here). It can be difficult to snug the seizing tight up against the block, especially with thicker line, so I tried a couple of approaches. In the first picture below, I started the seizing a couple of mill away from the block and worked the seizing towards the block; in the second I wet the line with water and pinched it round the block with tweezers to get it to conform to the shape of the block better, then began the seizing as close as I could to the block and worked away: The second result looks neater, and will produce a less clunky end product. In this example I'm seizing the block to a ring, so the next step is to thread the short length of line through the ring (much easier off the model!), fold it back over the block and hold the block and line together in the clip (unfortunately I only photographed this stage for the first seizing method, but the idea is the same): The trick here is to fold back the line just enough to produce the gap you want between the block and the fitting. Next, I repeated the over and under seizing, this time including the folded back line (this photo shows the result using a block stropped using the second seizing method): After a tiny drop of thin CA and trimming: The method works equally well with double blocks: One variation that I touched on briefly before is where you need a ring in the strop. Initially I used a 1mm drill bit to make the ring but after deciding it was too large I substituted a 0.8mm needle. Soaking the rings in thin CA seems to keep their shape - you just have to be careful to move the line on the needle before it sets! Here, I'm doing four at once: Economising I started cutting 100mm/4 inch lengths of line for each strop but decided this was wasteful. Instead, I just used one end of a longer line, trimming it off close to the seizing when the CA had hardened. In this way I used less than 30 mm of line for each strop. May seem like penny pinching, but it actually makes your line go three times further. By the way I can imagine some experienced modellers turning up their eyes at what they see as obvious points about rigging, but none of this stuff was obvious to me when I started, and if it helps one or two people then I'm happy. I'm moving on to the bowsprit next which brings its own interesting challenges, for example with collars with one, two and four deadeyes seized into them. I'll cover that next. Derek

- 725 replies
-
- 13
-
-
- vanguard models
- speedy
- (and 1 more)
-
Very good first planking James. You're right that you don't need to cover all the MDF at the stern. On the other hand you need to make sure the planks merge smoothly into the MDF, especially the second planking, otherwise you'll end up with a step. Here's mine after sanding: I think there are similar photos in the kit manual. Unfortunately you do have to sand off a good deal of wood to get the desired result (alternatively filler can be a life saver in first planking!). Anyway, well done. You've produced a sound base for your second planking. Derek

-
Furloughed the valet after all I see 😂🤣
- 778 replies
-
- 3
-
-

-
- cheerful
- Syren Ship Model Company
- (and 1 more)
-
Hi. I'd be interested in your three AOTS books. I'm also based in Nottinghamshire so regular postage should do for me as well. Looking forward to your pm. Ta Derek
-
I'm surprised, as I find the Proxxon mill very accurate. Have you tried adjusting the gib strips to eliminate any play in the 3 axes? I've not had any problem with backlash with mine, but if it an issue I suspect there's information on the web on how to eliminate it. Derek
- 589 replies
-
- 2
-
-
- le gros ventre
- cargo
- (and 1 more)