HOLIDAY DONATION DRIVE - SUPPORT MSW - DO YOUR PART TO KEEP THIS GREAT FORUM GOING! (Only 20 donations so far - C'mon guys!)
×


DelF
-
Posts
1,409 -
Joined
-
Last visited
Content Type
Profiles
Forums
Gallery
Events
Everything posted by DelF
-
 Just beautiful! You've achieved such a crisp, clean finish on all your work - very impressive.
- 778 replies
-
- 2
-

-
- cheerful
- Syren Ship Model Company
- (and 1 more)
-
Thanks Glenn - the attention to detail can be tiresome in some aspects of life (ask my wife 😬). Btw, our posts must have crossed, as I was responding to Scarborough Glenn's in my previous one.
-
Thanks Glenn. Unfortunately I think I’ve just spotted one detail I got wrong on the back stay! I’m pretty sure the stays should go down between the 2nd and 3rd crosstrees (like the shrouds) rather than aft of them. I’ll double check and re-rig if necessary.
-
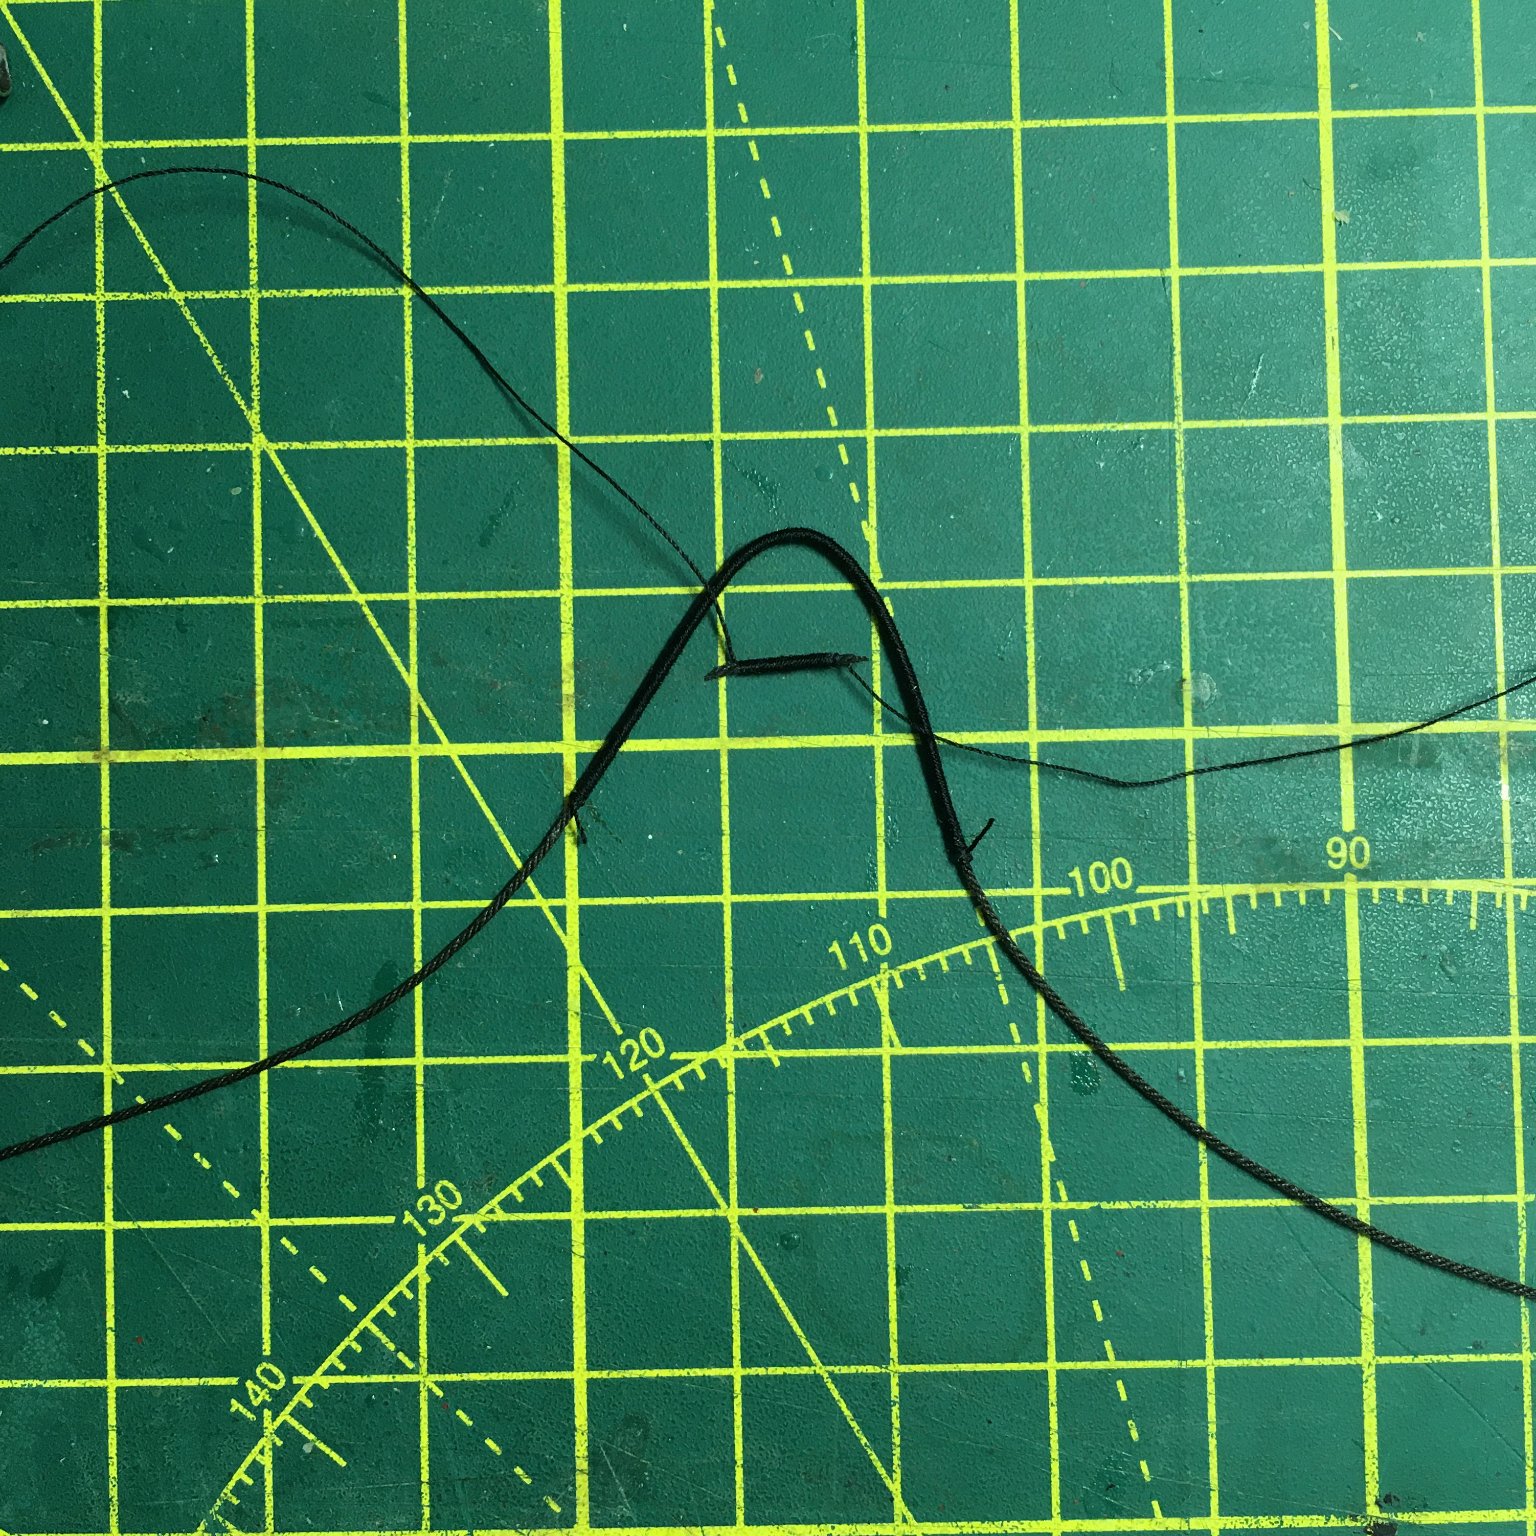
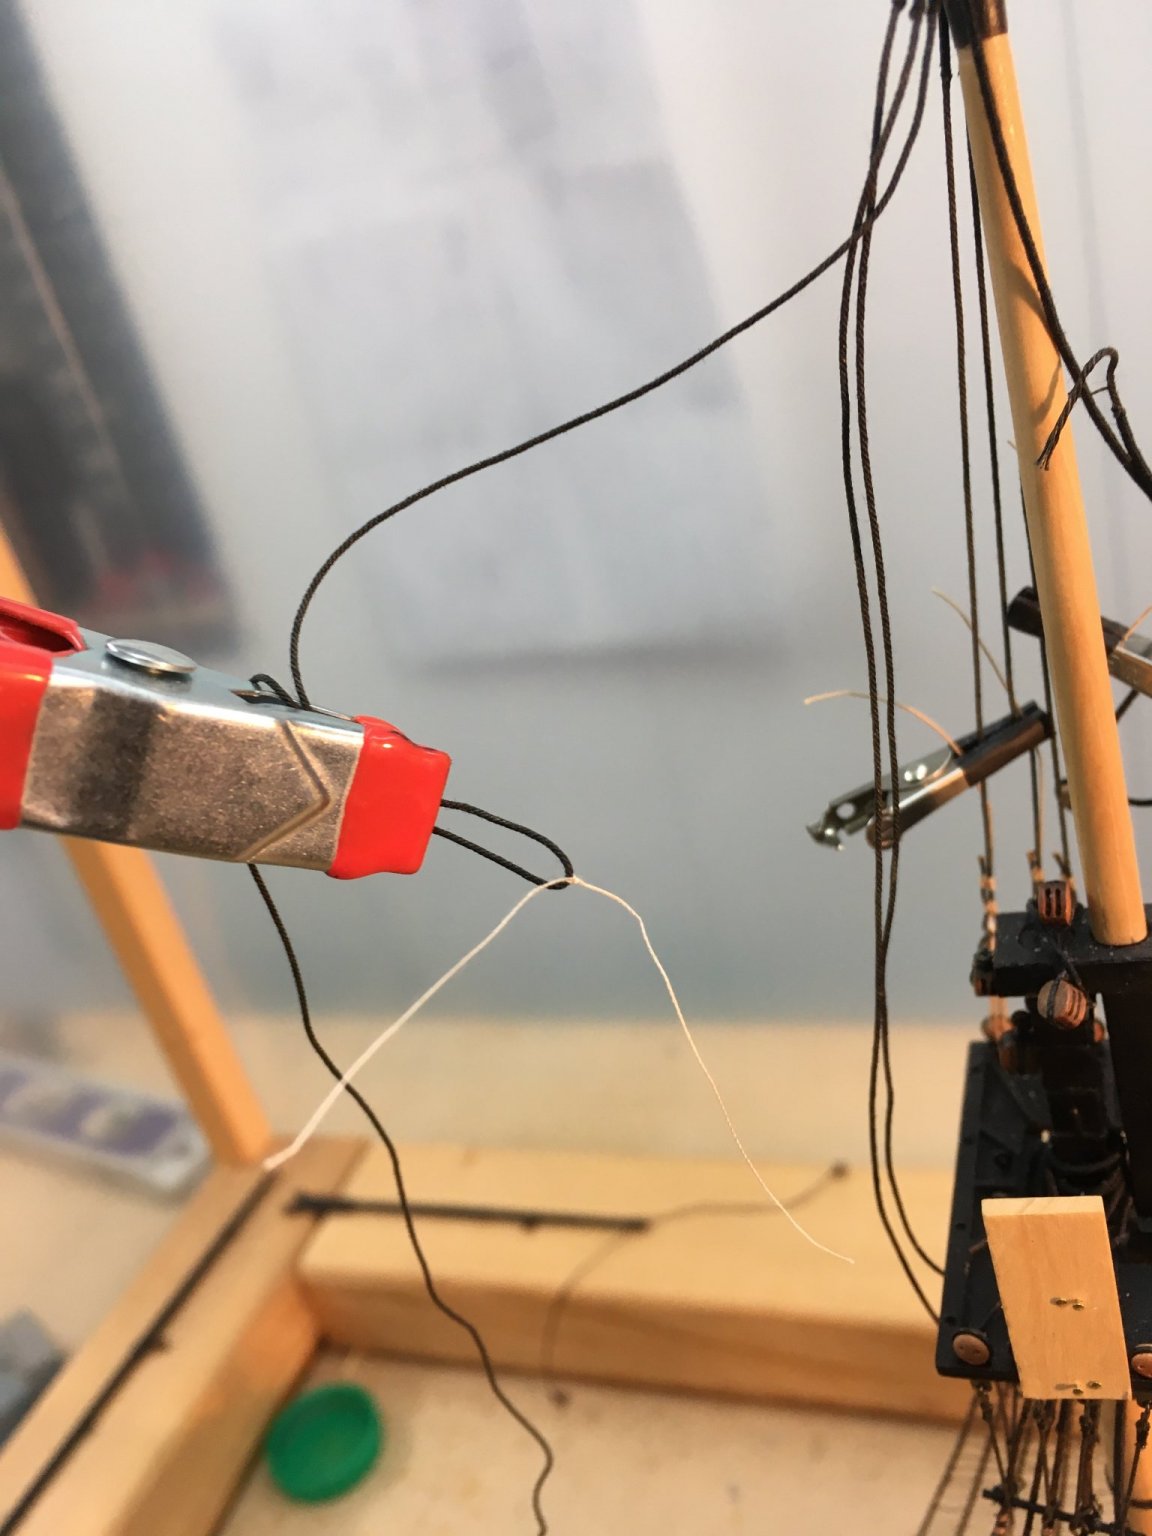
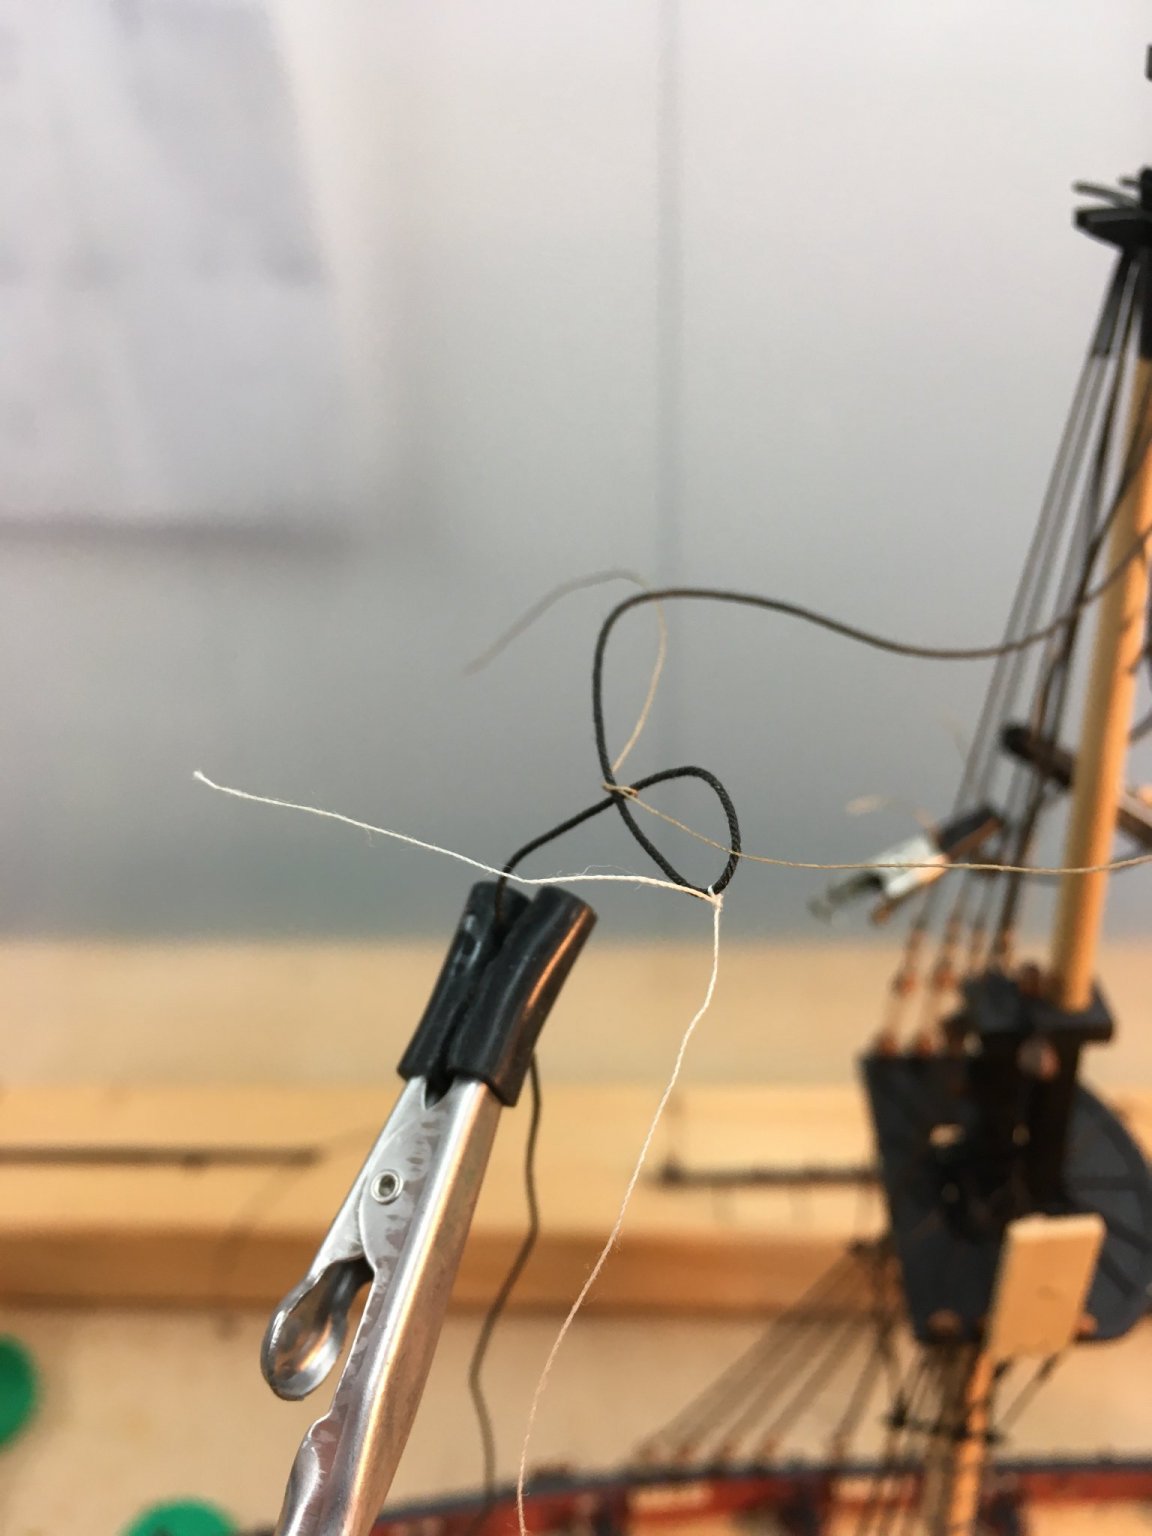
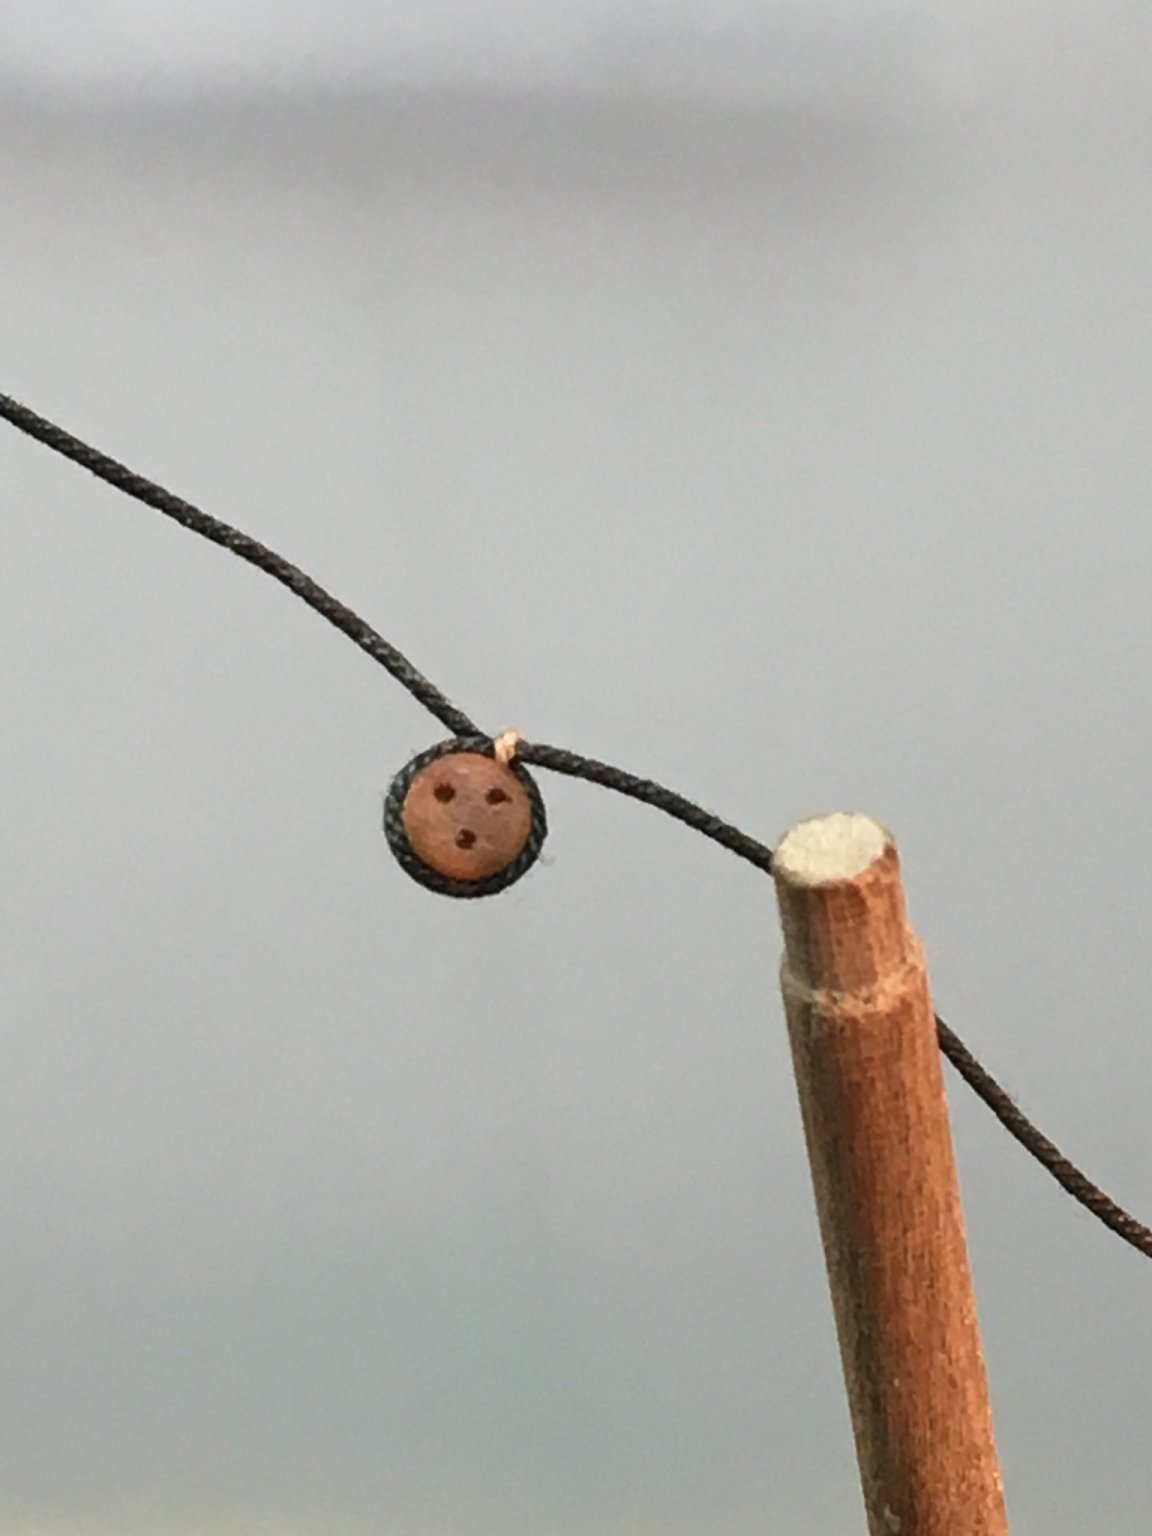
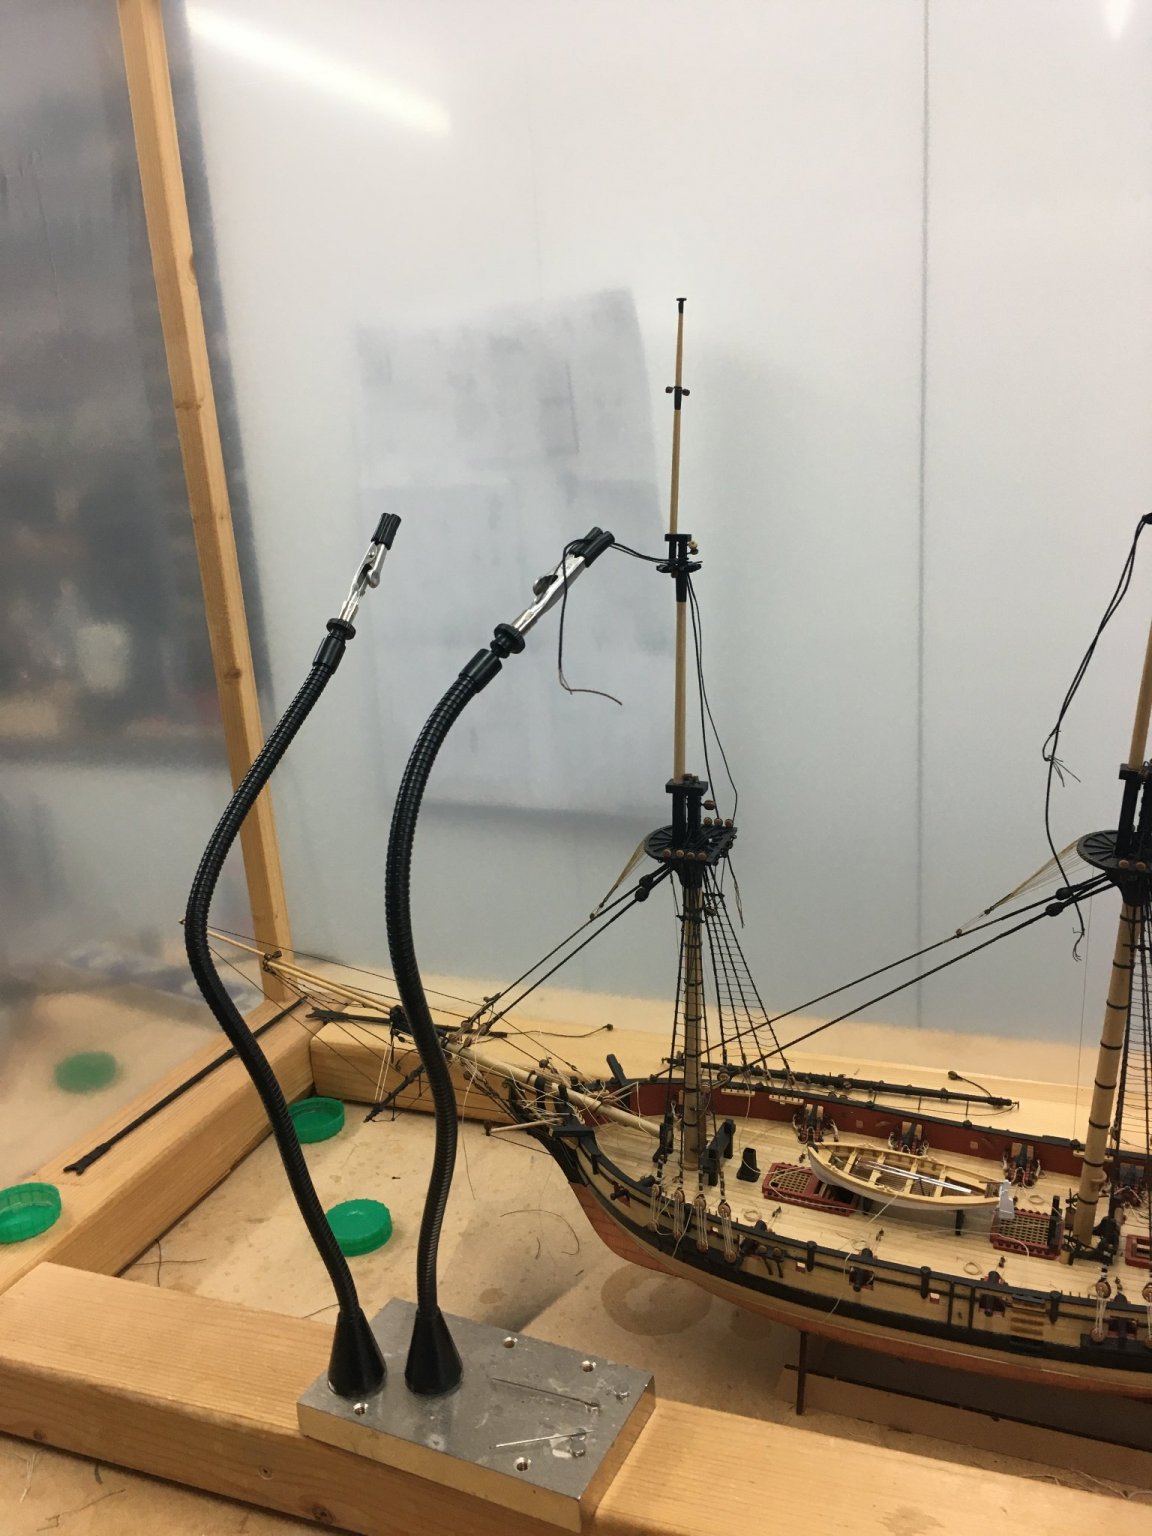
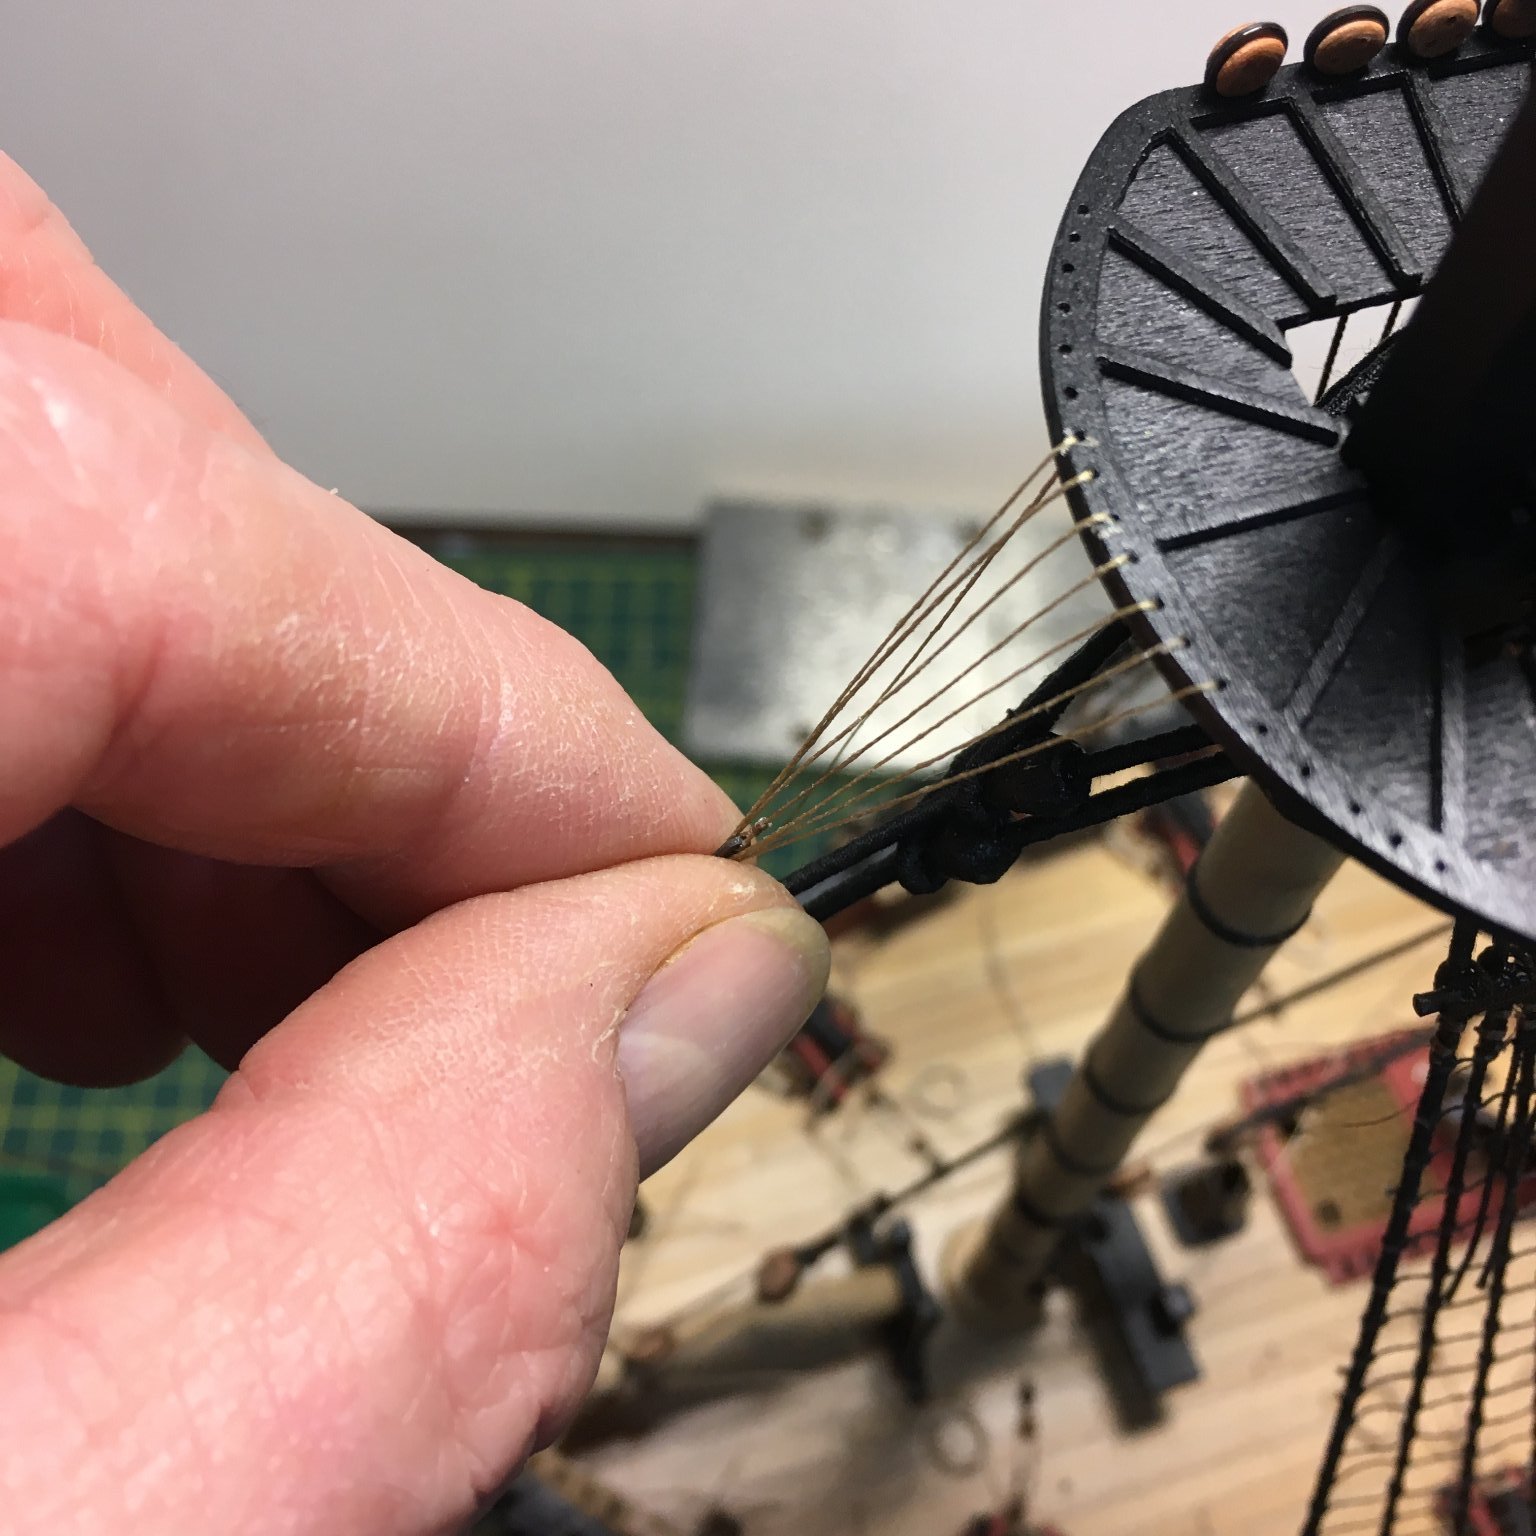
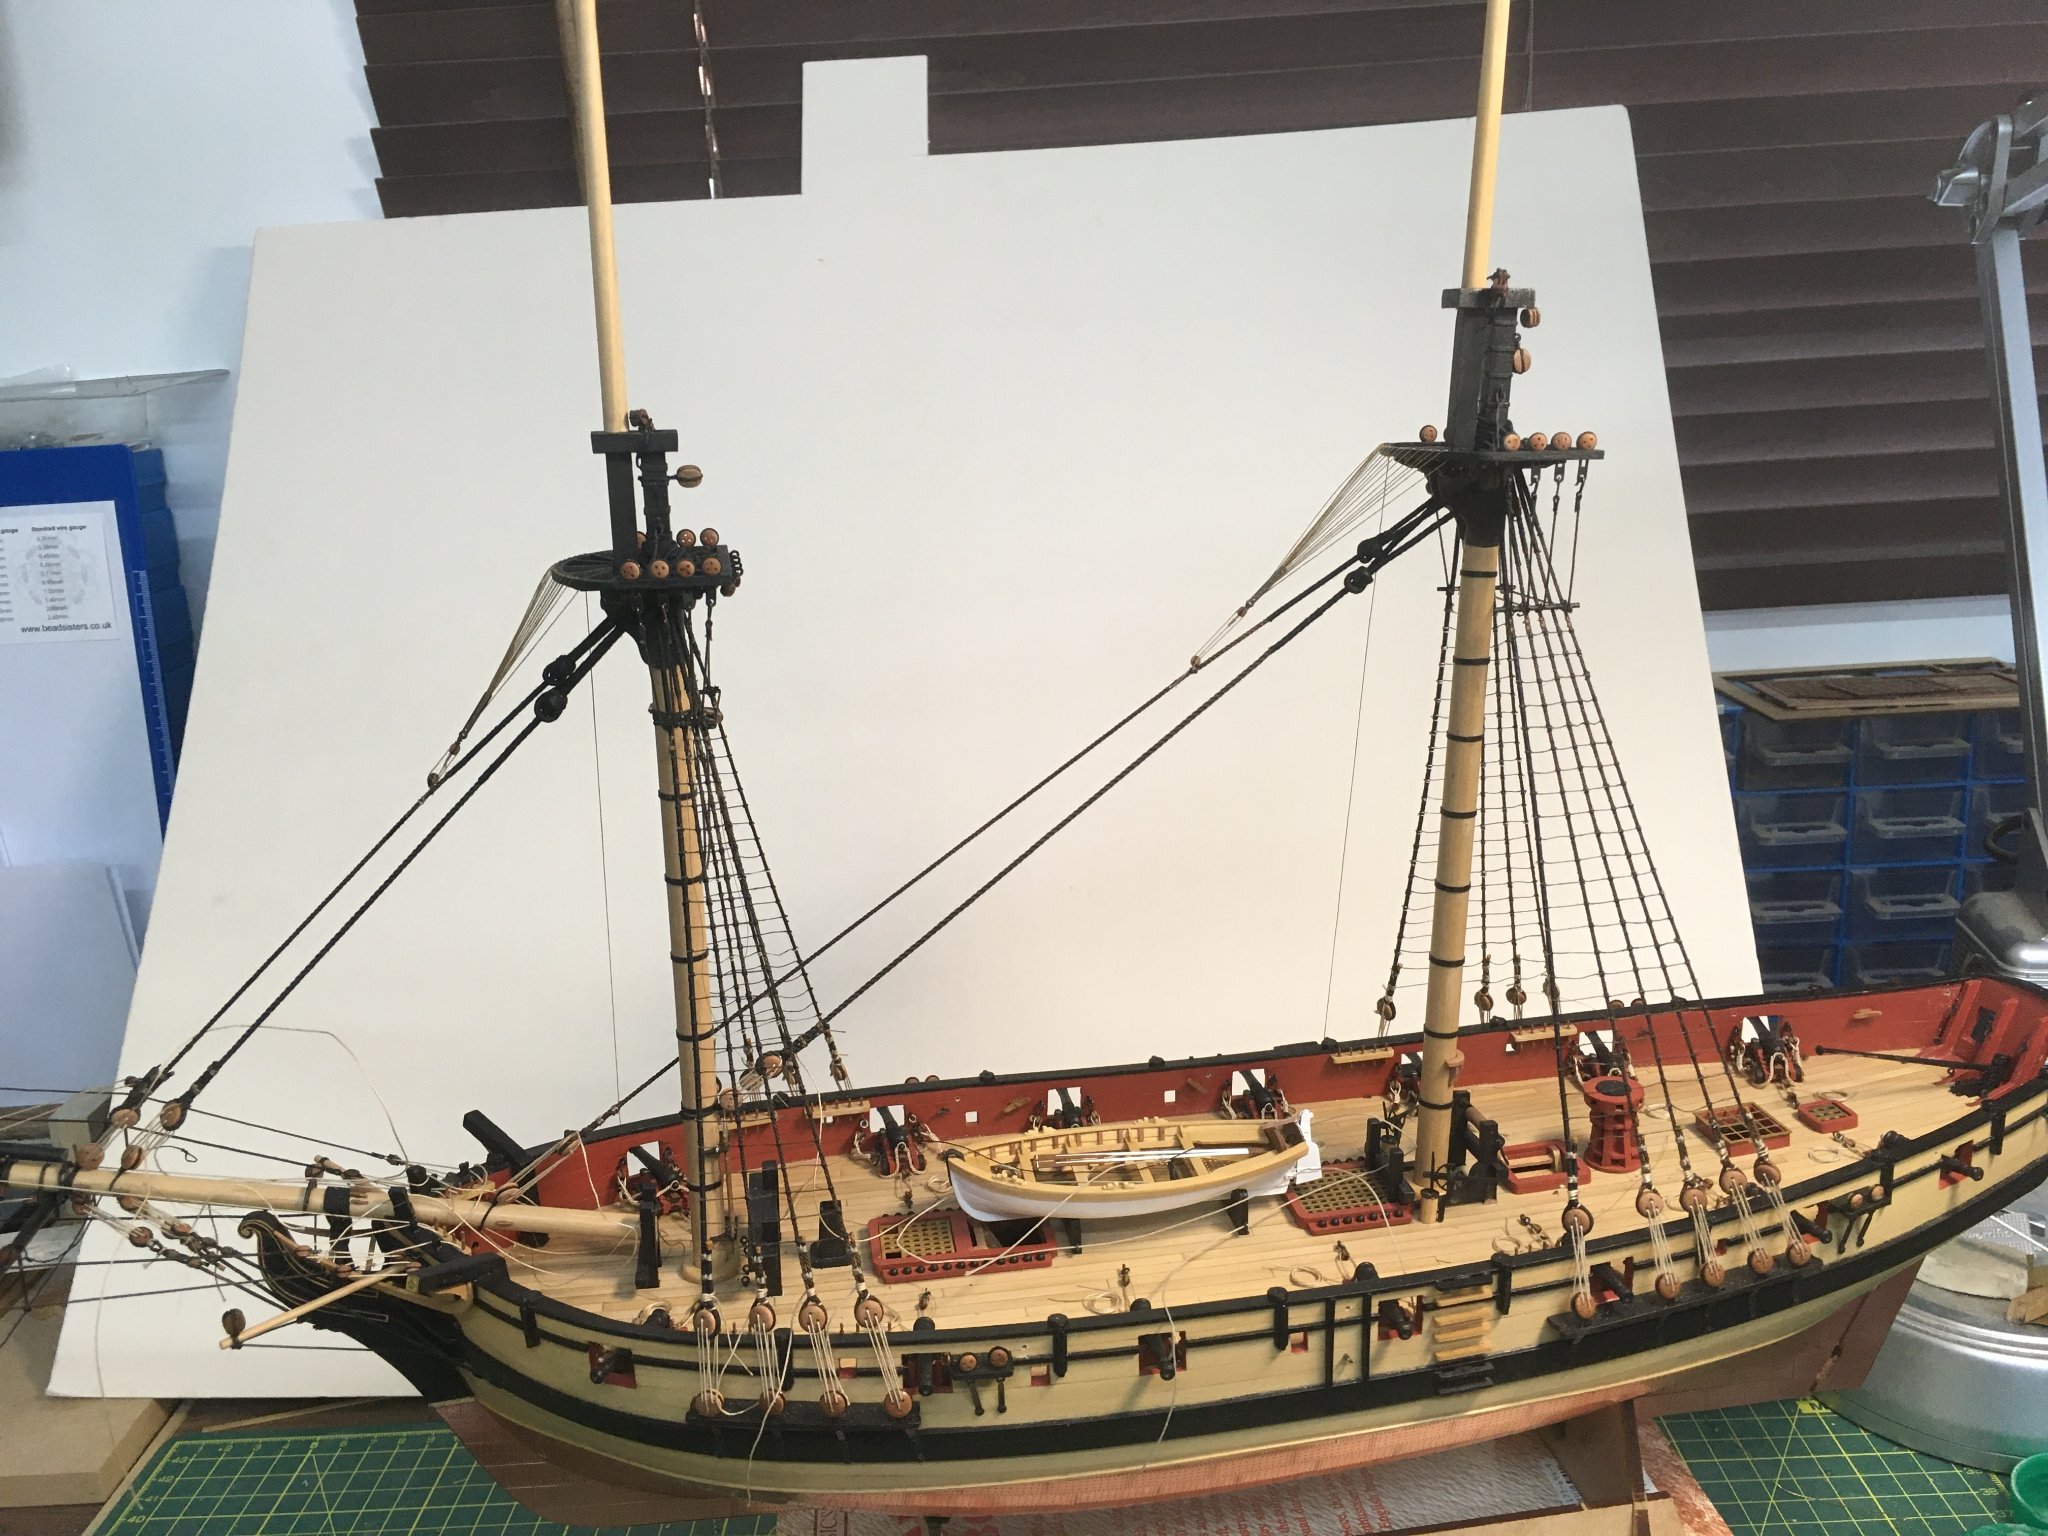
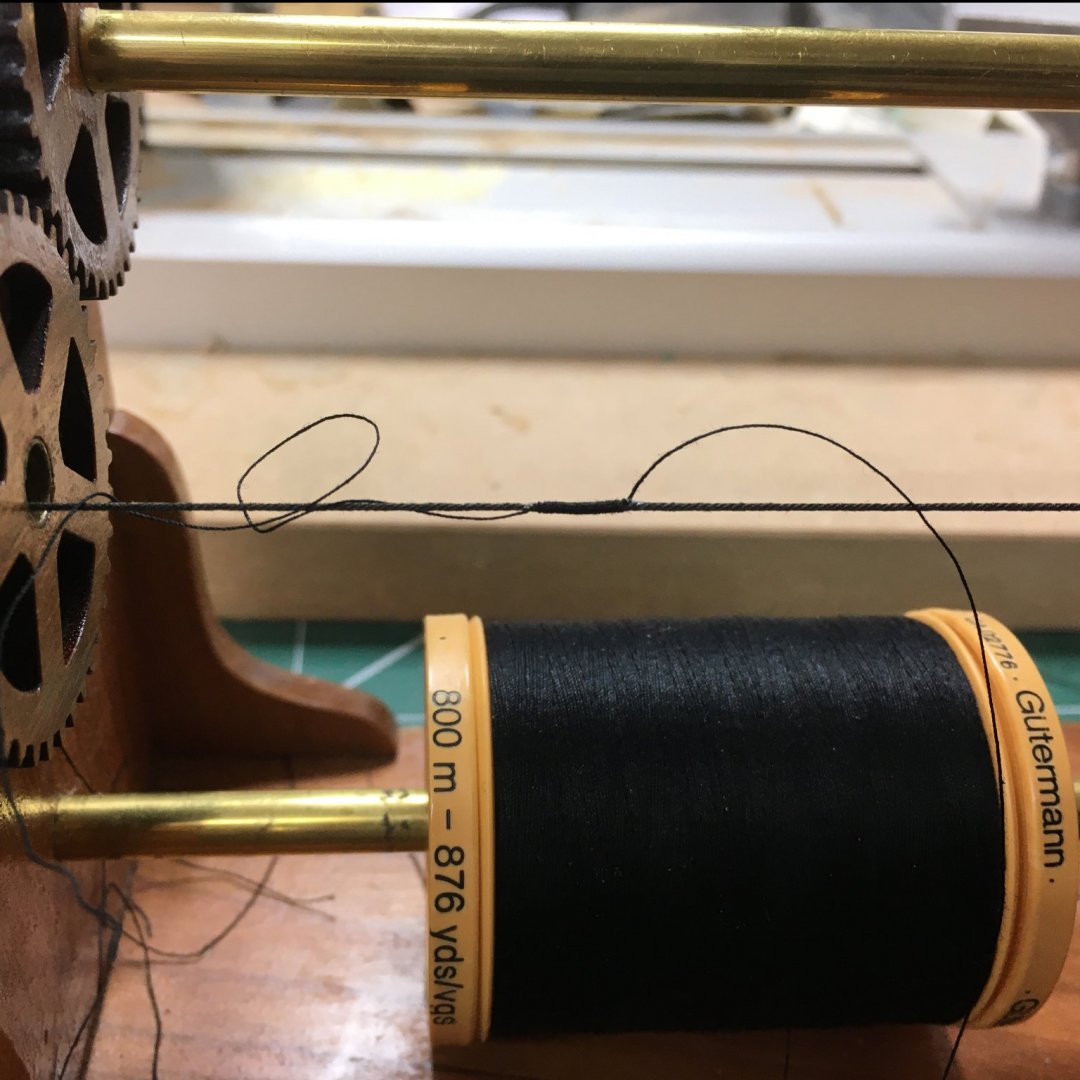
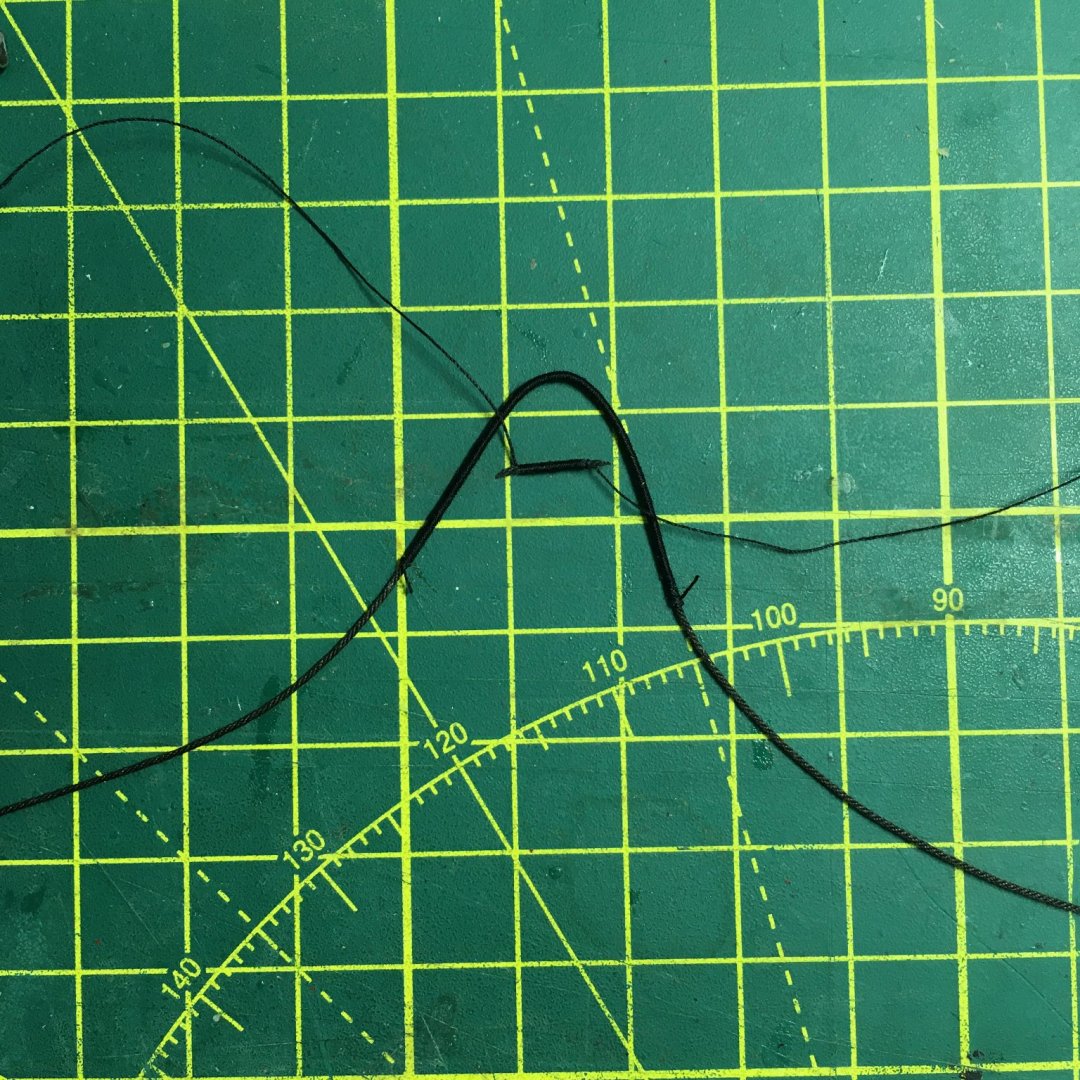
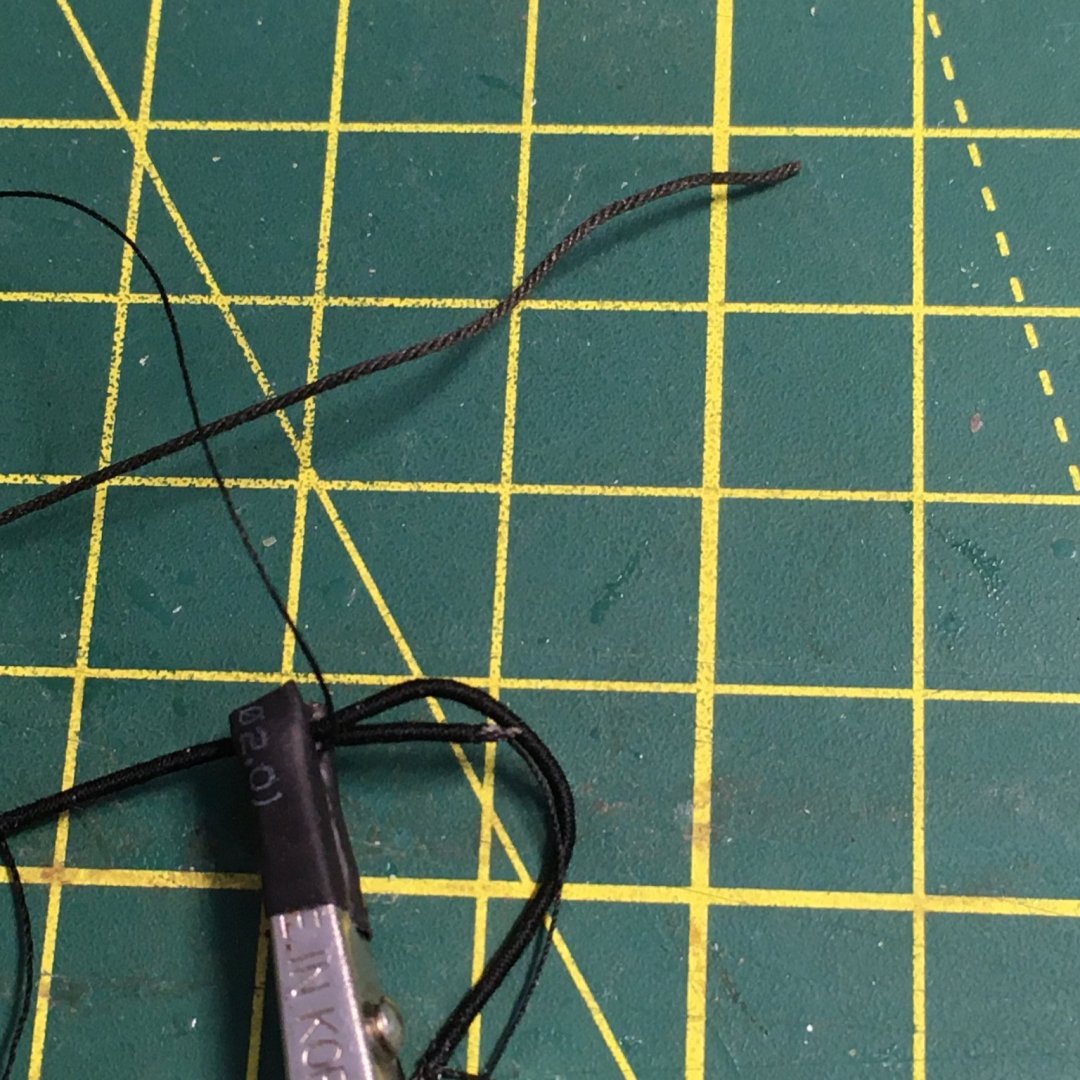
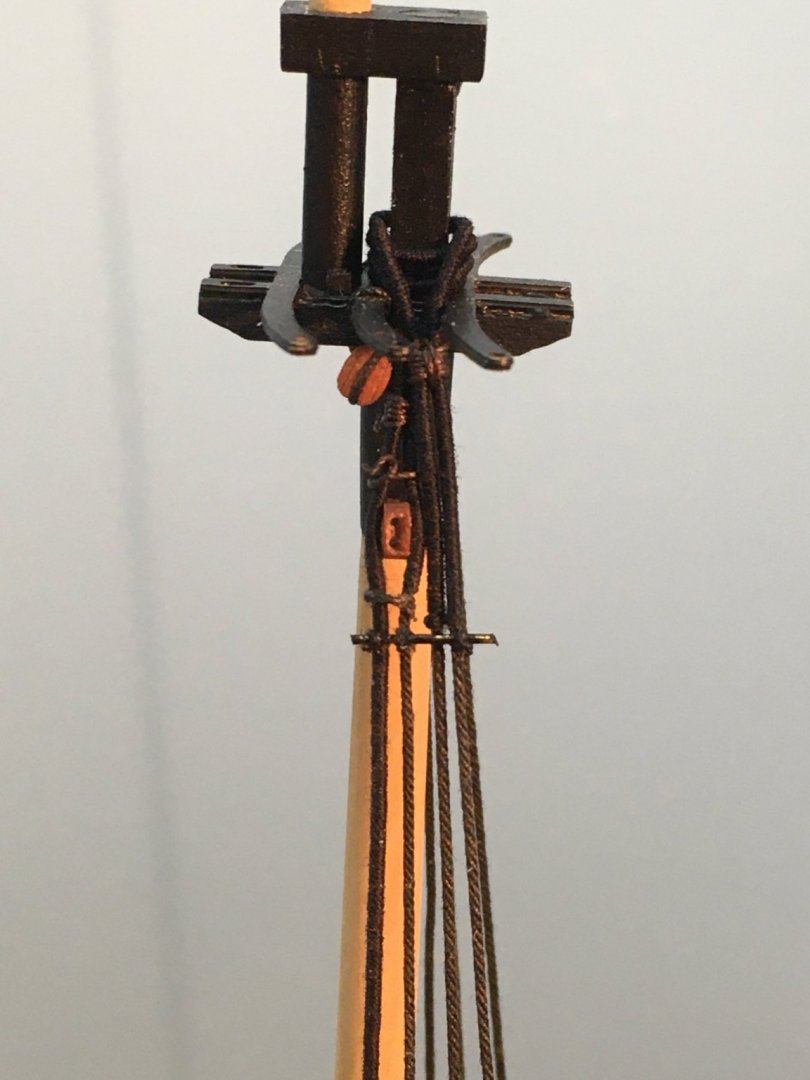
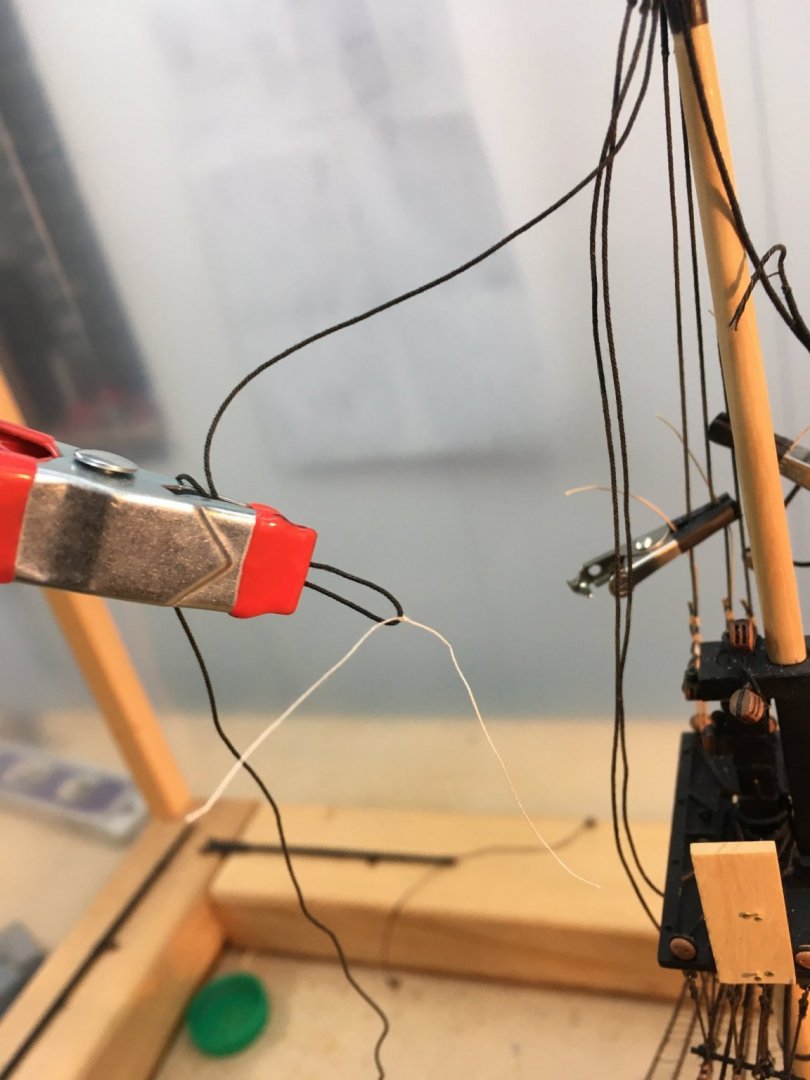
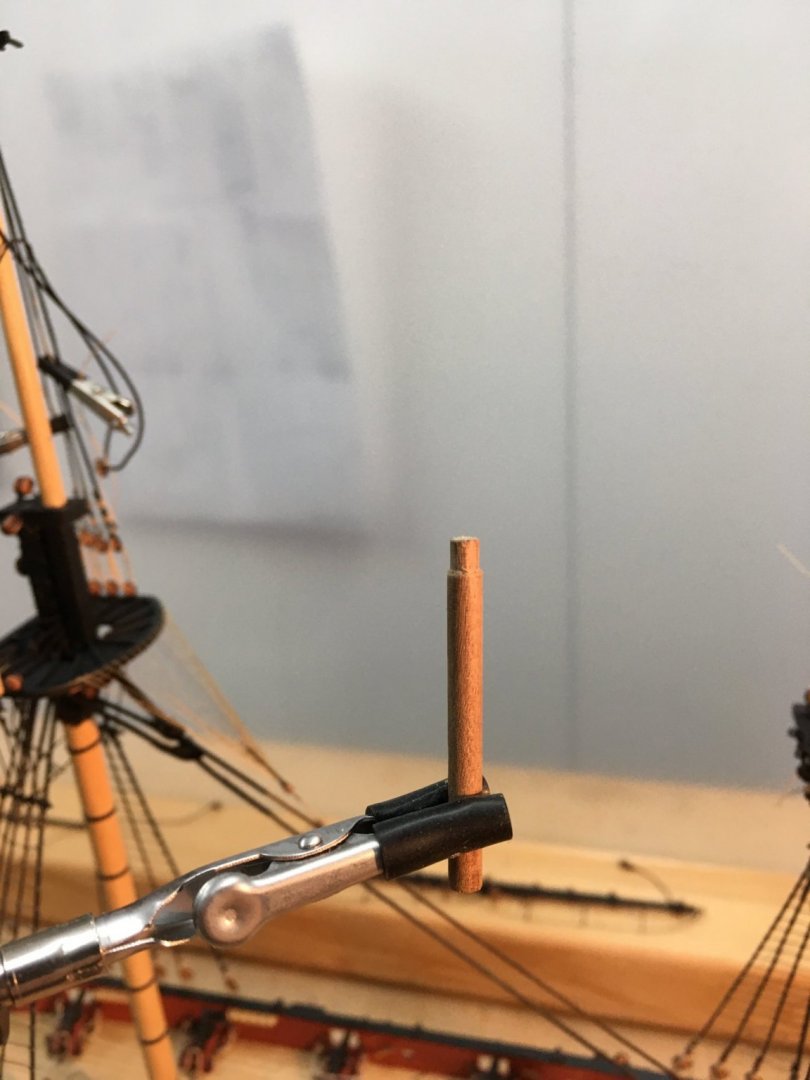
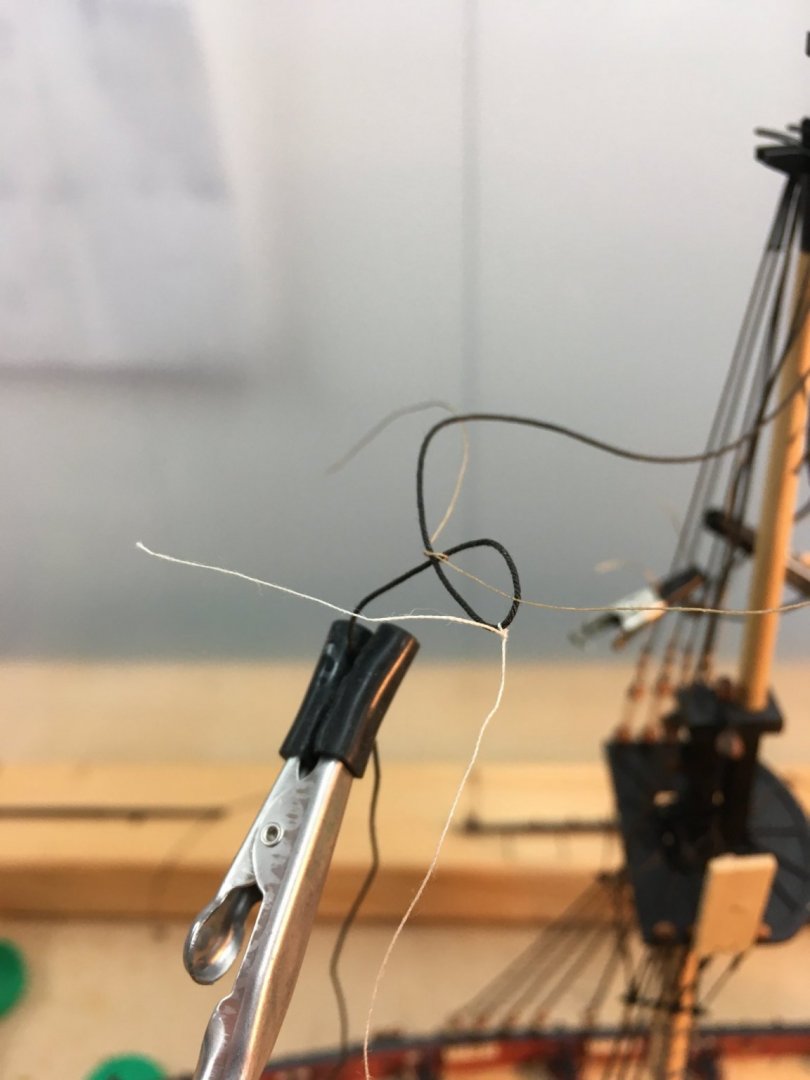
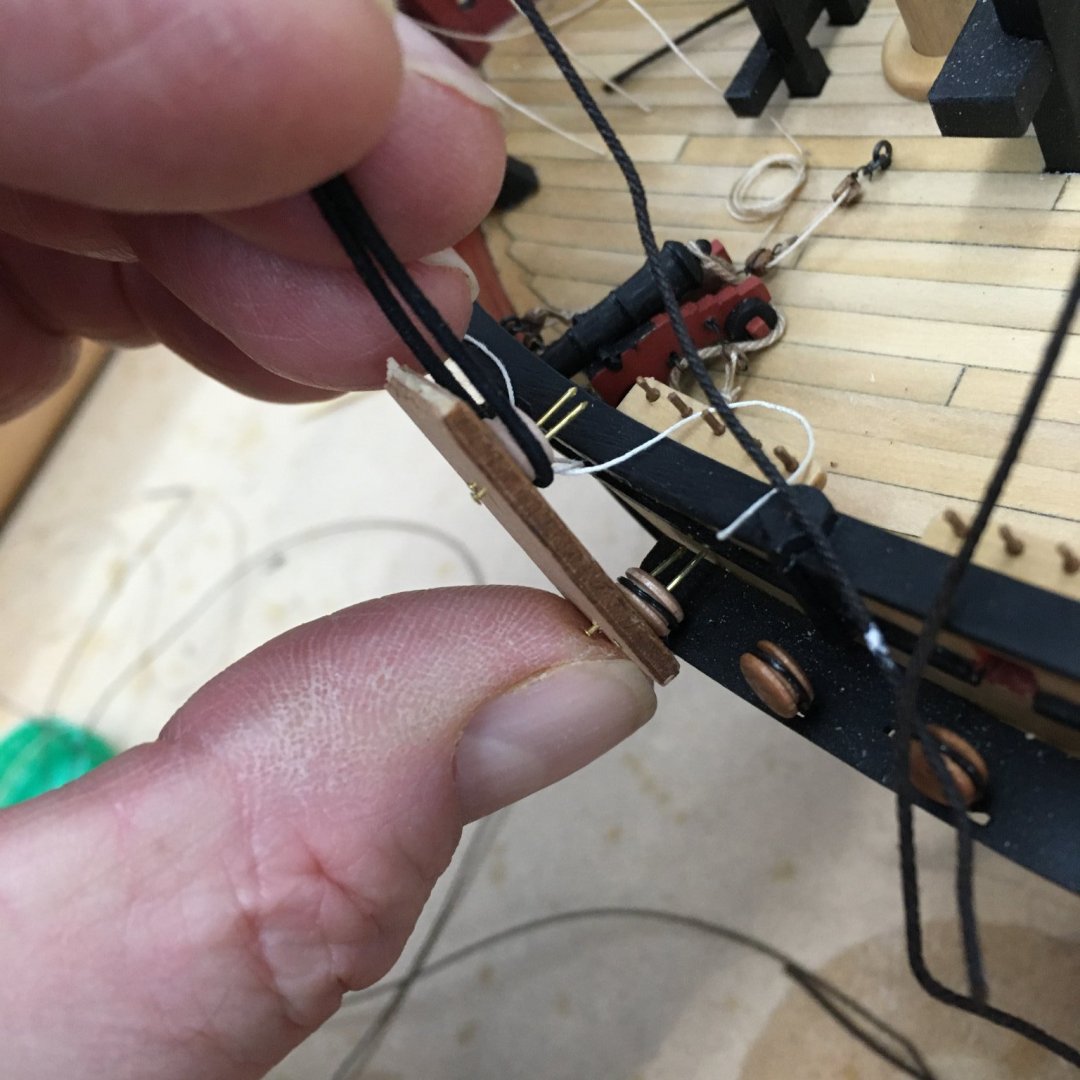
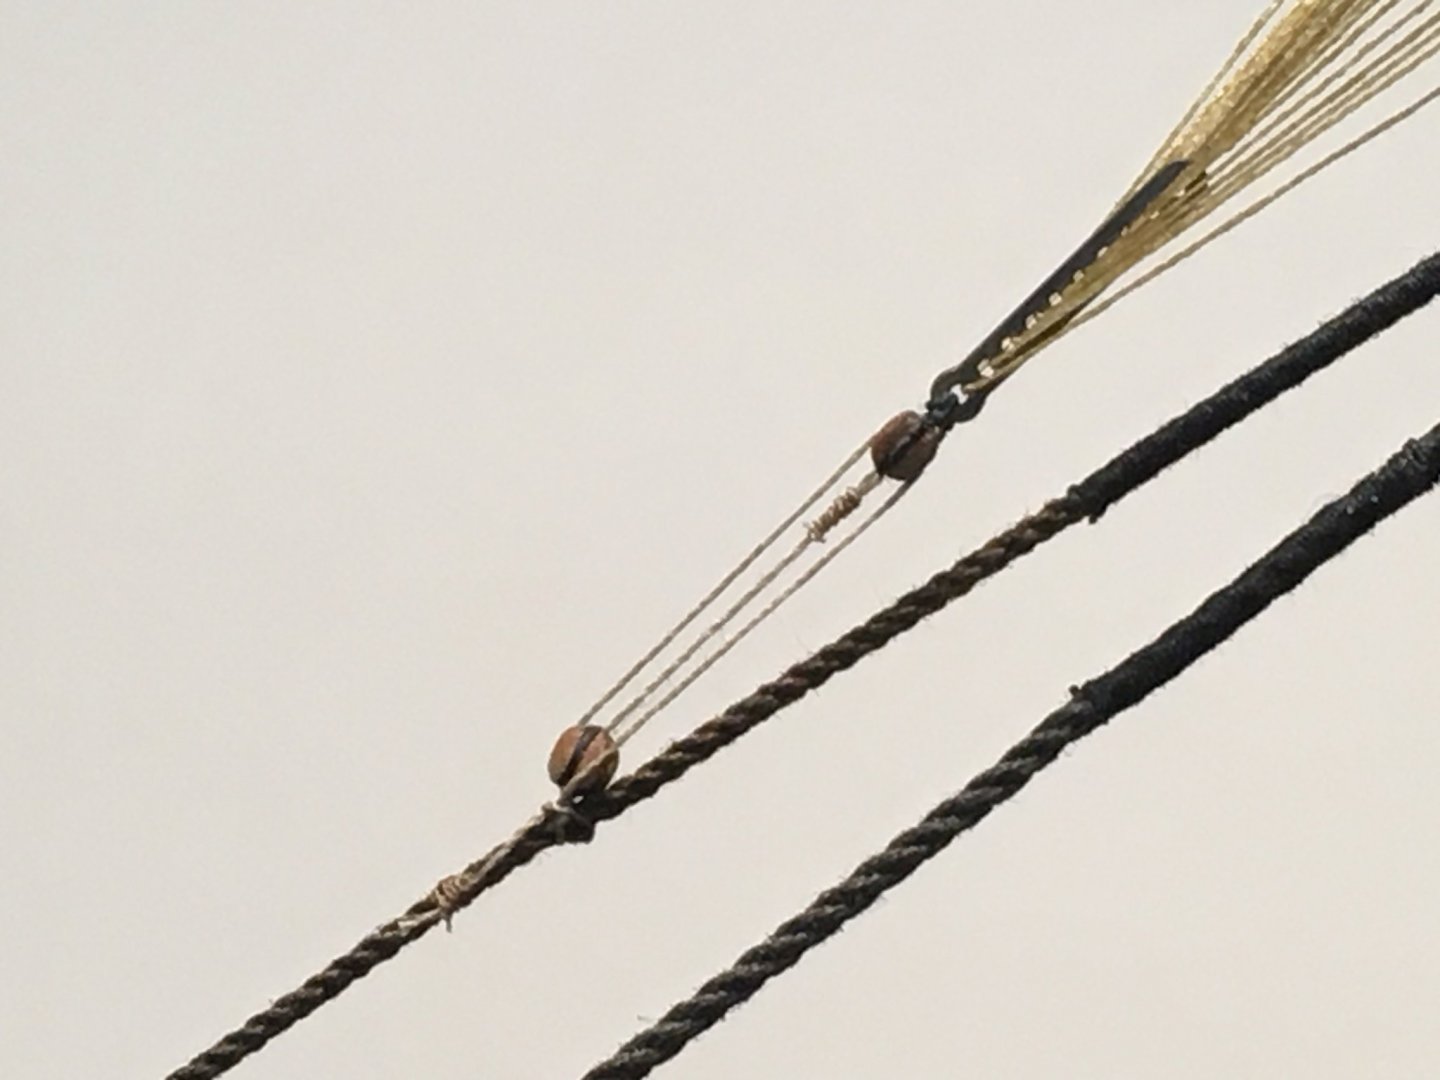
Backstays Speedy has standing and shifting backstays on both fore and main masts. The standing backstays presented an interesting challenge. In full size practice the port and starboard backstays would have been formed from a single length of rope, fitted round the topmast head with a "tongue" - a short length of rope spliced across the bend in the backstay. This is sometimes called a horseshoe splice given it's shape. The challenge would be to replicate this on the model. With the mast caps already fixed in place I couldn't make the tongue splice totally off the model and just slip it over the masthead, but I was keen to give it a go. The kit uses 0.75mm line for the backstays, which I felt was a bit heavy. Instead, I decided to use some 0.6mm stuff I had left over from a previous model. The backstays would have been served to about 2 feet below the crosstrees - 9.5mm at scale - and after measuring on the model this meant I had to serve the middle 44mm of the rope. This was straightforward (see post #486 for details of using the Syren serving machine). Slightly trickier was preparing the tongue. I needed a 6mm piece of served rope for this, not counting the ends which need to be 'spliced' into the backstay. The picture shows the tongue being prepared on the Serv-o-matic. I've left plenty of spare serving thread at each end to serve over the joins. The next picture shows the tongue cut free, with the ends cut at angles to join with the backstay: Next, I applied a small blob of PVA to one cut end and clamped it against the backstay: When the PVA was dry I removed the clamp and used the spare thread to continue serving over the join. To make it easier to wrap and to make it extra secure I brushed some dilute PVA over the serving thread before starting to wind it round, then finished with a half hitch. I didn't think it looked too bad. Call me weird, but I think there's something very satisfying about seeing a stack of served rope growing round a masthead - it just looks better than unserved rope to my eye. The colour is way off in this shot - the masts are not yellow! Of course the really tricky part was completing the second join as that had to be done on the model. However it turned out to be easier than I expected, albeit a bit tight. As before, I glued and clamped the join then completed the serving. The final job was to turn a 3mm deadeye into each end of the backstay and rig lanyards: Apologies for the focus. I'm following my usual practice and leaving final tightening of the lanyards until all stays are in place. Shifting backstays next, which hopefully will be a bit easier.

- 725 replies
-
- 9
-
-
- vanguard models
- speedy
- (and 1 more)
-
Thanks Glenn - this forum is all about learning from each other. Thanks for the kind words Glenn, and thanks for the link to the tube jig. I must confess cutting brass on the Preac has always made me a tad nervous. I've had a look on the web and it looks like similar products are available over here. I'll definitely get one. Derek
- 725 replies
-
- 2
-
-
- vanguard models
- speedy
- (and 1 more)
-
Superb work on the guns Glenn - I get envious every time I see those cannon. As for the rope, why not get a Syren Rope Rocket? It's so easy to use and produces such good results so quickly you'll never look back.
- 778 replies
-
- 3
-
-
- cheerful
- Syren Ship Model Company
- (and 1 more)
-
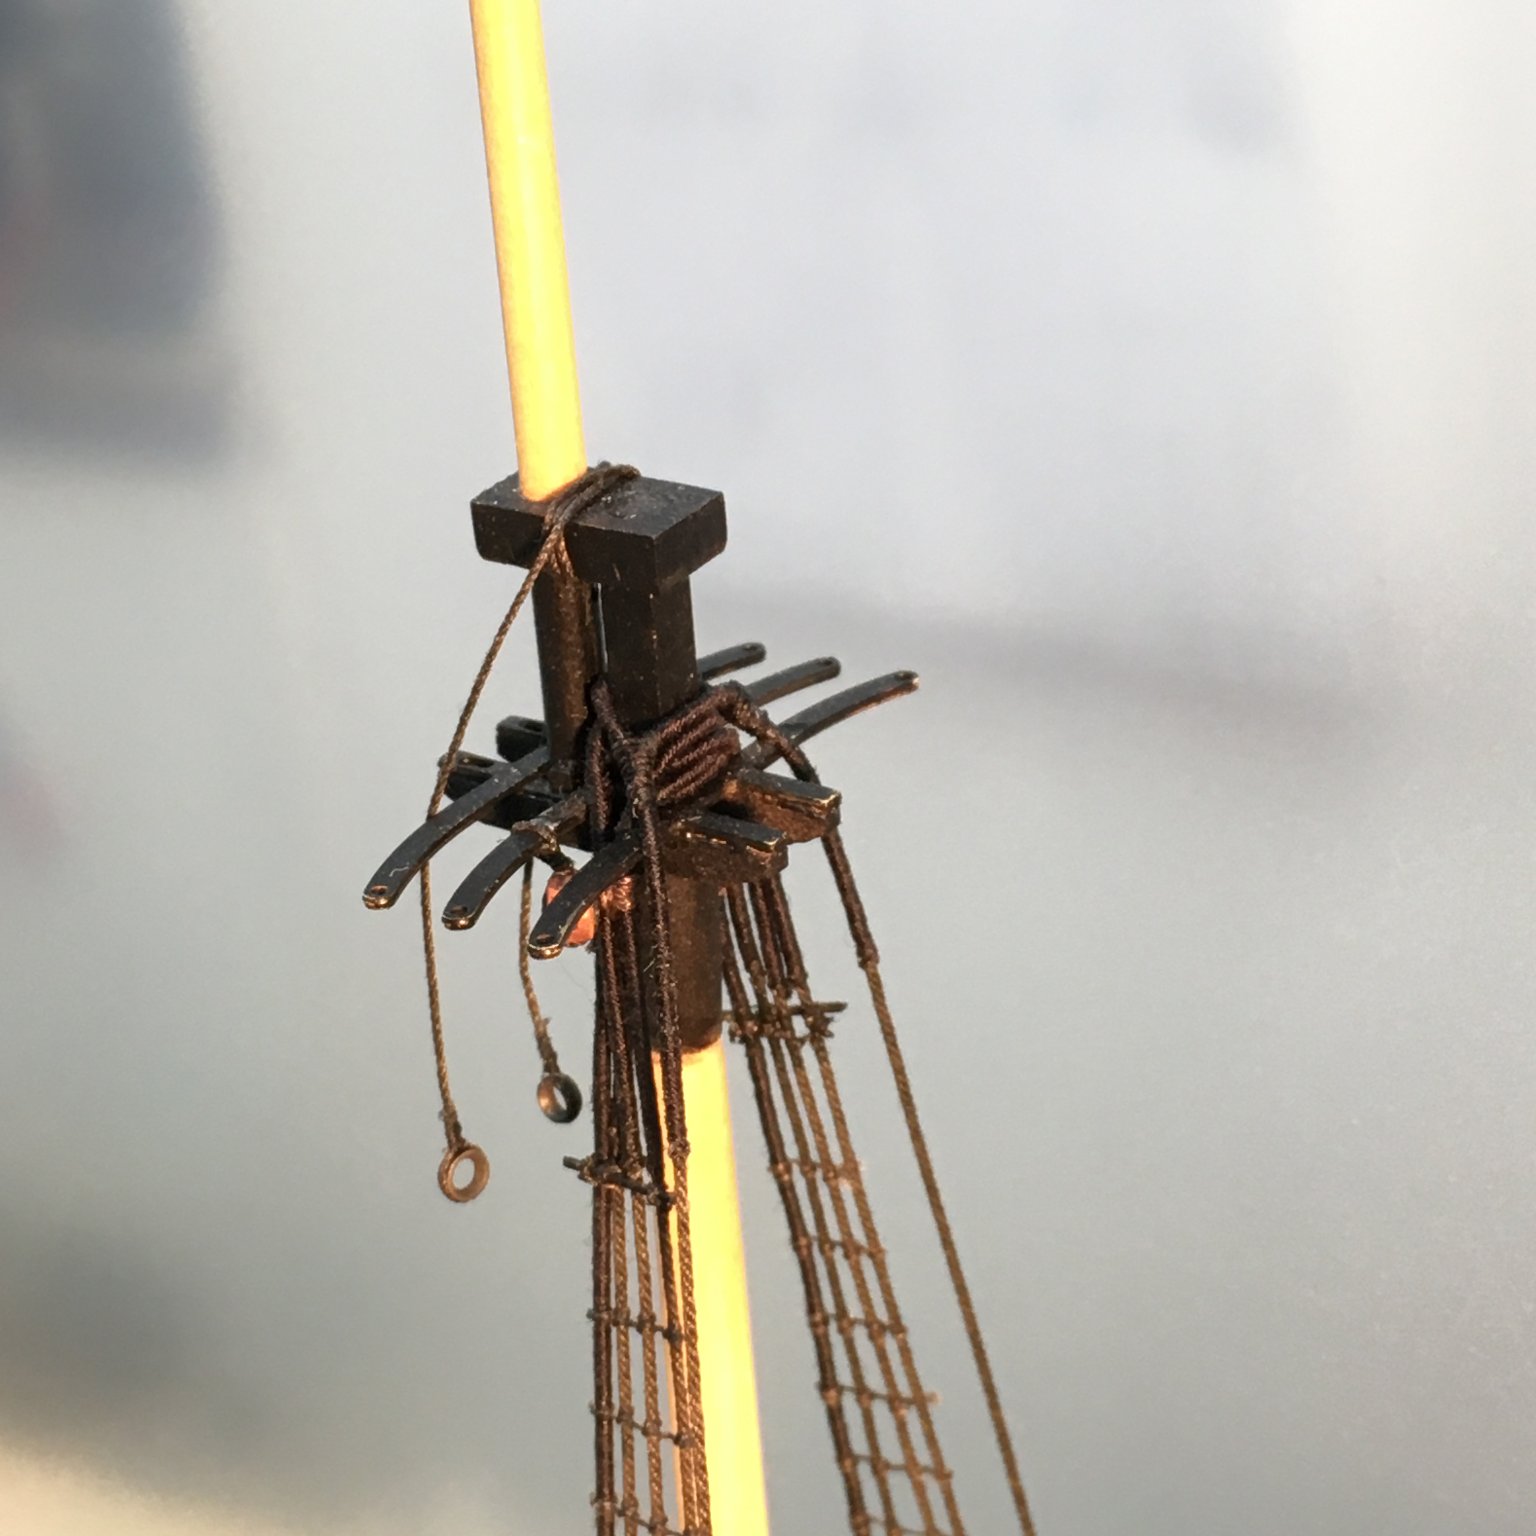
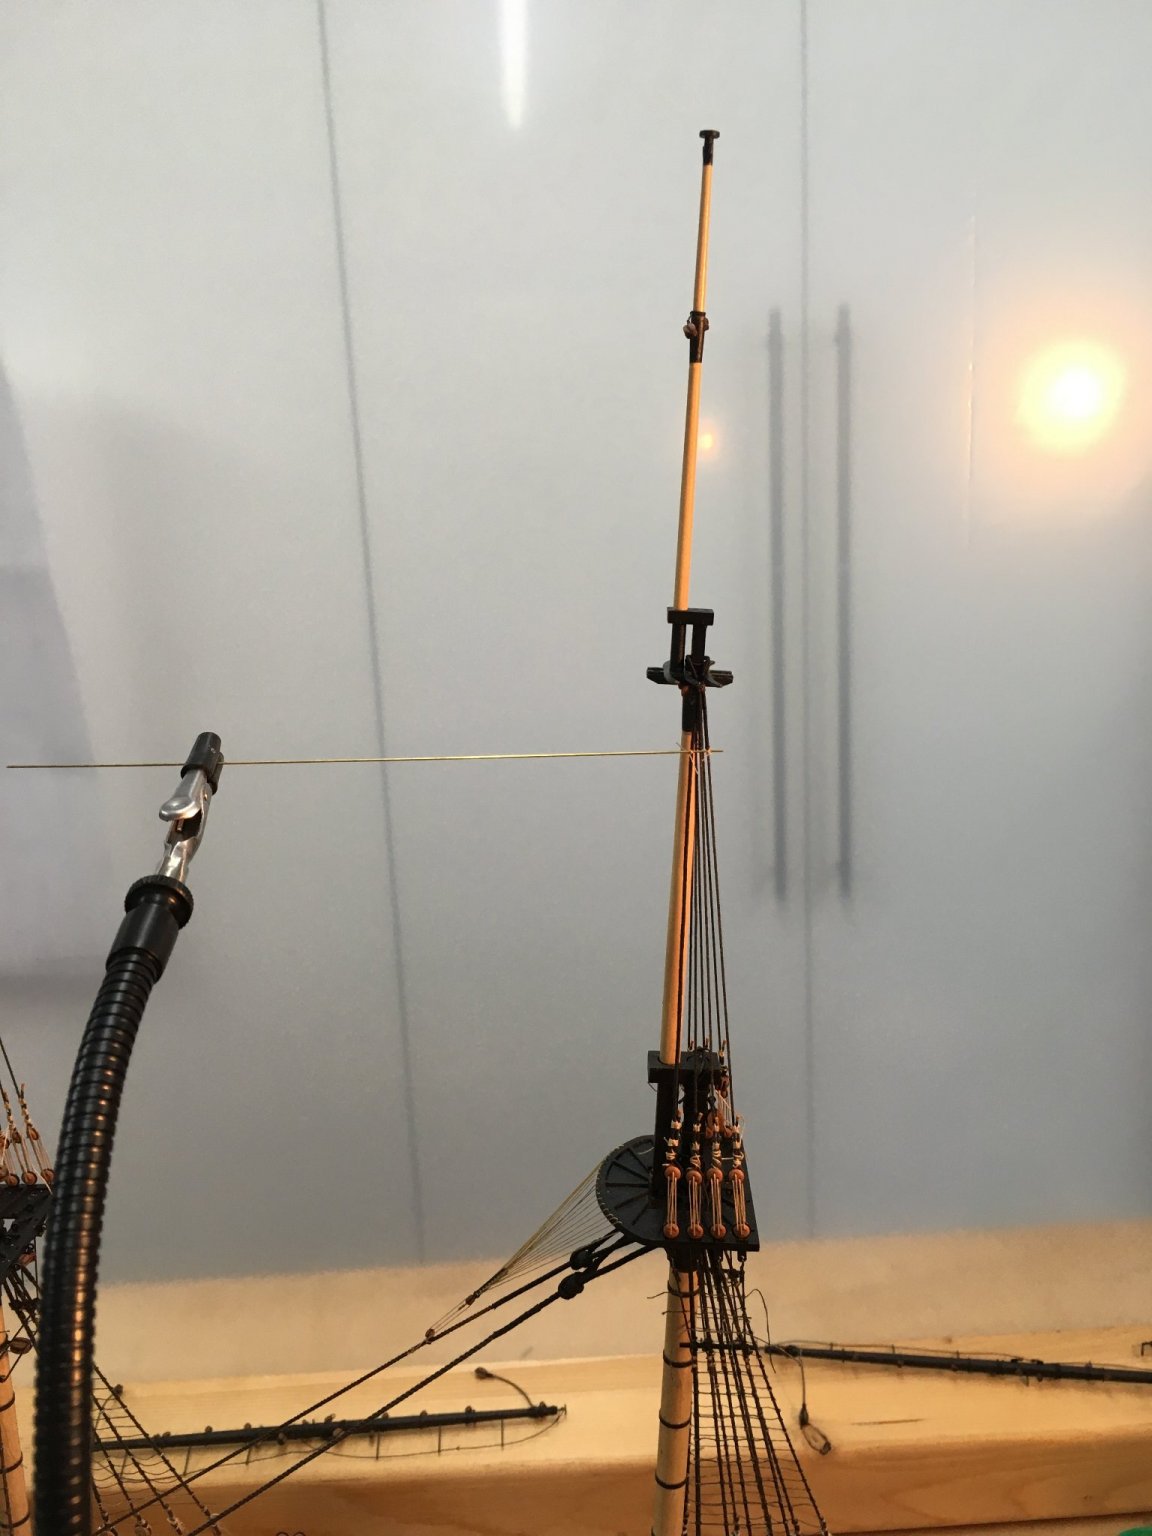
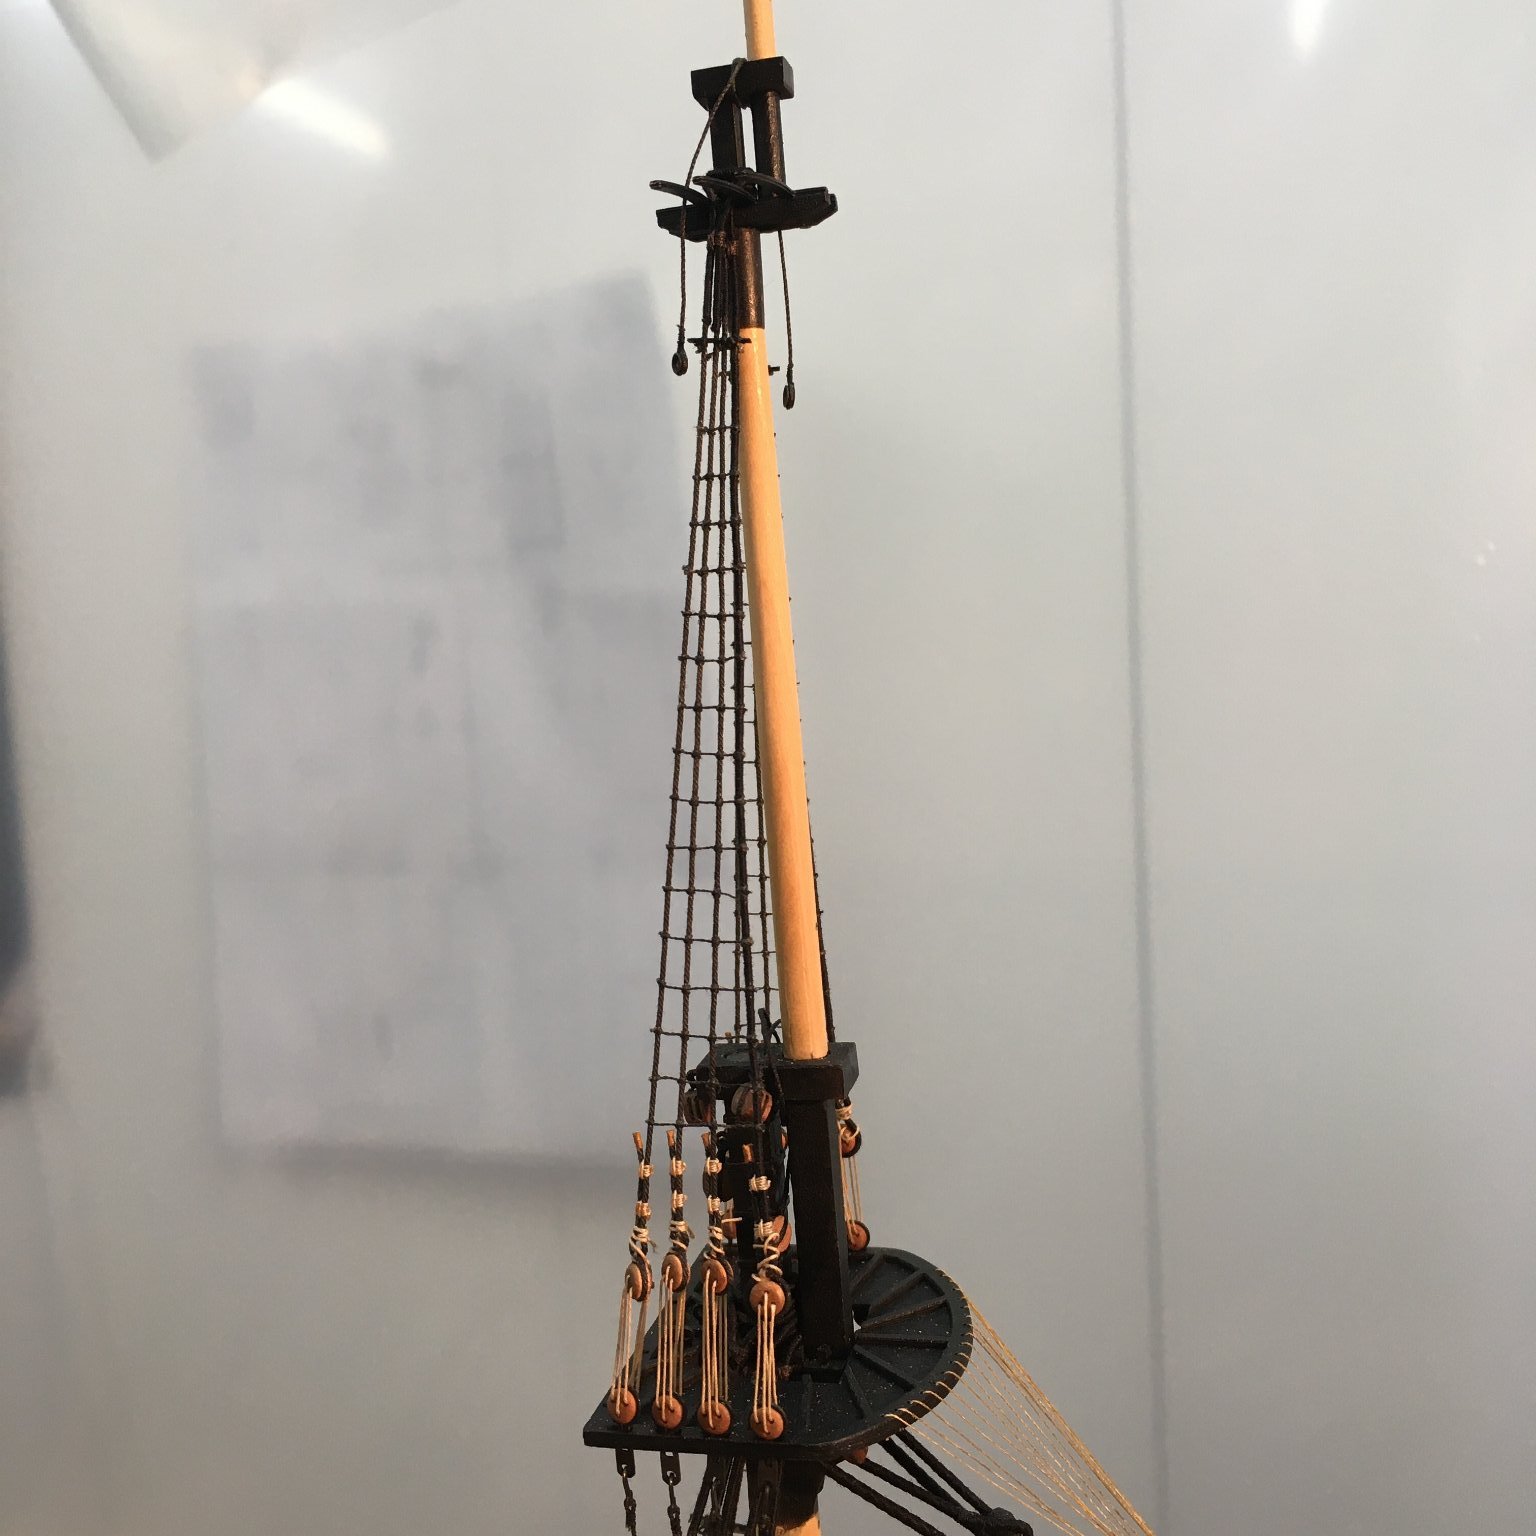
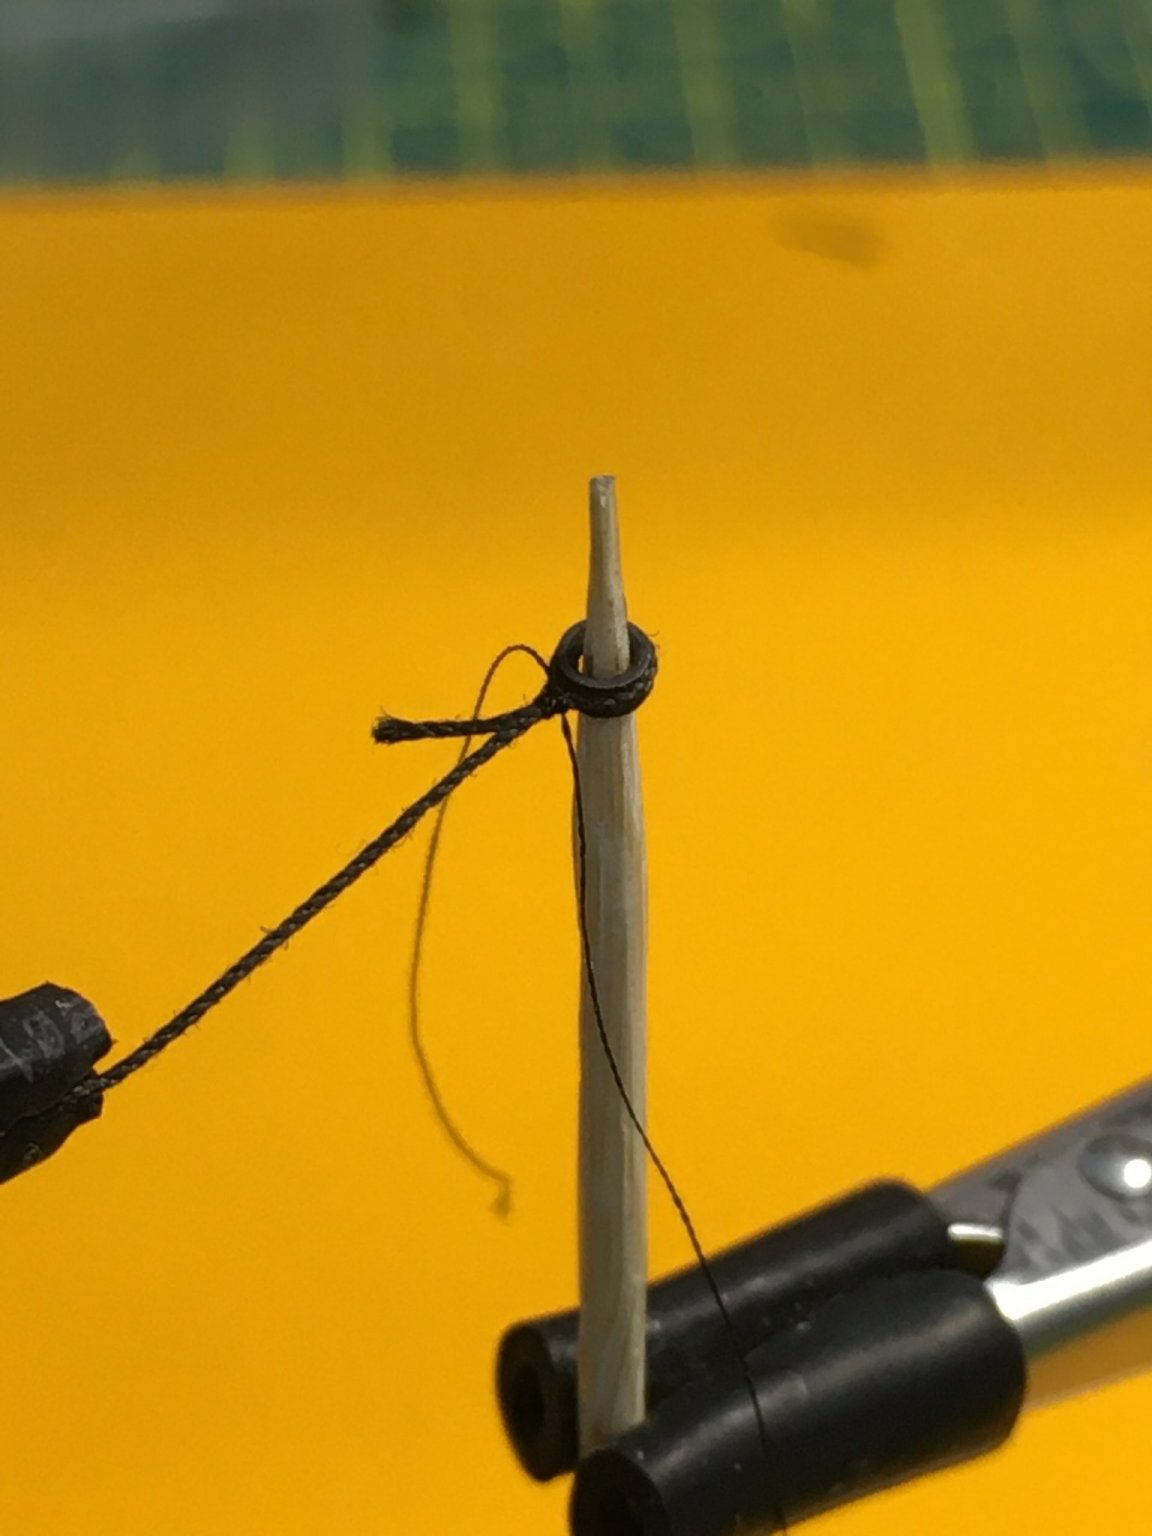
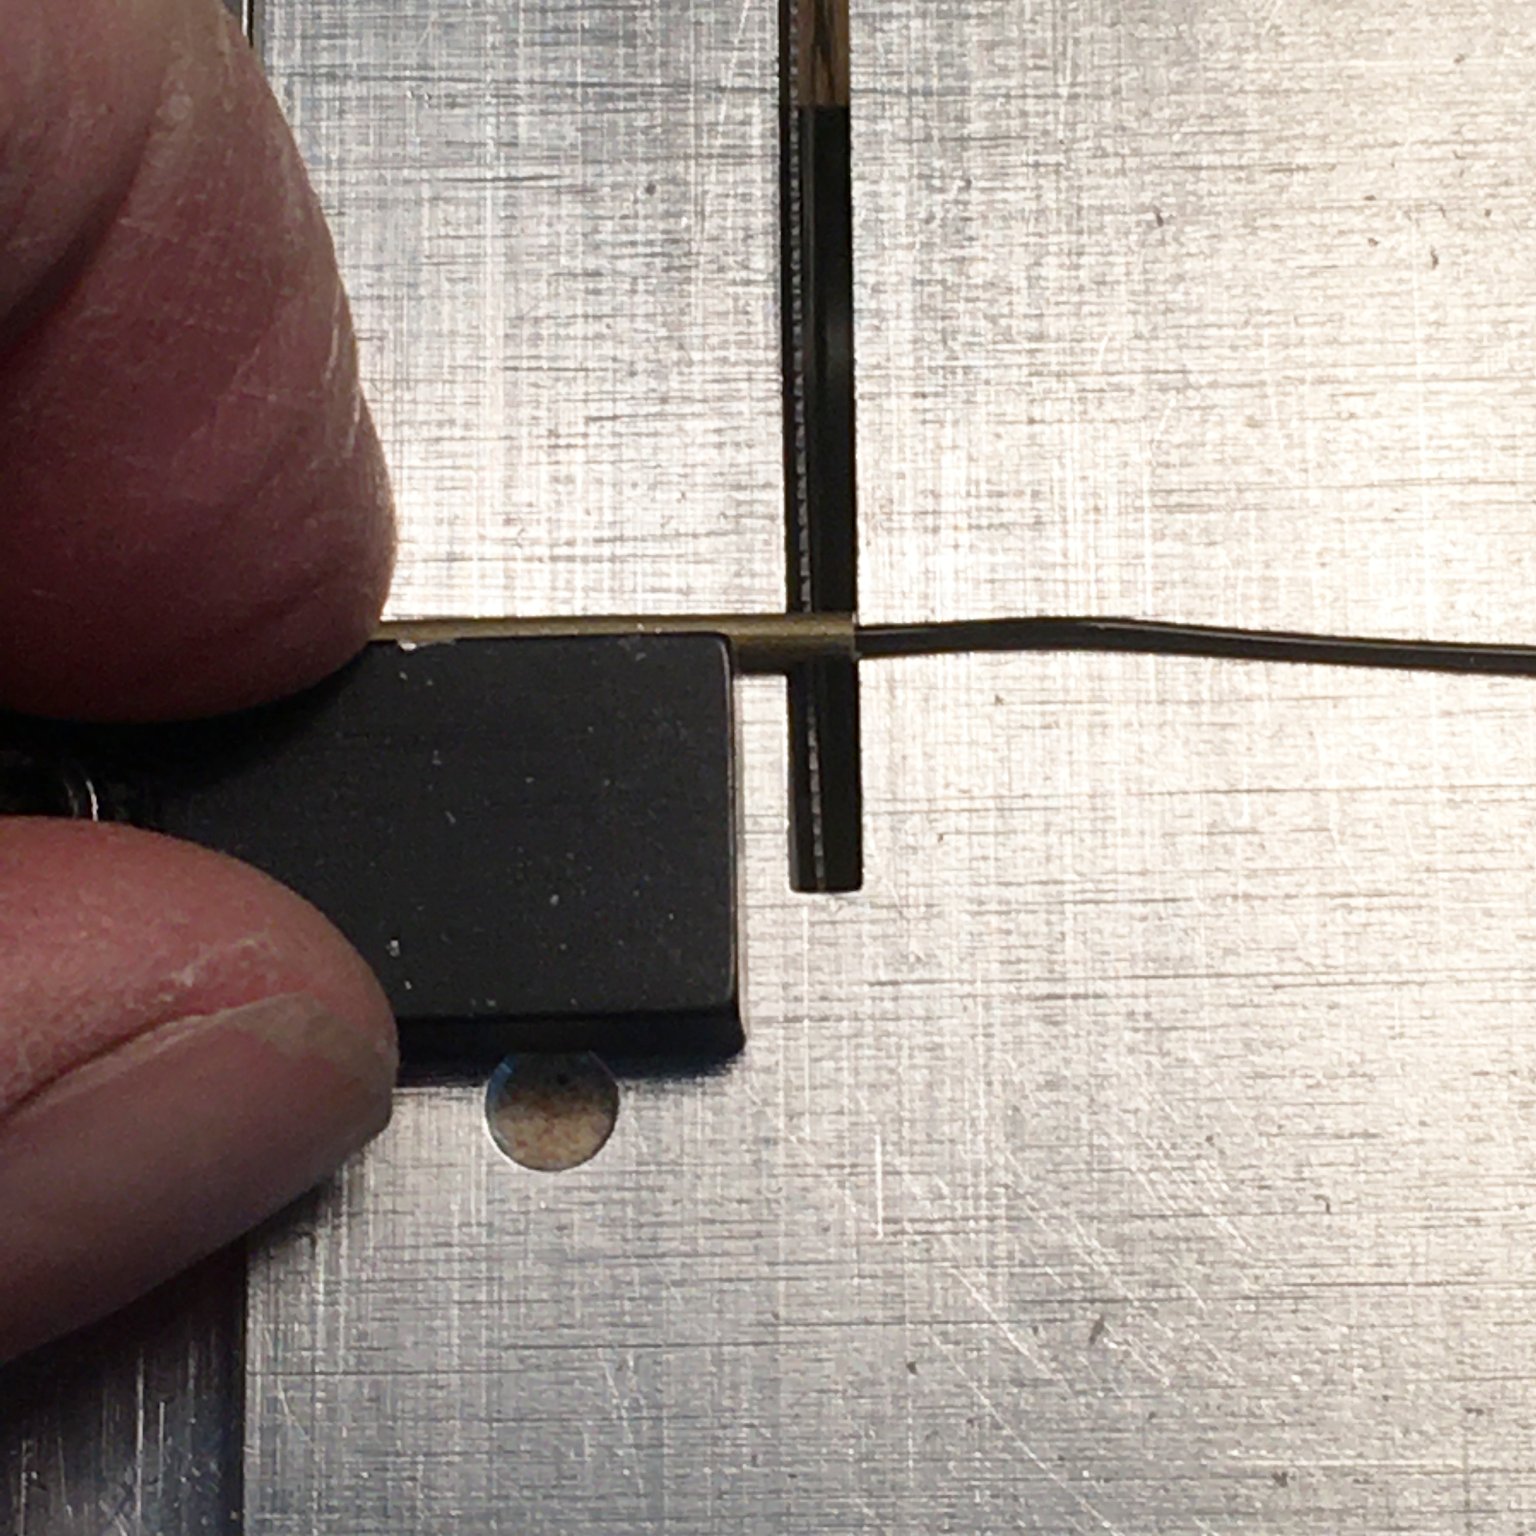
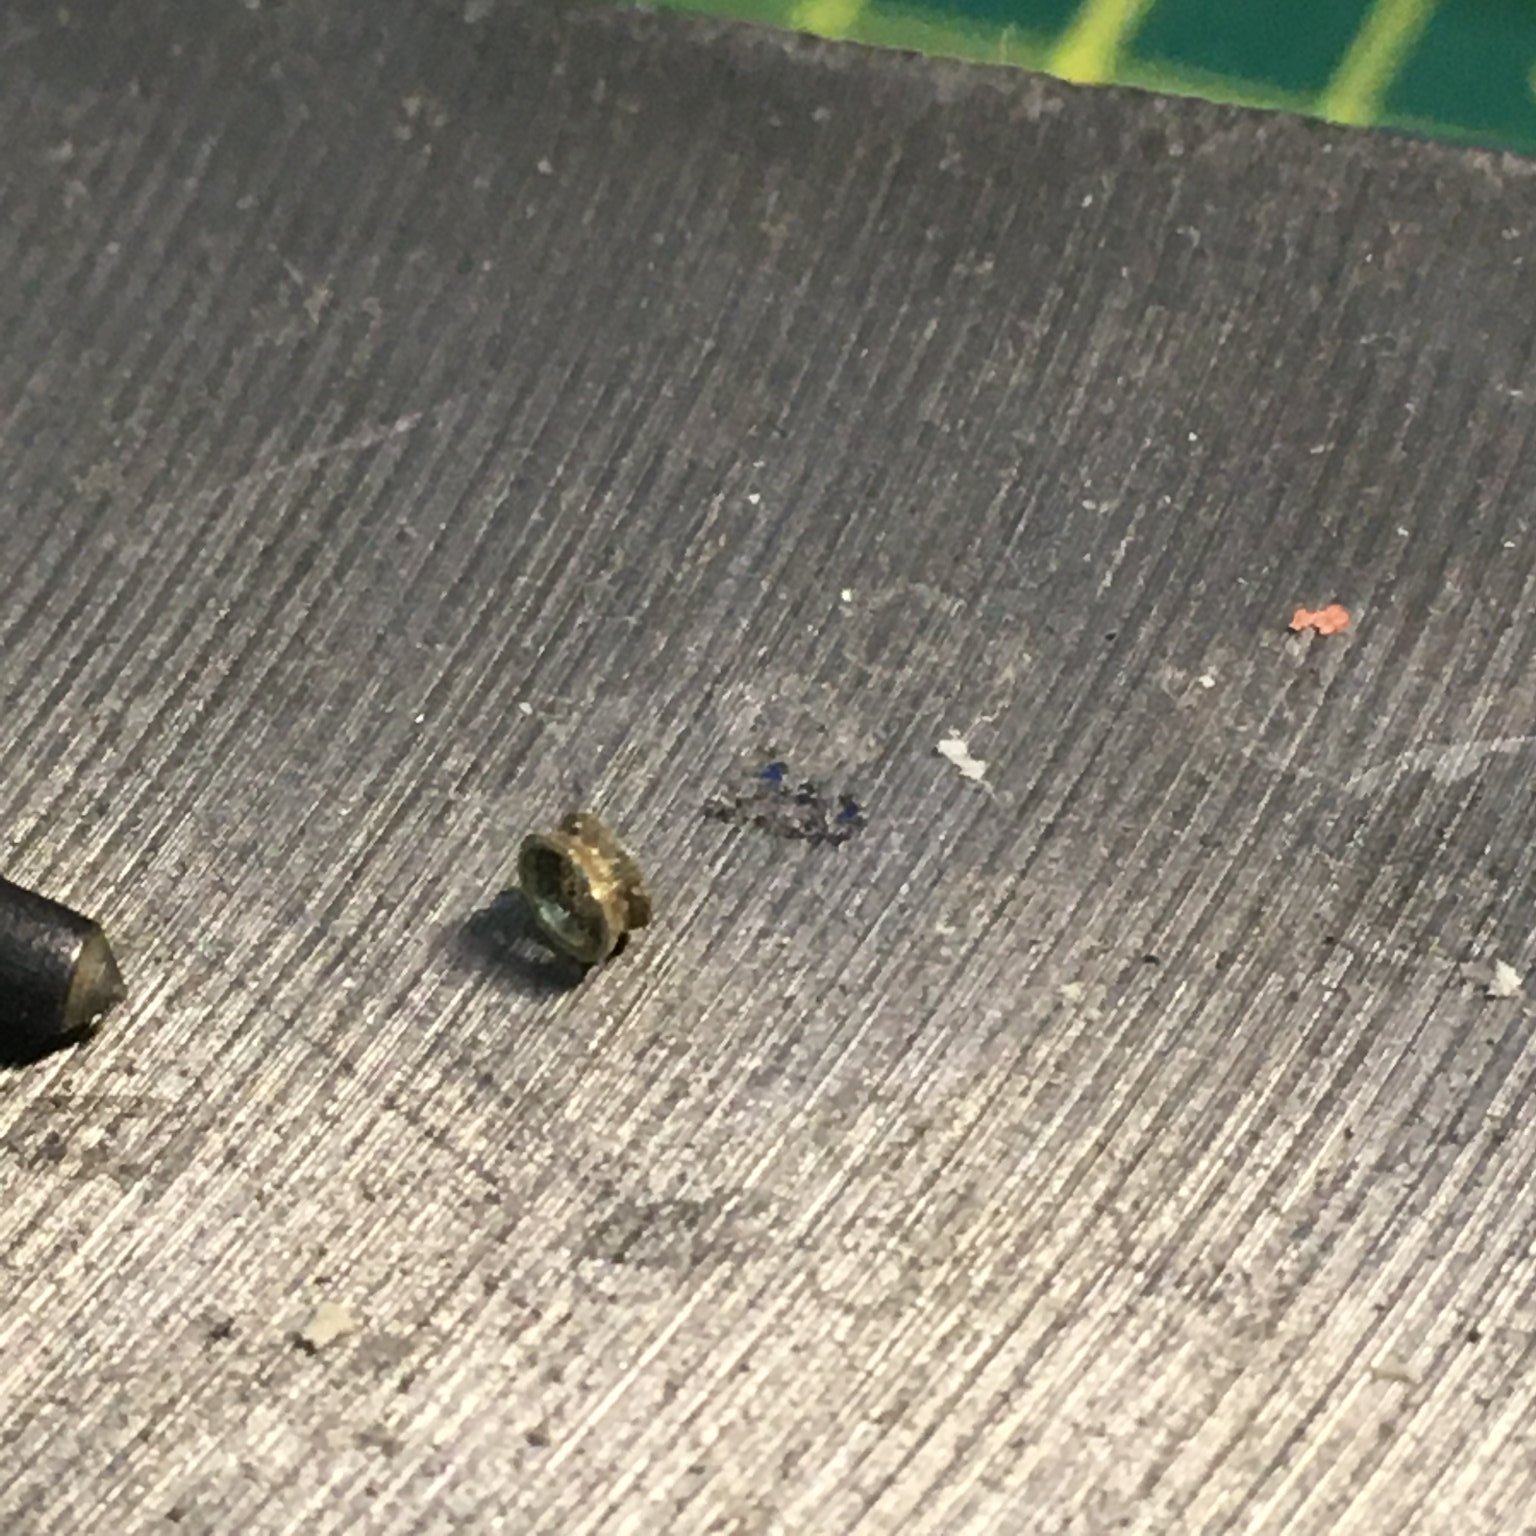
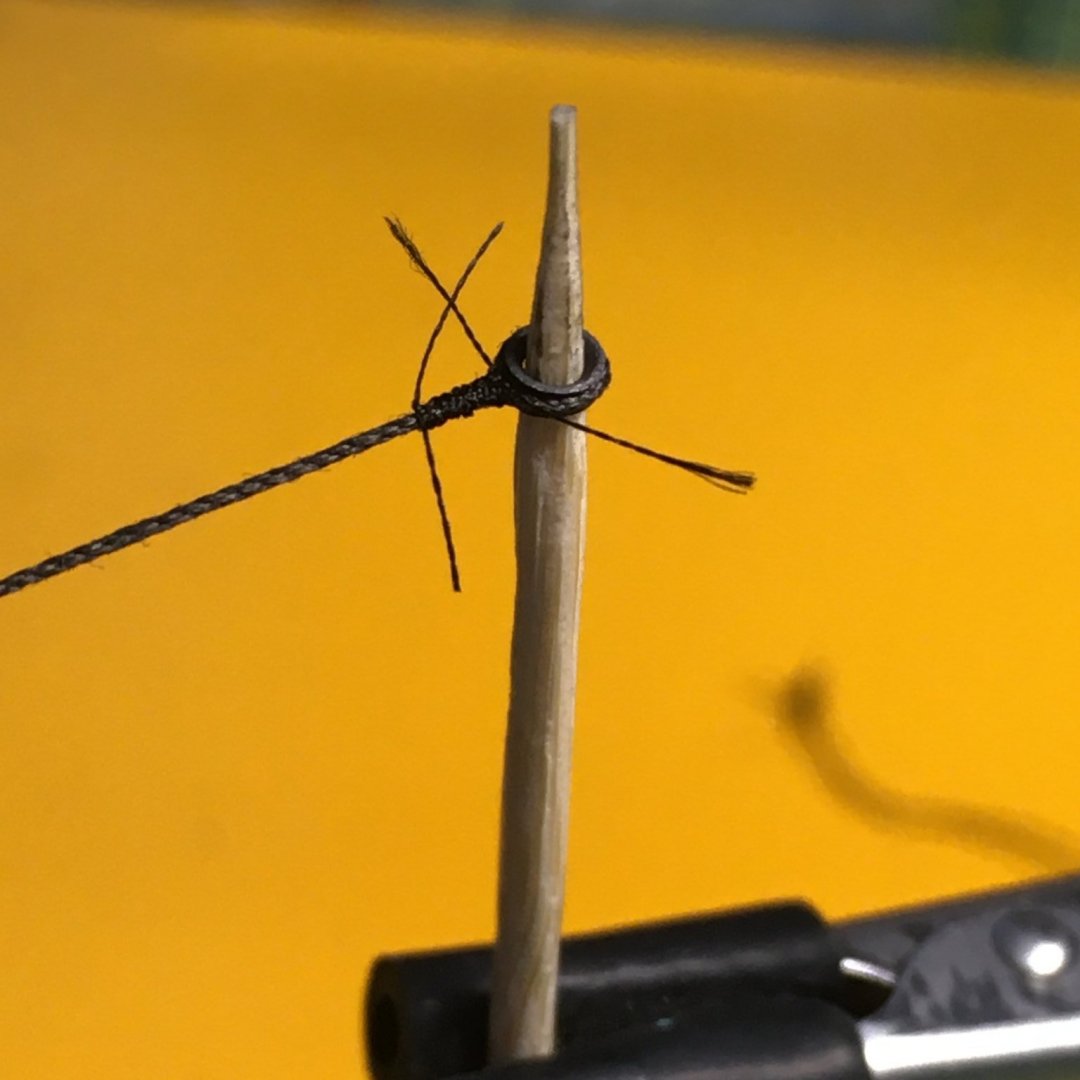
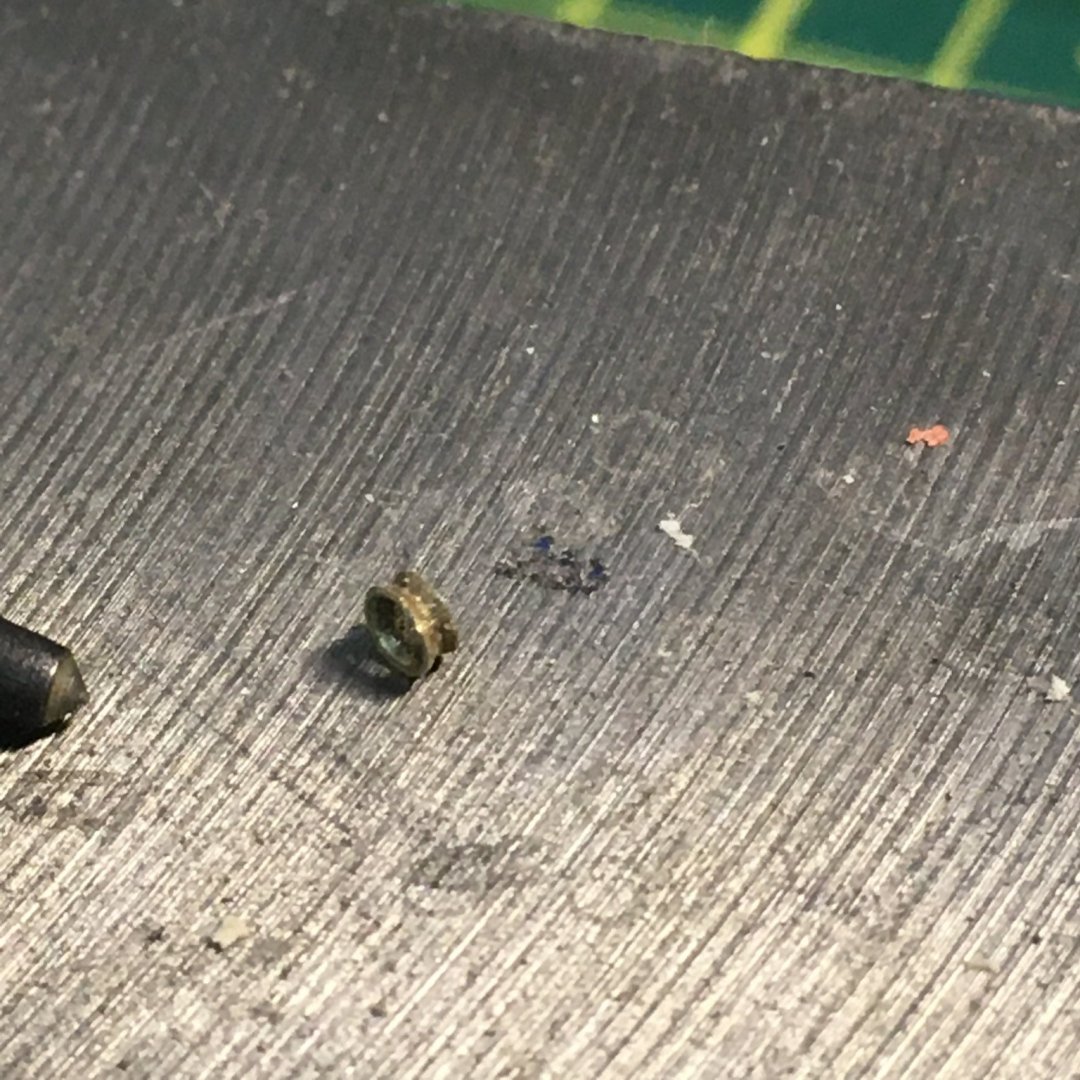
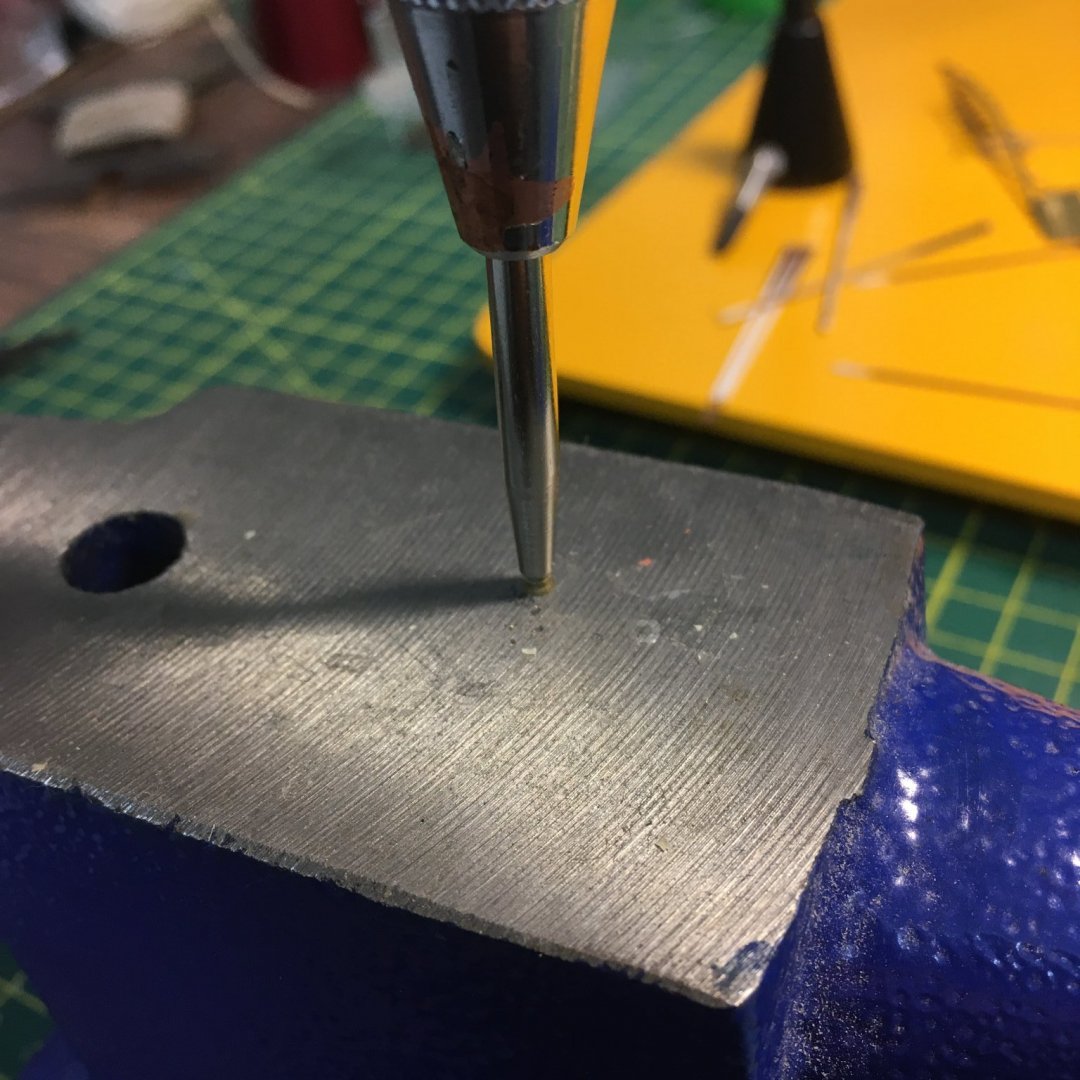
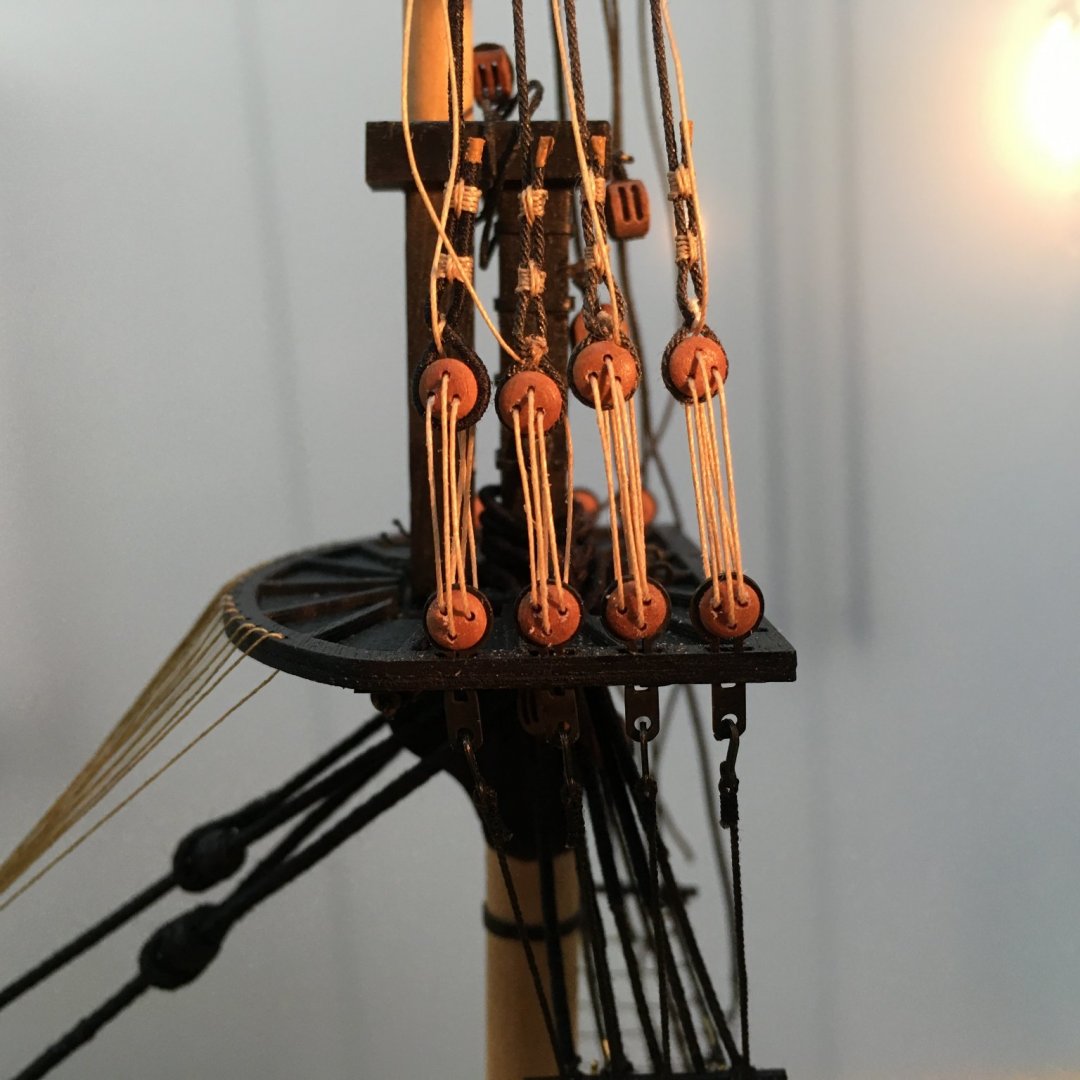
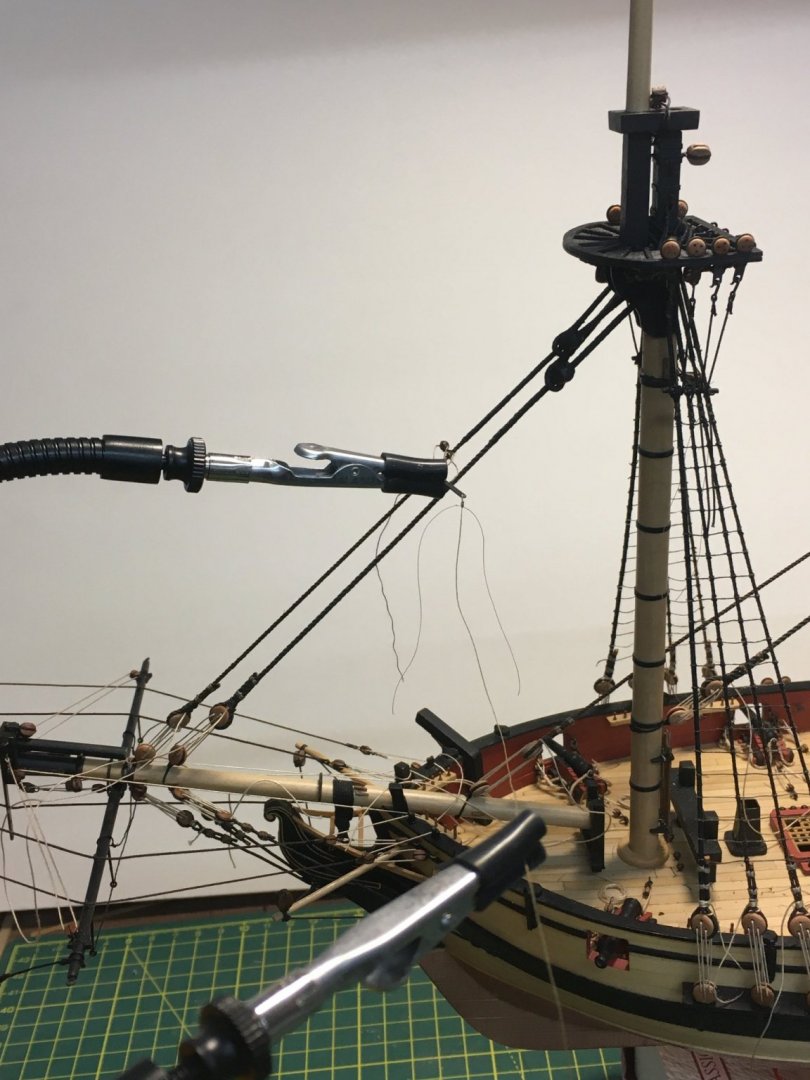
Topmast shrouds - ratlines etc. Topsail yard lifts I've finished adding futtock staves and rattling down the topmast shrouds. Still nowhere near perfect, but slightly better than my attempts on the lower shrouds. For the futtock staves I used the 0.5mm brass rod supplied in the kit. On the lower masts I'd found it difficult to hold the staves in place whilst lashing them to the shrouds, but this time round I copied the method @glennard2523 used in his Duchess of Kingston build, which keeps the quadhands well out of the way: I departed slightly from the kit instructions when it came to the topsail yard lifts. The kit calls for a 3mm single block to be seized between the first and second shrouds on each side of each mast, above the futtock staves. The kit solution is a modified version of full-size practice where a sister block would have been fitted in this location - a very thin long block, with two sheaves placed one above the other. After reeving through the lift block at the yard arm the lift would go down through the lower of the two sheaves in the sister block. Try as I might, I couldn't get a block to fit properly between the shrouds - possibly because I'd served the shrouds making them thicker and less flexible. I tried flattening the sides of a block and deepening the grooves, but it still felt wrong: Fortunately help was at hand in the shape of Lees' Masting & Rigging, which notes that an alternative arrangement was in use prior to 1790 whereby ordinary blocks were lashed to the topmast head on long strops that suspended them just below the crosstrees. The next question was how to rig the standing parts of the topsail yard lifts. I may have missed it, but I couldn't find a clear picture of this in the instructions and plans. However I believe one common method at the time was to use a span clove hitched around the topmast head. The span was a length of tarred rope with a thimble eye spliced into each end; the lifts were then seized to the thimbles. To make each span I used 140mm of 0.5mm line - seems a lot but you need to allow for the clove hitch and splicing round the thimbles. For the latter I used brass tube - 1.6mm O.D./0.8mm I.D. - cut into 1.5mm lengths on the Preac saw using the finest blade. To support the tube and prevent the cut piece flying off I inserted a length of 0.8mm wire into the tube: The next step was to use a spring-loaded punch to squash the tube into a thimble shape: I've tried using an ordinary punch with light hammer blows, but found it difficult to get consistent results. Luckily, the spring-loaded punch seems to deliver just the right amount of force needed to produce a good shape. After blackening with brass black I seized the thimbles in the ends of the spans with simulated splices. To get the line to sit snuggly round the thimble I used two seizings with fly-tying thread - the first worked towards the thimble (note: yet another use for a cocktail stick!)... ...and the second away: I trimmed the spare end of line at an angle before I seized over it in order to make the result as much like a splice as possible. Fortunately, the thimbles were thin enough to fit between the topmast head and the heel of the topgallant mast, which meant I could prepare them off the model then clove hitch them round the mast cap. They can be seen in the first photo in this entry. Next, it's on to the various topmast stays and backstays.


- 725 replies
-
- 11
-
-
- vanguard models
- speedy
- (and 1 more)
-
Excellent work Glenn. The mast cap in particular caught my eye - looks like you had fun with the mill making those concentric circles. And the mast and bowsprit look superb. As for your finger plane - what a little gem! Tool envy? Me? 😬
- 778 replies
-
- 1
-
-
- cheerful
- Syren Ship Model Company
- (and 1 more)
-
Thanks Phil. I can highly recommend the quadhands. They come in a variety of formats - different numbers of arms and different bases - so I'm sure you'll find one to suit. I got mine from Amazon.
- 725 replies
-
- 1
-
-
- vanguard models
- speedy
- (and 1 more)
-
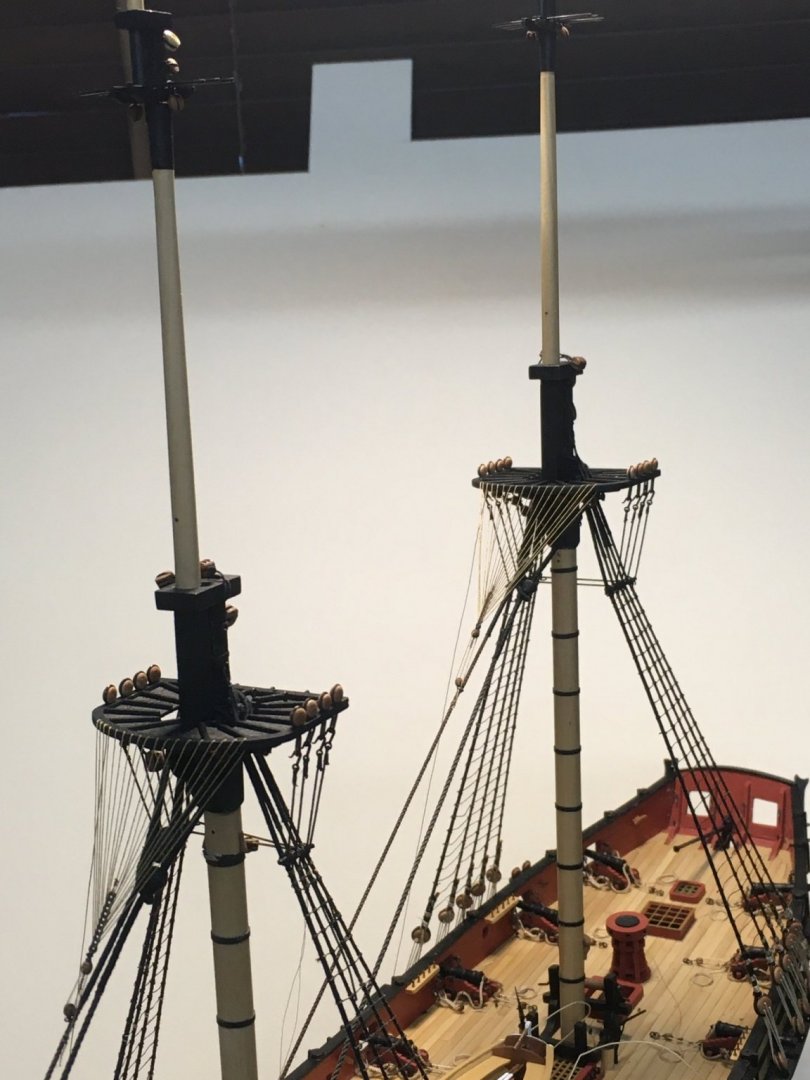
Topmast shrouds Thanks for all the likes and kind comments. It's been some time since my last update, with jobs around the house and garden eating into shipyard time. It seems to have taken ages to rig the topmast shrouds, and I haven't got round to futtock staves, ratlines etc yet. Still, I've enjoyed trying to improve my techniques, and I think I've finally got (slightly) better at getting the deadeyes reasonably level. I started by departing slightly from the kit instructions by using 0.5mm line for the shrouds rather than 0.75mm. I felt the latter looked slightly too heavy. When I checked the tables in Lees' Masting & Rigging for a 6th rate of Speedy's size and date (a reasonable equivalent, I think) the main topmast shrouds were given as 3.4 inches in circumference which equates to a shade under 0.5mm diameter at scale. I started by serving the shrouds in exactly the same way as the lower shrouds - the centre portion of each shroud pair down to roughly level with the hounds, and the whole length of the first shroud on each side. The next job was to seize each shroud pair round the topmast heads. I did this in the dust cabinet I made and there wasn't room for the quadhands base, but as the individual arms are magnetic it was easy to put them on a smaller metal plate: To rig the deadeyes I used the usual pins-in-a-plank method, and as with the lower shrouds I tied white thread to the shroud to mark the lowest point. Here's a photo from earlier in the log as it's easier to see what's going on with the larger deadeyes: With the lower shrouds I used a drill bit to form the loop. Working higher and with smaller deadeyes the drill bit method proved too fiddly, so I used a length of dowel instead (a slight variation on @glennard2523's method). I turned the end of the dowel down to 3.4mm - about 0.2mm less than the diameter of a deadeye - so the resulting loop would sit snuggly in the deadeye groove: Before using the dowel, I tied a length of 0.10mm seizing line round the shroud end to form a loose loop: Next, I wrapped the shroud tightly round the dowel, ensuring the seizing was directly opposite the white line marking the lower end of the loop: The seizing tied off with a reef knot and trimmed, the deadeye was a tight squeeze into the loop, but the result was neat: From there on everything was a repeat of the lower shrouds - two modified round seizings, raw sienna acrylic to represent the leather cap, and 0.25mm line for the lanyards (details here). I pulled the lanyard line through a beeswax block to make it run easier and to lay the 'fuzz'. Here's one set of shrouds before and after final tightening and trimming of the lanyards: Two things I did differently this time. First, looking at examples of shrouds on real ships such as Victory it's clear that lanyards were not wrapped round as neatly as I'd tried to do on the lower shrouds. Hopefully the topmast lanyards are more realistic. On the lower shrouds I didn't glue deadeyes in position, preferring to leave them loose in case I needed to revolve any of them slightly in order to make the lanyards look right. This worked OK(ish) for the bigger deadeyes, but I soon found the topmast versions were too small and fiddly and I spent forever trying to rotate them back to the correct orientation. I quickly reached for the glue! Next, on to the ratlines etc. Derek


- 725 replies
-
- 9
-
-
- vanguard models
- speedy
- (and 1 more)
-
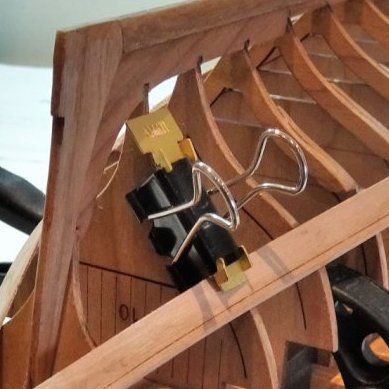
Great work as always B.E. - I'm sorely tempted to add this kit to the list! As an aside, can I ask you about the clips you're using, with apologies if you've covered this elsewhere? I use similar clips, but yours look more effective and adaptable, and I wondered where you got them. Here's yours compared with mine - the latter made by cannibalising spare clips to use the wire handles to apply downward pressure:

- 185 replies
-
- 2
-
-
- queen anne barge
- Syren Ship Model Company
- (and 1 more)
-
I was also concerned by 'waves' in the gun port pattern, but as Richard and SpyGlass said it turned out fine - see here.
-
Proxxon DB-250 lathe extension bed
DelF replied to glbarlow's topic in Modeling tools and Workshop Equipment
I use a thin strip of fine grit sandpaper wrapped around the spar a couple times. I find the chuck then grips without damaging the wood. If I wrap it good and tight the spar usually spins reasonably true, and as I'm not using cutting tools it doesn't need to be 100% perfect. -
Proxxon DB-250 lathe extension bed
DelF replied to glbarlow's topic in Modeling tools and Workshop Equipment
Just wondering why you need the extension? You can handle long spars through the hole in the headstock. For convenience, I've fitted the 3-jaw chuck to replace the collets the lathe comes with which makes it easy to hold the part of the spar you want to work on close to the chuck (with thick paper or card wrapped round the spar to protect it from the jaws). If you're concerned about the tailstock, I rarely bother with mine, preferring to hold the spar with my fingers holding the sandpaper. I would never suggest that on a full-size or metal working lathe, but it is perfectly safe on the DB 250 so long as you keep fingers well away from the chuck. No different to using a power drill to shape spars, as many people do. If you've not got it, the chuck is Proxxon part 27 026: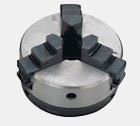
-
Oh no! Another build I'm going to have to add to the to do list. I was very tempted to go for it when I read Meddo's log and seeing you build the barge will probably push me over the edge 🤪. Too many models, not enough time!
-
More great work, and great to see you getting so much good use out of the mill.
- 778 replies
-
- 2
-
-
- cheerful
- Syren Ship Model Company
- (and 1 more)
-
I really must get hold of some of that weathering powder - your barrels are the most realistic I've seen. Derek
- 778 replies
-
- 2
-
-
- cheerful
- Syren Ship Model Company
- (and 1 more)
-
Well done for persevering Glenn. I particularly like the realistic way you've wrapped the excess lanyard round the shrouds. One tip you might want to consider. When I've finished seizing a deadeye into a shroud and I want to trim the excess shroud, I put a small drop of very thin CA onto the shroud at the point I want to cut it and let it harden before I do so to ensure the end doesn't fray. Then, a dab of brown or burnt sienna simulates the leather cap used to protect the open end of the shroud.
- 382 replies
-
- 2
-

-
-
- Vanguard Models
- Duchess of Kingston
- (and 1 more)
-
I can only echo what these guys have said - outstanding work!
- 778 replies
-
- 1
-
-
- cheerful
- Syren Ship Model Company
- (and 1 more)
-
Ouch, I feel your pain!🥺 Another reason why it's not a good idea to make up the whole mast in one go. I did the same with Speedy, and am now finding it awkward to rig the shrouds.
-
Excellent work. I wish I'd followed your lead in rigging the lower masts first on my Speedy build. I followed the kit instructions and completed each mast assembly before rigging, then cursed having to seize the shrouds and stays round the mastheads in situ. I'm currently repeating the curses as I struggle with the topmast shrouds. However I must say you're brave fitting the railings on the tops at this stage. If I did that I'd be sure to break them before I'd finished rigging! Derek
-
Good solution Glenn - I'll try that dowel jig next time.
-
Thanks Sailor. The crowsfeet protected the stays from being rubbed and damaged by the lower edges of the topsails, and prevented the lower edges of the sails from getting caught up in the rims of the tops. The euphroe is just a specialised block to get the correct tension on the crowsfoot line. Somewhere earlier in the log is a discussion about the origin of the word - basically it stems from the Dutch for 'young woman'. The mind boggles
- 725 replies
-
- 1
-
-
- vanguard models
- speedy
- (and 1 more)
-
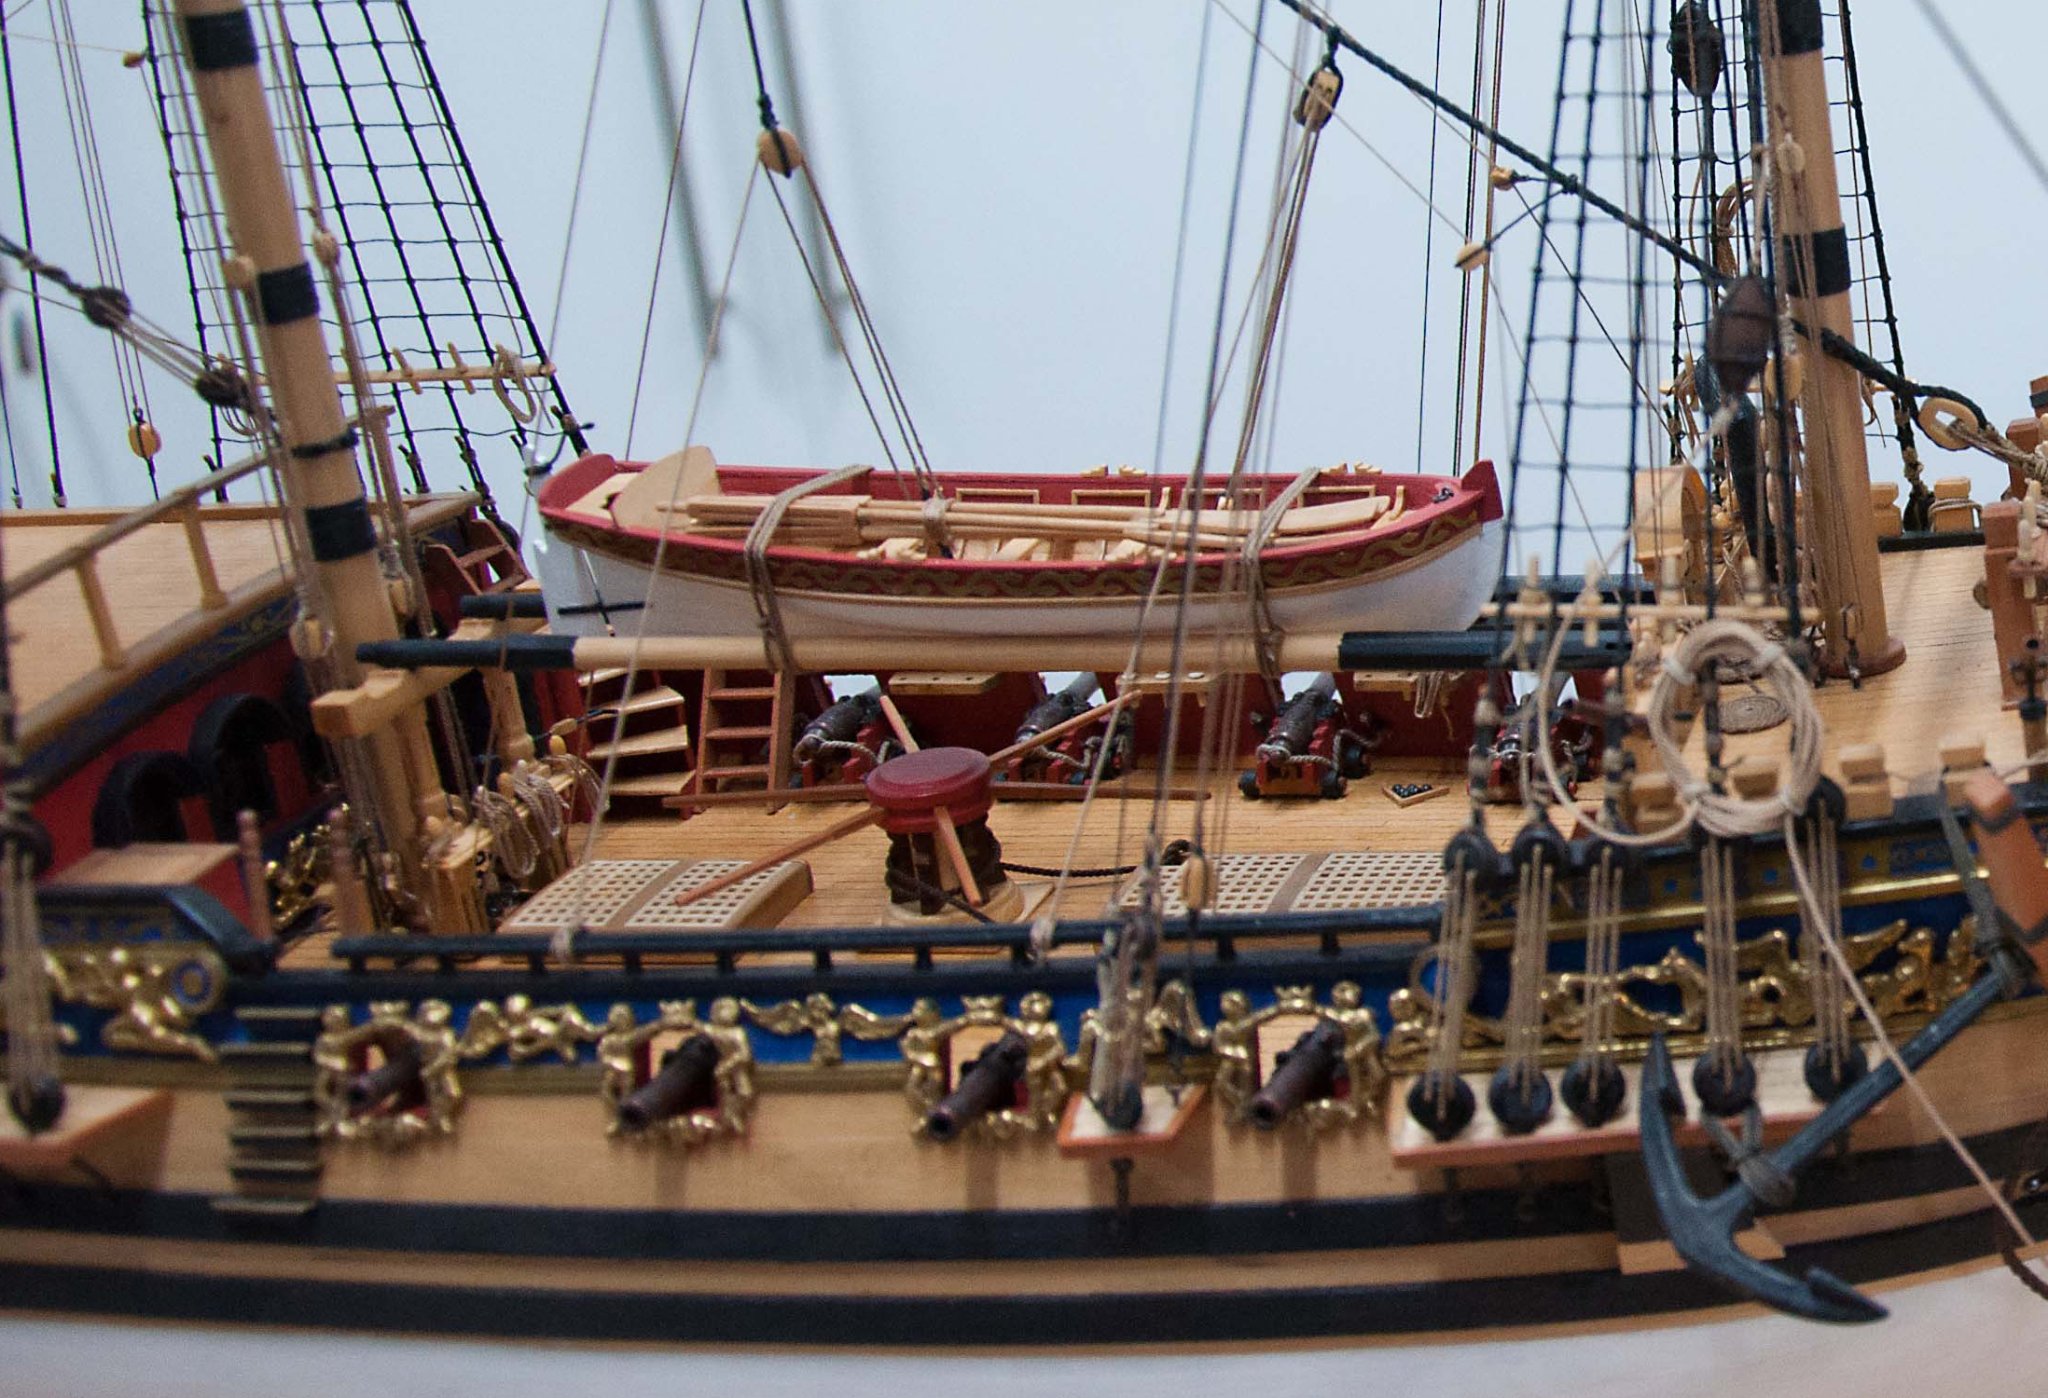
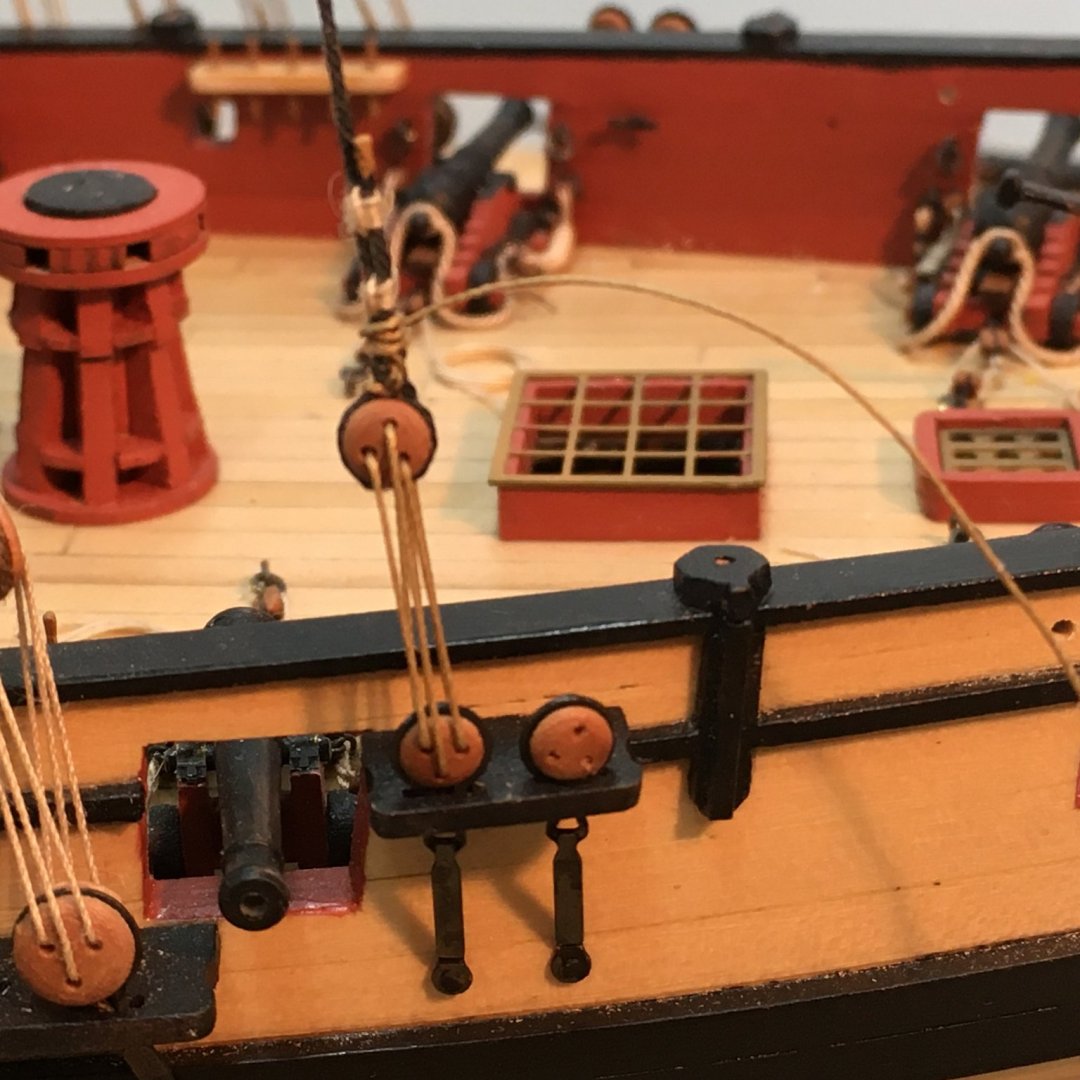
I only rigged the breech ropes on my Royal Caroline, but I admit I was more interested in appearance than historical accuracy. I agree with other folks that too much clutter can detract from other aspects of the model. Of course, real-life sailing ships were very cluttered and crews had to work hard to keep everything ship-shape, but this was a royal yacht so perhaps we can forgive them for not wanting all that rigging spoiling the guns! On my latest build, HMS Speedy, I fully rigged all 14 guns with 2mm blocks and that was an exercise in patience! Rather than go that far, you might want to consider adding some details like the triangular shot garlands shown in the AOTS book you have (see photo below). I like your swivel guns by the way, and wondered if you had also considered replacing the cannon barrels. I don't know if the kit has changed since I bought mine a long time ago, but I found that the cannon barrels were too large according to AOTS - 40mm when they should have been around 32mm. I replaced them with ones I got from the Model Dockyard (now sadly closed) and I can't remember what brand they were, but they looked much more in scale. Unfortunately it meant I also had to make my own carriages but that was an interesting little side project. This is the only picture I can find of mine (it's difficult to photograph now as it's in a case): Derek

- 124 replies
-
- 6
-
-
- panart
- royal caroline
- (and 1 more)
-
Crowsfeet contd. Finished rigging the crowsfeet this morning. I think they've turned out reasonably well, and without pulling the stays out of line too much - to my eye at least. After they passed down through the last starboard hole in the tops, the crowsfoot lines were tied off to their adjacent loops under the rims. In the photo the spare ends of the lines are awaiting trimming. The crowsfoot tackle was tied off with a couple of half hitches below the block on the stay, and the free end seized to the stay with fly tying thread: I tried to keep the crowsfoot line in reasonable tension as I wove it through the holes in the top and the euphroe block, but that wasn't easy as the line was coated in beeswax and tended to slip back through the holes. One trick I found helpful was to pinch the line between my fingers each time I passed it through the euphroe. This imparted a sharp 'V' shape to the line which tended to hold (presumably because of the beeswax) and prevented the line slipping back through: The beeswax caused one minor problem, part of which can be seen round some of the rim holes in the previous photo. It tended to scrape off, leaving a deposit on the top and also on some of the line itself. This was easily fixed using a hot air gun on its lowest setting (a hot air gun designed for craft projects, not paint stripping!) which melted the loose beeswax back into the line and rendered it invisible. One final point worth sharing, partly to plug my favourite extra-hands tool but also to emphasise how careful you need to be when threading the line. On the foremast crowsfeet I managed to damage the line by catching it on a tool I'd carelessly left lying nearby. Needless to say you need to avoid catching the line on the ship as well - I found it very easy to snag guns, channels and other protrusions when I let my concentration slip. Anyway, I had to attach a new line to the euphroe block, and thanks to good old quadhands I was able to do this without removing the block and its tackle from the stay: And yes, I know my rigging looks a mess but that's because I don't like to finally tension up lanyards until all the relevant elements are in place and I can make sure all the forces and counterforces in the rigging are balanced, hence the spare lines all over the place. It'll all come good in the end, I hope😬 Topmast shrouds next, I think. Derek

- 725 replies
-
- 12
-
-
- vanguard models
- speedy
- (and 1 more)