HOLIDAY DONATION DRIVE - SUPPORT MSW - DO YOUR PART TO KEEP THIS GREAT FORUM GOING! (Only 20 donations so far - C'mon guys!)
×


DelF
-
Posts
1,409 -
Joined
-
Last visited
Content Type
Profiles
Forums
Gallery
Events
Everything posted by DelF
-
 Many thanks Glenn, Glenn, B.E., James and Theodosius for your kind comments, and for the likes. I read your Pegasus log before attempting the crowsfeet on Royal Caroline, and took note of your advice on distorting the stays. I found it impossible to avoid completely, but with care it can be mnimised. Completely agree - a fine balance to achieve but worth it for a part of the rigging I find interesting and visually attractive. I'll post a final update on the crowsfeet shortly. Derek
- 725 replies
-
- 1
-

-
- vanguard models
- speedy
- (and 1 more)
-
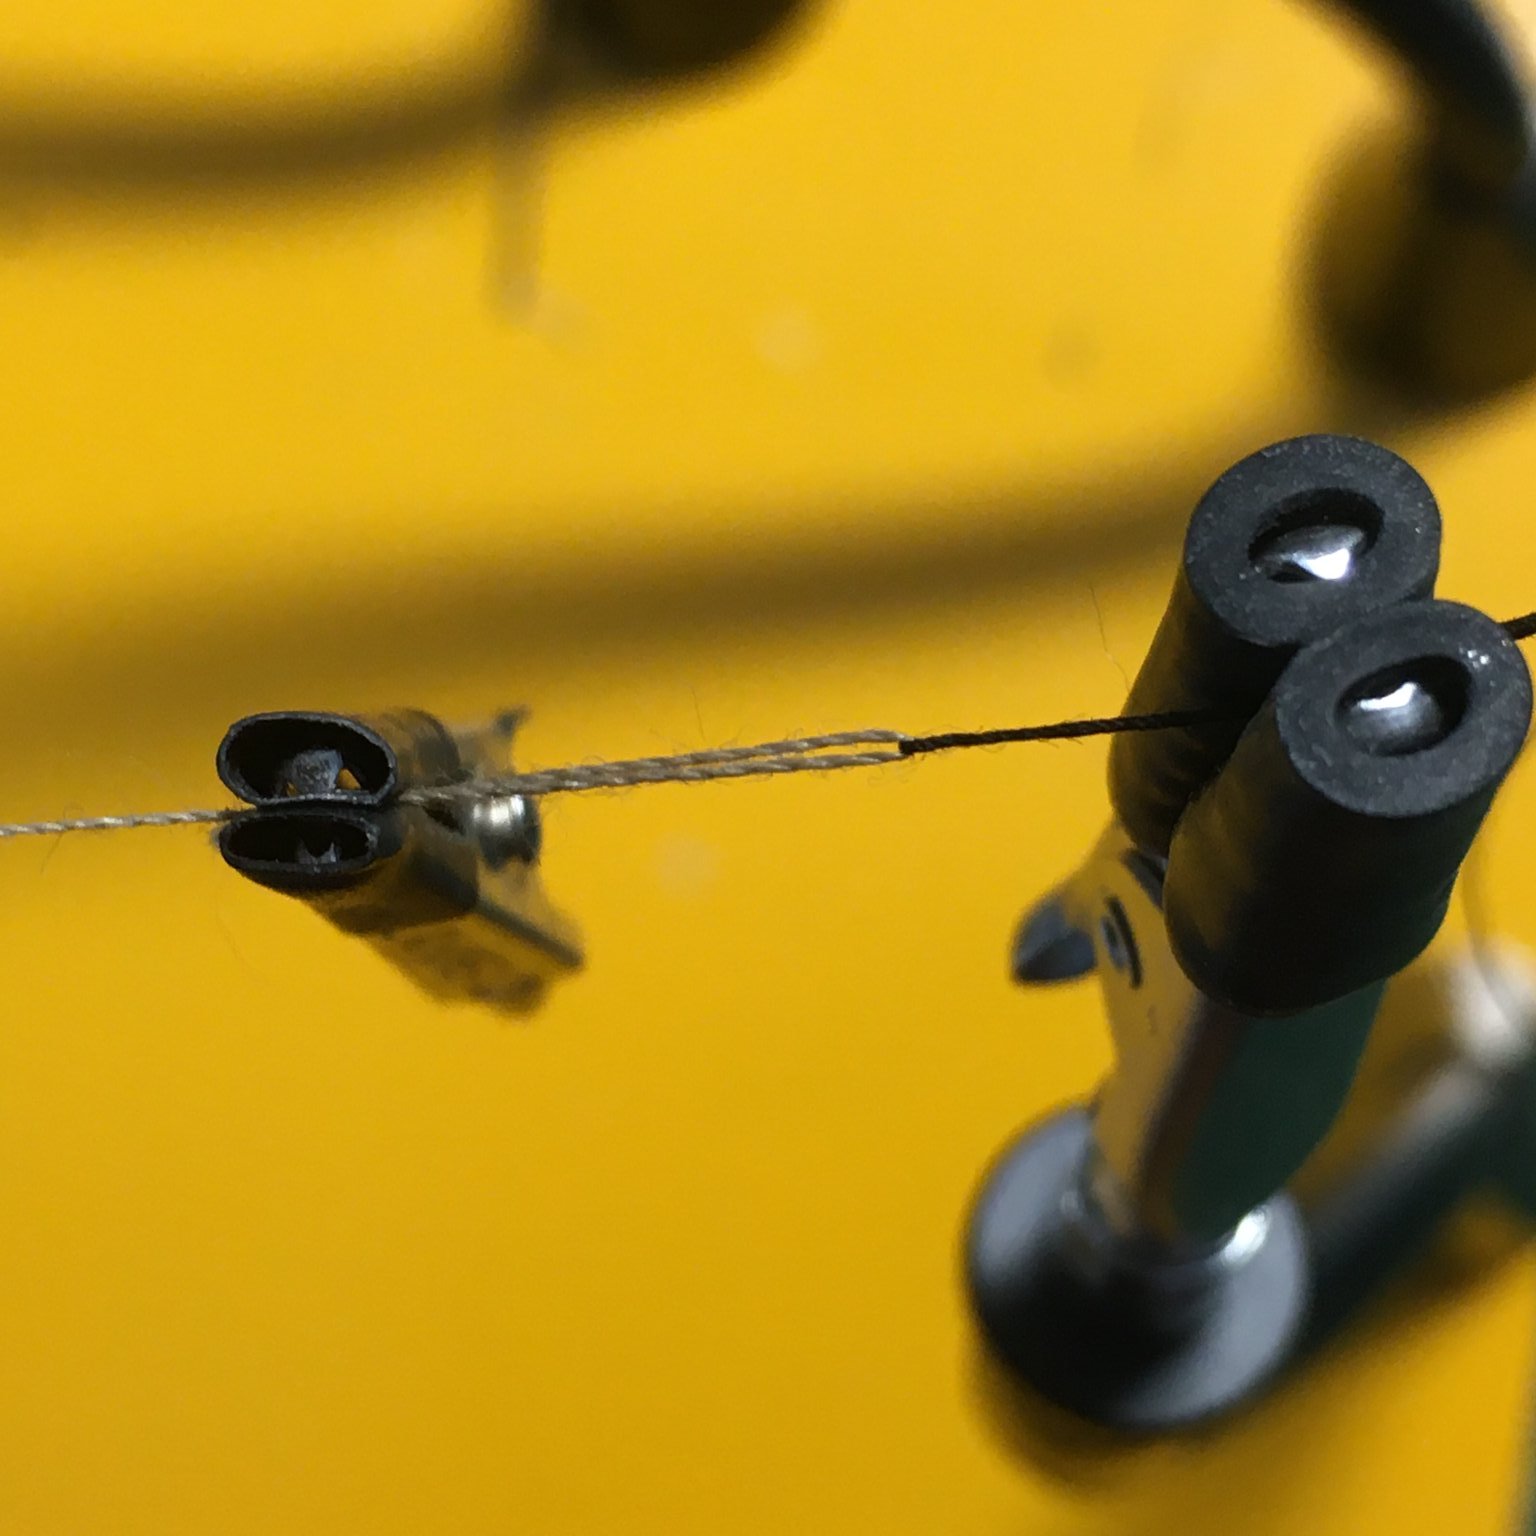
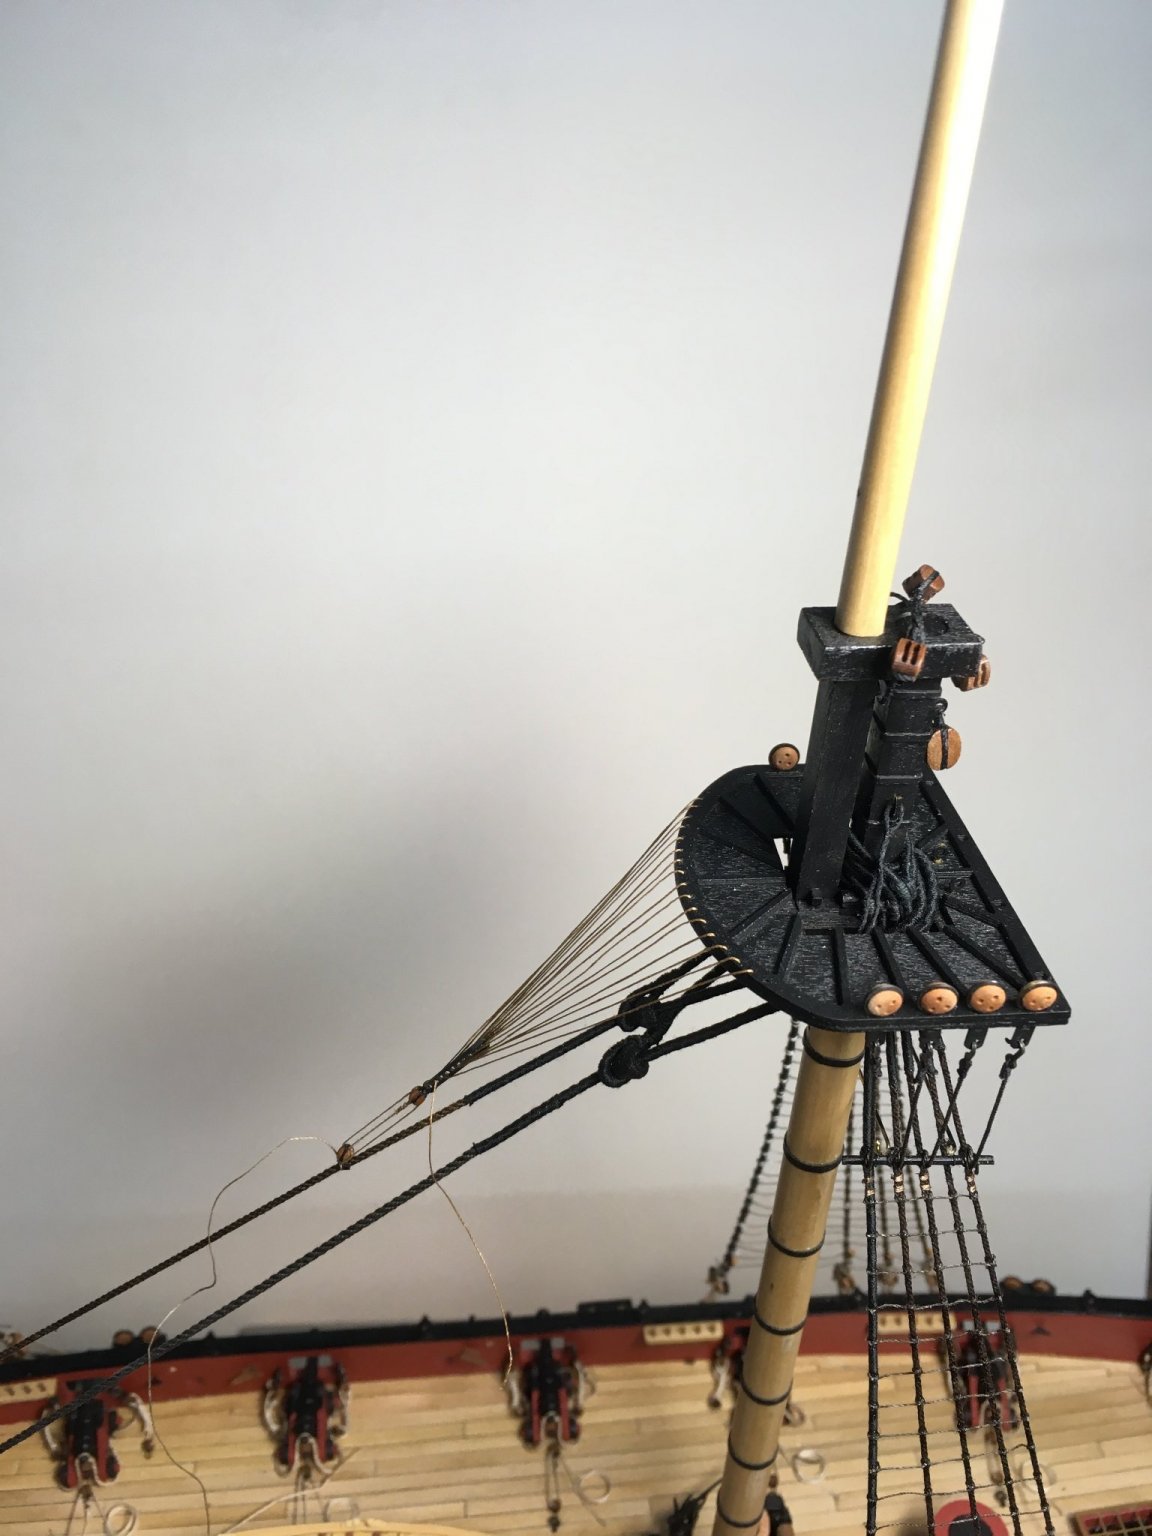
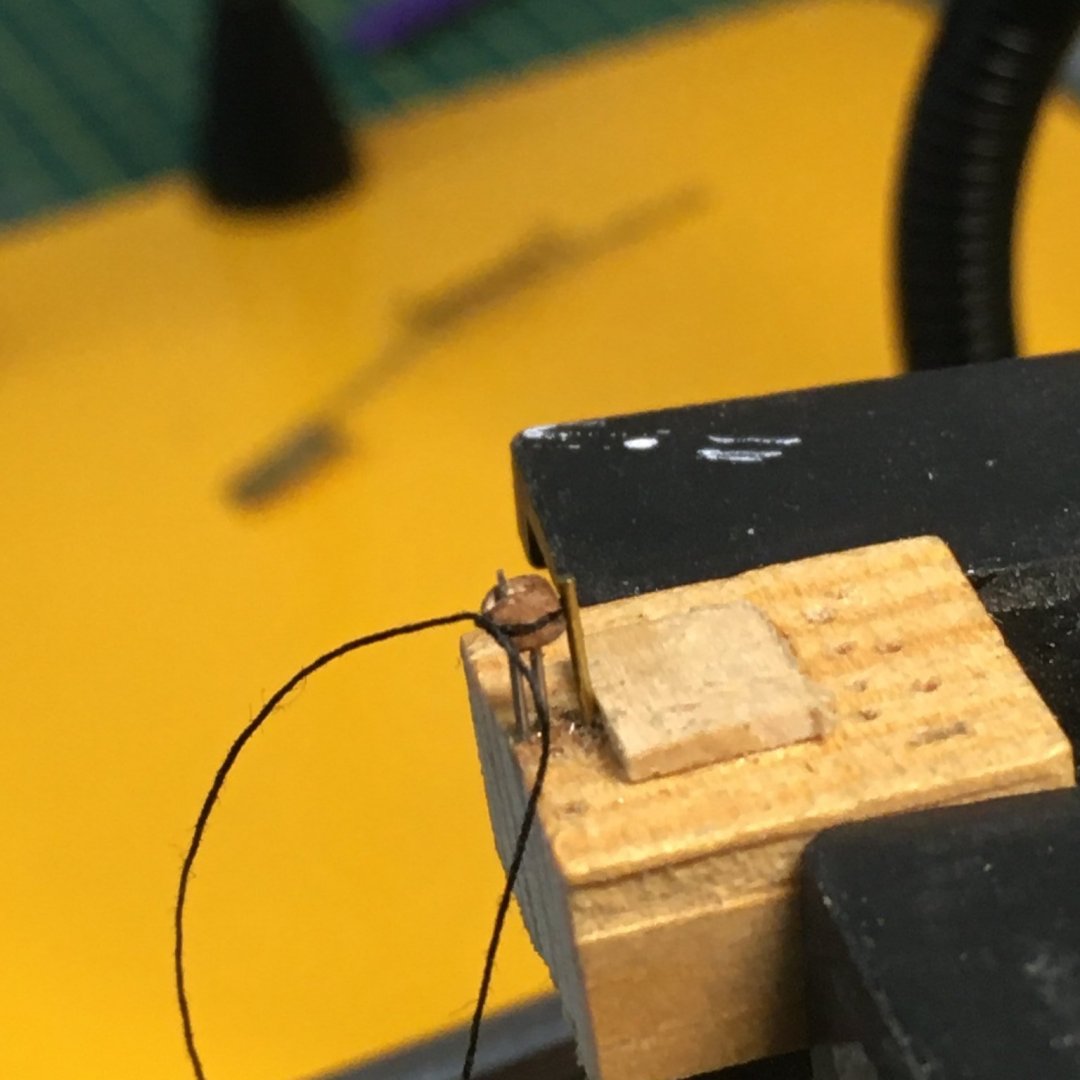
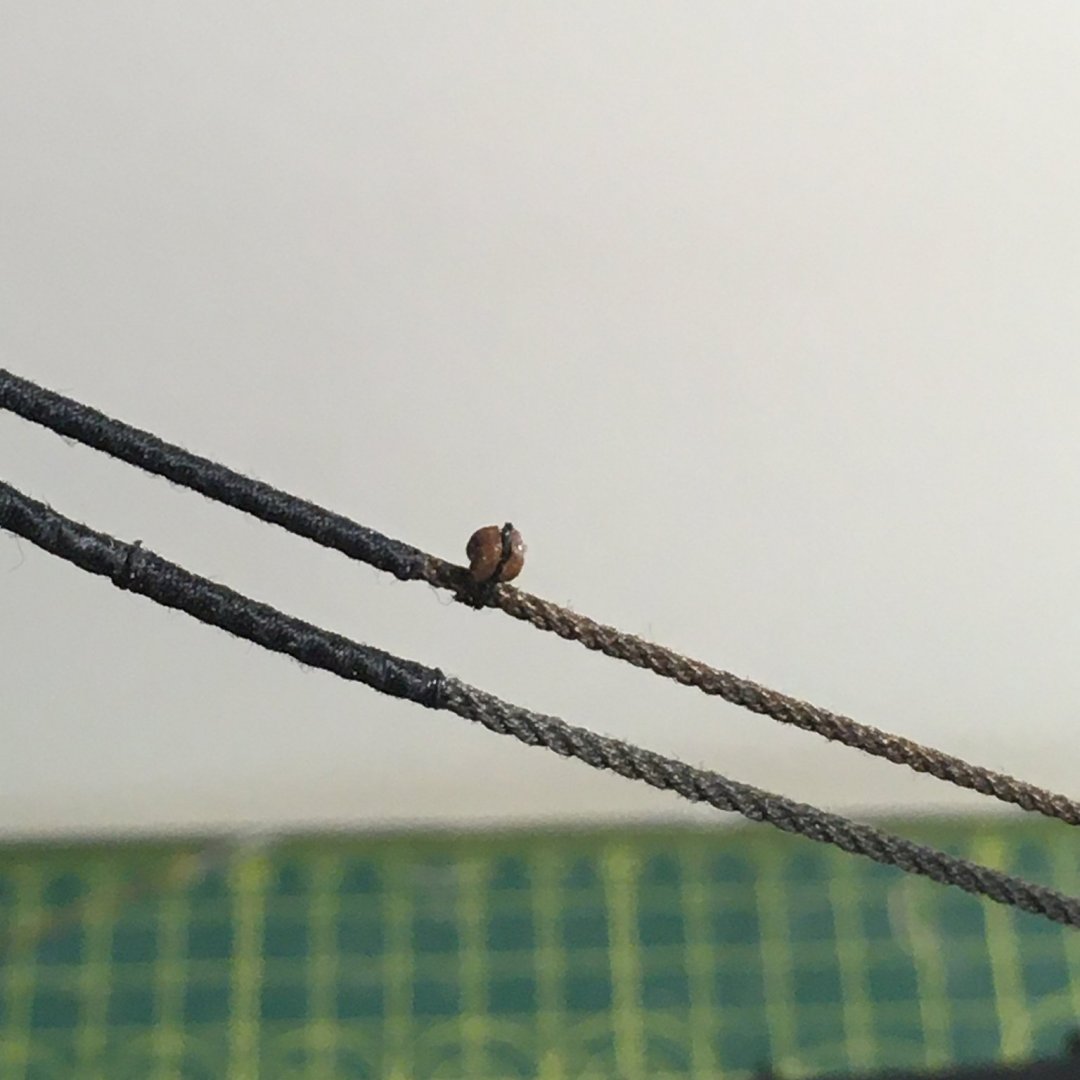
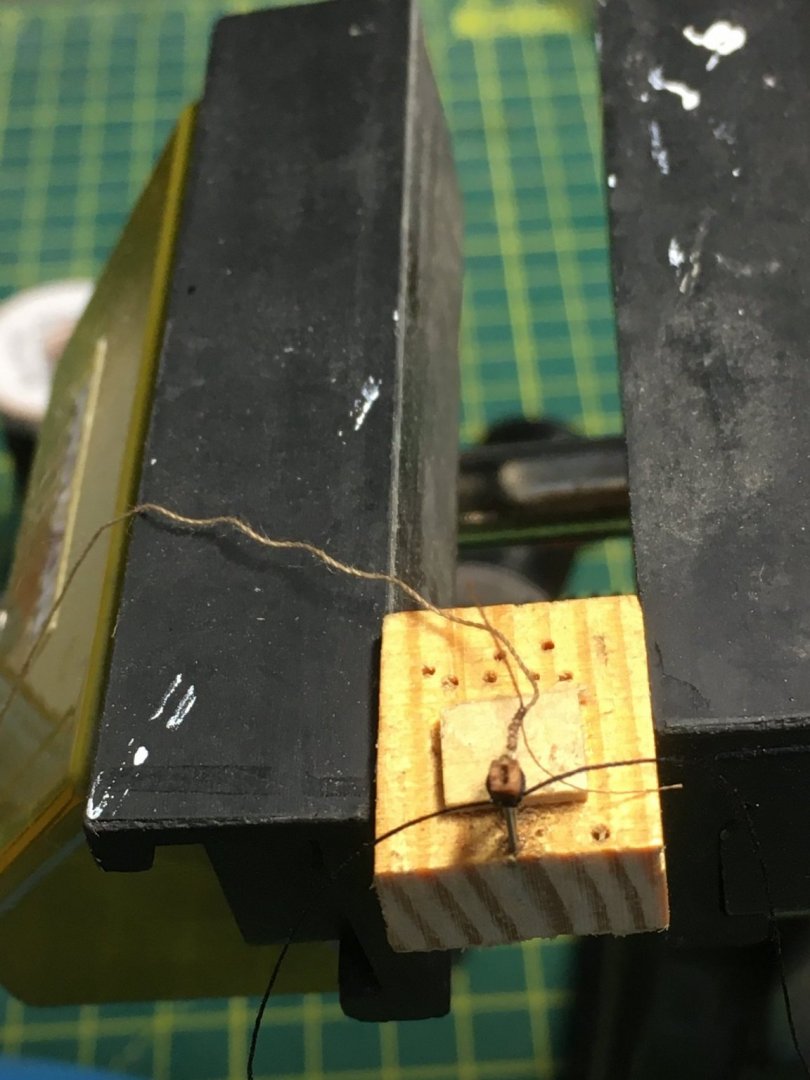
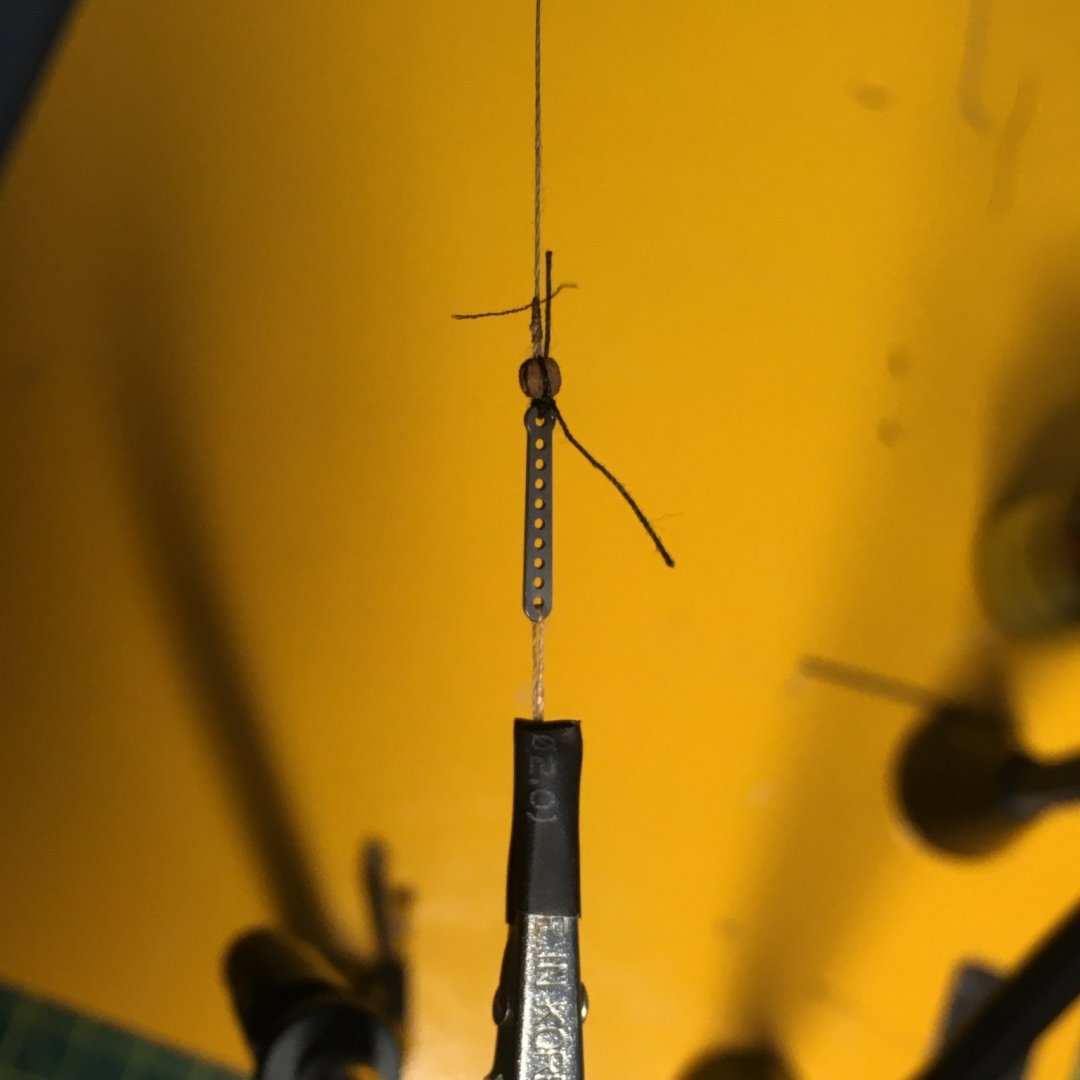
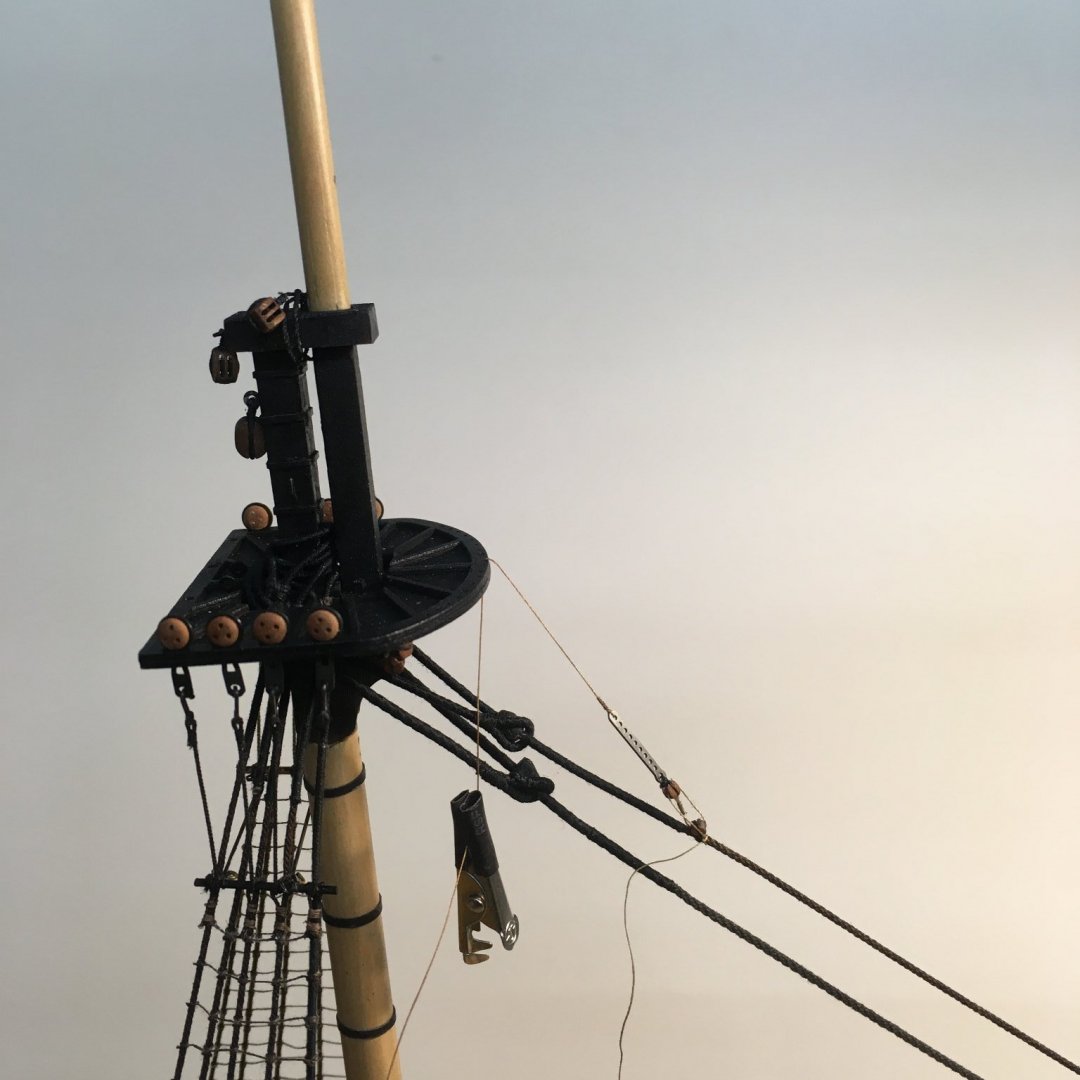
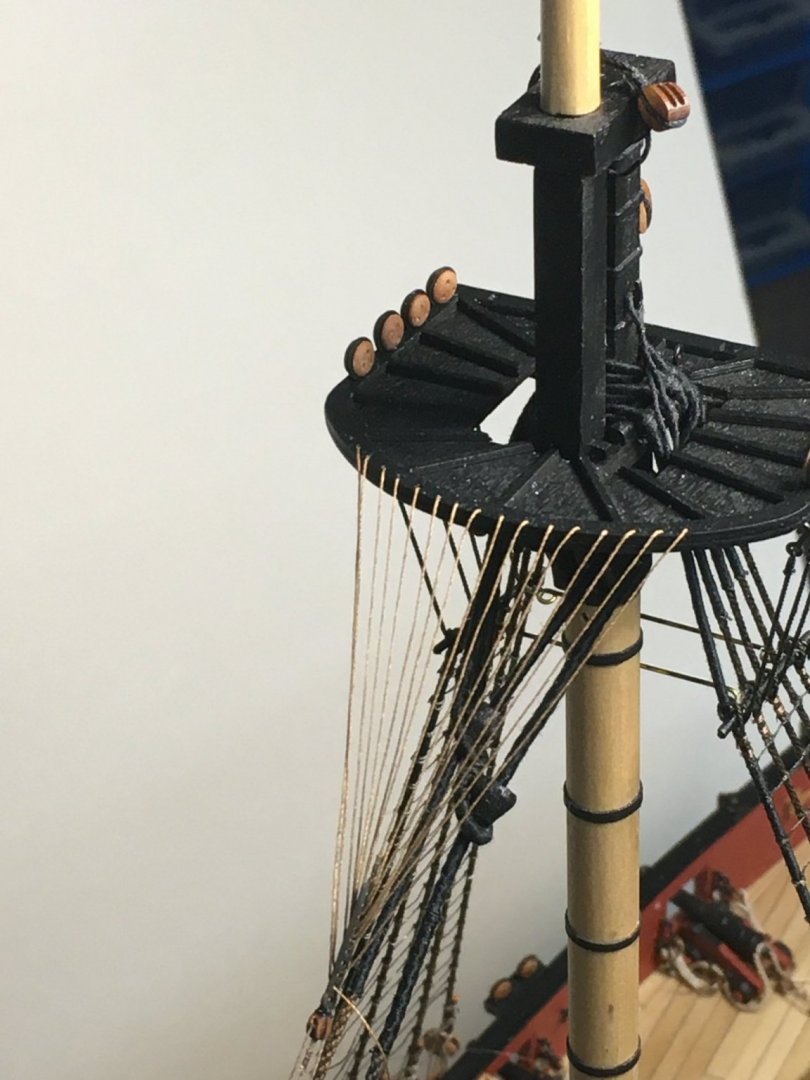
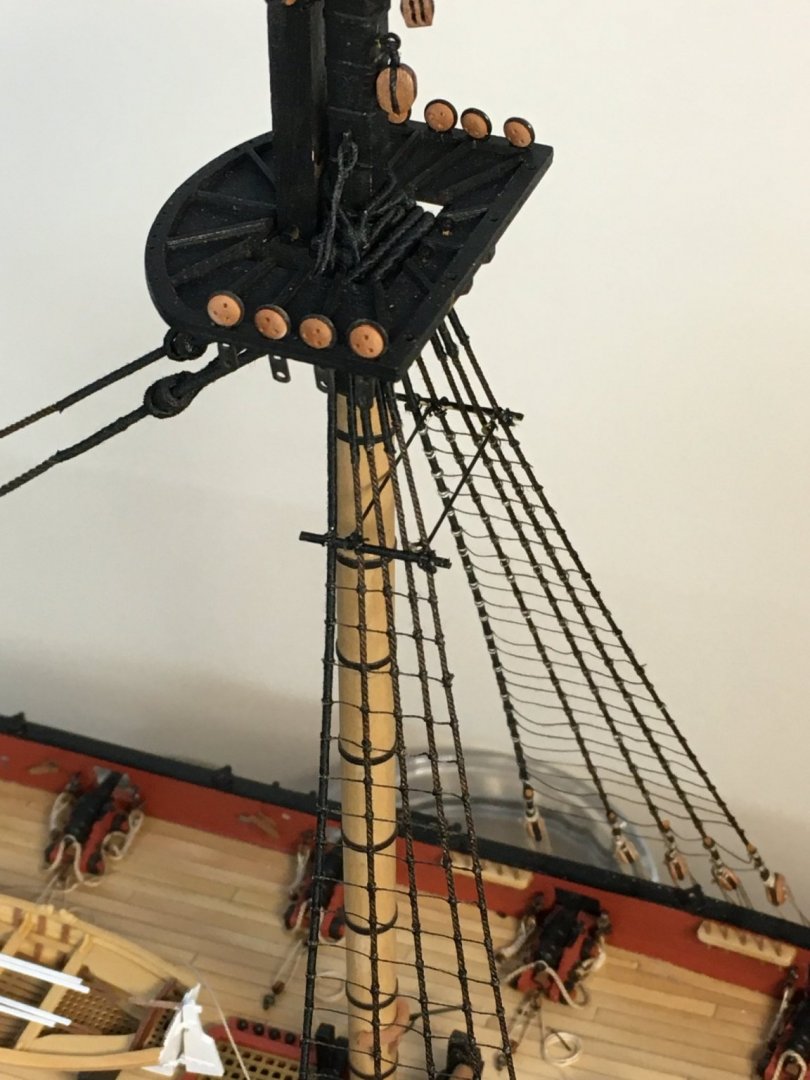
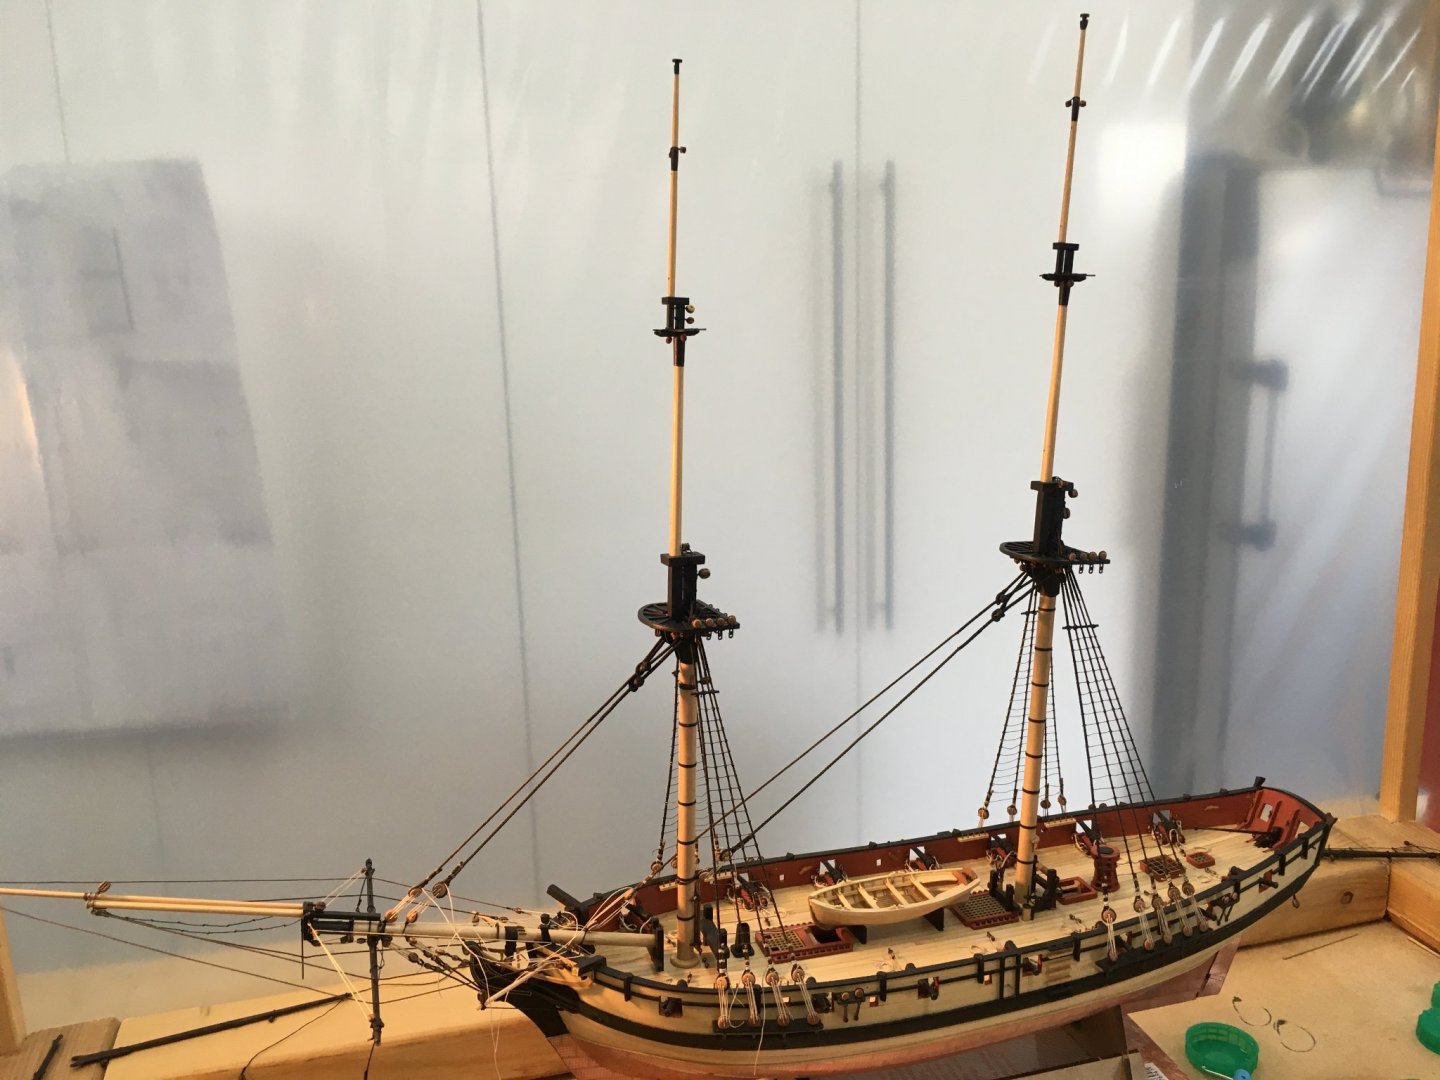
Crowsfeet I decided to fit these before the ship got too cluttered with yards and so forth. Crowsfeet are one of my favourite parts of the rigging - I just think they add interest and visual appeal. However they can be tricky to get right, particular problems being making sure the lines look straight and even, and that the crowsfeet don't pull the stays they are attached to out of line. The crowsfeet are identical on the fore and main masts, so I'll describe how I tackled the latter. Line For the crowsfeet themselves I used 0.1mm line. 1200mm for each mast gave me enough for the job with about 200mm to spare. I didn't want them to stand out too much, so I darkened the off-white line slightly using very dilute van dyke crystals. I found it was also very helpful to run the line through a block of beeswax, both to lay the fibres down but also to aid in pulling the line through lots of very small holes. Stiffening one end with CA was essential. Tackle I had several 2mm single blocks left over from rigging the guns and these were ideal for the crowsfeet tackle. The first job was to seize a block to the main preventer stay about six feet below the mouse - this worked out at 28mm on the model. Nothing fancy, I just tied some fine black Gutermann sewing thread round the block with a single overhand knot, applied a tiny dab of CA, then tied the thread round the stay with a reef knot and more CA, then trimmed. To handle the tiny block I dug out the little jig I used when rigging the guns: Next came the euphroe block. I did consider making my own out of boxwood as I had for Royal Caroline, but that was hard enough at 1:48 scale so in the end I decided to use the photo-etch from the kit, which I think turned out fine once blackened. The other 2mm single block for the tackle is seized to one end of the euphroe block. Before fitting the strop round the 2mm block I seized the 0.1mm tackle line to it, using brown fly tying thread: Used the jig again to tie the strop round the block: Then seized the block to the euphroe. The final job was to seize the crowsfeet line to the other end of the euphroe block, again using brown fly tying thread. Here's the completed tackle ready to fit to the model: The next picture shows the start of the rigging process, with the crowsfoot line fed down through the central hole in the top rim and the tackle set up at the lower end of the euphroe. After reeving the tackle line through the block on the stay and back up through the block on the euphroe, I fastened the running end temporarily to the stay with a half hitch. I kept tension on the tackle whilst I did this with a clip on the crowsfoot as shown. The rigging from then on was relatively straightforward but needed some concentration to get the sequence right and keep proper tension on the line. From the position shown above, the crowsfoot line goes up through the next hole to port of the central hole, from the underside of the rim, then down to the first free hole in the euphroe (ie not the one the crowsfoot line is seized to). The line goes through the euphroe from port to starboard then down through the first hole to starboard of the central hole, back up through the next hole to starboard, down to the next hole in the euphroe, and so forth. Problem If everything had worked out the sequence should have ended when the line came down through the single hole remaining on the port side, from where it would have been hitched to an adjacent loop of line under the rim. It was at this stage I realised something was amiss - I had a hole left over in the rim! A spare one on the starboard side. My understanding was that the number of holes in the rim should be twice the number in the euphroe block plus one. There are eight holes in the euphroe block so I assumed there would have been 17 in the rim; there are actually 18 in both tops. However, checking in James Lees' Masting & Rigging I found several diagrams of tops with even numbers of holes. Although Lees' description of rigging crowsfeet matches mine (his example has 11 euphroe holes and 23 rim holes) I reasoned that there must be a method that utilises an even number of holes in the rim. In the absence of any information on historical practice I decided the easiest and neatest solution would be lead the line down from the final port side hole, through the bottom hole in the euphroe (the one the 2mm block is seized to) down through the 'spare' hole on the starboard side of the rim, then hitch it to the adjacent loop under the rim. The last pictures show the stage immediately before this - ie before I'd worked out what to do! I'll post an update when I've rigged the crowsfeet on the foremast and tensioned the tackles and stays properly. Derek


- 725 replies
-
- 16
-
-
- vanguard models
- speedy
- (and 1 more)
-
Congratulations on the build, she's coming along fine. And well done on keeping such a comprehensive log. I tend to leave lanyards loose until I'm ready to tighten all the related rigging. There are so many forces and counter forces in the rigging that there's a danger that if you seize up lanyards too early in the process they will turn out to be either too tight or too loose later on. Leave the lanyards loose until everything bearing on a particular mast or yard is ready then progressively tighten everything up until all is in balance. If so, I'm a weirdo too. Seriously Glenn, you're spending so much time in the shipyard just now that a few minutes spent redoing a few lanyards will hardly signify, and you'll feel much better for it! Derek
- 382 replies
-
- 1
-

-
- Vanguard Models
- Duchess of Kingston
- (and 1 more)
-
Edward, if you stick at it and practice you'll be surprised what you can achieve. I made most of mine for Royal Caroline from boxwood rules - not all at once - just a few at a time every day or so. That way, it's surprising how many you can make over the course of a build. I've not bothered with Speedy, as the pearwood blocks in the kit option I went for are so good. Derek
-
Well done Eric - a lovely model. I've enjoyed following your log as you've put your own stamp on the kit. Derek
- 123 replies
-
- 2
-
-
- Model Shipways
- Pinnace
- (and 1 more)
-
Thanks for the likes and comments, they're much appreciated as always. I won't go back to using ordinary thread for small scale stuff. Reassuring it's not just me! If anyone knows how to tie perfect ratlines, I wish they would let us into the secret. Btw, I've gone with your suggestion and painted the ship's boat.
- 725 replies
-
- 2
-
-
- vanguard models
- speedy
- (and 1 more)
-
Definitely have a go at making your own rope. I haven’t looked back since I got my Syren rope rocket.
-
Great to see you scratch building as much as you can Edward. If you can do such a good job with cheap pine dowel there'd be no stopping you if you tried some decent finer-grained timber. You wouldn't need that much for a few deadeyes, and you wouldn't need to paint them. . Same goes for blocks. I used to get old boxwood rulers from a second hand tool stall on the local market. He's shut during lockdown, but you can still get ones like this on ebay. Ouch! Been there, done that, so you have my sympathy. Good job wood is such a forgiving material. Derek
-
Here you go Glenn: Derek P.S. I can see I've got some more ratline staining to do! I started off using light-coloured line to help with visibility whilst I was rigging, then dyeing the ratlines in situ. However after a couple of goes I decided this was more trouble than it was worth and started using dark line to start with.
- 725 replies
-
- 10
-
-
- vanguard models
- speedy
- (and 1 more)
-
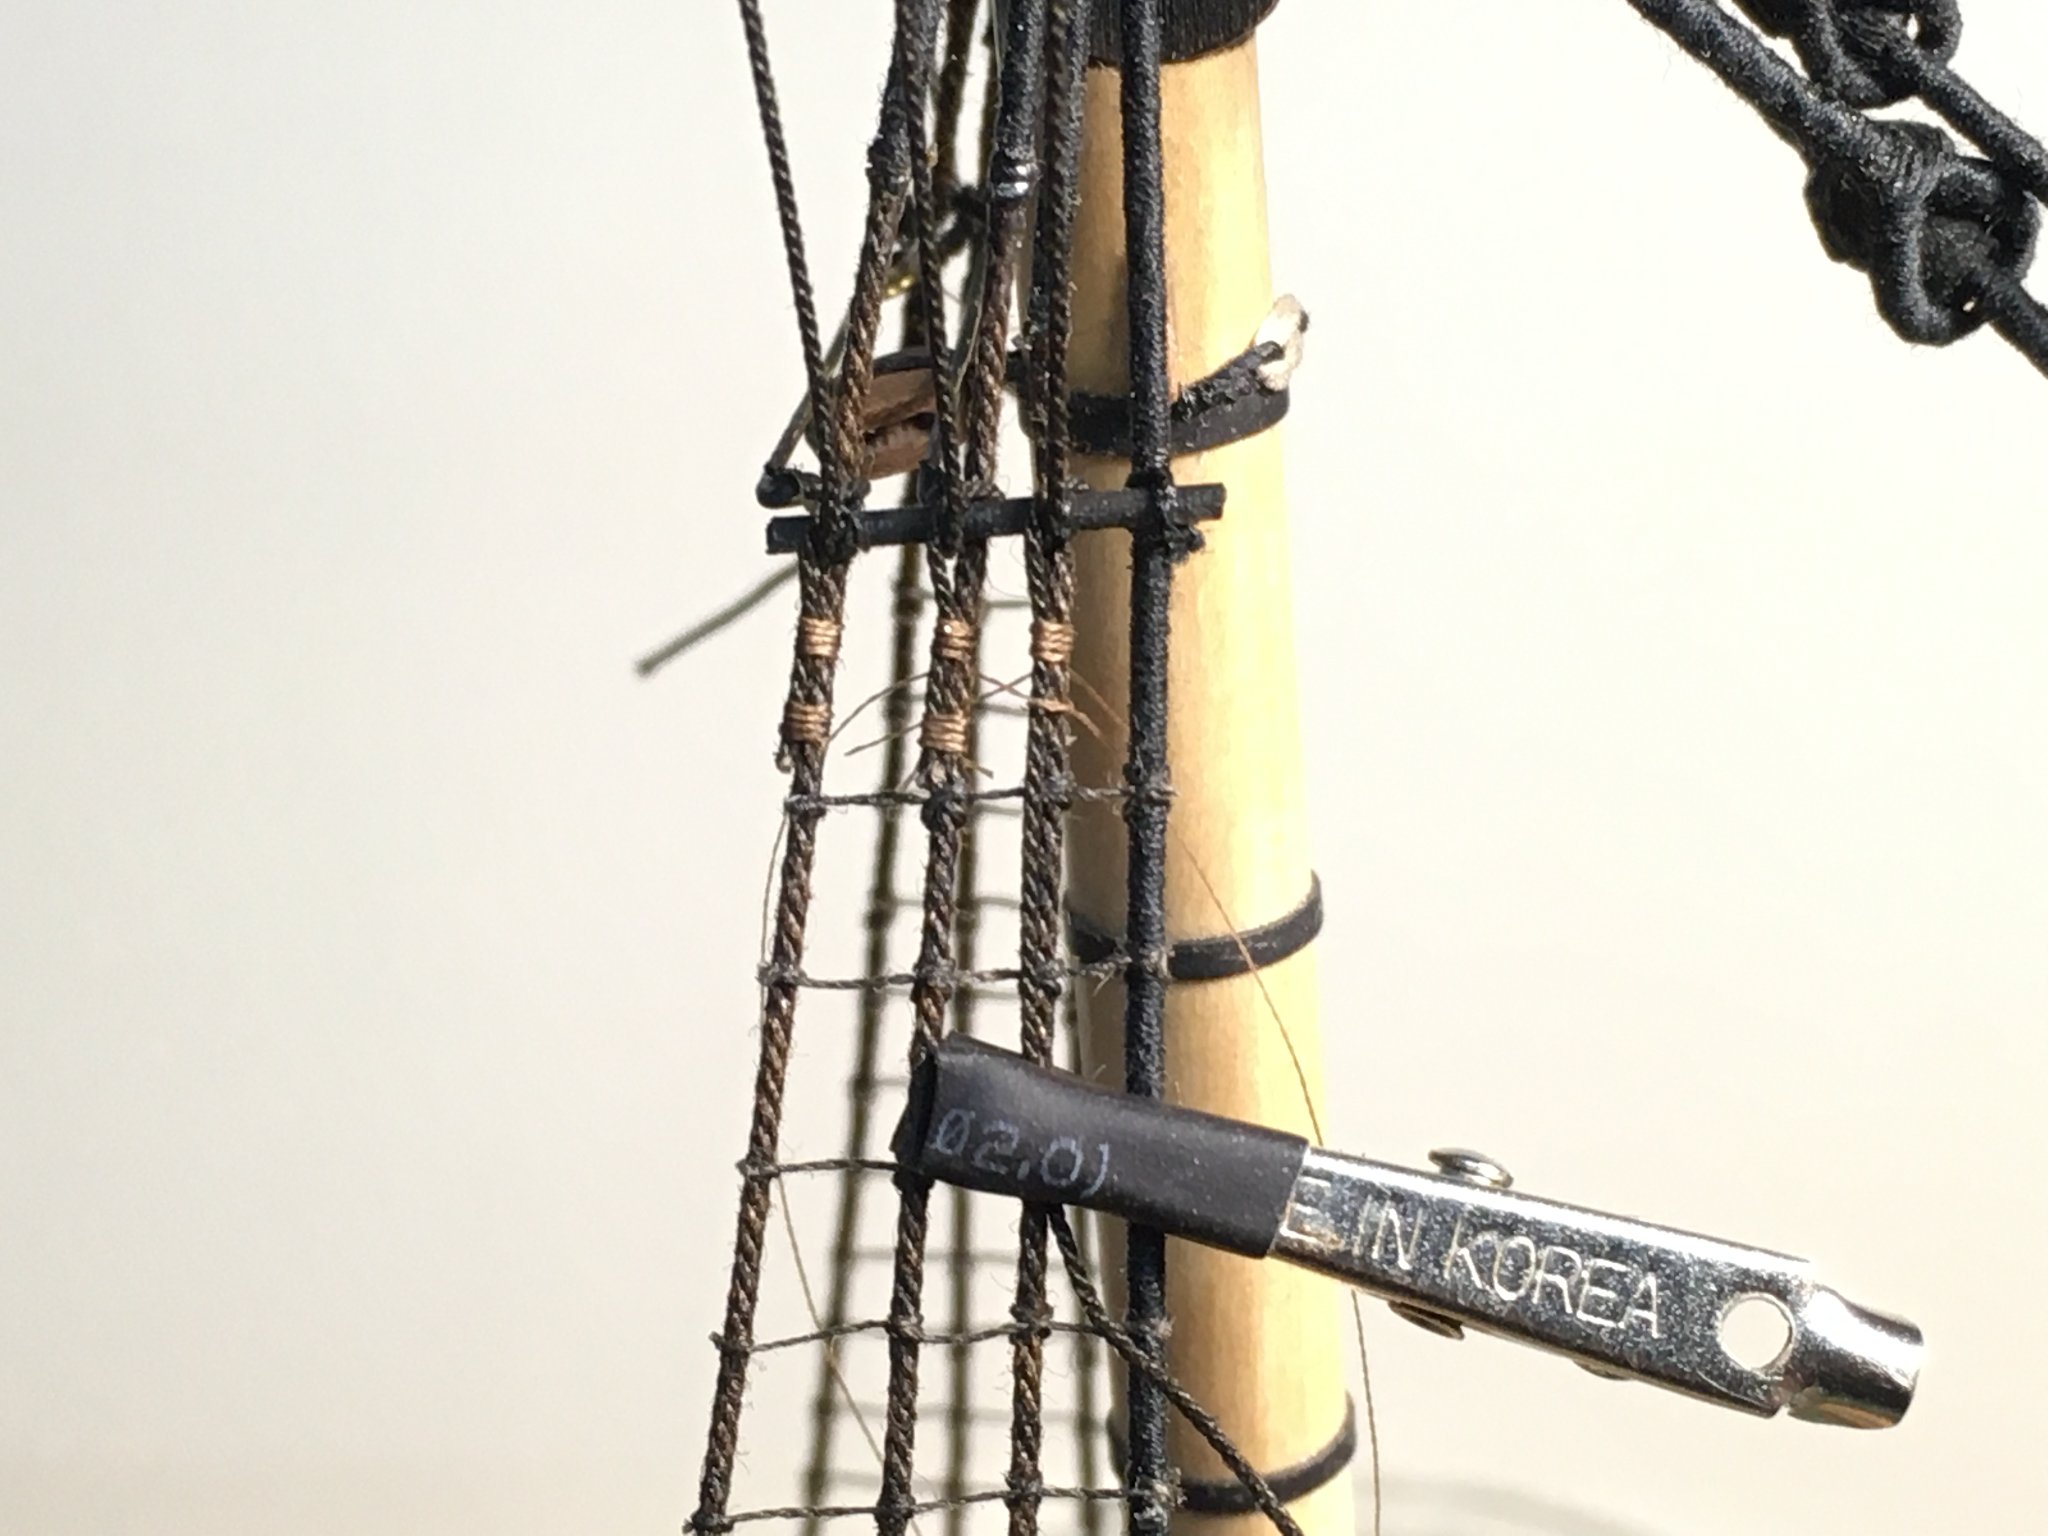
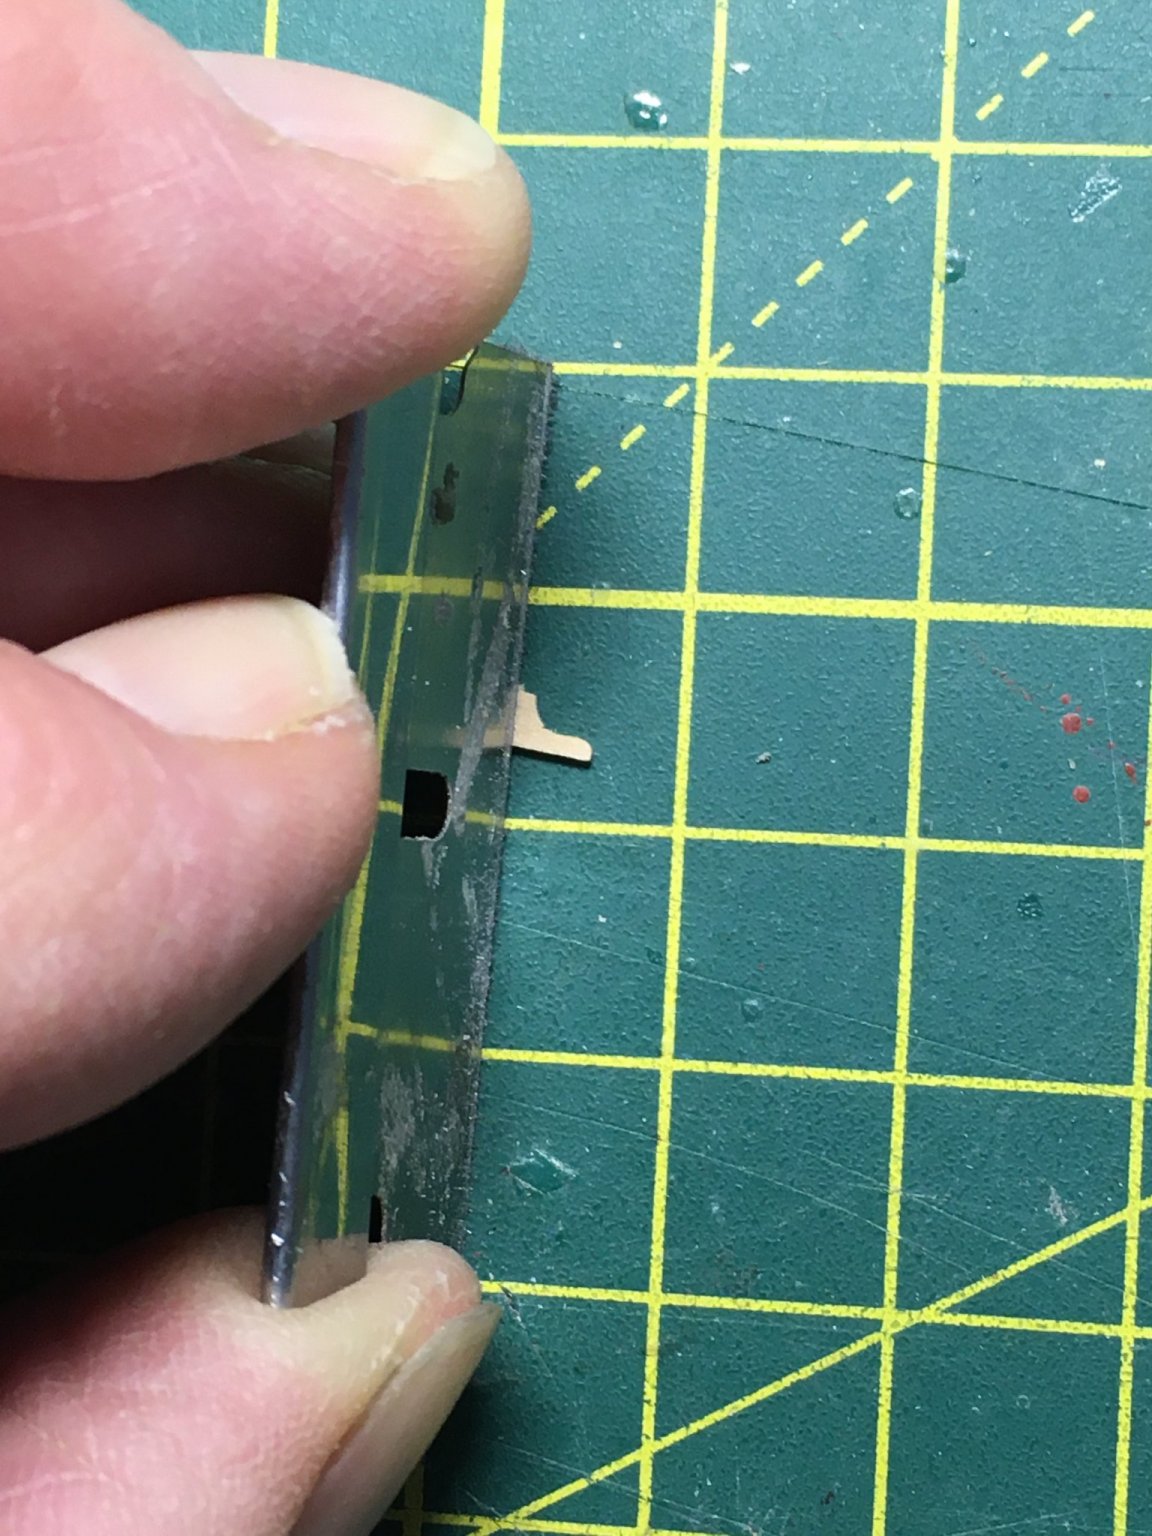
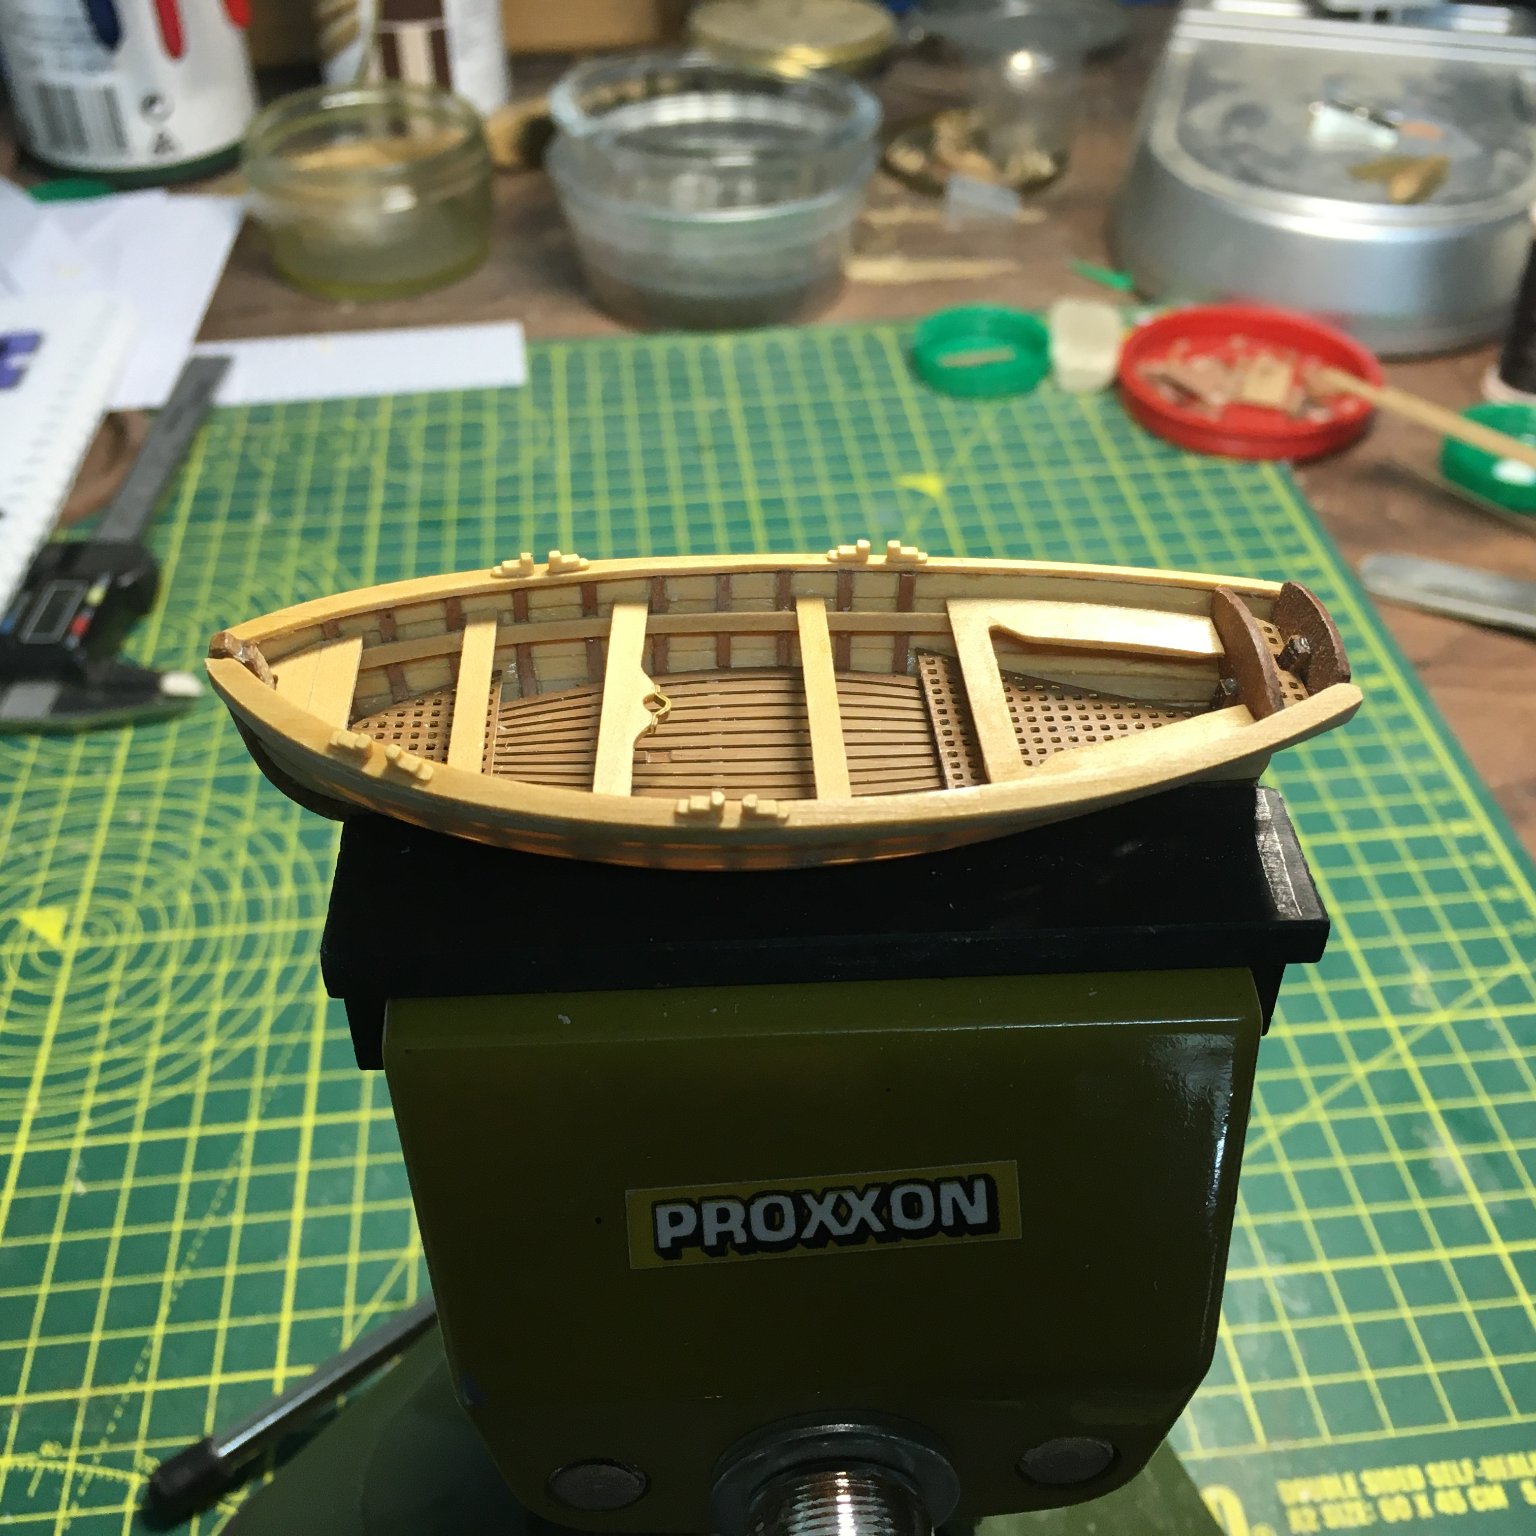
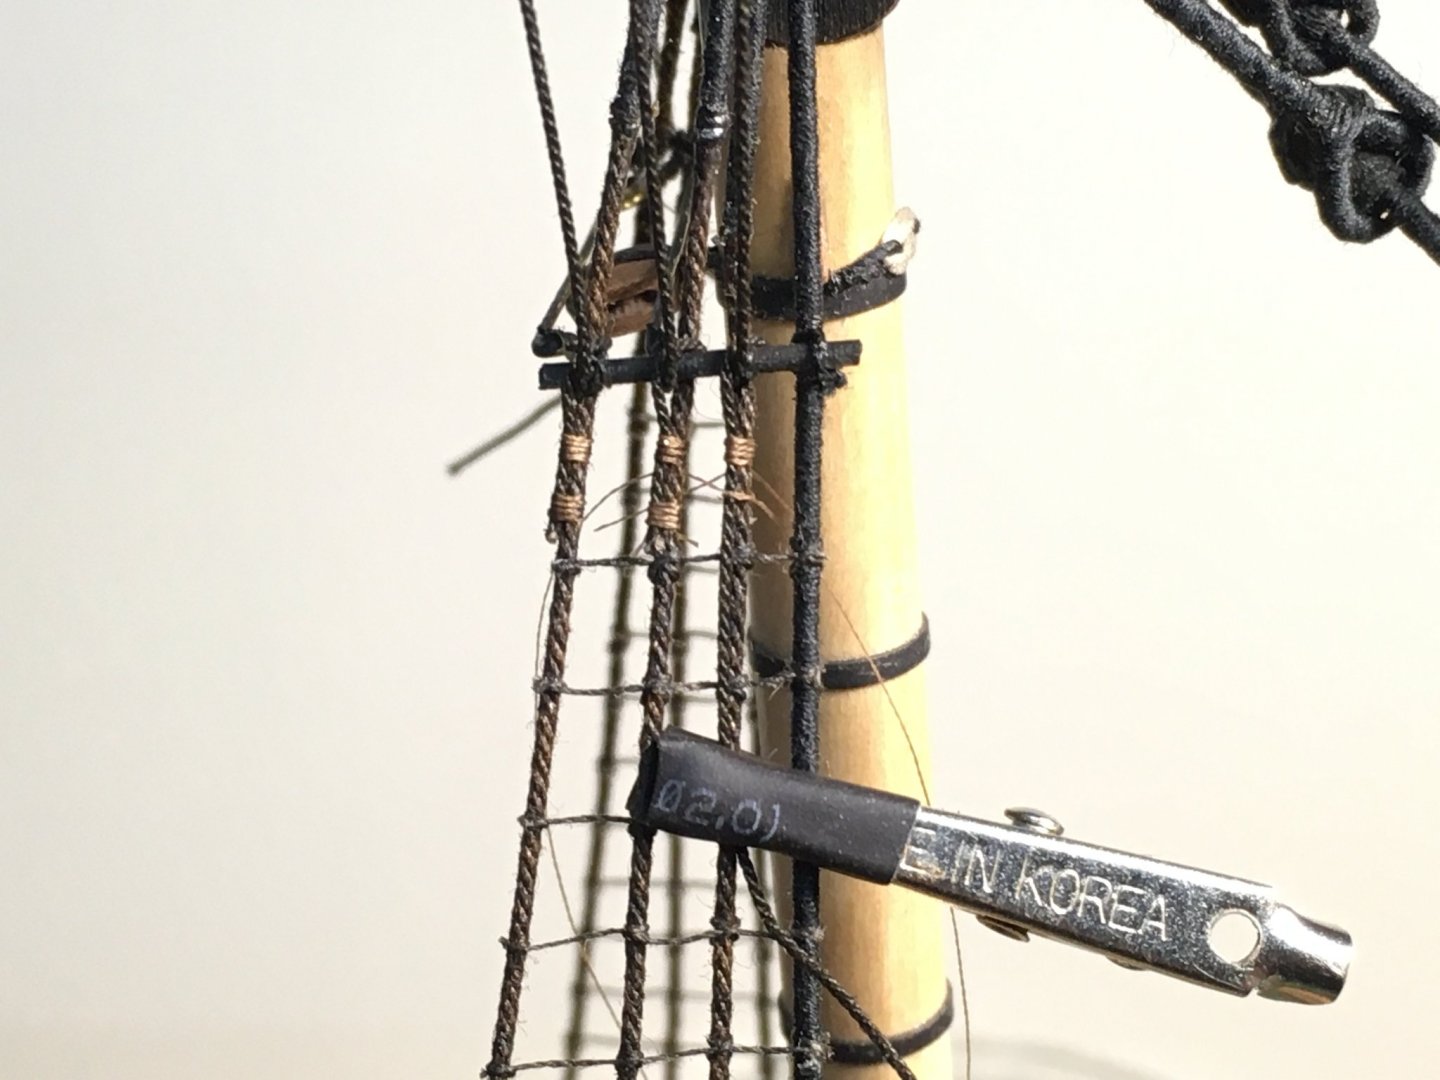
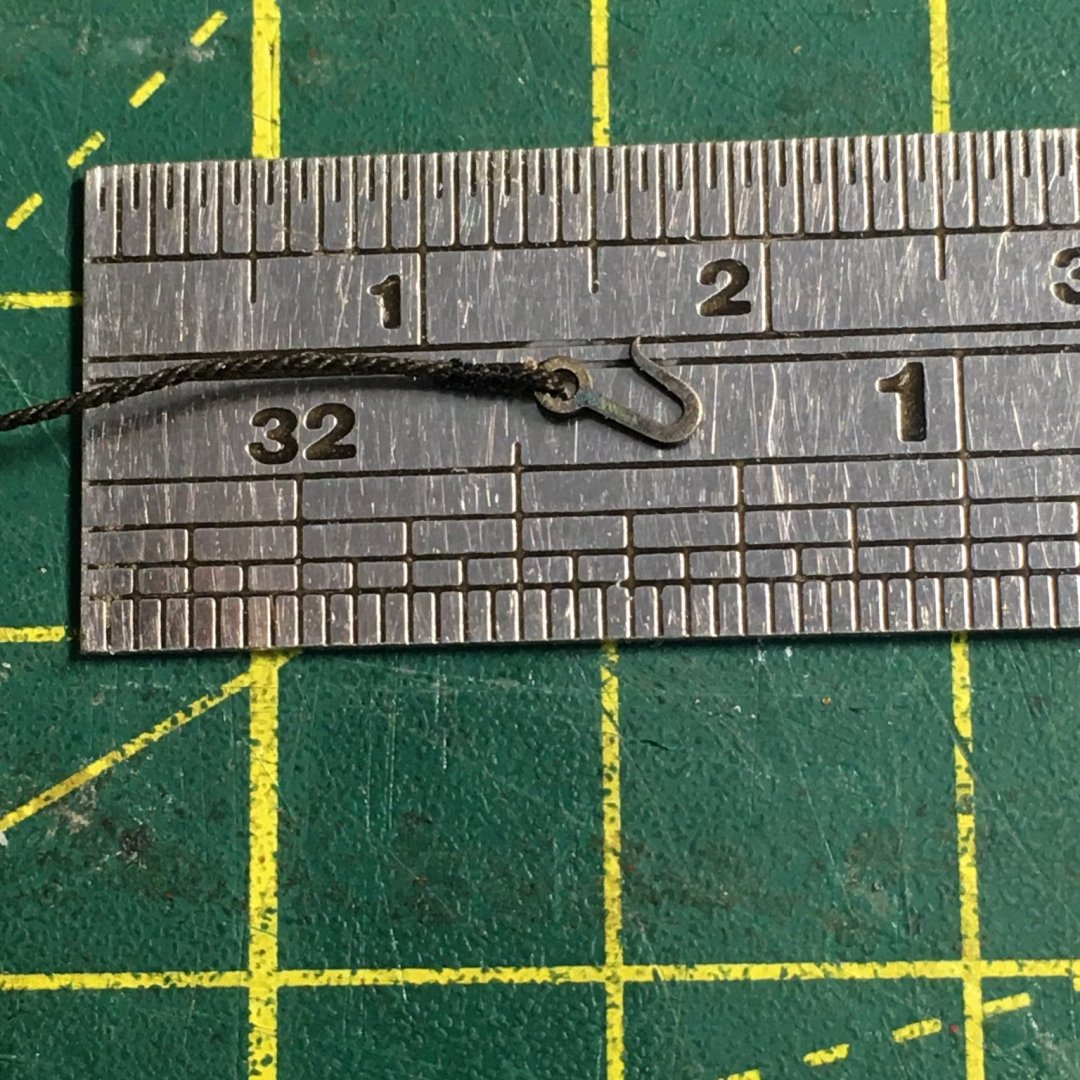
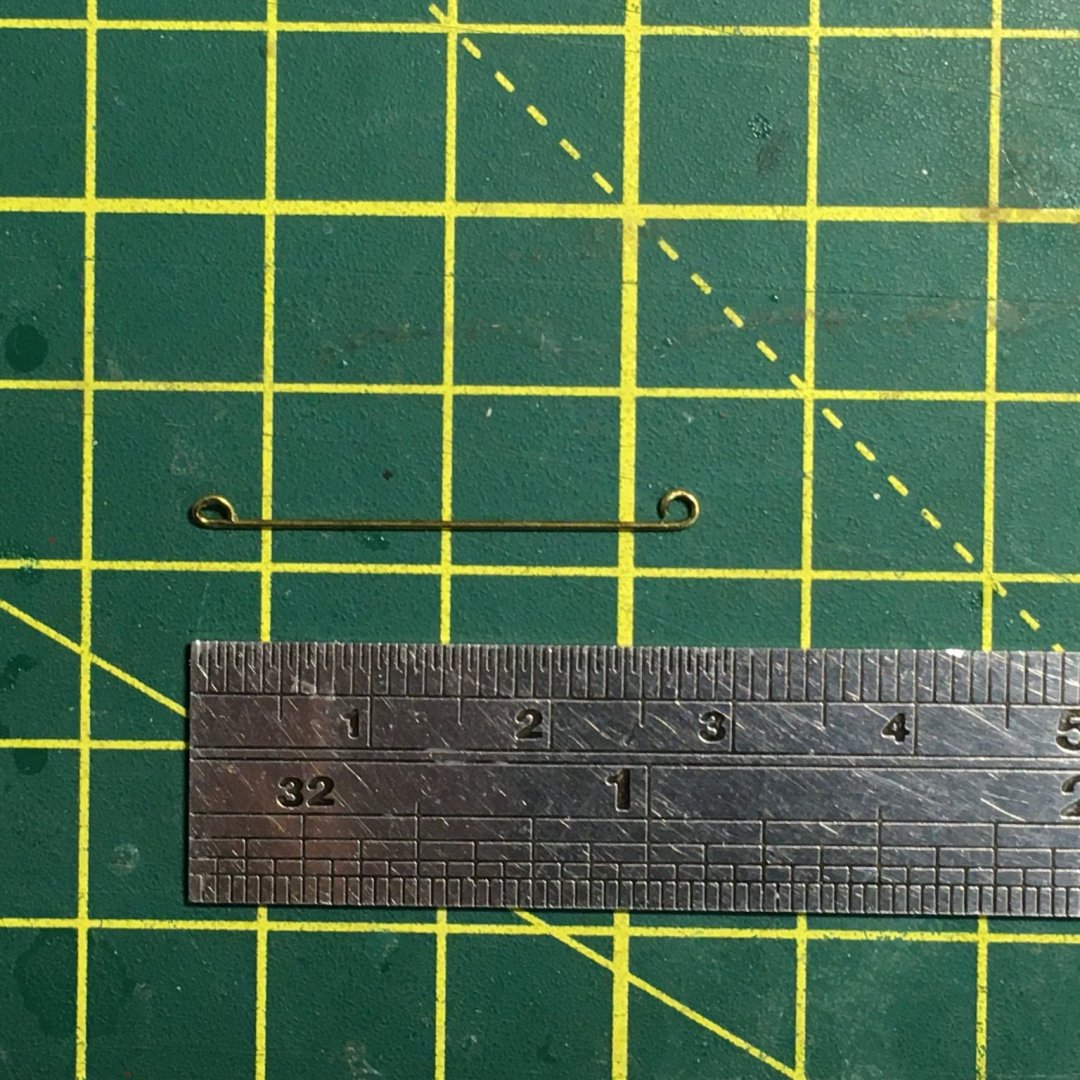
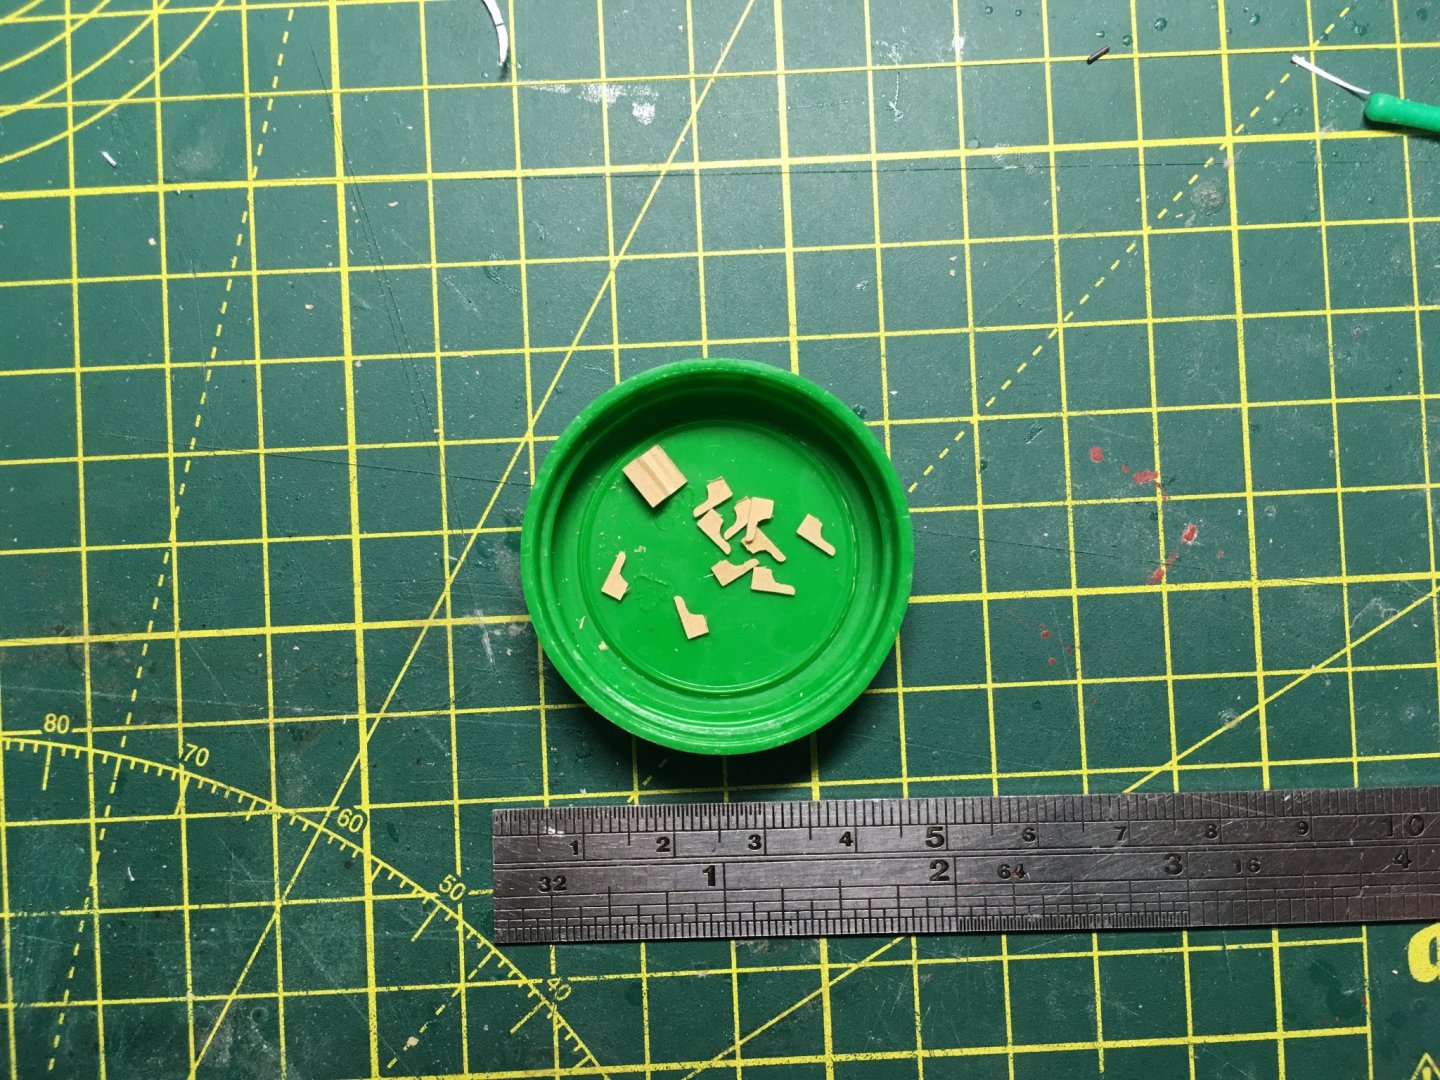
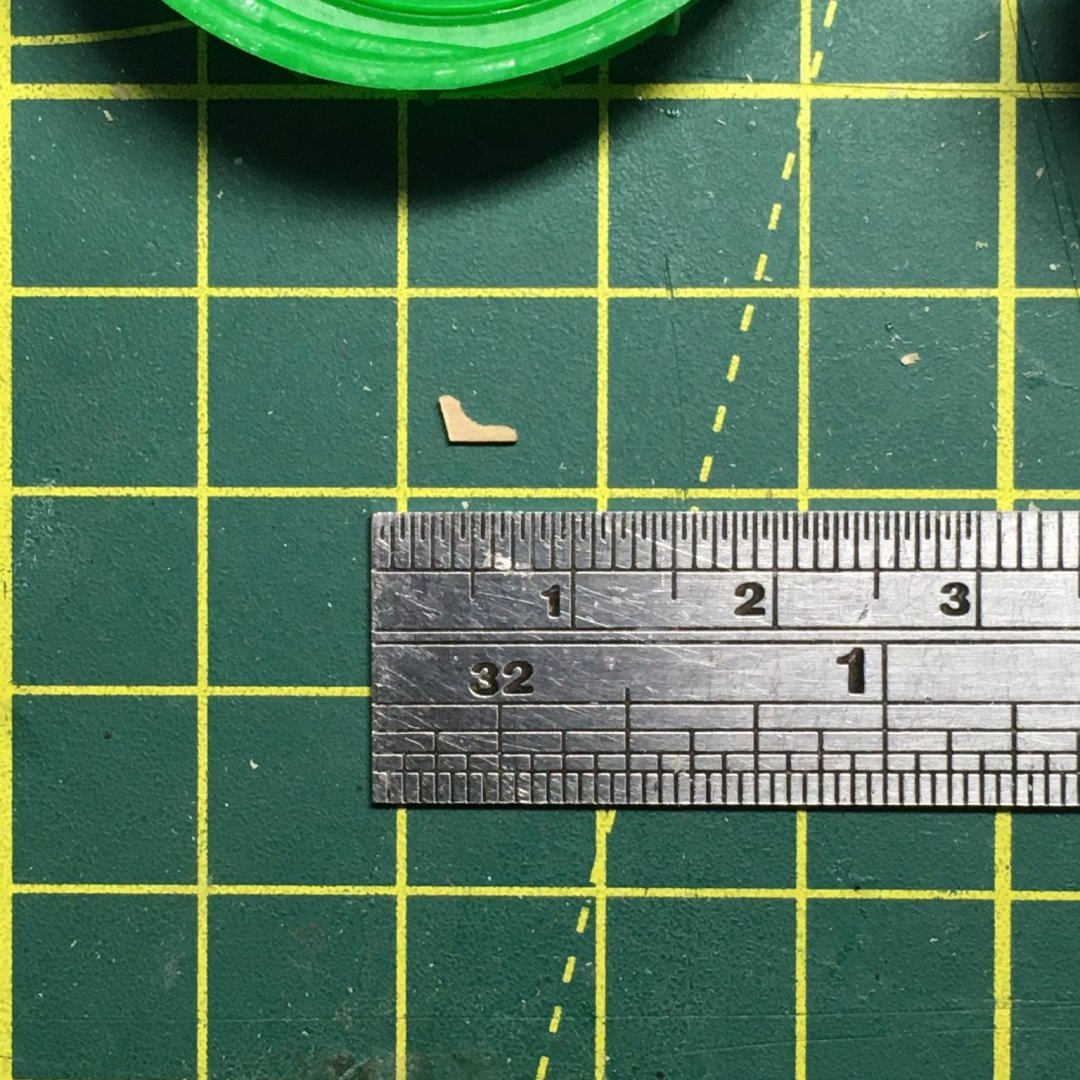
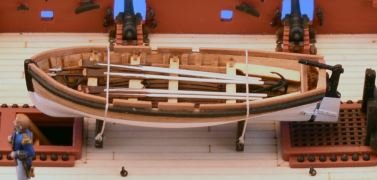
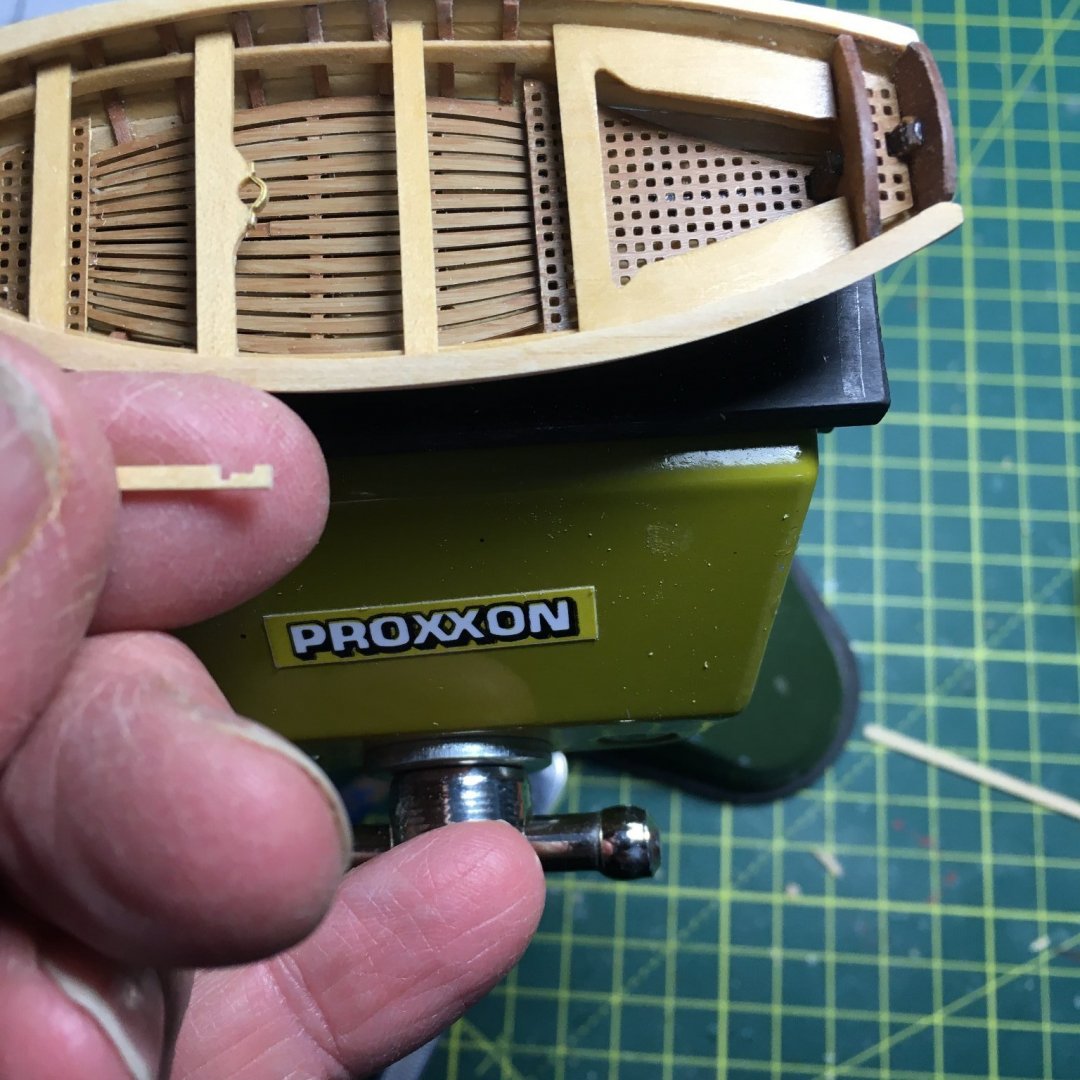
Many thanks as always for the 'likes' and kind comments. Ship's boat & ratlines The last internal fittings to do on the boat were the little knees on the thwarts. The kit supplies tiny pieces in pearwood, but I wanted to use box to match the thwarts. I started by shaping a piece of 2.5 X 3.5 mm box using the Proxxon mill and a selection of files to get the right profile. Then it was on to the Preac saw with the finest blade (0.010"; ).25mm) to slice off the required number of pieces: The next step was to trim the back edge of each knee to match the slope of the hull. I used a razor blade in a safety holder: The thwarts fitted: Just the rudder to fit, plus equipment such as oars, anchors and boathooks, then a final decision on painting (or not). Shrouds Meanwhile work on the lower mast rigging continues. I'll not say much about ratlines other than to confirm I'm still rubbish at them. It's not a matter of practice; even if Speedy had four masts I'm convinced the fourth's ratlines would still be just as poor as the first's. I did all the recommended stuff - ruled card behind the shrouds; complete every fifth ratline first to avoid the hourglass effect, and so forth. My problem is I just can't get the ratlines to hang naturally. No matter how hard I try I end up with some that sag too much and some that take on an 'S' shape, and others that insist on defying gravity by bending upwards, despite efforts with pva to persuade them otherwise. Here's the lower ratlines finished. I'm trying not to look too closely. Futtock staves The kit supplies 1mm brass rod for the staves but I found this tricky to lash to the shrouds. I substituted some 1mm dowel left from another job and this worked fine. Catharpins Chris suggests using line to represent the catharpins. I found it difficult to tie lines between the futtock staves. Also, there's a lot going on in a very small space and I was concerned the whole area would look very clunky if I wasn't careful. For example, on the fore mast the futtock staves are only about 10mm long. Within that space you have to make room for lashings to seize the stave to the shrouds, the catharpins to the staves, and for the four futtock shrouds to loop round the staves and seize to the shrouds. To minimise the clutter I decided to use thin brass wire for the catharpins, with loops formed in the ends that could be seized to the futtock staves with the thinnest fly tying thread. I should note that the rake of the masts limits the number of catharpins that can be fitted. I just fitted two per mast, but that was sufficient to apply the required tension to the shrouds. Futtock shrouds The kit uses 0.75mm line which I felt somewhat heavy, especially bearing in mind the point about how cluttered this space is. Lees suggests 3.5" line for 6th rate vessels, which equates to just under 0.5mm at this scale. The kit provides very nice PE hooks, to which I seized the line using black fly tying thread: That close-up surprised me, because with the naked eye that hook looks a nice dull grey metal having been treated with Brass Black. The camera seems to bring the brass colour back out, but I think I'll stick with what my eye tells me. I've just started fitting the futtock shrouds. So much work goes into the seizings I decided to make them visible (without being too obtrusive) by using brown fly tying thread: It's worth pointing out that this thread is the same diameter as a human hair. Note also the serving on the first shroud, and the stays in the top right of the photo, curtesy of my Syren serving machine. Building work on the house is about to go quiet as we wait for doors and windows to be delivered, so I'm hoping I might be able to get more time in the shipyard. In other news, I've just had my first covid jab 🙂. I suspect I must be one of the first healthy, under 70s to get the vaccine in the UK (apart from health care and other priority workers) for which I'm very grateful. Derek


- 725 replies
-
- 11
-
-
- vanguard models
- speedy
- (and 1 more)
-
Hi Eric Progress is a bit slow at the moment as we’re in the middle of some building work at home. However I’m making some progress on the rigging, and am hoping to finish the ship’s boat soon. I had intended to wait until I’d finished the lower shrouds before posting an update, but I’ll try to do a quick interim report. In the meantime I’m enjoying following your build, which is bringing back fond memories of my own pinnace last year! Derek
- 725 replies
-
- 1
-
-
- vanguard models
- speedy
- (and 1 more)
-
Joinery
DelF replied to Maury S's topic in Building, Framing, Planking and plating a ships hull and deck
If you trust Google Images it's an old log cabin in Slovenia. -
Thanks Eric, you've tempted me to have a go at carving and making my own chisels. I agree with Steve on leaving the trunnels off. Derek
- 123 replies
-
- 2
-
-
- Model Shipways
- Pinnace
- (and 1 more)
-
Good luck with the serving machine Glenn. The mechanism is fairly straightforward so hopefully shouldn’t be too difficult to make. I was fortunate that I got mine from Chuck long before covid, and I can vouch for the extra realism you get from serving rigging - especially the shrouds where they are seized round the masthead. Derek
- 382 replies
-
- 2
-
-
-
- Vanguard Models
- Duchess of Kingston
- (and 1 more)
-
That’s a very decent first attempt - certainly better than my woeful attempts at carving! I suspect a little fettling with fine files and sandpaper to round off the edges would make it very presentable.
- 123 replies
-
- 2
-
-
- Model Shipways
- Pinnace
- (and 1 more)
-
Beautiful model Tim - you must be justifiably very proud. Well done! Derek
- 436 replies
-
- 2
-
-
- vanguard models
- alert
- (and 1 more)
-
Thanks Clogger! Whilst the kit makes a great model right out of the box, I enjoy adding a few little tweaks of my own. Derek P.S. I see you live in a beautiful part of the world. I've fond memories of a slow drive from Perth to Margaret River a few years ago, taking in several vineyards and great seafood restaurants along the way!
-
More nice touches - you're certainly making this model your own.
- 123 replies
-
- 1
-
-
- Model Shipways
- Pinnace
- (and 1 more)
-
The Fully Framed Model, four volumes series on scratch building a Swan class sloop, by David Antscherl and Greg Herbert. See here. Fantastic series, often quoted on the forum hence the tendency to refer to it simply as TFFM. Derek
-
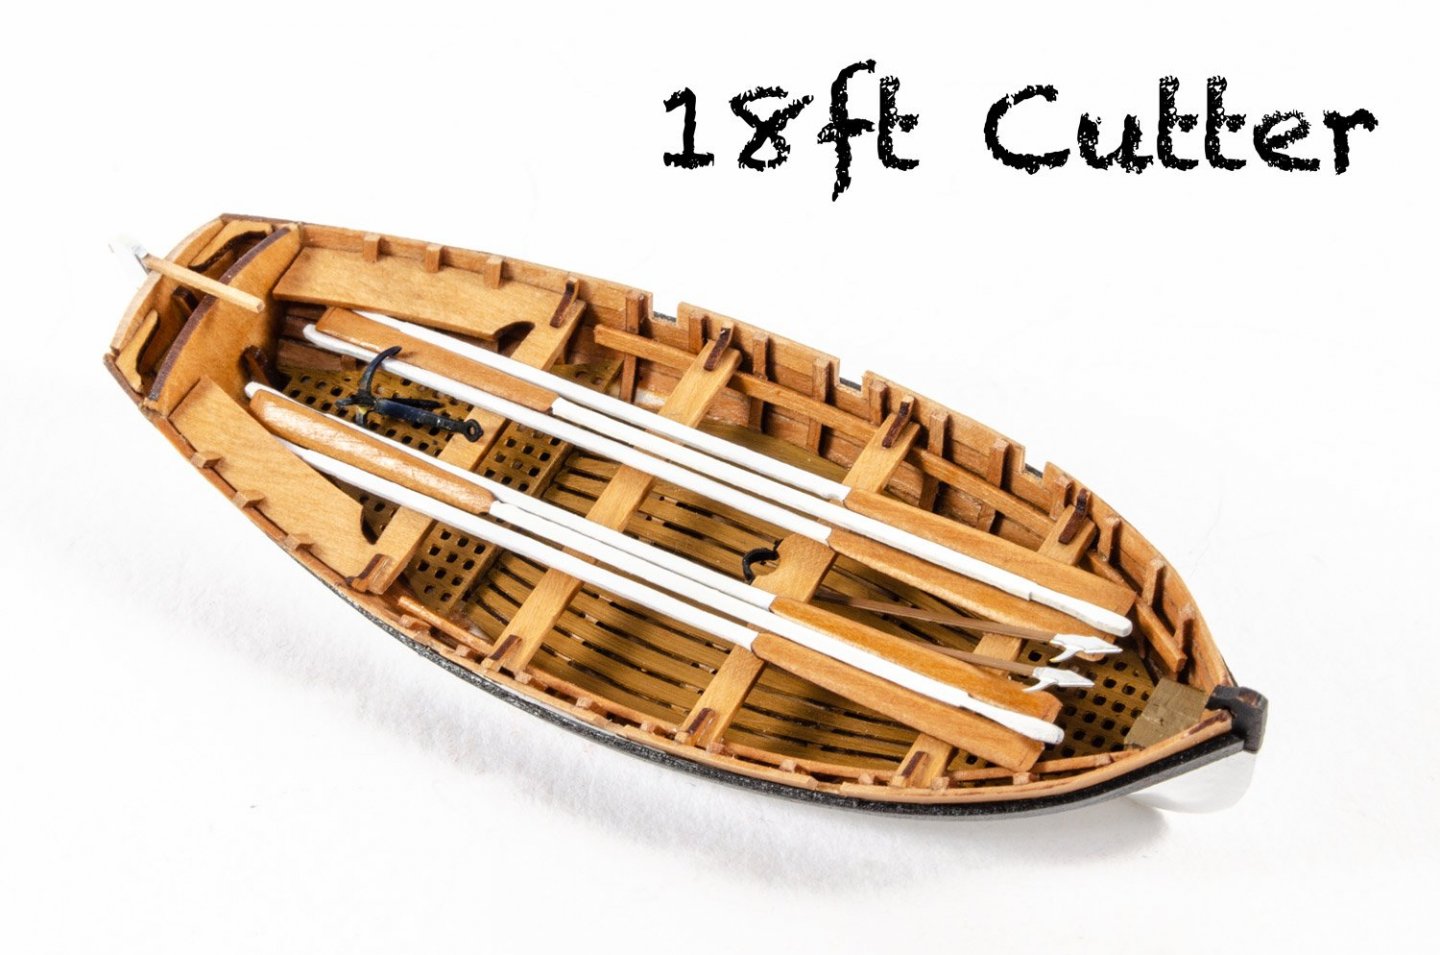
Ships Boat (aka anything but ratlines!) I wasn't too keen on the way the rowlocks were fashioned in the kit boat, from holes cut in the wash strake: I was especially dubious about my ability to glue the wash strake edge on above the wale, especially as I had followed the kit instructions and cut the ribs off below the wash strake. Without thinking about it I also copied the kit boat in not fitting ribs in the stern section. I note that the revised 18 foot cutter Chris now offers has put this right: I got the revised cutter from Chris with half a mind to start again, but as the original boat was already quite far advanced I thought I'd try a different approach. With the wale fitted I felt I had enough width at the top edge of the hull to have a go at fitting cap rails and more conventional rowlocks. I started by thinning a small sheet of boxwood down to 0.75mm then holding it against the top of the boat to trace each side in turn. After cutting the two halves of the cap rail on the scroll saw and sanding as close to the proper shape as I could I CA'd them in place and tried to even them up with a tad more sanding. I made the rowlocks using the same method I employed on the English Pinnace so I won't repeat that here. Here's the link to post #47 of that log with the details. Of course this boat is only 3/8ths the size of the pinnace so the rowlocks were cut from a strip of 1 X 1.5mm boxwood. For ease of handling I kept each one on the strip until I'd finished shaping it: Here they are rounded off and tried on for size: I'm not entirely happy with the cap rails. They're not as symmetrical as I'd like, but I've decided not to stress about it. I'll see what it looks like finished and fitted to Speedy. If I don't like it at that stage then plan B is to make up the revised boat kit. Btw, I've just noticed the thwarts aren't straight but fortunately they're not glued in yet. Back to ratlines. Whoopee! Derek

- 725 replies
-
- 15
-
-
- vanguard models
- speedy
- (and 1 more)
-
Very neat, and nicely in scale. Kit-supplied rings often look too large, but yours are just right. I also like the way you've bent wire round the ring - much more realistic than putting the ring on an eyelet.
-
Methinks you jest Glenn, especially as we’ve already had this conversation 😉 . To jog your memory, here’s the bit about gibs copied from that discussion: “...normally the only initial adjustments needed to a [Proxxon] mill are to the gibs. These are strips of metal that bear on the sliding surfaces - properly set they allow the table to move smoothly in the X and Y directions with no wobble (too loose) or binding (too tight). Adjustment is via three sets of small hex bolts with locknuts on each gib. Fortunately all mills are basically similar so any YouTube video on adjusting a mill should get you started on this.” There’s also gibs on the z-axis but I found I didn’t need to adjust these. Try it - it’s quite easy and should make quite a difference. Derek
- 778 replies
-
- 1
-
-
- cheerful
- Syren Ship Model Company
- (and 1 more)
-
I agree with Ron - no sign of age in your work! I was very dubious about fully rigging the guns on Speedy as they are so tiny, but was eventually persuaded - and I'm glad I did. The 2mm blocks needed for the side tackle were not supplied in the kit, but the ones I subsequently got from Vanguard were such good quality they made all the difference. I also used the finest silk fly-tying thread (18/0) to keep the seizings in scale. Here's some information on the method I used. As for age, I rely on good magnification and a quality spare hands tool (Quadhands) that I found out about on the forum. Give it a go Bob, and I'm sure you won't regret it. Derek
-
More great work Glenn. Your care and attention to detail - and your refusal to settle for second best - are really paying dividends. Not sure what's going on here? The dials should be smooth with very little backlash. Have you adjusted the gibs? Derek
- 778 replies
-
- 1
-
-
- cheerful
- Syren Ship Model Company
- (and 1 more)