DelF
-
Posts
1,409 -
Joined
-
Last visited
Content Type
Profiles
Forums
Gallery
Events
Everything posted by DelF
-
 Thanks, that makes sense. I wonder though, if drag is a particularly American, or relatively modern term? I ask because I can't find it in my dictionary of nautical terms, but that was compiled by the British Admiral Smyth and he died in 1865. Also, I wonder why some ships were designed that way - what are the advantages (and disadvantages) of sitting deeper at the stern? Was the position ever reversed, with ships designed to float deeper at the bows? Derek
 -
Our posts crossed in the post, as it were! And you've now got more than me.
- 725 replies
-
- 1
-

-
- vanguard models
- speedy
- (and 1 more)
-
Thanks - glad it's helping you. With the first planking I simply eyeballed the taper. Chris explains his method in the build manual, but basically you lay a plank against the preceding one and let it go where it wants, than mark it where it starts to overlap the previous plank. Just give it a reasonable amount of taper from that point to the end - but reduce it by no more than half it's width. The stern is a bit tricky because after the initial few tapered planks that follow the tight curve of the hull, the planks need to get wider again - eventually you need to use triangular stealers to fill the gaps. Hopefully this is clear from the photos. I'm sure you know triangular stealers are not good practice where the planks show, but they're fine in Speedy where they will eventually be covered by copper. Speaking of good practice, when you're quoting someone else you don't need to copy the whole post - it's just as easy to highlight the bit you want and hit the 'quote selection' prompt that comes up, and it makes it easier for others reading the log. Ccoyle's post immediately before yours is a good example. Hope you don't mind me mentioning this, but I used to do the same until someone else pointed out the neater method. I look forward to seeing your log. Derek P.S. Just noticed that you and I have the exact same number of posts to our name. Spooky!
- 725 replies
-
- 1
-
-
- vanguard models
- speedy
- (and 1 more)
-
Good luck...a good opportunity to practice edge bending. On second planking, I think I've discovered why some of my planks are a bit 'bumpy ' - I'd not been careful enough in cleaning off excess CA and I think blobs must have hardened along the edges of some strakes. When dry they're hard to see, but it's such an obvious mistake I could kick myself, especially as I know it's one I've taken care to avoid in the past. Must be an age thing! I'm sure it'll all sand out. Derek
-
Excellent progress so far. I suspect you’ll have overtaken me before long. I was sorry to hear about your accident, but at least it served to illustrate Chris’s great customer service - from what you say it sounds like he replaced the broken parts very quickly. I think you’re right to try edge-bending - it seems the best way to go. Using the gun port pattern to get the right curve was a smart idea, though it’s usually good to over-bend initially as the wood will tend to straighten slightly. Like glbarlow, I find a travel iron works best. It literally flattens the wood, helping to ensure it doesn't bend in a direction you don’t want. Derek
-
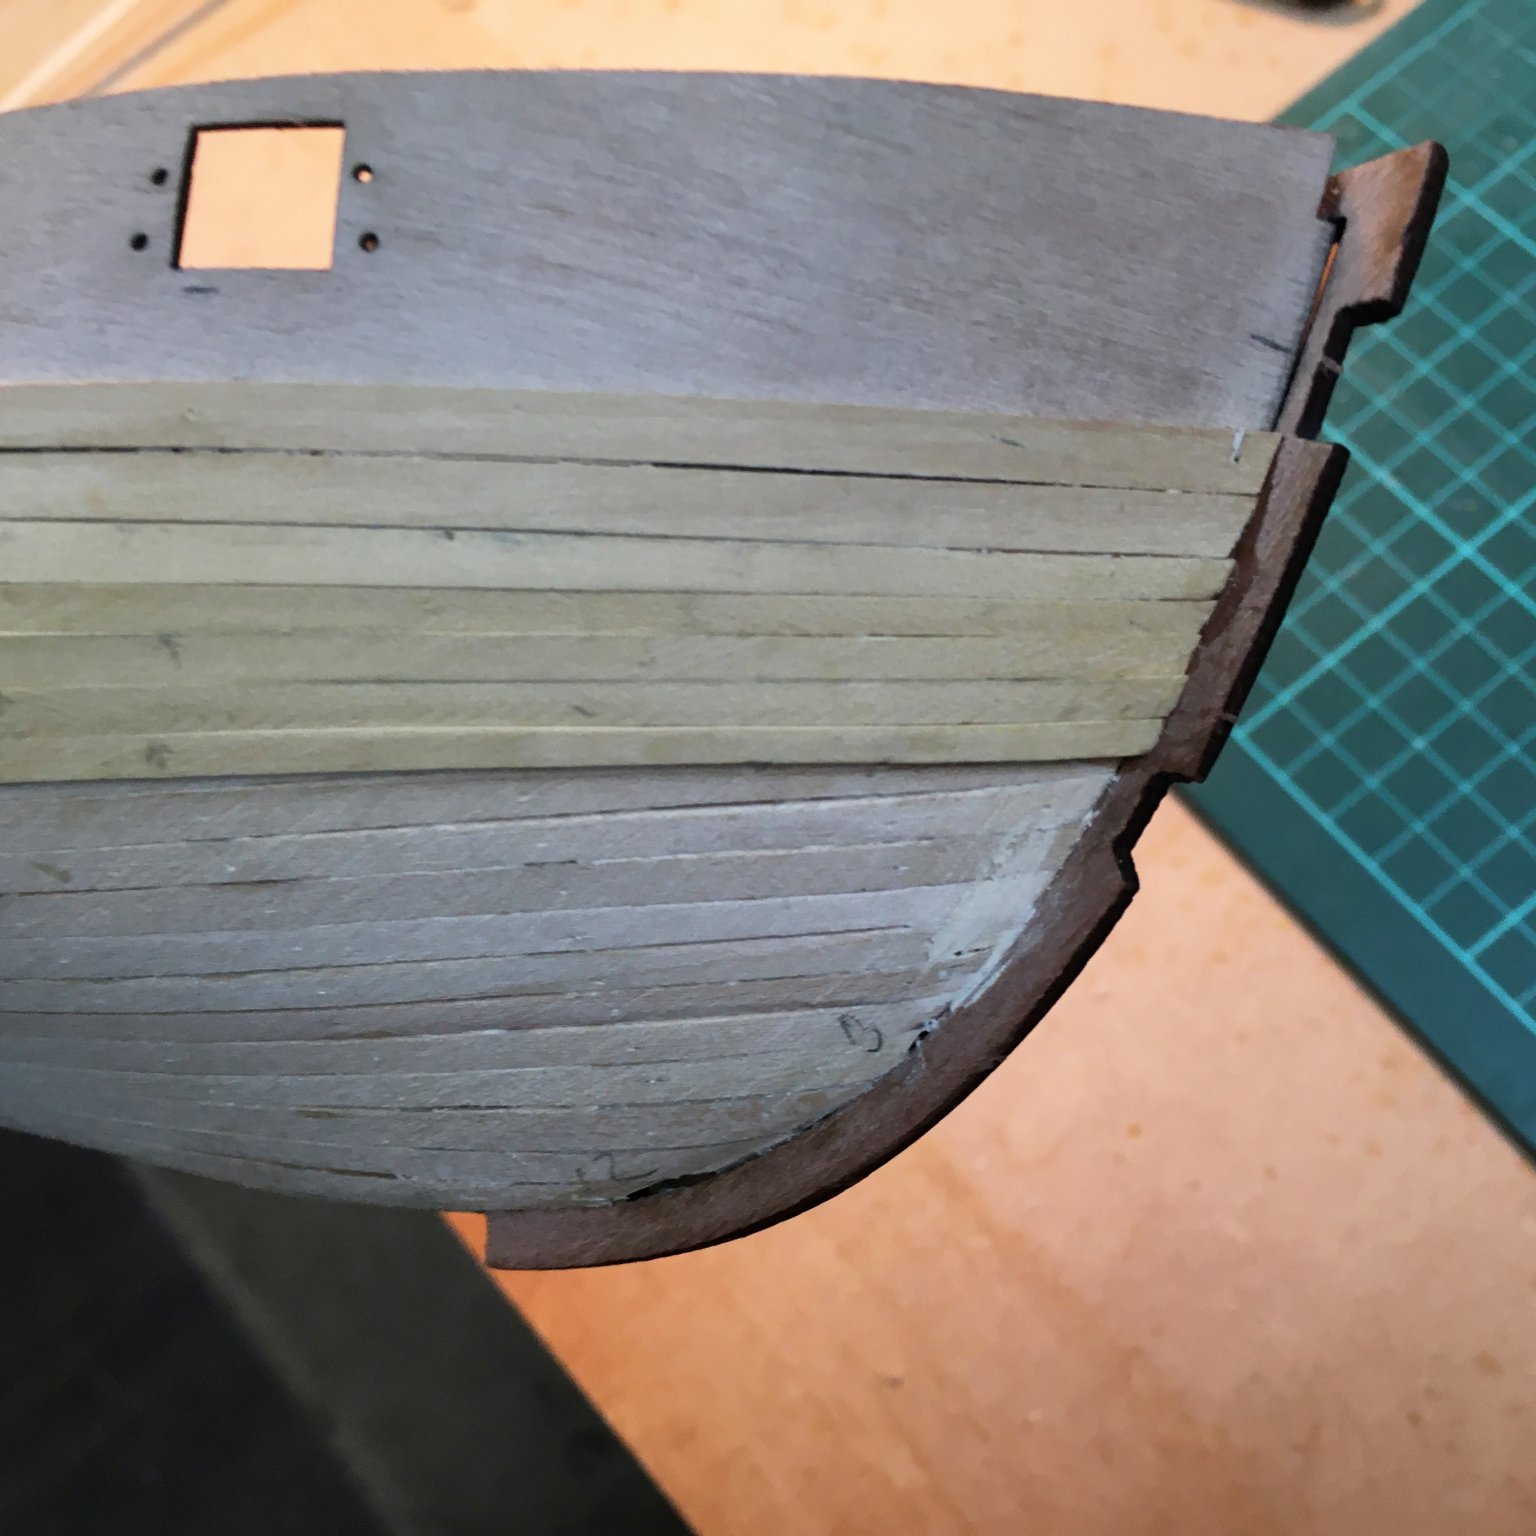
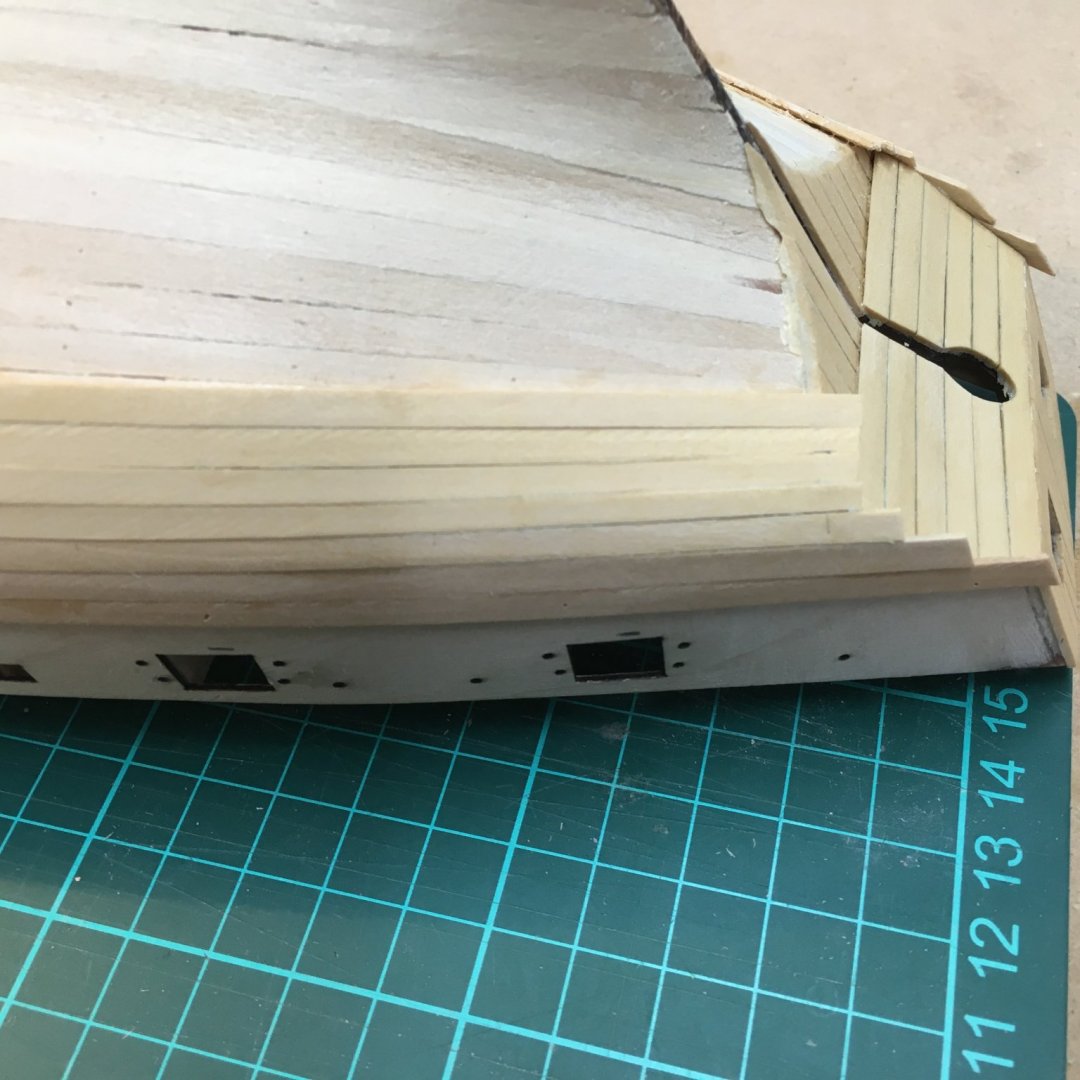
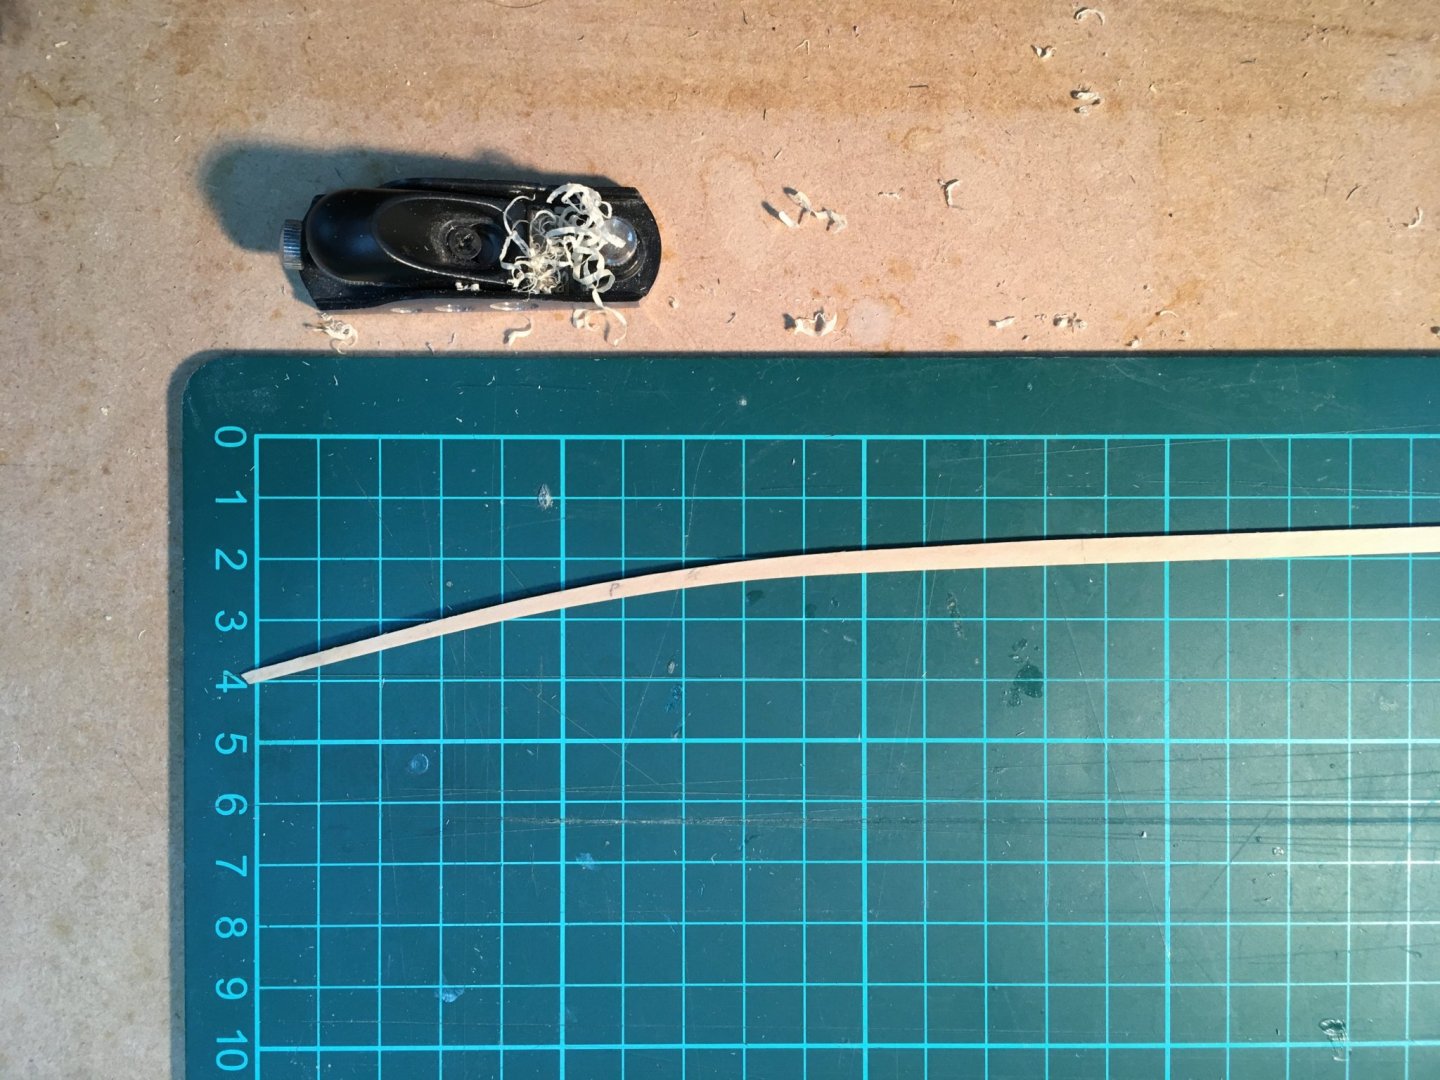
After a break during which I've spent more time on my pinnace build, I've completed a bit more of the second planking. I apologise for the quality of these pictures - I'm not the world's greatest photographer. Apart from anything else, the pictures tend to make the planking look worse than it actually is (honest!😀), especially in the bow area. In reality each strake is lying flat against the hull and tight against its neighbours. The top two strakes are a bit gappy but that doesn't matter as they'll be covered by additional wale planks. The lighting tends to highlight the bumps and dips, but these should sand out. As you can see, the second planking will require a fair degree of sanding in any case, to remove the saw marks that are prominent on several planks - my only slight criticism of the kit materials. Overall the edge bending technique is working well. As for tapering, I decided not to rely on eyeballing. Instead, I measured the distance from the underside of the first two (wale) planks to the keel at various points on the hull and divided by the number of planks needed at midships. As the hull is fairly regular this distance was the same for several frames fore and aft of midships - as you might expect, tapering was only required for a short distance in the bows and stern. The measurements in these areas gave me the width of planks at various points and hence the tapering required. Chuck explains this much better than me in various tutorials on MSW, including in the articles database. Here's what a plank looks like after tapering and edge bending. The little Veritas plane also makes chamfering the edge of the plank easy (before bending), helping planks sit snuggly together on curved areas of the hull. In the end I decided to go with medium gel CA for the second planking. A bit scary, but I've found if I'm careful and just apply the glue a couple of inches at a time, I can get good adhesion without getting the stuff all over the front surface of the planks. I'm approaching the point where the remaining strakes will be covered by copper sheathing, at which stage I should be able to proceed more quickly. Looking ahead to that stage, it's just struck me how much the waterline diverges from the line of the keel. This close-up of the hull from the manual shows just how non-parallel the waterline and the keel are. I'm sure there's a proper nautical term for this, but the result is that there's much more copper in the stern than the bows. Marking the waterline will be an interesting exercise. Onwards and upwards. Derek
- 725 replies
-
- 6
-
-
- vanguard models
- speedy
- (and 1 more)
-
Thanks LS, much appreciated. However, carpentry at 1:24 scale is surely much easier than the 1:200 you have to work with on your Victory model. Derek
-
Me too. This was a project a couple of years ago. Sorry. I'm getting off-topic. Derek

-
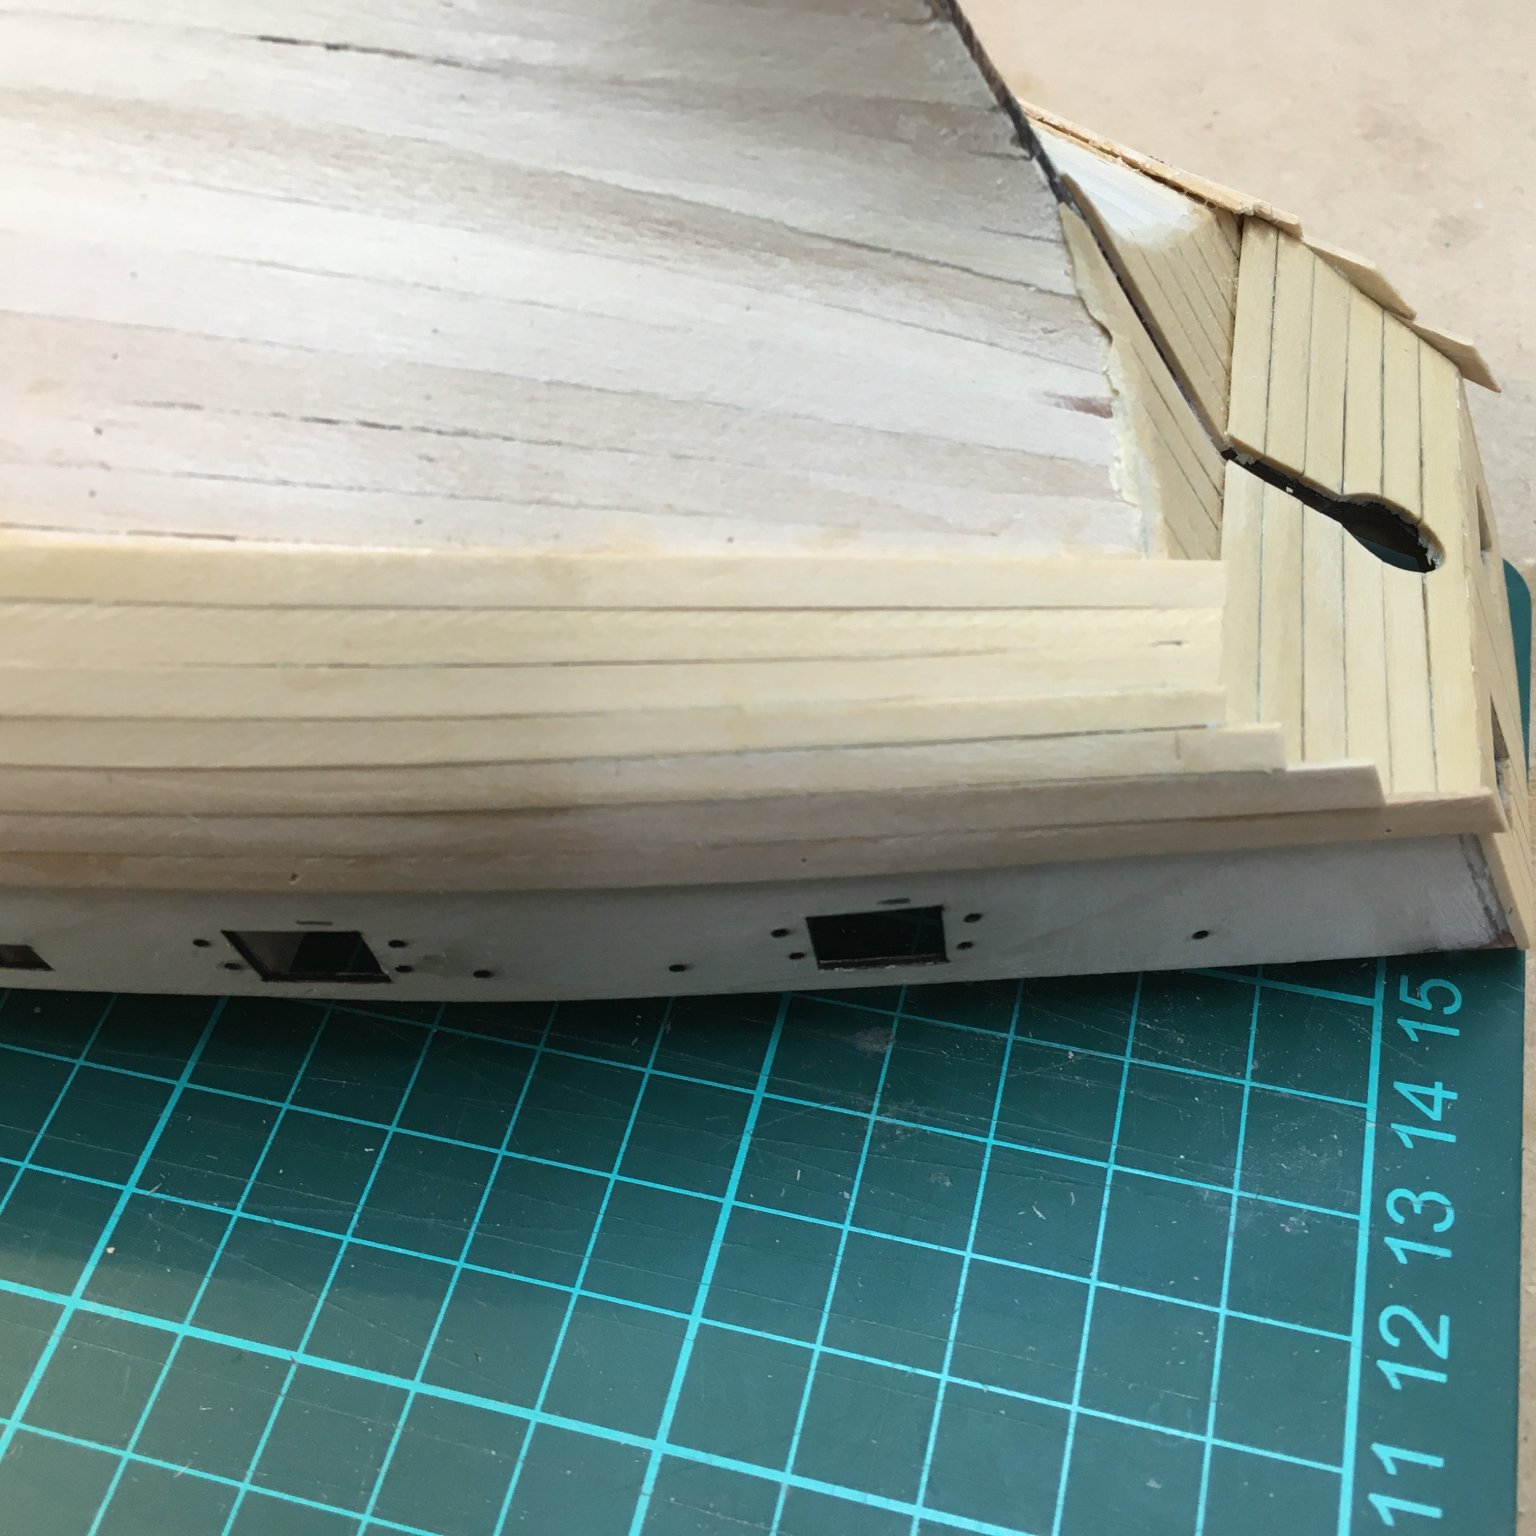
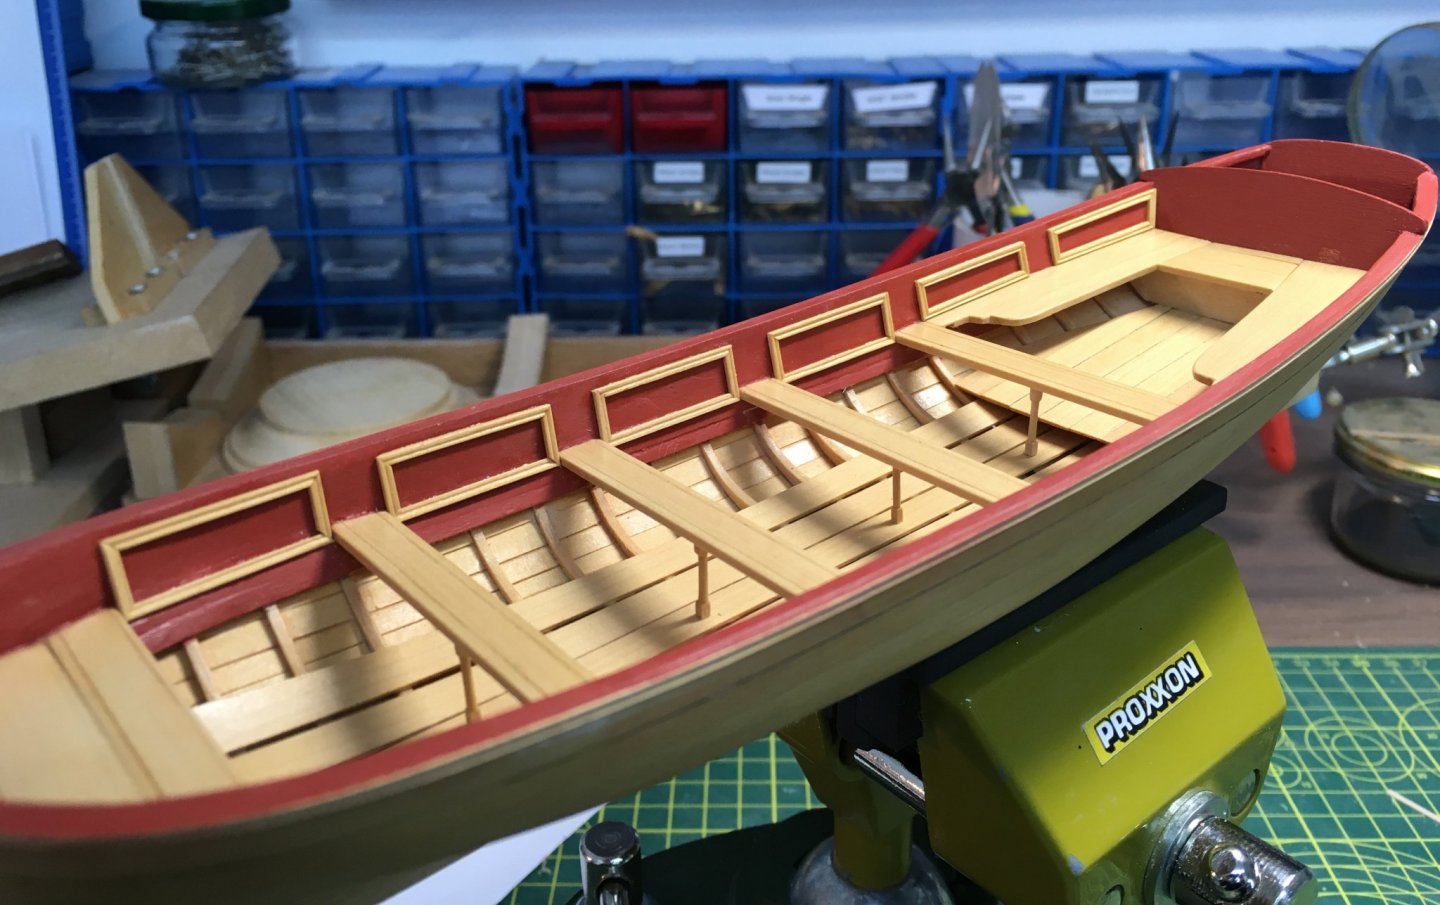
Many thanks for the likes. Thanks Chuck. I'm trying to be more precise in my work - measuring angles properly and tweaking templates 'til they fit, for example, rather than just eyeballing things. Bit more progress on inboard details, completing the decorative frames, making the little step in the cockpit for lazy officers, and fashioning the various knees. As before, I made the unpainted items from spare boxwood, using the kit-supplied pieces as templates. I cut out the shapes roughly on the scroll saw and finished with swiss files and sandpaper. The trickiest piece to fit was the larger knee in the bows - due to the curves in that area the back edge needed considerable chamfering to get it to sit neat and square. I pre-drilled the hole for the ring that sits on the knee as I felt it would be more awkward once it was fitted. As before, the pinnace continues to provide welcome relief from second planking on Speedy! Derek

- 77 replies
-
- 12
-
-
- model shipways
- pinnace
- (and 1 more)
-
Looking good LS. Being nosey, I couldn't help noticing the book on the Night Sky beside your workbench. You're not an astronomer as well are you? Derek P.S. I also notice your bench is considerably tidier than mine - probably explains why you are able to make such quick progress!
-
Revenge 1577 by Asat - Amati - 1/64
DelF replied to ASAT's topic in - Kit build logs for subjects built from 1501 - 1750
Great progress - you're as fast as Chris Watton! I particularly like your coamings. Beautiful. Derek -
I’m just using it on the second planking. You can get away with more on the first planking as it won’t show. Of course, for the same reason, the first planking would be a safe place to practice edge bending. Derek
- 725 replies
-
- 2
-
-
- vanguard models
- speedy
- (and 1 more)
-
Looking good! I always think models really come to life when all their masts are stepped and you get an impression of their overall size. I lived in Thanet from 1973 to 1990; and you're right, it hasn't changed much. Others will judge whether that's a good thing or not! Derek
-
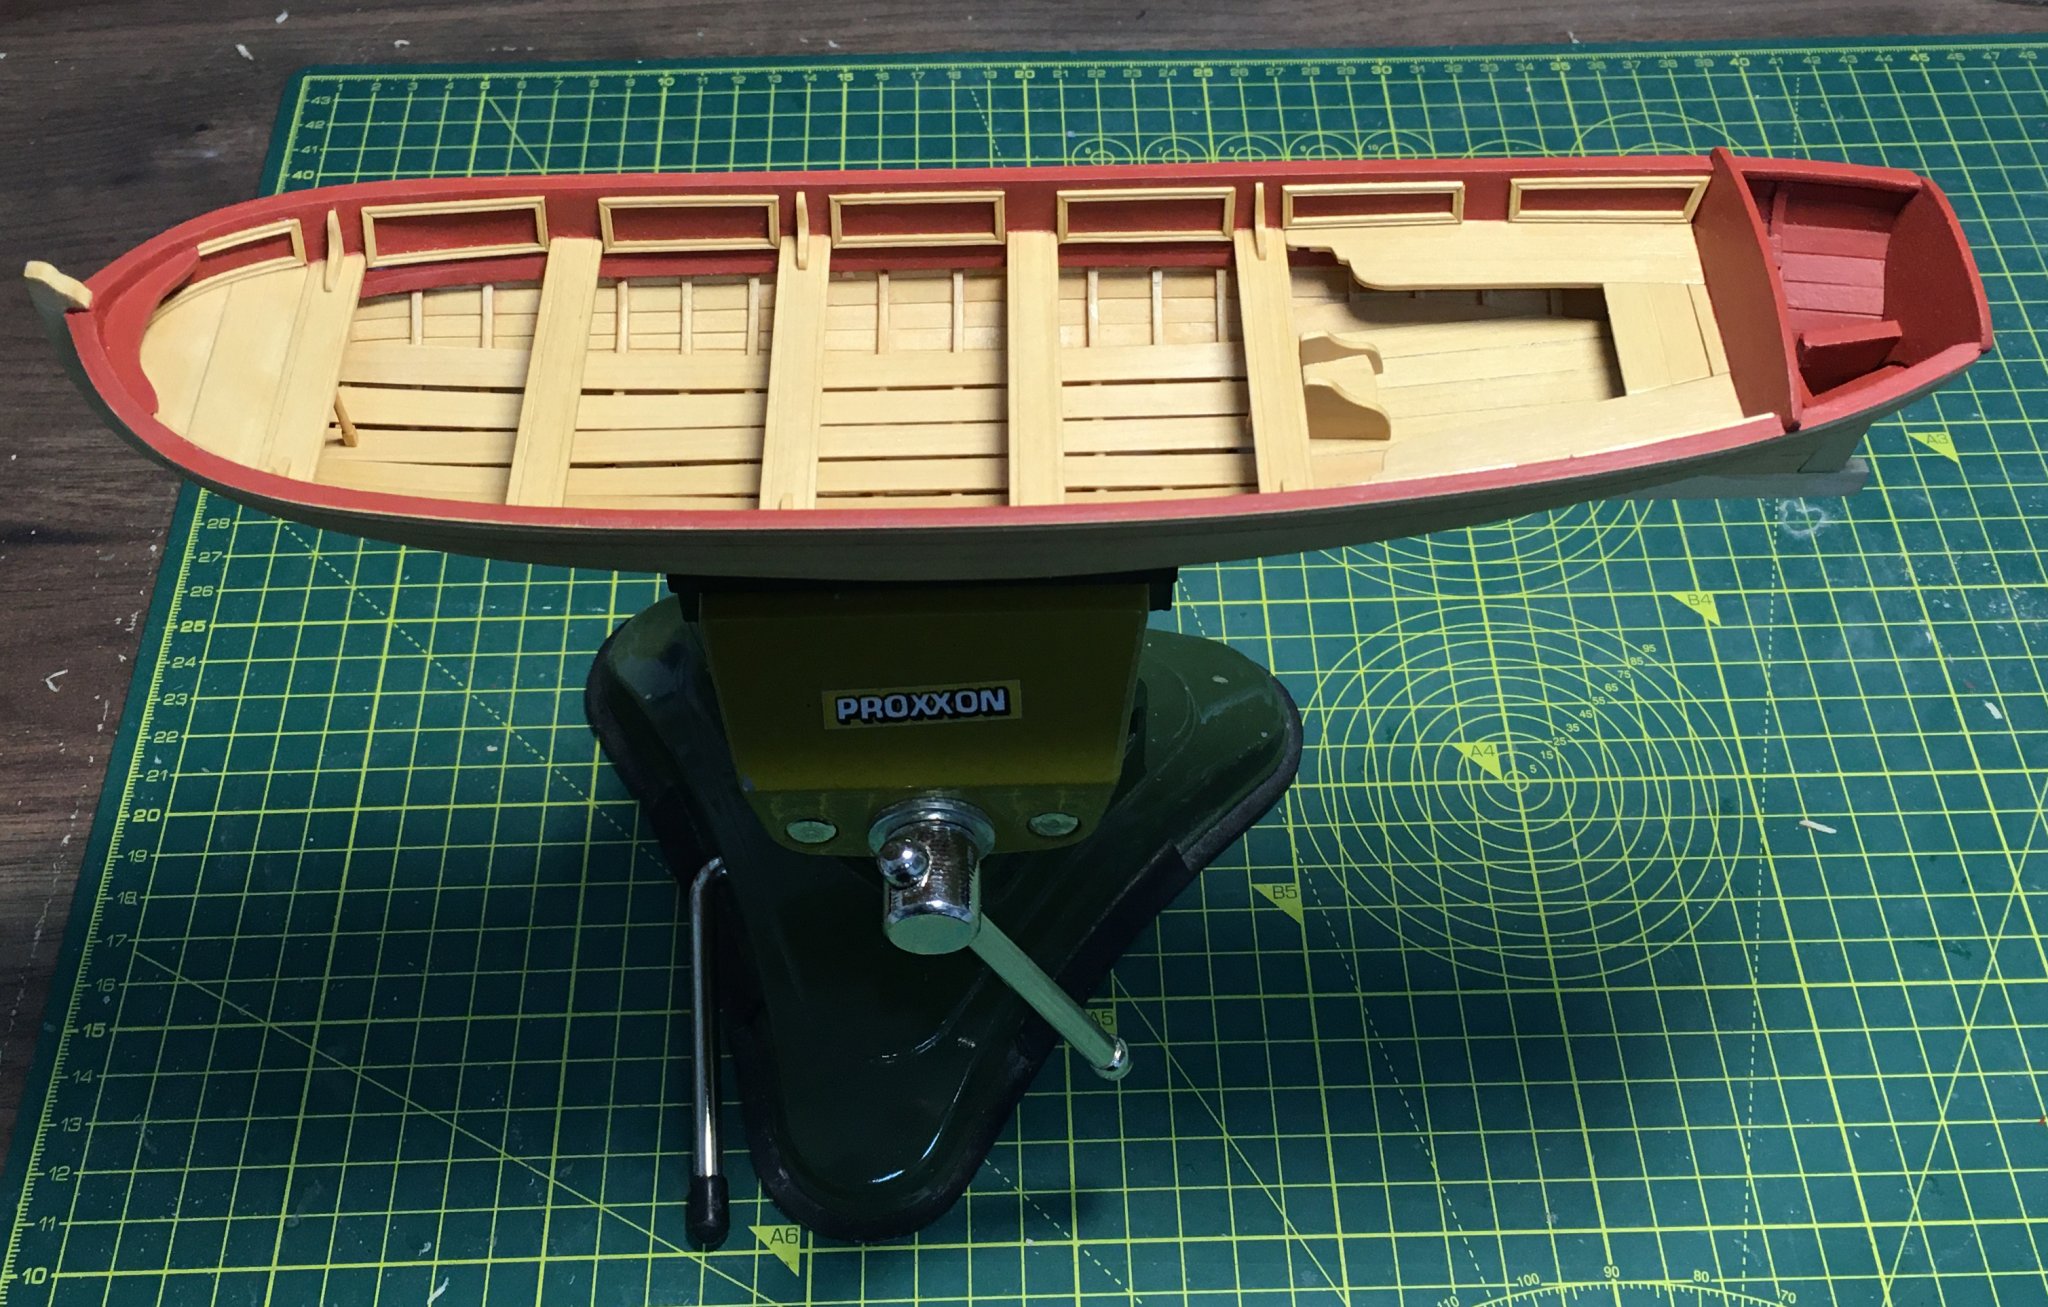
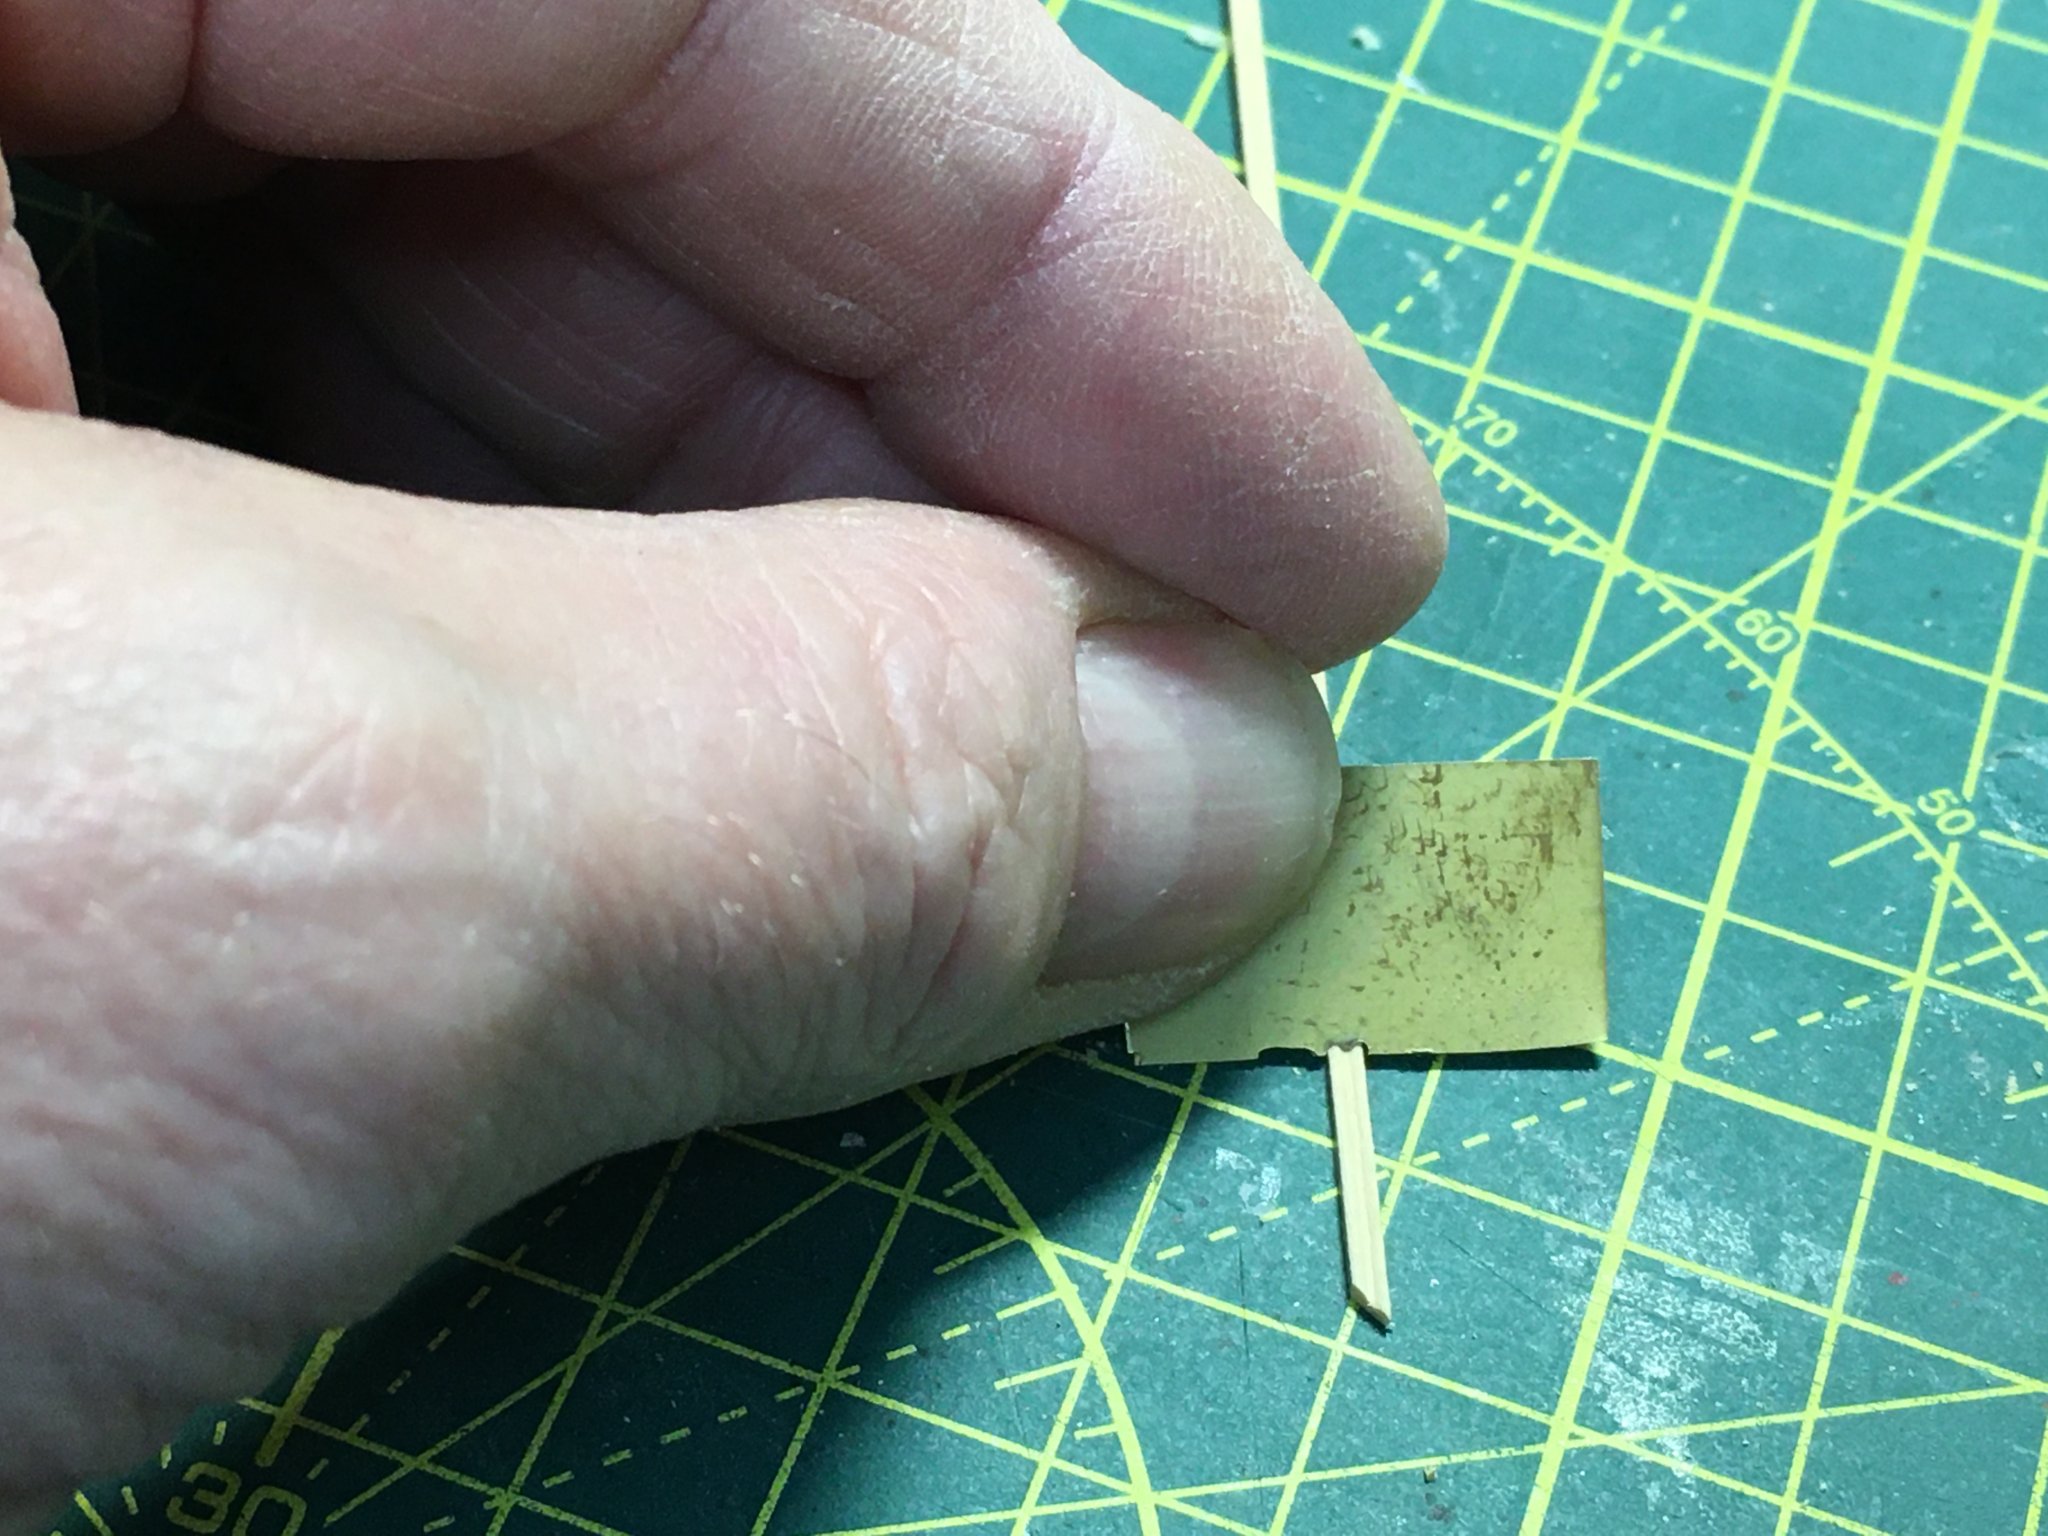
Thanks for the 'likes', they're much appreciated. I've done a bit of work since the last post, but just realised that I've not photographed all the relevant stages so this entry will be a bit scrappy. I continued building up the internal planking above the thwarts, and did this in thin strips as recommended in the instruction manual. Although this makes the strips easier to bend into shape it inevitably leads to unevenness and gaps that require filler. Not a major problem as the wood will be painted; just a chore to avoid marking the thwarts and other unpainted surfaces. Fitting the cap rail was easier than I expected, with the soft basswood simple to cut out and glue into place. I wasn't sure whether the cap rail was meant to go under the seat back (where it overlaps the hull at each side) or butt up against it. In the end I decided it was easier to trim the seat back so the cap rail could slip under it, which meant I only needed to cut and fit one piece for each side rather than two. I left the glue overnight with weights in place to hold the cap rail in place against the curve of the hull, then trimmed and sanded the rail flush with the hull both inside and out. I'd already tried scraping a nice profile on a test piece and decided there was no way I could get a decent result with basswood. So I decide to make the profile in boxwood strip glued to the edge of the cap rail. This worked fine. The first picture below shows the scraper in action. The second shows the basswood cap rail and the boxwood profile fitted, and a prodigious amount of filling still going on! The scraper was simplicity itself to make - a piece of thin scrap brass with the profile filed on the edge. After more filling, sanding and painting the result was fairly neat, and I turned to the decorative frames. These are made from the same boxwood profile. As several would be more or less identical I used my trusty Preac saw to cut the mitres. Although I love my new Byrnes saw, I still like the Preac for tiny, delicate pieces like this. Here I'm using the thinnest blade (0.010"/0.25 mm) which produces very fine cuts, especially in boxwood. The mitre bar can be set quite easily with a protractor ( I use a surprisingly accurate digital protractor - surprising as it was only £6 from Aldi), and the horizontal black bar visible on the fence on the right can be set up as a stop to allow repeatable cuts. This approach worked well until I got to the cockpit area where the frames become less like regular rectangles. At first I tried to judge the necessary mitre angle by eye, with mixed (ie poor!) results. In the end measuring the angles properly and setting the saw up didn't take much longer than trying to bodge it. Next step will be finishing the decorative moulding in the bow area. I must say the pinnace is providing welcome light relief from Speedy, where I'm taking the second planking very slowly and carefully. Consequently I'm finding it rather nerve wracking and I need frequent breaks. I'll try to remember to take more pics in future. Derek


- 77 replies
-
- 14
-
-
- model shipways
- pinnace
- (and 1 more)
-
Hi LS I've just found your Victory log, and wanted to add my compliments on a great build so far. I'm particularly impressed that you've managed such a lot of progress in just 152 hours (I daren't time my builds as I spend far too much time faffing around and re-working!). Derek P.S. I used to live near you, in Cliftonville (sounds posher than saying Margate)
-
I'd certainly recommend Chuck's edge bending method. I've seen him use a hot air gun and a small travel iron. I've tried both, and both work, but I find the iron works faster and, as it literally irons the wood flat, it reduces any tendency for the strip to bend in a direction you don't want. Derek
- 725 replies
-
- 1
-
-
- vanguard models
- speedy
- (and 1 more)
-
Hi Great to hear you’re joining the ‘Speedy Club’. Chris covers your question in the instruction manual. Once you have completed the first layer of hull planking and are sanding it smooth, you should aim to reduce the overall thickness at the stern to 1.5mm. When the second planking is added that will match the width to that of the sternpost and rudder. The photos in the manual show this quite well. I’m working on the second planking just now and taking it slowly to get it as neat as possible, so there’s not much to put in the log. I may start doing some sub-assemblies for variety. Good luck with your build - I’d certainly be interested to see the videos you’re planning. Derek
-
I suspect you’ve considered making your own rope, and if so I wonder why you decided against it? I find it quite straightforward with Chuck’s Rope Rocket and you've got almost infinite options in terms of diameter, strands, lay etc. I appreciate that it is much simpler and quicker to buy rope, but making one’s own is much easier than some scratch building tasks (eg block making) and can be very rewarding. Just a thought. Derek
- 335 replies
-
- 1
-
-
- alert
- vanguard models
- (and 1 more)
-
I think I'd like to see your maple deck once it's been varnished (or whatever finish you plan) before deciding which I prefer. You've started an interesting debate, though. Derek
-
Square tomatoes were bred to fit neatly into sandwiches. Derek
-
Could this thread get any further off-topic? I love it!
-
We just ‘season’ cast iron ware when it’s new by rubbing in cooking oil then heating it (without food). From then on it seems to be almost non-stick when you wash it. Before I tried it I thought the seasoning trick was an old wives tale, but it seems to work. I wish you hadn’t mentioned steak - I could just eat one now and it’s only breakfast time here! Derek
-
Hi Jud It’s an induction hob. I’m not sure if that’s the same thing as a ceramic hob, but in any case it works fine with cast iron. It also works with stainless steel, so long as it is a magnetic grade. I have to say, it’s the best hob we’ve ever had, by far. Efficient, even heating and dead easy to clean. Hope that helps Derek
-
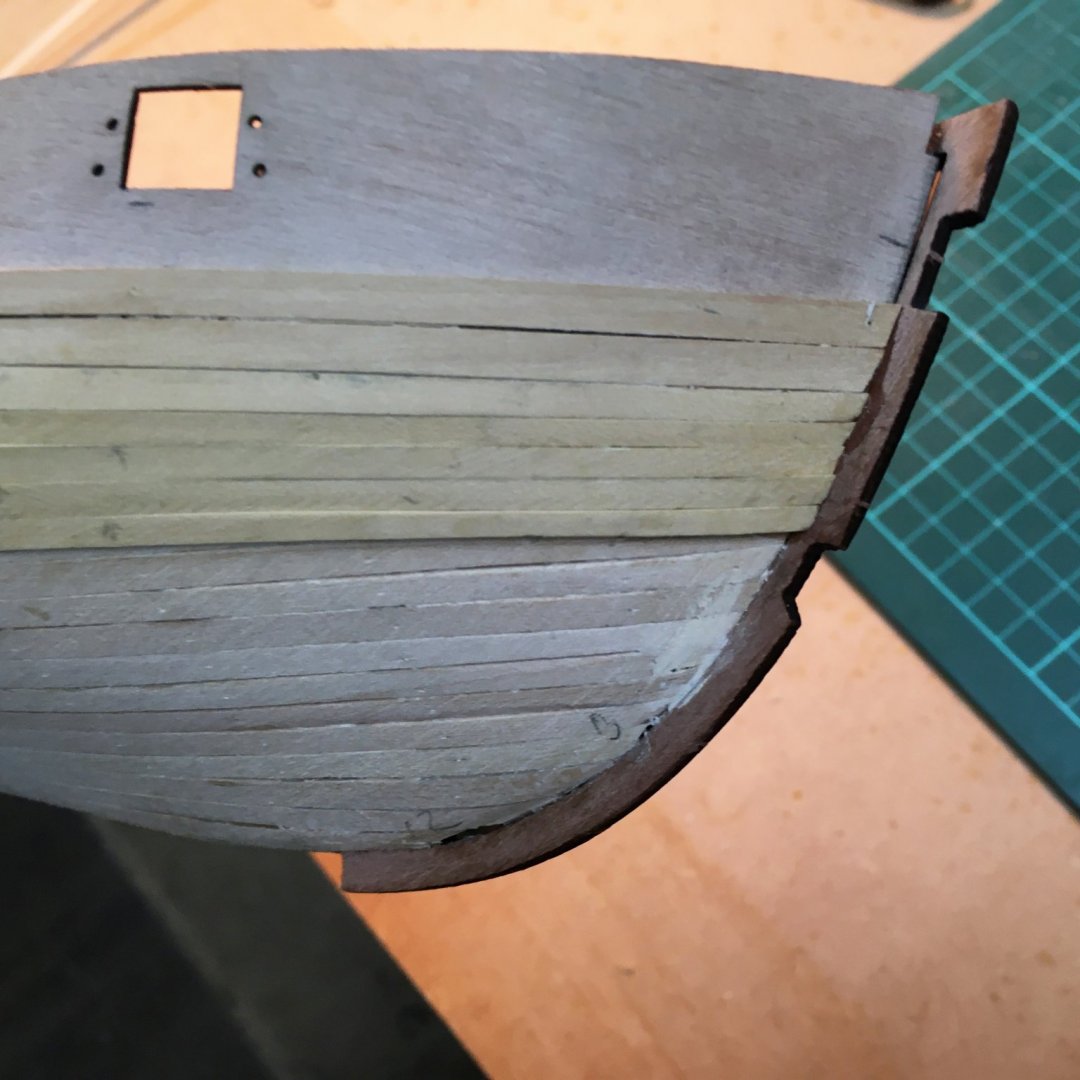
I've had a word with Chris, and he decided to go with vertical planking on Speedy based on his research which found many contemporary model pictures showing similar sized and period models with the stern planking running vertically, not horizontal or angled. Looking at my copy of the AOTS book on Alert I noticed that the transom had horizontal beams as well as vertical frames. The Alert book showed the transom planked horizontally, but depending on how the beams tied into the frames I imagine vertical planks would be just as possible as horizontal. I'm going to leave the planks as they are, mainly because of Chris's research, but also I quite like the alternating pattern of vertical-horizontal-vertical. Thanks again for raising. Derek
- 725 replies
-
- 1
-
-
- vanguard models
- speedy
- (and 1 more)