DelF
-
Posts
1,409 -
Joined
-
Last visited
Content Type
Profiles
Forums
Gallery
Events
Everything posted by DelF
-
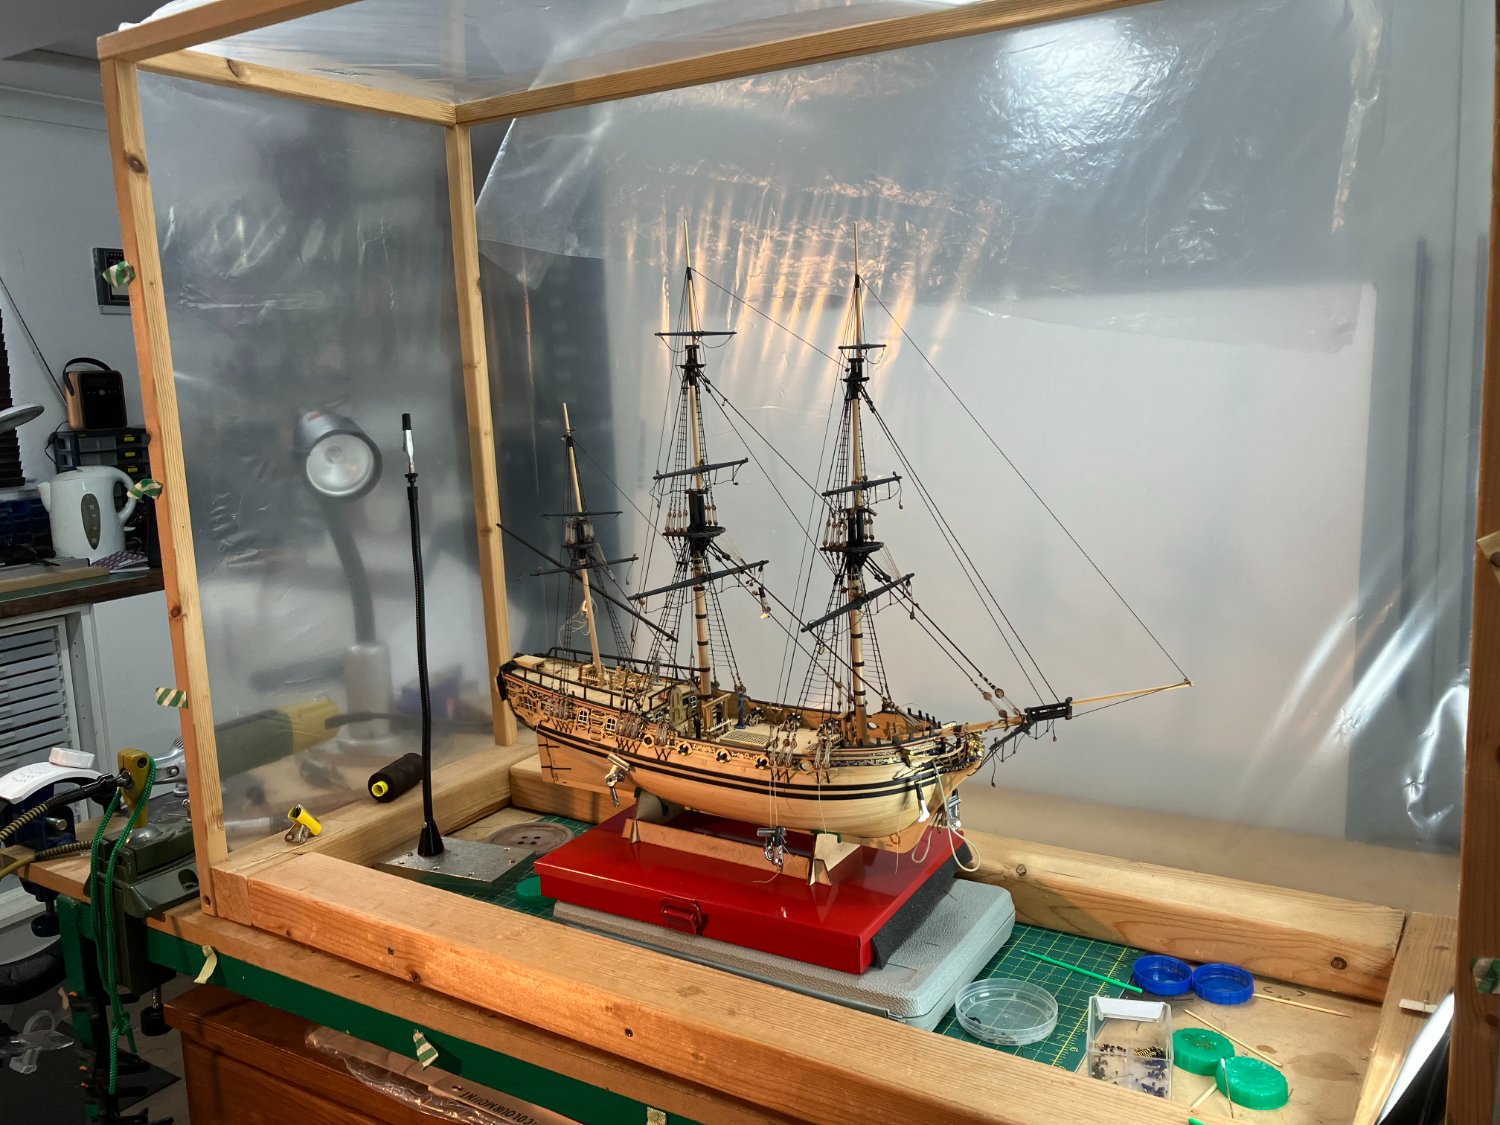
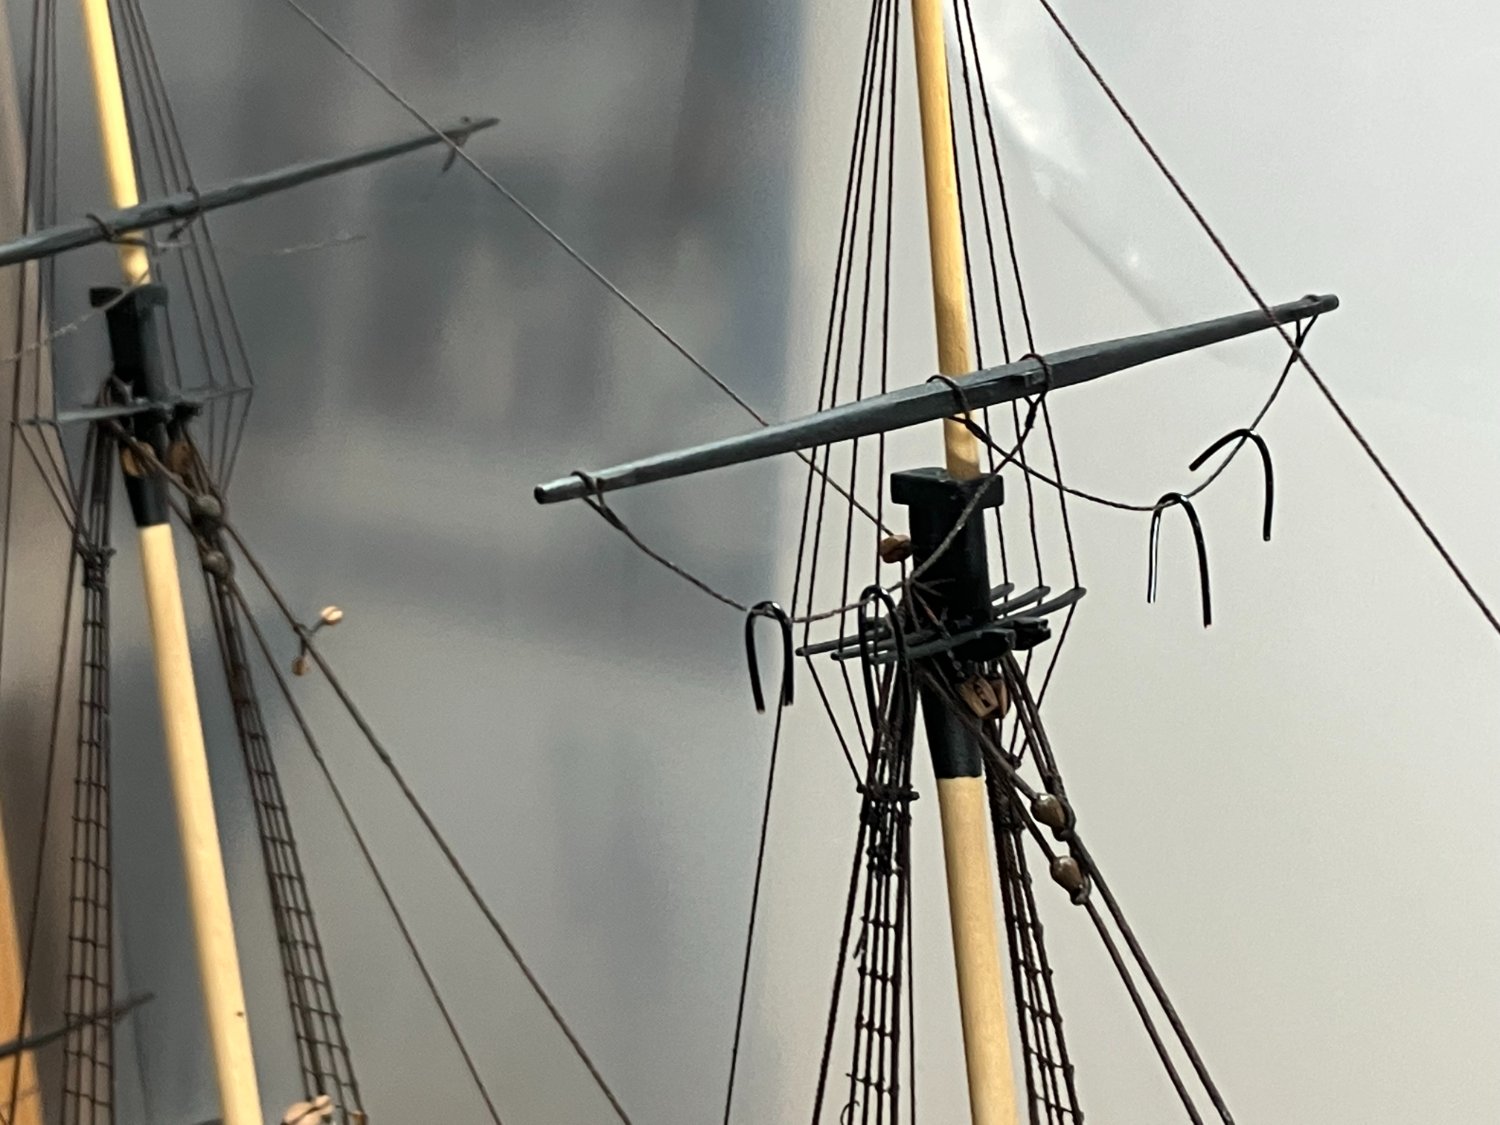
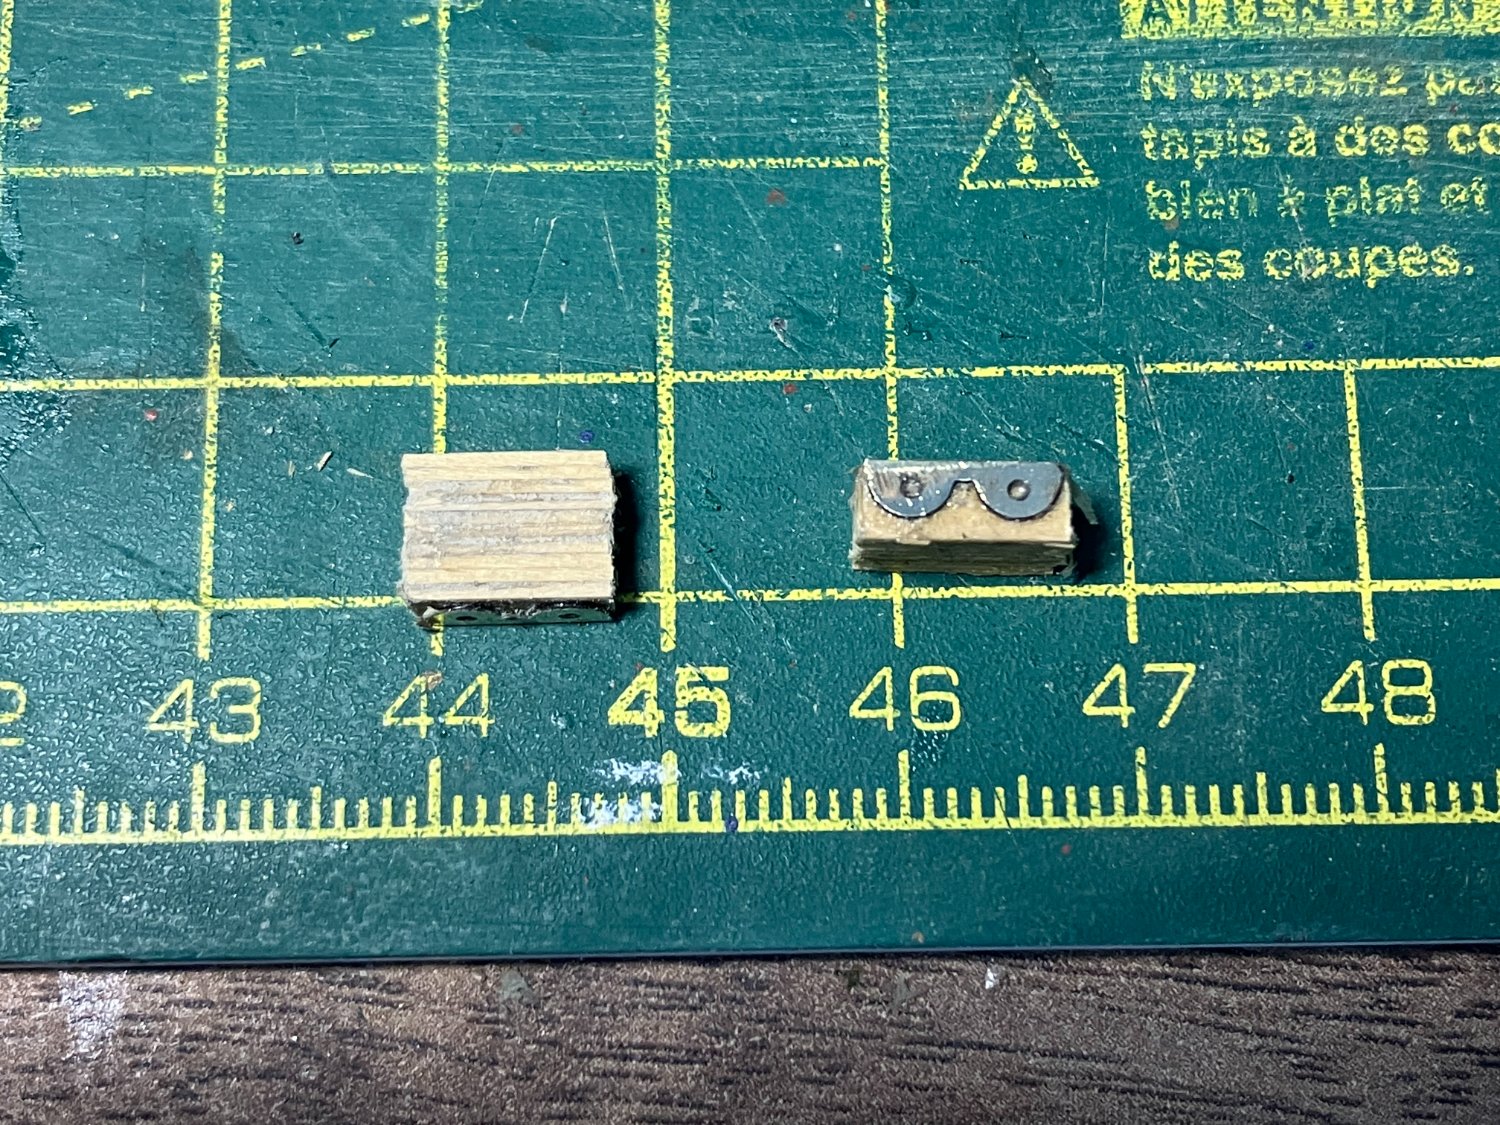
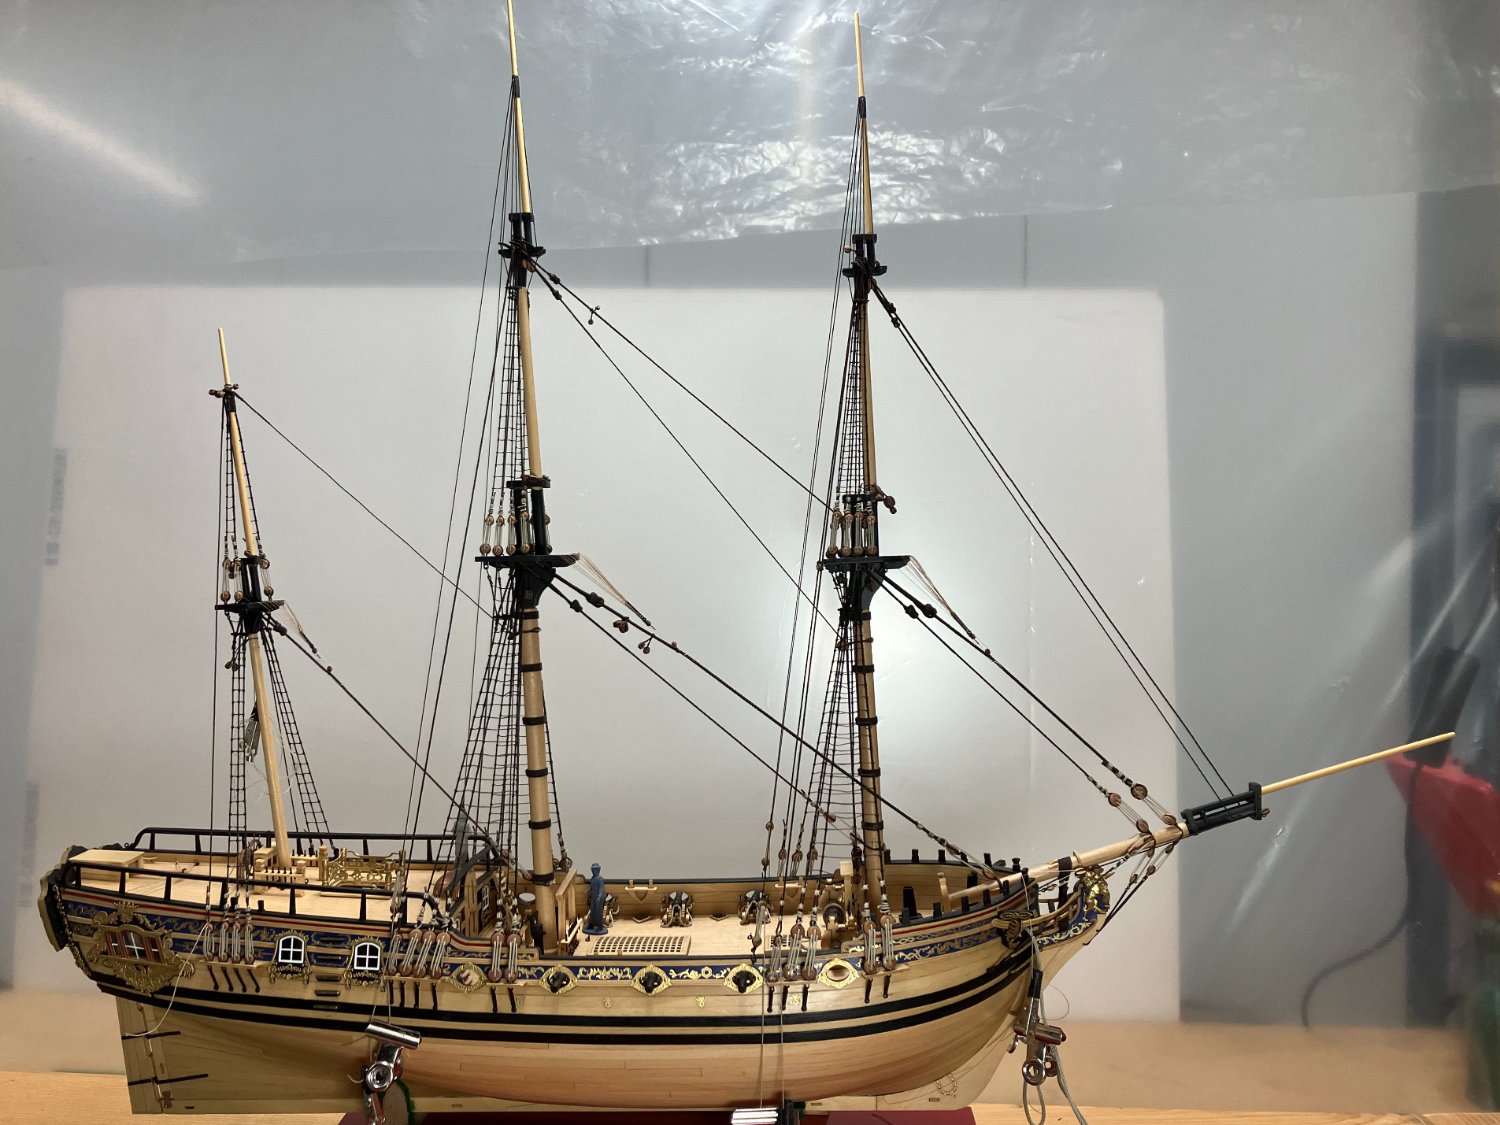
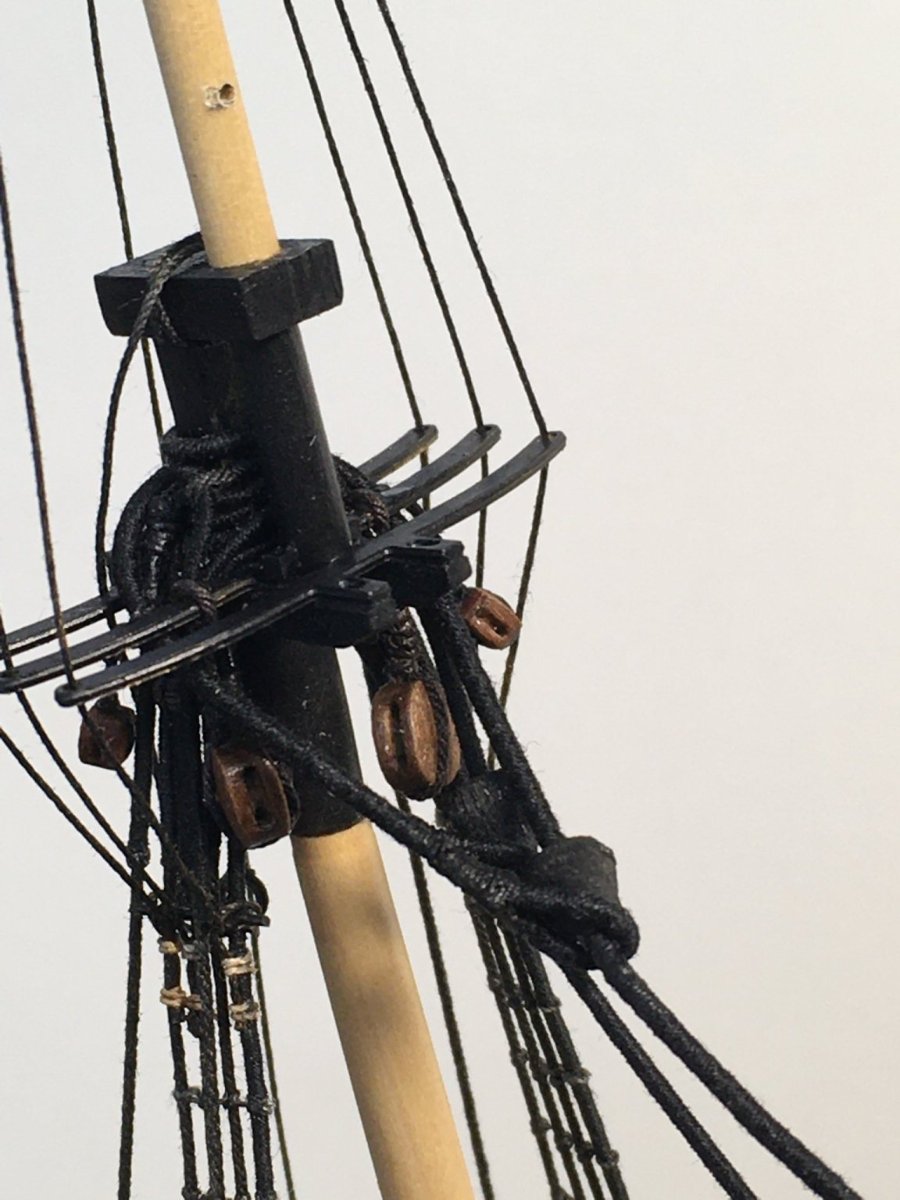
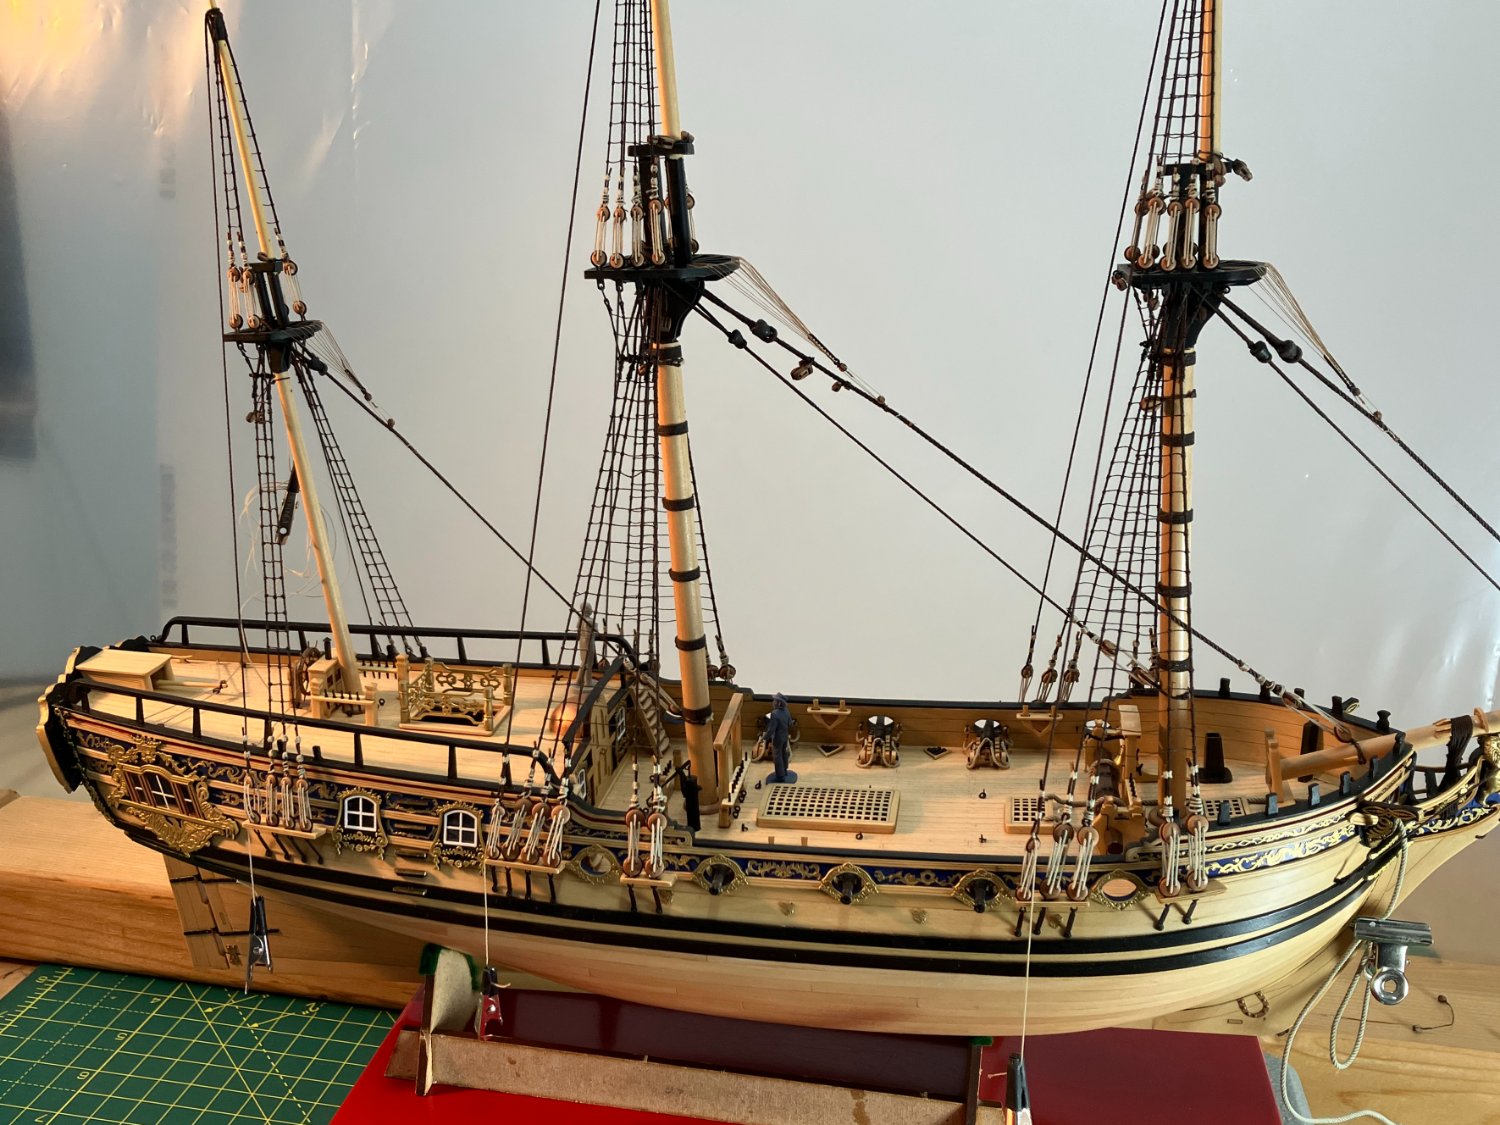
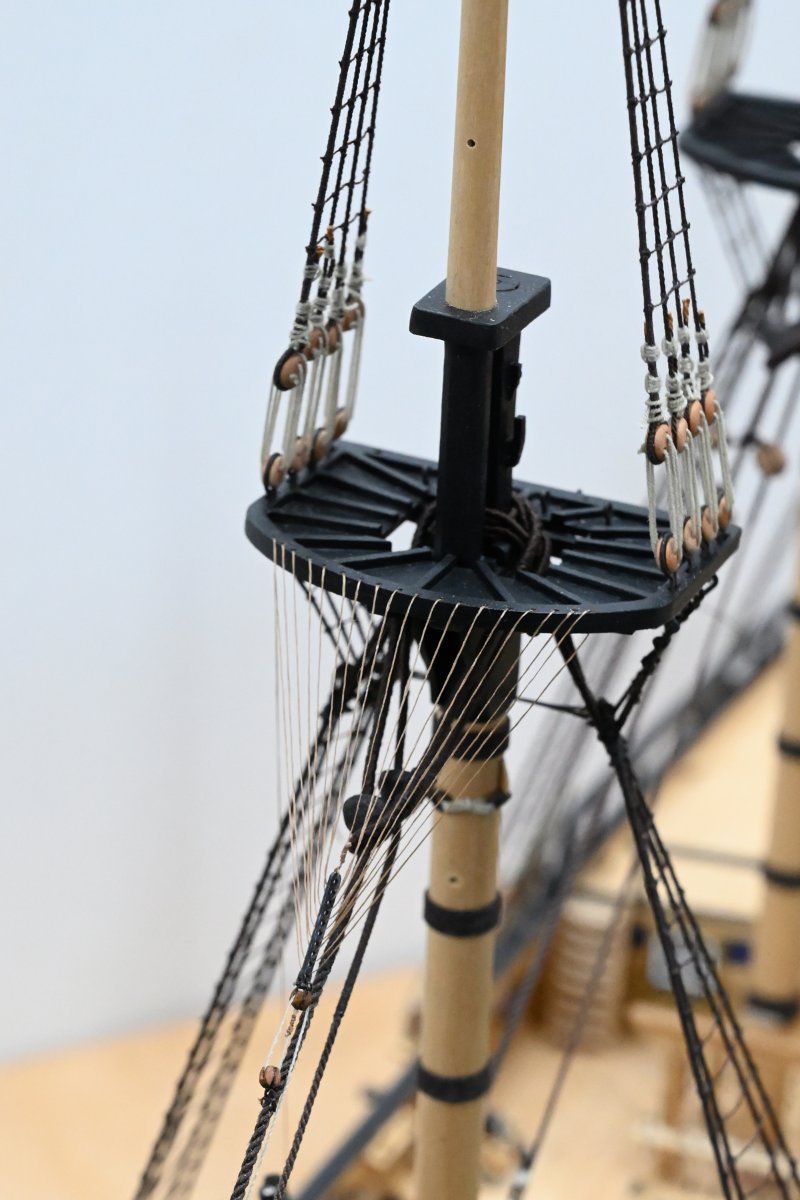
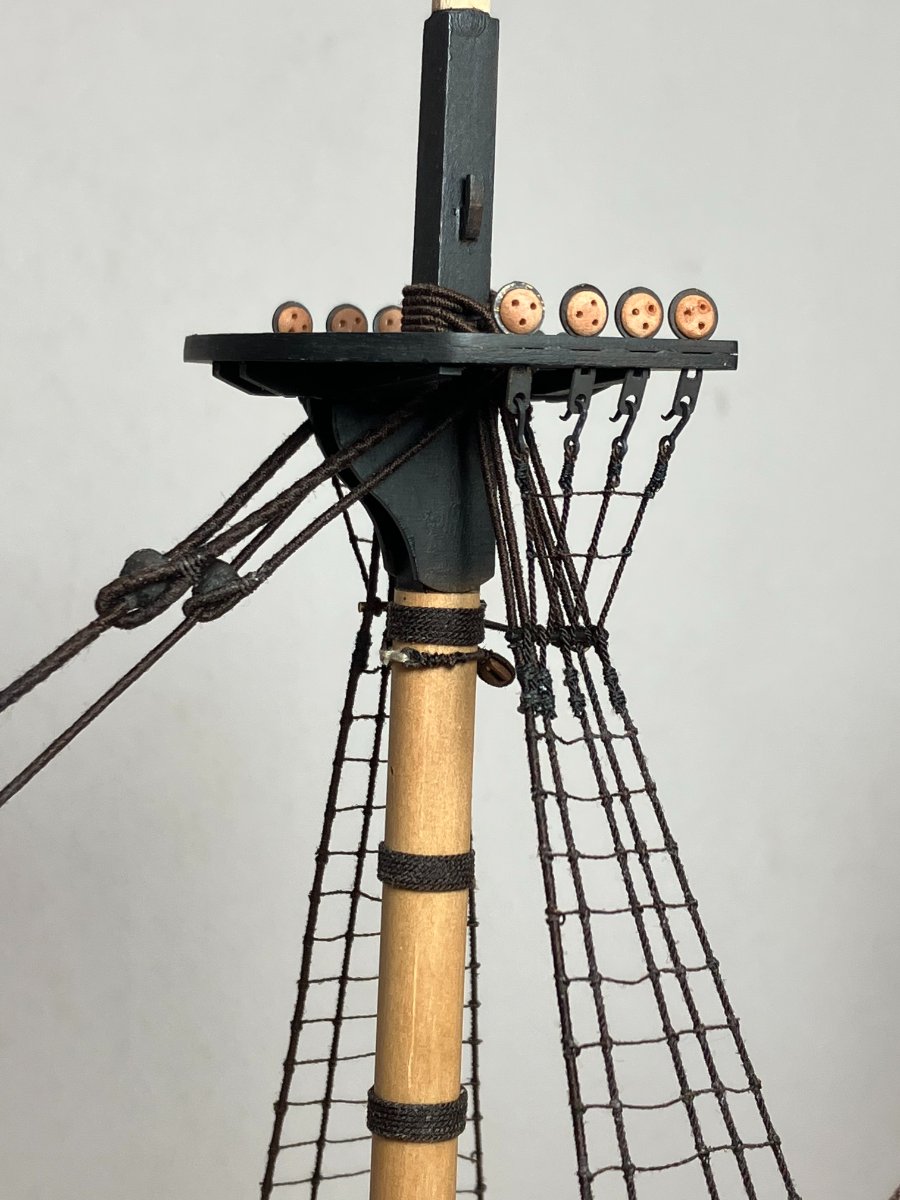
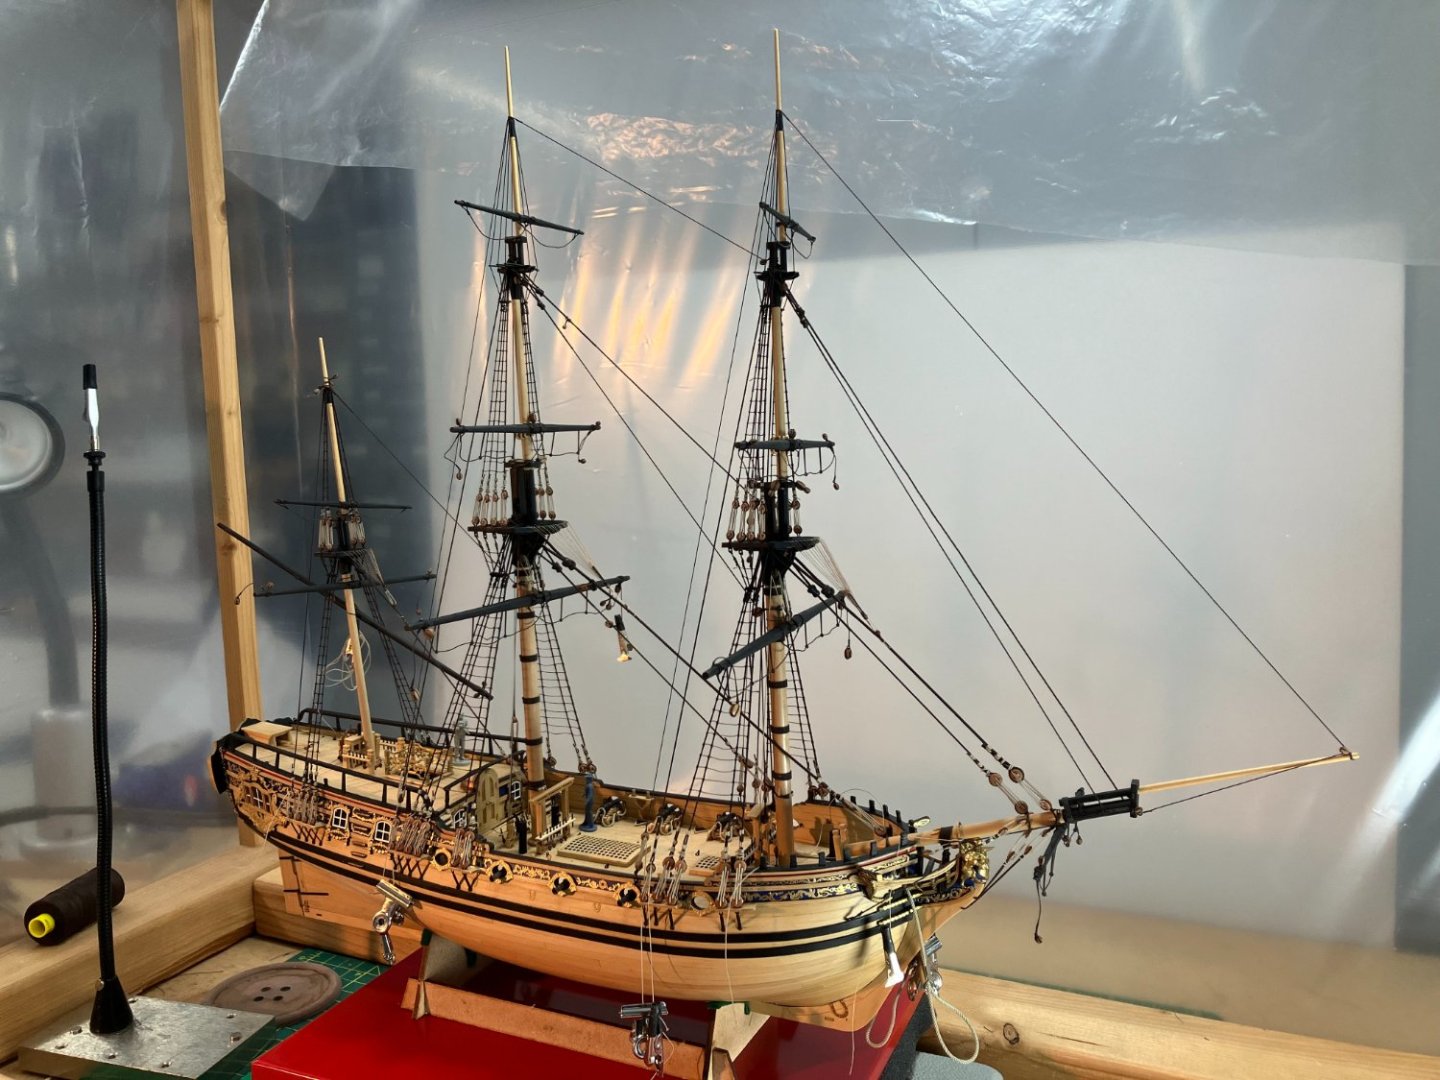
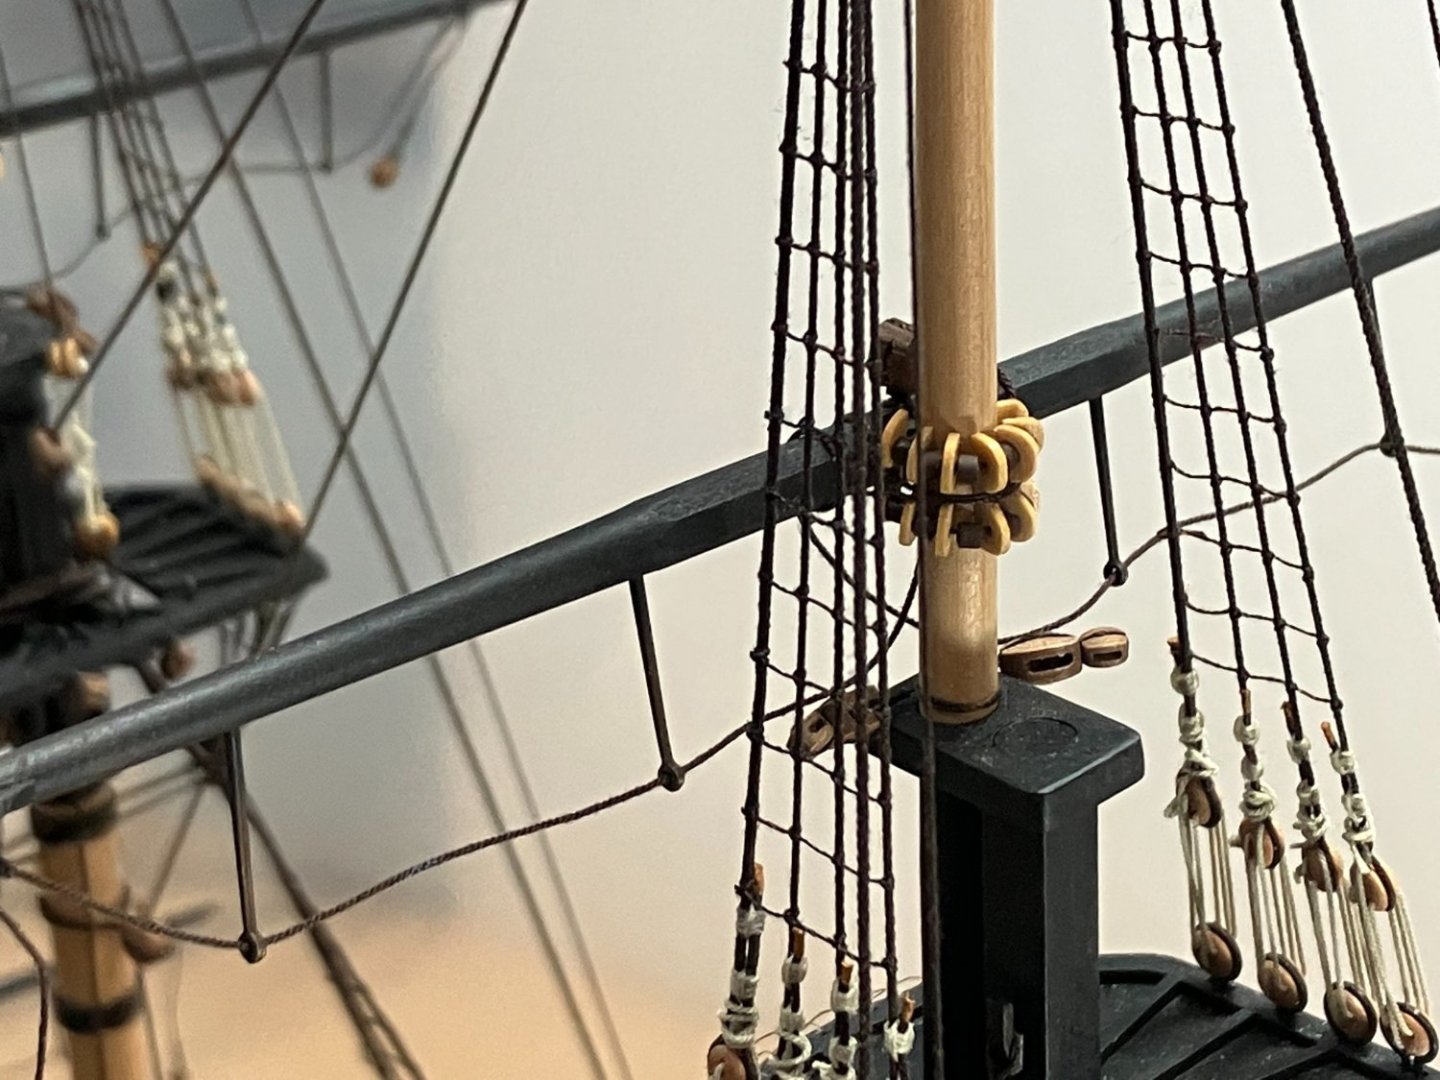
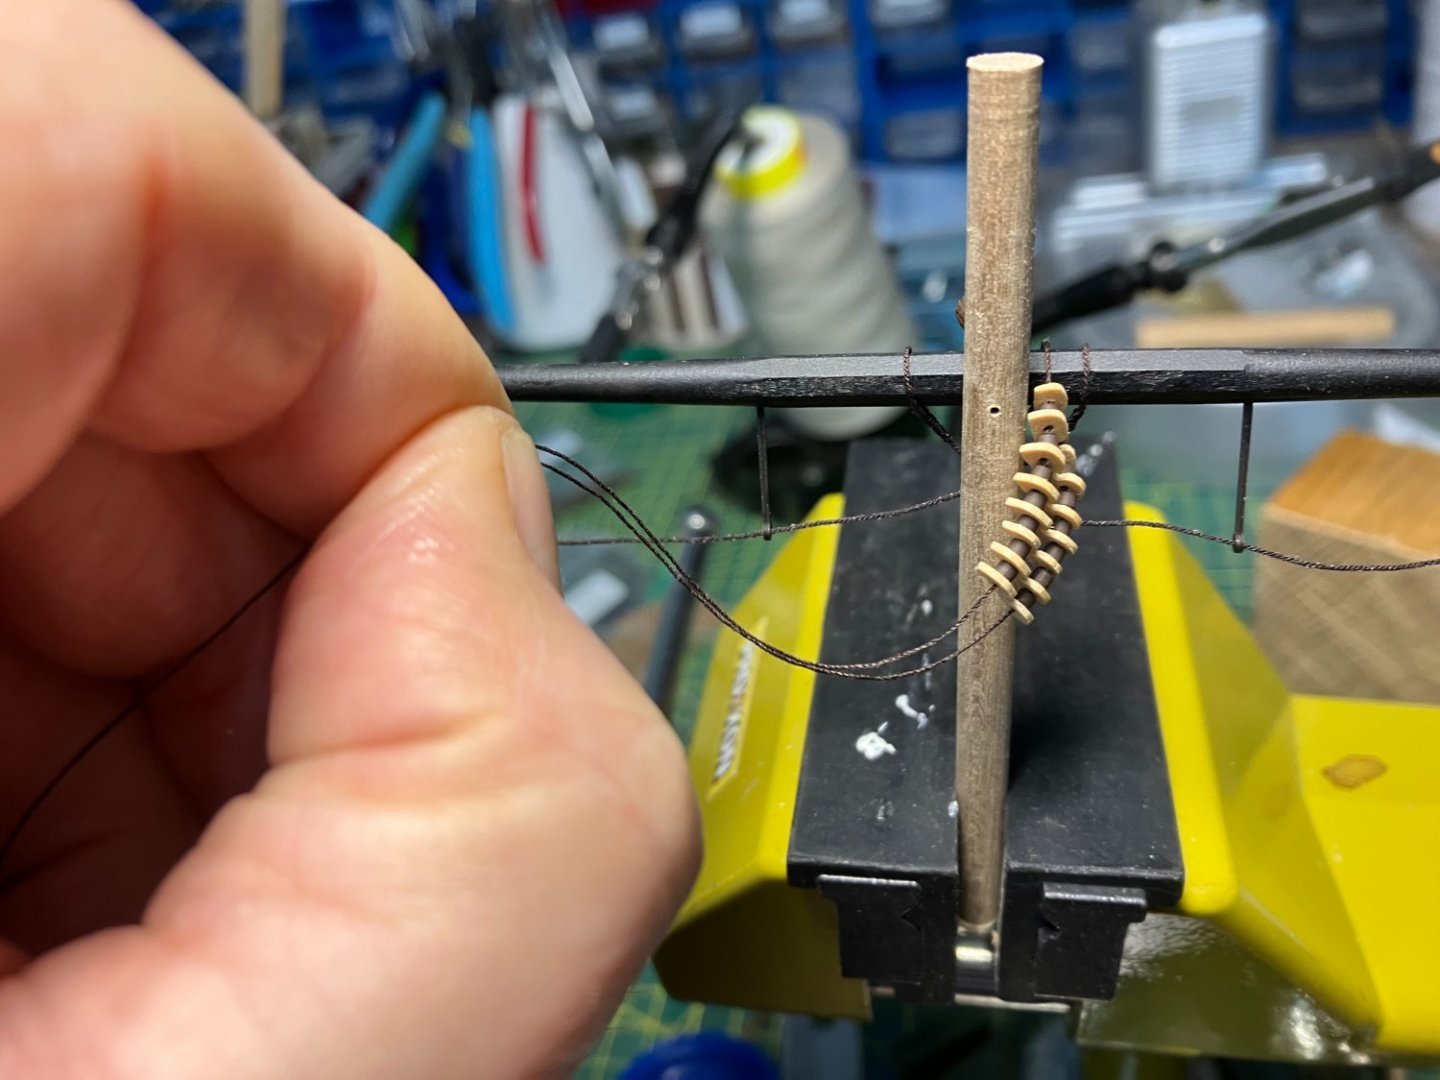
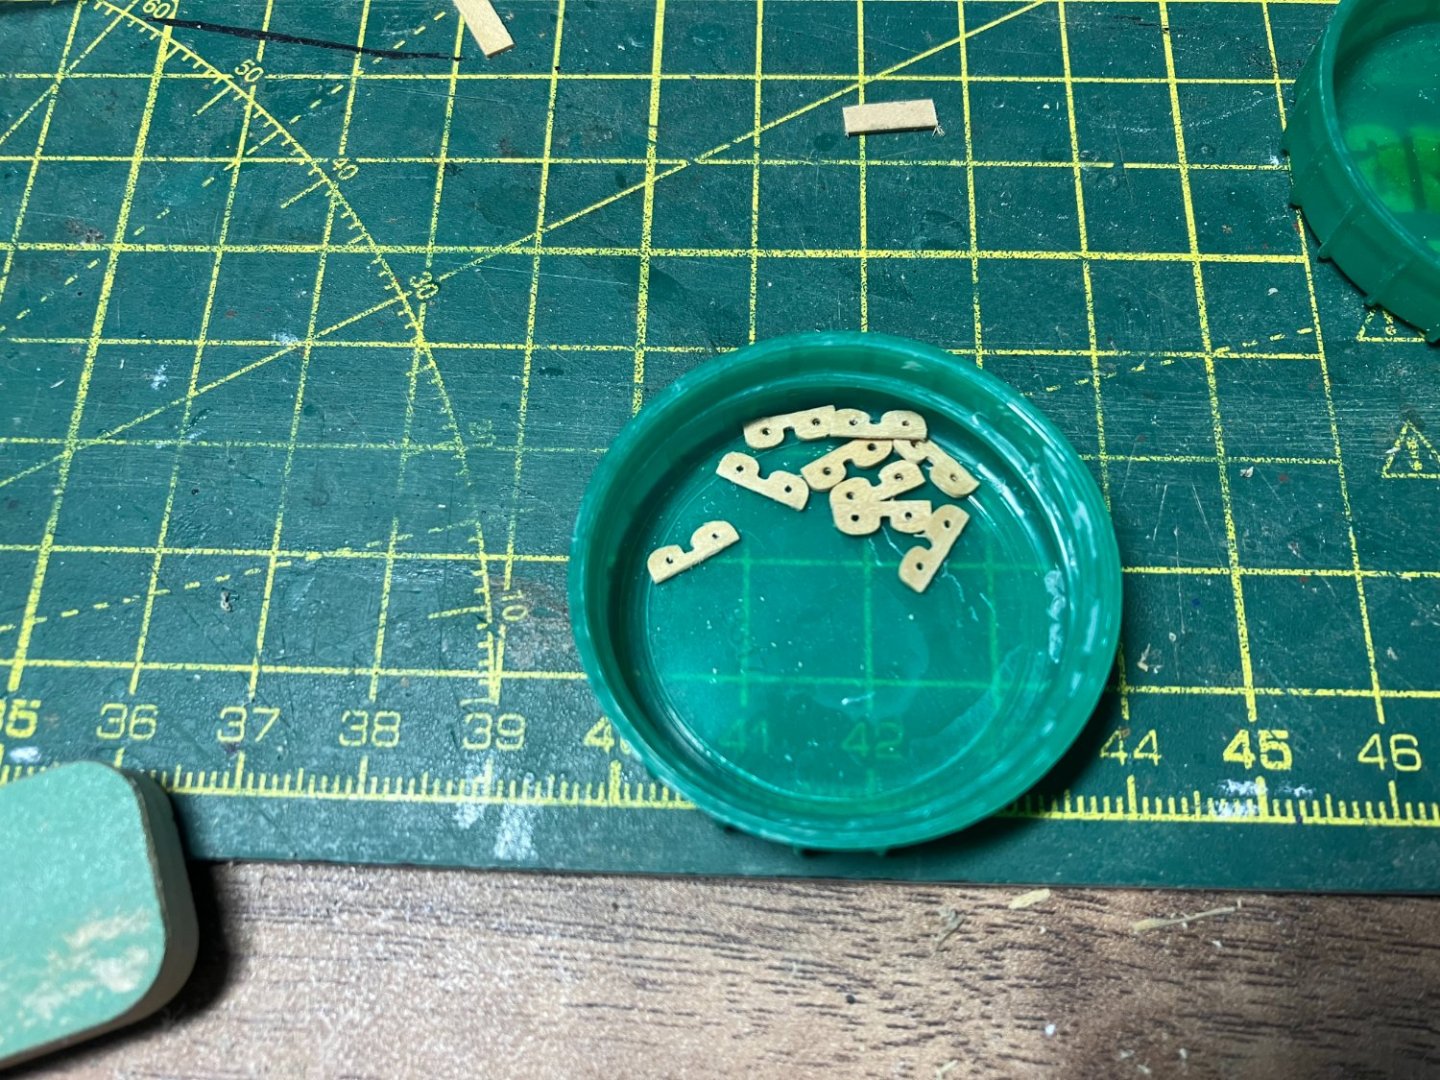
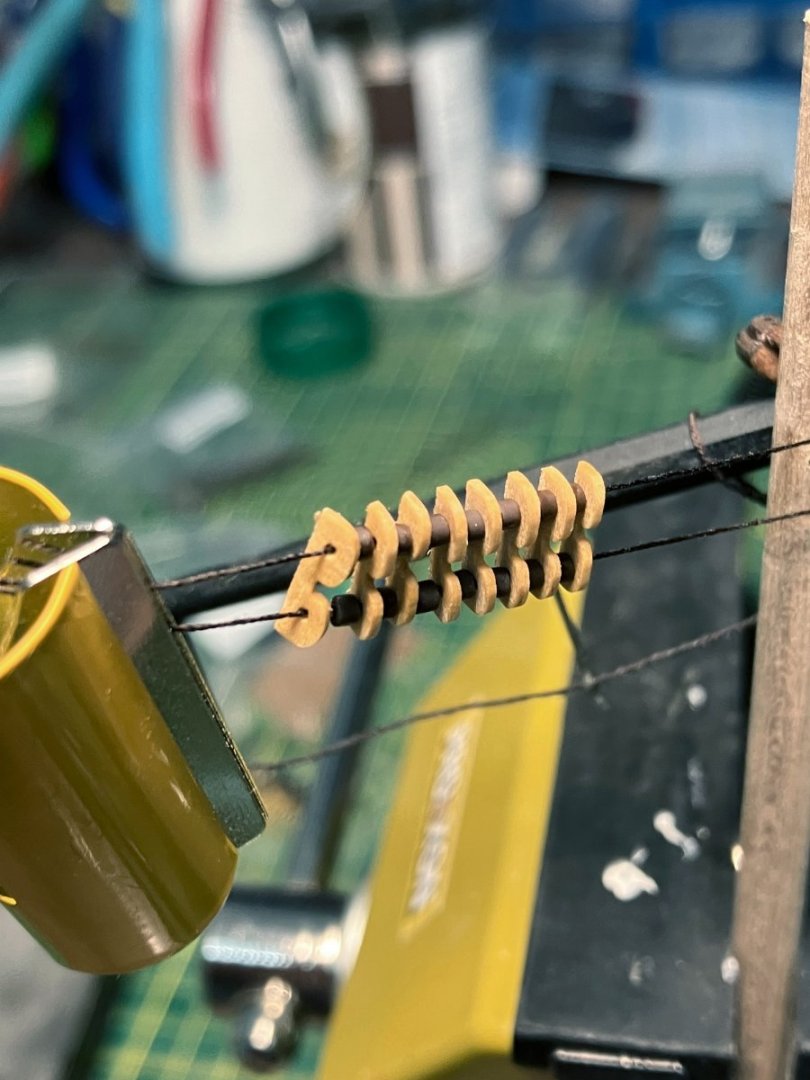
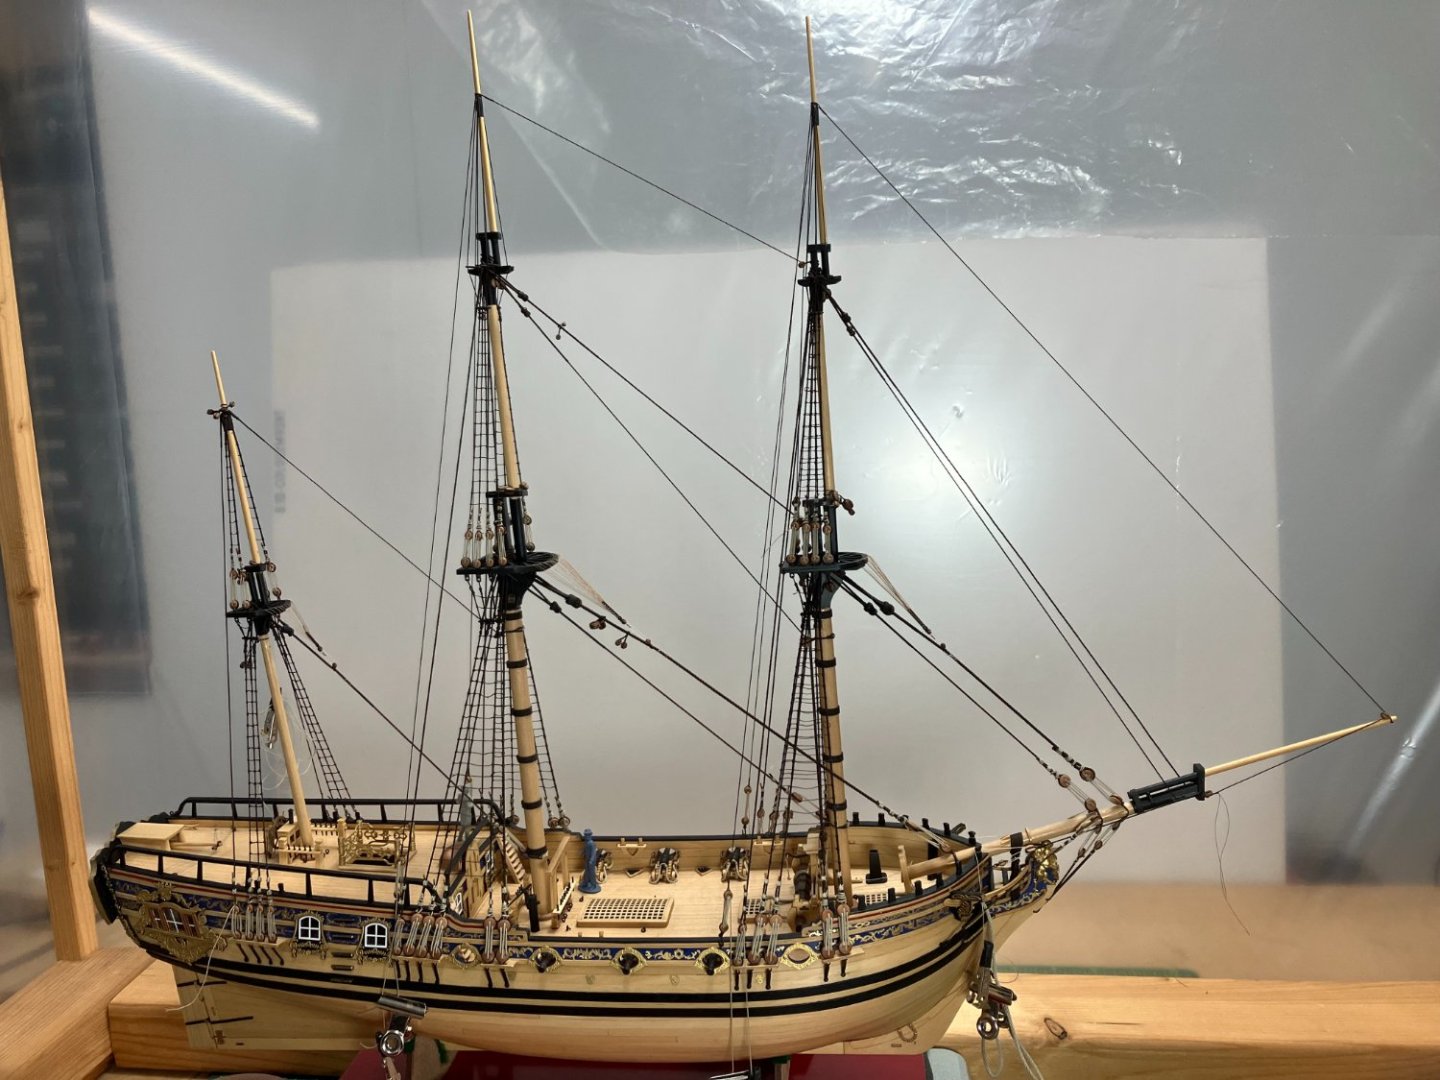
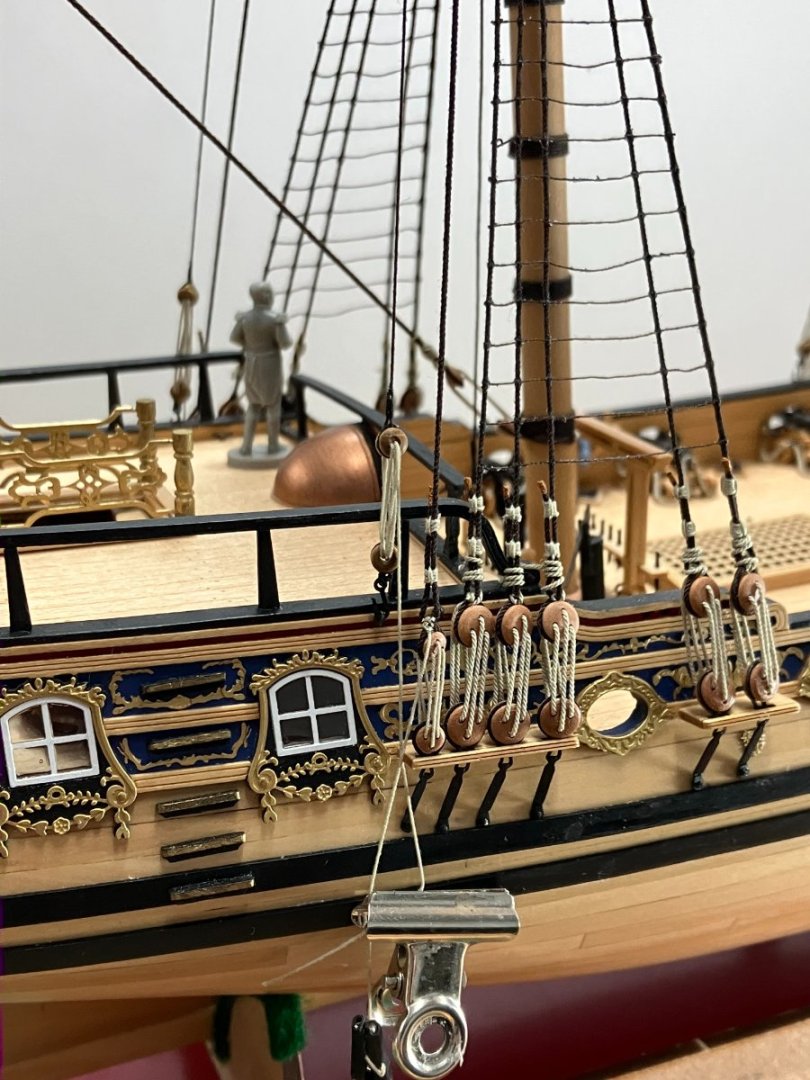
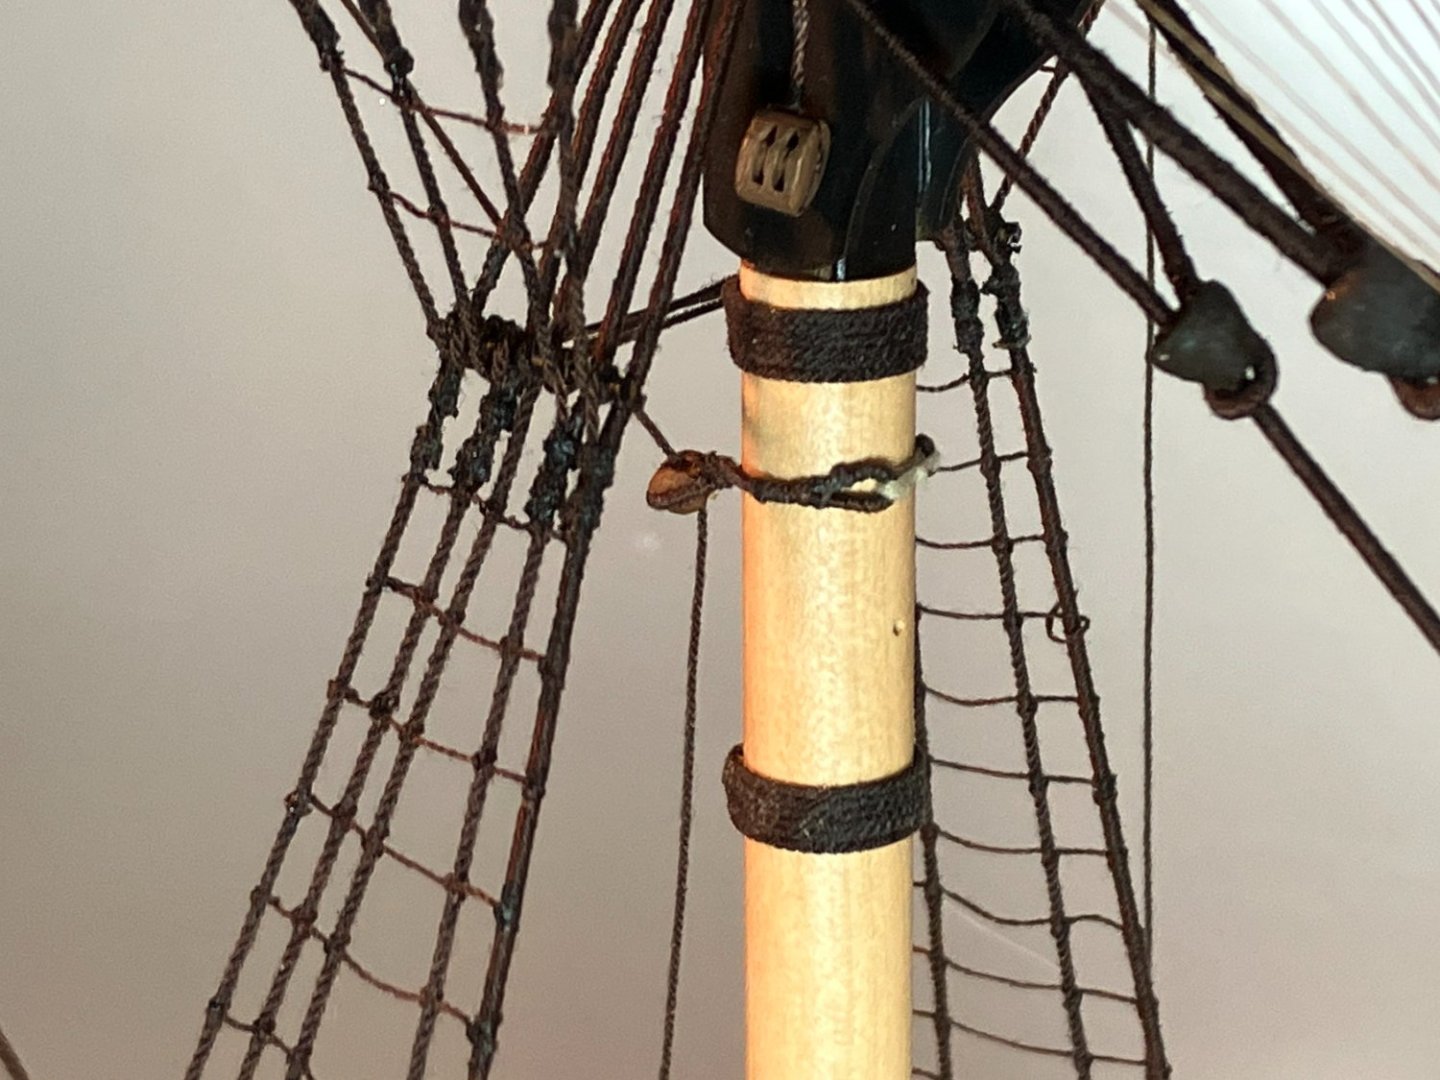
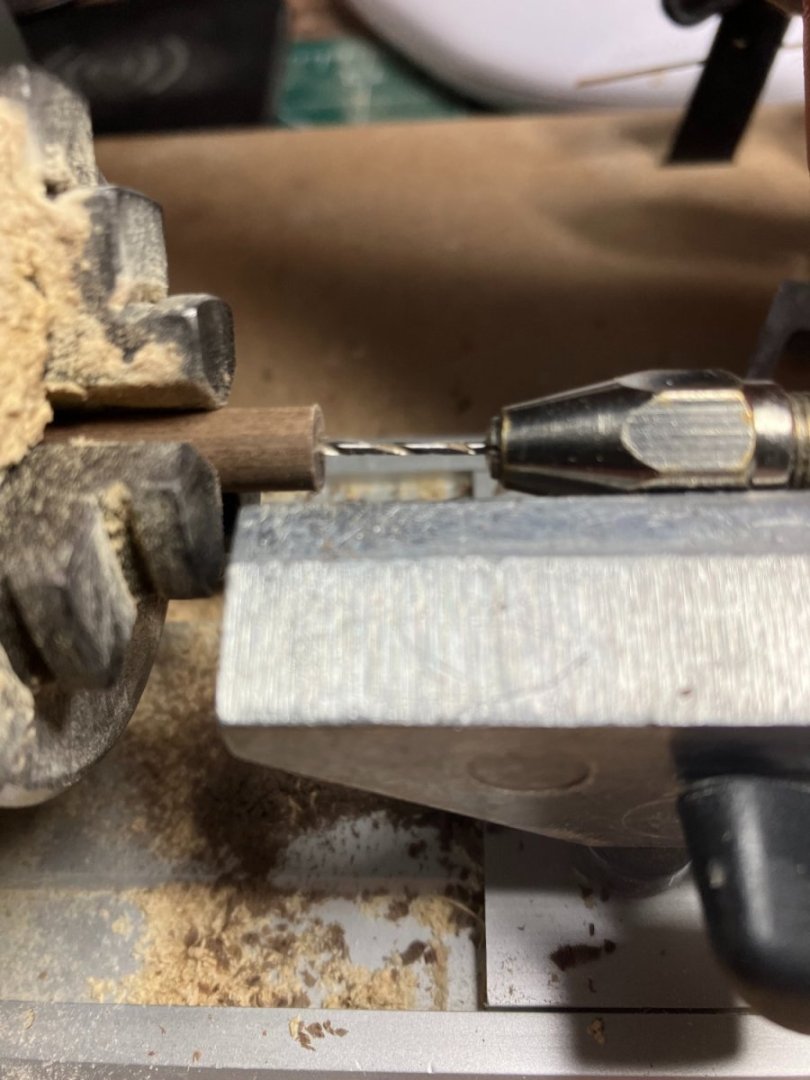
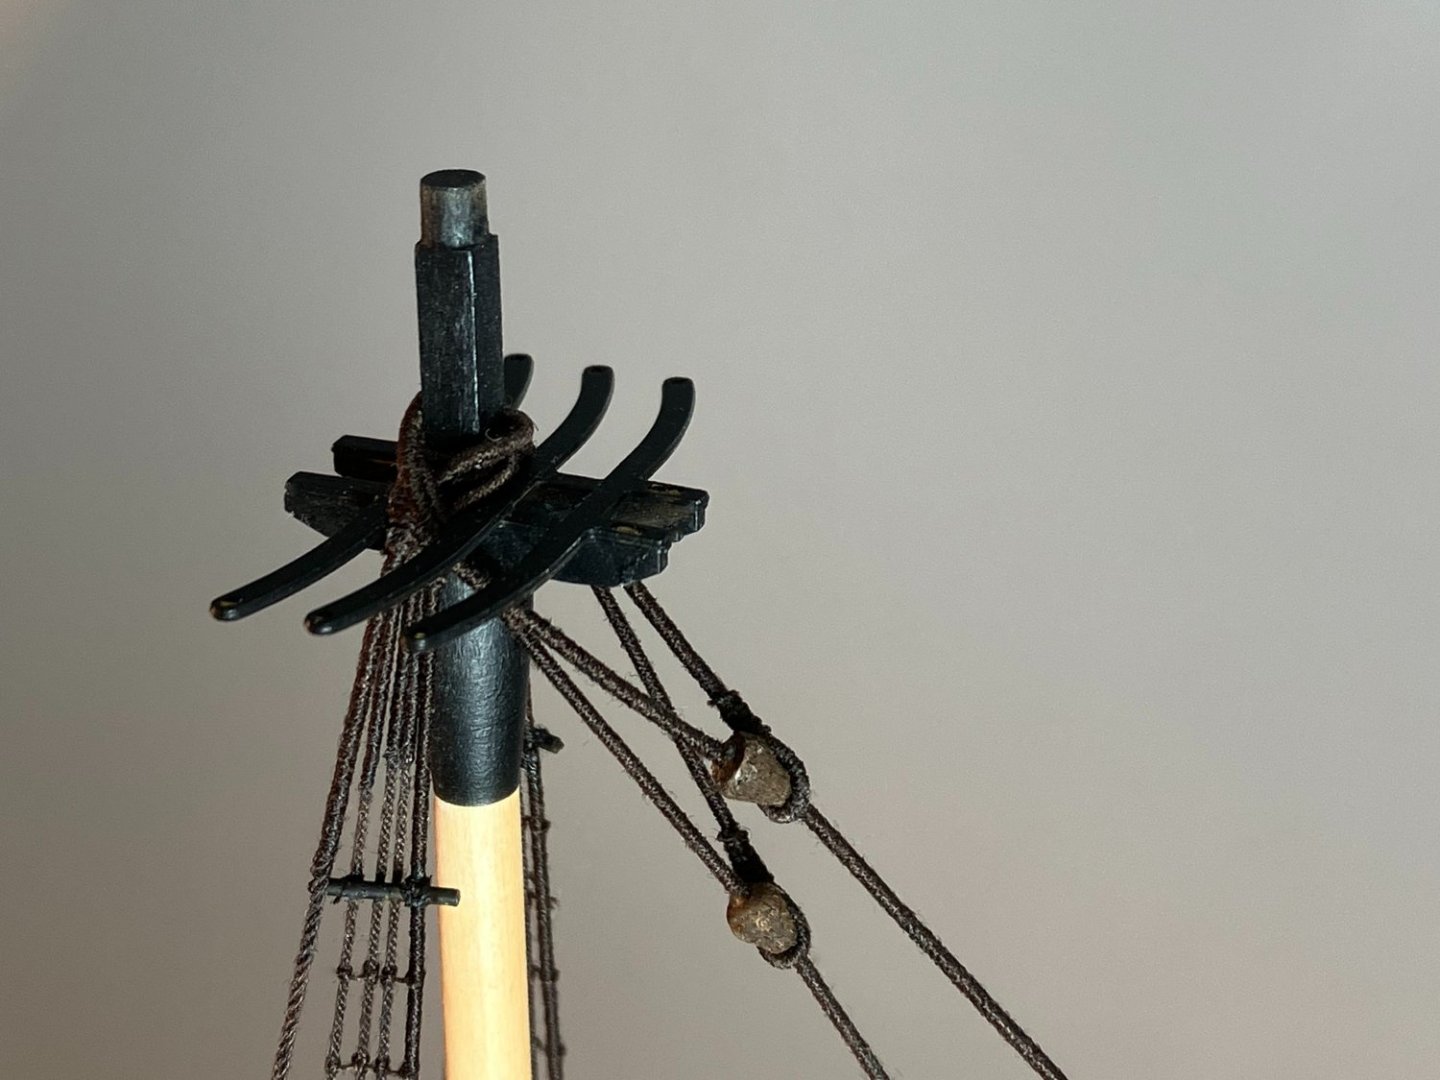
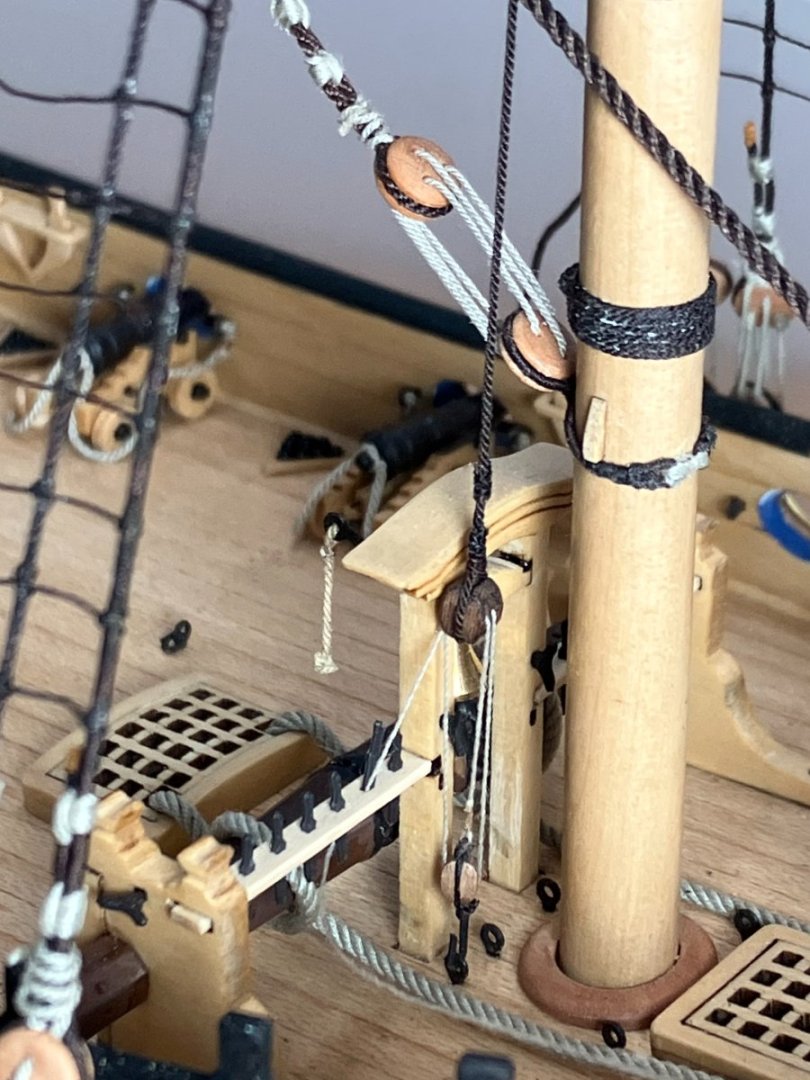
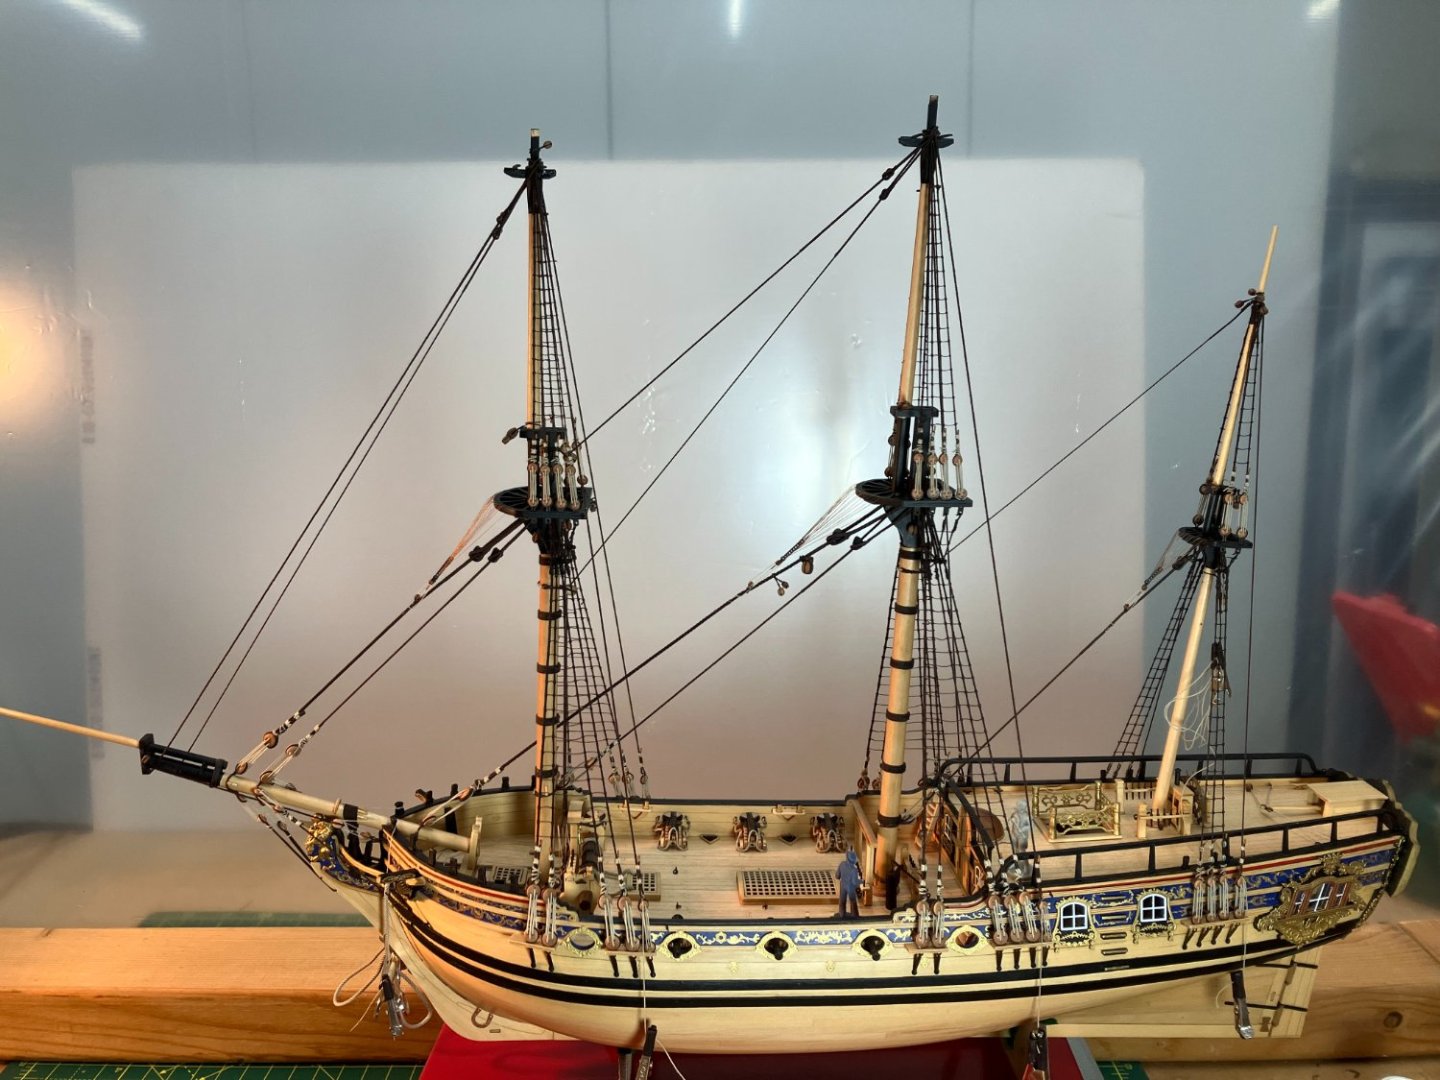
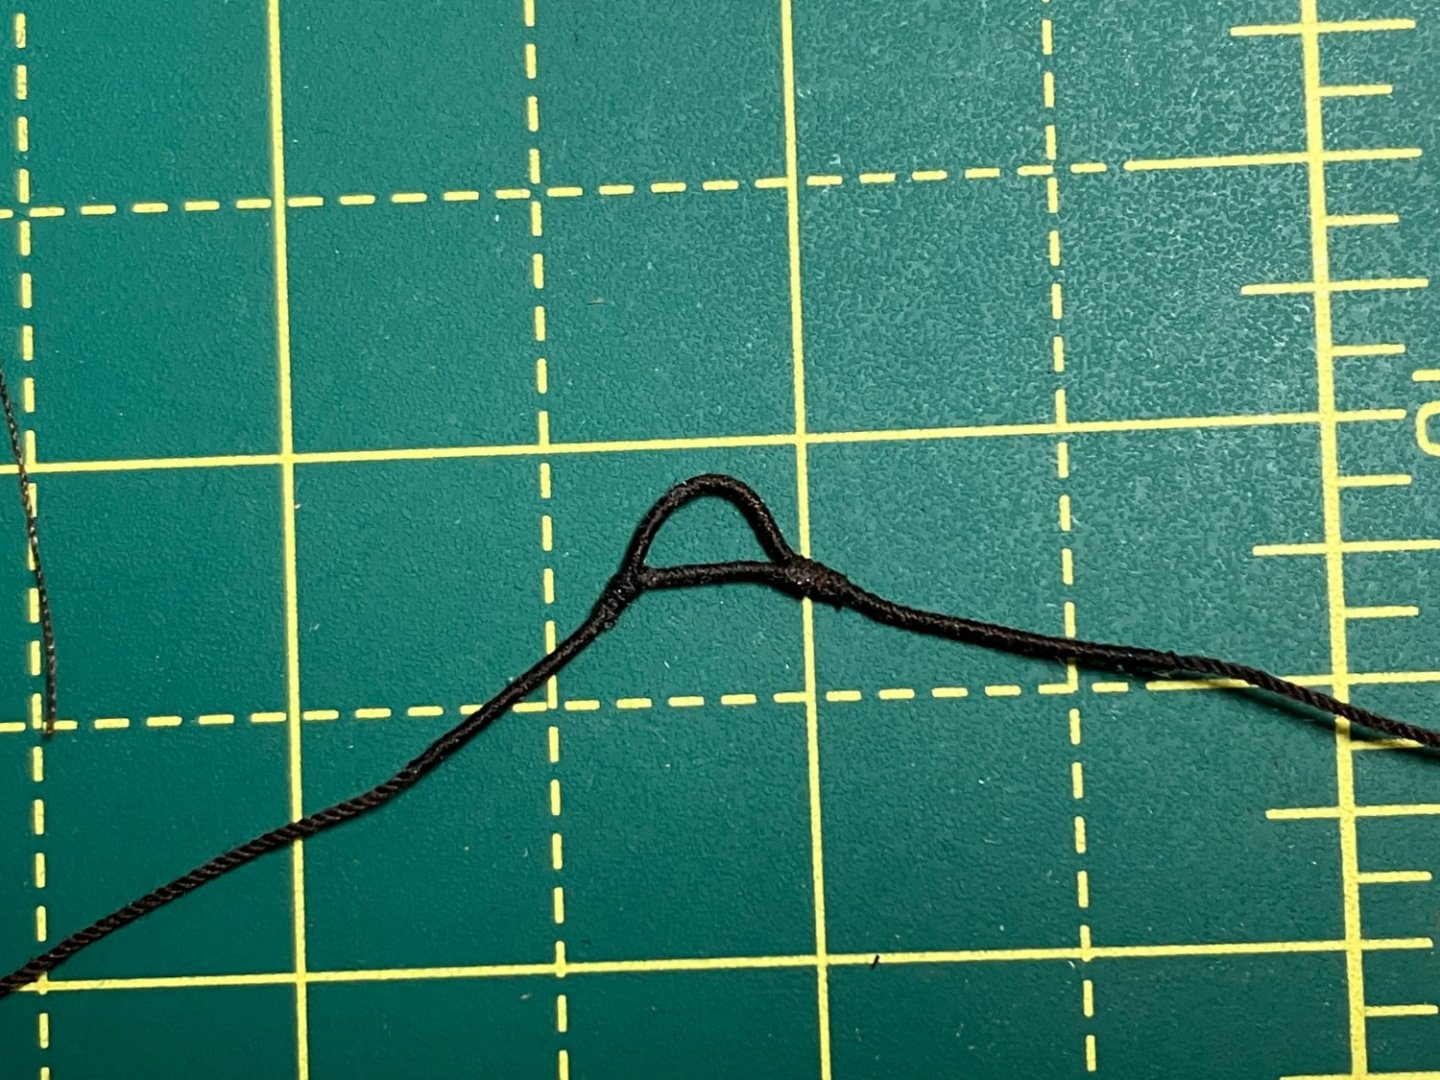
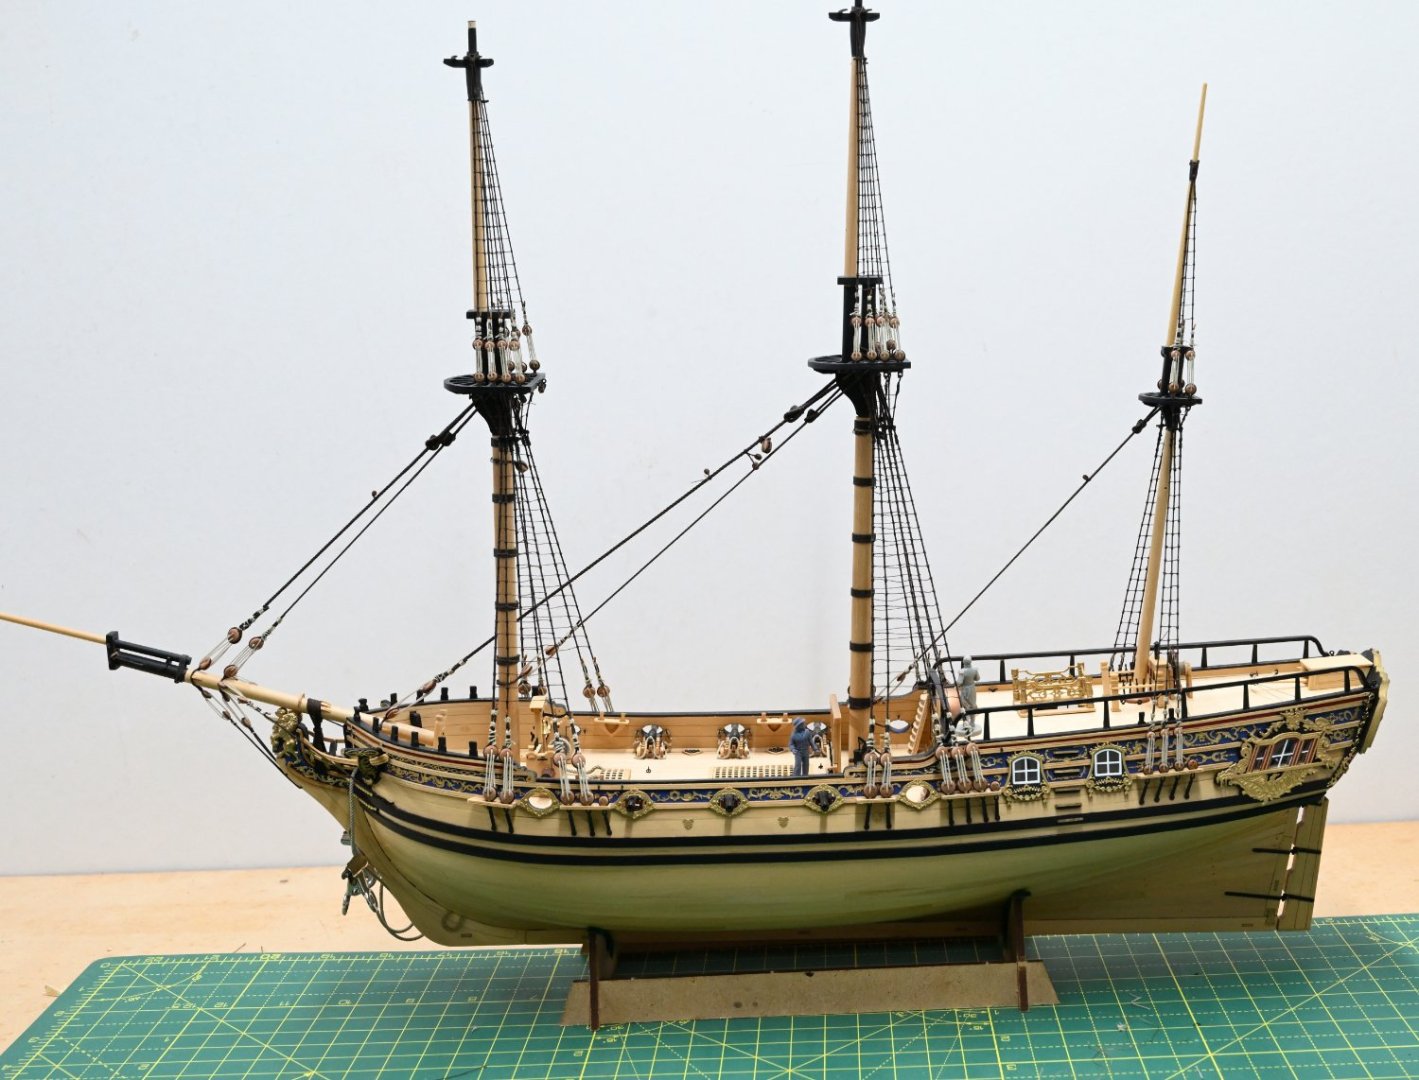
 Crossing the Yards I crossed all the yards today. I'd already completed most of the work on them in advance so it didn't take too long. Here she is in the dust cabinet: Most of the work was fairly routine, so I'll just mention a couple of items. Getting the footropes to hang properly is always a challenge. I use dilute acrylic matte medium to wet the rope, with small pieces of bent wire hanging on it while it dries to try to get the right shape. However I did this before crossing the yards, and unfortunately the act of fitting them to the model undid a lot of the work so I'm having to re-shape the footropes in situ, starting with the topgallant yards: The topgallant footropes are the easiest to get right. I seized the first footrope on the yard and then, as there are no stirrups, I was able to slip this rope off the yard and use it as a template for the other side. The first rope is on the bottom in this shot, stretched between two drill bits, with the rope above being seized round the bits to create an exact copy. The left hand side has been completed, and the rope pulled tight and ready to be seized round the right hand bit. As usual I used fly tying thread for the seizings: As with previous builds I made my own parrel ribs for the topsail yards, preferring bare wood to painted brass. I originally found the method in The Fully Framed Model by David Antscherl and it is useful for other tasks where multiple copies of flat objects are required. For example I've used the same method for gun carriage sides. I think of it as the sandwich method, as you start by gluing strips of wood together to form a block that you then shape before separating the individual pieces. The individual ribs need to be 8.0 x 2.5mm. I cut 20 pieces from 0.6mm boxwood, slightly oversize to allow for trimming, and glued them into two blocks of 10 strips each. I needed 16, but wanted to allow for waste. I glued a kit rib to the front and back of each block as templates then drilled 0.75mm holes: Shaping with Swiss files was easy using the templates, after which I separated the strips by soaking the blocks in IPA: Rather than use the shiny black parrel beads from the kit I sourced some from the Spellbound Bead Co in the UK. They are closer to the size and barrel shape of parrel beads, and I found two colours that seemed close: In the end I decided the lighter beads were too shiny and metallic so I went for the dark matt ones. I started rigging them off the model. In this shot I've passed a single length of line round the yard between the sling cleats and started threading the ribs and beads: With eight ribs and seven pairs of beads threaded I held the parrels away from the yard so I could brush on some shellac: Here's the result on the model: And a final close up of the current state of play: I plan to do some work on the anchors next, as a bit of a break from rigging. Derek


- 345 replies
-
- 15
-

-

-
- Duchess Of Kingston
- Vanguard Models
- (and 1 more)
-
A superb addition to your fleet Glenn. I’m not usually keen on sails, but yours help to make her a very attractive model. Derek
-
Looking very smart Glenn. Your rigging has come on leaps and bounds. Derek
- 106 replies
-
- 2
-
-

-
- Erycina
- Plymouth Trawler
- (and 3 more)
-
Happy Birthday Chris! Sorry I'm late to the party - have I missed all the beer? 🍺🍺🍺 Derek
-
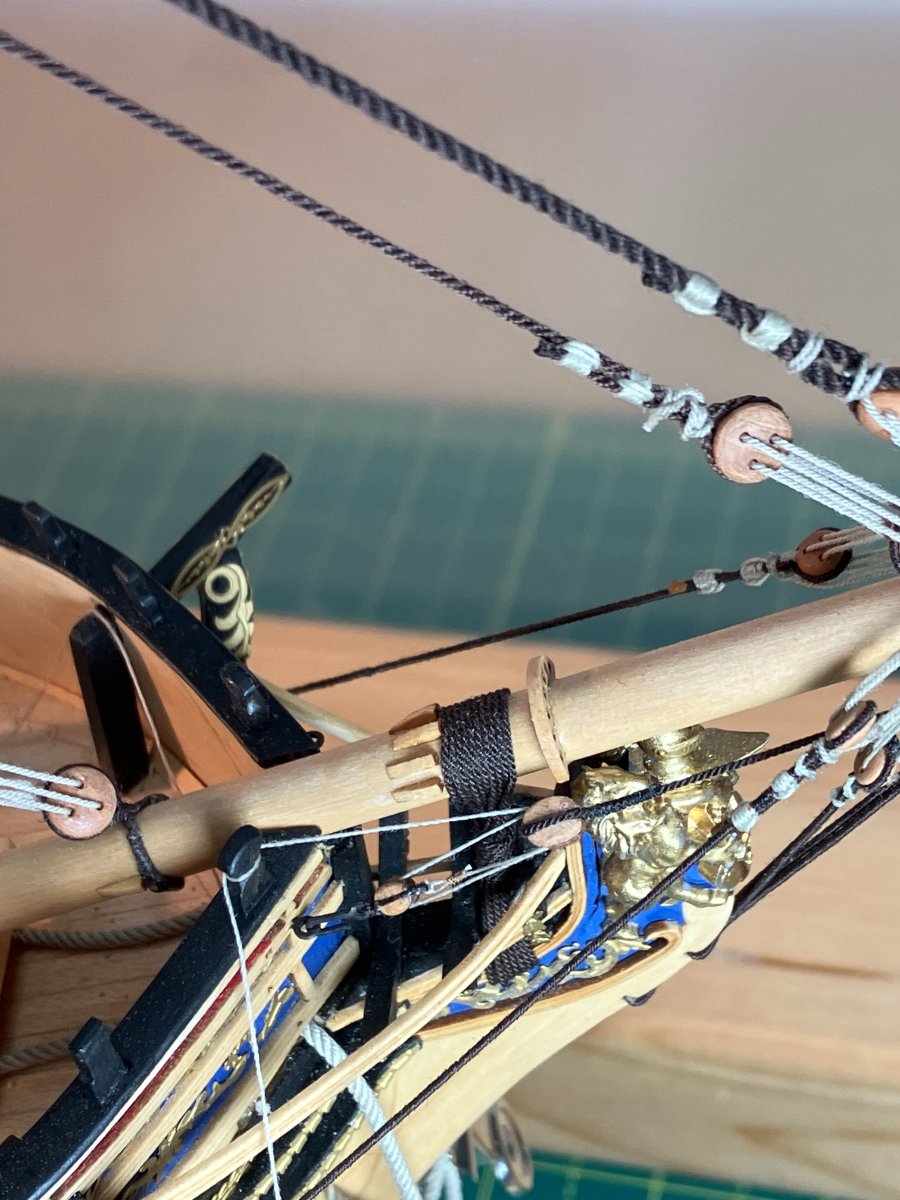
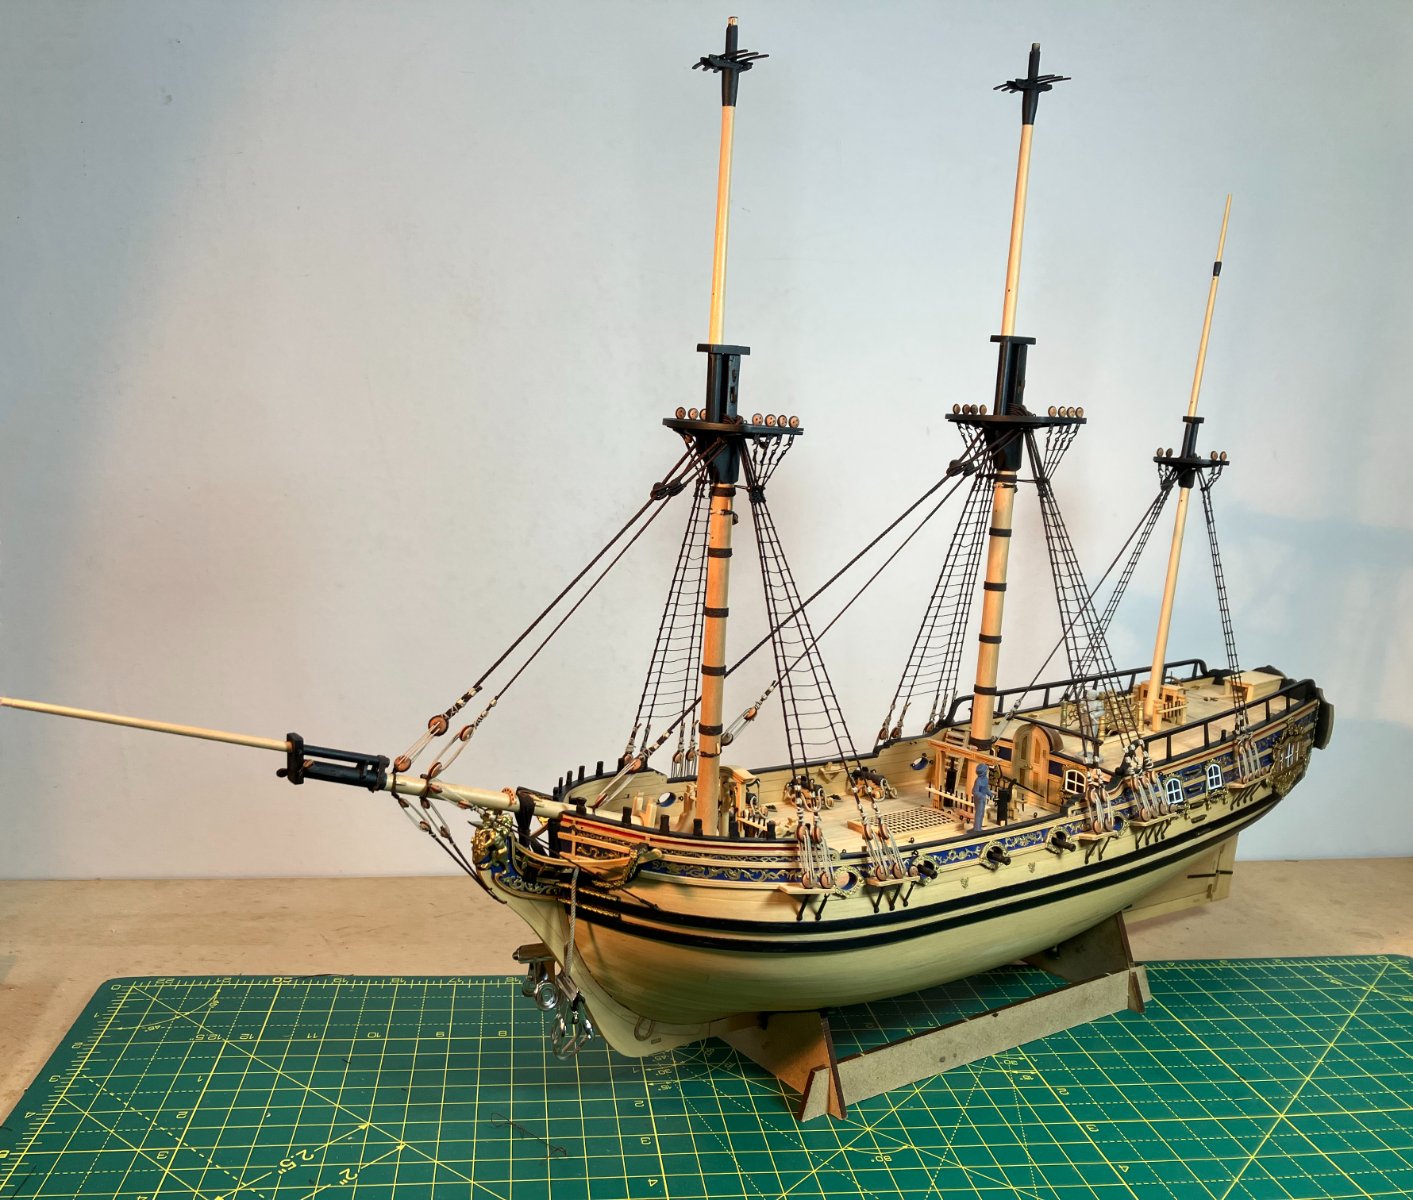
Topgallant stays Thanks everyone - much appreciated. The fore and main topgallant stays were straightforward. Both start with simple eyes slipped over the topgallant masts and brought down to rest on the backstays and shrouds. The main then roves through a 3mm block lashed to the head of the fore topmast, shown in the photo below: The stay terminates in a thimble tackle hooked to the foretop (apologies for the focus): Note the Quadhands in the background. Being able to take 'hands' off the baseplate and mount them on spare bits of iron is invaluable in the confined space of the dust cabinet. The fore topgallant stay roves through a 3mm block rigged round the groove in the end of the jibboom, passing fore to aft through the block, then belaying to a hook in the fore face of the bowsprit cap: That's the bulk of the standing rigging finished. Next I'll concentrate on crossing the yards. Derek


- 345 replies
-
- 13
-
-
- Duchess Of Kingston
- Vanguard Models
- (and 1 more)
-
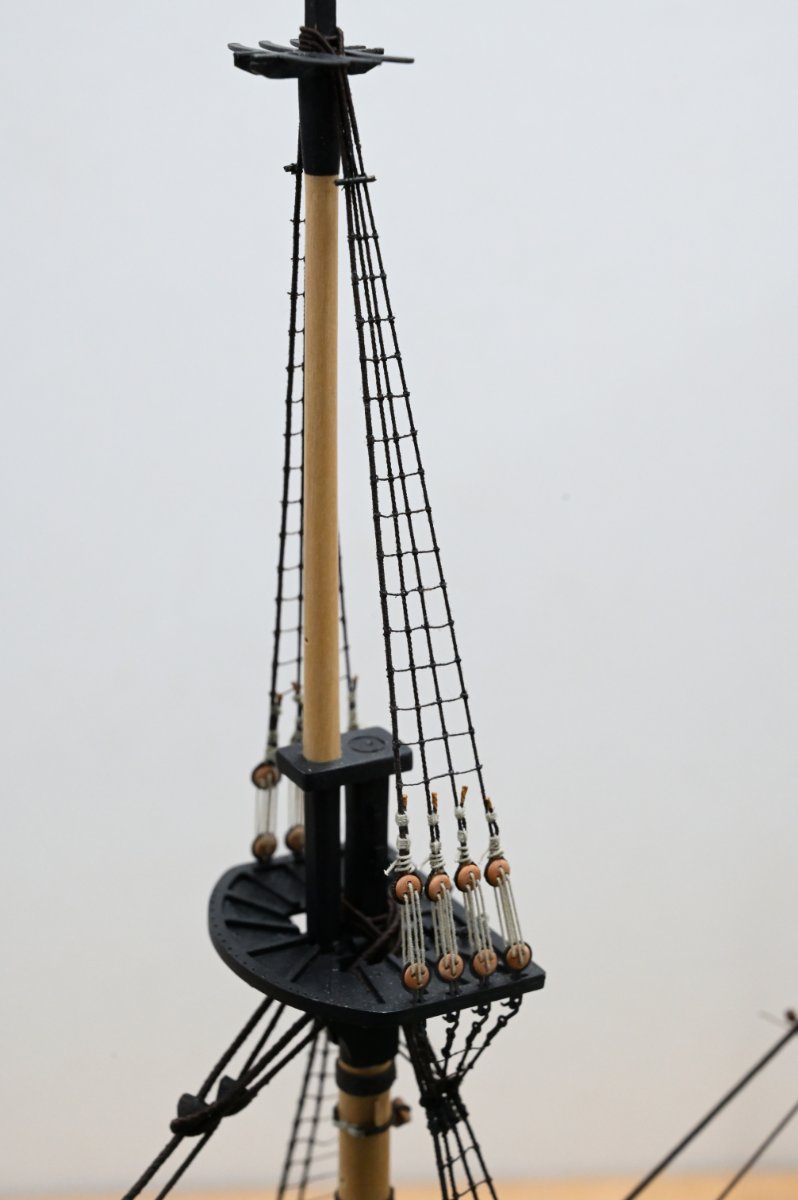
Topgallant shrouds & Backstays Thanks guys - much appreciated! These are straightforward shrouds, not needing any ratlines. Although there is an odd number of shrouds - three - on both sides of both masts, the shrouds are still set up in pairs - two each side. That's because the aftmost leg of each pair becomes the topgallant backstay. You just have to remember that this leg needs to be considerably longer than its companion. I'm not sure this practice is recognised in the kit instructions where the topgallant backstays seem to feature as separate items, but my understanding is that this was the way it was done at the time. In theory the central portion of each pair should be served as per the lower masts, but I don't like serving such light line (I used 0.40mm), partly because it's difficult but also the result looks too heavy. On Speedy I experimented with using fly tying thread to serve the line which avoided the bulkiness, but it was so hard to tell the difference between served and unserved line I concluded it wasn't worth the effort. The shrouds rove through the holes in the cross trees and are then led round the futtock staves and the ends seized to the topmast shrouds. An innovation that came in towards the end of the eighteenth century (and is suggested in the kit instructions) was to lead the topgallant shrouds down to the tops where they were tied off to the lower deadeyes, presumably for ease of access when they needed adjustment. I thought that might look a bit messy so I stuck to the older method. On both masts, the backstays ended in a thimble lashed to another thimble hooked close to the main and fore channels: As usual, I haven't tightened any of the stays yet, preferring to wait until they're all rigged and I can make sure everything is balanced. Here's the current state of play: Topgallant stays next. Derek


- 345 replies
-
- 16
-
-
-
- Duchess Of Kingston
- Vanguard Models
- (and 1 more)
-
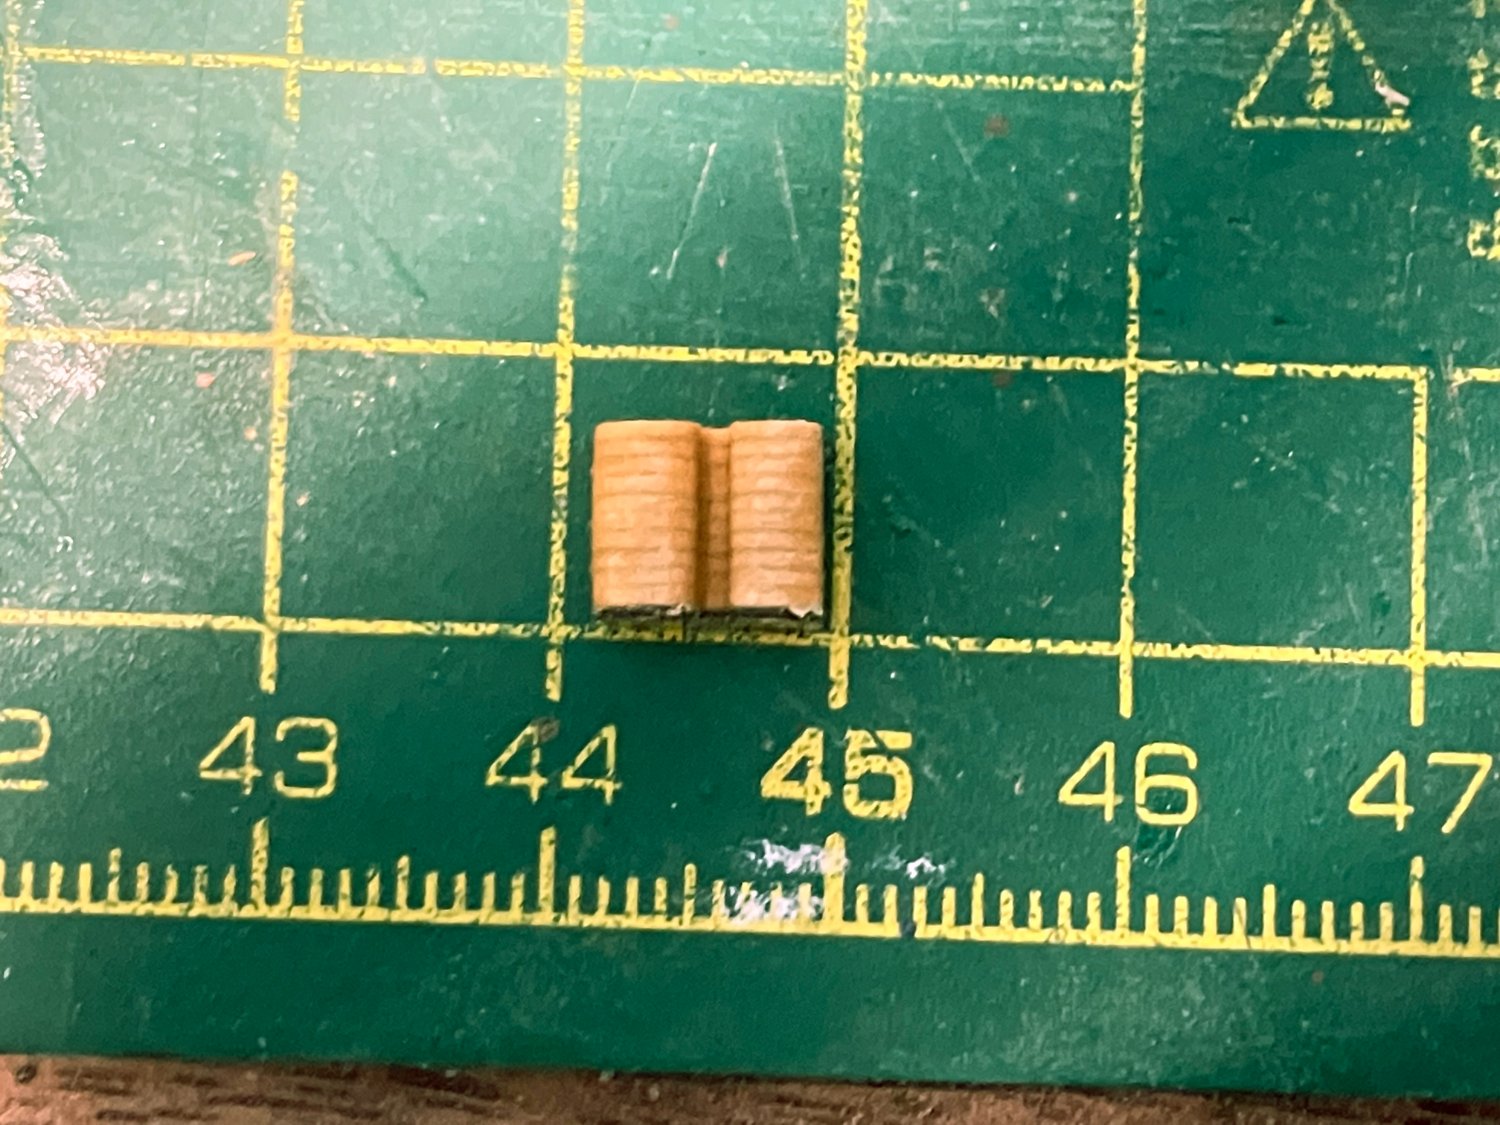
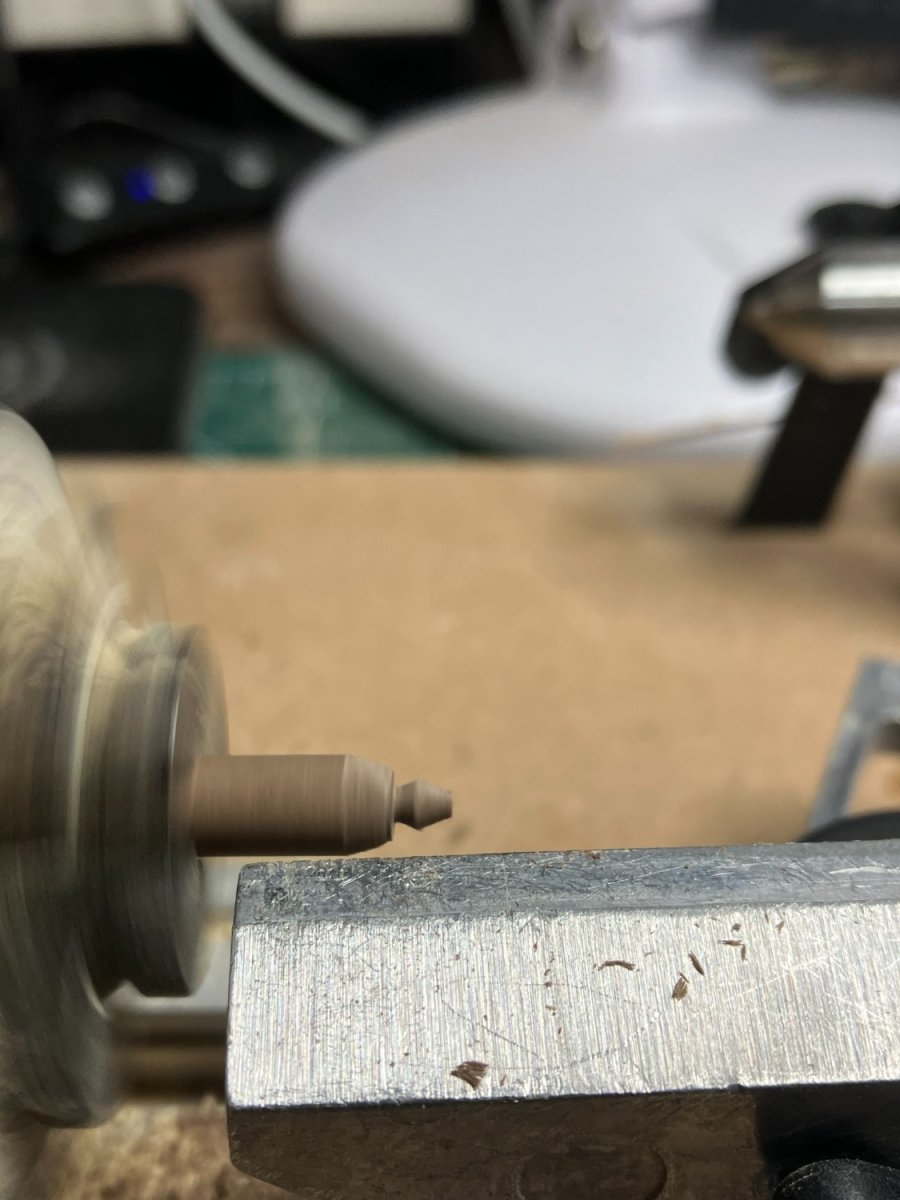
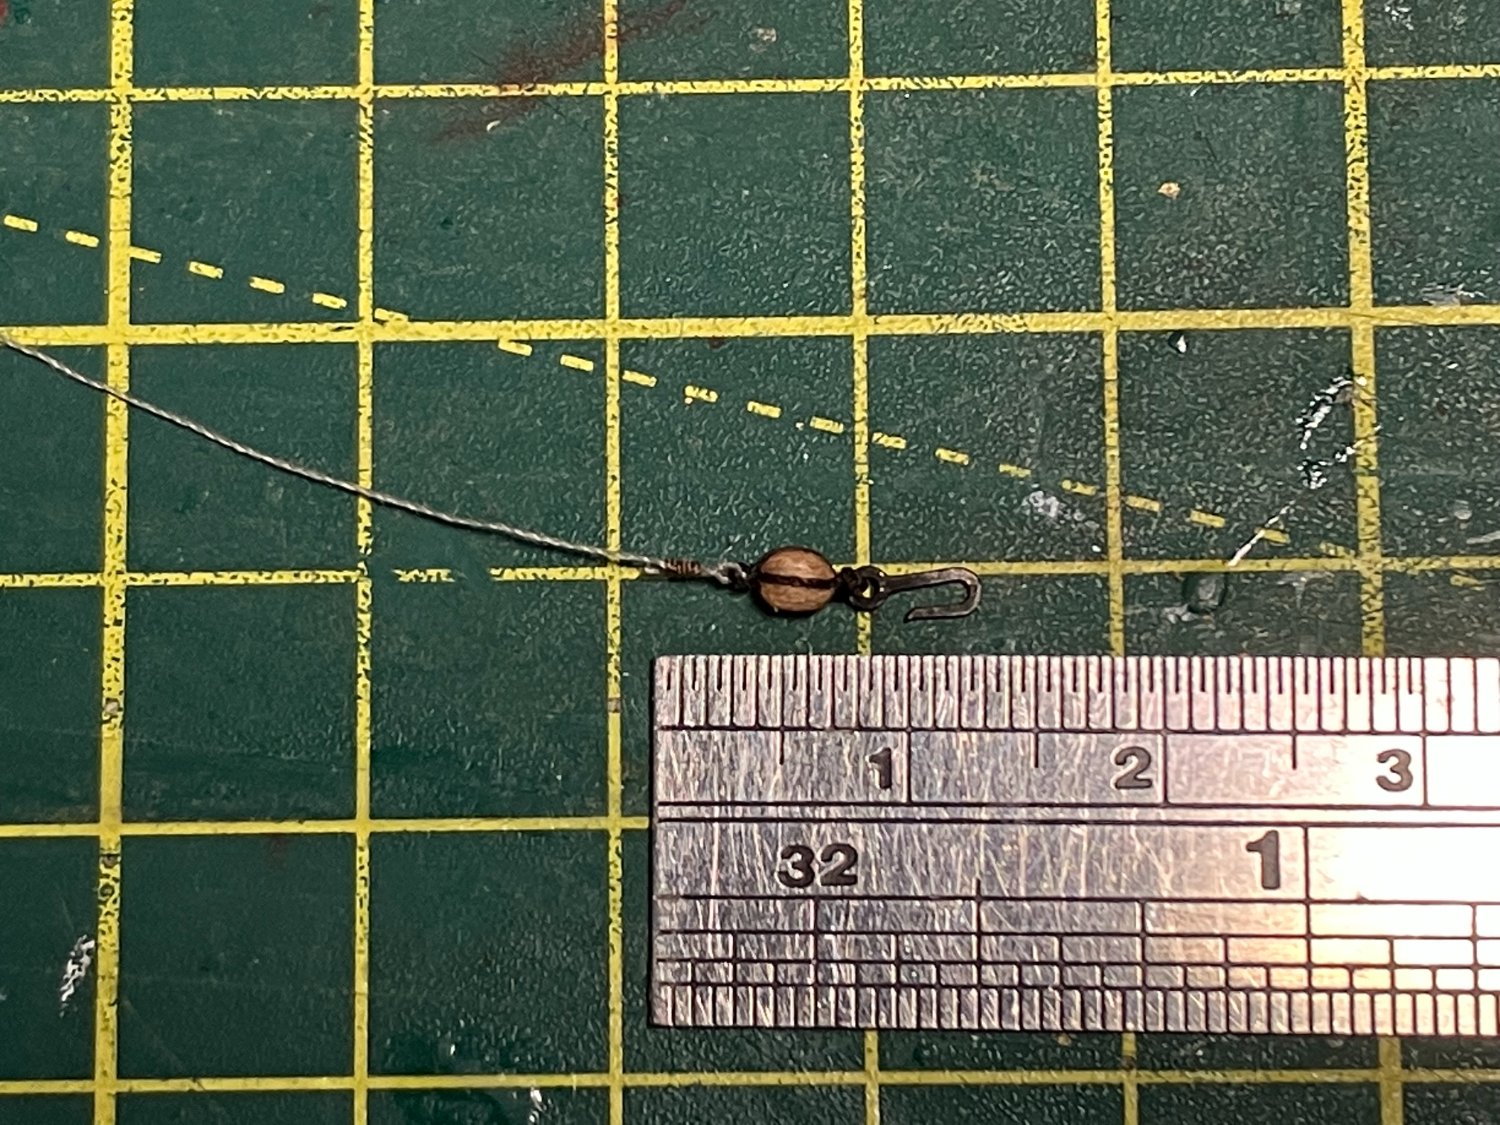
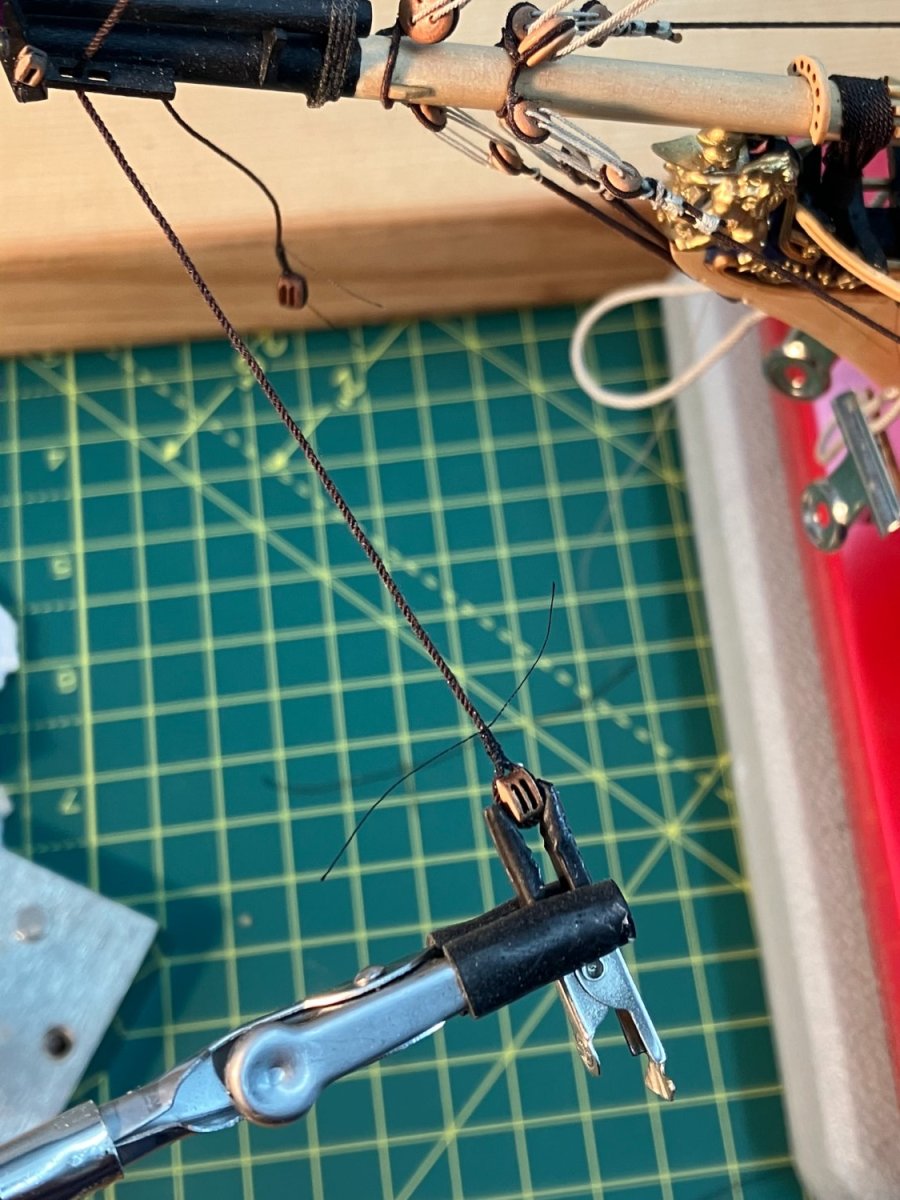
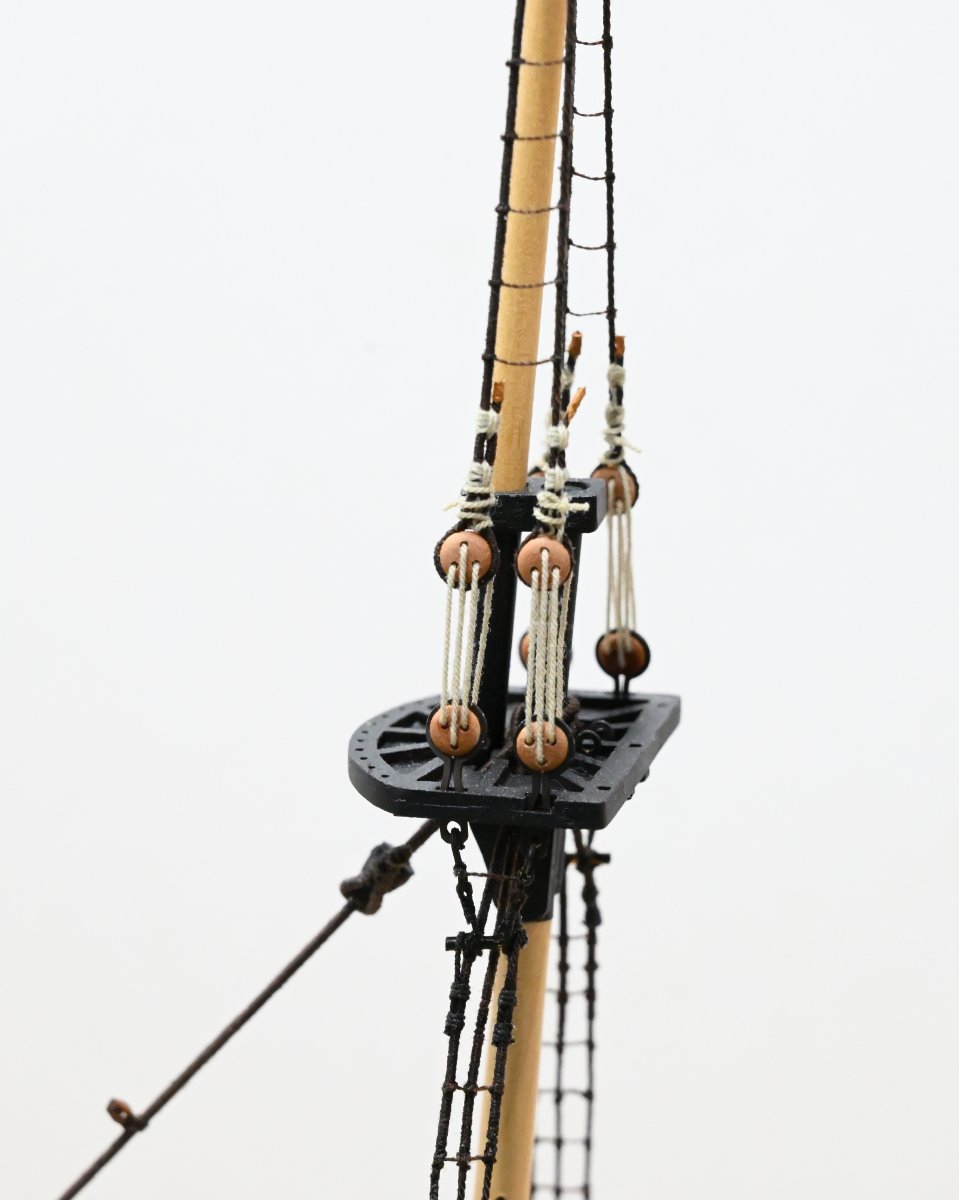
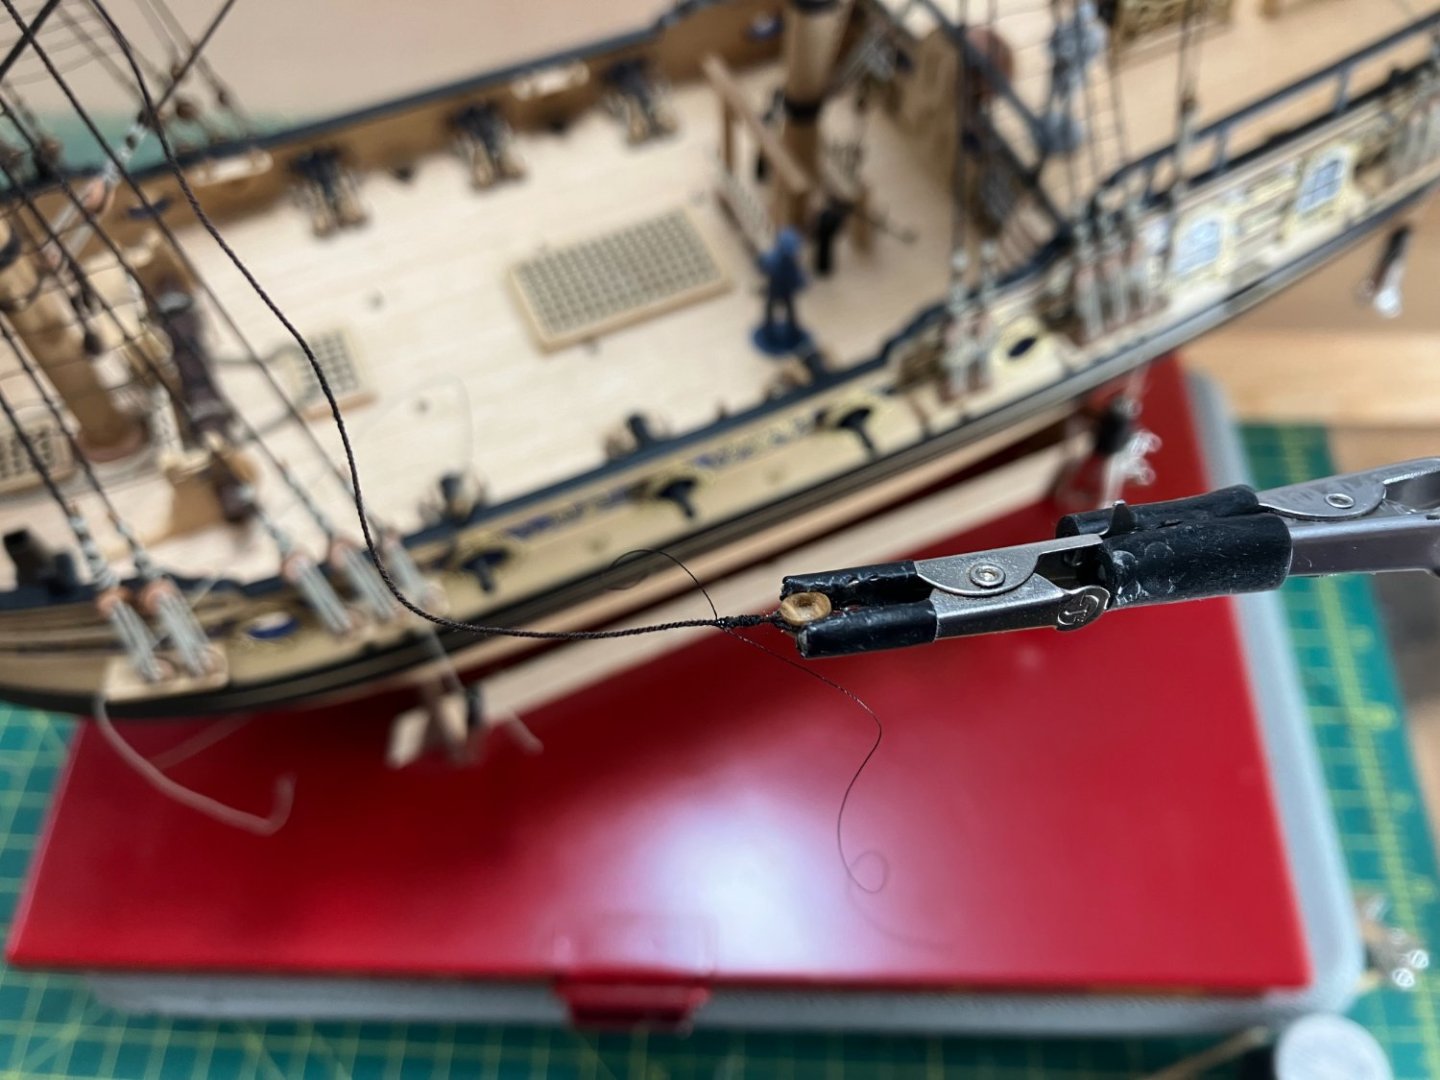
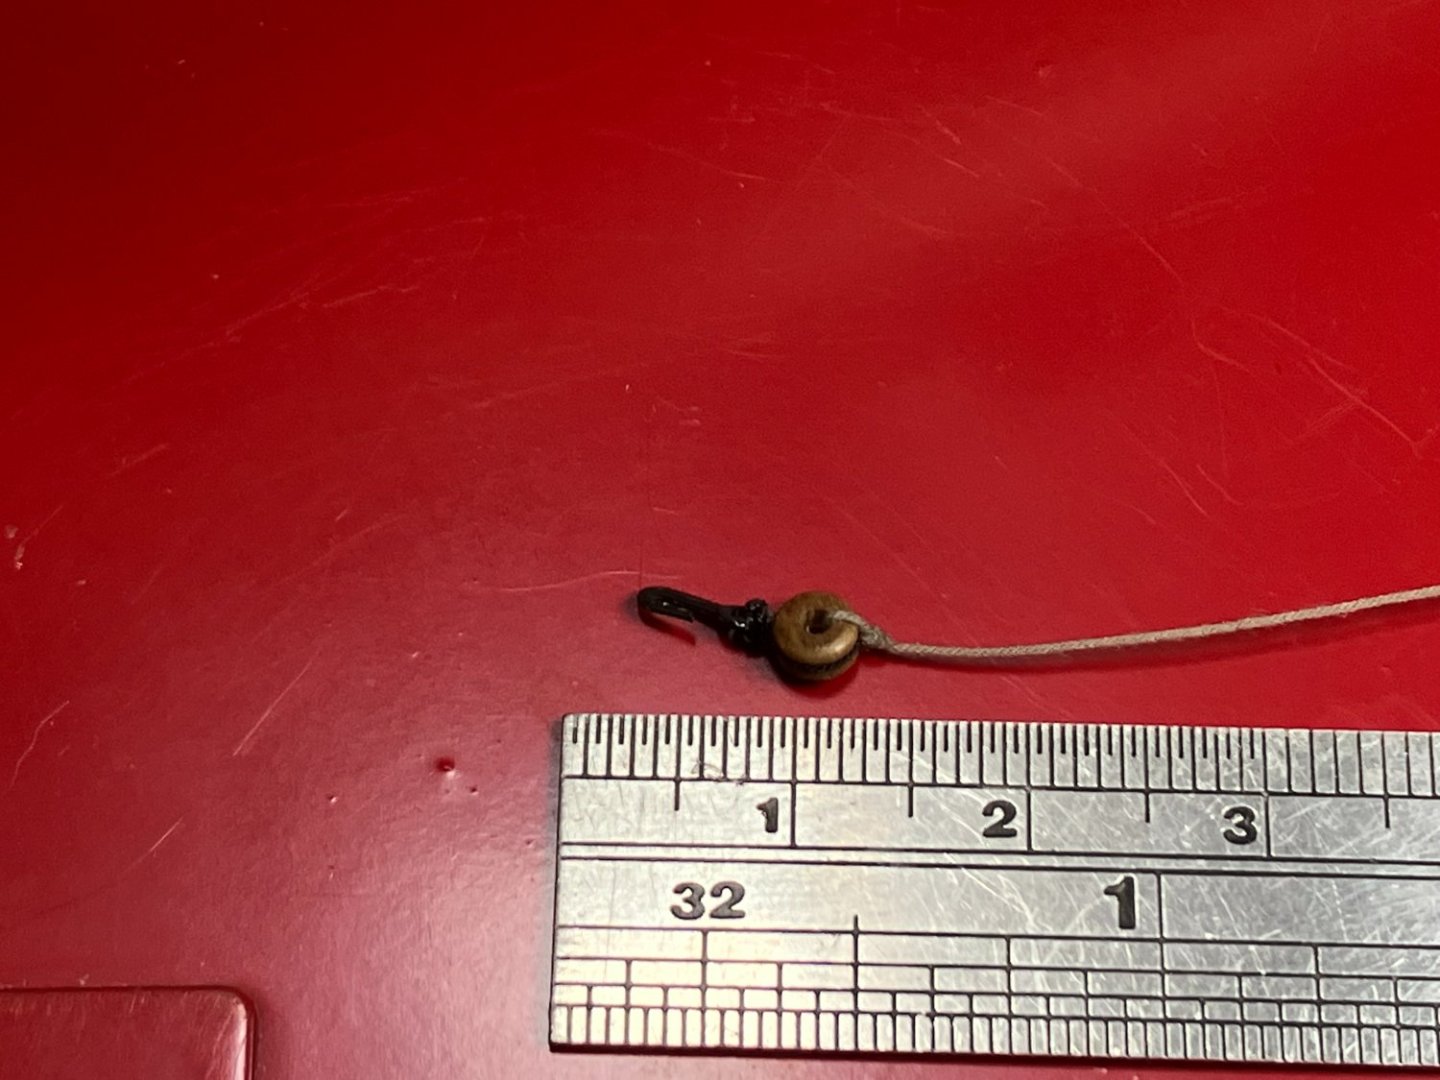
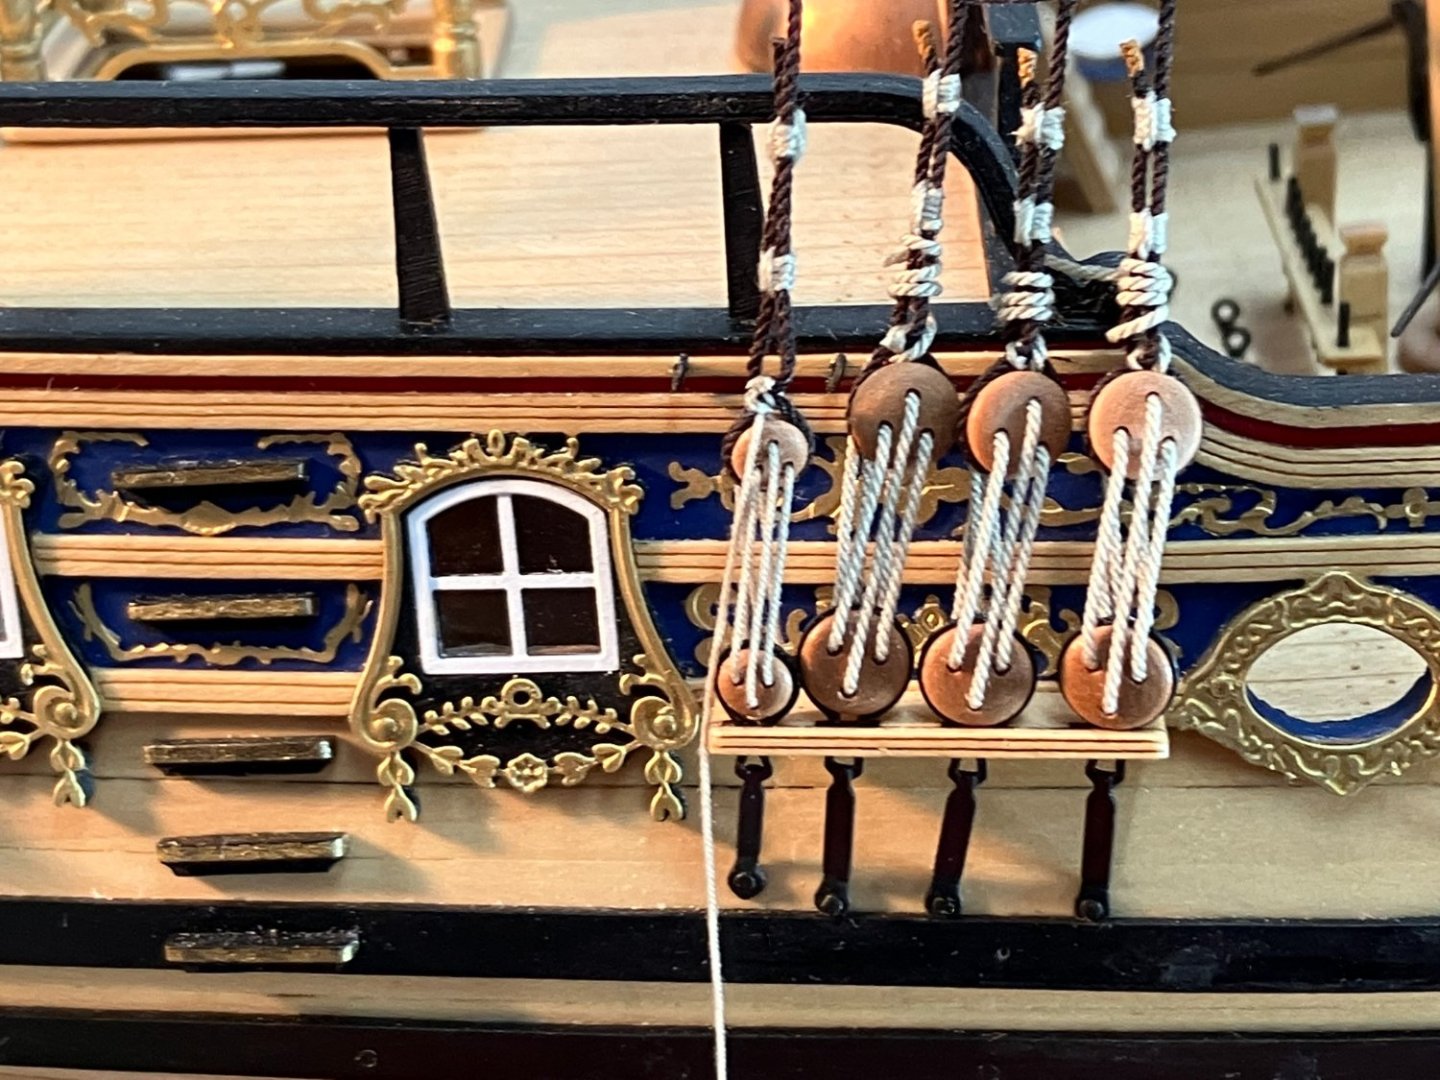
Topmast stays Thanks as always for the likes and kind comments. I rigged the stays from aft to fore, starting with 0.40mm line for the mizzen (3 X Mara100) . One end of the stay is seized round the head of the mizzen topmast, this end being served for about six (scale) feet beyond the eye. The other end was reeved through a block seized round the main mast, just below the hounds. This end has a thimble seized into it, which in turn is lashed to another thimble hooked to an eyebolt just abaft the main bitts. I used Mara150 for the lashing (about 0.20mm): (Just notice some ratline knots I'll need to fix!) I've previously always made my own thimbles from copper tubing (eg Speedy log here). However I was impressed by the quality of the wooden thimbles in this kit and so was happy to use them. The main topmast has both a stay and a preventer stay, each fitted with a mouse in imitation of their big brothers at the main top. I used 0.65mm and 0.50mm line for these two stays (9 X Mara150 and 3 X Mara70 respectively), serving each to about six scale feet below the mouse. I made the eye in the end of each stay and the mouse in the same way as I described for the main stay (here), with one minor variation. Previously when making a mouse I'd used my metal working lathe with a drill bit in the tailstock to make the hole through wooden dowel prior to shaping it. This time I decided that it would be easier, given the small workpiece and low powered machine involved, to perform this operation on the Proxxon lathe, simply by holding a drill bit by hand and pushing it against the dowel. I'd marked the centre of the dowel with a pointy tool and this was sufficient to keep the drill in place as it made the initial cut: I used a 0.90mm bit to give clearance for the served line. Then it was on with the turning tools to create the shape and size (aiming for the mouse to be about 3X the diameter of the stay): Here's the stained result - I will darken these further to match the stays: The stays then rove through blocks seized to the fore mast before having 4mm double blocks seized into their ends. With eyes and mice on the other ends, it is not possible to do this operation off the model. As usual, Quadhands proves invaluable (this is the fore topmast stay, but the idea is the same): As usual, I used 18/0 fly tying line for the seizings (or more accurately, to fake the look of a splice). The tackle for the main topmast stays consists of the double block and a single 3mm block seized to a hook. Opposite the hook I created a loop (becket?) in the strop using a 0.90mm drill bit and CA, as previously described. For the tackle line I used 0.25mm Mara100 seized to the becket: The tackle is then hooked to eyebolts, one either side and just abaft of the foremast: Here, I've temporarily jammed the spare line into the pinrack. The fore topmast stay and preventer stay are made of the same size line and are also seized and fitted with eyes and mice. They rove through the bees then end in similar tackles to the main topmast stays, hooked to eyebolts either side of the bowsprit. This time the spare line is temporarily hitched around a timberhead: Here's the current state of play: Photography inside the dust cabinet isn't great, but at least the rigging is starting to take shape. On to the topgallants next. Derek


- 345 replies
-
- 18
-
-
-
- Duchess Of Kingston
- Vanguard Models
- (and 1 more)
-
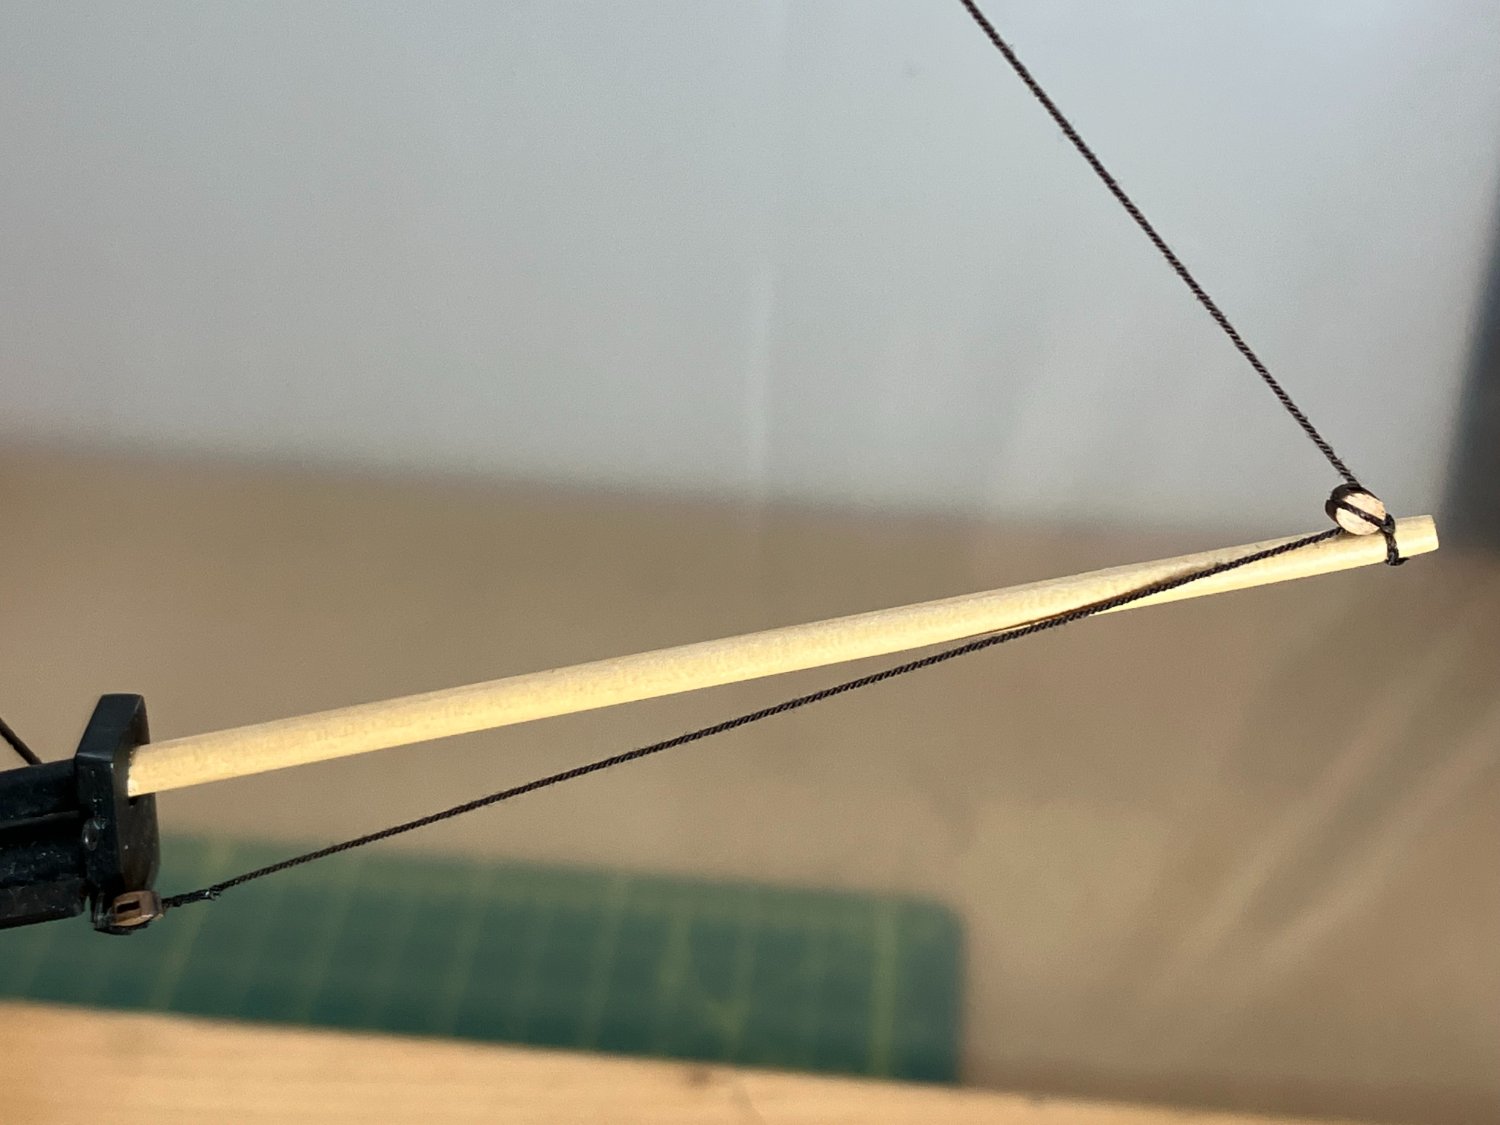
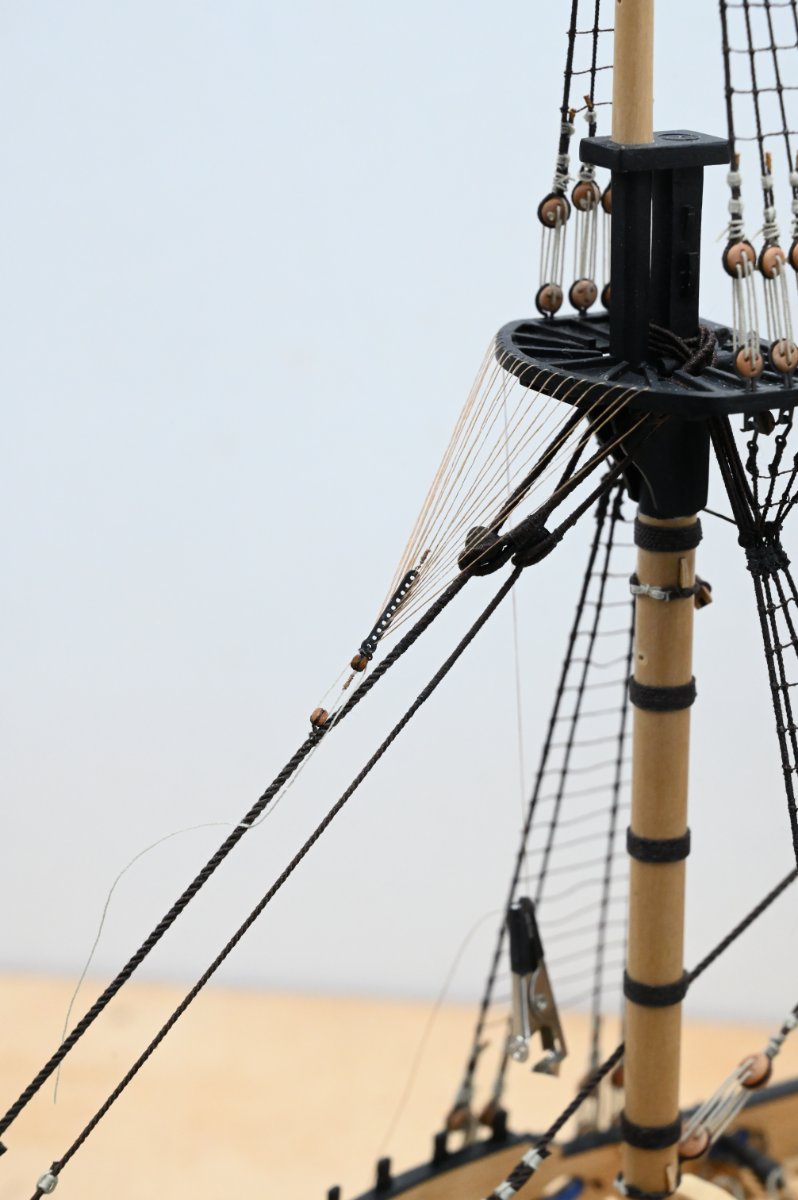
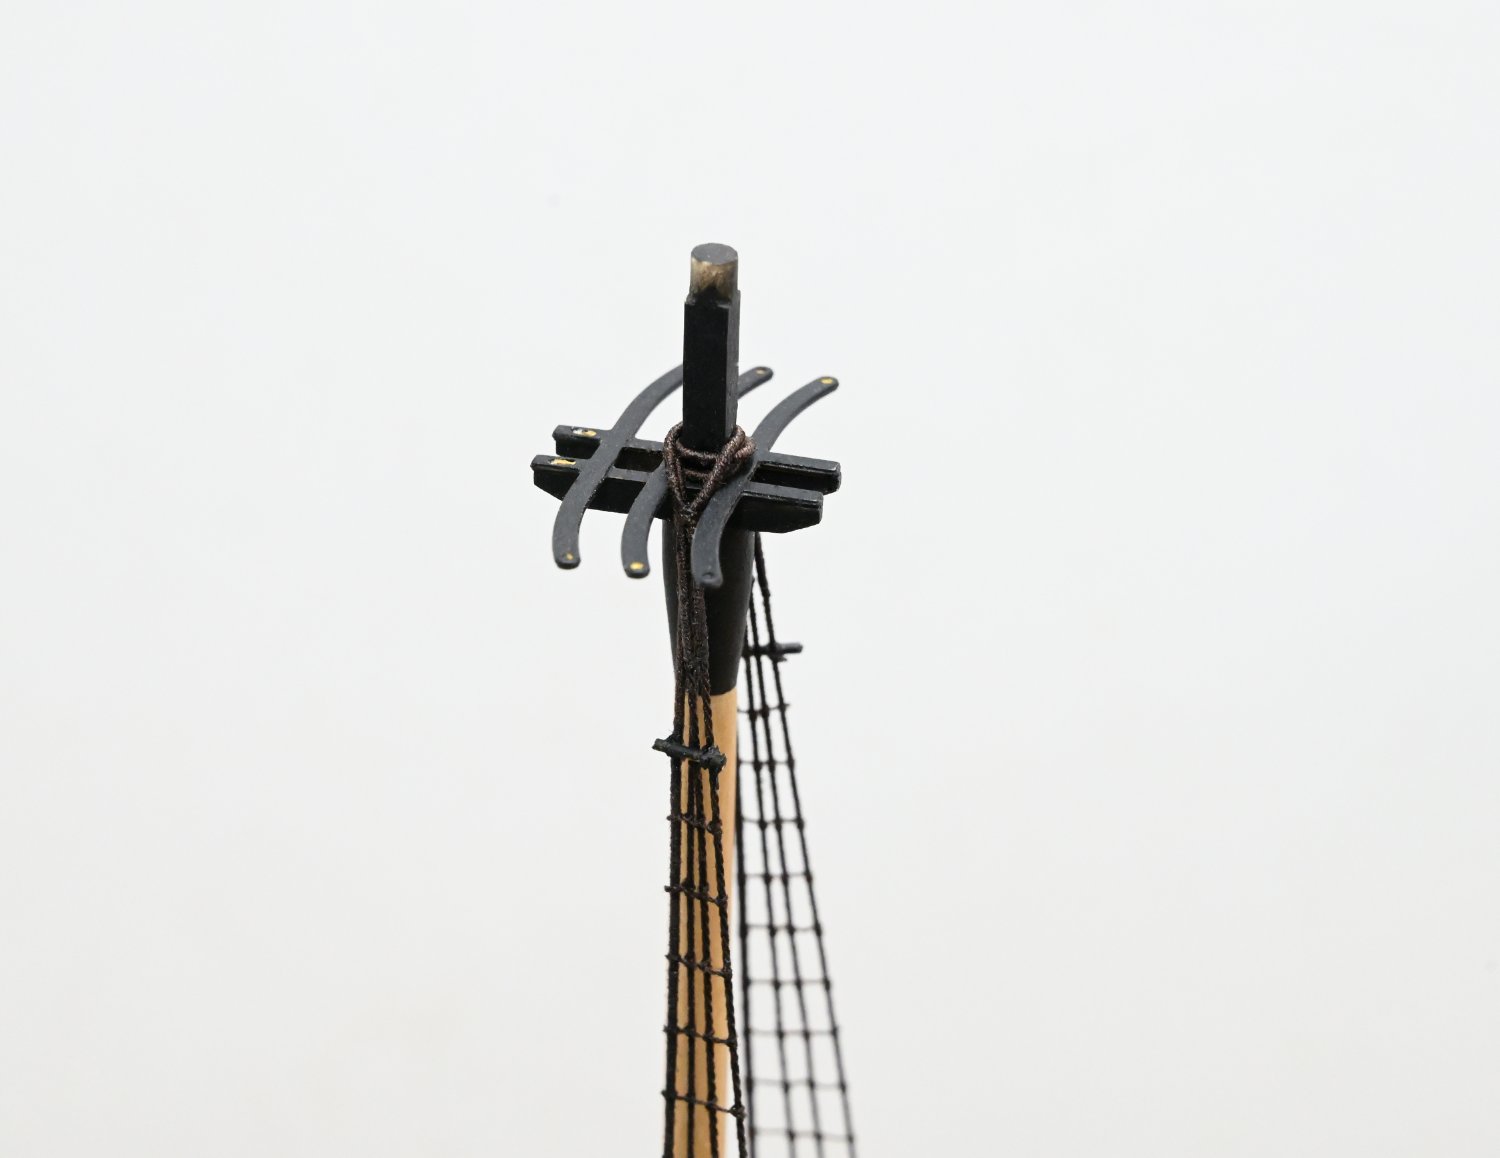
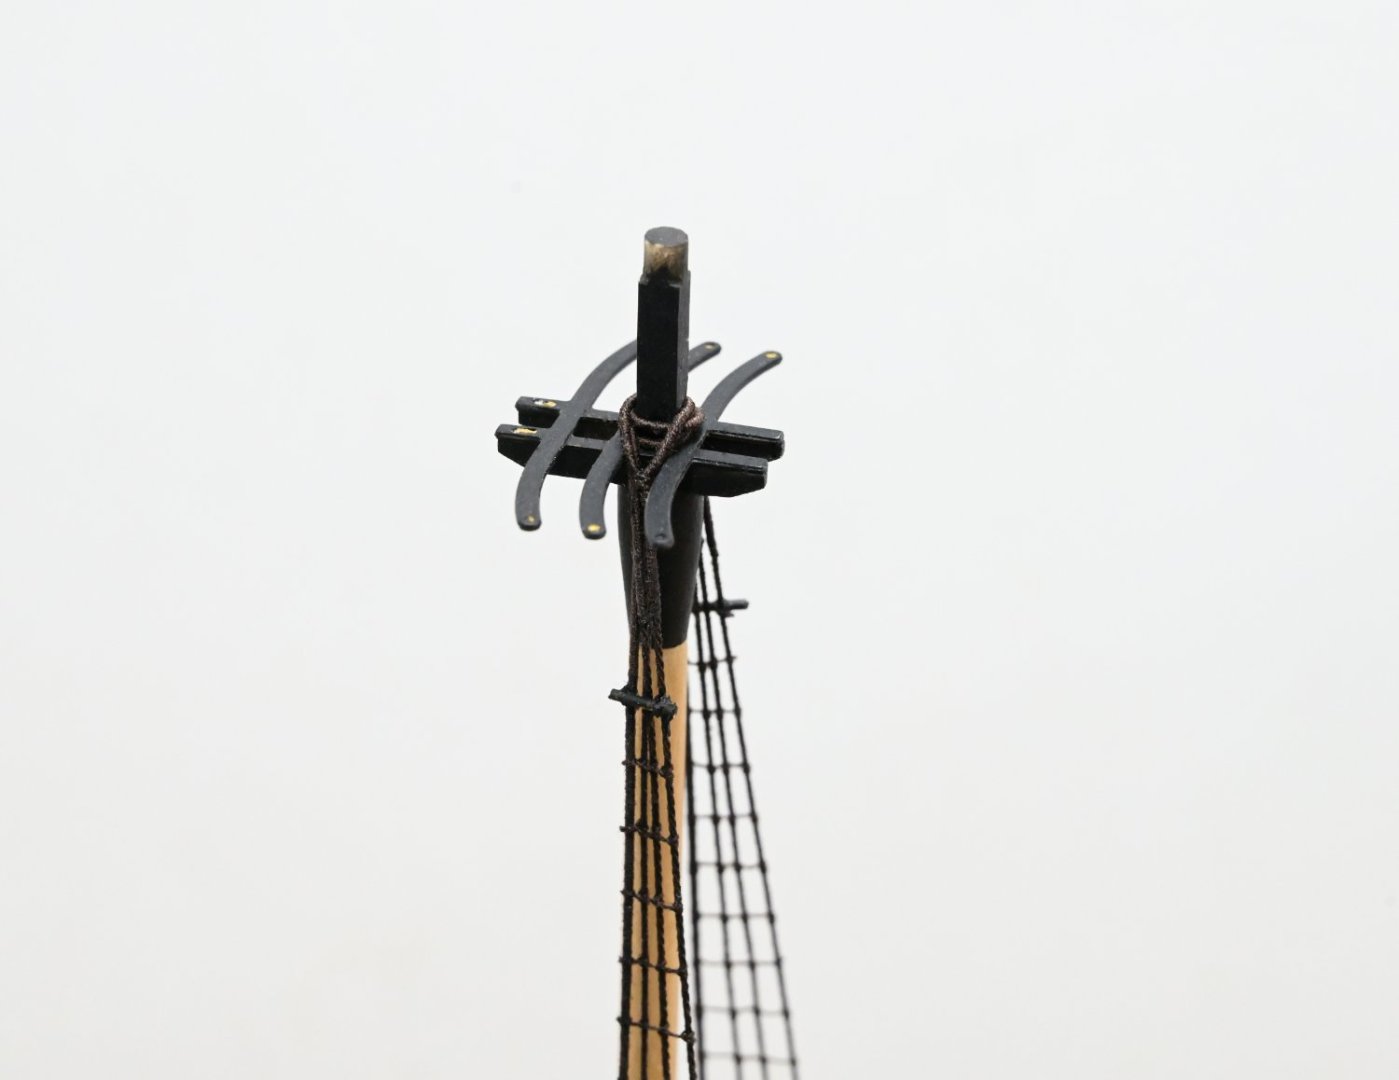
Crowsfeet & Topmast Backstays Thanks guys. I decided to stick with the 6/0 fly tying line for the crowsfeet. Here's the current state of play, with the crowsfeet on all three masts (now that I've started the rigging in earnest I've put the model in my dust cabinet, which makes photography a bit trickier): I've also rigged the topmast backstays, seen above with the small clips holding the laniards in place prior to final adjustment. Each backstay is made from a single line (I used 0.50mm for the mizzen and 0.65mm for the main and fore masts) fitted with a horseshoe splice in the middle to fit over the masthead: I served the central 40mm of each line, and created the horseshoe by splicing in a short 6mm length of line to form the straight piece. Here's a description of the method I used. I seized a 3mm deadeye into the end of each backstay and used 0.30mm for the laniards connecting them to the deadeyes already fitted to the channels: Topmast stays next. Derek

- 345 replies
-
- 14
-
-
-
- Duchess Of Kingston
- Vanguard Models
- (and 1 more)
-
I use a similar routine. I have a couple of ships in cases, but in a perverse way I quite enjoy getting reacquainted with my other models when I have to dust them. That, and the fact that I simply haven't got round to casing them yet 😁. Your Vanguard figures look great. I've got a set but have yet to paint them - not something I've done before, so I'll be resorting to Youtube to hopefully find some lessons. Derek
- 542 replies
-
- 4
-
-
- Sphinx
- Vanguard Models
- (and 3 more)
-
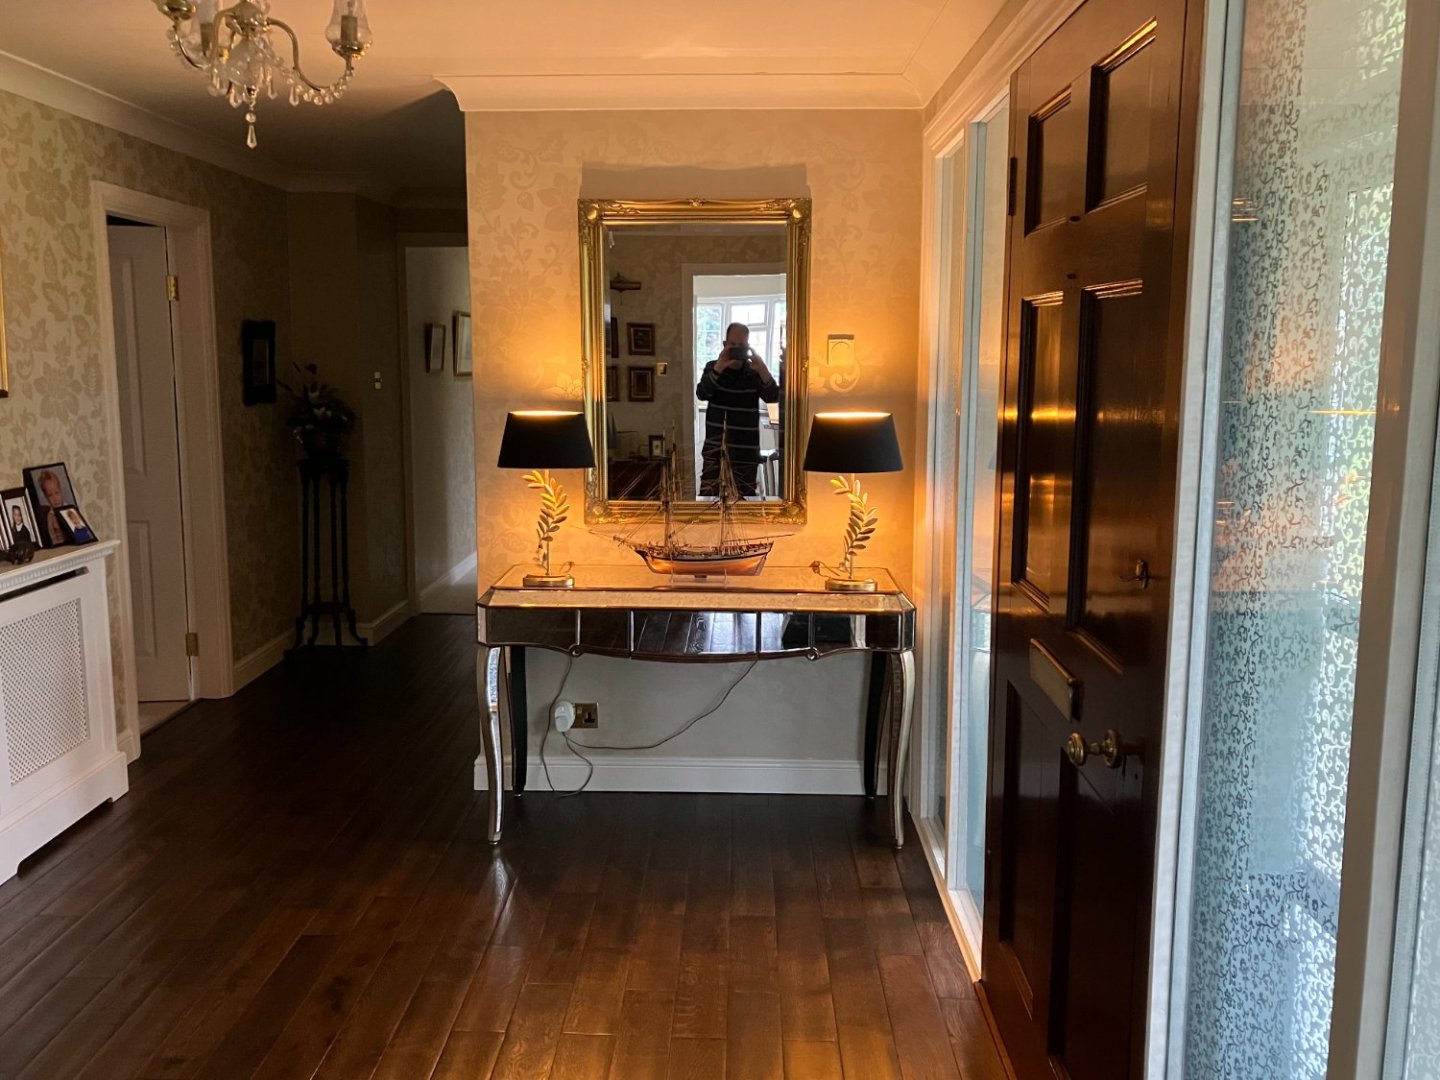
Thanks Ron. I'll try and lay the blame on you but I'm not sure it'll wash. Too late I'm afraid. This is our entrance hall - Speedy was only meant to be there temporarily but somehow temporary has turned into over a year: Most of the pictures in the house are of ships and other maritime themes, which doesn't help. My last-ditch tactic will be to remind Karen that she bought me Sphinx as a present so ultimately it's her fault. But that's not a line I'll take unless I'm desperate (and preferably outside throwing distance!). Derek
- 542 replies
-
- 10
-
-

-
- Sphinx
- Vanguard Models
- (and 3 more)
-
I blackened the brass fittings for my Speedy build (here). I've tried various methods. The one I use now (described here in my current Duchess of Kingston log) enables me to blacken several dozen small fittings at a time. I find this method gives a much better finish than paint.
-
Great work Ron. I've had my Sphinx sitting on a shelf in my workshop for a year now and I'd always intended her as a Navy Board-style model, partly because I've always wanted to do one and partly because it would take up much less space. Until I saw your Camilla that is. The splendid job you're making of her rigging and sails is making me think again. I'll blame you when my wife berates me for "filling the house with yet another huge model"! Derek
- 542 replies
-
- 3
-
-
- Sphinx
- Vanguard Models
- (and 3 more)
-
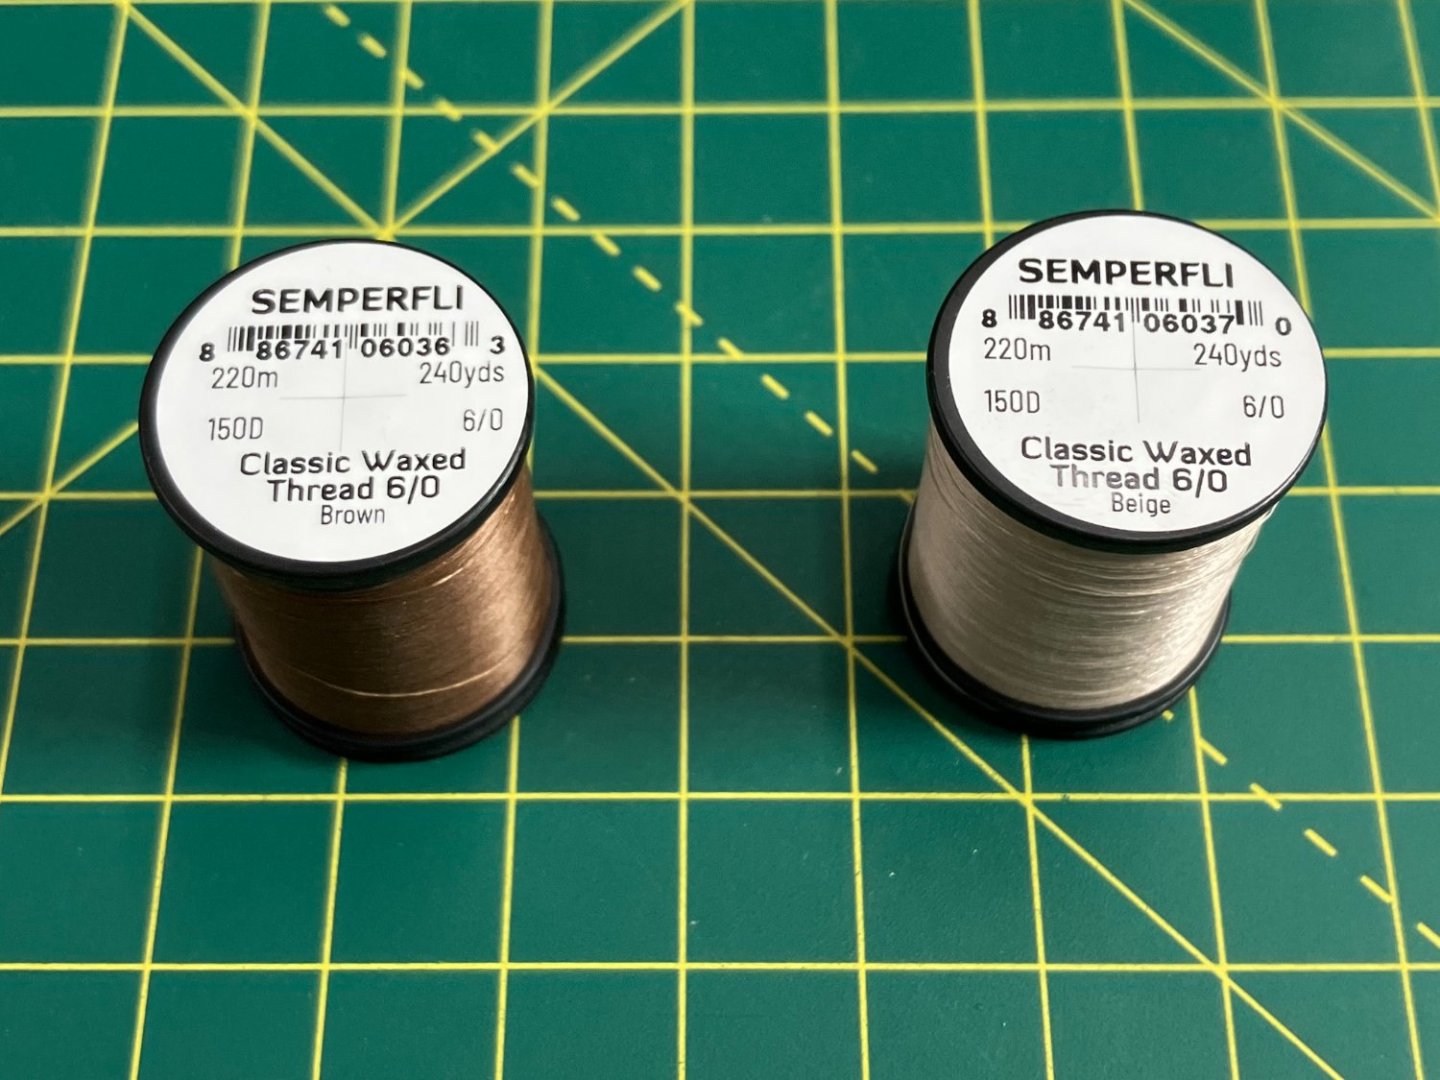
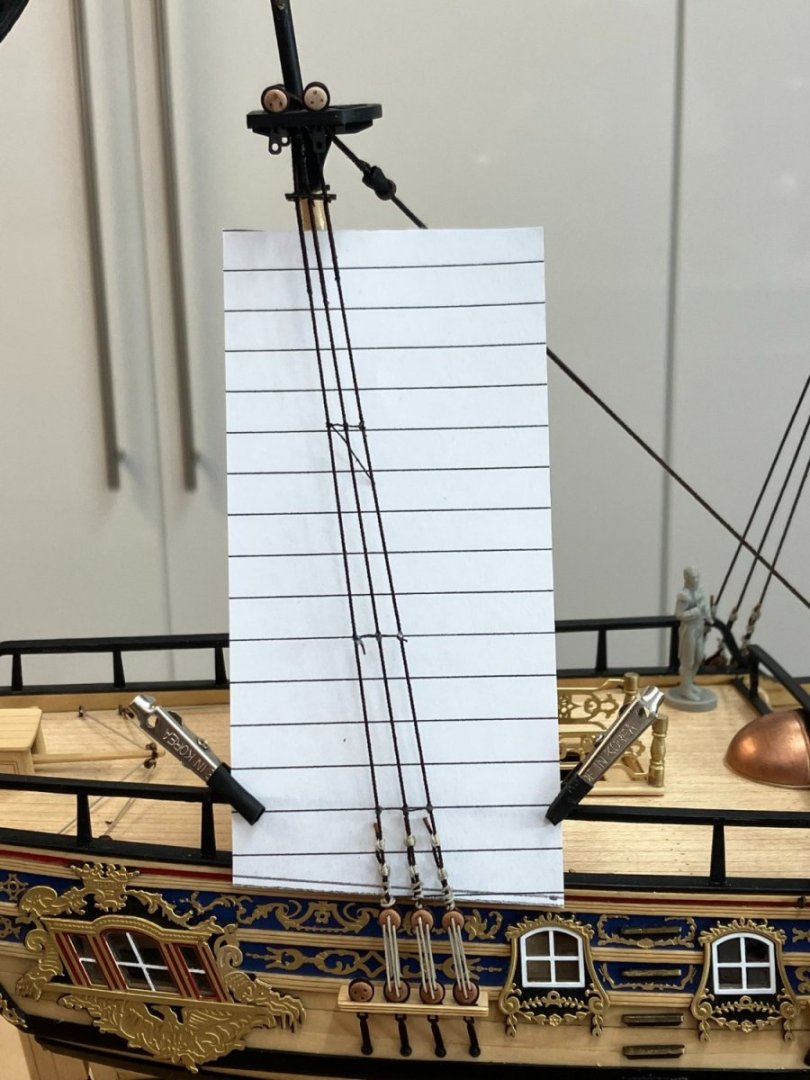
Crowsfeet In my Speedy log I described fitting the crowsfeet in some detail so I'll just cover some changes I made rather than repeat everything here. Here's the link to the earlier description: On Speedy I used DMC Cordonnet thread, run through a beeswax block to make it easier to thread through the holes in the tops and euphroe block. I used my thinnest thread, which I measured at about 0.15mm. In the real ship the crowsfeet line would have been very light - 0.75" circumference/<0.25" diameter, which equates to a fraction under 0.10mm at scale. As an aside I've yet to find commercially available 0.1mm rigging line that actually measures 0.1mm - it's often nearer 0.20mm - so I looked for alternatives. I checked in The Fully Framed Model by David Antscherl and he used 6/0 fly tying silk. I use thinner 18/0 fly thread for seizings, and it measures 0.04mm (human hair territory!) so I thought I'd give the thicker material a go. Not sure of colours, I ordered brown and beige: On arrival I was pleased to find that my micrometer agreed with David's, measuring the line at 0.10mm. The thread was a little tricky to rig to the euphroe block. I used 18/0 line for the seizing, and as both the line and the seizing were smooth silk they tended to slip apart. I found I had to leave the fly tying cement to set firmly before moving the line otherwise the seizing wouldn't hold. Once set, everything was fine. As with conventional thread I dipped the end in CA to harden it and facilitate threading through the tops. As with Speedy, I rigged the crowsfeet according to the descriptions in Lees and Antscherl rather than the kit instructions, with a slight modification to allow for the even number of holes in the tops (the method I use requires an odd number of holes, namely twice the number of holes in the euphroe block plus 1). All this is covered in the Speedy log. I used the brown line as the beige just look too light. Here's the foremast crowsfeet. I've not tied the line off yet as I haven't finally decided I like the result yet: ...and a comparison with the same crowsfeet on Speedy: I must say the 6/0 line on the left was a lot easier to rig. It was much easier to get the tension right, and the whole set up seemed to need less tension to get the line to sit straight, which in turn meant there was less tension on the stay which therefore wasn't pulled out of line too much. The lack of beeswax made the whole process less messy as well. So, the question comes down to one of appearance. I think I'm happy with the way the 6/0 silk looks, but I'm going to give it a few days while I get on with other jobs before deciding whether or not to use it on all three masks. I'd be interested in other folks' views. Derek


- 345 replies
-
- 16
-
-
- Duchess Of Kingston
- Vanguard Models
- (and 1 more)
-
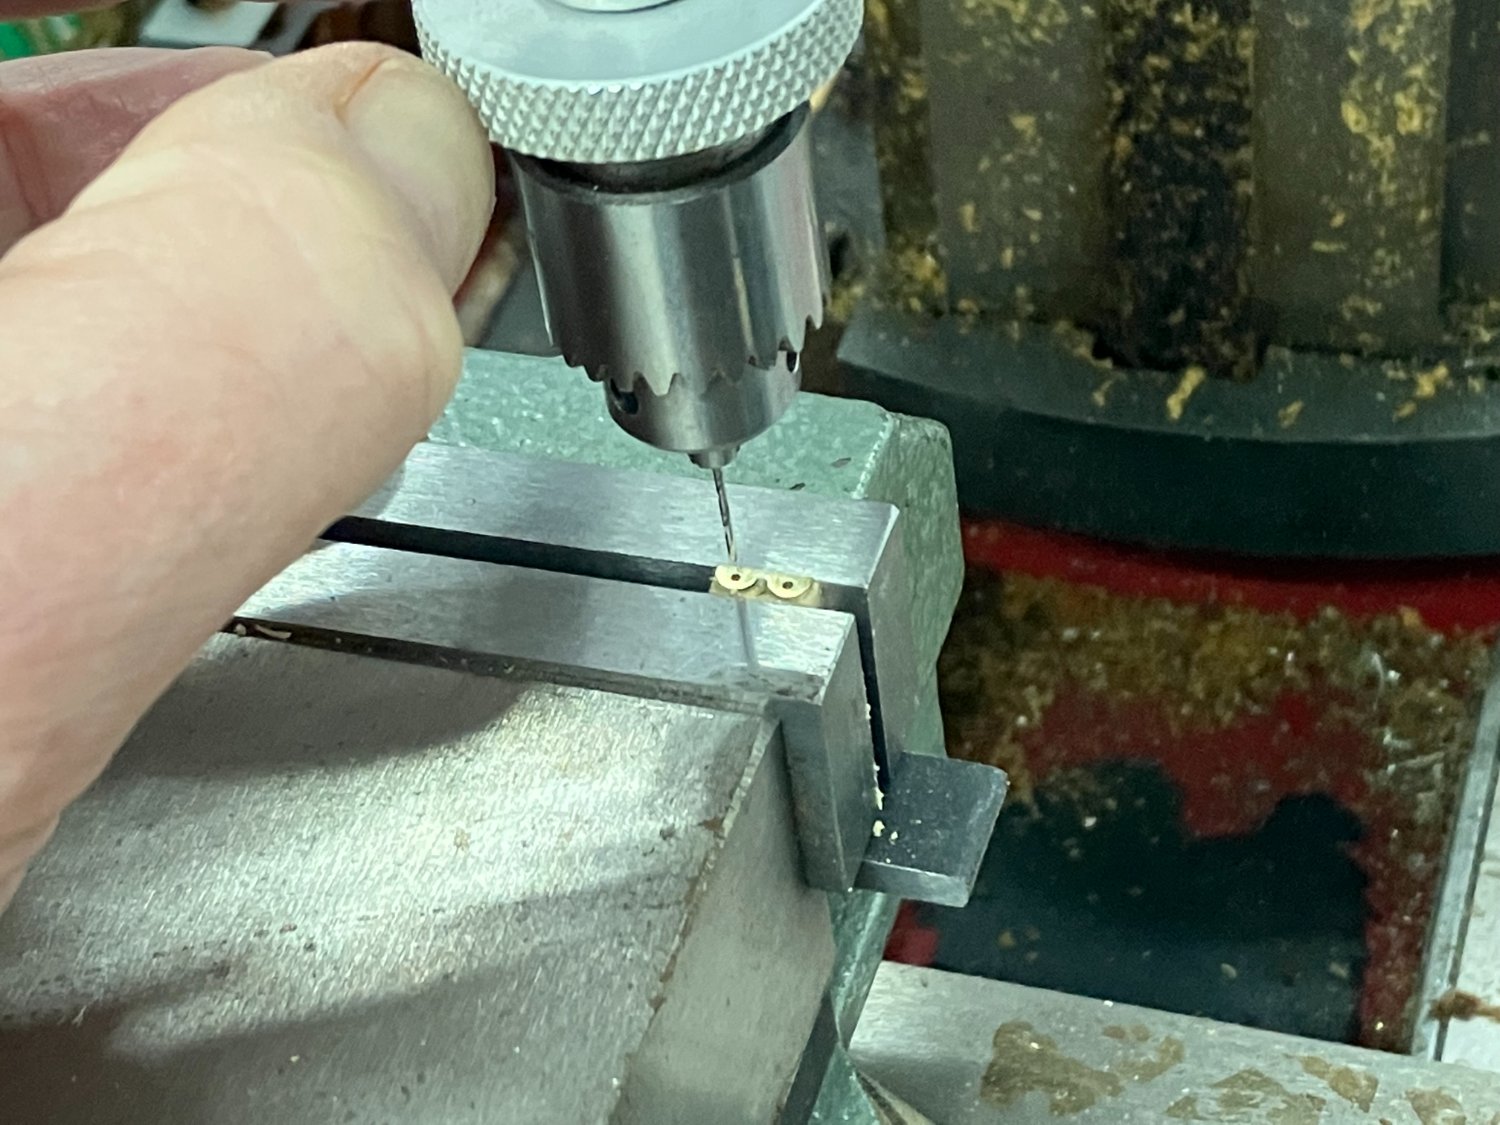
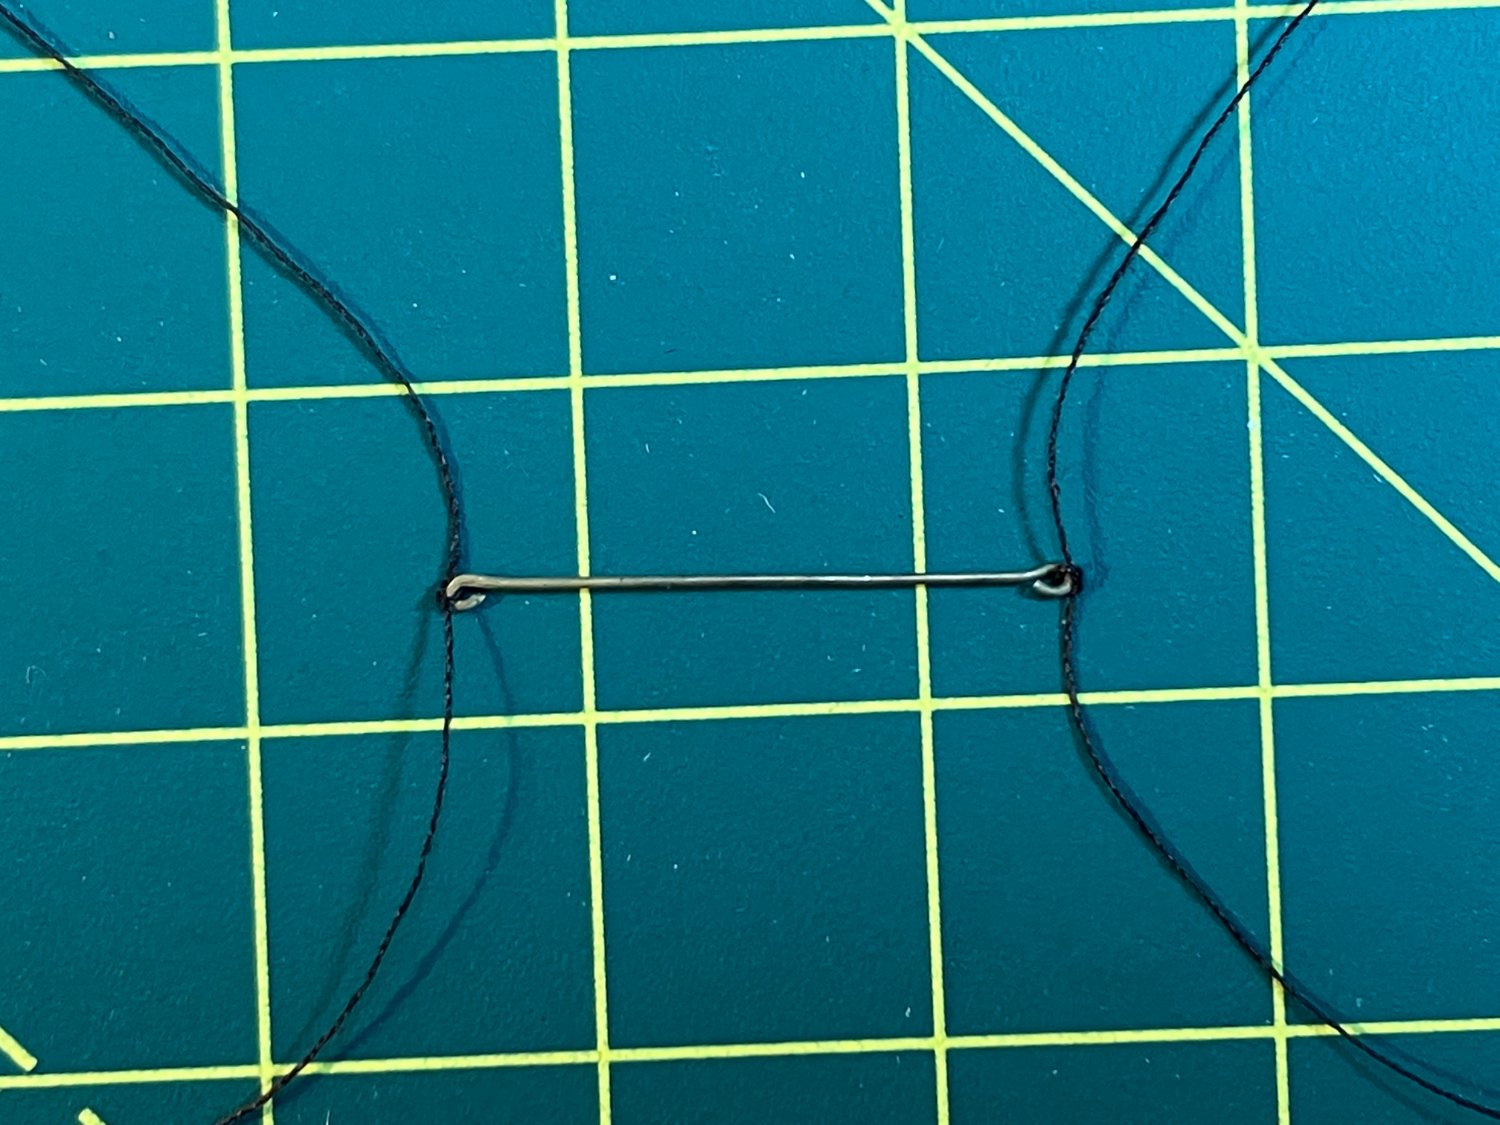
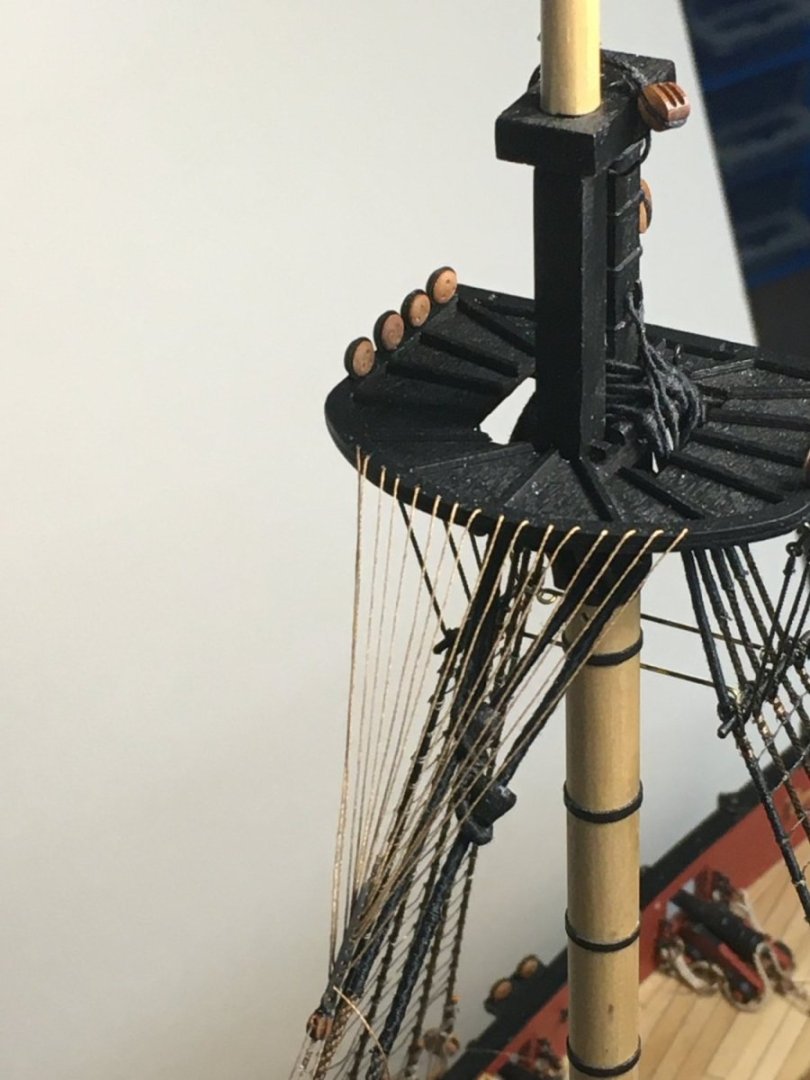
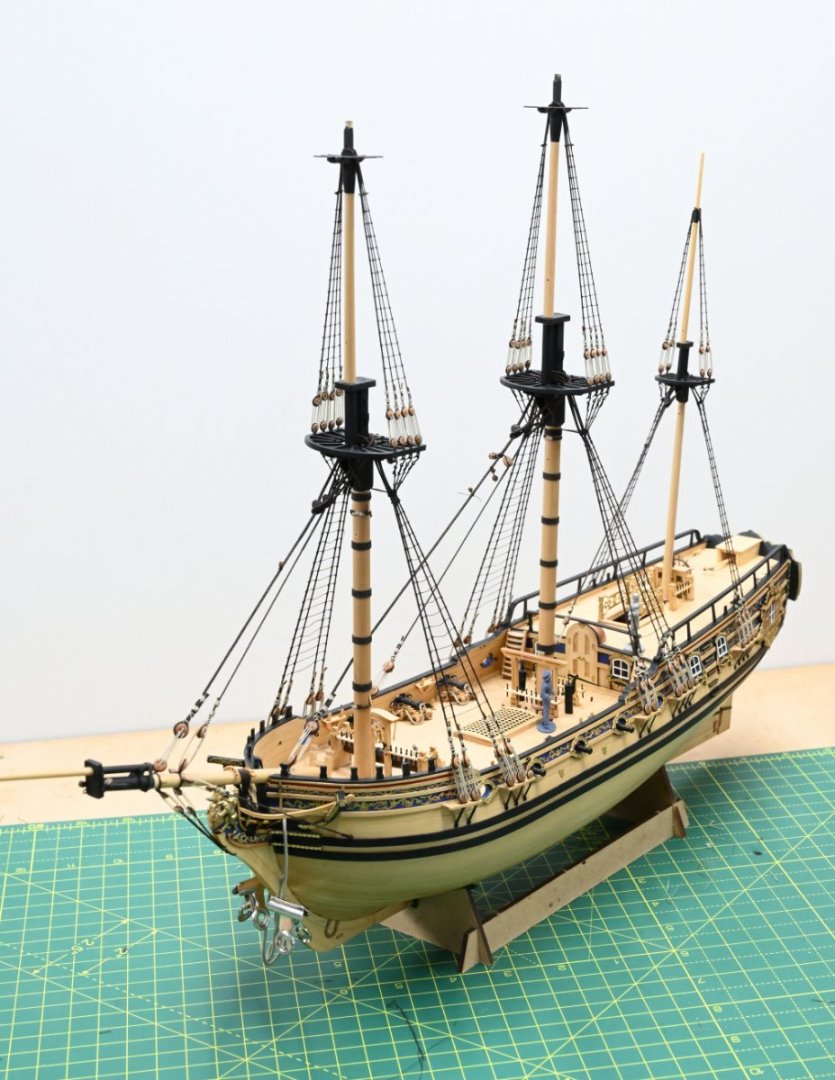
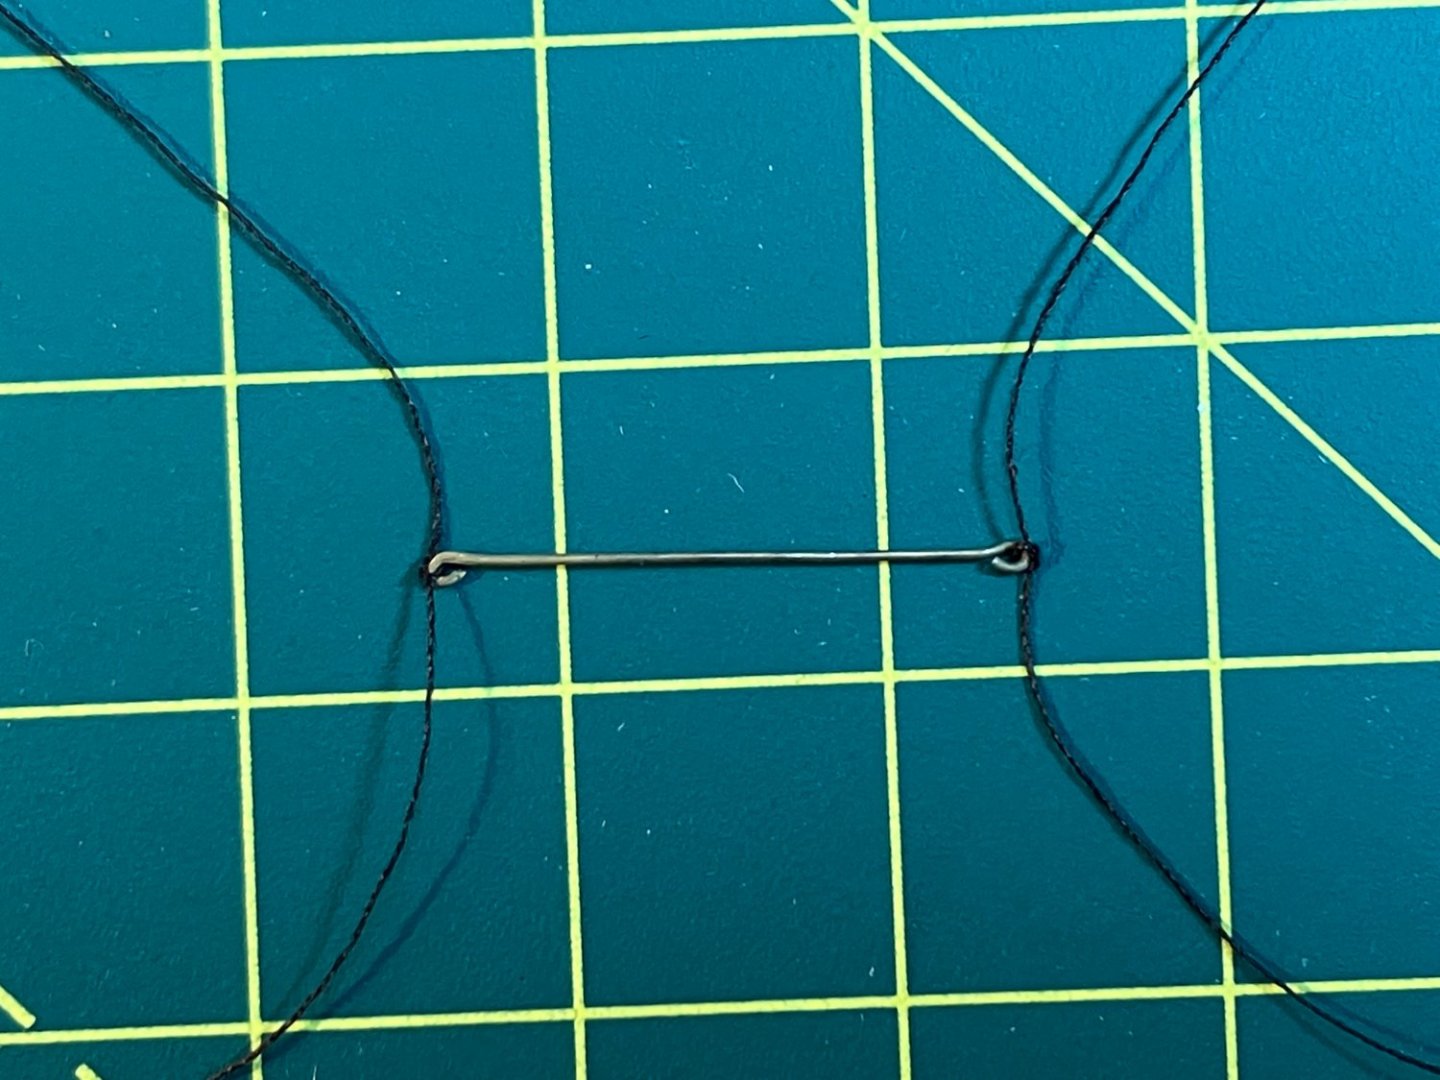
Topmast shrouds Many thanks as always for the kind comments and 'likes'. I'm really glad I rigged the shrouds before fitting the topmast caps and topgallants. Unlike Speedy where I had to seize the shrouds on the model, it was much easier to measure everything on the Duchess then complete the seizings and rig the deadeyes in comfort on the workbench. I used 0.6mm line for the fore and main topmast shrouds and 0.5mm for the mizzen, 0.3mm for the lanyards and my thinnest Mara line (#150) for the ratlines and seizings. All the techniques were as per the lower shrouds. I also used #150 to serve the shrouds in the normal way, i.e. the full length of the first shroud each side on each mast and the middle quarter of each shroud pair. I always like the look of a gang of served shrouds stacked up on a masthead, even if it's only a few like this: The futtock staves are short lengths of 0.5mm brass rod from the kit, seized with 18/0 fly tying silk. I used the Quadhands to hold the rod in place during seizing as described for the lower masts. Unlike the lower masts, I didn't fit catharpins. They are shown in the kit, but according to Lees (The Masting & Rigging of English Ships of War) catharpins on topmasts did not appear on contemporary models until 1805, and that was an outlier. I was happy to leave these fiddly little items off. As for the ratlines, I'm still trying to improve my technique. I mentioned in an earlier post experimenting with tying alternate clove hitches upside down to avoid the 'S' shape that tends to result if each knot is tied the same way: For the first rung the result is a pleasing downward curve..., ...but the next pair of knots results in an upward curve: However, I actually found that on the model it was easier to persuade the latter curve into a better shape than it was to get an 'S' curve to conform. I was quite pleased with the results, especially on the mizzen where there are only two shrouds! Here's the whole model: On next to one of my favourite rigging components, the crowsfeet. Derek


- 345 replies
-
- 13
-
-
-
- Duchess Of Kingston
- Vanguard Models
- (and 1 more)
-
I've been using small amounts of pre-mixed shellac out of the same bottle for the last five years and it's still as good as new. Me neither. Derek
-
Good to hear from you David, and best wishes for your cataract procedure. And thanks for giving me a chance to catch up with you - my Duchess build had also been on hold for some time over the Summer! Derek
-
Hi Dave - good to hear from you again, and thanks for your kind words (and no, I won't be adding sails!). In fact I suspect my next two models - Sphinx & Indefatigable from Vanguard - will be hull only. Although I enjoy rigging, Navy Board-style models take up much less space and that will be a consideration when we eventually downsize. Best wishes Derek
- 345 replies
-
- 5
-
-
- Duchess Of Kingston
- Vanguard Models
- (and 1 more)
-
Looking forward to this with great anticipation having followed Jim's superb build log (though I haven't even started Sphinx yet!). I imagine you've been asked this before, but wouldn't it be possible to offer a slimmed down hull only version for those of us aiming for a Navy Board-style model? I suspect the answer will be that it would cause you more trouble than it would be worth, but I had to ask. I don't mind paying for the full kit, but it just seems a waste to have to send me material I won't need. Derek
-
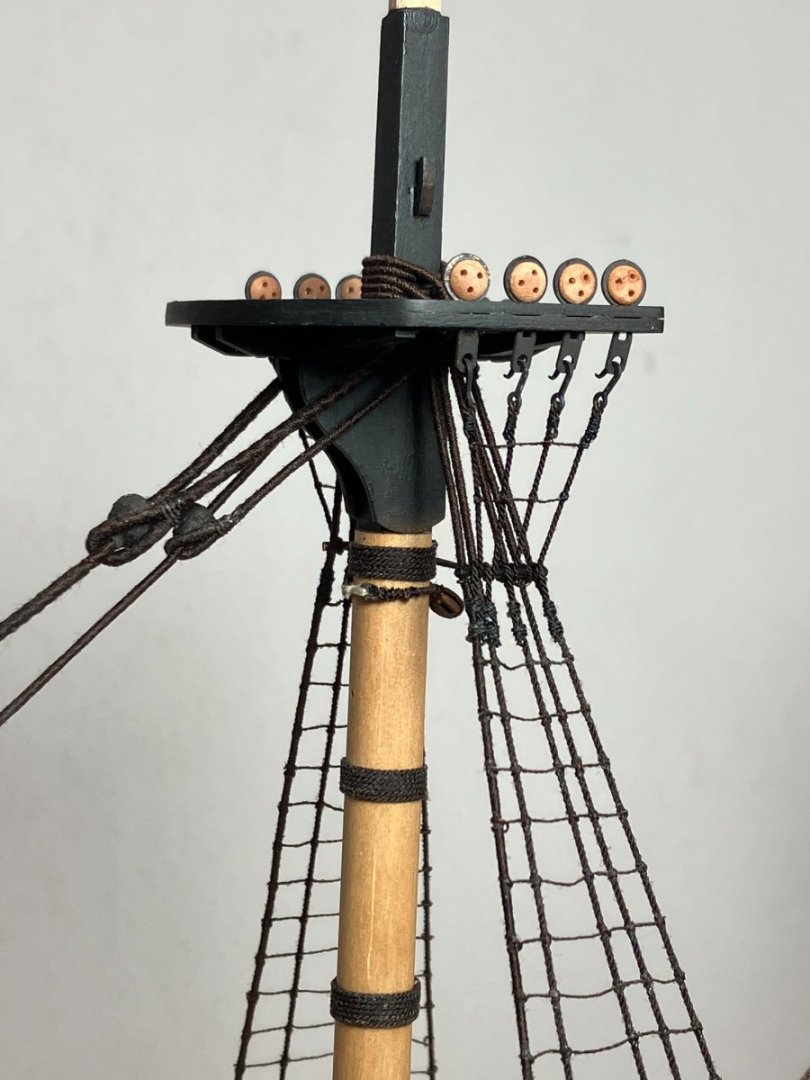
Lower Catharpins & Futtock Shrouds, Topmasts Over the last few days I've completed the standing rigging to the lower masts and fitted the topmasts: I use the same methods for these elements of the rigging as I did for Speedy so in the interests of brevity here's a link to the relevant post in that log for the details. One minor point on the catharpins. I use wire for these as I find it too difficult to get even tension using rope. However by the time I've formed eyes in the end of a length of 0.5mm brass wire it usually ends up bent and difficult to straighten by hand. I usually straighten short lengths of brass wire by rolling them between two metal plates. With eyes on each end I couldn't use my usual plates but luckily I had a couple of pieces of square section that did the job nicely. I suspect hardwood might also work, but I find smooth metal works well for me: Here's a closeup of the main top, showing the futtock shrouds in place. Topmast shrouds next I think, then perhaps the crowsfeet. Derek

- 345 replies
-
- 14
-
-
-
- Duchess Of Kingston
- Vanguard Models
- (and 1 more)
-
A welcome addition to your range Chris. Would these paints also be suitable for your 3d printed figures and furniture?
-
Congratulations on yet another splendid model, with a great log to match. Well done! Derek
- 857 replies
-
- 5
-
-
-
- Sphinx
- Vanguard Models
- (and 1 more)
-
Well done Glenn - great model and a great log. I suspect you will have finished your next build (Indefatigable?) before I get round to starting Sphinx! Derek
- 476 replies
-
- 3
-
-
-
- sphinx
- vanguard models
- (and 1 more)
-
I think you've made the right decision. For me, the cranes add yet another element of interesting detail. You are creating a truly beautiful model. Derek
- 857 replies
-
- 7
-
-
- Sphinx
- Vanguard Models
- (and 1 more)
-
You’re welcome! I’ve learned so much from this forum I’m happy if I can help a bit too.
- 345 replies
-
- 2
-
-
- Duchess Of Kingston
- Vanguard Models
- (and 1 more)
-
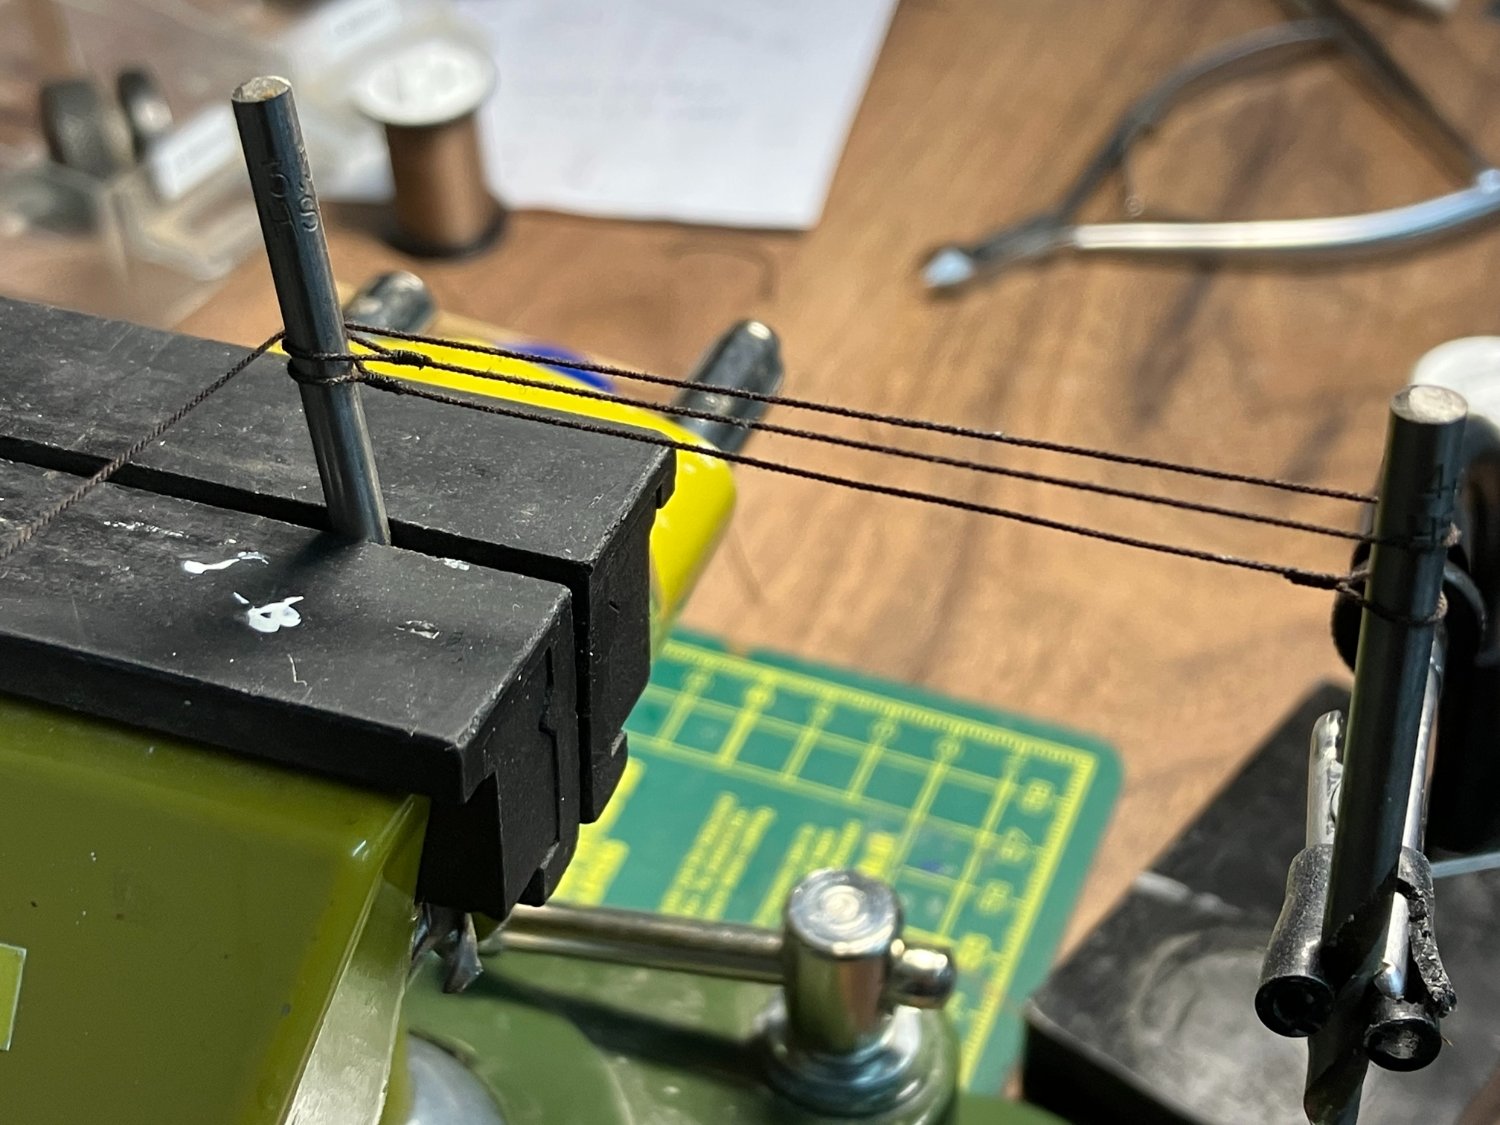
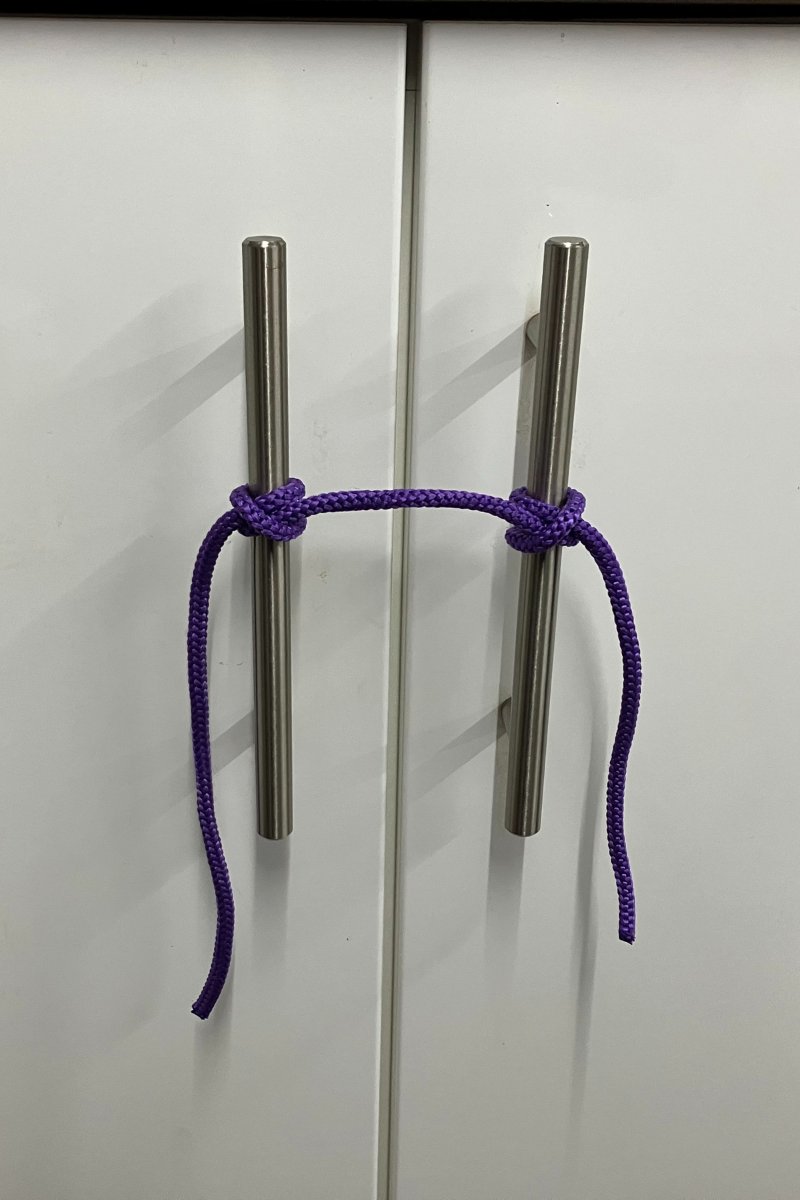
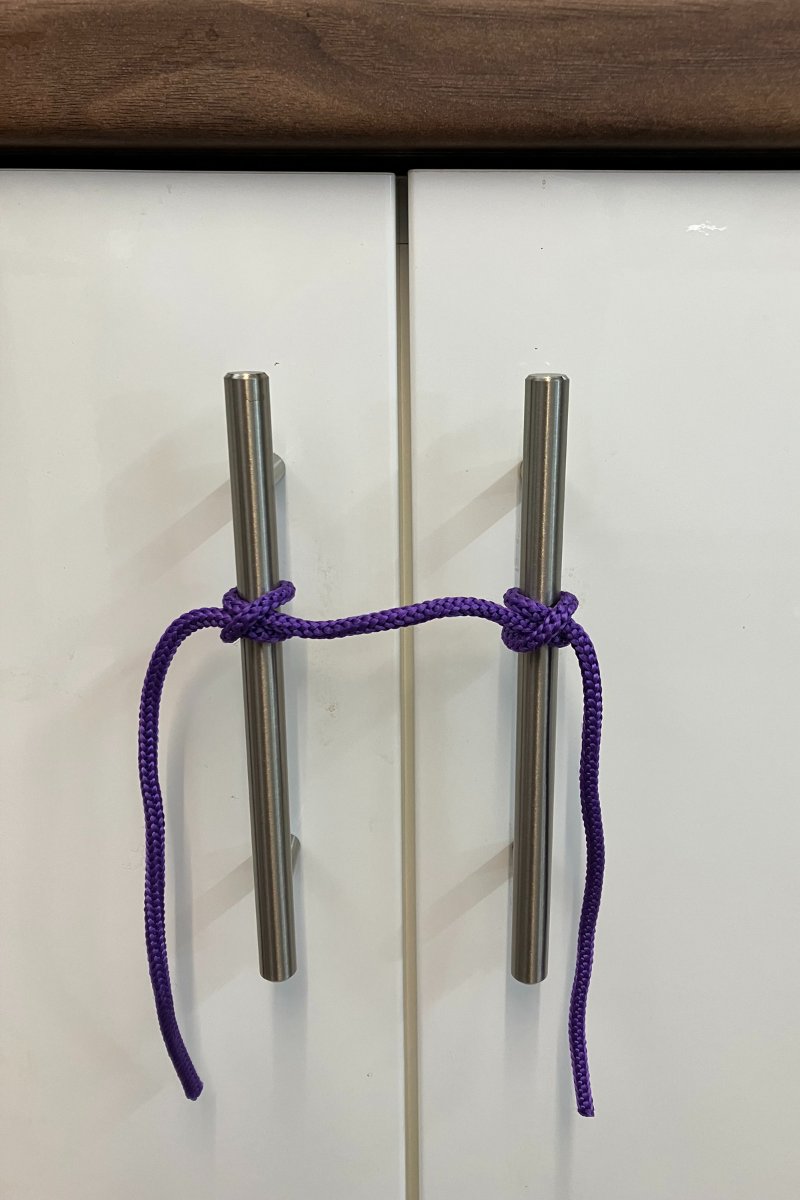
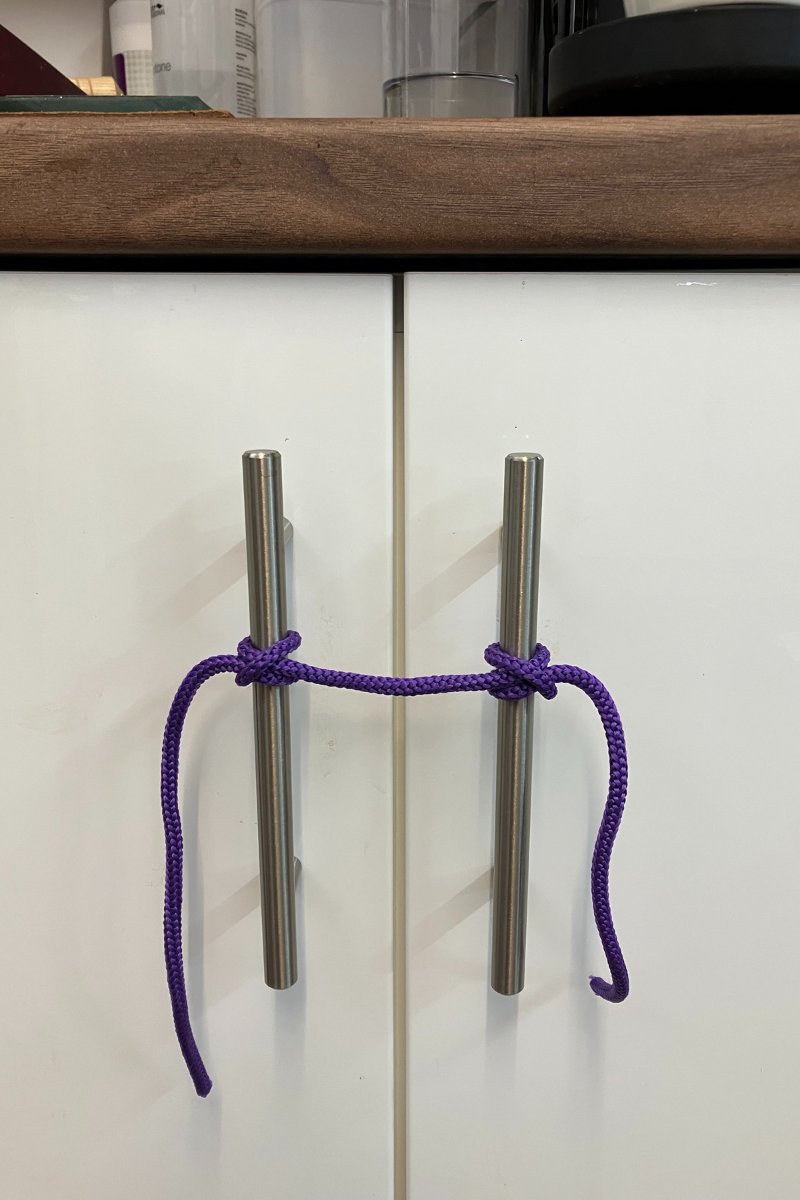
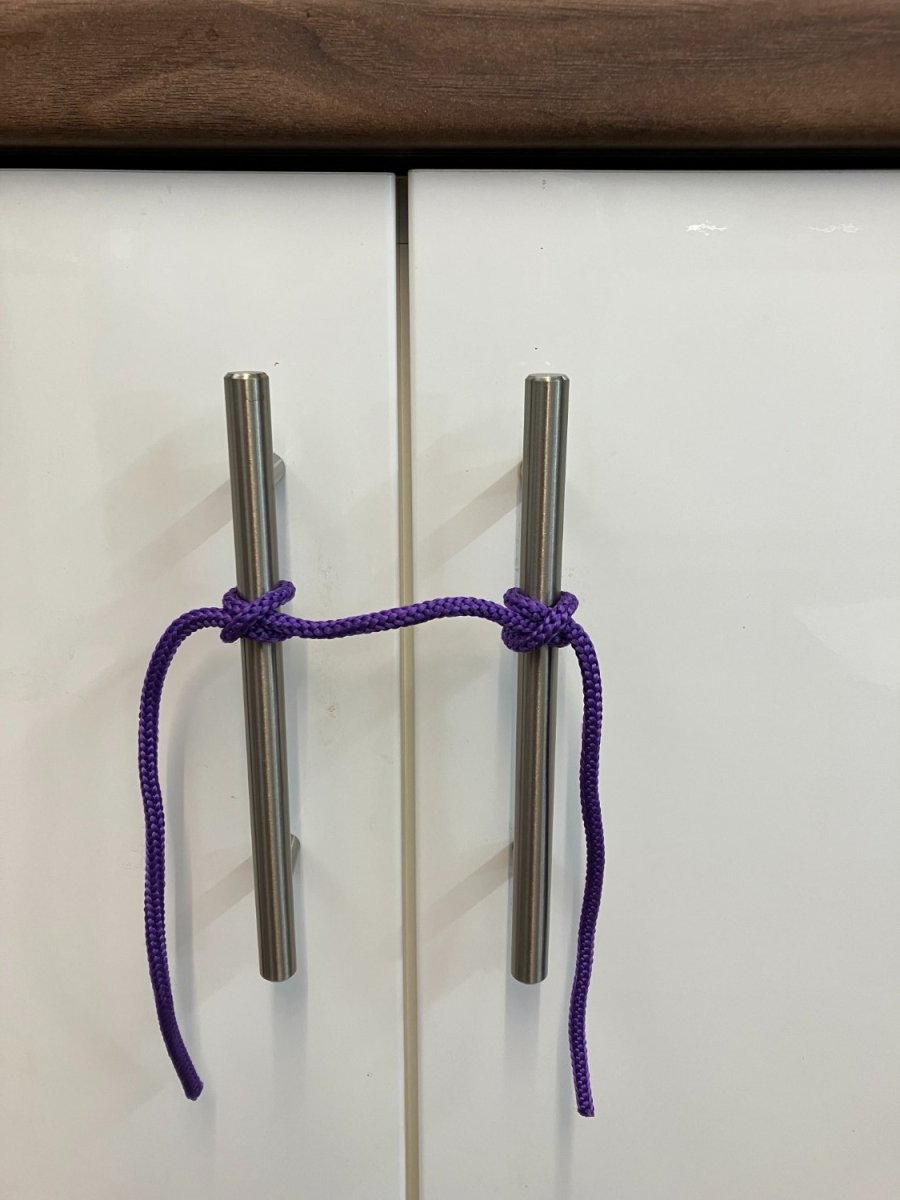
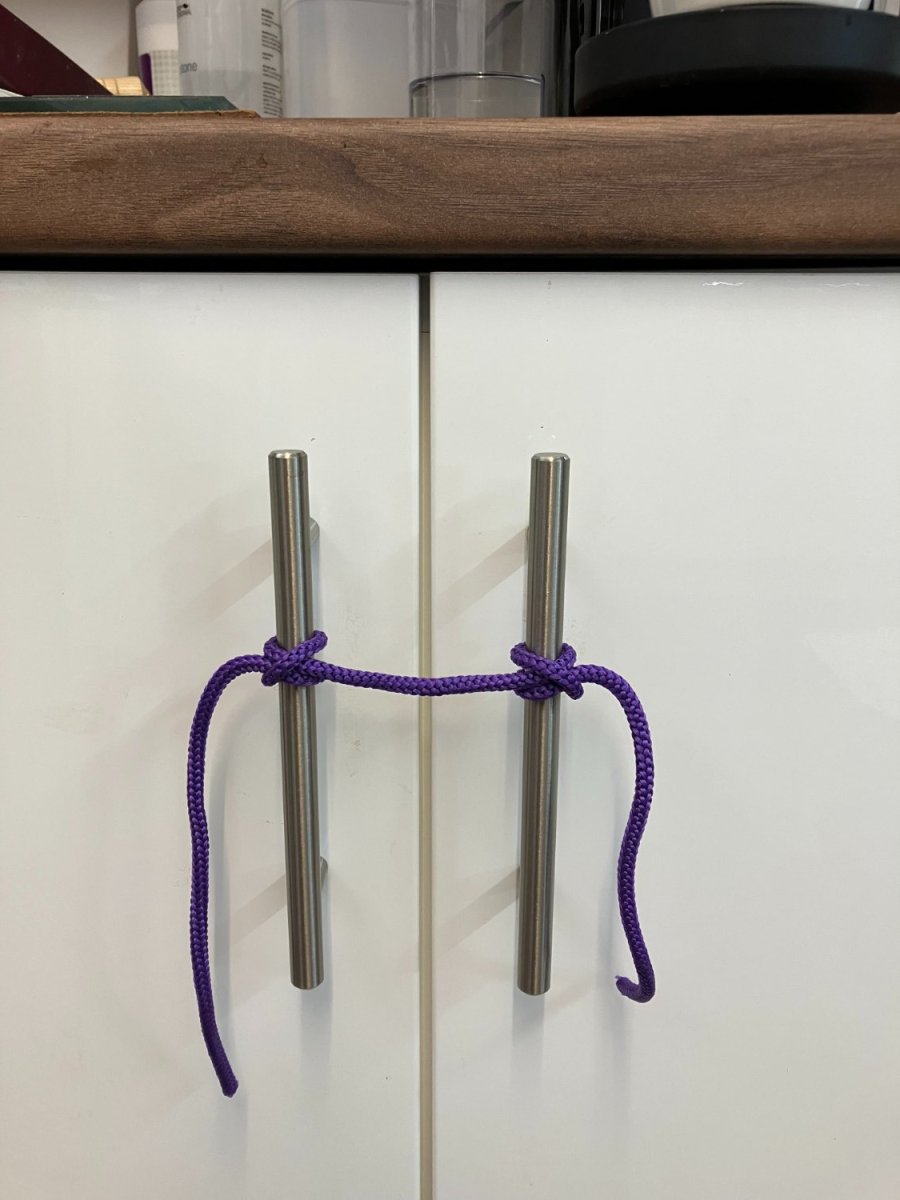
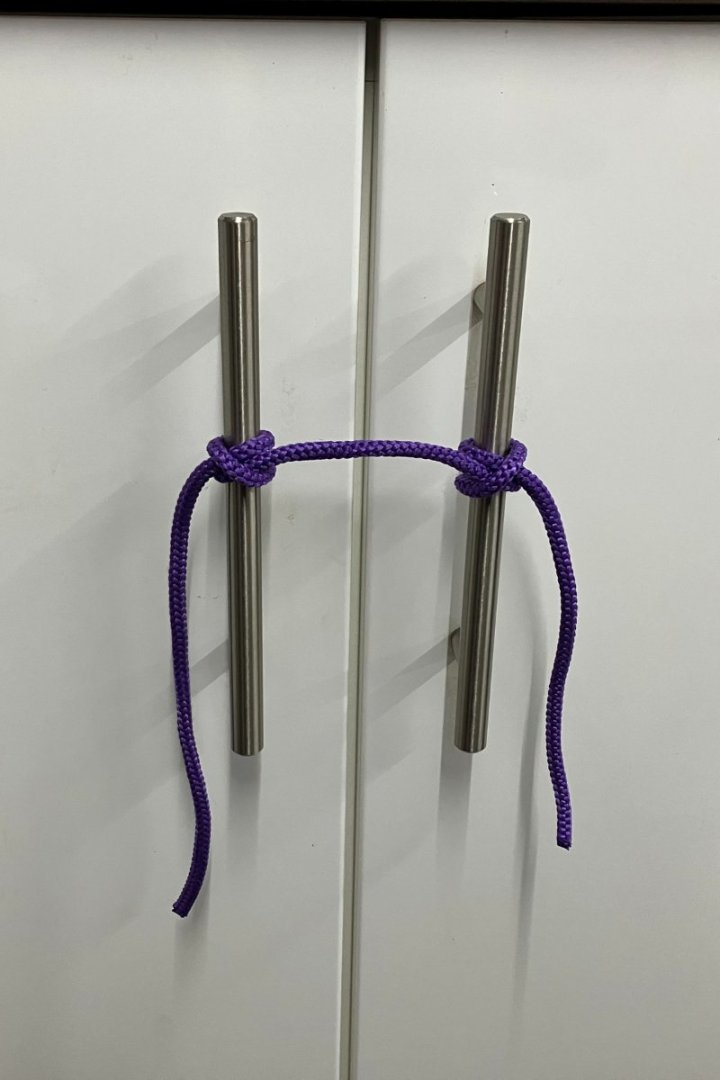
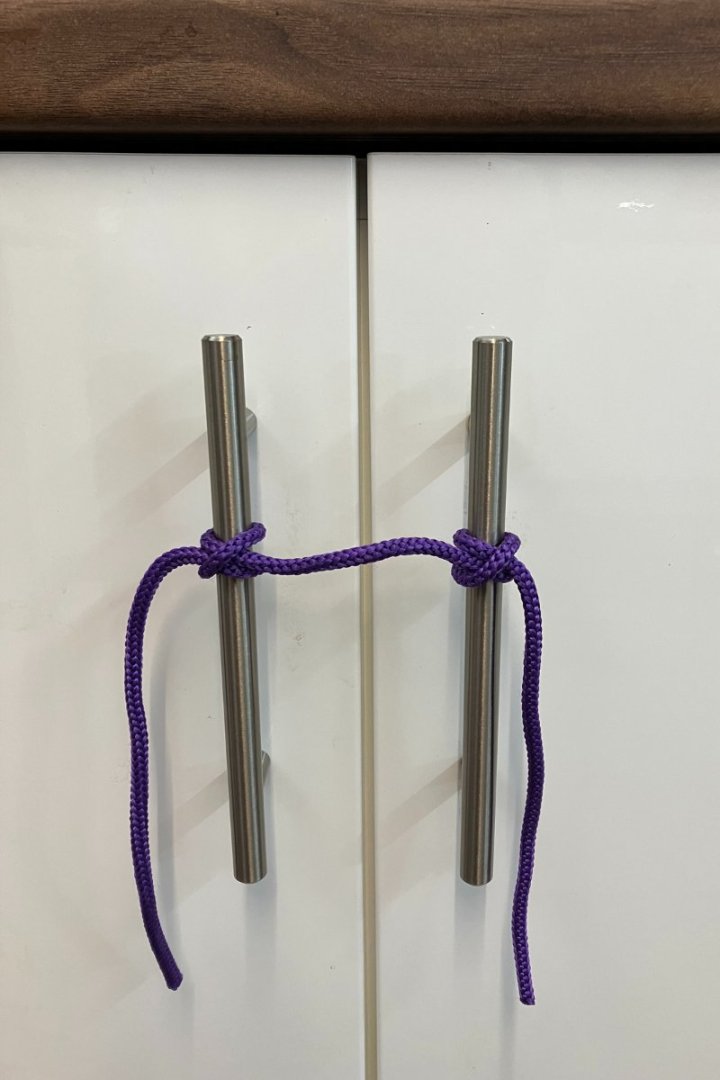
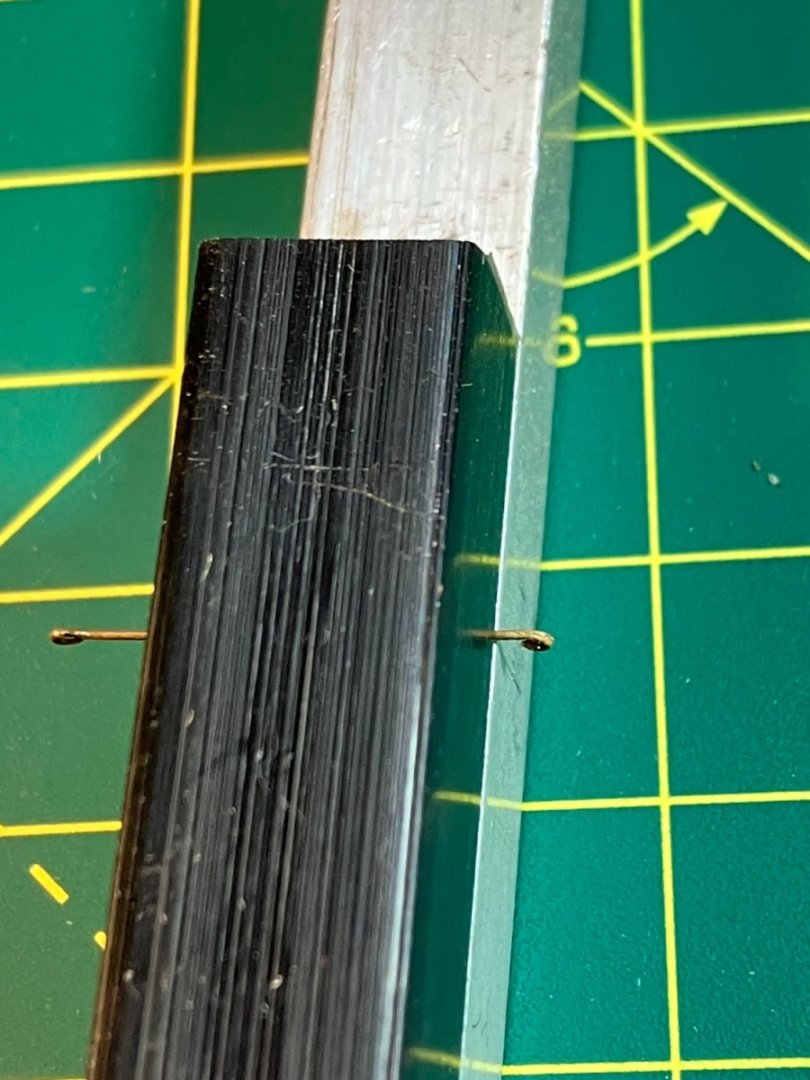
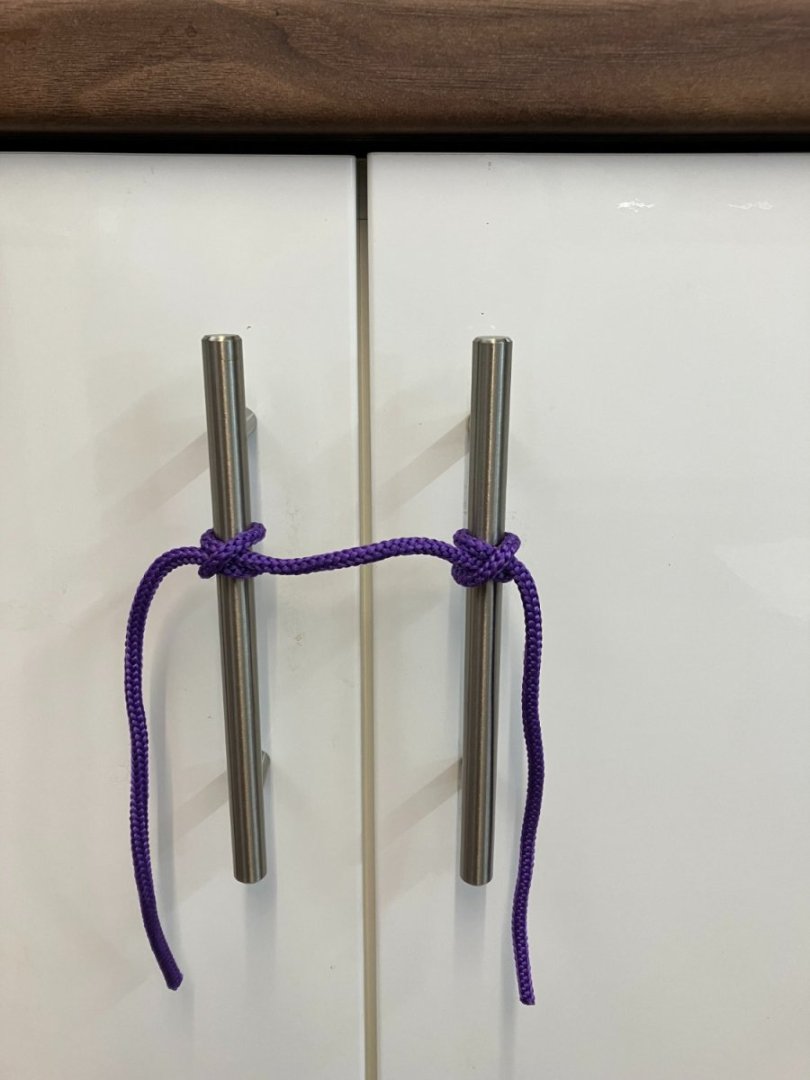
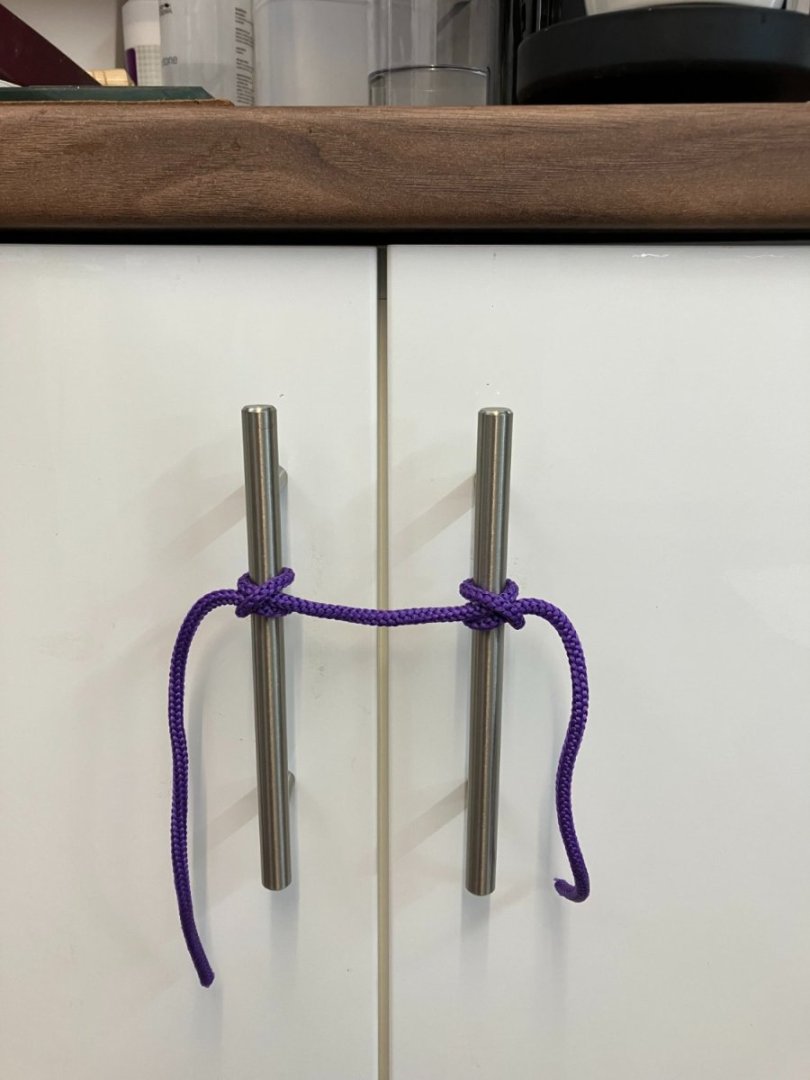
That's not a lame question. In trying to rig decent ratlines I've tried half hitches, overhand knots and cow hitches but I always end up using clove hitches. I believe that's what was used on real ships, and most modellers do the same. The best guide I've found is this youtube video: Couple of points to note. He's pinned some white card behind the shrouds which makes it much easier to see what you're doing. However he's using plain card whereas I prefer to use lined card to help me get the ratlines evenly spaced and parallel with the waterline. Here's an example: Second, he starts with an overhand knot on the first shroud whereas I prefer to start as I mean to go on - with a clove hitch. It's very easy to tighten the ratlines as you work your way up, producing an hourglass shape in the shrouds which just looks wrong. One way to help avoid this is to rig the every fifth or sixth shroud first, then fill in the gaps. Some people draw lines on the card to represent the shrouds and use these to try to keep the shrouds straight. I find that more difficult, but you might find it worth trying. Couple of other points. I try to use the finest line I can for ratlines. In real life the lower ratlines would have been made from 1.5" line (that's circumference, ie less than 0.5" in diameter). On a model that's just under 0.20mm in diameter; any thicker looks too heavy, at least to my eye. Also, I find the knots can slacken quite easily, so I usually put a dab of glue (I use dilute pva or shellac) on each knot as I finish each line. Finally, if you tie each clove hitch the same way there's a danger that you'll end up with 'S' shaped 'rungs' in your ratlines. Here's a photo where I've tied some rope to a pair of door handles to illustrate the point: You need to try to tweak each knot as you tie it to minimise this effect. Just out of interest, I tried tying alternate knots upside down which works for the first rung, producing a nice downward curve... ...unfortunately the next rung slopes up and looks worse than an S-bend! I hope this is of some help. I suggest you look at the video then try practicing some knots. Practice really is the answer although I've been practicing for years and still can't do it to my own satisfaction! Derek
- 345 replies
-
- 8
-
-
-
- Duchess Of Kingston
- Vanguard Models
- (and 1 more)