DelF
-
Posts
1,409 -
Joined
-
Last visited
Content Type
Profiles
Forums
Gallery
Events
Everything posted by DelF
-
 Stunning. That must be the most realistic stern I’ve seen on a kit. I’m going to have a hard time leaving Indefatigable in the box while I get on with Sphinx!
- 488 replies
-
- 10
-

-
- Indefatigable
- Vanguard Models
- (and 1 more)
-
Thanks for checking Glenn. I got your PM and by coincidence my mailbox is also just 19% full. I tried to PM you again without success, then on the third go it worked. No idea why. Probably operator error (on my part).
- 840 replies
-
- 3
-
-
- winchelsea
- Syren Ship Model Company
- (and 1 more)
-
Glenn - you might want to check if your mailbox is full - I just tried to PM you but got an error saying you can't receive messages. Nothing important, just a nerdy camera question that can wait. Derek
- 840 replies
-
- 2
-
-
- winchelsea
- Syren Ship Model Company
- (and 1 more)
-
Oh well, another item to add to the shelf in my workshop labelled "Things Glenn made me buy" 😁 Great work - a pleasure follow along. Derek
- 840 replies
-
- 6
-

-
-
- winchelsea
- Syren Ship Model Company
- (and 1 more)
-
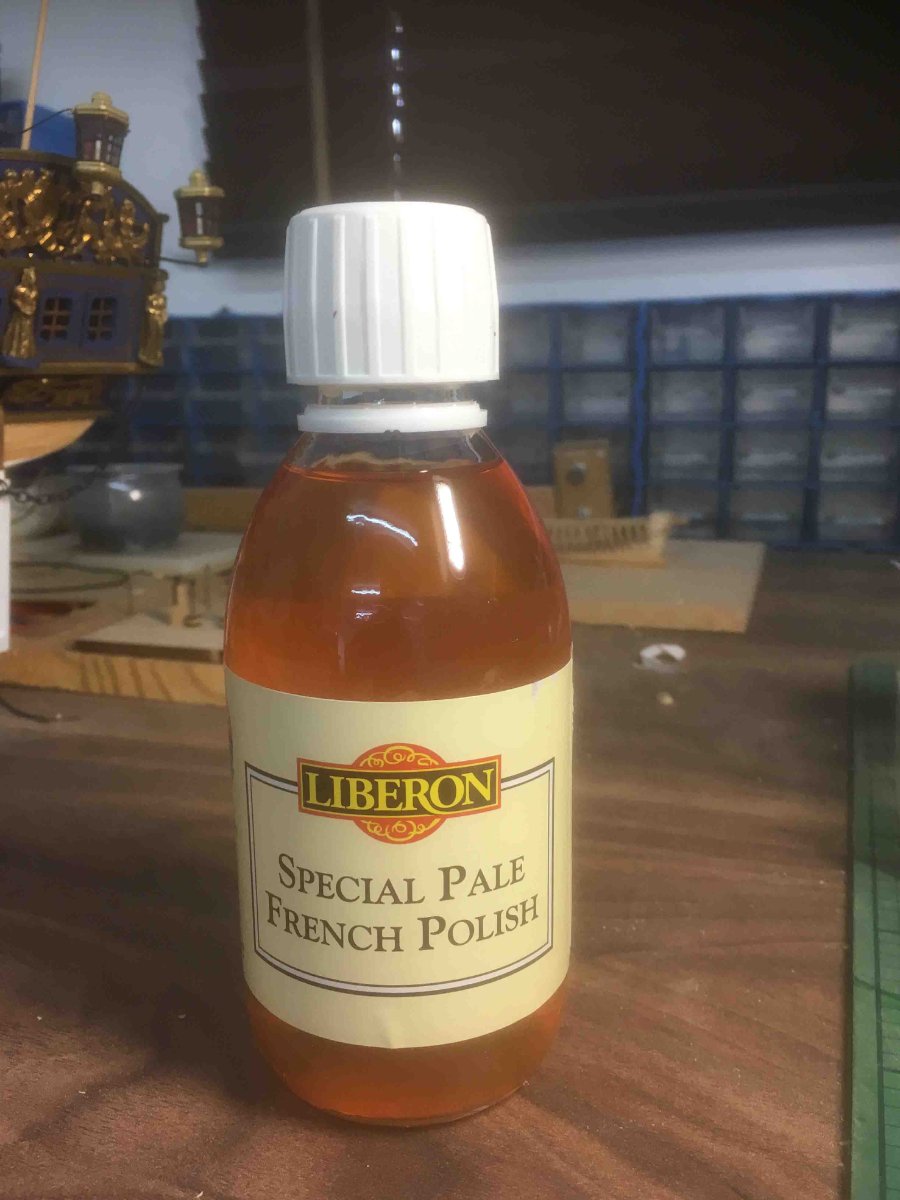
Hi Mark Your kind comments on my log prompted me to visit yours. Wow! Your craftsmanship is producing a work of true beauty. I'm currently working through a set of excellent kits by Vanguard Models, which I enjoy enhancing, but your example might inspire me to go the whole hog and try scratch building. On shellac, I use a Liberon product. It's labelled Special Pale French Polish but it's basically shellac. I've used it extensively on castello boxwood and it gives a beautiful warm finish. Not totally matt but not shiny either. And a lot cheaper than the product you mentioned! Best wishes Derek

-
Thanks Bob, much appreciated. We're setting sail from Ushuaia, which is sometimes described as the world's southernmost city so I'll look out for your penguins. I've just finished a book about Shackleton my mother-in-law bought me for Christmas. I was familiar with the story but this one had all the original photographs from the expedition. What an incredible tale. I might give the Endurance a miss though - too modern for me, with that newfangled steam engine! Derek
-
Thanks! To be honest most of the detail on this model is provided out of the box, with me just adding a few of my own enhancements such as the anchor buoys. I've had your log bookmarked since I started the Duchess and have referred to it frequently, so thank you Rusty! For me, anchor buoys are one of those little details, like crowsfeet, that add interest to a model. Cheers Glenn! At least you've got a nautical dictionary now. I remember when you used to refer to "strings and things" 😁 Enjoy Patagonia - I'll look forward to your photos. I'm off to pack the sled and check the huskies. Derek
- 345 replies
-
- 6
-
-
- Duchess Of Kingston
- Vanguard Models
- (and 1 more)
-
Like you I use Brass Black, with equal success. The only slight modification I'd make is if you need to blacken a large number of small components such as hooks or eyebolts. If these clump together in the solution the treatment can be patchy. I've found that putting the components and solution in a small container with a tightly fitting lid and shaking vigorously obviates any problem. I used to use the canisters that old film rolls came in, but now I've got some even smaller bottles that my wife used to have for washing contact lenses. I've blackened upwards of 100 small components at a time using this method. Derek
-
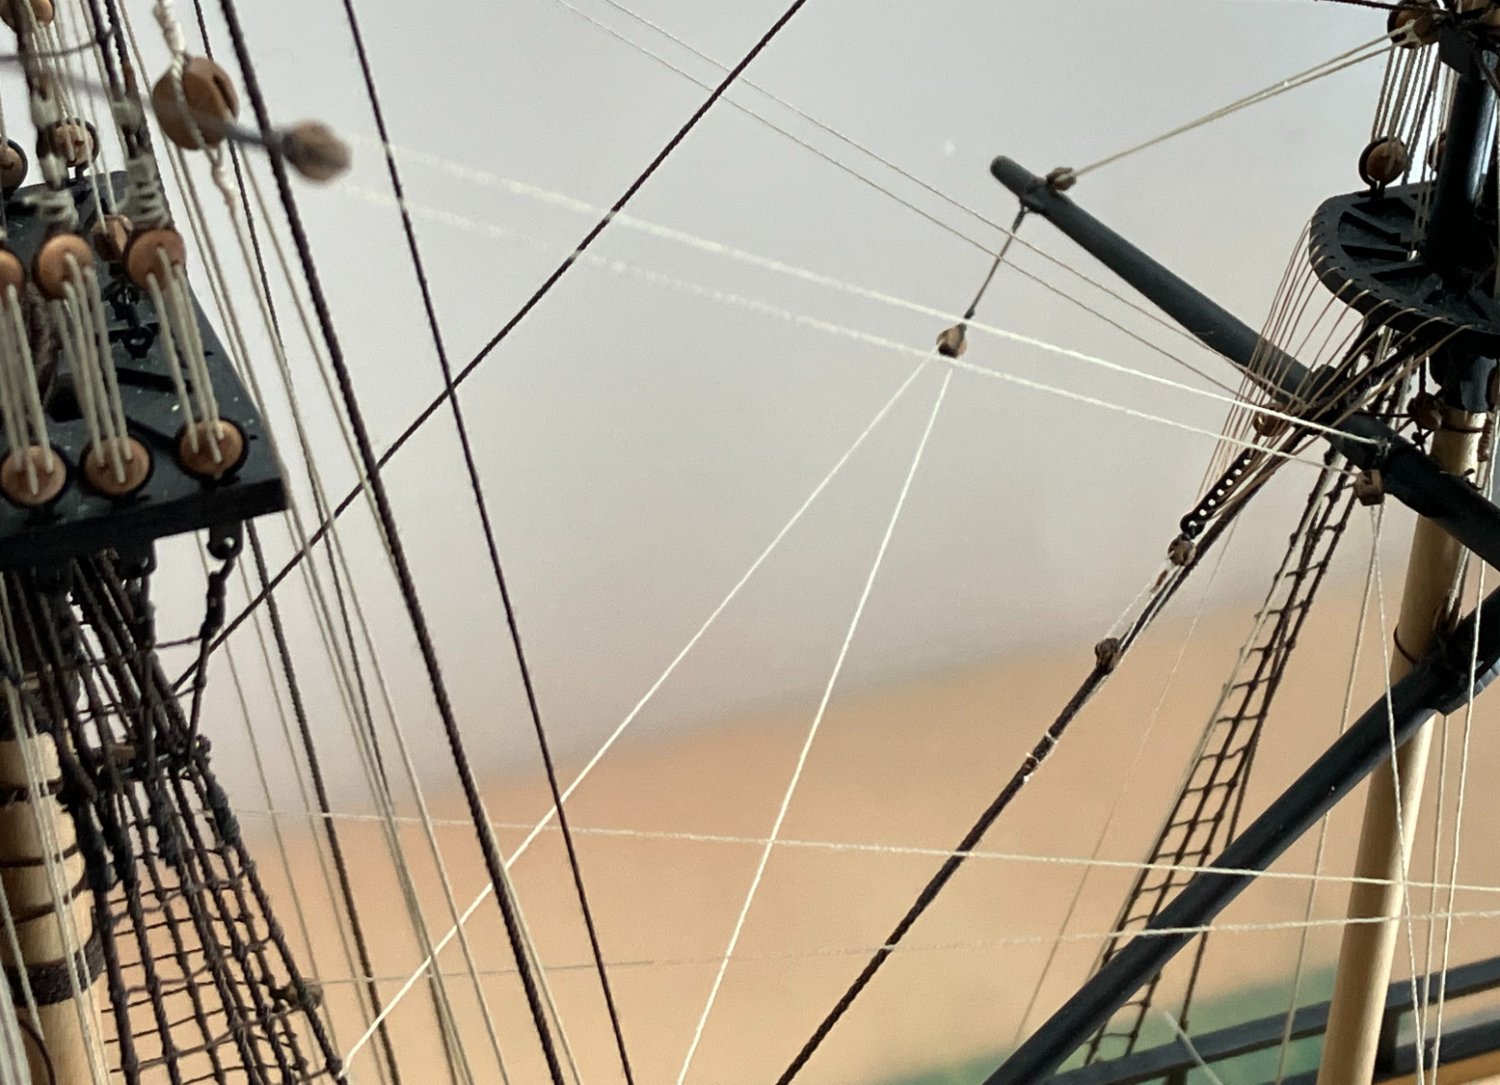
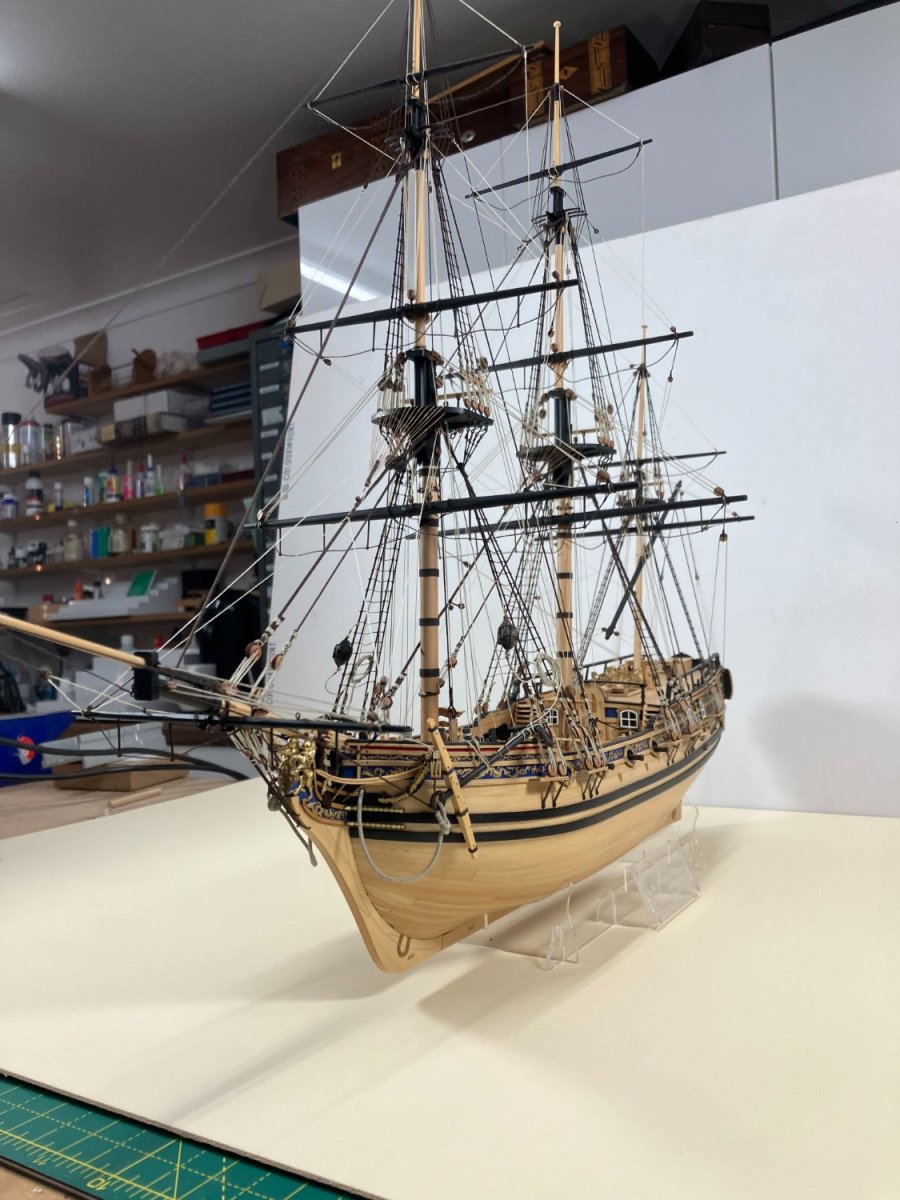
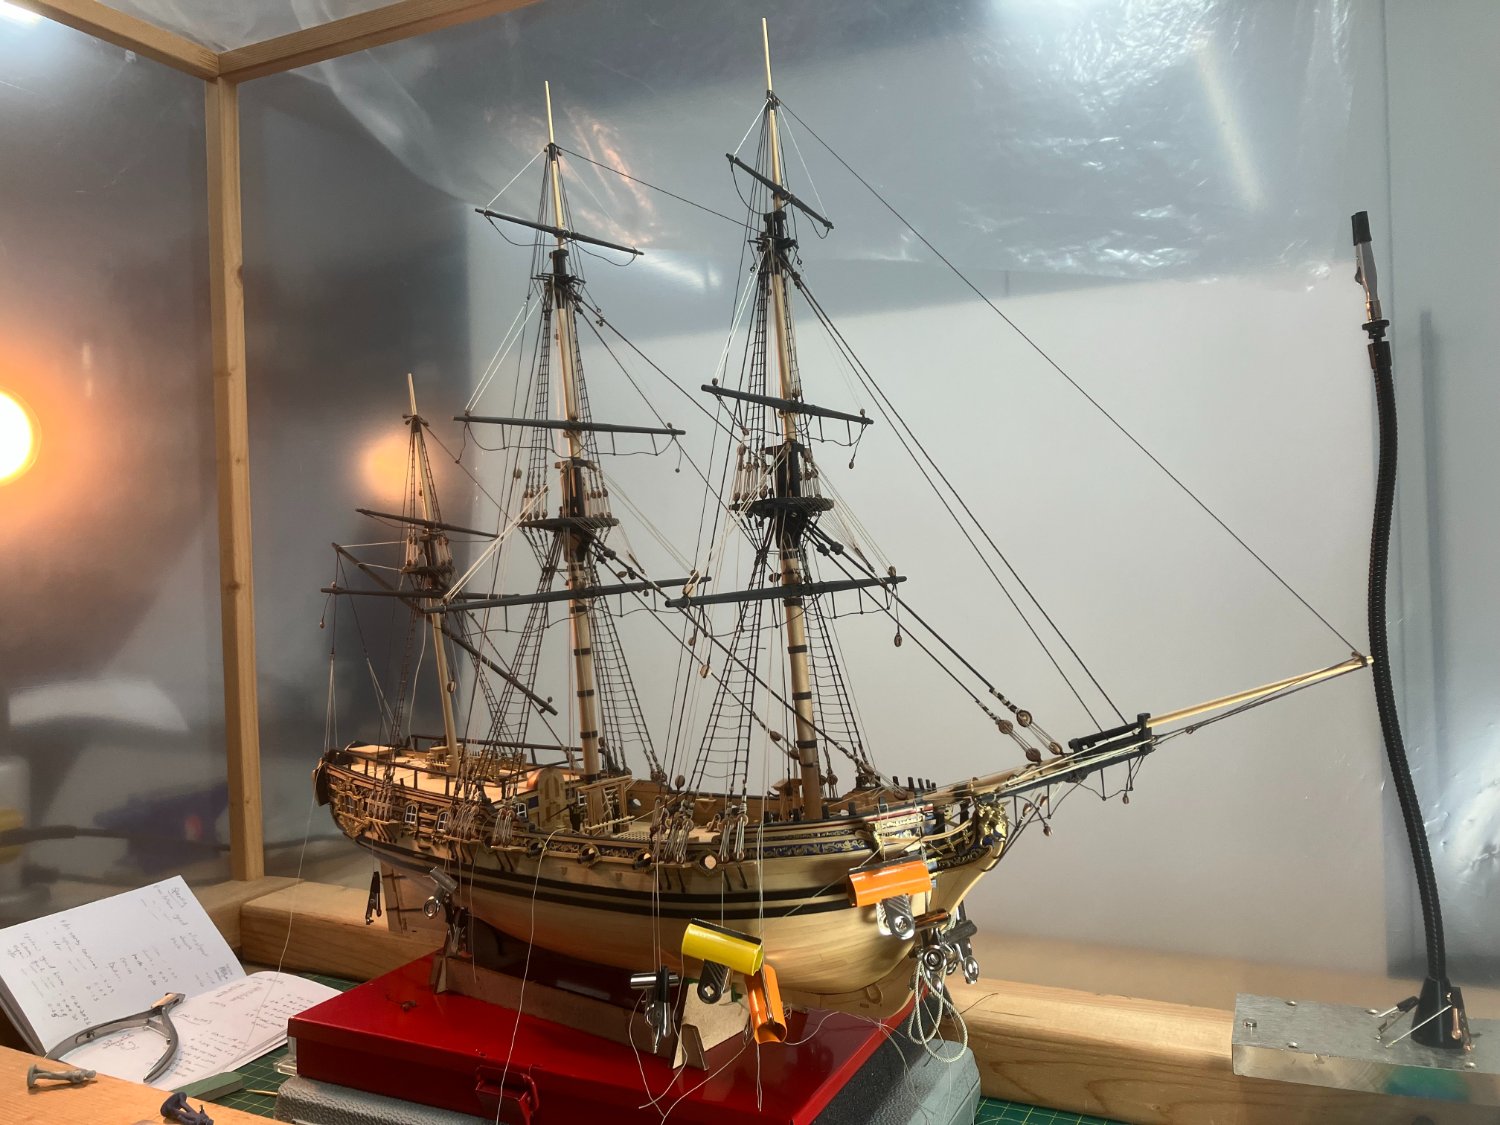
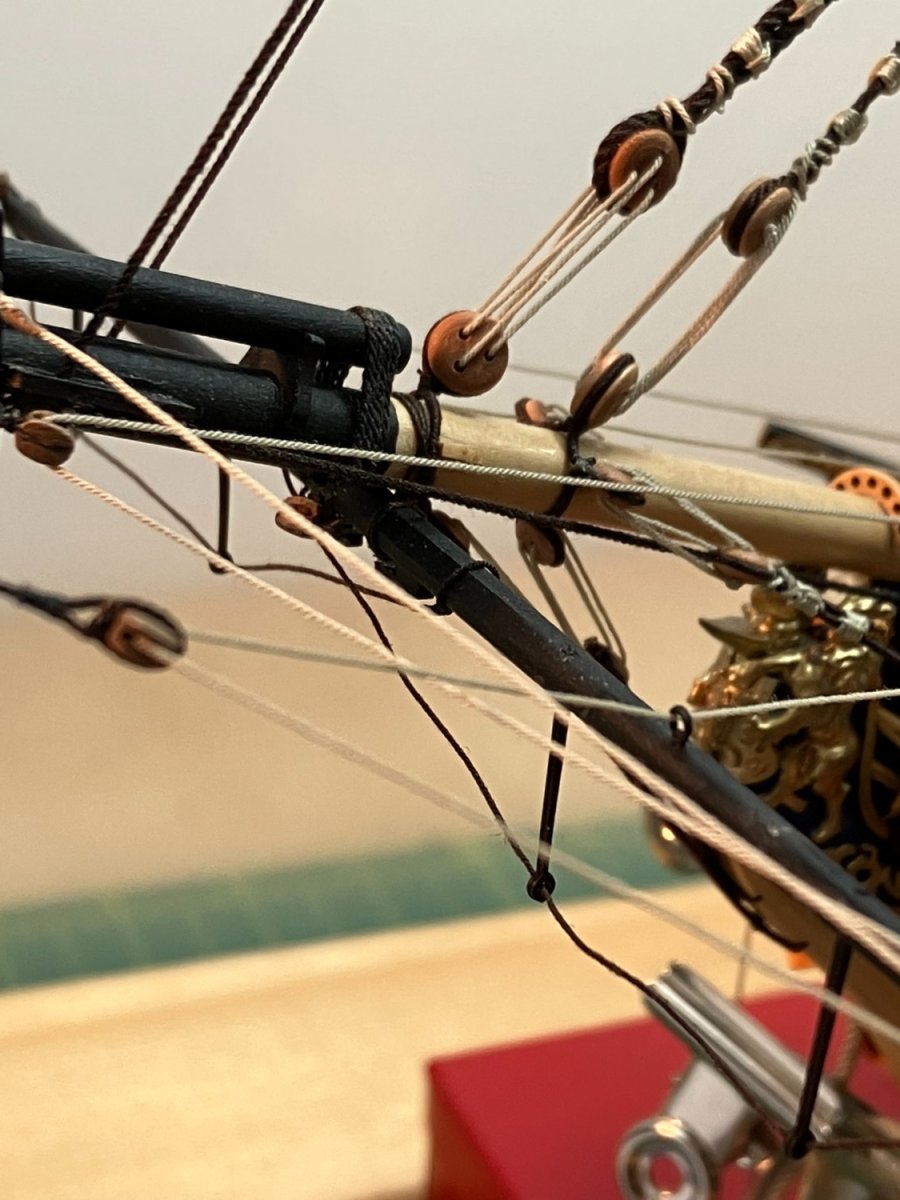
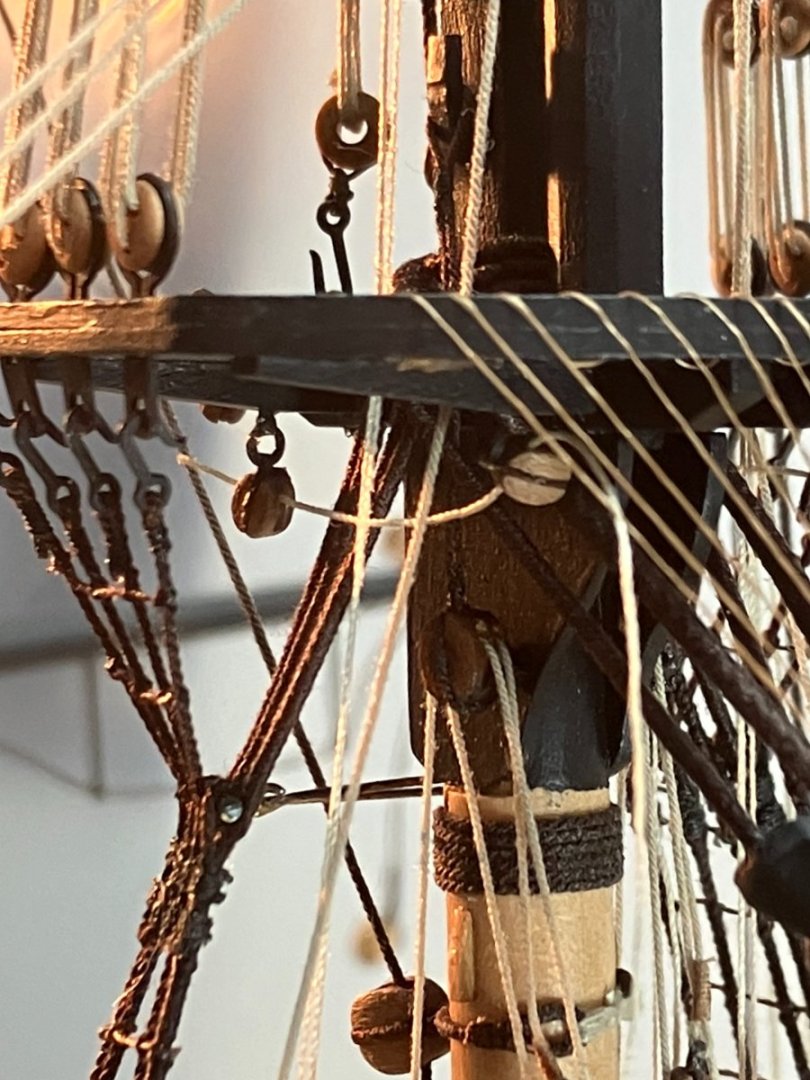
Completing the rigging Kind of you to say Glenn, although I would defer to some of the real experts on the forum (and I don't normally suffer from modesty!). Anyway, I'm hurrying this along a bit as I'm keen to clear the decks before setting off for the Antarctic next week. The rest of the running rigging went smoothly for the most part and the process was almost identical to the description in my Speedy log. The only really tricky task I found was rigging the main topsail yard braces. These are set up with brace pendants on the yard and a pair of 3mm blocks on a long strop fitted round the mizzen mast, just above the crossjack. The space between the latter and the mizzen top is very tight so I'd fitted the blocks before I'd even stepped the mast. However I realised too late that the standing ends of the main topsail yard braces had to be seized to the strops between the blocks and the mizzen yard. Hopefully this is clear from this shot and the following close-up: The only way I could find to do this was to twist the strop round so the blocks faced aft, i.e. away from the crowsfeet and other obstructions on the fore side of the mizzen mast. It was still tight, but I did eventually manage to a seize a brace just behind each of the two blocks then twist the whole affair back round to the other side of the mast after which it was comparatively simple to take the braces up through the brace pendants on the topsail yard, back through the blocks stropped to the mizzen, then through the top to belay on the mizzen bits. One point where I departed slightly from the plans was in belaying the mizzen topsail braces. Unless I misinterpreted them, the plans show these reeving through blocks at the aft end of the lateen yard then running forward at quite a sharp angle to belay on the mizzen bitts. I chose to belay the braces on the quarterdeck rail near the transom, where the near-vertical line from the lateen yard seemed more natural. I've just got a bit of tidying and touching up to do, and a few more rope coils, but I'm not sure I'll get all that done before disappearing to the frozen wastes so here's a few shots of the almost complete model. I'll do some proper shots and a fuller write up when I get back, and also give some proper thought to her display. HMS Sphinx is calling! Derek


- 345 replies
-
- 27
-
-

-
- Duchess Of Kingston
- Vanguard Models
- (and 1 more)
-
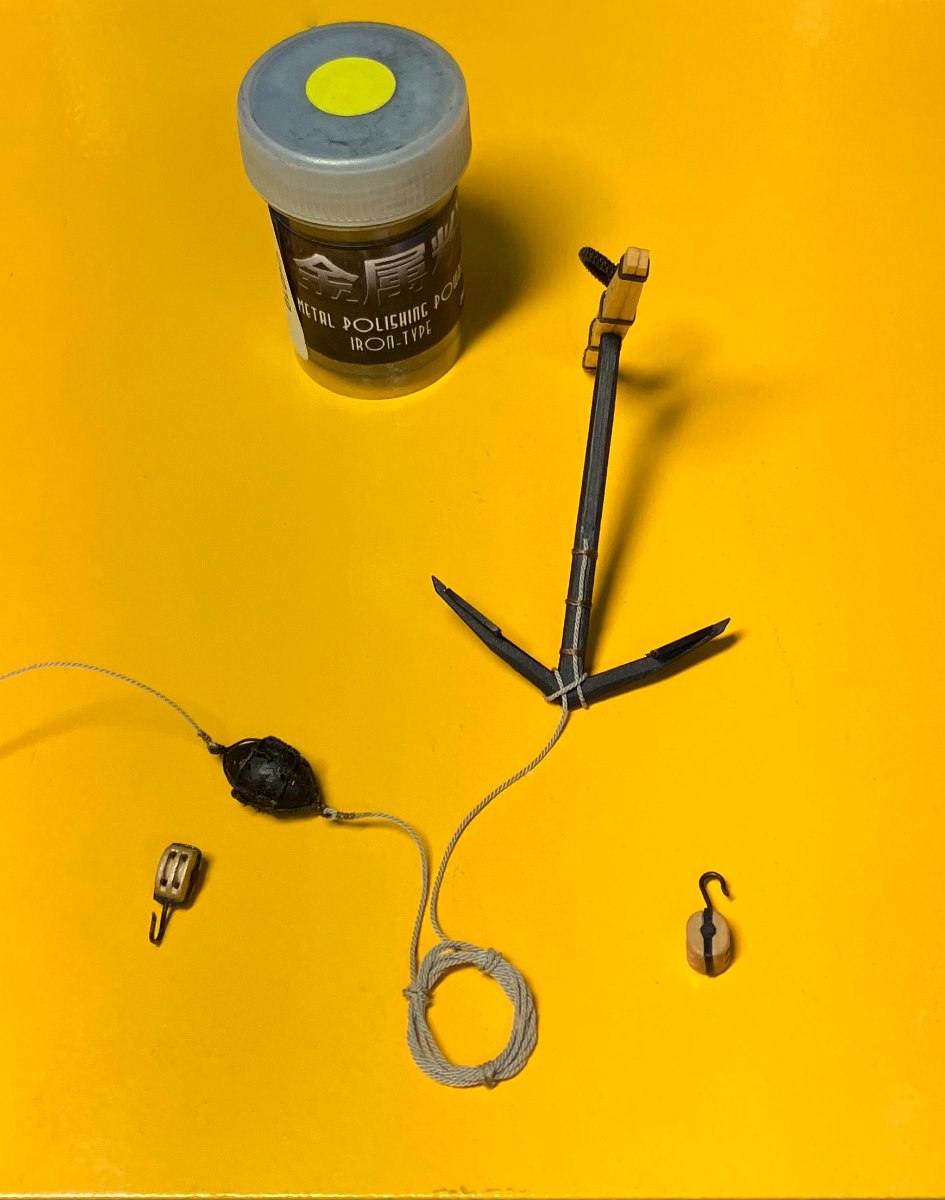
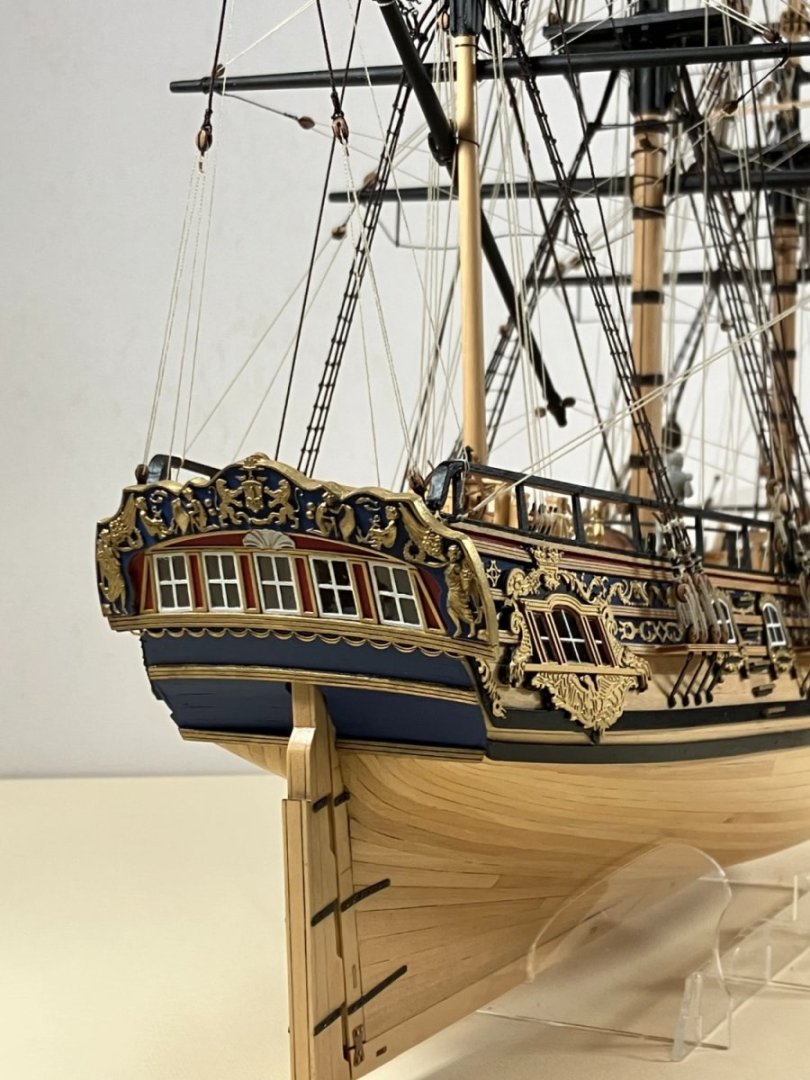
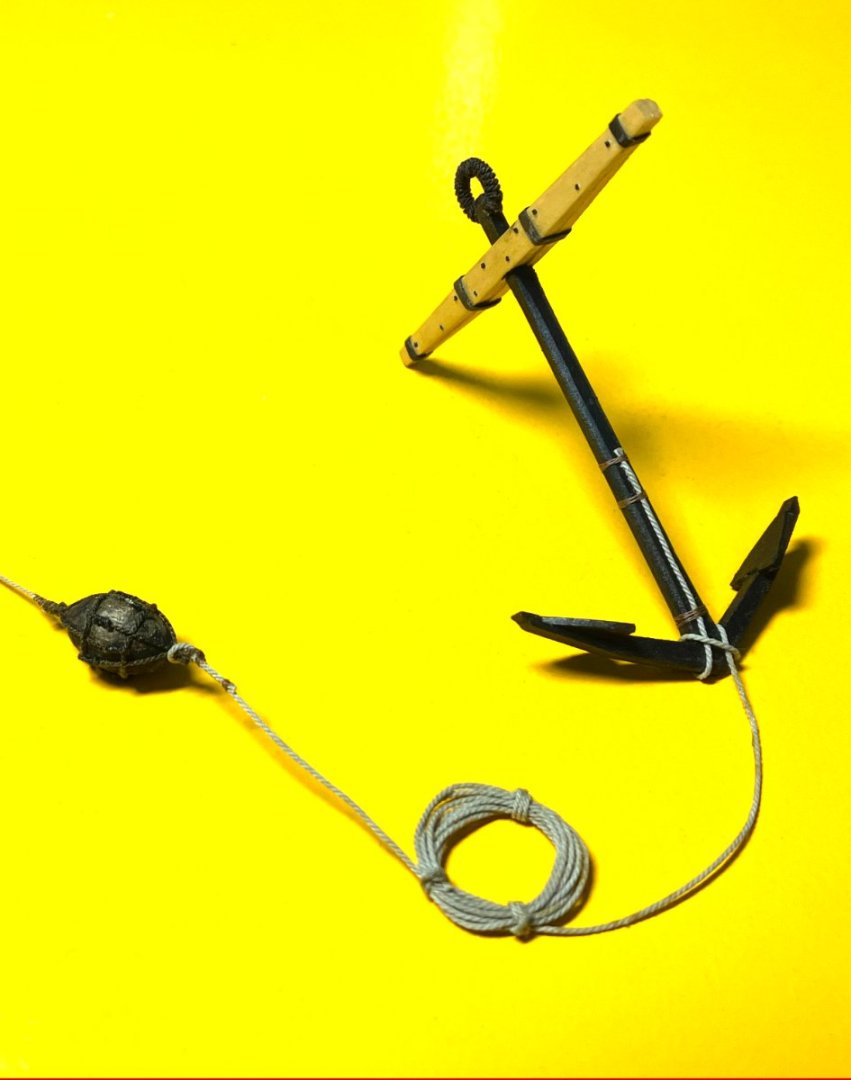
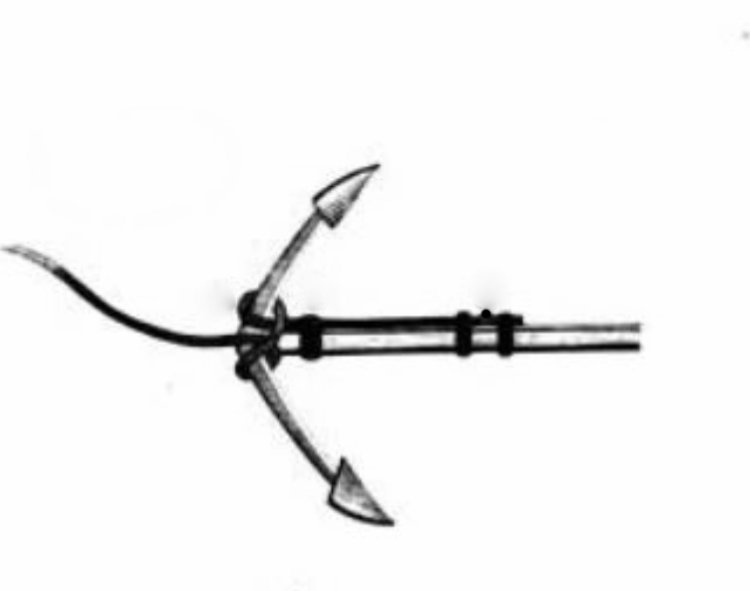
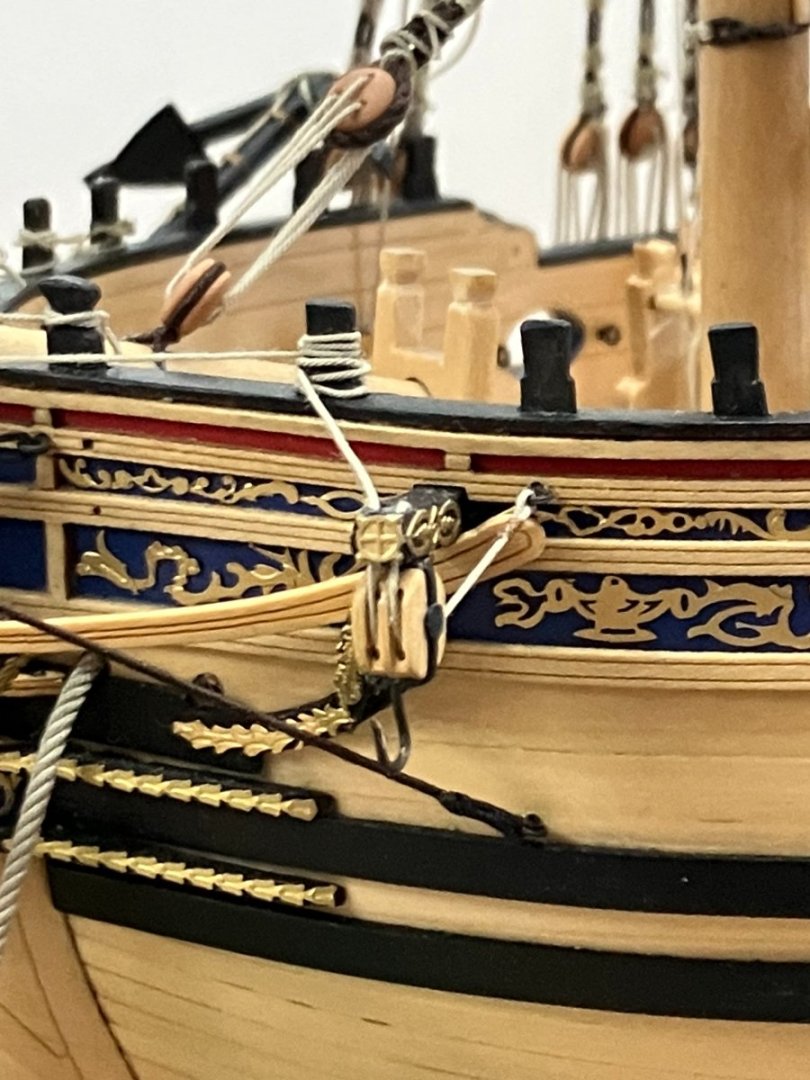
Anchors #2 Thanks again for the kind comments and likes. Starting on the port anchor I realised I'd made a slight mistake on the starboard side. Where the buoy rope attaches to the shank I'd spaced the three seizings equally, whereas in full size practice they looked like this illustration from D'Arcy Lever's The Young Sea Officer's Sheet Anchor: (I got this from Google Books so presumably there's no copyright issue). The two closely spaced seizings straddle the buoy rope knot, essentially a raised lump designed to help prevent the rope from slipping off the anchor. I couldn't resist looking up this knot in the Ashley Book of Knots to see if it would be practical to reproduce it at 1:64 scale. As always this fantastic volume never ceases to amaze - I have yet to come across a knot he doesn't cover, and usually with beautiful and often witty hand drawn illustrations. Here's how the knot is described: "First put on a heavy seizing, and open the cable into its three component ropes as far as the seizing. Next lay one strand from each rope end. Stop all ends, and lay up the cable again with the two three-strand ropes that are left, having first beaten them well with a mallet. To do this, take two of the rope ends, twist them as hard as possible, and lay them up together. Then lay up the two with the remaining single rope end. Stop them, and beat them again to make them lay fair. Next, proceed to wall and double wall the three single strands where they were originally laid out. Draw the knot taut, and work the three strands to the end of the cable. Finally, put on a strong whipping, which in width should equal the diameter of the cable." I lost the plot somewhere around beating the rope with a mallet, although I remain in awe of the knowledge and skills the old time sailors and riggers must have had. My go-to reference for rigging small ships (after James Lees) is The Fully Framed Model by David Antscherl and Greg Herbert. In Volume 4 David describes using a blob of acrylic to simulate the knot. Lacking a suitable colour I experimented with a blob of PVA. After clearing up the mess I decided to abandon further experimentation and skip this particular enhancement. Here's the anchor and buoy, sans knot, awaiting fitting: Finally, just before fitting the anchor I took this shot of the starboard cathead to show the extra eye I had to fit for the standing end of the catblock rope: I'm assuming the block would have been snugged up tight to the cathead like this when not in use. With the anchor fitted, a few more rope coils and the stand made it'll be on to the finishing line. Derek
- 345 replies
-
- 17
-
-
-
- Duchess Of Kingston
- Vanguard Models
- (and 1 more)
-
Thanks Tony - kind of you to say. Briefly following on from my last post on the anchors, I've just spent another hour or so on the second buoy. I do like a challenge, and working out how best to make them was initially enjoyable, but having made them on my last three models the novelty is beginning to wear decidedly thin. I'd therefore like to make a heartfelt plea to @chris watton to add anchor buoys to his brilliant range of 3D printed accessories before I have to make any more of the little blighters Derek
- 345 replies
-
- 2
-
-
- Duchess Of Kingston
- Vanguard Models
- (and 1 more)
-
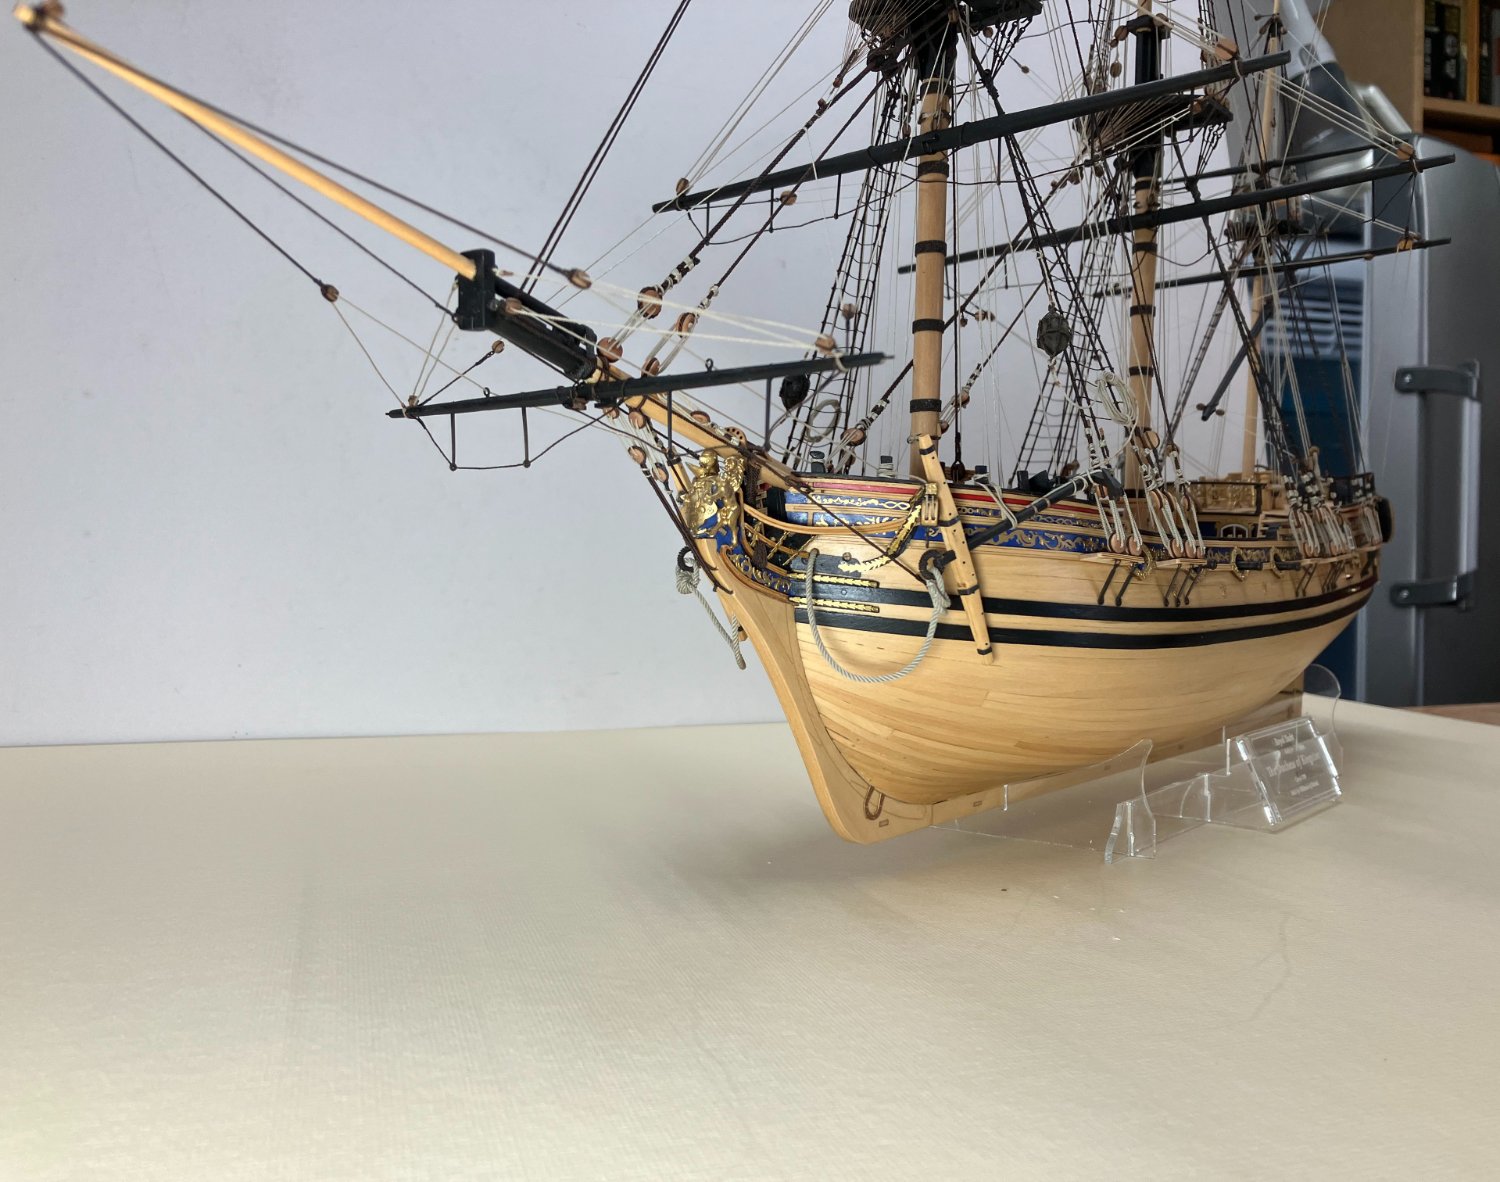
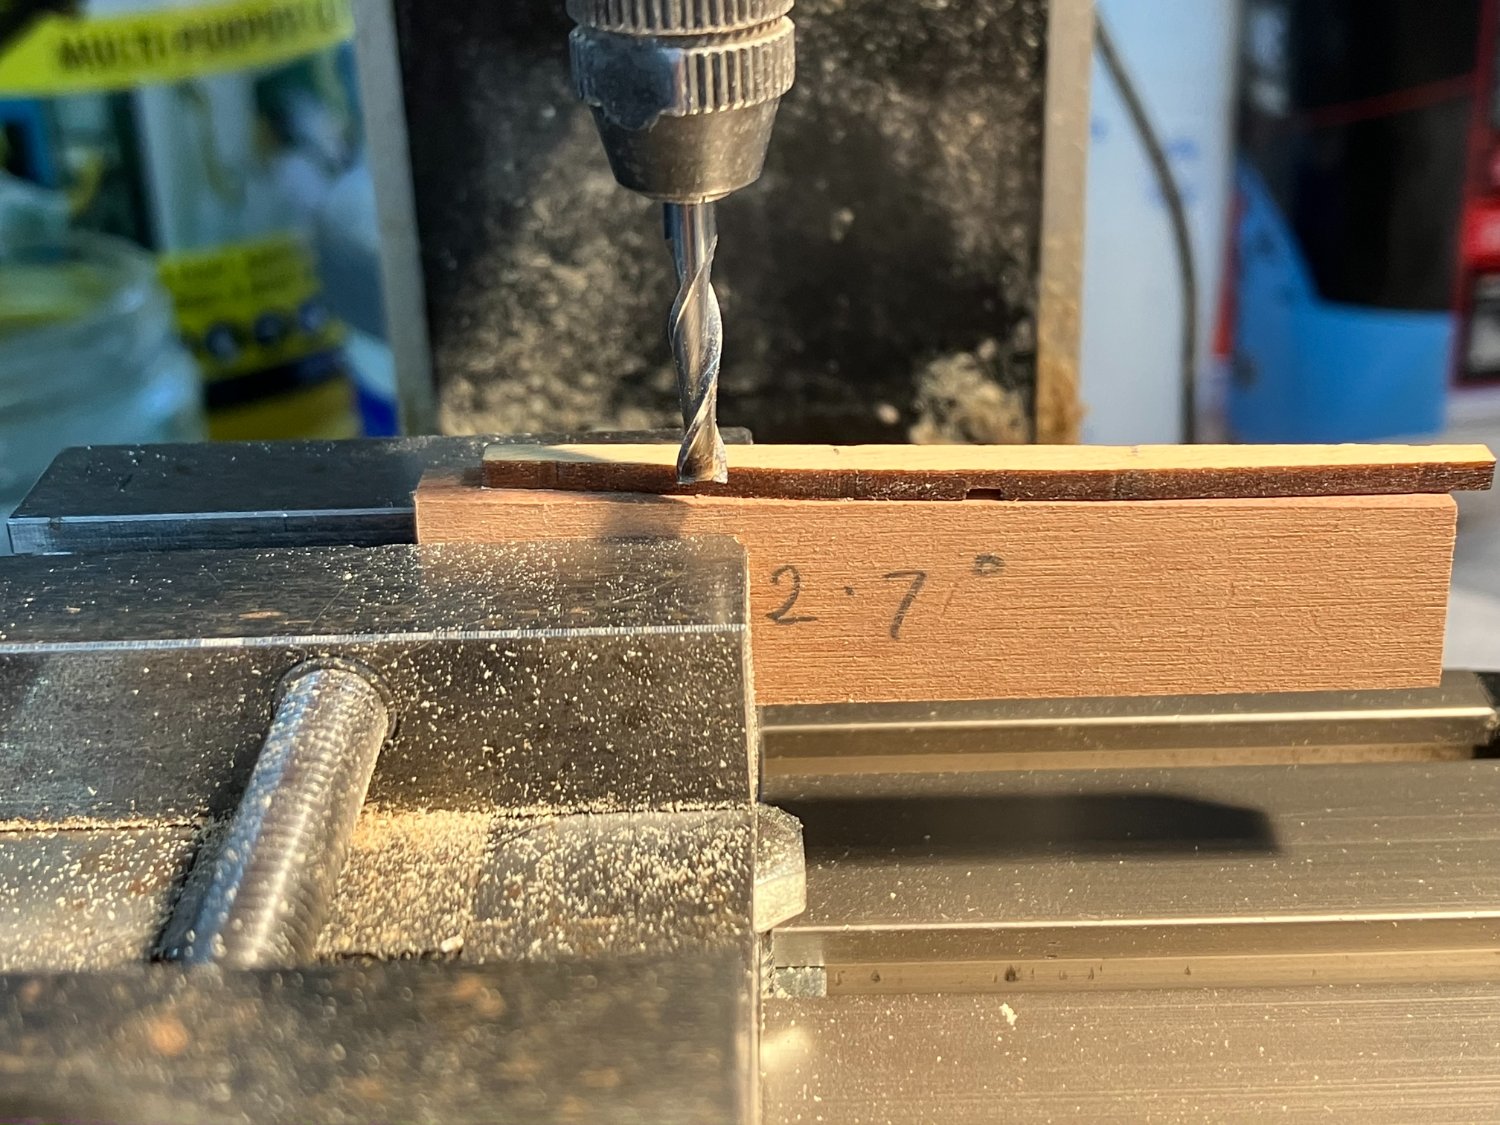
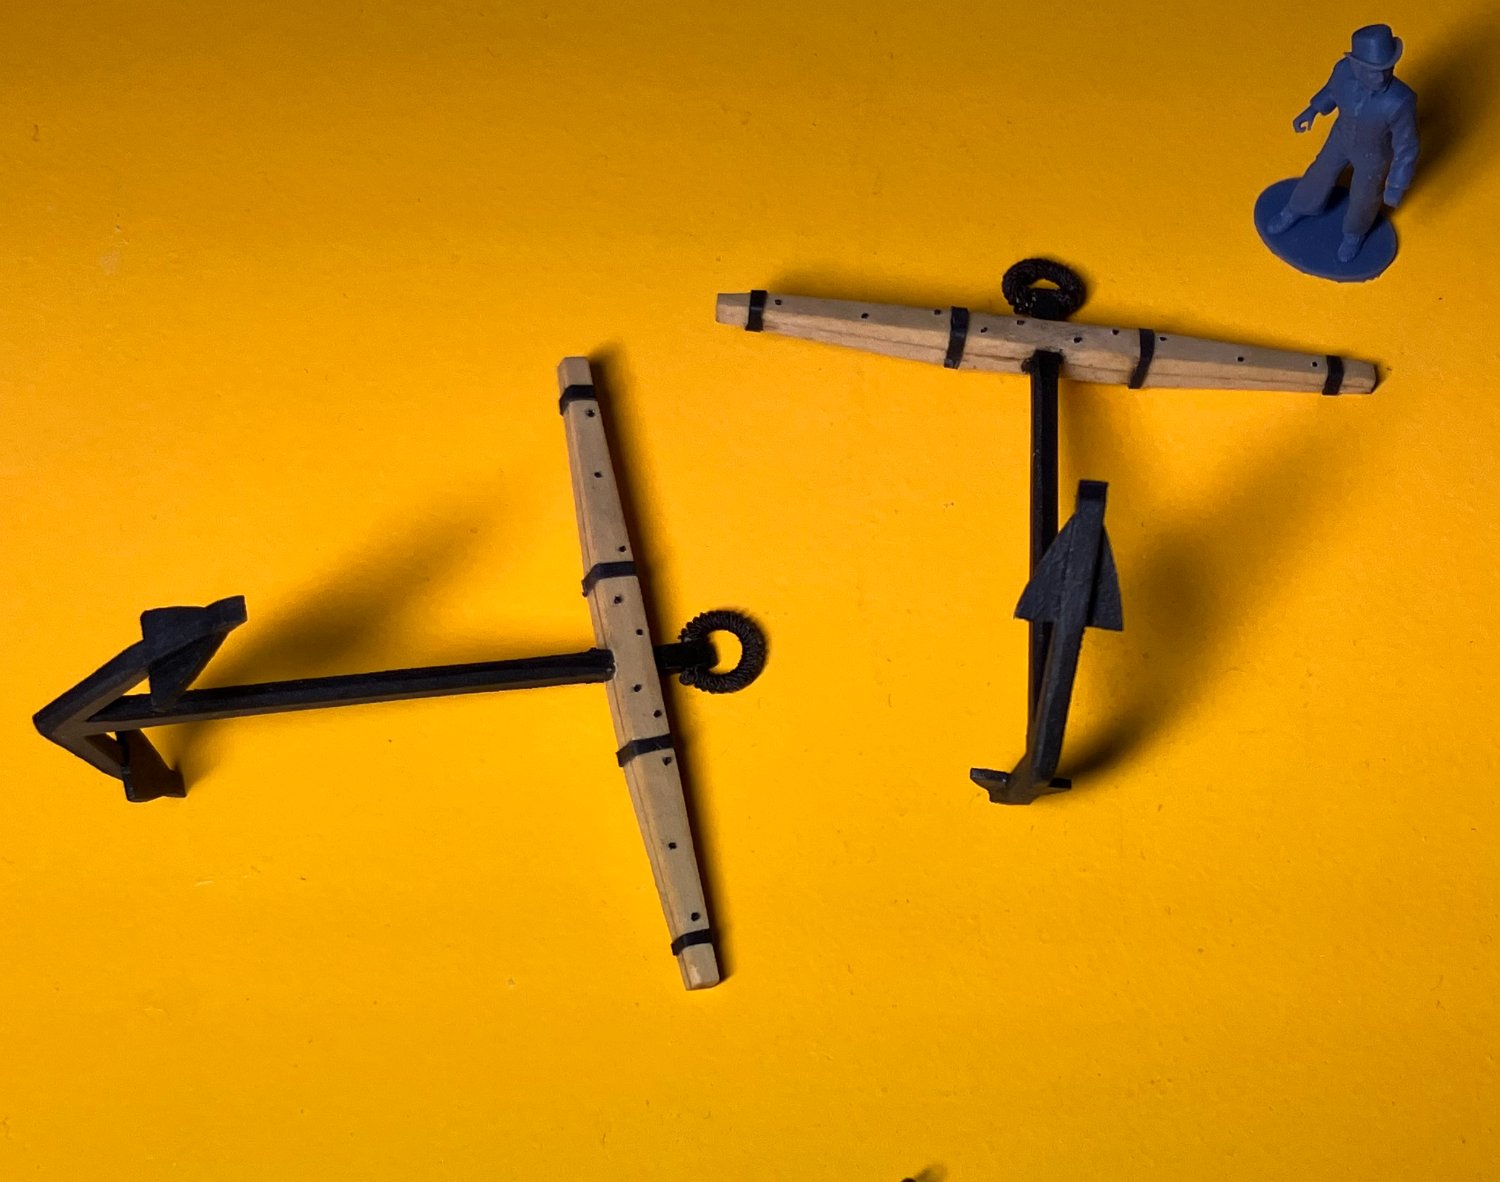
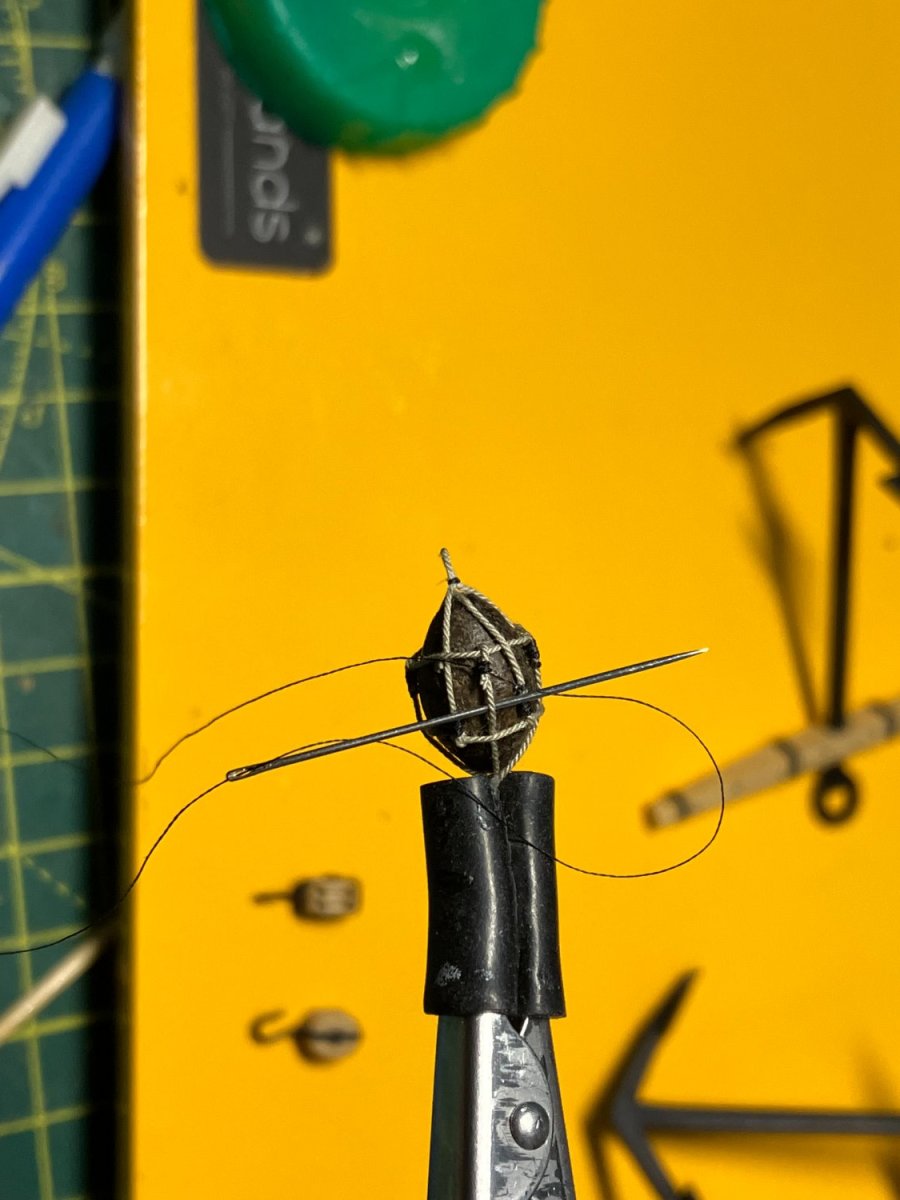
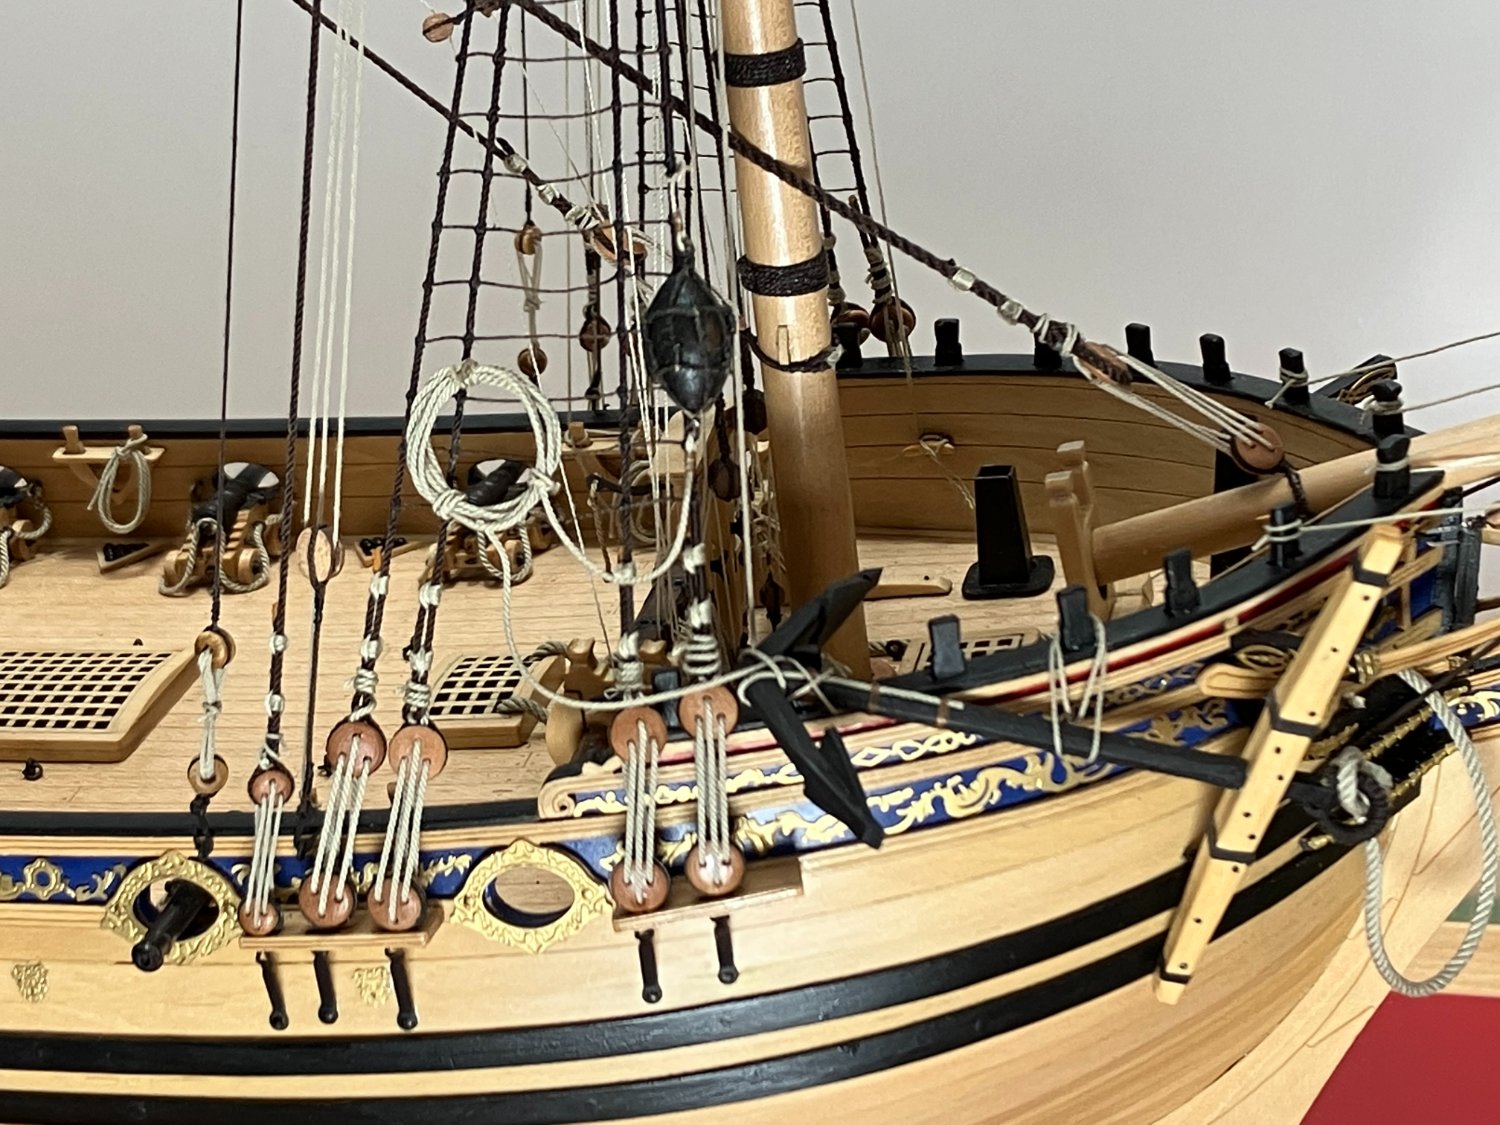
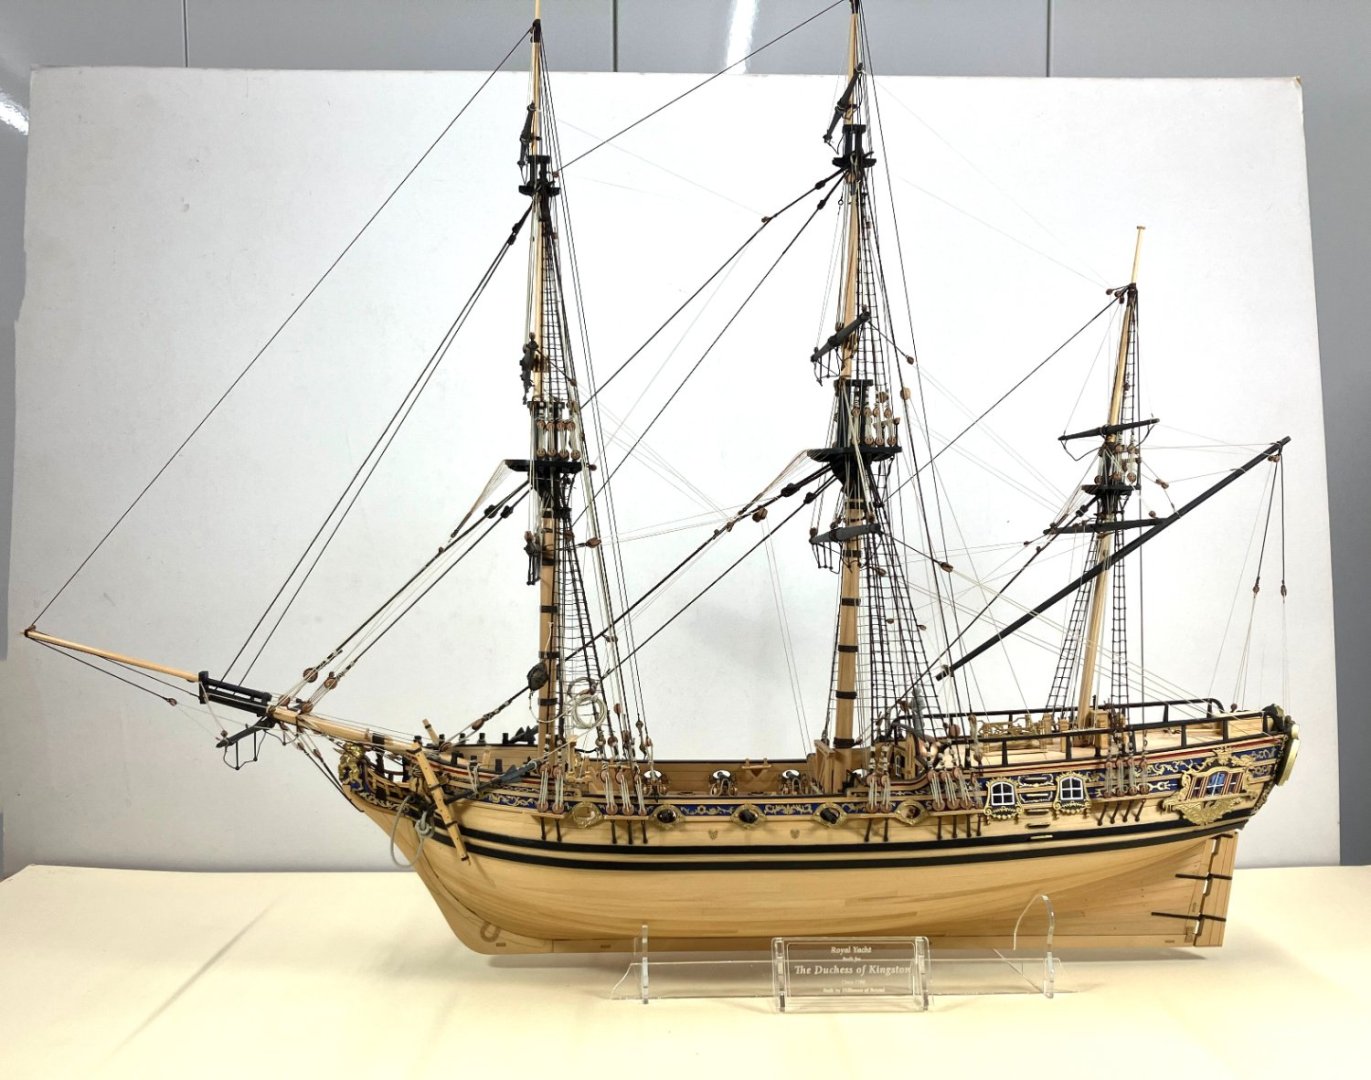
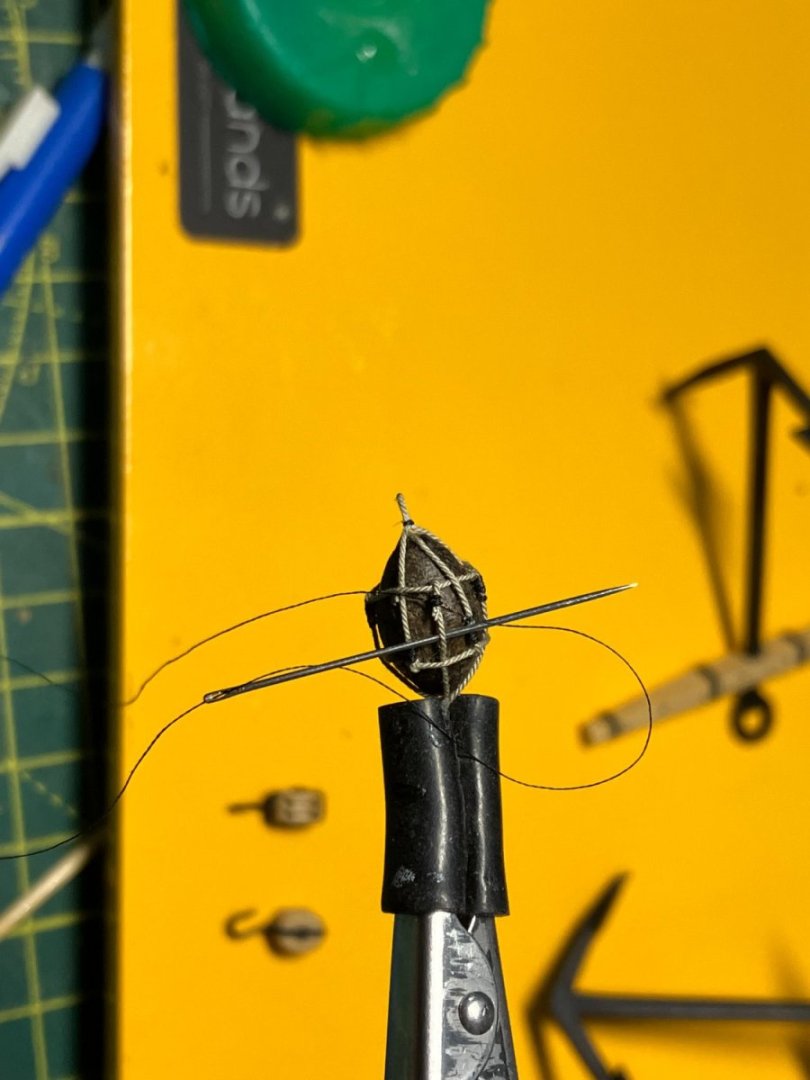
Anchors Not much time in the workshop recently. I've been working on the anchors for a while and eventually got round to finishing them. Much of the work was the same as for Speedy, except this time the whole of each anchor is made from MDF. The shanks in particular needed a good session with a file to chamfer the edges, probably best shown in the close-up photos below. I used Admiralty ironwork black as a base then lightly brushed on some iron metal powder. The stock came in two halves that clamped neatly round the shank. However as they were laser cut from a sheet they were only tapered in one dimension rather than two. To cut the second taper as neatly as possible I worked out the angle needed then cut a small wooden wedge the top edge of which sloped at said angle. With the wedge sitting in a vice on the Proxxon mill, the required angle was shaved off the anchor stock, one half at a time: Double-sided tape was sufficient to hold the stock on the wedge. The bands on the stocks were the usual shrink tubing, the puddening from dark line and the bolts are made from bristles stolen from a hair brush (Shhh!!!). I made the anchor buoys using mostly the same method I employed for Speedy and other ships (link here), but this time I tried to make the end result neater. I made the wooden body of each buoy on the lathe as before, but instead of making eyes in the rope slings before fitting them to the buoy, this time I did all the fitting on the buoy. This enabled me to make each eye as tight as possible around the two rope bands circling the buoy. As before, I drilled two 0.9mm holes right through the buoy to accommodate the rope bands and put a touch of thin CA in each hole. Once the glue had set I started attaching the rope slings. I had to use a needle to get round the bands, and everything was so tight and awkward I ended up using light rope so I could see what I was doing: Obviously I dyed it once I was happy with the end result. Here's one of the buoys attached to an anchor ready for fitting to the model. Also shown are the two cat blocks. Here's how I made the blocks last time. The only difference this time was I discovered I had some 1/4" triple boxwood blocks I got years ago from Syren and never used. Rather than make my own as I did before I cheated by milling off one side of each triple block to create a double . Here's the starboard anchor rigged, then a closer shot showing the cat block: Apologies for the focus. The finish line is rapidly approaching. I'll update the log shortly to show progress on the remaining rigging tasks. Derek


- 345 replies
-
- 18
-
-
-
- Duchess Of Kingston
- Vanguard Models
- (and 1 more)
-
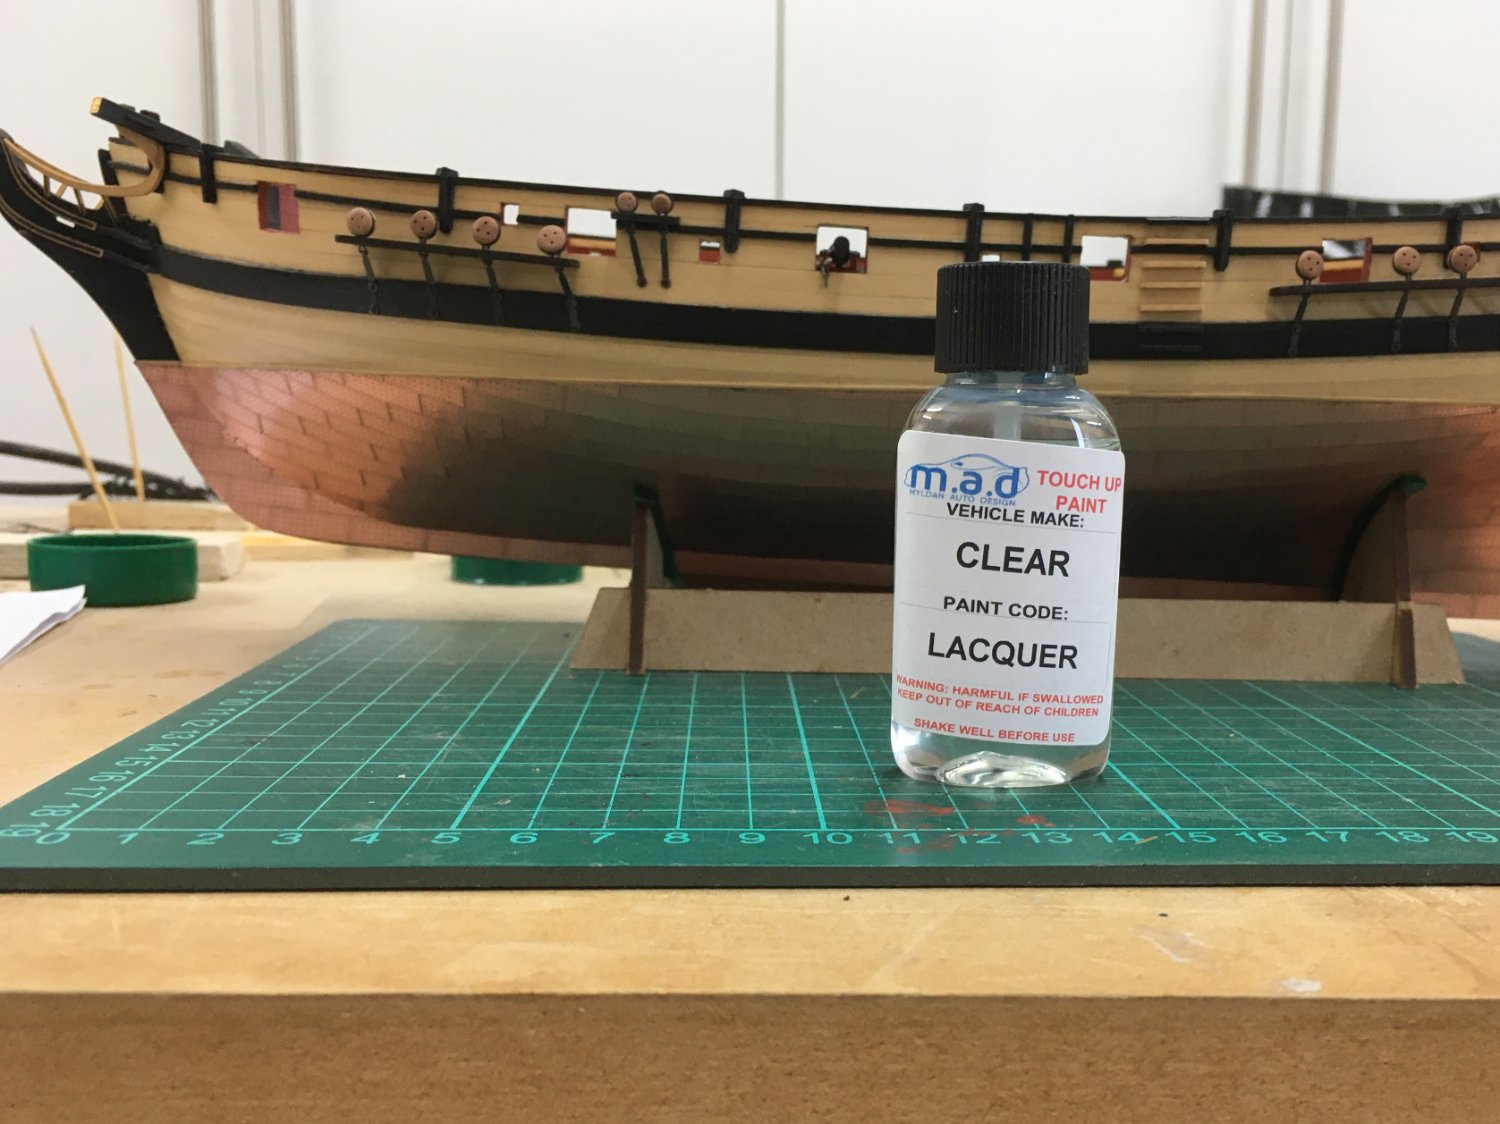
I used this car lacquer on Speedy. I was worried it might be too glossy, but it dried with a nice sheen, and has kept the copper tarnish free:

- 488 replies
-
- 8
-
-
- Indefatigable
- Vanguard Models
- (and 1 more)
-
K&E Mark.I Proportional divider
DelF replied to modeller_masa's topic in Modeling tools and Workshop Equipment
I got an old Staedtler set years ago but only used them for the first time on my current build. They were a revelation - like you I found them more accurate than tick strips - and much faster. They'll be my goto planking measuring tool from now on. Very true. You can't beat the genuine tools. I think I paid about £30 for mine on ebay. Here's a link to how I used them. Derek -
Great idea Glenn! HMS Sphindefatigable? 🙄
- 345 replies
-
- 3
-
-
-
- Duchess Of Kingston
- Vanguard Models
- (and 1 more)
-
Thanks guys! Much appreciated. I must confess I'm finding it hard to concentrate on the Duchess just now, with HMS Indefatigable on order from Vanguard and HMS Sphinx sitting on a shelf for the last year shouting "build me!". I'm looking forward to seeing her complete though. Derek
- 345 replies
-
- 3
-
-
- Duchess Of Kingston
- Vanguard Models
- (and 1 more)
-
I can only echo what everyone else has said Ron - simply magnificent, the most realistic representation of the sea I've ever seen (and the ship ain't 'alf bad either!). Derek
- 542 replies
-
- 7
-
-
- Sphinx
- Vanguard Models
- (and 3 more)
-
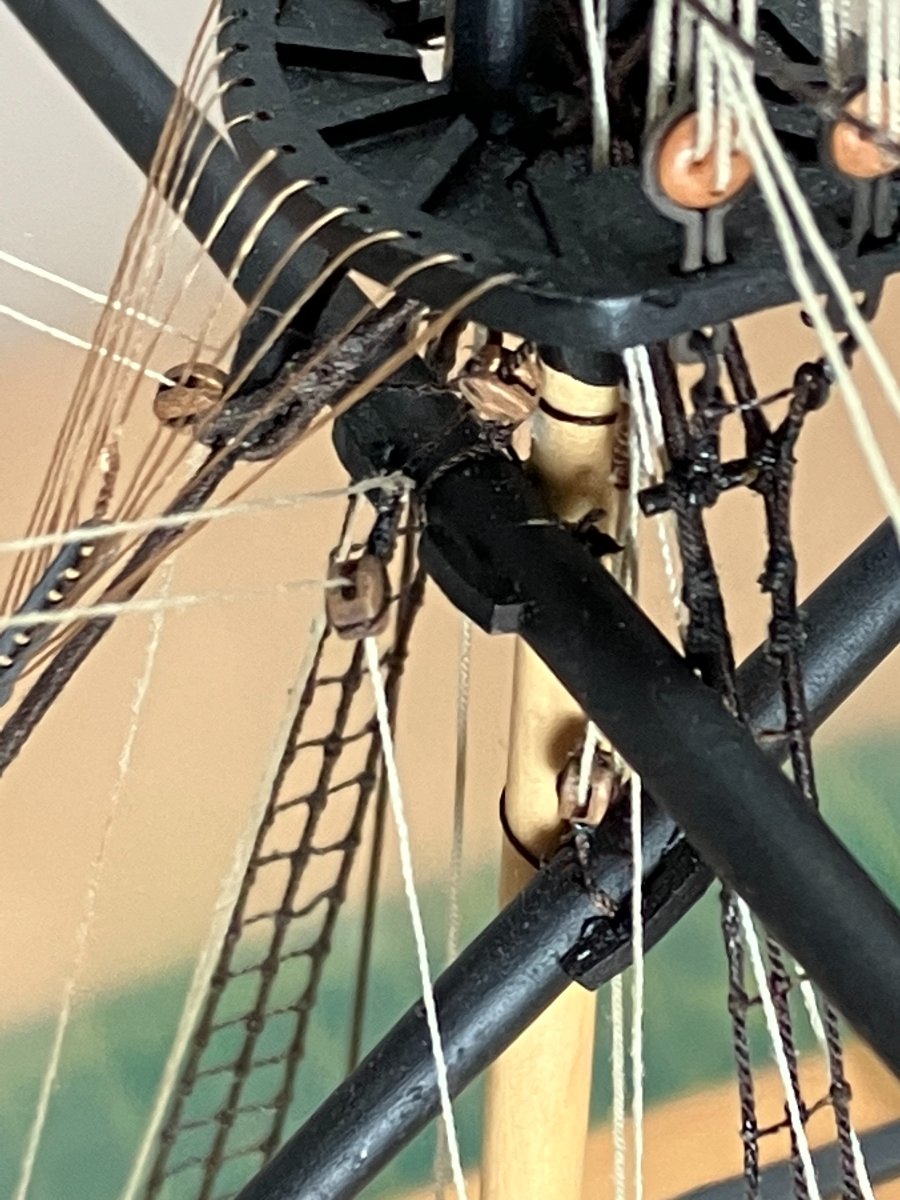
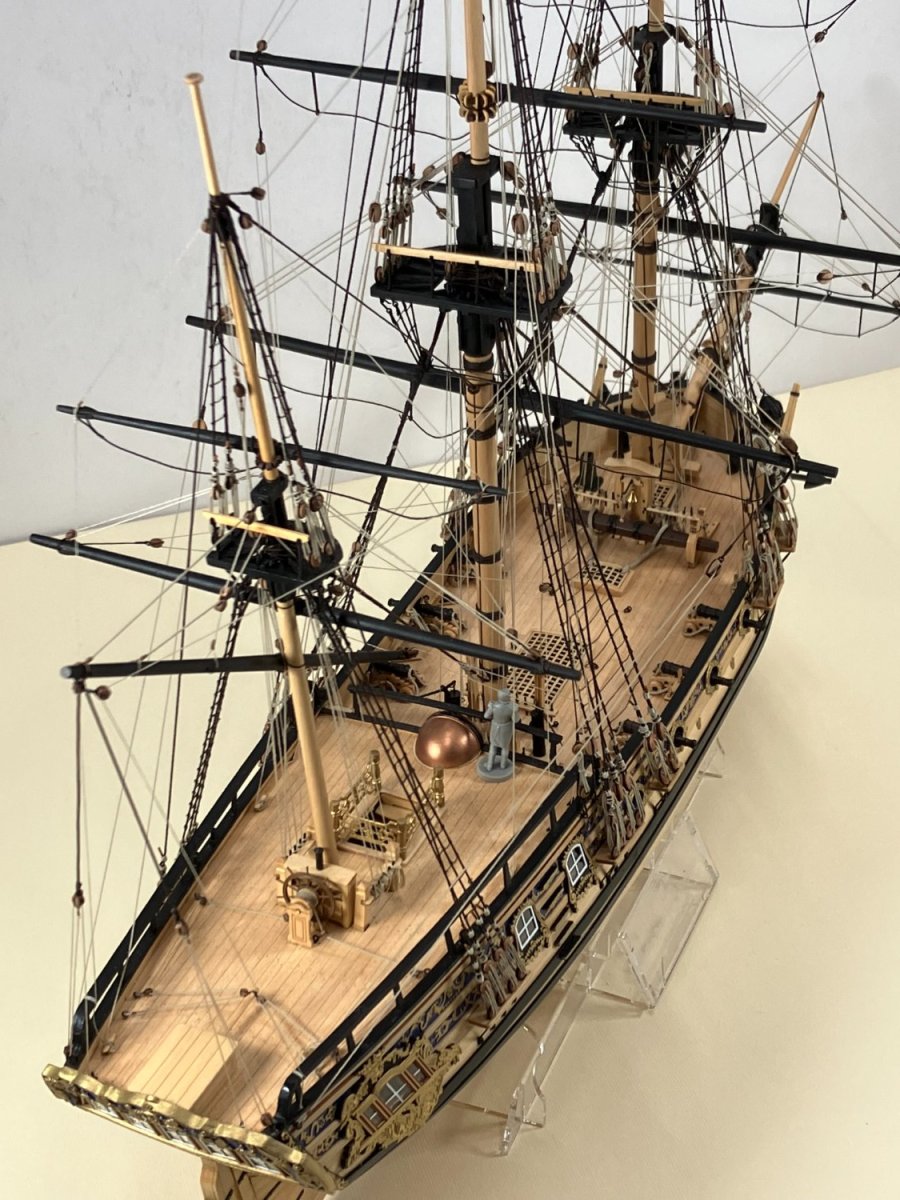
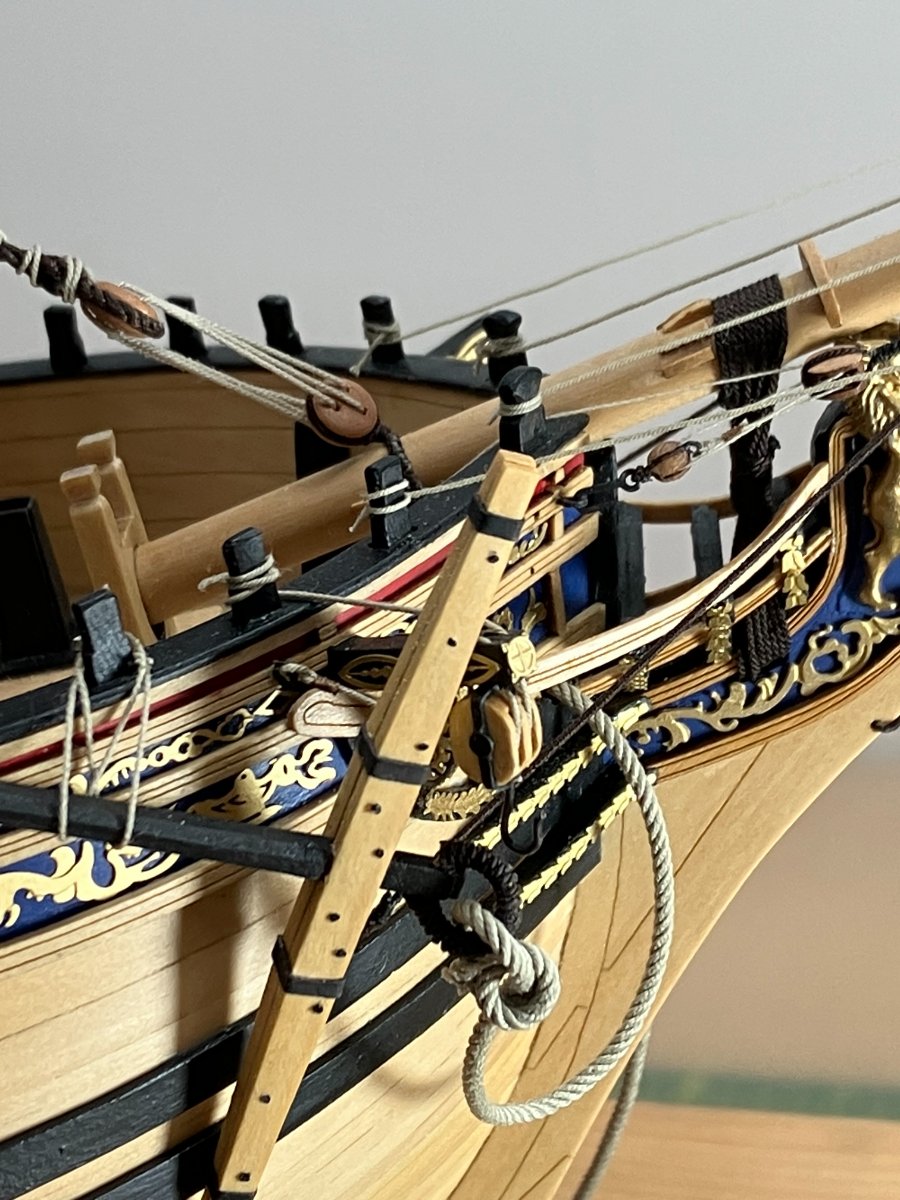
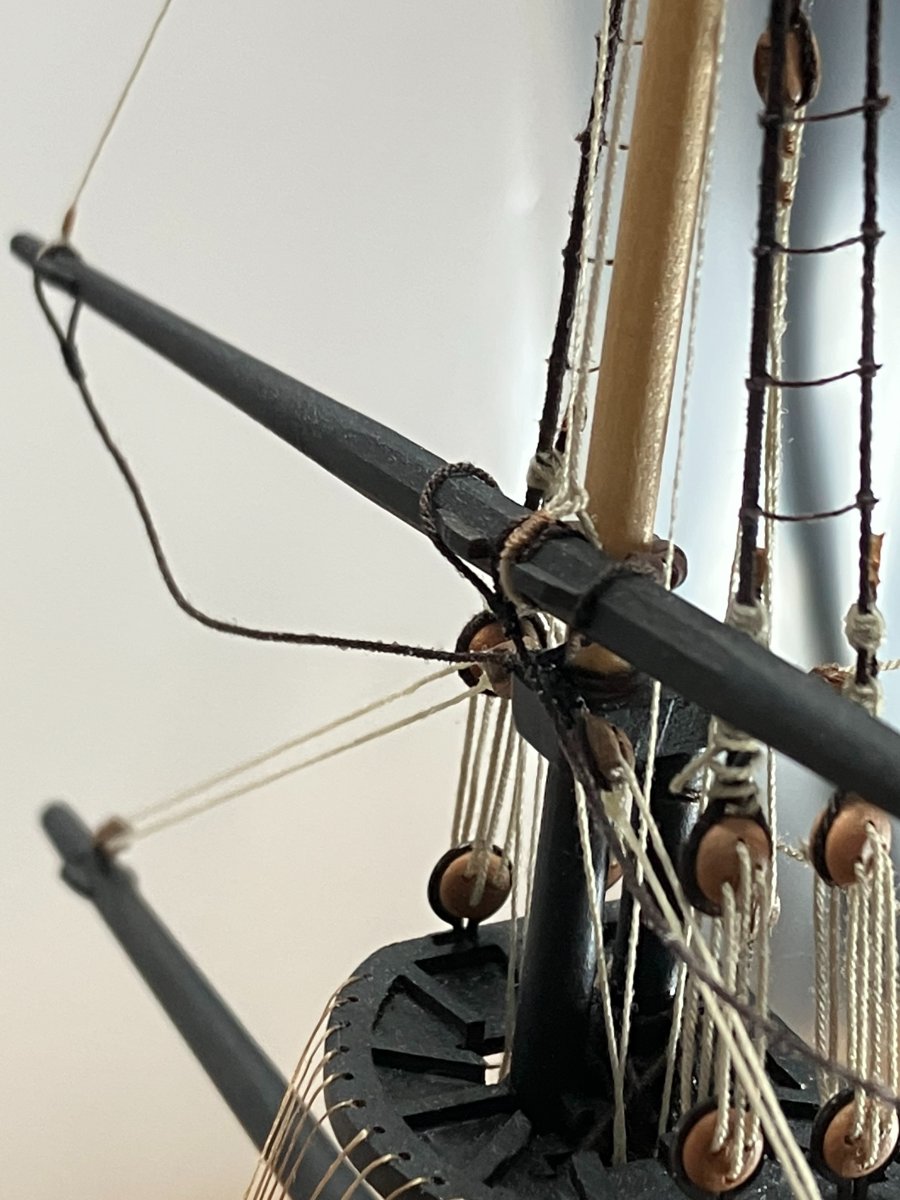
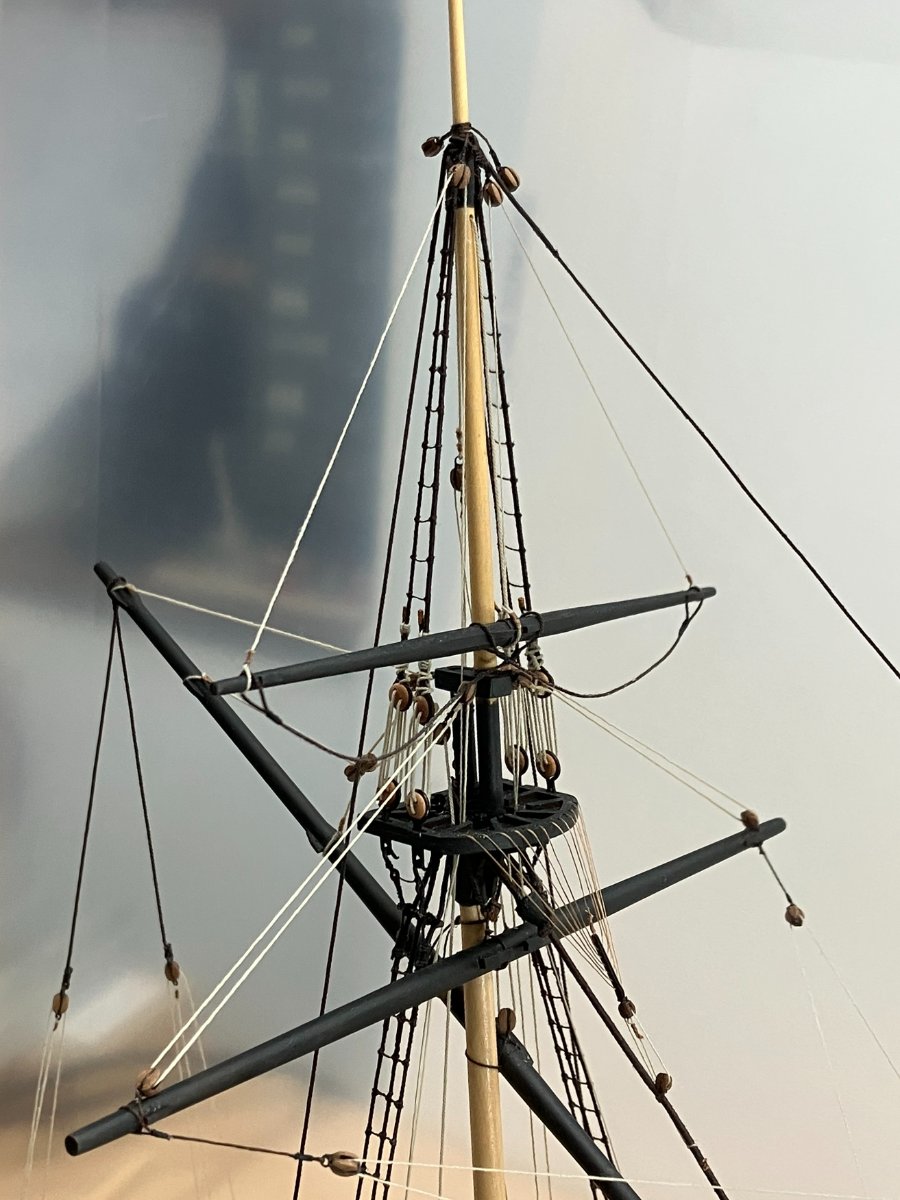
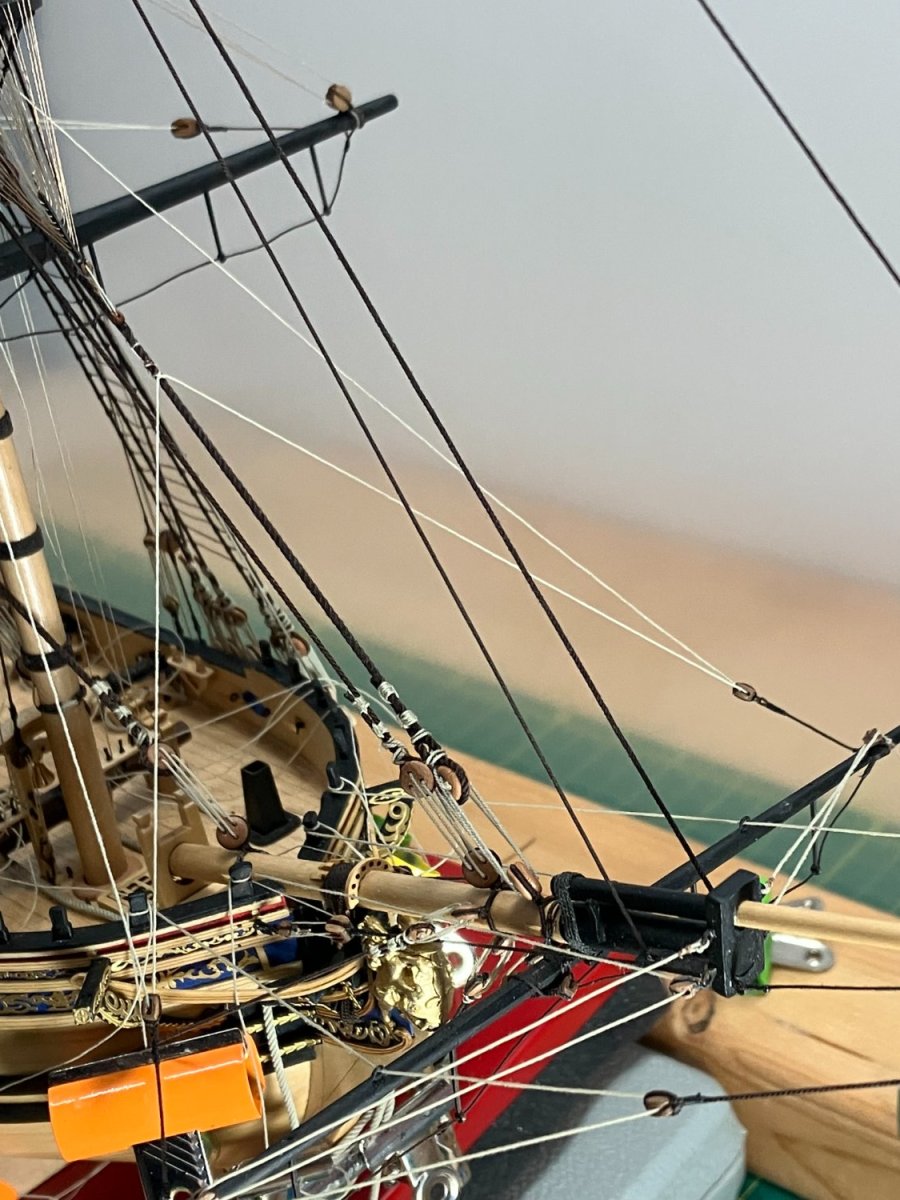
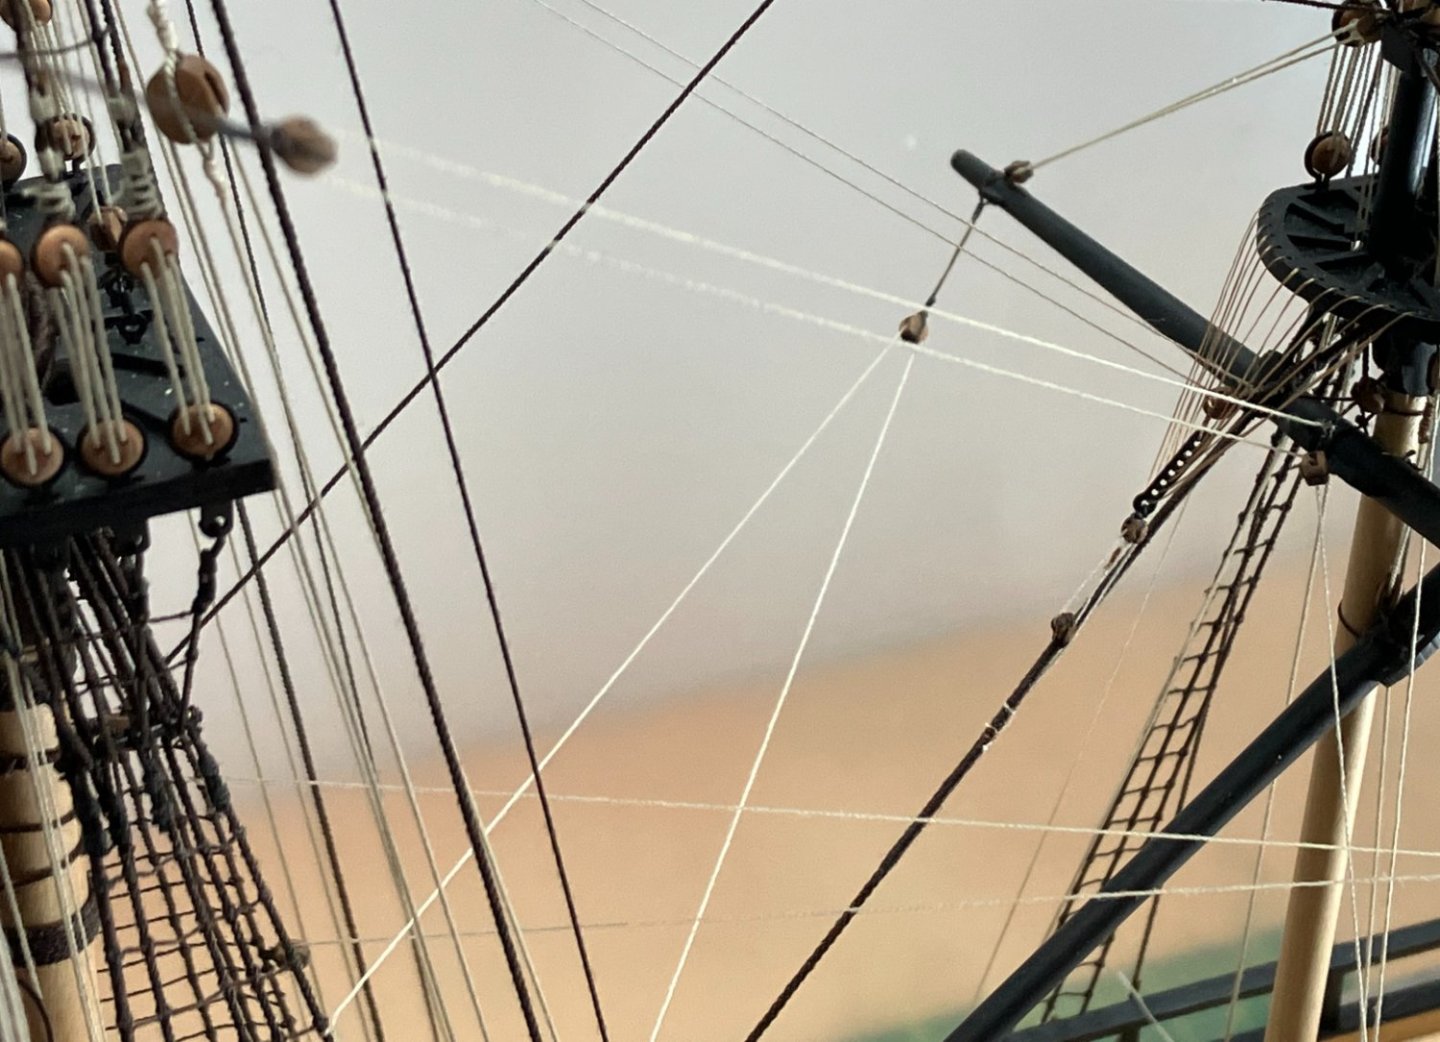
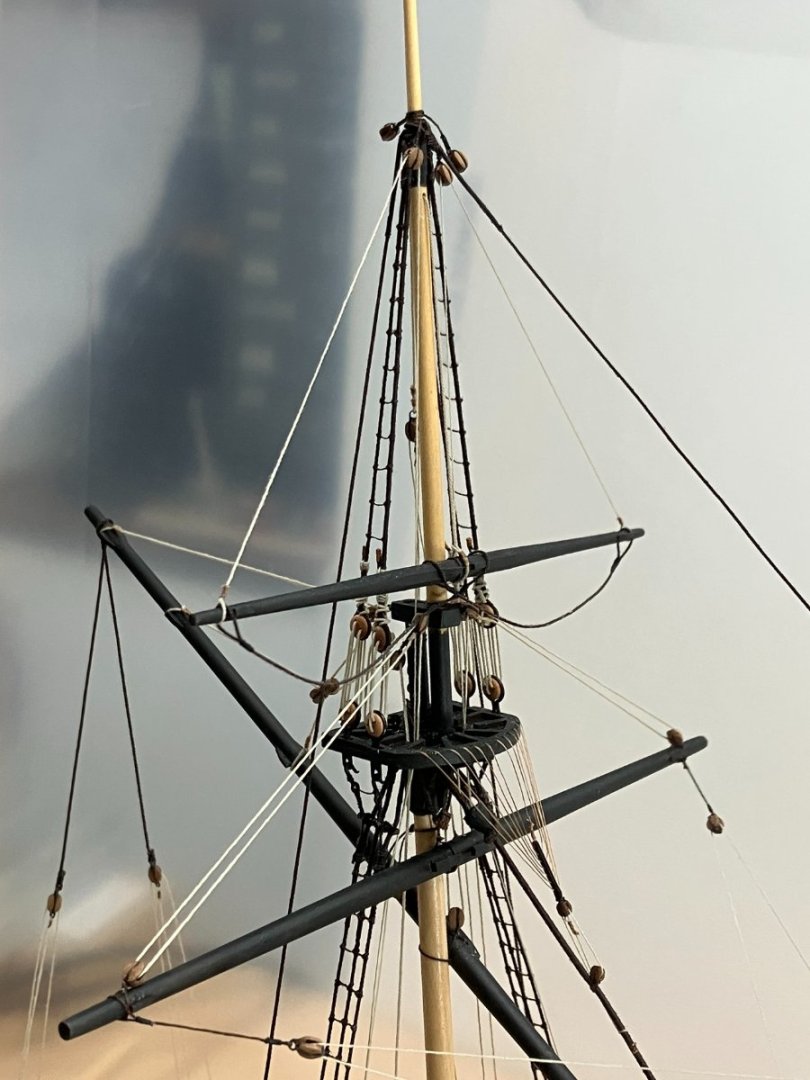
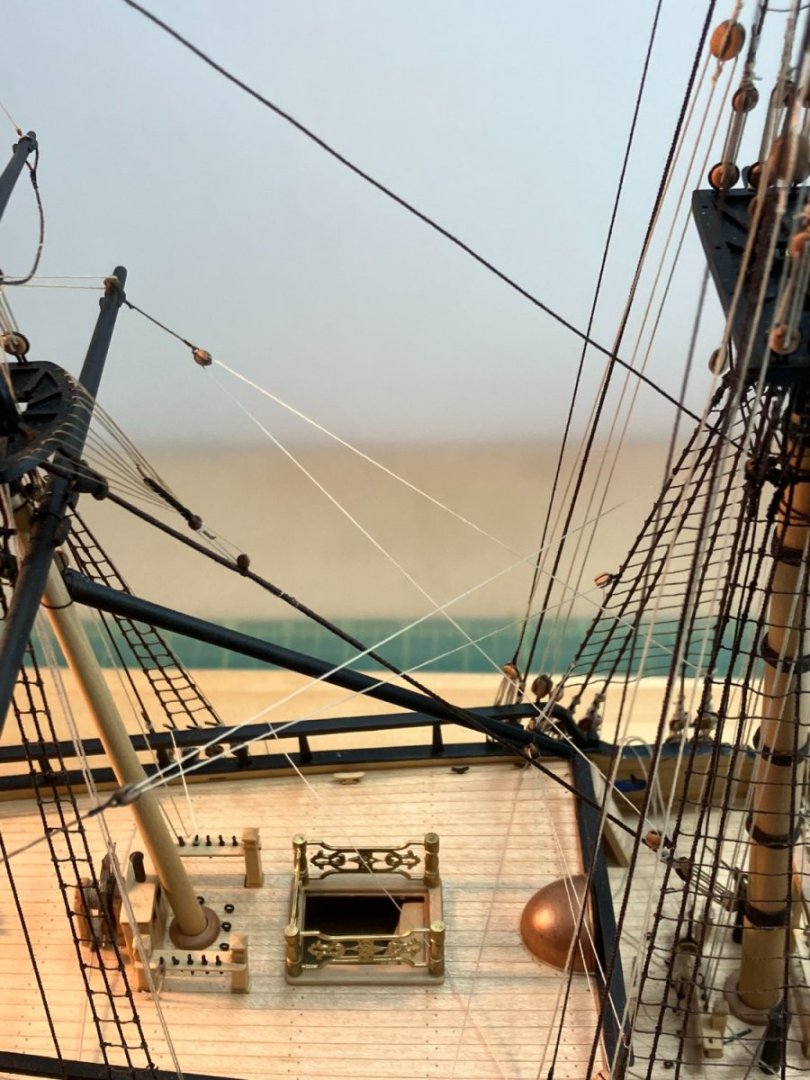
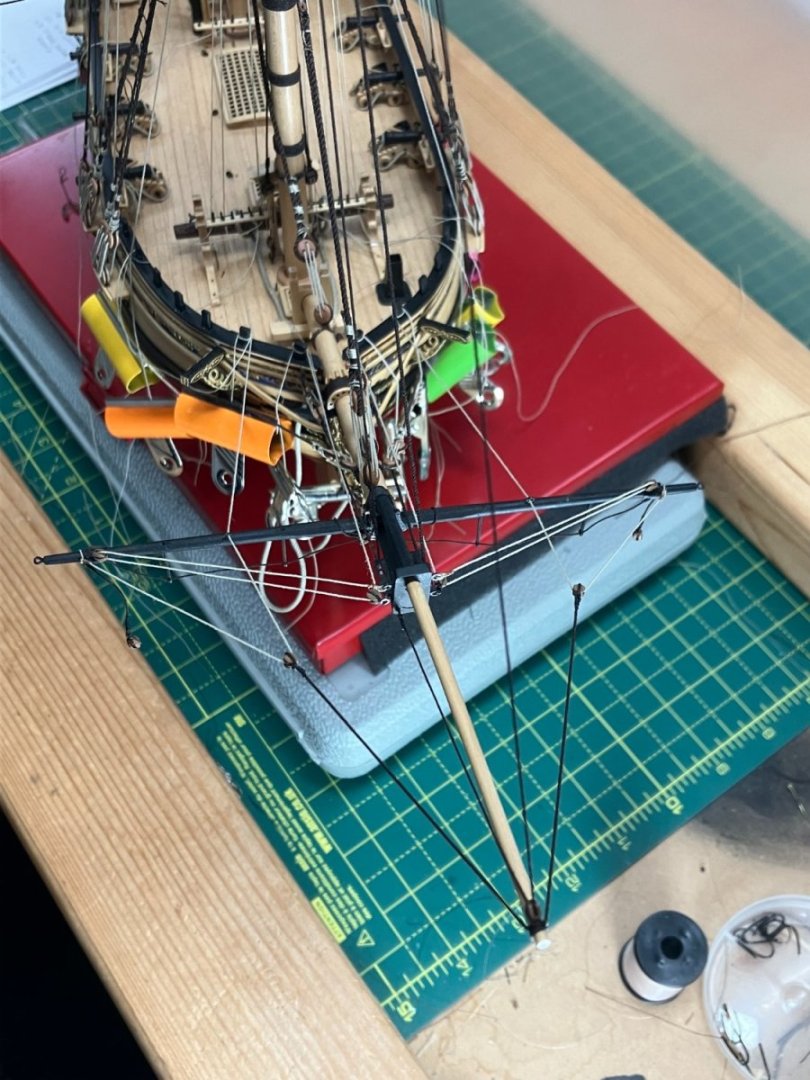
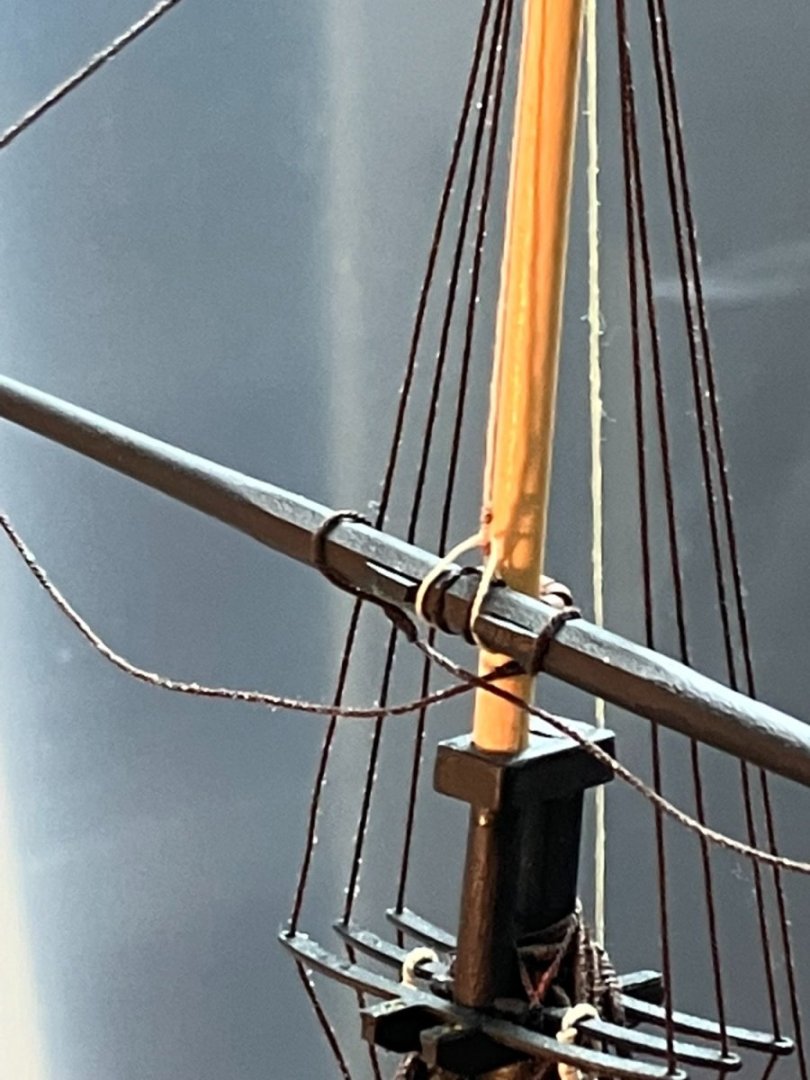
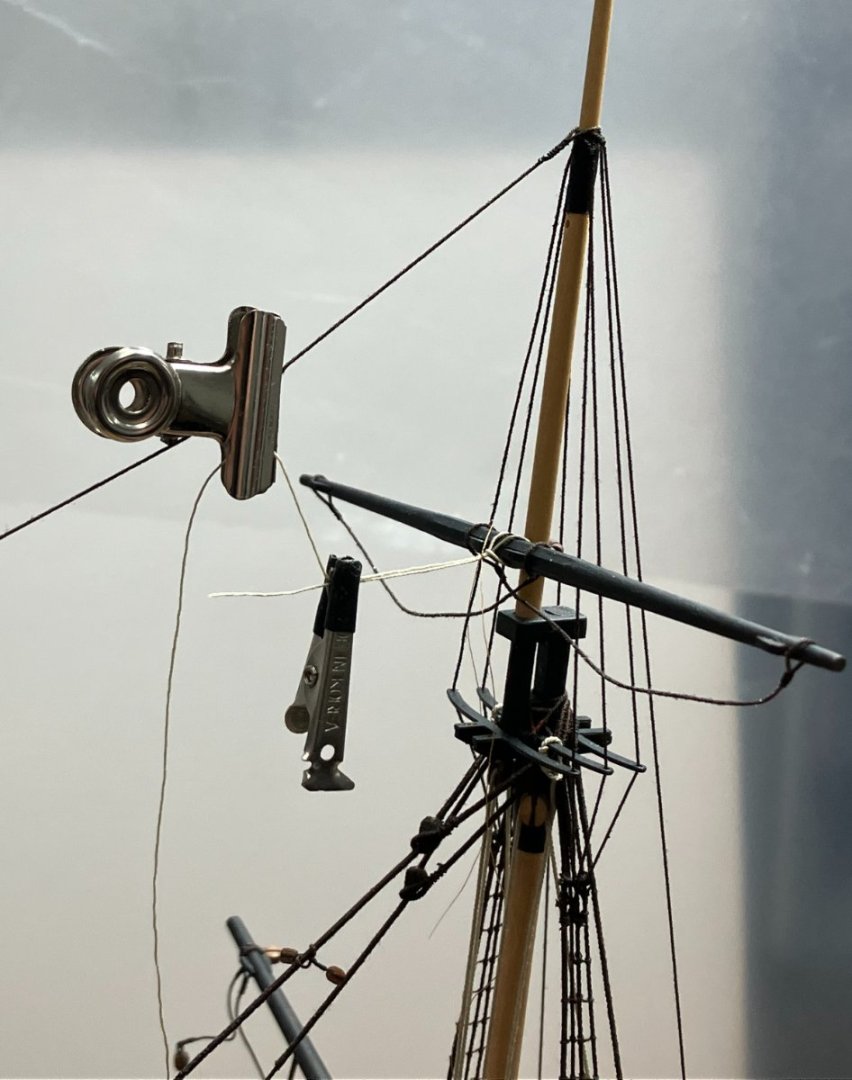
Running rigging - mizzen lifts and lower yard braces Happy New Year everyone, and many thanks for the likes and kind comments. The various lifts on the mizzen mast were mostly straightforward. The peak halliard required some in situ seizing of lines to the lateen yard, but nothing too difficult: I used three strands of Mara #150 to make the ropes. The lifts on the crossjack and mizzen topsail yards were somewhat lighter - I used Mara #70 and Mara #100 respectively: The photo above hides a real problem I had with the crossjack lifts. The falls are seized to the strops on a pair of 3mm blocks on a span clove hitched around the topmast, just above the cap. The falls then rove through the 3mm blocks on the yard arms, back through the first blocks then through the top to belay on the mizzen bitts. Unfortunately I'd fitted the blocks without the falls attached. The only solution was to use the finest needle I could find to thread the fall line through the strop on the end of each block, tie it off with a simple overhand knot, apply CA and trim. Needless to say the air was blue as I struggled to do this through a forest of existing lines. The result was not to a standard I would normally be happy with but in reality it's hard to spot the bodge: Btw, I didn't follow the kit plans and fit footropes on the crossjack. Sails weren't fitted to this yard, and as a result my understanding is that footropes were seldom fitted either. Braces I started at the bow and worked aft, although I have decided to leave the main brace off at this stage as I felt it would get in the way too much. The standing ends of the spritsail yard braces are hitched to the forestay, just below the crowsfeet tackle. Rather than two lines, I used one long length of Mara #70 (roughly 2.5" rope) clove hitched round the stay, which is easier and neater than tying and trimming separate knots. The falls then run forward through the brace pendants then back aft to the foretop: Each brace then reeves through the pair of blocks under its side of the top, then down to belay on the pinrail attached to the belfry. Threading the line through these blocks was easier than I had found on previous builds, although in this shot I'd managed to push the first block out of position: I used the same technique with the foreyard brace, clove hitching a long line round the main stay. The braces then lead forward through the brace pendants on the yard, back to the 5mm blocks fitted to the main stay then down to belay on the main bitts: The crossjack is different in that it is braced forward, and the braces cross. The standing part of each brace is seized to the aftermost lower shroud on the main mast, at roughly the height of the crossjack. It then crosses to the brace pendant on the opposite side of the ship, and across again to reeve through a 3mm block seized lower down on the same shroud, then belays to a cleat on the deck. NB Because the lines cross it's a good idea to stagger the seizings on the two shrouds to avoid the lines fouling. Not far to go now - I need to get my finger out and start making up some rope coils and finish the anchors. Derek


- 345 replies
-
- 19
-
-
-
- Duchess Of Kingston
- Vanguard Models
- (and 1 more)
-
Hi Dave This is the one I use. It's very pale and leaves a lovely warm sheen: Liberon is a great brand for all sorts of wood care products. Derek

-
Thanks for your kind words. Boxwood is so beautiful I'm always reluctant to paint over it and I'm glad I eventually decided not to in this case, especially as I learned how to apply wipe-on poly properly. Having said that, the bare timber also contrasts well with painted areas such as the wales, and with coppering such as on Speedy. When stuck for a decision on these matters I must confess aesthetic considerations usually trump historic accuracy, for me at least.
- 345 replies
-
- 5
-
-
- Duchess Of Kingston
- Vanguard Models
- (and 1 more)
-
Merry Christmas to you and yours Glenn!
- 345 replies
-
- 1
-
-
- Duchess Of Kingston
- Vanguard Models
- (and 1 more)
-
Running Rigging - brief update I've not kept the log up as conscientiously as I should, partly because it is difficult to photograph the model properly in the dust cabinet, but mainly because this stage of the build is an almost identical repeat of the same stage in HMS Speedy's construction. I confess I baulked at the idea of simply mirroring my entries in the earlier log. I hope anyone wanting more details will check the latter. Here's the current state of play: I've completed most of the rigging to the bowsprit, along with the ties and lifts on the main and fore masts, the ties on the mizzen and the vangs on the mizzen yard. As usual I haven't secured most of the lines yet, preferring to wait until a final squaring up. I found the bowsprit a little challenging, and had to have a couple of attempts to get the various lines to run cleanly without fouling: The first of these shots reminds me of another lesson I keep forgetting, despite keeping logs, which is that it is much easier to rig lines to eyebolts off the model. In my enthusiasm to complete the hull in line with the drawings I glued all such fittings in place long before I started thinking about the rigging, and of course I then had the pleasure of trying to seize lines on the model, usually through a cats cradle of existing ropes and spars. The one exception on the Duchess was the pair of cleats on the transom. I forgot these until I came to rig the vangs, at which point I had great fun drilling holes without destroying deck fittings and shrouds. Hey ho. Similarly, I usually regret not fitting more lines to spars before attaching them to the model. Quadhands is often my saviour, although I had to develop other solutions for higher parts of the ship. Here's me rigging the main topgallant yard tie: On a more positive note, I found that the beige 6/0 fly tying thread I rejected as an option for the crowsfeet works well as a seizing. I normally use the thinner 18/0 thread but the 6/0 version looks good on heavier lines: Anyway, my new year's resolution will be to work harder at keeping my log up. I'll also have to work harder in the dockyard - I've got Sphinx waiting on the stocks and I've ordered Indefatigable 😁. In the meantime, I'd like to wish everyone a merry Christmas and a happy and peaceful New Year. Derek


- 345 replies
-
- 12
-
-
-
- Duchess Of Kingston
- Vanguard Models
- (and 1 more)
-
She's looking great Glenn. I don't think I'd appreciated how big she is until I saw your shot with the metal rules on the deck, and the one on the cutting mat. As always, I admire your attention to detail and your refusal to accept second best. I would probably have been happy with a couple of coats of paint, but you show what can be achieved by going the extra mile and applying seven coats - inspirational! Derek
- 840 replies
-
- 2
-
-
- winchelsea
- Syren Ship Model Company
- (and 1 more)
-
Thanks guys! Boxwood is certainly my favourite timber for ship models, although I'd love to get hold of some Alaskan yellow cedar to try it out having seen how beautiful it looks, for example on Glenn's Winchelsea. Unfortunately it's not readily available in the UK, and as Glenn knows, I wasn't able to smuggle any out on my recent trip to Alaska Derek
- 345 replies
-
- 1
-
-
- Duchess Of Kingston
- Vanguard Models
- (and 1 more)