


druxey
-
Posts
13,092 -
Joined
-
Last visited
Reputation Activity
-

 druxey reacted to MBerg in Norwegian Sailing Pram by MBerg - Model Shipways - 1:12
Thanks!
I haven't gotten much done over the past week, but I've released all the wooden parts, and figured I'd force myself to organize my pictures up to the current point. This one feels a little picture heavy for the amount that was accomplished.
Log #15 - Oar pads & locks, mast
I picked up a few new tools, glue looper, Swann Morton scalpel, round nose pliers and some proper flush cutters (for wire/tube, I've been using the beginners kit ones from ME which I don't think are really appropriate for metal). First used was the glue looper which helped getting the oar lock pads in place. I applied each one differently, some techniques worked better than others. Using pins in the 'nail holes' to guide it into place with a small amount of CA on the pad help align it in the right spot. The looper helped apply just enough to make it stick, but not so much it spilled into the holes (there was so little glue, one or two of them actually came off).
The loose pads were trickier to get nailed down, but I managed to drive the nails (applying a bit of CA to the tip to ensure they would do their job). I also had the nails slightly longer than the hole so they would bite into the wood and act as a nail should. 100% unnecessary, but I clearly have psychological problems. They all turned out quite well and fairly straight (and I just noticed a small amount of flaking CA on the paint in one of the pictures, now I'll have to go clean that up).
I was debating for a while about what to do with the oar locks as I didn't really want them to be 'steel'. I ended up painting them with some gold OcCre paint I picked at the ME clear out sale.
The Mast
This took the majority of my time. I made both the laser cut glued pieces and the dowel versions. I ended up using the dowel because it's size and taper ended up near perfect. Although the process was interesting, I struggled with the glued pieces. Getting the char off reduced the size too much and discolored it. I found drilling such a small hole in the glue seem to be more awkward than drilling into the round dowel (I used some tricks for that). The bottom end that fits into the mast step ended up way too small and the overall profile was an ellipse - although I don't think that's an issue as many, if not most masts are oval.
However, I finally got to use my Christmas present:
Comparing both masts:
I wish I could remember who, so I could properly thank them, but one of the build logs had used a cordless drill to shape the dowel. I did the same and although it was far too dusty and time consuming for my liking, it worked perfectly. The process really sped up when I stopped using the same piece of sandpaper, and cut 5 or 6 strips to rotate as soon as they got 'clogged'. (Now I might need to put a mini lathe on my wishlist)
Drilling straight holes in the dowel took some ingenuity. With a press it would be much easier. I made a 'guide' out of a thicker piece of wood, placed the dowel in a vice and put the guide across the top to keep the drill straight. It would've worked even better had the top of my vice been perfectly level, but it worked well enough.
Making the guide:
Using the guide:
Next, to make the perpendicular hole, I drove a pin through the current one and used that to rest it it on so it would sit perfectly level and I could drill perpendicular:
The round nose pliers came in handy for the eyelets. The eyelet itself was a U shape with one tip being longer than the other. That way, I was able to glue in one tip and then line up the other tip to push it all the way in. Applying the cleats has it's own miniscule and shaky hand challenges, but straightforward. Finally, to simulate the chafe pad (I went the 'copper' route instead of leather), I used some copper OcCre paint I had got for dirt cheap from... you guessed it.... the ME clear out sale.
First I simply used a toothpick to slather some paint on a piece of brown paper, wrapped the opposite side around a dowel to give it some memory while drying. Flipped it over, marked it out, cut with a brand new blade, PVA glue and voila.
I sent this to the wife with no context and she asked if my fake nail broke off
More gold paint, I cleaned it up after it dried, but didn't get a pic:
The stay plates swivel since I managed to get them on with only the nails being glued into the mast. Handy if I need to readjust them when rigging
The color matches nice enough; though I'm not sure how durable the gold paint will be. I've yet to glue them in. I was thinking of using a rubbery/flexible adhesive so they could be twisted slightly though the longevity of those adhesives probably don't make them the best choice.
As of this week, I've shaped the boom; just need to finish gluing and drilling. Need to shape the top spar and oars, then onto making the sail and rigging.
On a personal note, I found the time to get over to my boat for the first time this season. I stepped the mast and got the jib rigged up. I ran out of time and had to many questions to continue with the mainsail, boom, halyards, sheets, etc. I reviewed manuals, and reference pictures after I got home, and should be able to go back and finish it up when I have time for another visit. Maybe even get a little crazy and actually launch it!
Thanks for the comments, and likes,
Matt
-
druxey reacted to ClipperFan in Staghound 1850 by rwiederrich - 1/96 - Extreme Clipper
Damn straight!
-

 druxey got a reaction from ClipperFan in Staghound 1850 by rwiederrich - 1/96 - Extreme Clipper
Ah, the joys and frustrations of reproducing plans!
-
druxey reacted to ClipperFan in Staghound 1850 by rwiederrich - 1/96 - Extreme Clipper
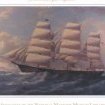
@rwiederrich @Luis Felipe and @Vladimir_Wairoa here's the actual pdf plan images from Staples. I noticed that the grid lines on the previous plans are slightly skewed. That's due to my cell phone not being precisely above when I took the picture. These are more precise. The only mistake I see are slightly misaligned fore halves of the Chappelle.
-
druxey reacted to shipman in La Créole 1827 by archjofo - Scale 1/48 - French corvette
Every new post is simply overwhelming.
-
druxey reacted to archjofo in La Créole 1827 by archjofo - Scale 1/48 - French corvette
@jdbondy
Yes, the Paasch is really very helpful for translating old nautical terms.
I can therefore recommend it.
Continued: Fore yard – Bowlines / Boulines
Since I don't equip my corvette with sails, the question inevitably arose as to how the bowlines are attached. Originally, I intended to simply tie the bowlines around the yard, like on the original Paris model, without bridles. Since I was naturally interested in how bridles work, the next question arose: What happens to the bowline bridles when the sails are taken down?
I found the answer to this question in K. Schrage's book – Rundhölzer, Tauwerk und Segel – on page 144. There, you can see an illustration of how the bridle legs are attached to the yard with timber hitches when the sails are taken down.
Source: K. Schrage – Rundhölzer, Tauwerk und Segel – p. 144
Since I find this arrangement very logical, I decided to show it this way for my model. Regarding the number of bridle shanks, I'm guided by the monograph, as diverse variations can be found in relevant contemporary illustrations.
I intend to implement the bowline bridles as in the original, using real eye splices. The bowline bridles in the foreyard had a diameter of 19 mm (1:48: ø 0.35 mm – 2 x 3 Kimono Japanese silk yarn). Splicing the thin ropes is now very easy.
In order to finally attach the bowline, I still had to tie the guide blocks to the bowsprit, as shown in the next picture.
I'm also currently working on the correct mooring of the running rigging.
But more on that soon.
To be continued...
-
druxey reacted to jdbondy in La Créole 1827 by archjofo - Scale 1/48 - French corvette
Wefalck, that book is exactly the reference I have been looking for! Should be immensely useful when looking at Boudriot's books.
-
druxey reacted to wefalck in La Créole 1827 by archjofo - Scale 1/48 - French corvette
Use Paasch‘s ‚From Keel to Truck‘ and forget about GoogleTranslator …
-
druxey reacted to jdbondy in La Créole 1827 by archjofo - Scale 1/48 - French corvette
There's German, and then there's nautical German. And then there is the nautical German translation of the nautical French...or vice versa...
-
druxey reacted to archjofo in La Créole 1827 by archjofo - Scale 1/48 - French corvette
@SaltyScot
@ccoyle
@wefalck
Hello,
Since I can't be held responsible for my dear colleagues getting headaches ...😁... , I've tried to translate the terms.
I hope it's more understandable now.👍
-
druxey reacted to rwiederrich in Staghound 1850 by rwiederrich - 1/96 - Extreme Clipper
Remember when I said translating scale can sometimes be difficult? Welcome to difficult. I remeasured the mast locations and it appears I can fudge. Since Vlad misplaced the main mast slightly forward….. and thus caused the mizzen to also be relocated just enough forward to compensate. I think the offset poop pushed everything forward 2 scale feet. The slightly long poop deck does not reduce the overall appearance, since everything measures correctly forward of it. I’ll just redo the poop furniture. No problem.
Rob
-
-
druxey reacted to albert in HMS ANSON 1781 by albert - 1/48 - 64 guns
Thank you very much for yours comments and likes, photo Anson.
-
 druxey got a reaction from J11 in Trireme Olympias by Richard Braithwaite
Am I correct in my recollection of reading somewhere that a flute or fife-like instrument was used to keep time, not a drum?
-
druxey reacted to GGibson in Norwegian Sailing Pram by whitesoup12 - Model Shipways - 1:12
If you fill the gap on the stern side, the seat that is placed there should hide it well. Looking good, sir. 👍
-
druxey reacted to whitesoup12 in Norwegian Sailing Pram by whitesoup12 - Model Shipways - 1:12
I was going to wait to make a bit more progress before posting another update, but felt this one was worth a recap. In the process of attaching the dagger board case, I noticed the slot in the keel was too long for the case. Had to cut a small piece and glue it in to fill the gap. It worked (and shouldn't be noticeable after painting), but hopefully the bow-to-stern alignment of the case doesn't affect the frames that get attached in the next step. I wasn't sure if I should put it towards the bow or stern.
-
druxey reacted to ClipperFan in Staghound 1850 by rwiederrich - 1/96 - Extreme Clipper
@rwiederrich Rob and @Luis FelipeLuis after our discussion about relative deck dimension issues, I used a photo app
to realign the few deck sources available. Both the 1881 Hall and 1967 Chappelle copies we have were slightly out of true. I have corrected that as best as possible. The same process was applied to the sole deck image supplied by Luis. Finally, I've included my own beginning deck sketch. By comparing each of these, we can more accurately nail down this portion of Staghound.
-
druxey reacted to Chuck in Syren Ship Model Company News, Updates and Info.....(part 2)
Here is a look at my new 3d printed toggles used on a fighting top to secure the blocks under it. This photo shows I believe 3 sizes of toggles being used and I think they look great.
A big thanks to Greg Herbert who is using them on a commission model and sent me his progress photo.
-
-
-
druxey reacted to ChrisLBren in La Renommee 1744 by ChrisLBren - 1/48 - 2025
Thanks guys - I like the Hornbeam a lot so far. It cuts easily and glues well. Also it carves nicely - harder edge to it than Pear or Box. Many of the Eastern European modelers swear by it as a replacement for ebony. As far as bending with heat - I will let you know once I get to the wales. That's probably months away - so far I've broken down and rebuilt more assemblies than I care to admit !
That stem was probably version three. My mill went astray this AM while cutting the rabbet. So I took it apart with my friend Iso Alcohol and will reassemble it tomorrow with a new forefoot. I am very happy the upper part of the stem consisting of black hornbeam was not yet glued to the lower half.
-
druxey reacted to ChrisLBren in La Renommee 1744 by ChrisLBren - 1/48 - 2025
Progress on the keel - stem. Pear and Black Hornbeam
-
druxey reacted to dvm27 in HMS Thorn by Kevin Kenny - 1:48 scale - Swan-class - David Antscherl practium
Nice video on blackening Kevin. Some random thoughts - I use either alcohol or acetone as a degreaser. Also, keep in mind that brass is an alloy and, depending on the composition, some brass is much more difficult to blacken. For large groups of pieces I find that pickling first makes a difference in the blackening and uniformity of the finish. For small pieces you can use a paint brush to polish them in a deep tupperware piece so they don't fly away. Polishing prevents the finish from transfering to surrounding pieces and evens out the finish. Finally, while it's easier to blacken the Swan PE sheet whole don't you find that you still have to blacken the cut edges after removal from the sheet?
-
druxey reacted to Kevin Kenny in HMS Thorn by Kevin Kenny - 1:48 scale - Swan-class - David Antscherl practium
What a number of the videos and modelers notes seem to indicate is that no one knows what is on the brass and different solvents will affect different contaminants on the pieces. I have acetone and should have mentioned it. Certainly the best results was pickling the pieces. Based on my soldering experience this has never disappointed me. You are right about blackening the photo etched pieces still connected to the frame. I actually used a stiff paint brush with the solvents and could see something coming off in the solution. My choice would be to prickle the pieces, rinse, then blacken. If they did not take then i would try one of the three solvents i have in the shop until i get success. Thanks for the feedback.
-
