HOLIDAY DONATION DRIVE - SUPPORT MSW - DO YOUR PART TO KEEP THIS GREAT FORUM GOING! (89 donations so far out of 49,000 members - C'mon guys!)
×

catopower
-
Posts
1,897 -
Joined
-
Last visited
Content Type
Profiles
Forums
Gallery
Events
Everything posted by catopower
-
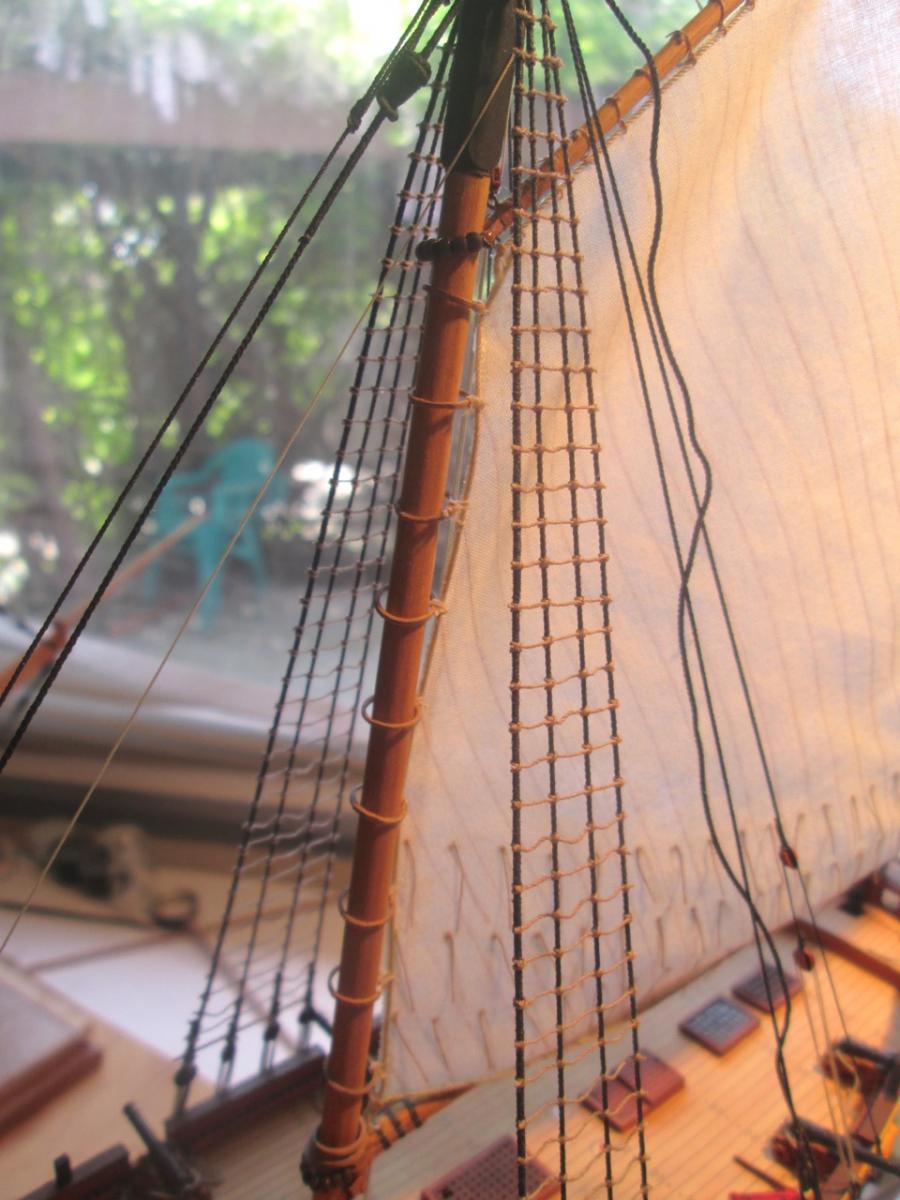
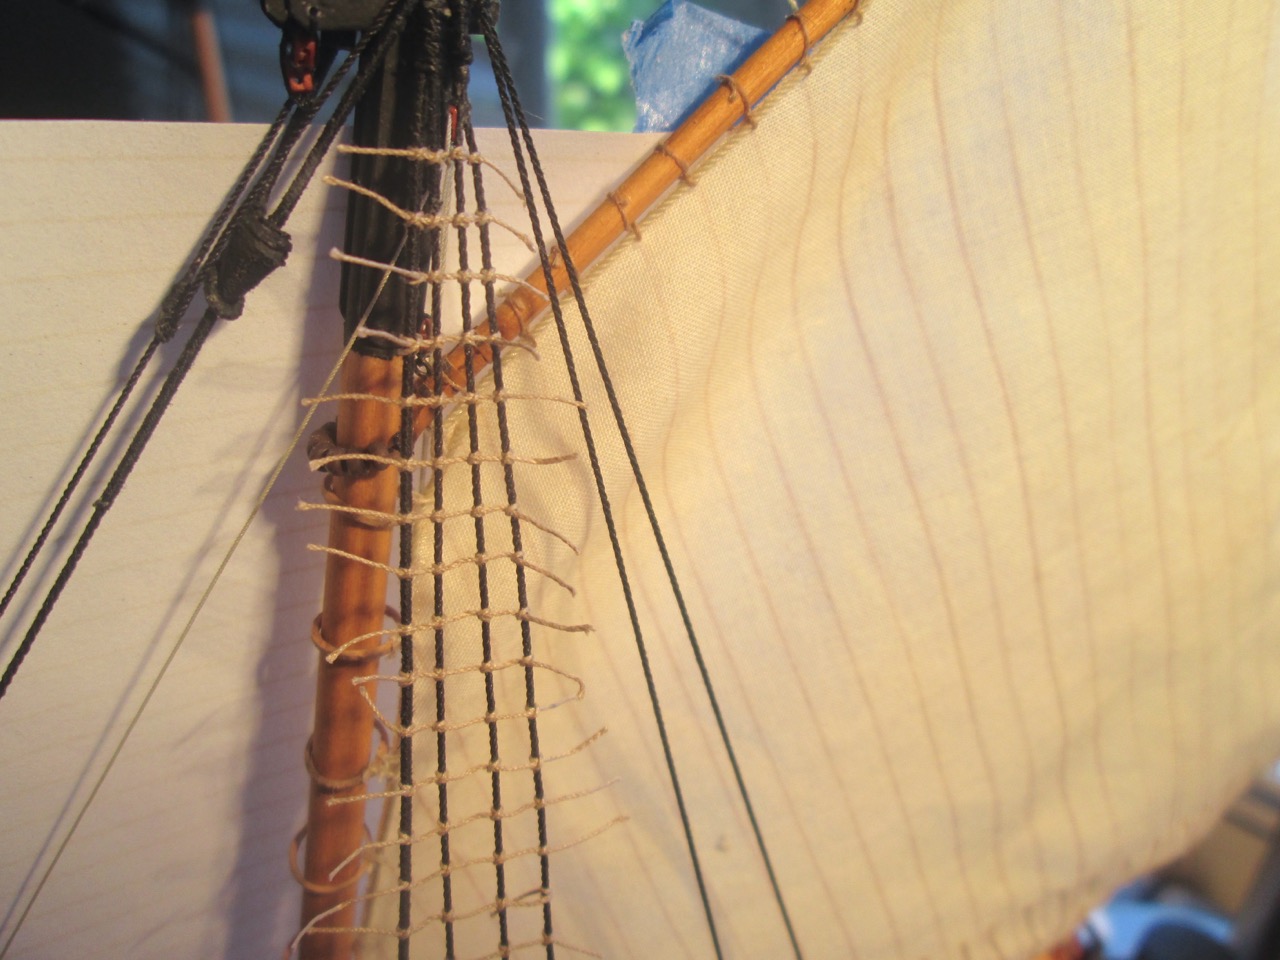
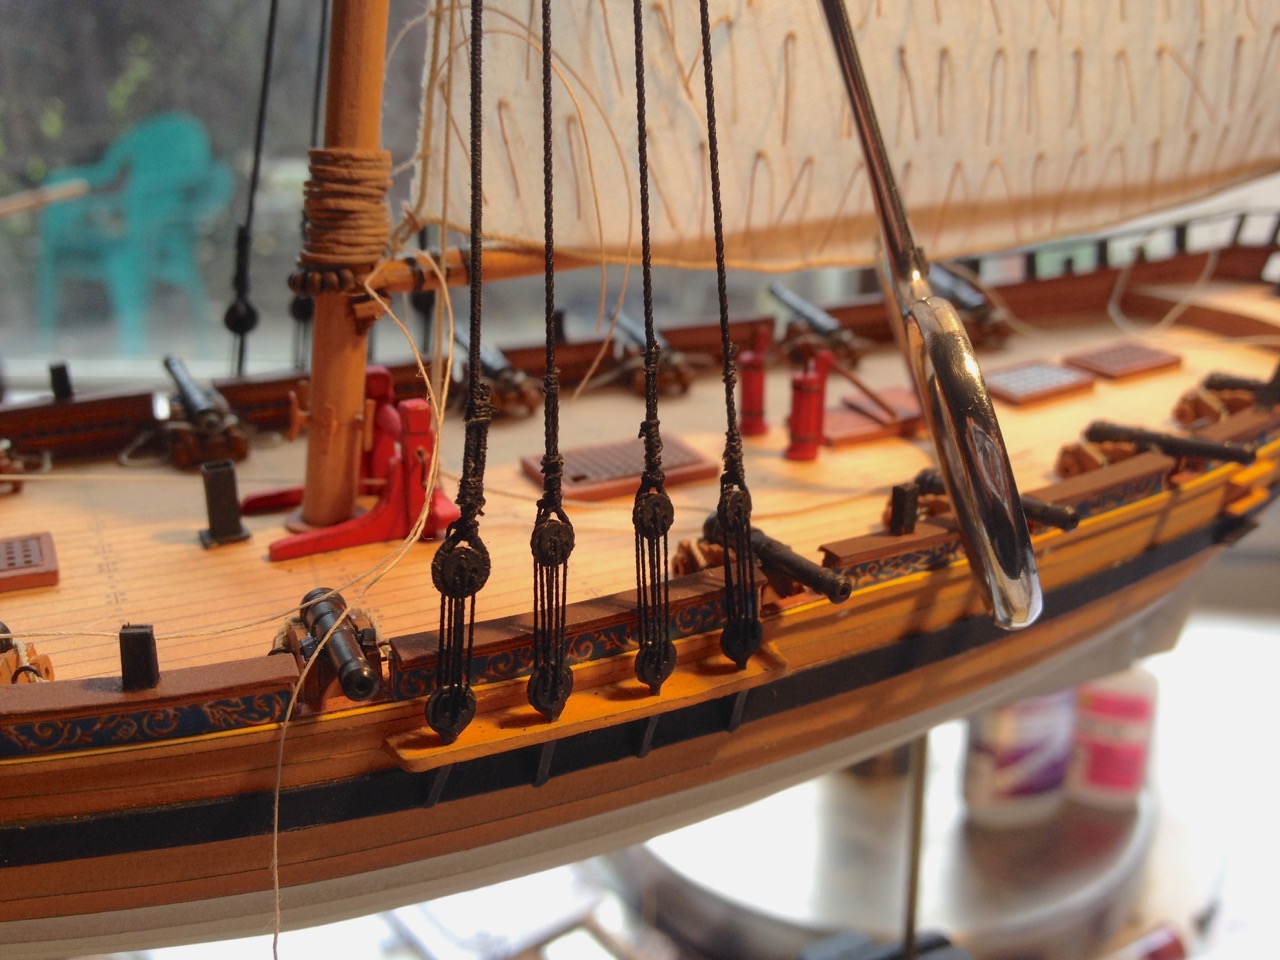
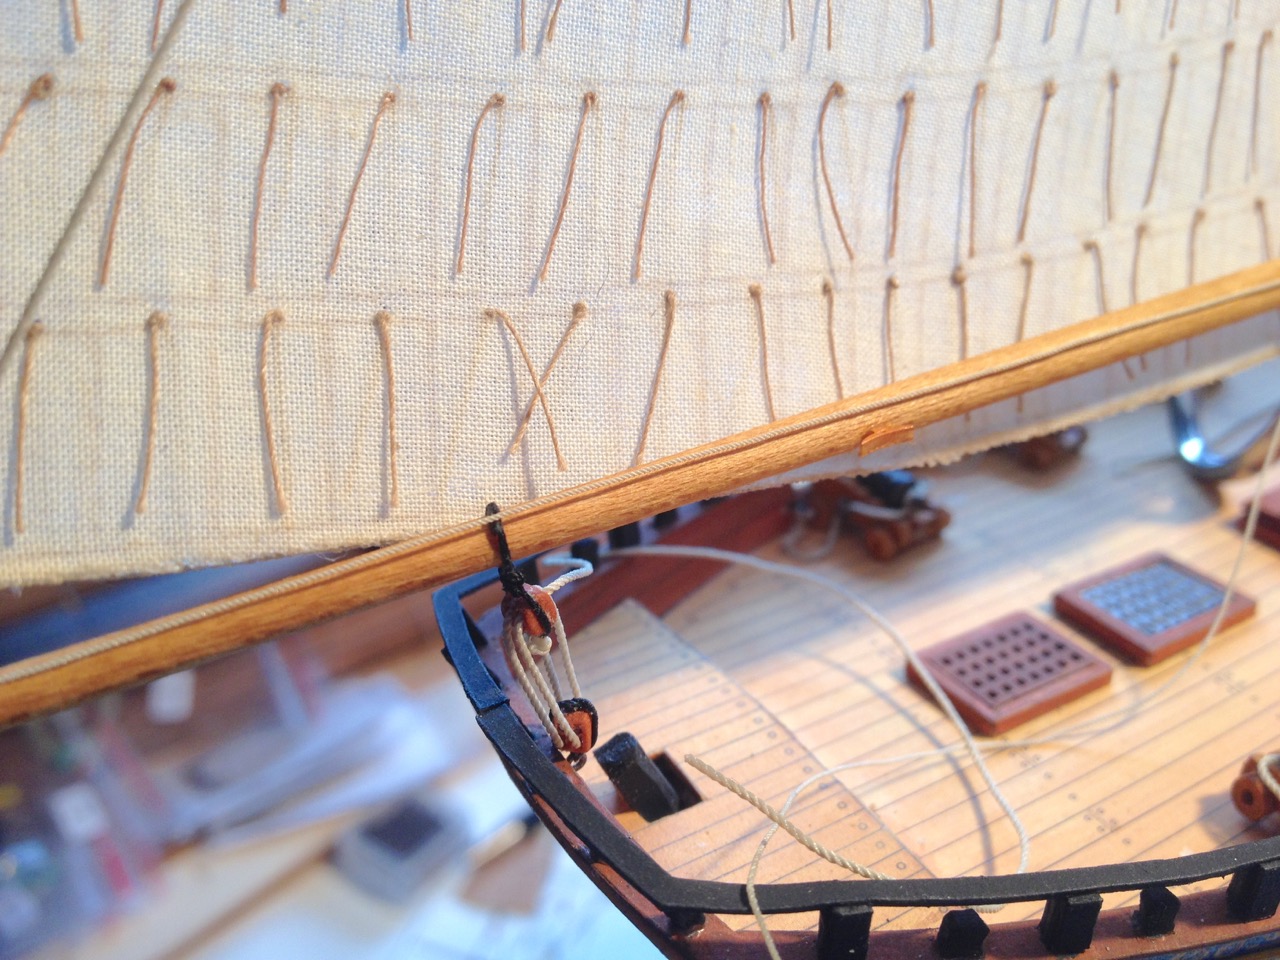
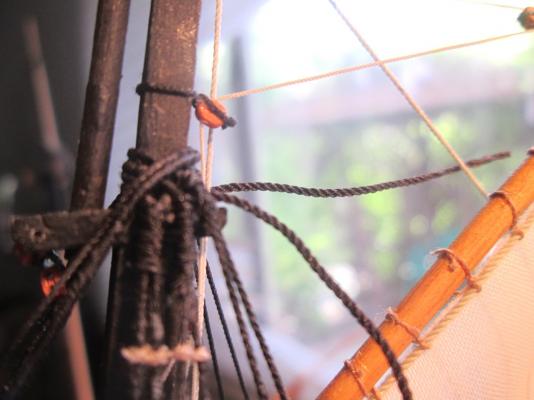
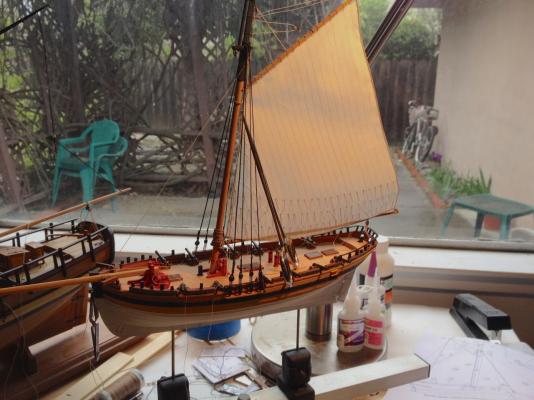
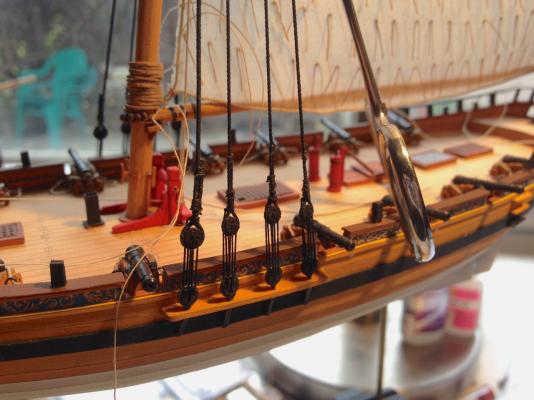
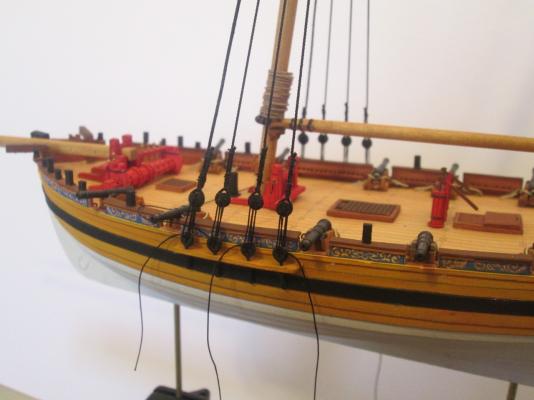
 Thanks for the comment and advice Carl, all. Well, I think I'm able to declare success! Had the quarterly meeting of shipmodelers at our gathering place at the Vallejo Naval and Historical Museum yesterday morning. After nearly 3 hours ship model shop talk about lunch with a fellow shipmodeler afterterwards, I managed to have a marathon session of rattling down the shrouds. All worked out pretty well and I didn't notice the stretching issue as much. So, this morning, I tried spraying the completed work with the fixative. The matte varnish had a bit of sheen, so I used the matte fixative, which dried much faster, so I could use a heavier coat. It didn't really do much to lock the clove hitches in place, so I just brushed on some acrylic matte varnish. I know it works and it's quick to apply. I trimmed off the excess line from the ratlines and the shouds looked okay. But, then... I went ahead and took a thick piece of black rigging line, threaded it under the shrouds and then pulled the line tight. As I did, I could feel it slip tight against the mast head and I could actually see the shrouds tightening up. I know it's cheating, but you will never be able to see this extra piece of line at this scale. And, after all, much of model making is about the art of illusion. Below, you can see the excess line sticking out. So, now, after I secure that piece of line and cut the excess, I can comfortably start rigging the standing rigging on the bowsprit. Clare
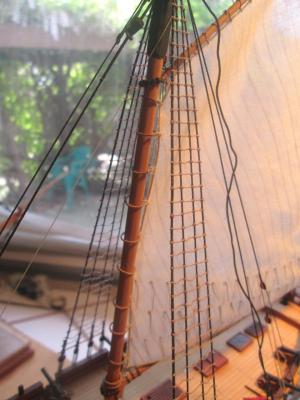
- 121 replies
-
- 19
-

-
Hi Carl, You reminded me that I have a couple cans of artist's matte spray from Prisma Color and from Grumbacher. Do you know how those compare with the hair spray? Grumbacher is a Matt Varnish, Prisma Color just calls theirs "Fixative". I'm guessing that "fixative" is just an expensive can of hair spray. Appreciate the advice! Clare
-
Hi Cog, I never really considered it. Do you know what kind of chemical is used in hairspray? I assumed it wore off after a short time. But, now that you mention it, I have hit the hull and deck with a little Testor's Flat Lacquer. Hides those tiny glue specks really well. I was thinking about hitting the rigging with it to help seal the line and to secure the knots. So, maybe that's the same idea as what you're suggesting. Clare
-
Thanks Carl, I appreciate any comment that suggests that I don't have to fix anything! Mark, to answer your earlier question, the Morope is a little shiny in the closeups, as you say. And to answer your question, it's Polyester. Clare
-
Hi Mark, The need for pre-stretching might be the issue here. Too late for the work done so far. But, it hasn't affected the backstays or the forestays, just the shrouds. The other thing that I started to consider is the perhaps there IS a paper model issue here. I'm wondering if anyone with paper sailing ship model experience has noticed some settling of the mast down into the hull, even a miniscule amount. Just in case, in the future, I thing I would put some reinforcing at the mast step. Thinking on it now, I can't imagine the card stock NOT crushing just a little under the strain of the rigging. But, I could just be imaging excuses for my own shortcomings here. I finished the ratlines on one side, but haven't trimmed or glued the knots in place yet. Still thinking about how to procede. I might have to step away from it for a bit and look at it with a fresh perspective. Tomorrow, there's a ship modeler's gathering I organize at the Vallejo Naval and Historical Museum near Mare Island. I'll probably take it there and see what people think. Again, I may rattle down (?) the starboard side shrouds and then see what I can do to tighten it all up together. Clare


- 121 replies
-
- 10
-
-
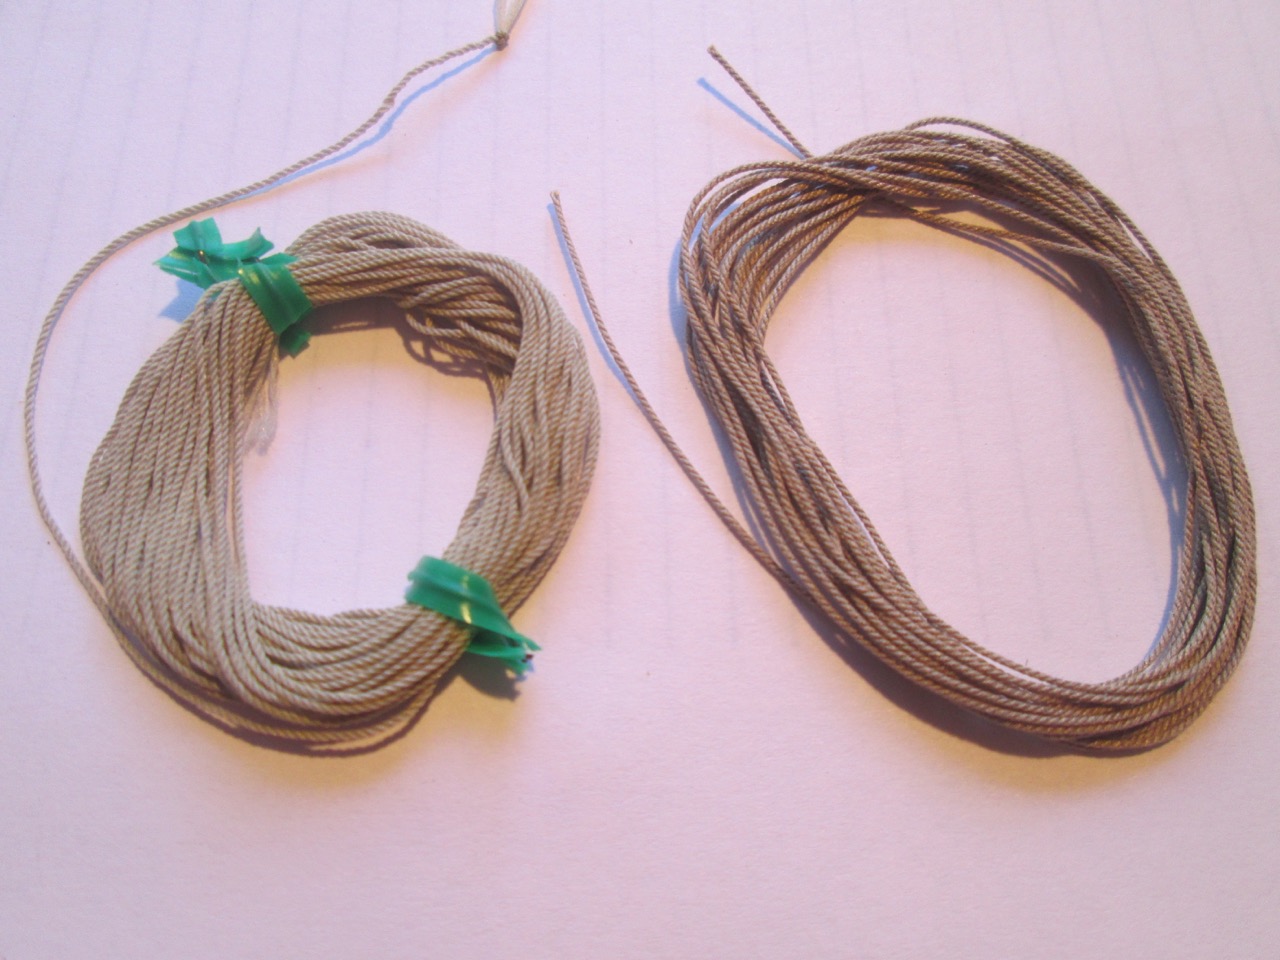
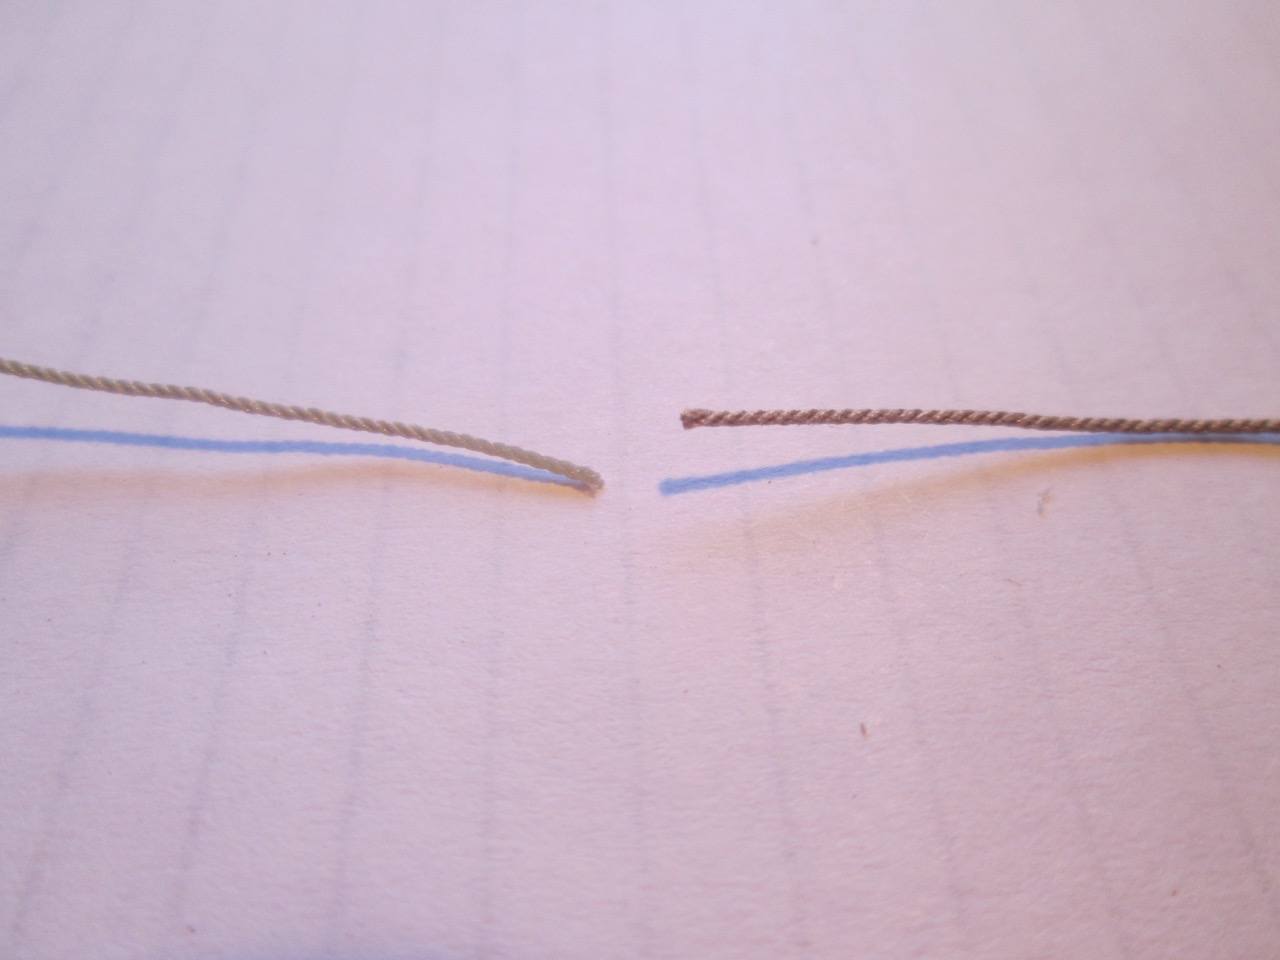
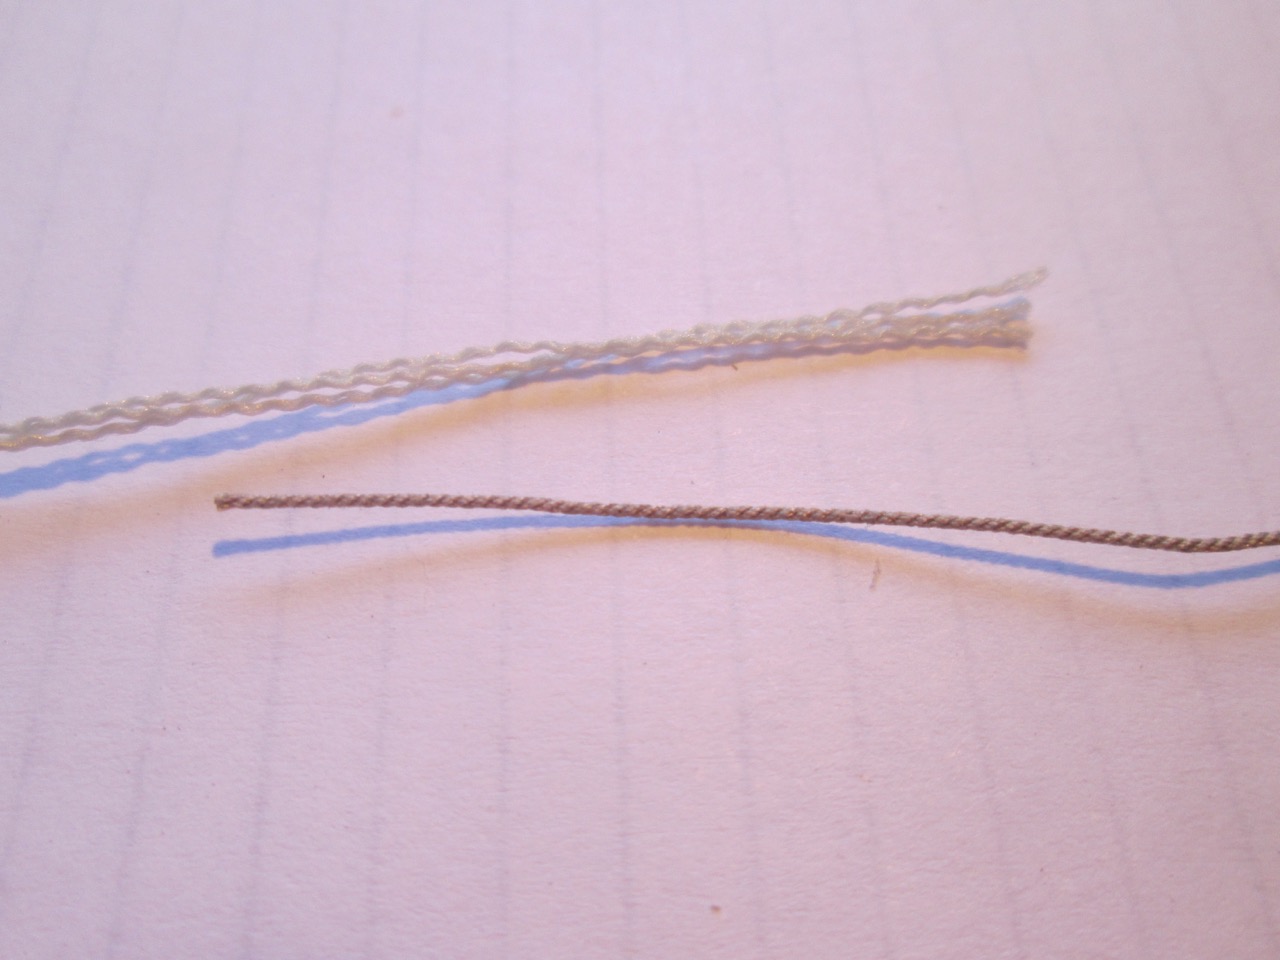
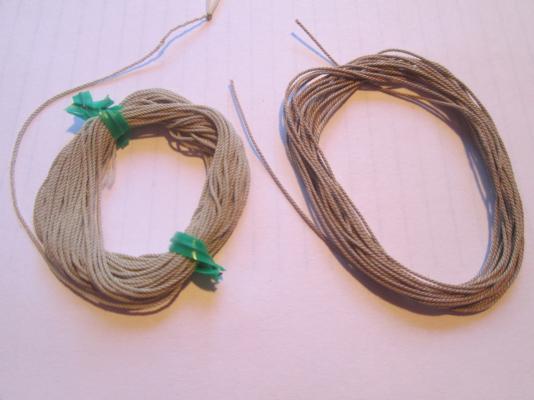
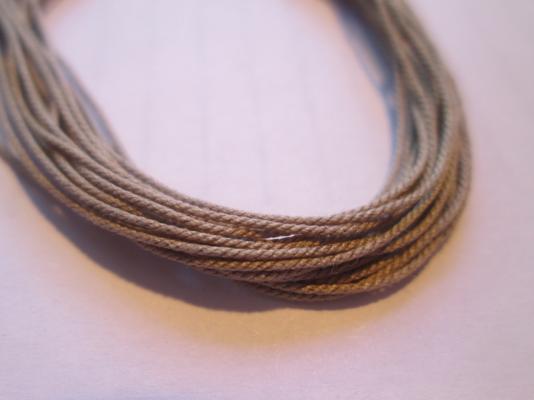
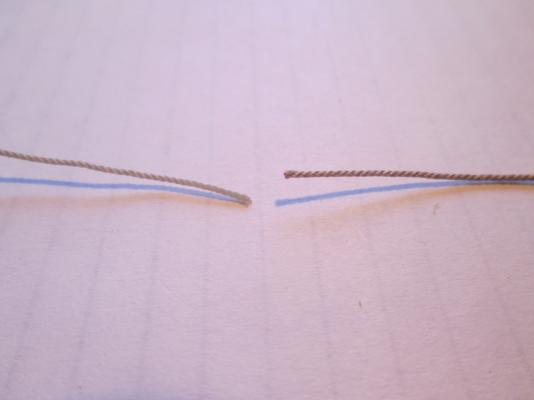
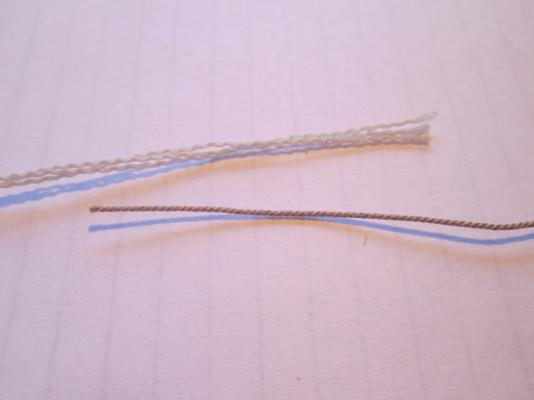
In my last post, I didn't have any photos to illustrate the differences in the rigging line that I was referring to. So, I took a few shots to post here. Above is a coil of Morope on the left and Syren line on the right. They both have good definition and look very nice. I don't recall the difference in pricing, but I don't remember it being a very great difference. Here is a closeup of the Morope line. And a closeup of the Syren line. The above are roughly equivalent sizes. And, of course, for my model in 1/8" scale, I'm only using very small sizes. So, the larger sizes will look a little different in comparison. What's shown is roughly 0.4 mm diameter line. When the Morope is glued so that it doesn't unravel, it doesn't look too different from the Syren line. Except of course, the Syren line looks like this freshly cut, without any special treatment. While this doesn't usually happen to me since I make sure to glue the line before cutting it, here is the Morope and the Syren line both freshly cut with no special treatment of the line. As you can see, the Morope wildly unwinds. It will continue to do so if it's not tied off or treated with glue. It's not necessarily a problem if it's handled properly. But, it's a shame it's like this as the Morope does have very good visual definition, and is available in left and right hand twists. I haven't run into any serious problems with the stuff as far as I can tell, but it is a concern as I work. Also, the Morope does seem stretchier and doesn't hold it's shape as well as the Syren line. For instance, if I make a coil of line, the Syren line is easier to work with, and holds the shape better. I'm not trying to push one or the other. I'm just pointing out the difference and a possible related issue I'm having with the forward most shrouds, which are served Morope line. Clare

-
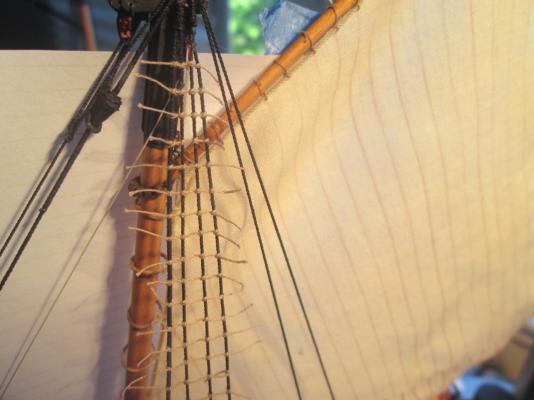
Well, just to report that I ran into my first real problem with the Alert. However, it has nothing to do with the fact that this is a paper model. This has to do entirely with the rigging material I chose. I decided that this small model provided a good opportunity to try using a product called MOROPE. This stuff has been around for many years. It's made in Europe and there is a person in the U.S. that handles U.S. sales of the product. The stuff looks really good and is visually stiff competition for Chuck Passaro's rigging line because it is well defined and is available in both Left and Right-Hand Lays (both S and Z laid). The first downside to MOROPE is that it's not really properly turned. If it was, when you cut it, it wouldn't immediately start to unravel. Seems like they don't twist the strands first... or is it yarns or threads? Anyway, when you cut Syren line, nothing bad happens. To keep the MOROPE from unravelling, you need to hit the area you're going to cut with some glue first. Then, it cuts just fine. However, now I'm tying ratlines – yes, lovely ratlines in 1/8" scale, so the rows are only about 5/53" apart. As I'm doing this, I'm finding that the MOROPE shrouds are stretching just a little. It may be a small enough stretch that I can compensate a little. But, this far into the rigging, if I can't work with it, I'm going to have to tear most of it down and re-rig. For the most part, I suppose it wouldn't be TOO terrible to take the rigging down as it's mostly a matter of cutting lanyards, which can be replaced. But I don't look forward to the idea of reworking the shrouds, deadeyes, etc. We'll see. I'm almost half way done with ratlines. There's only one mast – it's really not like I'm having to worry about rigging on a clipper ship. So, I'll get through the ratlines, trim them, and see how it all looks. I'm sure it's something like I hadn't stretched the line properly first. But, the line is stretchy to begin with and it seemed like the springiness would help to keep the shrouds taught. The detail at this scale is so hard to see, that it might be enough to cheat and tie an extra piece of line tight under all the shrouds, forcing them to lift upwards a millimeter, which would probably be enough to do the trick. Nobody would ever be able to see the fix. Anyway, we'll see how it goes. More later. Right now, it's back to clove-hitches... "under, over, through... under, over, through..."
-
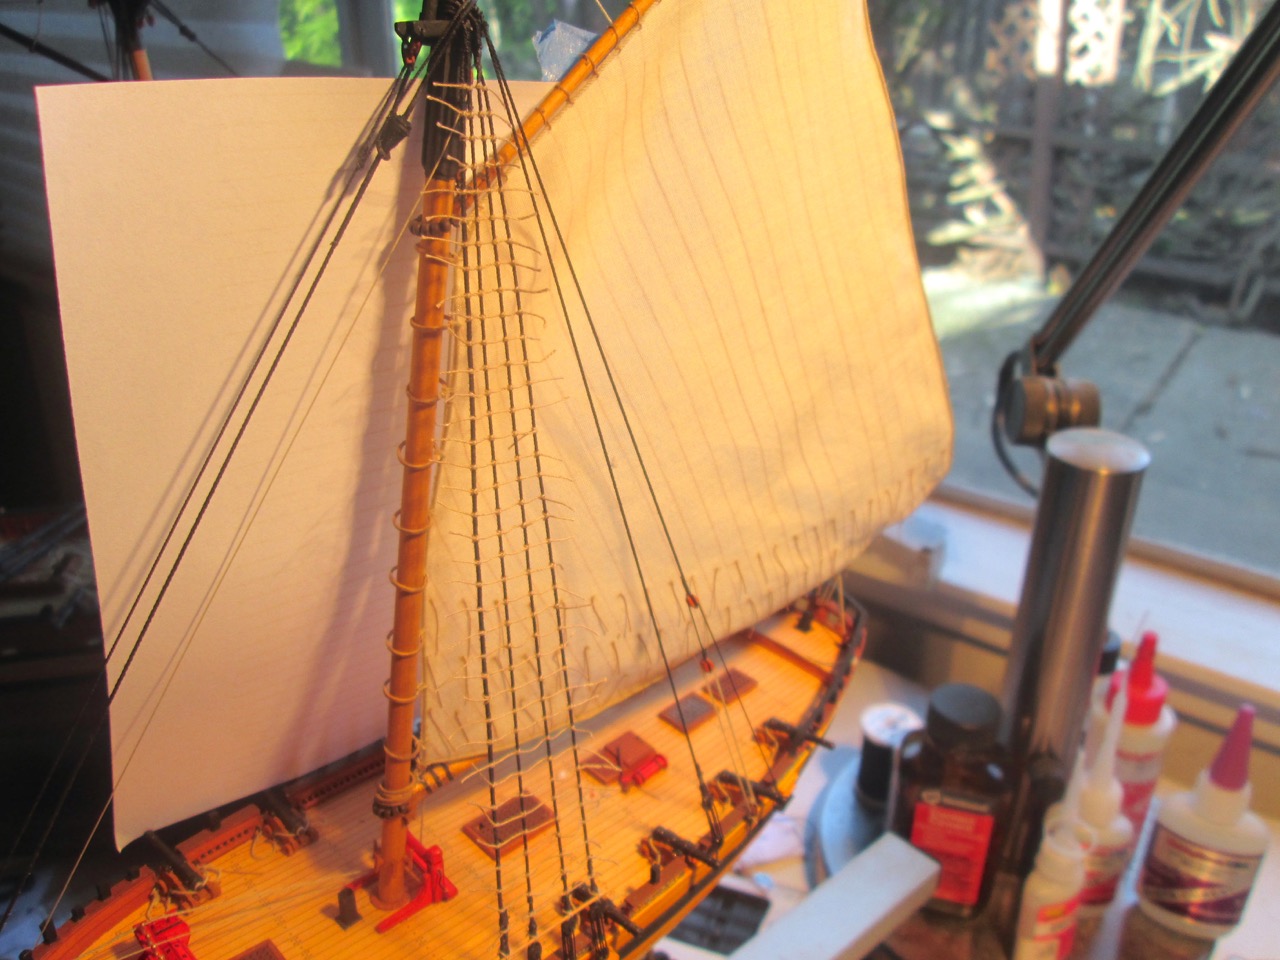
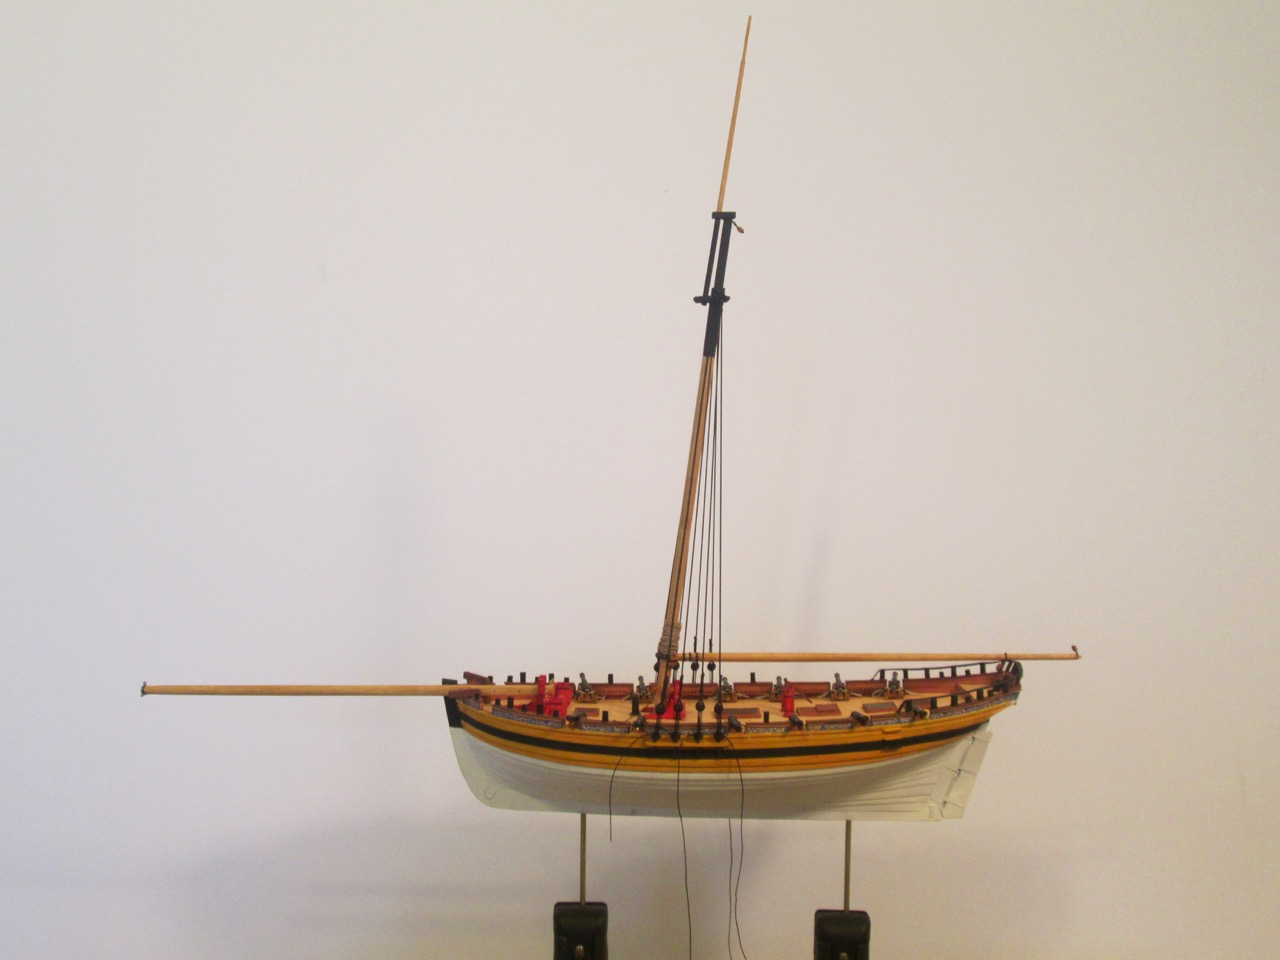
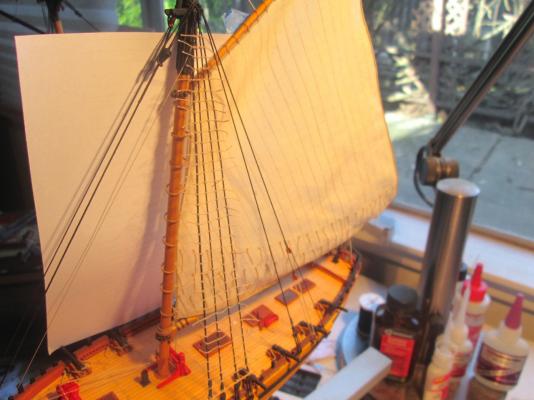
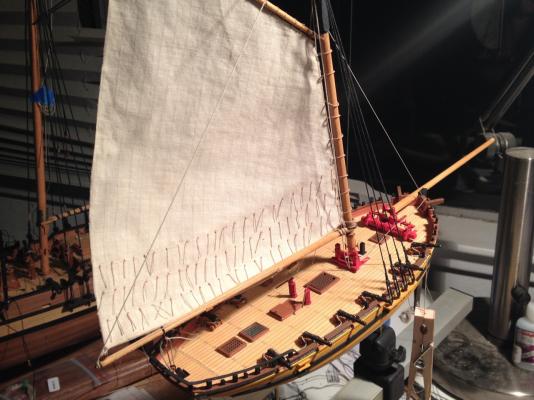
Before putting the main stays in place, I needed to get the shrouds and backstays secured. The problem is that they get in the way of dealing with the mainsail. So, I worked on rigging the mainsail first. The sails came as a set from Shipyard. I originally ordered these direct from Shipyard, but it appears that's no longer possible. I think the company may have blocked U.S. IP addresses, so as to support U.S. dealers, namely Ages of Sail, which sells the Shipyard kits. The problem is that Ages of Sail doesn't currently sell the various accessories. For the moment, if you want those, you can order them from http://www.gpm.pl. Next, I'll be rigging the backstays and then the mainstay. When I want to something a bit repetitive, I will get started on the ratlines. But, that shouldn't take too long, given that there is only the one mast with only lower shrouds. Clare

- 121 replies
-
- 10
-
-
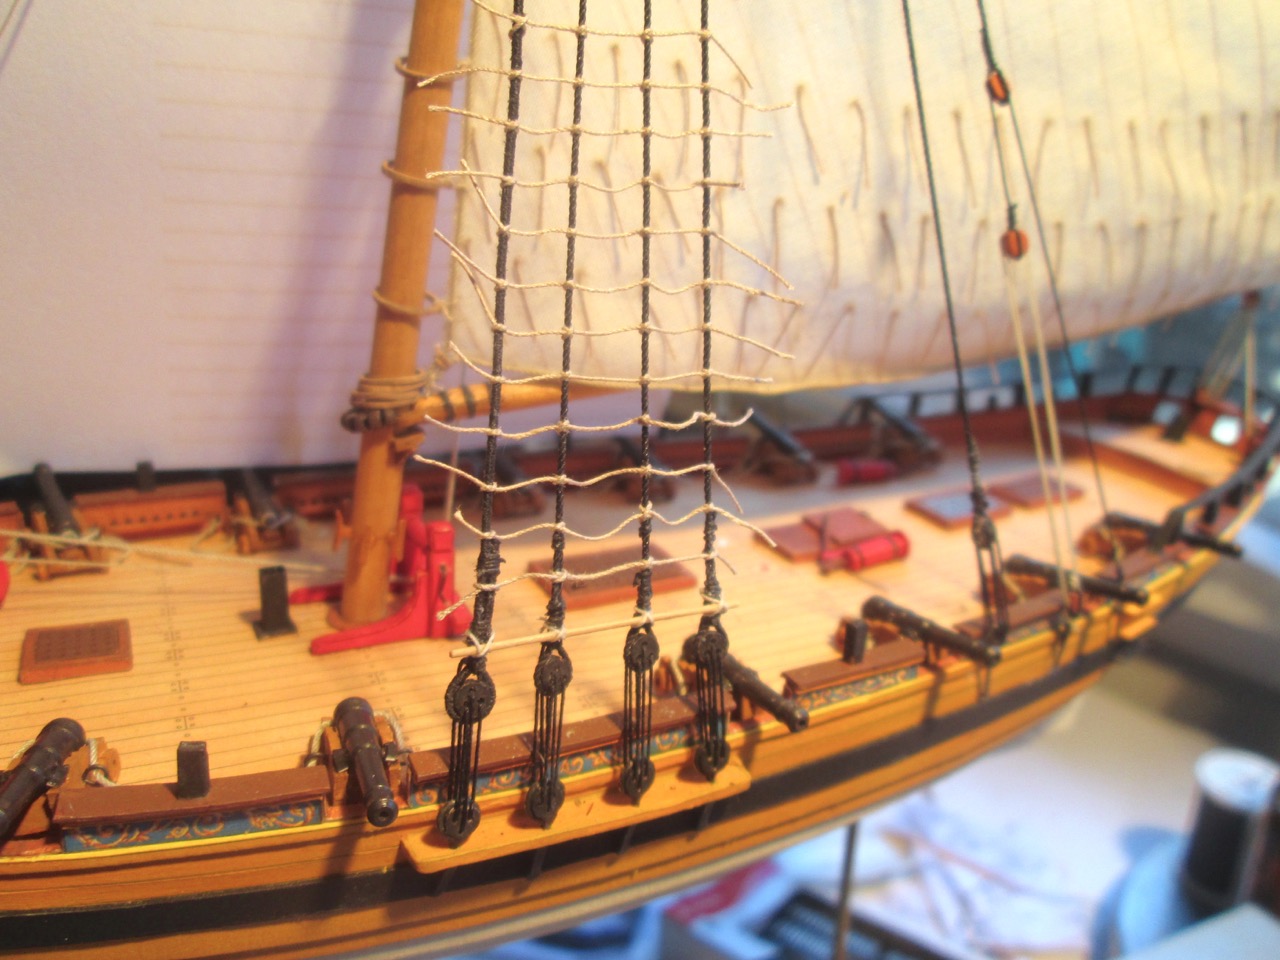
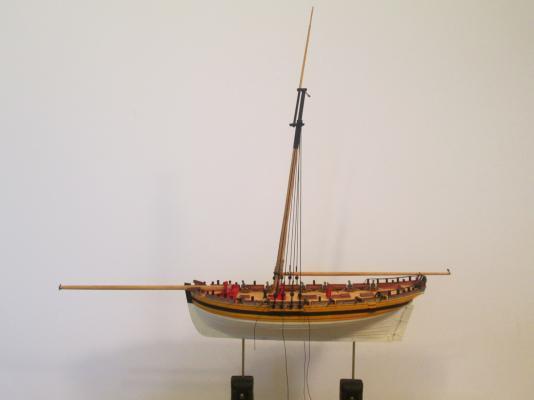
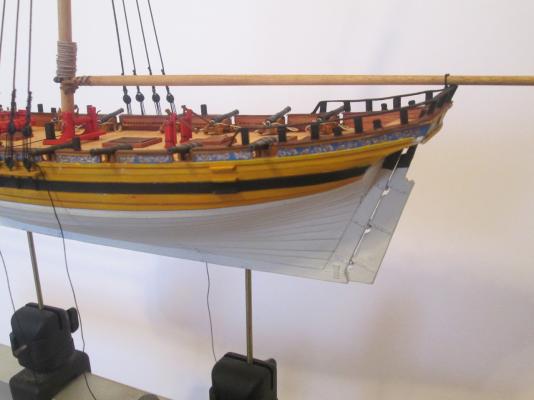
Quick update. I started the rigging process and added the lower deadeyes using 24 gauge annealed steel wire. The kit provides faux chainplates to glue over the wire, which I added later. First, I served the shrouds where they wrap around the mast head. I decided to go ahead and serve the forward shroud the full length using the finest thread I could find, short of using fly tying monofilament line, which I've had trouble using in the past. I made the shrouds long and used a method for locating the upper deadeyes show in some of the Shipyard kit instructions, which has you tied the ends of each shroud together with it's corresponding shroud under the hull of the ship. I just used clips. Then, glue the deadeyes to the shrouds all at the same height, making sure the deadeyes are all oriented the same. Once the glue has dried, you then loosen the shrouds, cut off the excess and then finish wrapping deadeye in the shroud end and trying things off. Of course, you have to make sure that you end up with the deadeye oriented correctly as your wrapping the shroud around it and tying things off. This seemed to work okay, though the served shroud doesn't stretch like the other shrouds, so I seemed to have more issues with its alignment to the rest when I reeved the deadeyes. I didn't tie off the shroud lanyards yet, as I thought I might need to take the mast off the model to work on adding the mainsail, square topsail and boom, gaff and yards. But, given that there is a fair amount of room to work with the mast in place on this cutter rig, I may go ahead and tie them off. I'll probably add the backstays and mainstays before I start on the ratlines. Sorry, the photos I've been taking lately look terrible. I have been experimenting with lighting and backdrops and such and having really mixed results with everything I've been trying. I have some ideas yet, which I can try another time. Meanwhile, I've started adding more blocks, eyebolts, etc. I think I want to get the mainsail into place next before I add the remaining stays. Clare
-
Thanks for the supportive comments Cog, Druxey, Telp and Mark. Cog, okay, you're probably right... Watch. My next paper (card) model will probably have open bulwarks! Telp, I doubt I'll ever go down the path of 3D printing, though there are some 3D printed parts that I'm sure I'll use. I already bought a 3D printed ship's wheel for a 1:78-scale HMS Victory model. I won't necessarily use it if I can make one that looks good enough. Overall, I like building the parts myself, even if they're not perfect. Of course, with a paper kit, it's a different game, with its own challenges. Don't know that I'd ever feel up to the task of scratch-building a paper model. For now, I'll stick to kits, or at least to this one kit. But, I have to admit, I picked up another Shipyard kit (HMS Mercury) that I thought I might partially build as a display model showing the hull construction style. I also thought one would make a great dockyard scene with the ship's hull completed and ready for launch – a follow up to a discussion here on flags mounted on a Royal Navy ship at launch. Clare
-
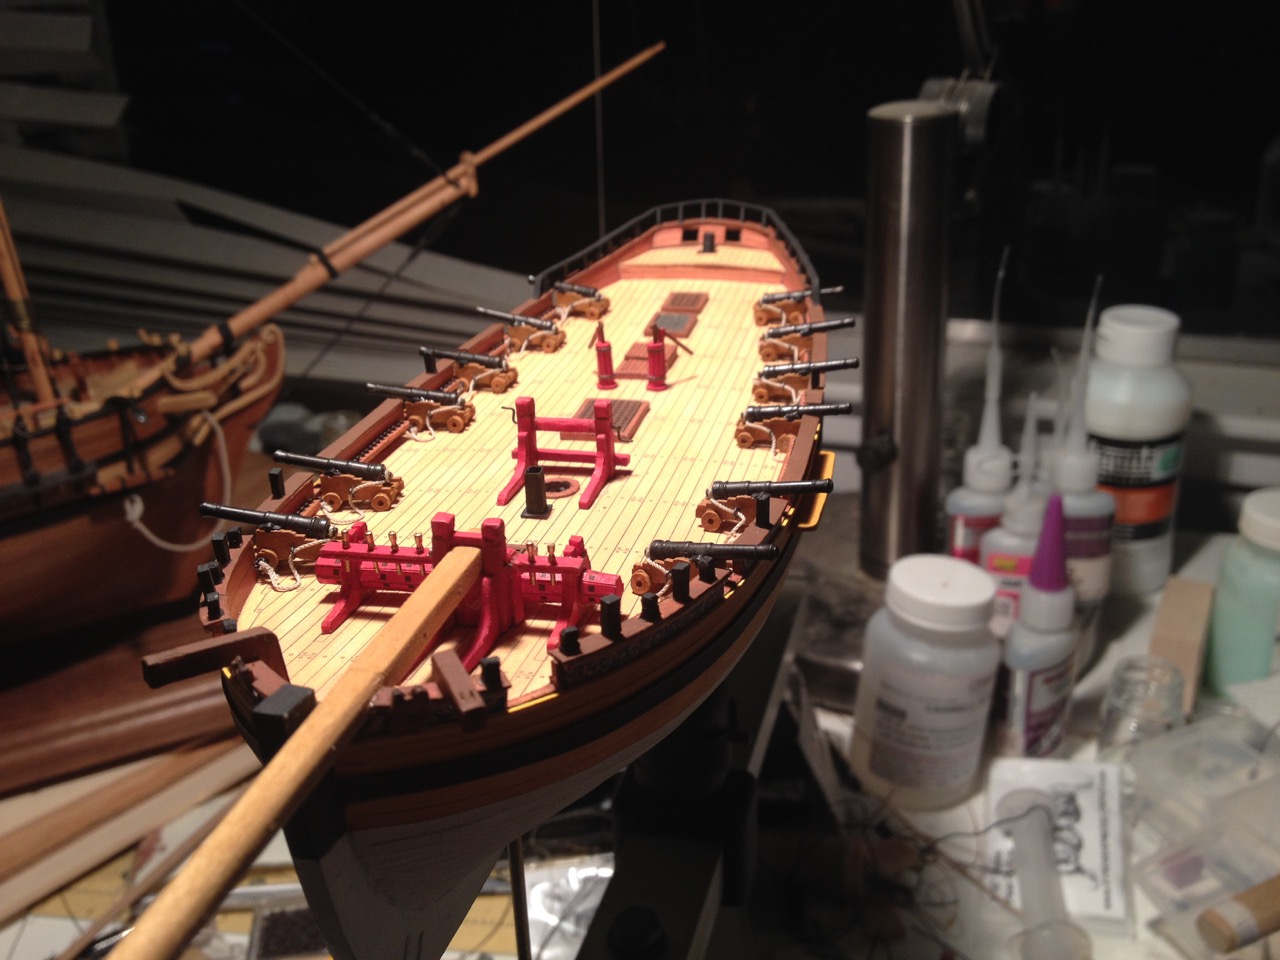
Thank you Nils. Of course, I can't take credit for making the cannons out of card. I decided my skills weren't up to doing that and having something nice looking, so I did purchase swivel guns from Chuck Passaro's Syren Ship Model Company and adapted them for 1/92-scale 6-pounder guns. I had the hardest time with all the timberheads and the taffrail. Next time I build a paper model, I think it will have no railing like on this one! Clare
-
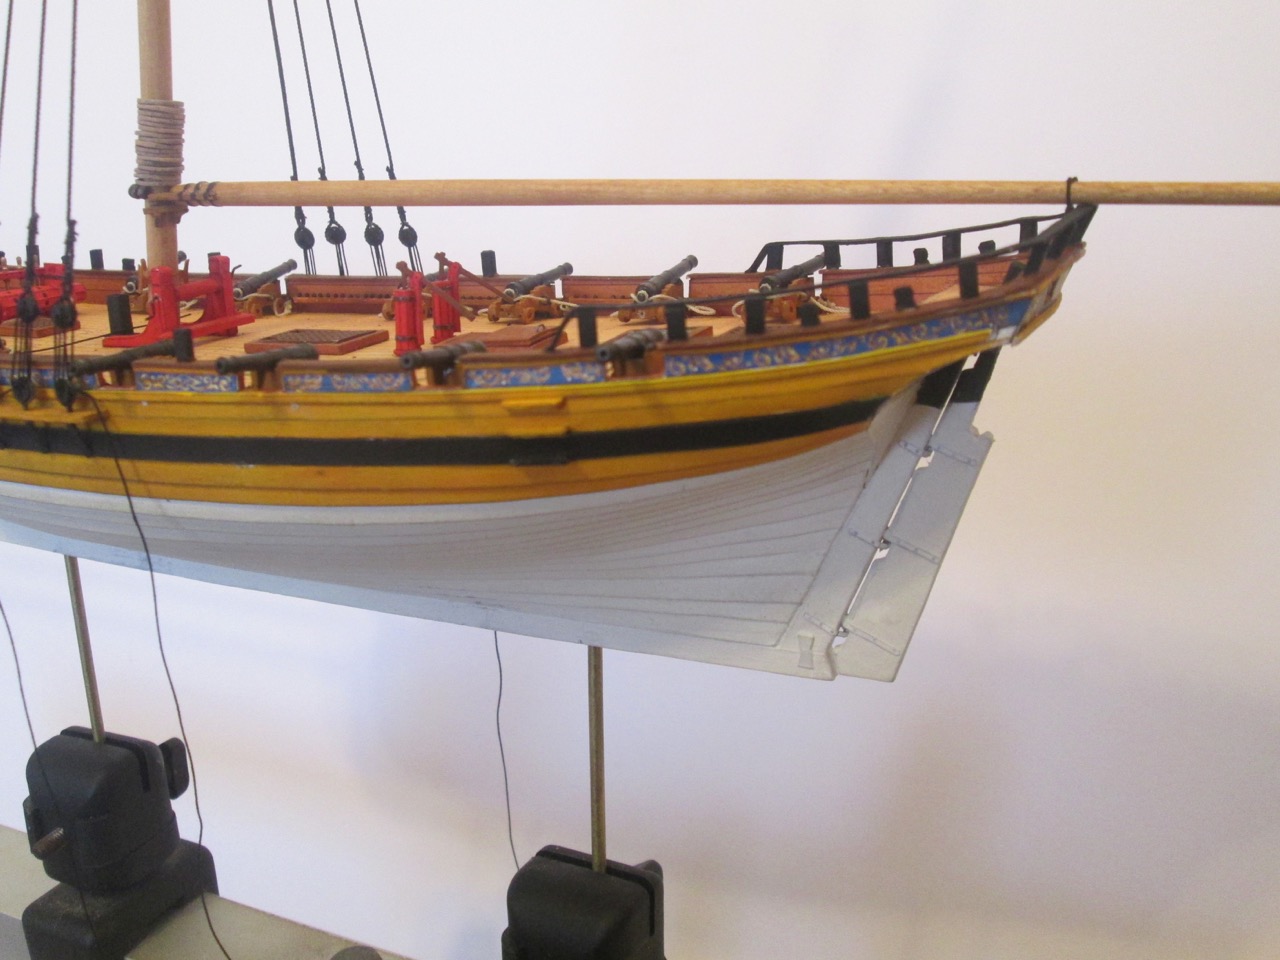
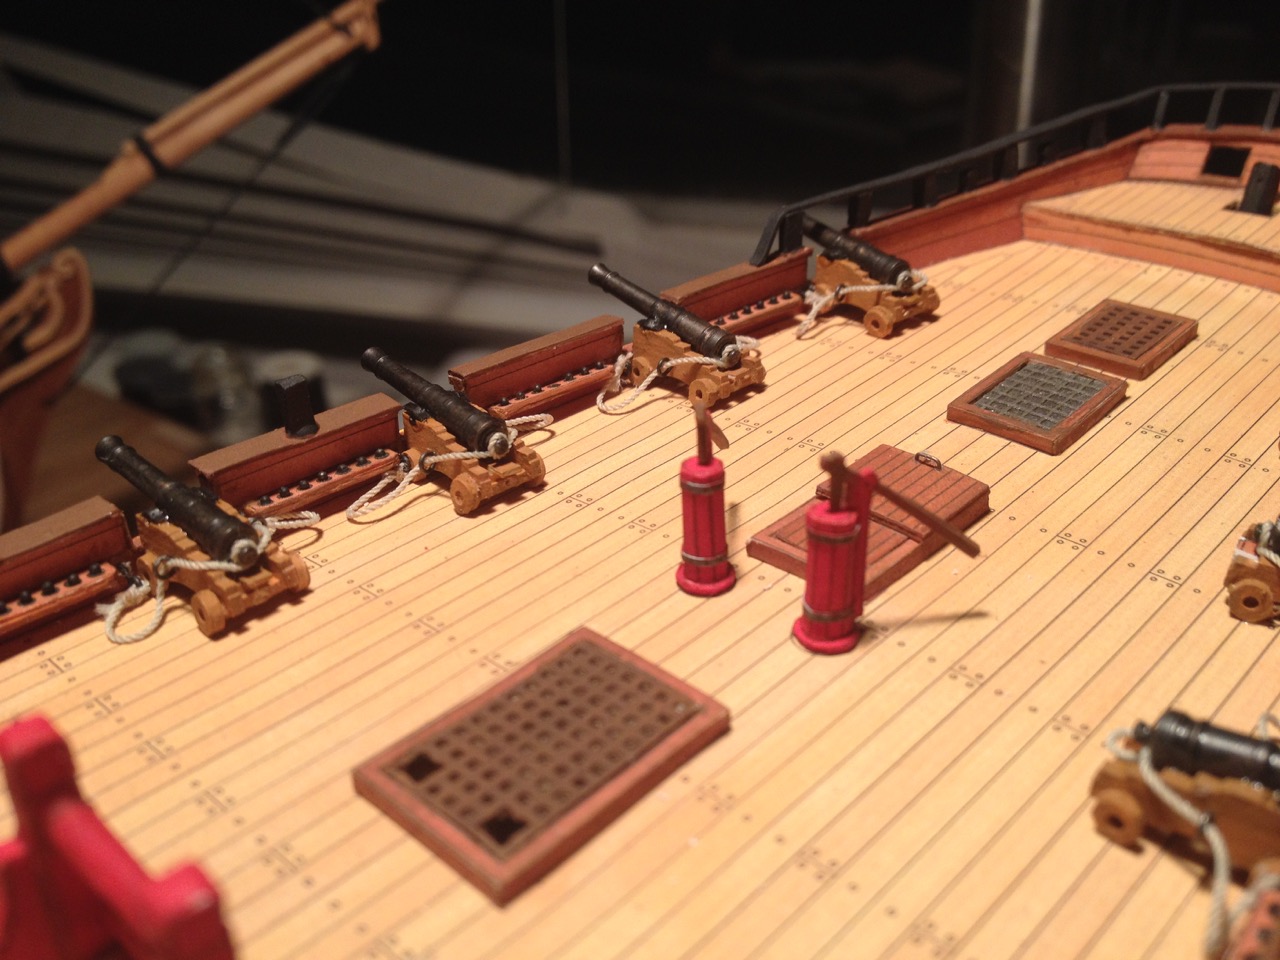
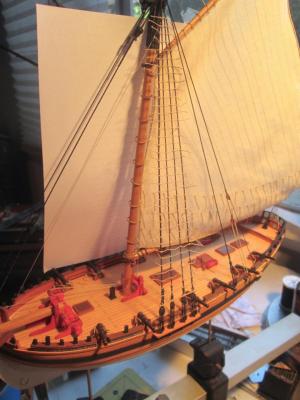
Thanks for the kind words Ron! Well, small update here... I've been trying to wrap up one project and put some time into a big project – can't get very far on large 3-masted ships if you don't put in the hours! But, a friend of mine is interested in the Alert model, and I'm really not that far from the end since the rig is so simple. So, I thought I'd make a little progress by installing the carriage guns. I've had the guns done for some time now, but fitting them into place along with their breech ropes means drilling small holes in paper, gluing eyebolts into place in very small places, etc. I epoxied pins on the underside of the guns to help position and secure them to the deck. Holes were drilled at each of the gunport openings as well as at either side of the gunports. I'd already secured eyebolts to the ends of the breech ropes, so now they just had to be trimmed and glued into place. I used gap-filling CA for this. I found that I didn't have enough room to glue the eyebolts to the bulwarks with the cannon in place, so I let the cannons flop around while I installed the breech rope eyebolts. When these were dry, I mixed up some epoxy and glued the cannons down to the deck. The pins, even epoxied, didn't hold the guns securely in all cases. So, on some guns, I put a little glue underneath, close to the rear axles. Definitely tricky trying not to spoil the appearance of the printed paper deck. I manage to get a small shiny spot on the deck from glue. I ended up having to give a shot of Testor's Flat Lacquer Clear Coat, which worked extremely well hiding the shiny spot. Clare


- 121 replies
-
- 19
-
-
jbford, what is it that you are building that you don't think is good enough for nice quality rigging line? You will definitely find that the good stuff will enhance your build and your enjoyment. Of course, if you're rigging a 3-masted ship, it might take a good supply of line. I turned my own rigging line early on, but I was never really very satisfied with what I could produce. I have given in to the wisdom of buying line from Chuck Passaro – it's really nice stuff! Clare
-
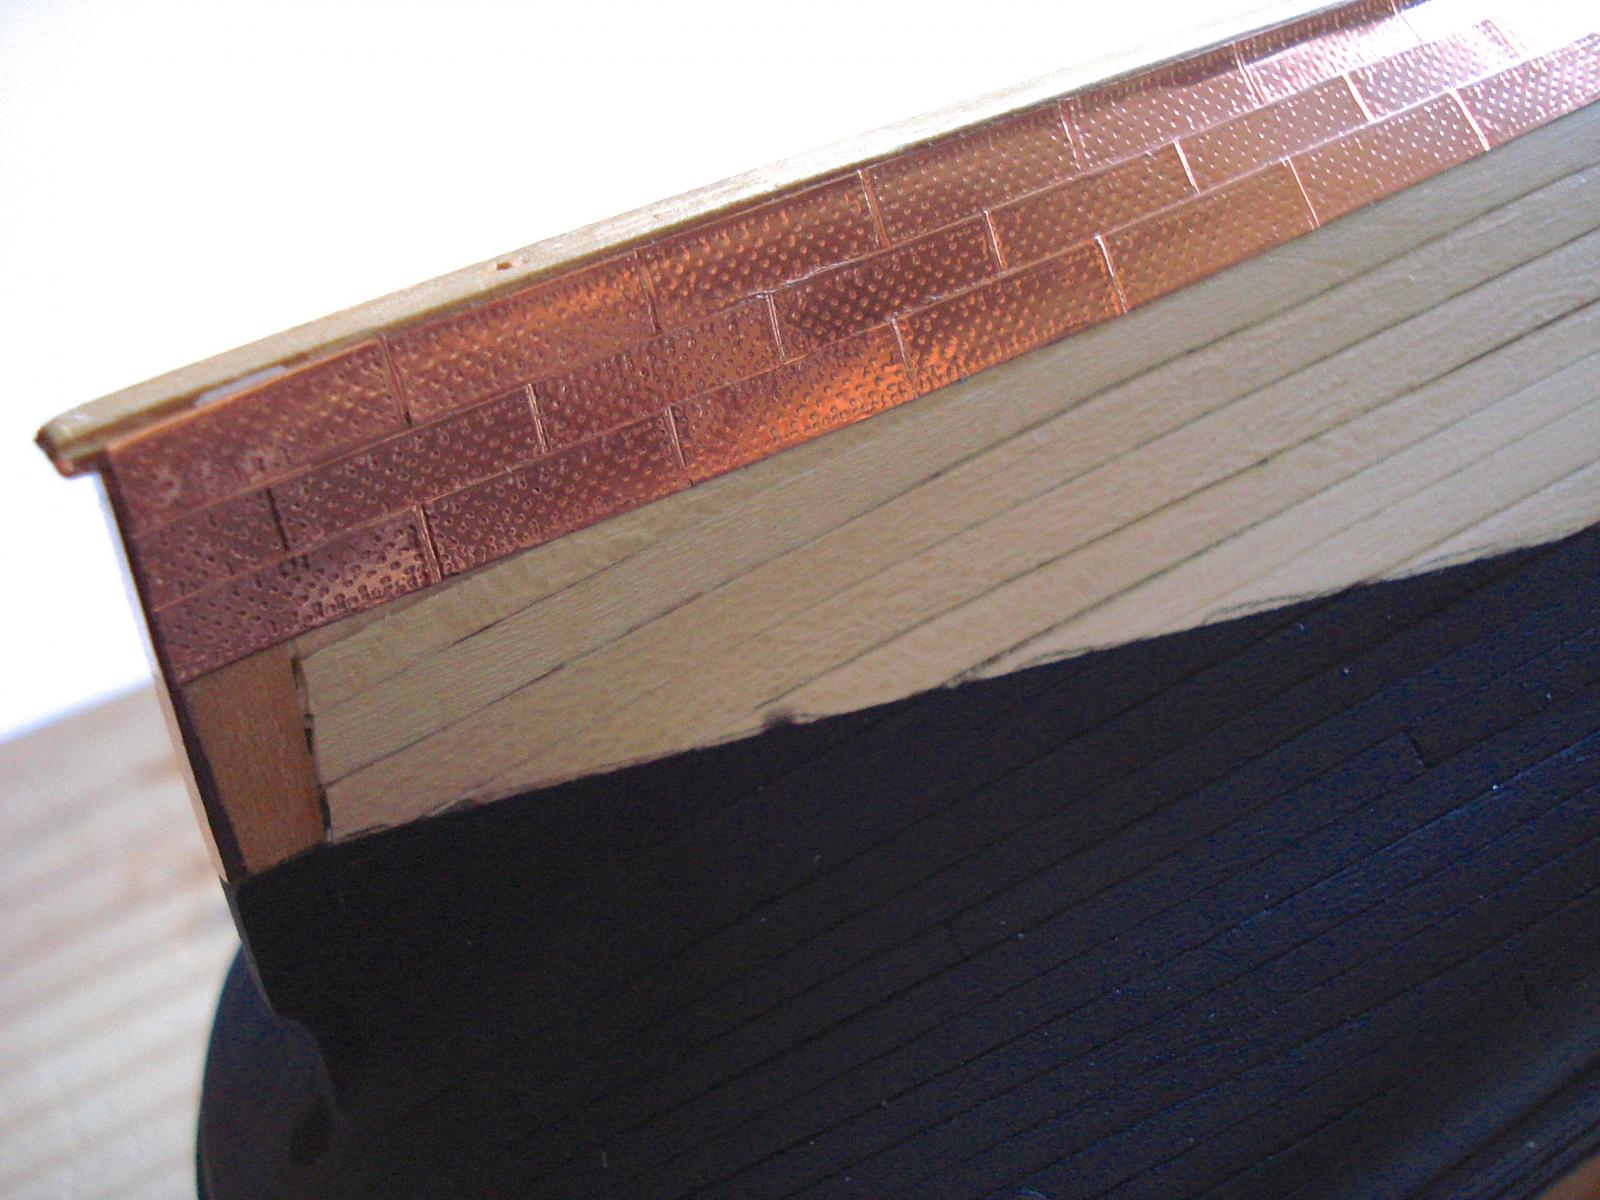
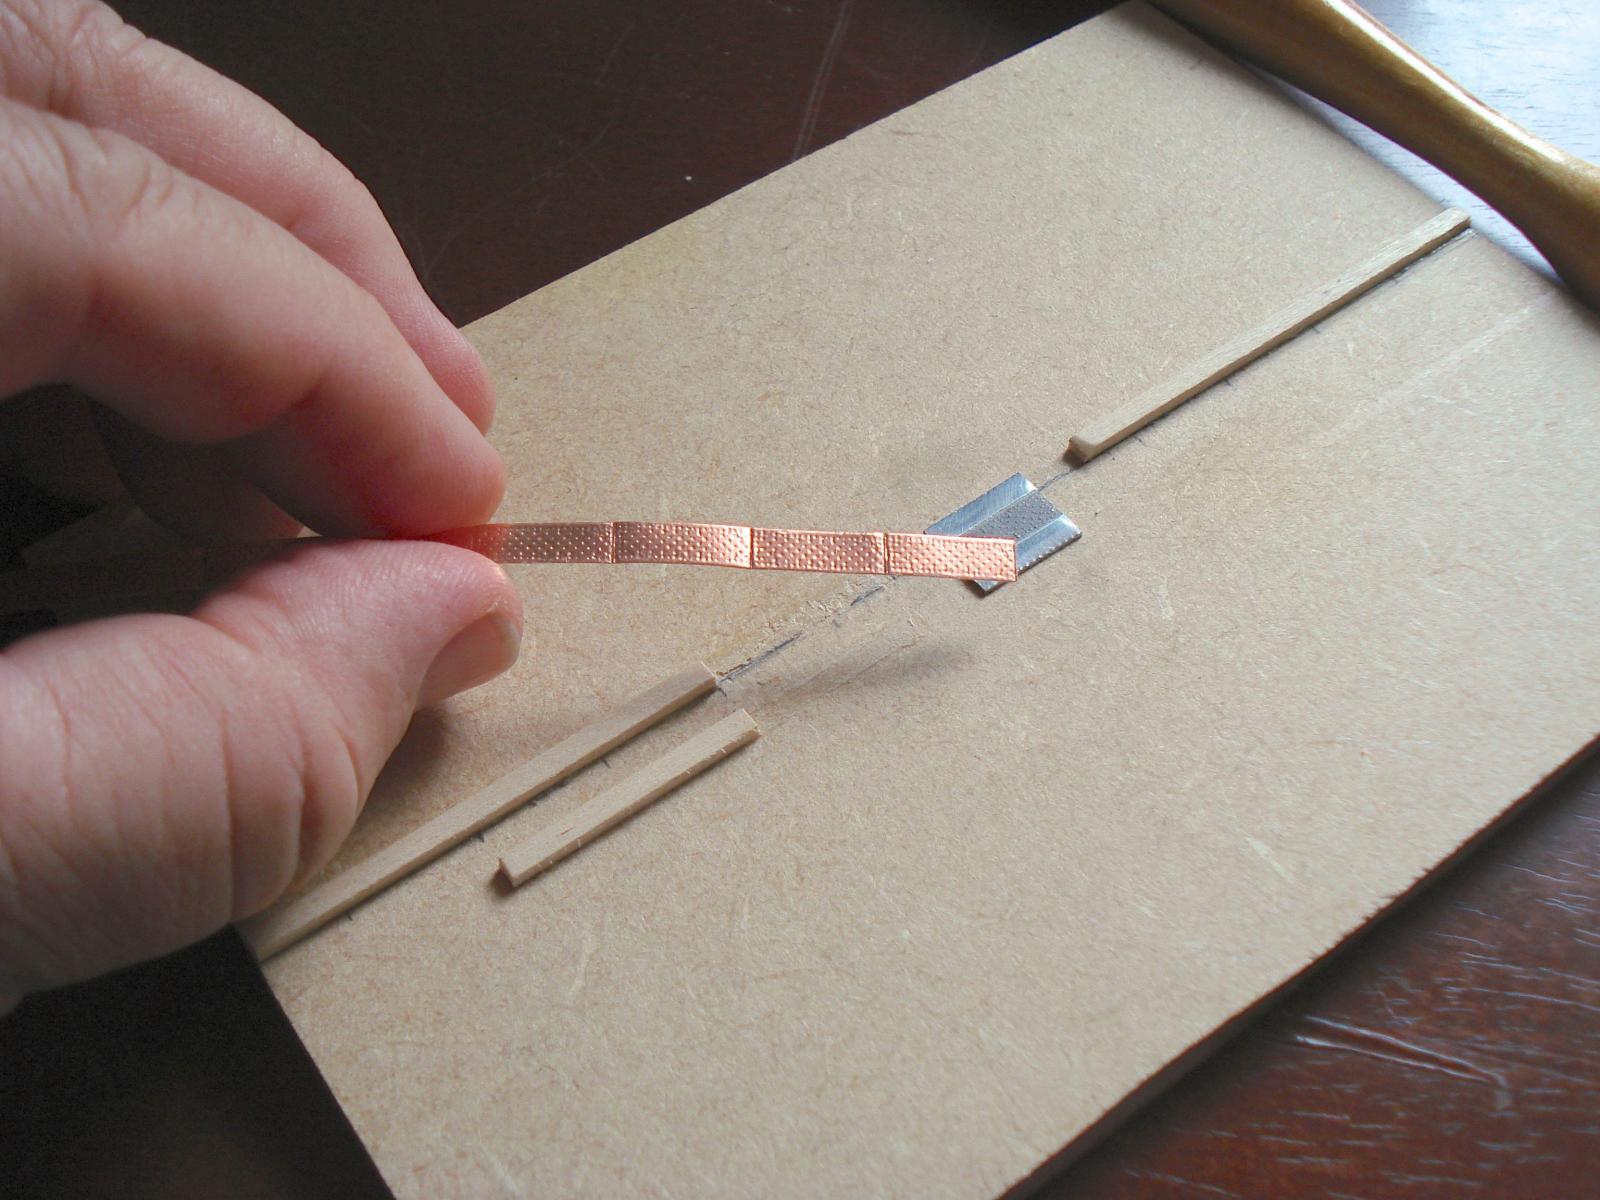
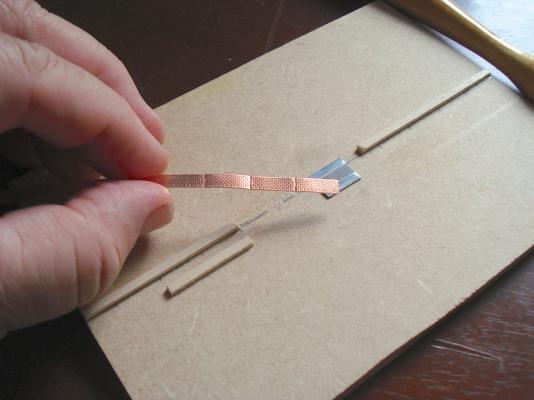
Tadeuz, There is something particularly disturbing about running across ones own photos that someone else posted without so much as an acknowledgement. Worse yet, it's mixed in with copper plates from kits! These copper plates are made from tape that I embossed using a die a created. Shown below (and the earlier post above), is the hull of my scratch built U.S.S. Saginaw hull) I gave up on all manufactured copper plates 20 years ago as none of them are realistic - all are way out of scale. The closest I've seen to looking correct are the ones that BlueJacket makes, but they are REALLY expensive. Unfortunately, I like the look of a coppered hull, so I've had to work on improving mine ever since my first wooden ship model, the pilot boat Phantom, with its coppered hull. However, I haven't gotten a European nail pattern down yet. That's coming up soon. But, I've always liked using copper tape. It's available in a wide variety of sizes – not just the couple sizes regularly sold by ship modeling sites. It's also very thin and can be overlapped the way actual copper plates were applied and not unrealistically butted together. They're also much cheaper than pre-fab plates of any manufacturer, and are copper all the way through. Clare

-
Hi Dave, Congrats on starting your build and build log here! In reality, my model's scale is somewhere in between 1:40 and 1:48. It's so close in design to being a kit of the Halifax, that I've been using elements of that ship to build this model. There's actually a lot of "fudge factor" in my model! Also, I actually used plain pear wood, not swiss pear. I got some from The Lumberyard that was very dark in color. I bought more in sheet and rough cut form and think I must have gotten the last of the dark pear wood supply. I've seen other models that used pear wood (again, not swiss pear) and it was much lighter. In any case, I'm really looking forward to watching your progress. Clare
-
Hi Andy, Looks like you don't have many options there. I agree with your original thoughts. Don't look at the bulkheads, just lay your center plans between the center of stem and center of transom. You're deck will be wider to one side, but only slightly. It won't be noticeable unless you're looking really closely. Only problem I can see is that you're masts will be slightly off center too. Shrouds on one side will be slightly longer than on the other. But, looks like you're only talking about 1/8", so you should be fine. The photo of your model from the side looks great, by the way. Clare
-
Thank you Phil and David, for the nice comments. Sorry I haven't posted in a while. I had reason to work on some other things. One of those is a big project that is close to completion and then I have someone who wants the Alert and would like it in the next few months. So, I'll press ahead. Hopefully, the end of the build will go as well as the start of it. But, I have no experience rigging a paper model. The masts and yards are all wood, so that's no problem. However, I sense the need to be particularly careful about the shrouds, deadeyes and chainplates. I'm actually wondering if I can work out a way to set the upper deadeyes, then rig the ratlines off the model. In theory, if I could set up a stand that holds the mast and a set of lower deadeyes in the exact position, everything should work out. No? Now, one thing that happened recently is that I can't get any more of the pear wood blocks I bought from Syren Ship Model Company. I probably have enough for this rig. But, I've been thinking about switching to paper blocks anyway. It IS a paper model, after all. I've only rigged a few blocks, so those should be easy enough to replace. Hope it all looks good! Clare
-
molding casting metal
catopower replied to michael101's topic in Metal Work, Soldering and Metal Fittings
Hi Michael, For metal casting, I like the 10 to 1 RTV silicone rubber that Micromark sells. It can take up to 600˚ F or about 450˚ sustained.I tried using stuff from TAP Plastics, which works, but it's thicker and harder to work with I think. I started casting Britannia Pewter, but the melt temperatures are high and so I started using a Tin/Bismuth alloy. I recommend staying away from lead. Rotometals.com has a whole range of low melt alloys and their prices are much better than buying them from Micromark. Personally, I enjoyed learning the new skill. Clare -
Funny, but I ran into the same question today... I'm working on a 1770s colonial schooner with windlass. I just got the line for the anchor cables in the mail today and went to mount them. Then, I realized I wasn't sure which way to run them. I was trying to look at photos of Harold Hahn's work, but, dare I say, I think he might have it wrong. It's actually kind of hard to say as the photos I have don't show the windlass very clearly. Most photos are about the general structure of his models, not on the rigging details. But, I think he has the anchor cable coming off the bottom of the windlass and backwards from the way Harland describes in his book. So, SOS, I think you're right. In Harland's book on page 263, bottom of first column, he writes "The cable was taken three times around the barrel, the turns coming off the top, the inboard part being kept to the outer end, to facilitate fleeting the turns." Clare
-
Hi Phil, There are probably plenty of people on MSW who can chime in with better answers than mine. You're right in the Bluenose II being a wooden hull ship. In fact, I don't think I've ever built a wooden model of a steel hull ship. Well, at least until Sir Winston Churchill. So, I've never had to worry about trying to get rid of wood grain or planking outlines. For my Woody Joe Sir Winston Churchill model, I've been using plain old Elmer's wood filler on the hull. Regular sanding sealer can be applied after filling. In fact, it seems to harden the filler a bit, which is otherwise pretty soft. I'm not sure what to do about an undercoat prior to painting yet. I haven't gotten there, but will have to figure that out pretty soon. I saw on another thread where someone recommended using a coat of Future on the hull to get a smooth finish. I've never tried that though, so I can't say that it works well or not. Clare
-
Hi Phil, Nice progress on your SWC. I always liked the Billing Boat series of kits that has you build the hull in halves. I built their Bluenose II kit that way and it all went together quite nicely. I recently received the update Woody Joe kit (Japanese manufacturer) of the Sir Winston Churchill which is the exact same scale as the Billing Boats kit. Your blog and the posts by various people here are very helpful. There are some details that seem a little simplified in the Woody Joe kit, so I've been scouring the Internet and calling on various resources. I didn't see anyone mention this here yet, but there are some neat short videos about the ship on Youtube. This one seems to be a spliced together compilation of them: If you can put up with the use of the Wagner music in a couple spots, most of it is actually well narrated. I've had a hard time finding good reference photos, so this video turned out to be a godsend for me. Clare
-
Hello "The Old Man", Birch plywood is fine for bulkheads and strong back. Just get stuff that's flat as others have said. Aircraft grade is nicer to work with, but in the end, what you're using should be just as good. I'd suggest using something nicer for the actual visible keel, stem and sternpost though. I like to use boxwood for those, even with kits. I've cut off the existing stem and keel of those "all in one" keel/strong back pieces and replace them with boxwood (or pear wood) pieces, built up as with the real ships and nobody can tell the inside is just plywood. Using nice wood for those visible areas will avoid bad looking edges and the wood discoloration you're getting, and would allow you to leave the visible wood natural if you like. Clare
-
A fine finish to your beautiful build, Bob! You should send your photos to Woody Joe. They would love to see it too. Clare
- 196 replies
-
- 4
-
-
- higaki kaisen
- woody joe
- (and 1 more)
-
Hello Bensid54, Looking very good. Nice job on the hull planking. Hard to see the deck in those photos, but the timberheads and all look great. Clare