divarty
-
Posts
130 -
Joined
-
Last visited
Content Type
Profiles
Forums
Gallery
Events
Everything posted by divarty
-
 Just found your posting, absolutely beautiful work, thanks for sharing.
- 803 replies
-
- 2
-

-
- colonial cutter
- modellers shipyard
- (and 1 more)
-
Great work, that's the next boat on my shelf to build and I'm really looking forward to it, even more so now that I have seen your end product.
-
Beautiful work.
-
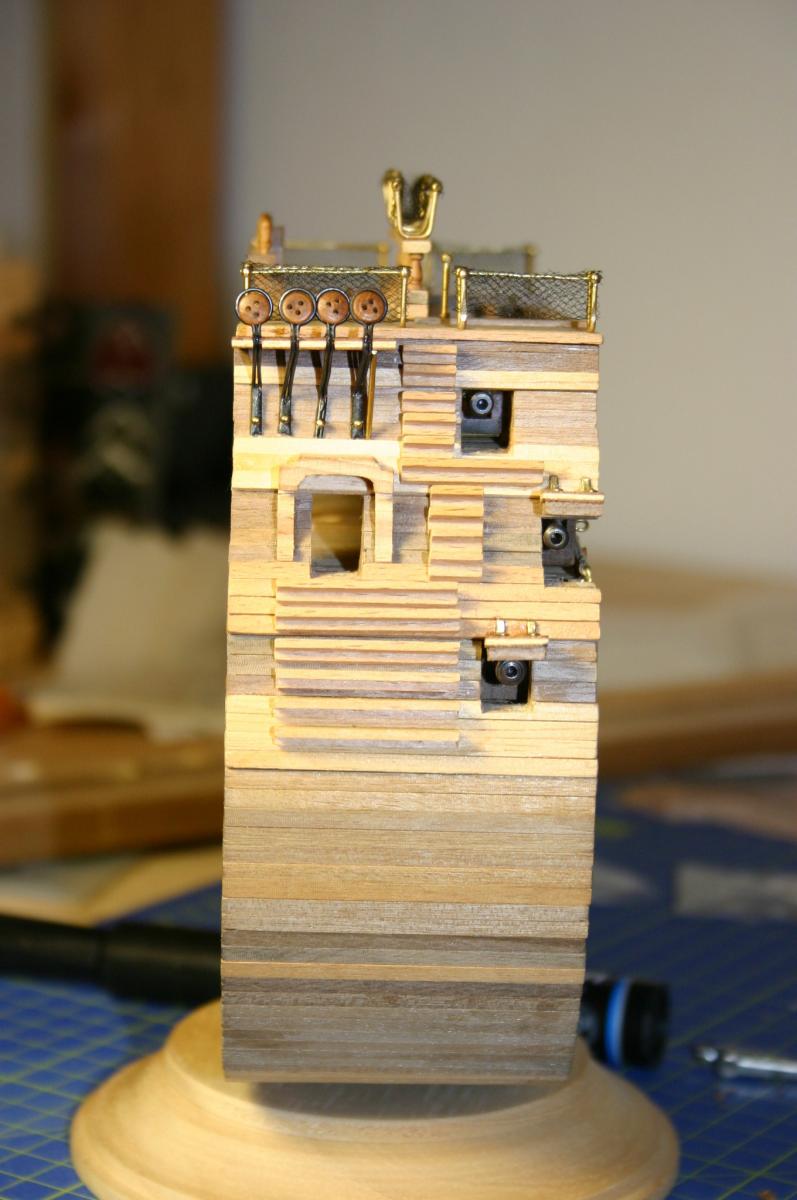
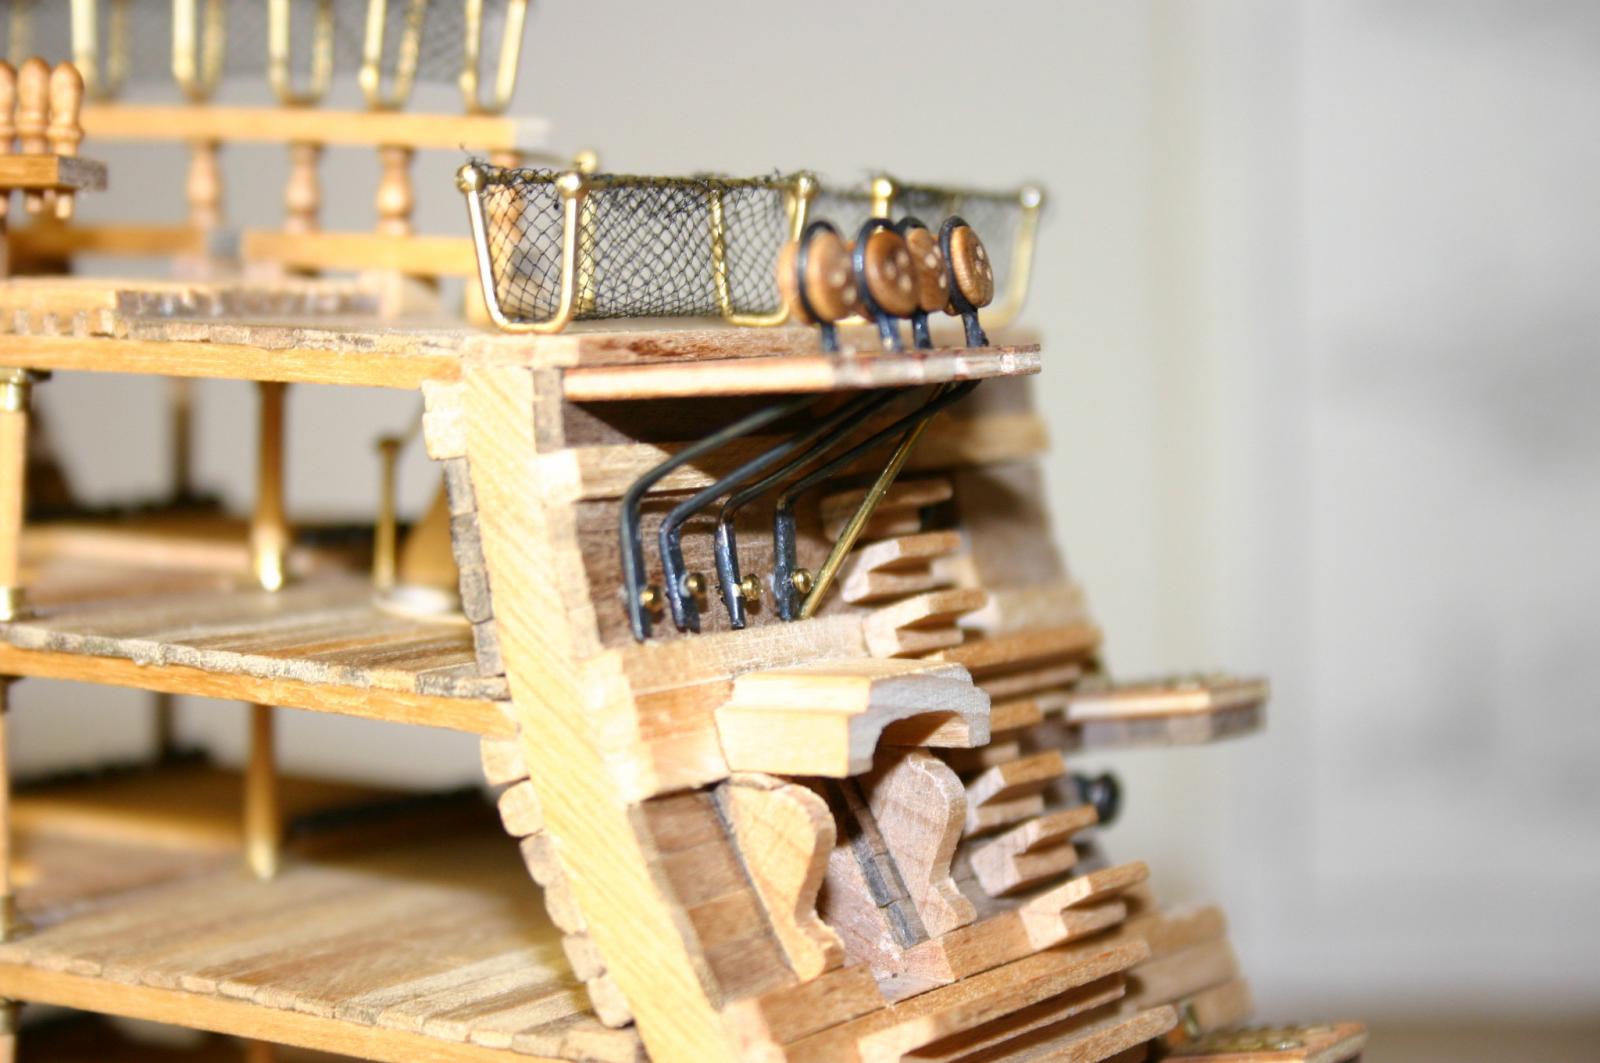
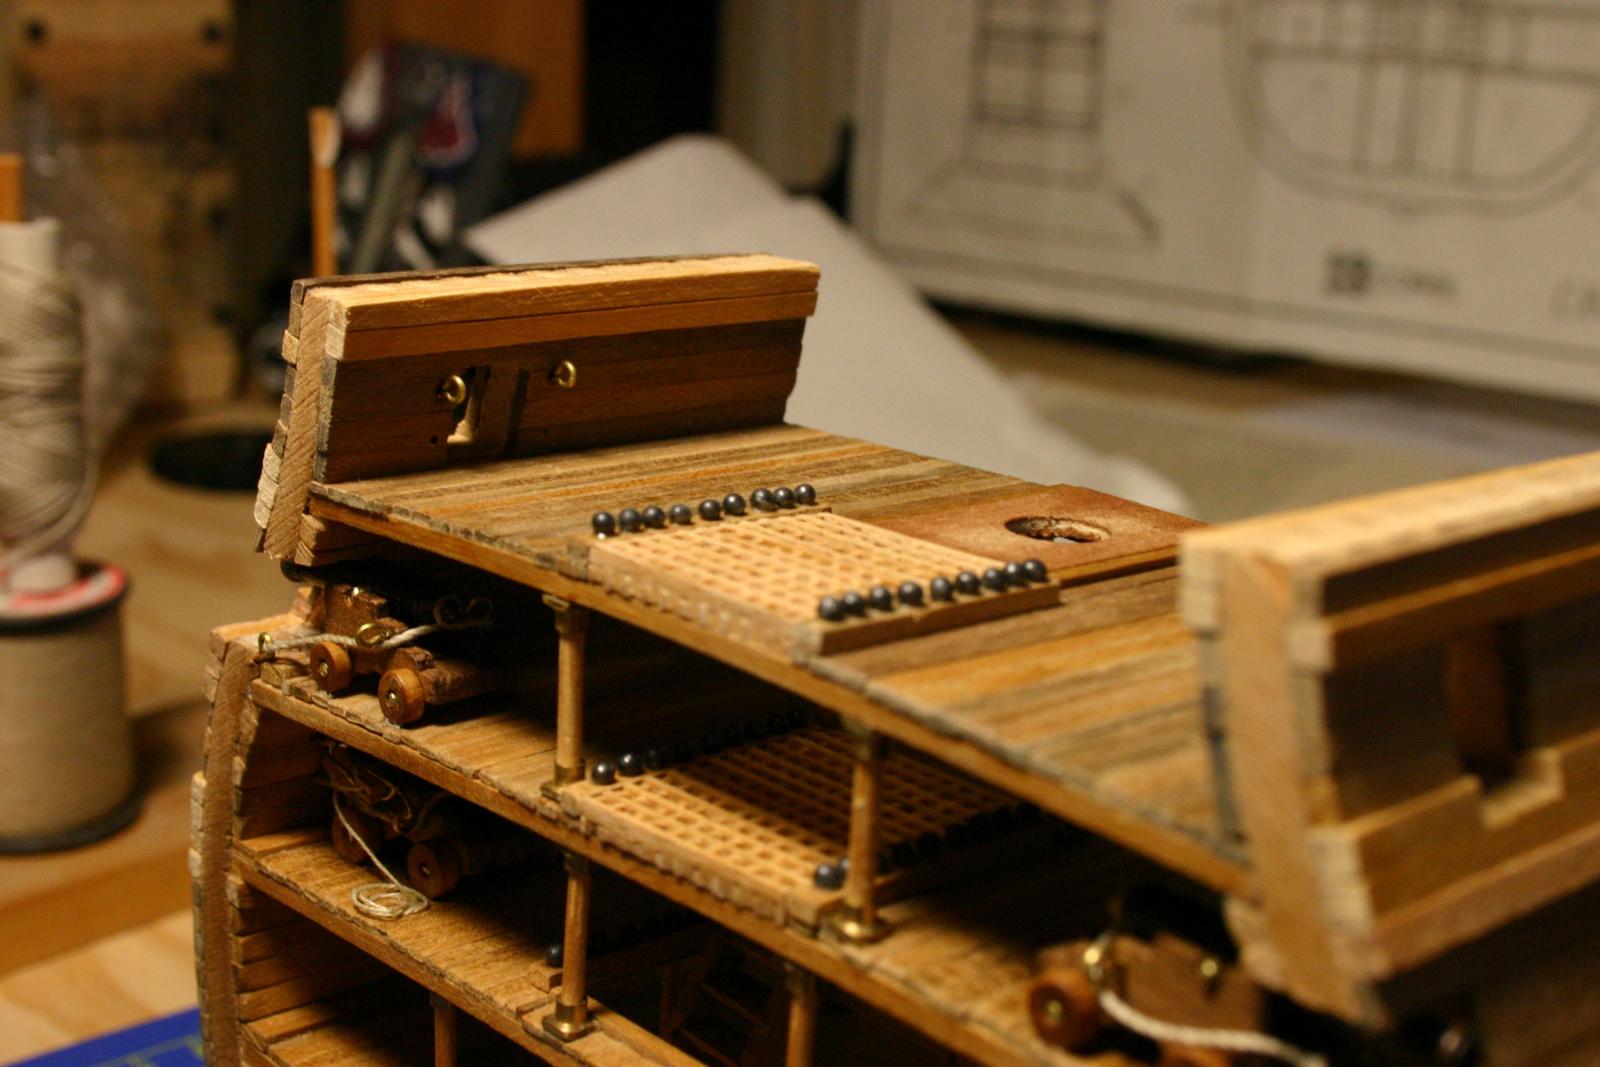
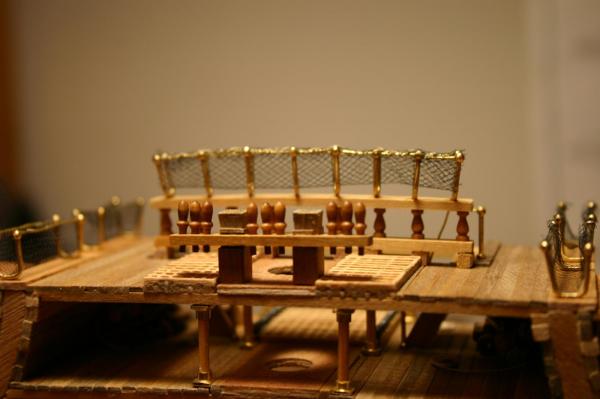
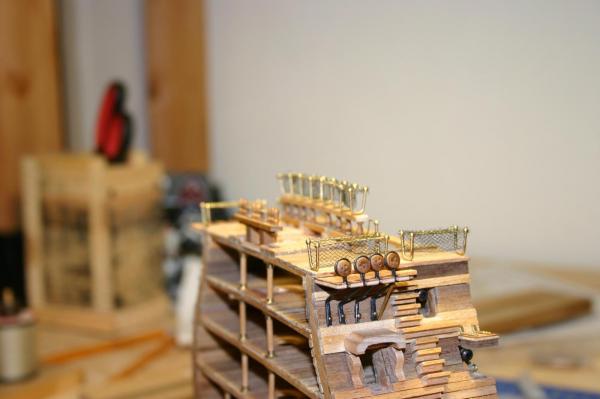
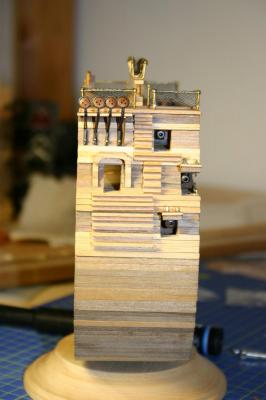
View of the top deck with hammock netting and the belaying pin rack. Chainstays and deadeyes Side view of the overall Close up of the chainstays and deadeyes The chain stays were a pain to put in, hopefully they look ok. The hammock netting went through a couple of iterations to get right, I think the best way to do it is put the netting in, weight it down then with the overlap on the top use a needle and thread to cinch it tight. Using CA was so so.

-
Man I am so sorry that work and travel have pulled me away from my build for this long. To answer some of the questions above (hopefully it's not too late). Snedley when I say detail work I mean the guns with the rigging tackle, once you have the decks built up it becomes much harder to get nice coils of rope and to put in the eyebolts that the tackle connects to. Given a chance to redo I would build up to the first deck with guns, put in my eyebolts, tackles, guns etc then build the next deck over it and repeat until I was at the top. I don't plan on coppering the hull, I'm enough of a novice with this that I decided to not vary from the instructions too much
-
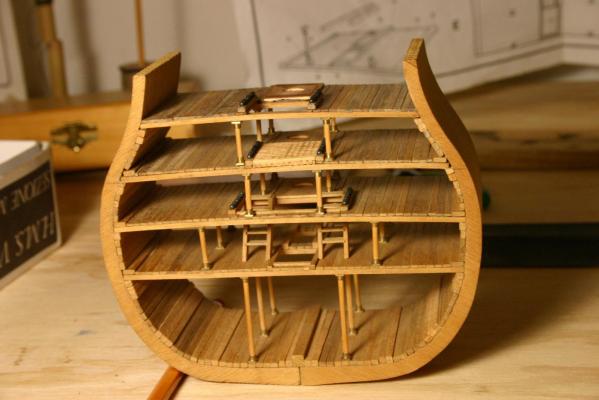
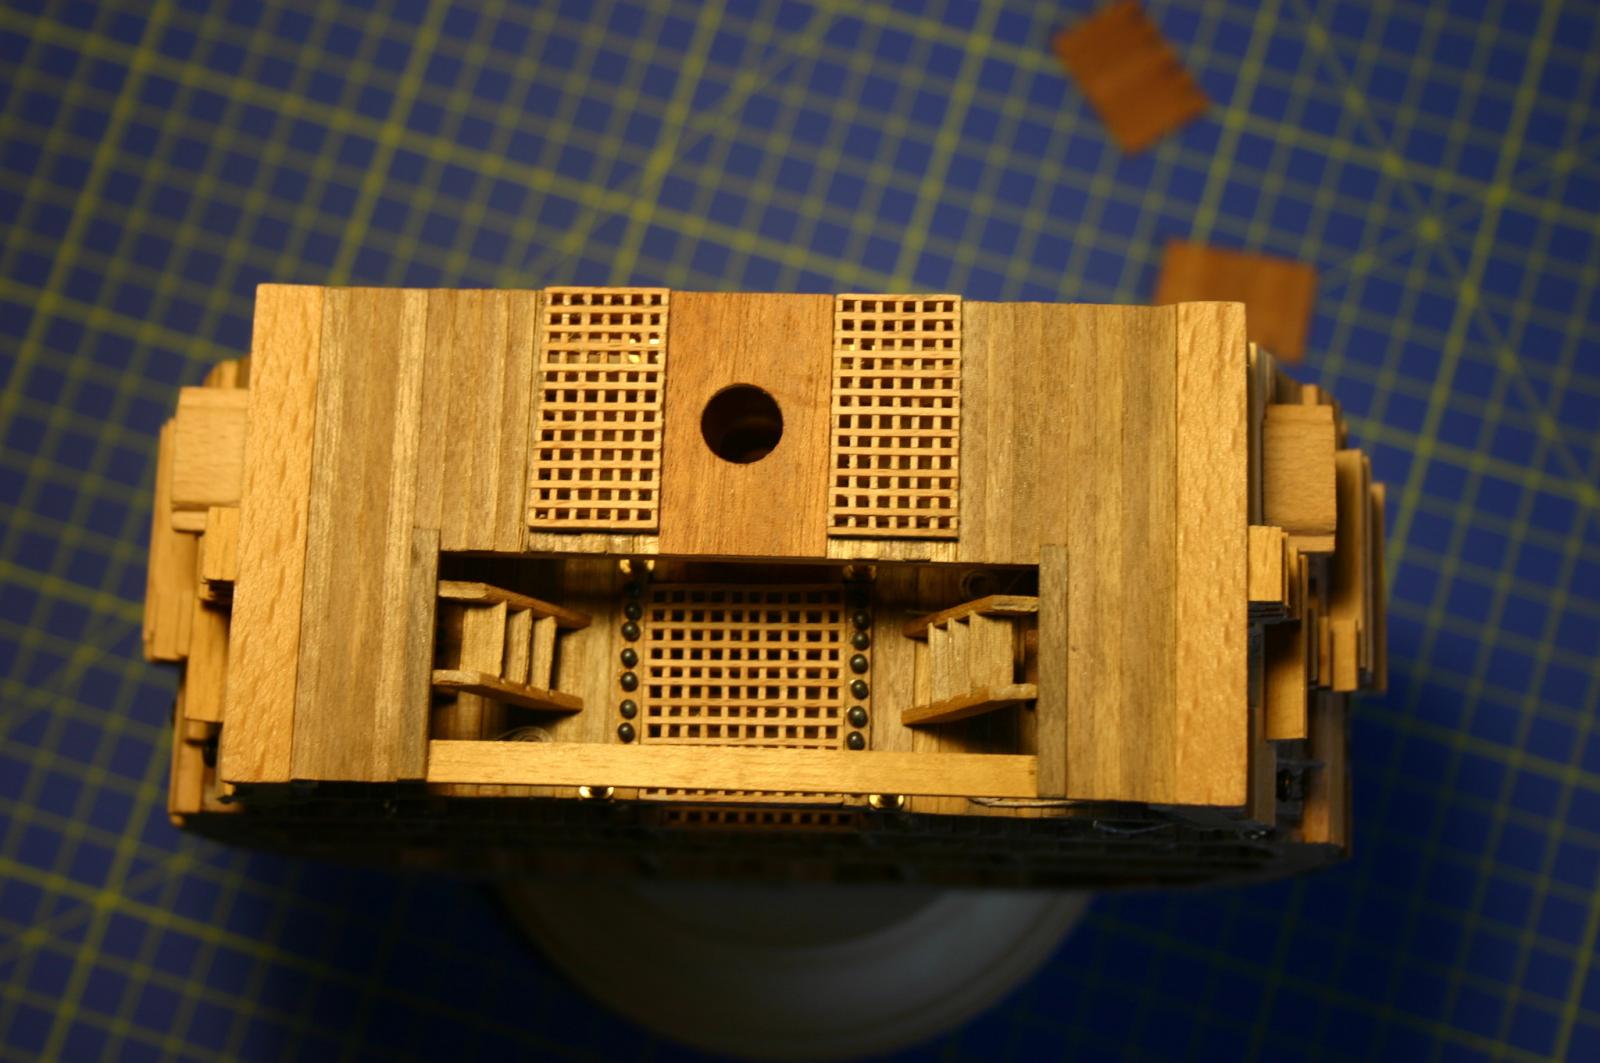
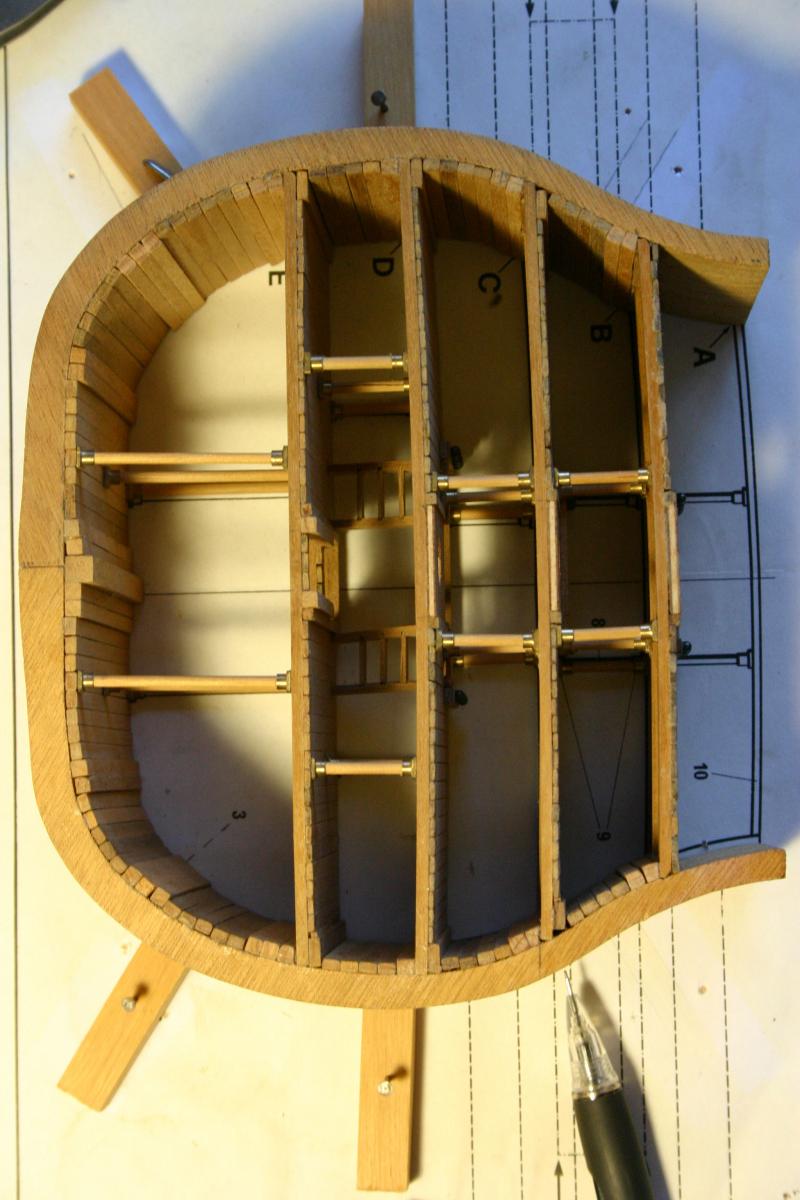
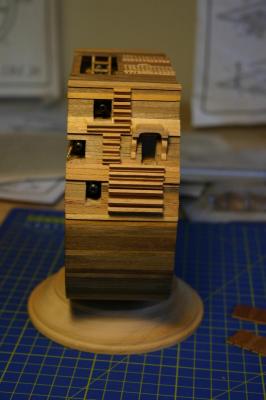
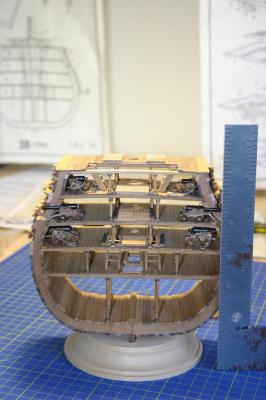
More progress has been made in the shipyard. I finished laying the upperdeck with gratings, the ladders to the quarterdeck and the steps up the side along with the cover over the entrance. I also decided it was time to mount the model to the supplied base as it's getting to the point where I need the model upright more often then laying on it's side. Looking down at the top deck you can see some of it isn't alligned quite right, I blame the fact that my eye is crooked but the bits that are off aren't too horrible. I also didn't add a bulkhead on the top deck even though it should have one but I decided I'm already challenged enough by this kit without going totally off the reservation. Two side shots to show the stairs and base. I looked at Antony's build to see how the stairs should be laid in and realized I was off enough from his build that I couldn't exactly replicate it so I SWAG'ed it. Not historically accurate I'm sure. And a full front shot with a ruler to give some scale


-
Still working on the top deck, no pictures to present yet. It's been slower because the main deck has so many details on it that it's been difficult to wrap my head around. One of the questions that I'm unsure of is how to make up the hammock nettings on the top deck? I see others have included it on their builds but I don't know where they got the material or what it's made of. Another question that is thinking ahead just a little is how to taper my mast to fit into the hull, should the taper be even on the lower mast and the upper? What kind of tools will I need to taper it? etc. Also looking back at this point I'm seeing all the errors that have worked their way into the build, items off by mm, planks that arent quite right, support posts that aren't alligned correctly, places where I hacked in a fix to offset somethign I hadn't measured correctly. It's a little disheartening but talking to my Admiral she dosen't see the errors so hopefully it's just me being overly critical of my work.
-
Hi Sherry, I'm new to the forums and finding my way in model ships. I'll be following your log now, absolutely fantastic work, can't wait to see more, it's inspiring to a hack like myself. Welcome back and best wishes for everything non build related.
-
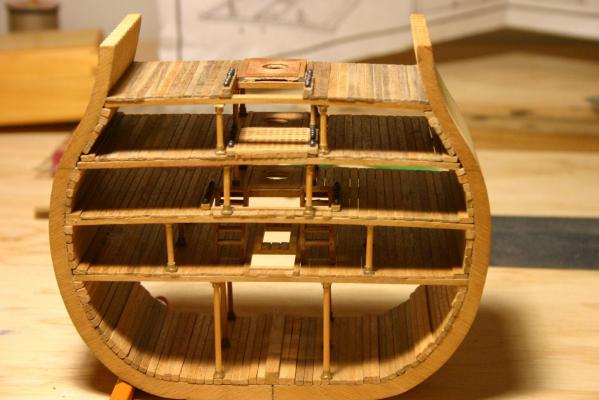
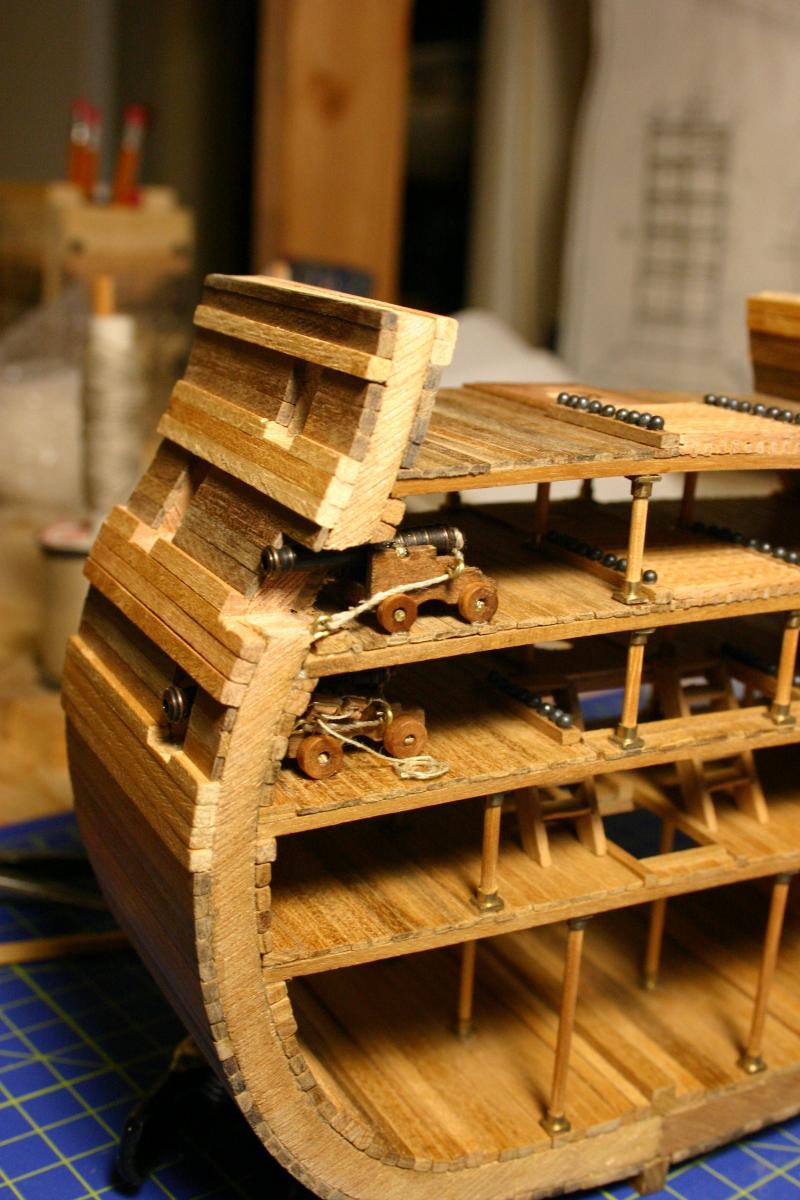
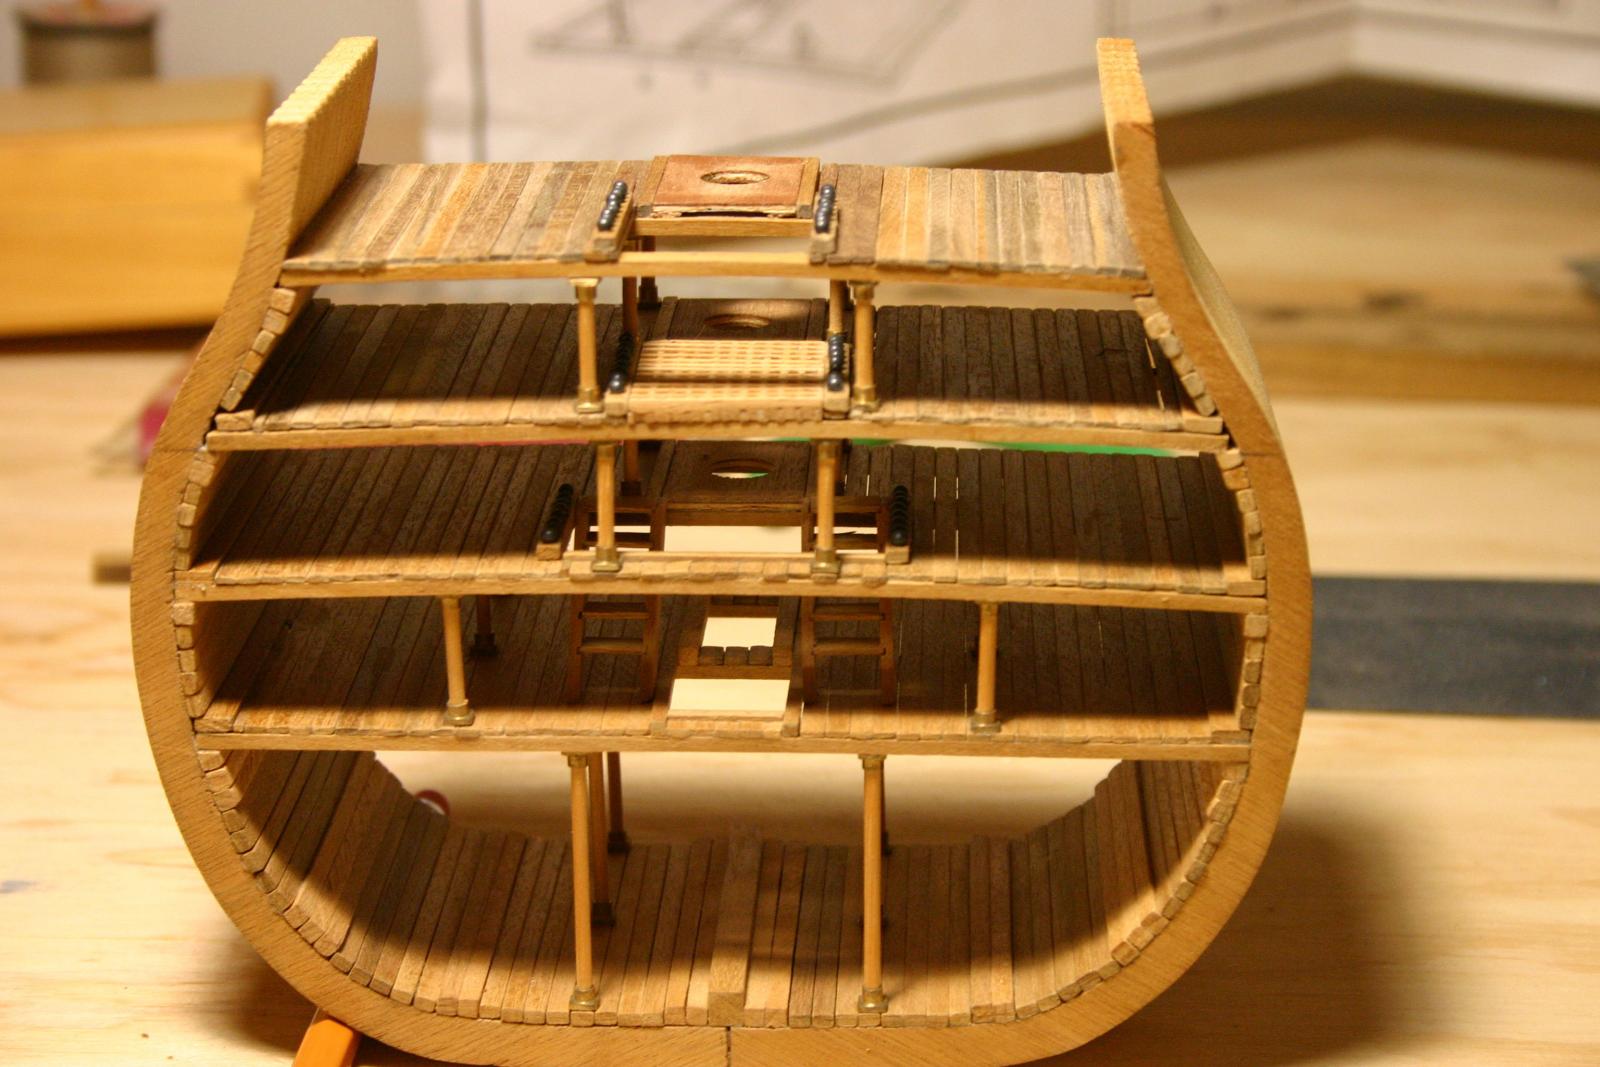
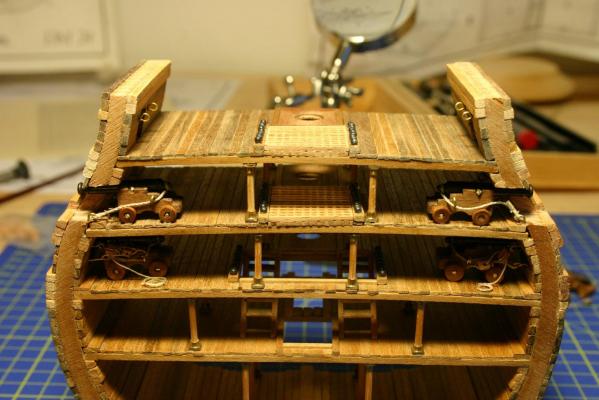
Worked on finishing up the upper gun deck, it was nice to not have to be working with a deck above already in place, it made it quite a bit easier to work. The insid of the upper gun deck after before mounting the guns. The individual guns (took two pictures on the one side to get a little better detail on the coiled ropes). The blocks seem to be too large for the guns, with the gun in battery posistion it's not as clean as i would like, but I guess it's clean enough. Stepping back a little to see how it looks altogether. And finally starting to lay the boards to build the quarter deck on. They side planks came up a little high so the floor supports needed to be cut down a about a mm on each end. It seems like I'm doing a lot of work to offset little measurement problems. I think overall it's coming together but I do wonder where I made my miscalculations that put me off by these tiny increments or if it's normal and part of building a kit where some things just don't quite match up. Anyway, enough damage done today, hopefully this week I'll get some more time to plank the quarter deck, put in the stairs and and work on the new deck furniture.
-
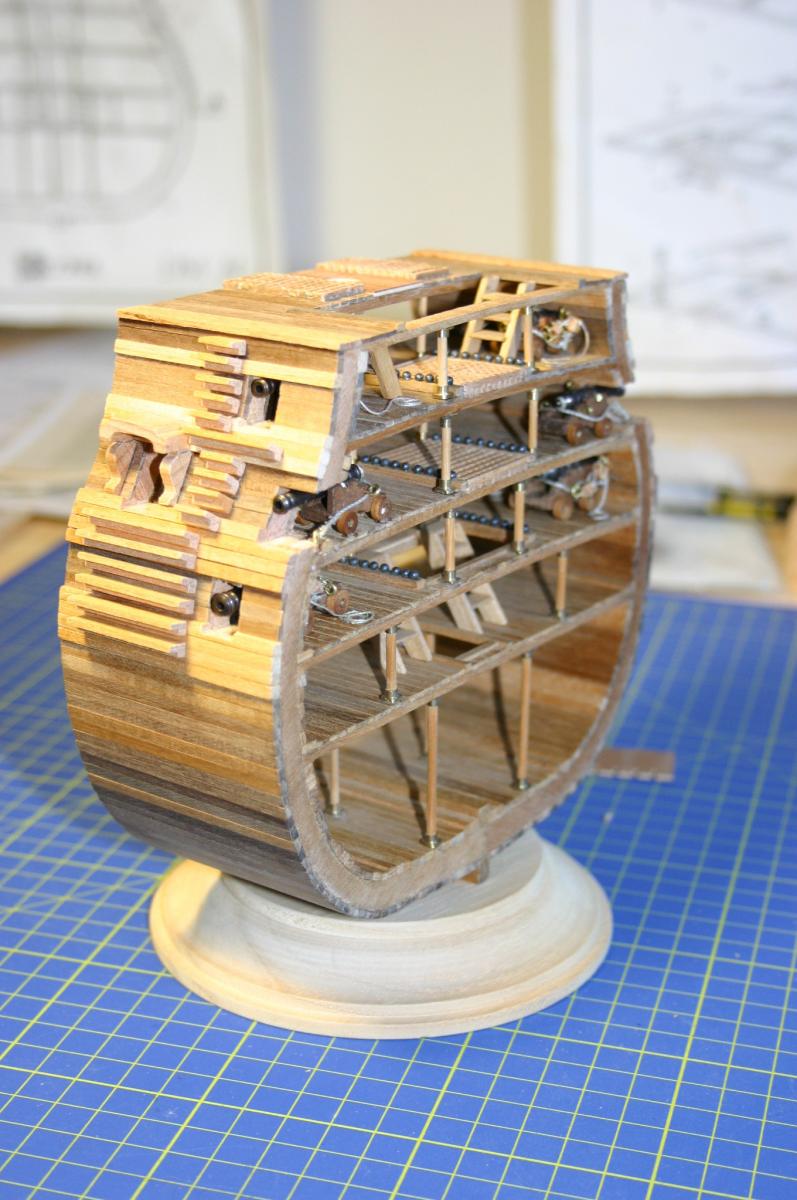
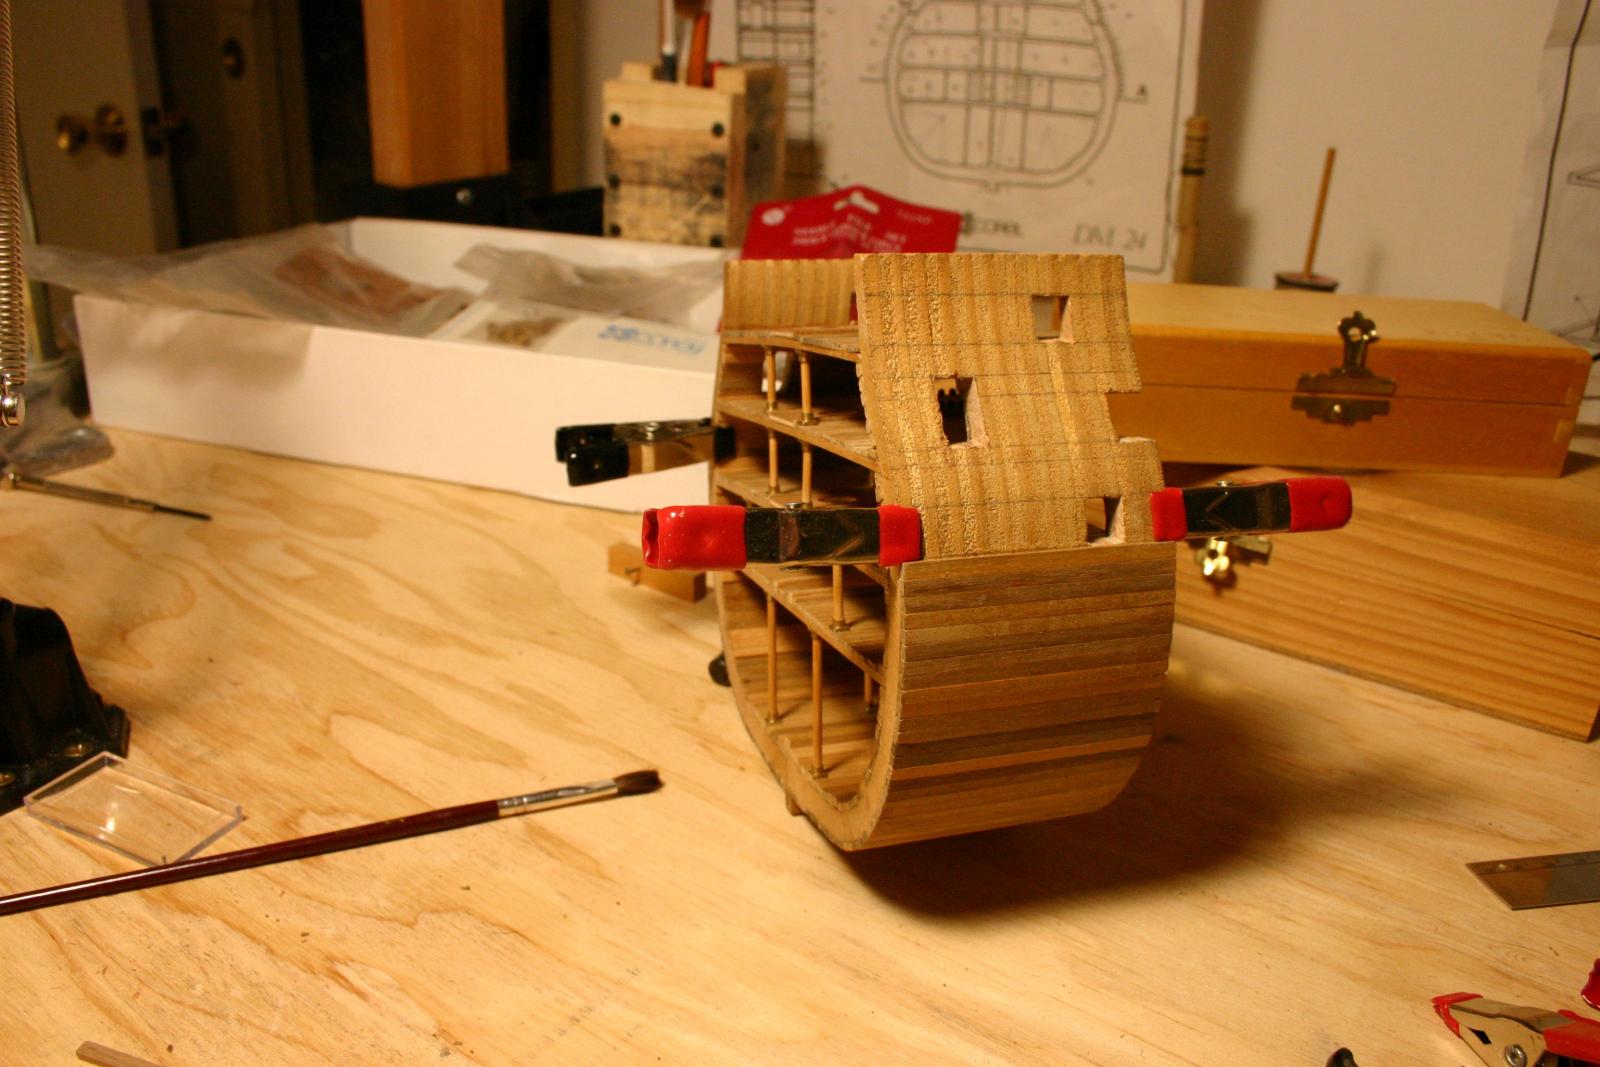
Finally got some time to work on this between work and travel for work. I was able to get the second set of guns in and plank both the internal and external hull all the way to the top. I had a ton of problems with it, the planks on the sides not being even, being short 1mm on one side and high by 2mm on the other when I finally reached the top. After some filing, adding extra planks and some artistic carving I the end result is decent if I do say so myself. Next steps will be to place the last set of guns, WOOO, the first set I can do without a deck overhead, and to build up the last deck. I also purchased some new buckets as the ones they gave me were totally out of scale. Those will be added later.


-
Will do Antony. I found your build log and the Erebus and Terror logs, very informative and helpful. I wish I had read about the gunports needing to be raised about 3mm from the kit plan markings but I guess thats part of the learning curve. As this is only my second model I certainly won't be up to your standards or E&T with the kit bashing and modifications, amazing work btw, but I hope to at least do it justice.
-
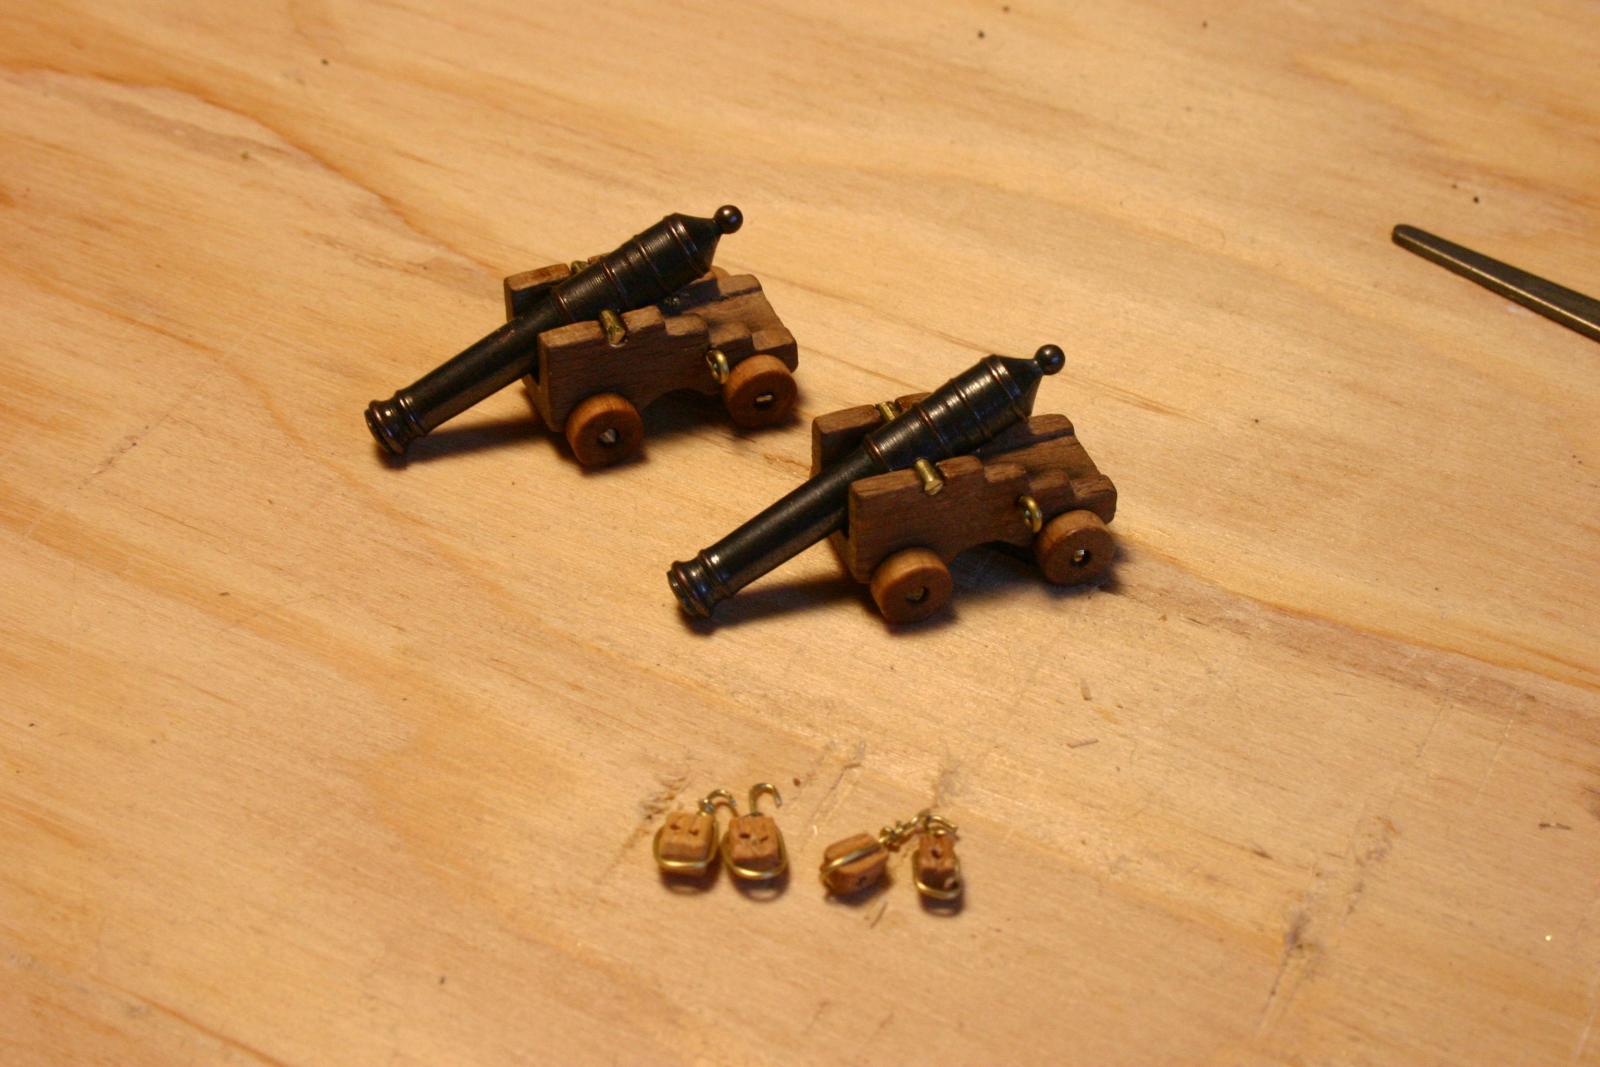
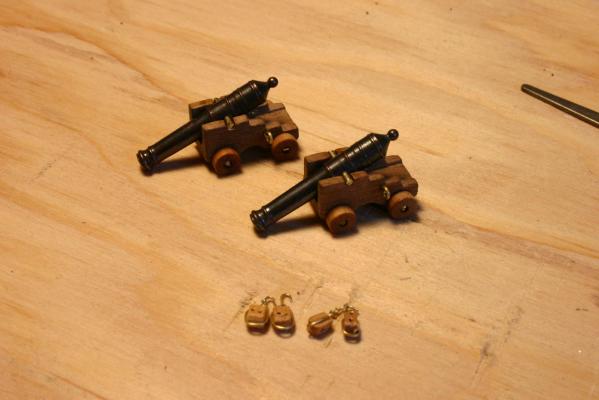
Thanks for the advice Jpett and the kind words and thanks Pygothian it's defintley a work in progress. Speaking of progress I began the planking on the hull, brough it up to just beneath my lowest gun ports and started work on the first cannons. Because I no longer had access to the inside to put in my eye bolts for the gun tackle I drilled the hole from the outside. This allowed me to put in the eyebolts and the hold on the outside will be covered when I plank over it. I did have a minor ooops, at certain points on the external planks you are supposed to swap in boxwood and I failed to do that so I ended up having to cut off a total of 7 fixed planks, file and sand the hull and put in boxwood planks. I was going to skip it when I realized my mistake but this is as much about the journey as the final product so I took the time. I worked on the cannons and had them inspected by our resident miniture cannon expert. And the final look with the cannon mounted.


-
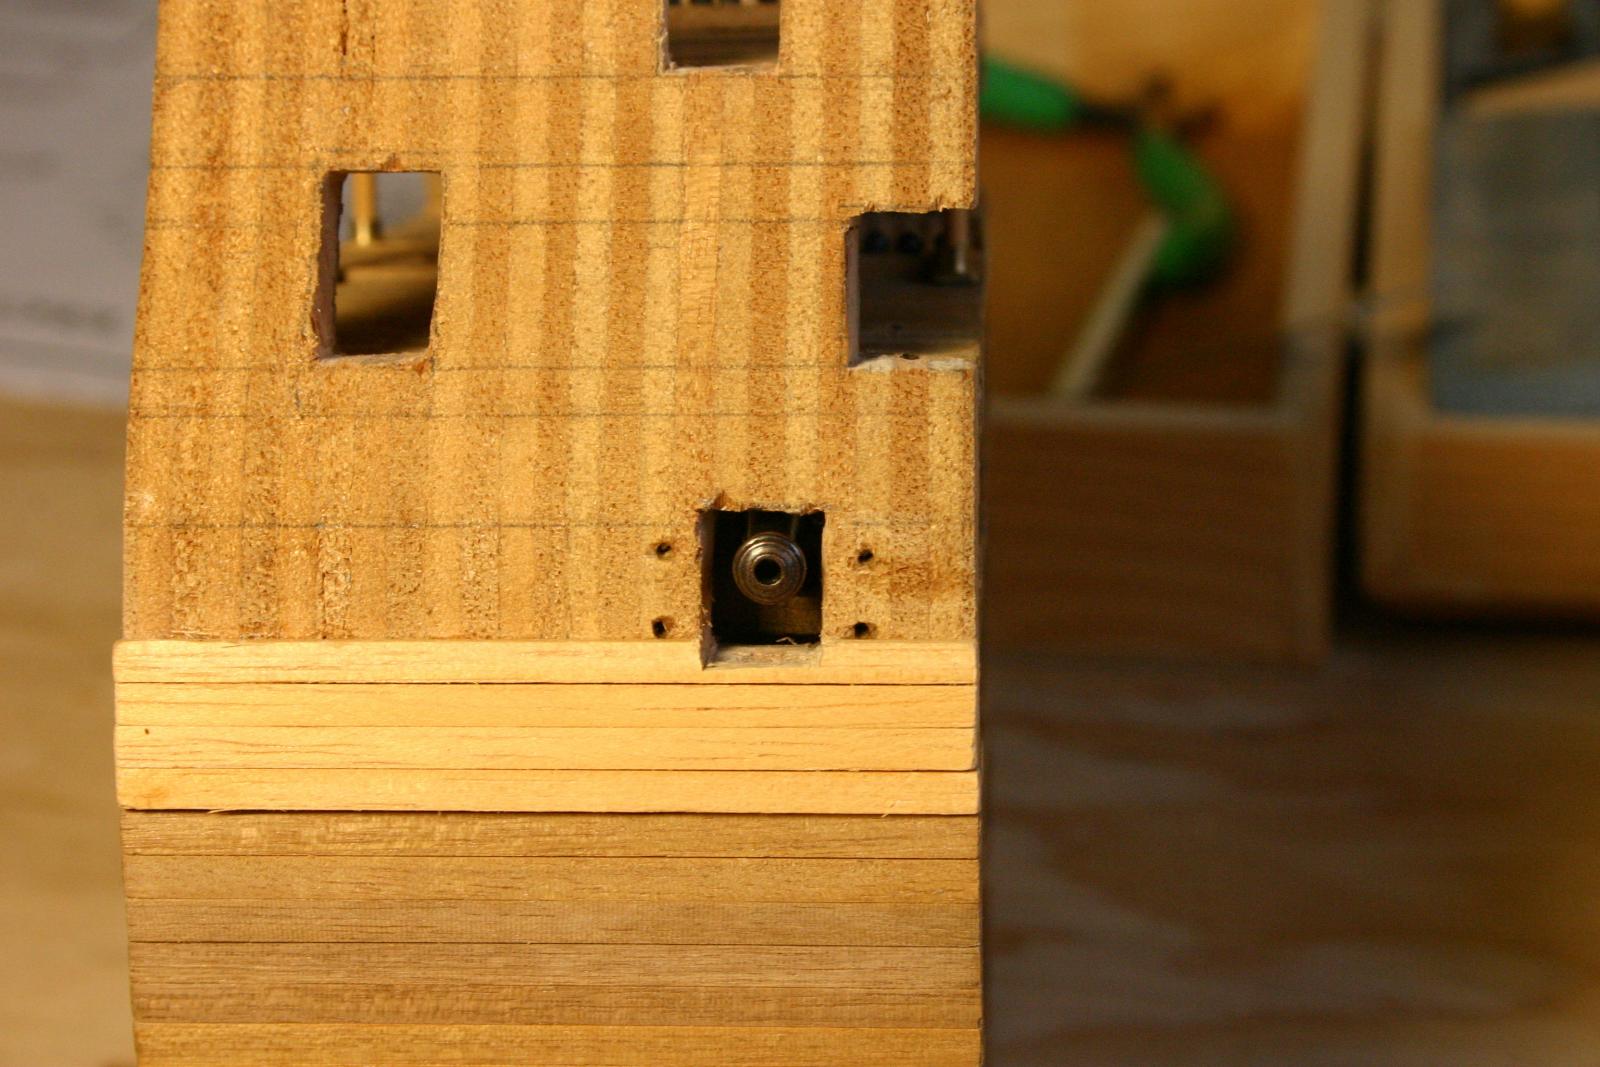
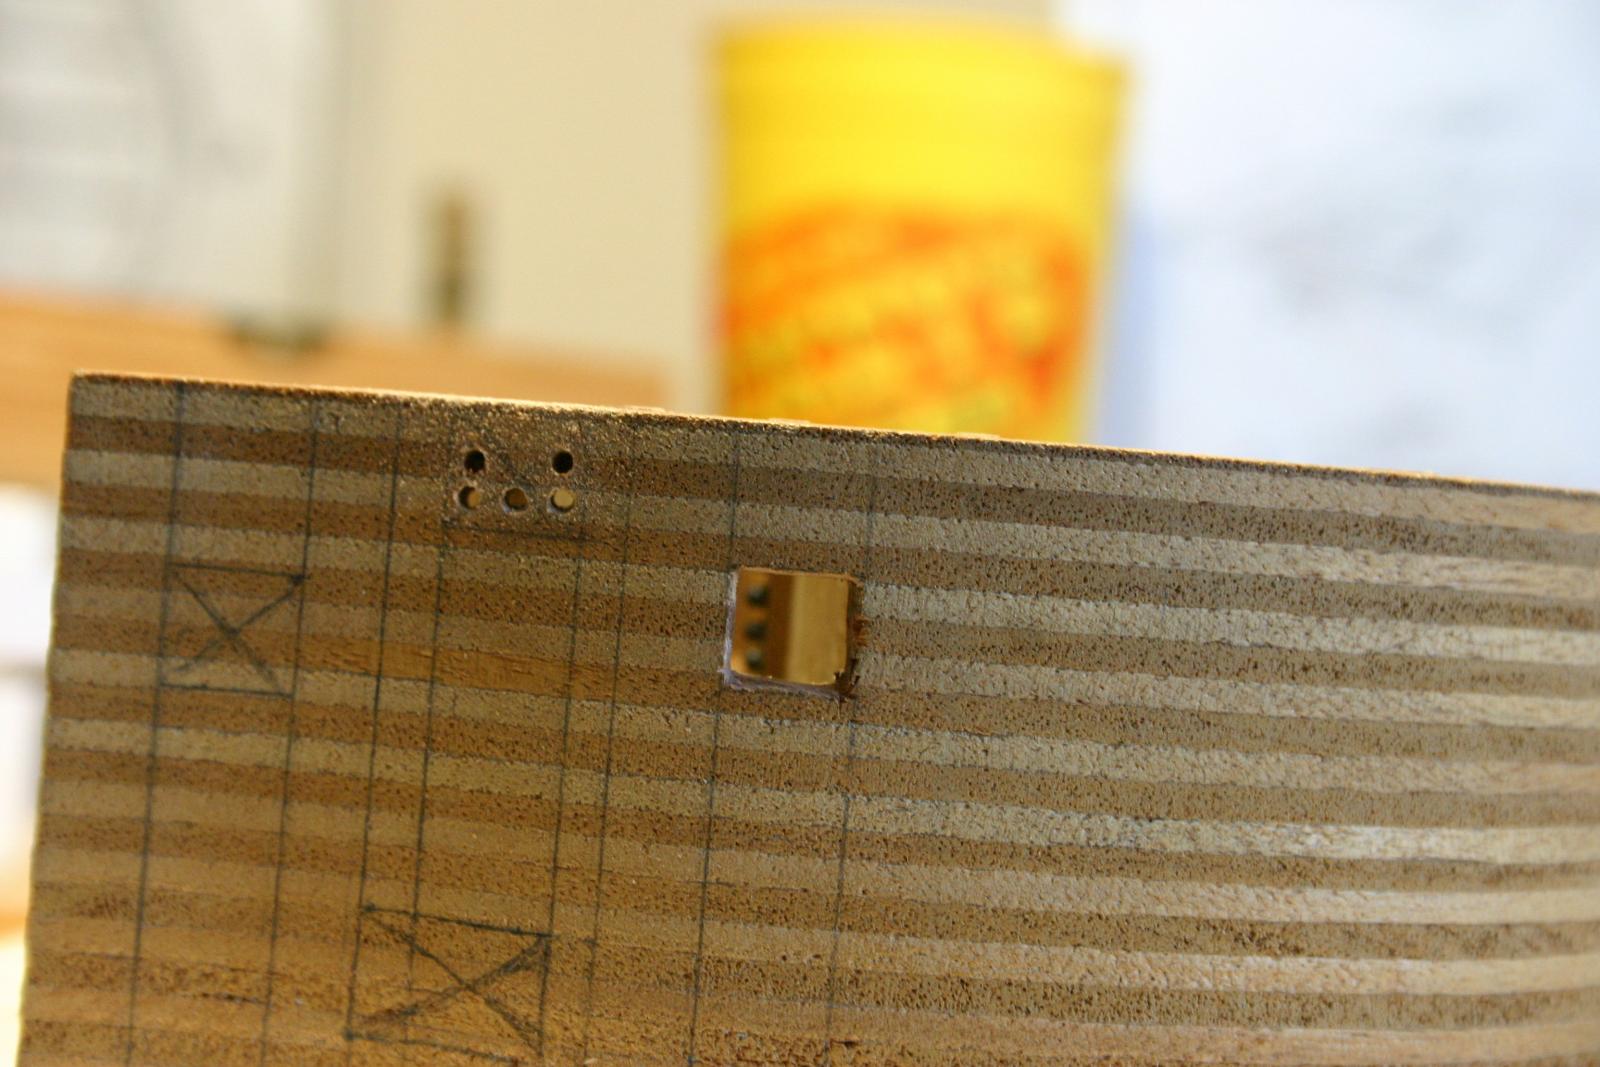
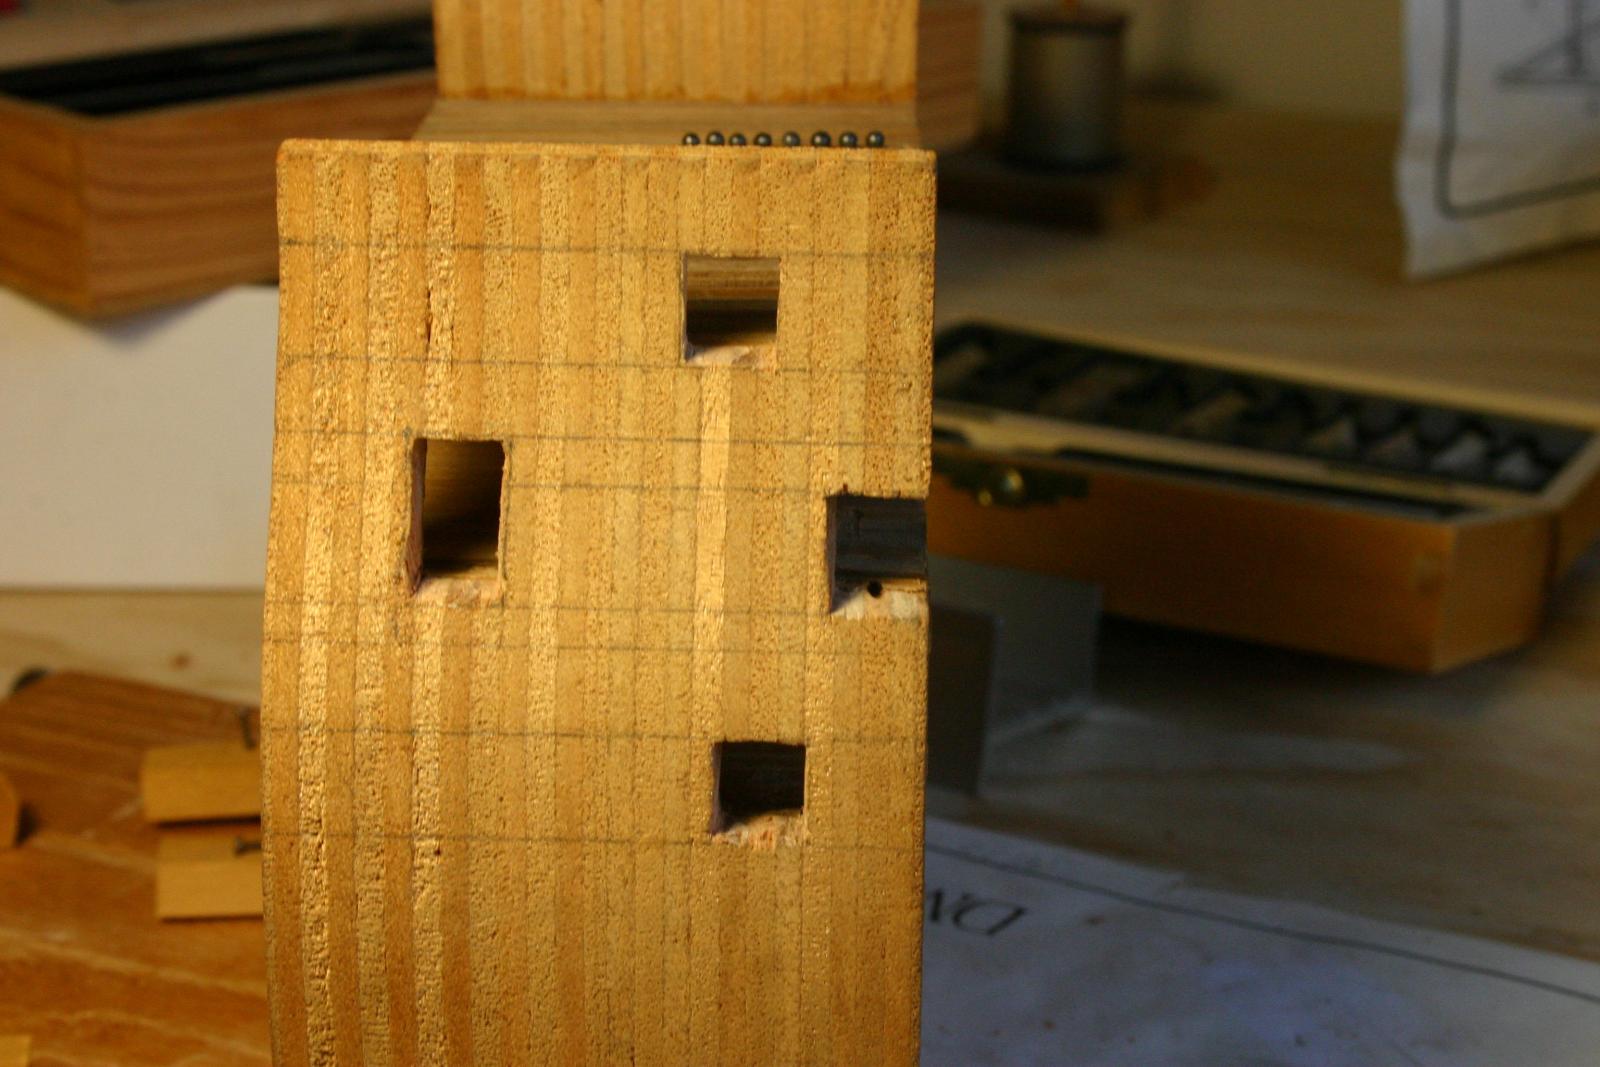
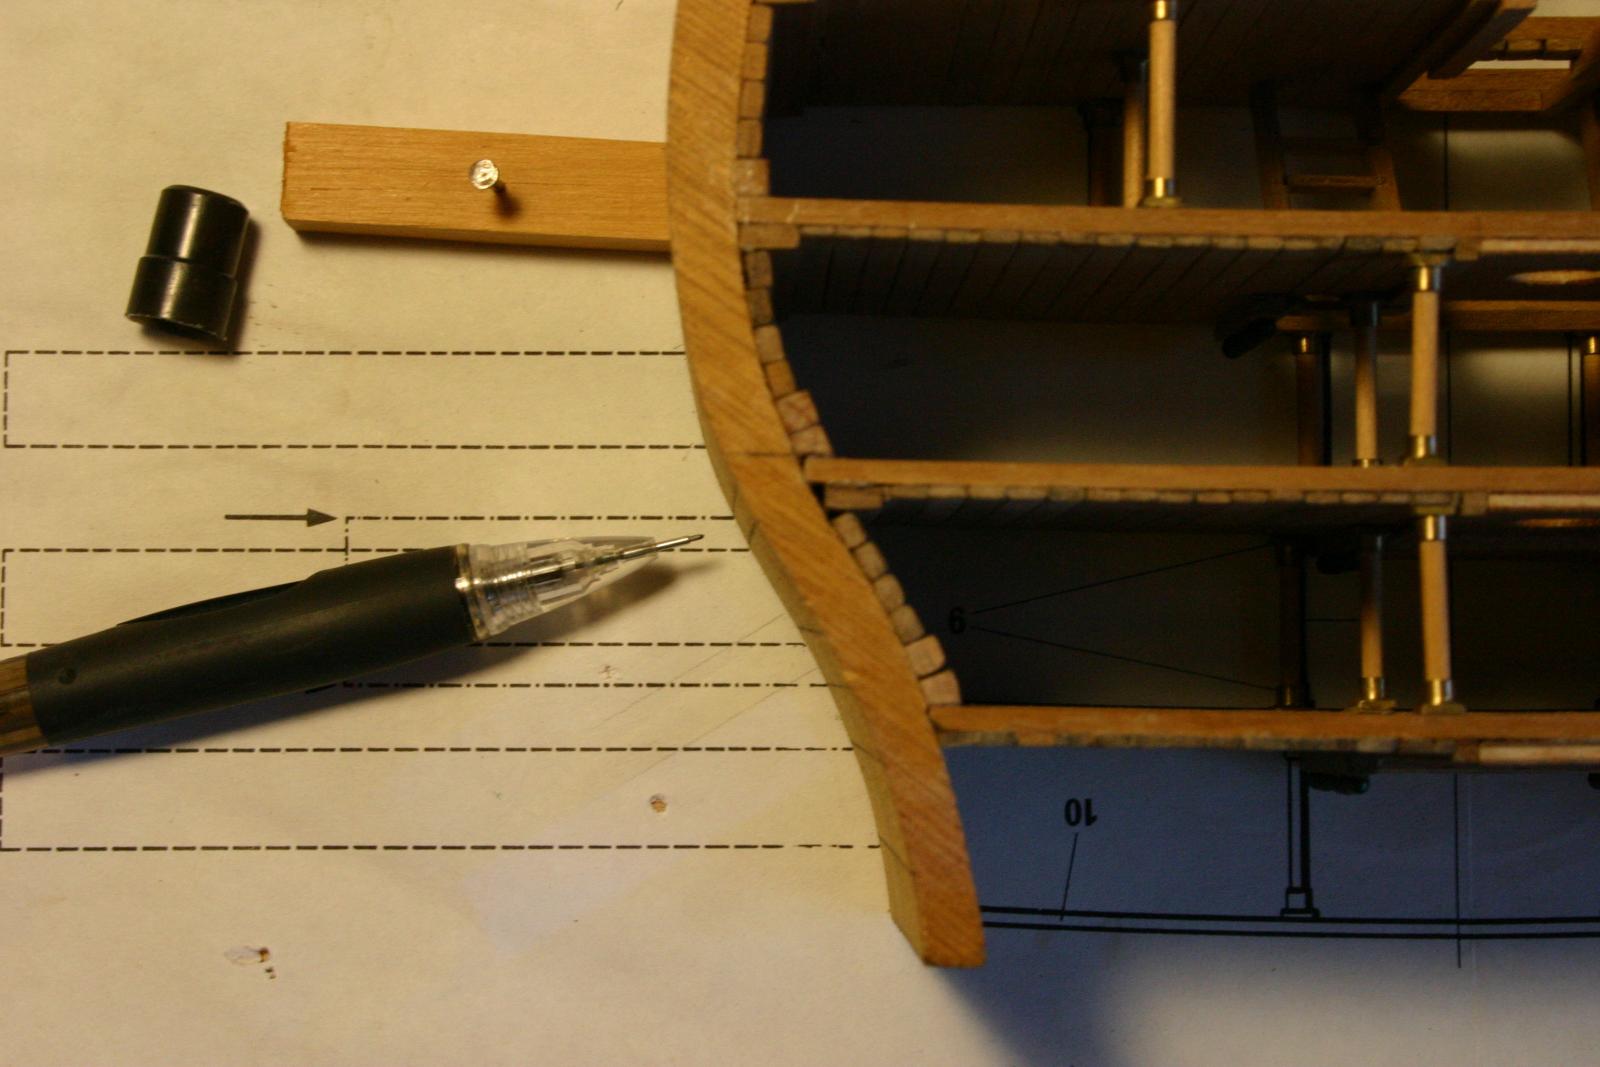
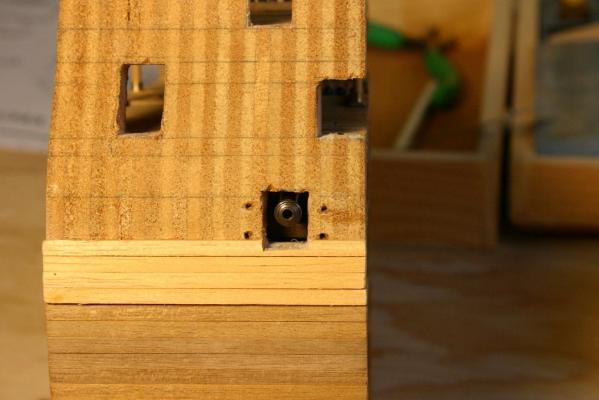
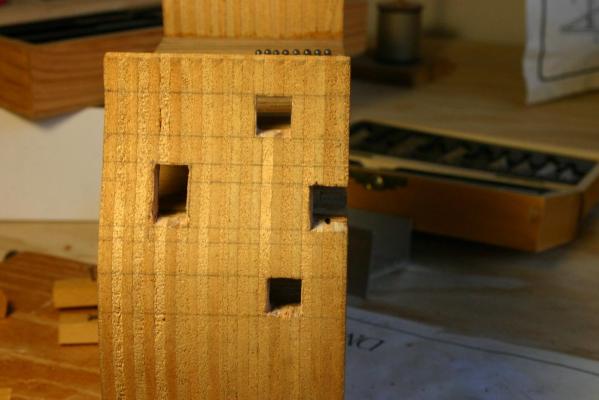
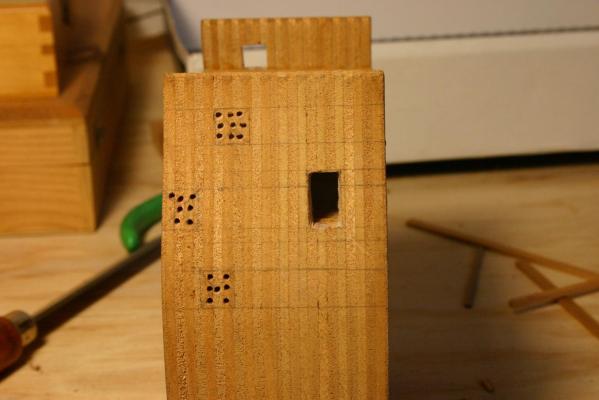
Following up on the problems in point #3 above I decided to cut the gun ports now and start working on the detail work for each existing deck. I marked out the gunports and doors. The door was slightly taller and would have screwed up my decking so I shortened it by 2 MM, hopefully that one doesn't bite me later on. I managed to get through 5 of the 8 openings today. After drilling the holes with my dremel I used an Xacto key hole saw to cut through then an xacto knife to shave the excess and square everything up. The one file I have is a cheese ball thing so I've ordered another set of files and rasps from model expo, hopefully those come in the next couple of days and they will help me square it up a little more.

-
Nice work, both on the canoe and on this one! I just picked up the hobby again and am working on an HMS Victory cross section. I look forward to following your build to see how it works out and learn any tips and tricks you come up with. The only advice I can give you is something I realized too late, I built 4 decks before I thought about the limited space I was going to have to work on the details of the guns and furniture, I should have built up a deck completely with all the guns and furniture before building up and planking the next deck.
-
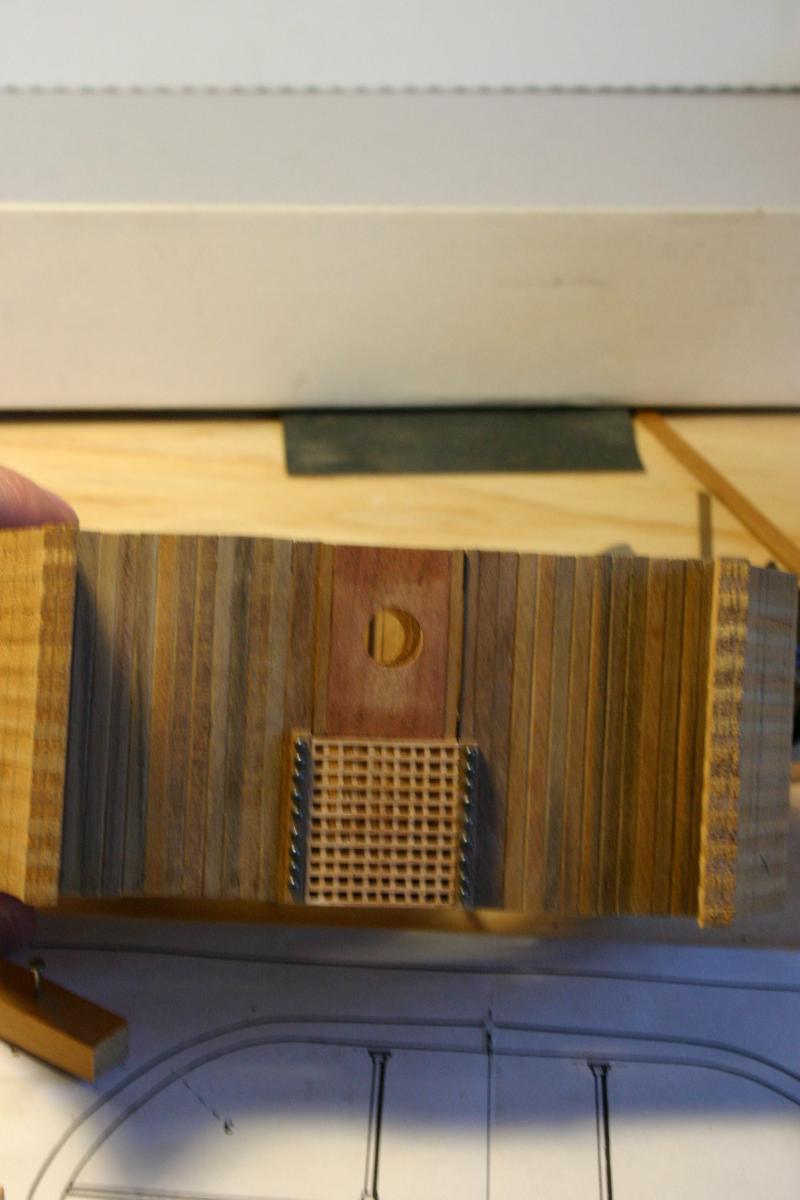
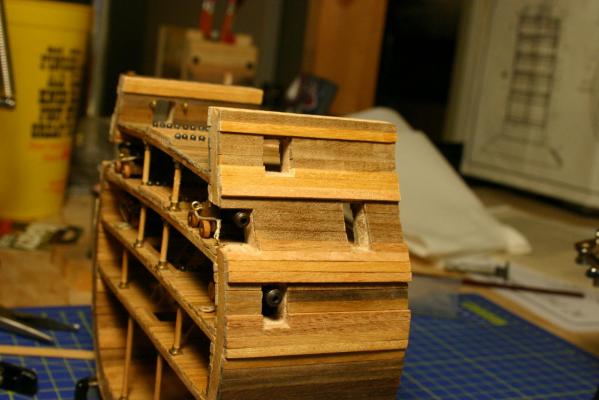
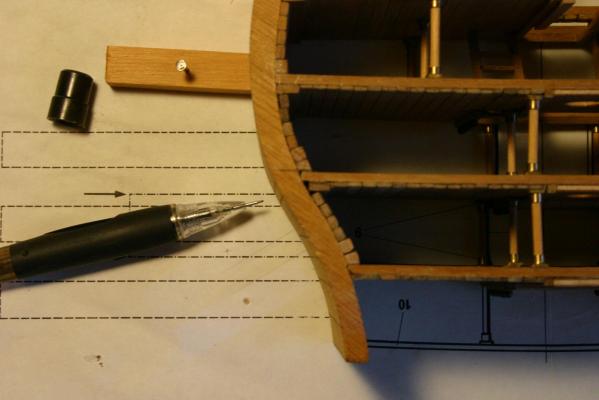
Thanks Helmsman this seems like a solid community. As for the build I finished up the grating for the 4th deck today, it took a little work, think my deck was slightly off and I had to shave/sand about 1/2 mm off of the planks to get the grating to fit in. Before I start working on the next deck I was marking out the gun ports and doors on the side. Problems I have now: 1. I mounted the ship to a scrapboard above the kit drawing and used a square to mark lines up the outside of the hull to give me the upper and lower edges of the gun ports and doors. The lines for the door seems to be low. The bottom of the door would actually be underneath the internal deck planking. So I either need to make the door slighty shorter or I need to raise the whole door about 2mm when I cut it. 2.The kit instructions do not tell you how far in the gun ports and doors go so I think I'm going to have guesswork on that as well. 3. The written instructions are only 3 pages, mind you 3 pages of incredibly dense type in poorly translate english but they don't include anything about putting in the cannons or other fixtures and i realized today that i should have been building each deck and installing the extras before I moved onto the next deck, now it's going to be quite a bit harder to install the features. Hindsight being 20/20 I should have put together the hull, measured, marked and drilled the gun ports and doors, built up to each deck finishing the detail work on it and planking around the gun ports etc then built the next deck up until I was at the top deck.


-
Hi all, was recently pointed to this site and came looking for some company I've lost at least 2 days of work crawling through build logs and the finished models so joining and posting my own build log may mean dire things for my future employment. Anyway, as the title says I'm working on an HMS Victory cross section kit from Corel. To date I've only completed one kit, the Union from Constructo, a solid hull build. I have two others on hold that I started and hung up when I hit snags on the difficulty level (read that as I am a total novice when it comes to working with wood and it's been years since I built a model and I panicked). I'm going to include the a couple of pictures from my current build state and continue to update as I progress. I'm honored to be sharing a forum with such talented folks!