HOLIDAY DONATION DRIVE - SUPPORT MSW - DO YOUR PART TO KEEP THIS GREAT FORUM GOING! (Only 24 donations so far out of 49,000 members - C'mon guys!)
×
SGraham
-
Posts
538 -
Joined
-
Last visited
Content Type
Profiles
Forums
Gallery
Events
Everything posted by SGraham
-

HALF MOON by jct - FINISHED - Corel
SGraham replied to jct's topic in - Kit build logs for subjects built from 1501 - 1750
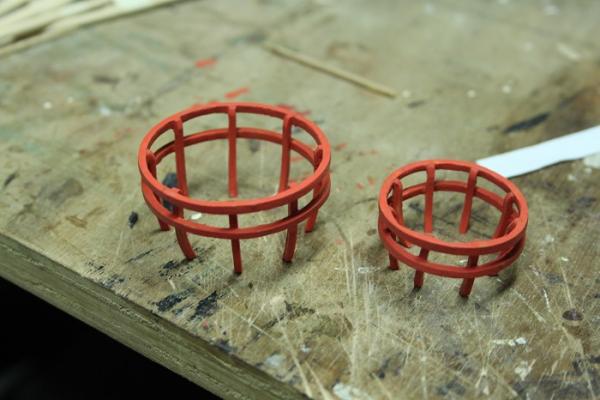
J, thanks for the reply about the rope making. There's so much to learn. Soldering first and then rope making. I feel like a learn by the numbers ship chandlery. The masts look great. Those nests are spectacular on them. I'm definitely using your technique on the nests when I get around to building the Moon. Steve -
HALF MOON by jct - FINISHED - Corel
SGraham replied to jct's topic in - Kit build logs for subjects built from 1501 - 1750
Looks good, J. I like the stain on the yards and the trick with the black wire on the blocks. So you make your own rope? I'm still pretty new at this and am trying to get everything figured out. Is rope making a difficult process? Is it worth it? How long will it take you to make up 5 yards? Pardon the interrogation. Steve -
Thanks for asking, Sam. We indeed had a small fire up in Azusa Canyon, or East Fork again, but they knocked it down pretty fast. I've had some family stuff to attend to as well as getting ready for a bluegrass gig we're playing tonight. So, I haven't been in the Glacial Progress Boatworks this week. I've got to let it live up to its name. Those quarter badges on the Enterprise are simply spectacular--meaning spectacular in a simple way. Steve
- 569 replies
-
- 2
-

-
- shenandoah
- corel
- (and 1 more)
-
Very nice, very clean. I love the proportions. Can't wait to see them on the hull. Steve
-
There you go.
-
I remember when I was soldering jewelry 30 plus years ago we would cut off a tiny piece of solder, hit it with the torch and turn it into a little ball, take an old needle file that was worn out and had been sharpened down to a point, and with the torch attach the solder to the tip. It got so there was always a little solder on the end of the file. Then it was easy to apply solder where necessary. I have no idea if that was good practice or not, but it took care of handling little pieces of solder. That was with gold solder. Steve
-
Sam, that's clean and beautiful and fits the ship. I like the contrasting colors of wood and different grain directions. So much more convincing than that pewter blob to the left. Steve
-
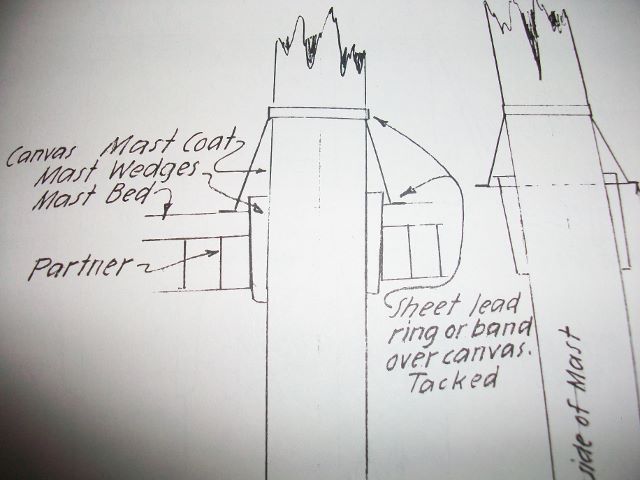
Thanks Bob. That helps a lot. I used to solder silver and gold back when I was in high school too. We used torches hooked up to tanks of oxygen and some other kind of gas. We also soldered on asbestos pads right at nose level on our workbenches. It was second nature then, but I've mostly forgotten now since it's been, ummm... a few years. I've got to get me a torch setup. Let's see...that's a foredom tool with foot pedal and a torch on my wish list. Well, Christmas is coming. And I've got to finish restoring my lathe before I get to the spars...This ship modeling thing has a tendency to mushroom, what with tooling up, learning new techniques, researching, etc. Seriously, I spent an hour last night researching what mast collars looked like on medium-sized mid-19th-century working vessels. Does that sound like something a normal person would do? What am I going to tell my friends and family when they ask? If anyone cares to know, Chapman's "The American Fishing Schooners" has a lovely diagram on page 551 of something that looks like it's going to work. It was a simple canvas gasket tacked onto the mast and deck with lead strips. The kit came with a thick beveled brass ring that looks like it came from Lamps R Us. Steve

- 569 replies
-
- 1
-
-
- shenandoah
- corel
- (and 1 more)
-
Thanks J and Jesse. Bob, the card stock worked better than I thought it was going to. You are an expert in brass work. I've been following your schooner build. I tried brass initially, but it just kept breaking at the right angled corners. I don't know how you do it. Also, I really need to learn to silver solder. Suggestions on how to start learning? Equipment? Sam, you can't see them in the photos but the holes are on the inboard sides of the pumps. I think I should have put them on the outboard sides so that with the camber of the deck, the water could just run to and out the scuppers. Not that it matters much. You get to soak your friend's ankles. It's all good. Steve
- 569 replies
-
- 1
-
-
- shenandoah
- corel
- (and 1 more)
-
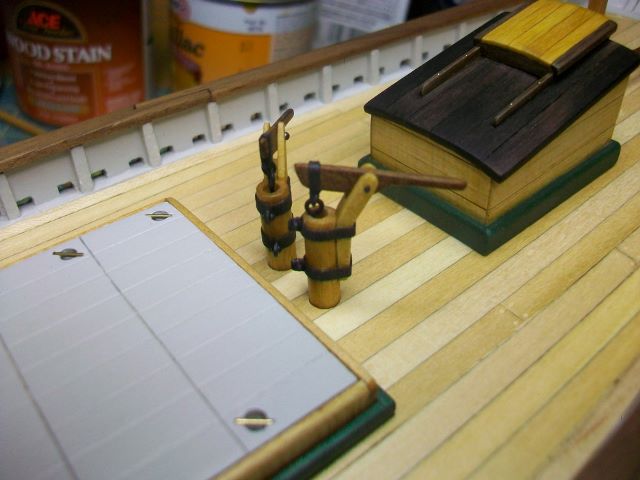
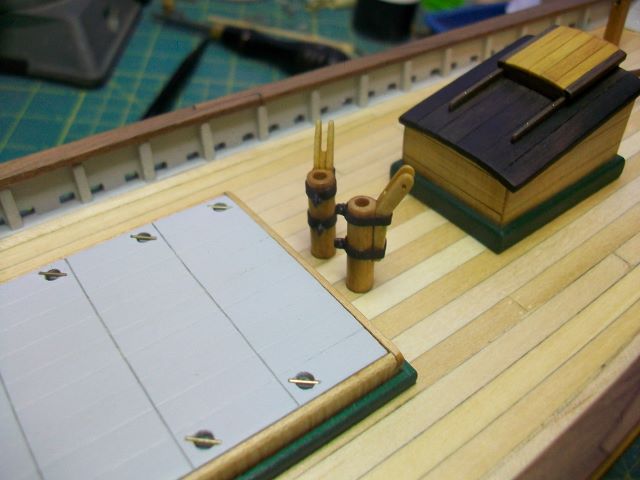
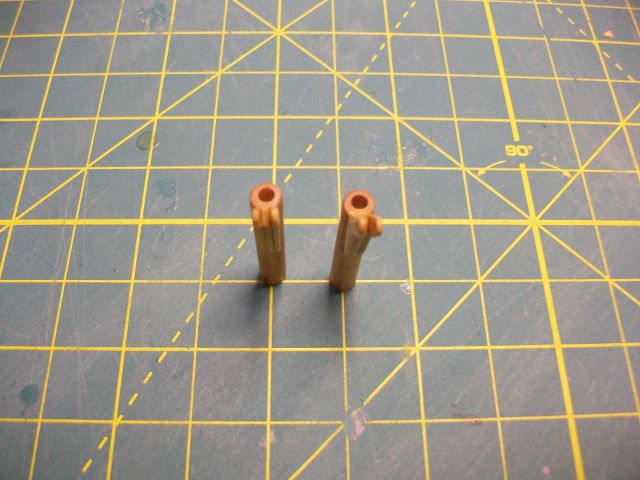
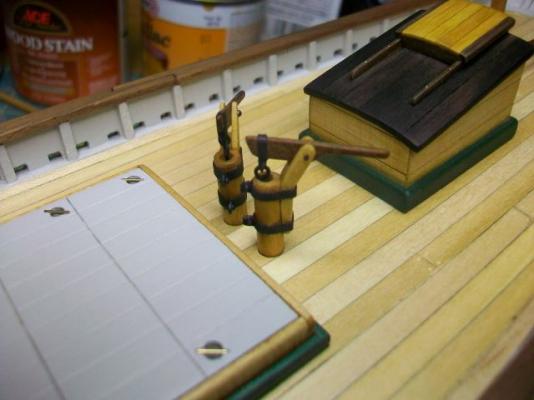
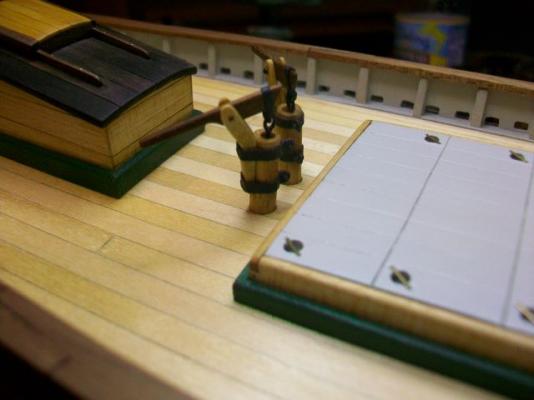
Thanks Steve. Here are the pumps finished. I wasn't thinking too clearly when I drilled the discharge holes. These pumps are arranged for fun. Anyone working the starboard pump will get sprayed by the guy working the port pump, and vice versa. They would spray across the deck toward the opposite scuppers. Thanks for looking. Steve
- 569 replies
-
- 10
-
-
- shenandoah
- corel
- (and 1 more)
-
Yup, I kinda wonder what the people thought when they got back from vacation and their piano was in a million pieces on the floor... Actually, it was my great aunt's and had been sitting under an air conditioner getting dripped on for half a century. Felt and leather eaten up, horribly cracked soundboard, mold, the thing was a mess. Most old uprights are veneer covered poplar, but this one had those maple braces. Also the Sitka spruce soundboard braces supplied bracing for 5 or 6 instruments. Also, lots of ebony and ivory keys...Fun project. I wouldn't do it again though. I'd still like to see photos of your scrapwood schooner whenever you get a chance. Steve
-
I made some bands for the pumps with card stock and "bolted" them on. The pumps aren't glued in yet. Next come the handles, or heavers. Steve

- 569 replies
-
- 6
-
-
- shenandoah
- corel
- (and 1 more)
-
I'm so glad to hear she's OK. I wish there was some way to make this all better for you guys. Still, your daughter walked away from the crash. That's a huge blessing. Steve
- 607 replies
-
- 1
-
-
- scottish maid
- artesania latina
- (and 1 more)
-
Again, good to know David. The paint is a bit thick for what I'm trying to do. Steve
-
Jesse, how is your daughter? My prayers go out for both of you. Steve
-
I was going to say trashpicker but I have to maintain some kind of dignity... Steve, did you ever tear a piano apart for the wood? I got some absolutely incredible massive curly maple back braces off a 110 year old upright grand. Steve
-
Thanks J and David. Good to know. I wonder if you could just color the card stock with a black permanent marker instead of paint. Ever tried this? Steve
- 569 replies
-
- 1
-
-
- shenandoah
- corel
- (and 1 more)
-
They'll be banded. I'm playing around with making the bands from card stock. If I give it a coat of shellac and then a coat of paint I'm hoping it'll hold up OK. Steve
- 569 replies
-
- 1
-
-
- shenandoah
- corel
- (and 1 more)
-
Thanks J. Actually, about 25 years ago a guy at work had a deck made out of the ironwood. He gave me 3 two-foot-long cutoffs. I've still got a bit of it left. I think the biggest thing I ever made from it was a fretboard. The maple was trash picked, and the ebony was scraps from a friend who makes banjos. I bet more people than me on this site are shameless scavengers when it comes to wood. Steve
- 569 replies
-
- 3
-
-
- shenandoah
- corel
- (and 1 more)
-
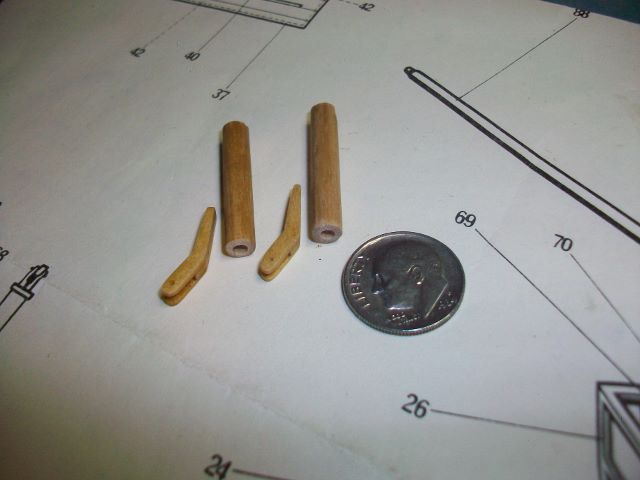
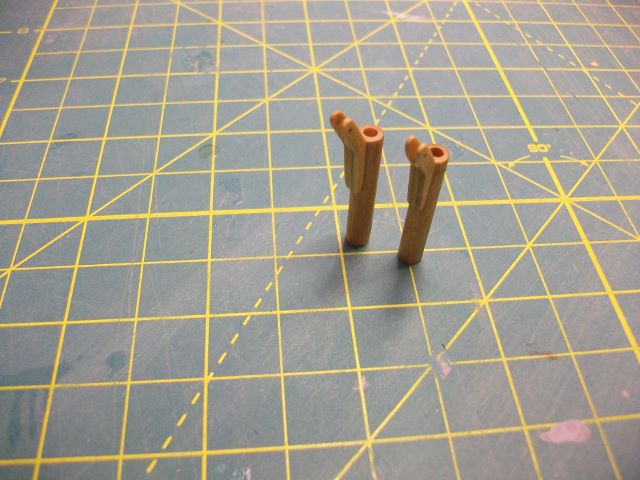
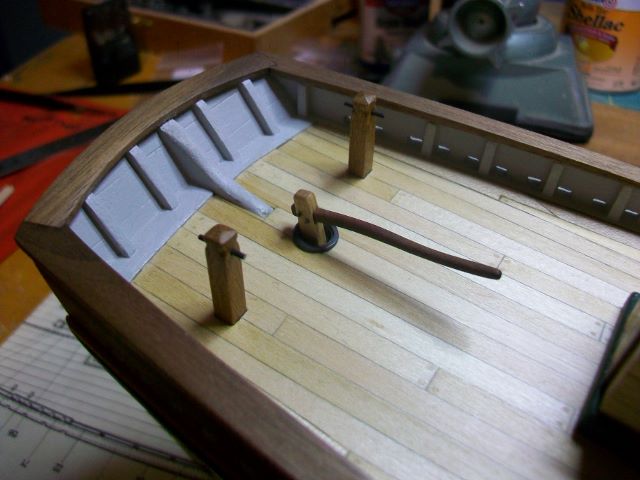
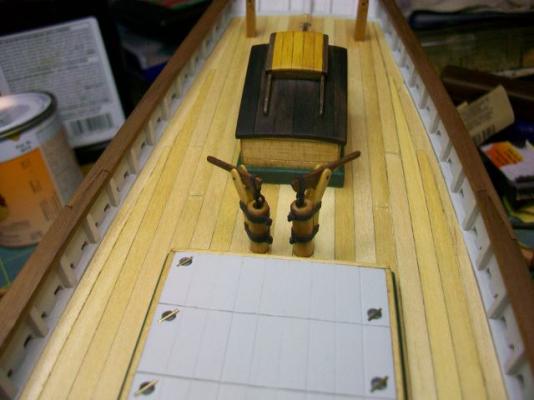
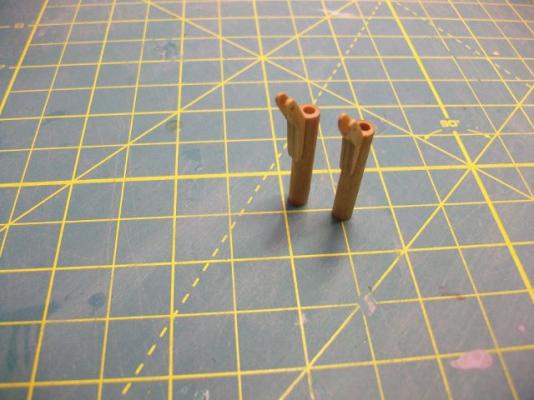
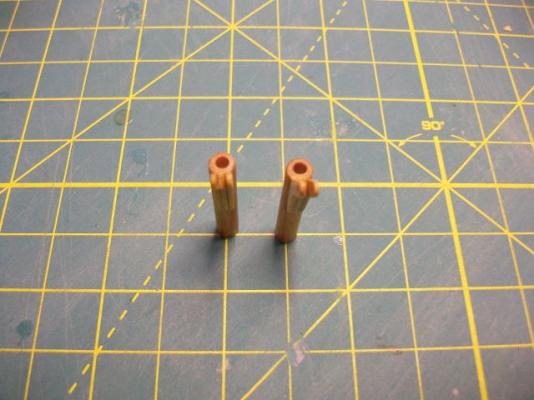
It's time to give Shenandoah a pair of pumps. Sounds like she's going dancing... I wasn't overjoyed with the ones supplied with the kit, so after some research online I found a type that looked within the range of my abilities. Here are the tubes made from a hardwood dowel, of course, and the brackets that attach to the sides of the tubes for holding the handles. The brackets are made from maple. It did a nice job not splitting on me while I worked it. These are the smallest ship parts I've made yet. The handles will be quite long and thin--about twice as long as those supplied by the kit--so I'll use desert ironwood for them since you can carve it very long and thin and it won't break or split. Also, the brackets will be attached to the tubes with flat blackened brass straps. Thanks for reading. Steve

- 569 replies
-
- 9
-
-
- shenandoah
- corel
- (and 1 more)
-
HALF MOON by jct - FINISHED - Corel
SGraham replied to jct's topic in - Kit build logs for subjects built from 1501 - 1750
Great job, J. Look at the old and new next to each other. I like the double horizontal pieces as well as the thinner upper rail in the new nest. Much more realistic looking.
-
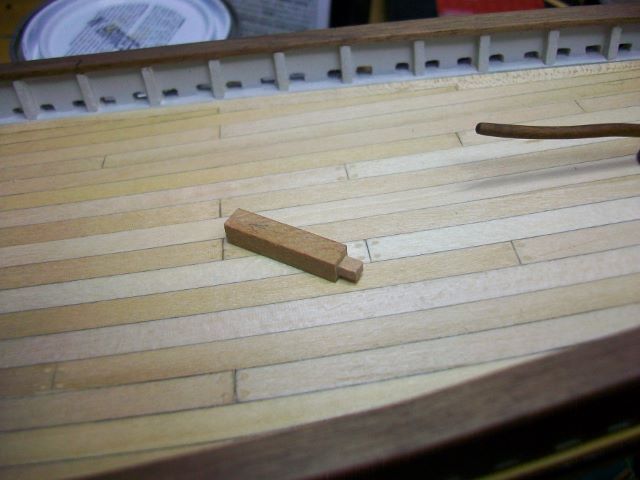
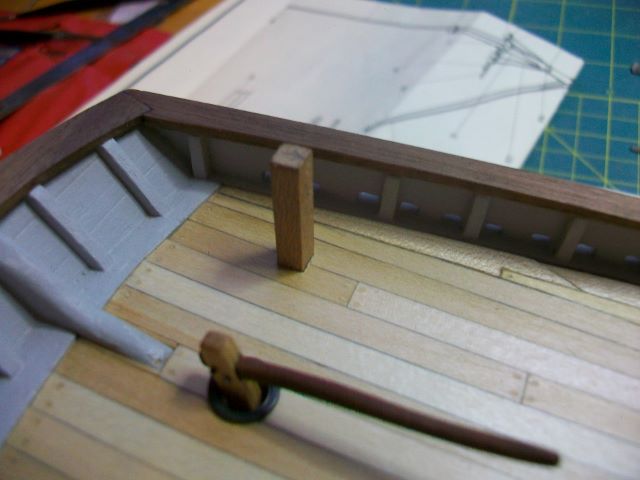
Thanks for the kind replies. Jesse and David, I'm definitely on the hunt now for a used foredom setup. DeeDee, I used a jig of sorts for the tenon at the bottom of the bitts. I did this because I wanted a nice clean joint at deck level--which now that I come to think of it wasn't necessary since I cut holes in the deck to receive the bitts. The photos don't show it, but I also cut a mortise inside the hole I made in the deck for each bitt. The dogleg micro chisels are really useful for this job( see post #75). The "jig": I cut a piece of thick planking the length of the above-deck portion of the bitts. Then I butted the bitt stock with the piece of plank lying lengthwise on top of it up against a nice square wooden block. Then I scored deeply across the bitt stock with a knife, using the piece of plank as a guide. That way I got the stock scored straight and even all the way around. The carving away around the tenon was done by eye as was the beveling at the top of the bitts. There, I made a 1mm pencil mark around the top edge of the side of each bitt. I also drew a line across the middle of the top end of the bitt, both directions, like a + sign. It was easier than I thought to gently file a bevel from the line on the edge of the bitt to the line in the middle of the top. I found it worked best to do opposite sides rather than adjoining sides. Thanks Steve, I appreciate it. Sam, your Enterprise build log is serving as a joinery primer for me. Steve
- 569 replies
-
- 3
-
-
- shenandoah
- corel
- (and 1 more)
-
Fresh off the showroom floor!
-
Thanks Pete. And Sam, I'm trying to make mortise and tenon joints on my bitts right now, after studying some of your Enterprise photos. Steve
- 569 replies
-
- 1
-
-
- shenandoah
- corel
- (and 1 more)