

Omega1234
-
Posts
6,060 -
Joined
-
Last visited
Reputation Activity
-

 Omega1234 got a reaction from GrandpaPhil in SHADOW by Omega1234 - FINISHED - Scale 1/300 - Luxury 60m Mega Yacht
Good morning everyone!
Thanks for all of your comments and Likes. Greatly appreciated.
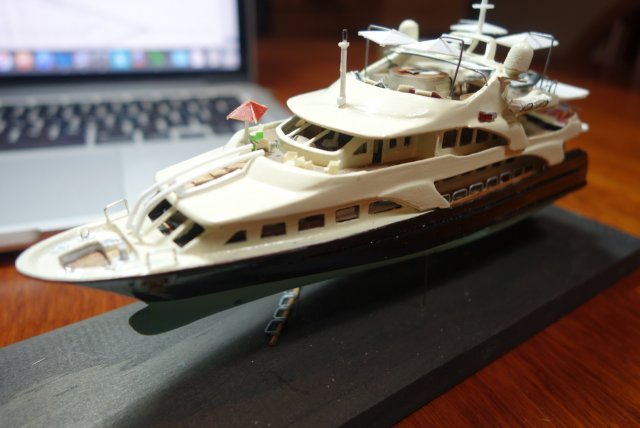
A quick update - I’ve finally decided upon how I want to display Shadow. In this case, (as in keeping with my preference for a minimalist approach, so as not to detract from the model itself), I’ve decided to use a plank of pine wood, polished with Tan shoe polish and three brass rods to secure the hull.
What do you think?
Cheers.
Patrick
-
 Omega1234 got a reaction from DBorgens in SHADOW by Omega1234 - FINISHED - Scale 1/300 - Luxury 60m Mega Yacht
Good morning everyone!
Thanks for all of your comments and Likes. Greatly appreciated.
A quick update - I’ve finally decided upon how I want to display Shadow. In this case, (as in keeping with my preference for a minimalist approach, so as not to detract from the model itself), I’ve decided to use a plank of pine wood, polished with Tan shoe polish and three brass rods to secure the hull.
What do you think?
Cheers.
Patrick
-
 Omega1234 got a reaction from Piet in SHADOW by Omega1234 - FINISHED - Scale 1/300 - Luxury 60m Mega Yacht
Hi Ben
Thanks!
Cheers.
Patrick
-
Omega1234 got a reaction from Piet in SHADOW by Omega1234 - FINISHED - Scale 1/300 - Luxury 60m Mega Yacht
Good morning everyone!
Thanks for all of your comments and Likes. Greatly appreciated.
A quick update - I’ve finally decided upon how I want to display Shadow. In this case, (as in keeping with my preference for a minimalist approach, so as not to detract from the model itself), I’ve decided to use a plank of pine wood, polished with Tan shoe polish and three brass rods to secure the hull.
What do you think?
Cheers.
Patrick
-
 Omega1234 reacted to flying_dutchman2 in Boyer by flying_dutchman2 - FINISHED - Scale 1:48 - 17th Century Dutch Coastal water freighter by Marc Meijer
Thank you Backer.
Marcus
-
Omega1234 reacted to Baker in Boyer by flying_dutchman2 - FINISHED - Scale 1:48 - 17th Century Dutch Coastal water freighter by Marc Meijer
Great start Marcus.
you have my interest, i follow your build.
-
Omega1234 reacted to flying_dutchman2 in Boyer by flying_dutchman2 - FINISHED - Scale 1:48 - 17th Century Dutch Coastal water freighter by Marc Meijer
I am waiting for a dry day so I can start sanding her. It has been drizzling on and off. So instead of the boat I've been working on the mill
Marcus
-
Omega1234 reacted to wefalck in Boyer by flying_dutchman2 - FINISHED - Scale 1:48 - 17th Century Dutch Coastal water freighter by Marc Meijer
Going to be interesting. I am not very familiar with the 17th century, as I am more into the 19th century. It is interesting to see how either a type evolved over time or how a denomination shifted from one type to another. In any case, the boeiers of the 19th century look rather different from those of the 17th century and also have a different purpose, being either a short-distance private conveyance or pleasure boat (equivalent to a horse-drawn carriage in less waterlogged parts of the world), rather than being a freight ship.
I always found these Dutch boats somewhat bizarre and ungainly - but got to love them during my years in Noord-Holland ...
-
Omega1234 reacted to amateur in Boyer by flying_dutchman2 - FINISHED - Scale 1:48 - 17th Century Dutch Coastal water freighter by Marc Meijer
We asked Ab in an other forum. He didn't had any intention to publish this book. It was done on request of seawarch, who specializes in interesting books with drawing for modellers. No market for that over here. Unfortunatedly, impoting books from the other side is a bit expensive.
with respect to all of these ships: there are almost no written sources, so these drawings are kind of reconstructions, starting from the few written sources there are (like builders ontracts), and art- drawings and paintings.
That is also the reason that these drawings are more schematic than those of the statenjacht (and some earlier drawings of Emke). They are not intended as fully detailed drawings, but as a reaonably good starting point to build these ships: it is a drawing of a ship-type, not of a specific vessel.
That said: ask all your questions, we might have an anser for that.
The aft mast for instance, was in many case only rigged at low wind, to hold course, or even (especially fishing ships), to keep position when the main mast was lowered. So, at a fair wind, it was either not rigged, or had small sailsl. You can see that in many paintings of a related shiptype: the hoeker.
a famous drawing of the ship is this one by Reinier Nooms
https://www.rijksmuseum.nl/nl/collectie/RP-P-OB-20.523
Jan
-
Omega1234 reacted to flying_dutchman2 in Boyer by flying_dutchman2 - FINISHED - Scale 1:48 - 17th Century Dutch Coastal water freighter by Marc Meijer
# Carl, thanks for the suggestion.
# Jan, thank you for the elaborate explanation. That picture in the Rijks is also in the book. I will ask the questions as you are answering them as I built. The plans itself is an interpretation of a contract in Witsen's book and Ab mentions the pages as well.
Ab has translated this book in English and it is more than $100.00. So I have to save some money and need to get this.
Marcus
-
Omega1234 reacted to cog in Boyer by flying_dutchman2 - FINISHED - Scale 1:48 - 17th Century Dutch Coastal water freighter by Marc Meijer
Marcus,
Maybe one of the Maritime musea in Holland (Amsterdam, Rotterdam) might have more information on her, even Germany, as she is both a sweet and salt water sail(st?)er
-
Omega1234 reacted to BenF89 in SHADOW by Omega1234 - FINISHED - Scale 1/300 - Luxury 60m Mega Yacht
Looks spectacular - I think it achieves the intended effect perfectly!
-
 Omega1234 got a reaction from Mahuna in SHADOW by Omega1234 - FINISHED - Scale 1/300 - Luxury 60m Mega Yacht
Good morning everyone!
Thanks for all of your comments and Likes. Greatly appreciated.
A quick update - I’ve finally decided upon how I want to display Shadow. In this case, (as in keeping with my preference for a minimalist approach, so as not to detract from the model itself), I’ve decided to use a plank of pine wood, polished with Tan shoe polish and three brass rods to secure the hull.
What do you think?
Cheers.
Patrick
-
 Omega1234 got a reaction from cog in SHADOW by Omega1234 - FINISHED - Scale 1/300 - Luxury 60m Mega Yacht
Good morning everyone!
Thanks for all of your comments and Likes. Greatly appreciated.
A quick update - I’ve finally decided upon how I want to display Shadow. In this case, (as in keeping with my preference for a minimalist approach, so as not to detract from the model itself), I’ve decided to use a plank of pine wood, polished with Tan shoe polish and three brass rods to secure the hull.
What do you think?
Cheers.
Patrick
-
 Omega1234 got a reaction from popeye the sailor in 40' Cruising Sailboat by BenF89 - 1:12 Scale
Hi Ben
You're definitely off to a great start. Nice and methodical...as befitting someone in your line of work.
Having said that, it won't be long before you can lay your first bulkhead!
Cheers
Patrick
-
Omega1234 reacted to Tecko in Wardell Bridge and boat by Tecko - 1:72 - diorama
DIY static grass applicator. It works very well for small dioramas (1 or so square feet max). Any bigger and the charge gets overly dissipated and becomes weak.
Experimented with grass applicator on the diorama. Results were mixed, but generally poor. Ended up using a small vacuum cleaner to assist in raising any loose grass into a vertical position. Repeated this application on the same area while the glue was still wet. This helped.
The shire council applied lots of wood-chip mulch over the north-side of the bridge. I did the same, and for both sides of the bridge to even up the display.
Grass, plants and trees will cover much of the mulch.
Added previous grass sample (patch) to diorama. It peels off the baking paper and then glued where you want it (great for clumps of grass).
-
Omega1234 got a reaction from popeye the sailor in Hr. Ms. Java 1925 by Piet - FINISHED - Pacific Cross Roads - 1:350 - PLASTIC - Light Cruiser of Royal Netherlands Navy as she was in 1942
Hi Piet
What a beautiful job you’re doing. Of course, the emotions must be running high at times, but, like the others have said, it’s good that you’re at peace with your father’s fate. Not so, with your time in the concentration camps; but some memories are hard to shake.
Thanks for sharing and I value your willingness to bring us into your world.
All the best and take care.
Cheers.
Patrick
-
 Omega1234 got a reaction from mtaylor in 40' Cruising Sailboat by BenF89 - 1:12 Scale
Hi Ben
You're definitely off to a great start. Nice and methodical...as befitting someone in your line of work.
Having said that, it won't be long before you can lay your first bulkhead!
Cheers
Patrick
-
Omega1234 reacted to BenF89 in 40' Cruising Sailboat by BenF89 - 1:12 Scale
BULKHEAD TEMPLATING JIG - PART 1
I've built the main longitudinal beam of my template jig I sketched up and shared on Monday. I got some nicely finished, and straight 1x2 pine from the hardware store. It cost about twice that of the normal 1x2 furring strips you get, but double a little over a dollar is a little more over two dollars, which seemed justifiable given that the furring strip was not as straight as what I got.
The next steps were (a) identify the dimensions to the various bulkheads and partitions to mark out along the beam, and (b) figure out a way to put it on the boat such that it's easily removed, but when put back is in the same place (so my templates are taken at the right place relative to the other templates).
The first part was accomplished by using my design 3d model to ID every transverse section that touches the hull. There are a lot of them. More on that later.
My solution to the second part was to first ID where I wanted the stem. So I marked that. Then I laid a small piece of balsa into the inside of the stem, and trimmed it horizontally so that when attached to the pine, it would set my mark at the stem and prevent movement forward. See the image below:
Stem Guide/Chock/Thing
Then, at the aft end, I had to do three things. The first was to prevent movement aft (which, combined with the stem guide/chock/thing preventing forward movement, would fix the beam in place longitudinally). The second was to make sure the beam ran down centerline of the boat, or close enough to it that my measurements stay correct. The third was to make sure the beam was level. I accomplished all three by building up several layers of balsa wood. The lowest was fit into the aft part of the hull, with the sides trimmed to the hull shape. Then I added a couple strips to build height (leveling the beam with the sheer line at the stem). Finally, for the last layer, I made a chunk the width of the beam, and then added guides to either side. Each successive strip of balsa was centered to the piece in the boat, so that the guides on the sides of the last chunk would make it so that the beam was centered. Again, see the below picture:
Aft Beam Support - Levels, Centers, and Prevents Aft Movement.
One thin balsa shim added to the last chunk put the level bubble dead center. I should note - I put the whole thing together with a hodge podge of wood superglue, Gorilla Construction Adhesive, and small hobby nails. The next picture shows the finished jig on the boat:
Finished Longitudinal Beam for Bulkhead Templating
With the longitudinal centerline beam complete, I started the process of marking out the template locations by marking the 'datum' bulkhead which will be used to double check all the other positions of the bulkheads, partitions, and interior joinery. I used the forward side of each partition or bulkhead as the 'molded line', so that the thickness is thrown aft, for consistency. A picture of the first bulkhead marked, and my previously mentioned bulkhead-and-partition measurement reference, are below.
Bulkhead and Partition Measurements
I have a lot of templates to make, it seems. Thinking about only templating those bulkheads and partitions that significantly interact with the side (vs only hit it for a short distance, especially if hidden behind something).
Next update will (hopefully) be once I get the 'datum' bulkhead (which is the forward bulkhead of the main salon/aft bulkhead of the forward cabin) templated. I'm planning to print out each bulkhead or partition shape from the model, and compare with what I actually template on the boat. It will be interesting to see how close my process for measuring and adjusting the hull shape got me.
-
Omega1234 reacted to amateur in HMS ROYAL KATHERINE 1664 by Doris - 1/55 - CARD
Hi Doris,
That was very a good change you made!
The new windows do look far better than the old ones.
Jan
-
Omega1234 reacted to druxey in HMS ROYAL KATHERINE 1664 by Doris - 1/55 - CARD
I did actually notice the original leaded lights were not quite right, but decided not to mention it. I'm so glad someone else did and that the new ones are so much better! Nicely re-done, Doris.
-
Omega1234 got a reaction from cog in Deben 5-tonner by vaddoc - FINISHED - Scale 1:10 - a Whisstock yard design
Hi Vaddoc
Another milstone reached!
Well done.
Cheers
Patrick
-
Omega1234 got a reaction from popeye the sailor in 40' Cruising Sailboat by BenF89 - 1:12 Scale
Hi Ben
Woohoo! Your scroll saw’s arrived. That’s good news because you can finally start making some sawdust. However, kudos to you for waiting and making sure that you’ve figured out the correct build sequence.
You know the saying...”Measure twice, cut once...”
I’m looking forward to your next update.
Cheers.
Patrick
-
 Omega1234 got a reaction from src in Licorne 1755 by mtaylor - 3/16" scale - French Frigate - from Hahn plans - Version 2.0 - TERMINATED
Hi Mark
...Not deliberately taking the focus away from the guns, but, man oh man, seeing the photos of the hull has suddenly reminded me of just how good a planking job you’ve done. Very nice, Mark, very nice indeed.
Cheers.
Patrick
-
Omega1234 reacted to AndyG in Deben 5-tonner by vaddoc - FINISHED - Scale 1:10 - a Whisstock yard design
The whisstock.com pages lead me to this layout of the gaff-rigged 5-tonner. (It's a .pdf - you might need to be registered with the site to view it.)
That shows the mast held in a tabernacle on the roof of the coach house - this is handy for lowering the mast when required. Under the mast there's a vertical support for the tabernacle down to the keel. No doubt there's an athwartship beam for the roof at that point, and the support butts against the lower side of this beam. This support is seen also functioning as the bottom-right corner of the 'head' and the port side of the frame of the door into the forward berth.
Andy