rvchima
-
Posts
712 -
Joined
-
Last visited
Content Type
Profiles
Forums
Gallery
Events
Everything posted by rvchima
-
 Dave, Thank you very much for the booklet. It's beautiful on its own and should be a big help with the remaining construction. Rod
- 108 replies
-
- 1
-

-
- endeavour
- caldercraft
- (and 1 more)
-
Pat, I've been through the AOTS book many times now and completely overlooked the deck plan on pages 120-121, maybe because it's sandwiched between many pages of sail rigging. That plan will help a lot, but I'm afraid to look to see what I've done wrong already. At least the spiritsail yard brace pin 11 isn't used yet. Rod
- 108 replies
-
- 2
-
-
- endeavour
- caldercraft
- (and 1 more)
-
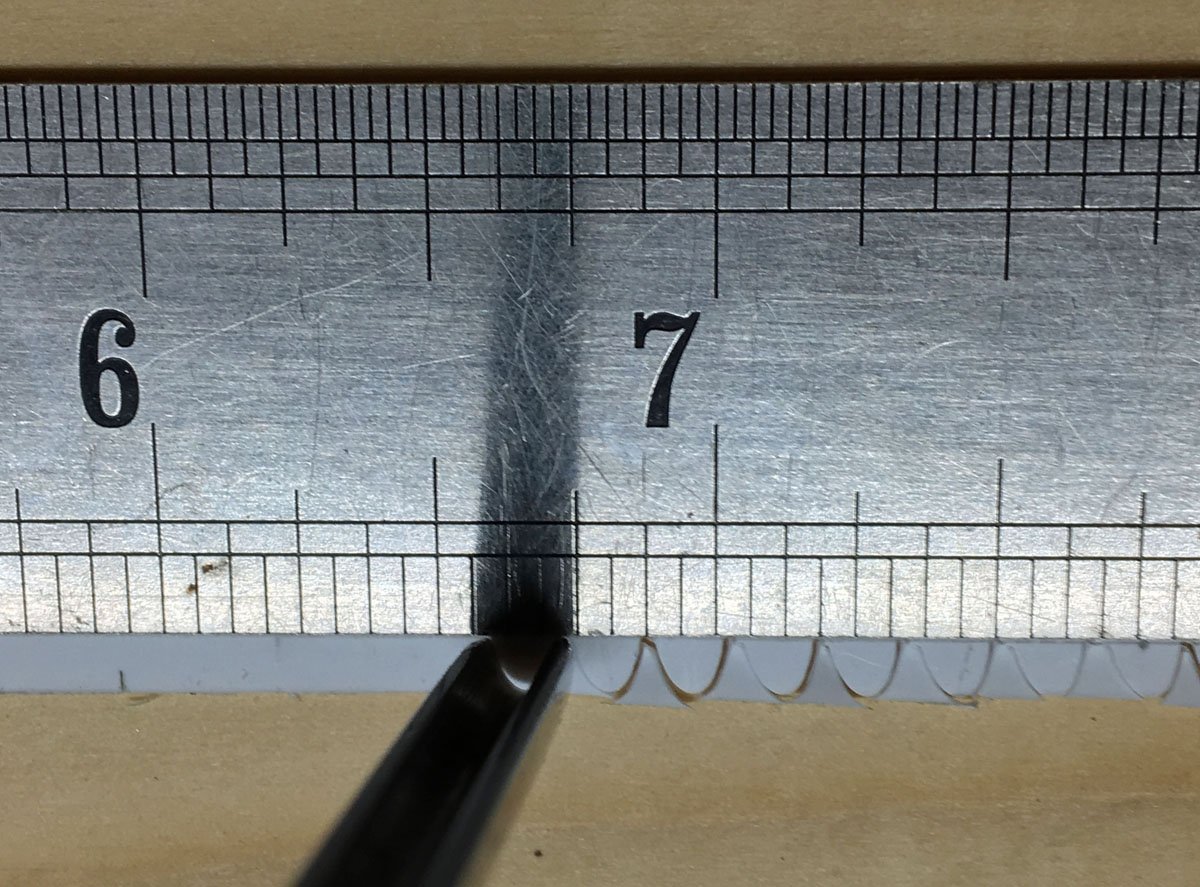
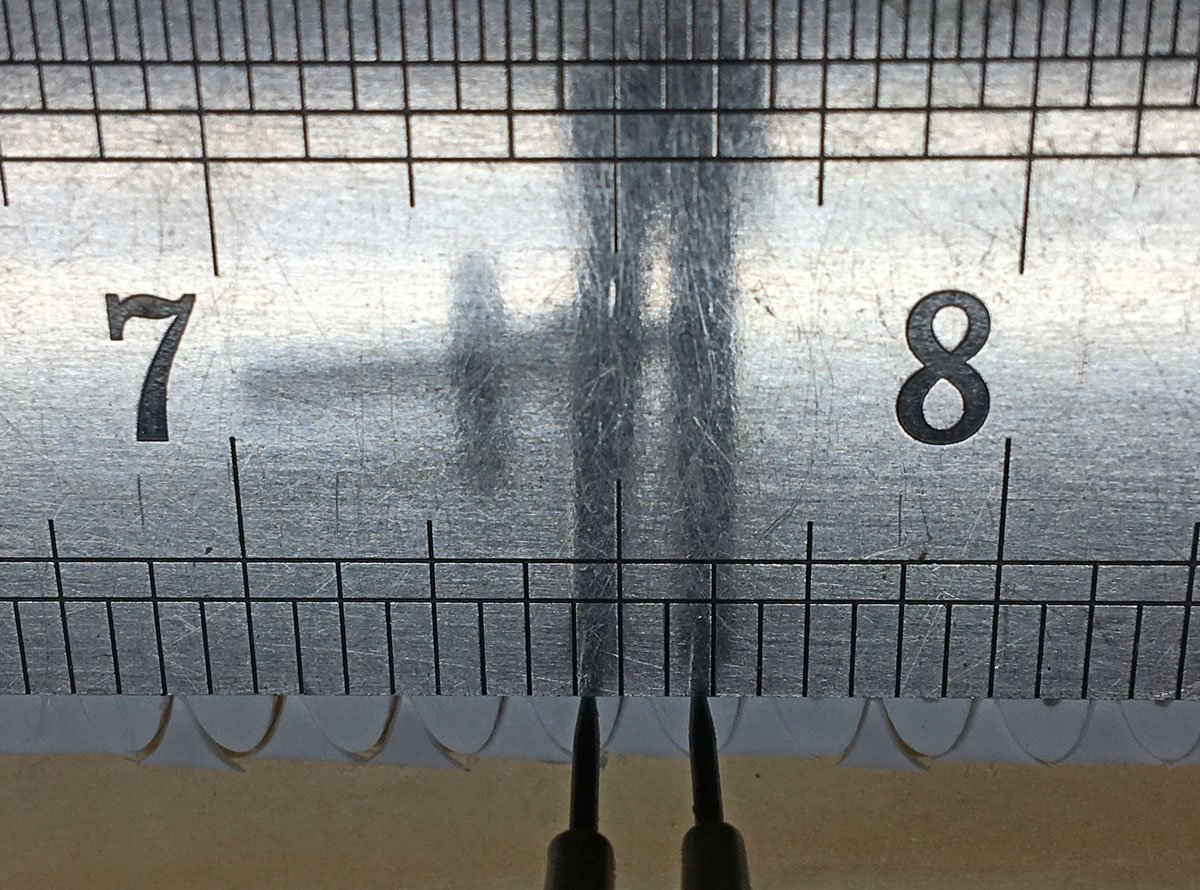
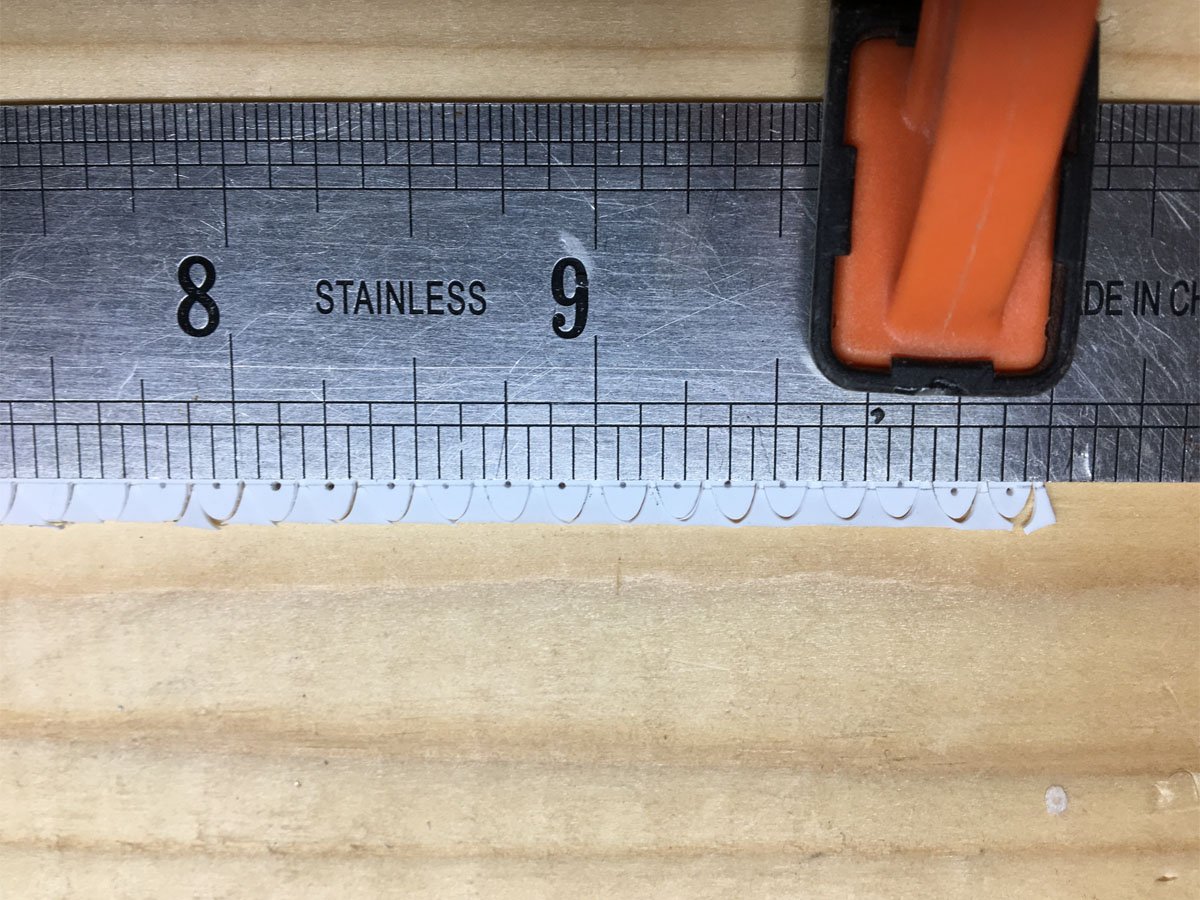
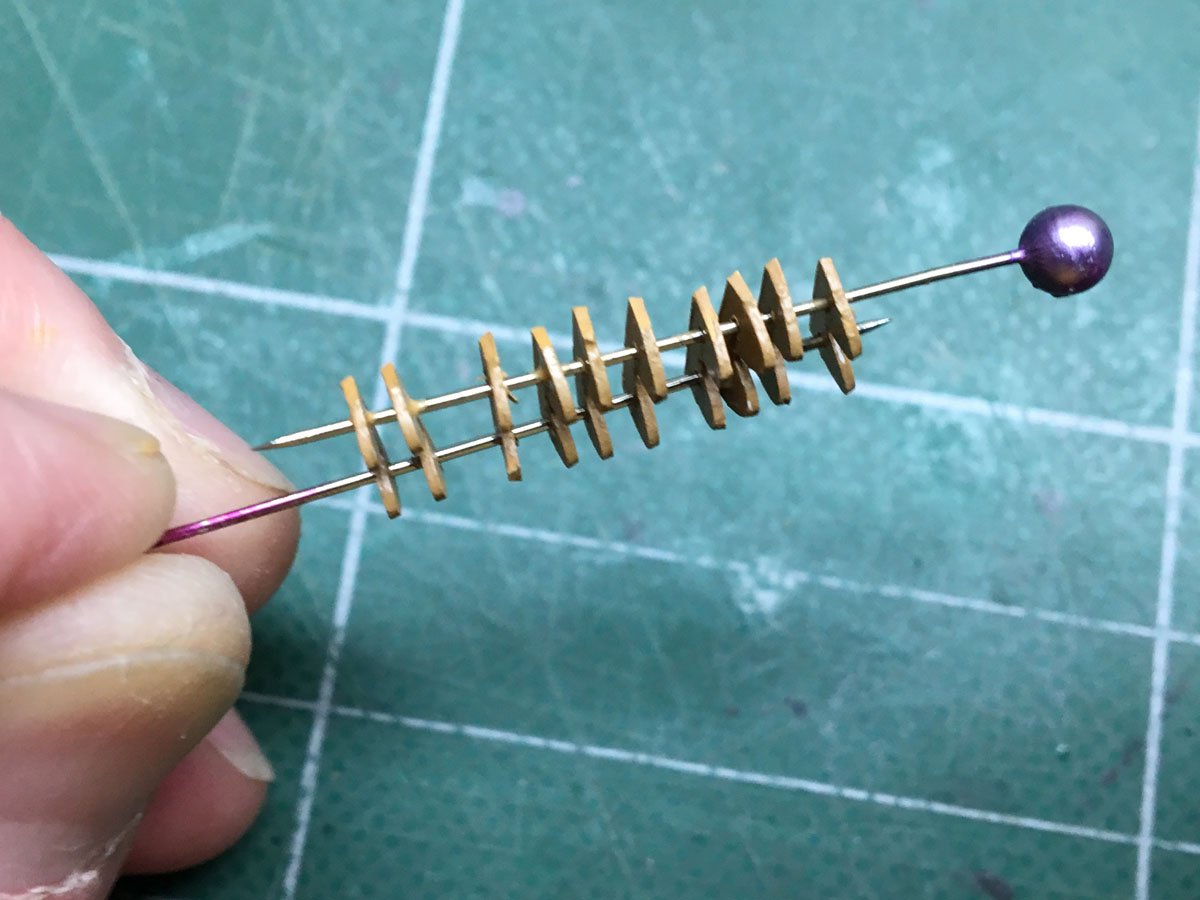
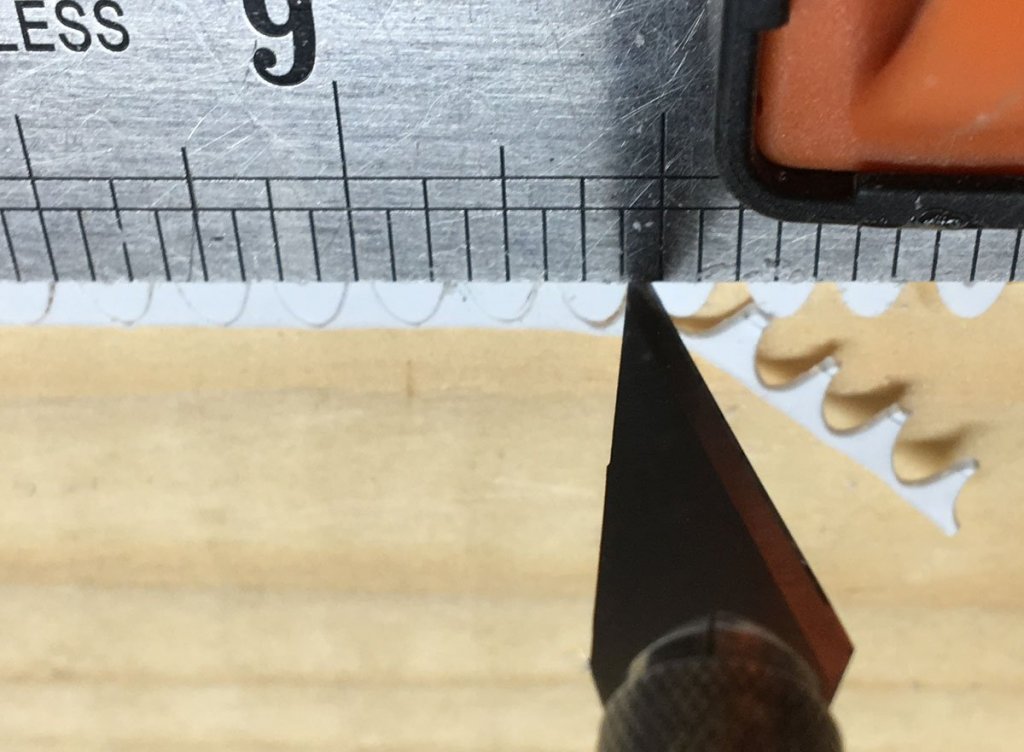
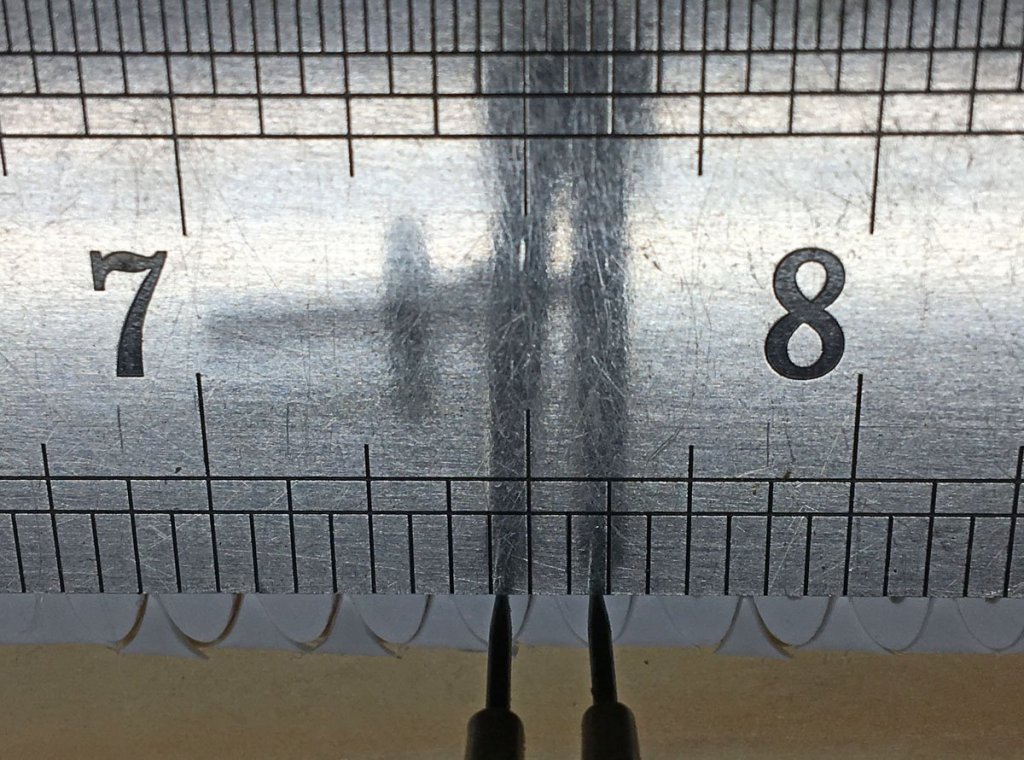
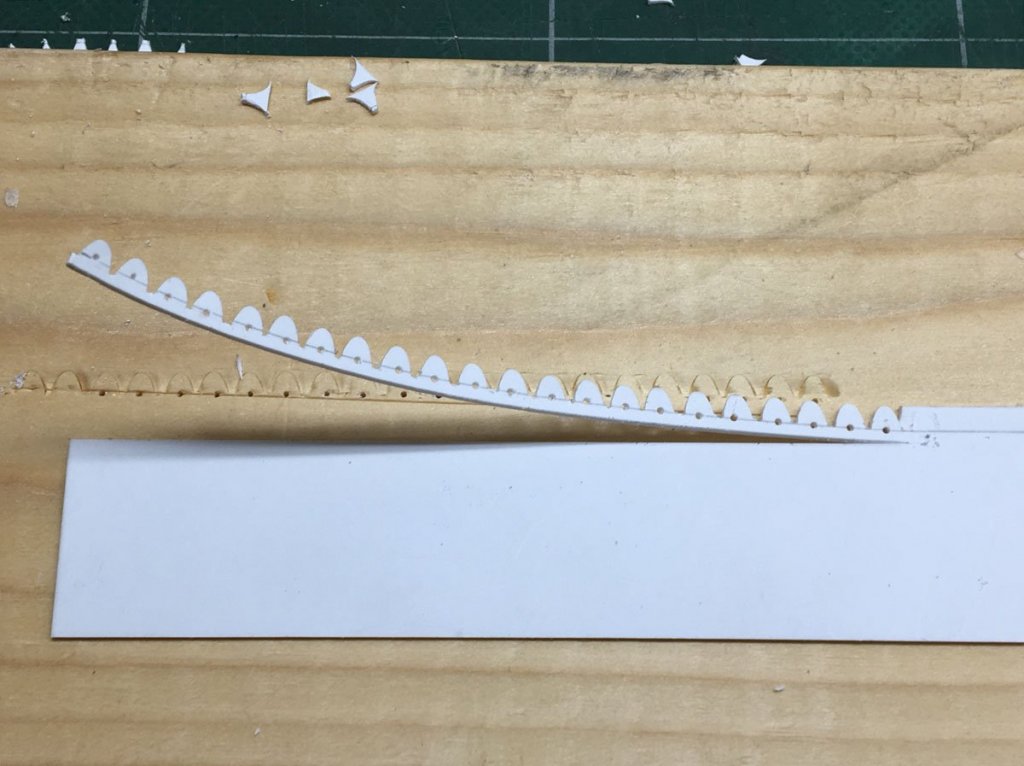
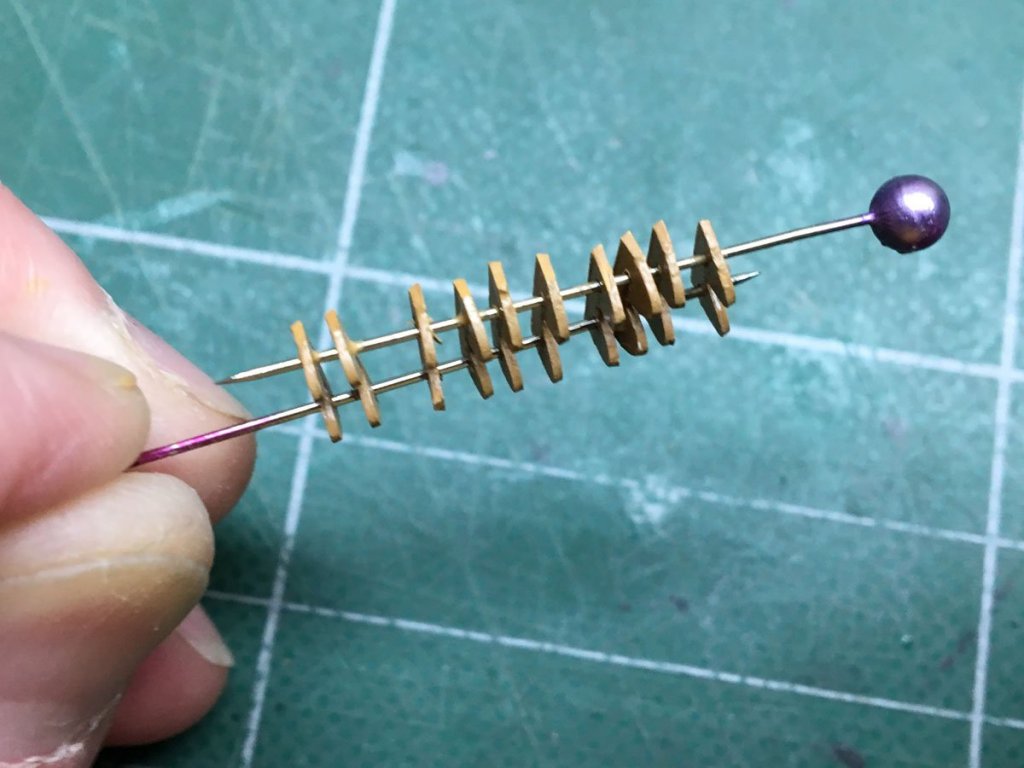
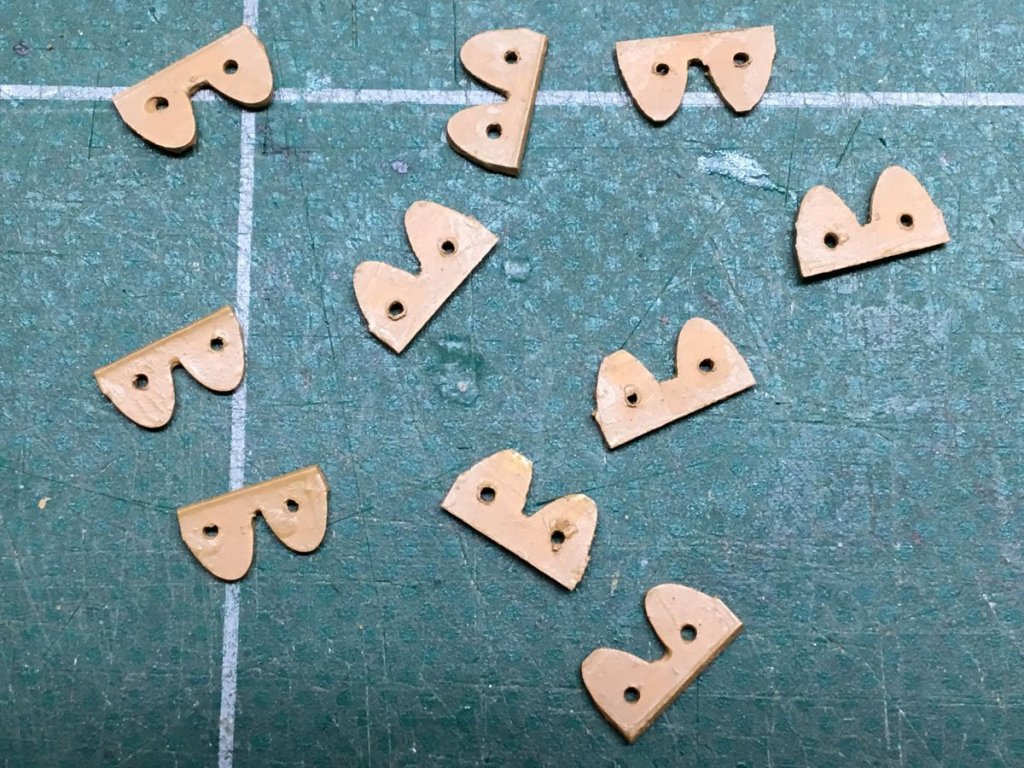
The Parrels of Ship Modeling I decided to go ahead and loft all my yards, with the mains on slings and all else on parrels as discussed earlier. I've been using the PE brass parrels supplied with the kit, painted wood color. They're a little thin but look pretty good. I'll get some pictures up soon. Anyway, when I got to the final yard (the mizzen top) I ran out of parrels. I don't have a 3-D printer like Dave Rowe or a milling machine like Pat Banyan, so I needed another clever way to make parrels. Here's what I came up with. I started with some styrene sheet left over from my Arleigh-Burke. It was exactly the same thickness as the PE brass parrels, 0.5 mm. I clamped it down with a straight edge 3 mm from the edge, and used a 3 mm gouge to cut a series of humps along the edge. The humps are a little hyperbolic. If I were to do this again I'd try sharpening a piece of brass tube to cut circular humps, but this looks OK. I used an X-acto knife to cut the gaps between the humps, and used dividers to mark holes exactly 4 mm apart in each pair. I drilled the holes with a Proxxon drill, and sliced off a strip of parrels when I was done. I painted the strip (and my fingers) wood color, sliced off the individual parrels with a chisel, and stacked them on 2 pins to touch up the ends. Ta da!


- 108 replies
-
- 2
-
-
- endeavour
- caldercraft
- (and 1 more)
-
All, I took a little road trip with my wife and just noticed that there were some new posts here. I do have Marquardt's AOTS, and while it is great for showing where lines are attached on the yards, etc., it doesn't really show where they belay to. Does Mr. Marquardt have another rigging plan that I am unaware of? Rod
-
Pat, Thank you for the quick response! I was just sitting at the dining room table with my two rigging plans and colored pencils to try to see where everything goes, and now I have a more general question. Should the fore and main masts be rigged symmetrically? i.e., if a line from the fore yard goes to a cleat on fore shroud #1, should the corresponding line on the main yard go to the cleat on main shroud #1? It seems likely to me, but there are a couple of instances on my plans where the yards on the fore and main masts are rigged very differently.
-
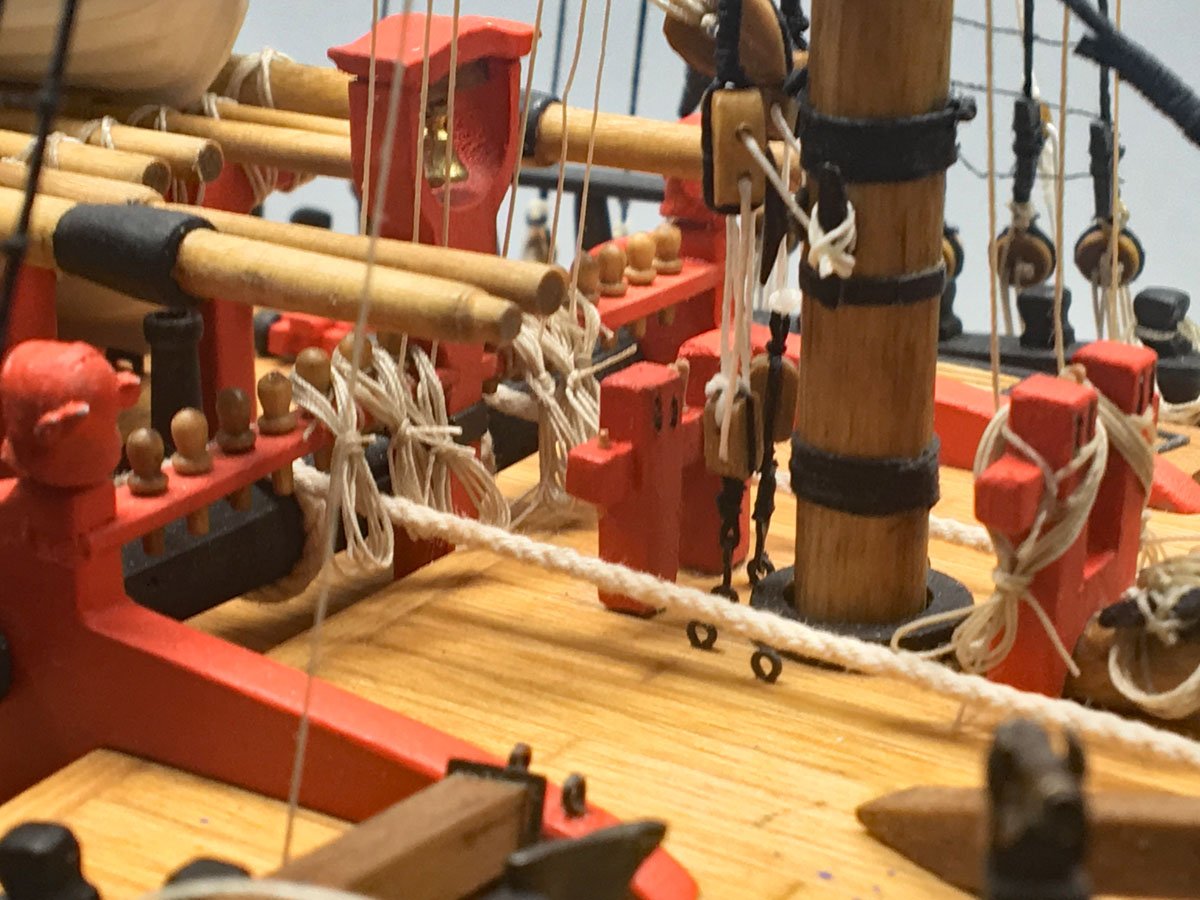
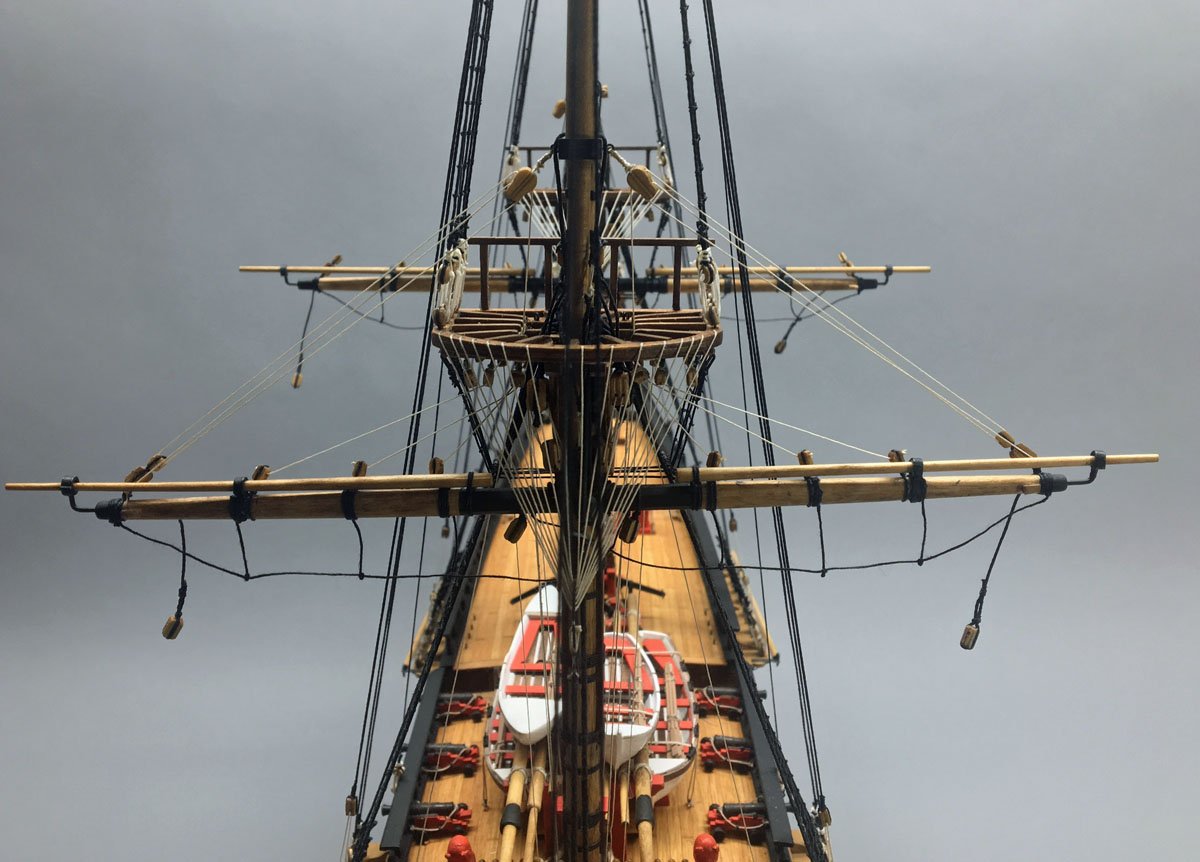
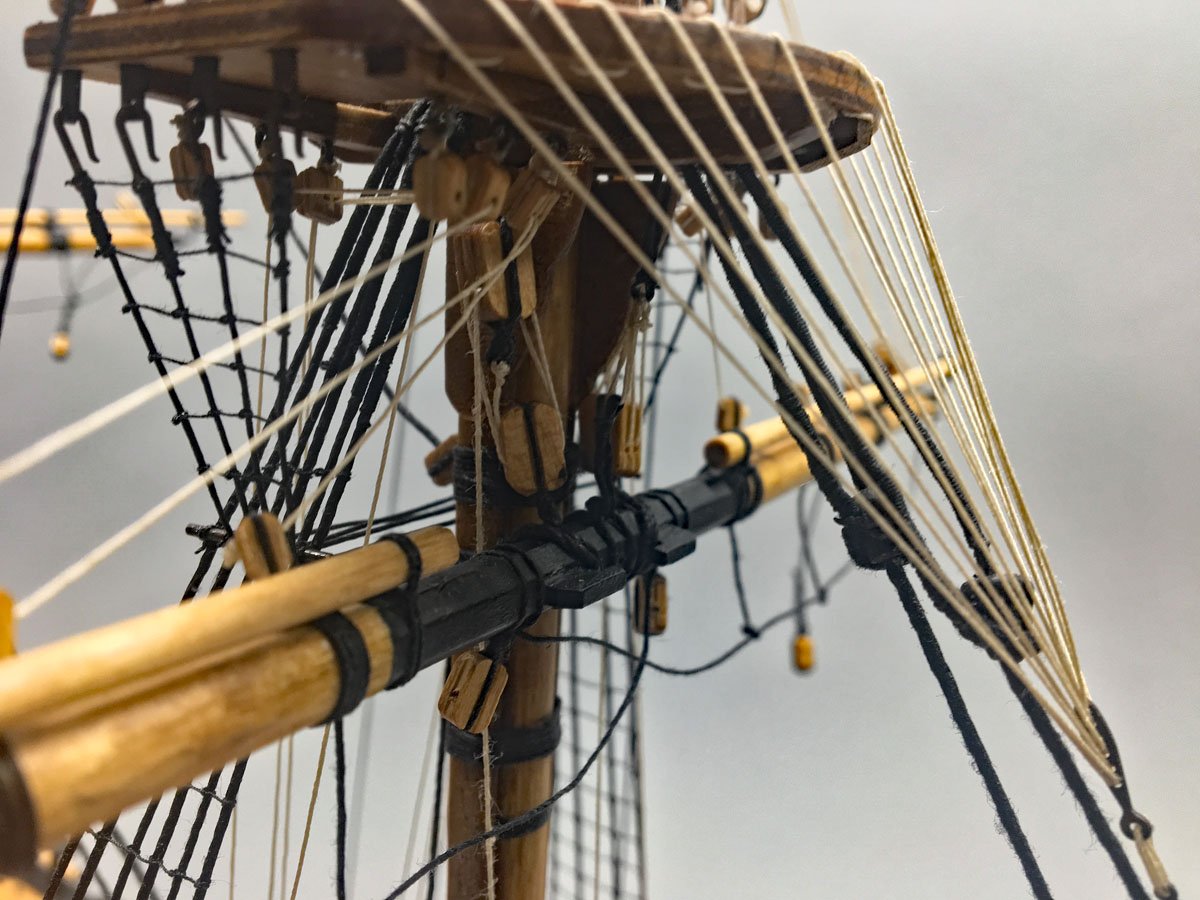
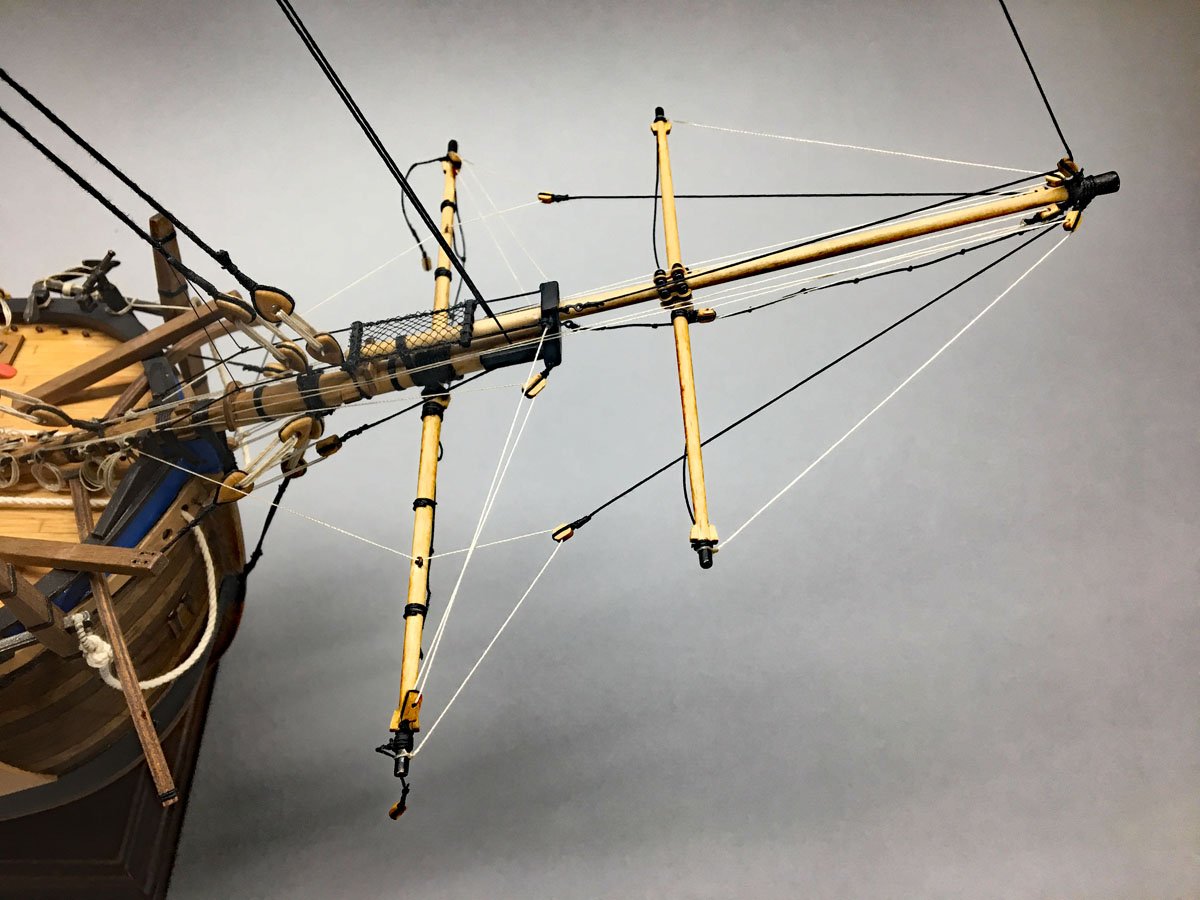
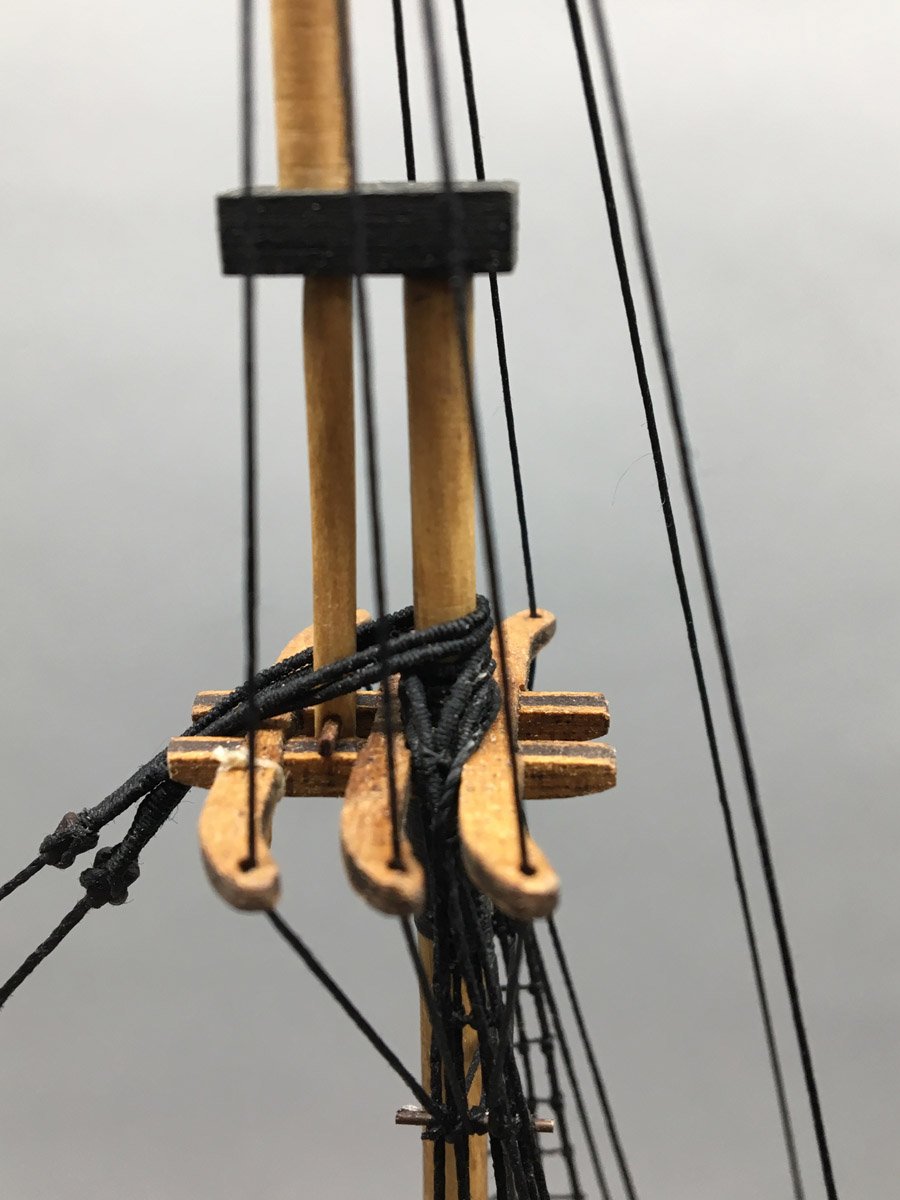
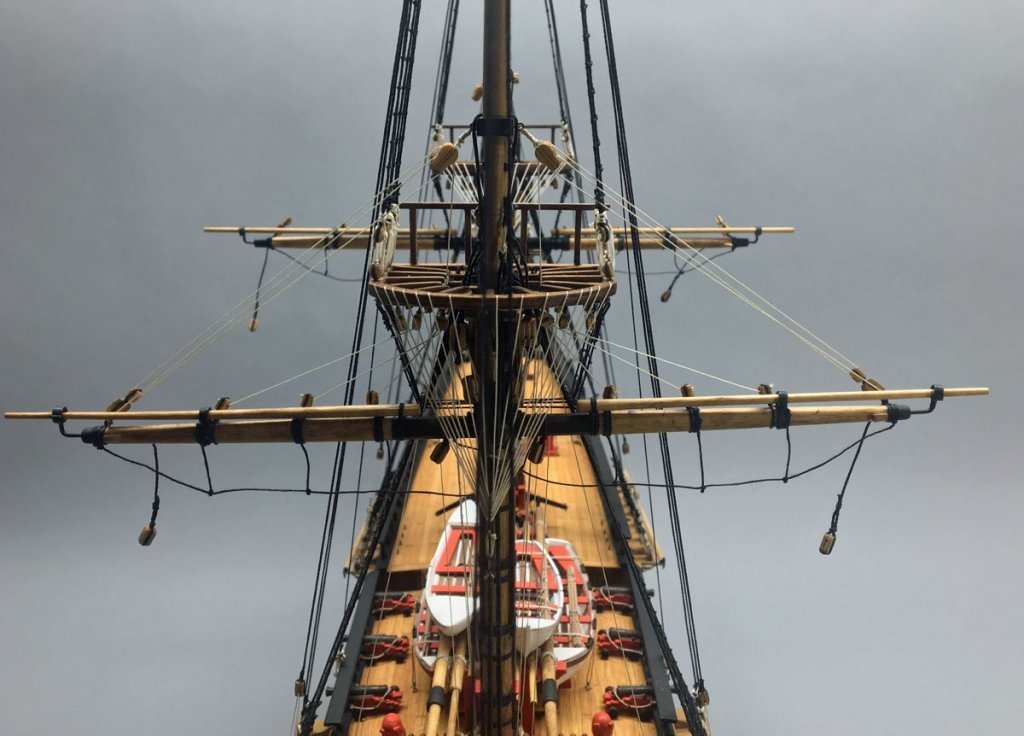
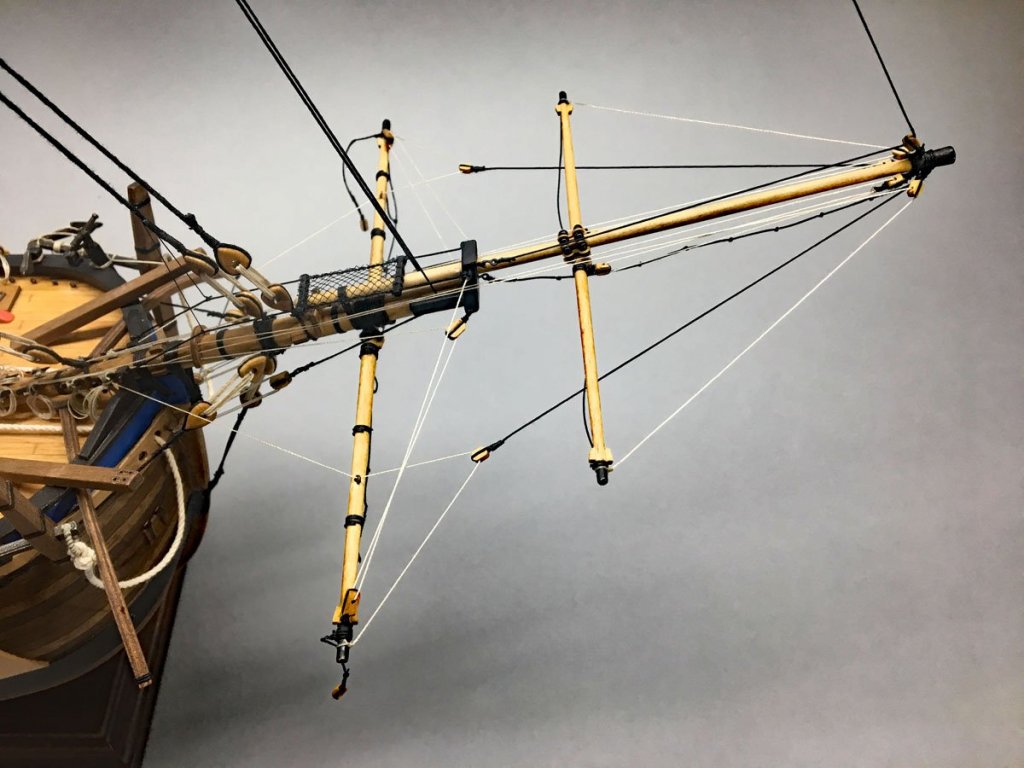
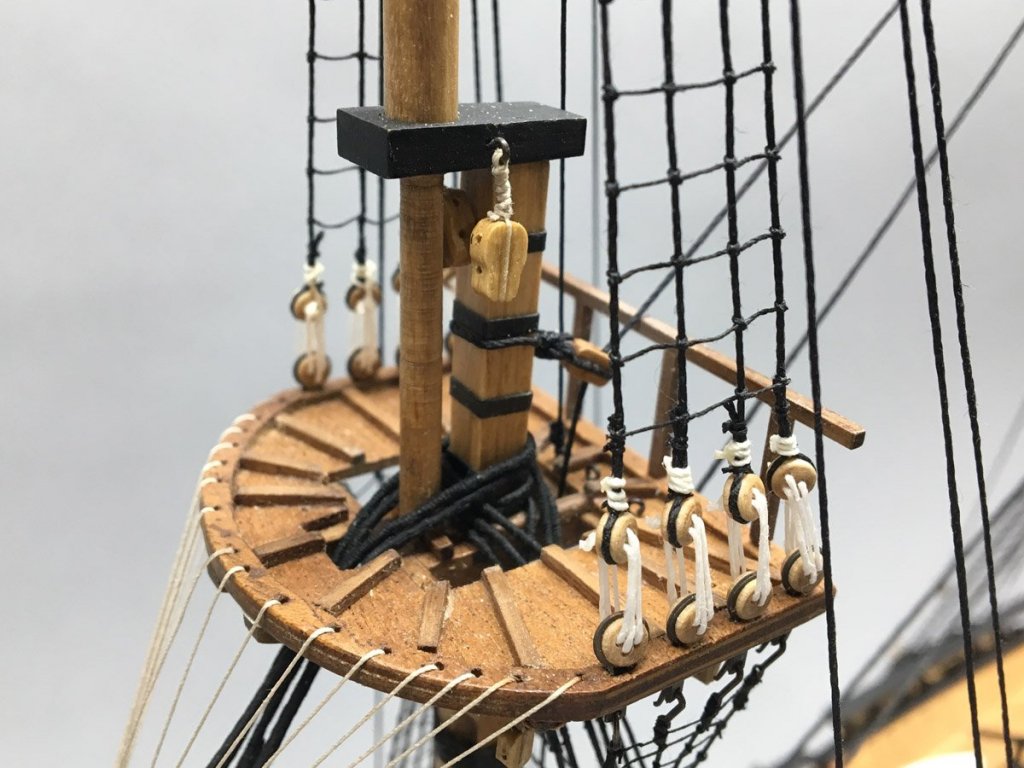
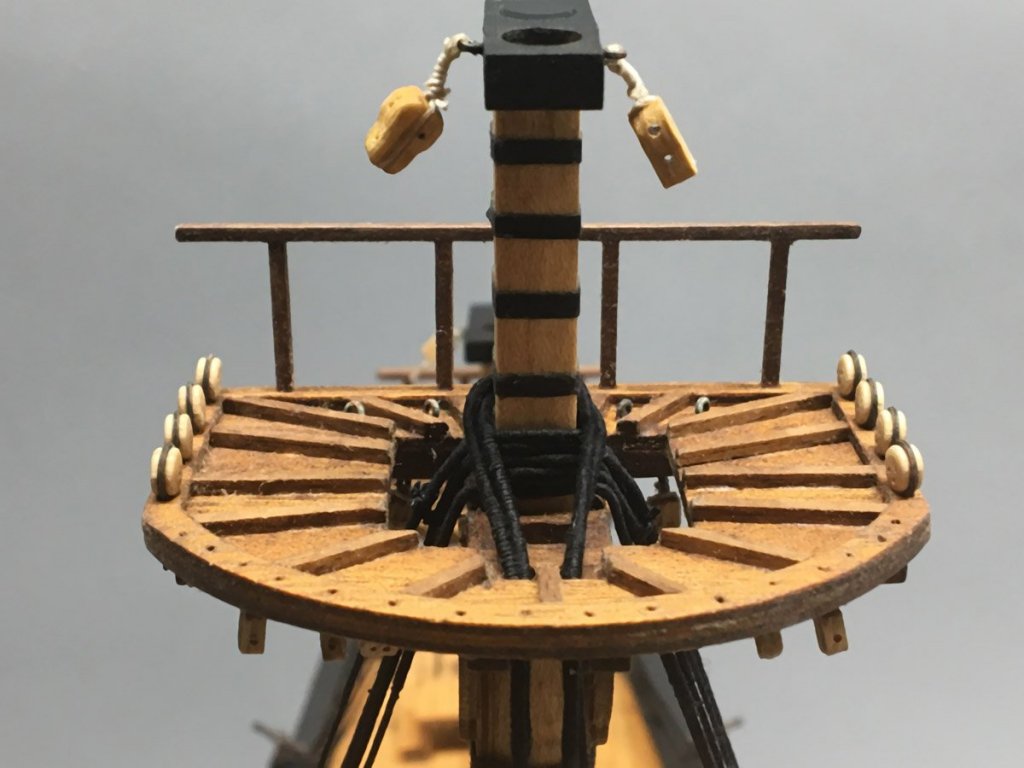
Spirit, Fore, and Main Yards Here are some photos of my progress on the yards, as promised. Spiritsail and spirit topsail yards are installed and mostly rigged. The Caldercraft kit did not include any reference to the netting or any material for the same. I thought that I might have a scrap left over from my Syren, but alas, none in my parts box. So I went to the local fabric store where I had to buy 1/4 yard of netting at the outrageous price of 28 cents ;^) The fore and main yards are lofted, and the foreyard is mostly rigged. It was really tricky getting the jeer blocks lashed in place. They hang freely from lashing around the mast that hangs on two little wood bumps attached to the mast. The blocks want to dance around and the lashing wants to fall off the blocks. I hung some spring clamps from the blocks to keep them pointed downwards, attached some electrical clamps to the jeer block ties to hold them at the right position, and put a pin into the mast at the top of the bump to keep the lashing above it. A picture would have helped but I was too frustrated to get the camera. Anyway I got them done. Here's where the fore leech and bunt lines are belayed. I'm still not sure where to belay the main lines.


- 108 replies
-
- 2
-
-
- endeavour
- caldercraft
- (and 1 more)
-
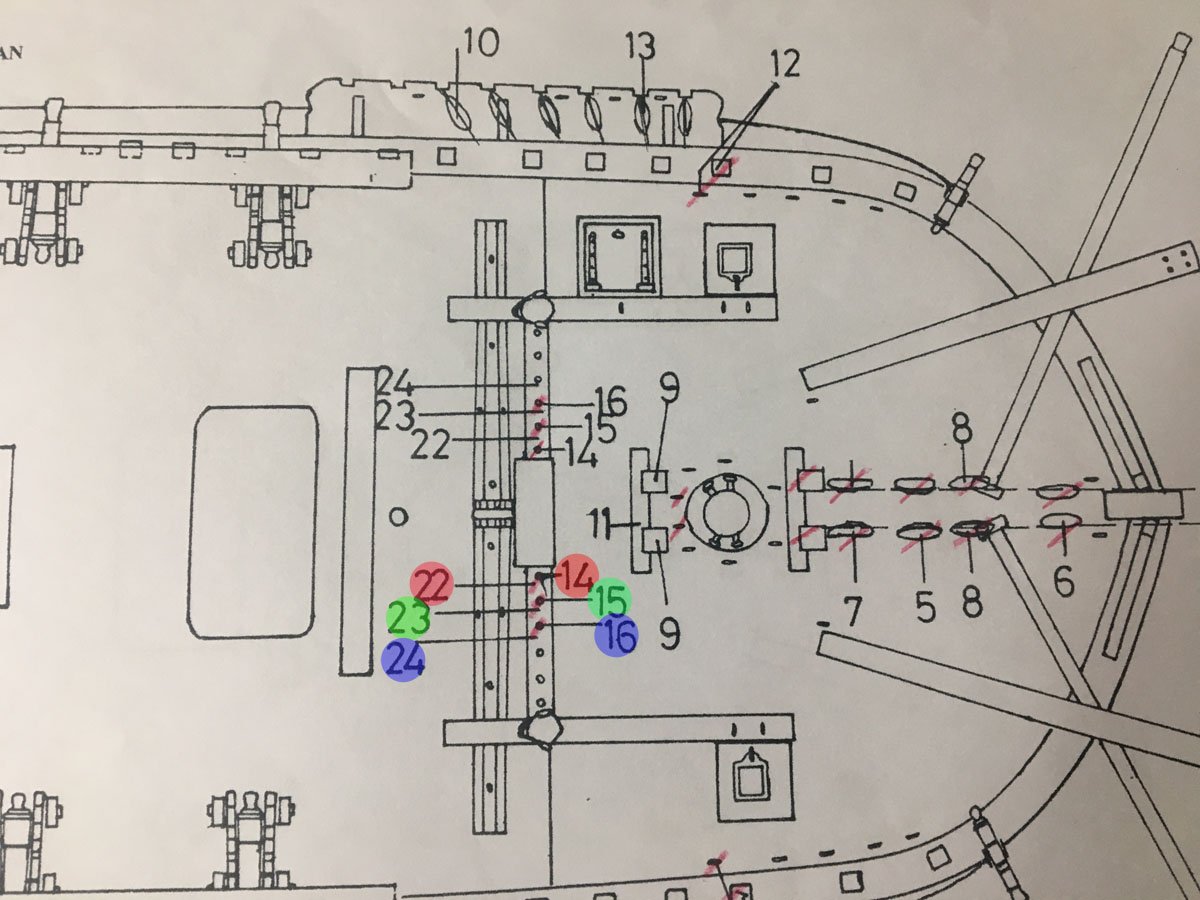
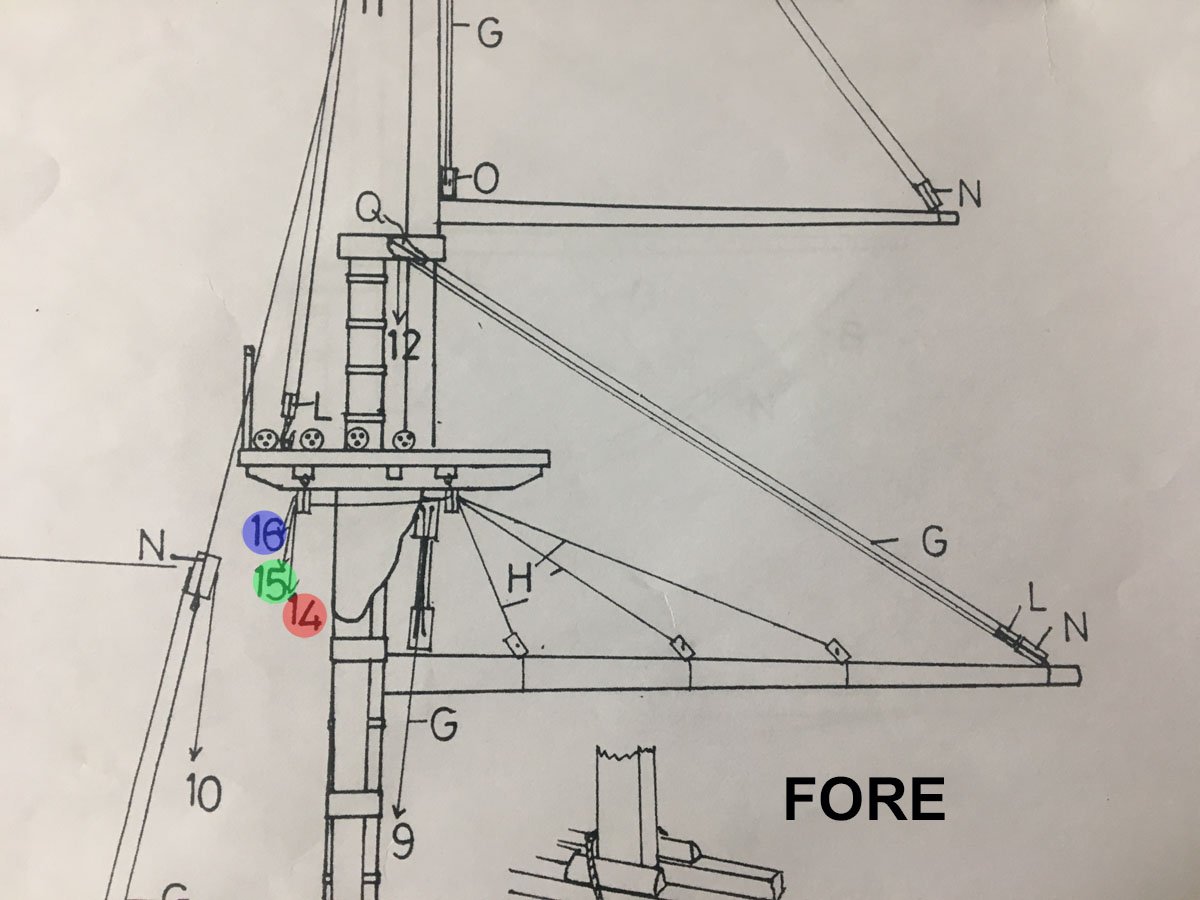
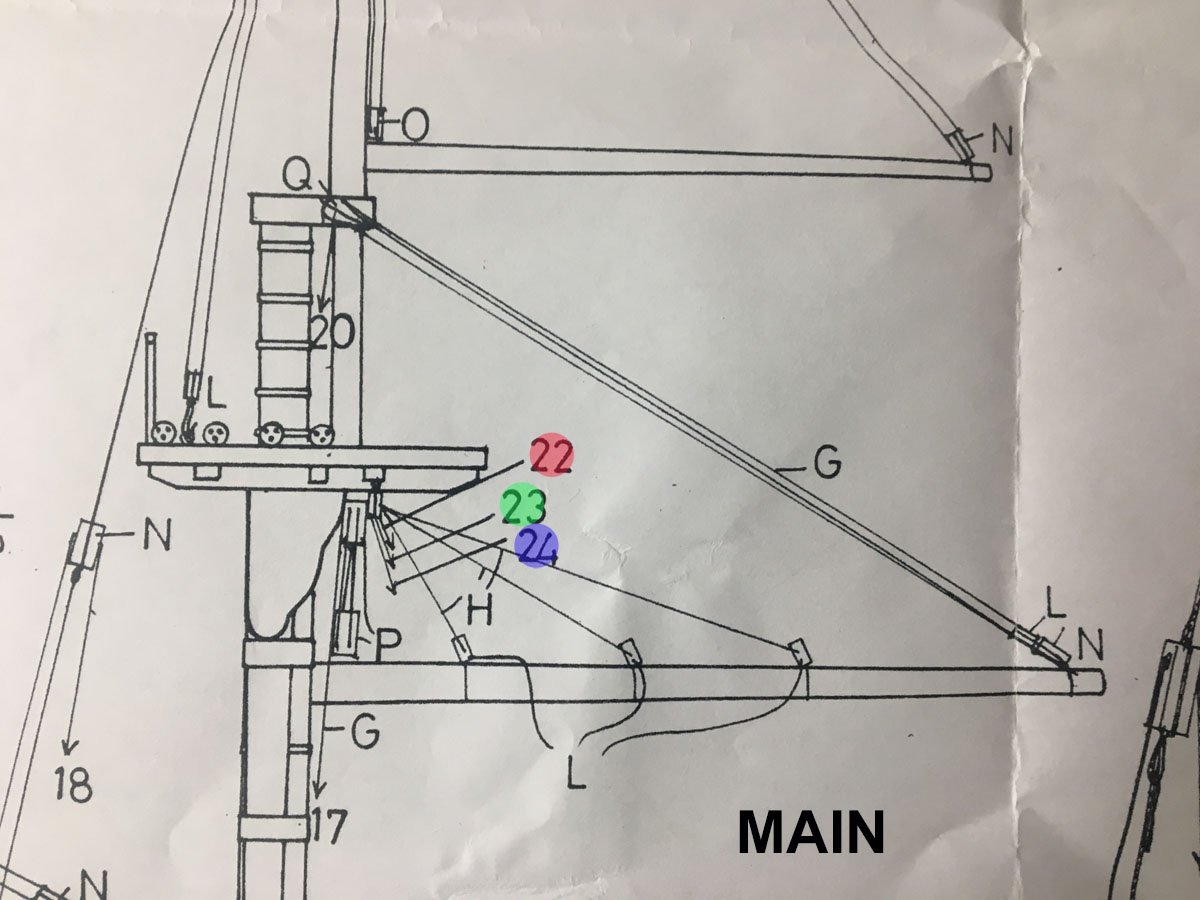
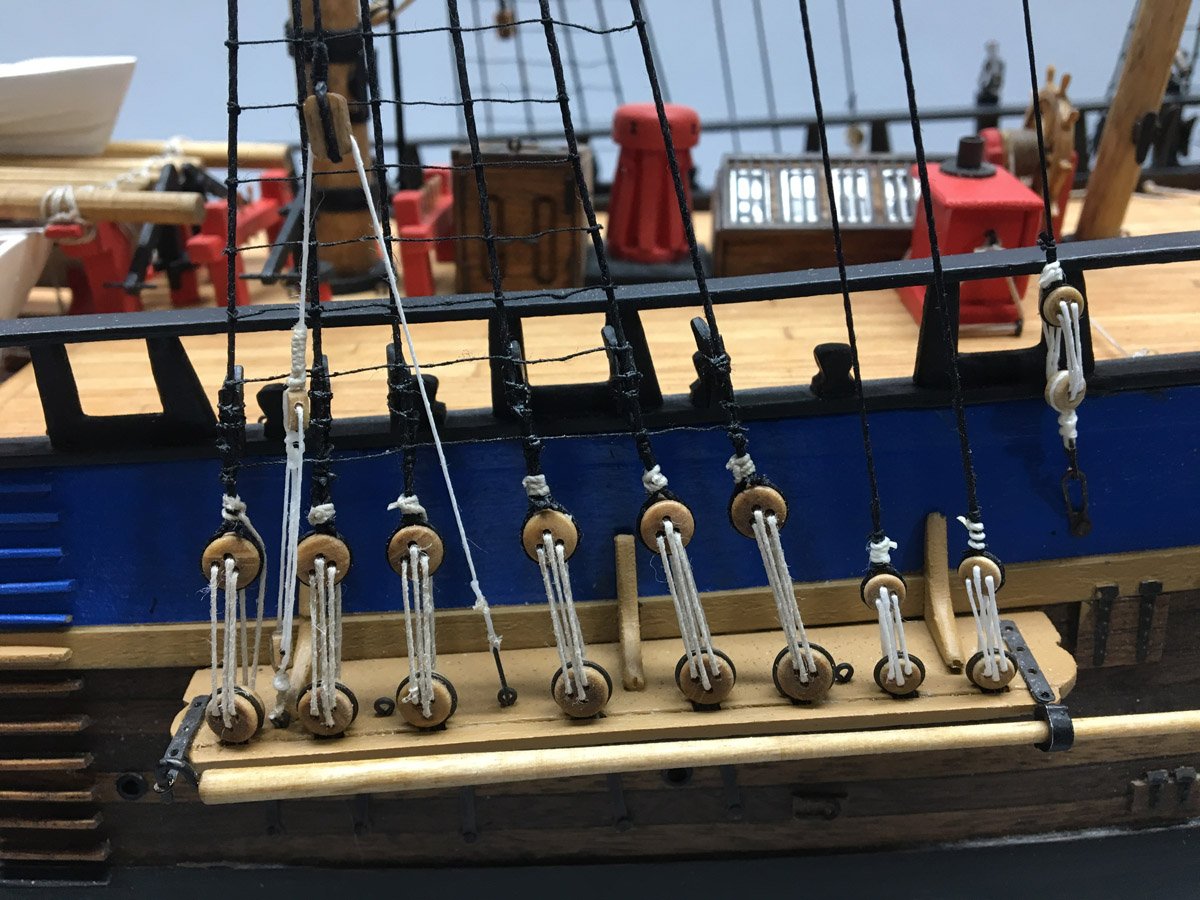
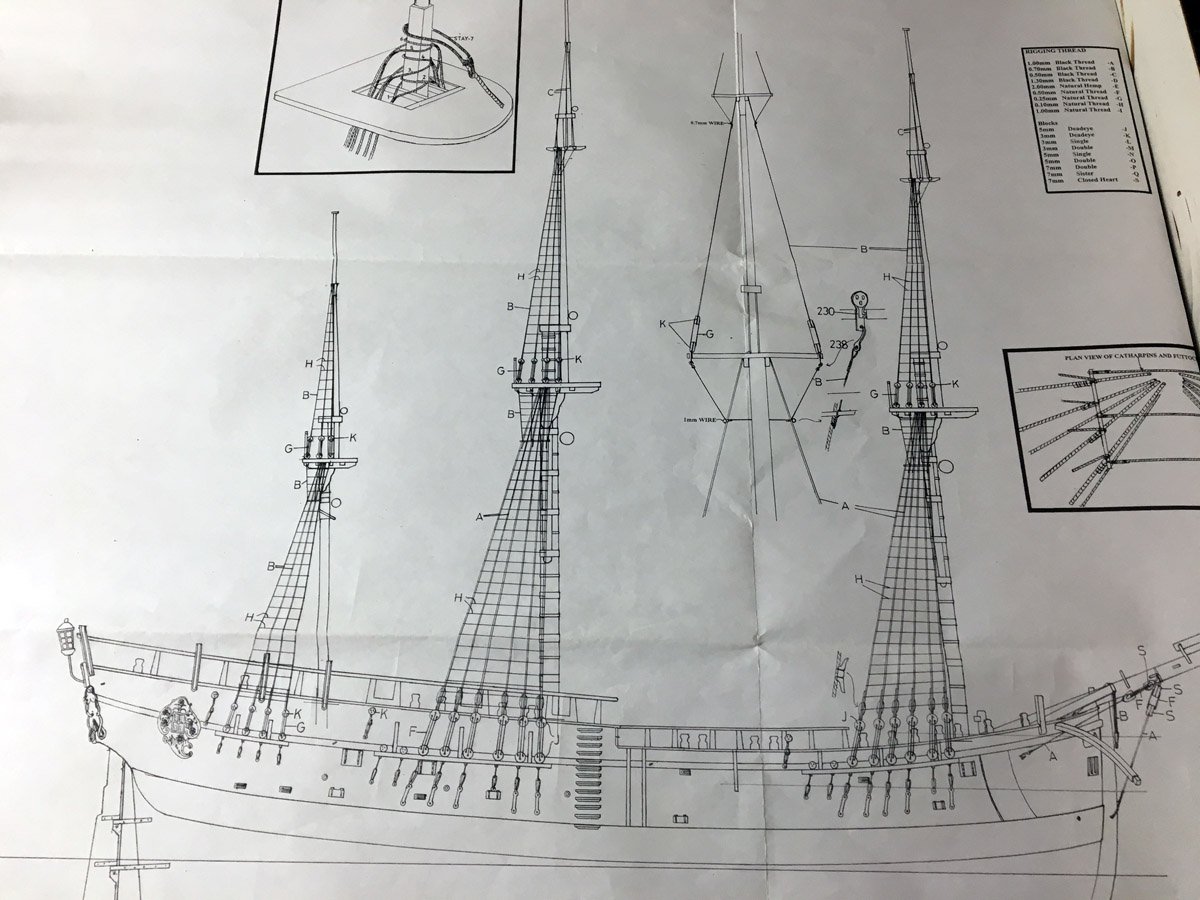
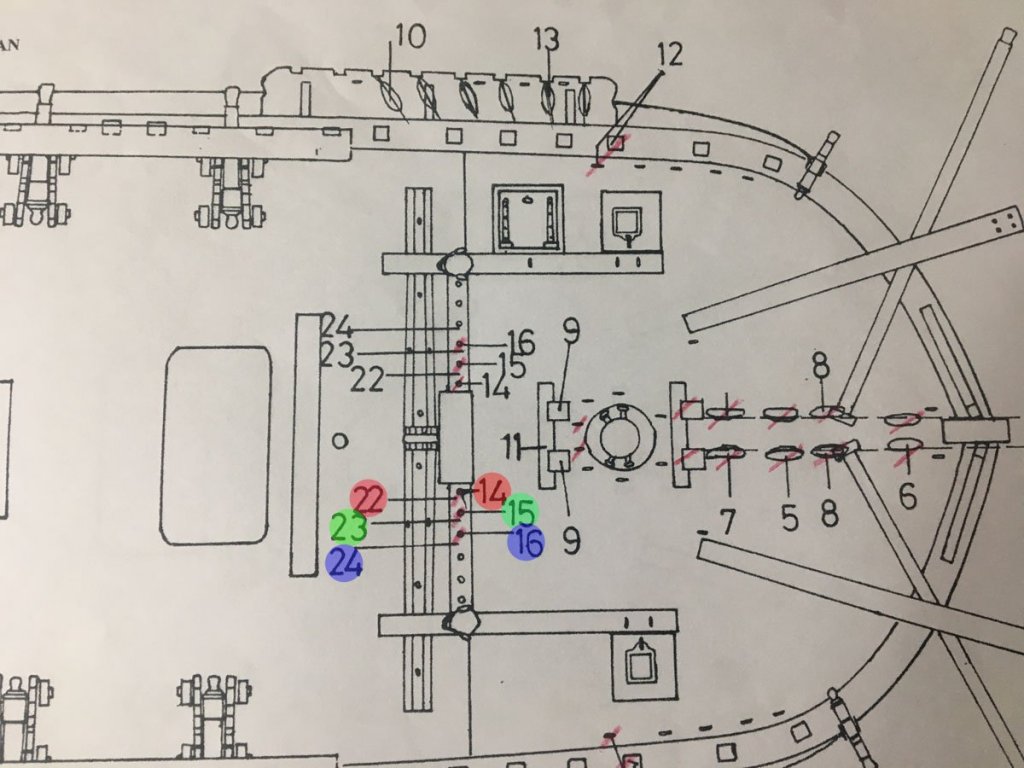
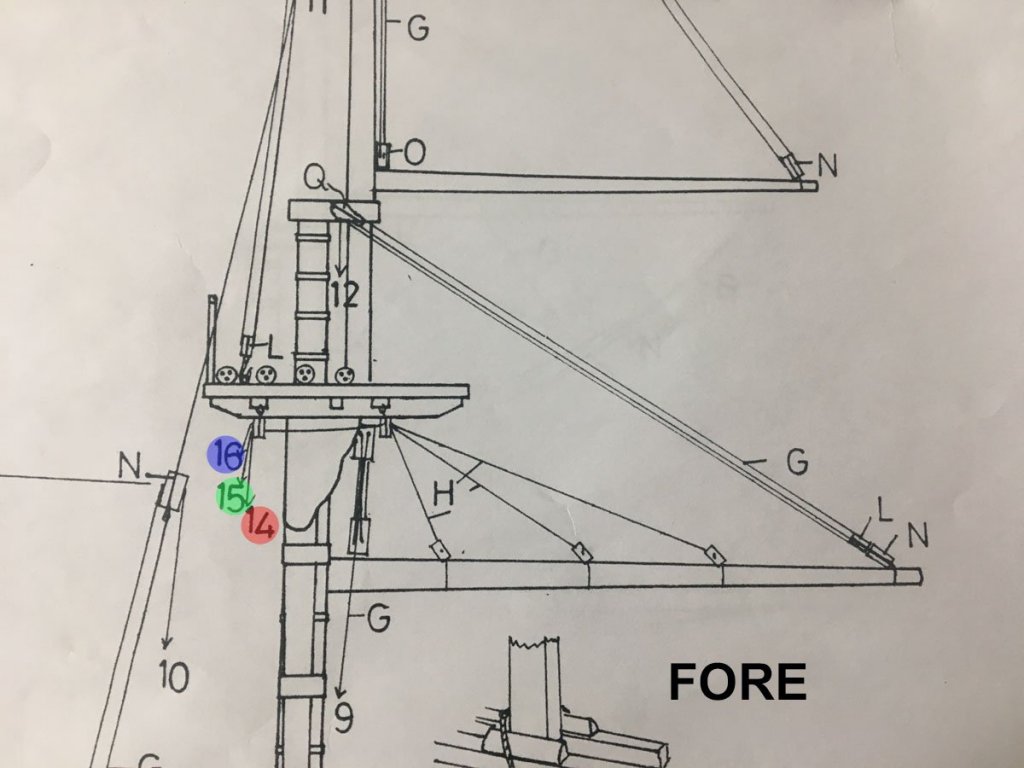
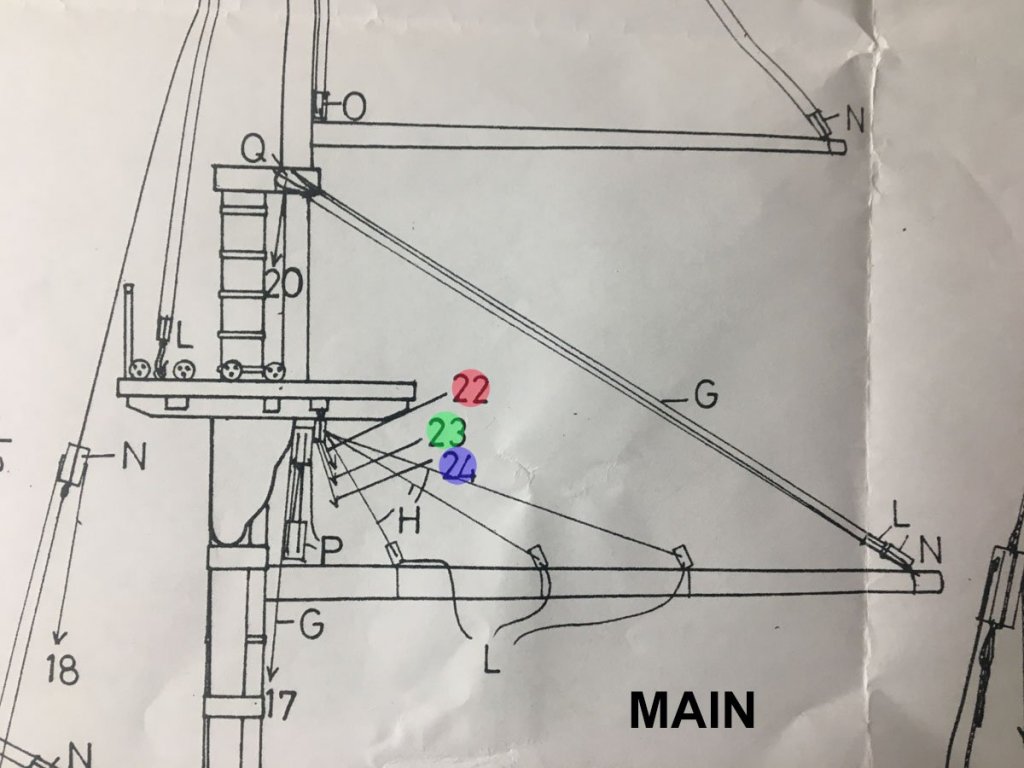
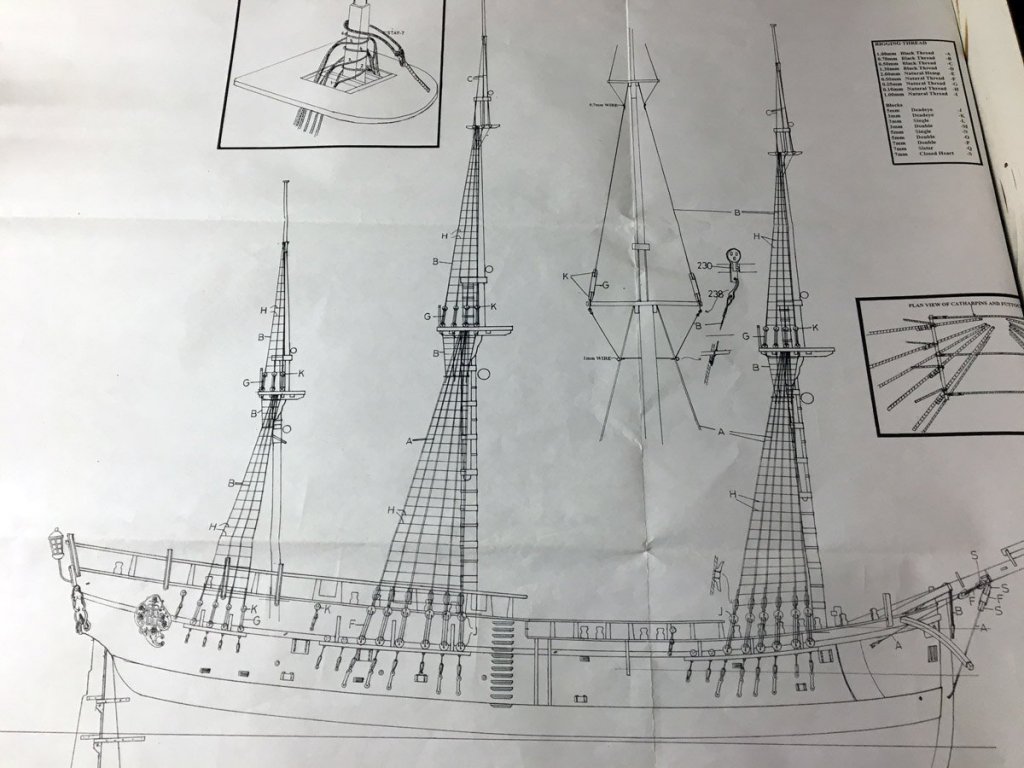
Running Rigging Question I am pretty much done with the spiritsail and spiritsail topsail, and have lofted the fore and mainsails. I promise to get some photos up later today or tomorrow. I rigged the leach and and bunt lines on the foresail but have run into some probable errors on the Caldercraft plans and need some advice on how to proceed. The deck plan shows where the lines attach. The foresail leach and bunt lines, 14, 15, and 16, (red, green, and blue) attach to the pin rail ahead of the winch. Seems reasonable to me. But the leech and bunt lines on the mainsail, 22, 23, and 24, appear to go forward and attach to exactly the same pins as the foresail lines. That does not seem right. I suspect that they should lead aft across the top, and then down to the bitt just abaft the mainsail. I mentioned previously that the plans did not show any belaying pins in the bitts. I did add some, but maybe not enough. If you've completed this step, please let me know what you did with these lines. Many thanks.
-
I like what you did with the oar handles. The notches in the gallows make a lot of sense. I wish I'd thought of it. Rod
-
Pat & Dashi, Thank you so much for the information. I was not aware of the books by Peterson or Steele. They look like excellent references that I should have been looking at all along. I attached the spirit yards and some of their rigging last week, but am currently visiting my son in North Carolina. Thus, no progress for awhile. Rod
- 108 replies
-
- 1
-
-
- endeavour
- caldercraft
- (and 1 more)
-
Parrels Question So I am ready to loft some yards and am unsure which ones should have rolling parrels. The Cladercraft plans only show parrels on two yards - the main topsail yard and the spirit topsail yard. Dave Row's build log shows rolling parrels just about everywhere except on the top gallants. I can't quite tell where Pat Banyan has rolling parrels. From what little I've read, main yards were usually lofted into place and left there. I can't imagine how rolling parrels could roll past all the bands and hoops on the main mast anyway. So I'm thinking: Rolling parrels on the spiritsail top Sling on the spirit yard Slings on the top gallants Rolling parrels on the top yards Slings on the main yards Crossjack and mizzen topsail ?? Beads on the gaff without spacers Please let me know what you think, and feel free to correct any incorrect terminology. This is not exactly my area of expertise. The beads in the Caldercraft kit look pretty good. The spacers are PE brass. I've painted them wood color but haven't strung them up yet to see how they look. I have a feeling that I may end up making my own. Sure would be nice if Chuck Pissaro offered some laser cut ones!
- 108 replies
-
- 1
-
-
- endeavour
- caldercraft
- (and 1 more)
-
Standing Rigging Complete - 1 year, 2.5 months, 576 hours Just 2 weeks since my last post and I have 2 more layers of masts and rigging in place. I'm about ready to start lofting yards. The top gallants were relatively easy. I ran out of Caldercraft line after the main deadeyes and replaced it with white linen from Bluejacket Shipcrafters for the top deadeyes. It is much nicer line - no fuzz and exactly the diameter it claims to be. It is whiter than the line that I used on the crows feet and the lower deadeyes, but I'm OK with it. The top shrouds and ratlines were just like the mains - just fewer knots to tie. The breast backstays were complicated to set up. With three blocks and a hook it was hard to decide what to tie last to maintain tension. I set up all the blocks first and tied the hook last, probably exactly the opposite of real life, but everything is taut.

- 108 replies
-
- 2
-
-
- endeavour
- caldercraft
- (and 1 more)
-
Lower Standing Rigging Complete, 1 year, 2 months, or 542 hours Back on August 30 I threatened to quit when I got got all the lower standing rigging in place like this, and here I am. But last night I attached the top masts so it's too late to quit. Then looked at the plans to see what happens next. Basically I just have to do the standing rigging all over again, albeit with fewer lines. I can hardly wait.
- 108 replies
-
- 4
-
-
- endeavour
- caldercraft
- (and 1 more)
-
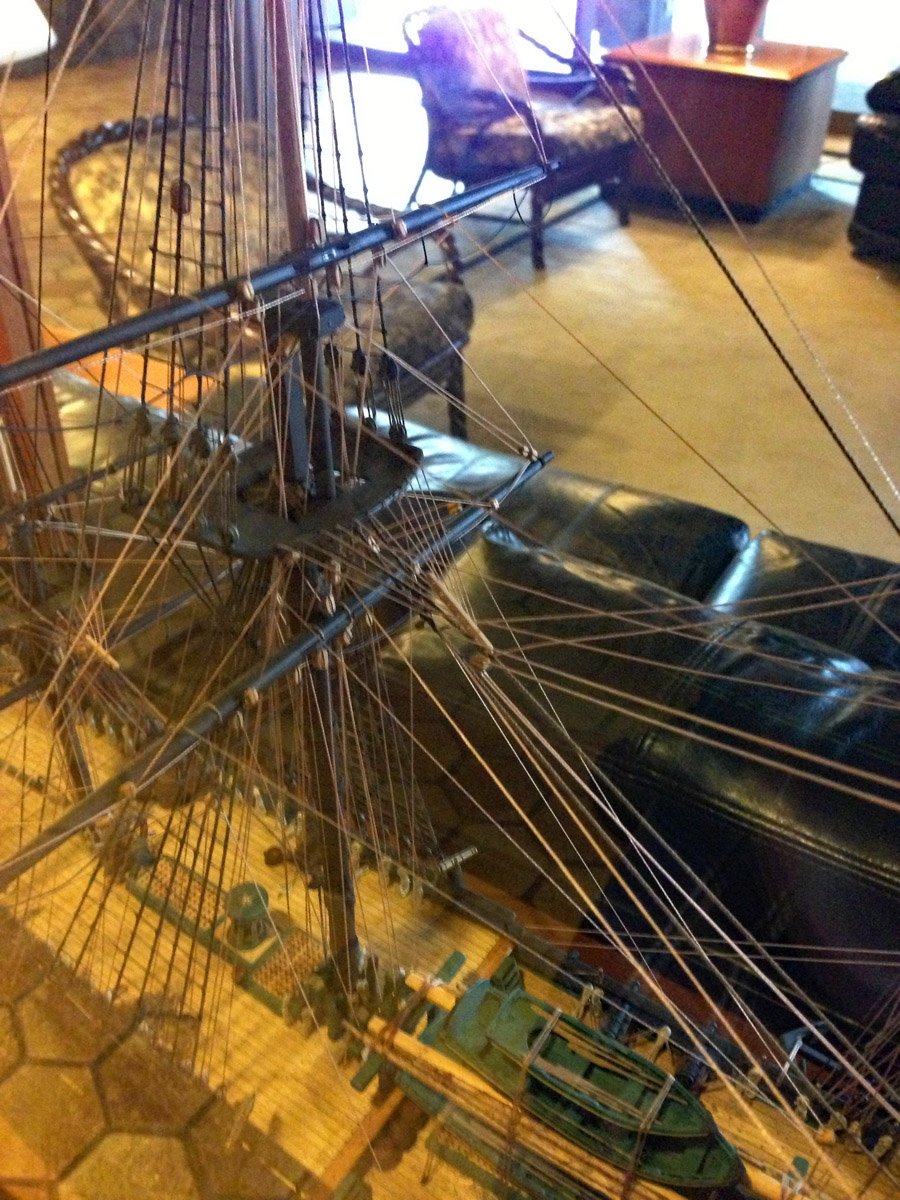
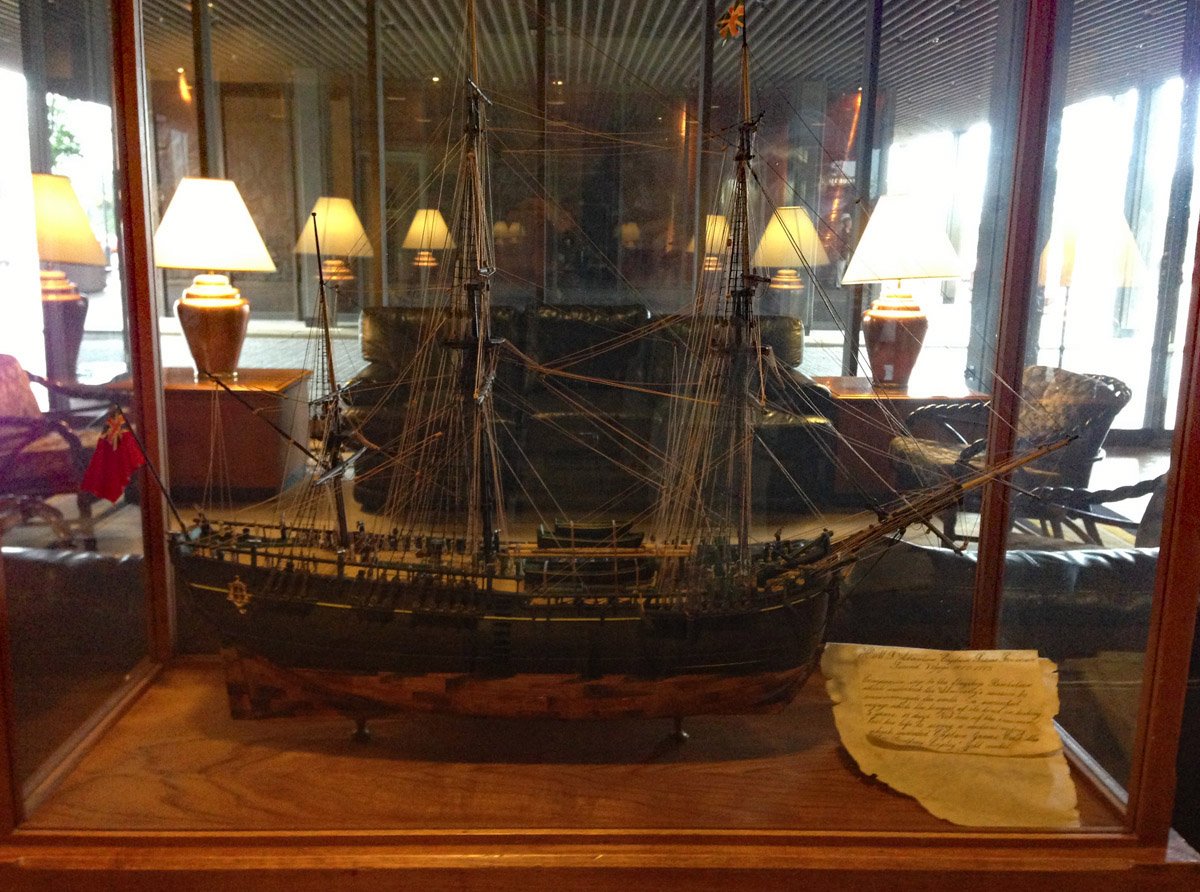
Crows Feet My wife and I were in Alaska in 2013 and stayed in a nice hotel in Anchorage. They had a beautiful model of the HMS Resolution in a case in the lobby. I had never seen a ship with crow's feet before (the radial lines from the back stays to the tops). I was intrigued and took a couple of (poor) photos. Three years later I was searching for something to build and I looked for the Resolution. No luck there but I found this kit of the Endeavour. So now I've spent 500+ hours on the Endeavour just to rig crows feet, that took about an hour tops to make. But I love them.


- 108 replies
-
- 3
-
-
- endeavour
- caldercraft
- (and 1 more)
-
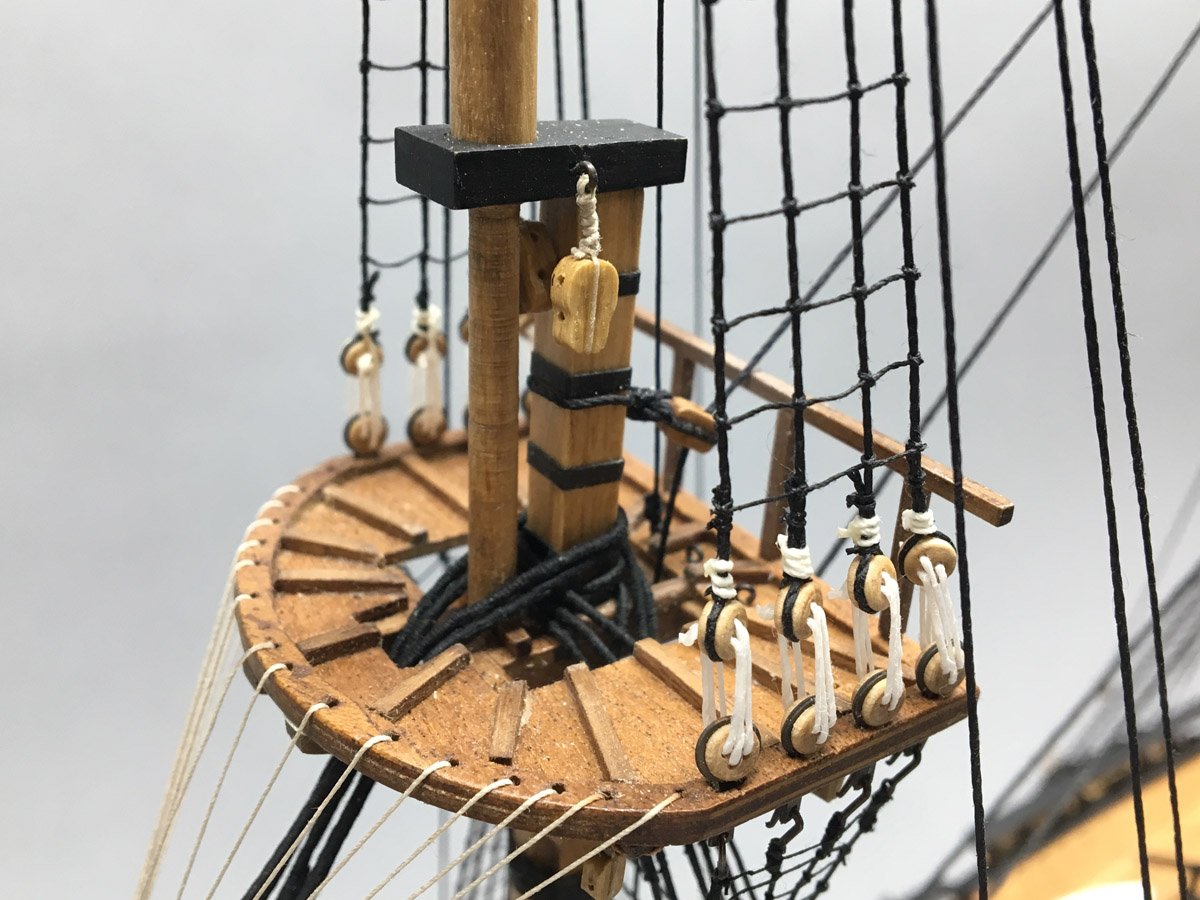
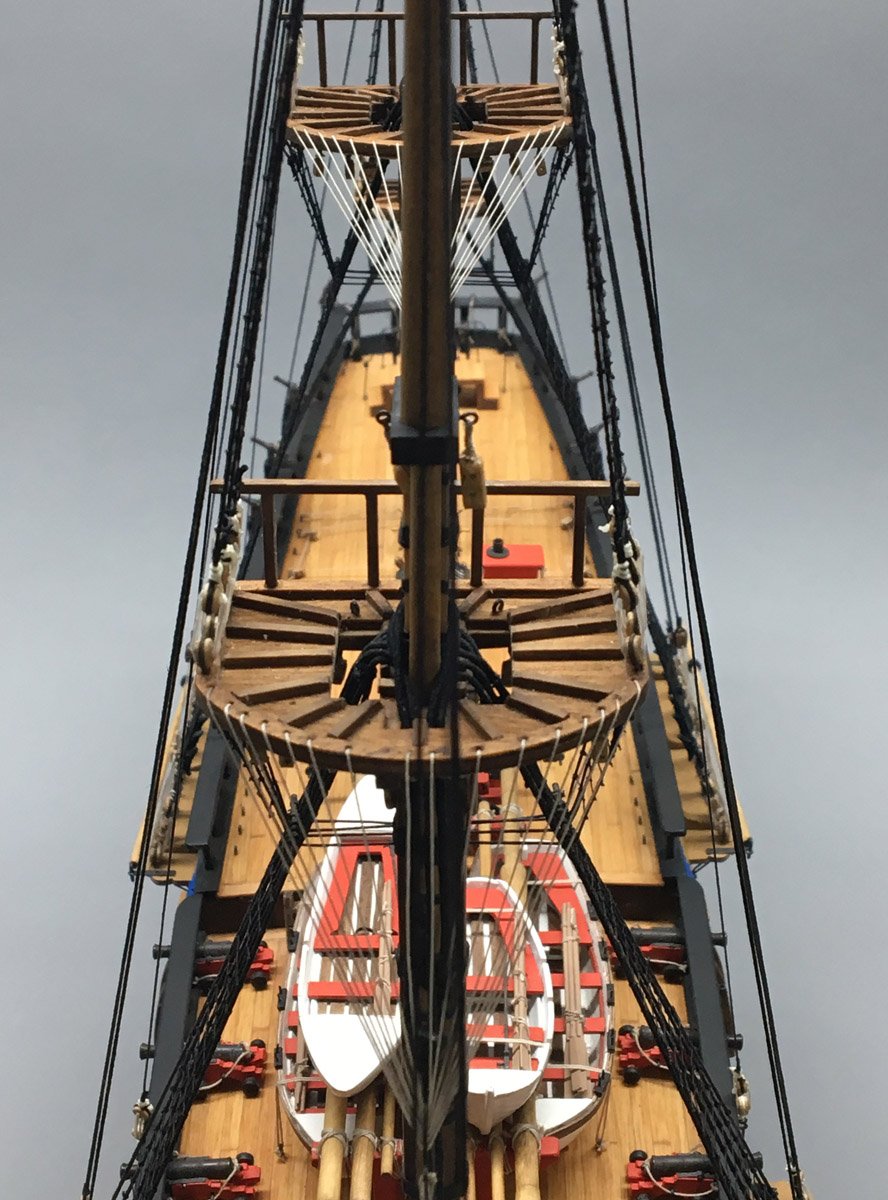
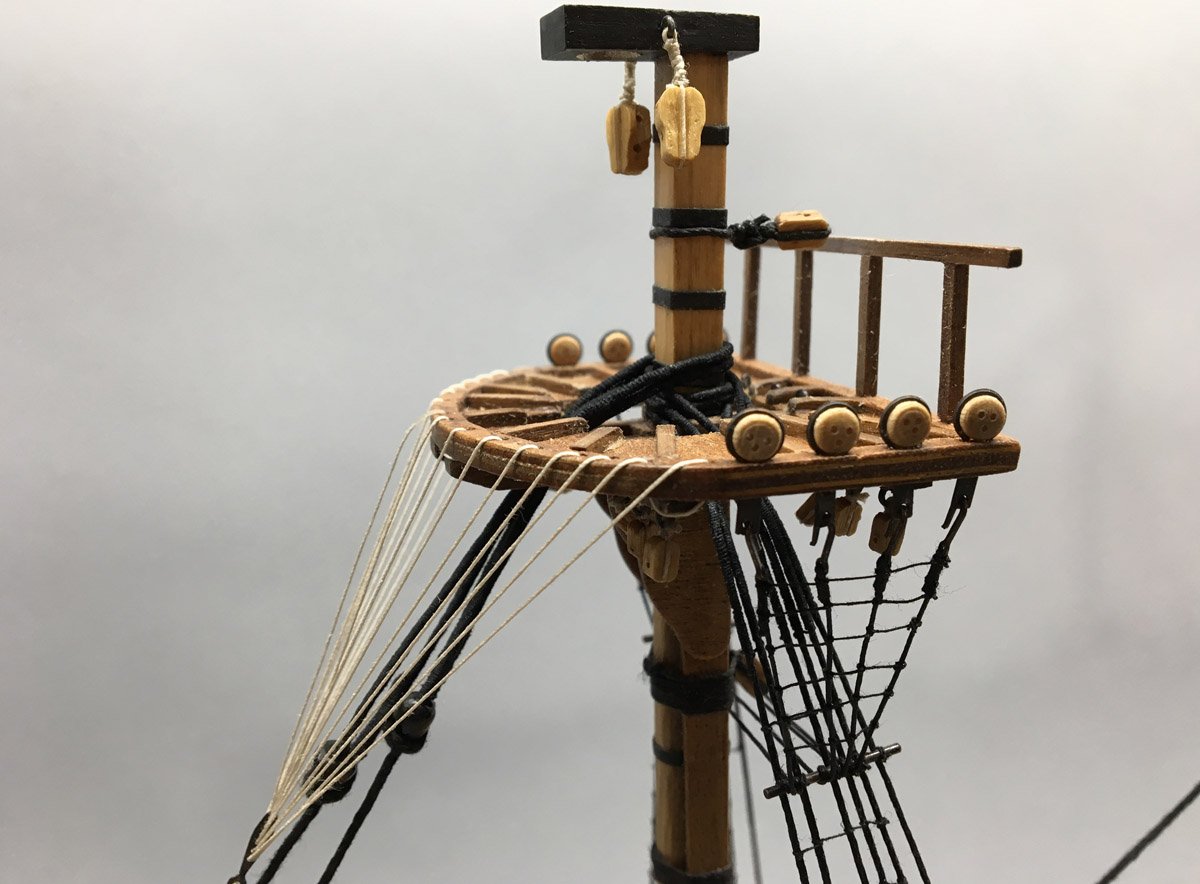
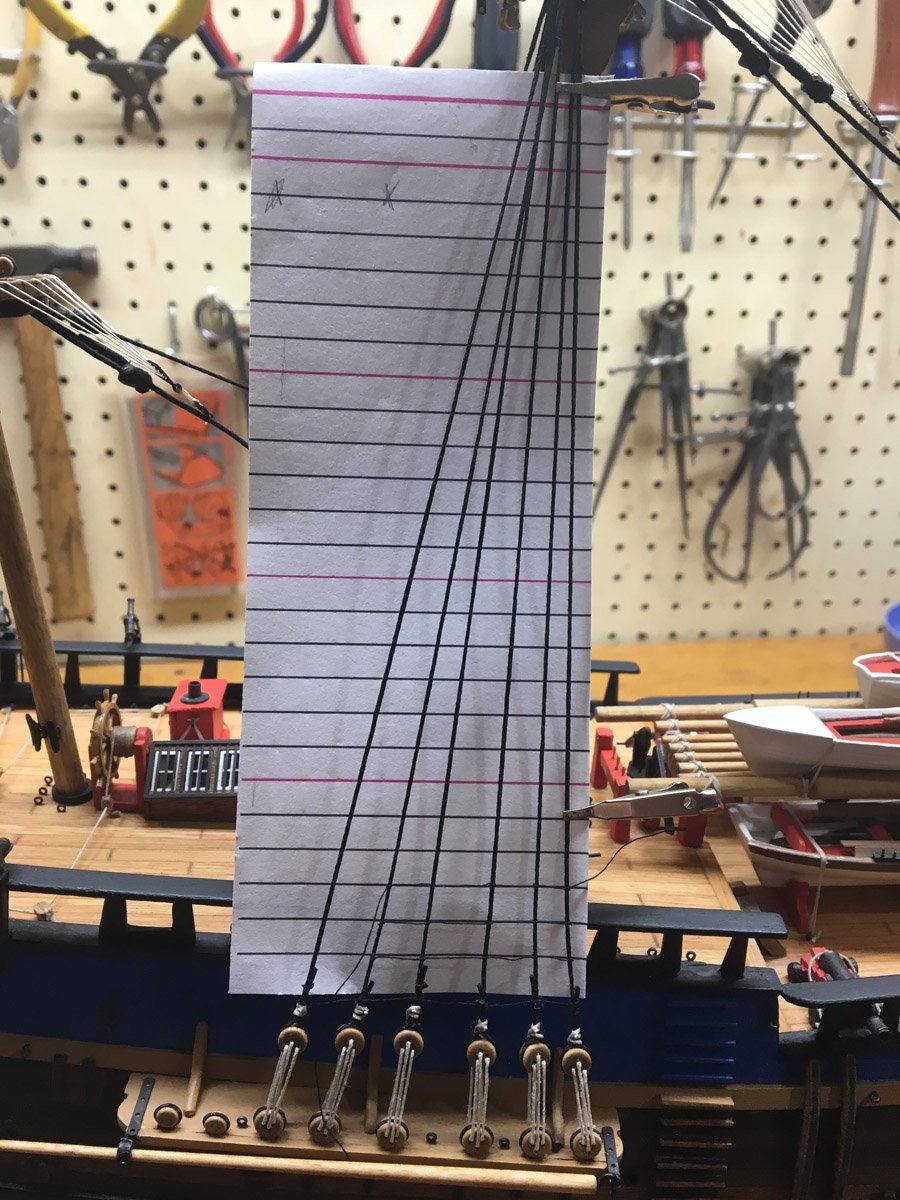
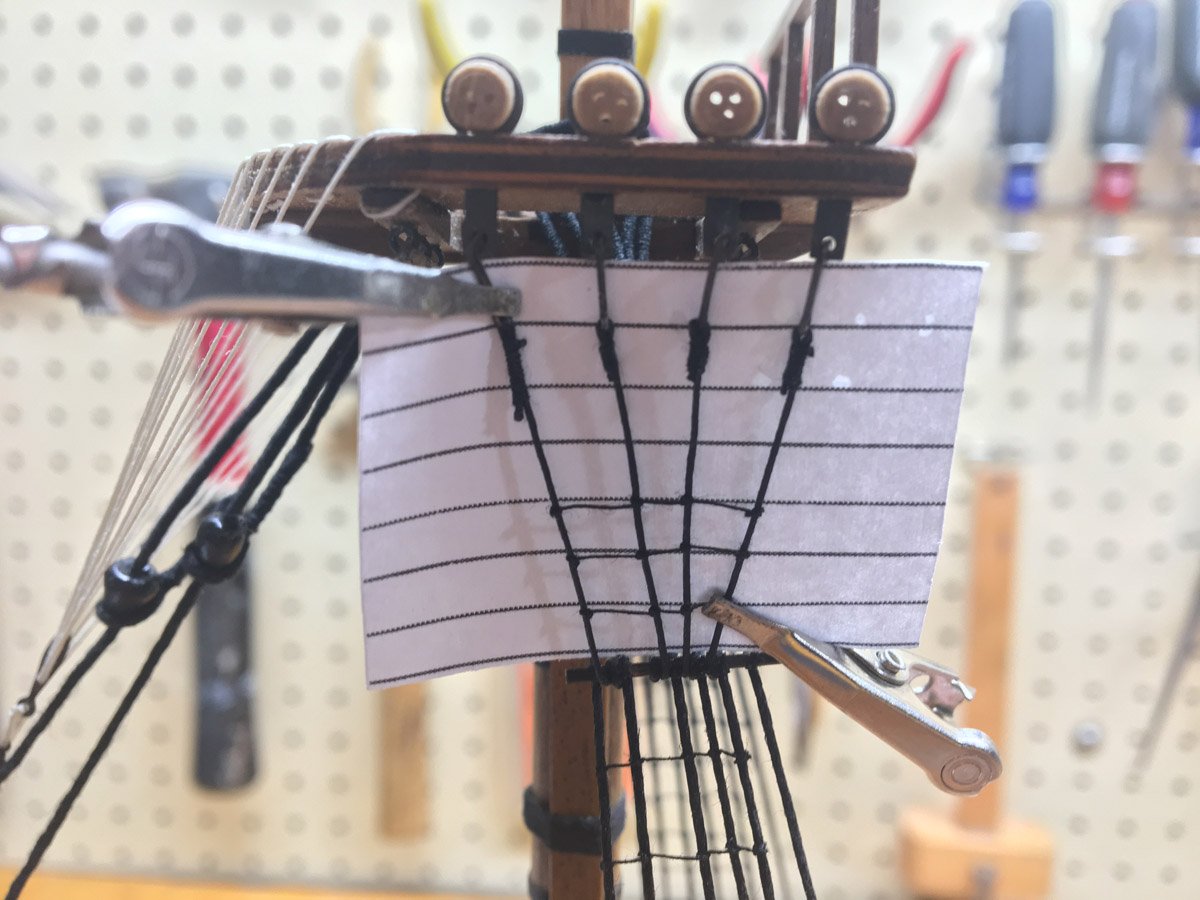
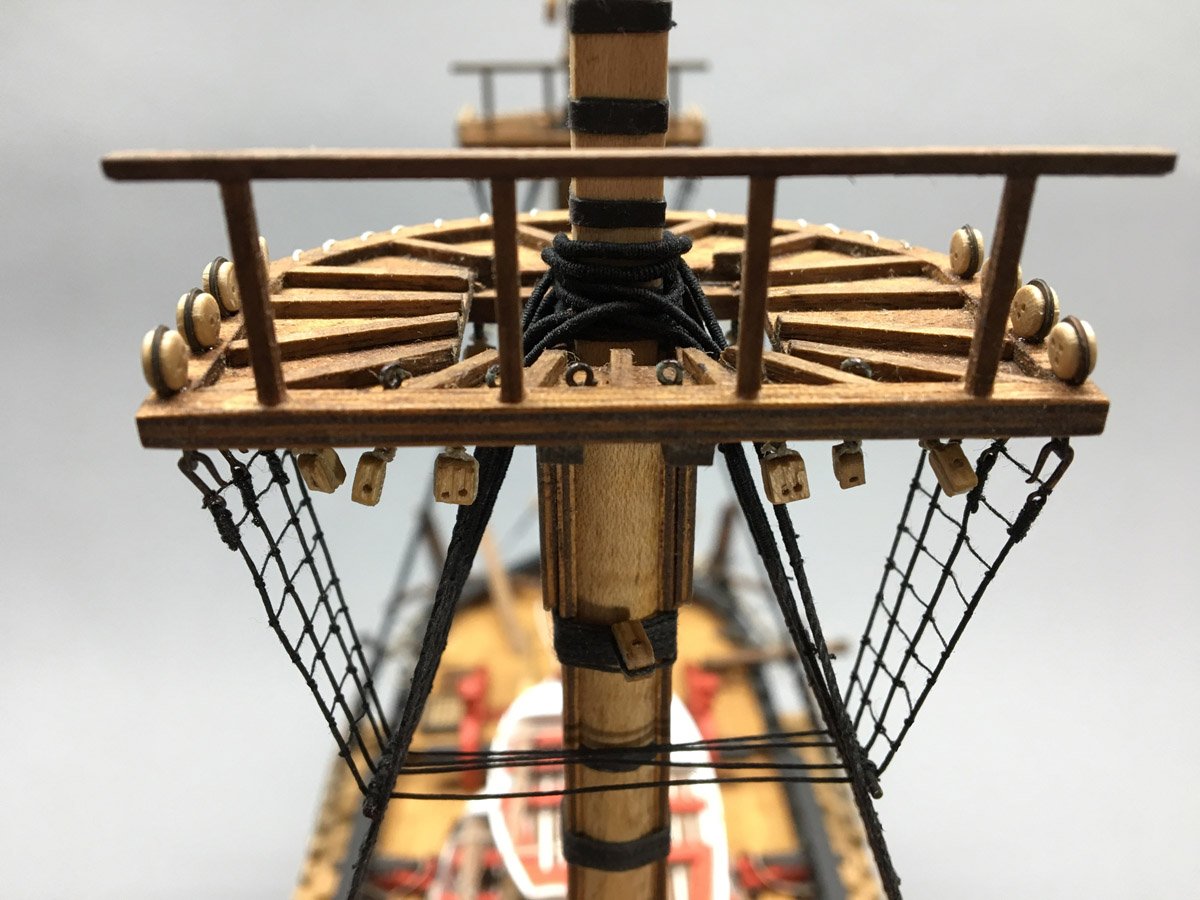
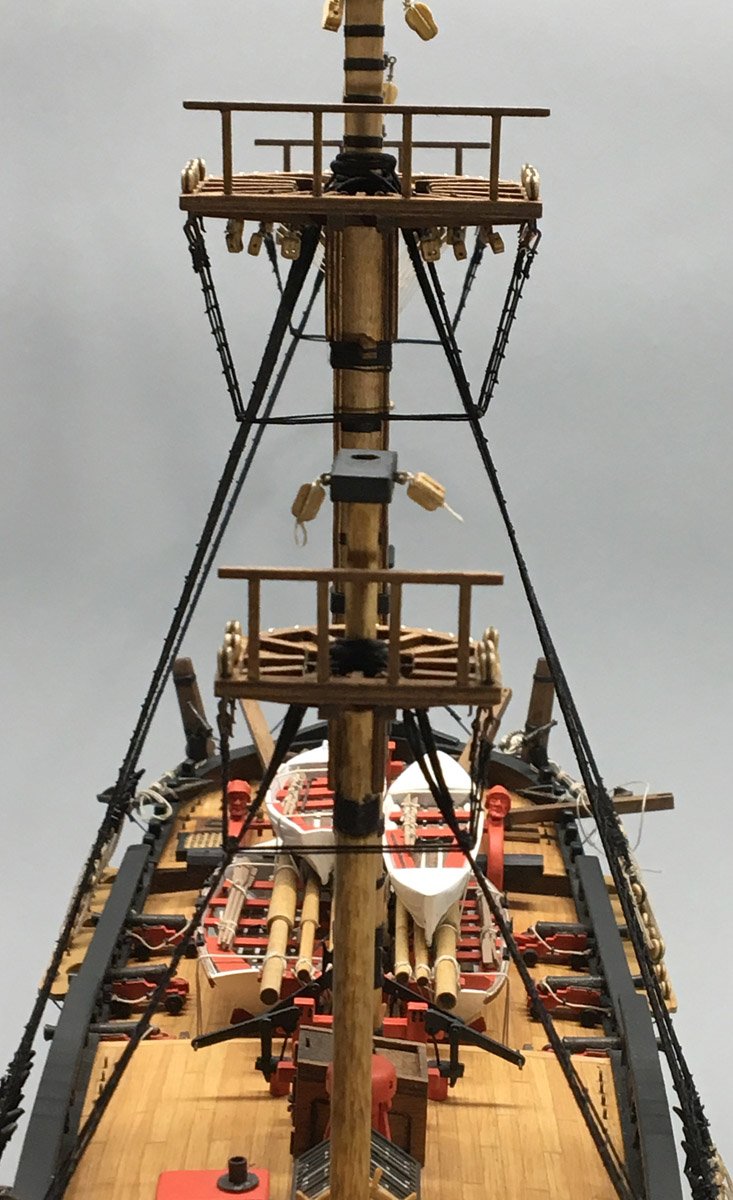
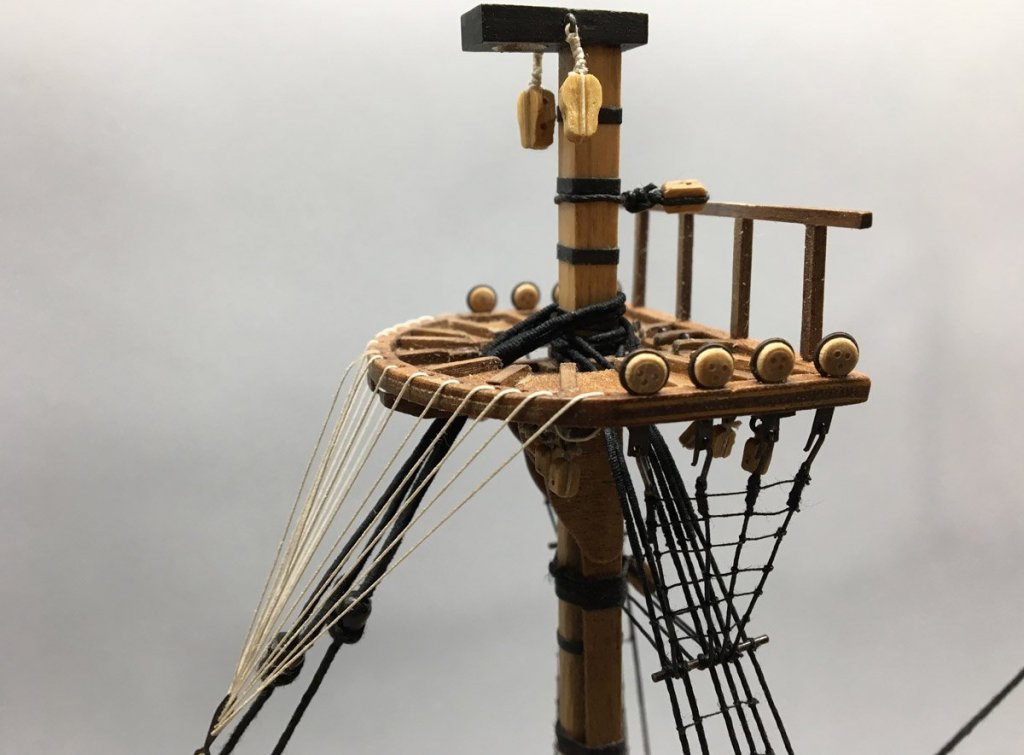
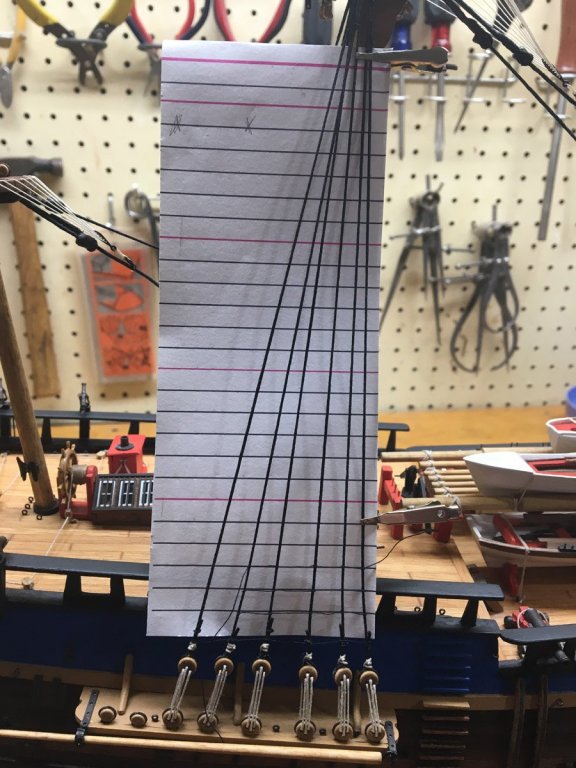
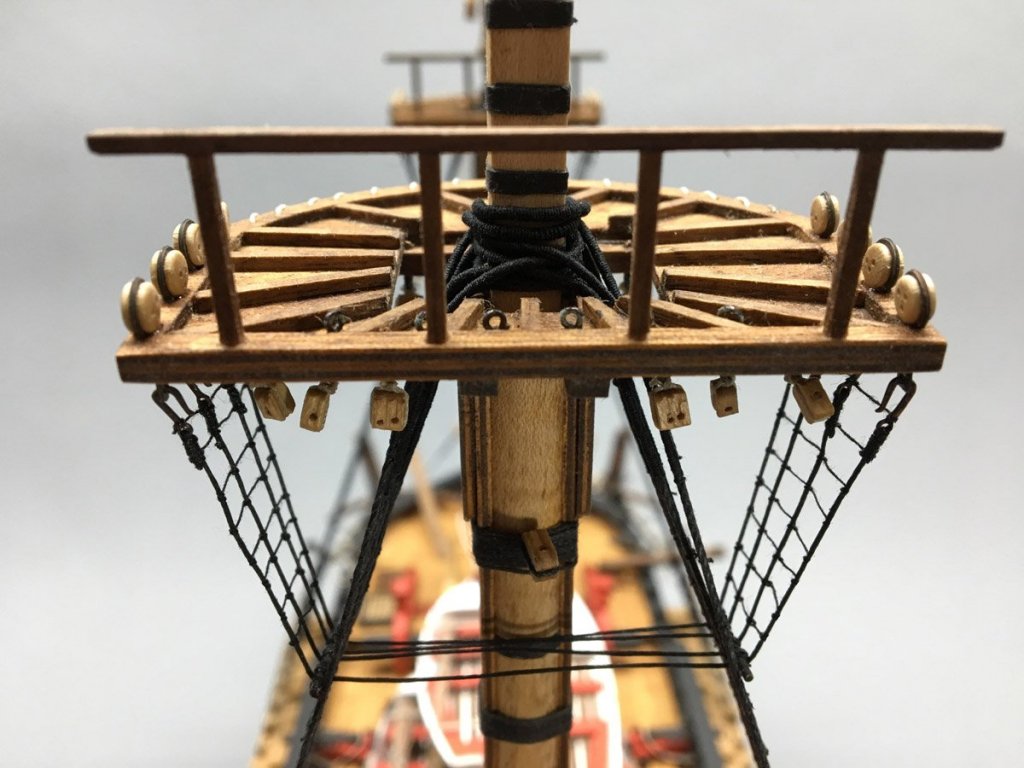
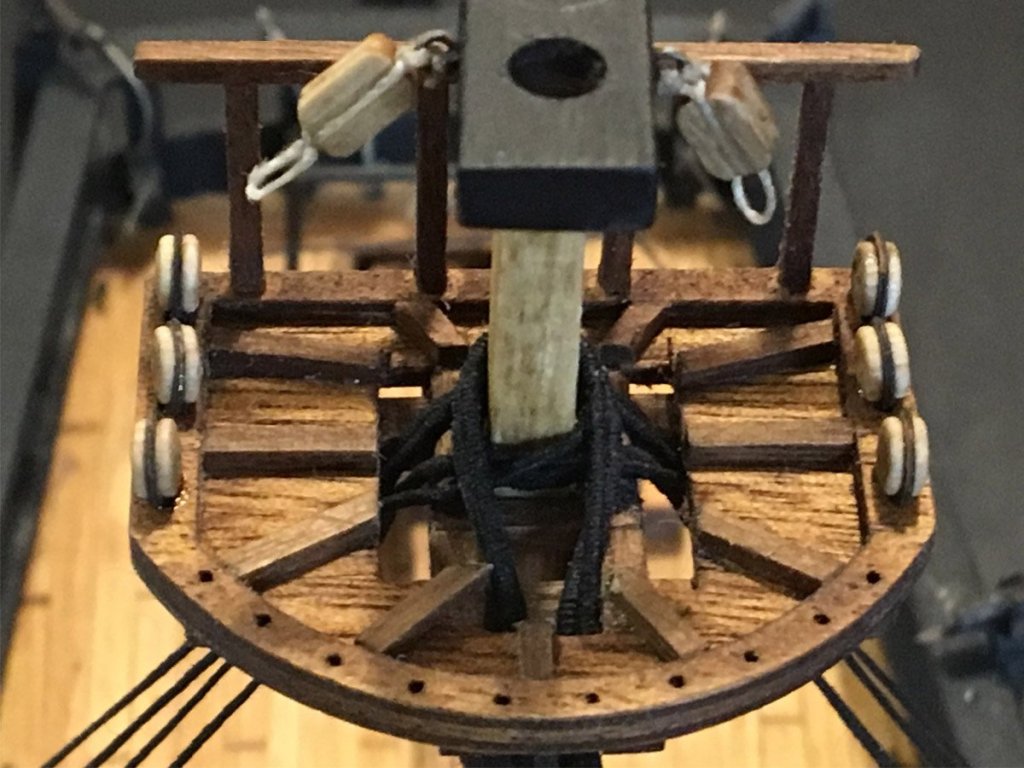
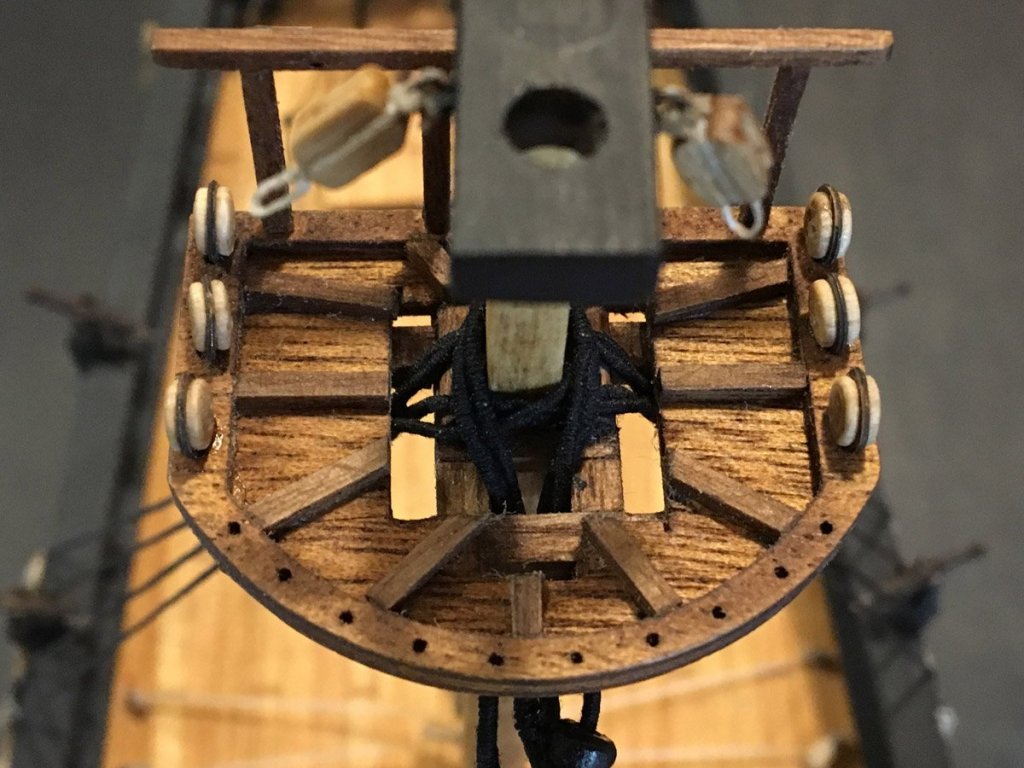
Ratlines I drew up a ratline spacing chart in Photoshop Elements, with 1/4" spacing corresponding to 16" spacing in full size. That's slightly big, with 12" - 14" being typical, but it looks OK to me. Here's the chart on the main mast. with the first couple of lines tied. I posted my method of tying ratlines way back when I built my Syren in 2013. Here's a link to the details if you're interested. Basically I used a clove hitch for the first knot, simple half hitches for the rest, and a spot of CA to hold everything together. I was slightly concerned about the half hitches slipping until I had to undo a crooked line. Once the CA is on the knots they do not want to move. It took me about 2 hours per set of shrouds to tie the ratlines, only about 12 hours total. The futtock shrouds and catharpins should comprise 3 separate lines: A port FS going from a hook on the top to a bar on the port shrouds A carthapin going from port shroud to stbd. shroud A stbd. FS opposite #1. I tried several ways to make separate lines but it was tough to get them all the right size to hold the tension. Something always ended up loose. Then I realized I could use a single line for everything. I seized a hook on one end, wraped it around to the other size, and temporarily attached a second hook. When all 4 lines were in place I adjusted the tension and seized the opposite hooks. Not historically accurate but very easy and looks fine. Here are a couple of image that shows the tops all rigged.


- 108 replies
-
- 3
-
-
- endeavour
- caldercraft
- (and 1 more)
-
Dashi, I'm happy to see you back. Your Endeavour was looking great, but you stopped updating your build log just after I started mine. Are you still working on the model?
- 108 replies
-
- 1
-
-
- endeavour
- caldercraft
- (and 1 more)
-
Another Dumb Mistake but Quick Fix A few days ago I posted an image of the completed lower stays with the topmasts inserted temporarily in place. Well when I set the mizzen topmast in its top I realized that ... I had put the stay lines through the wrong hole! I even remember thinking "That forward hole is very tiny, so I'll just put the lines through the aft hole." Duh - that's where the topmast goes. I had visions of cutting the stays and starting over, but after some experimentation I found that I could disconnect the lower ends, slip the upper loops over the mast, and reroute through the forward hole. I did file the hole a little larger. The fix took about an hour. Here's the after photo. Study twice, rig once.
- 108 replies
-
- 1
-
-
- endeavour
- caldercraft
- (and 1 more)
-
Fernando, You have made a beautiful model of a beautiful ship. And it looks like you did it in record time. Does Mantua still sell the model? Rod
-
Fernando, I had trouble finding this post. You should consider putting your current and previous builds in your signature. Or is there some way to search for build logs or other threads started by a specific member? Rod
-
Are you buying or scratch building a case for the Endeavour? The suspense is killing me! I can hardly wait to see what you start next. Rod
-
Hi Fernando, I thought that you were considering building the Endeavour, but I'll plan to follow along on the Perseverance instead. Rod
-
Shrouds and Stays I've completed the lower shrouds and stays. It took me about 30 minutes per deadeye, or about 16 hours for all the shrouds, including seizing. Not too painful. Each of the stays were a little different and they took longer. The top masts are not attached yet because I still have to tie about 950 clove hitches for the lower ratlines! If you don't hear from me for a while you'll know why.

- 108 replies
-
- 5
-
-
- endeavour
- caldercraft
- (and 1 more)
-
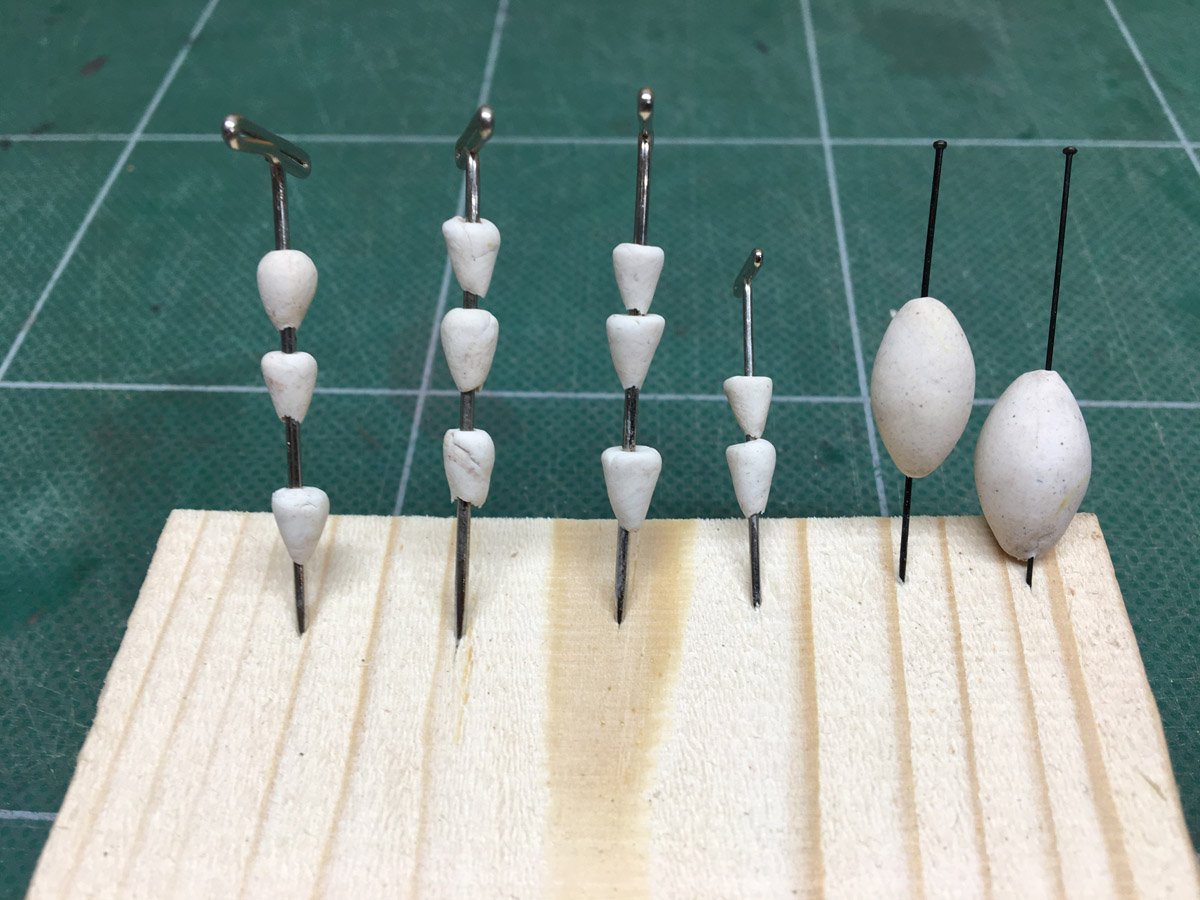
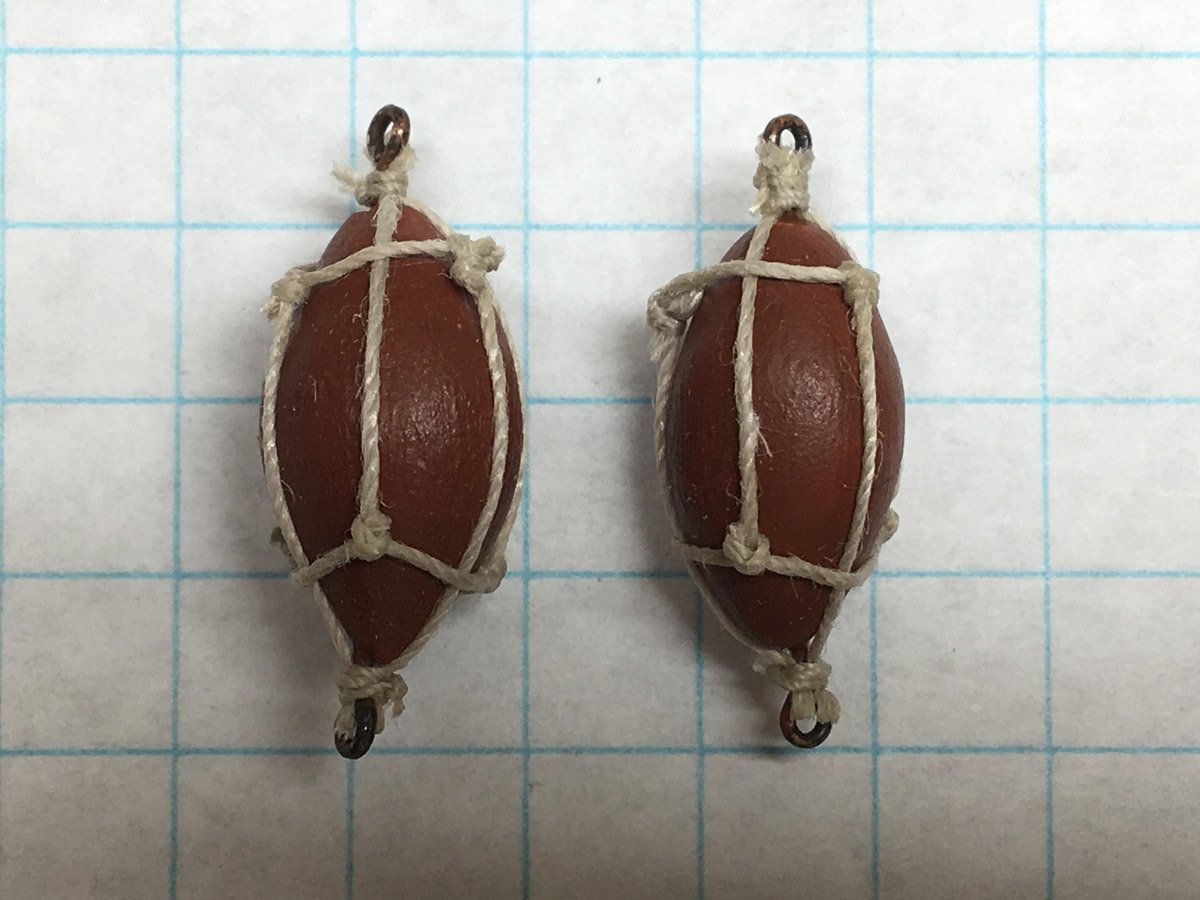
Mice and Anchor Buoys I needed some mice for the stays so I made them out of polymer clay. As long as I was at it I made two anchor buoys. The mice are very tiny. It was hard to get consistency so I made a bunch and used the best. I couldn't find drawings for the anchor buoys on the Caldercraft plans. They're probably there somewhere, but I built two using the Syren plans.


- 108 replies
-
- 3
-
-
- endeavour
- caldercraft
- (and 1 more)
-
Serving I spent the money and bought Chuck Passaro's Serv-O-Matic from Syrenshipmodelcompany.com. I built my Syren model using Chuck's awesome 130 page instruction manual, and IMHO, you can't go wrong with anything Chuck sells. It took a couple of days to build the Serv-O-Matic (is that a great name or what?) because I took the time to sand off the laser char, stain, and urethane the cherry parts. It's very easy to use. Stretch the main line through the gears on either end and attach the ends to the nails with the spring clips. Thread some very thin serving thread through the main line with a fine needle and secure with a tiny drop of CA. Spin the handle with one hand while guiding the the thread with the other. Thread the serving line through the main line at the far end and glue. Coat everything with thinned PVA glue. I served 3 inches of line in the center of each doubled shroud, using about 1 yard of thread at 100 turns per inch. It takes about 5 minutes to serve one doubled shroud line. My first impression was that it wasn't worth the effort. I could hardly see the thin serving on top of the main line. But when I saw several shrouds stacked up on the tops I was totally glad that I spent the time and money.

- 108 replies
-
- 5
-
-
- endeavour
- caldercraft
- (and 1 more)
-
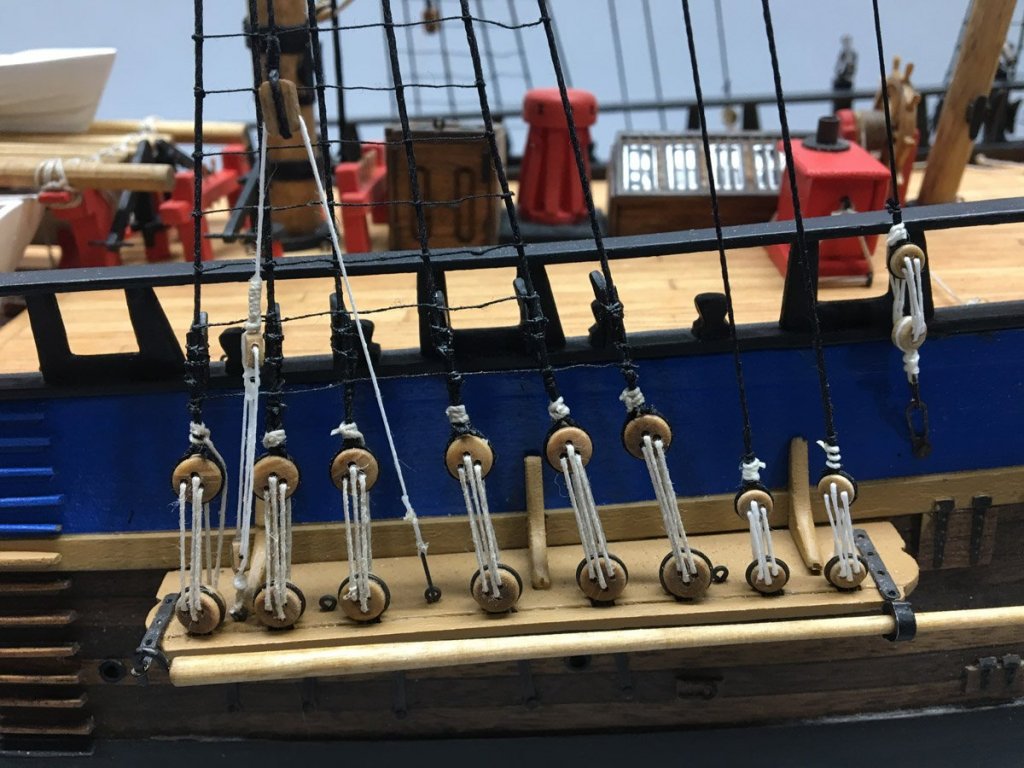
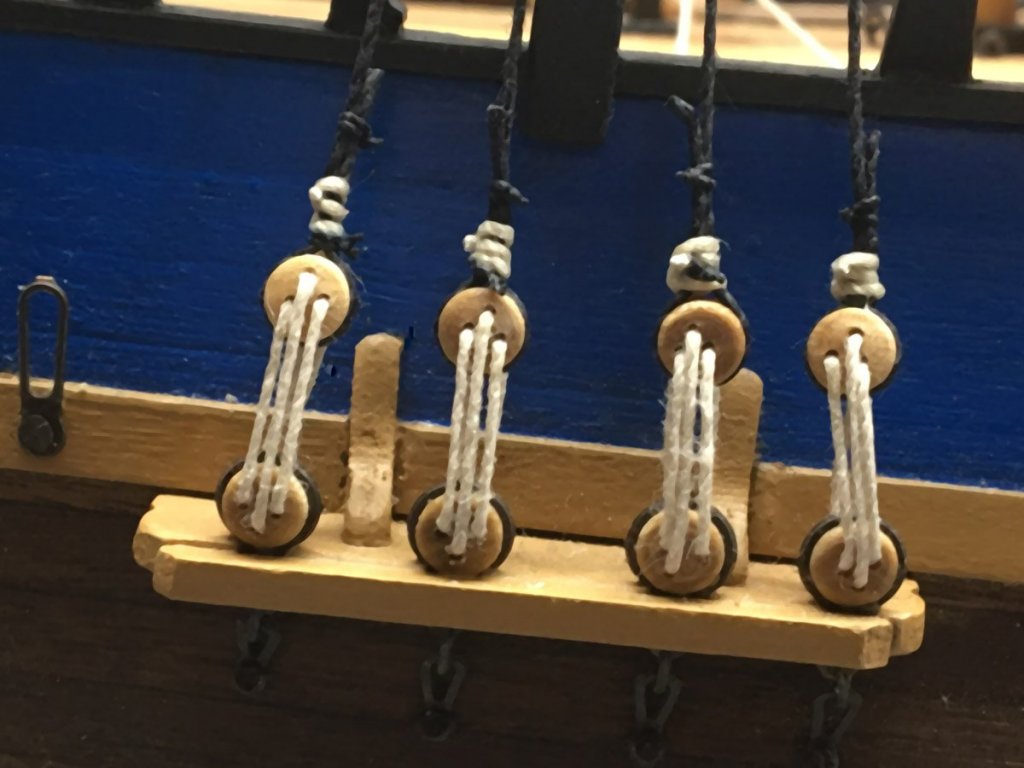
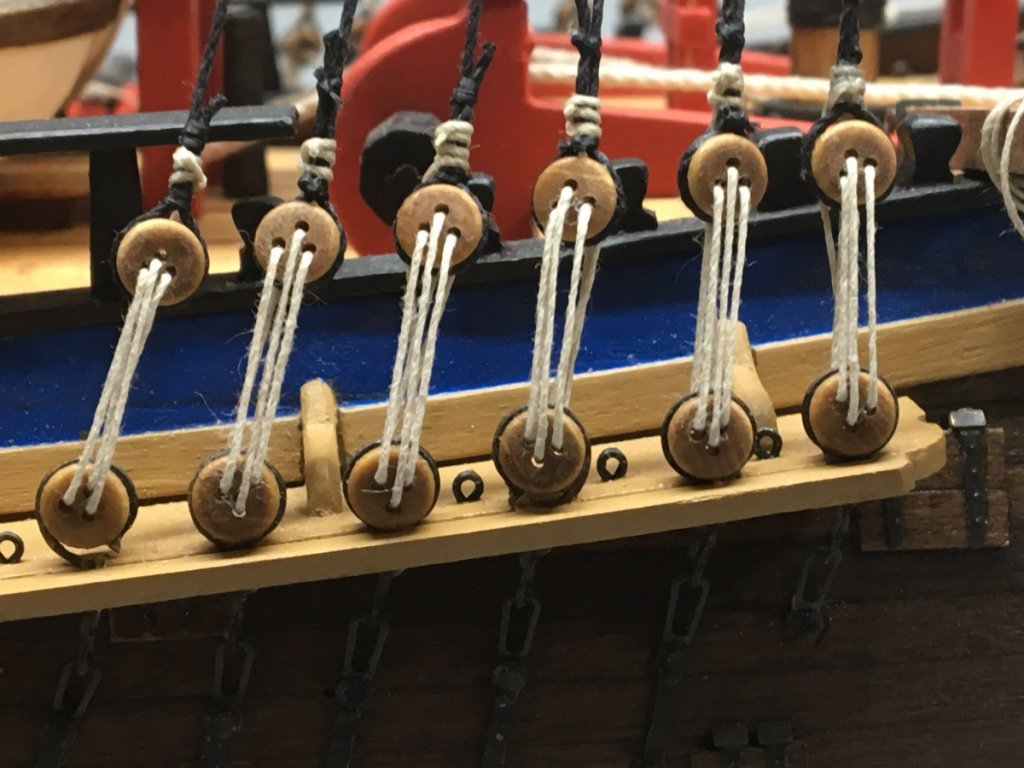
Standing Rigging I stepped the masts and started the standing rigging. Here's my jig for setting the deadeyes at a constant height - two pieces of wire glued to a piece of wood as thick as the deadeye hole spacing. and here are the lines of deadeyes from fore to aft. I've been using beeswax on the linen chord but there sure is a lot of fuzz when I zoom in ;(


- 108 replies
-
- 2
-
-
- endeavour
- caldercraft
- (and 1 more)
-
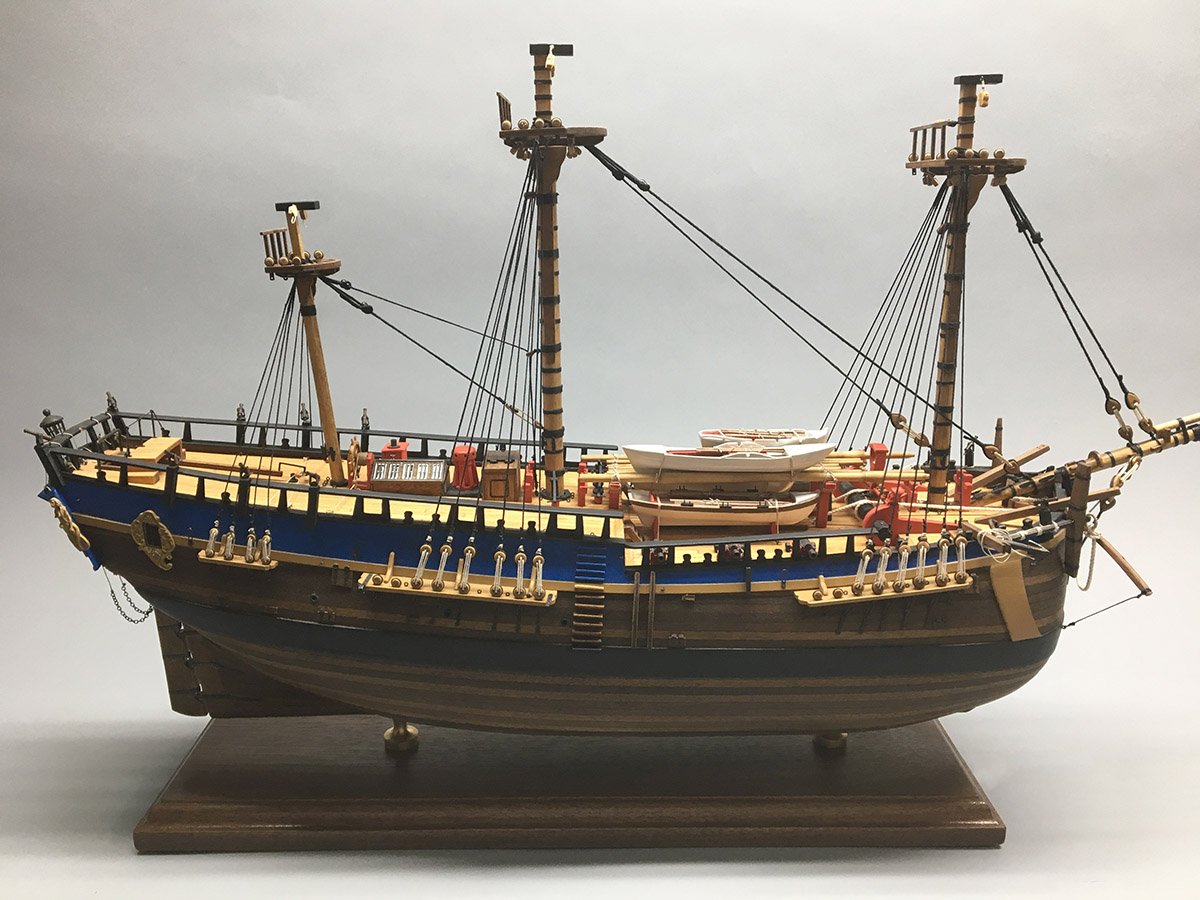
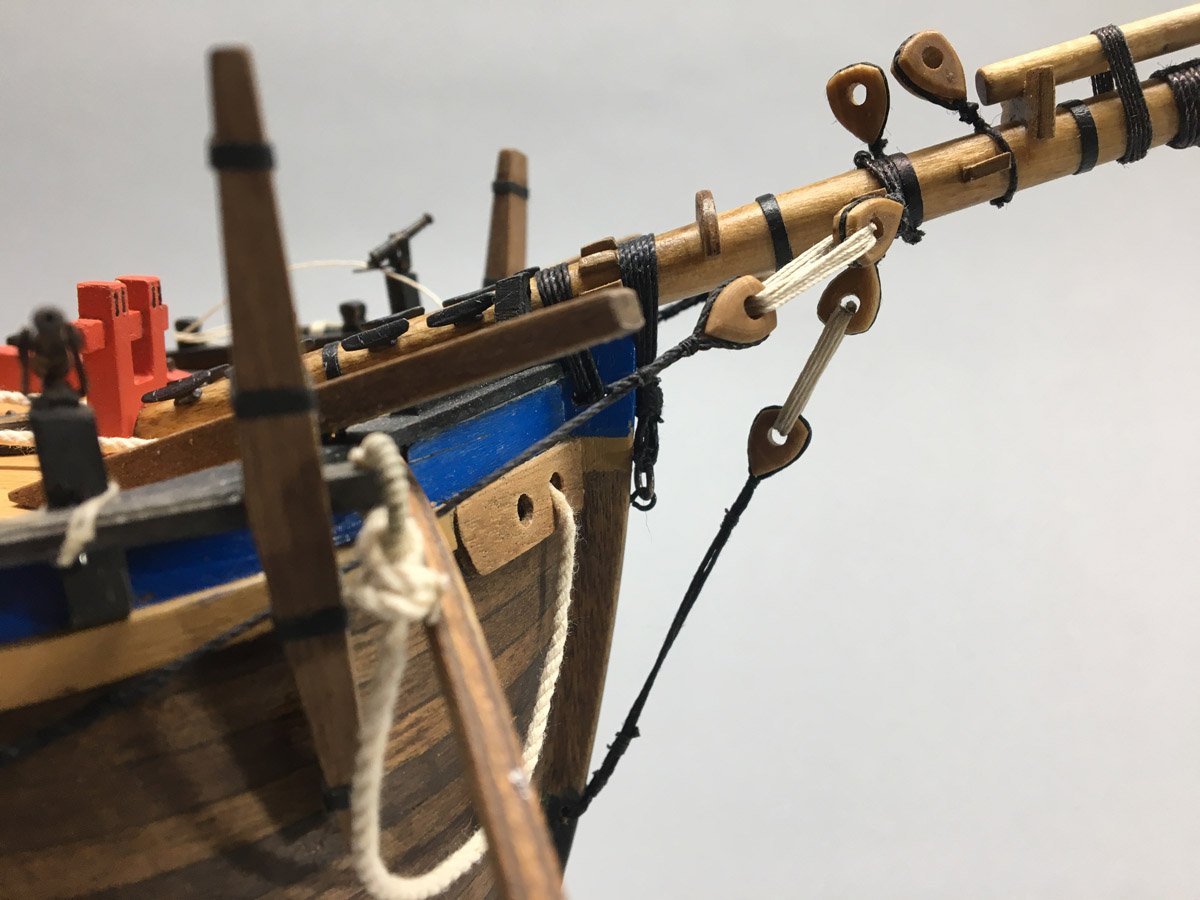
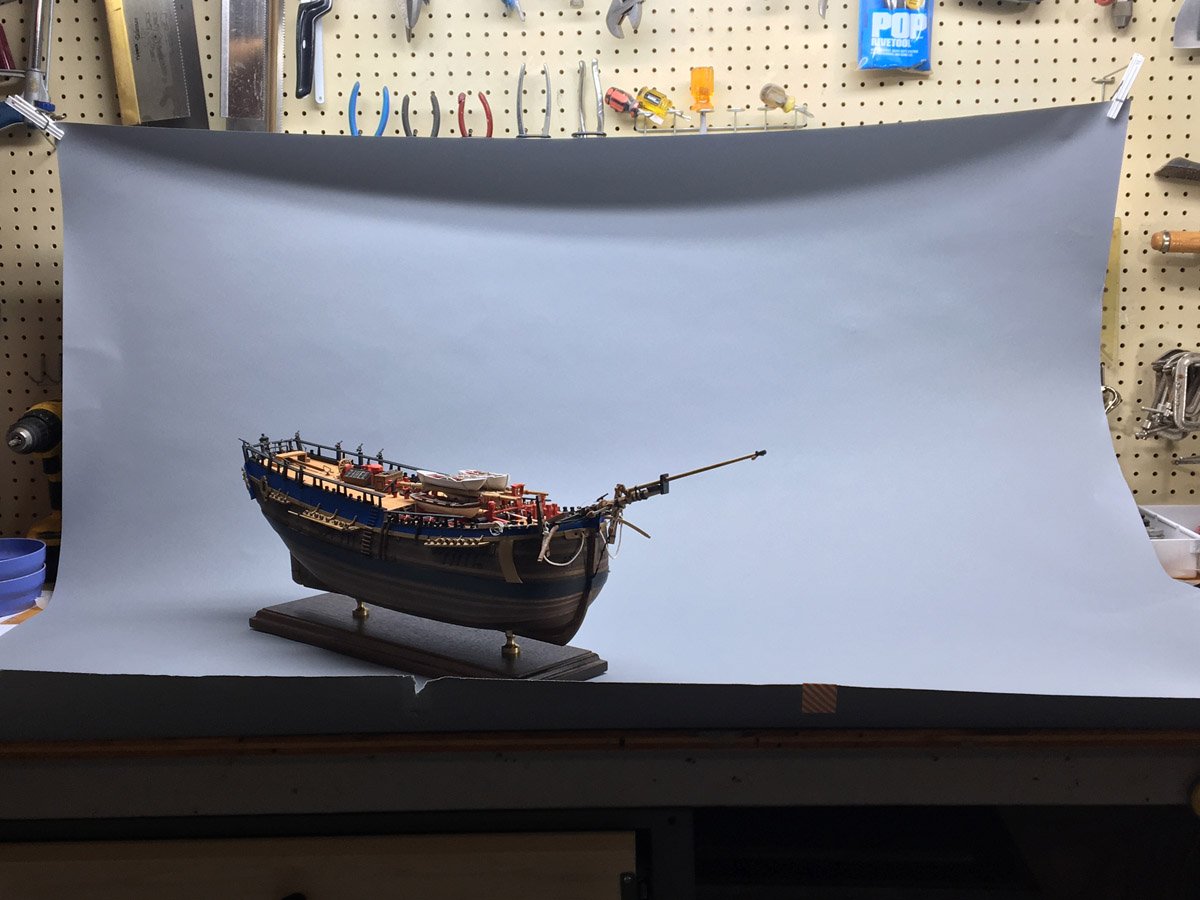
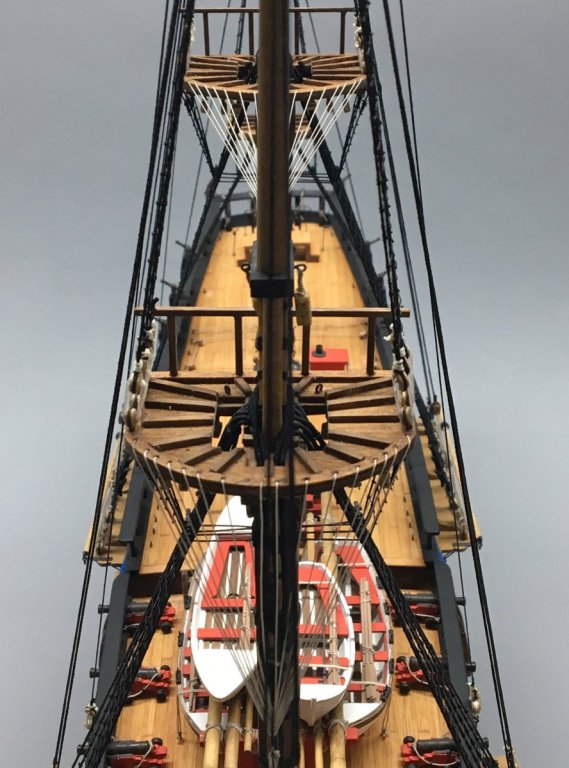
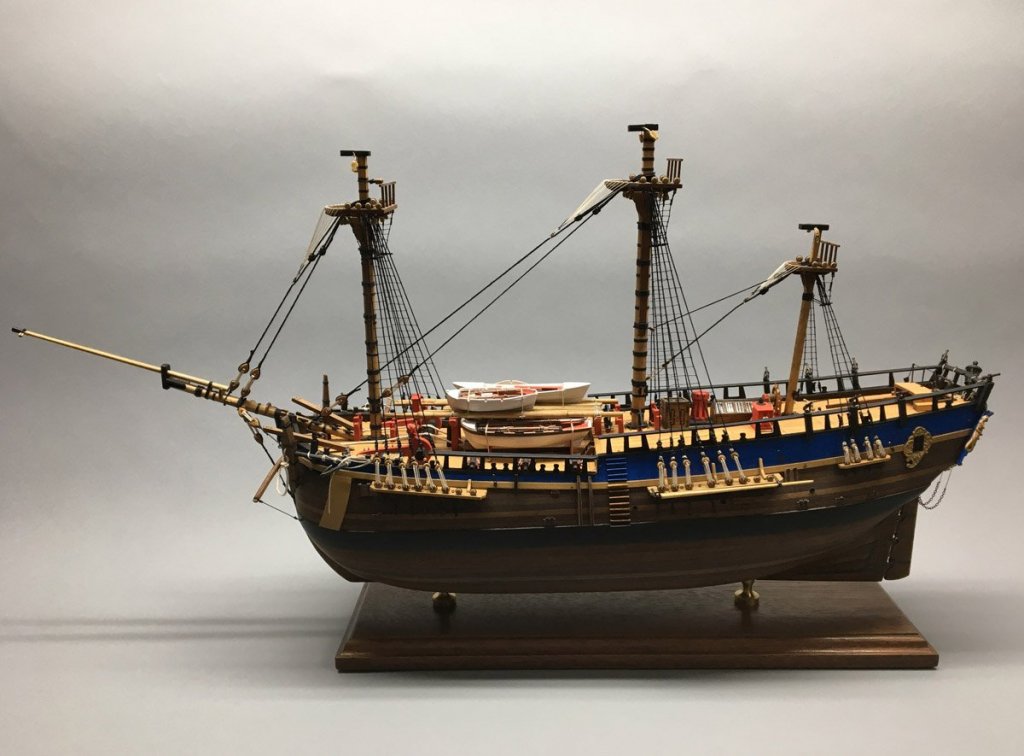
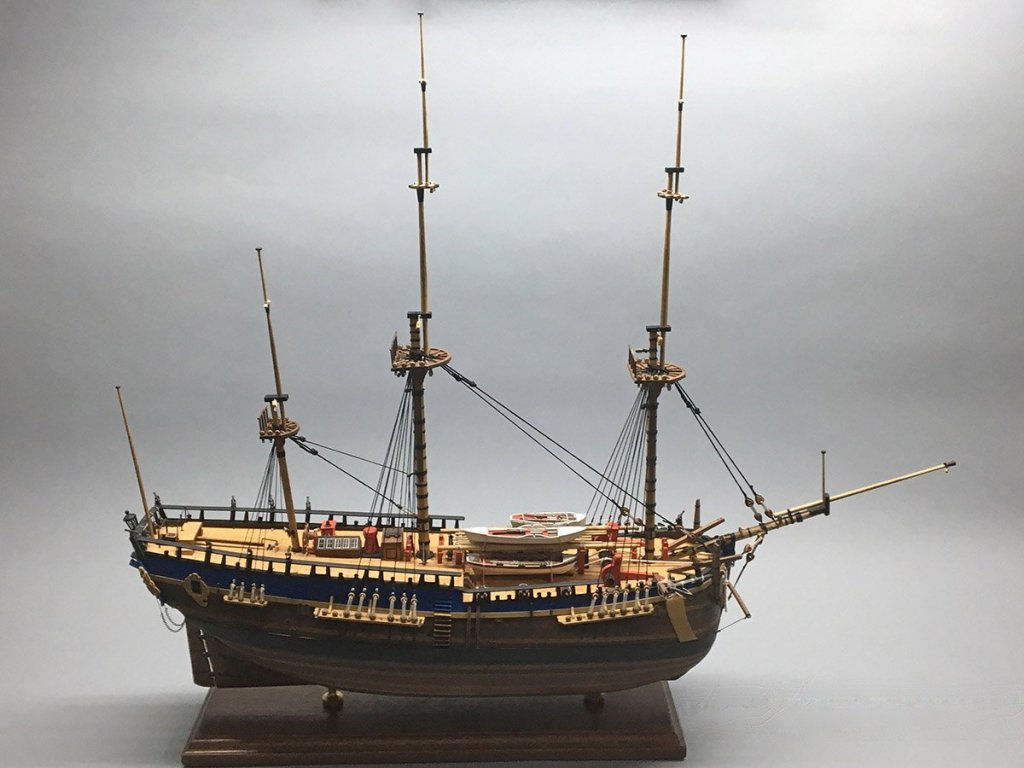
Bowsprit & Jib Boom After 6 build logs I finally invested in a decent photo backdrop. It's just a long roll of heavy gray paper 53 inches wide and 36 feet long. I chose gray so the standing and running rigging should both be visible against it. Here's my highly professional photo booth. You can see that I've installed the bowsprit and attached the stays. Here's a better look. Isn't that gray background great?


- 108 replies
-
- 1
-
-
- endeavour
- caldercraft
- (and 1 more)